eeo-1 survey user s guide - eeoc home page · eeo-1 survey user’s guide version 1.0 ... starting...
TRANSCRIPT

EEO-1 Survey User ’s Guide Version 1.0
Screen 1
December, 2017
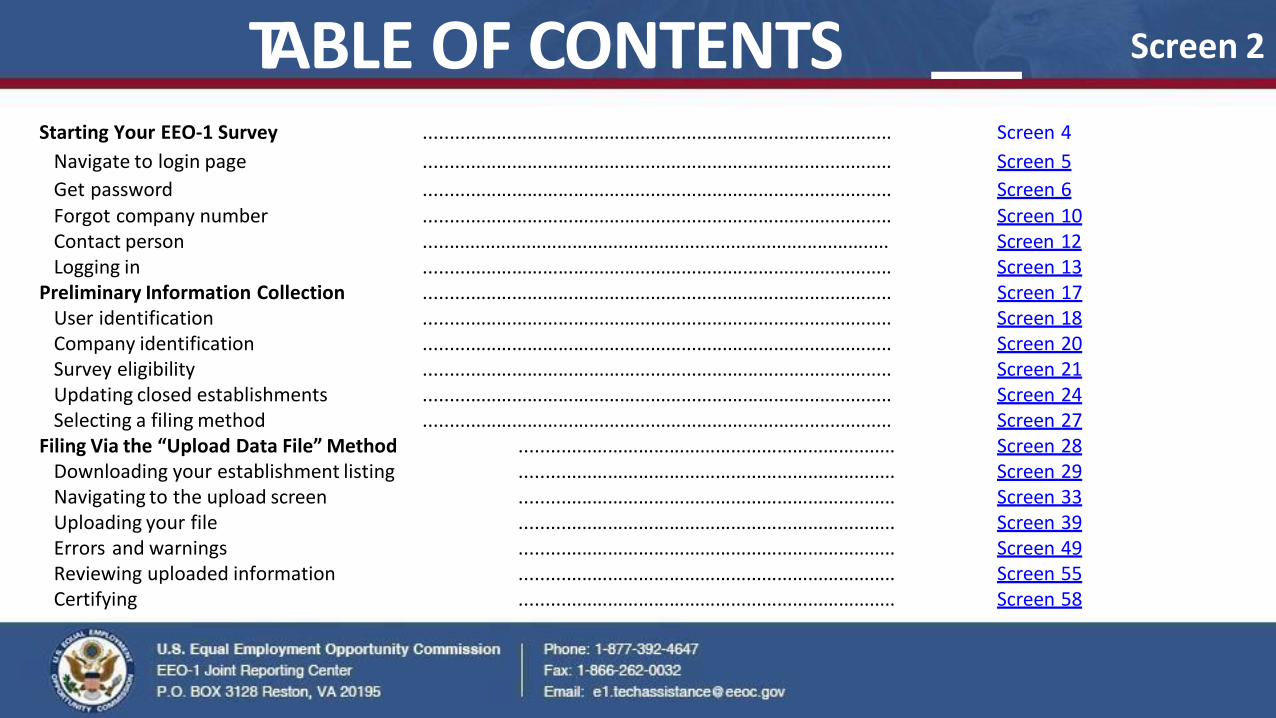
TABLE OF CONTENTS Screen 2
Starting Your EEO-1 Survey ........................................................................................... Screen 4
Navigate to login page ........................................................................................... Screen 5
Get password ........................................................................................... Screen 6 Forgot company number ........................................................................................... Screen 10 Contact person ........................................................................................... Screen 12 Logging in ........................................................................................... Screen 13
Preliminary Information Collection ........................................................................................... Screen 17 User identification ........................................................................................... Screen 18 Company identification ........................................................................................... Screen 20 Survey eligibility ........................................................................................... Screen 21 Updating closed establishments ........................................................................................... Screen 24 Selecting a filing method ........................................................................................... Screen 27
Filing Via the “Upload Data File” Method ......................................................................... Screen 28 Downloading your establishment listing ......................................................................... Screen 29 Navigating to the upload screen ......................................................................... Screen 33 Uploading your file ......................................................................... Screen 39 Errors and warnings ......................................................................... Screen 49 Reviewing uploaded information ......................................................................... Screen 55 Certifying ......................................................................... Screen 58
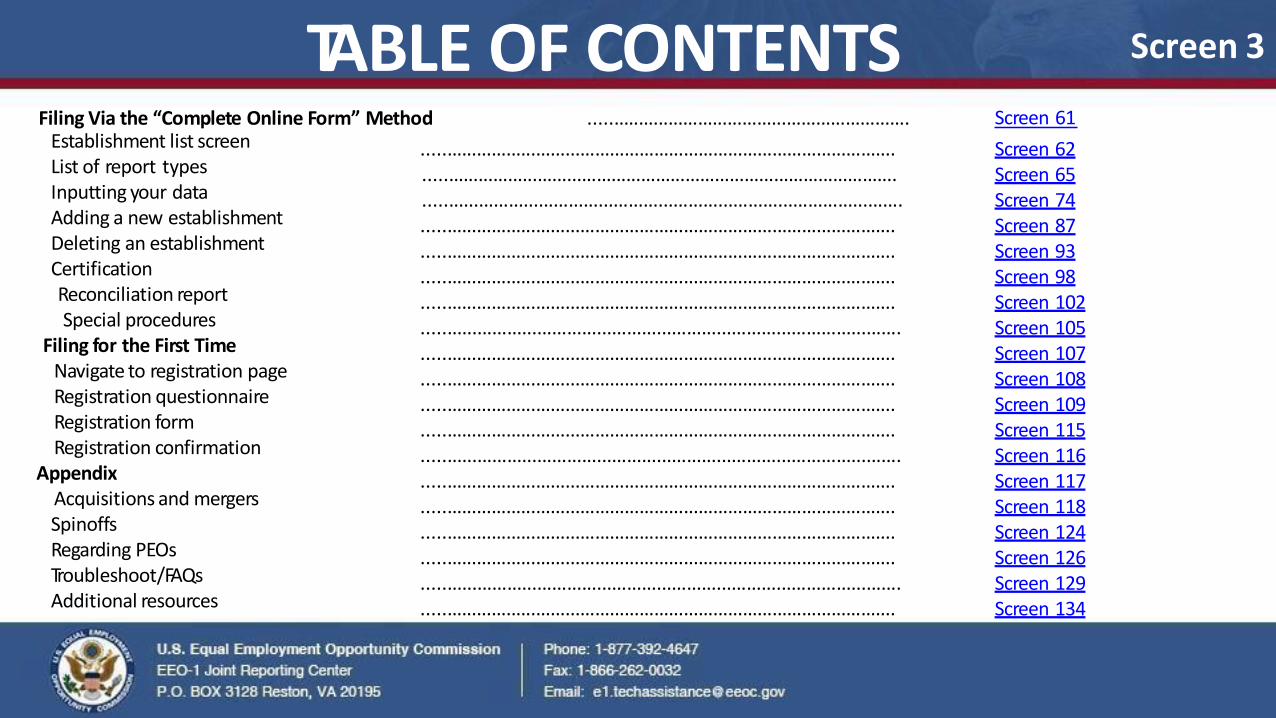
TABLE OF CONTENTS Filing Via the “Complete Online Form” Method .................................................................
Screen 3
Screen 61
Screen 62 Screen 65 Screen 74 Screen 87 Screen 93 Screen 98 Screen 102 Screen 105 Screen 107 Screen 108 Screen 109 Screen 115 Screen 116 Screen 117 Screen 118 Screen 124 Screen 126 Screen 129 Screen 134
Establishment list screen List of report types Inputting your data Adding a new establishment Deleting an establishment Certification Reconciliation report Special procedures
Filing for the First Time Navigate to registration page Registration questionnaire Registration form Registration confirmation
Appendix Acquisitions and mergers Spinoffs Regarding PEOs Troubleshoot/FAQs Additional resources
................................................................................................ ................................................................................................ ................................................................................................ ................................................................................................ ................................................................................................ ................................................................................................ ................................................................................................ ................................................................................................ ................................................................................................ ................................................................................................ ................................................................................................ ................................................................................................ ................................................................................................ ................................................................................................ ................................................................................................ ................................................................................................ ................................................................................................ ................................................................................................ ................................................................................................

Starting Your EEO-1 Survey Screens 4 – 16
Screen 4
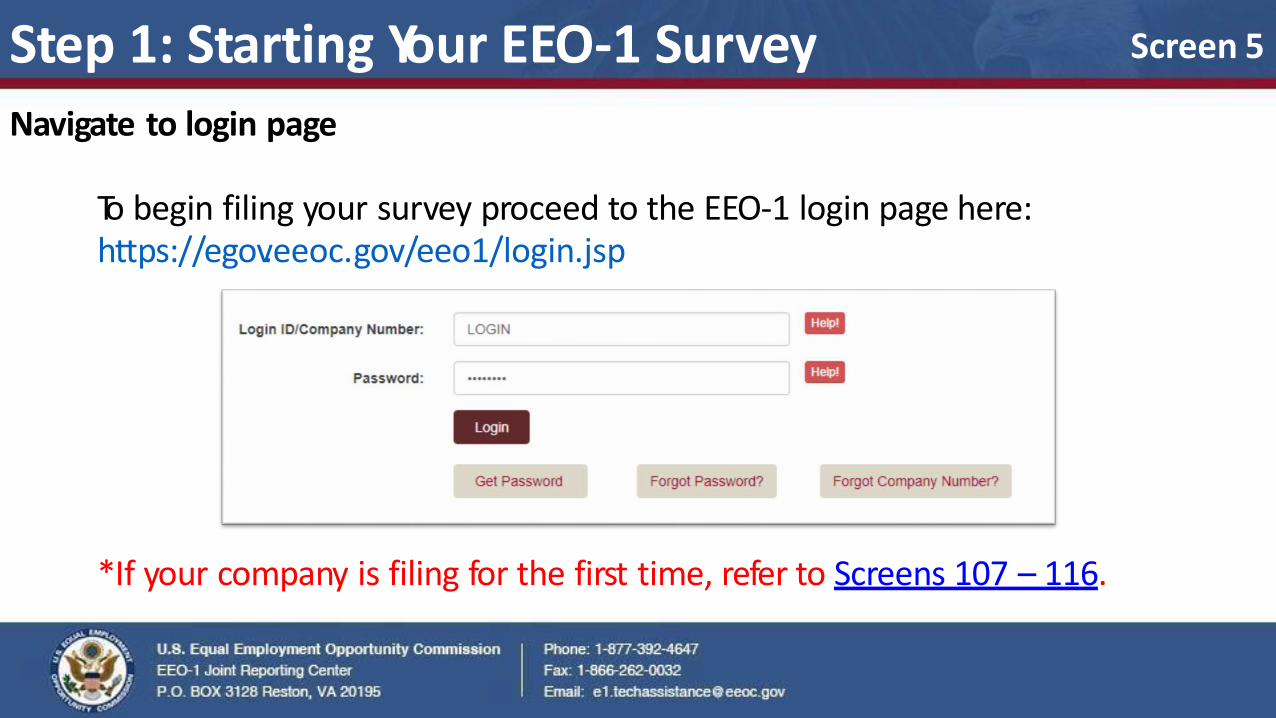
Step 1: Starting Your EEO-1 Survey Navigate to login page
To begin filing your survey proceed to the EEO-1 login page here: https://egov.eeoc.gov/eeo1/login.jsp
Screen 5
*If your company is filing for the first time, refer to Screens 107 – 116.

Step 2: Starting Your EEO-1 Survey
Get password
Your password changes every year. To create a new password for the current survey year, click the “Get Password” button.
Screen 6

Input your company number/login ID into the field and click “Send Password Reset Link.”
Step 3: Starting Your EEO-1 Survey Get password
Screen 7
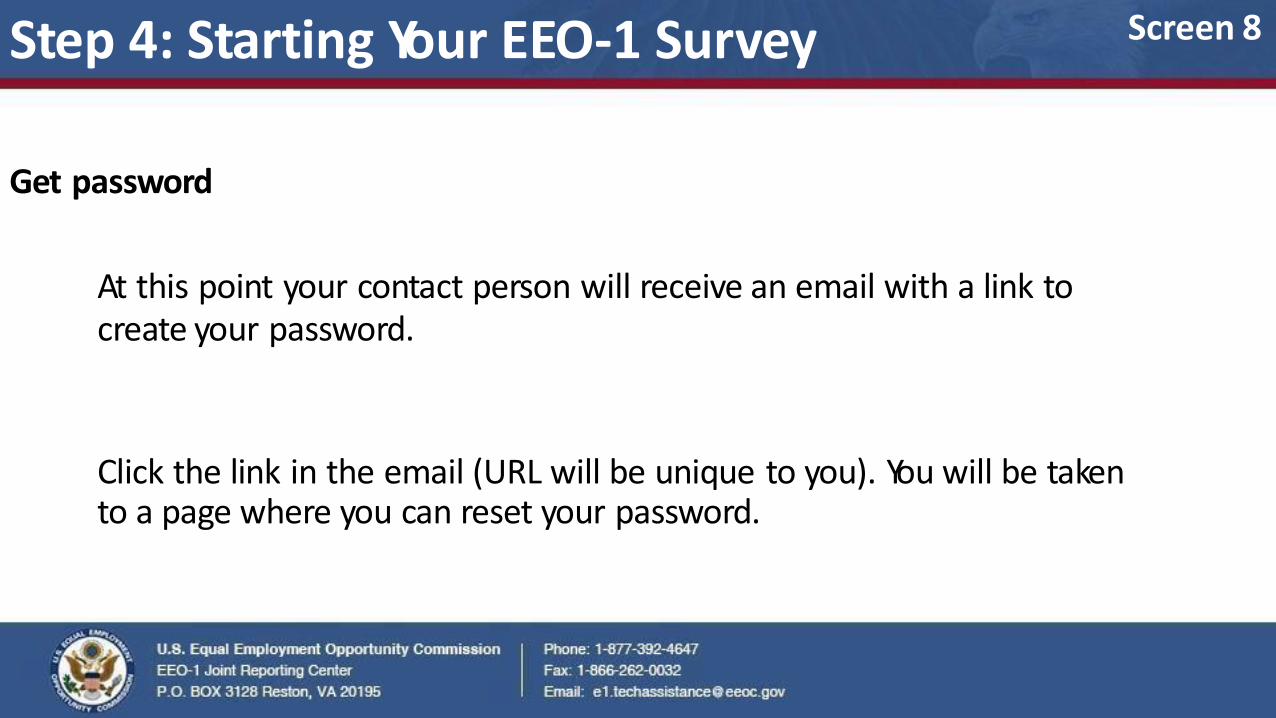
Step 4: Starting Your EEO-1 Survey
Get password
At this point your contact person will receive an email with a link to create your password.
Click the link in the email (URL will be unique to you). You will be taken to a page where you can reset your password.
Screen 8

Step 5: Starting Your EEO-1 Survey
Get password
Enter your company number/login ID, and create your new password. Rewrite your new password in the “Confirm New Password” field, then click “Submit Password” to finish resetting your password.
Screen 9
Make sure to follow these password specifications
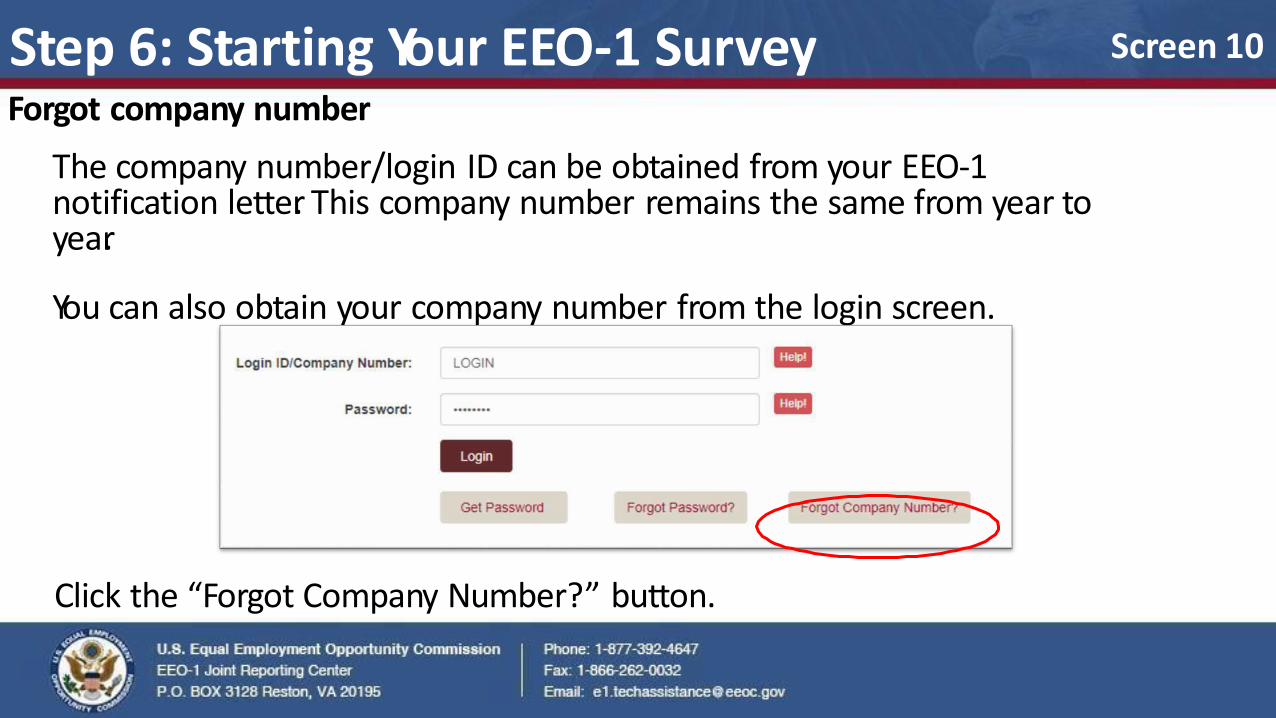
Step 6: Starting Your EEO-1 Survey Forgot company number
The company number/login ID can be obtained from your EEO-1 notification letter. This company number remains the same from year to year.
You can also obtain your company number from the login screen.
Click the “Forgot Company Number?” button.
Screen 10
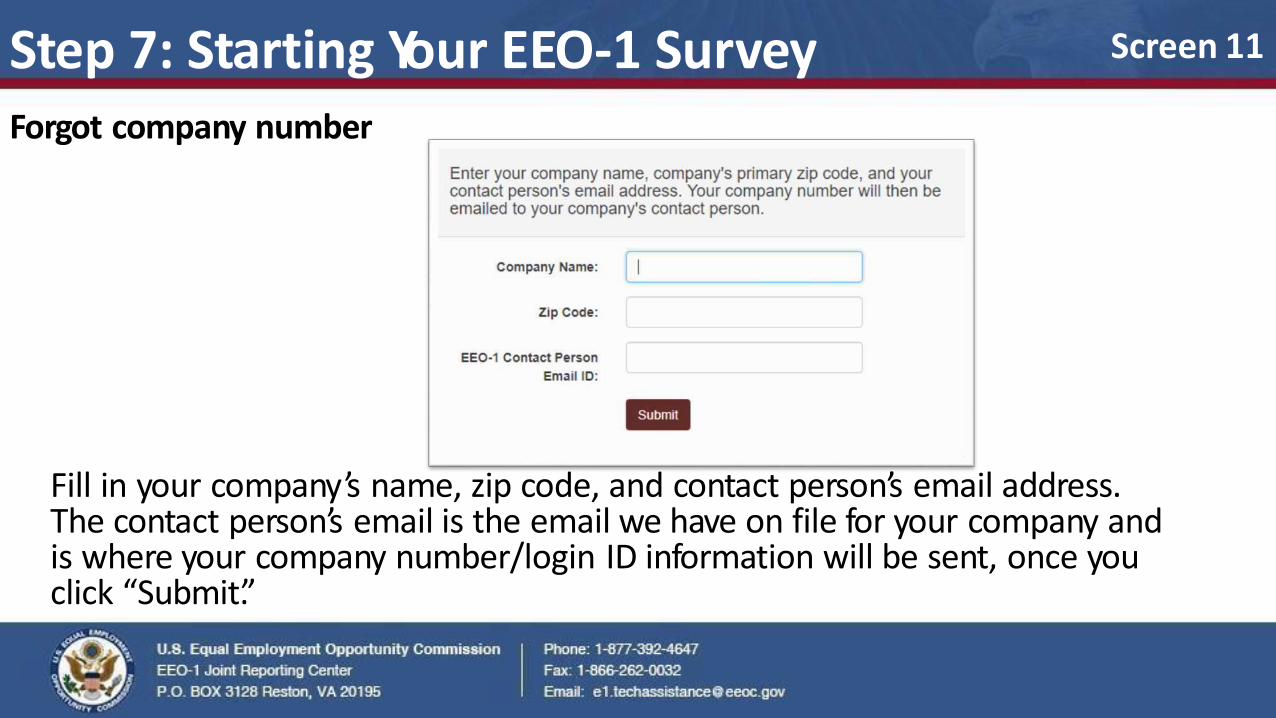
Fill in your company’s name, zip code, and contact person’s email address. The contact person’s email is the email we have on file for your company and is where your company number/login ID information will be sent, once you click “Submit.”
Screen 11 Step 7: Starting Your EEO-1 Survey Forgot company number
Step 7-A: Starting Your EEO-1 Survey Contact person
You may change your Contact Person Email ID by sending the EEOC a signed change request on company letterhead with the company number/login ID (if known), name, title, phone number and email address of the new contact person at your company. This change request MUST be signed by an authorized company representative (anyone in your company authorized to sign documents) in order for the change request to be processed.
Please either scan and email this request to [email protected] or fax to 1-866-262-0032. Your new contact will receive an email with a link to create your new password once your change request has been submitted. If you have any questions about this process you may contact the EEOC at 1-877-392-4647 or [email protected].
Screen 12
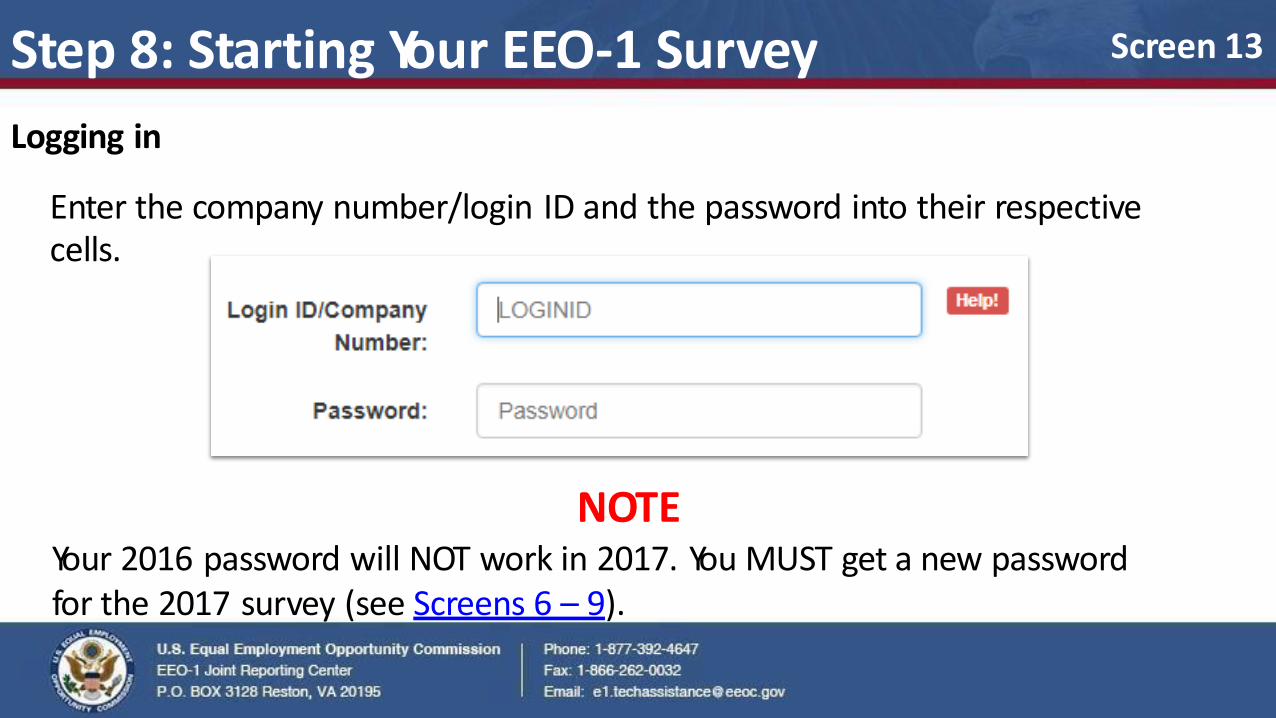
Logging in
Enter the company number/login ID and the password into their respective cells.
NOTE Your 2016 password will NOT work in 2017. You MUST get a new password for the 2017 survey (see Screens 6 – 9).
Screen 13 Step 8: Starting Your EEO-1 Survey
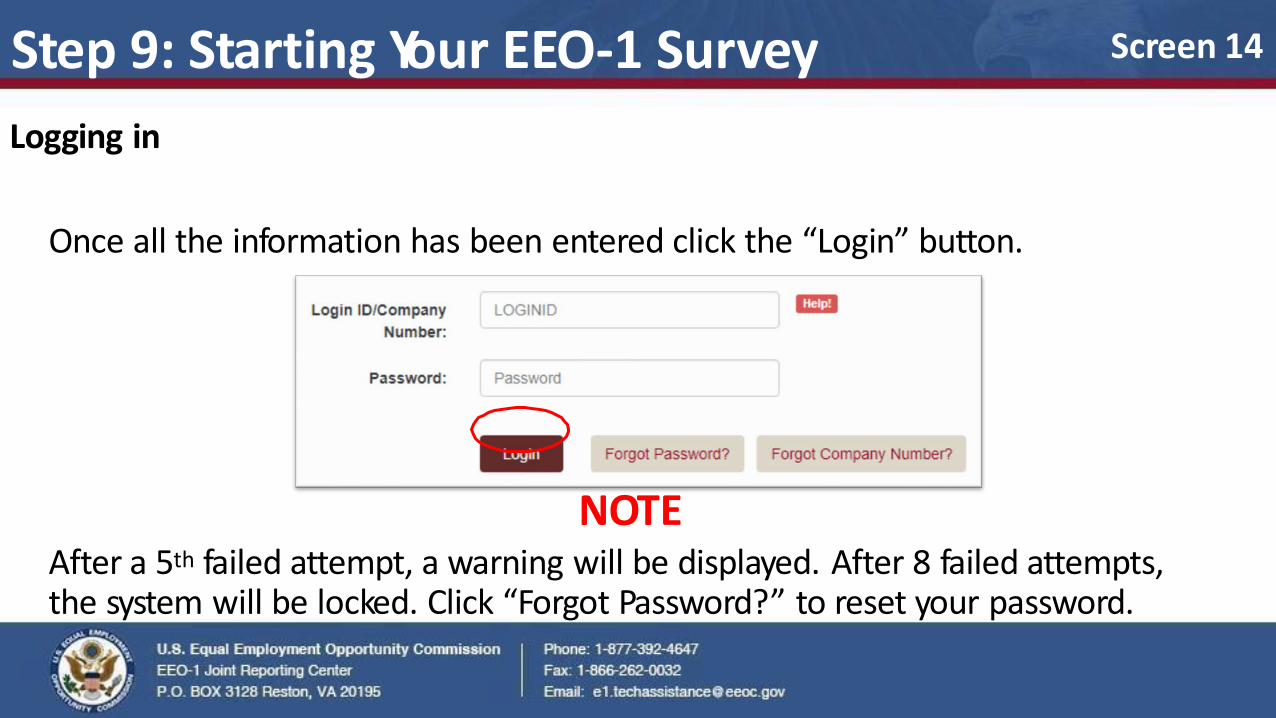
Logging in
Once all the information has been entered click the “Login” button.
NOTE After a 5th failed attempt, a warning will be displayed. After 8 failed attempts, the system will be locked. Click “Forgot Password?” to reset your password.
Screen 14 Step 9: Starting Your EEO-1 Survey

Step 10: Starting Your EEO-1 Survey Logging in
When logging in for the first time, or if you are logging in from a different computer or browser than previously used, you will be directed to an authentication page. At this time a one time verification code will have been sent to the contact person’s email. Enter this code in the cell.
Check “Yes, remember this Computer” to avoid this step in the future.
Press Submit to proceed.
Screen 15
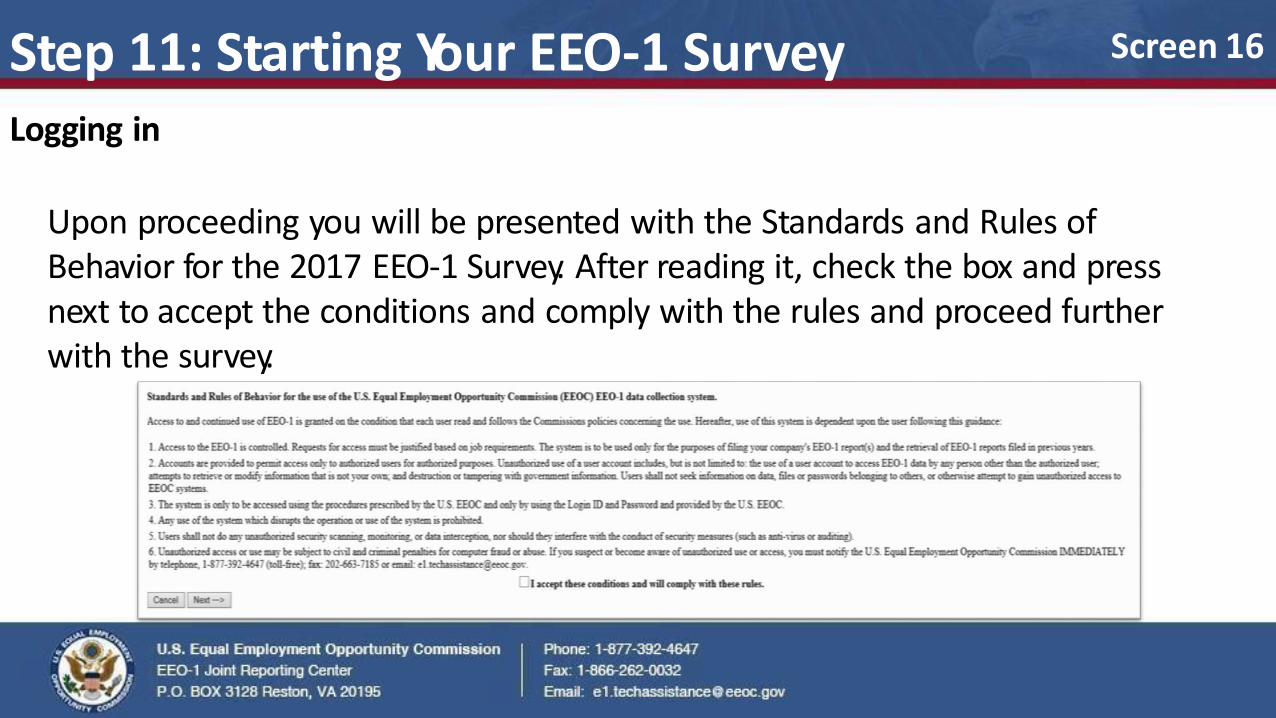
Step 11: Starting Your EEO-1 Survey Logging in
Upon proceeding you will be presented with the Standards and Rules of Behavior for the 2017 EEO-1 Survey. After reading it, check the box and press next to accept the conditions and comply with the rules and proceed further with the survey.
Screen 16
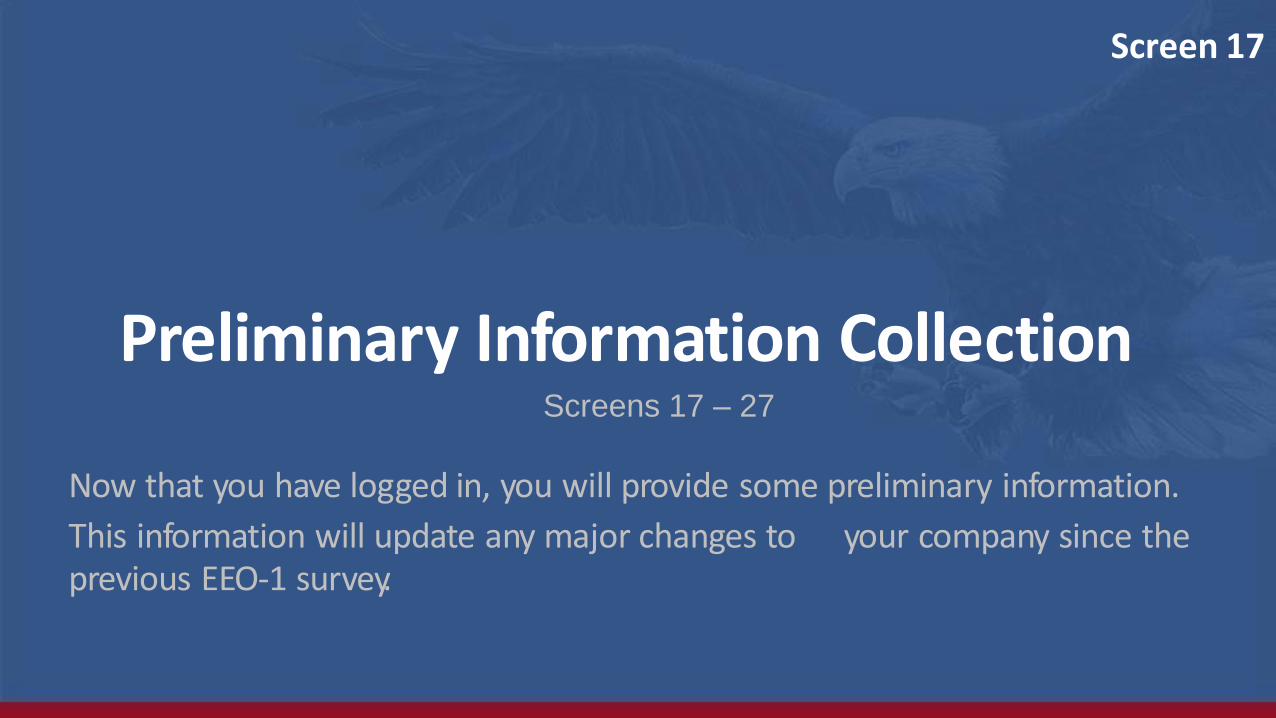
Preliminary Information Collection Screens 17 – 27
Now that you have logged in, you will provide some preliminary information.
This information will update any major changes to your company since the previous EEO-1 survey.
Screen 17
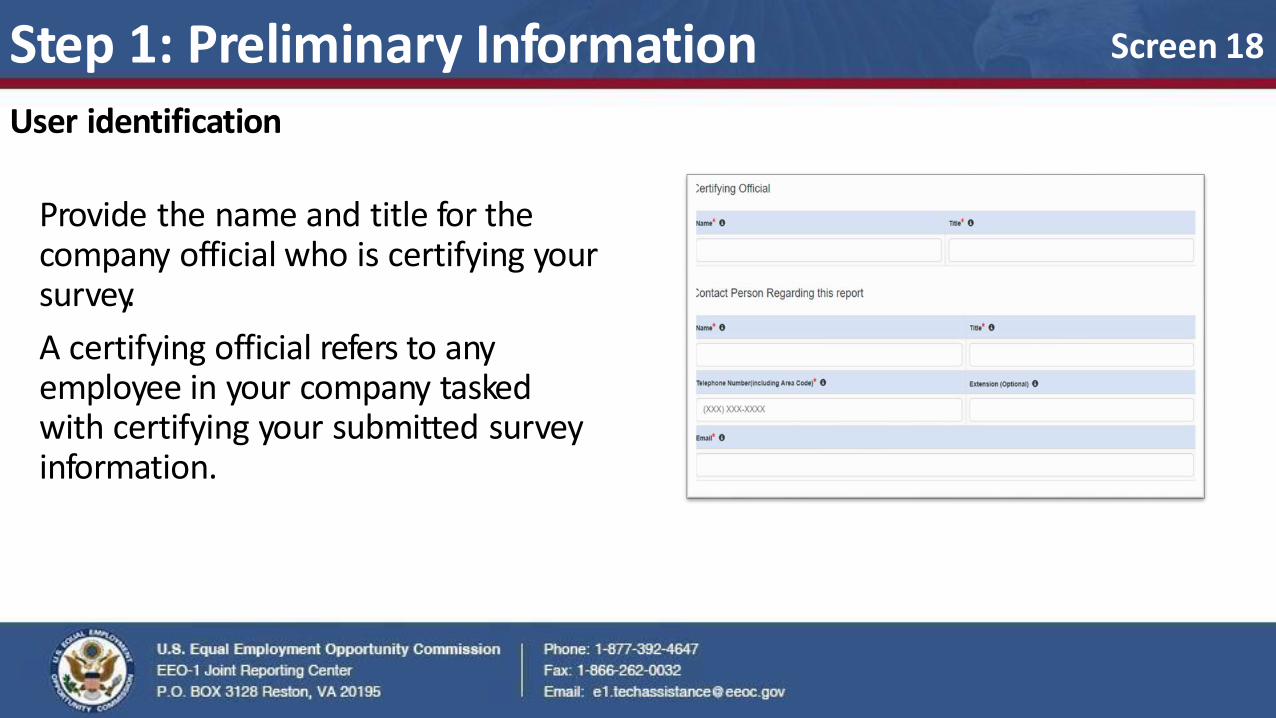
Step 1: Preliminary Information User identification
Provide the name and title for the company official who is certifying your survey.
A certifying official refers to any employee in your company tasked with certifying your submitted survey information.
Screen 18
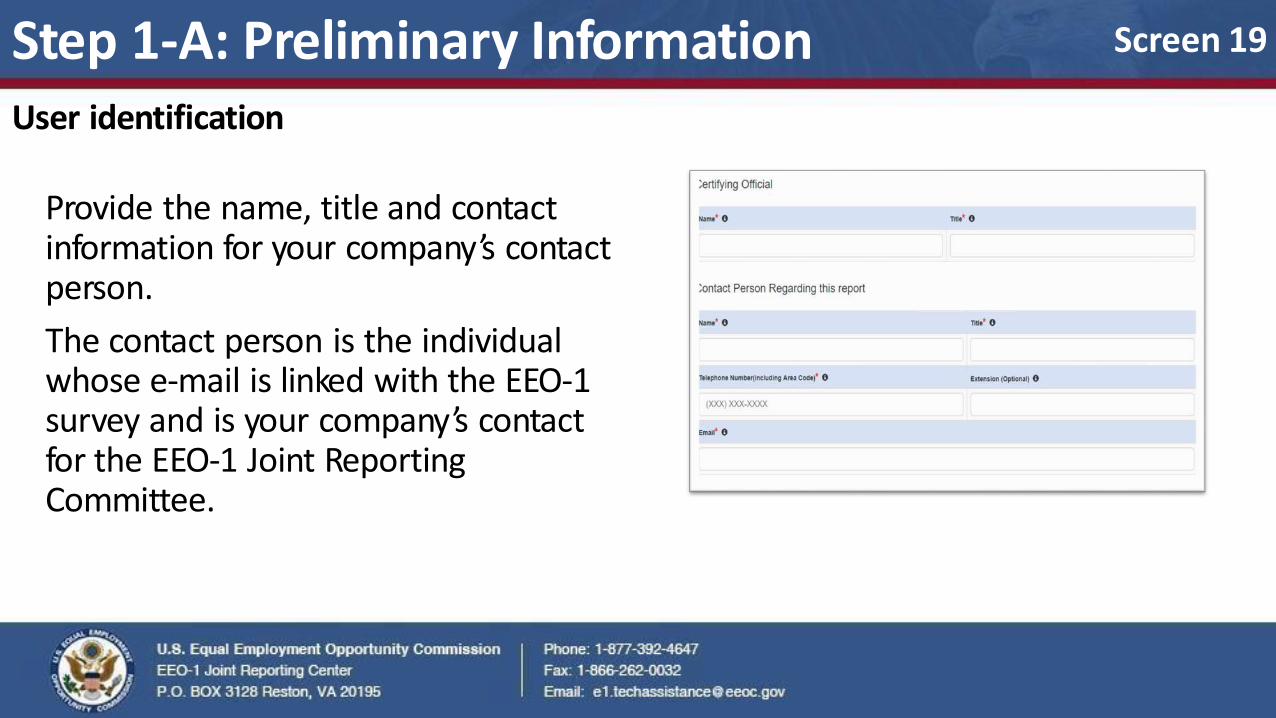
Step 1-A: Preliminary Information User identification
Provide the name, title and contact information for your company’s contact person.
The contact person is the individual whose e-mail is linked with the EEO-1 survey and is your company’s contact for the EEO-1 Joint Reporting Committee.
Screen 19
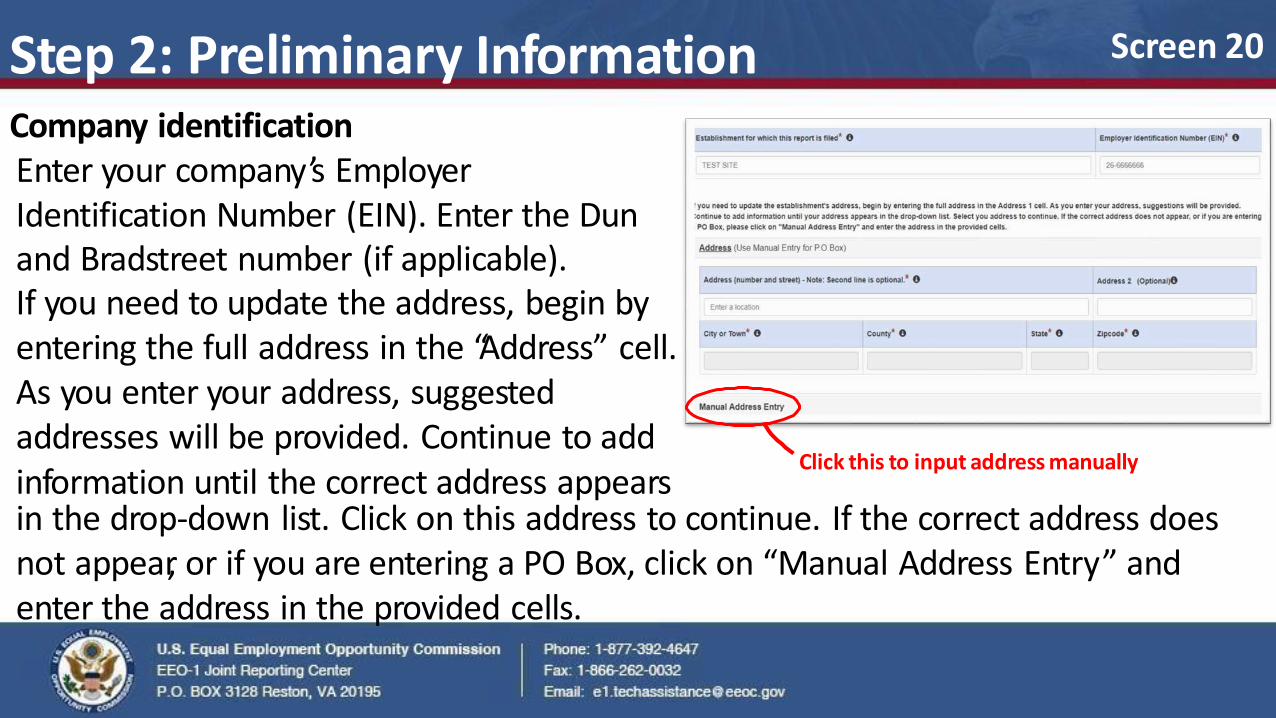
Step 2: Preliminary Information Company identification Enter your company’s Employer Identification Number (EIN). Enter the Dun and Bradstreet number (if applicable). If you need to update the address, begin by entering the full address in the “Address” cell. As you enter your address, suggested addresses will be provided. Continue to add information until the correct address appears
Screen 20
in the drop-down list. Click on this address to continue. If the correct address does not appear, or if you are entering a PO Box, click on “Manual Address Entry” and enter the address in the provided cells.
Click this to input address manually
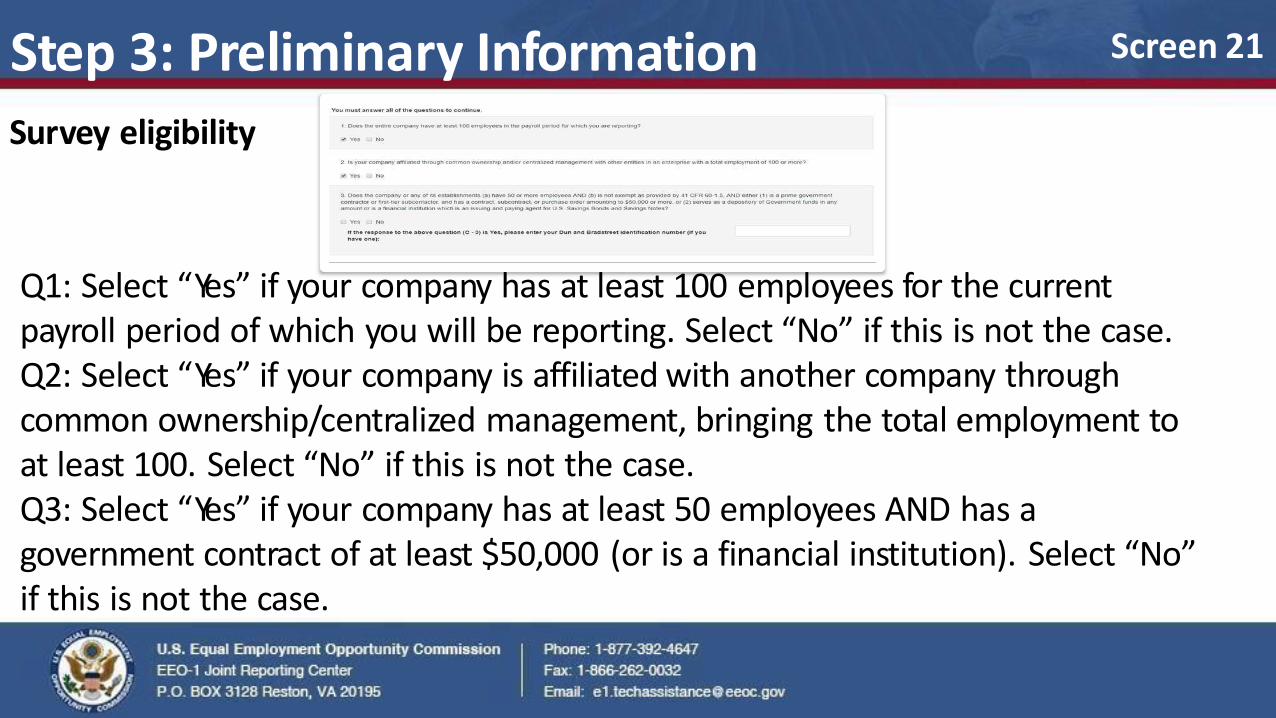
Q1: Select “Yes” if your company has at least 100 employees for the current payroll period of which you will be reporting. Select “No” if this is not the case. Q2: Select “Yes” if your company is affiliated with another company through common ownership/centralized management, bringing the total employment to at least 100. Select “No” if this is not the case. Q3: Select “Yes” if your company has at least 50 employees AND has a government contract of at least $50,000 (or is a financial institution). Select “No” if this is not the case.
Screen 21 Step 3: Preliminary Information
Survey eligibility
Survey eligibility
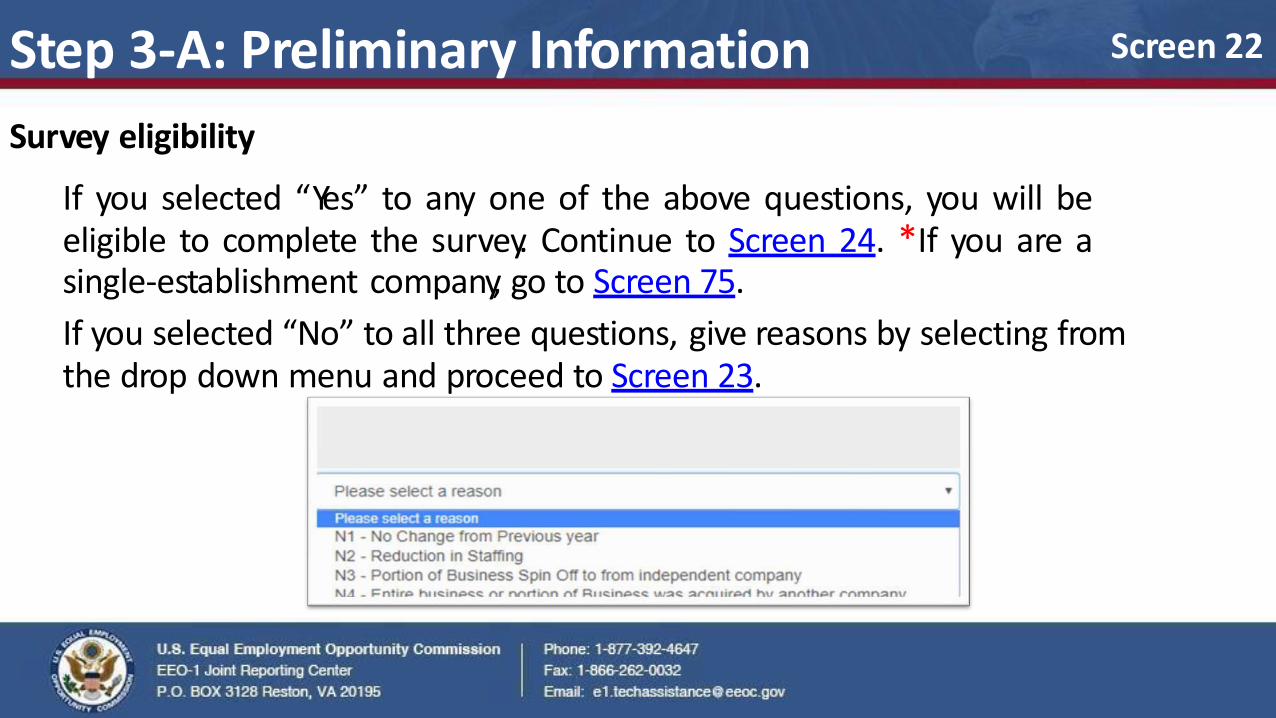
If you selected “Yes” to any one of the above questions, you will be eligible to complete the survey. Continue to Screen 24. *If you are a single-establishment company, go to Screen 75.
If you selected “No” to all three questions, give reasons by selecting from the drop down menu and proceed to Screen 23.
Screen 22 Step 3-A: Preliminary Information
Screen 23
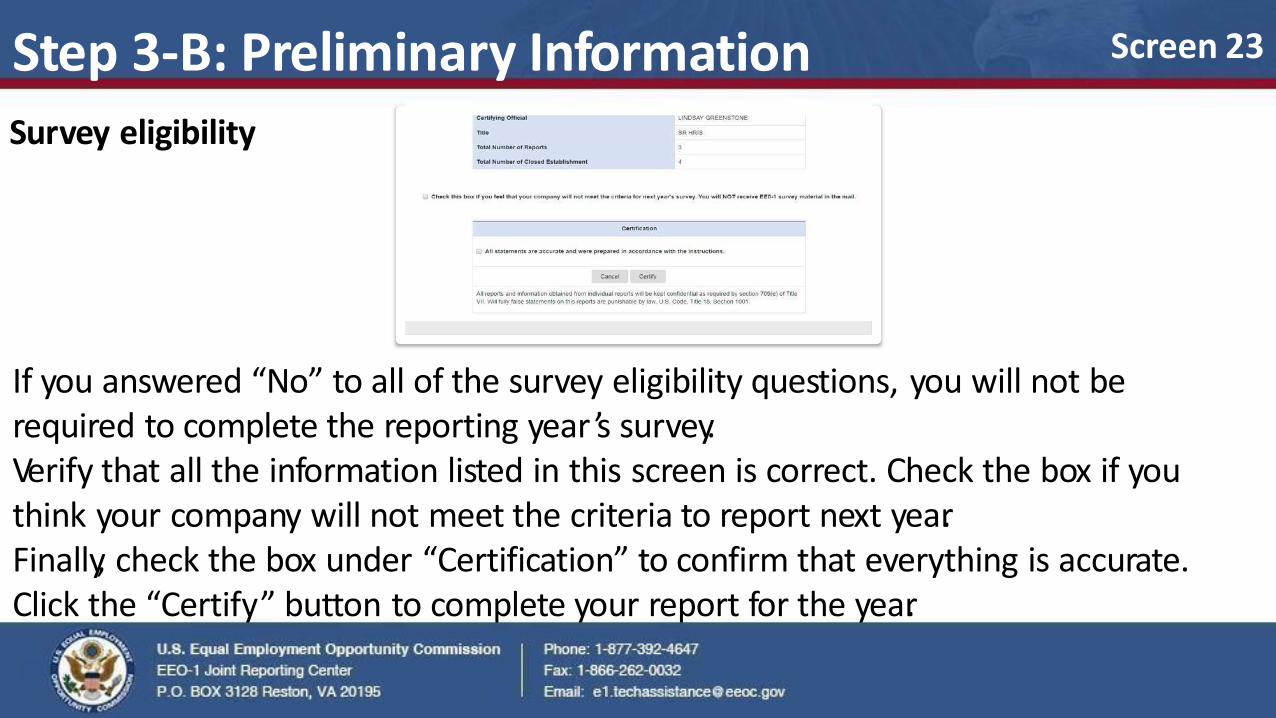
If you answered “No” to all of the survey eligibility questions, you will not be required to complete the reporting year ’s survey. Verify that all the information listed in this screen is correct. Check the box if you think your company will not meet the criteria to report next year. Finally, check the box under “Certification” to confirm that everything is accurate. Click the “Certify” button to complete your report for the year.
Step 3-B: Preliminary Information
Survey eligibility
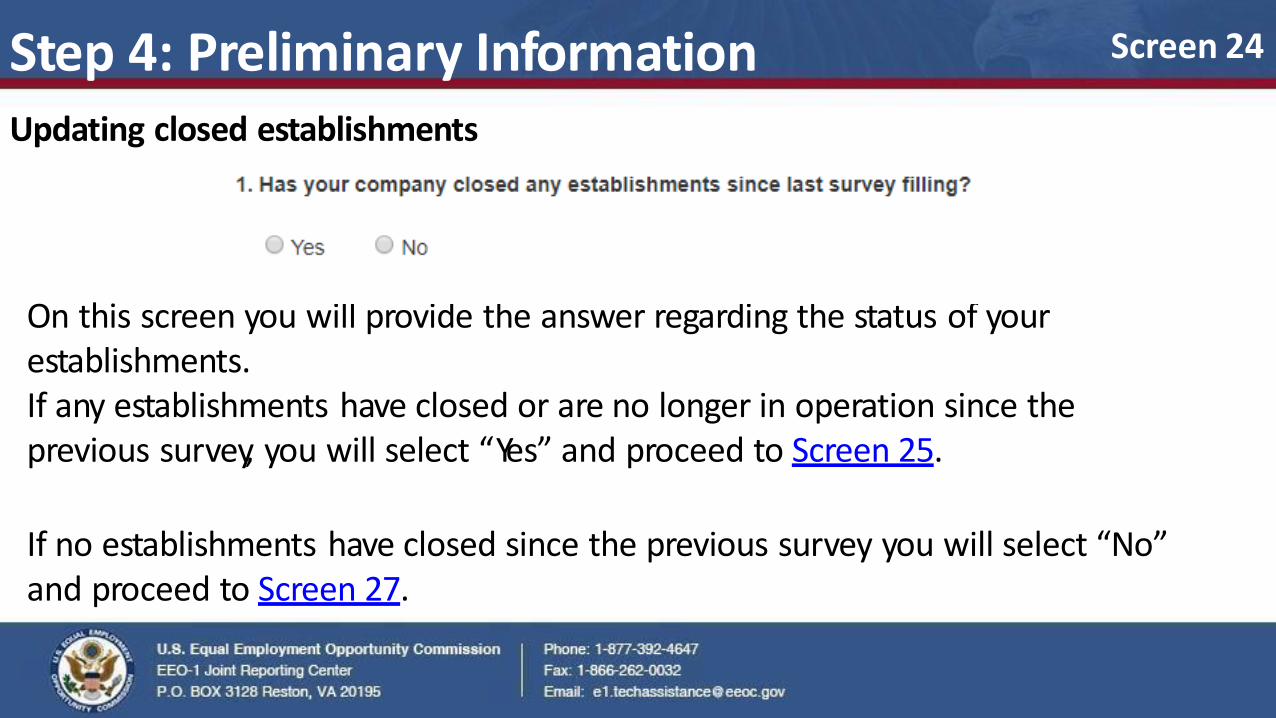
On this screen you will provide the answer regarding the status of your establishments. If any establishments have closed or are no longer in operation since the previous survey, you will select “Yes” and proceed to Screen 25.
If no establishments have closed since the previous survey you will select “No” and proceed to Screen 27.
Screen 24 Step 4: Preliminary Information Updating closed establishments
Step 4-A: Preliminary Information Updating closed establishments
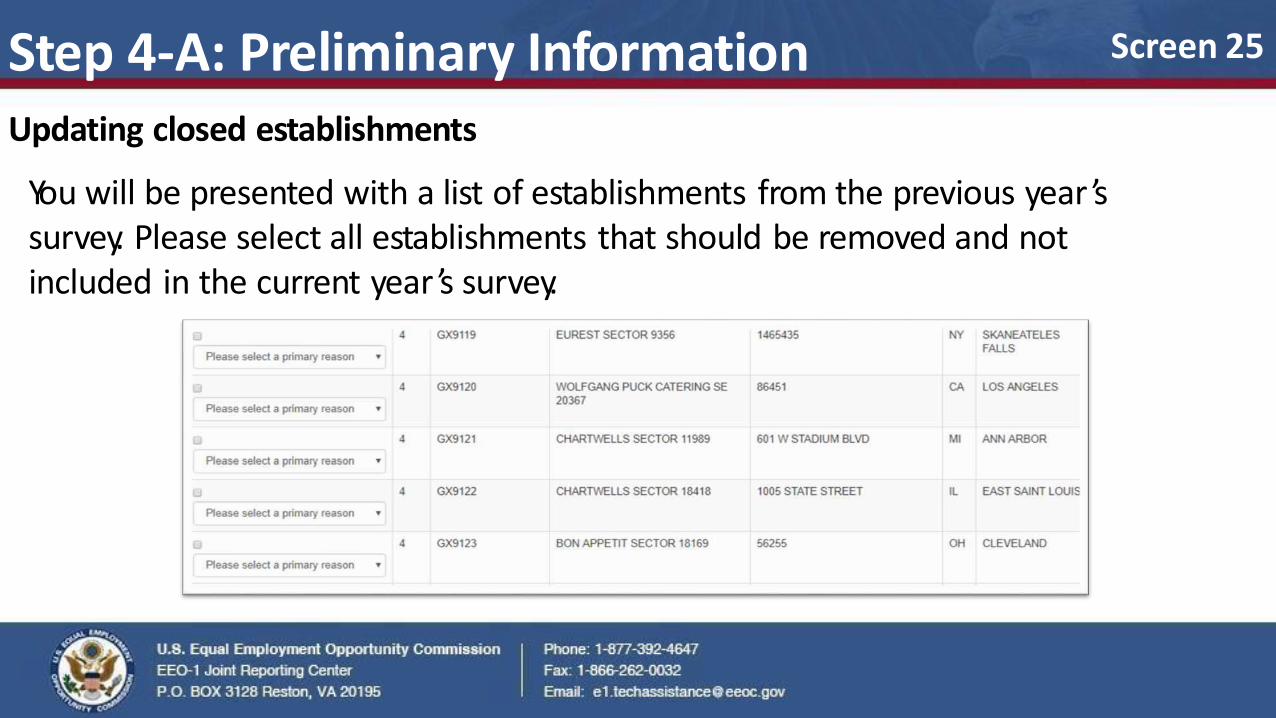
You will be presented with a list of establishments from the previous year ’s survey. Please select all establishments that should be removed and not included in the current year ’s survey.
Screen 25

Screen 26 Step 4-B: Preliminary Information Updating closed establishments
If your company has closed establishments since the previous filing year, select the option that best explains why it has closed.
Screen 27 Step 5: Preliminary Information Selecting a filing method
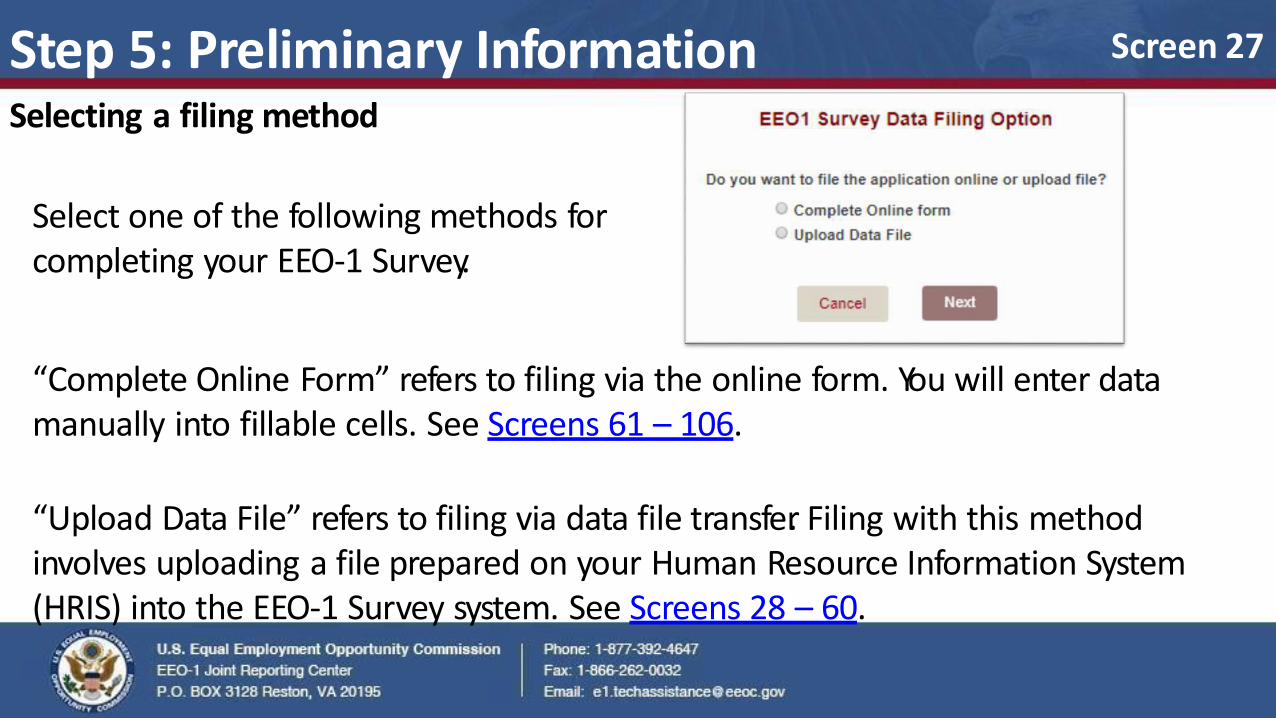
Select one of the following methods for completing your EEO-1 Survey.
“Complete Online Form” refers to filing via the online form. You will enter data manually into fillable cells. See Screens 61 – 106.
“Upload Data File” refers to filing via data file transfer. Filing with this method involves uploading a file prepared on your Human Resource Information System (HRIS) into the EEO-1 Survey system. See Screens 28 – 60.
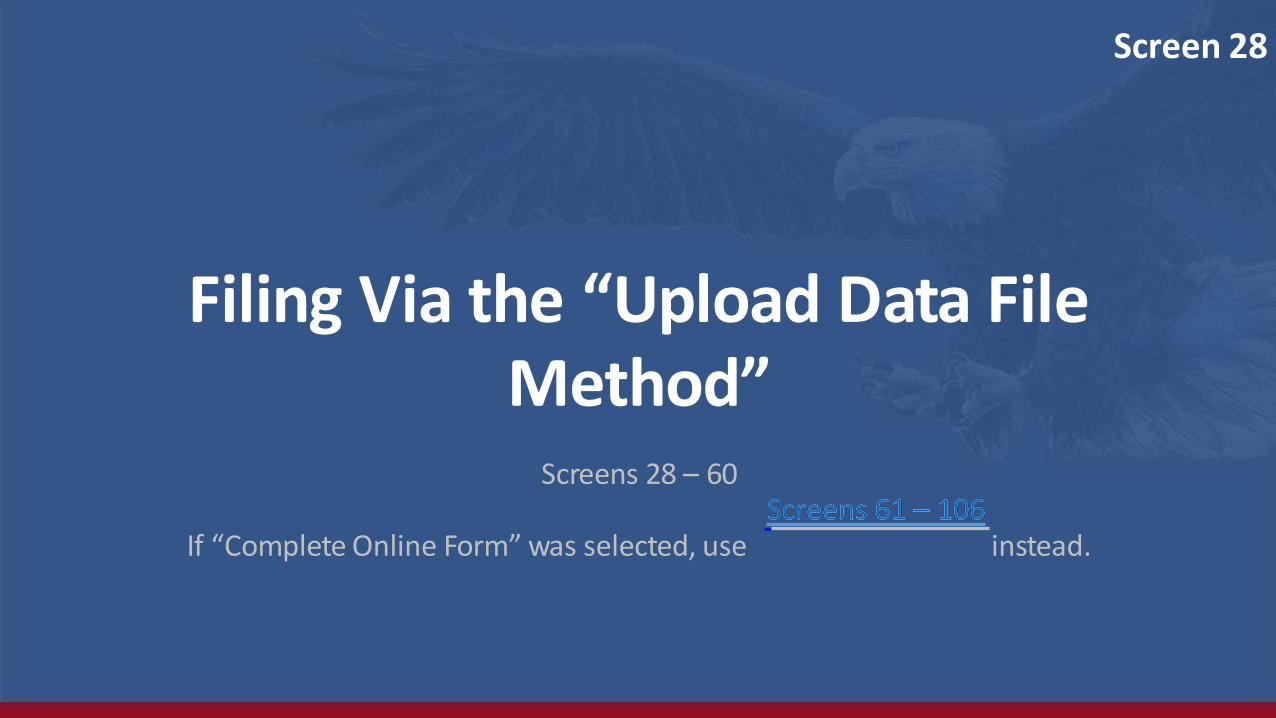
Filing Via the “Upload Data File Method”
Screens 28 – 60
If “Complete Online Form” was selected, use instead.
Screen 28
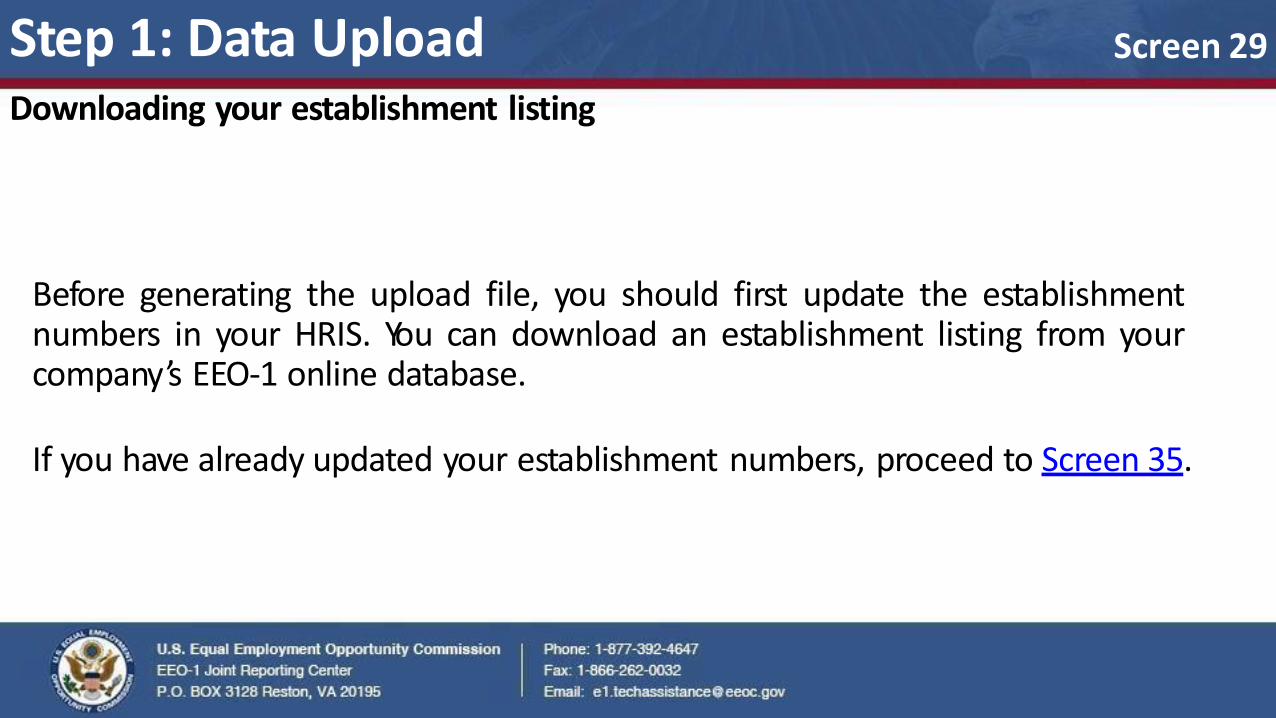
Before generating the upload file, you should first update the establishment numbers in your HRIS. You can download an establishment listing from your company’s EEO-1 online database.
If you have already updated your establishment numbers, proceed to Screen 35.
Step 1: Data Upload Downloading your establishment listing
Screen 29
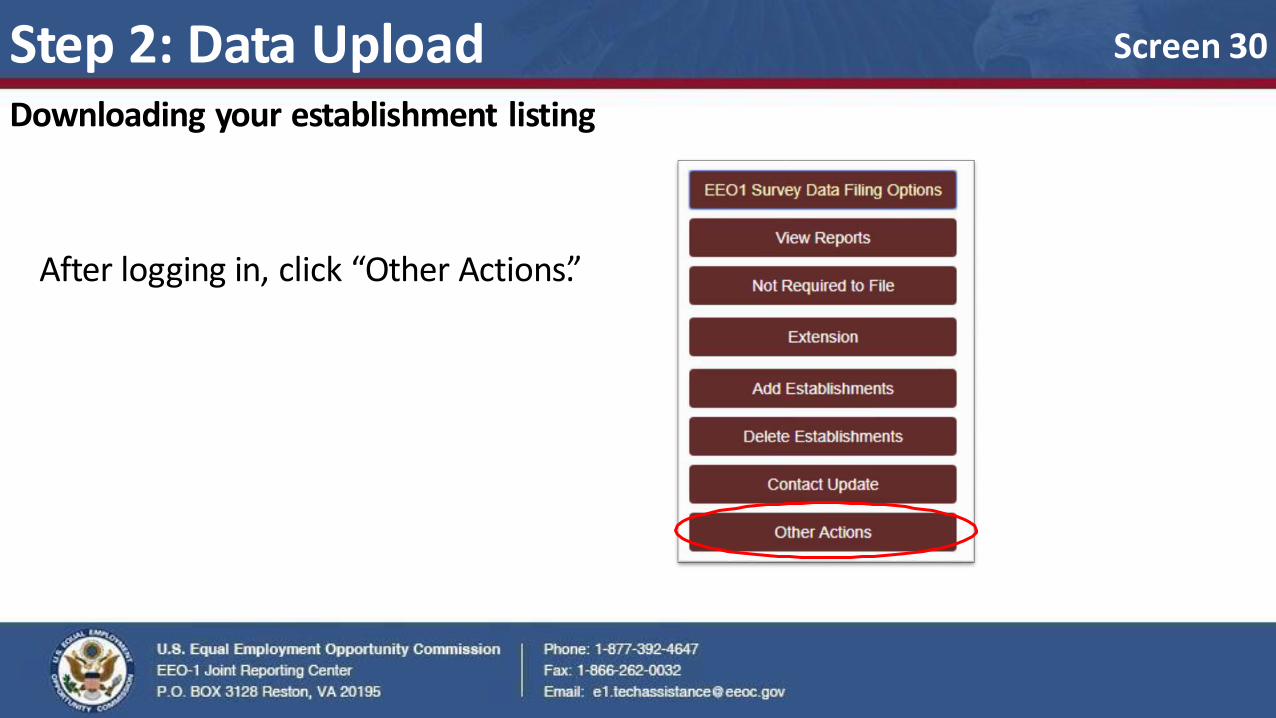
Step 2: Data Upload Downloading your establishment listing
After logging in, click “Other Actions.”
Screen 30
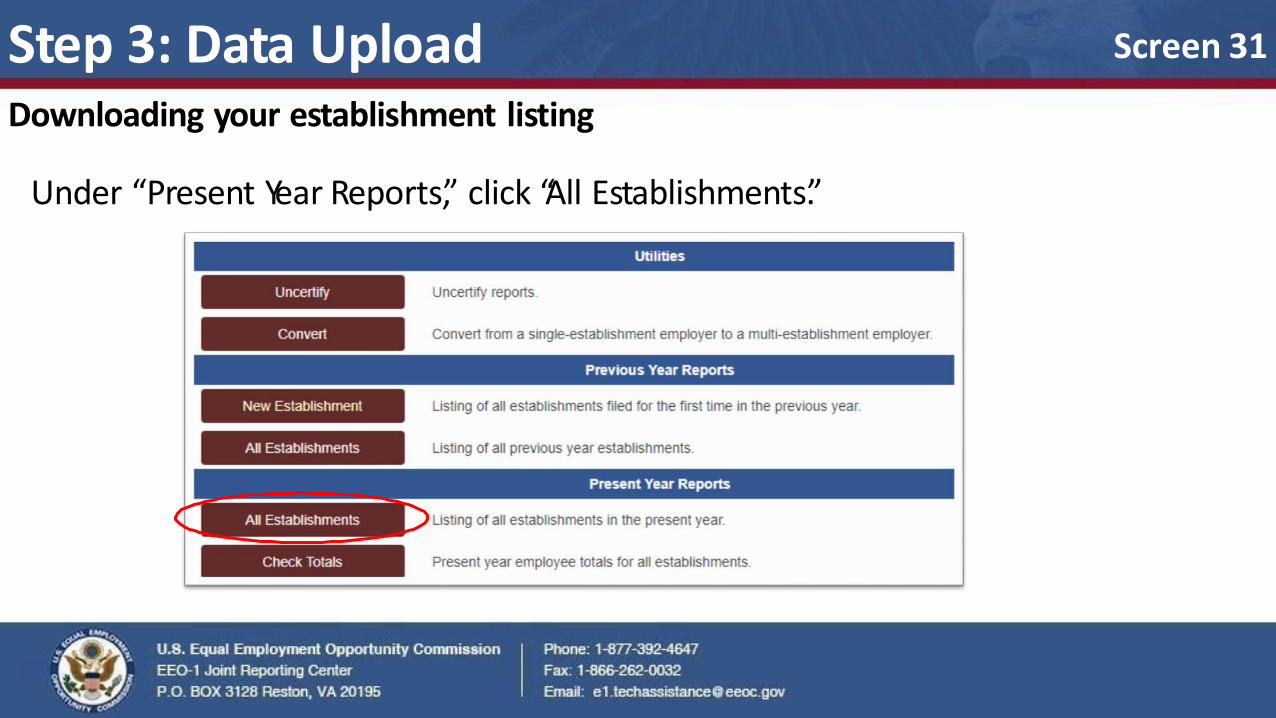
Step 3: Data Upload Downloading your establishment listing
Under “Present Year Reports,” click “All Establishments.”
Screen 31
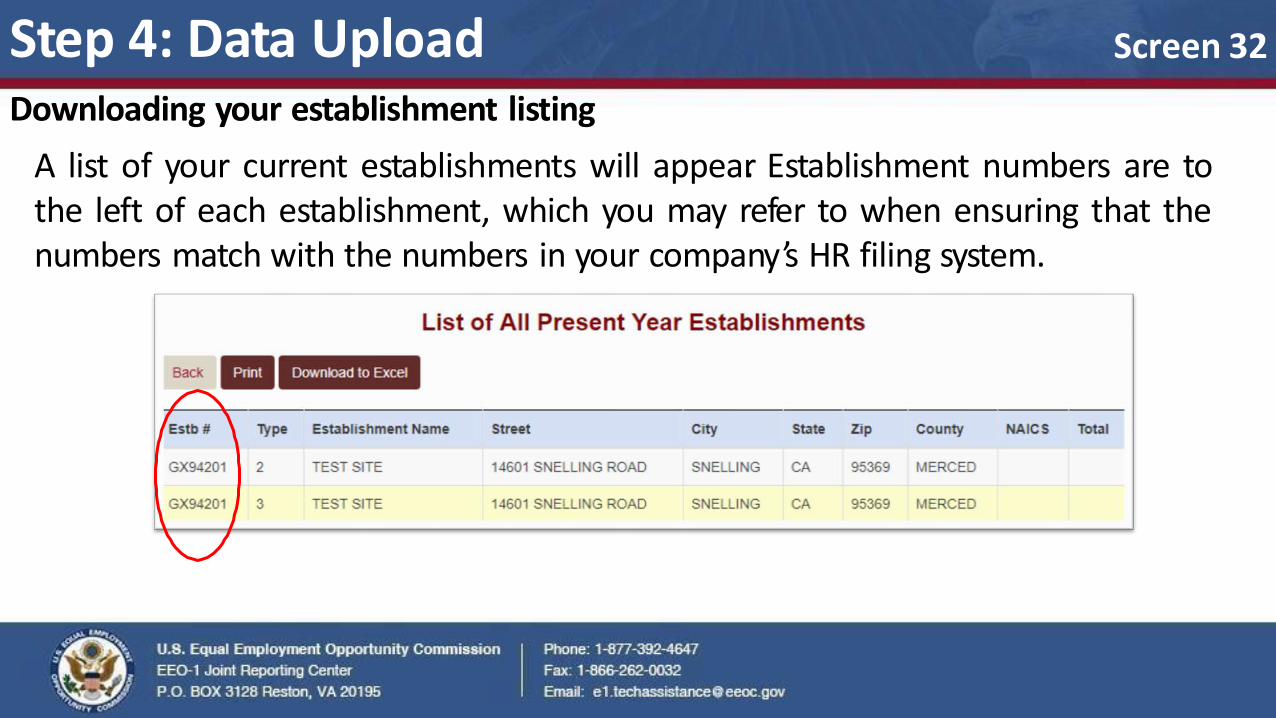
Step 4: Data Upload Downloading your establishment listing
A list of your current establishments will appear. Establishment numbers are to the left of each establishment, which you may refer to when ensuring that the numbers match with the numbers in your company’s HR filing system.
Screen 32
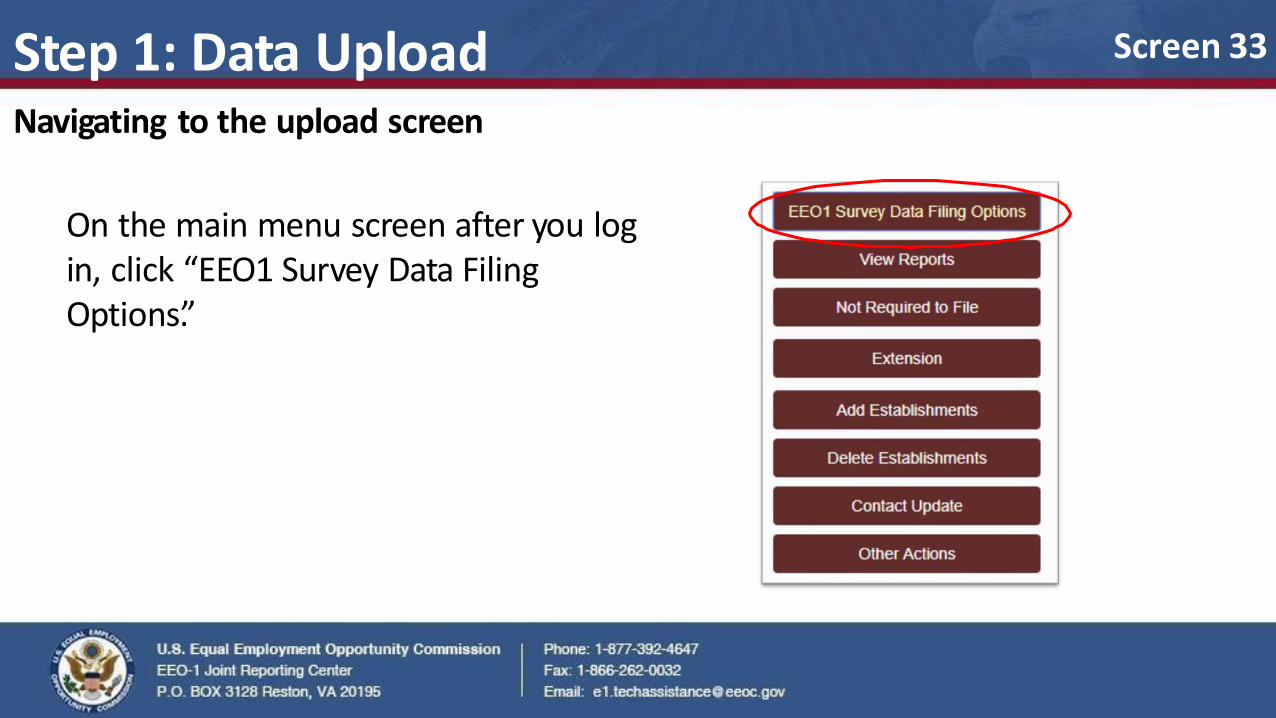
Step 1: Data Upload Navigating to the upload screen
On the main menu screen after you log in, click “EEO1 Survey Data Filing Options.”
Screen 33
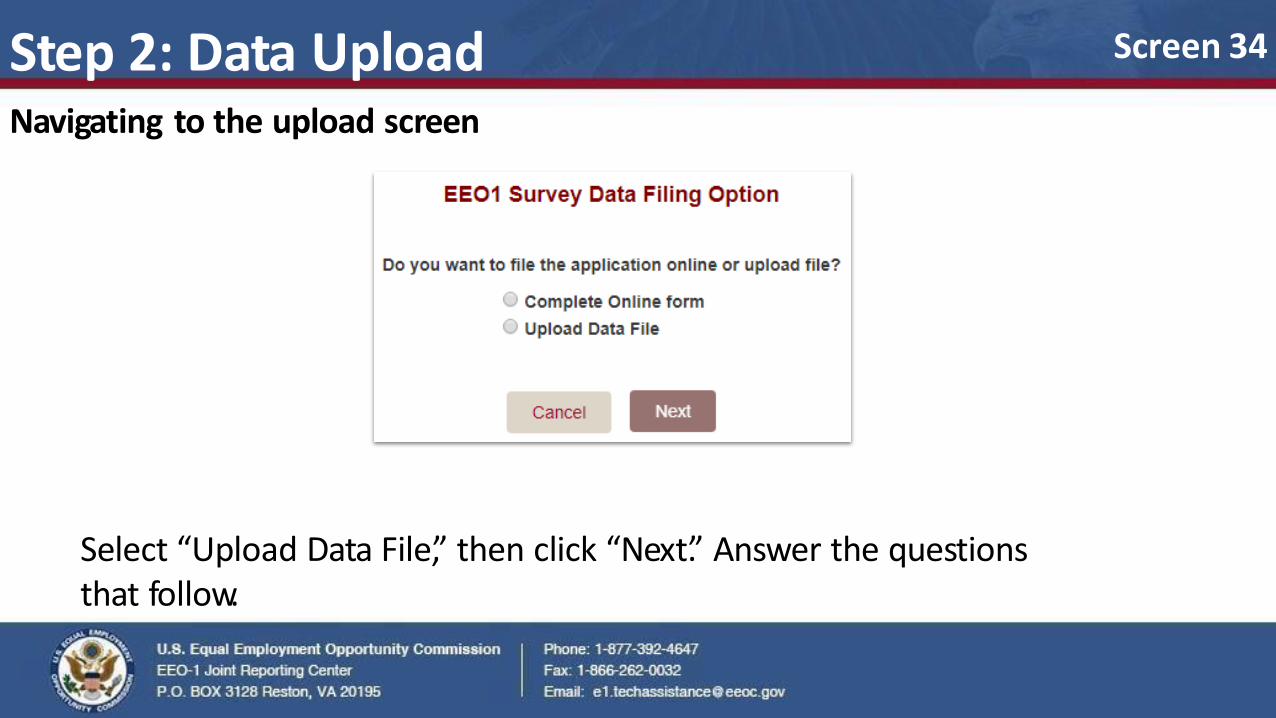
Select “Upload Data File,” then click “Next.” Answer the questions that follow.
Screen 34 Step 2: Data Upload Navigating to the upload screen
Screen 35
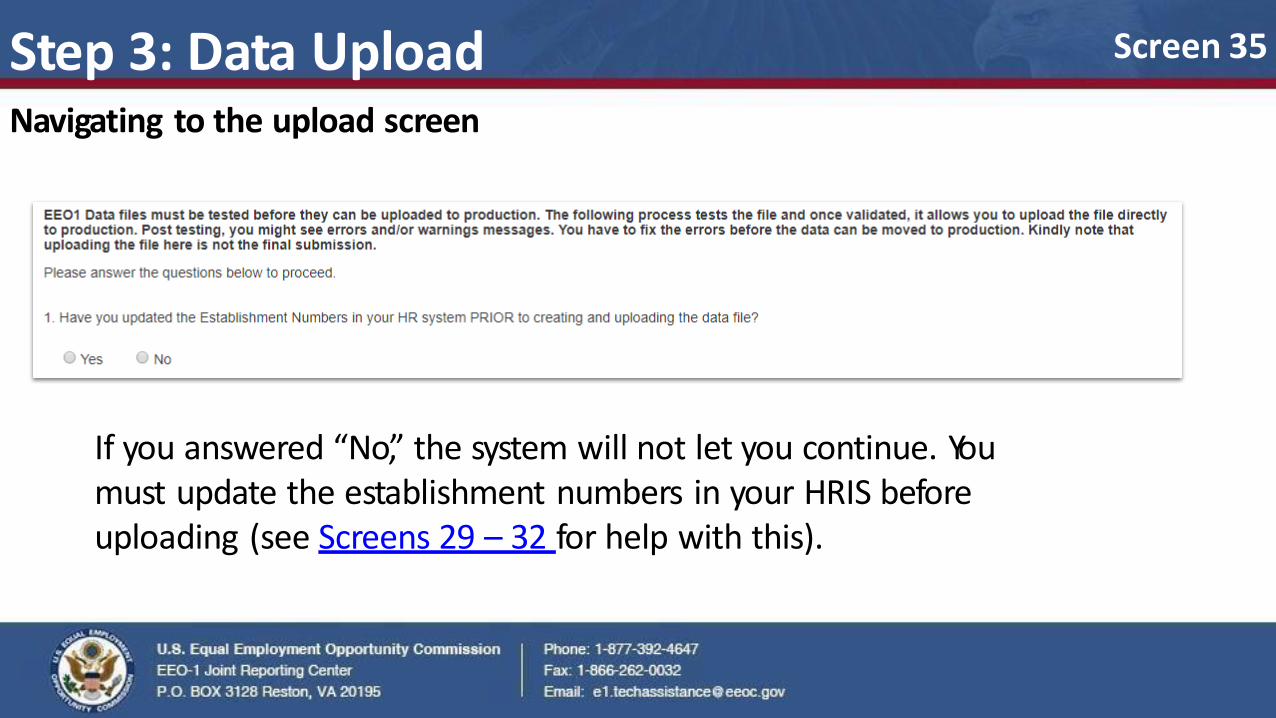
If you answered “No,” the system will not let you continue. You must update the establishment numbers in your HRIS before uploading (see Screens 29 – 32 for help with this).
Step 3: Data Upload Navigating to the upload screen
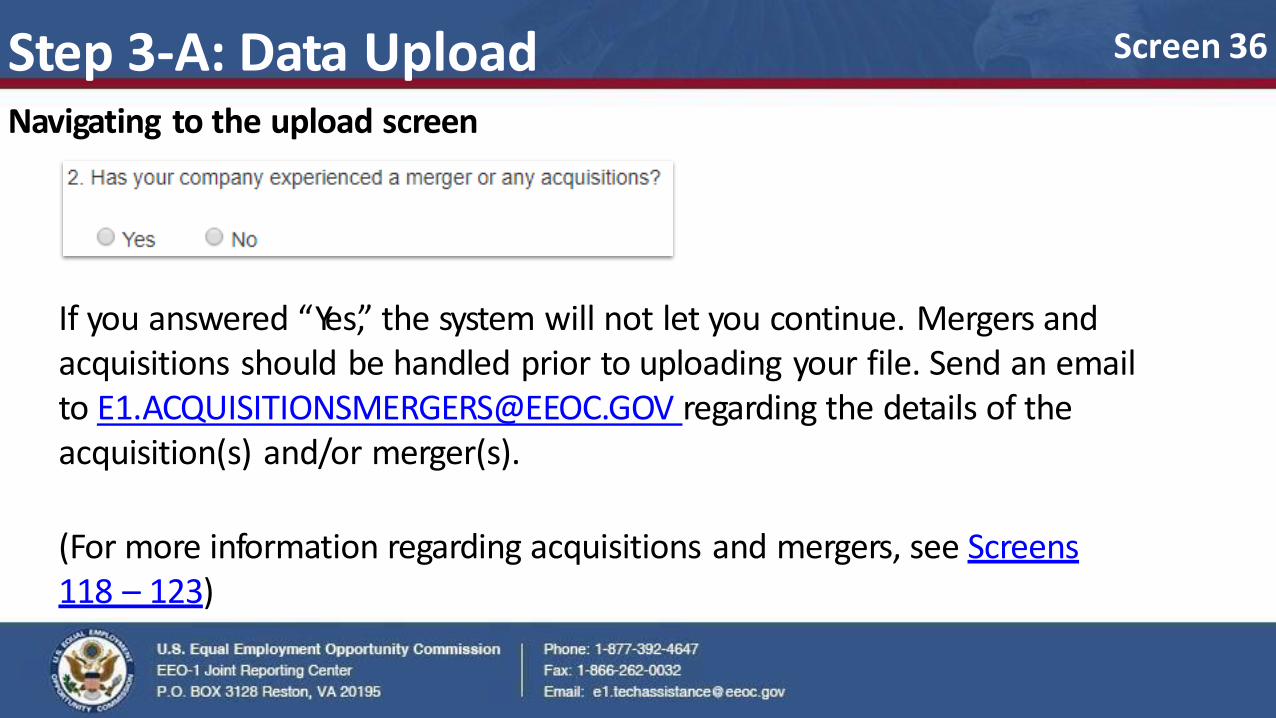
If you answered “Yes,” the system will not let you continue. Mergers and acquisitions should be handled prior to uploading your file. Send an email to [email protected] regarding the details of the acquisition(s) and/or merger(s).
(For more information regarding acquisitions and mergers, see Screens 118 – 123)
Screen 36 Step 3-A: Data Upload Navigating to the upload screen
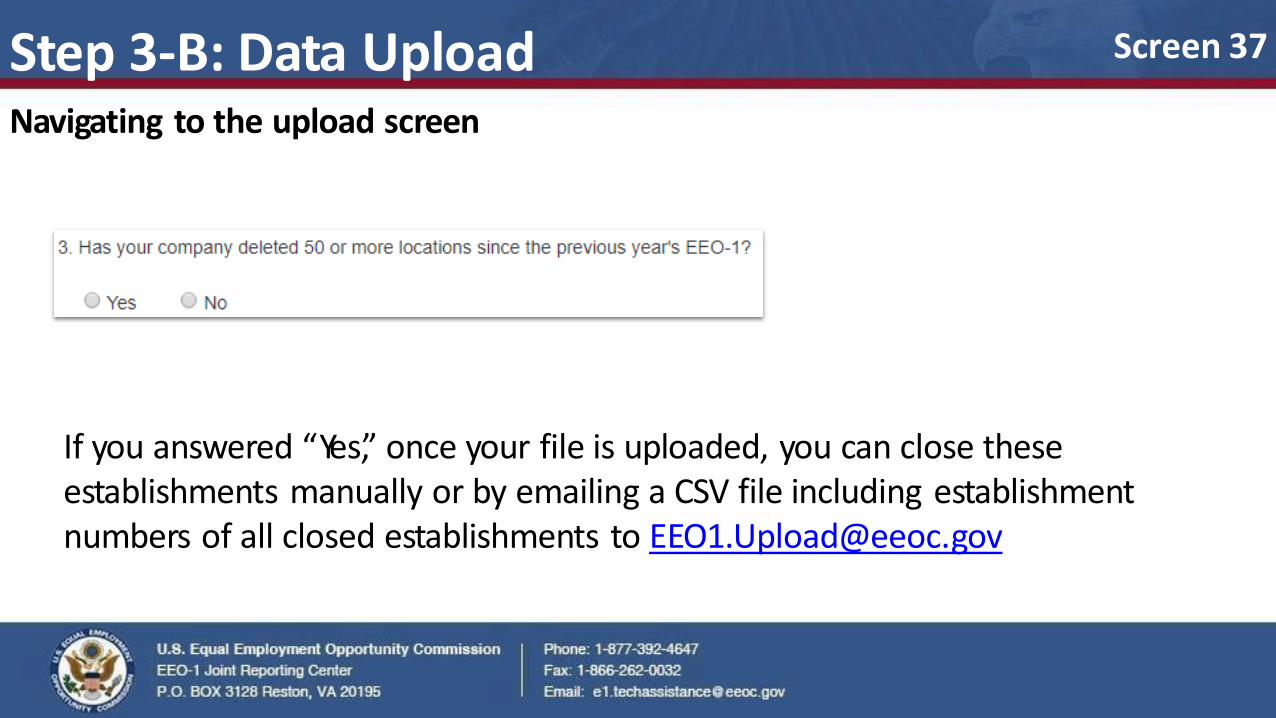
If you answered “Yes,” once your file is uploaded, you can close these establishments manually or by emailing a CSV file including establishment numbers of all closed establishments to [email protected]
Screen 37 Step 3-B: Data Upload Navigating to the upload screen
Step 4: Data Upload Navigating to the upload screen
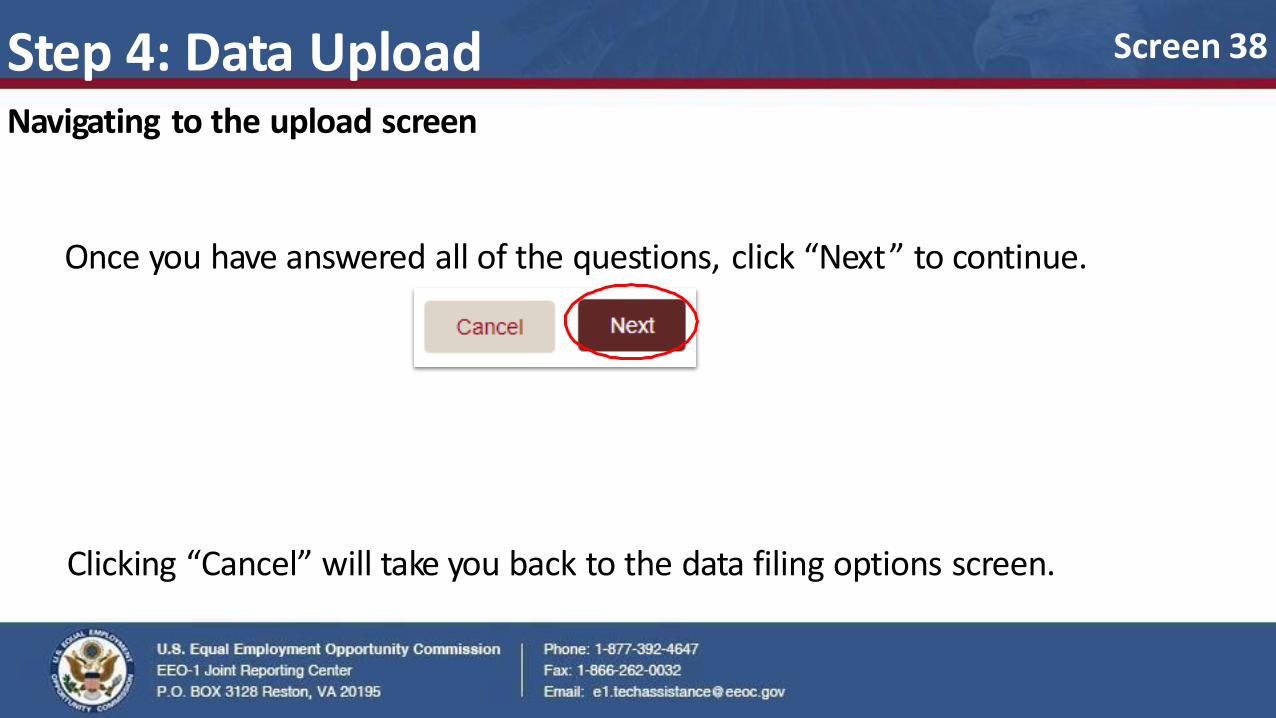
Once you have answered all of the questions, click “Next” to continue.
Clicking “Cancel” will take you back to the data filing options screen.
Screen 38
Step 1: Data Upload Uploading your file
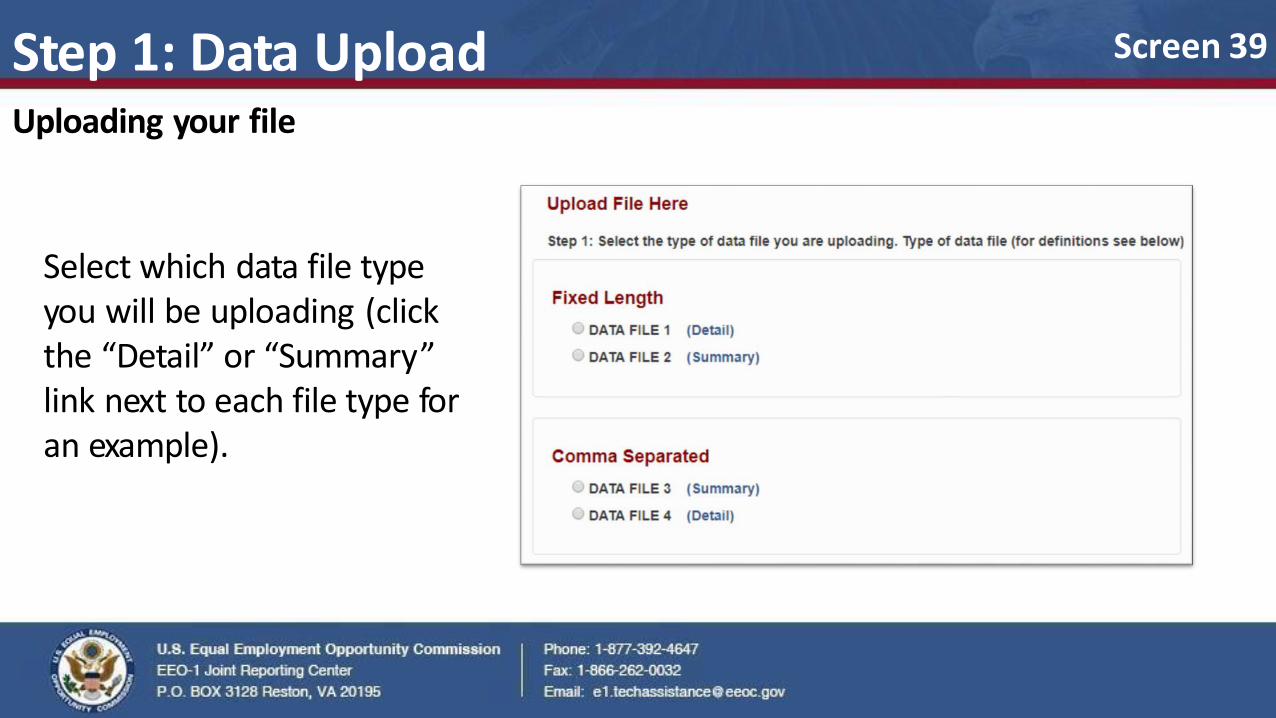
Select which data file type you will be uploading (click the “Detail” or “Summary” link next to each file type for an example).
Screen 39

Step 1-A: Data Upload Uploading your file
DATA FILE 1 Data File 1 is a fixed-length file and must be in an ASCII/TXT format.
Screen 40
Step 1-B: Data Upload Uploading your file
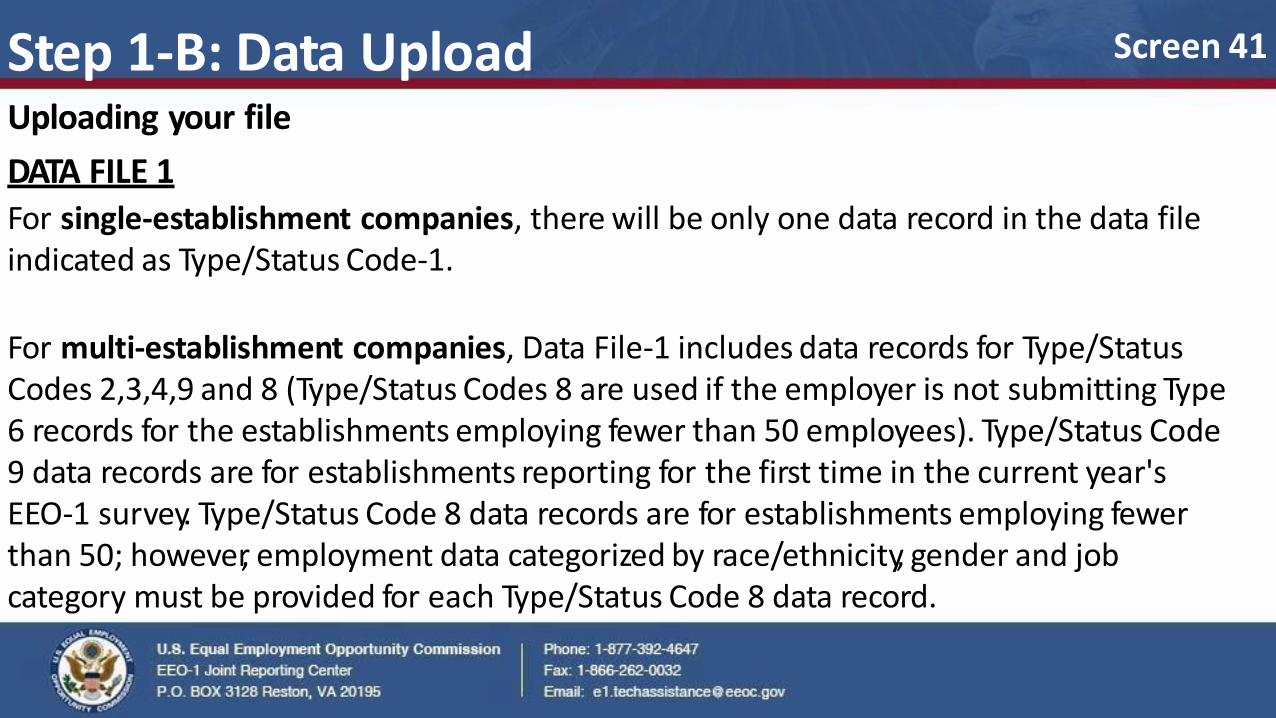
DATA FILE 1 For single-establishment companies, there will be only one data record in the data file indicated as Type/Status Code-1.
For multi-establishment companies, Data File-1 includes data records for Type/Status Codes 2,3,4,9 and 8 (Type/Status Codes 8 are used if the employer is not submitting Type 6 records for the establishments employing fewer than 50 employees). Type/Status Code 9 data records are for establishments reporting for the first time in the current year's EEO-1 survey. Type/Status Code 8 data records are for establishments employing fewer than 50; however, employment data categorized by race/ethnicity, gender and job category must be provided for each Type/Status Code 8 data record.
Screen 41
Step 1-C: Data Upload Uploading your file
DATA FILE 2 Data File 2 is a fixed-length file and must be in an ASCII/TXT format.
Screen 42
Step 1-D: Data Upload Uploading your file
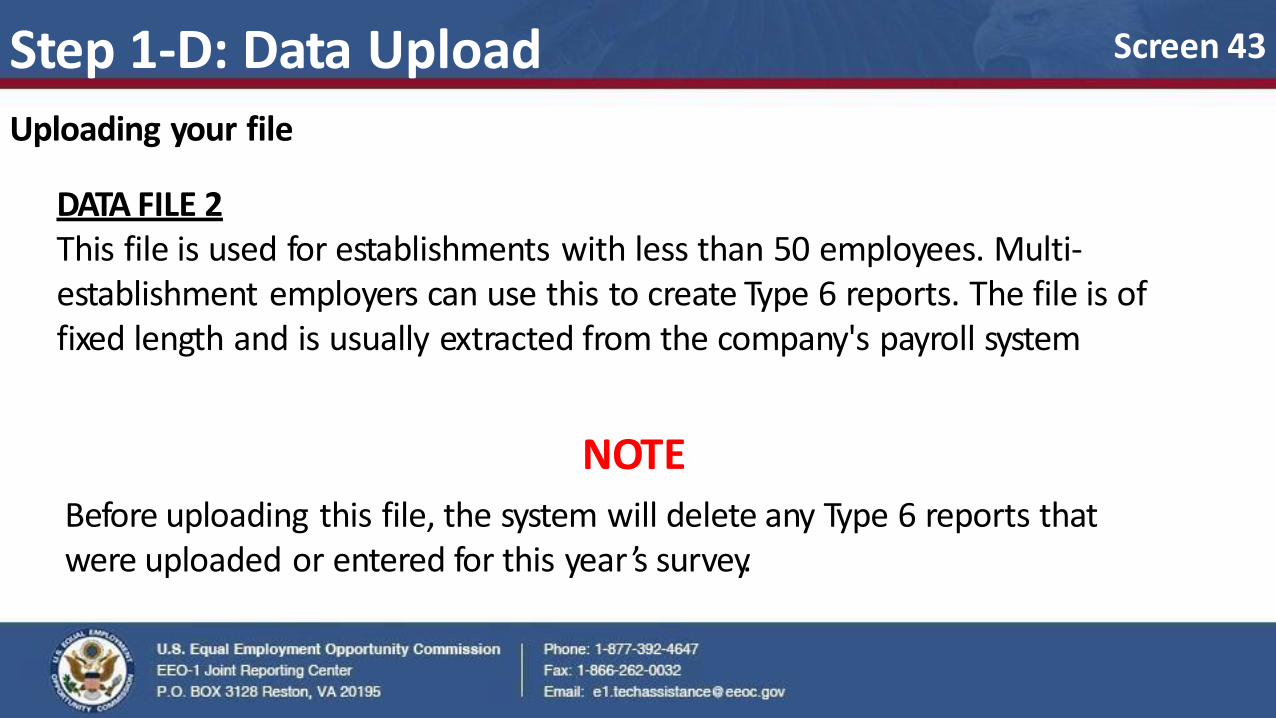
DATA FILE 2 This file is used for establishments with less than 50 employees. Multi- establishment employers can use this to create Type 6 reports. The file is of fixed length and is usually extracted from the company's payroll system
NOTE
Before uploading this file, the system will delete any Type 6 reports that were uploaded or entered for this year ’s survey.
Screen 43
Uploading your file
DATA FILE 3
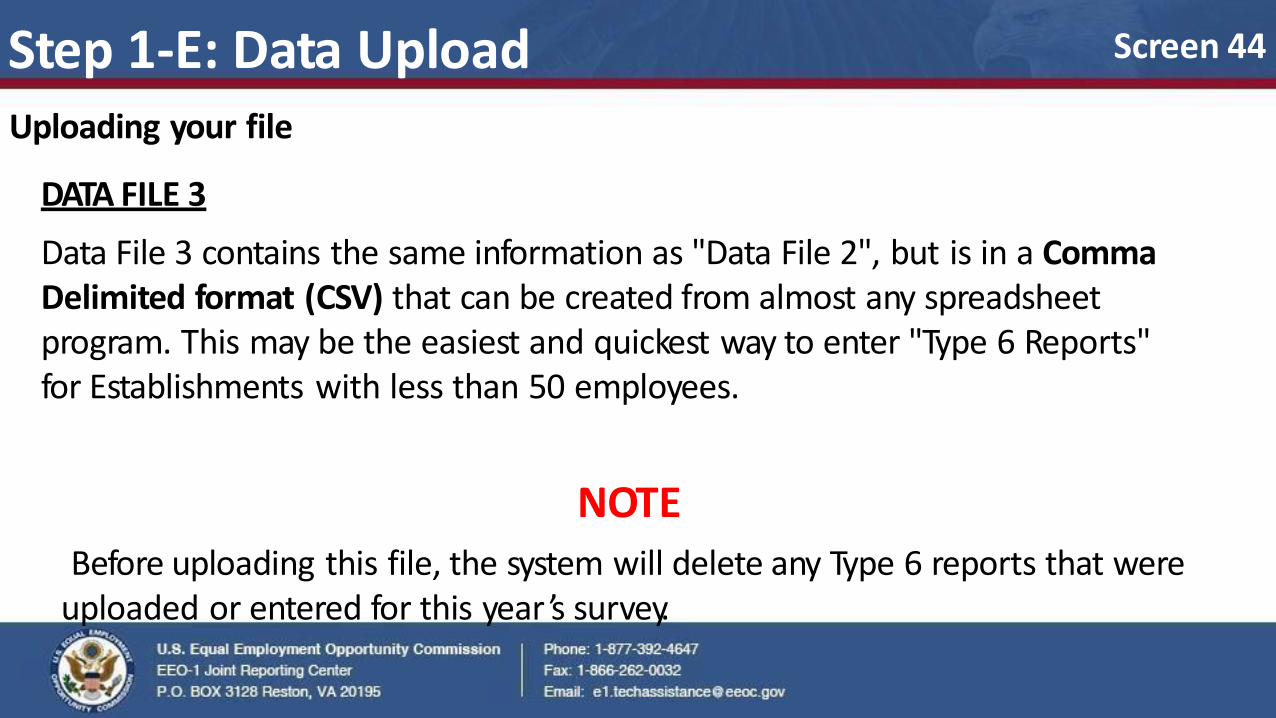
Data File 3 contains the same information as "Data File 2", but is in a Comma Delimited format (CSV) that can be created from almost any spreadsheet program. This may be the easiest and quickest way to enter "Type 6 Reports" for Establishments with less than 50 employees.
NOTE
Before uploading this file, the system will delete any Type 6 reports that were uploaded or entered for this year ’s survey.
Screen 44 Step 1-E: Data Upload
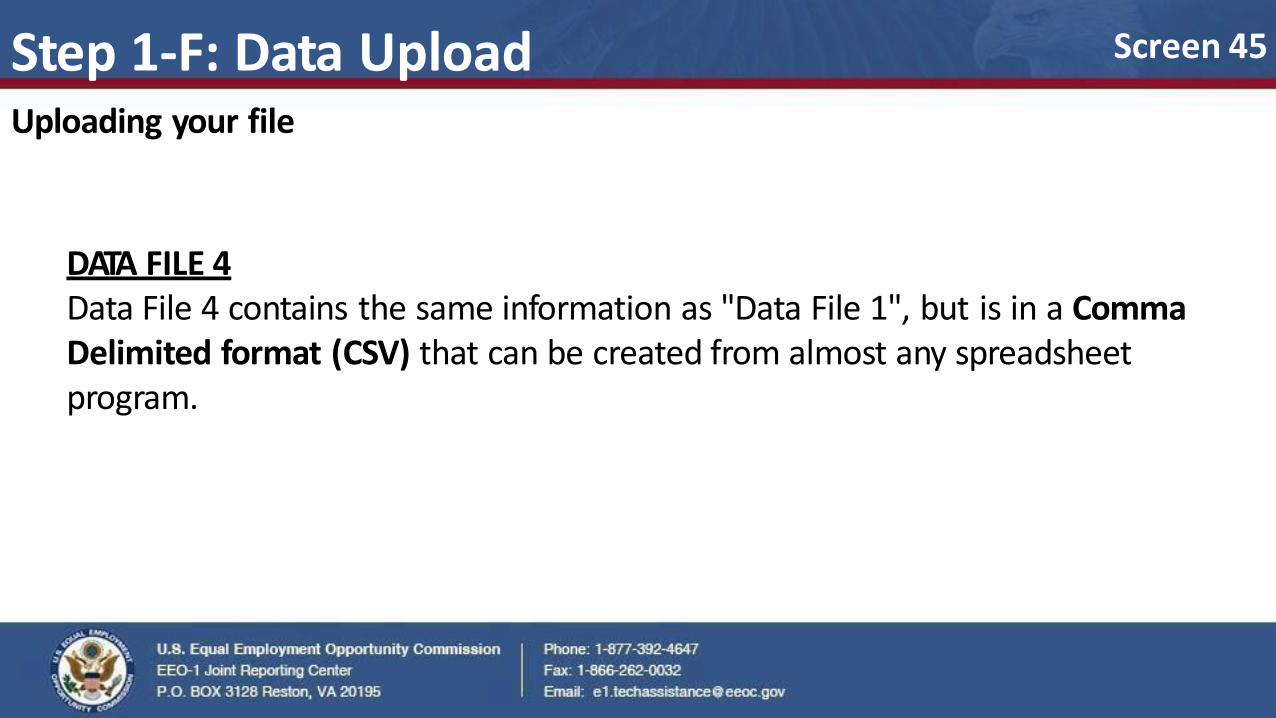
Step 1-F: Data Upload Uploading your file
DATA FILE 4 Data File 4 contains the same information as "Data File 1", but is in a Comma Delimited format (CSV) that can be created from almost any spreadsheet program.
Screen 45
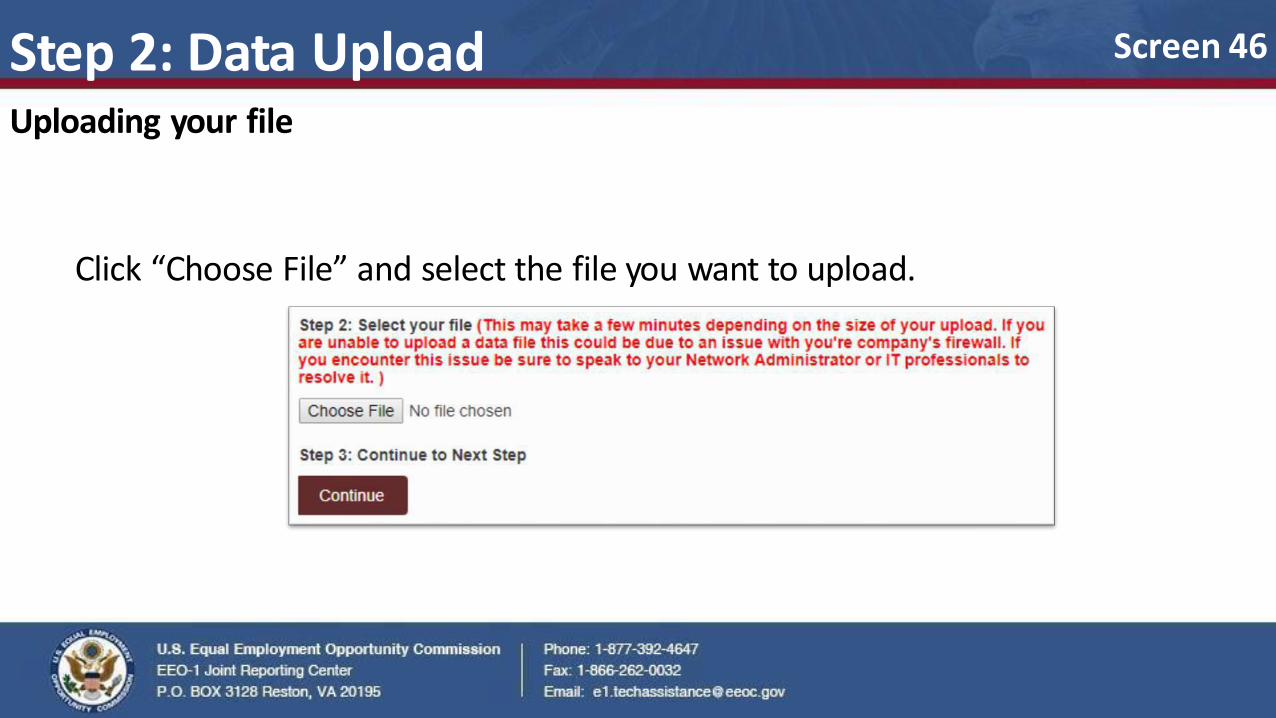
Step 2: Data Upload Uploading your file
Click “Choose File” and select the file you want to upload.
Screen 46
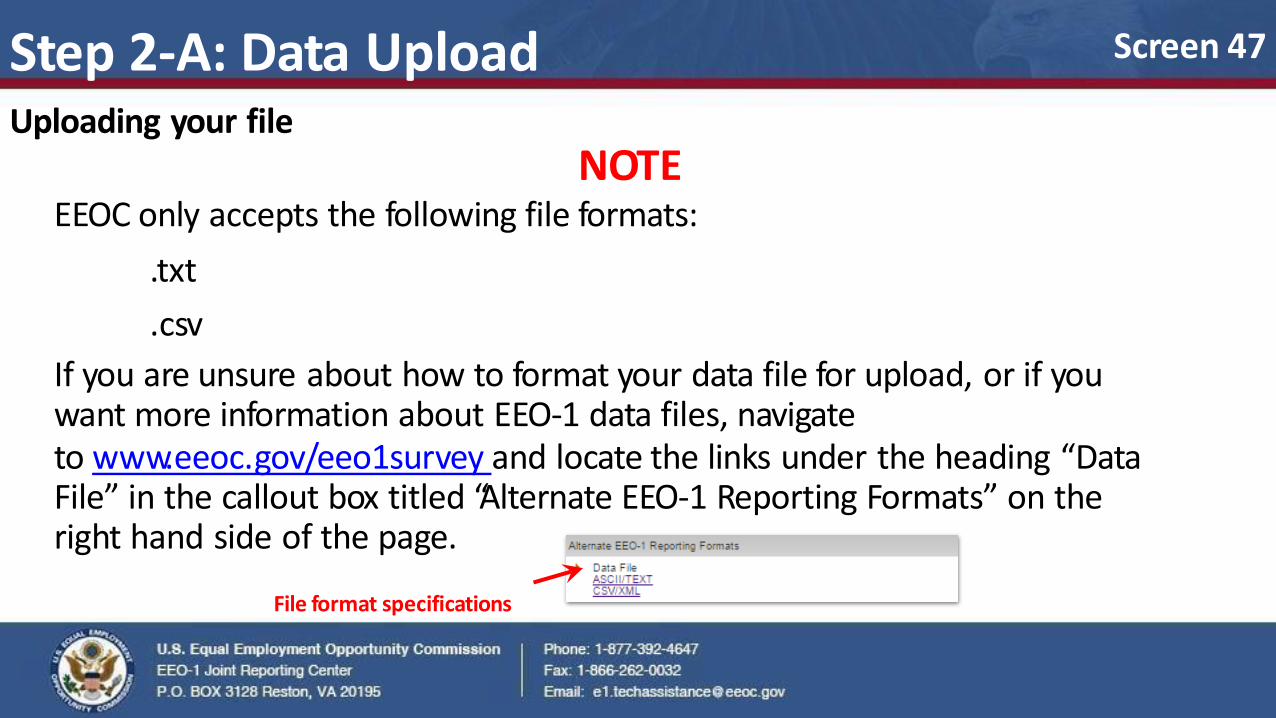
NOTE EEOC only accepts the following file formats:
.txt
.csv
If you are unsure about how to format your data file for upload, or if you want more information about EEO-1 data files, navigate to www.eeoc.gov/eeo1survey and locate the links under the heading “Data File” in the callout box titled “Alternate EEO-1 Reporting Formats” on the right hand side of the page.
File format specifications
Screen 47 Step 2-A: Data Upload Uploading your file
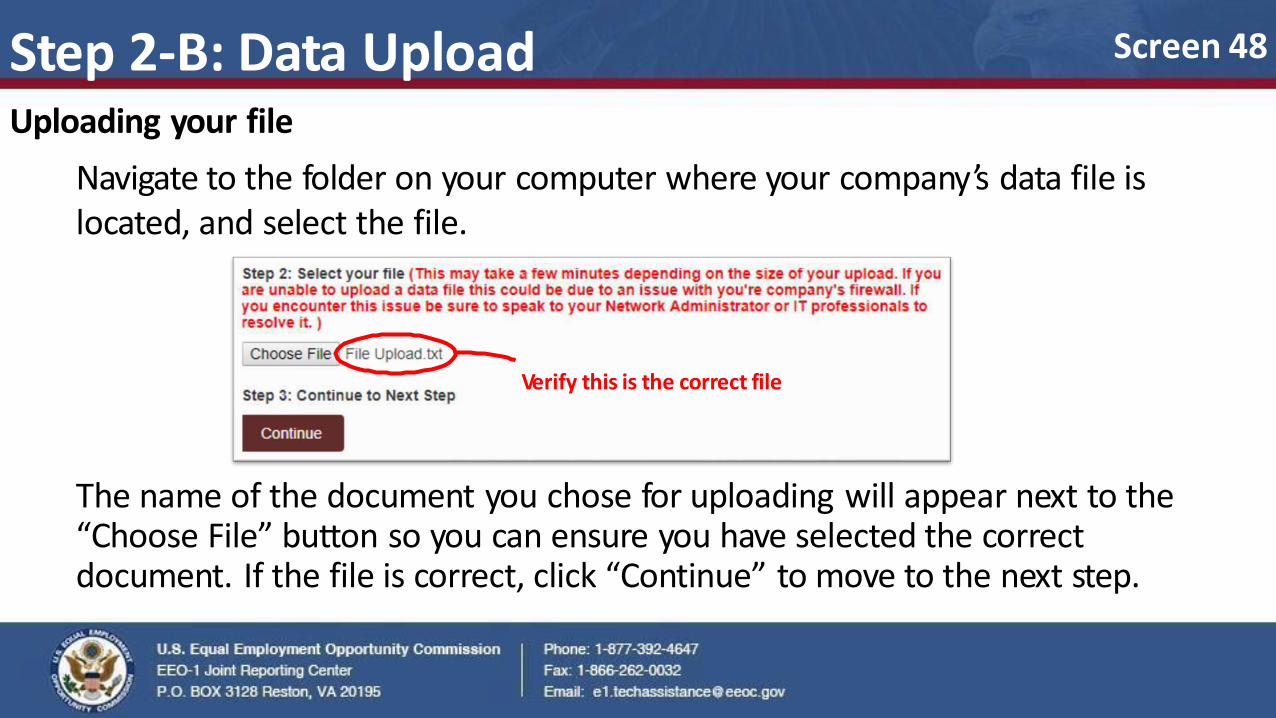
The name of the document you chose for uploading will appear next to the “Choose File” button so you can ensure you have selected the correct document. If the file is correct, click “Continue” to move to the next step.
Step 2-B: Data Upload Uploading your file
Navigate to the folder on your computer where your company’s data file is located, and select the file.
Verify this is the correct file
Screen 48
Step 3: Data Upload Errors and warnings
There are four possible results to the test.
1. There are errors and warnings in your file.
2. There are errors in your file.
3. There are warnings in your file.
4. There are no errors or warnings in your file.
These results will be accompanied by a list of errors and or warnings in the data file you chose for testing. You must correct the errors in the file before uploading. The warnings can be corrected either in the file or later in the electronic system. All records without warnings or errors are marked as “OK.”
Screen 49
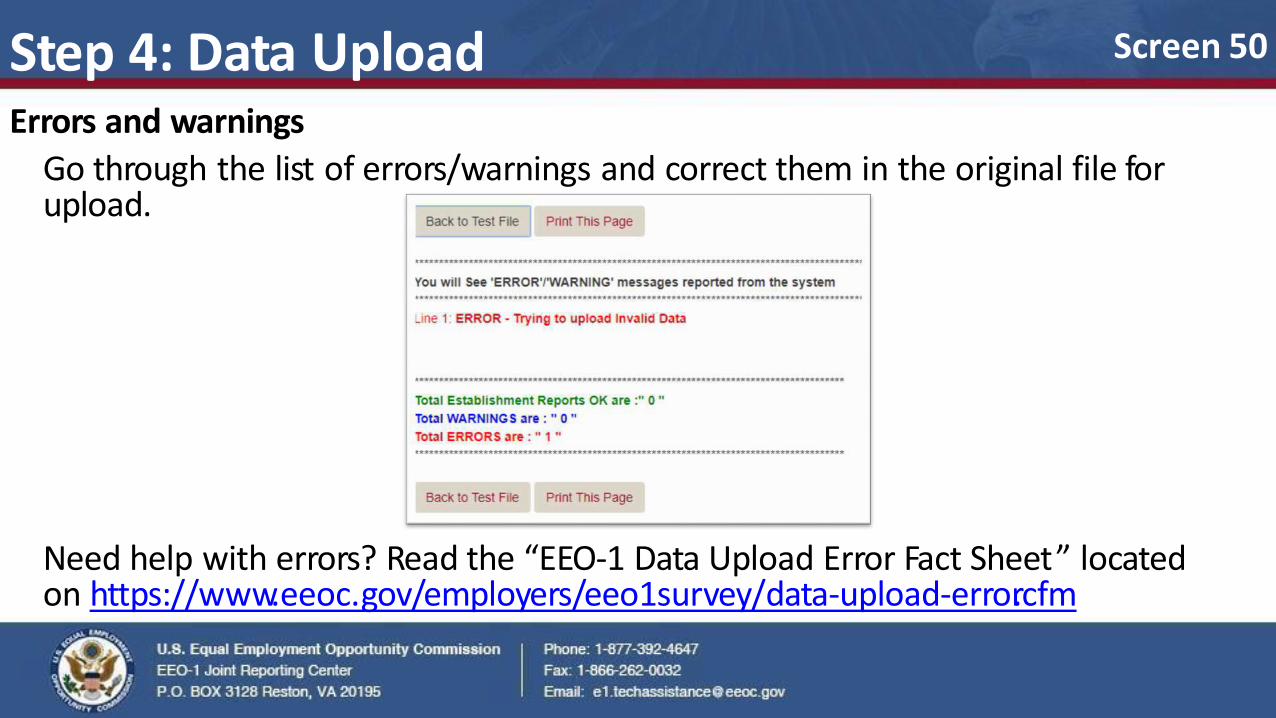
Step 4: Data Upload Errors and warnings
Go through the list of errors/warnings and correct them in the original file for upload.
Screen 50
Need help with errors? Read the “EEO-1 Data Upload Error Fact Sheet” located on https://www.eeoc.gov/employers/eeo1survey/data-upload-error.cfm
Click to print
Step 5: Data Upload Errors and warnings
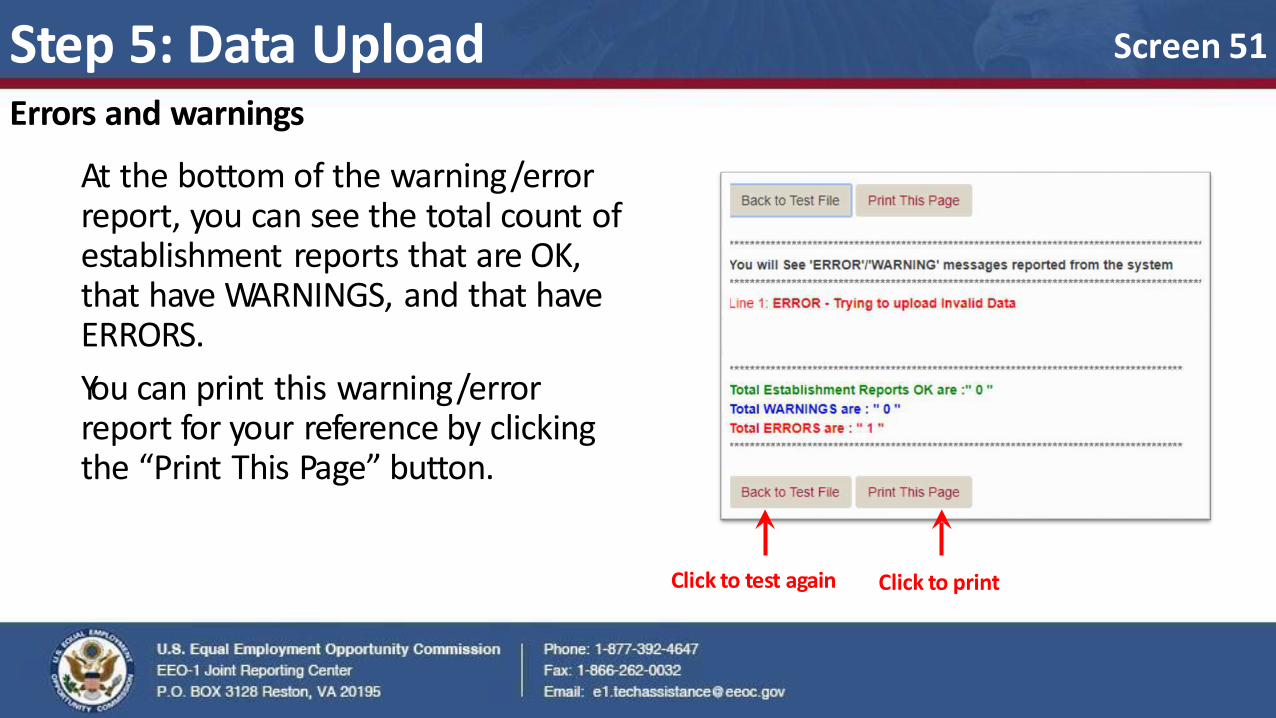
At the bottom of the warning/error report, you can see the total count of establishment reports that are OK, that have WARNINGS, and that have ERRORS.
You can print this warning/error report for your reference by clicking the “Print This Page” button.
Screen 51
Click to test again

Errors and warnings
Before uploading the file for re-test, the records with errors must be corrected or removed from the file.
Click the “Back to Test File” button to re-test the data file once you have corrected the errors in your file.
NOTE If you remove the records with errors from your file they must be entered manually using the online form’s filing method. (See Screen 61).
Screen 52 Step 6: Data Upload
Step 7: Data Upload Errors and warnings
Once you have fixed all of the ERRORS in your file and uploaded it for testing again, you might still have some WARNINGS. This will not impede your ability to upload the file. However, you will still have to fix these warnings in the online form before certifying your report.
Screen 53
Click to continue
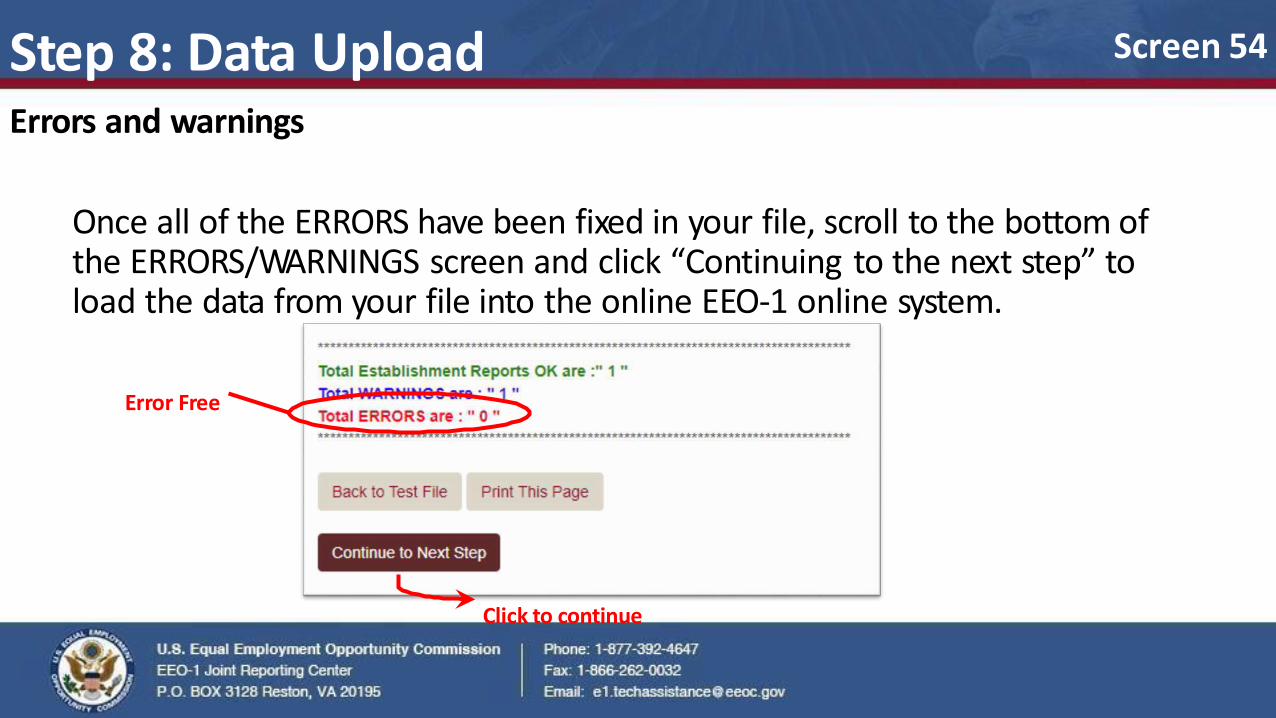
Step 8: Data Upload Errors and warnings
Once all of the ERRORS have been fixed in your file, scroll to the bottom of the ERRORS/WARNINGS screen and click “Continuing to the next step” to load the data from your file into the online EEO-1 online system.
Error Free
Screen 54
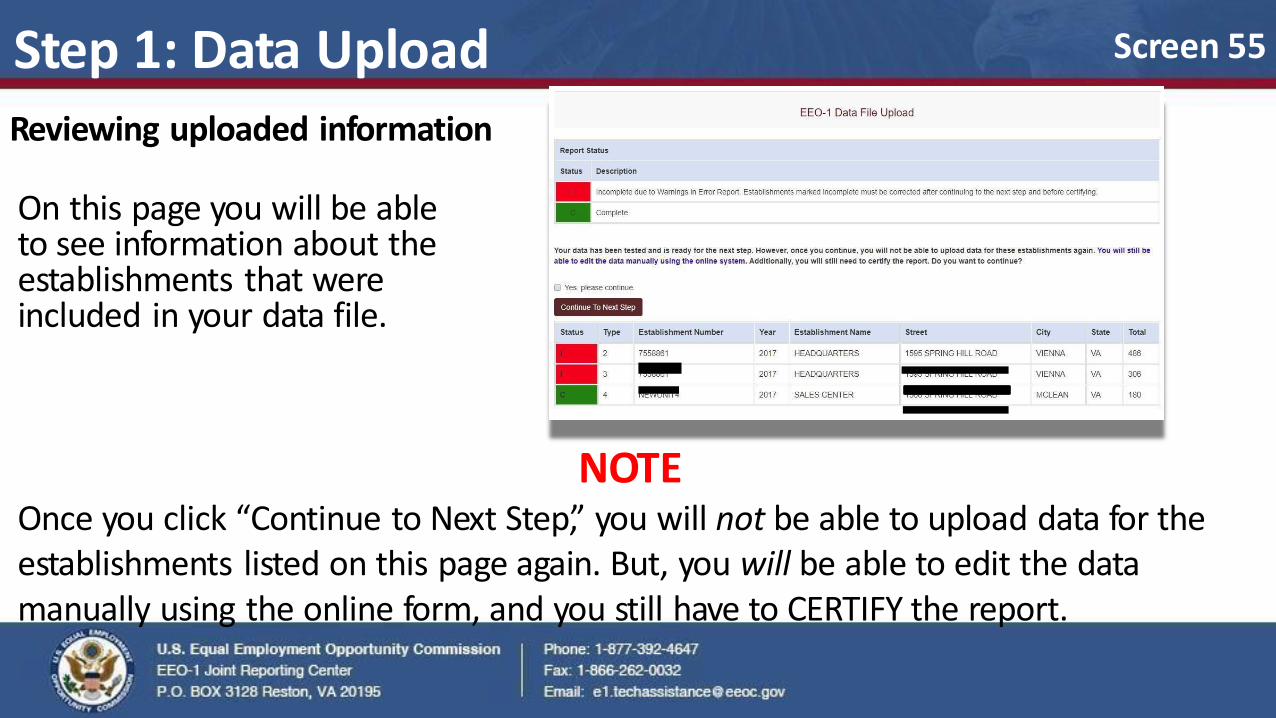
Reviewing uploaded information On this page you will be able to see information about the establishments that were included in your data file.
Screen 55
NOTE Once you click “Continue to Next Step,” you will not be able to upload data for the establishments listed on this page again. But, you will be able to edit the data manually using the online form, and you still have to CERTIFY the report.
Step 1: Data Upload
Step 2: Data Upload Reviewing uploaded information
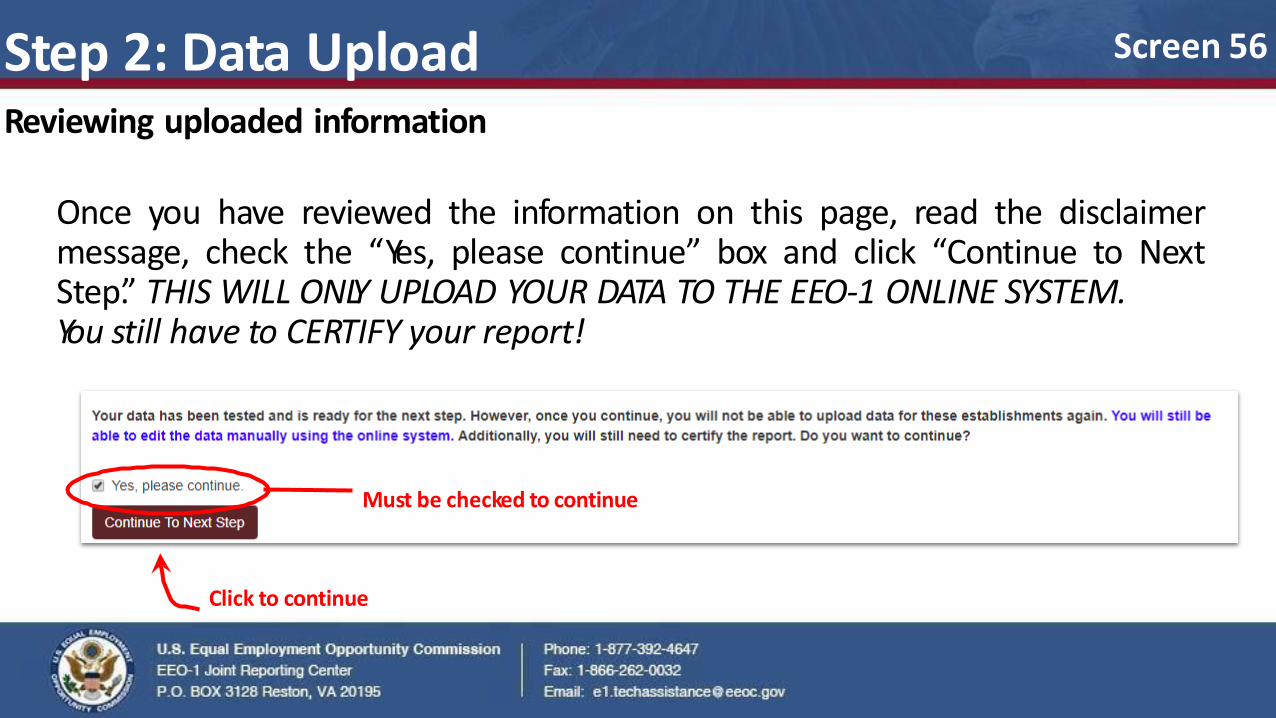
Once you have reviewed the information on this page, read the disclaimer message, check the “Yes, please continue” box and click “Continue to Next Step.” THIS WILL ONLY UPLOAD YOUR DATA TO THE EEO-1 ONLINE SYSTEM. You still have to CERTIFY your report!
Must be checked to continue
Click to continue
Screen 56
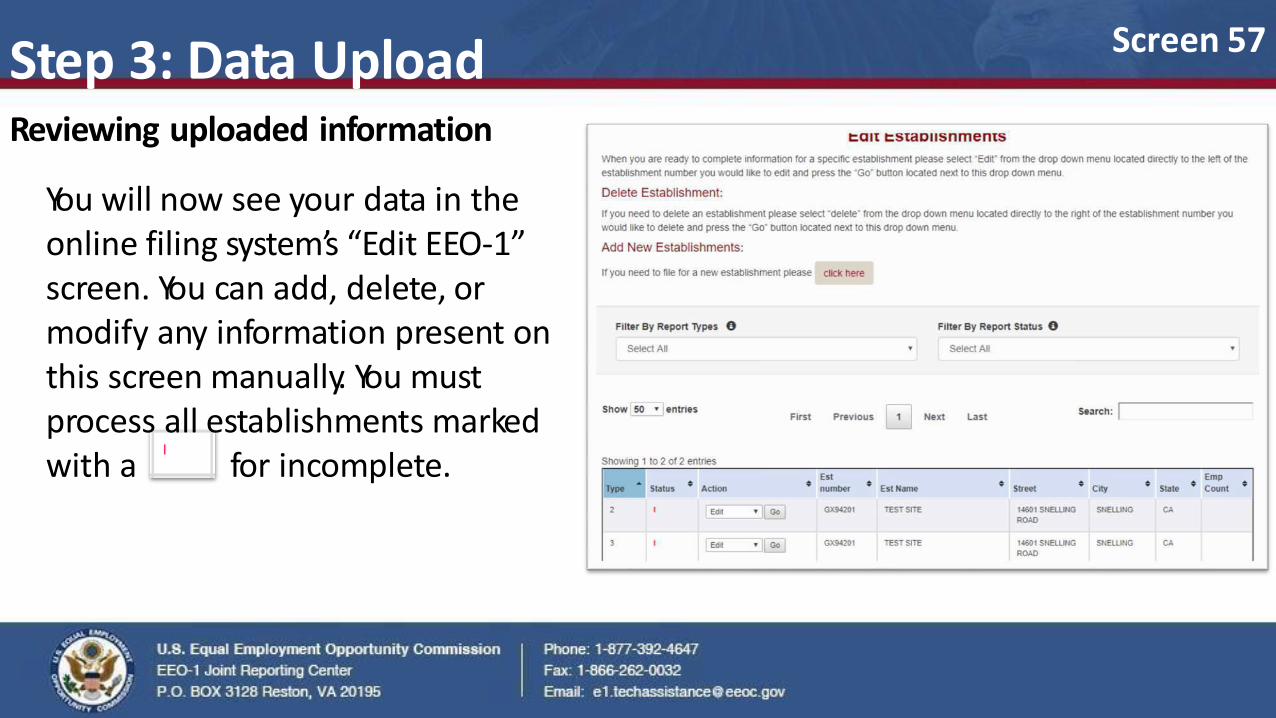
Step 3: Data Upload Reviewing uploaded information
You will now see your data in the online filing system’s “Edit EEO-1” screen. You can add, delete, or modify any information present on this screen manually. You must process all establishments marked with a for incomplete.
Screen 57
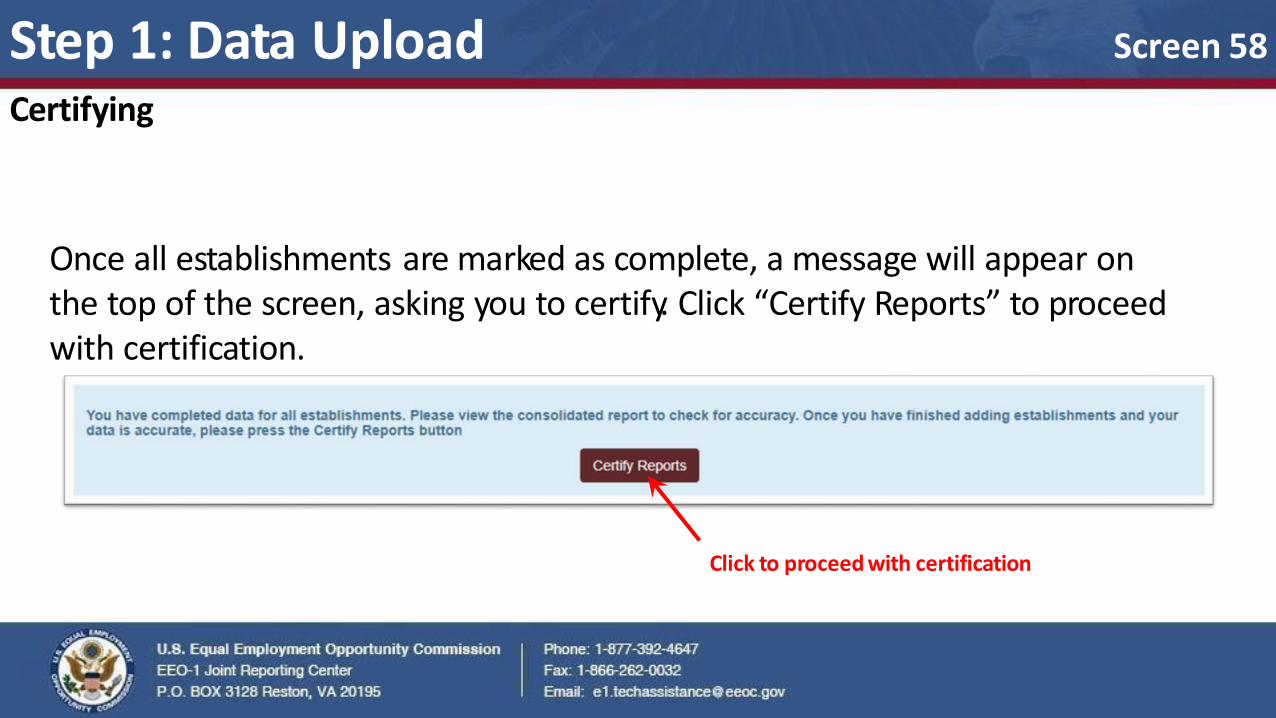
Step 1: Data Upload Certifying
Once all establishments are marked as complete, a message will appear on the top of the screen, asking you to certify. Click “Certify Reports” to proceed with certification.
Click to proceed with certification
Screen 58
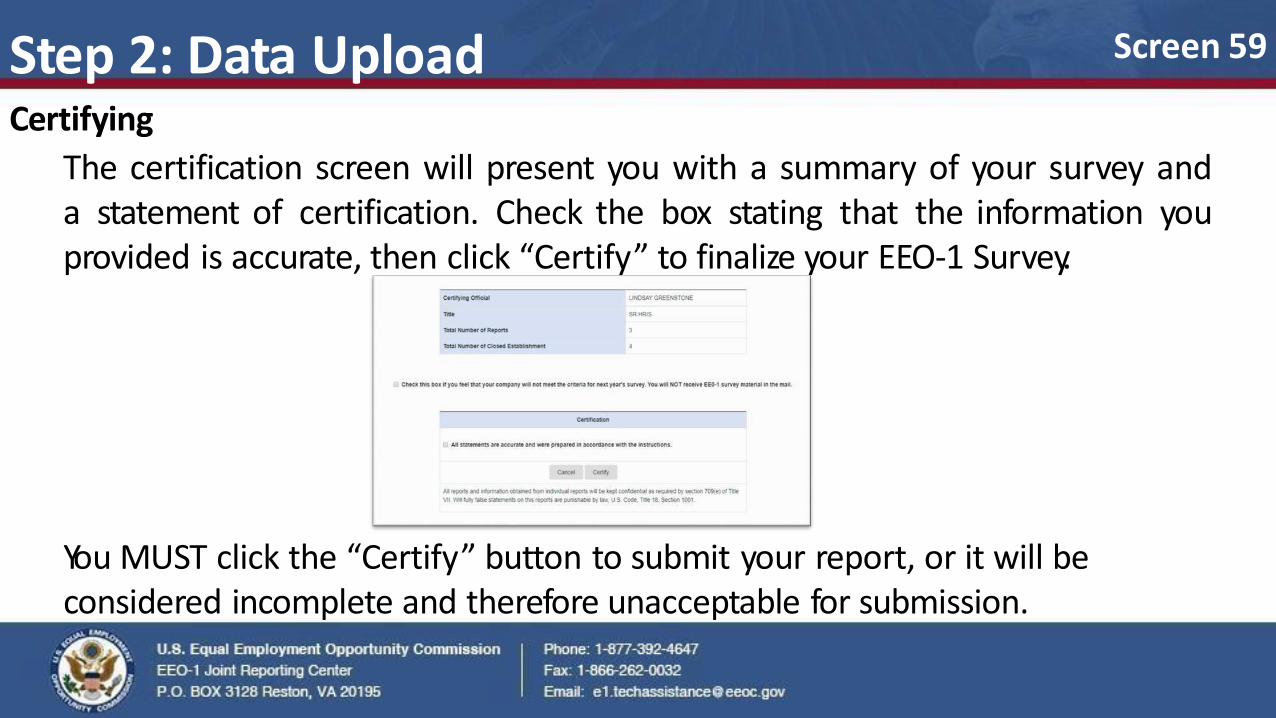
You MUST click the “Certify” button to submit your report, or it will be considered incomplete and therefore unacceptable for submission.
Step 2: Data Upload Certifying
The certification screen will present you with a summary of your survey and a statement of certification. Check the box stating that the information you provided is accurate, then click “Certify” to finalize your EEO-1 Survey.
Screen 59
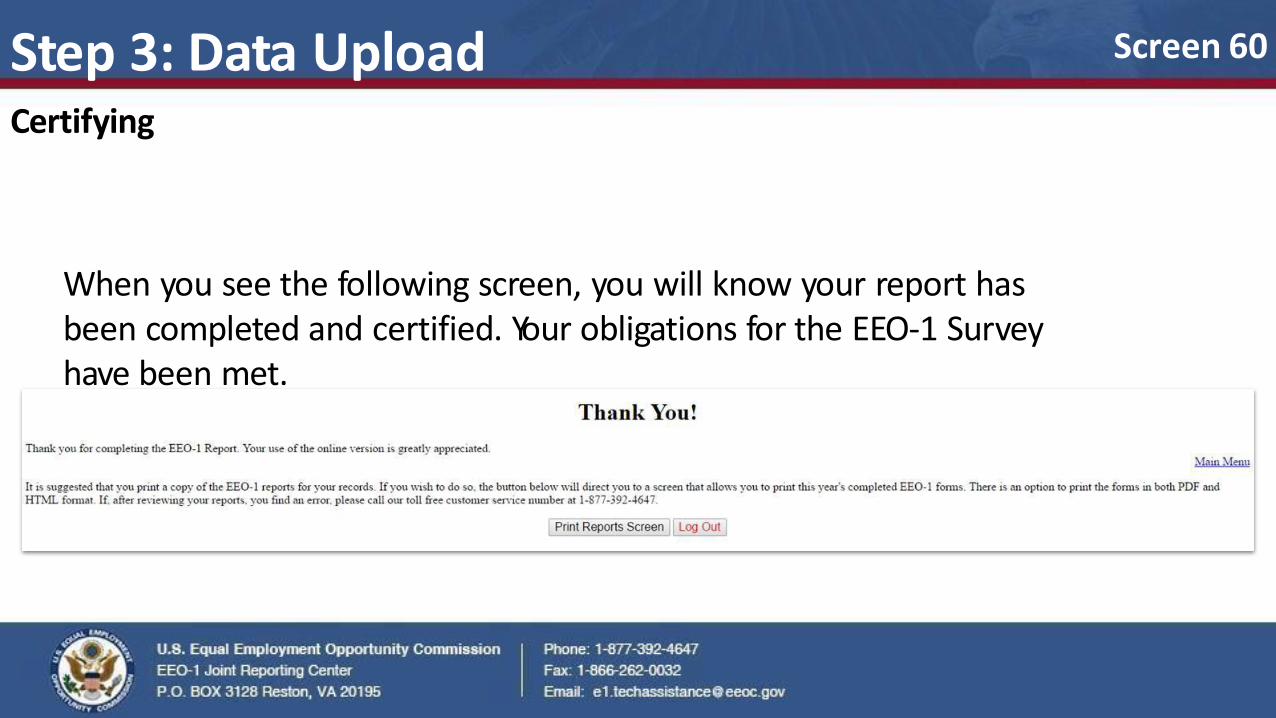
Step 3: Data Upload Certifying
When you see the following screen, you will know your report has been completed and certified. Your obligations for the EEO-1 Survey have been met.
Screen 60
Screen 61
Filing Via the “Complete Online Form Method”
Screens 61 – 106
If “Upload Data File” was selected, use instead.
Step 1: Complete Online Form
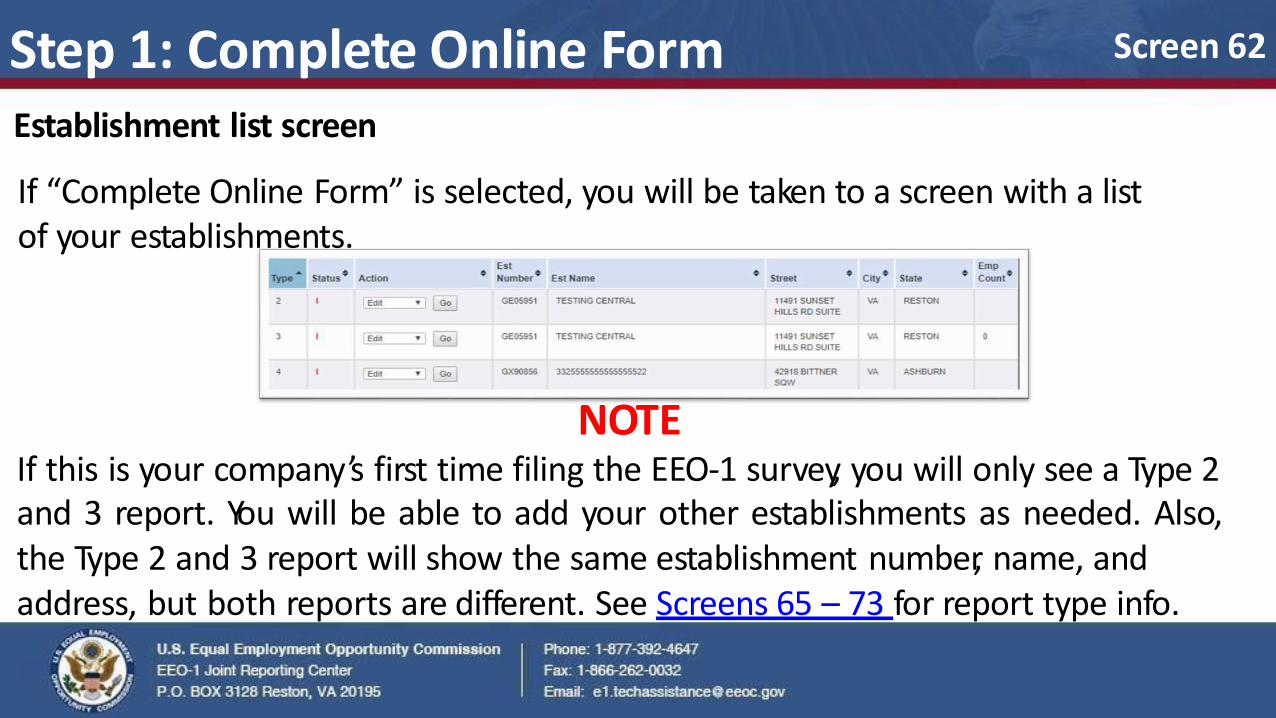
NOTE If this is your company’s first time filing the EEO-1 survey, you will only see a Type 2 and 3 report. You will be able to add your other establishments as needed. Also, the Type 2 and 3 report will show the same establishment number, name, and address, but both reports are different. See Screens 65 – 73 for report type info.
Establishment list screen
If “Complete Online Form” is selected, you will be taken to a screen with a list of your establishments.
Screen 62
Step 1-A: Complete Online Form Establishment list screen
If your company is a single-establishment (i.e. only has one establishment/location), you will see only one report listed as a Type 1 report. You are only required to fill out this one report.
You will not see a listing of establishments; instead, the system will guide you through filing for your sole establishment.
Screen 63

Step 1-B: Complete Online Form Establishment list screen
If your company is a multi-establishment (i.e. has more than one establishment/location), you must fill out a report for each of your establishments. To add a new establishment, refer to Screens 87 – 92.
Screen 64
Step 1: Complete Online Form List of report types
Type 1 – Single-establishment report; used only for companies that have one establishment/location.
Screen 65
Step 1-A: Complete Online Form List of report types
Type 2 – Consolidated report; contains the total employee breakdown for all of your establishments combined.
Screen 66
Step 1-B: Complete Online Form List of report types
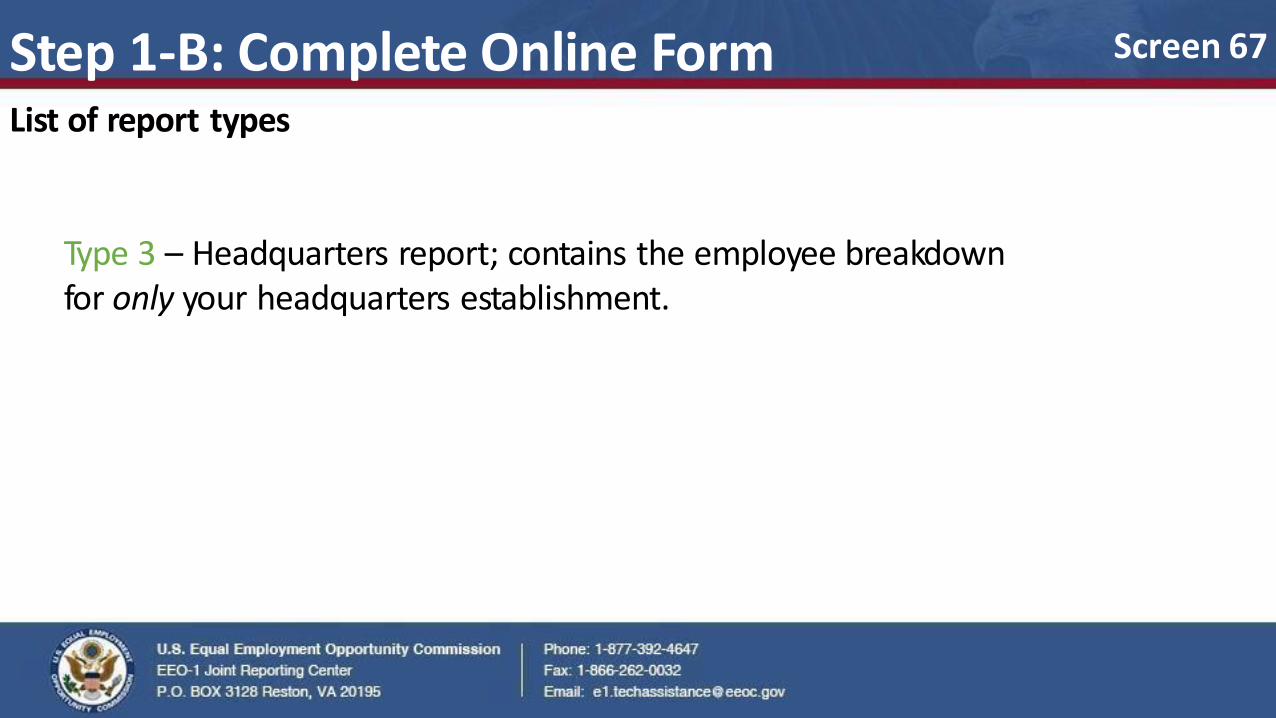
Type 3 – Headquarters report; contains the employee breakdown for only your headquarters establishment.
Screen 67
Step 1-C: Complete Online Form List of report types
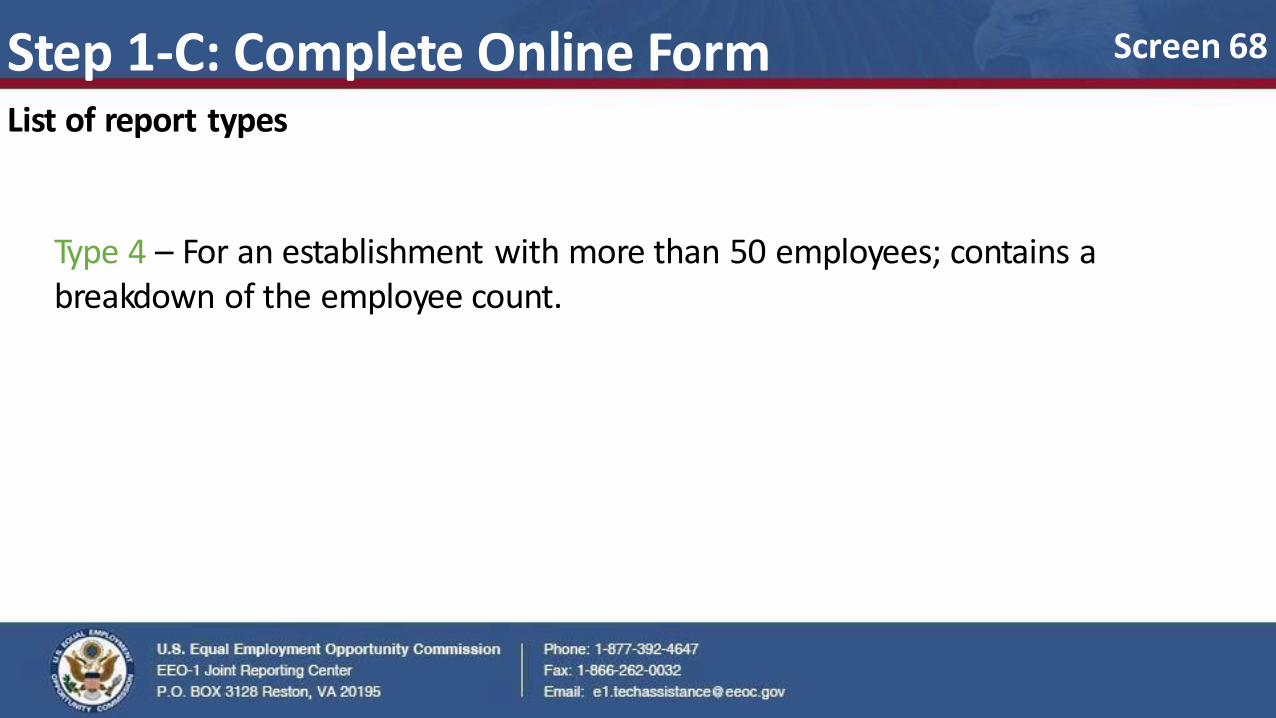
Type 4 – For an establishment with more than 50 employees; contains a breakdown of the employee count.
Screen 68
Step 1-D: Complete Online Form List of report types
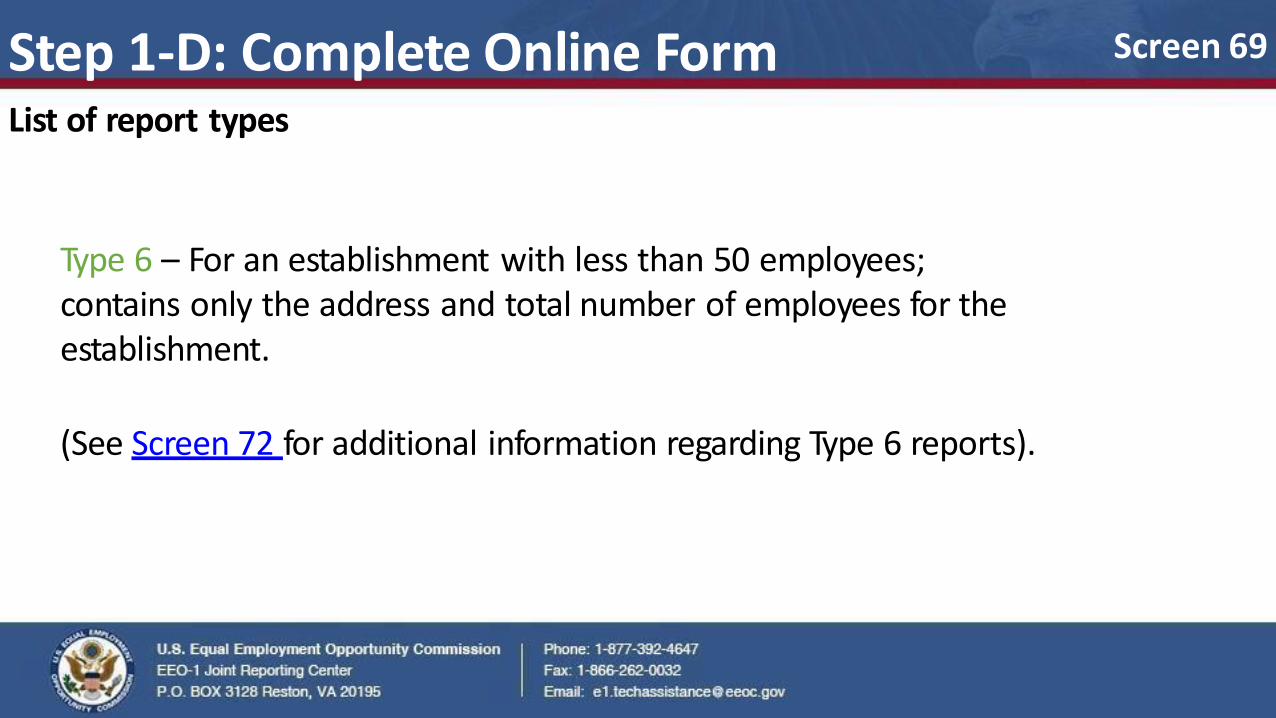
Type 6 – For an establishment with less than 50 employees; contains only the address and total number of employees for the establishment.
(See Screen 72 for additional information regarding Type 6 reports).
Screen 69
Step 1-E: Complete Online Form List of report types
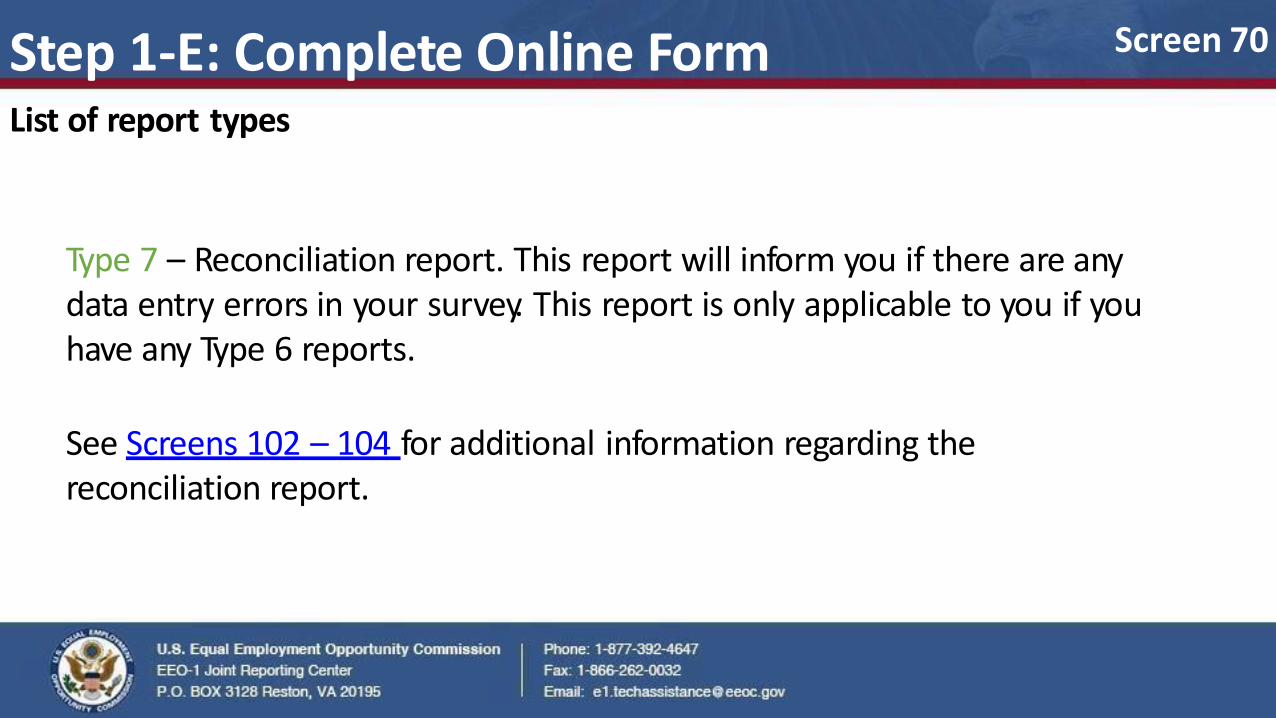
Type 7 – Reconciliation report. This report will inform you if there are any data entry errors in your survey. This report is only applicable to you if you have any Type 6 reports.
See Screens 102 – 104 for additional information regarding the reconciliation report.
Screen 70
Step 1-F: Complete Online Form List of report types
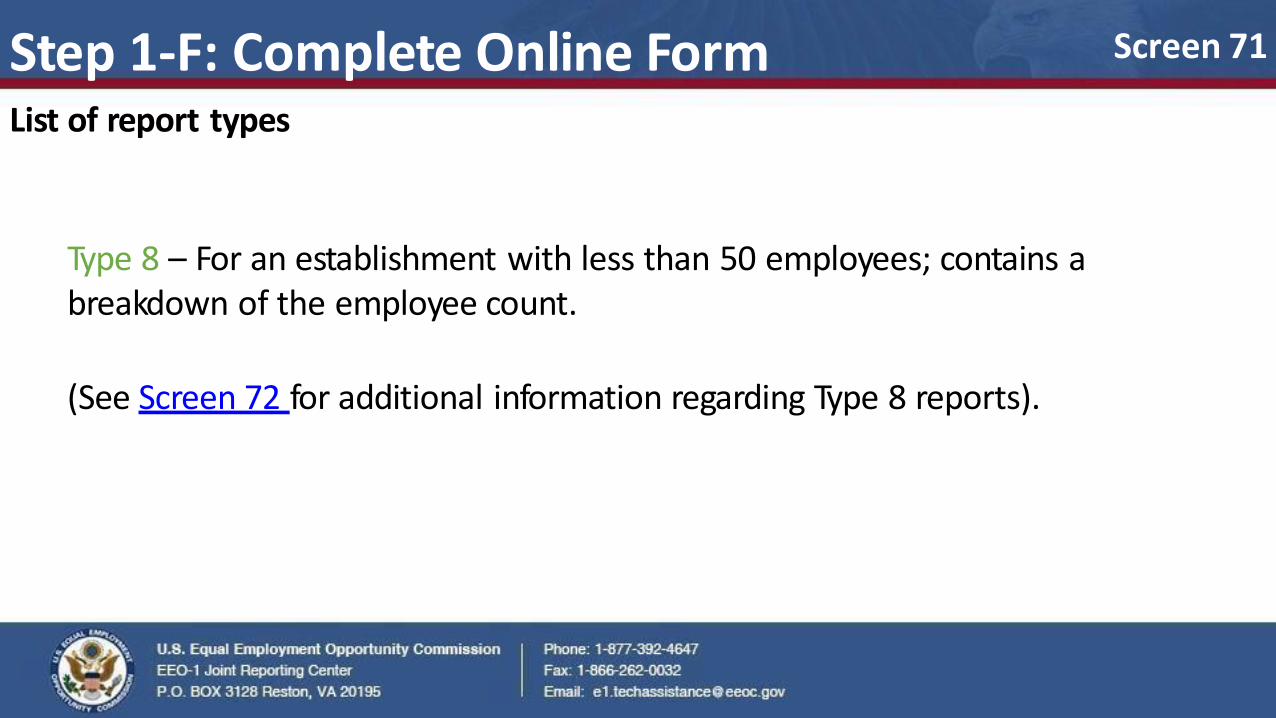
Type 8 – For an establishment with less than 50 employees; contains a breakdown of the employee count.
(See Screen 72 for additional information regarding Type 8 reports).
Screen 71
List of report types
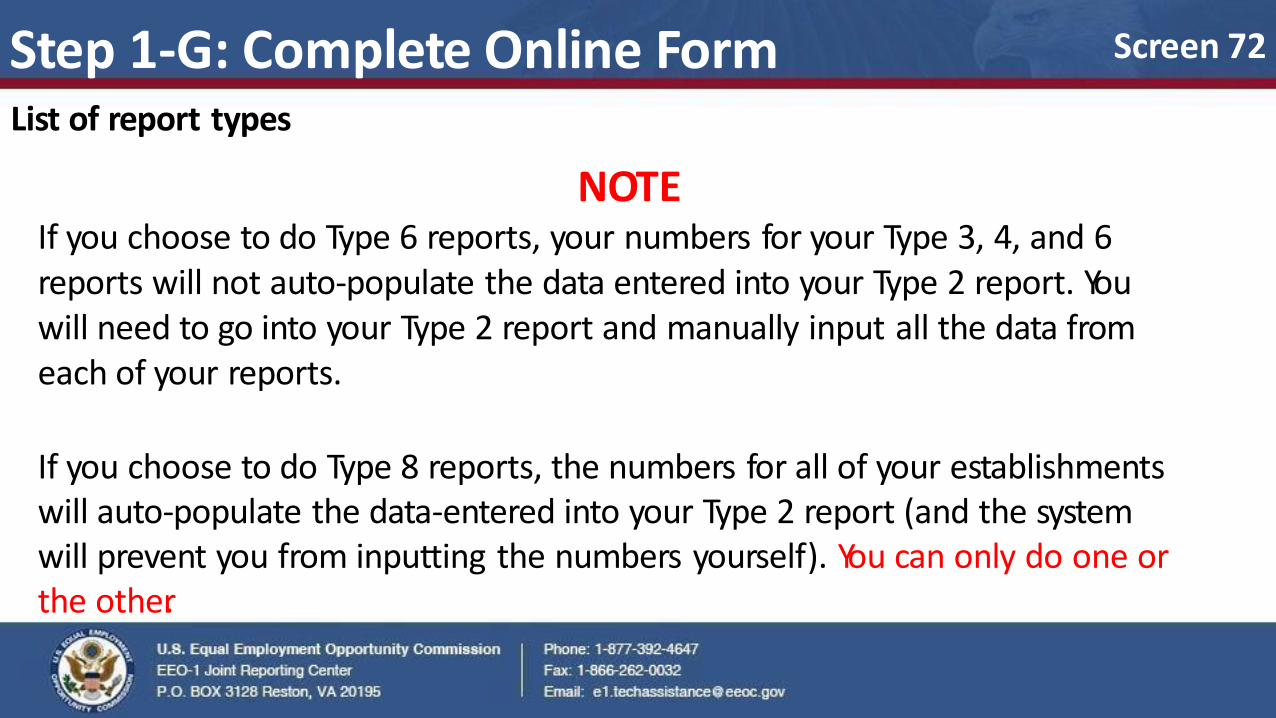
NOTE If you choose to do Type 6 reports, your numbers for your Type 3, 4, and 6 reports will not auto-populate the data entered into your Type 2 report. You will need to go into your Type 2 report and manually input all the data from each of your reports.
If you choose to do Type 8 reports, the numbers for all of your establishments will auto-populate the data-entered into your Type 2 report (and the system will prevent you from inputting the numbers yourself). You can only do one or the other.
Screen 72 Step 1-G: Complete Online Form
Step 1-H: Complete Online Form List of report types
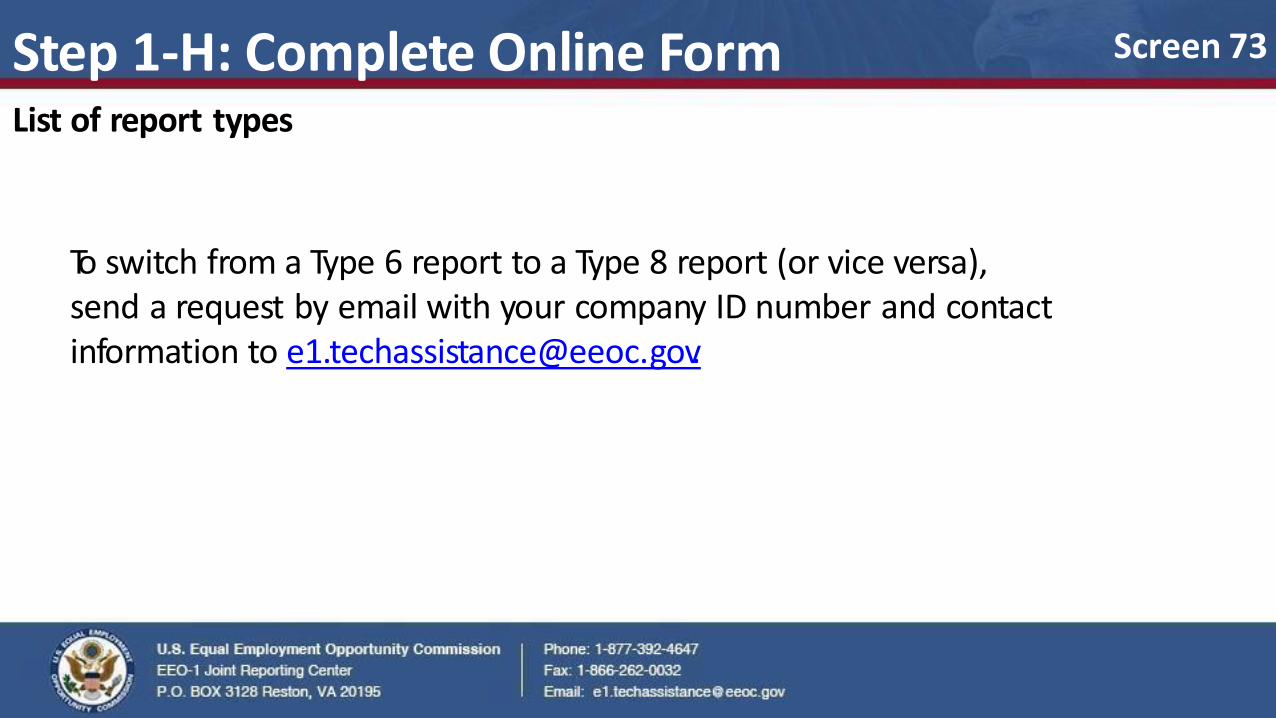
To switch from a Type 6 report to a Type 8 report (or vice versa), send a request by email with your company ID number and contact information to [email protected].
Screen 73
Step 1: Complete Online Form Inputting your data
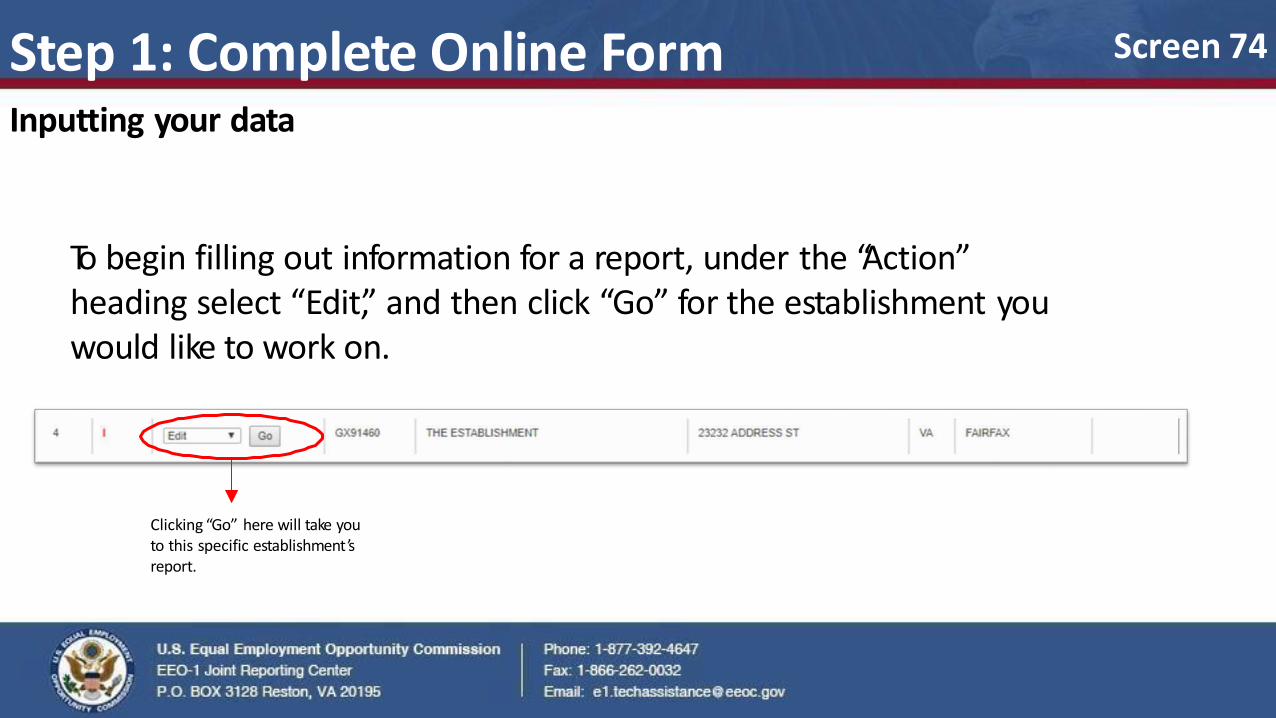
To begin filling out information for a report, under the “Action” heading select “Edit,” and then click “Go” for the establishment you would like to work on.
Screen 74
Clicking “Go” here will take you to this specific establishment ’s report.
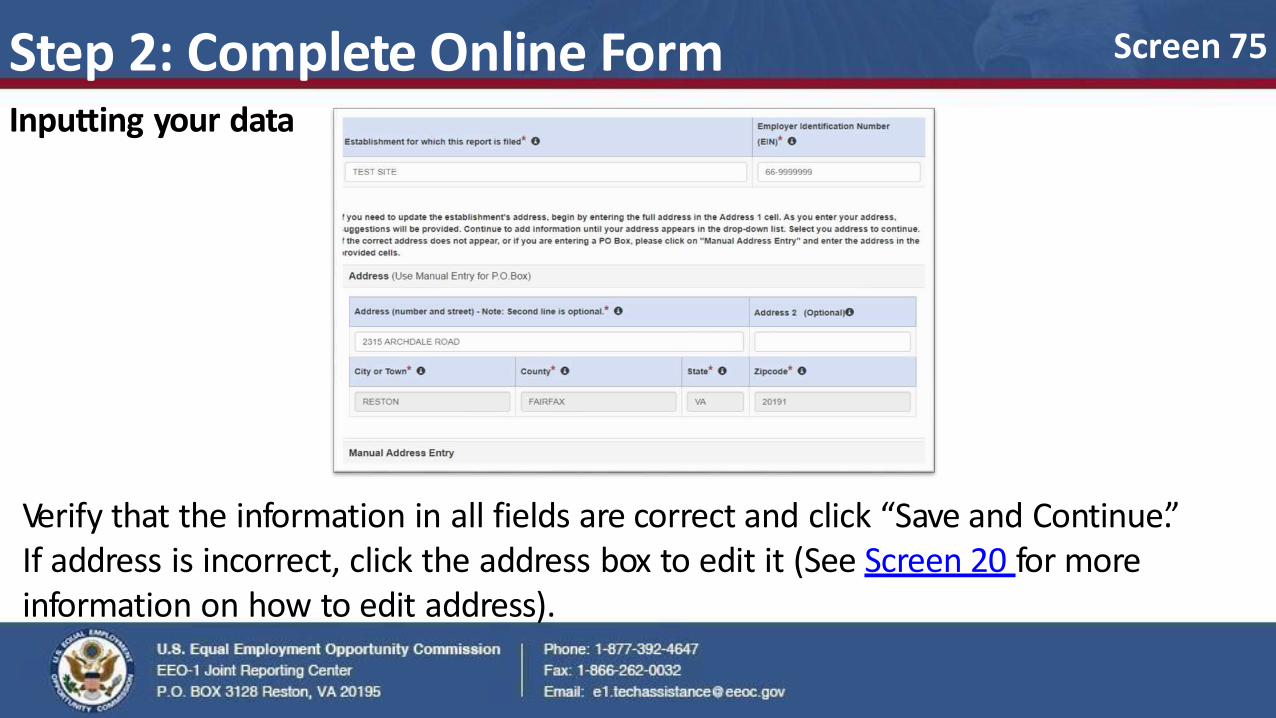
Verify that the information in all fields are correct and click “Save and Continue.” If address is incorrect, click the address box to edit it (See Screen 20 for more information on how to edit address).
Screen 75 Step 2: Complete Online Form Inputting your data
Step 3: Complete Online Form Inputting your data
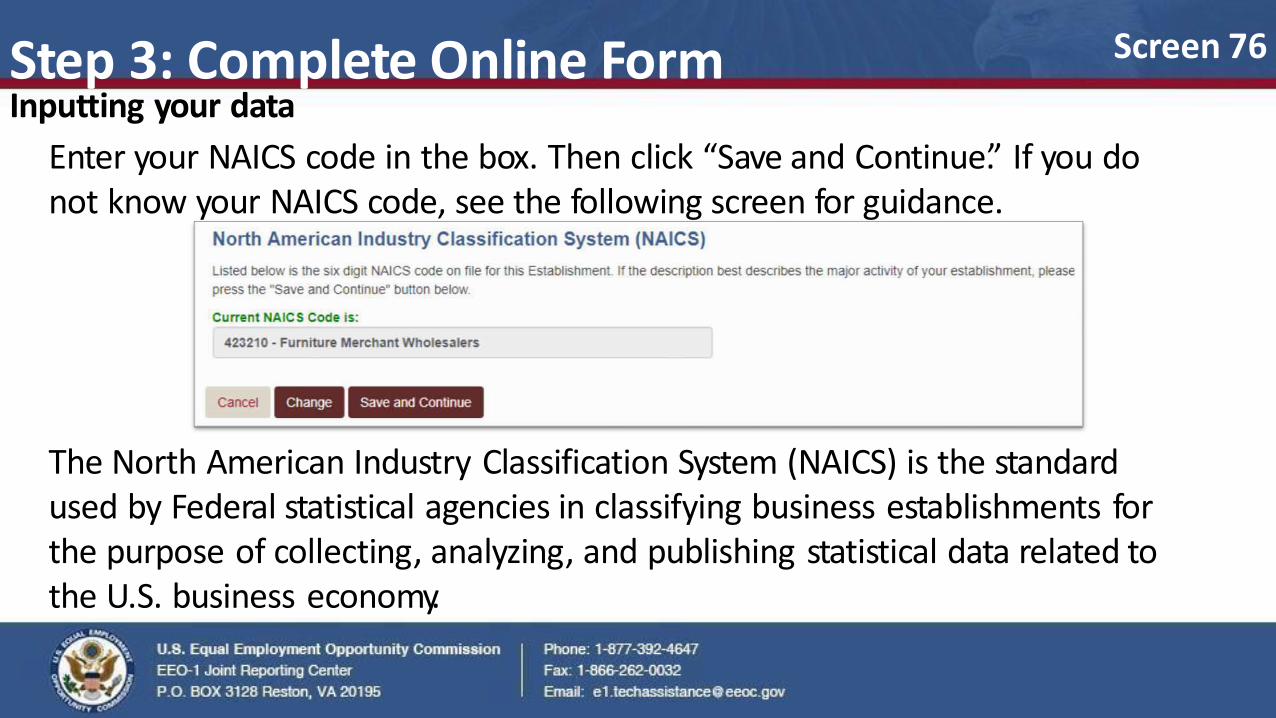
Enter your NAICS code in the box. Then click “Save and Continue.” If you do not know your NAICS code, see the following screen for guidance.
Screen 76
The North American Industry Classification System (NAICS) is the standard used by Federal statistical agencies in classifying business establishments for the purpose of collecting, analyzing, and publishing statistical data related to the U.S. business economy.

Step 3-A: Complete Online Form Inputting your data
You can search for your NAICS code by typing key words or numbers, and then selecting the option from the drop-down menu that best describes your establishment ’s industry.
Screen 77
Inputting your data
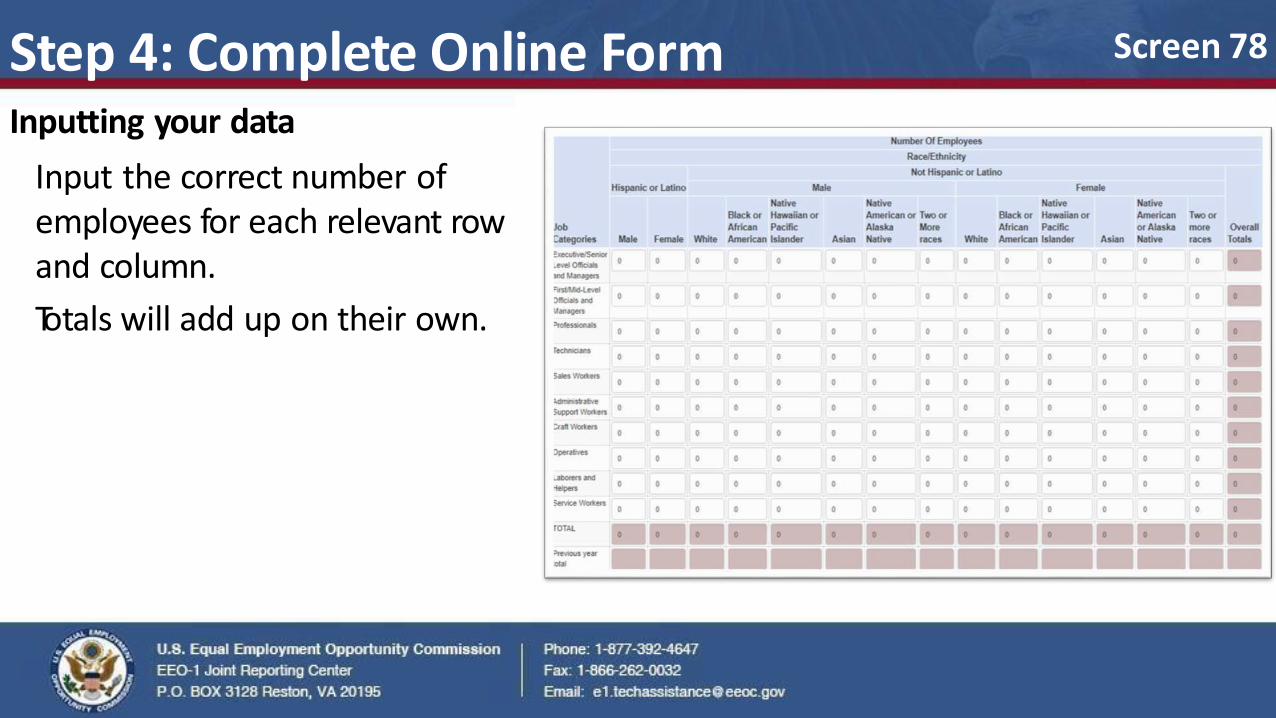
Input the correct number of employees for each relevant row and column.
Totals will add up on their own.
Screen 78 Step 4: Complete Online Form
Step 4-A: Complete Online Form Inputting your data
If a category has no employees, you may leave the box blank or put a “0”.
Screen 79
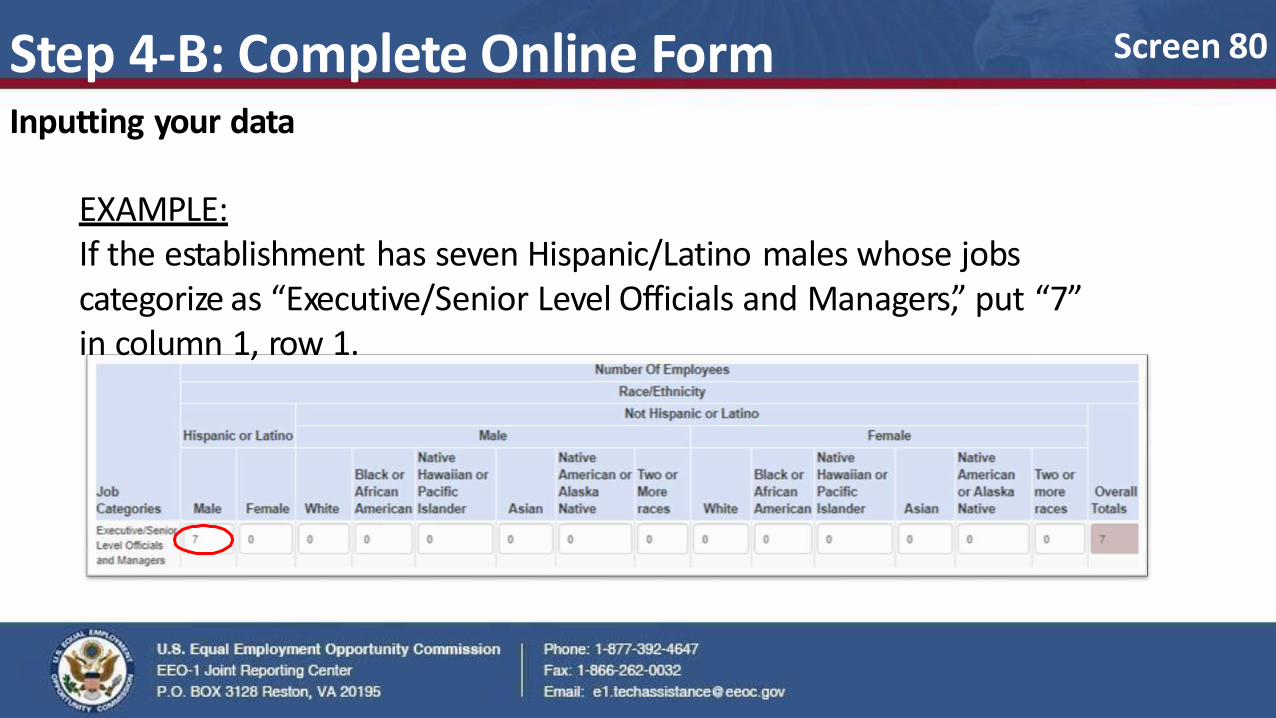
Step 4-B: Complete Online Form Inputting your data
EXAMPLE: If the establishment has seven Hispanic/Latino males whose jobs categorize as “Executive/Senior Level Officials and Managers,” put “7” in column 1, row 1.
Screen 80
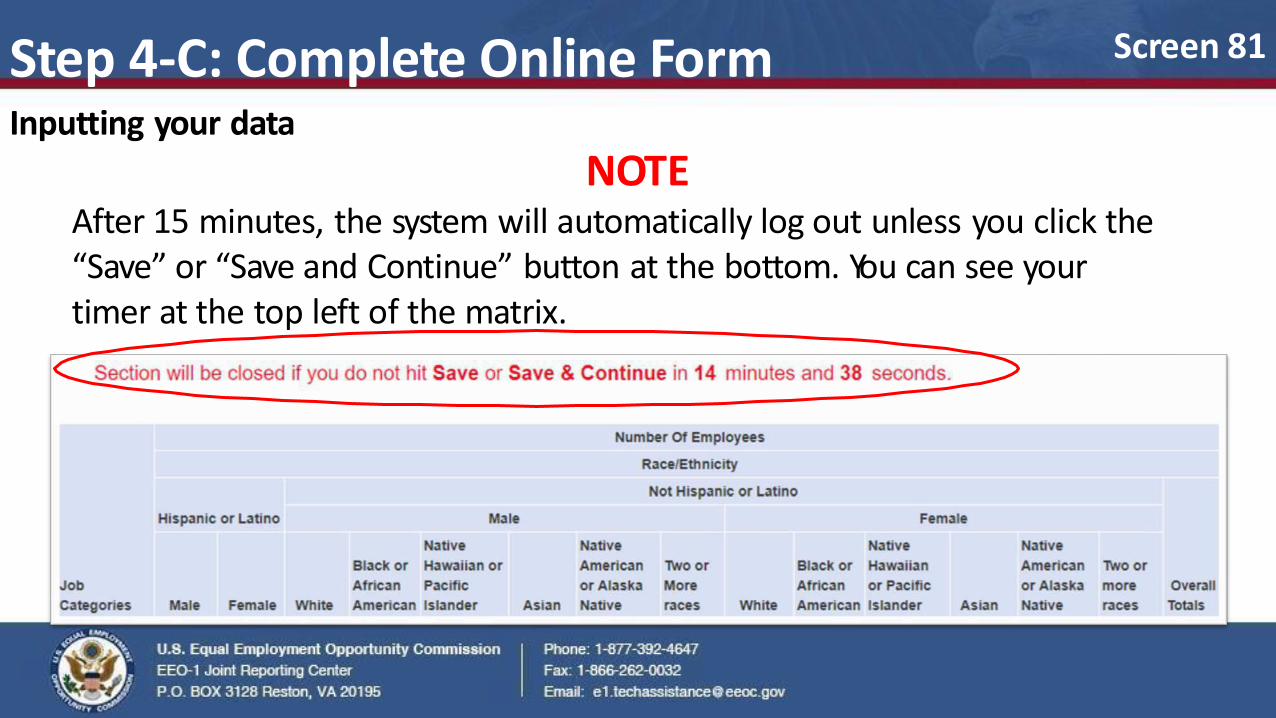
Inputting your data
NOTE After 15 minutes, the system will automatically log out unless you click the “Save” or “Save and Continue” button at the bottom. You can see your timer at the top left of the matrix.
Screen 81 Step 4-C: Complete Online Form
Step 4-D: Complete Online Form Inputting your data
Clicking “Save” will save your work and restart the timer at the top of the page.
Clicking “Save & Continue” will save your work and take you to the next step.
Clicking “Cancel” will take you back to the screen containing your list of establishments without saving your progress.
Screen 82
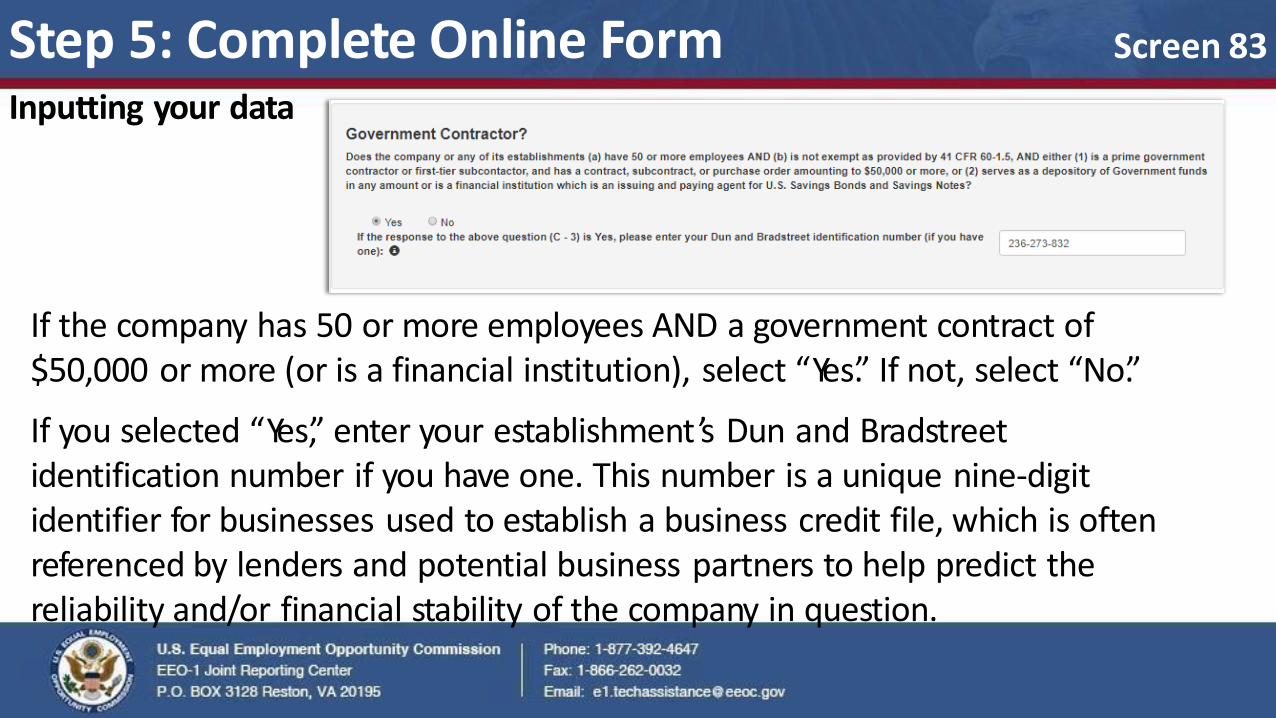
If the company has 50 or more employees AND a government contract of $50,000 or more (or is a financial institution), select “Yes.” If not, select “No.”
If you selected “Yes,” enter your establishment ’s Dun and Bradstreet identification number if you have one. This number is a unique nine-digit identifier for businesses used to establish a business credit file, which is often referenced by lenders and potential business partners to help predict the reliability and/or financial stability of the company in question.
Screen 83 Step 5: Complete Online Form Inputting your data
Inputting your data
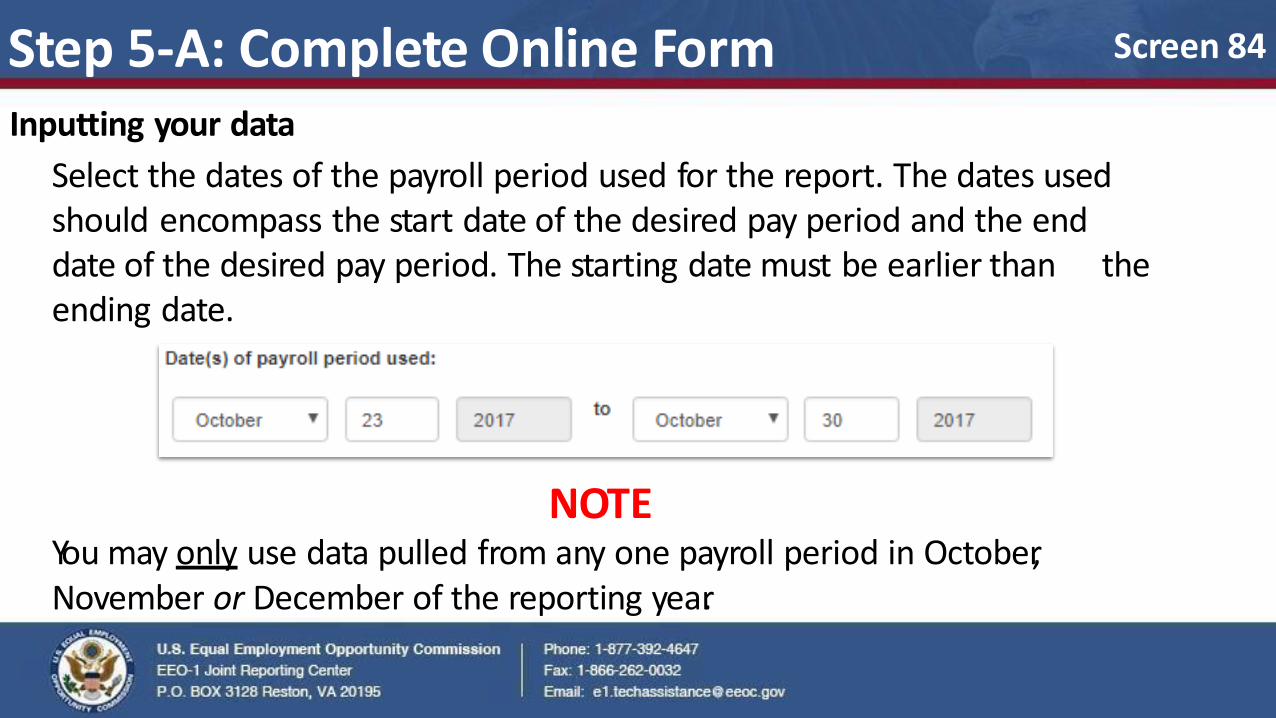
Select the dates of the payroll period used for the report. The dates used should encompass the start date of the desired pay period and the end date of the desired pay period. The starting date must be earlier than the ending date.
NOTE You may only use data pulled from any one payroll period in October, November or December of the reporting year.
Screen 84 Step 5-A: Complete Online Form
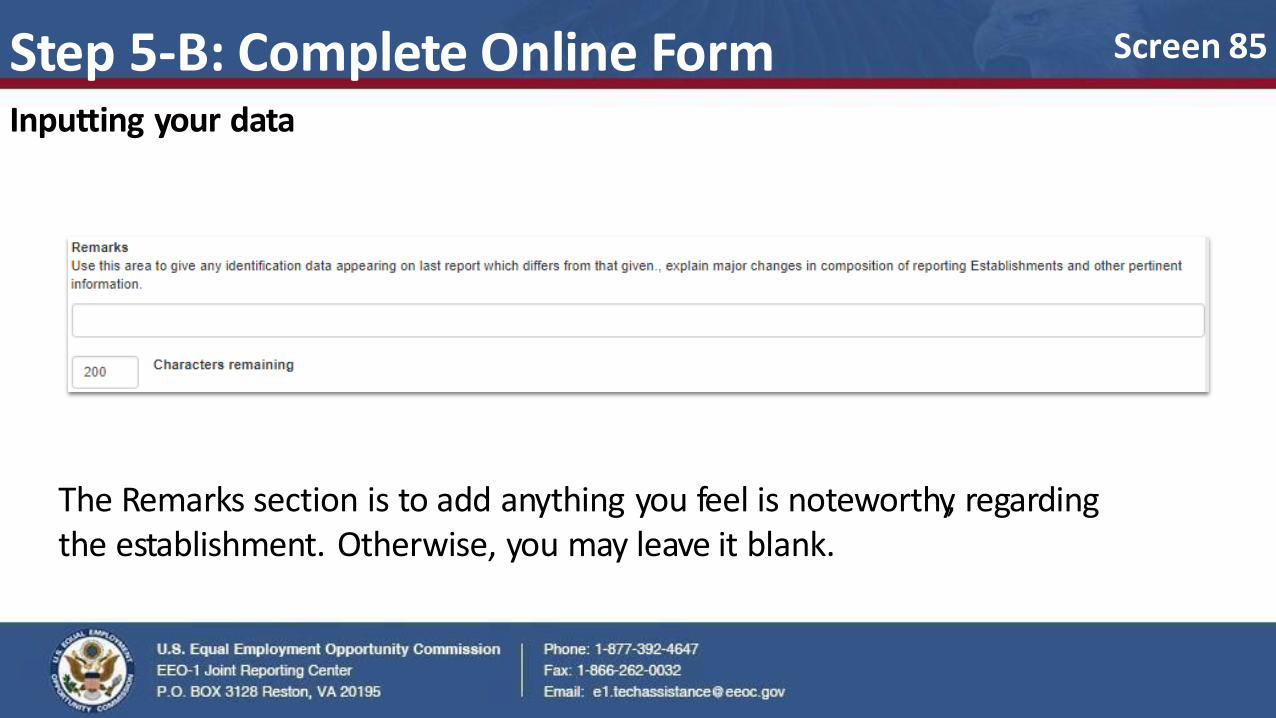
The Remarks section is to add anything you feel is noteworthy, regarding the establishment. Otherwise, you may leave it blank.
Screen 85 Step 5-B: Complete Online Form Inputting your data
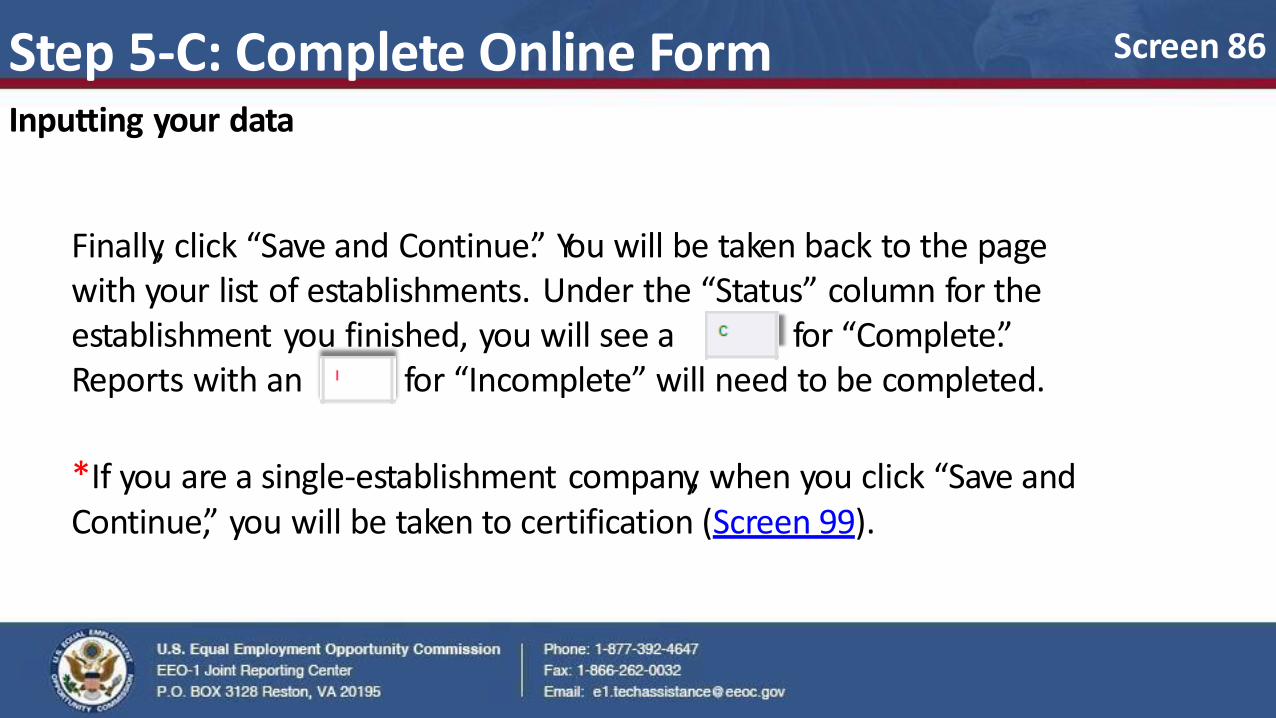
Finally, click “Save and Continue.” You will be taken back to the page with your list of establishments. Under the “Status” column for the establishment you finished, you will see a for “Complete.” Reports with an for “Incomplete” will need to be completed.
*If you are a single-establishment company, when you click “Save and Continue,” you will be taken to certification (Screen 99).
Screen 86 Step 5-C: Complete Online Form Inputting your data
If your company has new establishments/locations, you must file for those establishments as well.
Screen 87
NOTE If the establishment was obtained by an acquisition or merger, you must follow a different process. See Screens 118 – 123 for instructions regarding an acquisition or merger.
Step 1: Complete Online Form Adding a new establishment

Step 1-A: Complete Online Form Adding a new establishment
There are two ways you can add a new establishment:
The first is from the main menu screen right after you log in. Select the “Add Establishments” button.
Screen 88
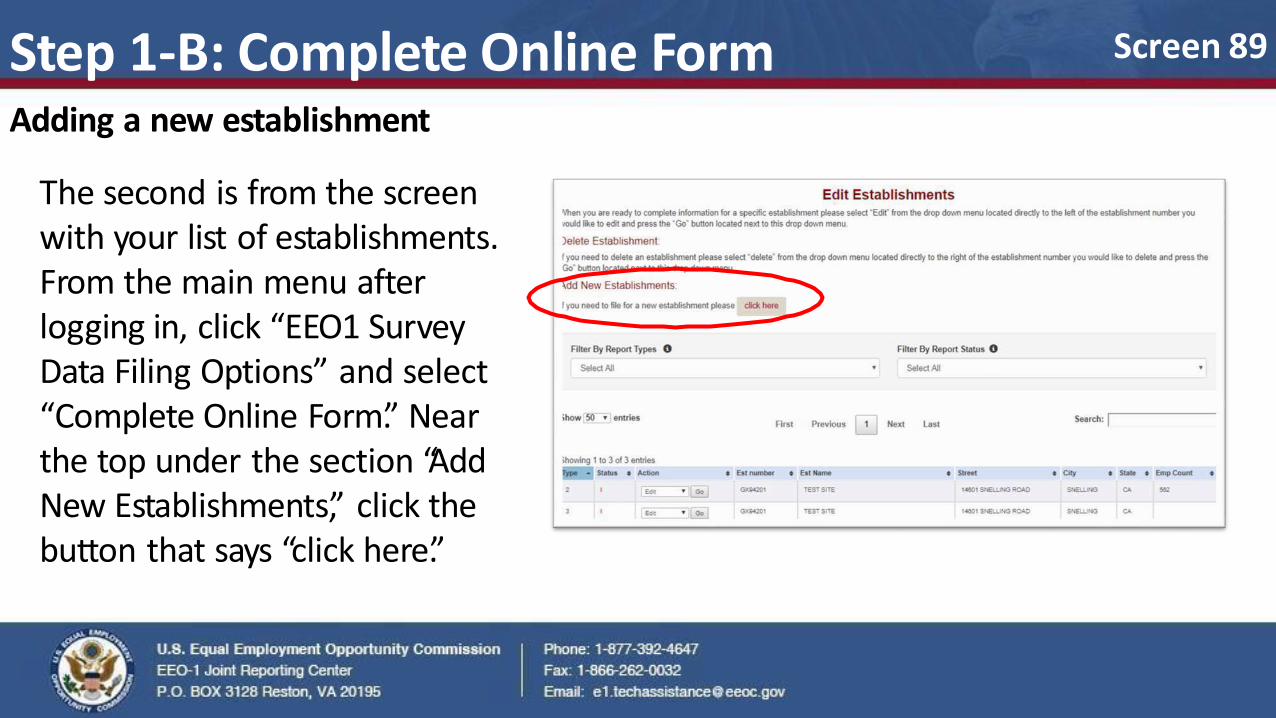
Step 1-B: Complete Online Form Adding a new establishment
The second is from the screen with your list of establishments. From the main menu after logging in, click “EEO1 Survey Data Filing Options” and select “Complete Online Form.” Near the top under the section “Add New Establishments,” click the button that says “click here.”
Screen 89
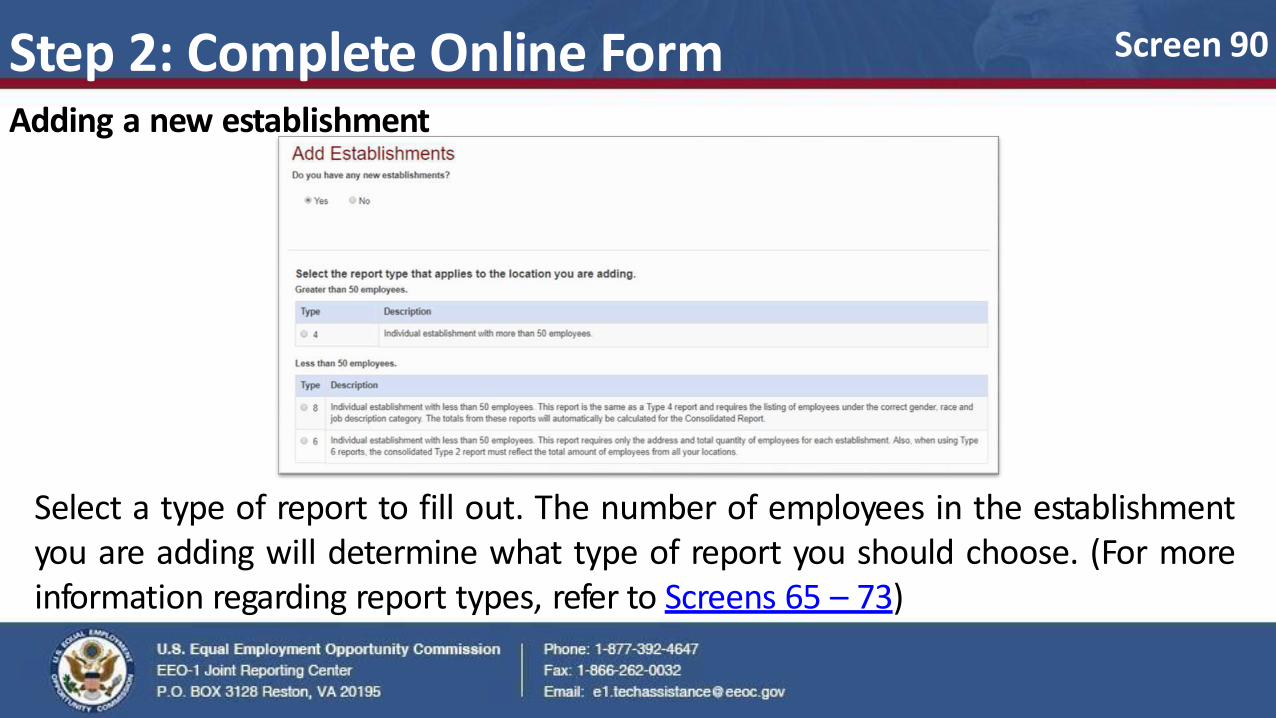
Select a type of report to fill out. The number of employees in the establishment you are adding will determine what type of report you should choose. (For more information regarding report types, refer to Screens 65 – 73)
Screen 90 Step 2: Complete Online Form Adding a new establishment
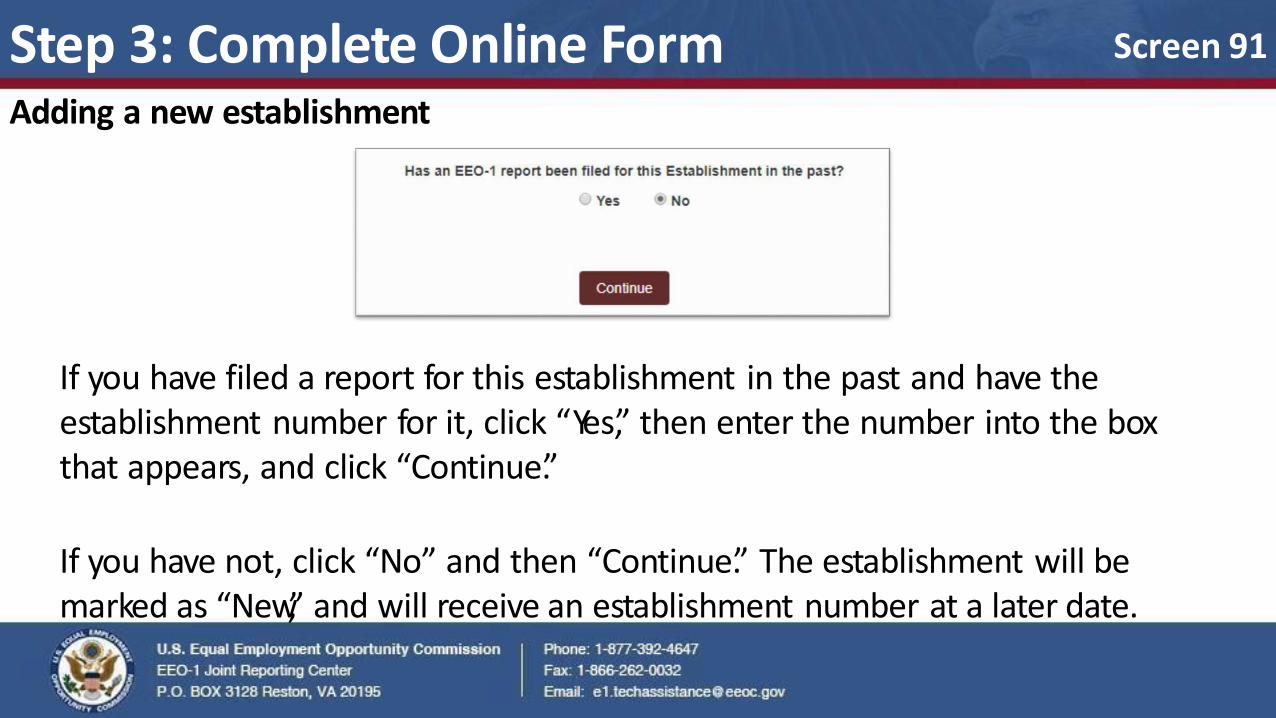
If you have filed a report for this establishment in the past and have the establishment number for it, click “Yes,” then enter the number into the box that appears, and click “Continue.”
If you have not, click “No” and then “Continue.” The establishment will be marked as “New,” and will receive an establishment number at a later date.
Screen 91 Step 3: Complete Online Form Adding a new establishment
Step 4: Complete Online Form Adding a new establishment
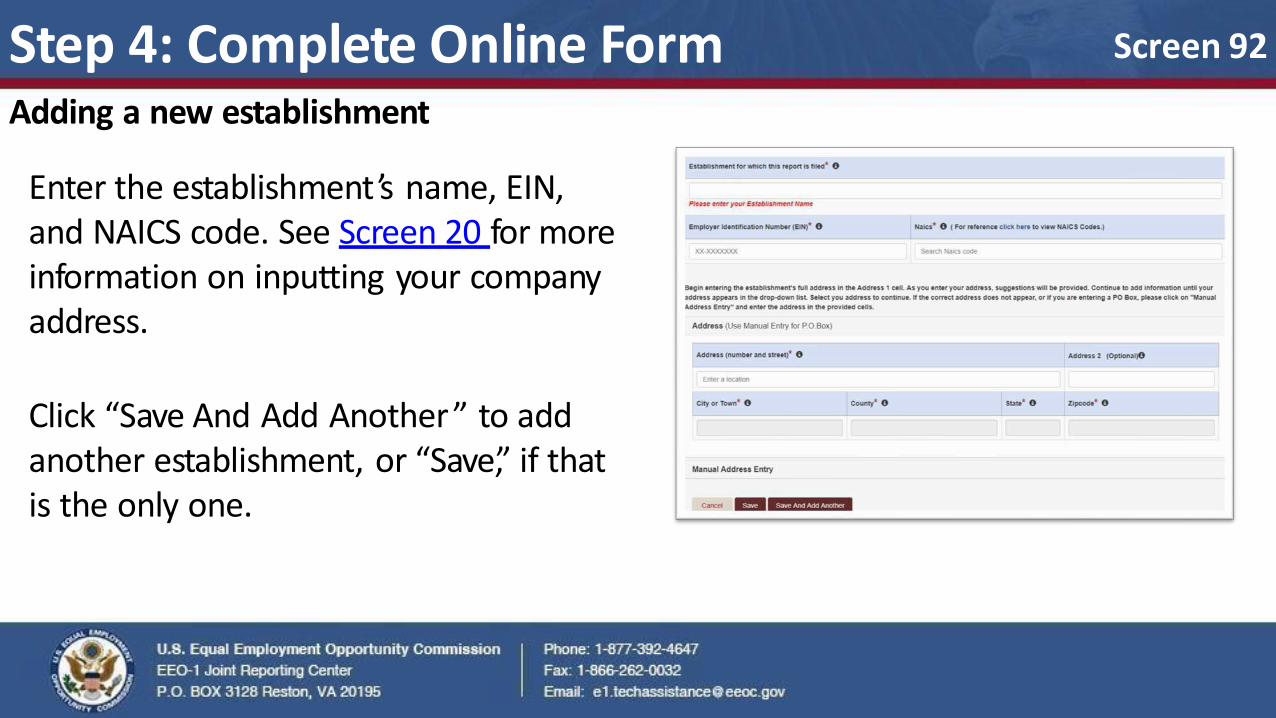
Enter the establishment ’s name, EIN, and NAICS code. See Screen 20 for more information on inputting your company address.
Click “Save And Add Another” to add another establishment, or “Save,” if that is the only one.
Screen 92
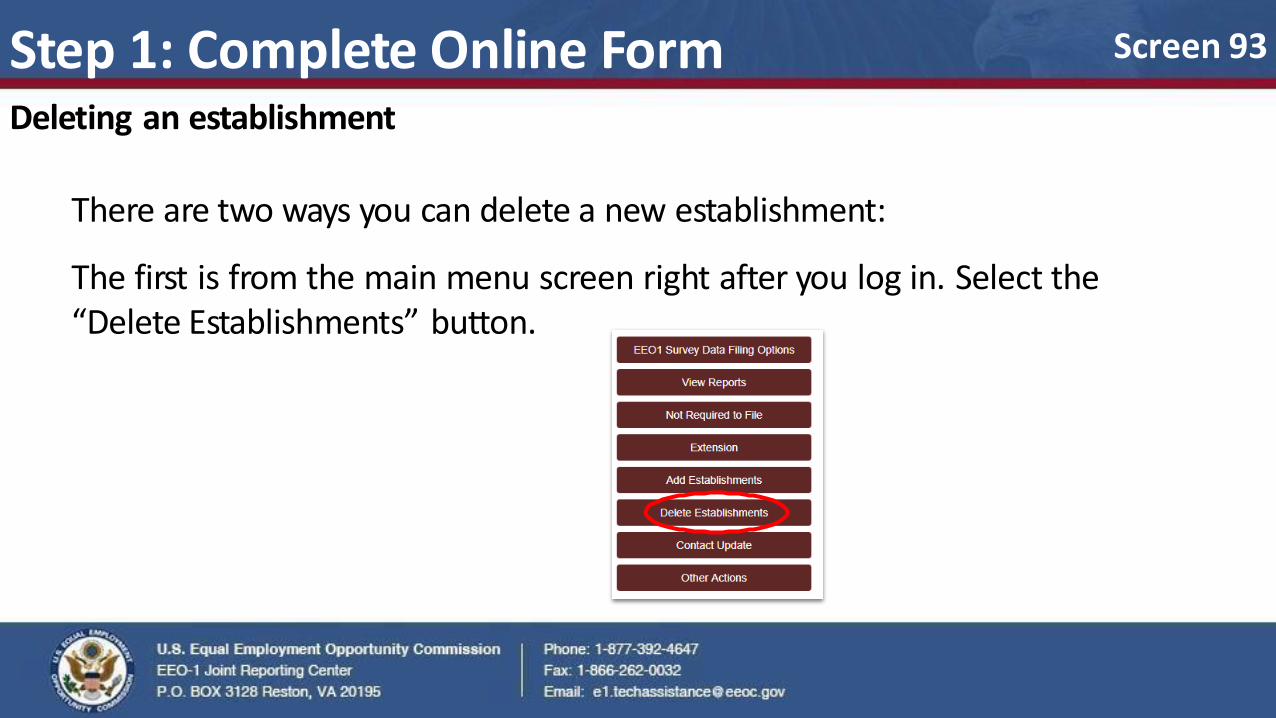
Step 1: Complete Online Form Deleting an establishment
There are two ways you can delete a new establishment:
The first is from the main menu screen right after you log in. Select the “Delete Establishments” button.
Screen 93
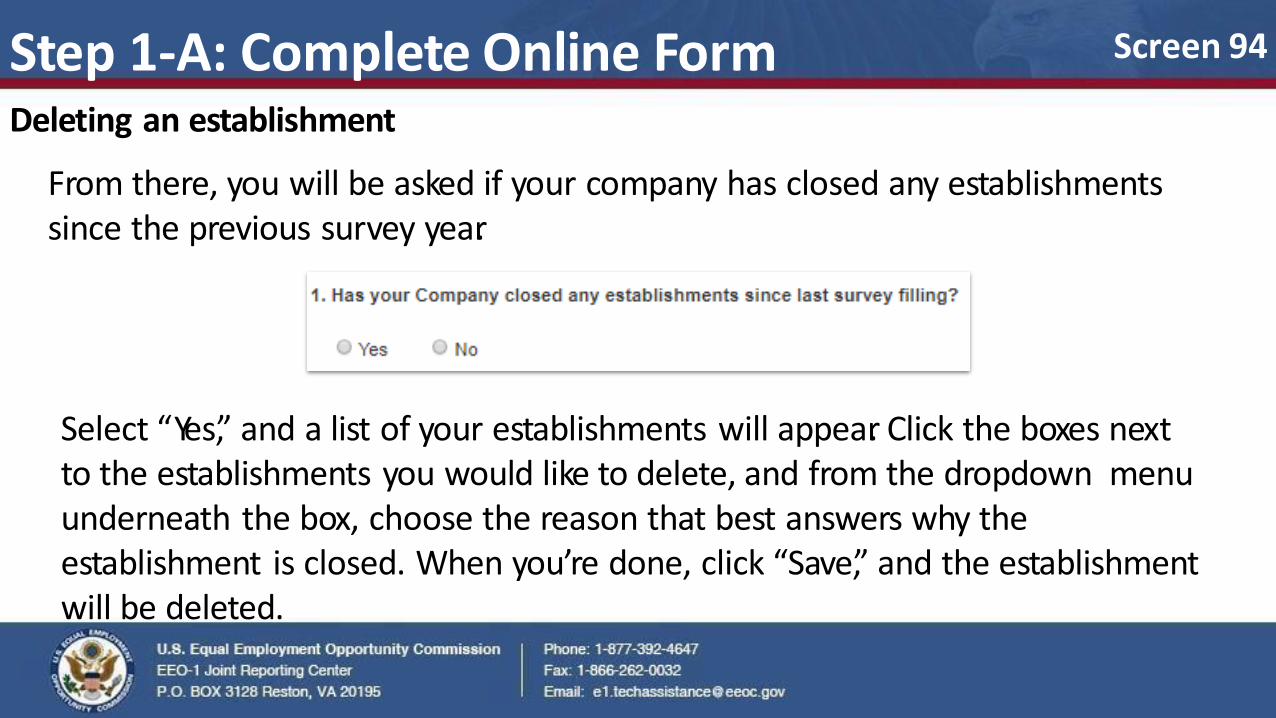
Step 1-A: Complete Online Form Deleting an establishment
From there, you will be asked if your company has closed any establishments since the previous survey year.
Select “Yes,” and a list of your establishments will appear. Click the boxes next to the establishments you would like to delete, and from the dropdown menu underneath the box, choose the reason that best answers why the establishment is closed. When you’re done, click “Save,” and the establishment will be deleted.
Screen 94
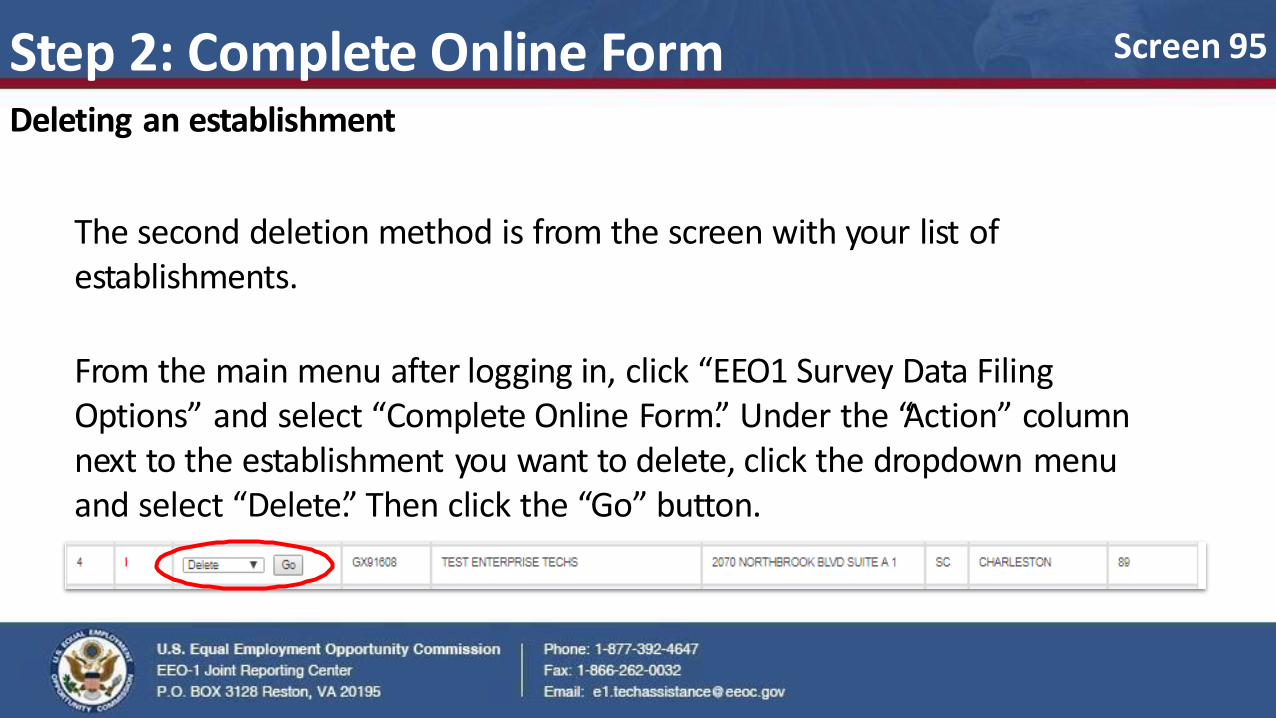
Step 2: Complete Online Form Deleting an establishment
The second deletion method is from the screen with your list of establishments.
From the main menu after logging in, click “EEO1 Survey Data Filing Options” and select “Complete Online Form.” Under the “Action” column next to the establishment you want to delete, click the dropdown menu and select “Delete.” Then click the “Go” button.
Screen 95
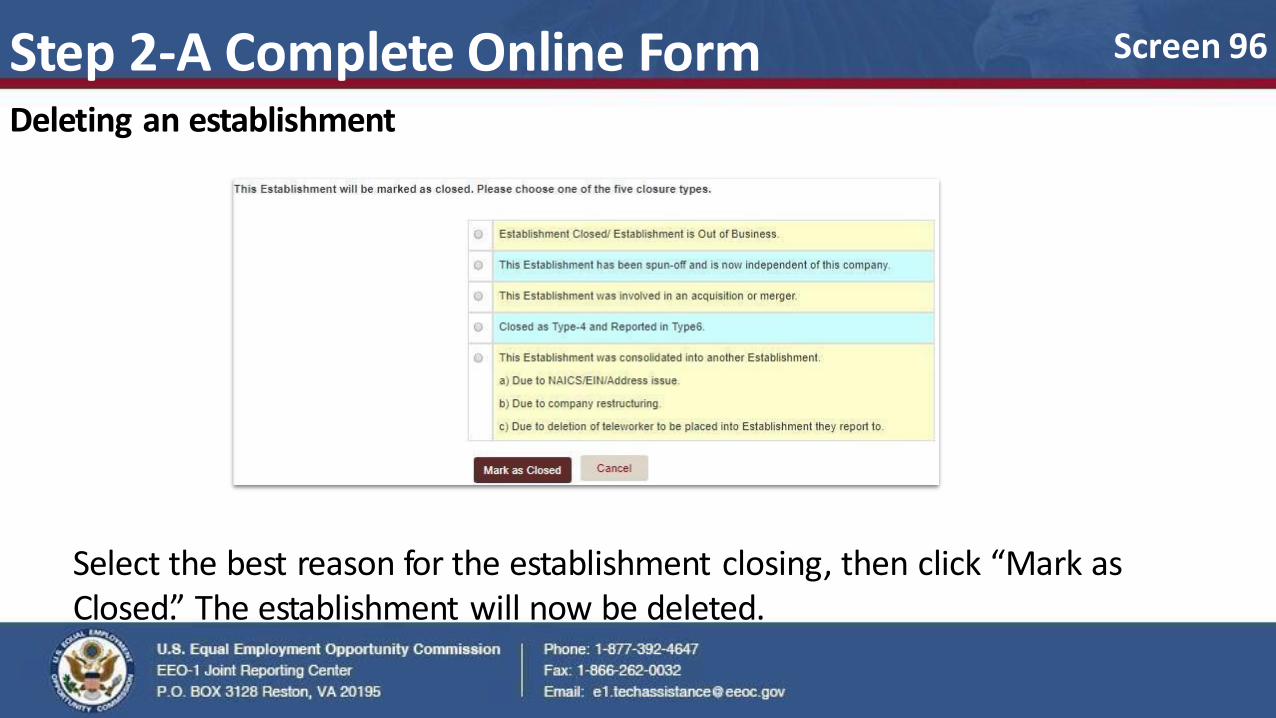
Select the best reason for the establishment closing, then click “Mark as Closed.” The establishment will now be deleted.
Screen 96 Step 2-A Complete Online Form Deleting an establishment
NOTE For both deletion techniques, you will not be able to delete your Type 2 consolidated report or your Type 3 headquarters report.
Screen 97 Step 2-B: Complete Online Form Deleting an establishment
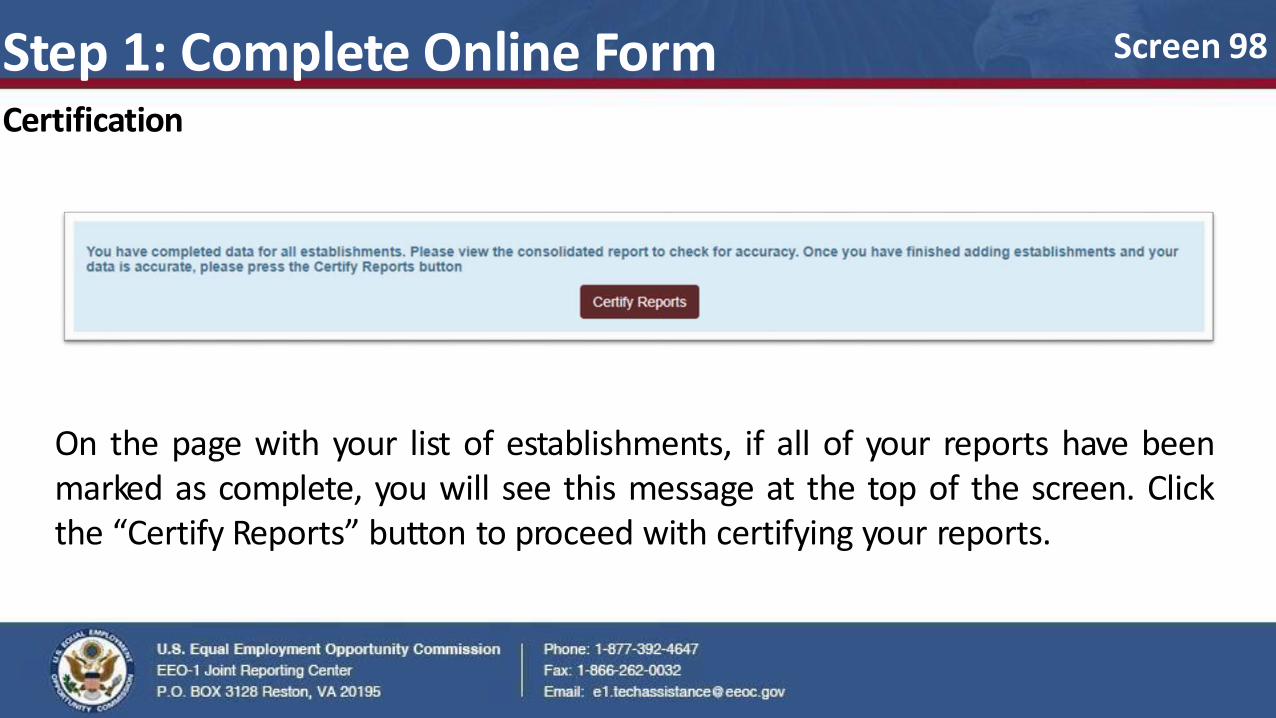
On the page with your list of establishments, if all of your reports have been marked as complete, you will see this message at the top of the screen. Click the “Certify Reports” button to proceed with certifying your reports.
Screen 98 Step 1: Complete Online Form Certification
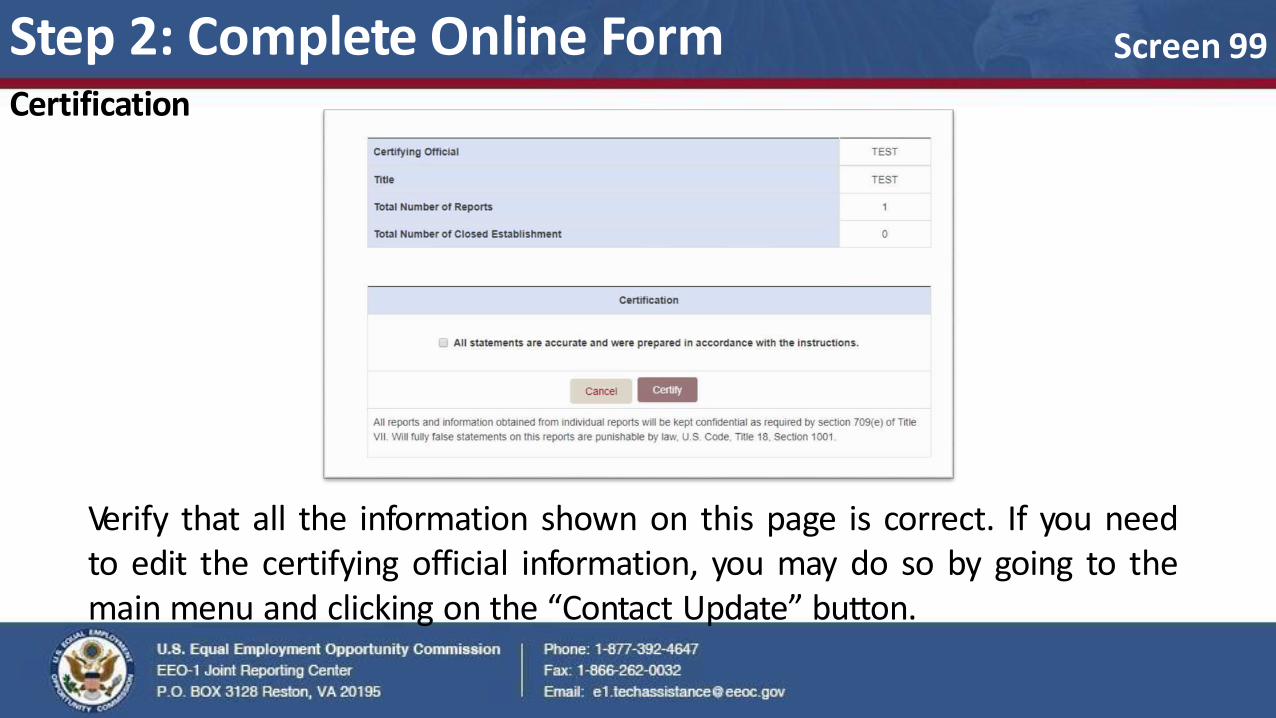
Verify that all the information shown on this page is correct. If you need to edit the certifying official information, you may do so by going to the main menu and clicking on the “Contact Update” button.
Screen 99 Step 2: Complete Online Form Certification
Before checking the box to certify your survey, please note all reports and information obtained from individual reports will be kept confidential as required by section 709(e) of Title VII. Willfully false statements on these reports are punishable by law, U.S. Code, Title 18, Section 1001.
Screen 100 Step 3: Complete Online Form Certification

Finally, check the box certifying that all data inputted is accurate, then click the “Certify” button. Your EEO-1 survey will now be complete!
Screen 101 Step 4: Complete Online Form Certification

Reconciliation Report
If you currently have any Type 6 reports, a reconciliation report will appear in your list of establishments to show you if there are any errors in the data you have inputted in the matrices.
The reconciliation report will not appear if you have chosen to do Type 8 reports.
Screen 102
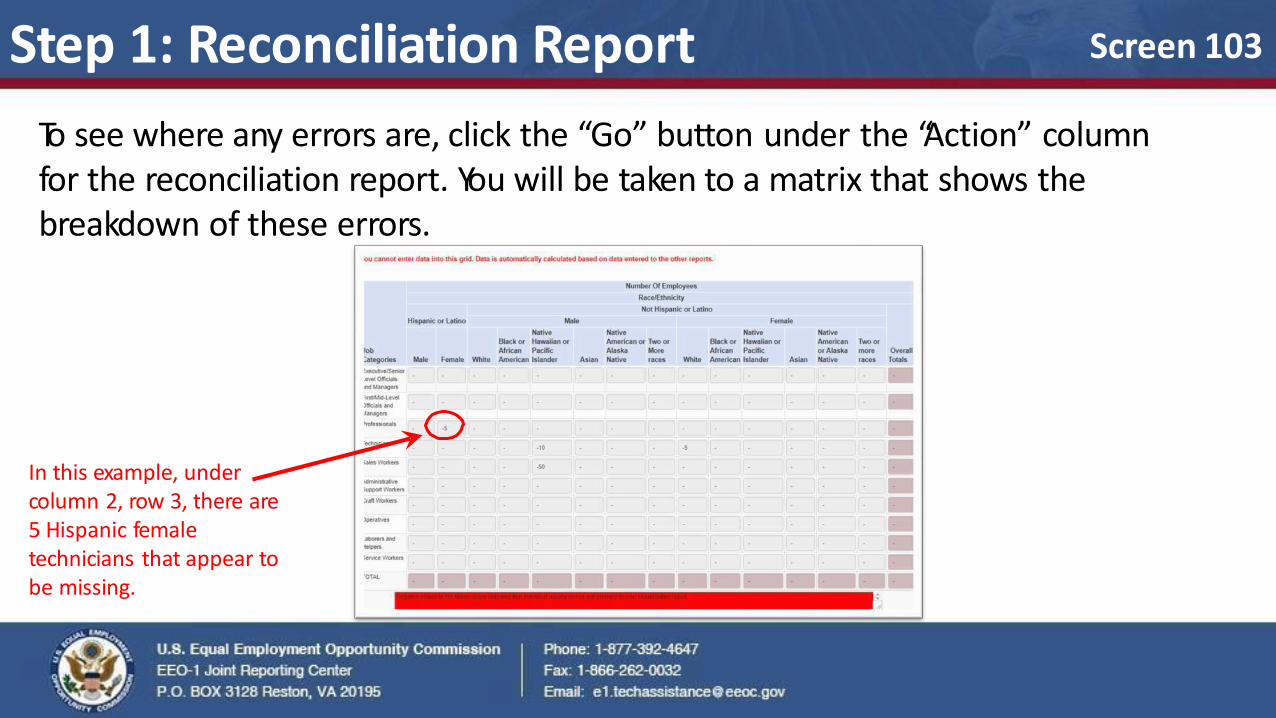
To see where any errors are, click the “Go” button under the “Action” column for the reconciliation report. You will be taken to a matrix that shows the breakdown of these errors.
Step 1: Reconciliation Report
In this example, under column 2, row 3, there are 5 Hispanic female technicians that appear to be missing.
Screen 103
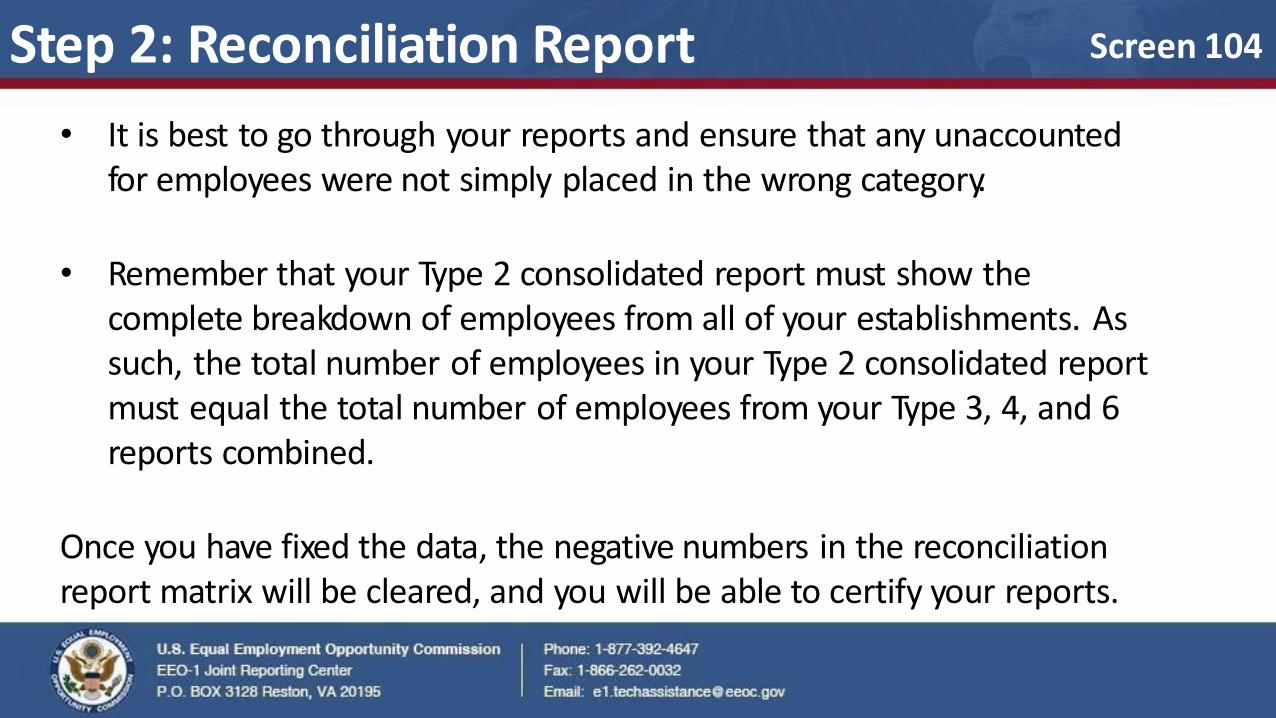
• It is best to go through your reports and ensure that any unaccounted for employees were not simply placed in the wrong category.
• Remember that your Type 2 consolidated report must show the
complete breakdown of employees from all of your establishments. As such, the total number of employees in your Type 2 consolidated report must equal the total number of employees from your Type 3, 4, and 6 reports combined.
Once you have fixed the data, the negative numbers in the reconciliation report matrix will be cleared, and you will be able to certify your reports.
Step 2: Reconciliation Report Screen 104
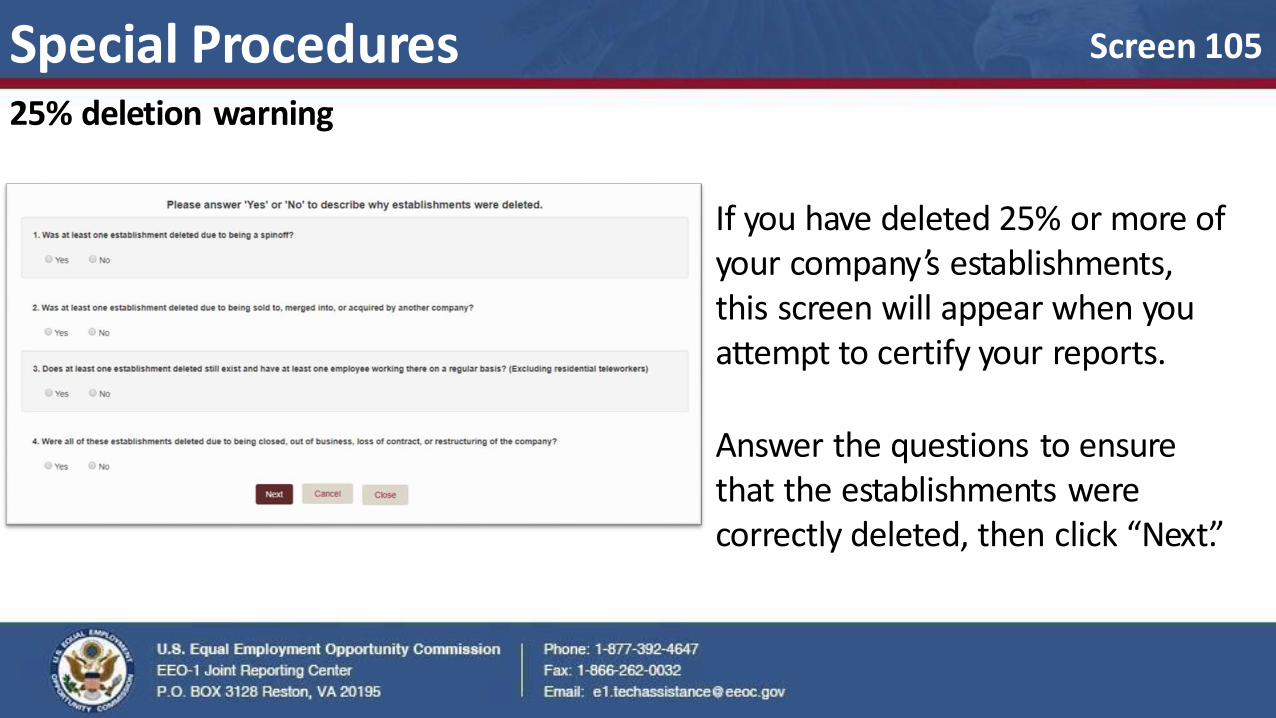
Special Procedures 25% deletion warning
Screen 105
If you have deleted 25% or more of your company’s establishments, this screen will appear when you attempt to certify your reports.
Answer the questions to ensure that the establishments were correctly deleted, then click “Next.”
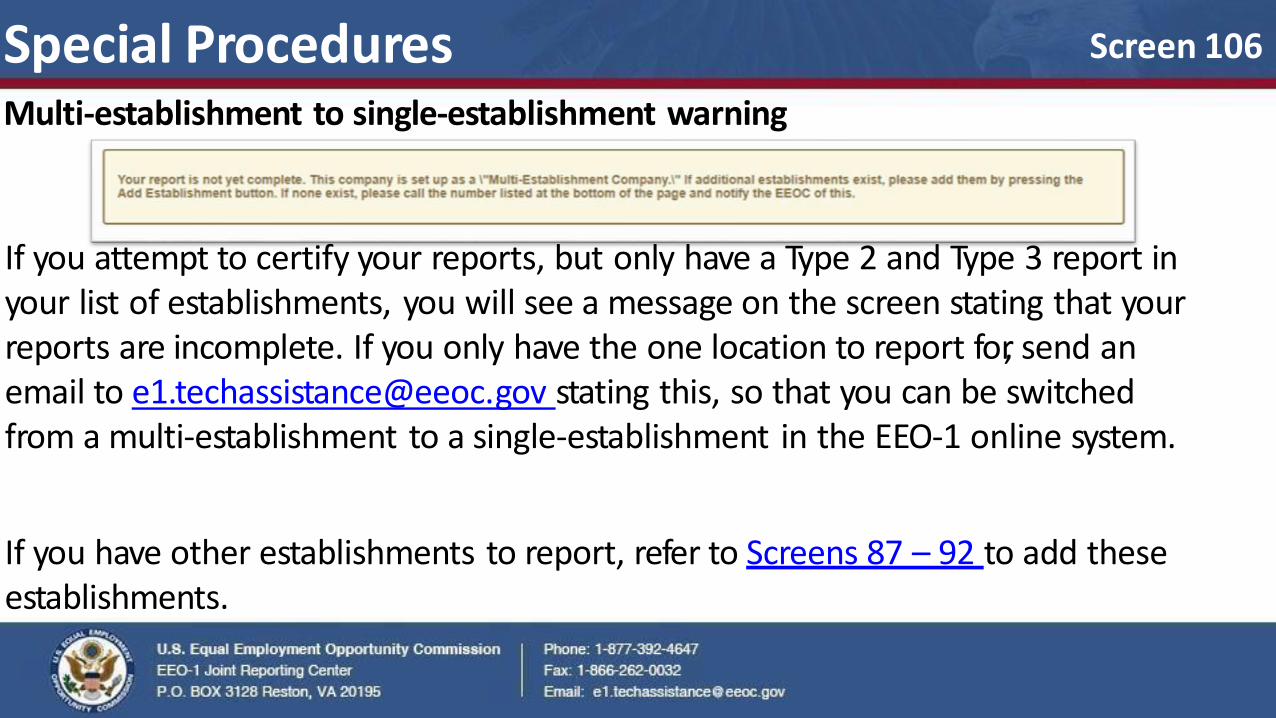
Special Procedures Multi-establishment to single-establishment warning
If you attempt to certify your reports, but only have a Type 2 and Type 3 report in your list of establishments, you will see a message on the screen stating that your reports are incomplete. If you only have the one location to report for, send an email to [email protected] stating this, so that you can be switched from a multi-establishment to a single-establishment in the EEO-1 online system.
If you have other establishments to report, refer to Screens 87 – 92 to add these establishments.
Screen 106

Filing for the First Time Screens 107 – 116
Screen 107

Step 1: Filing for the First Time Navigate to registration page
If your company has never filed an EEO-1 survey, you will need to register your company in the EEO-1 online system.
Navigate to https://egov.eeoc.gov/eeo1/register.jsp to start your company’s registration.
Screen 108
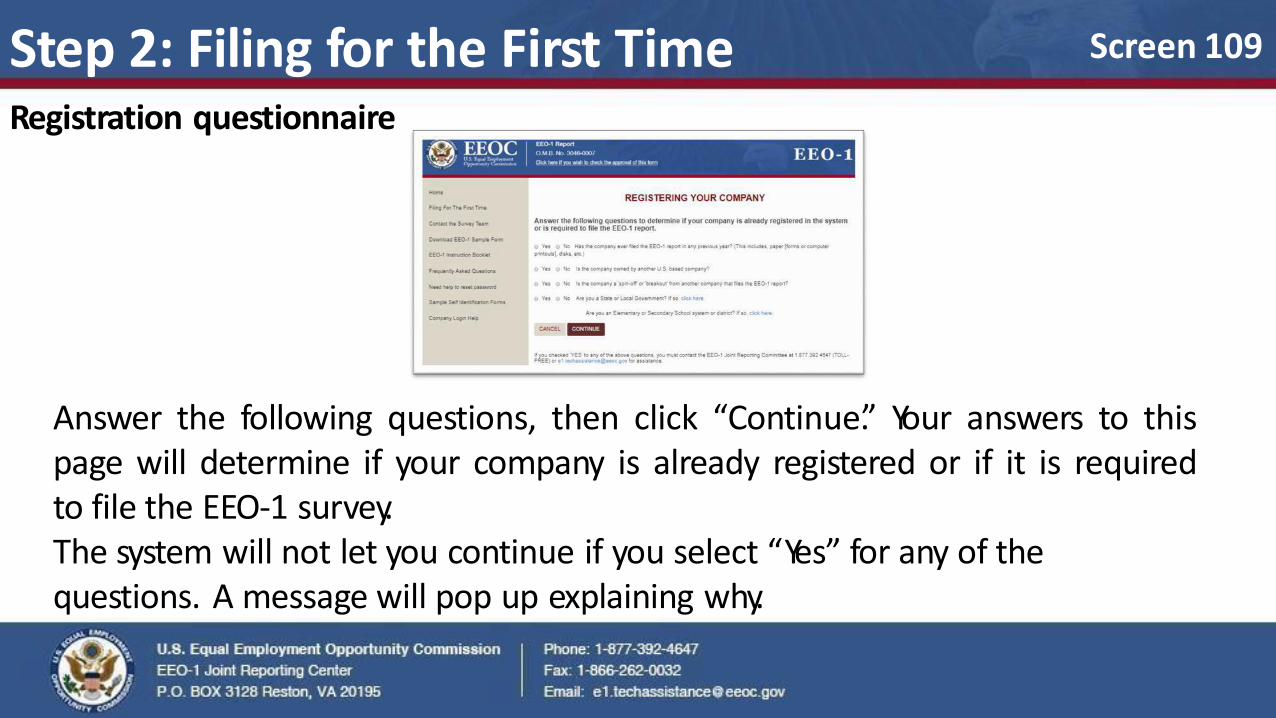
Step 2: Filing for the First Time Registration questionnaire
Screen 109
Answer the following questions, then click “Continue.” Your answers to this page will determine if your company is already registered or if it is required to file the EEO-1 survey. The system will not let you continue if you select “Yes” for any of the questions. A message will pop up explaining why.

Step 2-A: Filing for the First Time Registration questionnaire
Answering “Yes” to the first question:
Reason: If your company has filed an EEO-1 report in the past, you do not need to register the company again. If you do not know your login information, you can obtain this information by going to the login page at https://egov.eeoc.gov/eeo1/login.jsp. Click on “Forgot Password?” to get your password, and “Forgot Company Number?” to get your company number.
Screen 110
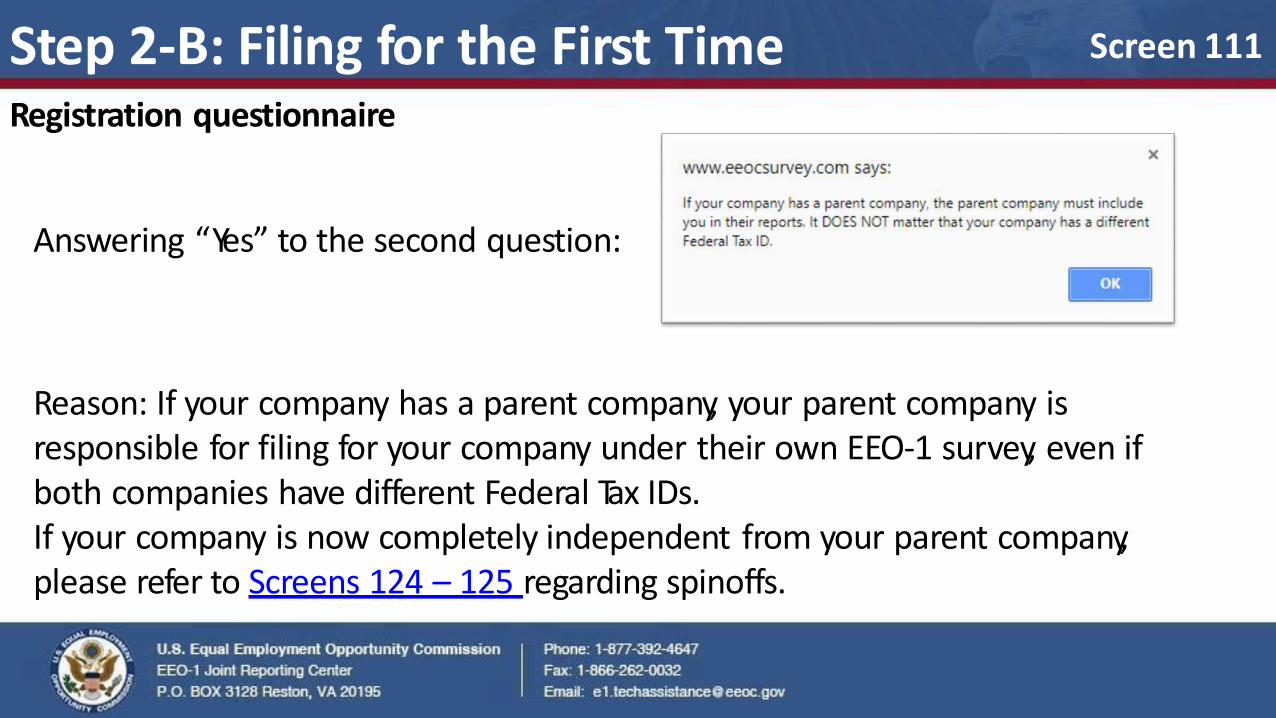
Step 2-B: Filing for the First Time Registration questionnaire
Answering “Yes” to the second question:
Reason: If your company has a parent company, your parent company is responsible for filing for your company under their own EEO-1 survey, even if both companies have different Federal Tax IDs. If your company is now completely independent from your parent company, please refer to Screens 124 – 125 regarding spinoffs.
Screen 111
Step 2-C: Filing for the First Time Registration questionnaire
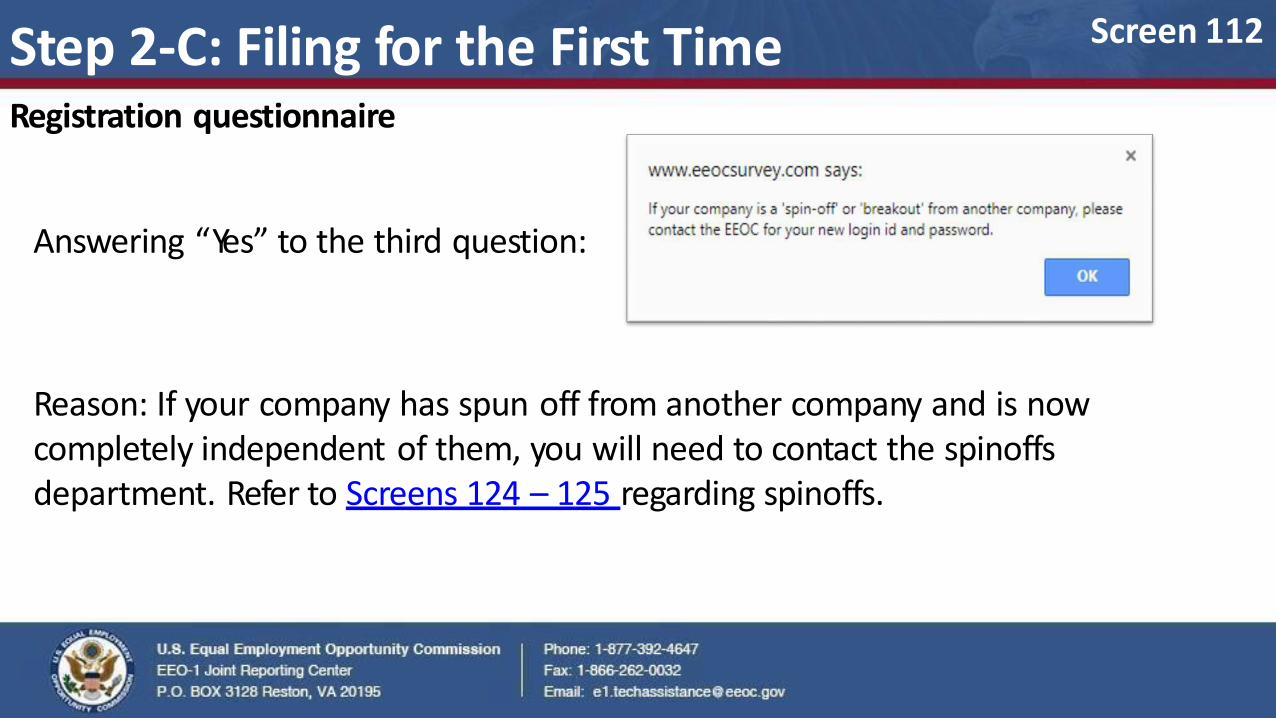
Answering “Yes” to the third question:
Reason: If your company has spun off from another company and is now completely independent of them, you will need to contact the spinoffs department. Refer to Screens 124 – 125 regarding spinoffs.
Screen 112

Step 2-D: Filing for the First Time Registration questionnaire
Answering “Yes” to the fourth question:
Reason: If your company is a part of the state or local government, or is an elementary or secondary school, you are not required to do the EEO-1 survey. You will be responsible for a different survey altogether.
Click this for more information if you are a state/local government.
Click this for more information if you are an elementary/secondary school system.
Screen 113
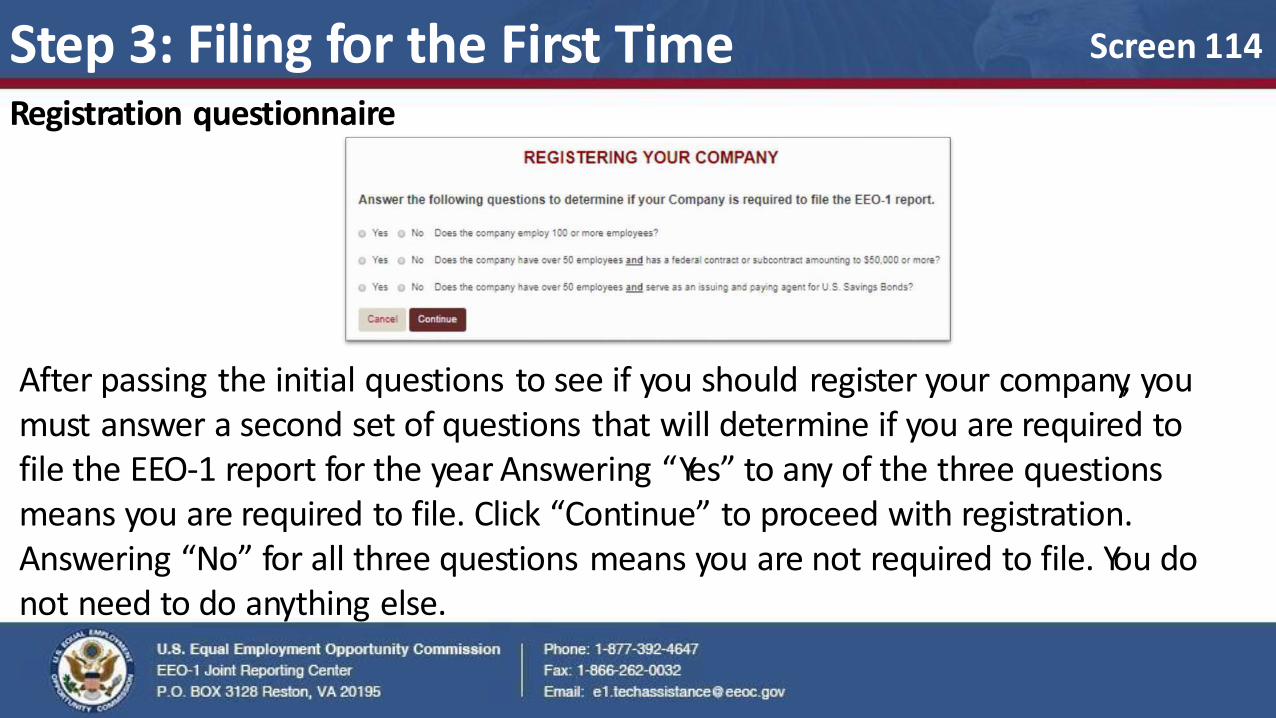
Step 3: Filing for the First Time Registration questionnaire
After passing the initial questions to see if you should register your company, you must answer a second set of questions that will determine if you are required to file the EEO-1 report for the year. Answering “Yes” to any of the three questions means you are required to file. Click “Continue” to proceed with registration. Answering “No” for all three questions means you are not required to file. You do not need to do anything else.
Screen 114
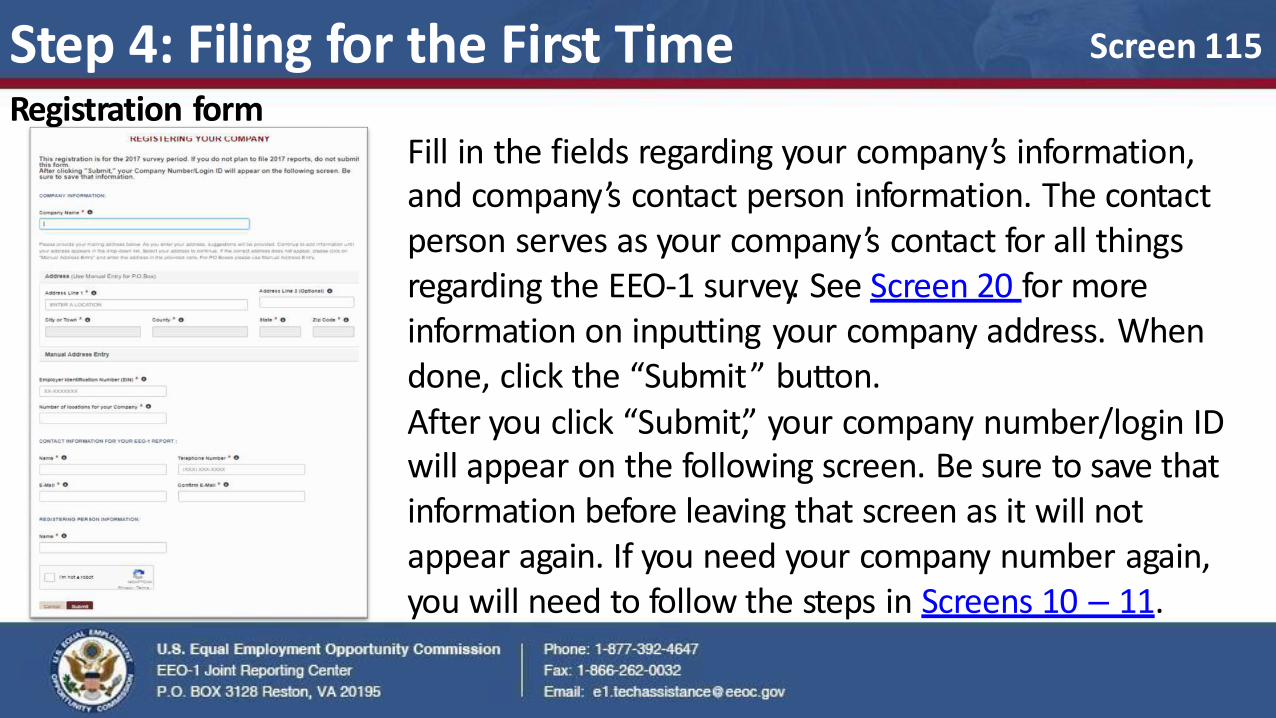
Step 4: Filing for the First Time Registration form
Fill in the fields regarding your company’s information, and company’s contact person information. The contact person serves as your company’s contact for all things regarding the EEO-1 survey. See Screen 20 for more information on inputting your company address. When done, click the “Submit” button. After you click “Submit,” your company number/login ID will appear on the following screen. Be sure to save that information before leaving that screen as it will not appear again. If you need your company number again, you will need to follow the steps in Screens 10 – 11.
Screen 115
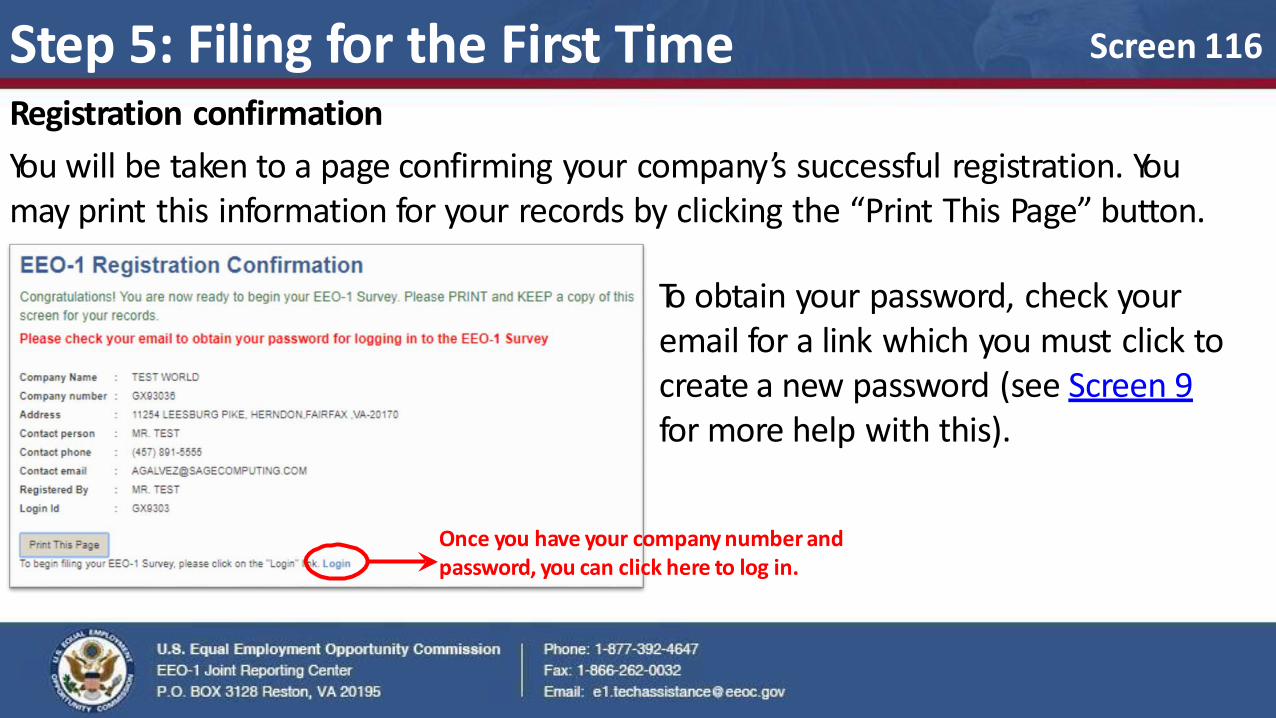
Step 5: Filing for the First Time Registration confirmation
You will be taken to a page confirming your company’s successful registration. You may print this information for your records by clicking the “Print This Page” button.
To obtain your password, check your email for a link which you must click to create a new password (see Screen 9 for more help with this).
Once you have your company number and password, you can click here to log in.
Screen 116

Appendix Screens 105 – 121
Notes, Definitions, FAQs and Links
Screen 117

Acquisitions and Mergers
Acquisition
An acquisition is a corporate action in which a company buys most, if not all, of the target company's ownership stakes in order to assume control of the target firm.
Screen 118

Acquisitions and Mergers
Acquisition
If your company has undergone an acquisition, send an email to [email protected].
Your email should include the name, address, and company number/login ID of both the acquiring and the acquired companies.
Screen 119
Acquisition
If a company acquired a small company that otherwise would not be required to file the EEO-1 report, or a company that has not previously filed the EEO-1 report, the acquiring company may proceed with adding the establishment(s) as a new establishment.
Screen 120
Acquisitions and Mergers

Acquisitions and Mergers
NOTE Asset Acquisition vs. Acquisition
In an asset acquisition, only the assets of a company are purchased, rather than its shares.
If this is the case with your company, you do not need to report for that establishment/location.
Screen 121

Acquisitions and Mergers
Merger
A merger is a legal consolidation of two entities to form a new entity.
Screen 122
Merger
If your company has undergone a merger, send an email to [email protected] .
Your email should include the names and company numbers/login IDs (if known) of all companies affected by the merger, the name and address of the corporate headquarters and the name of the new company.
Acquisitions and Mergers
Screen 123
Spinoffs
A spinoff occurs when an establishment(s) from one company forms a new
company that will file independently from its former parent company.
If your company has undergone a spinoff, send an email to [email protected]
Screen 124
Spinoffs
Your email should include the name, address, and company number (if known) of the current parent company.
Additionally, please include the establishment considered to be the new headquarters that should be spun off in the employer EEO-1 database with a list of all physical addresses for the new company.
Screen 125
Regarding PEOs
A Professional Employer Organization (PEO) provides services to employers
allowing them to outsource management, payroll and other activities
associated with the employer to the PEO.
A PEO must report for all establishments of the companies they are filing for.
They may not simply file a multi-establishment company as a single Type-4
establishment.
Screen 126

Regarding PEOs Q. We are a PEO, do we file for our clients under our company as establishments or do we file for each as a separate entity with its own Company Number? A. As a PEO you will report your clients as establishments under the parent company, your PEO’s Company Number.
Screen 127
Q. As a PEO many of our clients are companies that do not meet the requirements to file individually. Should they be included in our EEO-1? If so, how should they be reported? A. Client companies of a PEO that on their own are not subject to EEO-1 filing requirements are excluded from the PEO’s EEO-1 reports.
Regarding PEOs
Q. Our PEO dropped service to a client, how do we treat this establishment? A. Establishments that previously had been reported by a PEO but no longer, and do not meet the requirements to file individual, must be deleted. If employees appear at these establishments later, assigned unit numbers that were deleted may be retrieved. However, if the establishment does meet the requirements to file you will need to contact [email protected].
Q. Our PEO has several clients who we handle. These clients fall under our PEO EIN number and we report payroll and taxes for these client/employees. When submitting them on the EEO-1 report, do I use our company EIN number for ALL clients OR do I use the EIN number of each client when submitting the report? A. If the establishments fall under your PEO’s EIN for payroll and taxes you will use the PEO’s EIN for all establishments
Screen 128
Troubleshoot/FAQs Q. How do I change/update my contact person information? A. If your EEO-1 contact person information has changed, submit a letter on company letterhead signed by an authorized company representative, indicating the updated contact's name, title, phone number and email address to the EEO-1 Joint Reporting Committee at [email protected]. Please remember to include your company number (if known) in your request.
Q. When I try to log in, it says the information I entered is invalid. A. Double-check to ensure that you are inputting your password without any spaces in it (manually typing in your password can help). Additionally, remember that the password you used for the EEO-1 report in previous years will no longer work for the new reporting year. To obtain your new password for the year, please refer to Screens 7 – 9.
Q. Do public non-profit, tax-exempt establishments need to file the EEO-1 report? A. Yes.
Screen 129
Troubleshoot/FAQs Q. I’m trying to add a new establishment, but I got an error that says “Error: EIN already in use”. A. This error means this same EIN is already in use by another company completing their EEO-1. Please email [email protected] with your company number/login ID and the establishment you are trying to create, along with the EIN you attempted to enter.
Q. I received two different login IDs for my company. Which one should I use? A. If you received two different login IDs, your company may have accidentally been registered in the system twice. Send an email to the acquisitions and mergers department at [email protected] with your contact information and both login IDs, and they will help correct the issue.
Q. My employee regularly reports to two different establishments. Which establishment should I put them under? A. Report the employee to the establishment they spend the majority of their time in. If it is equal, you may choose which establishment to report them under. You may not report them in both establishments.
Screen 130
Troubleshoot/FAQs
Q. How do I report for employees that work from home? A. Employees who telework, i.e. work from home, must be included in the EEO-1 report for the establishment to which they report. DO NOT indicate home addresses for these employees.
Q. If my company is an employment/staffing agency, how should I report for leased employees? A. Leased Employee means a permanent employee provided by an employment agency for a fee to an outside company for which the employment agency handles all personnel tasks including payroll, staffing, benefit payments and compliance reporting. The employment agency shall, therefore, include leased employees in its EEO-1 report out of the establishment where their payroll is being handled. This will not include persons who are hired on a casual basis for a specified time, or for the duration of a specified job.
Q. How do I account for seasonal or part-time employees? A. Part-time employees should be included in the EEO-1 report. Seasonal employees should not.
Screen 131
Troubleshoot/FAQs
Q. If I have employees who regularly report to a physical establishment that my company does not own but just leases, do I still need to submit a report for that establishment? A. Yes. Leased property locations are included. You will report those employees under that address.
Q. Can I submit a paper copy of my EEO-1 report? A. An employer who claims that preparation or the filing of Standard Form 100 would create undue hardship may apply to the Commission for a special reporting procedure. In such cases, the employer must submit in writing a detailed alternative proposal for compiling and reporting information to: EEO-1 Survey Coordinator, U.S. Equal Employment Opportunity Commission (EEOC), Office of Research, Information and Planning, Program Research and Surveys Division, 131 M St., NE, Washington, DC 20507. Only those special procedures approved in writing by the Commission are authorized. Paper EEO-1 forms will be generated on request only, in extreme cases where Internet access is not available to the employer.
Screen 132
Troubleshoot/FAQs
Q. What about employees who work at client sites?
A. It has come to the EEOC ’s attention that there may be some confusion as to how employers are to report employees working at client sites
Some employers have been reporting the address of client sites for employees, while other employers have instead been rolling those employees up to a non-client site employer address.
Given this confusion, employers will not be considered “non-compliant” if they have chosen one approach over the other – either reporting by client site or by non-client site employer address.
EEOC is considering how to address client site reporting.
Screen 133

Additional Resources EEO-1 Instruction Booklet https://www. eeoc.gov/employers/eeo1survey/2007instructions.cfm
Questions and Answers: The 2017 EEO-1 Report https://www. eeoc.gov/employers/eeo1survey/faq.cfm
EEO-1 Frequently Asked Questions and Answers (extended) https://www. eeoc.gov/employers/eeo1survey/2017-qanda.cfm
Key Terminology and Definitions https://www. eeoc.gov/employers/eeo1survey/terminology.cfm
Screen 134