ef lenses - the-digital-picture.com · ef lenses ef14mm f/2.8l usm ef20mm f/2.8 usm ... ef50mm...
TRANSCRIPT
●❶
●❷
●❸
●❹
●❻
●❺
●❼
Thank you for purchasing a Canon product.
Safety Precautions1. Do not look at the sun or a bright light source through the
lens or camera. Doing so could result in loss of vision. Looking at the sun directly through the lens is especially hazardous.
2. Whether it is attached to the camera or not, do not leave the lens under the sun without the lens cap attached. This is to prevent the lens from concentrating the sun’s rays, which could cause a fire.
Handling CautionsIf the lens is taken from a cold environment into a warm one, condensation may develop on the lens surface and internal parts. To prevent condensation in this case, first put the lens into an airtight plastic bag before taking it from a cold to warm environment. Then take out the lens after it has warmed gradually. Do the same when taking the lens from a warm environment into a cold one.
1. Mounting and Detaching the LensSee your camera’s instructions for details on mounting and detaching the lens.• After detaching the lens, place the lens with the rear end up to
prevent the lens surface and contacts from getting scratched.• If the contacts get soiled, scratched, or have fingerprints on them,
corrosion or faulty connections can result. The camera and lens may not operate properly.
• If the contacts get soiled or have fingerprints on them, clean them with a soft cloth.
• If you remove the lens, cover it with the dust cap. To attach it properly, align the lens mount index and the index of the dust cap, and turn clockwise. To remove it, reverse the order.
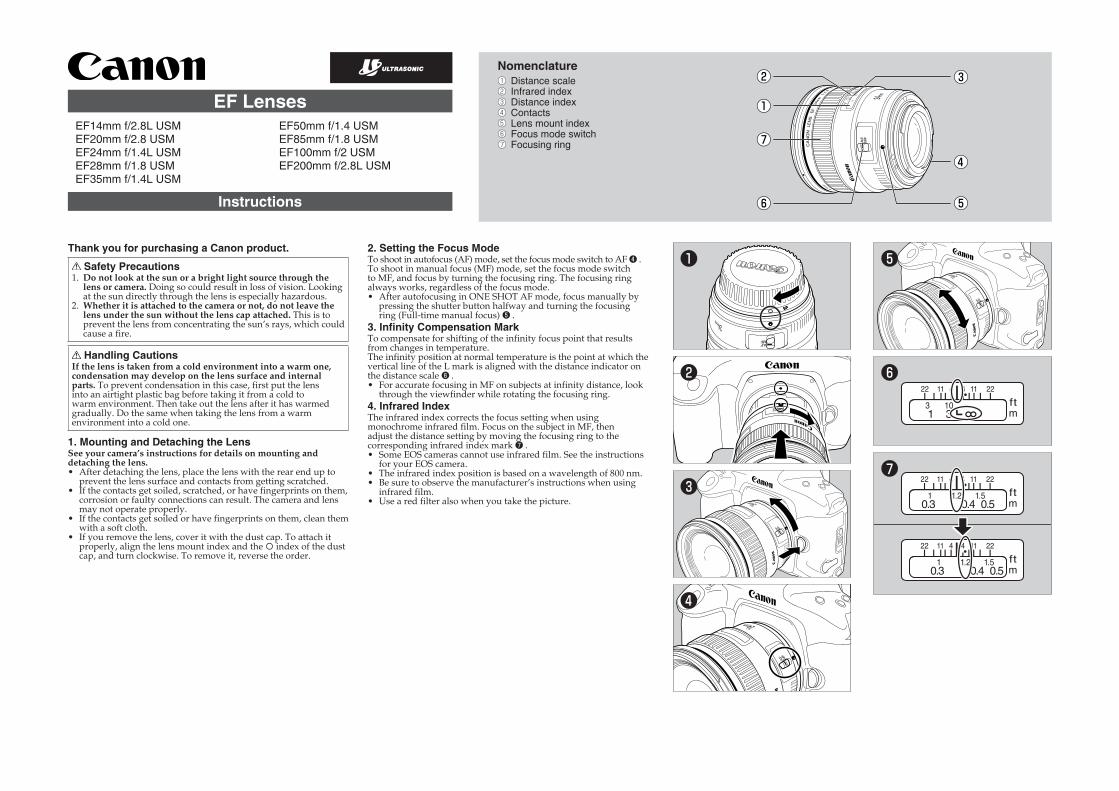
2. Setting the Focus ModeTo shoot in autofocus (AF) mode, set the focus mode switch to AF ❹ .To shoot in manual focus (MF) mode, set the focus mode switch to MF, and focus by turning the focusing ring. The focusing ring always works, regardless of the focus mode.• After autofocusing in ONE SHOT AF mode, focus manually by
pressing the shutter button halfway and turning the focusing ring (Full-time manual focus) ❺ .
3. Infinity Compensation MarkTo compensate for shifting of the infinity focus point that results from changes in temperature.The infinity position at normal temperature is the point at which the vertical line of the L mark is aligned with the distance indicator on the distance scale ❻ .• For accurate focusing in MF on subjects at infinity distance, look
through the viewfinder while rotating the focusing ring.4. Infrared IndexThe infrared index corrects the focus setting when using monochrome infrared film. Focus on the subject in MF, then adjust the distance setting by moving the focusing ring to the corresponding infrared index mark ❼ .• Some EOS cameras cannot use infrared film. See the instructions
for your EOS camera.• The infrared index position is based on a wavelength of 800 nm.• Be sure to observe the manufacturer’s instructions when using
infrared film.• Use a red filter also when you take the picture.
Nomenclature●① Distance scale●② Infrared index●③ Distance index●④ Contacts●⑤ Lens mount index●⑥ Focus mode switch●⑦ Focusing ring
EF LensesEF14mm f/2.8L USMEF20mm f/2.8 USMEF24mm f/1.4L USMEF28mm f/1.8 USMEF35mm f/1.4L USM
EF50mm f/1.4 USMEF85mm f/1.8 USMEF100mm f/2 USMEF200mm f/2.8L USM
Instructions
CT1-8536-002 © CANON INC. 2006
●❽
●❾
●10
●11
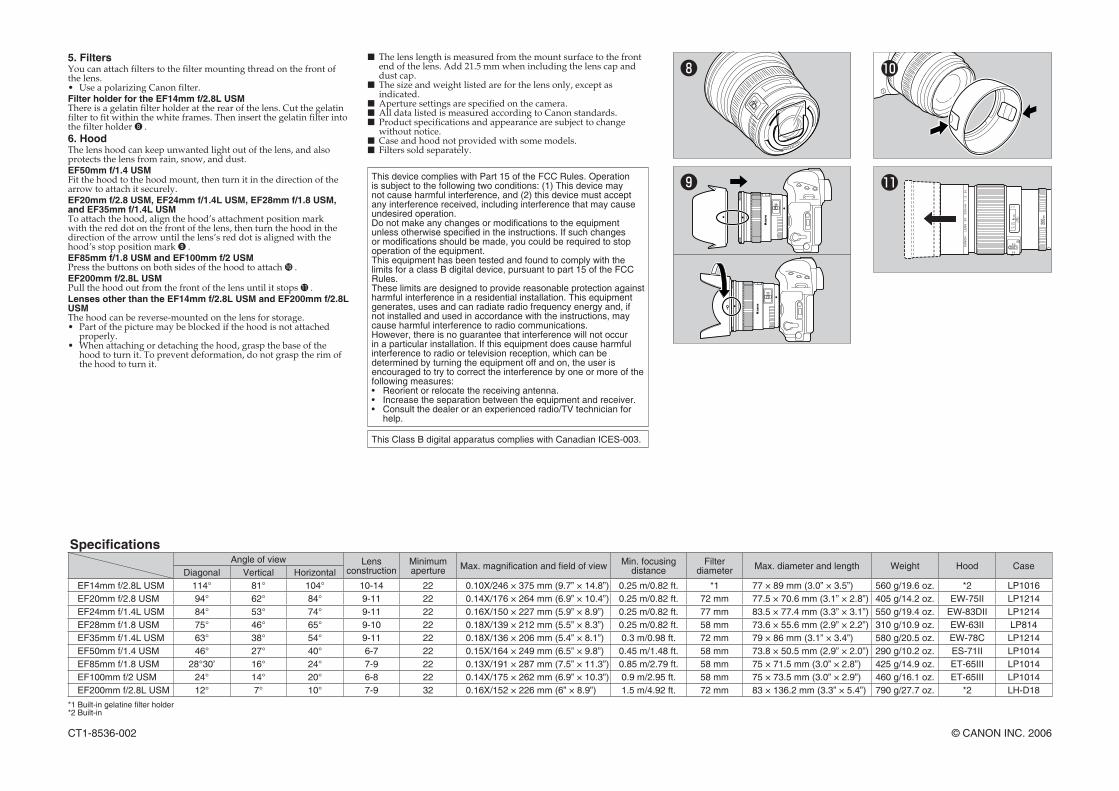
5. FiltersYou can attach filters to the filter mounting thread on the front of the lens.• Use a polarizing Canon filter.Filter holder for the EF14mm f/2.8L USMThere is a gelatin filter holder at the rear of the lens. Cut the gelatin filter to fit within the white frames. Then insert the gelatin filter into the filter holder ❽ .6. HoodThe lens hood can keep unwanted light out of the lens, and also protects the lens from rain, snow, and dust.EF50mm f/1.4 USMFit the hood to the hood mount, then turn it in the direction of the arrow to attach it securely.EF20mm f/2.8 USM, EF24mm f/1.4L USM, EF28mm f/1.8 USM, and EF35mm f/1.4L USMTo attach the hood, align the hood’s attachment position mark with the red dot on the front of the lens, then turn the hood in the direction of the arrow until the lens’s red dot is aligned with the hood’s stop position mark ❾ .EF85mm f/1.8 USM and EF100mm f/2 USMPress the buttons on both sides of the hood to attach 10 .EF200mm f/2.8L USMPull the hood out from the front of the lens until it stops 11 .Lenses other than the EF14mm f/2.8L USM and EF200mm f/2.8L USMThe hood can be reverse-mounted on the lens for storage.• Part of the picture may be blocked if the hood is not attached
properly.• When attaching or detaching the hood, grasp the base of the
hood to turn it. To prevent deformation, do not grasp the rim of the hood to turn it.
The lens length is measured from the mount surface to the front end of the lens. Add 21.5 mm when including the lens cap and dust cap.
The size and weight listed are for the lens only, except as indicated.
Aperture settings are specified on the camera. All data listed is measured according to Canon standards. Product specifications and appearance are subject to change without notice.
Case and hood not provided with some models. Filters sold separately.
This device complies with Part 15 of the FCC Rules. Operation is subject to the following two conditions: (1) This device may not cause harmful interference, and (2) this device must accept any interference received, including interference that may cause undesired operation.Do not make any changes or modifications to the equipment unless otherwise specified in the instructions. If such changes or modifications should be made, you could be required to stop operation of the equipment.This equipment has been tested and found to comply with the limits for a class B digital device, pursuant to part 15 of the FCC Rules.These limits are designed to provide reasonable protection against harmful interference in a residential installation. This equipment generates, uses and can radiate radio frequency energy and, if not installed and used in accordance with the instructions, may cause harmful interference to radio communications.However, there is no guarantee that interference will not occur in a particular installation. If this equipment does cause harmful interference to radio or television reception, which can be determined by turning the equipment off and on, the user is encouraged to try to correct the interference by one or more of the following measures:• Reorient or relocate the receiving antenna.• Increase the separation between the equipment and receiver.• Consult the dealer or an experienced radio/TV technician for
help.
This Class B digital apparatus complies with Canadian ICES-003.
SpecificationsAngle of view Lens
constructionMinimum aperture Max. magnification and field of view Min. focusing
distanceFilter
diameter Max. diameter and length Weight Hood CaseDiagonal Vertical Horizontal
EF14mm f/2.8L USM 114° 81° 104° 10-14 22 0.10X/246 × 375 mm (9.7” × 14.8”) 0.25 m/0.82 ft. *1 77 × 89 mm (3.0” × 3.5”) 560 g/19.6 oz. *2 LP1016EF20mm f/2.8 USM 94° 62° 84° 9-11 22 0.14X/176 × 264 mm (6.9” × 10.4”) 0.25 m/0.82 ft. 72 mm 77.5 × 70.6 mm (3.1” × 2.8”) 405 g/14.2 oz. EW-75II LP1214EF24mm f/1.4L USM 84° 53° 74° 9-11 22 0.16X/150 × 227 mm (5.9” × 8.9”) 0.25 m/0.82 ft. 77 mm 83.5 × 77.4 mm (3.3” × 3.1”) 550 g/19.4 oz. EW-83DII LP1214EF28mm f/1.8 USM 75° 46° 65° 9-10 22 0.18X/139 × 212 mm (5.5” × 8.3”) 0.25 m/0.82 ft. 58 mm 73.6 × 55.6 mm (2.9” × 2.2”) 310 g/10.9 oz. EW-63II LP814EF35mm f/1.4L USM 63° 38° 54° 9-11 22 0.18X/136 × 206 mm (5.4” × 8.1”) 0.3 m/0.98 ft. 72 mm 79 × 86 mm (3.1” × 3.4”) 580 g/20.5 oz. EW-78C LP1214EF50mm f/1.4 USM 46° 27° 40° 6-7 22 0.15X/164 × 249 mm (6.5” × 9.8”) 0.45 m/1.48 ft. 58 mm 73.8 × 50.5 mm (2.9” × 2.0”) 290 g/10.2 oz. ES-71II LP1014EF85mm f/1.8 USM 28°30’ 16° 24° 7-9 22 0.13X/191 × 287 mm (7.5” × 11.3”) 0.85 m/2.79 ft. 58 mm 75 × 71.5 mm (3.0” × 2.8”) 425 g/14.9 oz. ET-65III LP1014EF100mm f/2 USM 24° 14° 20° 6-8 22 0.14X/175 × 262 mm (6.9” × 10.3”) 0.9 m/2.95 ft. 58 mm 75 × 73.5 mm (3.0” × 2.9”) 460 g/16.1 oz. ET-65III LP1014EF200mm f/2.8L USM 12° 7° 10° 7-9 32 0.16X/152 × 226 mm (6” × 8.9”) 1.5 m/4.92 ft. 72 mm 83 × 136.2 mm (3.3” × 5.4”) 790 g/27.7 oz. *2 LH-D18
*1 Built-in gelatine filter holder*2 Built-in