ejb - javapadho.com · what is ejb •ejb is an acronym for enterprise java bean.it is a...
TRANSCRIPT

EJB
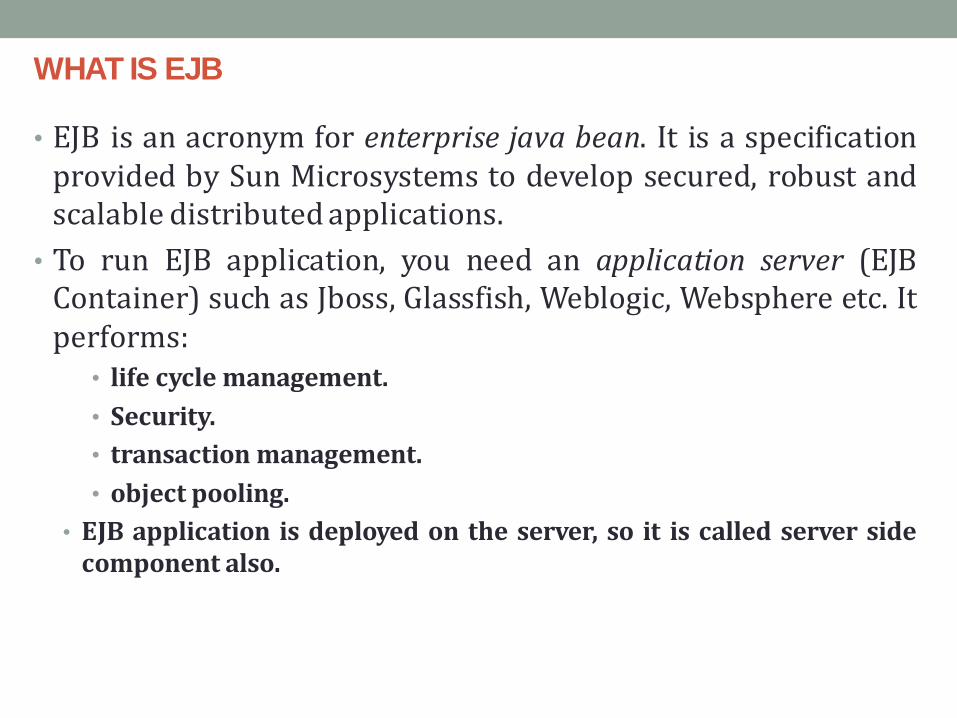
WHAT IS EJB
• EJB is an acronym for enterprise java bean. It is a specification provided by Sun Microsystems to develop secured, robust and scalable distributed applications.
• To run EJB application, you need an application server (EJB Container) such as Jboss, Glassfish, Weblogic, Websphere etc. It performs:
• life cycle management.
• Security.
• transaction management.
• object pooling.
• EJB application is deployed on the server, so it is called server side component also.

BENEFITS
• Simplified development of large scale enterprise level application.
• EJB container provides most of the system level services like transaction handling, logging, load balancing, persistence mechanism, exception handling and so on. Developer has to focus only on business logic of the application.
• EJB container manages life cycle of ejb instances thus developer needs not to worry about when to create/delete ejb objects.

WHEN TO USE EJB?
• Needs to encapsulate business logic
• Business logic is separated from presentation and persistence tier
• Needs Remote access • Applications running on different servers can access EJB.
• Needs to be scalable • Almost all Java EE application servers support clustering, load balancing,
and failover
• Needs Broad vendor support • JBoss, Oracle AS, WebLogic, WebSphere, Glassfish, etc are some of Java EE
Application Servers.
• Needs to be portable • Applications developed using EJB can be written once and deployed on
different Java EE Application Servers
• Needs deployment time configuration • Enables deployment-time configuration using XML-based deployment
descriptor or within the bean’s code using metadata deployment annotations.

Disadvantages of EJB: • Complexity
• EJB specification is too large and complicated. Even though EJB might be simpler than other remote object systems, remote-object frameworks are much more complex than local-object frameworks.
• Spring is easier and more powerful for local access
• Requires Java EE server • Can’t run on Web Containers such as Tomcat, Jetty, Resin, JRun, Resin
• Java EE servers are usually hard to configure, significantly slower to start/restart during development and testing, and usually cost money
• Bad name due to earlier releases • EJB2 was so complex that EJB has bad reputation till this day
• Needs Java Clients • EJBs are built on top of RMI. Both involve Java clients and beans. If your
clients need to be written in something else (e.g., .NET, PHP, etc.) then you have to go with web services or something else that is a platform independent protocol, like HTTP, XML over HTTP or SOAP.

EJB IS A COMPONENT BASED MODEL
• With EJB, you can develop “Reusable Chunks” – EJB Components. that developers from unrelated company can assemble it to construct their own application.
• All application methods are placed into separate components so that all of the data and functions inside each component are related.
• Combination of application servers and software components is usually called distributed computing.

Benefits of Component Based Model With Component Based Model, we can make use of code reusability and customize these components without touching the Java code. Application developer can buy bean (component) and assemble it to develop their own application.
• Credit card component can be assembled in applications such as, Online
Shopping, Airlines Reservation, Online Training, Online Bill Payment, etc.

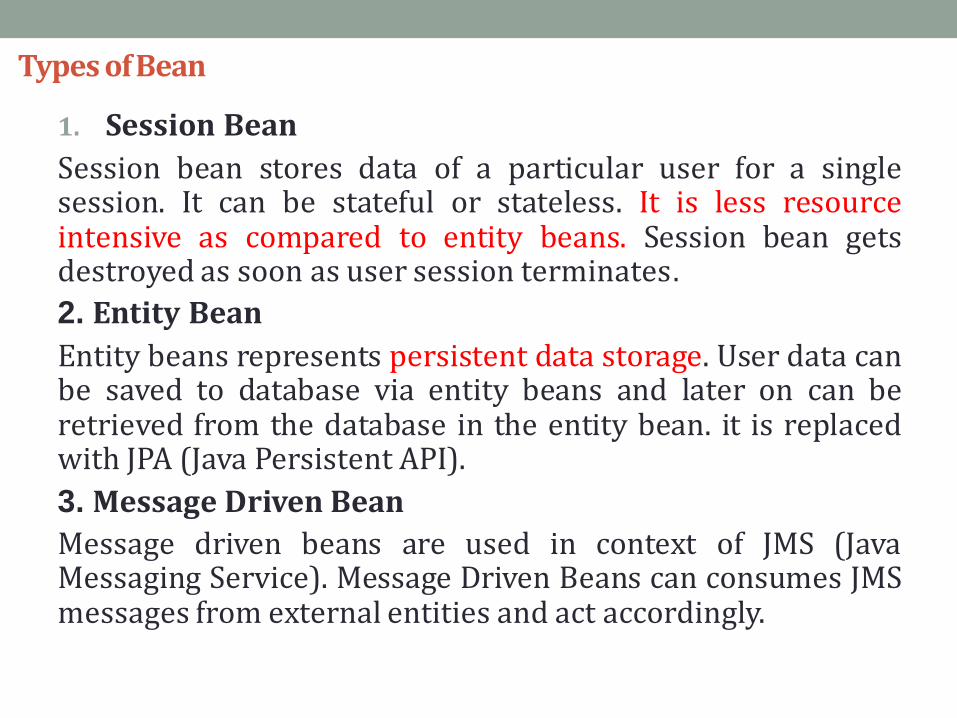
Types of Bean
1. Session Bean
Session bean stores data of a particular user for a single session. It can be stateful or stateless. It is less resource intensive as compared to entity beans. Session bean gets destroyed as soon as user session terminates.
2. Entity Bean
Entity beans represents persistent data storage. User data can be saved to database via entity beans and later on can be retrieved from the database in the entity bean. it is replaced with JPA (Java Persistent API).
3. Message Driven Bean
Message driven beans are used in context of JMS (Java Messaging Service). Message Driven Beans can consumes JMS messages from external entities and act accordingly.

Types of Session Beans

Difference between RMI and EJB • RMI and EJB, provides services to access an object running
in another JVM (known as remote object) from another JVM.
RMI EJB
In RMI, middleware services such as security, transaction management, object pooling etc. need to be done by the java programmer.
In EJB, middleware services are provided by EJB Container automatically.
RMI is not a server-side component. It is not required to be deployed on the server.
EJB is a server-side component, it is required to be deployed on the server.
RMI is built on the top of socket programming.
EJB technology is built on the top of RMI.

Session Bean • Session bean encapsulates business logic only, it can be invoked
by local, remote and webservice client.
• It can be used for calculations, database access etc.
• The life cycle of session bean is maintained by the application server (EJB Container).
Types of Session Bean
There are 3 types of session bean.
• 1) Stateless Session Bean: It doesn't maintain state of a client between multiple method calls. @Stateless
• 2) Stateful Session Bean: It maintains state of a client across multiple requests. @Stateful
• 3) Singleton Session Bean: One instance per application, it is shared between clients and supports concurrent access.
@Singleton

RULES FOR DEVELOPING EJB3.X SESSION BEAN WITH JBOSS5.X
• There must be at least one business interface for a session bean. • The interface can be marked as @Remote, @Local or @WebService.
• Session bean class must be a concrete class which should implement the business interface. This class cannot be defined as final, abstract since container might need to manipulate this class.
• Bean must be marked either as @Stateless or @Stateful or @Singleton (EJB 3.1)
• Bean class must have no-argument constructor.
Container uses this constructor to create bean instances. NOTE: If there is no constructor defined then the compiler inserts a default constructor.
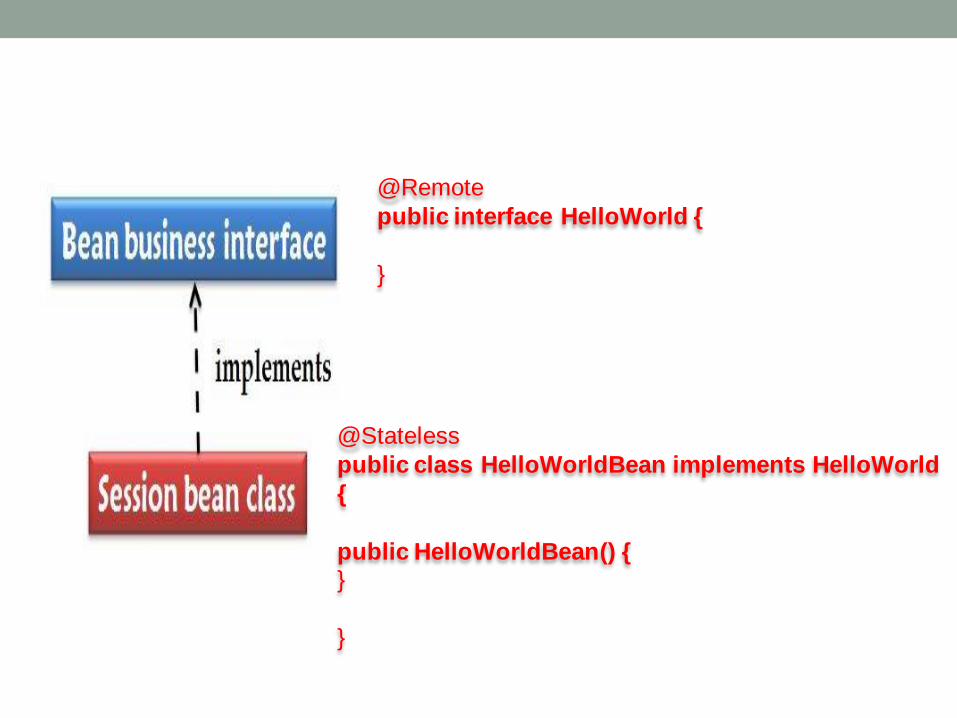
@Remote
public interface HelloWorld {
}
@Stateless
public class HelloWorldBean implements HelloWorld
{
public HelloWorldBean() { }
}

HOW TO CREATE A SIMPLE EJB3 PROJECT IN ECLIPSE
1) Create New EJB Project • File Menu-> New -> EJB Project

2) Enter the Project name as “HelloWorldSessionBean” and make sure the jboss5.x Runtime has been selected with EJB 3.0 module version

3. EJB project in the project Explore view
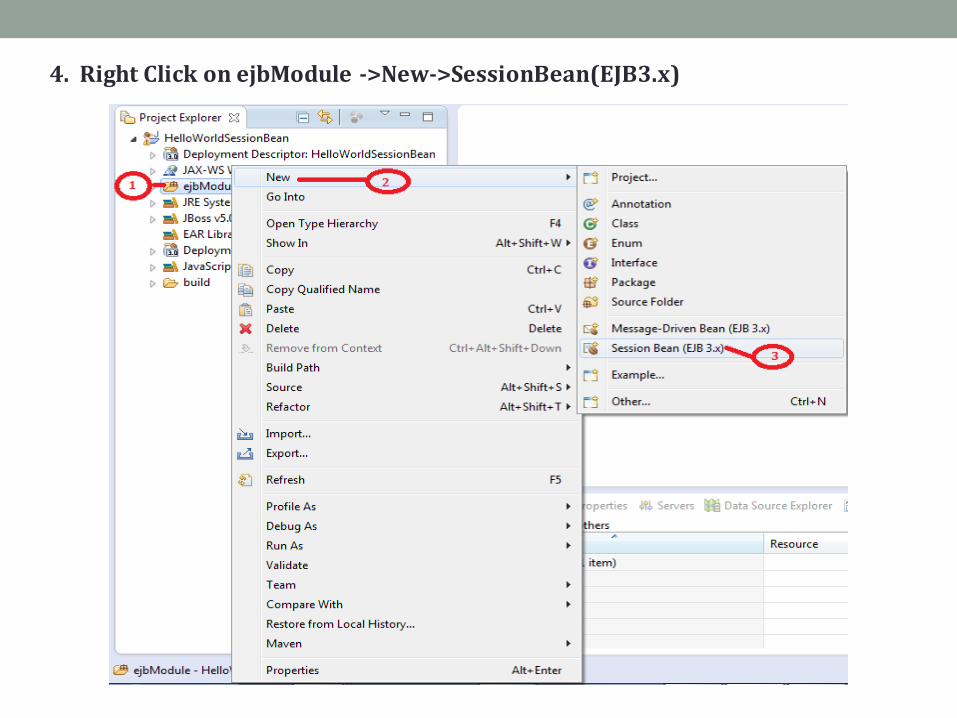
4. Right Click on ejbModule ->New->SessionBean(EJB3.x)
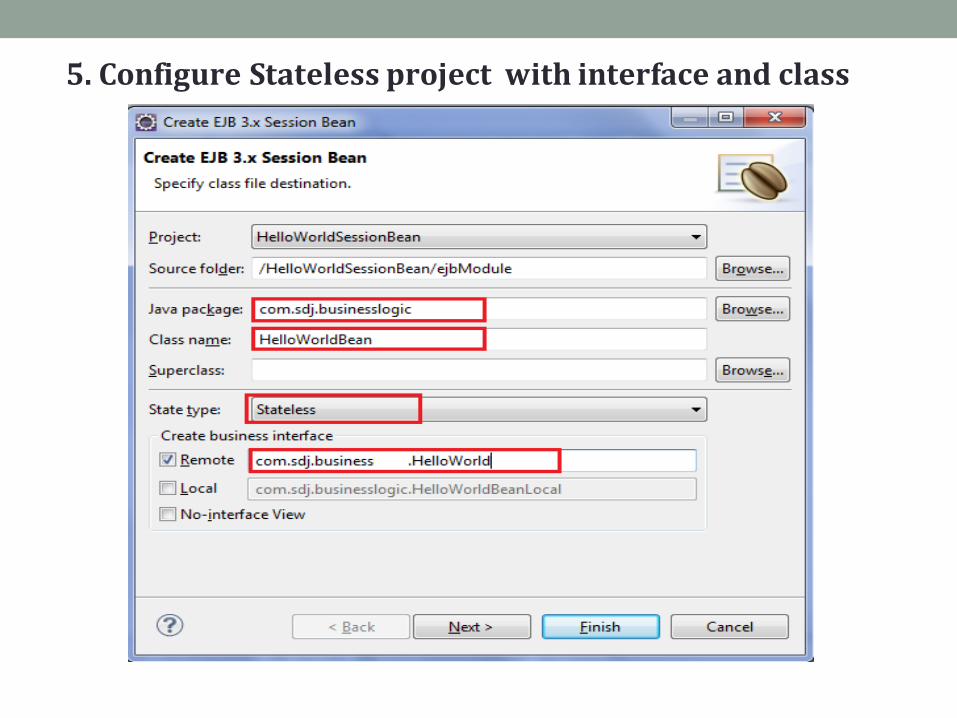
5. Configure Stateless project with interface and class
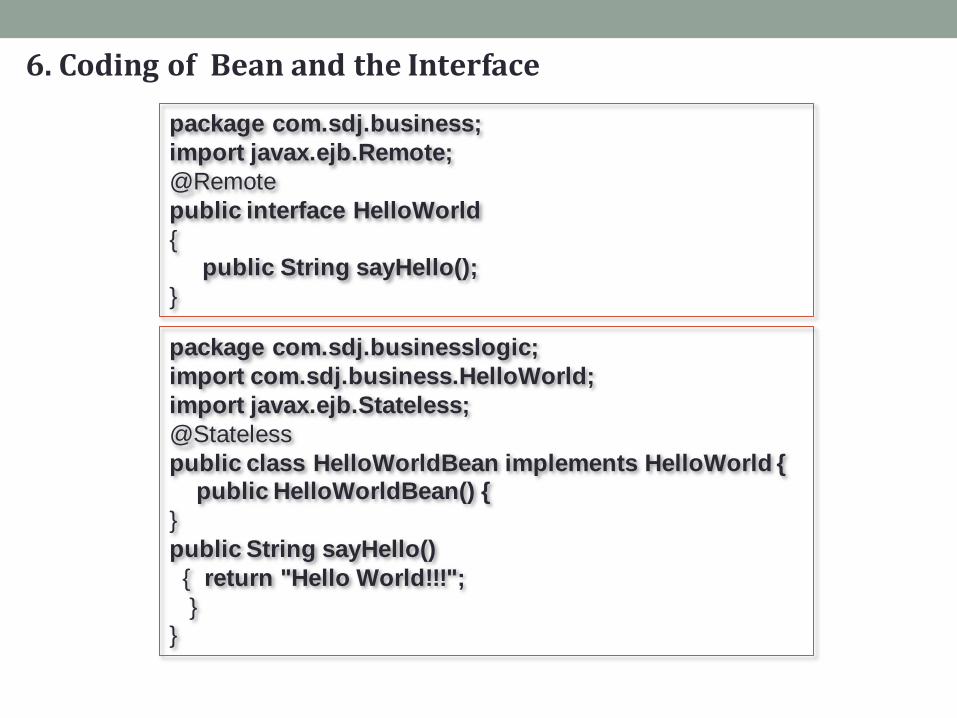
6. Coding of Bean and the Interface
package com.sdj.business;
import javax.ejb.Remote;
@Remote
public interface HelloWorld
{ public String sayHello();
}
package com.sdj.businesslogic;
import com.sdj.business.HelloWorld;
import javax.ejb.Stateless;
@Stateless
public class HelloWorldBean implements HelloWorld { public HelloWorldBean() {
}
public String sayHello()
{ return "Hello World!!!";
} }

7. Deploy the bean on the server(Deploying EJB Project)

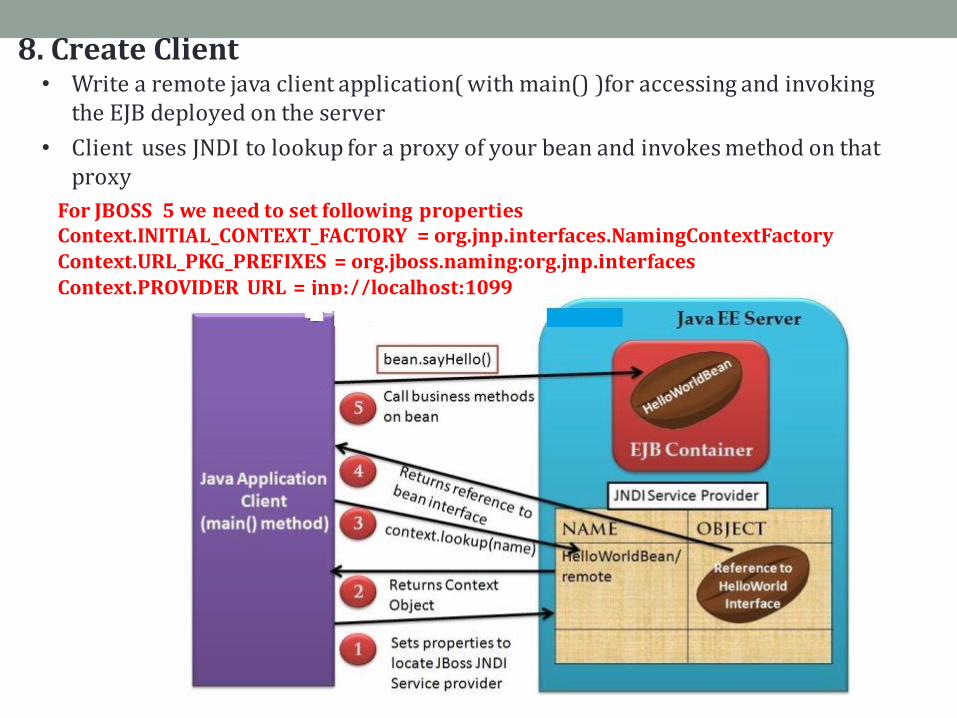
8. Create Client • Write a remote java client application( with main() )for accessing and invoking
the EJB deployed on the server
• Client uses JNDI to lookup for a proxy of your bean and invokes method on that proxy
For JBOSS 5 we need to set following properties Context.INITIAL_CONTEXT_FACTORY = org.jnp.interfaces.NamingContextFactory Context.URL_PKG_PREFIXES = org.jboss.naming:org.jnp.interfaces Context.PROVIDER_URL = jnp://localhost:1099

Right Click on ejbModule ->New->Class
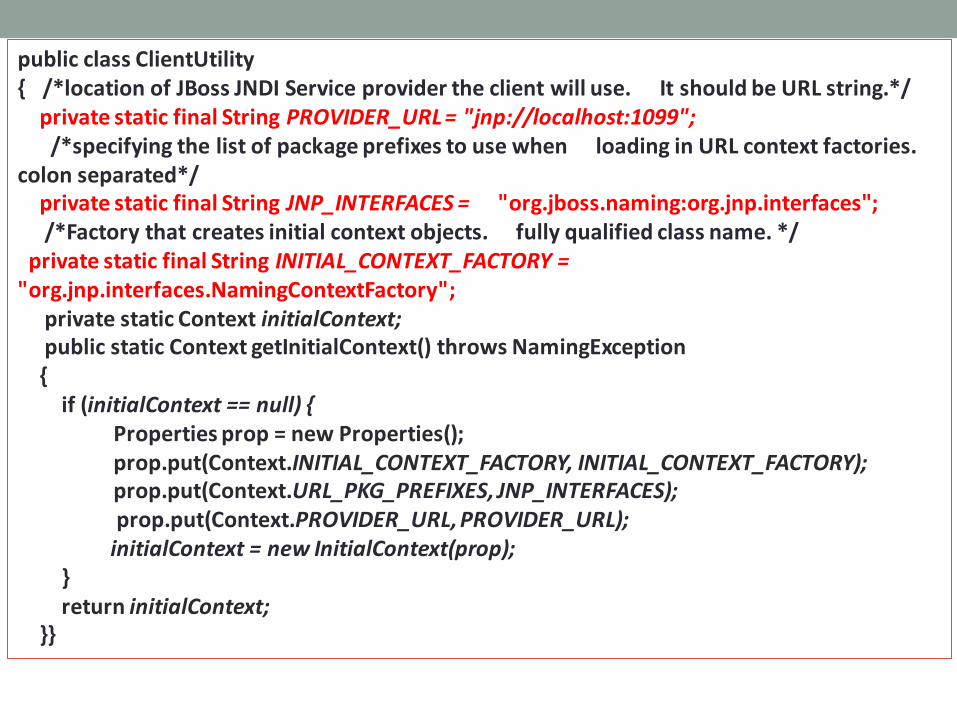
public class ClientUtility { /*location of JBoss JNDI Service provider the client will use. It should be URL string.*/ private static final String PROVIDER_URL = "jnp://localhost:1099"; /*specifying the list of package prefixes to use when loading in URL context factories. colon separated*/ private static final String JNP_INTERFACES = "org.jboss.naming:org.jnp.interfaces"; /*Factory that creates initial context objects. fully qualified class name. */ private static final String INITIAL_CONTEXT_FACTORY = "org.jnp.interfaces.NamingContextFactory"; private static Context initialContext; public static Context getInitialContext() throws NamingException { if (initialContext == null) { Properties prop = new Properties(); prop.put(Context.INITIAL_CONTEXT_FACTORY, INITIAL_CONTEXT_FACTORY); prop.put(Context.URL_PKG_PREFIXES, JNP_INTERFACES); prop.put(Context.PROVIDER_URL, PROVIDER_URL); initialContext = new InitialContext(prop); } return initialContext; }}

9. Creating client class

package com.sdj.client; public class EJBApplicationClient { private static final String LOOKUP_STRING = "HelloWorldBean/remote"; public static void main(String[] args) { HelloWorld bean = doLookup(); //3. Call business logic System.out.println(bean.sayHello()); } private static HelloWorld doLookup(){ Context context = null; HelloWorld bean = null; try{ //1. Obtaining Context context = ClientUtility.getInitialContext(); //2. Lookup and cast bean = (HelloWorld)context.lookup(LOOKUP_STRING); }catch(NamingException e){ e.printStackTrace(); } return bean; }}

10. Run the client

Select the client application (EJBApplicationClient) under Java Application from left pane Open the class path tab from right side pane. “User Entries “ select the application’s default Classpath(in out example ,HelloWorldSessionBean(default classpath)) and remove it
3

11. Select “User Enteries” -> Add External Jar Click on “Add Project” and add HelloWorldSessionBean client project Click on “Apply ” and “Run”.
JAR name Location
All JAR files jboss/common/lib
jbossall-client.jar jboss/client

HOW TO CREATE EJB3 JPA PROJECT IN ECLIPSE (JBOSS AS 5.X)

Steps
1. Creating Database and table in MySQL Project
Field Type Key Extra
pname varchar(255)
pnumber int Primary Key auto_increment
plocation varchar(255)
dept_no int
Database name: pu username : root Password: root Driver=“com.mysql.jdbc.Driver”
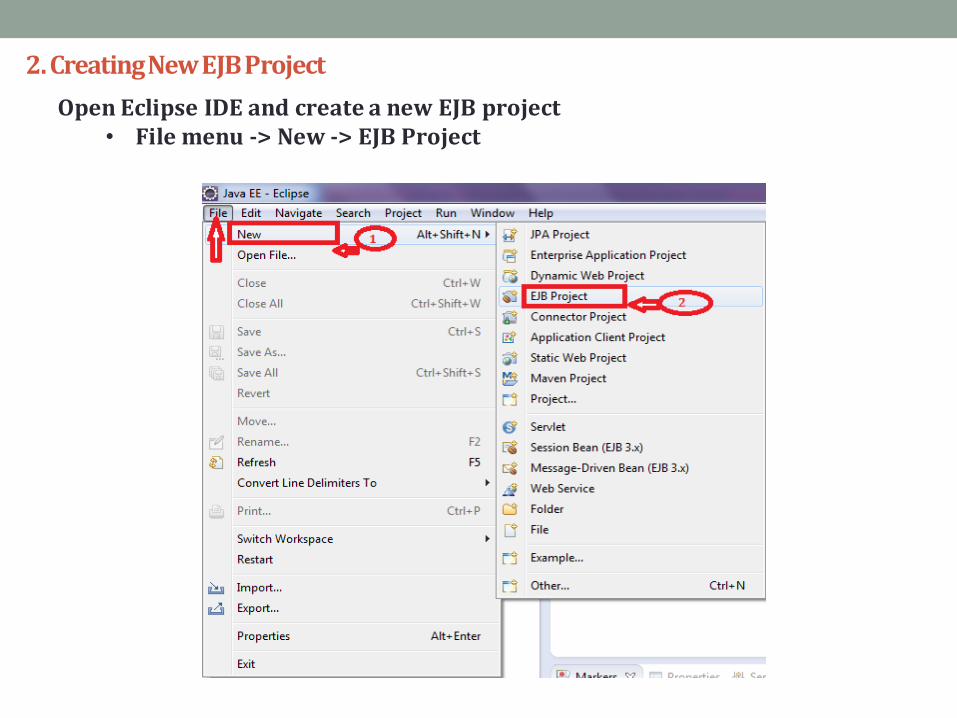
2. Creating New EJB Project Open Eclipse IDE and create a new EJB project
• File menu -> New -> EJB Project

3. Enter the project name as “FirstJPAProject” and make sure the JBoss 5.x Runtime has been selected with the EJB 3.0 Module version.

4. Creating JPA entity
Right click on ejbModule -> New -> Class Enter the Java package name as com.sdj.entities Enter the Class name as Project
@Entity(name="project") public class Project implements Serializable { @Id private int pnumber; private String pname; private String plocation; @Column(name = "dept_no") private int deptNo; //Generate getter and setter method and override toString method }

5. Creating Session Bean and Bean Interface

• Enter the Java package name as com.sdj.businesslogic • Enter the Class name as ProjectBean • Select the State type as Stateless • Check the Remote Business Interface and enter the name
as com.sdj.business.IProject.

Coding of Bean and the Interface
@Remote public interface IProject { void saveProject(Project project); Project findProject(Project project); List<Project> retrieveAllProjects(); }
@Stateless public class ProjectBean implements IProject { @PersistenceContext(unitName = "JPADB") private EntityManager entityManager; public ProjectBean() { } public void saveProject(Project project) { entityManager.persist(project); } public Project findProject(Project project) { Project p = entityManager.find(Project.class, project.getPnumber()); return p; } public List<Project> retrieveAllProjects() { String q = "SELECT p from " + Project.class.getName() + " p"; Query query = entityManager.createQuery(q); List<Project> projects = query.getResultList(); return projects; } }
API Description
EntityManager It is an Interface, it manages the persistence operations on objects. It works like factory for Query instance.
Entity Entities are the persistence objects, stores as records in the database.
Query This interface is implemented by each JPA vendor to obtain relational objects that meet the criteria.

6. Deploying EJB project
Now we need to deploy the project “FirstJPAProject” on server. Right click on the EJB project -> Run As -> Run On Server. Select the existing “JBoss 6.x Runtime Server” and click Finish.

7. persistence.xml • How does the server know which database the EntityManager API should use to
save / update / query the entity objects? The persistence.xml file gives you complete flexibility to configure the EntityManager.
• The persistence.xml file is a standard configuration file in JPA which should be placed in META-INF directory inside the JAR file that contains the entities. The persistence.xml file must define a persistence-unit with a unique name which is used by EntityManager.
• Right click on META-INF folder -> New -> Other -> XML -> XML file. Enter the file name as persistence.xml .
<persistence xmlns="http://java.sun.com/xml/ns/persistence" version="1.0"> <!-- MySQL Datasource --> <persistence-unit name="JPADB"> <jta-data-source>java:/MySQLDS</jta-data-source> <properties> <property name="showSql" value="true"/> <property name="hibernate.dialect“ value="org.hibernate.dialect.MySQLDialect" /> </properties> </persistence-unit> </persistence>

8. Configuring MySQL Datasource in JBoss 5 • JBossAS_HOME/server/default/deploy directory. If this is used then any application
deployed in this application server can use this configuration file, i.e.) one time deployment.
• Your EJB project’s META-INF directory. If this is used then you have to do this in every project which uses MySQL datasource.
Right click on META-INF folder -> New -> Other -> XML -> XML file. Enter the file name as “mysql-ds.xml” and type the following.
<datasources> <local-tx-datasource> <jndi-name>MySQLDS</jndi-name> <connection-url> jdbc:mysql://localhost:3306/pu </connection-url> <driver-class>com.mysql.jdbc.Driver</driver-class> <user-name>root</user-name> <password>root</password> <valid-connection-checker-class-name> org.jboss.resource.adapter.jdbc.vendor.MySQLValidConnectionChecker </valid-connection-checker-class-name> <metadata> <type-mapping>mySQL</type-mapping> </metadata> </local-tx-datasource> </datasources>
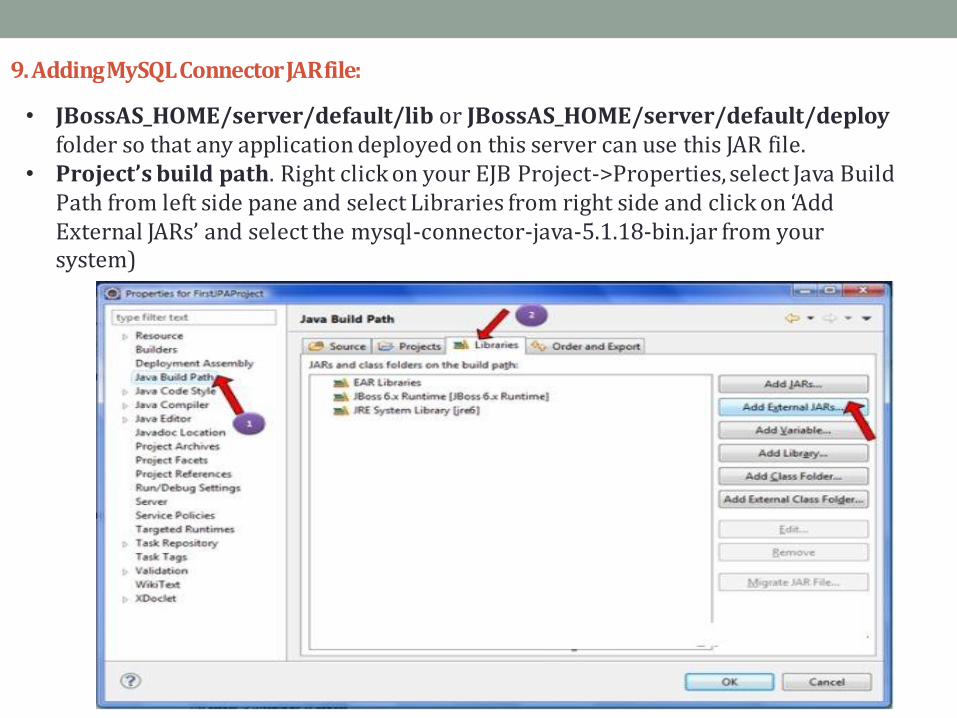
9. Adding MySQL Connector JAR file: • JBossAS_HOME/server/default/lib or JBossAS_HOME/server/default/deploy
folder so that any application deployed on this server can use this JAR file. • Project’s build path. Right click on your EJB Project->Properties, select Java Build
Path from left side pane and select Libraries from right side and click on ‘Add External JARs’ and select the mysql-connector-java-5.1.18-bin.jar from your system)

10. Creating JNDI InitialContext
• The next step is to write a remote Java client application (with main()) for accessing and invoking the EJBs deployed on the server

• Right click on ejbModule -> New -> Class • Enter the package name as com.sdj.clientutility • Enter the Class name as JNDILookupClass
public class JNDILookupClass { private static final String PROVIDER_URL = "jnp://localhost:1099"; private static final String JNP_INTERFACES = "org.jboss.naming:org.jnp.interfaces"; private static final String INITIAL_CONTEXT_FACTORY = "org.jnp.interfaces.NamingContextFactory"; private static Context initialContext; public static Context getInitialContext() throws NamingException { if (initialContext == null) { //Properties extends HashTable Properties prop = new Properties(); prop.put(Context.INITIAL_CONTEXT_FACTORY, INITIAL_CONTEXT_FACTORY); prop.put(Context.URL_PKG_PREFIXES, JNP_INTERFACES); prop.put(Context.PROVIDER_URL, PROVIDER_URL); initialContext = new InitialContext(prop); } return initialContext; } }

11.Creating client class package com.sdj.client;
public class EJBApplicationClient { private static final String LOOKUP_STRING = "ProjectBean/remote"; public static void main(String[] args) { IProject bean = doLookup(); System.out.println("bean : "+bean); Project p1 = new Project(); p1.setPname("Banking App"); p1.setPlocation("Town City"); p1.setDeptNo(1); Project p2 = new Project(); p2.setPname("Office Automation"); p2.setPlocation("Downtown"); p2.setDeptNo(2); // 3. Call business logic // Saving new Projects bean.saveProject(p1); bean.saveProject(p2); // Find a Project p1.setPnumber(1); Project p3 = bean.findProject(p1); System.out.println(p3); // Retrieve all projects System.out.println("List of Projects:"); List<Project> projects = bean.retrieveAllProjects(); for (Project project : projects) System.out.println(project); } private static IProject doLookup() { Context context = null; IProject bean = null; try { // 1. Obtaining Context context = JNDILookupClass.getInitialContext(); // 2. Lookup and cast bean = (IProject) context.lookup(LOOKUP_STRING); } catch (NamingException e) { e.printStackTrace(); } return bean; }}
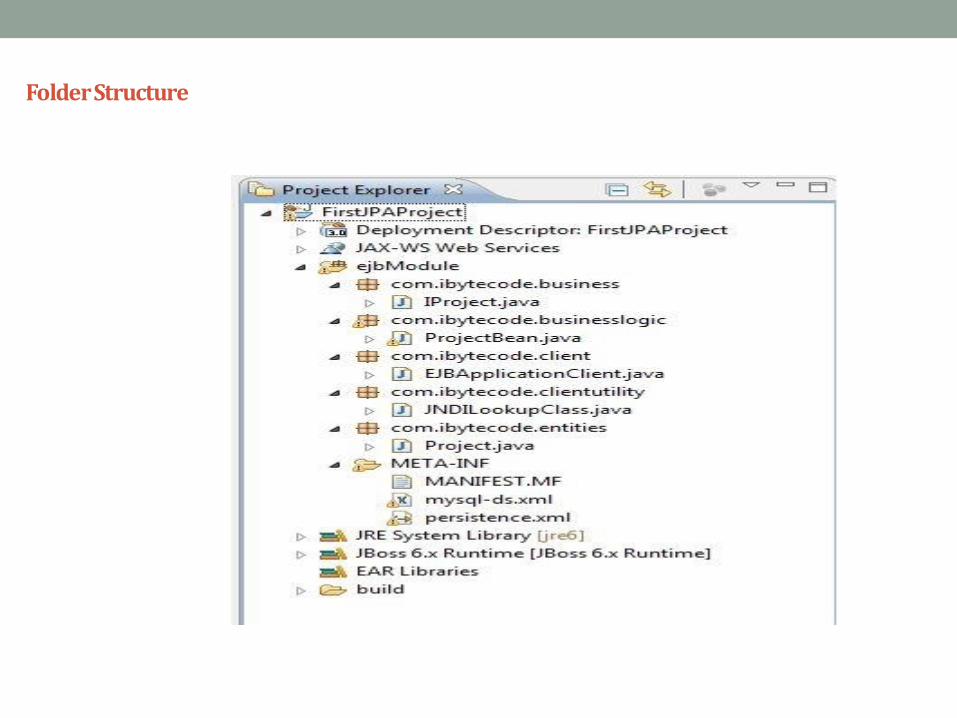
Folder Structure

12. Run the client

Select the client application (EJBApplicationClient) under Java Application from left pane and open the Classpath tab from right side pane. Under “User Entries” select the application’s default classpath (in our example, FirstJPAProject(default classpath)) and Remove it.

Select “User Enteries” -> Add External Jar
JAR name Location
All JAR files jboss/common/lib
jbossall-client.jar jboss/client
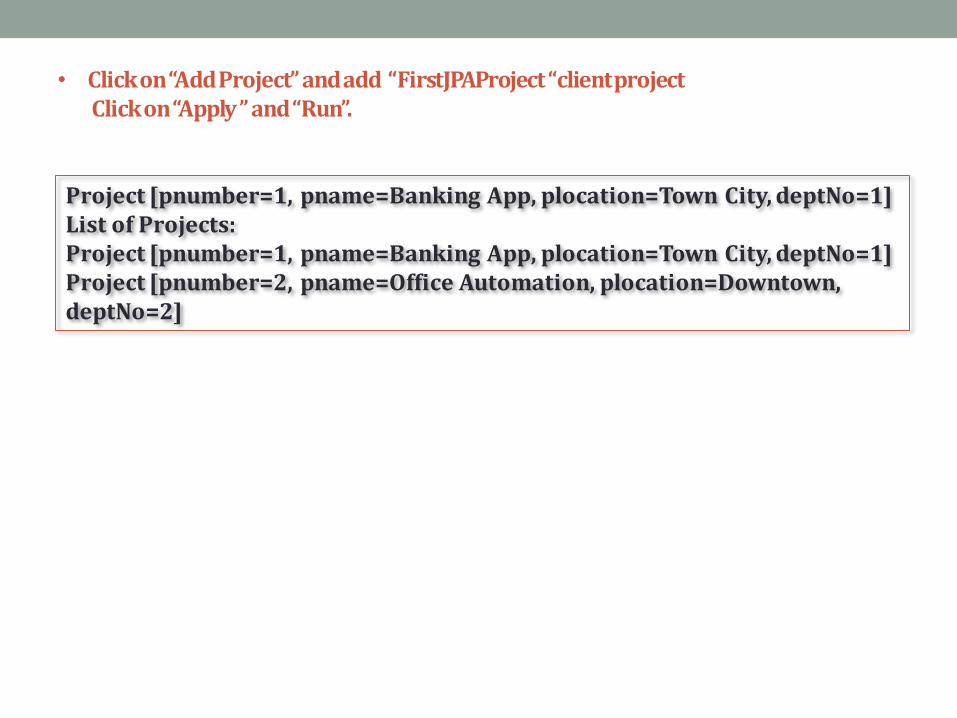
• Click on “Add Project” and add “FirstJPAProject “client project Click on “Apply ” and “Run”.
Project [pnumber=1, pname=Banking App, plocation=Town City, deptNo=1] List of Projects: Project [pnumber=1, pname=Banking App, plocation=Town City, deptNo=1] Project [pnumber=2, pname=Office Automation, plocation=Downtown, deptNo=2]