electronic licensing system training manualelectronic licensing system (els) to login, enter your...
TRANSCRIPT
Training Manual MN DNR
Electronic Licensing System (ELS)
Log in Procedure For MN DNR
Electronic Licensing System (ELS)
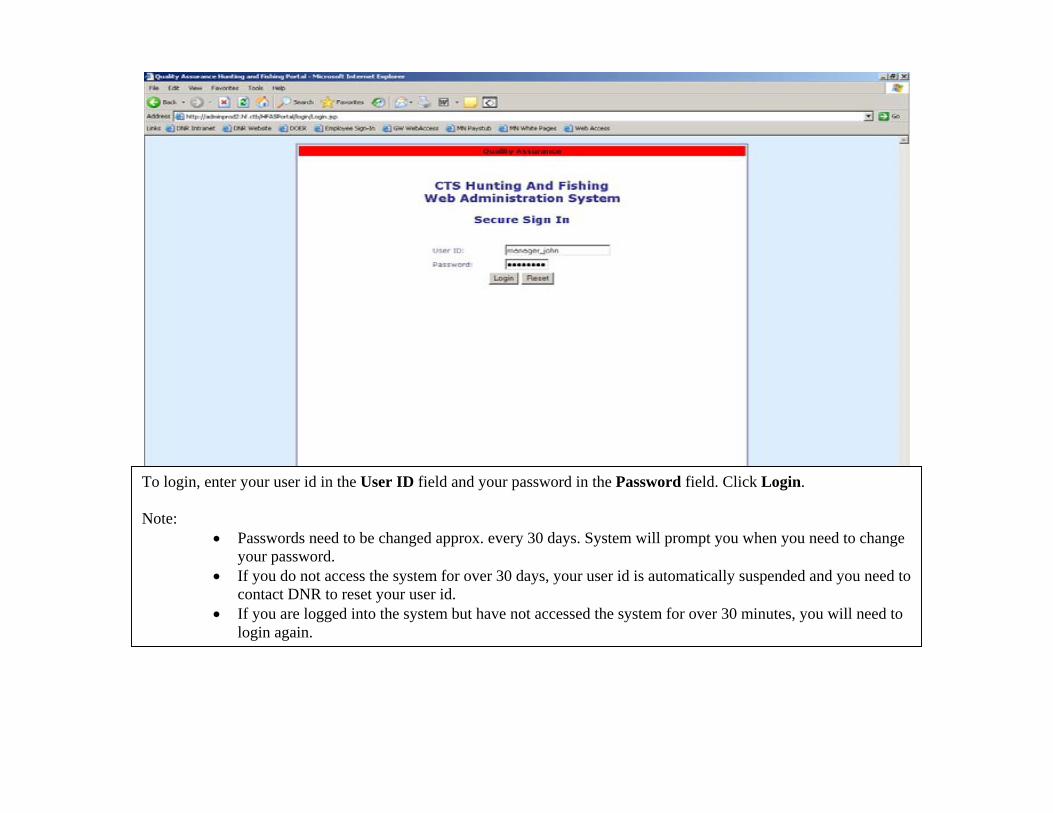
To login, enter your user id in the User ID field and your password in the Password field. Click Login. Note:
• Passwords need to be changed approx. every 30 days. System will prompt you when you need to change your password.
• If you do not access the system for over 30 days, your user id is automatically suspended and you need to contact DNR to reset your user id.
• If you are logged into the system but have not accessed the system for over 30 minutes, you will need to login again.
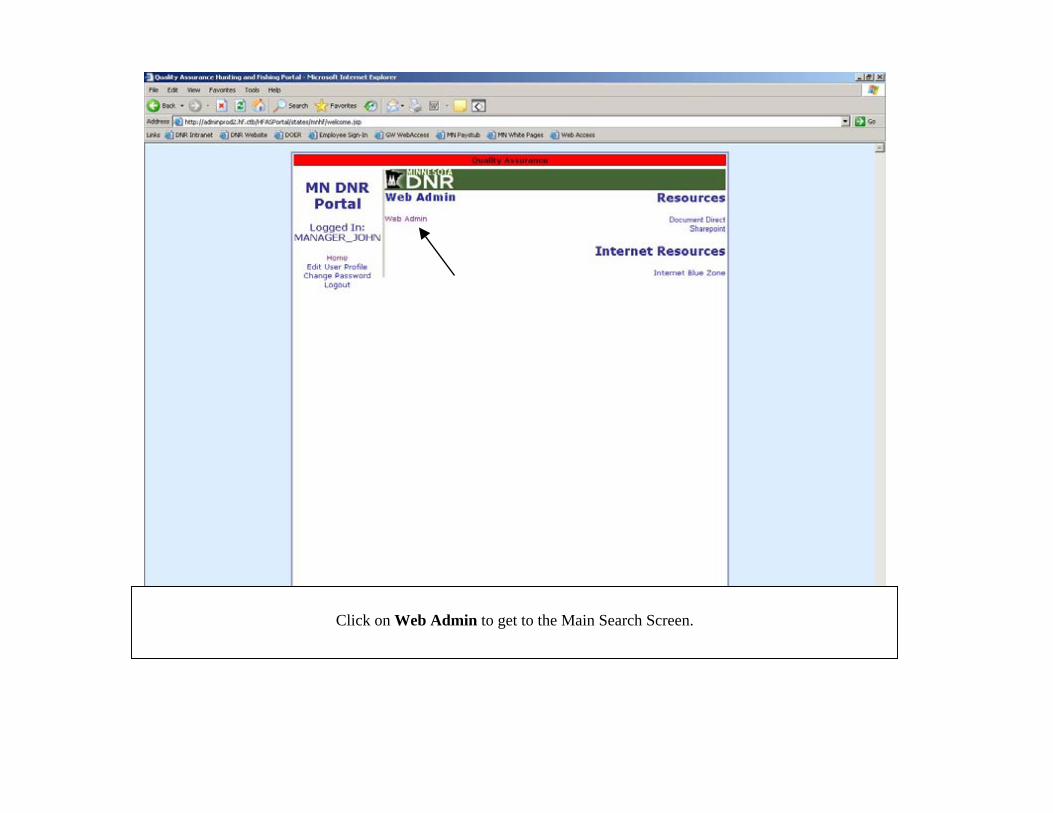
Click on Web Admin to get to the Main Search Screen.
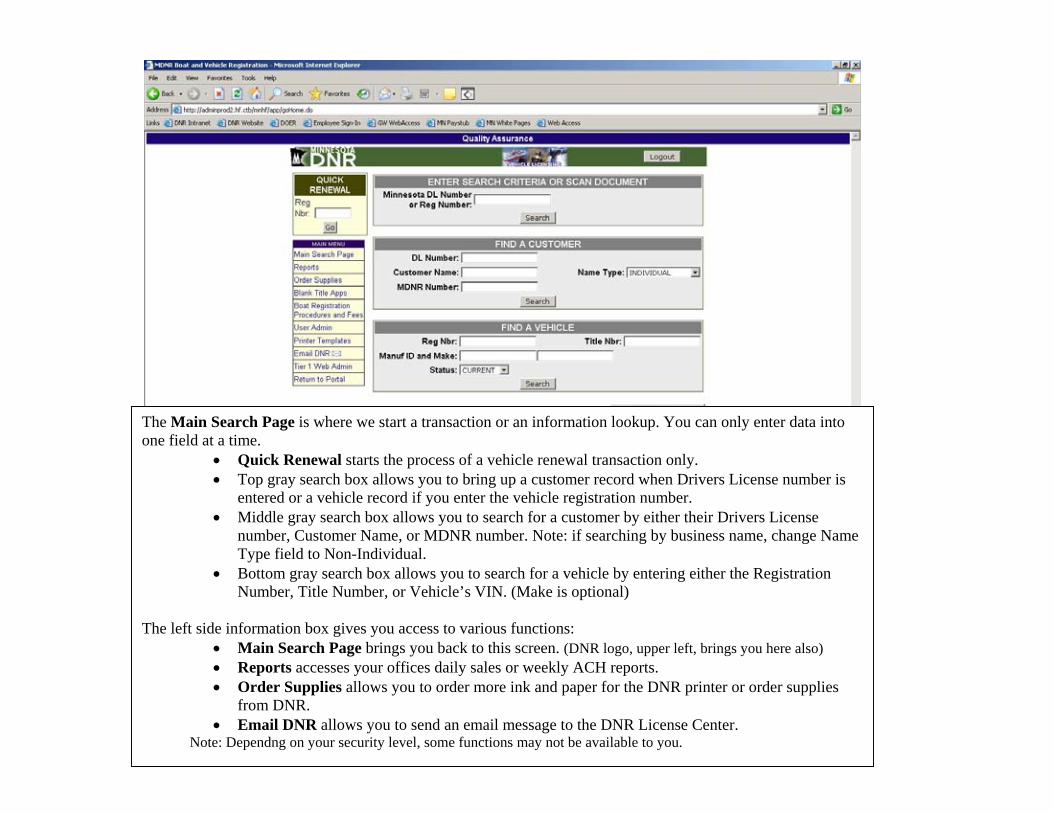
The Main Search Page is where we start a transaction or an information lookup. You can only enter data into one field at a time.
• Quick Renewal starts the process of a vehicle renewal transaction only. • Top gray search box allows you to bring up a customer record when Drivers License number is
entered or a vehicle record if you enter the vehicle registration number. • Middle gray search box allows you to search for a customer by either their Drivers License
number, Customer Name, or MDNR number. Note: if searching by business name, change Name Type field to Non-Individual.
• Bottom gray search box allows you to search for a vehicle by entering either the Registration Number, Title Number, or Vehicle’s VIN. (Make is optional)
The left side information box gives you access to various functions:
• Main Search Page brings you back to this screen. (DNR logo, upper left, brings you here also) • Reports accesses your offices daily sales or weekly ACH reports. • Order Supplies allows you to order more ink and paper for the DNR printer or order supplies
from DNR. • Email DNR allows you to send an email message to the DNR License Center.
Note: Dependng on your security level, some functions may not be available to you.
Quick Renewal Process
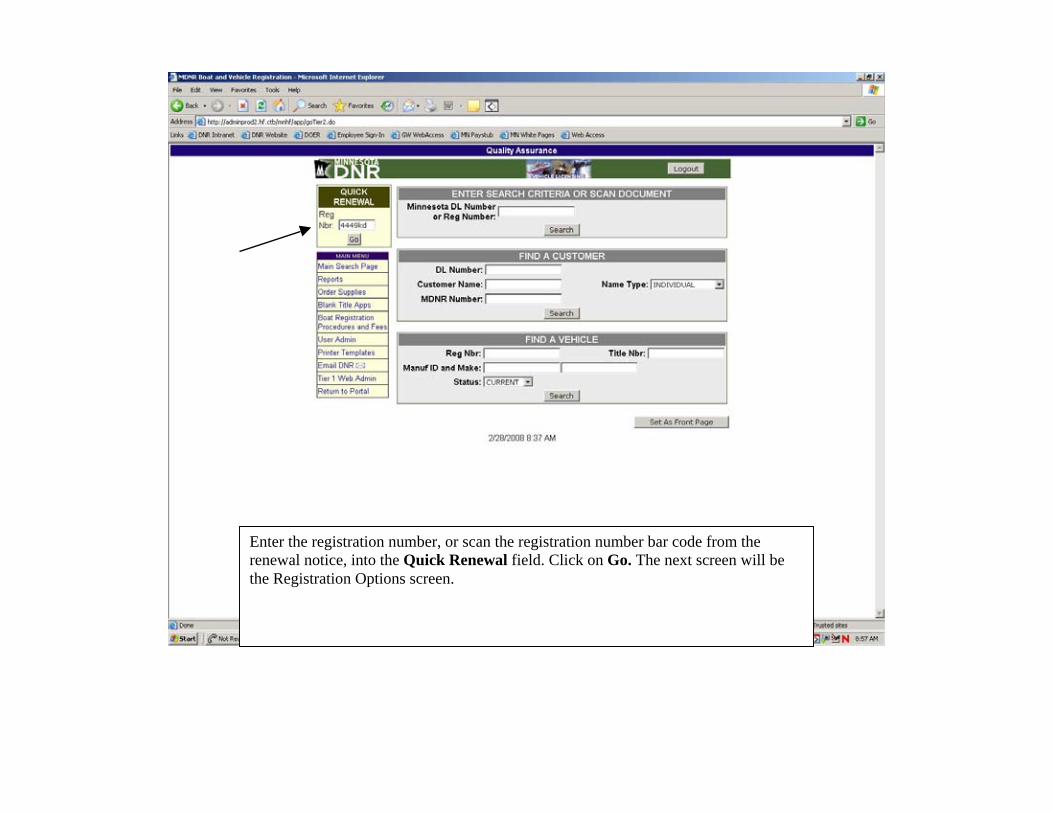
Enter the registration number, or scan the registration number bar code from the renewal notice, into the Quick Renewal field. Click on Go. The next screen will be the Registration Options screen.
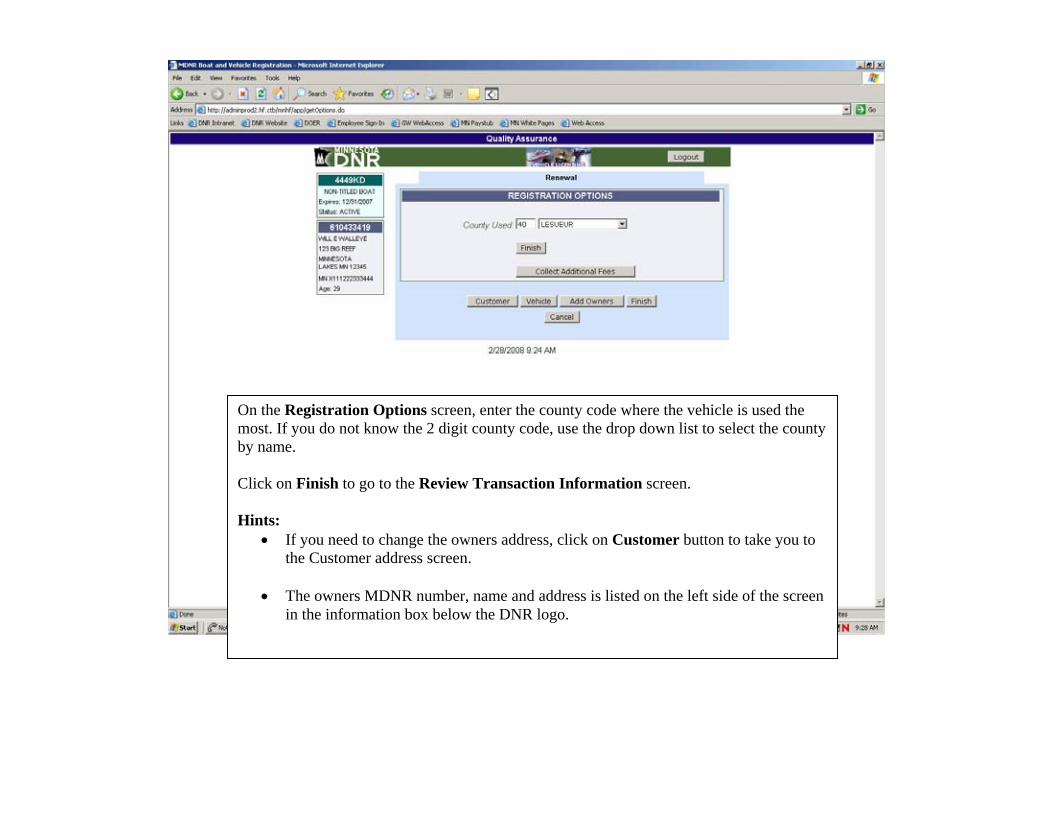
On the Registration Options screen, enter the county code where the vehicle is used the most. If you do not know the 2 digit county code, use the drop down list to select the county by name. Click on Finish to go to the Review Transaction Information screen. Hints:
• If you need to change the owners address, click on Customer button to take you to the Customer address screen.
• The owners MDNR number, name and address is listed on the left side of the screen
in the information box below the DNR logo.
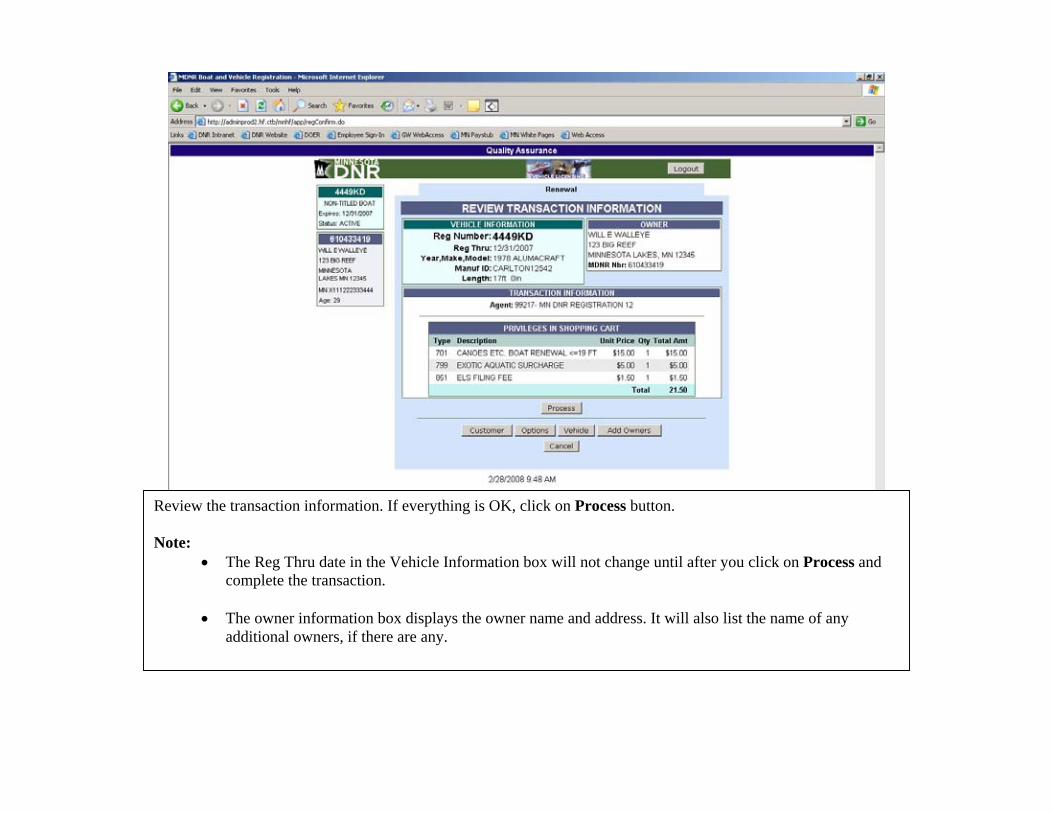
Review the transaction information. If everything is OK, click on Process button. Note:
• The Reg Thru date in the Vehicle Information box will not change until after you click on Process and complete the transaction.
• The owner information box displays the owner name and address. It will also list the name of any
additional owners, if there are any.
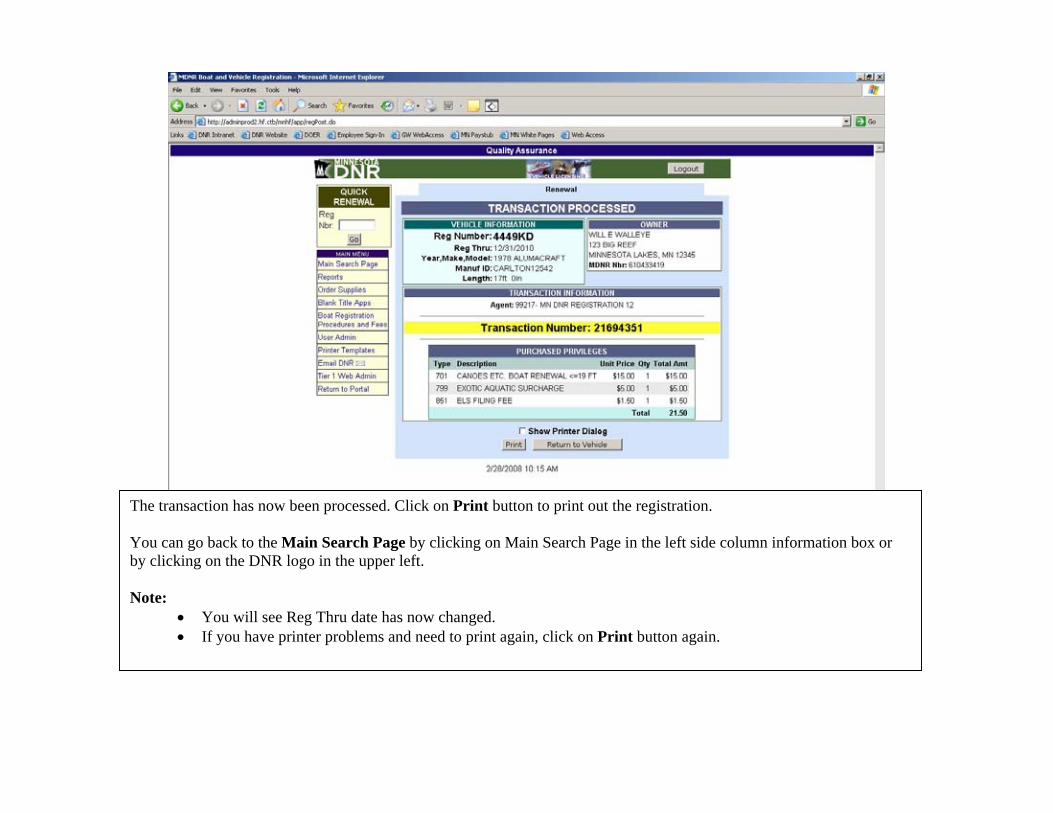
The transaction has now been processed. Click on Print button to print out the registration. You can go back to the Main Search Page by clicking on Main Search Page in the left side column information box or by clicking on the DNR logo in the upper left. Note:
• You will see Reg Thru date has now changed. • If you have printer problems and need to print again, click on Print button again.
New Titled Watercraft Transaction
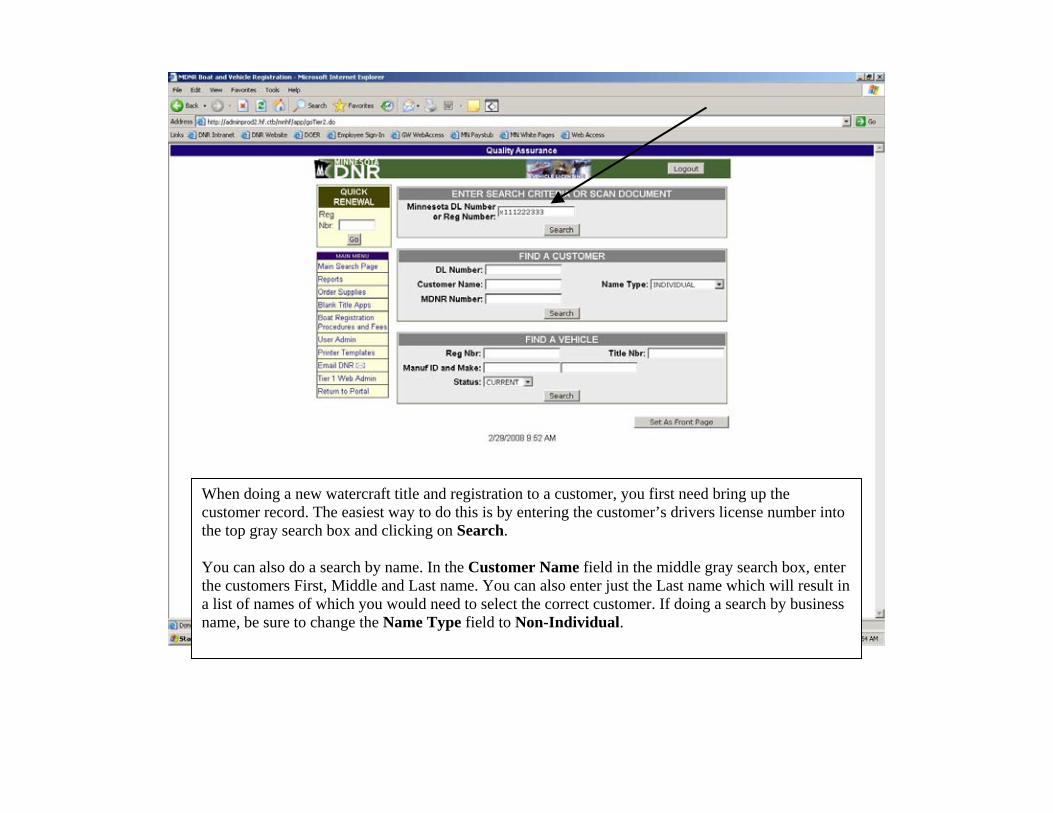
When doing a new watercraft title and registration to a customer, you first need bring up the customer record. The easiest way to do this is by entering the customer’s drivers license number into the top gray search box and clicking on Search. You can also do a search by name. In the Customer Name field in the middle gray search box, enter the customers First, Middle and Last name. You can also enter just the Last name which will result in a list of names of which you would need to select the correct customer. If doing a search by business name, be sure to change the Name Type field to Non-Individual.

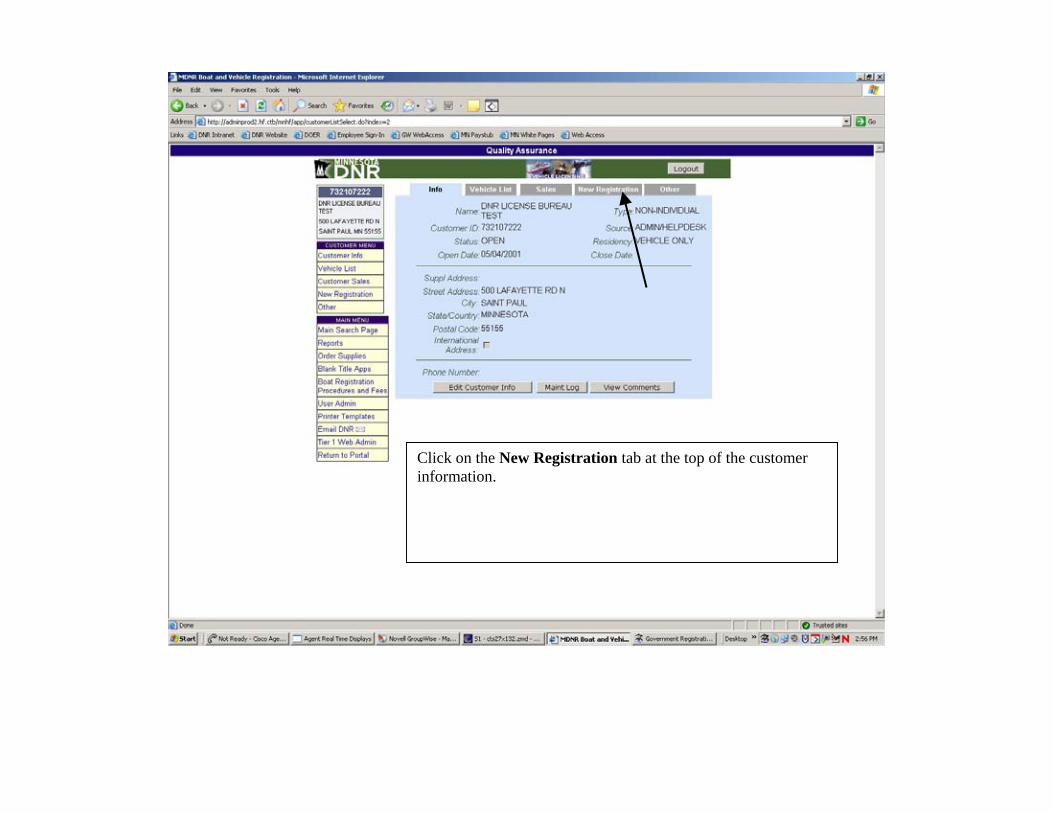
Once you have the customer record displayed, Click on the New Registration tab at the top of the customer record. Hint:
• If you need to change the customer’s address, click on Edit Customer Info button at the bottom of the customer record.
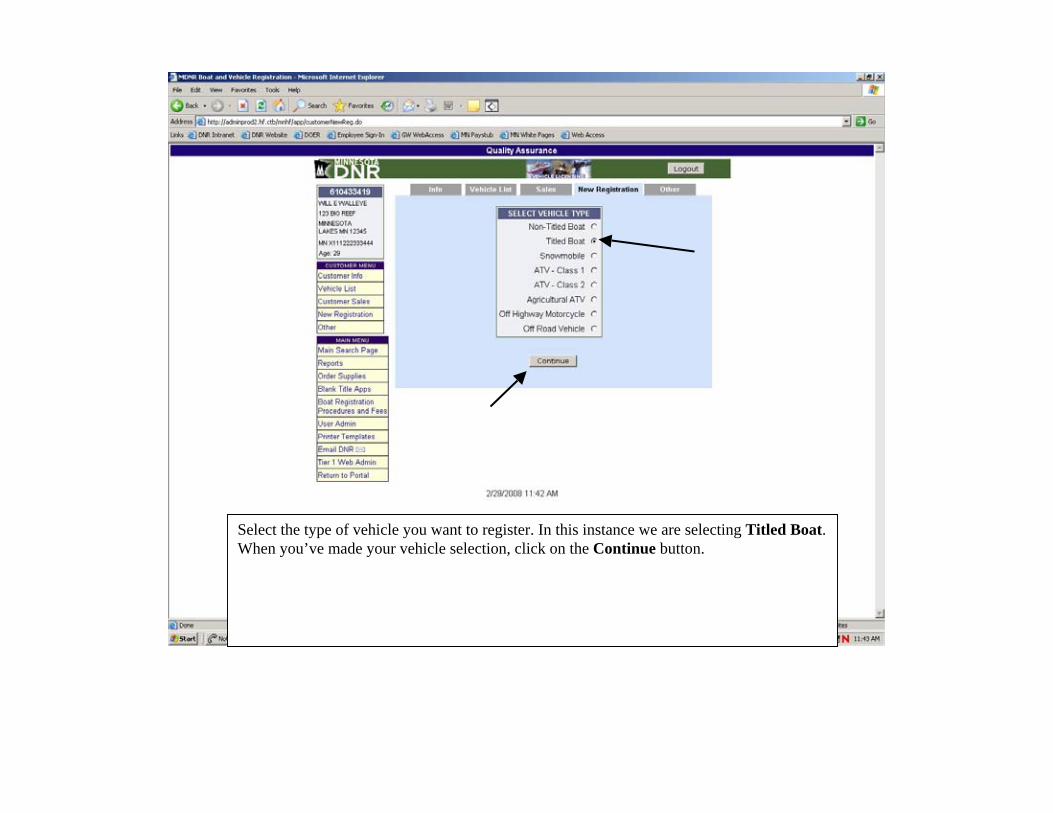
Select the type of vehicle you want to register. In this instance we are selecting Titled Boat.When you’ve made your vehicle selection, click on the Continue button.
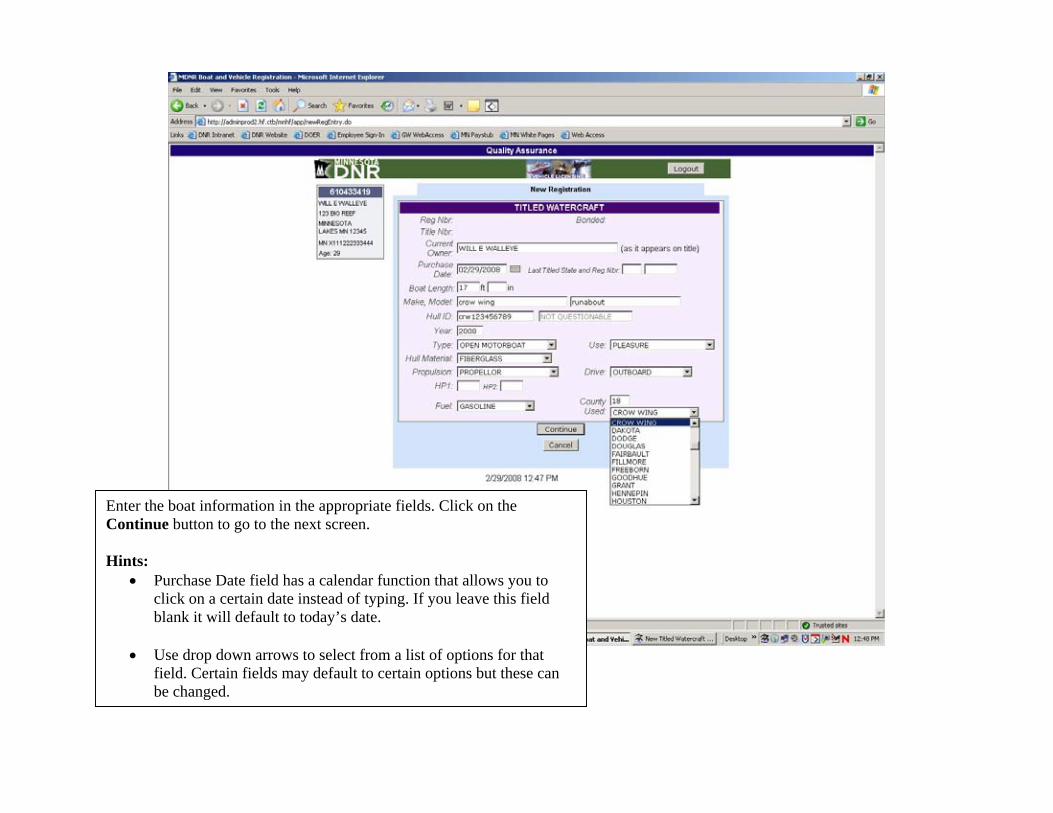
Enter the boat information in the appropriate fields. Click on the Continue button to go to the next screen. Hints:
• Purchase Date field has a calendar function that allows you to click on a certain date instead of typing. If you leave this field blank it will default to today’s date.
• Use drop down arrows to select from a list of options for that
field. Certain fields may default to certain options but these can be changed.
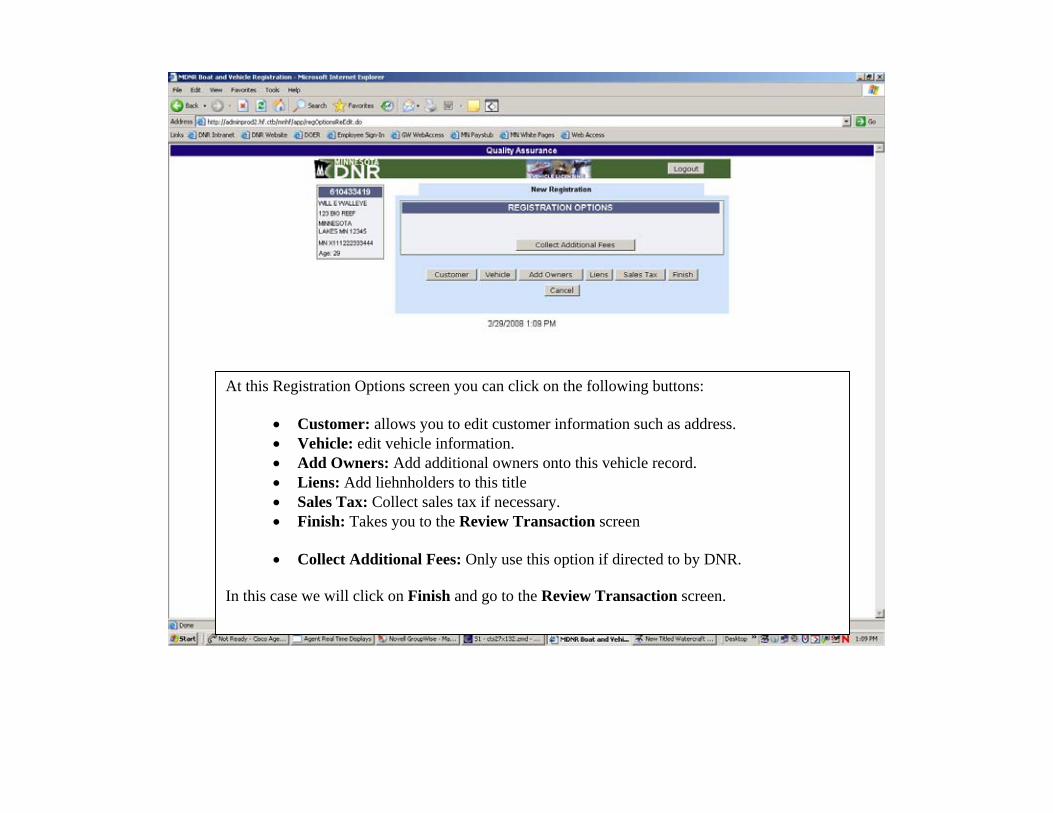
At this Registration Options screen you can click on the following buttons:
• Customer: allows you to edit customer information such as address. • Vehicle: edit vehicle information. • Add Owners: Add additional owners onto this vehicle record. • Liens: Add liehnholders to this title • Sales Tax: Collect sales tax if necessary. • Finish: Takes you to the Review Transaction screen
• Collect Additional Fees: Only use this option if directed to by DNR.
In this case we will click on Finish and go to the Review Transaction screen.
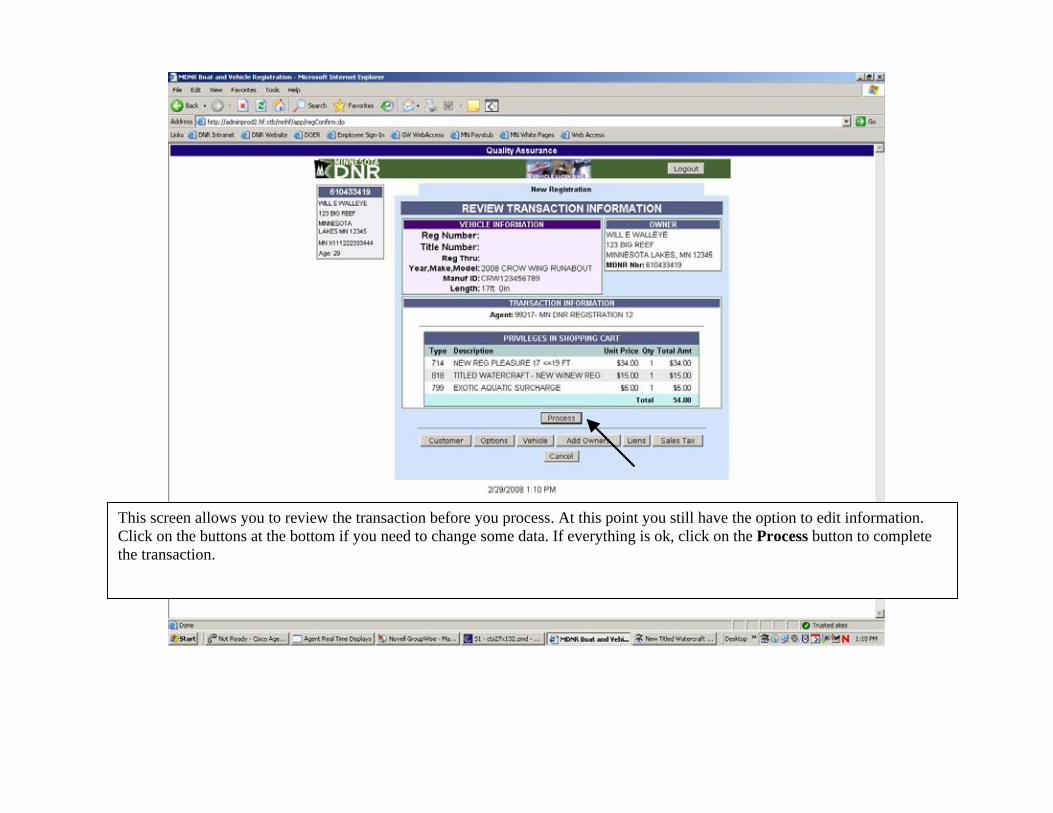
This screen allows you to review the transaction before you process. At this point you still have the option to edit information. Click on the buttons at the bottom if you need to change some data. If everything is ok, click on the Process button to complete the transaction.

This transaction has now been completed. To print out the customers registration card and decals, click on the Print button. Hint:
• If you click on Print Title Application, which is located just below the transaction number, a completed title application will print to your default printer.

Transfer Registration

To transfer a registration, the easiest way to start is by entering the registration number of the vehicle in the top gray search box. Click on Search. Hint: If you don’t know the registration number you will have to do a search by Customer Name or bythe vehicle’s Manuf ID (VIN).
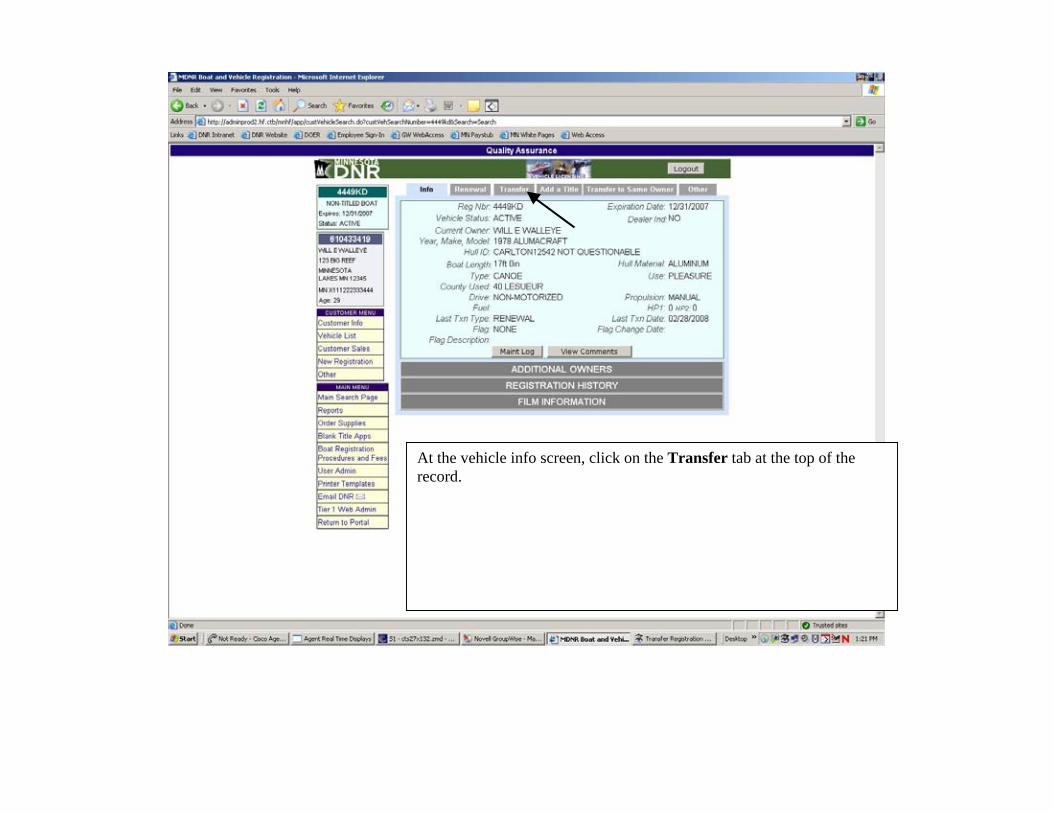
At the vehicle info screen, click on the Transfer tab at the top of the record.
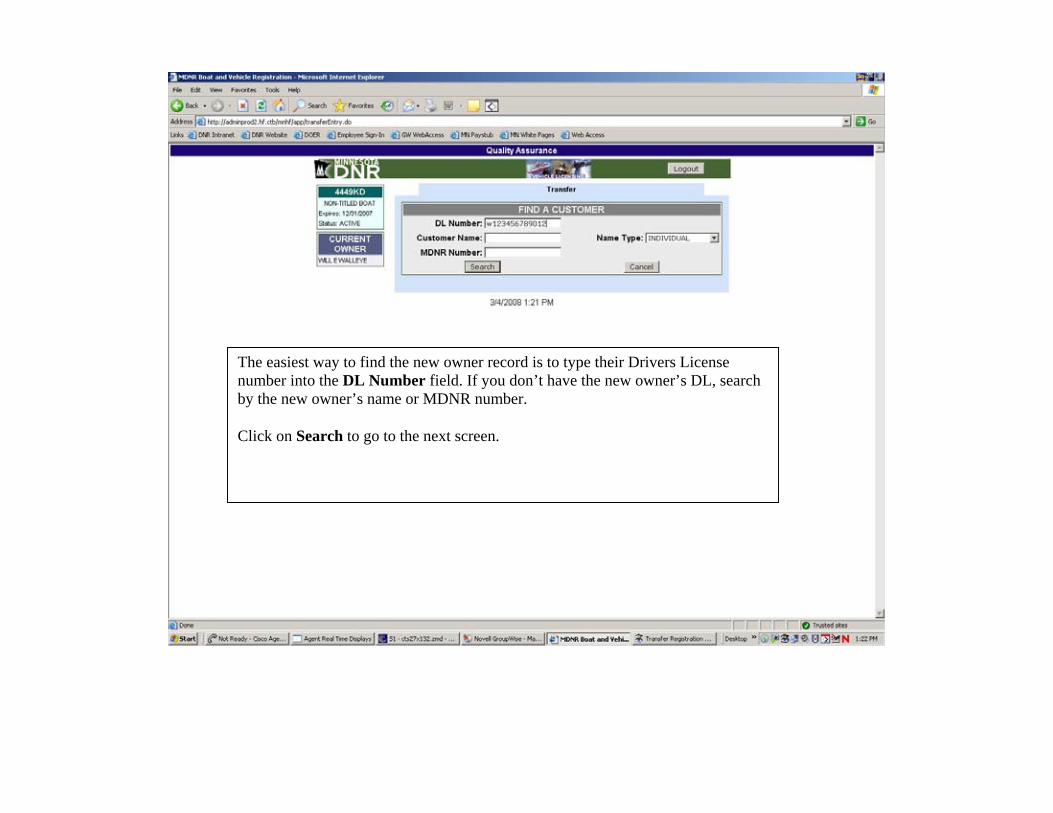
The easiest way to find the new owner record is to type their Drivers License number into the DL Number field. If you don’t have the new owner’s DL, search by the new owner’s name or MDNR number. Click on Search to go to the next screen.
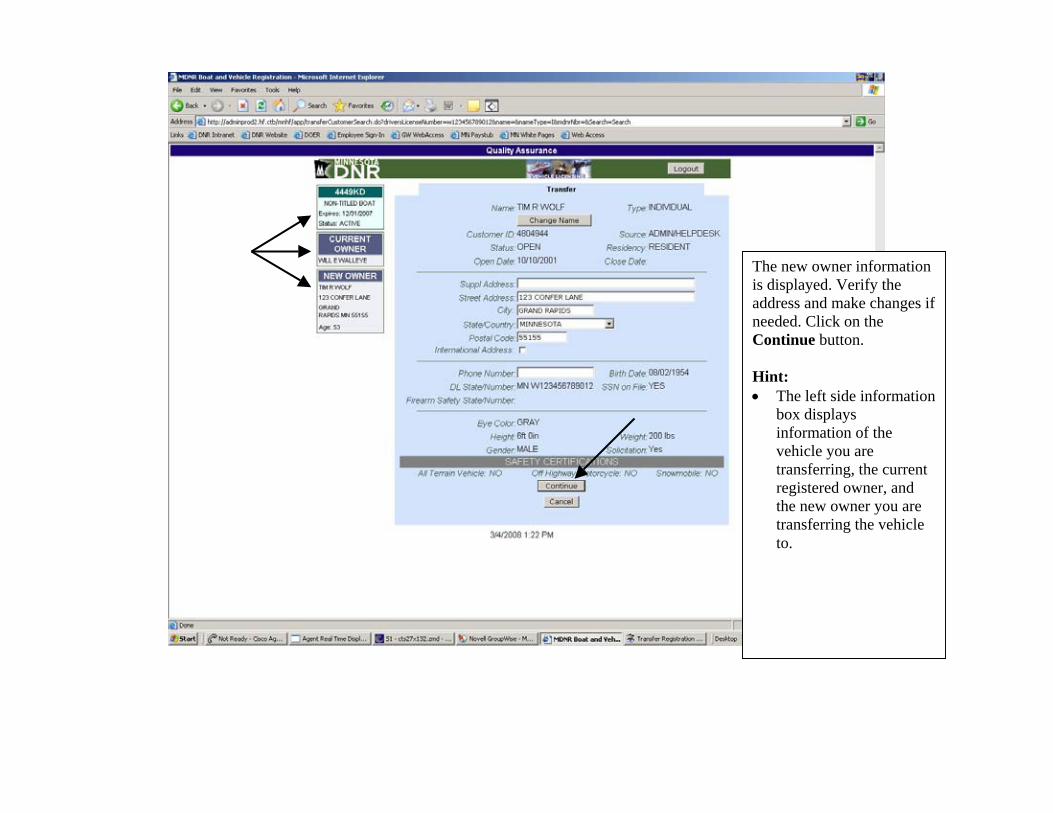
The new owner information is displayed. Verify the address and make changes if needed. Click on the Continue button. Hint: • The left side information
box displays information of the vehicle you are transferring, the current registered owner, and the new owner you are transferring the vehicle to.
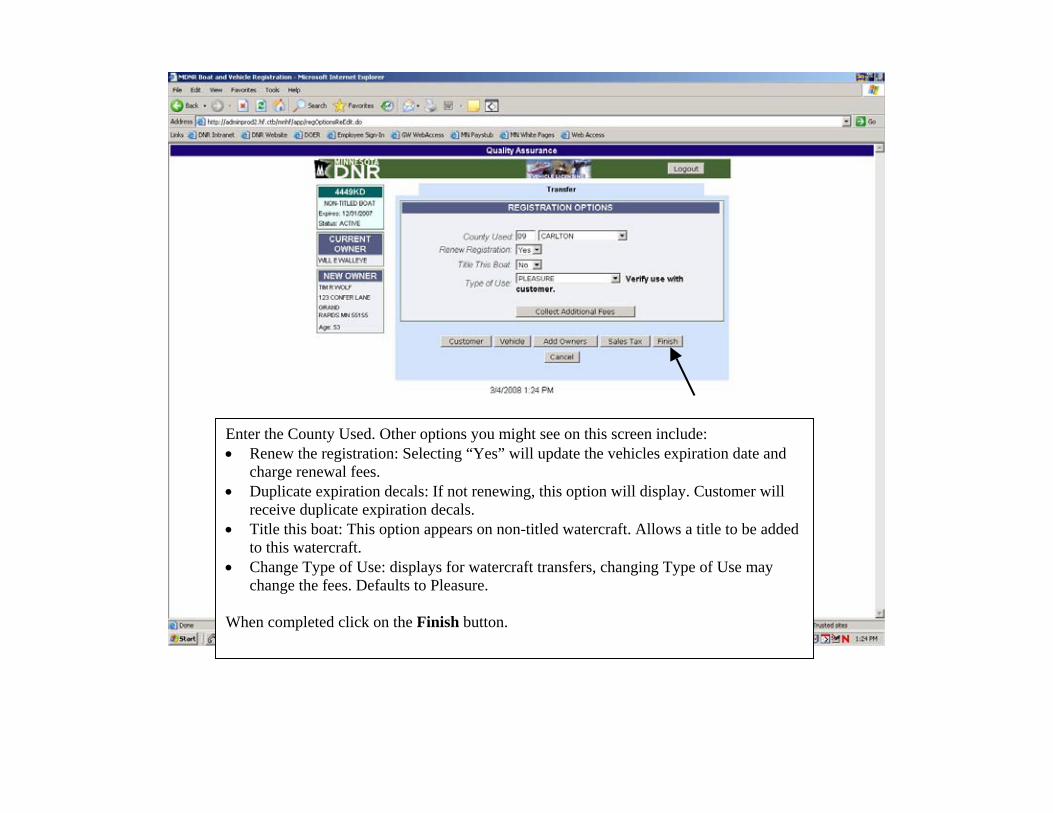
Enter the County Used. Other options you might see on this screen include: • Renew the registration: Selecting “Yes” will update the vehicles expiration date and
charge renewal fees. • Duplicate expiration decals: If not renewing, this option will display. Customer will
receive duplicate expiration decals. • Title this boat: This option appears on non-titled watercraft. Allows a title to be added
to this watercraft. • Change Type of Use: displays for watercraft transfers, changing Type of Use may
change the fees. Defaults to Pleasure. When completed click on the Finish button.
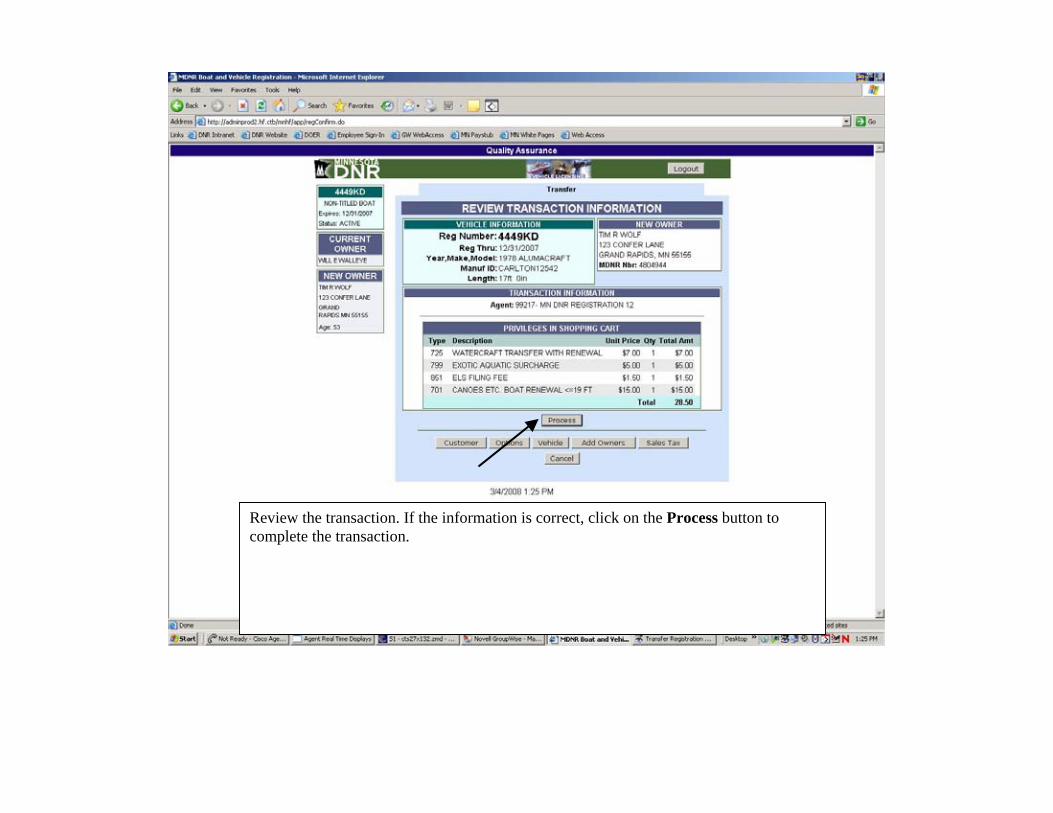
Review the transaction. If the information is correct, click on the Process button to complete the transaction.
Duplicate Registration Card
And Expiration Decals
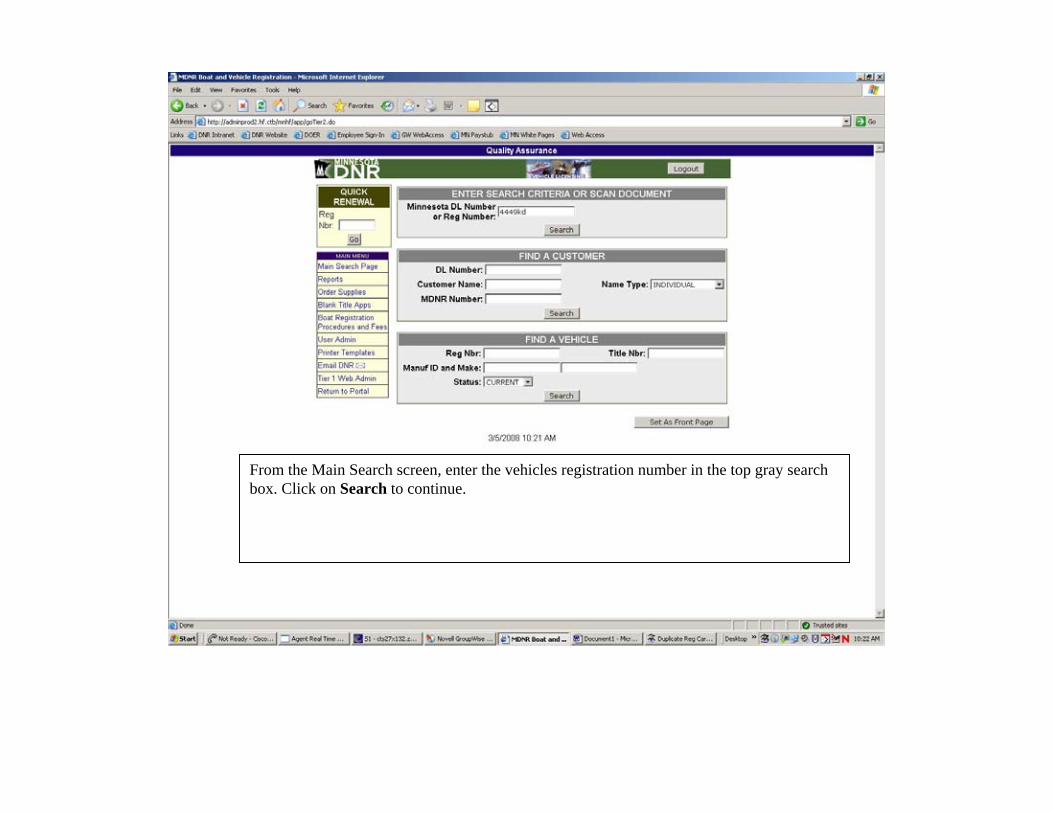
From the Main Search screen, enter the vehicles registration number in the top gray search box. Click on Search to continue.
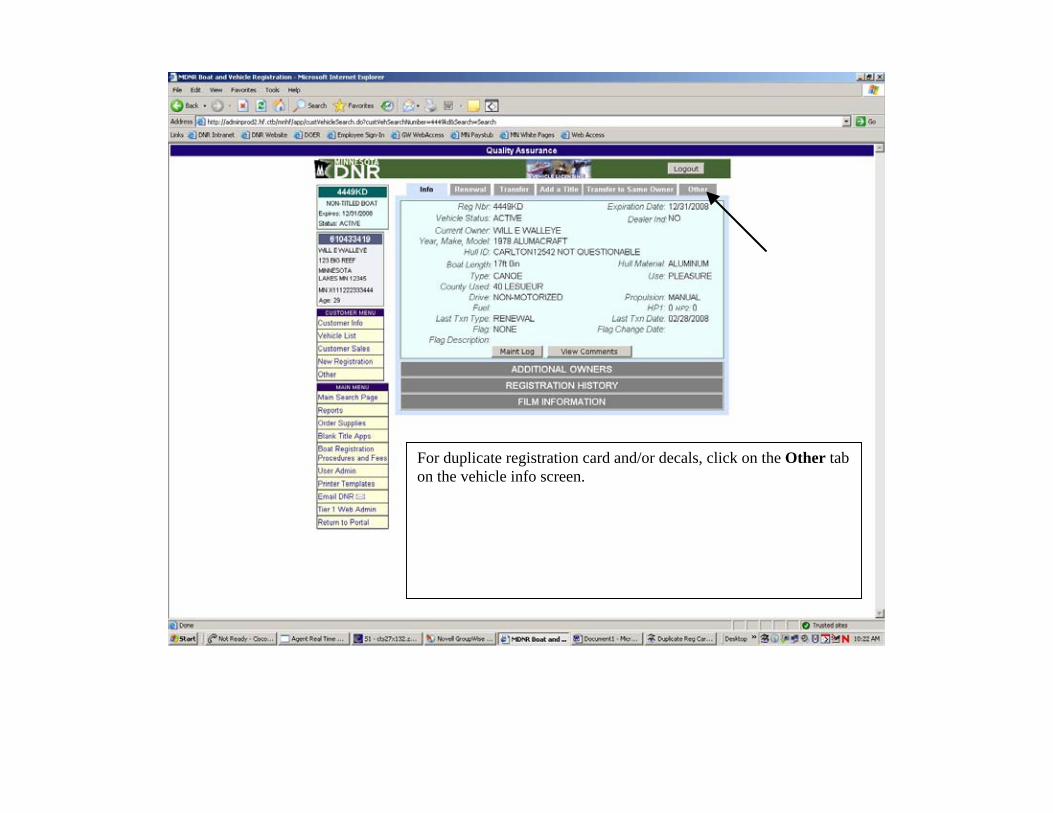
For duplicate registration card and/or decals, click on the Other tab on the vehicle info screen.
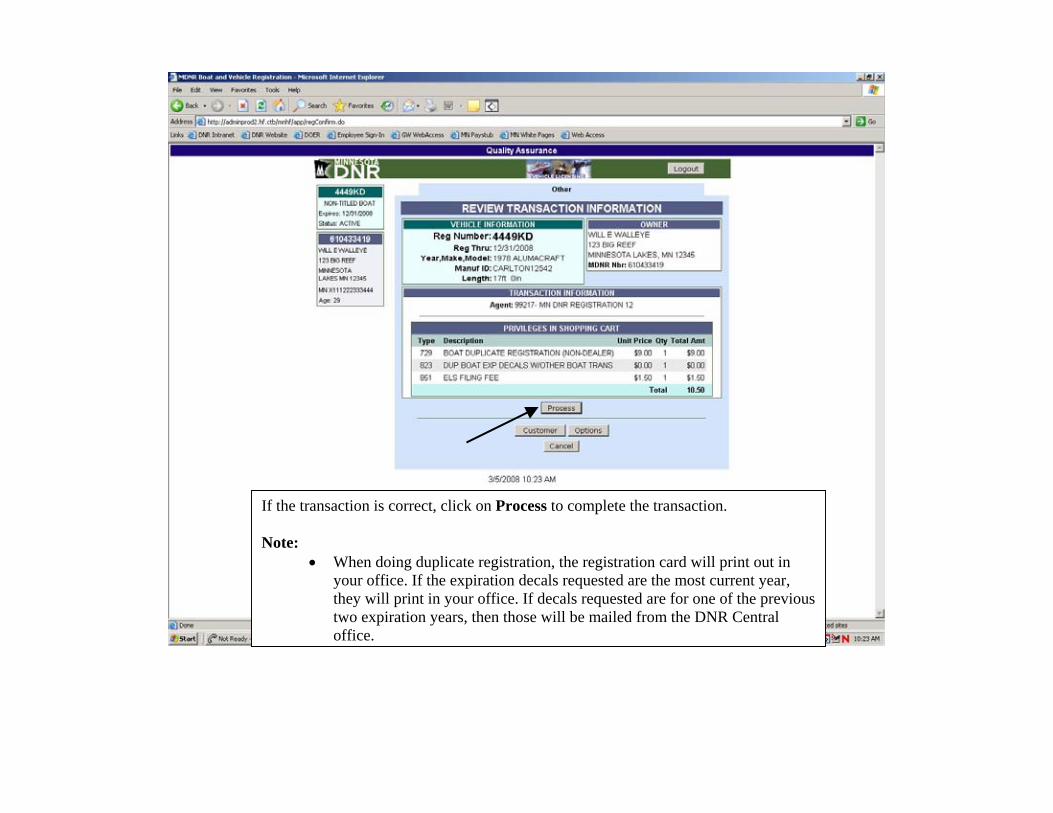
If the transaction is correct, click on Process to complete the transaction. Note:
• When doing duplicate registration, the registration card will print out in your office. If the expiration decals requested are the most current year, they will print in your office. If decals requested are for one of the previous two expiration years, then those will be mailed from the DNR Central office.
Duplicate Title
Transaction
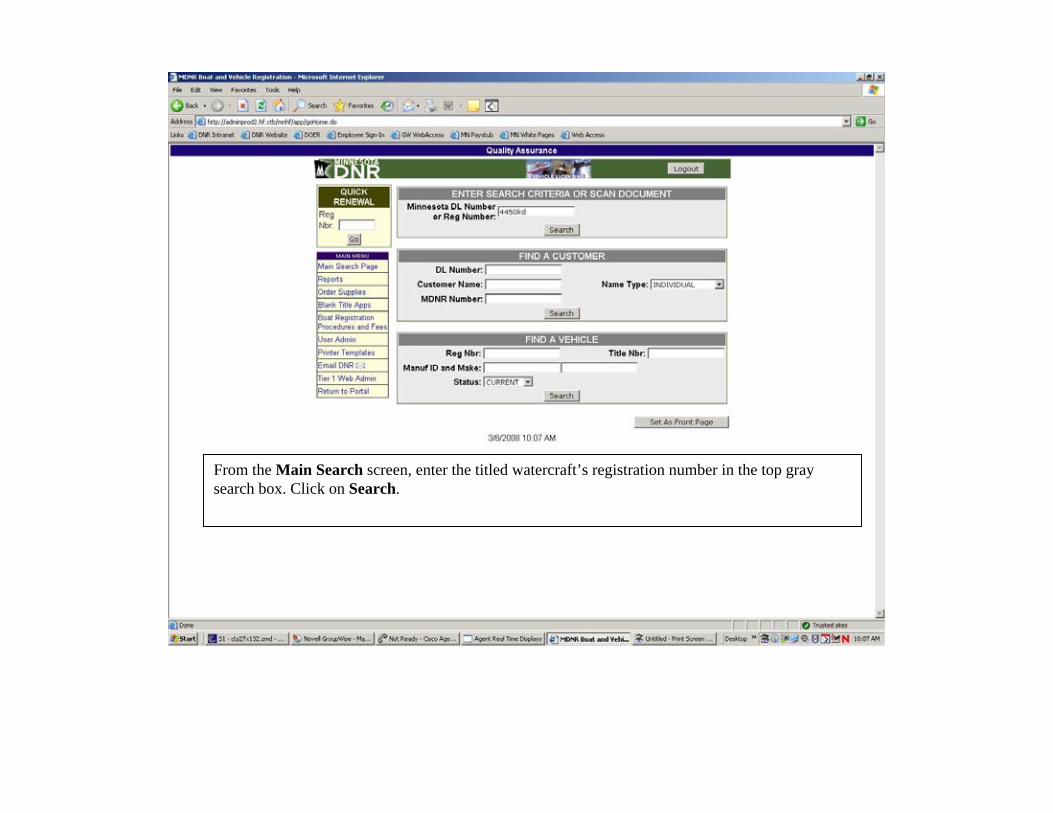
From the Main Search screen, enter the titled watercraft’s registration number in the top gray search box. Click on Search.
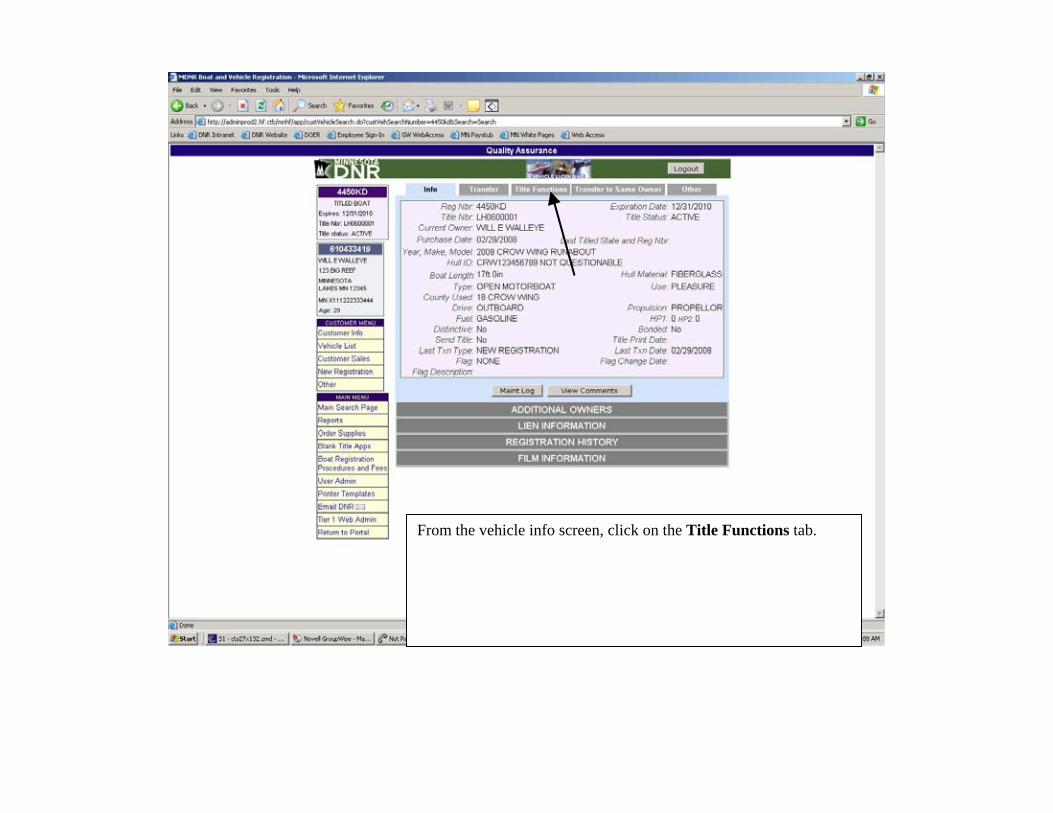
From the vehicle info screen, click on the Title Functions tab.
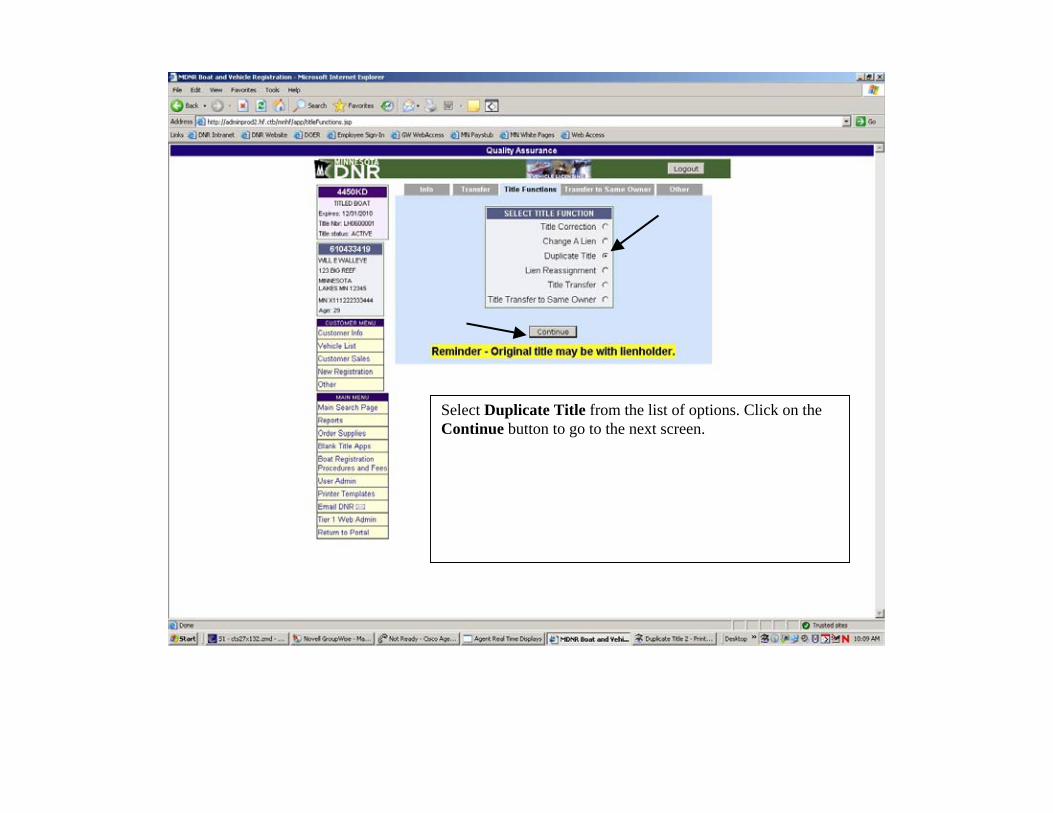
Select Duplicate Title from the list of options. Click on the Continue button to go to the next screen.
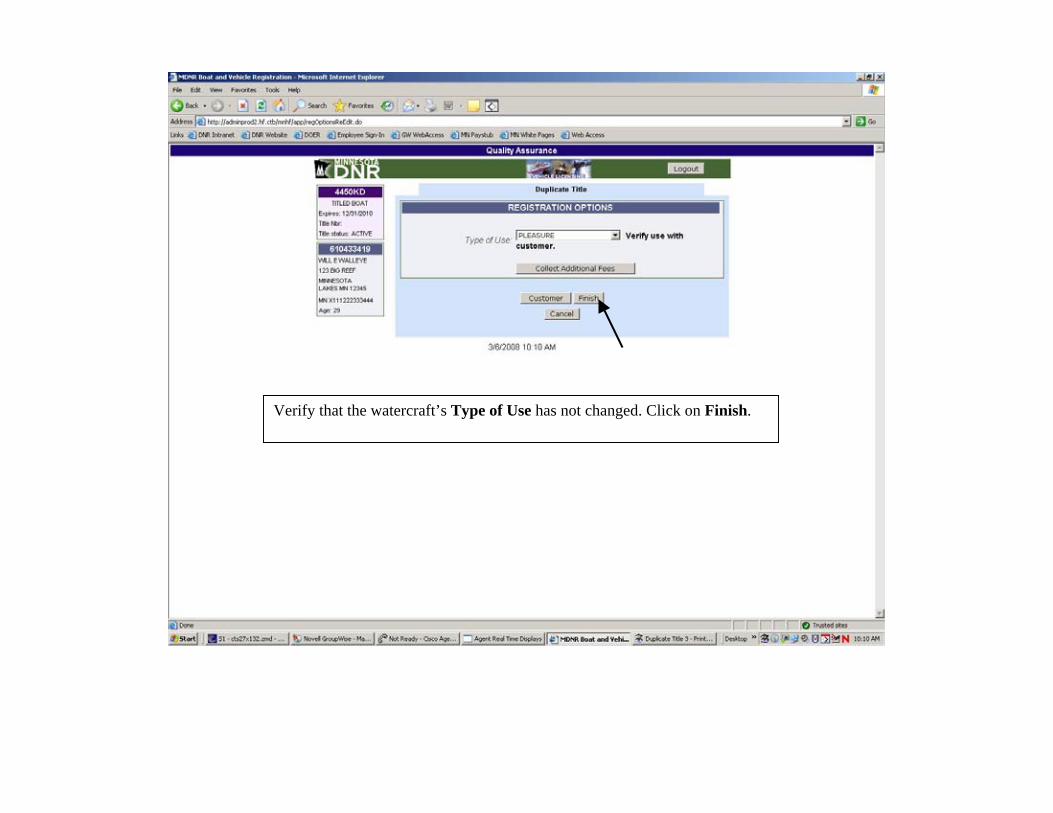
Verify that the watercraft’s Type of Use has not changed. Click on Finish.

Review that the transaction is correct. Click on Process to complete the transaction.
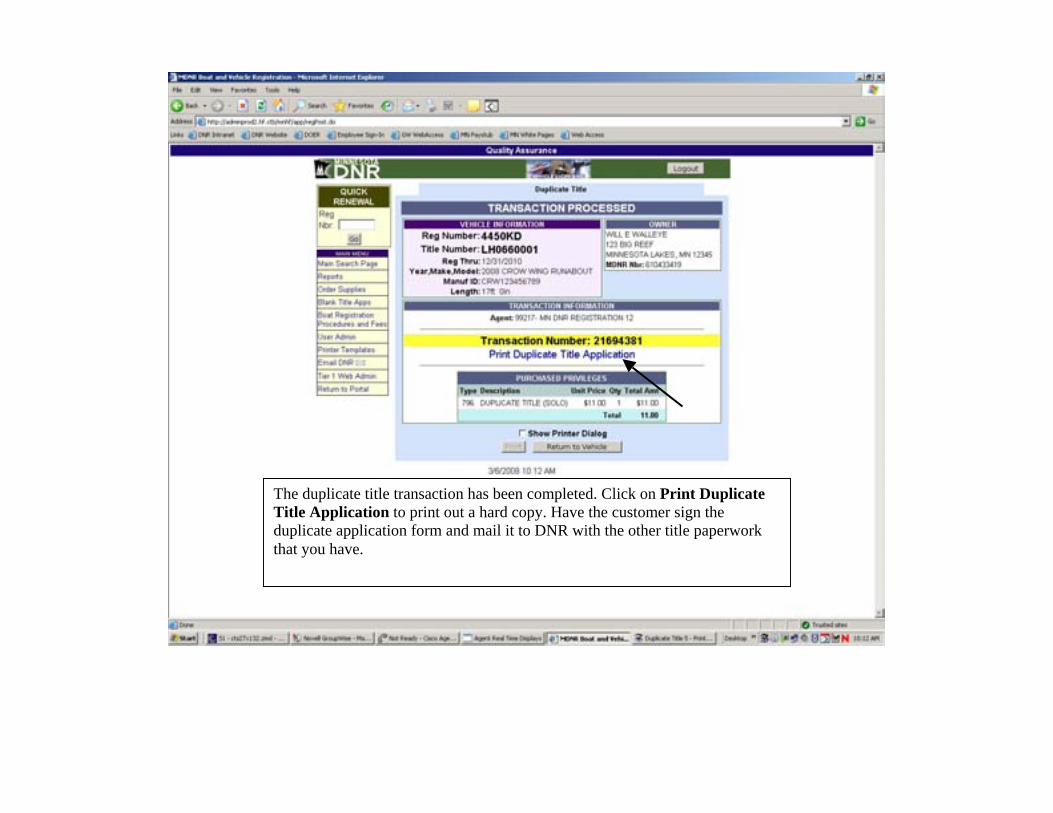
The duplicate title transaction has been completed. Click on Print Duplicate Title Application to print out a hard copy. Have the customer sign the duplicate application form and mail it to DNR with the other title paperwork that you have.
Reprint A
Transaction
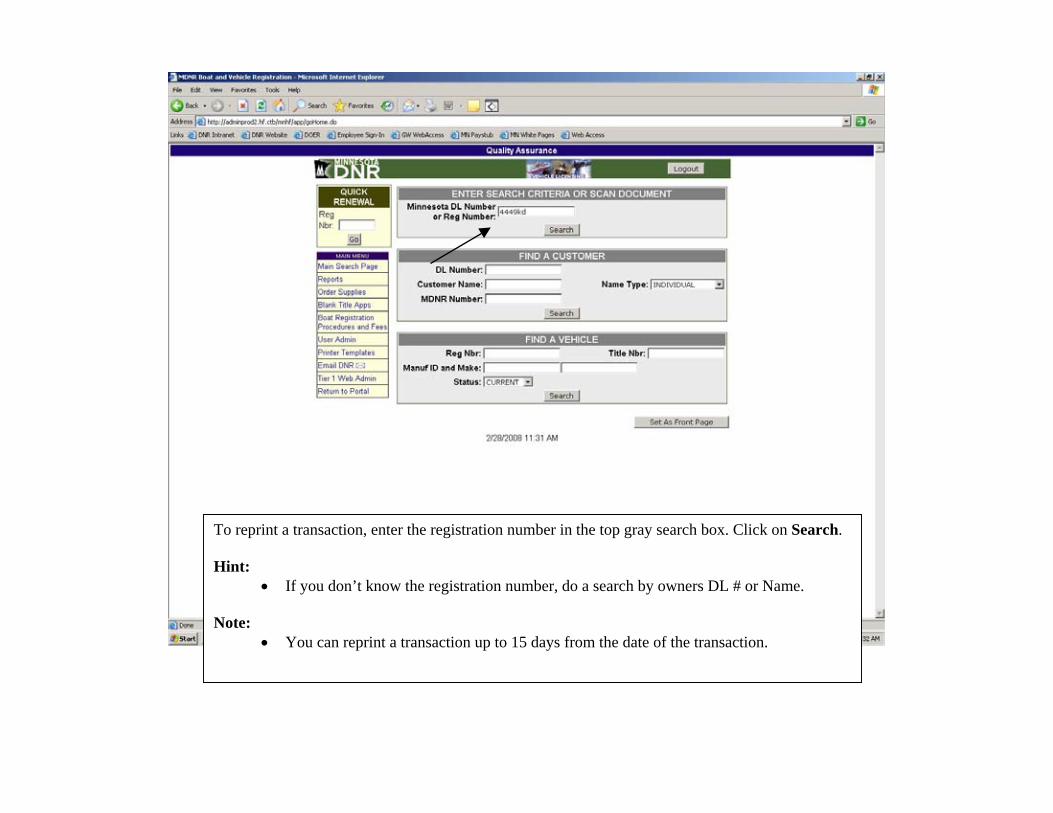
To reprint a transaction, enter the registration number in the top gray search box. Click on Search. Hint:
• If you don’t know the registration number, do a search by owners DL # or Name. Note:
• You can reprint a transaction up to 15 days from the date of the transaction.
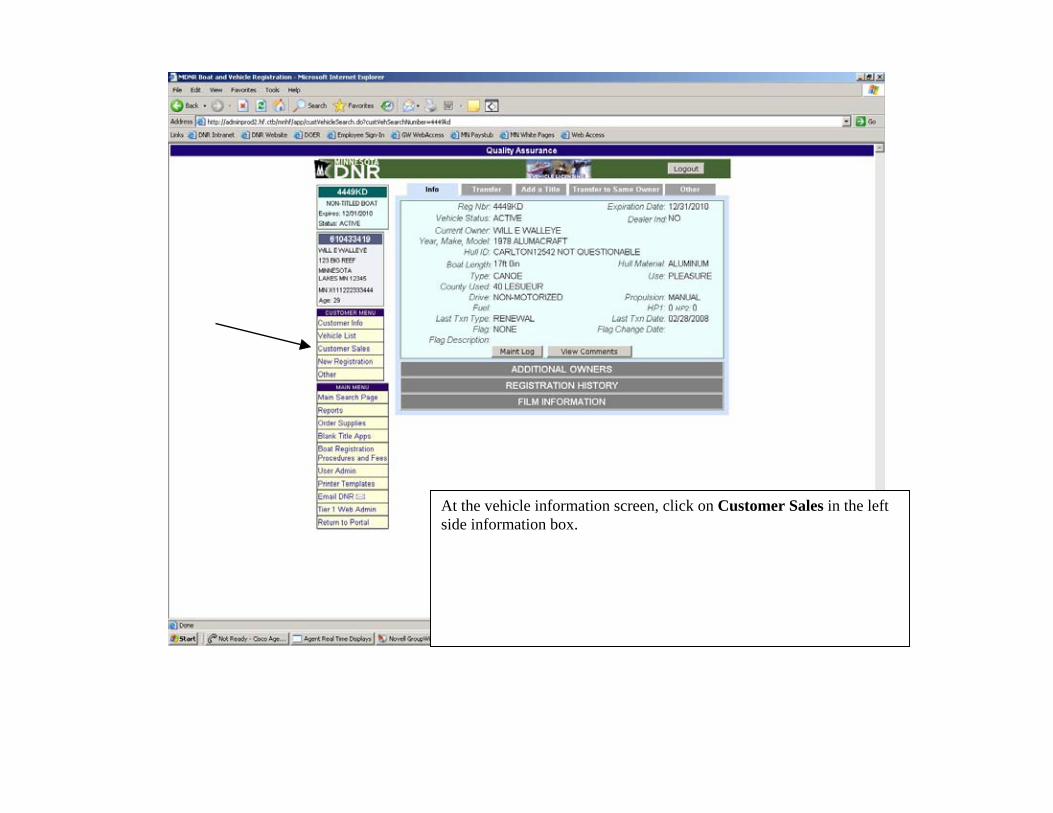
At the vehicle information screen, click on Customer Sales in the left side information box.
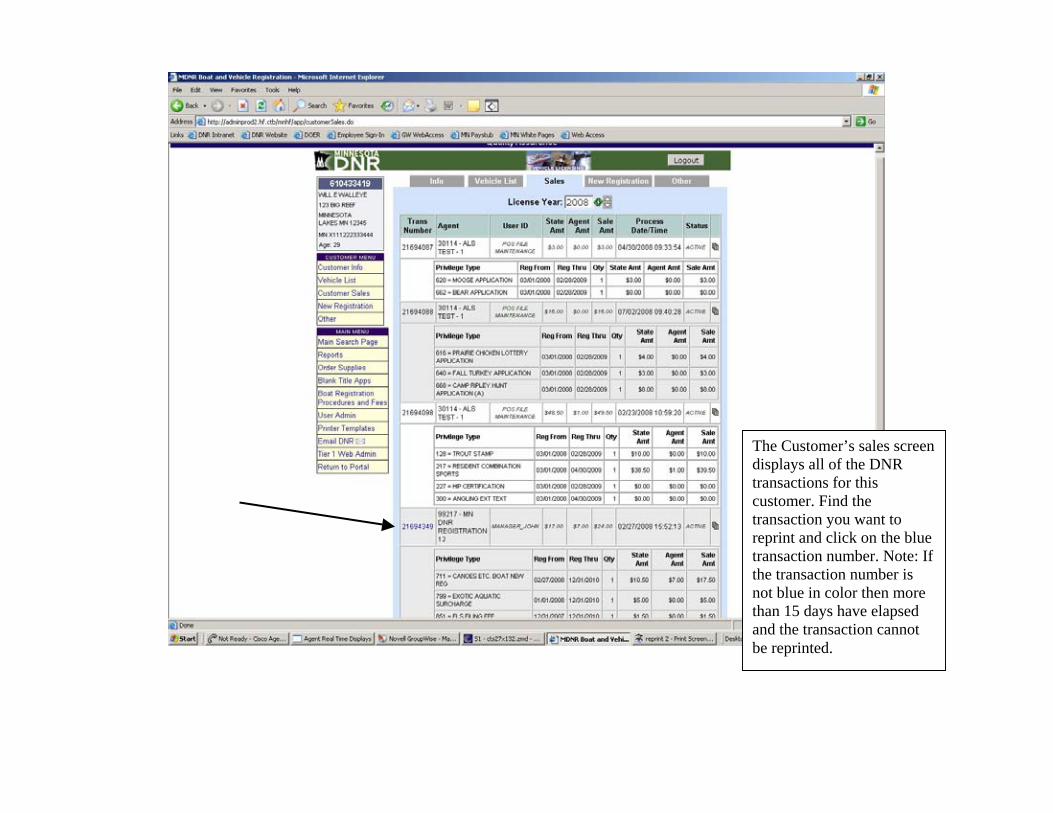
The Customer’s sales screen displays all of the DNR transactions for this customer. Find the transaction you want to reprint and click on the blue transaction number. Note: If the transaction number is not blue in color then more than 15 days have elapsed and the transaction cannot be reprinted.
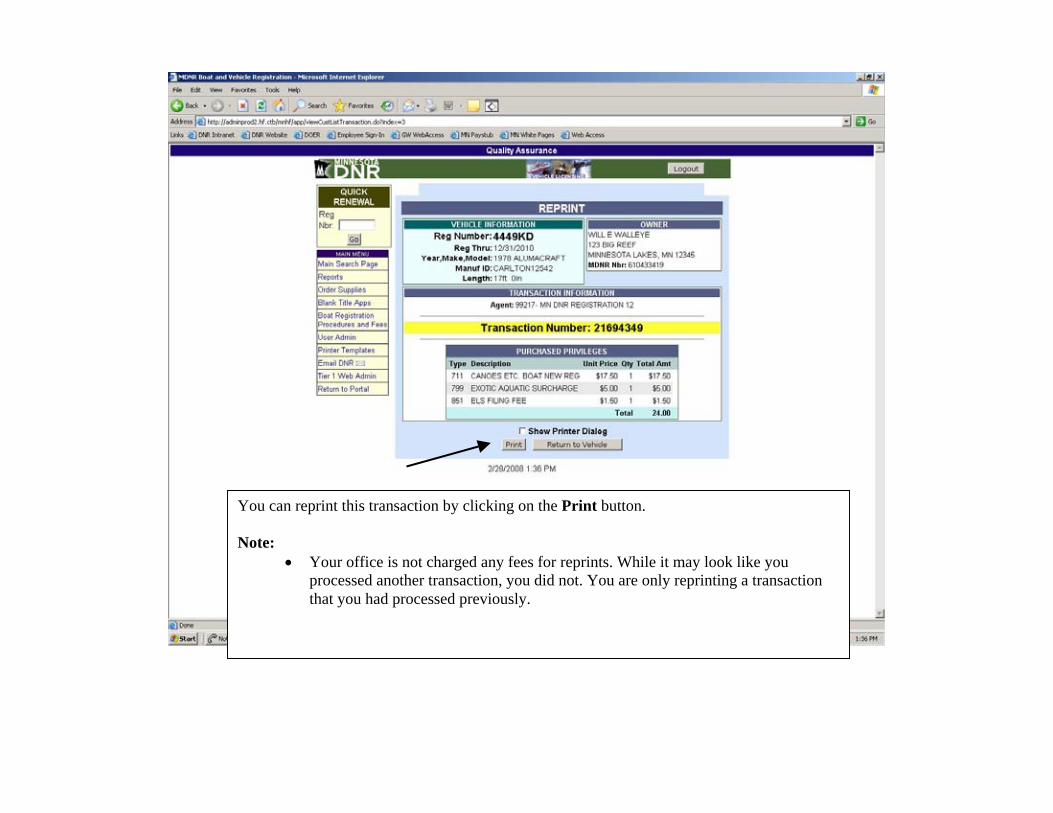
You can reprint this transaction by clicking on the Print button. Note:
• Your office is not charged any fees for reprints. While it may look like you processed another transaction, you did not. You are only reprinting a transaction that you had processed previously.

1 Year Snowmobile Trail Sticker
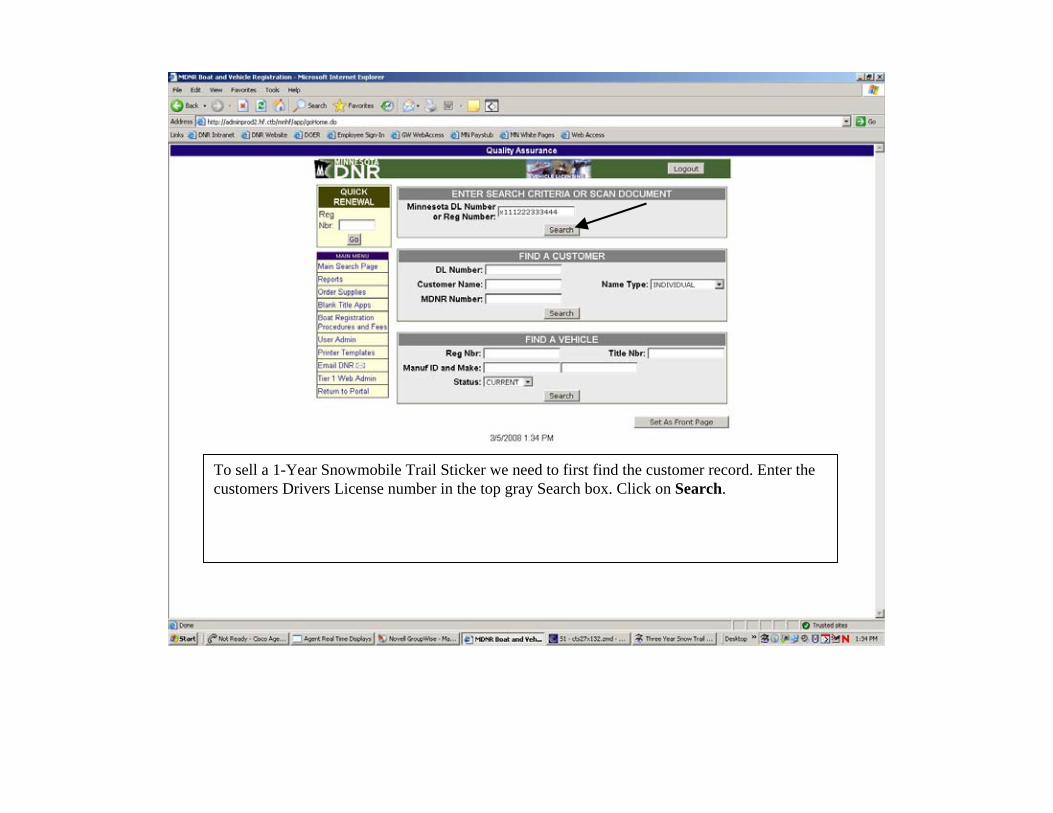
To sell a 1-Year Snowmobile Trail Sticker we need to first find the customer record. Enter the customers Drivers License number in the top gray Search box. Click on Search.
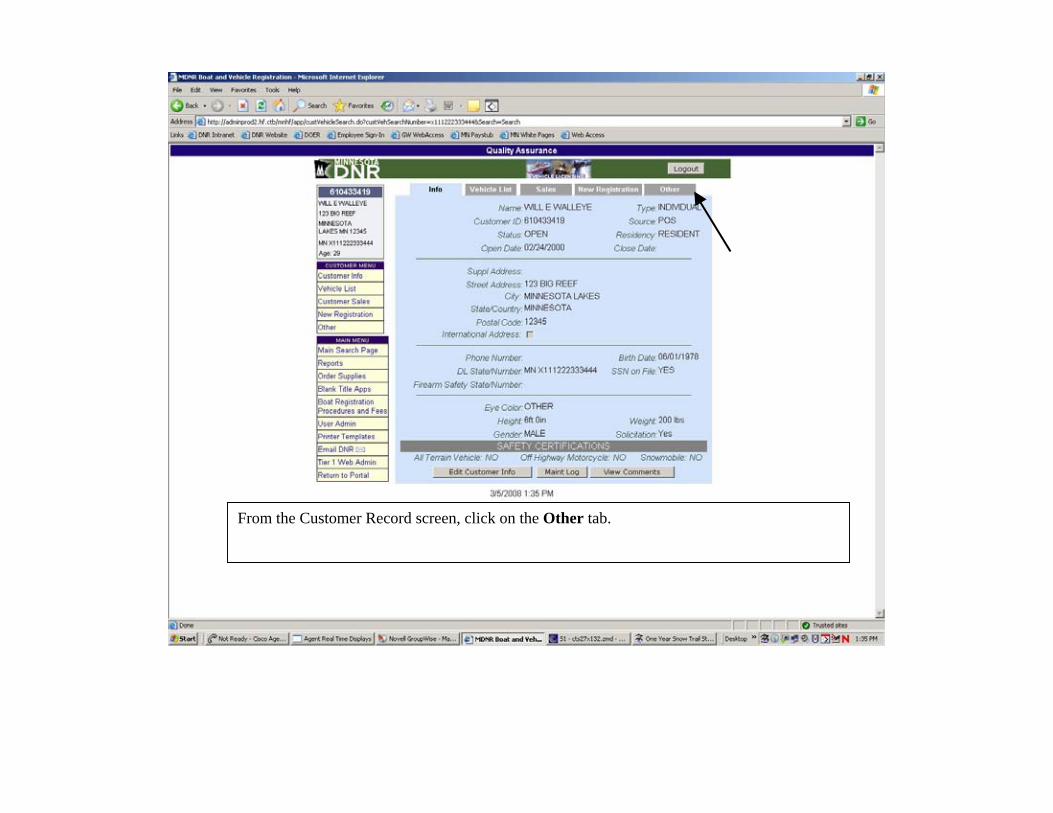
From the Customer Record screen, click on the Other tab.
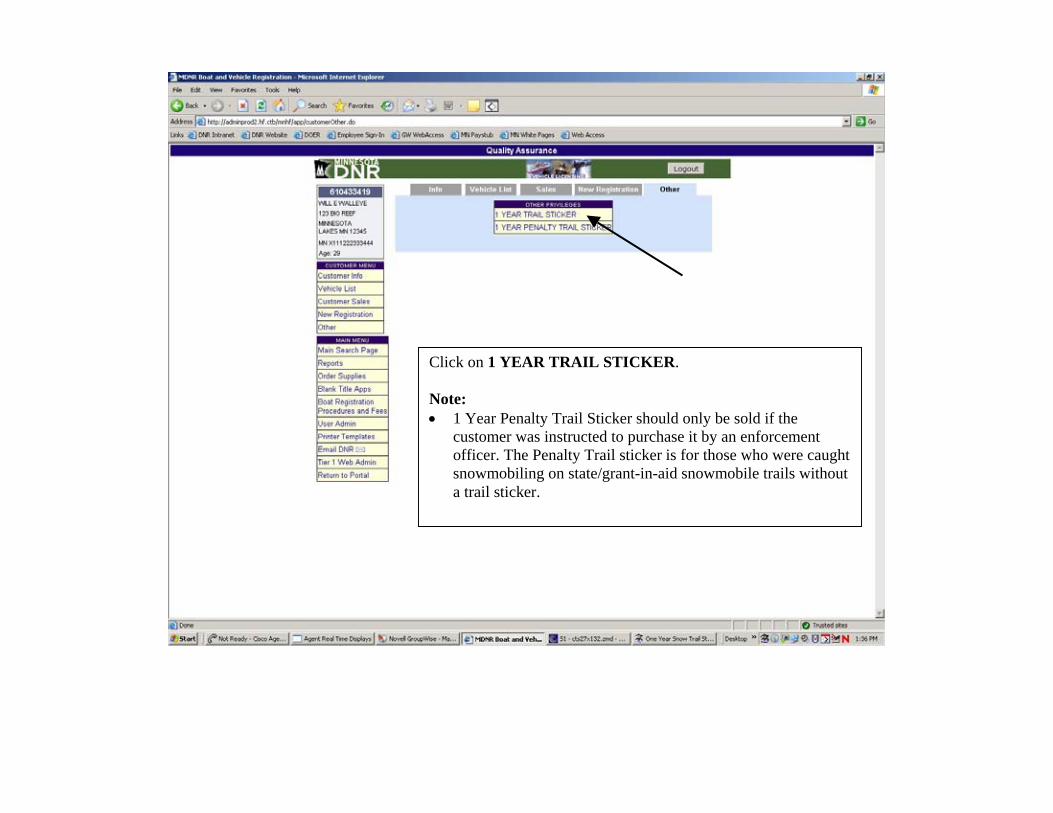
Click on 1 YEAR TRAIL STICKER. Note: • 1 Year Penalty Trail Sticker should only be sold if the
customer was instructed to purchase it by an enforcement officer. The Penalty Trail sticker is for those who were caught snowmobiling on state/grant-in-aid snowmobile trails without a trail sticker.
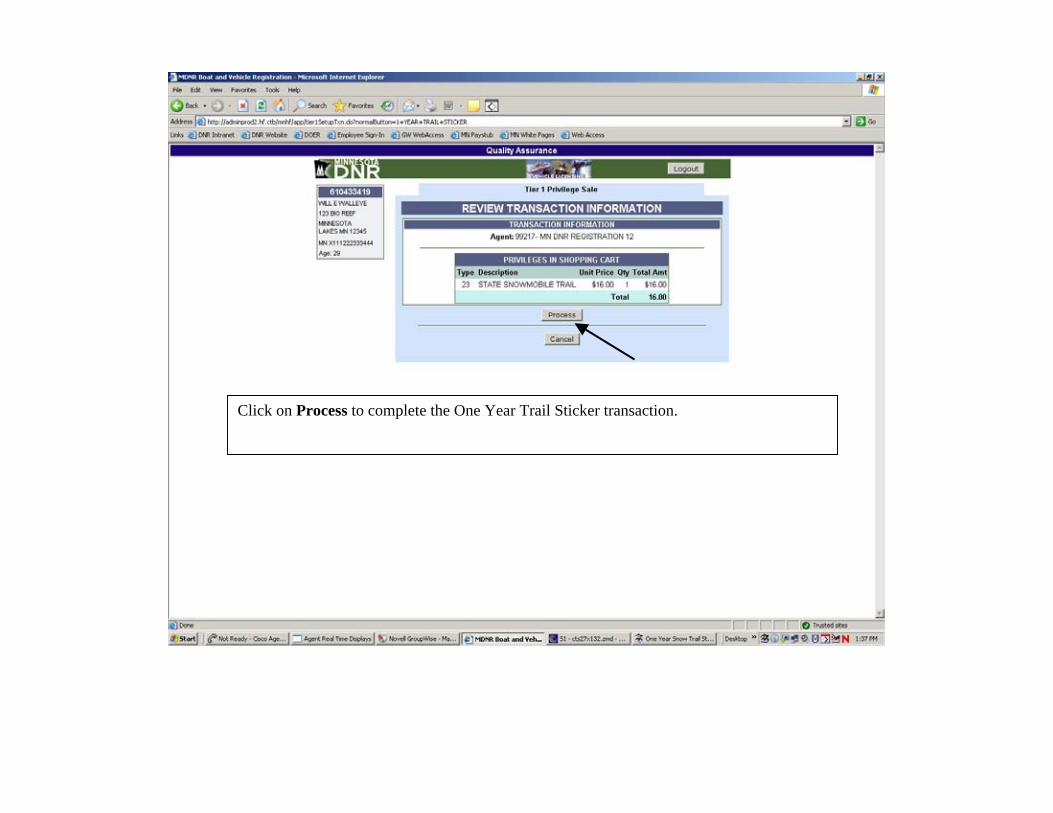
Click on Process to complete the One Year Trail Sticker transaction.

3 Year Snowmobile Trail Sticker
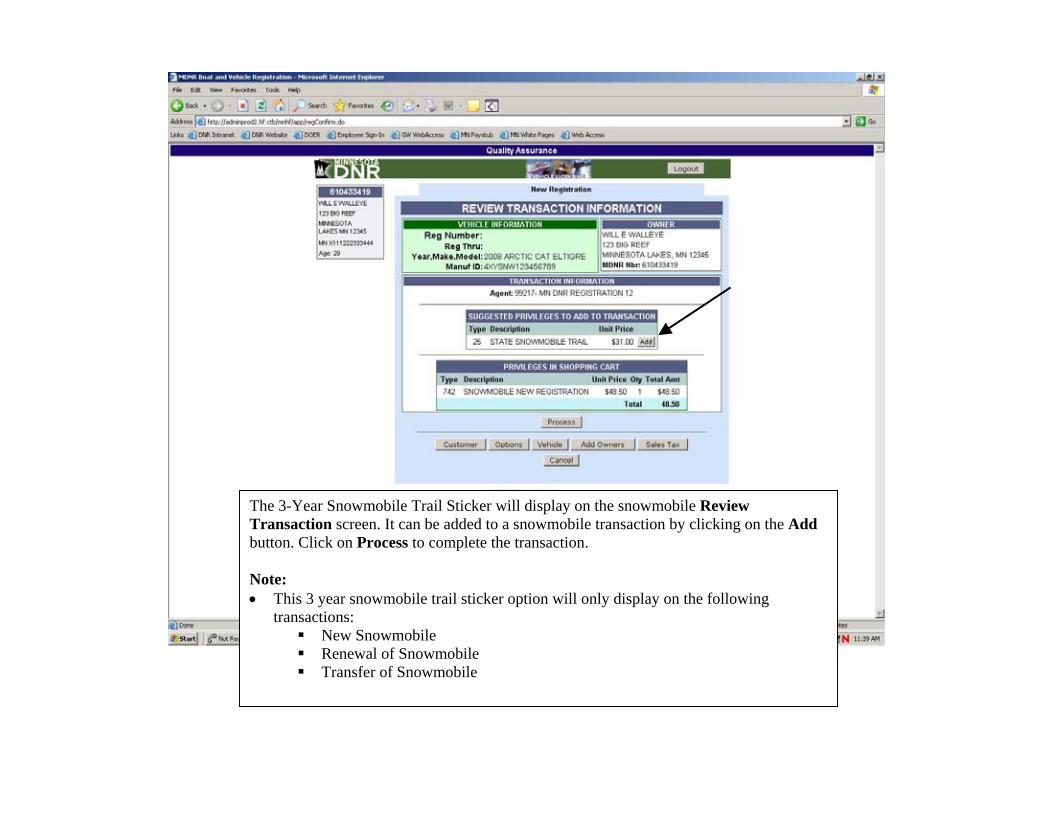
The 3-Year Snowmobile Trail Sticker will display on the snowmobile Review Transaction screen. It can be added to a snowmobile transaction by clicking on the Add button. Click on Process to complete the transaction. Note: • This 3 year snowmobile trail sticker option will only display on the following
transactions: New Snowmobile Renewal of Snowmobile Transfer of Snowmobile
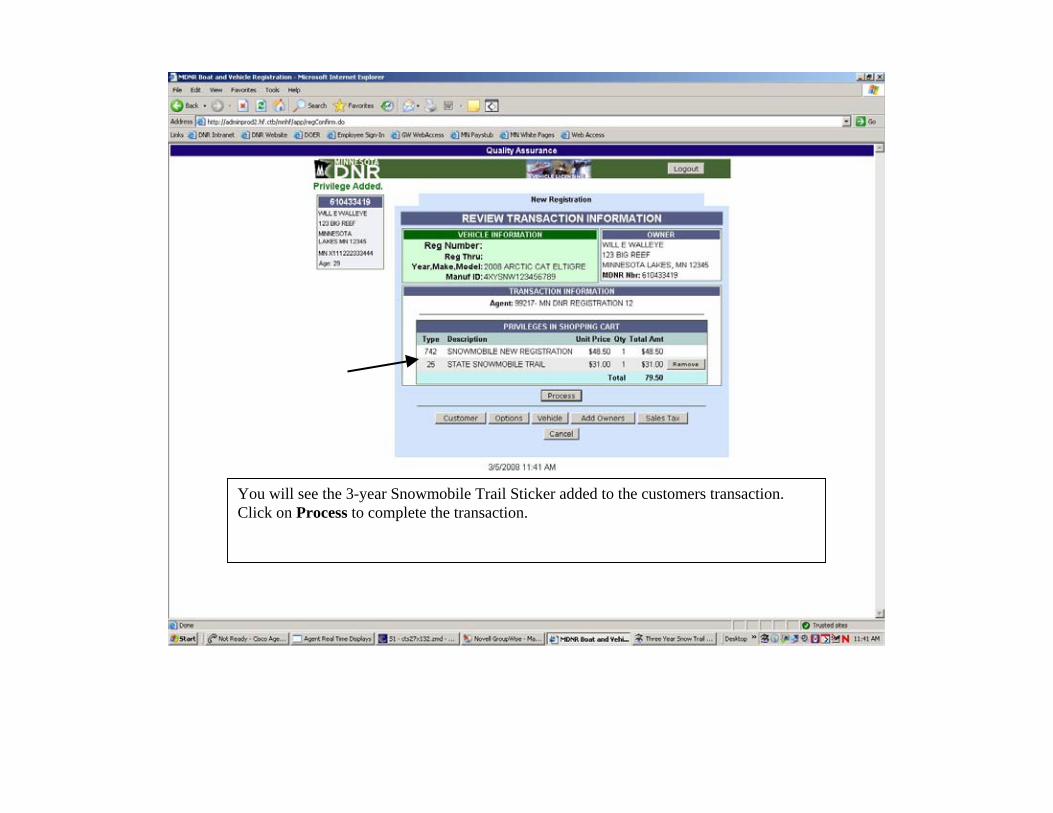
You will see the 3-year Snowmobile Trail Sticker added to the customers transaction. Click on Process to complete the transaction.

Add A
Lien
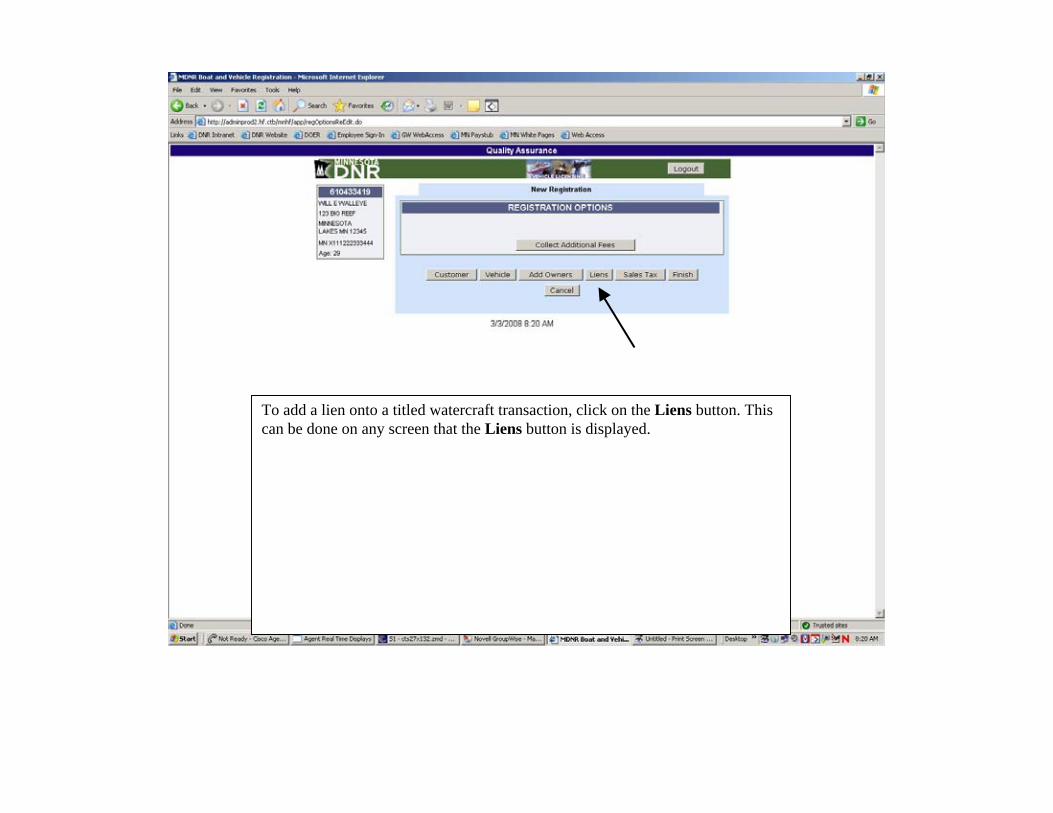
To add a lien onto a titled watercraft transaction, click on the Liens button. This can be done on any screen that the Liens button is displayed.
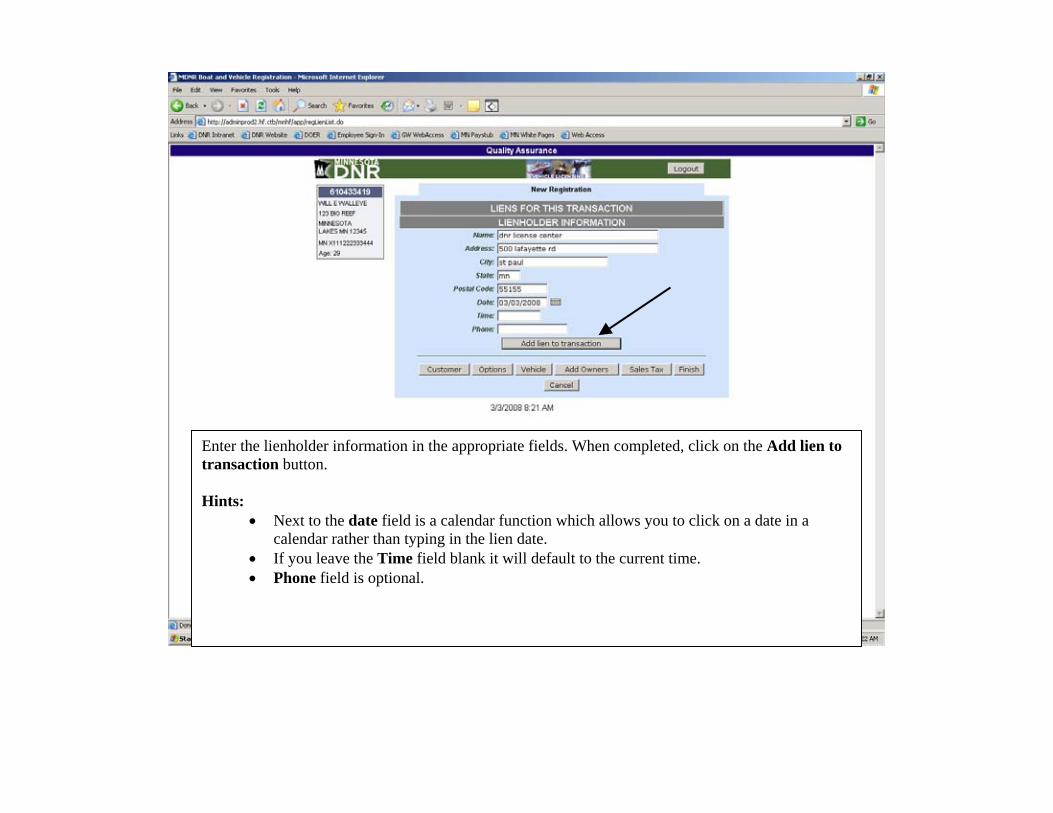
Enter the lienholder information in the appropriate fields. When completed, click on the Add lien to transaction button. Hints:
• Next to the date field is a calendar function which allows you to click on a date in a calendar rather than typing in the lien date.
• If you leave the Time field blank it will default to the current time. • Phone field is optional.
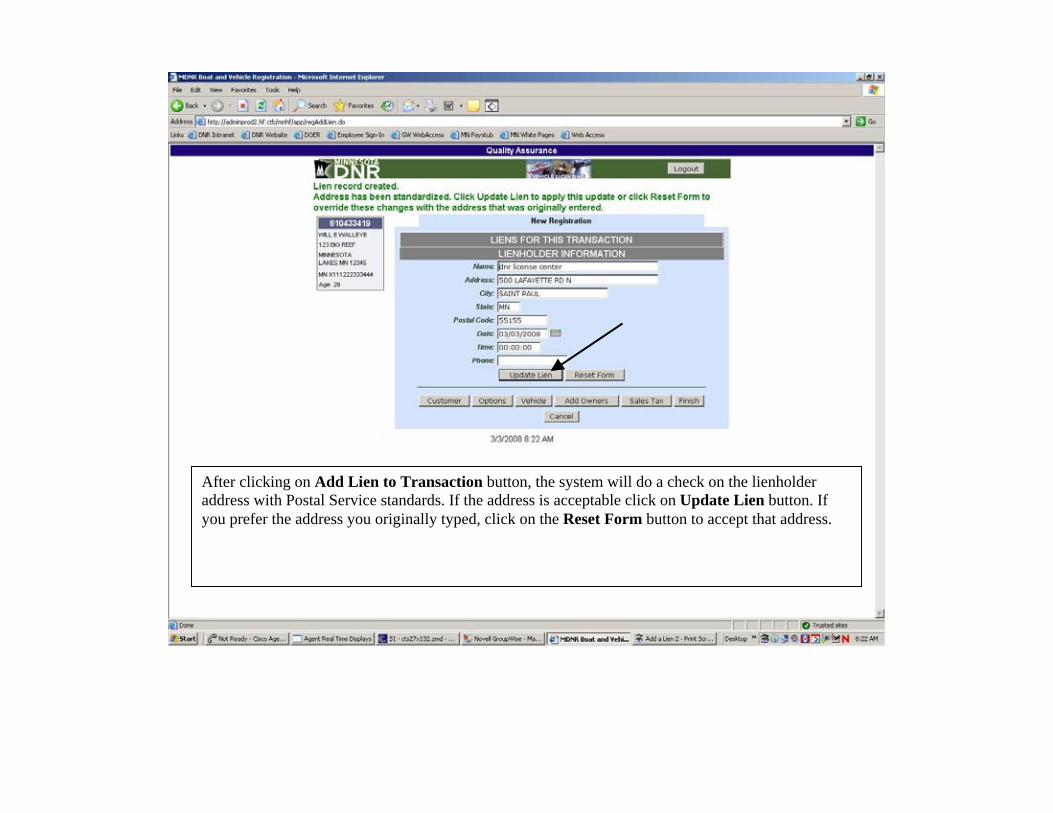
After clicking on Add Lien to Transaction button, the system will do a check on the lienholder address with Postal Service standards. If the address is acceptable click on Update Lien button. If you prefer the address you originally typed, click on the Reset Form button to accept that address.
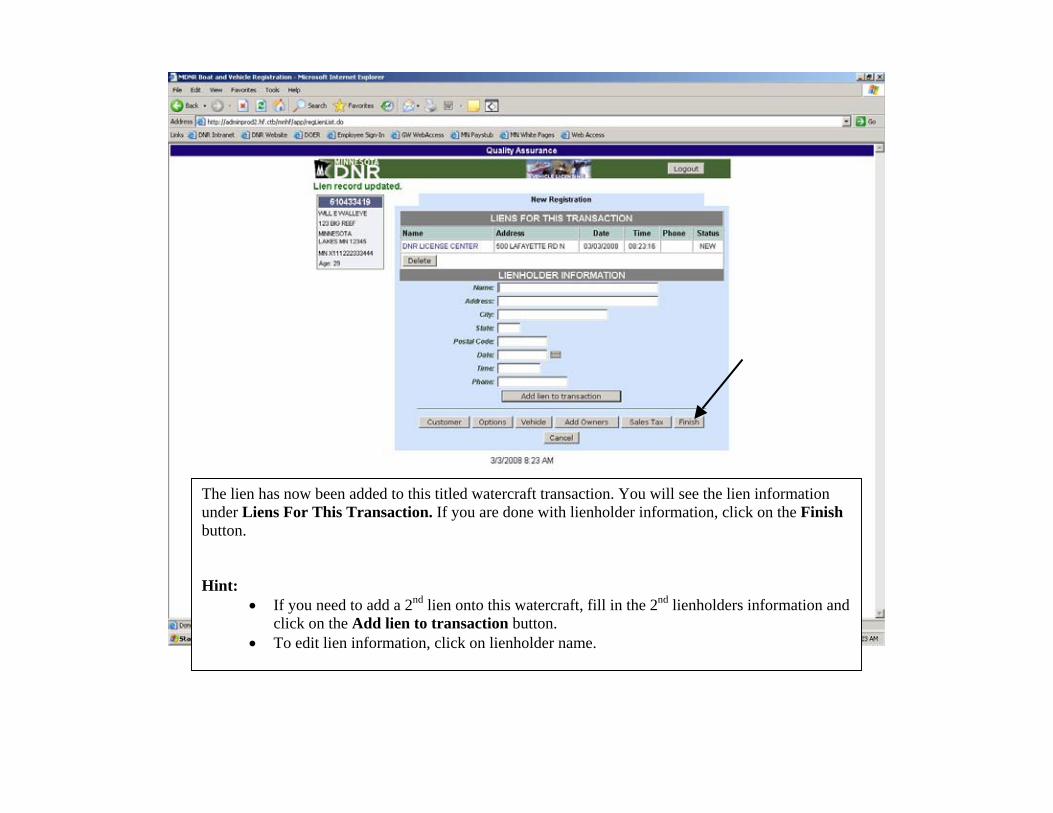
The lien has now been added to this titled watercraft transaction. You will see the lien information under Liens For This Transaction. If you are done with lienholder information, click on the Finish button. Hint:
• If you need to add a 2nd lien onto this watercraft, fill in the 2nd lienholders information and click on the Add lien to transaction button.
• To edit lien information, click on lienholder name.
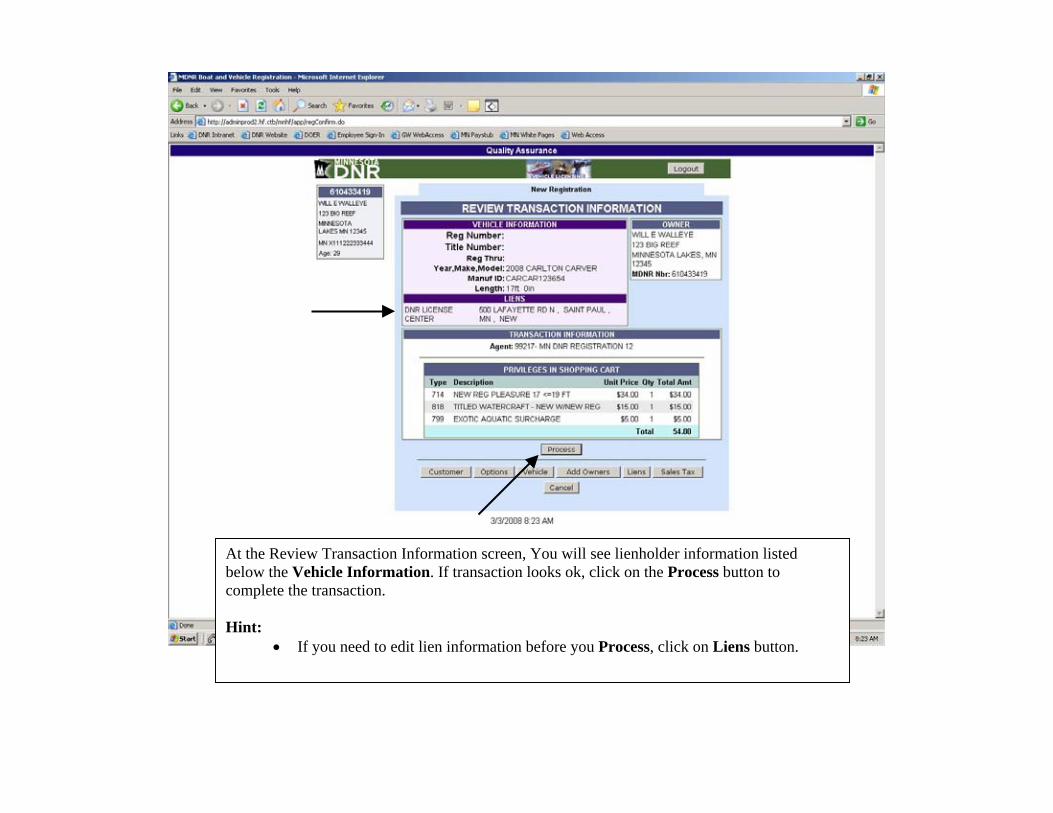
At the Review Transaction Information screen, You will see lienholder information listed below the Vehicle Information. If transaction looks ok, click on the Process button to complete the transaction. Hint:
• If you need to edit lien information before you Process, click on Liens button.
Add Additional
Owners
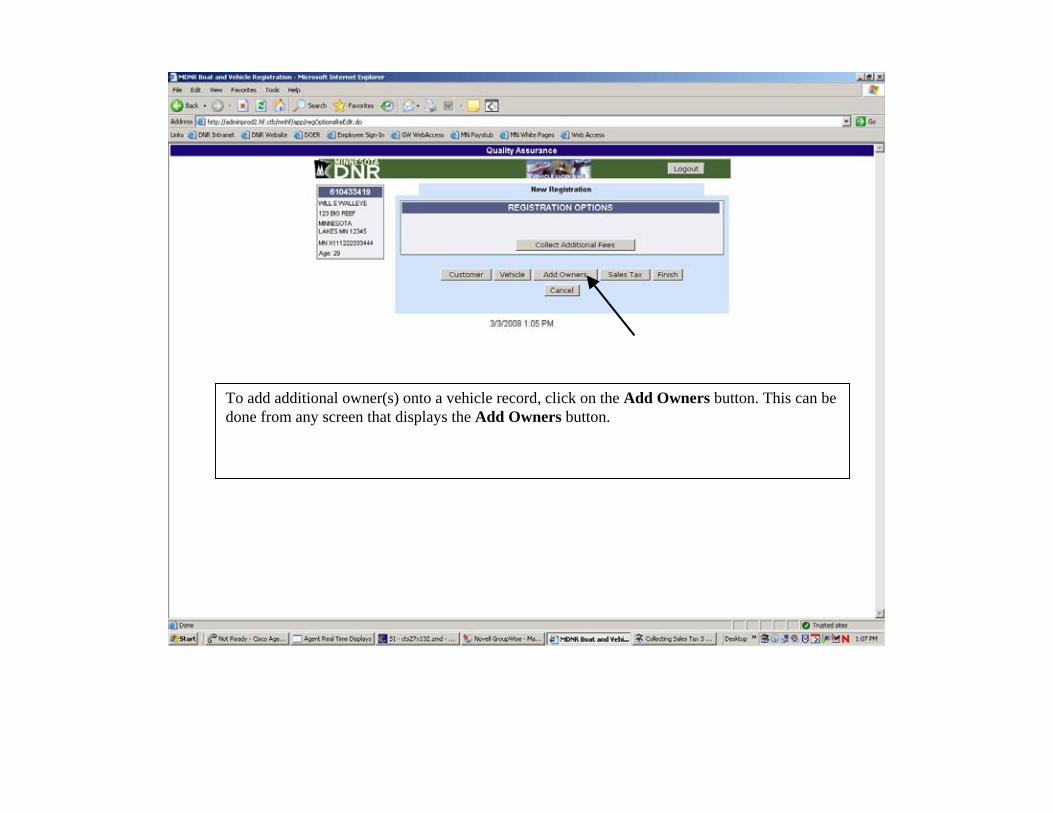
To add additional owner(s) onto a vehicle record, click on the Add Owners button. This can be done from any screen that displays the Add Owners button.
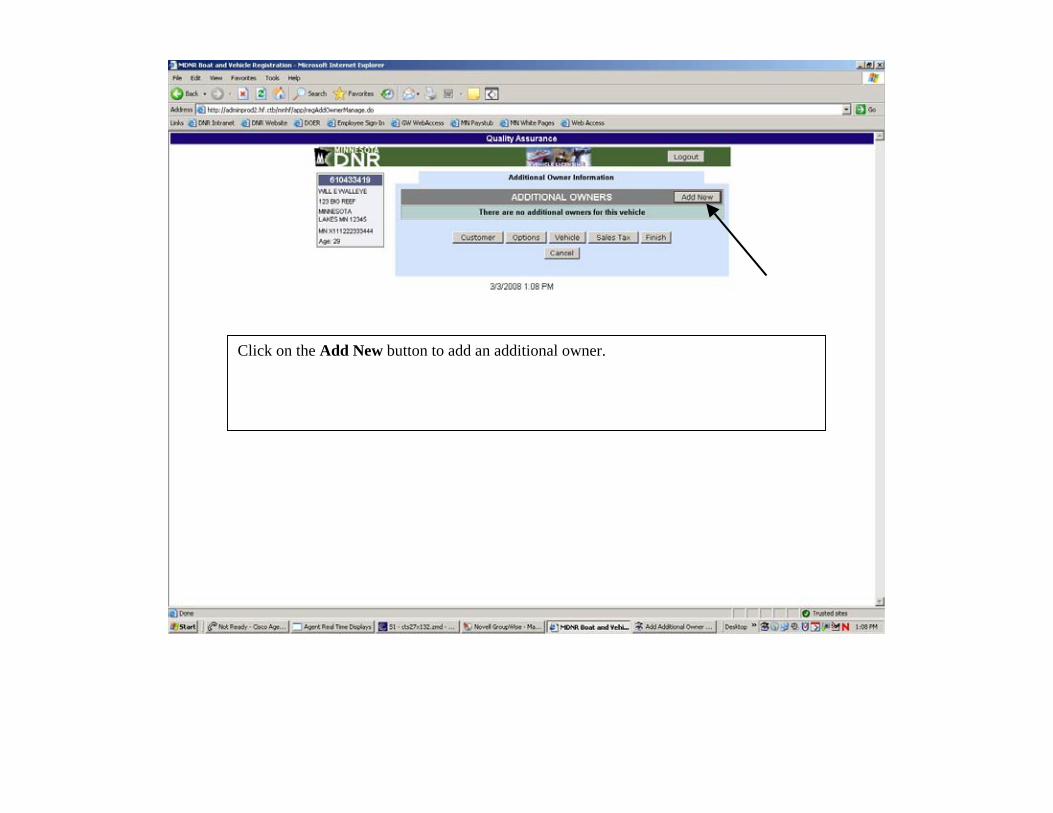
Click on the Add New button to add an additional owner.
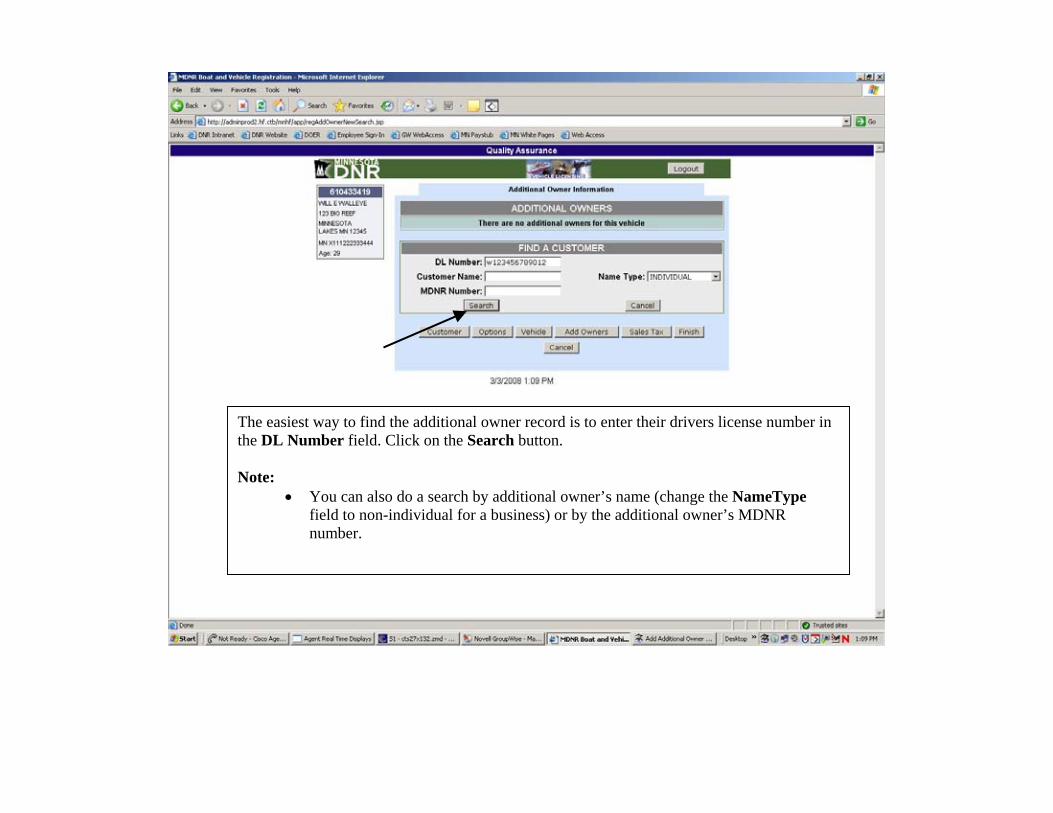
The easiest way to find the additional owner record is to enter their drivers license number in the DL Number field. Click on the Search button. Note:
• You can also do a search by additional owner’s name (change the NameType field to non-individual for a business) or by the additional owner’s MDNR number.

Since we searched for the additional owner by drivers license number, only one name came up. If you search by name you might get a list of names and you would have to select the correct name. Click on the blue colored name of the additional owner. This will add this additional owner to the vehicle record. Next you will go to the conjunction screen.
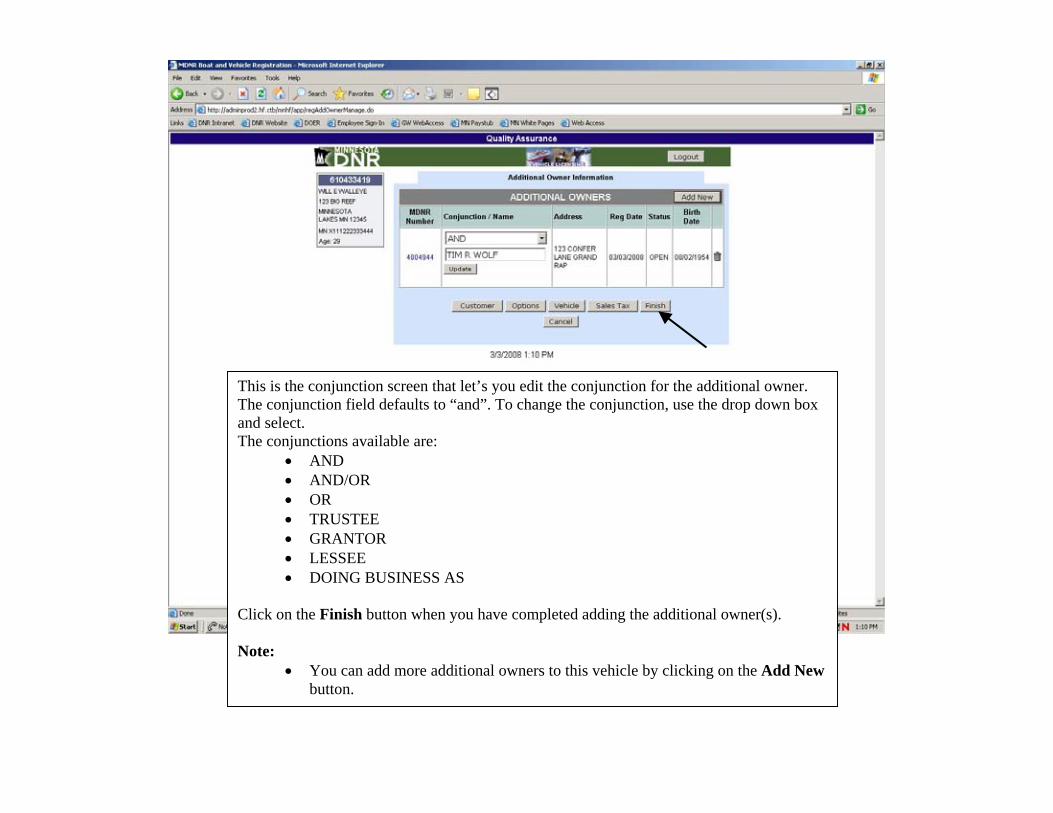
This is the conjunction screen that let’s you edit the conjunction for the additional owner. The conjunction field defaults to “and”. To change the conjunction, use the drop down box and select. The conjunctions available are:
• AND • AND/OR • OR • TRUSTEE • GRANTOR • LESSEE • DOING BUSINESS AS
Click on the Finish button when you have completed adding the additional owner(s). Note:
• You can add more additional owners to this vehicle by clicking on the Add Newbutton.

If you add an additional owner you will see their name(s) below the primary owner information. If everything is correct, click on the Process button to complete the transaction. Hint:
• If you need to edit the additional owner information, click on the Add Owners button before you process the transaction.

Create A
Customer

To create a new customer, enter the name in the Customer Name field. Click on the Search button. Hint:
• To create a business customer record, enter the name of the business and change the Name Type field to non-individual.
Note:
• Before creating a new customer, do a thorough search for an existing customer record. This will help prevent multiple customer records in the database.
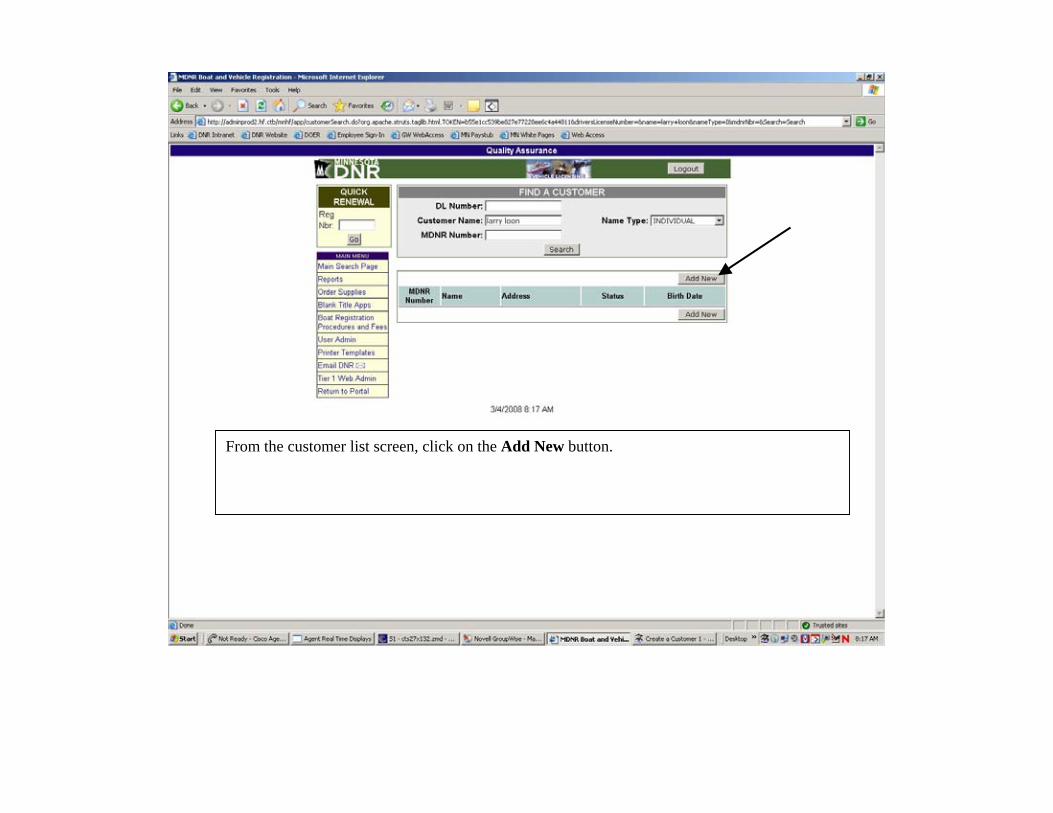
From the customer list screen, click on the Add New button.
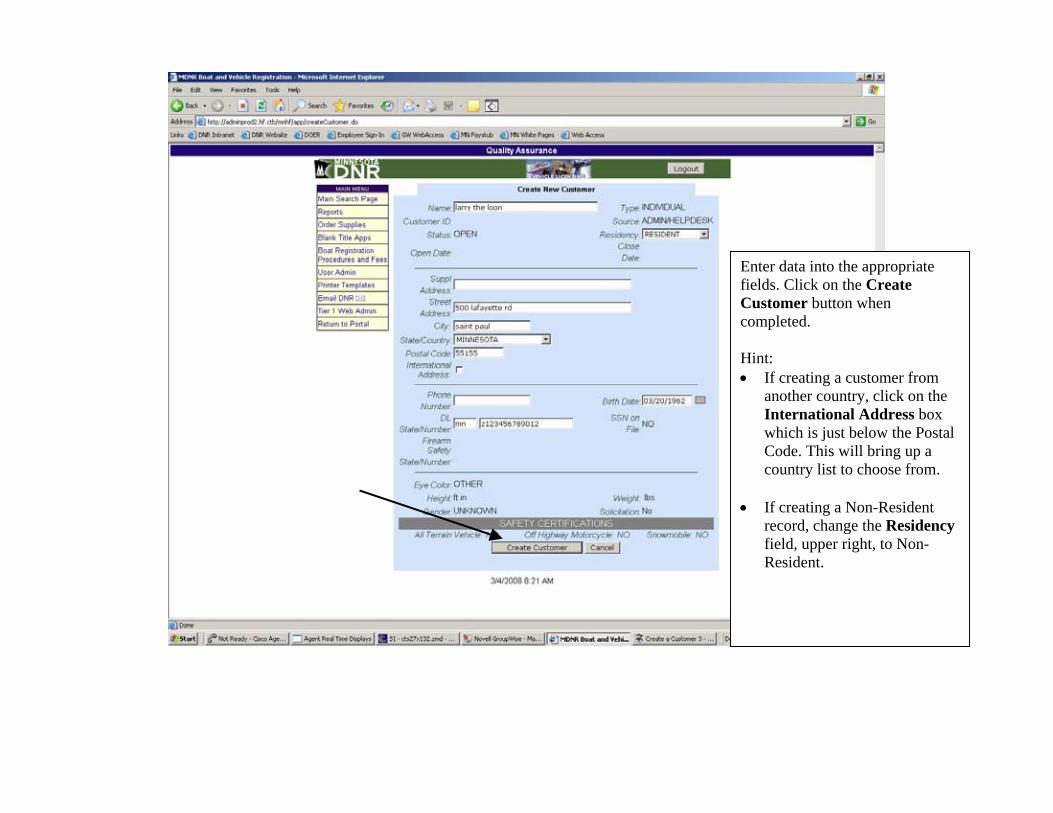
Enter data into the appropriate fields. Click on the Create Customer button when completed. Hint: • If creating a customer from
another country, click on the International Address box which is just below the Postal Code. This will bring up a country list to choose from.
• If creating a Non-Resident
record, change the Residency field, upper right, to Non-Resident.

The address you entered goes through a Postal Service address standardization check.If the address is acceptable, click on Save Changes. If you want the address as you originally entered it, click on Cancel.
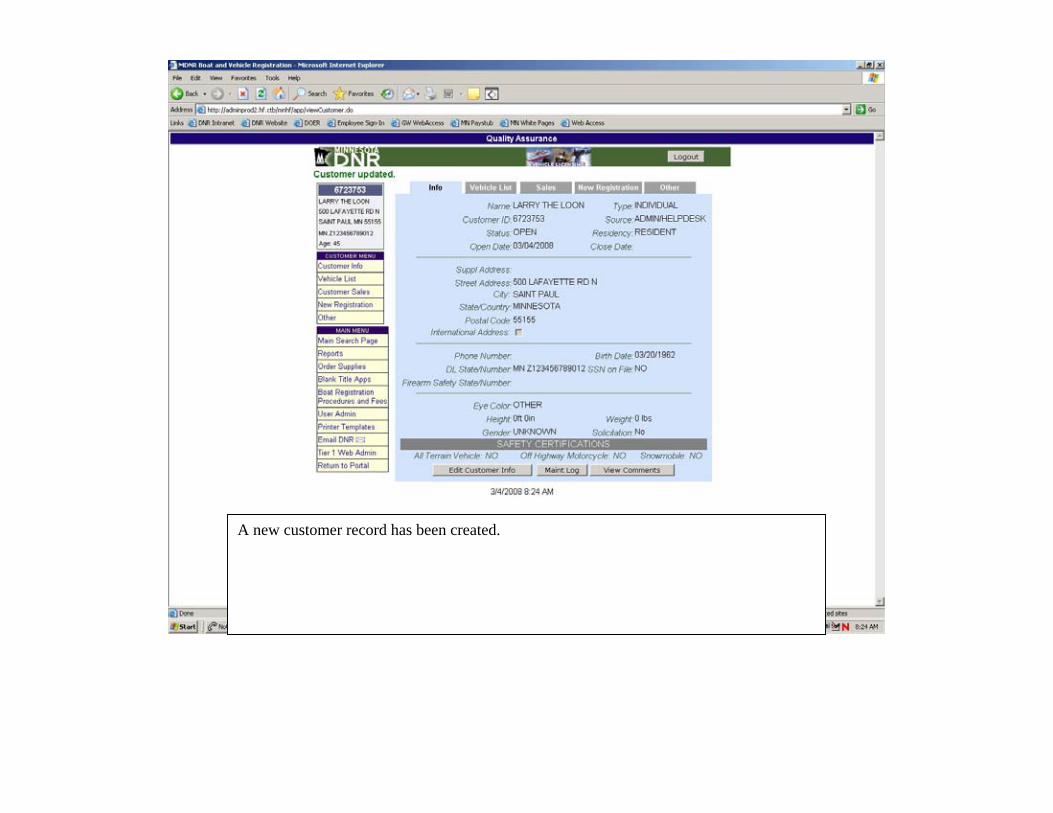
A new customer record has been created.

Customer Information
Lookup
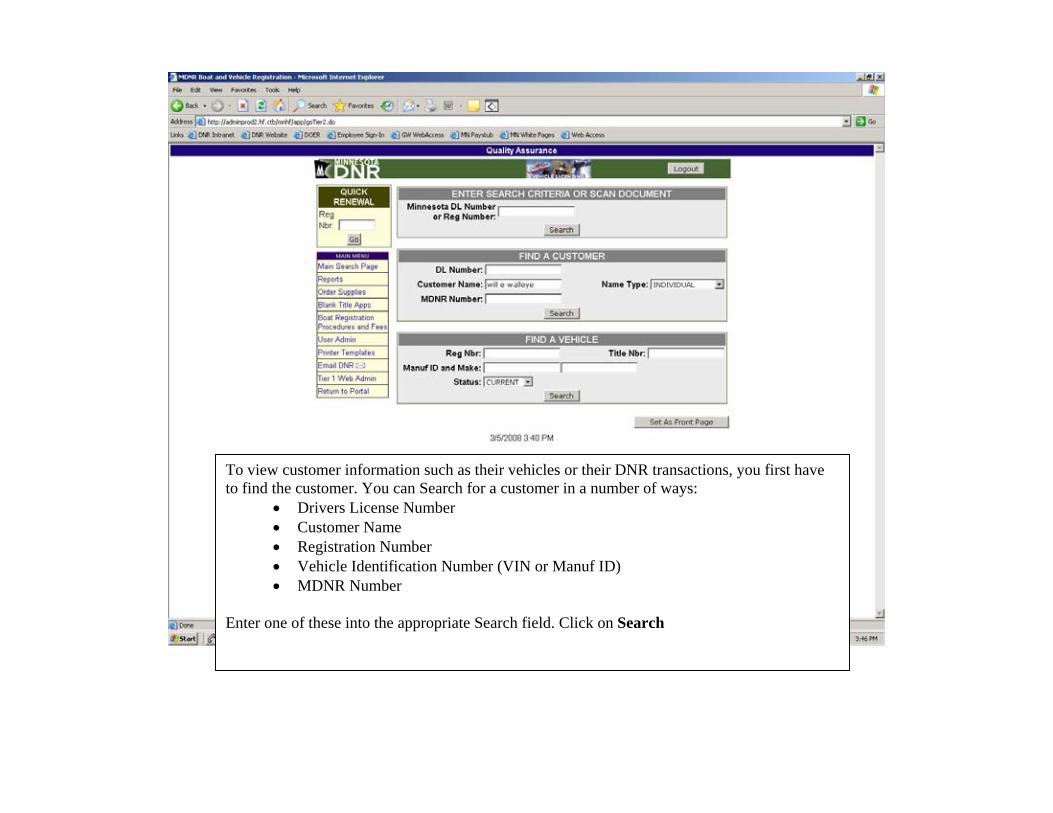
To view customer information such as their vehicles or their DNR transactions, you first have to find the customer. You can Search for a customer in a number of ways:
• Drivers License Number • Customer Name • Registration Number • Vehicle Identification Number (VIN or Manuf ID) • MDNR Number
Enter one of these into the appropriate Search field. Click on Search

Depending on the search method used, you may go directly to the customer or vehicle information screen or as is often the case when searching by name, we get a list of possible names to choose from. In this instance, we searched by customer name so we need to select the correct customer from the list. Click on the Customer Name to view their customer information.
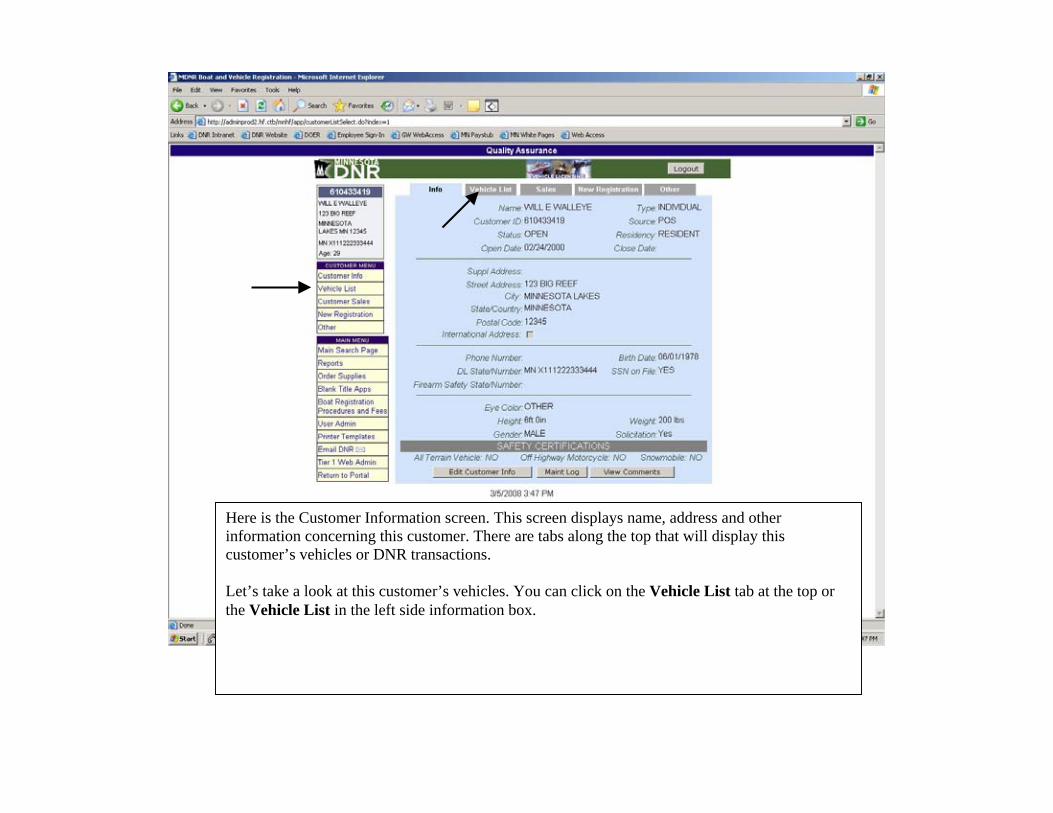
Here is the Customer Information screen. This screen displays name, address and other information concerning this customer. There are tabs along the top that will display this customer’s vehicles or DNR transactions. Let’s take a look at this customer’s vehicles. You can click on the Vehicle List tab at the top or the Vehicle List in the left side information box.
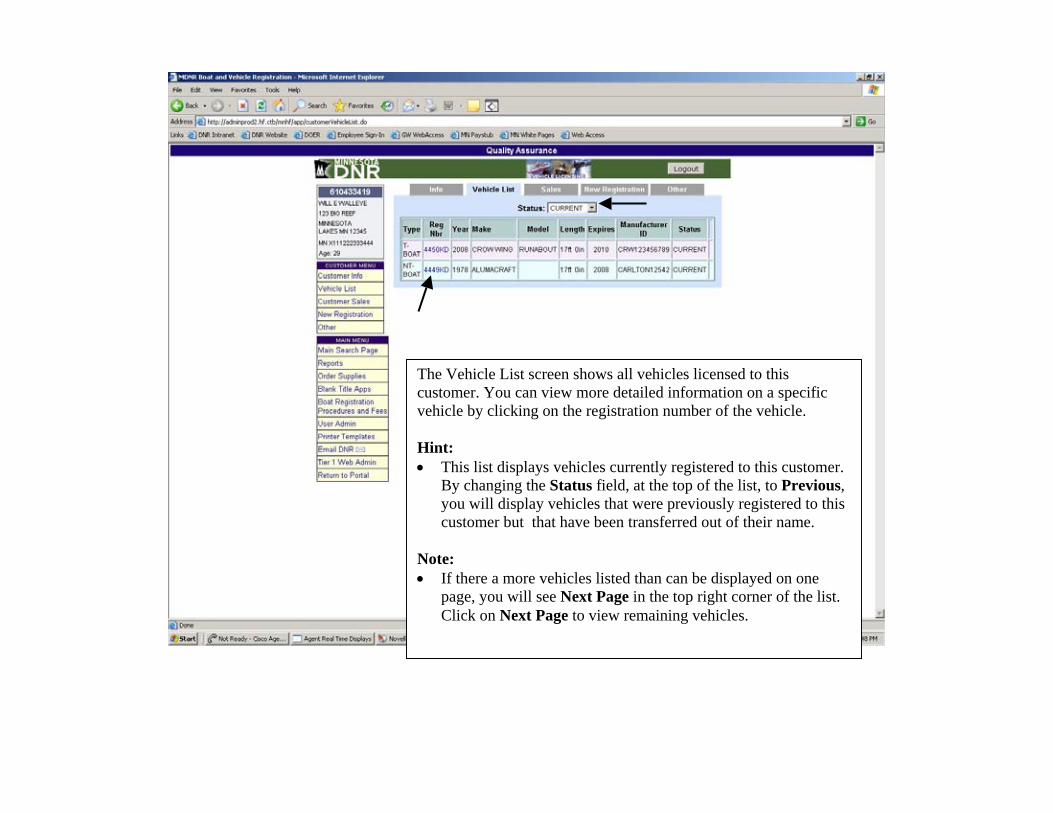
The Vehicle List screen shows all vehicles licensed to this customer. You can view more detailed information on a specific vehicle by clicking on the registration number of the vehicle. Hint: • This list displays vehicles currently registered to this customer.
By changing the Status field, at the top of the list, to Previous, you will display vehicles that were previously registered to this customer but that have been transferred out of their name.
Note: • If there a more vehicles listed than can be displayed on one
page, you will see Next Page in the top right corner of the list. Click on Next Page to view remaining vehicles.
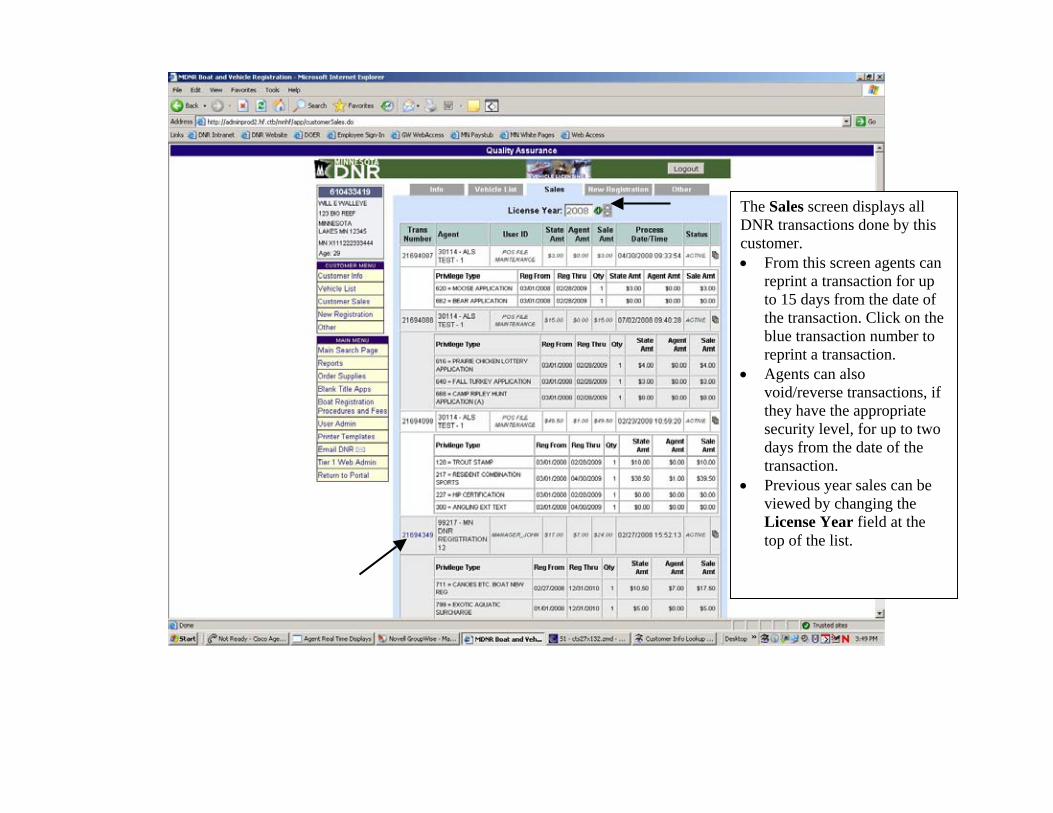
The Sales screen displays all DNR transactions done by this customer. • From this screen agents can
reprint a transaction for up to 15 days from the date of the transaction. Click on the blue transaction number to reprint a transaction.
• Agents can also void/reverse transactions, if they have the appropriate security level, for up to two days from the date of the transaction.
• Previous year sales can be viewed by changing the License Year field at the top of the list.

Transfer To
Same Owner
This transaction is used where the primary owner stays on the vehicle record but you want to add or delete additional owners.
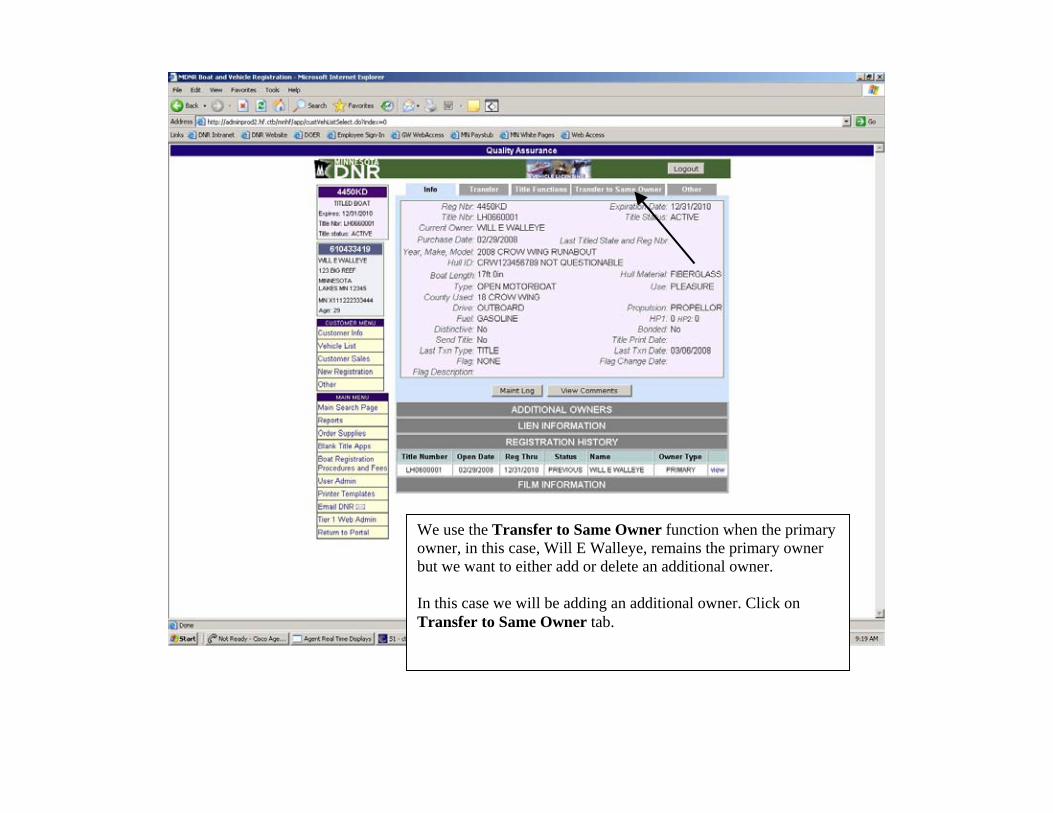
We use the Transfer to Same Owner function when the primary owner, in this case, Will E Walleye, remains the primary owner but we want to either add or delete an additional owner. In this case we will be adding an additional owner. Click on Transfer to Same Owner tab.
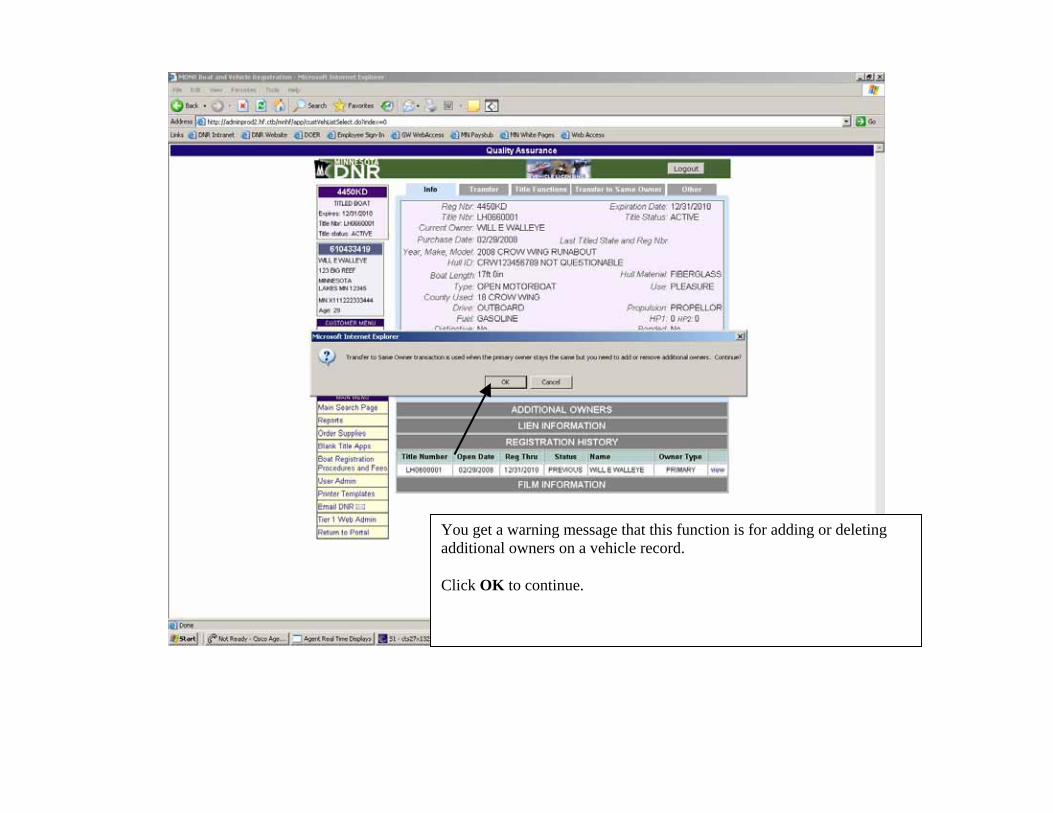
You get a warning message that this function is for adding or deleting additional owners on a vehicle record. Click OK to continue.
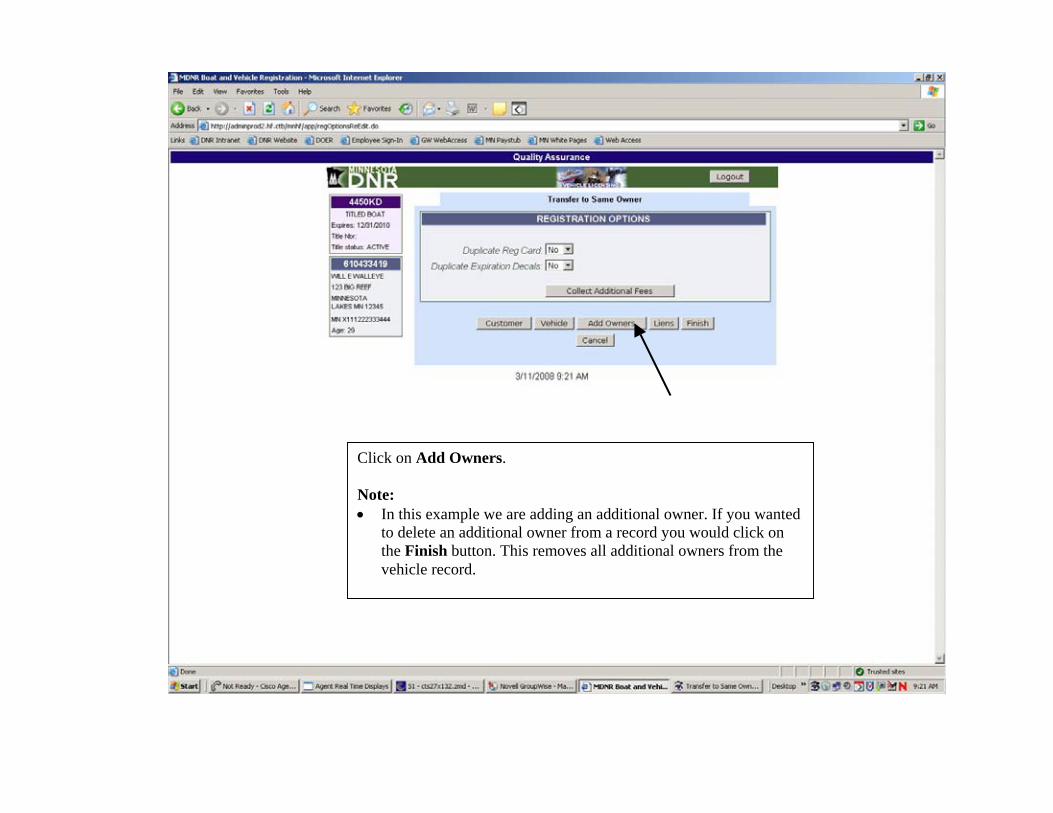
Click on Add Owners. Note: • In this example we are adding an additional owner. If you wanted
to delete an additional owner from a record you would click on the Finish button. This removes all additional owners from the vehicle record.
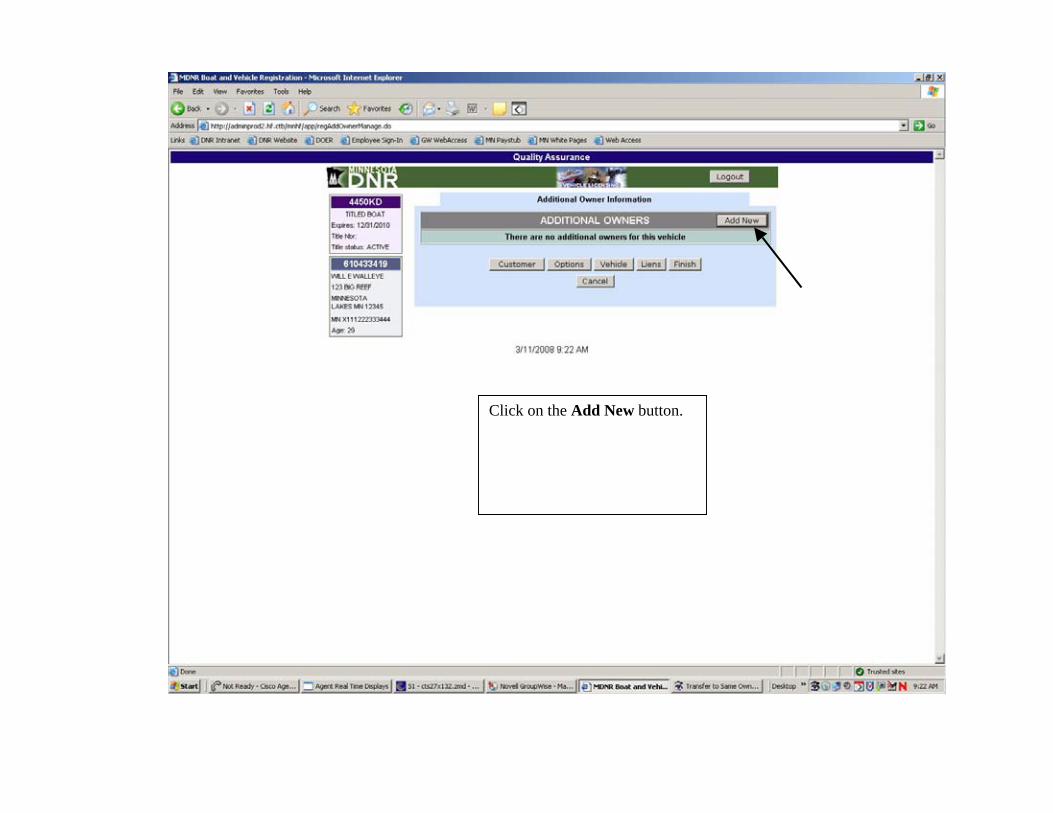
Click on the Add New button.
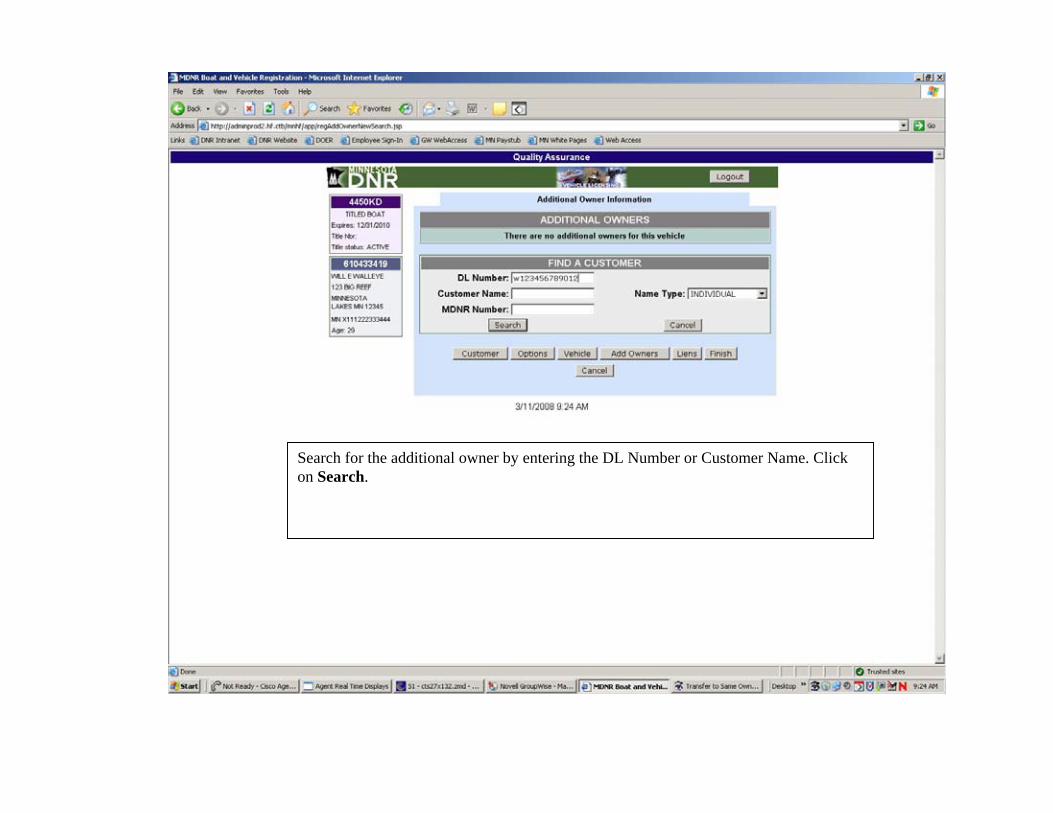
Search for the additional owner by entering the DL Number or Customer Name. Click on Search.
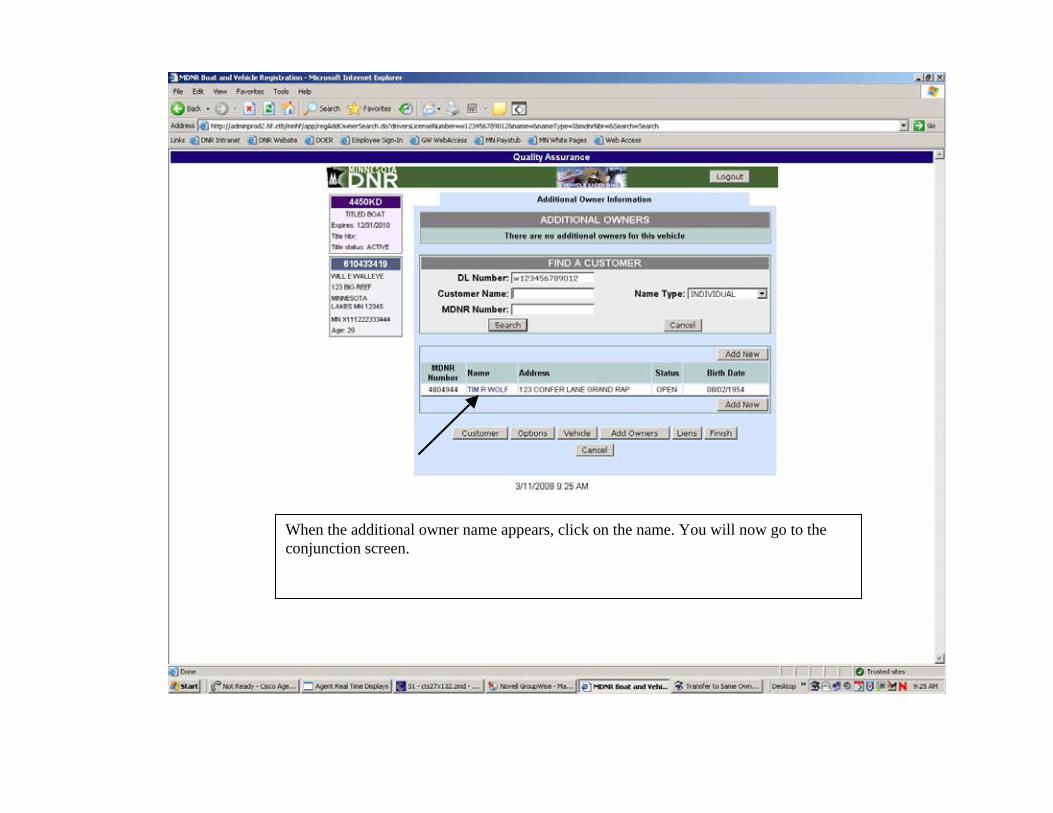
When the additional owner name appears, click on the name. You will now go to the conjunction screen.
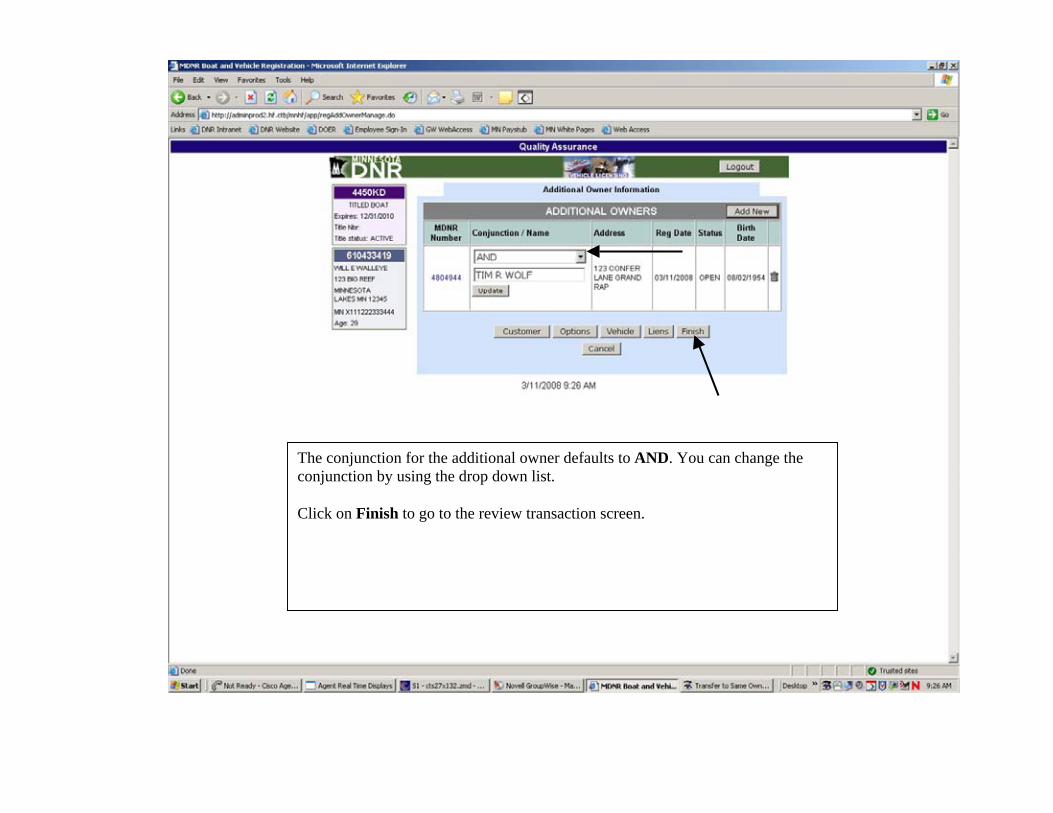
The conjunction for the additional owner defaults to AND. You can change the conjunction by using the drop down list. Click on Finish to go to the review transaction screen.

You see that the Transfer to Same Owner function kept the primary owner the same but you were then able to add an additional owner. Click on Process to complete the transaction.
Dealer Registration
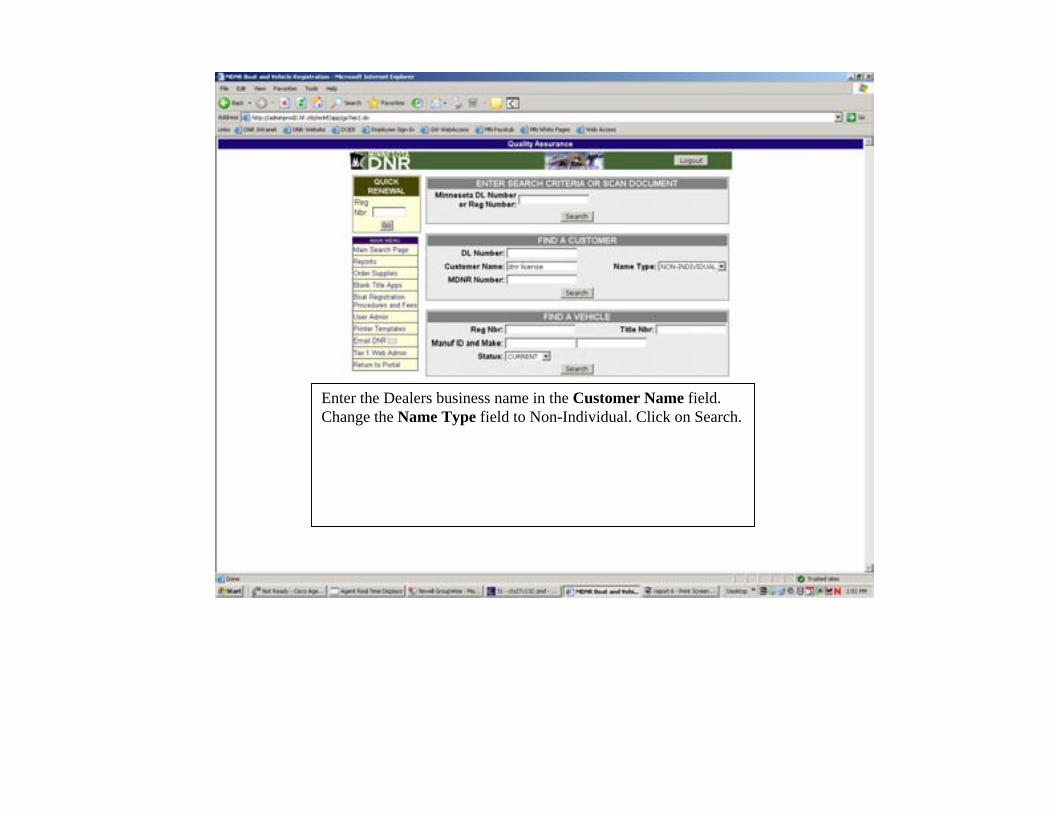
Enter the Dealers business name in the Customer Name field. Change the Name Type field to Non-Individual. Click on Search.

Select the correct business name from the customer list.
Click on the New Registration tab at the top of the customer information.
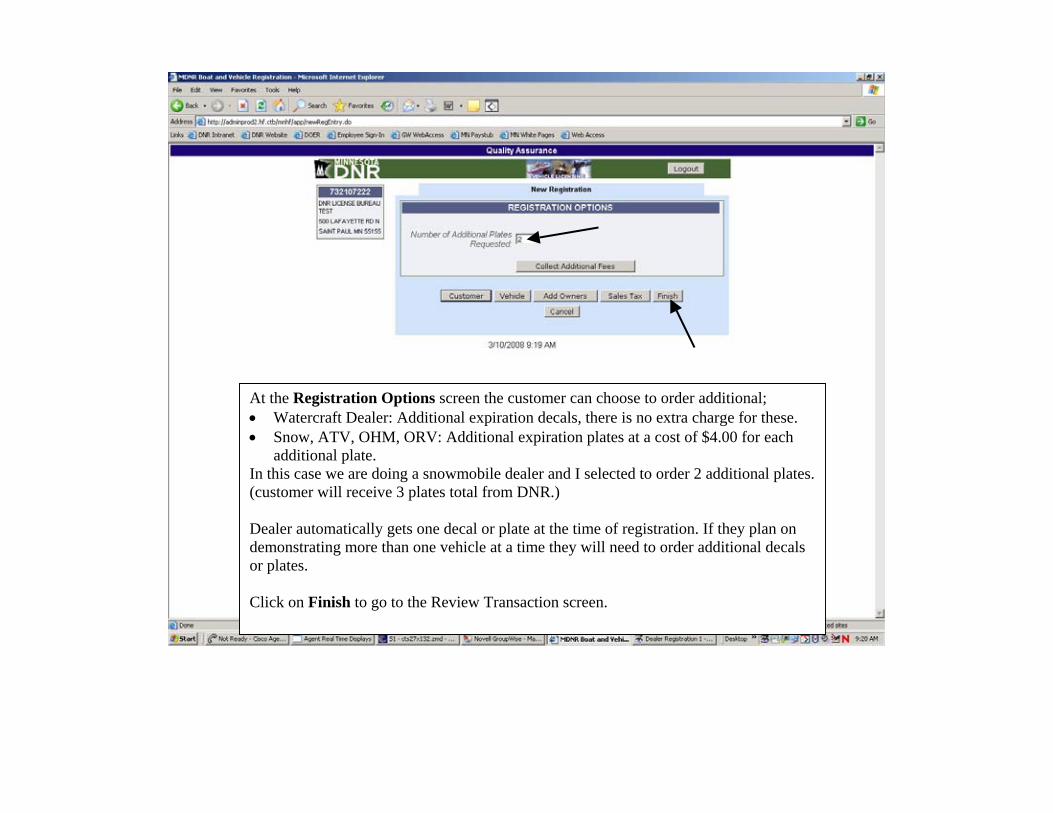
At the Registration Options screen the customer can choose to order additional; • Watercraft Dealer: Additional expiration decals, there is no extra charge for these. • Snow, ATV, OHM, ORV: Additional expiration plates at a cost of $4.00 for each
additional plate. In this case we are doing a snowmobile dealer and I selected to order 2 additional plates.(customer will receive 3 plates total from DNR.) Dealer automatically gets one decal or plate at the time of registration. If they plan on demonstrating more than one vehicle at a time they will need to order additional decals or plates. Click on Finish to go to the Review Transaction screen.
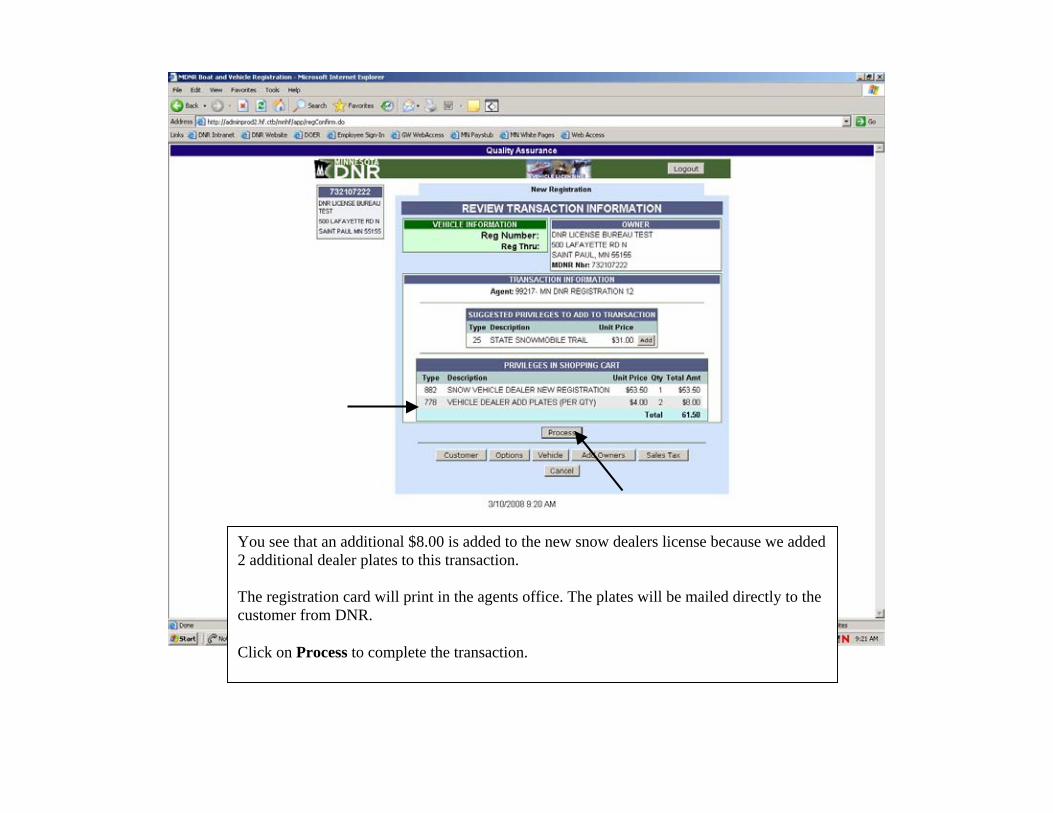
You see that an additional $8.00 is added to the new snow dealers license because we added 2 additional dealer plates to this transaction. The registration card will print in the agents office. The plates will be mailed directly to the customer from DNR. Click on Process to complete the transaction.
Registering Government
Vehicles
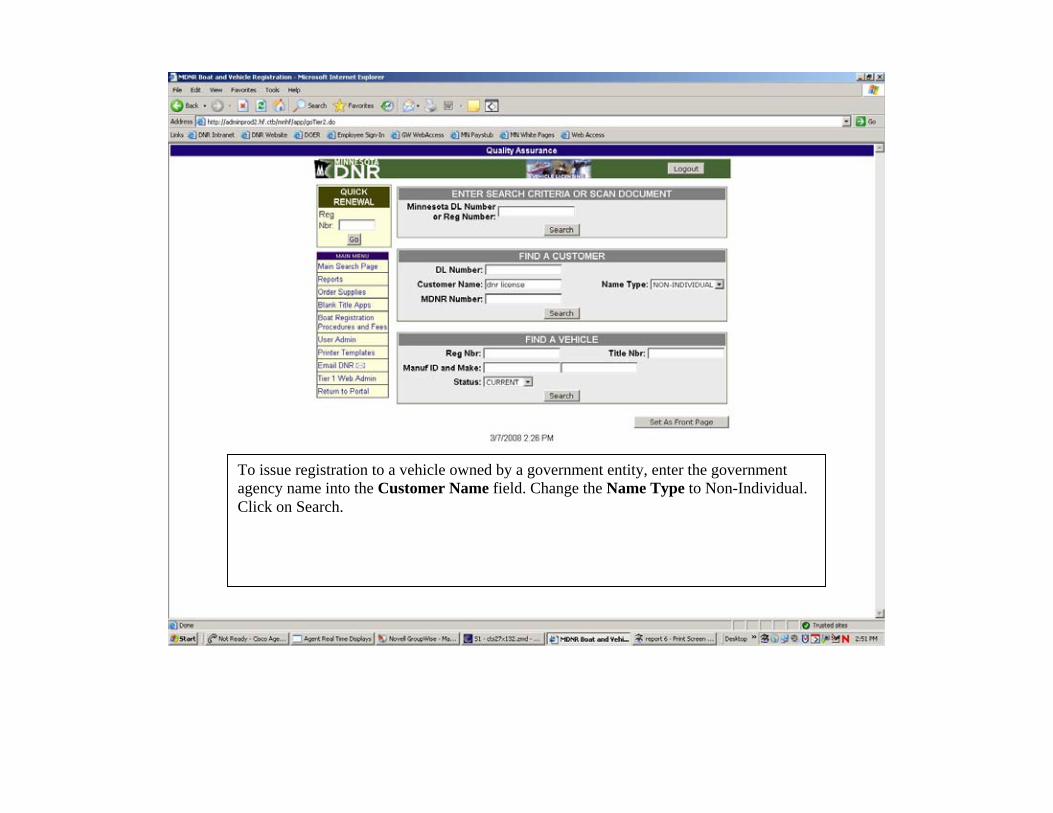
To issue registration to a vehicle owned by a government entity, enter the government agency name into the Customer Name field. Change the Name Type to Non-Individual. Click on Search.
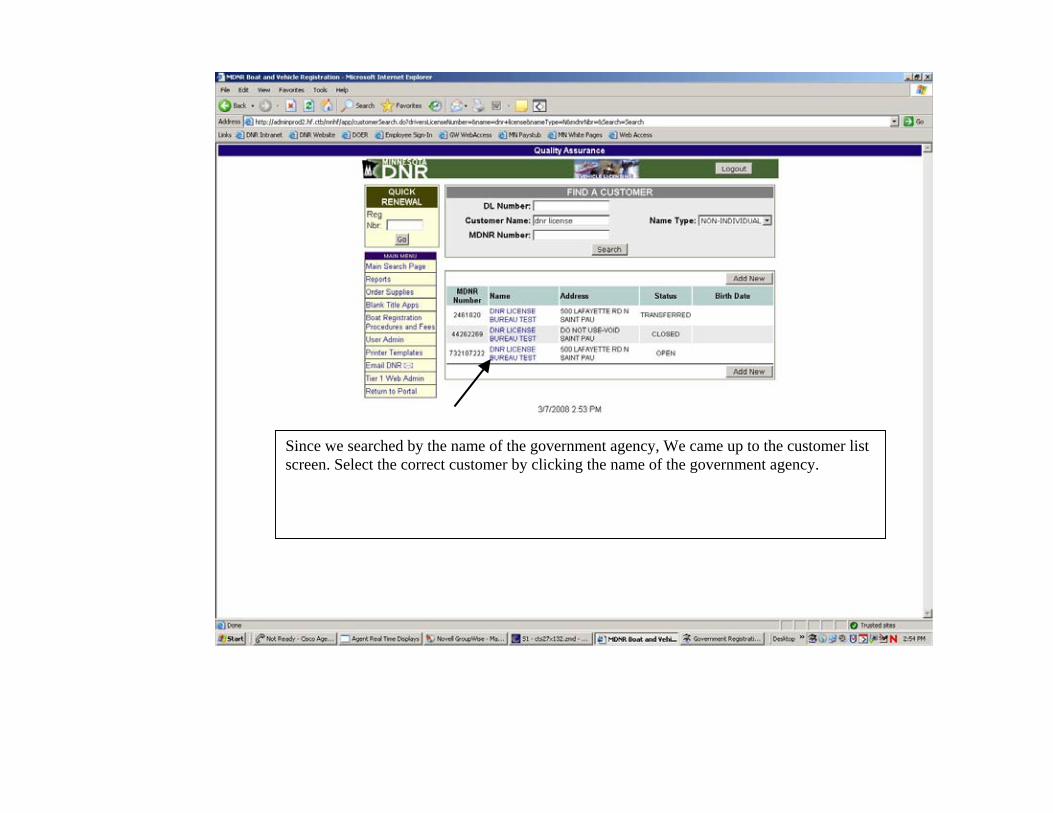
Since we searched by the name of the government agency, We came up to the customer list screen. Select the correct customer by clicking the name of the government agency.

From the Customer Info screen. Click on the New Registrationtab.
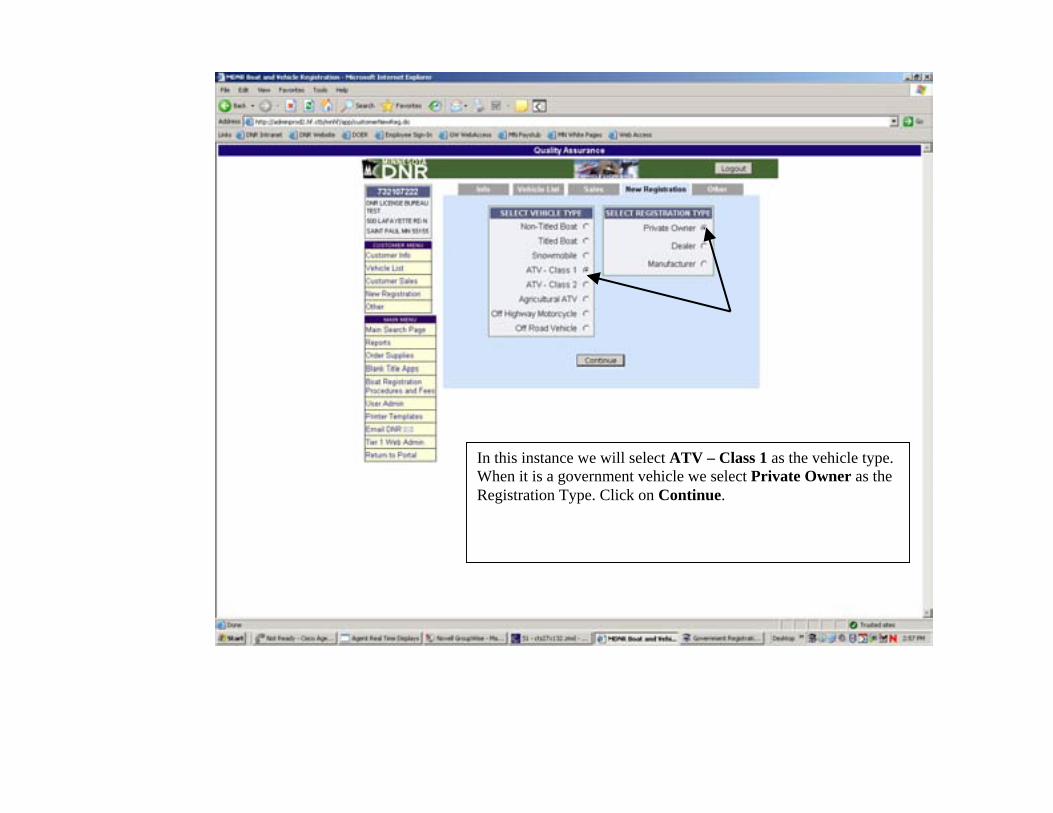
In this instance we will select ATV – Class 1 as the vehicle type. When it is a government vehicle we select Private Owner as the Registration Type. Click on Continue.

Enter the vehicle data into the appropriate fields. The Tax Exempt Status field has to be changed to Yes for government vehicles. It will now charge the correct fee for a government vehicle. Click on Continue.
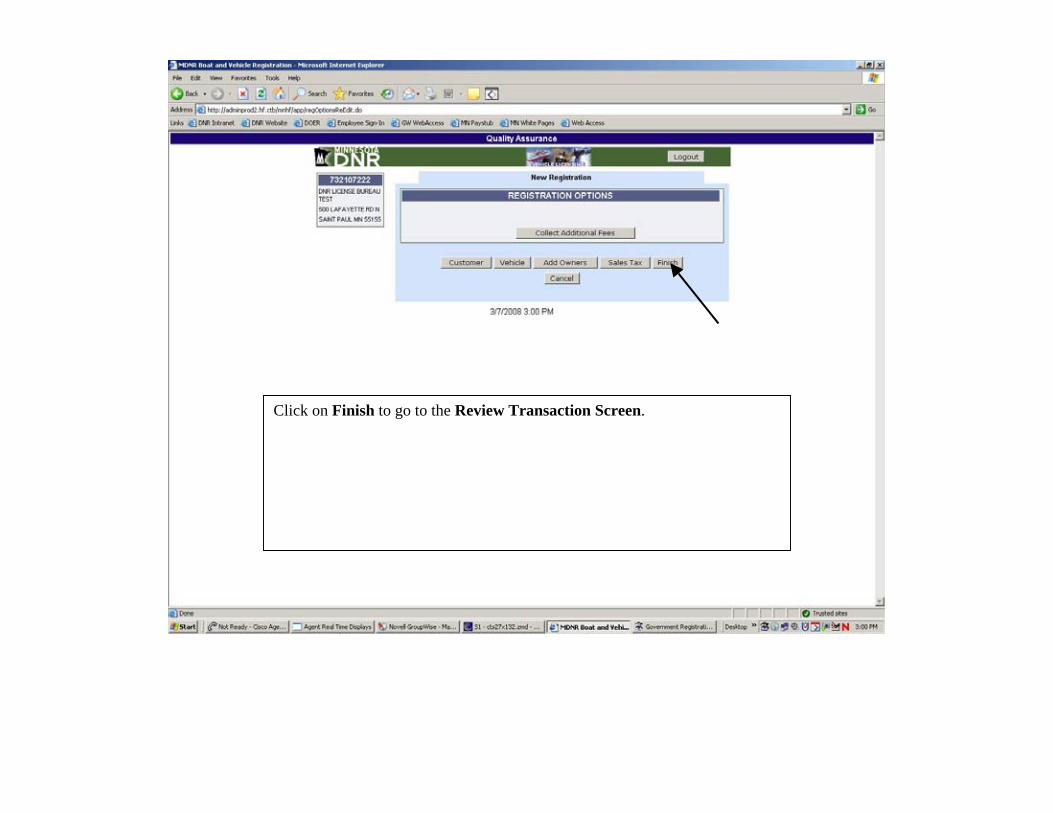
Click on Finish to go to the Review Transaction Screen.
Collecting Sales Tax
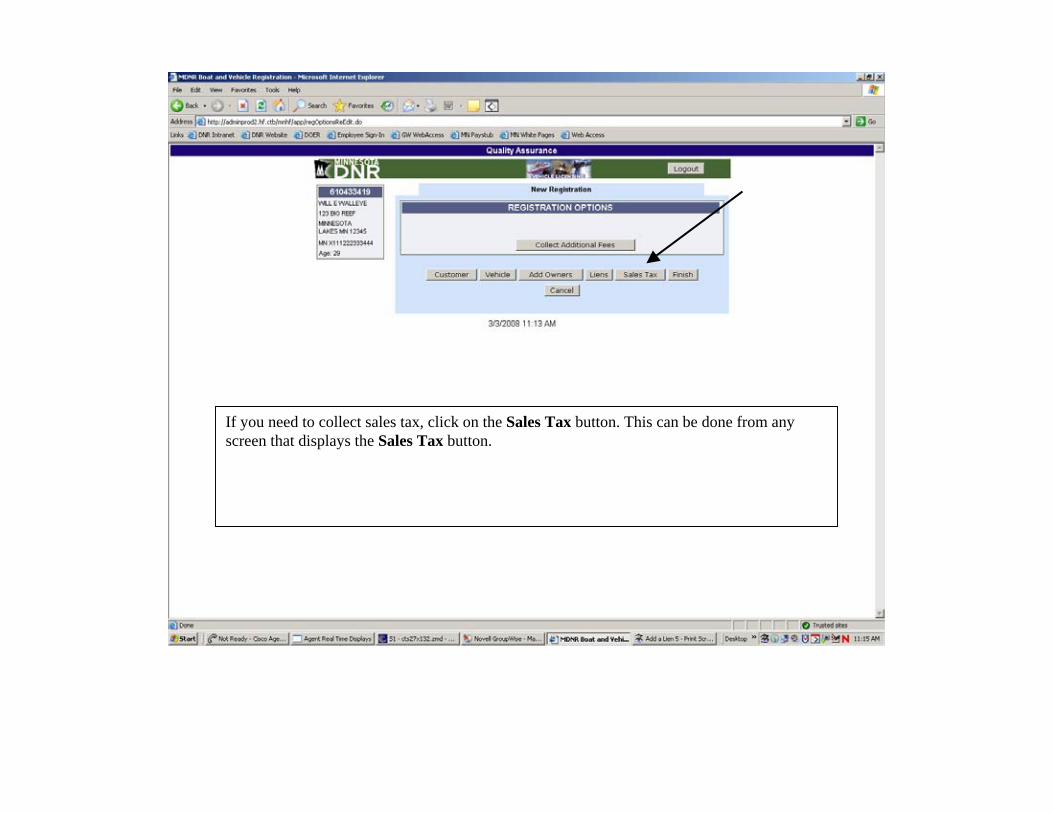
If you need to collect sales tax, click on the Sales Tax button. This can be done from any screen that displays the Sales Tax button.
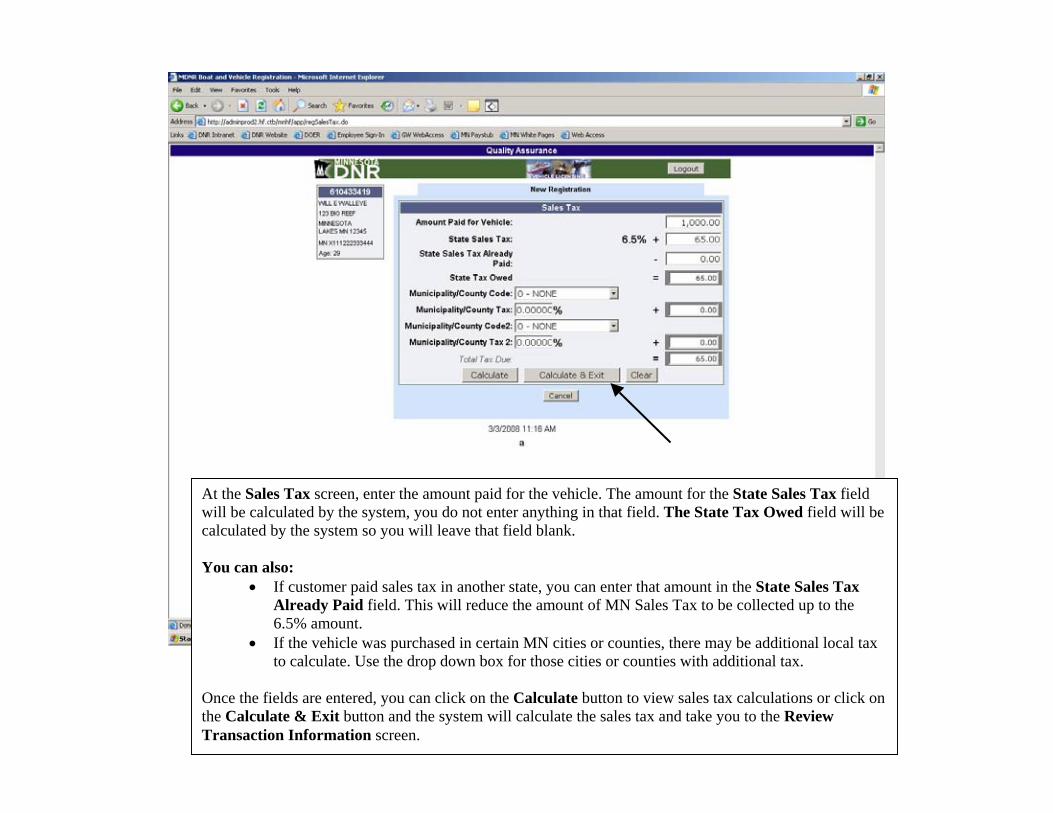
At the Sales Tax screen, enter the amount paid for the vehicle. The amount for the State Sales Tax field will be calculated by the system, you do not enter anything in that field. The State Tax Owed field will be calculated by the system so you will leave that field blank. You can also:
• If customer paid sales tax in another state, you can enter that amount in the State Sales Tax Already Paid field. This will reduce the amount of MN Sales Tax to be collected up to the 6.5% amount.
• If the vehicle was purchased in certain MN cities or counties, there may be additional local tax to calculate. Use the drop down box for those cities or counties with additional tax.
Once the fields are entered, you can click on the Calculate button to view sales tax calculations or click on the Calculate & Exit button and the system will calculate the sales tax and take you to the Review Transaction Information screen.
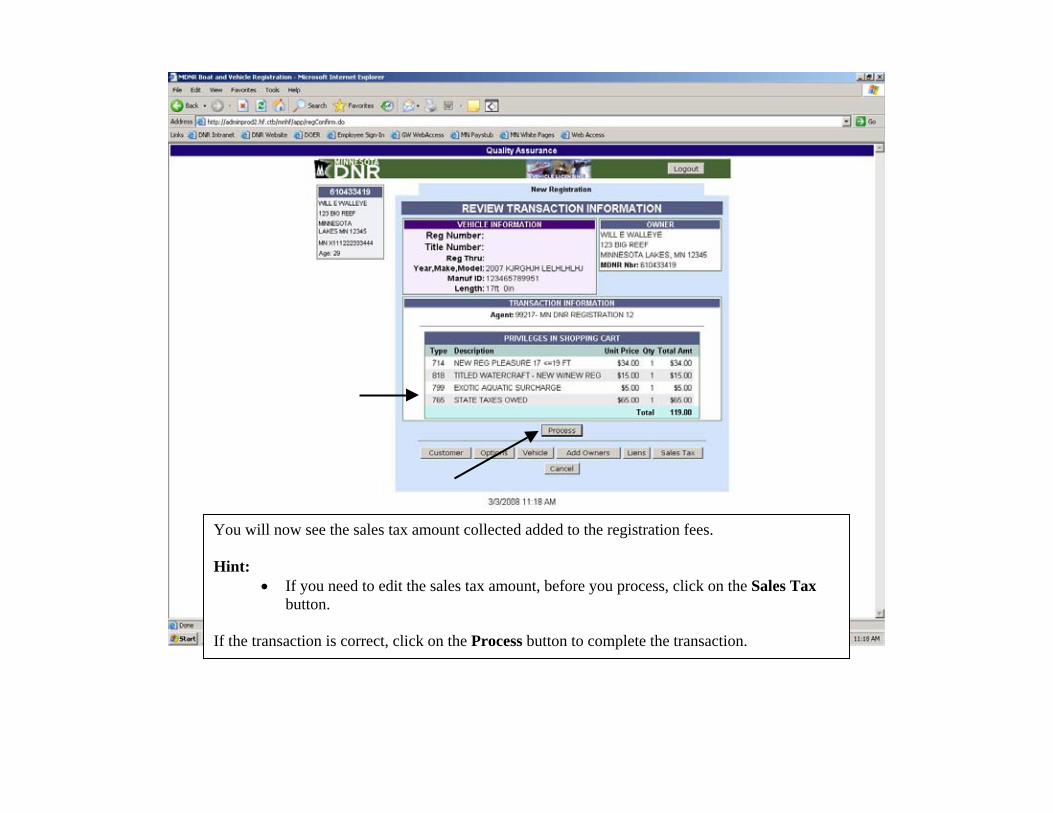
You will now see the sales tax amount collected added to the registration fees. Hint:
• If you need to edit the sales tax amount, before you process, click on the Sales Tax button.
If the transaction is correct, click on the Process button to complete the transaction.

Reports
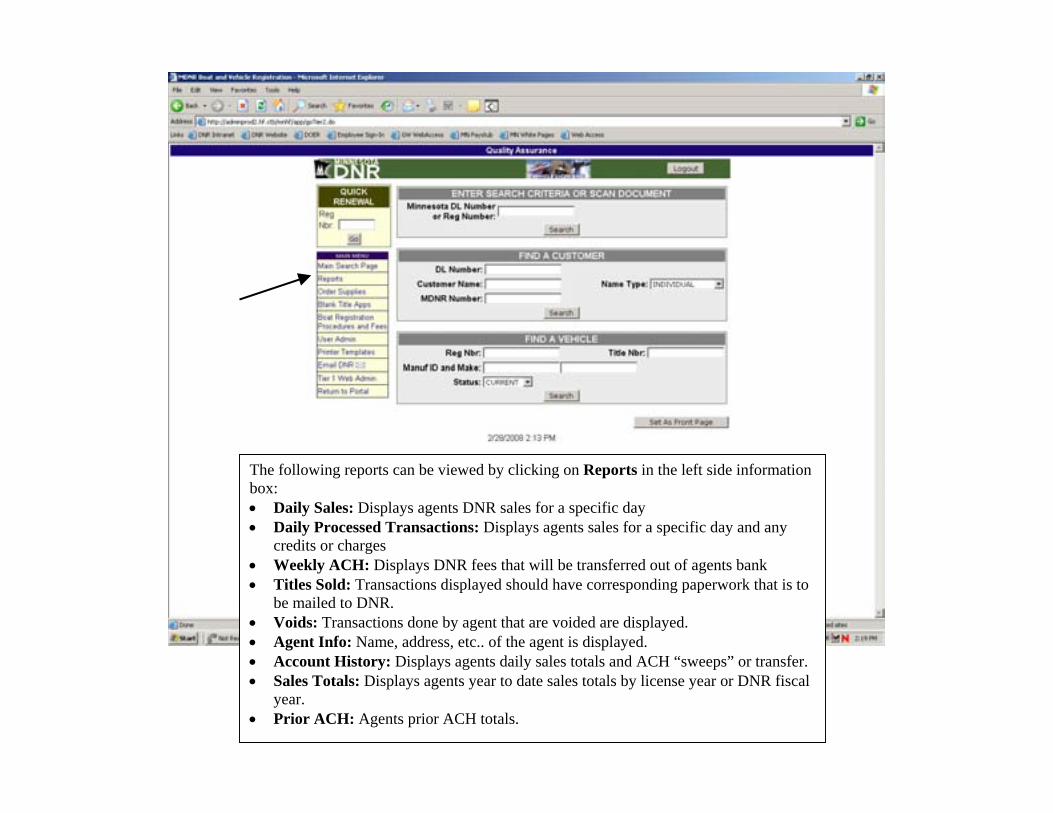
The following reports can be viewed by clicking on Reports in the left side information box: • Daily Sales: Displays agents DNR sales for a specific day • Daily Processed Transactions: Displays agents sales for a specific day and any
credits or charges • Weekly ACH: Displays DNR fees that will be transferred out of agents bank • Titles Sold: Transactions displayed should have corresponding paperwork that is to
be mailed to DNR. • Voids: Transactions done by agent that are voided are displayed. • Agent Info: Name, address, etc.. of the agent is displayed. • Account History: Displays agents daily sales totals and ACH “sweeps” or transfer. • Sales Totals: Displays agents year to date sales totals by license year or DNR fiscal
year. • Prior ACH: Agents prior ACH totals.
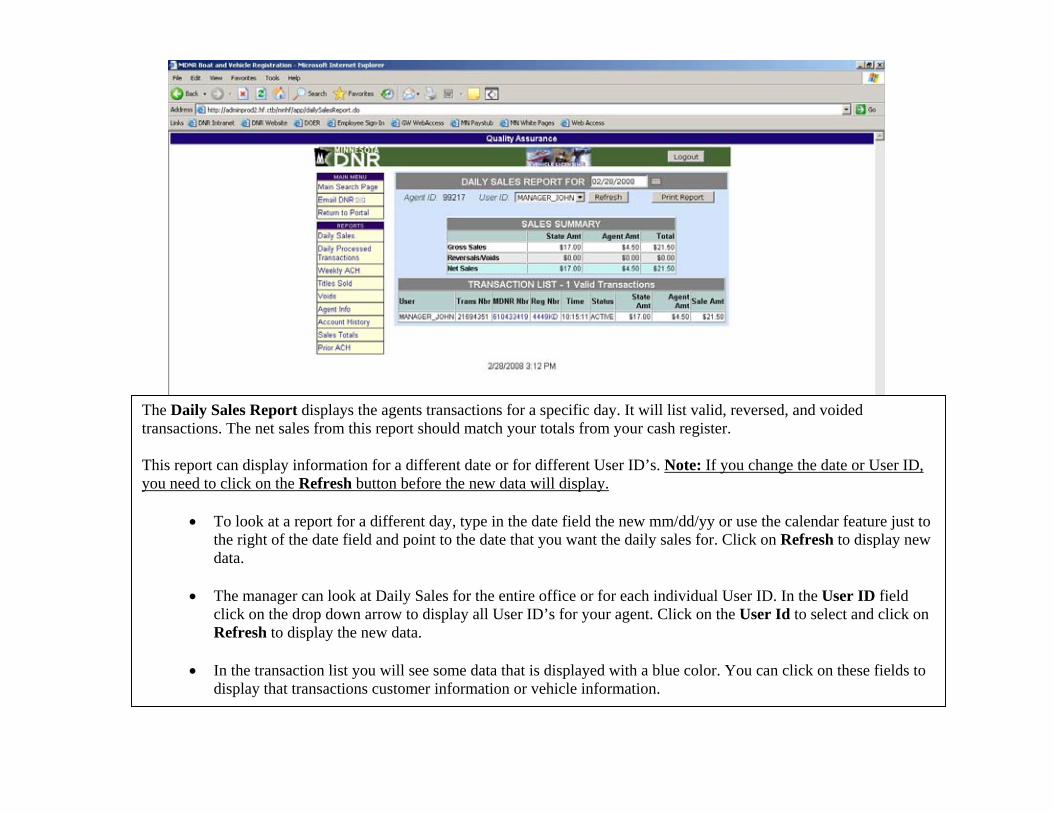
The Daily Sales Report displays the agents transactions for a specific day. It will list valid, reversed, and voided transactions. The net sales from this report should match your totals from your cash register. This report can display information for a different date or for different User ID’s. Note: If you change the date or User ID, you need to click on the Refresh button before the new data will display.
• To look at a report for a different day, type in the date field the new mm/dd/yy or use the calendar feature just to the right of the date field and point to the date that you want the daily sales for. Click on Refresh to display new data.
• The manager can look at Daily Sales for the entire office or for each individual User ID. In the User ID field
click on the drop down arrow to display all User ID’s for your agent. Click on the User Id to select and click on Refresh to display the new data.
• In the transaction list you will see some data that is displayed with a blue color. You can click on these fields to
display that transactions customer information or vehicle information.
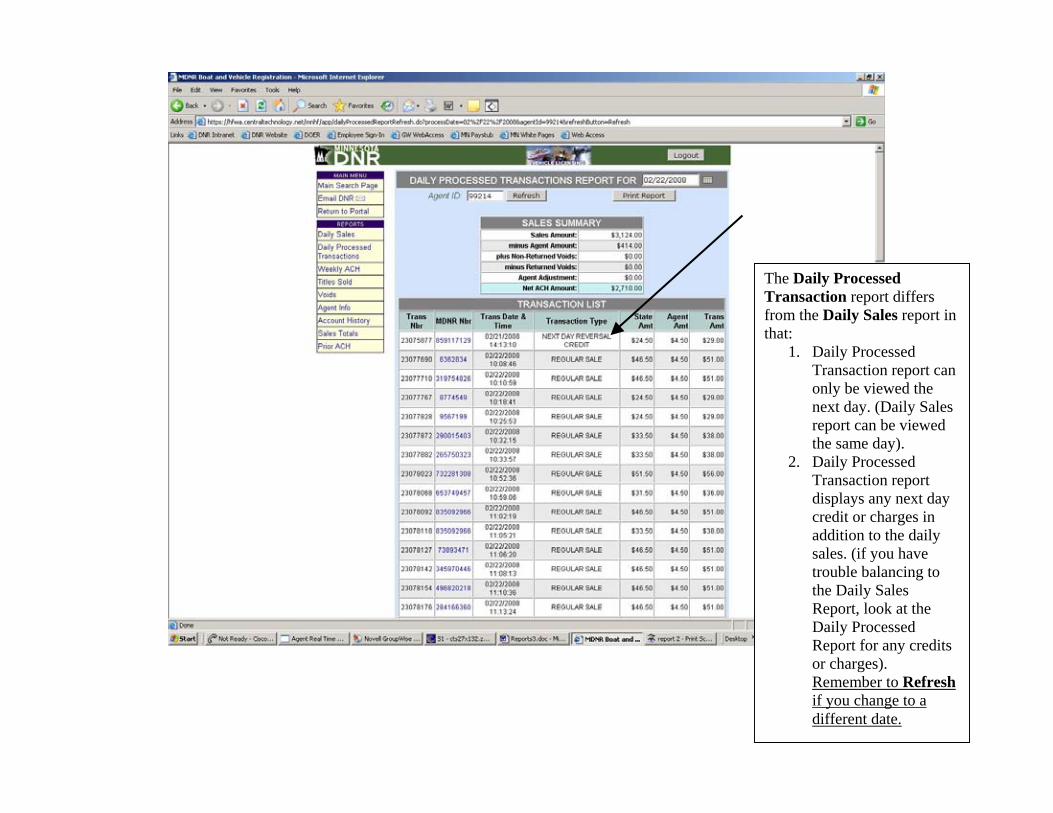
The Daily Processed Transaction report differs from the Daily Sales report in that:
1. Daily Processed Transaction report can only be viewed the next day. (Daily Sales report can be viewed the same day).
2. Daily Processed Transaction report displays any next day credit or charges in addition to the daily sales. (if you have trouble balancing to the Daily Sales Report, look at the Daily Processed Report for any credits or charges). Remember to Refreshif you change to a different date.
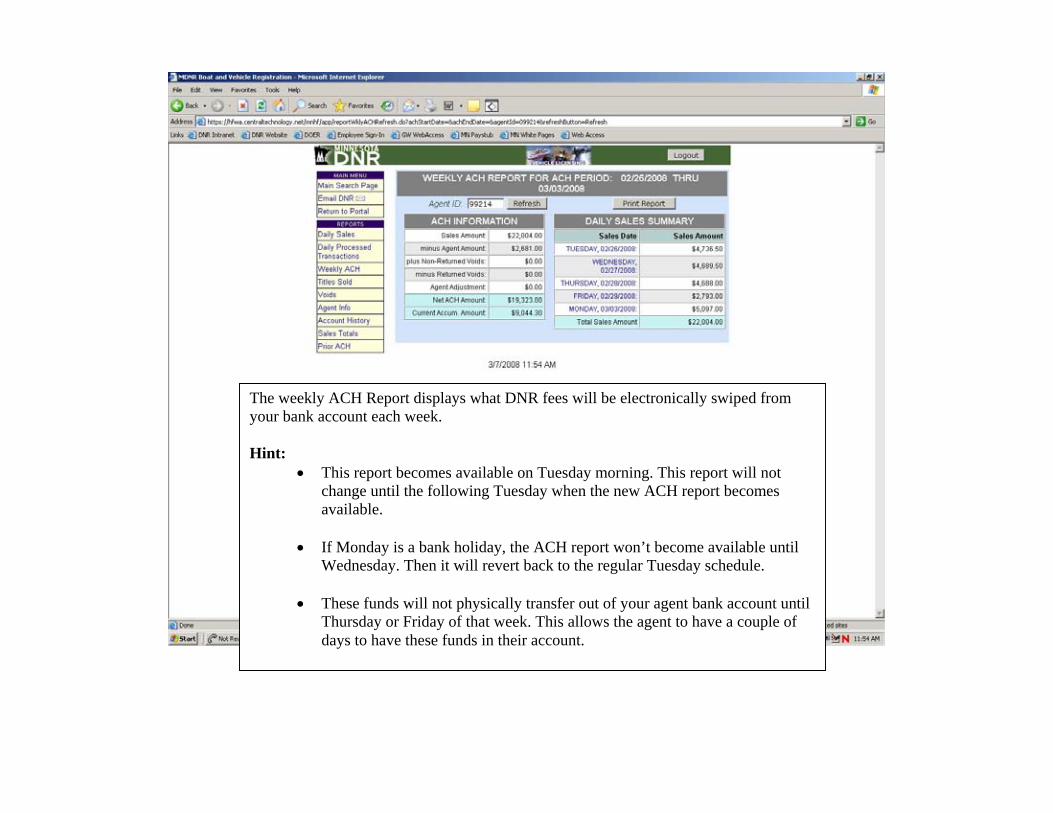
The weekly ACH Report displays what DNR fees will be electronically swiped from your bank account each week. Hint:
• This report becomes available on Tuesday morning. This report will not change until the following Tuesday when the new ACH report becomes available.
• If Monday is a bank holiday, the ACH report won’t become available until
Wednesday. Then it will revert back to the regular Tuesday schedule.
• These funds will not physically transfer out of your agent bank account until Thursday or Friday of that week. This allows the agent to have a couple of days to have these funds in their account.
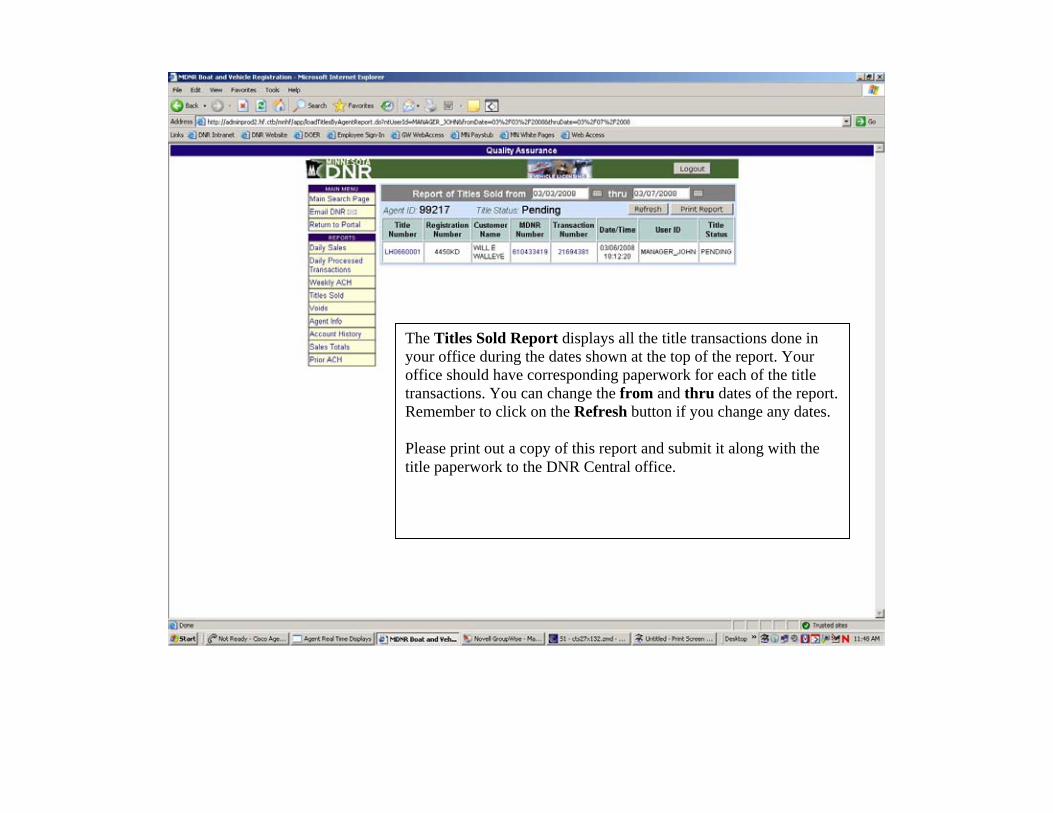
The Titles Sold Report displays all the title transactions done in your office during the dates shown at the top of the report. Your office should have corresponding paperwork for each of the title transactions. You can change the from and thru dates of the report. Remember to click on the Refresh button if you change any dates. Please print out a copy of this report and submit it along with the title paperwork to the DNR Central office.
Ordering Supplies
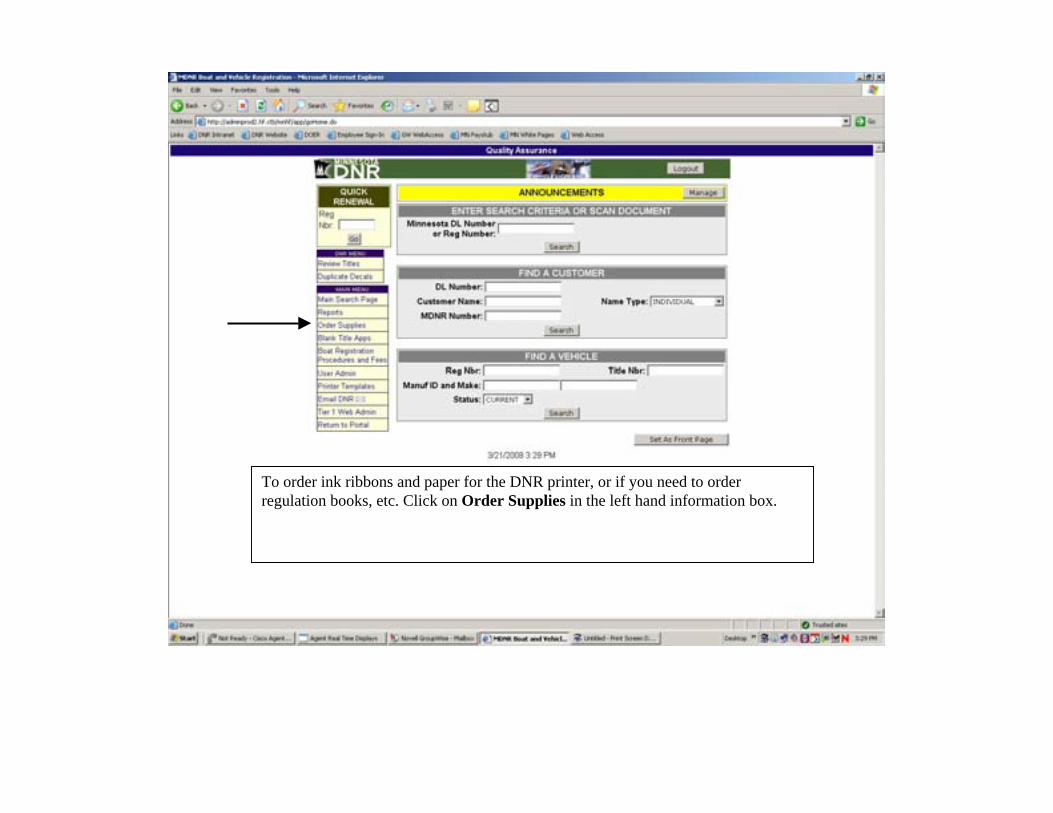
To order ink ribbons and paper for the DNR printer, or if you need to order regulation books, etc. Click on Order Supplies in the left hand information box.
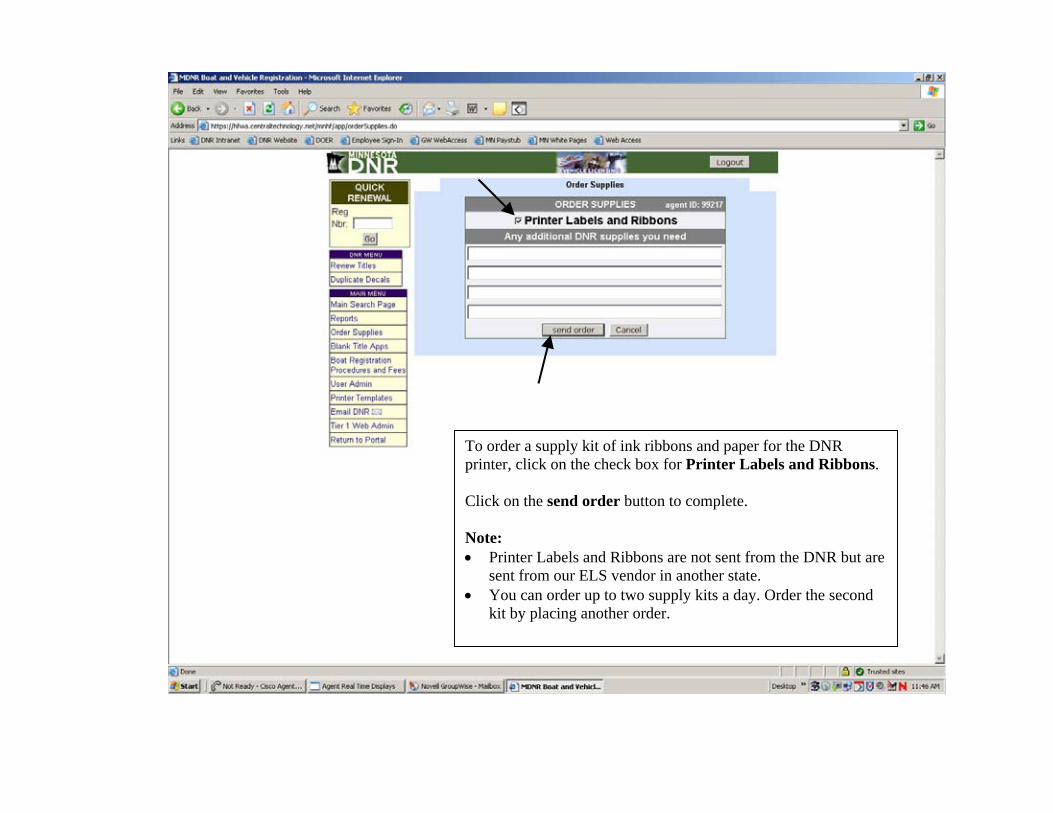
To order a supply kit of ink ribbons and paper for the DNR printer, click on the check box for Printer Labels and Ribbons. Click on the send order button to complete. Note: • Printer Labels and Ribbons are not sent from the DNR but are
sent from our ELS vendor in another state. • You can order up to two supply kits a day. Order the second
kit by placing another order.

Unlike printer supplies, items such as regulation books, DNR forms, etc.. come from the DNR Central office. To order these types of supplies, type in what you would like sent to you then click on the send order button. Your order will be sent to DNR for processing.