electronic plan review applicant user guide - kauai.gov applicant user guide (6... · revised...
TRANSCRIPT

Revised Date—6/7/18
Electronic Plan Review
Applicant User Guide Avolve ProjectDox Software Version 8.6.5

Revised Date—6/7/18
Table of Contents
Page 1 ……………………………………..……..…………………….……….. Table of Contents
Page 2 …………………….……………..…..….. Introduction to Electronic Plan Review (EPR)
Page 3 …………………………………………..……..... ERP Application Submittal Flow Chart
Page 4 ………………………………….…..………………………….……...….. EPR Flow Chart
Page 5 …………………..…………………...……………..……..……………… EPR Information
Page 6 ………………………………….……..………………..…………. File Naming Standards
Page 6 …………………………………………...…….……………... Folder Structure Standards
Page 7 ………………………………………….………..…..……….… Graphic Scale Standards
Page 7 …………………………………………..……….………………... File Printing Standards
Page 8 ………………………………………………...……………….…..…EPR Invitation Email
Page 8—9 …………………………………………..………..……...……….……….… First Login
Page 10 …………………………………………….…………………………..… EPR Preparation
Page 10 ………………………………………….…..….………………..…… Application Number
Page 11 …………………………….………..….……..…… EPR Helpful Tip (Button Functions)
Page 11 ………………………….………..…..….… EPR Helpful Tip (EPR Layout Description)
Page 12 …………………………………….……..………………..…..…. File Naming Standards
Page 13—14 …….………………………….……………………......…….…… Drawing Uploads
Page 15—16 ………………………….…………………..………..….. Prescreening Processing
Page 16 ……………………….………………………………..………….…… Plan Review Fees
Page 17 …………………………………….………………………………..…….... Changemarks
Page 18 …………………………………………….………………………..…… Plan Corrections
Page 19—20 …………………………………………...…..……….…..… Uploading Corrections
Page 21 …………………….…………………………….…………………..…….……… Approval
Page 21 …………………………….…………………… Discussion Board / Revision Requests
Page 22 …..…………………………………...…………..…….. Revision Requests (Continued)
Page 23 …………………………………………….…………..……….……….. Security Timeout
Page 23 …………………………….……………………….………..….… Forgot Your Password
Page 23 ……………………………………………………………..…………….………... Reports
Page 23 ……………………………………..………….…..…. Project Access by Outside Users
1

Revised Date—6/7/18
Electronic Plan Review (EPR) is a web-based electronic plan and document workflow solution that allows citizens and
government personnel to initiate and complete the construction plan submission, review, and approval process online,
rather than using a manual paper-based process, thus replacing the traditional paper-based review method.
Electronic Plan Review will greatly reduce the time it takes for the plan review cycle. Once all plans and documents
have been submitted, they are forwarded, electronically, to all reviewing agencies at the same time! A significant sav-
ings in plan review time have been noted.
An additional cost savings will be realized by eliminating the 5 sets of plans for residential projects and 6 sets of plans
for commercial projects that were typically required before EPR. By using EPR, after all reviews have been completed,
approved, and plans are ready to issue, only the final approved/stamped set will require printing. This can result in a
savings of hundreds of dollars in printing costs for the design professional with an additional benefit of supporting
green initiatives.
This manual provides basic documentation on the steps involved in the Electronic Plan Review process. It has been
prepared as a general reference guide and is not designed to present every detail or situation on every element of the
process. There are text descriptions and screen images of the step-by-step tasks necessary to complete a submittal
and review using electronic plan review.
If at any time in the process you have questions or concerns, do not hesitate to call the Building Division:
• (808)241-4854
In addition to a savings in time and paper costs, it should be noted that all plans and documents are stored in one
place (electronically) and will never be lost, misplaced, or delayed. The applicant can interact with this information any-
time from any location that has internet access by using any compatible Internet Browser. Access is through a secure
site, with the same browser security that is used when doing on-line banking. All access is password protected. Once
logged on, the applicant is only allowed to view and access the projects belonging to his/her identity. This availability
can be granted to other individuals as required as either “View Only,” or as a second applicant with full upload and
download rights.
Mayor Bernard Carvalho has been a strong supporter and advocate of this initiative: “Electronic Plan Review is long-
overdue, and will help us in our continual quest to provide the best possible customer service to the people of Kaua‘i,
our businesses and our visitors.”
Introduction to Electronic Plan
Review (EPR)
2

Revised Date—6/7/18
Electronic Application Submittal Flow Chart
Plans to be uploaded by Applicant
Uploads will go through a pre-screening process.
The task will be returned to the applicant if requirements are not met.
Once pre-screening is passed, an automated email will be sent to the
application with Plan Review Fee total.
Submit Plan Check Fees
Department
of Health
Flood
Planning
Department
Building
Division
Fire
Department
Water
Department
Engineering
Division
Addressing
Wastewater
Submit completed application and checklist to the Building Division
(Be sure to include the first and last name of the applicant, along with an e-mail address.)
Building Permit Clerks will create the application. At that point the applicant will re-
ceive an e-mail invitation into the Electronic Plan Review System
Begin Review—
Plans will be sent to all required agencies based on scope of work.
3
Revised Date—6/7/18
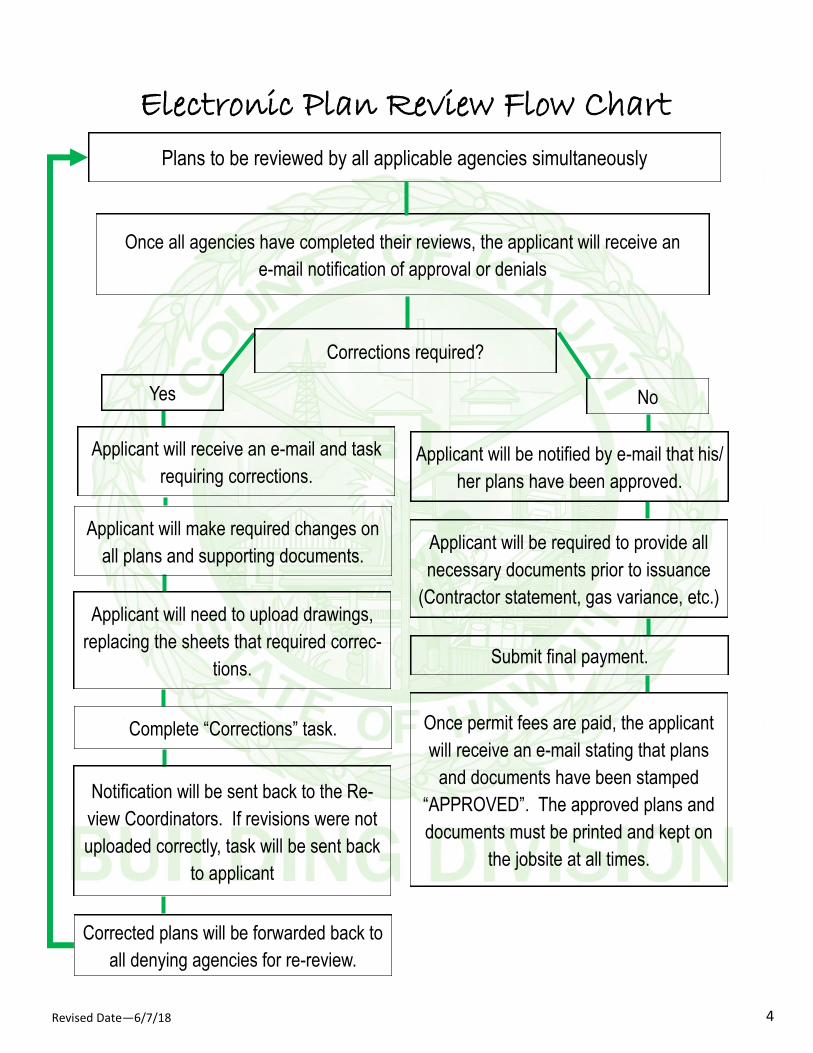
Electronic Plan Review Flow Chart
Plans to be reviewed by all applicable agencies simultaneously
Once all agencies have completed their reviews, the applicant will receive an
e-mail notification of approval or denials
No
Corrections required?
Yes
Applicant will receive an e-mail and task
requiring corrections.
Applicant will make required changes on
all plans and supporting documents.
Applicant will need to upload drawings,
replacing the sheets that required correc-
tions.
Complete “Corrections” task.
Corrected plans will be forwarded back to
all denying agencies for re-review.
Notification will be sent back to the Re-
view Coordinators. If revisions were not
uploaded correctly, task will be sent back
to applicant
Applicant will be notified by e-mail that his/
her plans have been approved.
Applicant will be required to provide all
necessary documents prior to issuance
(Contractor statement, gas variance, etc.)
Once permit fees are paid, the applicant
will receive an e-mail stating that plans
and documents have been stamped
“APPROVED”. The approved plans and
documents must be printed and kept on
the jobsite at all times.
Submit final payment.
4

Revised Date—6/7/18
Electronic Plan Review Information
1. Electronic Plan Review (EPR) is a web-based program. In order to use this software, the user
must have internet access. Recommended web browsers are Internet Explorer 9 or 10 (32-bit)
minimum; or the latest releases of Chrome, Firefox, and Safari.
2. In order to log in to EPR, you must have an e-mail address and a password. The first time you
are invited to upload plans, you will be given a temporary password. NOTE: this temporary pass-
word is case sensitive.
3. All users of the EPR software will upload plans and other documents electronically. Silverlight
must be installed on the Computer you are using to upload.
4. Internet Explorer users of the EPR software must install a small viewer program the first time they
log in to the system. You will be prompted to install this small viewer software program. All other
browser use a HTML5 viewer which does not require an install.
5. All drawings that you upload need to follow the standards outlined later in this document. Please
read the standards before creating the files for uploading. ** Please be sure File Naming Stand-
ards are followed.
6. All plans need to be job specific. We will no longer accept one set of drawings for two or more
applications. Drawings should only reflect scope of work based on application description.
7. In order to log into the system, your Pop-up Blocker must be turned off. If it is not turned off, you
will get a friendly notice. To turn off your pop-up blocker: •Go to the TOOLS menu > •Click POP-
UP BLOCKER > •Click TURN OFF POP-UP BLOCKER
8. For specific instructions for installing the Internet Explorer Viewer or Silverlight, please refer to the
following web page for detailed instructions: http://www.kauai.gov/epr NOTE: This software will
allow the applicant to upload plans and documents and to send and receive e-mails to the Review
Coordinator at the Building Division. At this time, there are no provisions to submit on line appli-
cations or to pay plan check/permit fees on line, although these two features may be added in the
future.
5

Revised Date—6/7/18
Folder Structure Standards
When directed to upload your plans and supporting documentation, applicants usually want to know what file types are
acceptable. Over 200 different file types can be read by the EPR software. The preferred format is either vector PDF
or Design Web Format (DWF) file types. Searchable PDF files or other searchable file types are preferred for calcula-
tions, reports and other supporting plan documentation (non-drawing files).
Since AutoCAD software is commonly used to create drawing files, converting a .DWG to .DWF file print ready is a
common secured file format. Files must be 2D DWF file print ready. The .DWF must be saved as Auto CAD version 10
or lower format. EPR does not support 3D DWF files at this time. Uploaded files are converted to a view only format
and are not editable.
If you choose to create PDF files, you will need to convert your AutoCAD files to a Vector PDF. It is recommended that
drawings created in AutoCAD be converted to a Vector PDF within the AutoCAD program itself. In addition, the newest
Adobe Acrobat (not the free version of Adobe Reader) will accommodate the creation of a Vector PDF.
** Why vector PDF’s? Vector PDF’s can be scaled by any amount without any degrading image quality. It al-
lows the plans to be reviewed in a much higher level of clarity on a computer screen.
File Type Standards
All plans must be uploaded into the “Drawings” folder. Each sheet of your drawings must be a
separate file (one sheet per file) saved using the naming standards which can be found
on page 12.
All supplemental or supporting documents must be uploaded into the “Documents” folder for
each project. Sample document types would be truss engineering, energy calculations, prod-
uct approval forms, geotechnical reports, storm water
reports, signed energy forms, flood zone information,
etc.
All responses to corrections requested by County Plan
Reviewers must be attached to the eForm for each
project.
Approved Drawings folder will contain all Kaua’i County
stamped and approved drawings.
Approved Documents folder will contain all Kaua’i County stamped and approved documents.
Revised drawings must retain the same name as the original. Example: a Building Division
Plans Examiner requires a correction to sheet A-1 of your plan. Your corrections to sheet A-1
must also be named “A-1.” This will automatically version (i.e., version 1 and version 2) this
sheet and allow plans examiners to take advantage of the “compare” feature found in EPR.
6

Revised Date—6/7/18
File Printing Size Standards
All plans must be drawn to scale using standards such as 1/4
inch per foot, 1/8 inch per foot, etc., or provide a typical graphic
scale as shown in the image to the right.
When more than one scale is used on a sheet, an independent
graphic scale must accompany the applicable detail.
Graphic Scale Standards
For consistency, all drawing files must be drawn and formatted in one of three sizes:
24” x 36”
11” x 17”
8½” x 11”
All drawing files must be drawn and formatted in the horizontal (landscape) position.
Provide a North arrow on your plot plan.
Please leave a 3-inch x 3-inch blank area, on all pages, in the upper right hand corner for the approved stamp to
be inserted later, as shown below.
Provide a scale for all drawings
Files must be saved as AutoCAD version 10 or lower format. EPR does not support 3D DWF files at this time.
When drawings are sent back to the applicant for corrections, corrected drawings MUST retain the same file name
as when first submitted (see page 12 for naming standards).
7

Revised Date—6/7/18
When your application for a Building Permit or Development Project is reviewed, accepted, and plan review fees have
been paid, an Electronic Plan Review invitation will be sent to your e-mail address (shown below). For first time users,
the invitation e-mail will contain your login information, temporary password (used only one time) and information
about the project, including a link to the electronic plan review web portal.
Electronic Plan Review Invitation Email
First Login—
1. Click on “Login to Electronic Plan Re-
view” to get started.
2. Enter your email address
3. Enter your temporary password that
was provided in the invitation e-mail.
Please note that this temporary pass-
word is case sensitive.
4. First time users of Electronic Plan Review will want to visit http://www.kauai.gov/epr for specific instructions for
your Operating System and Browser. This step is very important! PLEASE NOTE: Electronic Plan Review uses
pop-up windows (windows with no toolbars). If you login but no EPR window appears, you probably have a pop-
up blocker in use that is preventing the main project window from opening. You will need to disable pop-up block-
ing in order to utilize the EPR application. (Pop-up blockers allow you to disable pop-up blocking for specified
sites if you wish to leave it on and exclude EPR.)
Your E-mail Address here Your Temp. Password here
8

Revised Date—6/7/18
After logging on to the County’s electronic plan review system (explained on the previous page) with
your temporary password, you will be presented with the screen below. The boxes with the yellow/
orange highlighted fields must be completed:
5. You must change your temporary password to a permanent password. This password must be 8
– 16 characters long and must contain at least one letter and one number. Type in your new
password; then type your new password again to confirm. **PLEASE NOTE: your password is
case sensitive.
6. Provide a “Security question” and “Security answer.”
- Example security question: “Grandma Taylor’s middle name.”
- Example security answer: “Thompson”
***Please note: no one can know your security question or answer except you.
7. Complete the rest of the highlighted fields.
8. After completing all highlighted fields, click the “Save” button.
First Login (continued)
9

Revised Date—6/7/18
Once you set up your permanent password, return to the EPR Login Page; https://kaua-epr.aspgov.com
1. Click on “Install Electronic Plan
Review Components” to install a
the small viewer program that will
allow you to interact with the EPR
Software. This step only needs
to be completed once.
2. If you wish, you can create a
desktop short cut by clicking on
the island icon.
3. Click on the link in the third box, if you wish to add Electronic Plan Review to your favorites.
EPR Preparations
Application Number An application number will be provided to you in your Invitation email. You will need your application
number before you are able to upload any plan drawings and/or documents. Your application number
will look like this:
BP 12-00003456
PLEASE remember this number. This is the easiest and most efficient way
to access permit information should you have any questions.
BP = Building
Permit
The year your application was submitted
Sequential
Number
10

Revised Date—6/7/18
BP12-00003456
BP12-00007890 BP12-00001112 BP12-00001314
SINGLE FAMILY RESIDENCE
GARAGE FOR RESIDENCE
ALTER/REPAIR COMMERICAL
INDUSTRIAL
Building Division
Building Division
Building Division
Building Division
BP12-00001314 ApplicantUpload Applicant Pending 12/31/2012 12:23 PM 12/31/2012 12:23 PM
Any project for which you have access to will display in the “Active Projects List”
Any outstanding tasks that require your action are displayed in the “Active Task List”
**Select the project that corresponds to the plans you will be uploading by clicking on the application number
EPR Helpful Tips
Once you log back into the EPR system, the top half of the screen will look like the screen shot above. Description of
button functions can be found below:
1. The “Back/Forward” buttons will back up or move forward one frame at a time. It may be necessary to click the
Back or Forward buttons several times before getting to your desired location.
2. The “Projects” button will take you to your projects in the EPR system. Other applicants cannot see your projects
and you cannot see theirs.
3. The “Profile” button will take you back to your profile (shown on the previous page) if you wish to change or up-
date information.
4. The “Refresh” button will update all of your information. NOTE: you can also refresh by using the F5 key on your
keyboard.
5. The “Search” icon (magnifying glass) can be used to search for information on your plans.
6. The “Help” icon (question mark) provides information on a variety of topics.
7. The “Logout” button allows you to logout of electronic plan review.
Button Functions
EPR Layout Description
11

Revised Date—6/7/18
File Plan Naming Standards When preparing to upload your drawings / plan pages to the EPR system, please follow the file naming structure
shown below:
Abbreviation Definition Examples
0cs Your Cover sheet(s) 0cs1, 0cs2, 03, etc. (zerocs1, zerocs2 etc.)
A Architectural Drawings A01, A02, A03, A04, A05, etc.
C Civil Engineering & Site Work C01, C02, C03, C04, C05, etc.
D Demolition Drawings D01, D02, D03, D04, Do5, etc.
Dt Details Dt01, Dt02, Dt03, Dt04, etc.
E Electrical Drawings E01, E02, E03, E04, E05, etc.
Eq Equipment Plan Eq01, Eq02, Eq03, Eq04, etc.
F Fire (Fire Protection) Drawings F01, F02, F03, F04, F05, etc.
G Grading Plans G01, G02, G03, G04, G05, etc,
Gen General Project Requirements Gen01, Gen02, Gen03, etc
H Hazardous Materials H01, H02, H03, H04, etc.
I Interiors (Interior Design) I01, I02, I03, I04, I05, etc.
Irr Irrigation Plans Irr01, Irr02, Irr03, Irr04, etc.
L Landscape Plans L01, L02, L03, L04, L05, etc.
M Mechanical Plans M01, M02, M03, M04, M05, etc.
P Plumbing Drawings P01, P02, P03, P04, P05, etc.
Pl Planting Drawings Pl01, Pl02, Pl03, Pl04, etc
S Structural Drawings S01, S02, S03, S04, S05, etc.
Sec Section Drawings Sec01, Sec02, Sec03, etc.
SP Site Plan (Plot Plan) SP1, SP2, SP3, SP4, etc.
T Telecommunications Plan T01, T02, T03, T04, T05, etc.
X Existing Plan X01, X02, X03, X04, etc.
W Water Plan W01, W02, W03, W04, etc
Important: All file names will begin with a letter(s) designation followed by two numbers. Example: Architectural draw-
ings would be designated as A01 through A99.
Exception: the applicant’s cover sheet must always start with the number 0 (zero) followed by the letters cs (cover
sheet) and then a number: 0cs1, 0cs2, etc. (Using the number “0” (zero) will ensure that your cover sheet(s) will al-
ways be, alphabetically, on the top of the list in the electronic plan review Documents Folder.
Remember: Each sheet of your plans and each sheet of your supporting documents will be a separate file and must
be named in accordance with the naming standard above. When drawings are sent back to the applicant for correc-
tions, corrected drawings MUST retain the same name as when first submitted.
12

Revised Date—6/7/18
Drawing Uploads
1. Access the project Click on the permit number
2. Select “Workflow Portals” in the top right hand corner of the screen.
3. Select the task “Applicant Upload”
4. A notification will pop-up stating, “ Do you want to accept this task?” Select ok.
5. By accepting the task, another screen will display. Close that screen and return to the project.
6. You will now be able to upload your drawings. Click on the “Drawings” folder.
7. Select “Upload Files”.
SINGLE FAMILY RESIDENCE - 1-STORY SINGLE FAMILY RES
(0 Files – 0 New)
(0 Files – 0 New)
(0 Files – 0 New)
(0 Files – 0 New)
(0 Files – 0 New)
13

Revised Date—6/7/18
Drawing Uploads (Continued…)
8. Select Browse.
9. Select all files that you would like to upload. (*REMINDER: Each page needs to be uploaded as it’s own file.)
Be sure all File Naming Standards are followed. File Naming Standards can be found on the following page.
Once all files are selected, press “Open”.
10. Select “Upload”. Once all files have completed uploading, close window.
11. Return to your “Workflow Portal” and open your “Applicant Upload” task. The window you previously closed will
pop-up. Check the box that states “I have completed uploading all required files to the drawings and documents
folders for this project.” Then select “Complete”. (**This step is very important. By completing this task, Re-
view Coordinators will be sent a notification for Prescreening.)
12. This completes your first step. A notification will now be sent to the Review Coordinators for a Prescreening
Process.
14

Revised Date—6/7/18
Prescreening Process Prescreening Has Been Approved
If your submittal is approved, you will receive an email with your Review Fee information. Once review fees are re-
ceived, drawings will be sent to all required agencies for review.
Prescreening Had Been Denied
If your submittal requirements are not complete, you will receive an e-mail notification along with a task. The task
will display in your active projects list as “CorrectionComplete”. This indicates that corrections and/or additional in-
formation is required at this time. By clicking on the “CorrectionComplete” task, an eForm will open. The eForm
will give you further details on why your upload submittal was returned to you.
BP12-00003456
SINGLE FAMILY RESIDENCE – 1-STORY SINGLE FAMILY RES
BP12-00003456.
$25
BP12-00003456
BP12-00003456
SINGLE FAMILY RESIDENCE – 1-STORY SINGLE FAMILY RES
15

Revised Date—6/7/18
Prescreening Process (continued…)
If Prescreening has Determined that your submittal is incomplete:
1. You will have a “CorrectionComplete” task in your Active Task List. Open task.
2. A pop-up window will display. Review the checklist items (if any) and comments left in the task instruction text
box. Under “Comments”, you will see details on why the prescreening has been denied. Close window &
make corrections as advised.
3. After you have identified the corrections or missing documents/drawings that are being requested, upload into
the designated folder (Drawing Folder, Documents Folder, etc). Please refer to page 13-14 for uploading in-
structions.)
4. Once uploads are complete, return to your “Task List” and re-select the “CorrectionComplete” task.
5. At this point, all requirements should be satisfied. In the pop-up window, an “Applicant Response” box is provid-
ed if you wish to include any comments to the Submissions Group upon resubmittal. To complete the task, se-
lect the “I have uploaded the corrected documents and/or drawings as indicated below” box and click the
“Corrections complete” button at the bottom of the form. This will notify the Submissions Group that you are
ready for Prescreening Review again.
6. Refer back to previous page for prescreening approval / denial procedures.
BP12-00003456 CorrectionComplete
Plan Review Fees Plan Review fees will need to be submitted to the Building Division. Payment can be made in the form of cash or
check. Checks are to be made payable to “Director of Finance”.
Once payment is received, drawings will be sent to all required agencies for review.
16
Revised Date—6/7/18
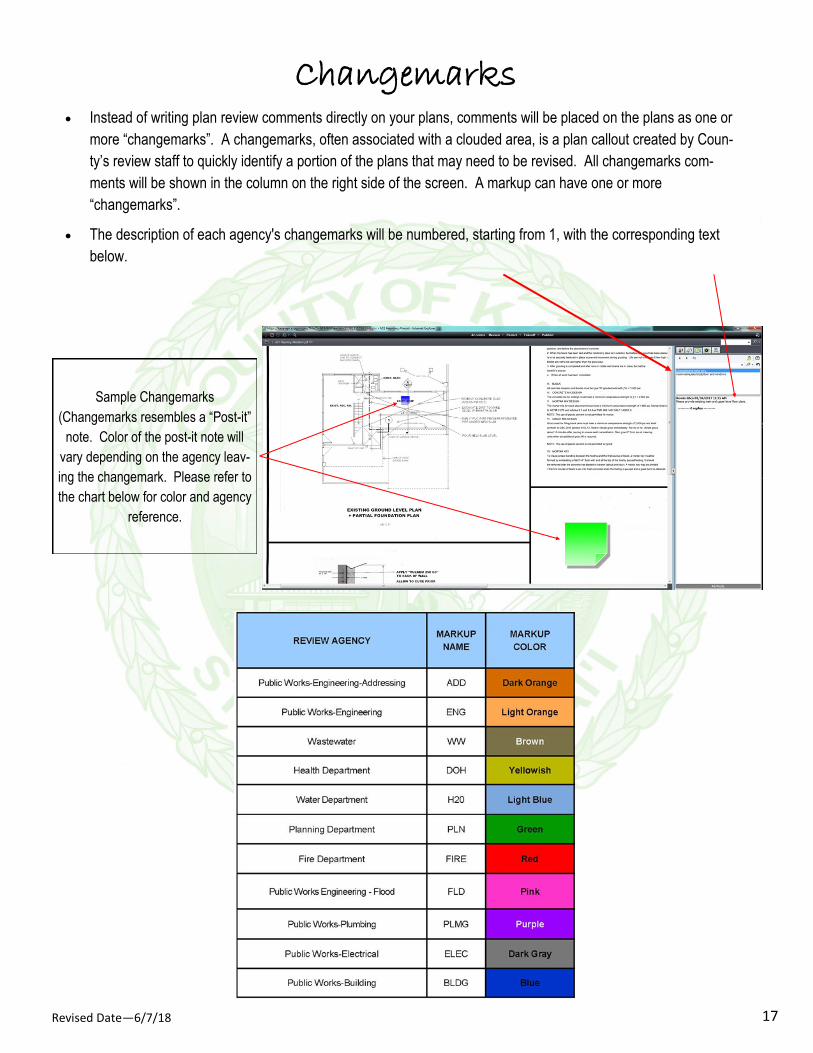
Changemarks Instead of writing plan review comments directly on your plans, comments will be placed on the plans as one or
more “changemarks”. A changemarks, often associated with a clouded area, is a plan callout created by Coun-
ty’s review staff to quickly identify a portion of the plans that may need to be revised. All changemarks com-
ments will be shown in the column on the right side of the screen. A markup can have one or more
“changemarks”.
The description of each agency's changemarks will be numbered, starting from 1, with the corresponding text
below.
Sample Changemarks
(Changemarks resembles a “Post-it”
note. Color of the post-it note will
vary depending on the agency leav-
ing the changemark. Please refer to
the chart below for color and agency
reference.
17
Revised Date—6/7/18
Plan Corrections
After plans have been reviewed by all agencies, changemarks, review comments, and/or checklist items may re-
quire plan corrections or changes.
1. If corrections are required, you will receive an e-mail re-
questing plan/document corrections.
2. Log in to the Electronic Plan Review system to access
project.
3. To access corrections, you will need to accept the
“ApplicantResubmit” task. This task should display in
your “Active Task List” toward the bottom of your screen.
4. Once accepting the task, a second window (eForm) will
display. That e-form has four sections that provide you
with correction package information:
- Checklists (located under each comment box)
- Changemarks/mark-ups
- Reviewing Agency
- Review status (approved or denied)
5. In the “Review Agency” section, the agency requesting
the corrections is displayed. If there are markups at-
tached, you will see a markup link in the changemark
section of the eForm. You can respond with a comment
to each change mark.
6. Click on the “Save and Close” button to exit the eForm.
7. Make corrections to all drawings as requested.
Department Review Comments
Reviewer Information Review Status
18

Revised Date—6/7/18
Uploading Corrections
1. Login to Electronic Plan Review to upload the corrected drawing(s) and/or document(s).
2. **IMPORTANT** Ensure that the corrected drawings retain the same file name and size as the originals.
3. Verify that all plans and documents that have markups have been corrected. Failure to submit corrected plans
will result in the submittal being returned.
4. Open project.
5. Open drawings folder.
6. Select “Upload Files”.
7. Select “Browse”.
8. Select the files you will like to upload. Once all necessary drawings are selected, click “Open” and then
“Upload Now”. (*Note: Your plans can be uploaded over several hours or several days. Do not complete
your task until all corrections have been addressed.)
(0 Files – 0 New)
(0 Files – 0 New)
(0 Files – 0 New)
(0 Files – 0 New)
(0 Files – 0 New)
19

Revised Date—6/7/18
Uploading Corrections (Continued…)
9. Once revised files are uploaded to either the drawings or documents folders, you will notice that each revised
file that was uploaded, a “V#” (version number) will appear. Under each thumbnail, the file name, author, date
and any relevant file icons are displayed. (*Note: If “V#” does not appear, revisions uploads were not done cor-
rectly. You will need to notify the “Submissions” group for page deletion.)
10. When your corrected drawing(s) have been successfully uploaded, you will
need to re-open the “Applicant Resubmit” task to access the eForm.
11. Scroll all the way to the bottom of the screen to the Task Instructions. Con-
firm that you have completed all task steps by reading and checking the box-
es.
12. Click the “Complete” button.
By completing the “Applicant Resubmit” task, this will notify the Review Coordinators. The Review Coordinators will
review that all revisions were submitted correctly. If incorrectly submitted, the task will be send back for corrections.
If submitted correctly, revisions will be sent back to all denying agencies for further review.
Applicant Name 1/2/2017 2:17:39 pm, 474 KB
Applicant Name 2/18/2017 12:09:44 pm, 474 KB
Applicant Name 12/2/2016 3:00:22 pm, 474 KB
Applicant Name 12/2/2016 3:00:22 pm, 474 KB
20

Revised Date—6/7/18
Approval When the plan review is approved by all agencies, you will receive an e-mail disclosing your final permit fees. Pay-
ment will need to be submitted to the Building Division by cash or check. Checks are to be made payable to
“Director of Finance”. Please keep in mind that a contractor statement will also be required to be submitted prior to
fees being accepted and permit being issued.
Once payment has been received, you will receive another email notification informing you that the approved plans
and/or documents are available in the Approved Drawings or Approved Documents folder.
21
Discussion Board / Revision Requests
After your plans have been approved and construction has
begun, sometimes changes arise that require revisions to
your approved plans or document. In order to submit revi-
sions, please follow these steps:
1. Login to EPR and open the desired project .
2. Select “Discussion Board” in the top right hand cor-
ner of the screen.
3. A second window will display and you will then need to
select “Add Topic”
4. Enter “Topic”. Select “Plan Revisions Requested” in
the category pull down menu.
5. Select “Save” once complete.
6. Once the discussion is created, “Add Participants”.
7. Select “Review Coordinators”. (*Note: You may
need to scroll to the next page unit group is found.)
8. Select “Save” and then “Return to Topic”.
9. “Add Comment”; include a brief description of your
request.
10. Once comment is complete, select “Send”. This will
notify the review coordinators of your request.
#2
#3
#4a #4b #5
#6
#7
#8a
#8b
#9
#10
**Note: The discussion board can also be used to com-
municate with reviewers throughout the review processes.
Revised Date—6/7/18
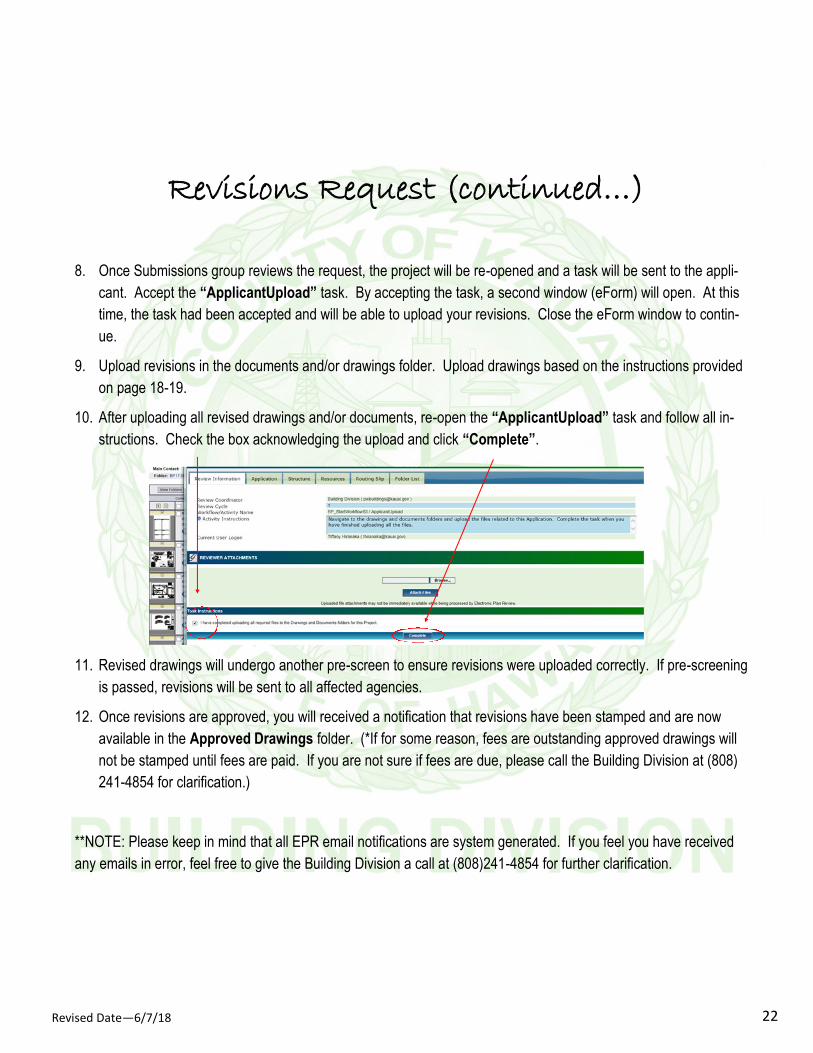
Revisions Request (continued…)
8. Once Submissions group reviews the request, the project will be re-opened and a task will be sent to the appli-
cant. Accept the “ApplicantUpload” task. By accepting the task, a second window (eForm) will open. At this
time, the task had been accepted and will be able to upload your revisions. Close the eForm window to contin-
ue.
9. Upload revisions in the documents and/or drawings folder. Upload drawings based on the instructions provided
on page 18-19.
10. After uploading all revised drawings and/or documents, re-open the “ApplicantUpload” task and follow all in-
structions. Check the box acknowledging the upload and click “Complete”.
11. Revised drawings will undergo another pre-screen to ensure revisions were uploaded correctly. If pre-screening
is passed, revisions will be sent to all affected agencies.
12. Once revisions are approved, you will received a notification that revisions have been stamped and are now
available in the Approved Drawings folder. (*If for some reason, fees are outstanding approved drawings will
not be stamped until fees are paid. If you are not sure if fees are due, please call the Building Division at (808)
241-4854 for clarification.)
**NOTE: Please keep in mind that all EPR email notifications are system generated. If you feel you have received
any emails in error, feel free to give the Building Division a call at (808)241-4854 for further clarification.
22
Revised Date—6/7/18
Due to security and resource concerns, the system will automatically sign you out after 90 minutes of inactivity.
When you are ready to resume working with the system, click any button on the electronic plan review screen. The
system automatically will load the sign-in page for you. You can also close the web browser window and re-load the
sign-in page manually in a new browser window by using the address below:
https://kaua-epr.aspgov.com/EPR/
Security Timeout
Forgot Your Password? If you are a returning user, log in to the Electronic Plan Review system with your full e-mail address and password.
If you have forgotten your password, click on the “Forgot Password” button. You will be asked to provide the answer
to the security question you have previously set up. No one, including County System Administrators can see your
password security answer.
If you cannot access your account after trying to retrieve your account information, contact the Building Division Ad-
ministrators at (808)241-4854 to have your password reset. This will trigger an email to be sent to you with a tem-
porary password.
Project Access by Outside Users To request that an outside user have access to your drawings, changemarks, and any other requested corrections,
follow the steps below. (*Please keep in mind that there can only be ONE APPLICANT on each project. These ad-
ditional users will be added as “View Only”, preventing them from ever having any upload rights.)
1. At the top of the application, write the words “VIEW ONLY”, along with a first name, last name, and email ad-
dress.
If you would like to add someone as a viewer after the project has already started you will need to create a
“Discussion Board Topic” within the project and send to the “Submissions” group. (Please see instructions
on creating a discussion on page 20, under “Revision Request”.)
2. Once the email is received by the Submissions group, they will add the requested viewer to the project. The
viewer may not receive an email notifying them that they have been added. If they would like to access the pro-
ject, they will need to search for the permit number. In the top right hand corner of the home screen, type in the
last digits of the permit number. If request was fulfilled, the project will display. By clicking on the project num-
ber, the reviewer will then have access to view review status and check reports.
23
Reports Open desired project. Select “Project Reports”, located next to your Workflow Portals button.
For department comment information, select the “Workflow—Department Review Status” report.
For date/time information, select the “Workflow—Routing Slip” report.