elegard™ patient positioning system instructions for use · stops the elevation of the unit when...
TRANSCRIPT

EleGARD™ Patient Positioning SystemINSTRUCTIONS FOR USE

2
Table of Contents EleGARD™ Patient Positioning SystemInstructions for Use | 40000, Rev. 2
4
5
5
5
5
6
10
12
12
12
12
13
13
13
14
14
14
14
15
16
16
16
16
19
19
1 Important User Information
2 Introduction
Intended Use
EleGARD™ Patient Positioning System Overview
Contraindications
EleGARD Description
Control Panel Operating Instructions
3 Safety Precautions
Conventions Used in Instructions for Use
Personnel
General Safety Precautions
Battery
Operation
Service
4 First Use Preparations
List of Materials
The Battery
Charge the Battery
Prepare the Carrying Case
5 Using the EleGARD
Arrival to the Patient
Unpacking the System
Positioning the Patient
Moving the Patient
Removing the Patient from the EleGARD

3
EleGARD™ Patient Positioning SystemInstructions for Use | 40000, Rev. 2
6 Preparation for Next Use
Cleaning Routines
Remove and Recharge the Battery
7 Maintenance
Routine Maintenance
8 Troubleshooting
Indications and Alerts During Normal Operation
9 Technical Description
10 General Information
Electrical Safety
Authorized EleGARD Service Center
Patent Information
20
20
21
22
22
23
23
24
29
29
30
30

4
EleGARD™ Patient Positioning SystemInstructions for Use | 40000, Rev. 21 Important User Information
The information in these Instructions for Use applies to the EleGARD™ Patient Positioning System,also referred to as EleGARD System or simply EleGARD. See below for the components making up the EleGARD System.
All operators must read the complete Instructions for Use before operating the EleGARD.
The Instructions for Use must always be easily accessible to the operators of the EleGARD.
Always follow your service’s protocol or approved procedures for cardiopulmonary resuscitation (CPR)when you use the EleGARD.
Trademarks
EleGARD™ is a trademark of AdvancedCPR Solutions™
ElevatedCPR™ therapy is a trademark of AdvancedCPR Solutions
LUCAS™ is a registered trademark of Stryker Corporation
ResQCPR™ System is a trademark of ZOLL Medical Corporation
Use of EleGARD is classified by the US FDA as: ONLY
This Instructions for Use Document describes the EleGARD System, catalog number: SYS-ELG-001.
The EleGARD System, SYS-ELG-001, consists of the following packaged together in two shipping containers:
Container 1:
1 EleGARD device, catalog number DEV-ELG-001 1 LUCAS 3, backplate, catalog number ACC-ELG-004 2 Batteries, catalog number ACC-ELG-002 1 Battery Charger, catalog number ACC-ELG-003 1 Copy of this Instructions for Use document
Container 2: 1 Carrying Case, catalog number ACC-ELG-001

5
EleGARD™ Patient Positioning SystemInstructions for Use | 40000, Rev. 22 Introduction
Intended Use
Intended to assist in elevating the head and the thorax of a patient from a supine position into a multi-level elevated position with the head above the thorax and the thorax above the lower body and extremities, and may be used during various procedures, i.e., airway management procedures, CPR, etc.
The environment of use is pre-hospital and hospital.
EleGARD™ Patient Positioning System Overview
The EleGARD Patient Positioning System is a portable tool designed to elevate a patient’s head and thorax. It can be used to help maintain the sniffing position. There are three different adjustable head and neck angle positions. The EleGARD can be used whenever elevation of the head and thorax is clinically indicated, including during CPR and patient transport.
The EleGARD can be used during manual CPR, manual active compression decompression CPR (ResQCPR System), and CPR with the LUCAS Chest Compression System.
Contraindications
DO NOT use the EleGARD:
When it is not possible to position the patient safely or correctly on the EleGARD If the patient weighs more than 350 pounds
6
EleGARD™ Description EleGARD™ Patient Positioning SystemInstructions for Use | 40000, Rev. 2
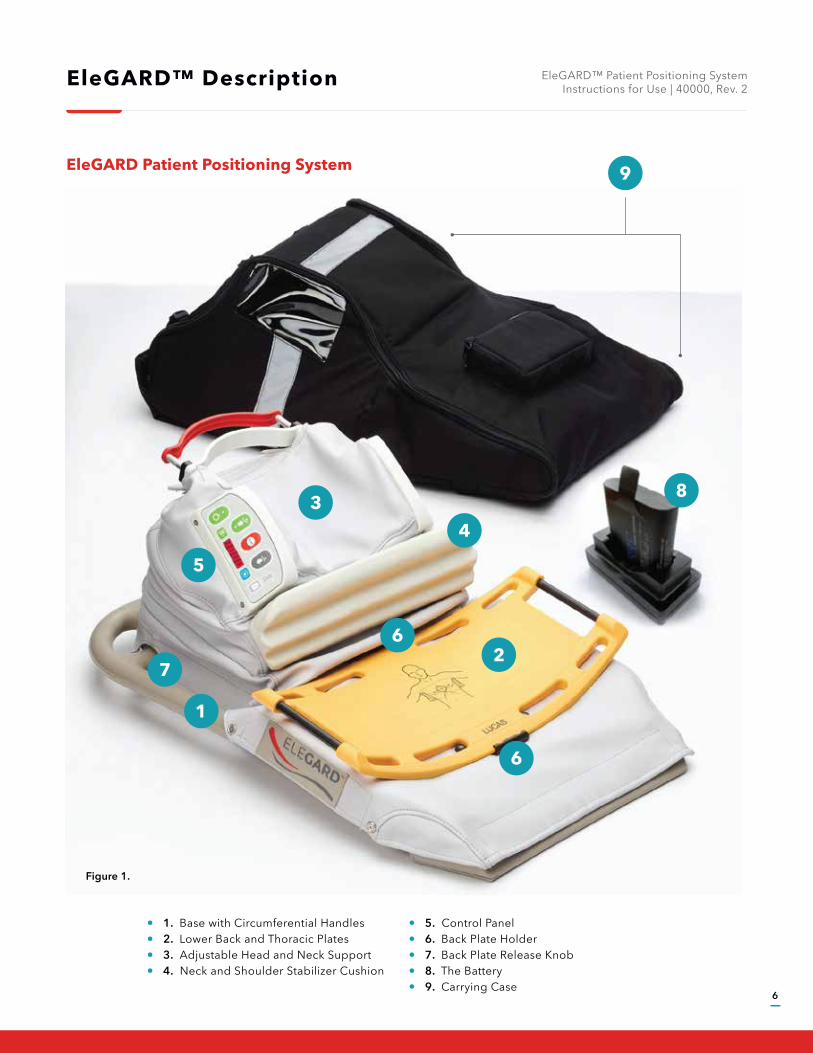
EleGARD Patient Positioning System
1. Base with Circumferential Handles2. Lower Back and Thoracic Plates3. Adjustable Head and Neck Support4. Neck and Shoulder Stabilizer Cushion
5. Control Panel6. Back Plate Holder7. Back Plate Release Knob8. The Battery9. Carrying Case
Figure 1.

7
EleGARD™ Patient Positioning SystemInstructions for Use | 40000, Rev. 2
Base with Circumferential Handles
The Base with Circumferential Handles is designed to stabilize the patient and allow rescuers to lift the patient’s upper body as needed. The base is designed to be used with portable patient litters or portable transport units and fit onto most stretchers and beds.
Lower Back and Thoracic Plates
The Lower Back and Thoracic Plates are designed to stabilize the patient’s lower back and thorax in thelowest and highest positions, and when elevating the head and thorax. The lower back and upper thoracic plates are designed to accommodate almost all adult body sizes by extending lengthwise, as needed, to reduce the likelihood the head and thorax will curl forward with elevation of the head and thorax.
Adjustable Head Support
The Adjustable Head Support is designed to support the head in the lowered and elevated positions. The head can be tilted back to help prevent airway closure and to help maintain the sniffing position. The head and neck angle can be adjusted using the red handle. There are three different head and neck angles, which can be adjusted as needed for each patient. The device should be stored with the head and neck in the middle position. NOTE: The outer squeeze handle is colored red to alert the user that it is not to be used as a handle when lifting the patient. The red and gray handles are designed to adjust the head and neck support and should NOT be used when lifting the EleGARD when the patient is on the unit.
Neck and Shoulder Stabilizer Cushion
The Neck and Shoulder Stabilizer Cushion is designed to help prevent the patient from slipping downward with elevation of the head and neck and to help maintain the sniffing position. If a patient requires a neck collar, the neck and shoulder stabilizer cushion should be removed to allow room for the patient’s head and neck, with the neck collar in place, on the EleGARD. To remove the Neck and Shoulder Stabilizer Cushion, stretch and detach the tether at each end of the cushion assembly and remove the cushion assembly. To replace the cushion assembly, center it on the EleGARD and re-attach the tether to each end.
Control Panel
The Control Panel is designed to control the head and thorax elevation height and the digital timer. There is a power OFF/ON switch. There is a way to determine the Battery charge status. There are switches to elevate the head and thorax, lower the head and thorax, and stop the upward or downward movement of the head and thorax. The order of operation is shown by the numbers 1, 2, and 3. Pressing 1 will power on the device. Pressing 2 will start the timer. The timer provides the rescuer with a real-time clock. The time will start when the timer Start button is pressed. The timer light will start flashing after 2 minutes and it will continue to flash and count thereafter. Pressing 3 will elevate the head and thorax over a 2 minute period of time. The Battery lights will flash off and on in an upward cascade as the head and thorax are being elevated.
See Figure 1.

Figure 4.
8
EleGARD™ Patient Positioning SystemInstructions for Use | 40000, Rev. 2
Back Plate Holder
The EleGARD is designed to securely hold a LUCAS 3 Series Chest Compression System standard back plate in place. During normal use, the LUCAS 3 Series back plate should be securely attached to EleGARD. In this manner, a patient can receive conventional manual CPR, ACD CPR with the ResQCPR System, or CPR with a LUCAS 2.0 or 3 Series Chest Compression System while on the EleGARD according to the protocol or standard procedure of the service or hospital.
Back Plate Release Knob
The LUCAS 3 back plate can be easily released by pulling the Back Plate Release Knob outward (see Figure 2) and then lifting the back plate out. The LUCAS 3 back plate can be readily inserted back into the EleGARD by first placing the lower end of the back plate, and then the upper end of the back plate, into the EleGARD LUCAS 3 back plate locking system.
Battery and Battery Charger
The Battery powers the unit and needs to be charged before use (see Figure 3). The amount of electricity remaining in the Battery can be checked by looking at the charge indicator on the Control Panel. The Battery can be easily removed by opening the Battery Compartment and removing the Battery (see Figure 4). The EleGARD comes with two Batteries to enable one to be used and one Battery carried as a spare.
Figure 2. Back Plate Release Knob
Open the Battery Compartment. Grab the black tab. Remove the Battery.
Figure 3. Battery and Battery Charger

9
EleGARD™ Patient Positioning SystemInstructions for Use | 40000, Rev. 2
Carrying Case
The Carrying Case is designed to store the EleGARD and is also used to easily carry the EleGARD to the patient. It can be carried on the back by using the shoulder straps or it can be carried using the handle. It can be opened in seconds by unclipping the two snap fit latches and pulling upward on the cover with one hand while holding down the base portion of the cover with the other hand. The zipper is designed to open when using a single smooth upward motion (see Figure 5).
Figure 5. EleGARD Carrying Case
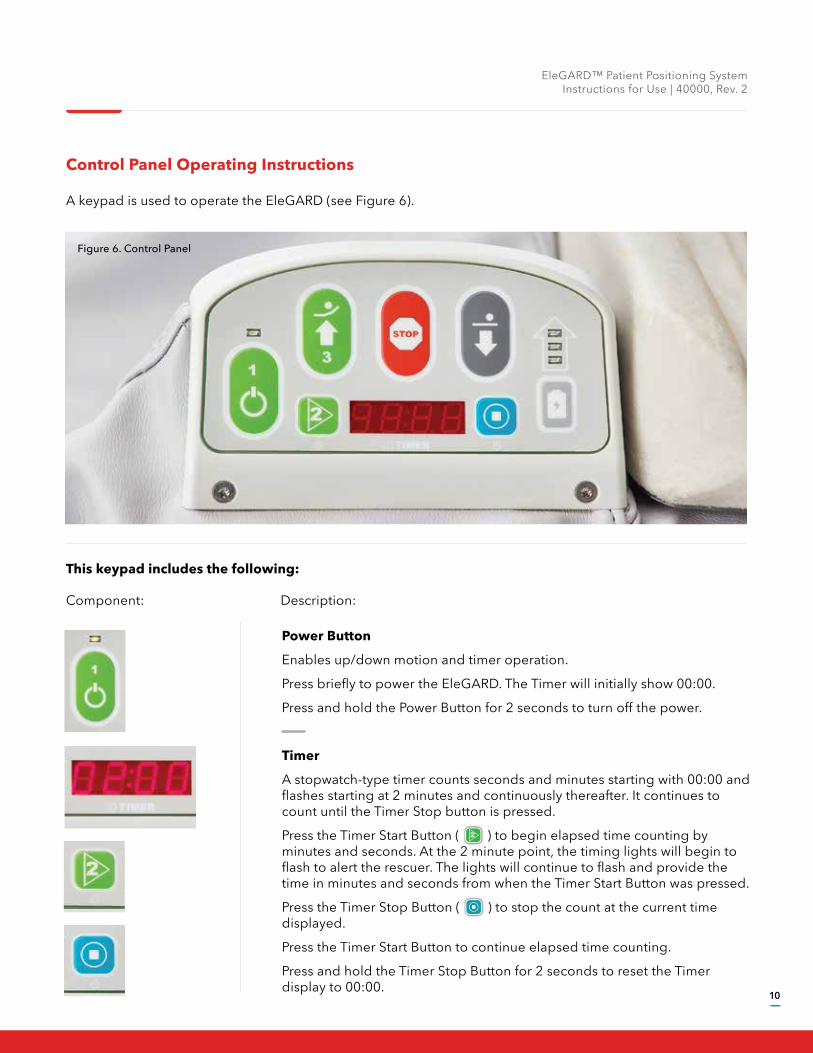
Figure 6. Control Panel
10
EleGARD™ Patient Positioning SystemInstructions for Use | 40000, Rev. 2
Control Panel Operating Instructions
A keypad is used to operate the EleGARD (see Figure 6).
This keypad includes the following:
Component: Description:
Power Button
Enables up/down motion and timer operation.
Press briefly to power the EleGARD. The Timer will initially show 00:00.
Press and hold the Power Button for 2 seconds to turn off the power.
Timer
A stopwatch-type timer counts seconds and minutes starting with 00:00 and flashes starting at 2 minutes and continuously thereafter. It continues to count until the Timer Stop button is pressed.
Press the Timer Start Button ( ) to begin elapsed time counting by minutes and seconds. At the 2 minute point, the timing lights will begin to flash to alert the rescuer. The lights will continue to flash and provide the time in minutes and seconds from when the Timer Start Button was pressed.
Press the Timer Stop Button ( ) to stop the count at the current time displayed.
Press the Timer Start Button to continue elapsed time counting.
Press and hold the Timer Stop Button for 2 seconds to reset the Timer display to 00:00.

Figure 7.Fully Charged Battery
Figure 8.2/3 Charged Battery
Figure 9.1/3 Charged Battery
Figure 10.Cascading Motion Indicator
11
EleGARD™ Patient Positioning SystemInstructions for Use | 40000, Rev. 2
Up Button
Raises the lower back and thoracic plates into their fully elevated positions. Requires approximately 2 minutes for the head and thoracic pieces to fully raise into position.
Down Button
Lowers the lower back and thoracic plates into supine position in about 6 seconds.
Stop Button
Stops the elevation of the unit when pressed. Unit can resume the elevation cycle when the UP Button ( ) is pressed. If the Down Button ( ) is pressed, the EleGARD will return to the fully lowered position in about 6 seconds
Battery and Upward Motion Indicator
Three green LEDs show the battery charge status when the Battery Button is pressed. The Battery is fully charged when all 3 LEDs are illuminated. Similarly, the Battery is 2/3 charged when 2 LEDs are illuminated and 1/3 charged when 1 LED is illuminated. See Figures 7, 8, and 9 below.
In addition to indicating Battery life, the 3 green LEDs cascade upward when theUp Button ( ) has been pressed to indicate that upward motion is in progress. See Figure 10 below. When the LED stops the cascading motion, the EleGARD is in the fully raised position.

12
EleGARD™ Patient Positioning SystemInstructions for Use | 40000, Rev. 23 Safety Precautions
Conventions Used in Instructions for Use
The following conventions are used throughout these Instructions for Use:
Personnel
These Instructions for Use and the equipment it describes are for use only by qualified professionalstrained in the particular technique and procedure to be performed.
General Safety Precautions
Warning: Indicates a potentially hazardous situation, which, if not avoided, could result in death or serious injury.
Caution: Indicates a hazardous situation, which, if not avoided,may result in minor or moderate injury.
Notice: Indicates a hazard, which may result in product damage.
Caution: Standing Water Do not place the EleGARD in standing water or snow. The system can be damaged from liquid entry.
Caution: Use Only Approved AccessoriesUse only AdvancedCPR Solutions TM-approved accessories with the EleGARDTM Patient PositioningSystem. The EleGARD may not operate correctly if you use accessories that are not approved. Useonly EleGARD Batteries and the EleGARD power supply that are designed for use with the EleGARD.If you use other batteries or power supply, you may cause permanent damage to the EleGARD.
Caution: Keep Battery InstalledDo not use the EleGARD in standing water or snow. The system can be damaged if liquid entersthe Battery Compartment.

Operation
13
EleGARD™ Patient Positioning SystemInstructions for Use | 40000, Rev. 2
All servicing and repairs must be done by service personnel that are approved by AdvancedCPR Solutions.
Replacement of the vinyl cover and Neck and Shoulder Stabilizer Cushion is allowed only when using the AdvancedCPR Solutions replacement components in accordance with their instructions.
Contact an Authorized EleGARD Service Center for repair, if needed as described in the Technical Description section at the end of this Instructions for Use document.
Battery
Warning: Low BatteryWhen the Battery indicator shows no or only the lower LEDilluminated, replace the Battery with one that is fully charged.
Warning: Patient PositionUse the EleGARD only on a flat surface.If a LUCAS Chest Compression System is to be used, ensure the LUCAS 3 back plate is securely fastened to the EleGARD and the patient is positioned properly on the LUCAS Chest Compression System. Refer to the LUCAS Chest Compression System Instructions for Use for proper patient positioning and use of the LUCAS Chest Compression System.
Warning: Patient InjuryDo not let the patient or the system stay unattended when the EleGARD is in use.
Service
Warning: Do Not Open or Remove the EleGARD’s CoverNever open or remove the vinyl cover encasing the EleGARD.Do not change or modify external or internal parts of the system.

14
4 First Use Preparation EleGARD™ Patient Positioning SystemInstructions for Use | 40000, Rev. 2
List of Materials
The EleGARD™ Patient Positioning System is supplied with the following:
EleGARD Device
Rechargeable EleGARD Battery
Extra EleGARD Battery
External Battery Charger
EleGARD Carrying Case
Instructions for Use
The Battery
The proprietary Lithium Polymer Battery is the exclusive power source for the EleGARD Patient Positioning System. You can remove the Battery from the EleGARD Case and recharge it. The front end of the Battery has connections for power transfer from the Battery Charger and to supply power to the EleGARD when installed properly.
Charge the Battery
To charge the EleGARD Battery in the Battery Charger:
1. Put the Battery into the slot of the Battery Charger. See Figure 11.2. Connect the Battery Charger power cord to the mains wall outlet.
Note: Optional chargers are available for charging either 2 or 4 Batteries at a time.
Figure 11. Charging the Battery

15
EleGARD™ Patient Positioning SystemInstructions for Use | 40000, Rev. 2
Notice: (refer to Figures 12 and 13)Putting the EleGARD in this position makes it possible to check the charge level ofthe installed Battery through the clear windows of the Carrying Case by pressing theBattery Button and observing the 3 green LEDs.
1. Install a fully charged EleGARD Battery into the Battery Compartment of the EleGARD.2. Insert the EleGARD into the Carrying Case. See Figure 12.
3. Put a charged spare EleGARD Battery in the pocket on the front of the Carrying Case.4. Close the Carrying Case by zipping both zippers fully up and snapping the two snap fit latches (see Figure 13).
Caution: Keep a Battery Installed A charged Battery must always be installed to operate theEleGARD quickly when needed.
Prepare the Carrying Case
Figure 12. EleGARD Carrying Case Figure 13. Closing the EleGARD Carrying Case
16
5 Using the EleGARD™ EleGARD™ Patient Positioning SystemInstructions for Use | 40000, Rev. 2
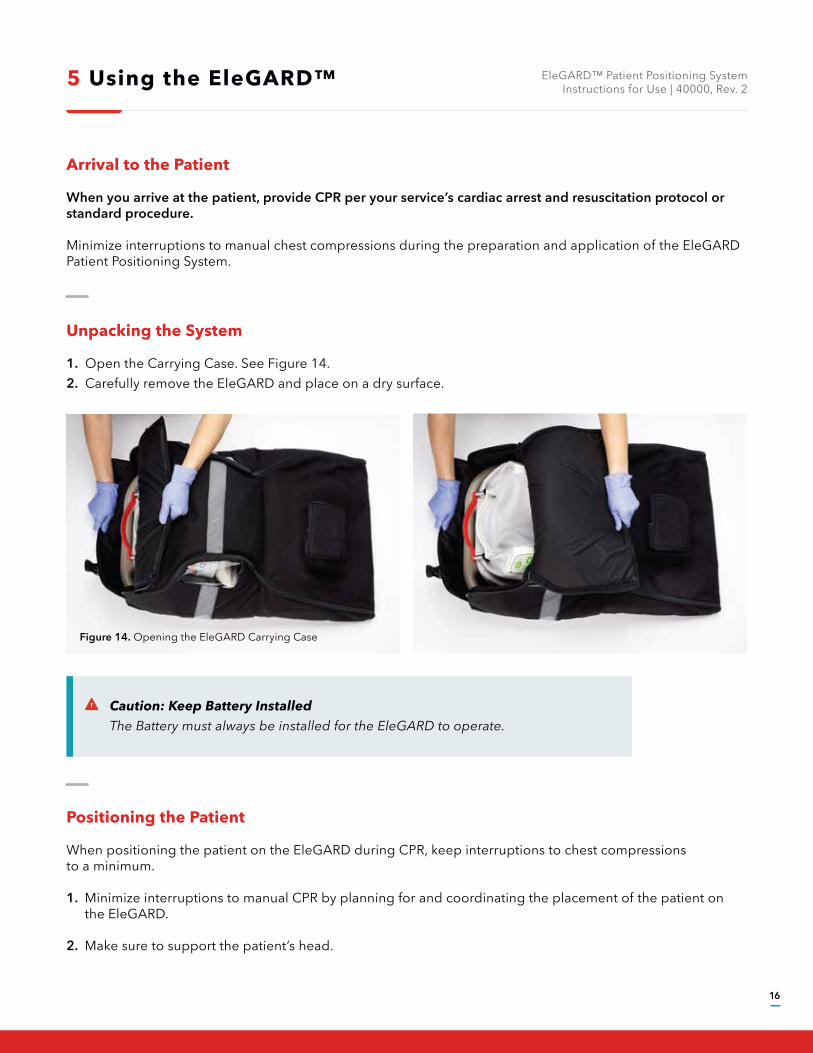
Figure 14. Opening the EleGARD Carrying Case
Arrival to the Patient
When you arrive at the patient, provide CPR per your service’s cardiac arrest and resuscitation protocol or standard procedure.
Minimize interruptions to manual chest compressions during the preparation and application of the EleGARD Patient Positioning System.
Unpacking the System
1. Open the Carrying Case. See Figure 14.2. Carefully remove the EleGARD and place on a dry surface.
Positioning the Patient
When positioning the patient on the EleGARD during CPR, keep interruptions to chest compressionsto a minimum.
1. Minimize interruptions to manual CPR by planning for and coordinating the placement of the patient on the EleGARD.
2. Make sure to support the patient’s head.
Caution: Keep Battery InstalledThe Battery must always be installed for the EleGARD to operate.

17
EleGARD™ Patient Positioning SystemInstructions for Use | 40000, Rev. 2
3. Pause manual CPR briefly (< 10 sec), lift the patient from the arms/shoulders and slide the EleGARD into place underneath the patient’s torso (see Figure 15), and then resume CPR immediately thereafter.
4. Position the patient properly over the LUCAS 3 back plate as directed in the LUCAS Chest Compression System’s Instructions for Use (see Figure 16).
5. Place the Neck and Shoulder Stabilizer Cushion under the patient’s cervical spine at the level of C6-C7 (see Figure 17). Ensure that the patient’s head rests properly in the headrest. Pull outward on the gray handle behind the head support to extend the headrest, if needed, to make sure the head and neck are properly positioned while the EleGARD is in its fully lowered position. The midportion of the back of the neck should rest on the top of the Neck and Shoulder Stabilizer Cushion. Adjust the angle of the head and neck such that the head is in the ‘sniffing’ position. The mid-position is adequate for most patients.
Figure 15. Placing Patient on the EleGARDFigure 16. Placing Patient overthe LUCAS 3 Back Plate
Figure 17. Neck and Shoulder Stabilizer Cushion

Figure 18. EleGARD Control Panel
10. If the patient needs to be further adjusted into the sniffing position for airway management procedures, grasp the red handle on the Headrest and tilt the head to the desired position (see Figure 19).
18
EleGARD™ Patient Positioning SystemInstructions for Use | 40000, Rev. 2
6. Continue CPR as specified in your service’s protocol or standard procedure for resuscitation.
7. Turn the power ON by pressing the #1 Button (see Figure 18).
8. Press the #2 Button, TIMER START, to start timer operation.
9. The TIMER will count up until stopped or reset by the caregiver.
Caution: Patients with Cervical Collars or Bullneck The Neck and Shoulder Stabilizer Cushion may be removed for patients wearing cervicalcollars or with bullneck features not compatible with the Neck and Shoulder Stabilizer Cushion.
Figure 19. Headrest Adjustment
19
EleGARD™ Patient Positioning SystemInstructions for Use | 40000, Rev. 2
11. If the ResQCPR System or the LUCAS Chest Compression System is to be used, you should switch from conventional manual CPR to the ResQCPR System or to LUCAS automated chest compressions as directed by your service’s cardiac arrest resuscitation protocol or standard procedure.
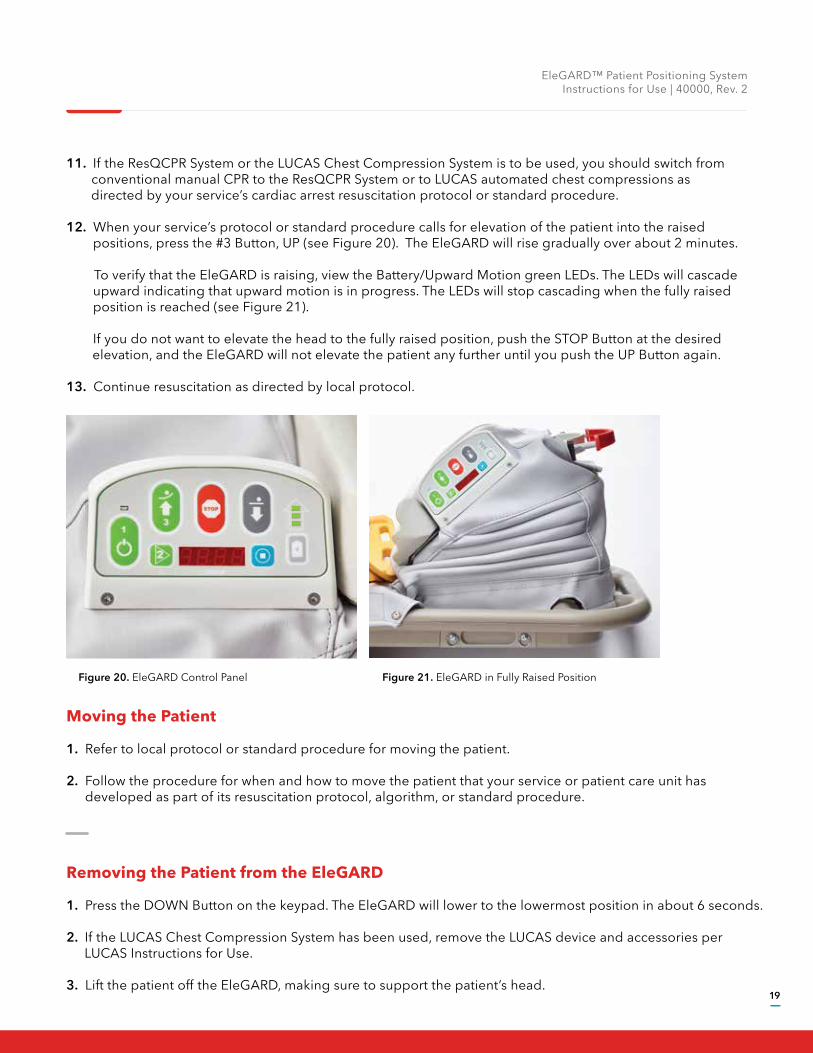
12. When your service’s protocol or standard procedure calls for elevation of the patient into the raised positions, press the #3 Button, UP (see Figure 20). The EleGARD will rise gradually over about 2 minutes.
To verify that the EleGARD is raising, view the Battery/Upward Motion green LEDs. The LEDs will cascade upward indicating that upward motion is in progress. The LEDs will stop cascading when the fully raised position is reached (see Figure 21).
If you do not want to elevate the head to the fully raised position, push the STOP Button at the desired elevation, and the EleGARD will not elevate the patient any further until you push the UP Button again.
13. Continue resuscitation as directed by local protocol.
Moving the Patient
1. Refer to local protocol or standard procedure for moving the patient.
2. Follow the procedure for when and how to move the patient that your service or patient care unit has developed as part of its resuscitation protocol, algorithm, or standard procedure.
Removing the Patient from the EleGARD
1. Press the DOWN Button on the keypad. The EleGARD will lower to the lowermost position in about 6 seconds.
2. If the LUCAS Chest Compression System has been used, remove the LUCAS device and accessories per LUCAS Instructions for Use.
3. Lift the patient off the EleGARD, making sure to support the patient’s head.
Figure 20. EleGARD Control Panel Figure 21. EleGARD in Fully Raised Position

20
6 Preparation for Next Use EleGARD™ Patient Positioning SystemInstructions for Use | 40000, Rev. 2
Cleaning Routines
After every use, clean the EleGARD and let it dry before returning it to the Carrying Case.
1. Raise the EleGARD to the fully raised position to clean.
2. Manually pull the gray headrest handle to extend the slide as needed to flatten the pleats in a smooth surface as needed for cleaning.
3. Remove the foam Neck and Shoulder Stabilizer Cushion for cleaning. To remove the Neck and Shoulder Stabilizer Cushion, stretch and detach the tether at each end of the cushion assembly and remove the cushion assembly. To replace the cushion assembly, center it on the EleGARD and re-attach the tether to each end.
4. Disinfect all surfaces with a soft cloth and/or soft brush and disinfectant. NOTE: It is important to clean the EleGARD after disinfecting per the instructions for use of the disinfectants listed below. Recommended disinfectants include:
Cavicide or Cavi-Wipes PDI Sani-Cloth AF3 Germicidal Disposable Wipes
5. Clean all surfaces with a soft cloth and/or soft brush dampened with warm water with a mild cleaning agent. Recommended cleaners include:
Formula 409 All-Purpose spray cleaner Fantastik spray cleaner Hand dishwashing soap and water
Caution: Cleaning FluidsDo not allow water or cleaning fluids to enter the EleGARD. Use cleaning liquids on adampened cleaning cloth. Avoid liquid pooling on the EleGARD.
Caution: Abrasive CleanersAbrasive powders, steel wool, industrial strength or solvent cleaners, and vinyl“conditioners” or “protectors” and isopropyl alcohol (IPA) solutions greater than 40% concentration should be avoided. Undiluted bleach, IPA, or lacquer can dull or damagethe product. If in doubt about a detergent or cleaner, test a patch in an inconspicuousplace before applying in a larger place.
Warning: LiquidDo not immerse.

21
EleGARD™ Patient Positioning SystemInstructions for Use | 40000, Rev. 2
6. After cleaning, rinse all surfaces with a soft cloth dampened with water and then dry with a clean, lint-free cloth.
Caution: Chemical ResidueFailure to remove chemical residue may cause discoloration of the coated fabric surfaceto occur earlier in the life cycle of the product. Always clean after disinfecting.
Remove and Recharge the Battery
1. Replace the Battery with a fully charged Battery.
2. Recharge the Battery for future use. Refer to Section 4 for Battery charging instructions.

22
7 Maintenance EleGARD™ Patient Positioning SystemInstructions for Use | 40000, Rev. 2
Routine Maintenance
After each use of the EleGARD™, do the following:
1. Make sure the system is clean.
2. Make sure the installed Battery is fully charged.
3. Make sure a spare Battery is fully charged and placed in the Carrying Case pouch.
Inspect the cover and Neck and Shoulder Stabilizer Cushion for wear or torn areas and contact theService Center if replacement is needed.
Whenever specified by your service, run the EleGARD through the full use cycle to confirm proper raising, lowering, and timer operation.

23
8 Troubleshooting EleGARD™ Patient Positioning SystemInstructions for Use | 40000, Rev. 2
Situation
The EleGARD™ is in the ONmode and there is more than
2/3 battery capacity remaining.
The EleGARD is in the ONmode and there is 2/3 battery
capacity remaining.
The EleGARD is in the ONmode and there is 1/3 battery
capacity remaining.
The EleGARD is in the ONmode and there is less than
1/3 battery capacity remaining.
The EleGARD does notpower on.
The EleGARD turns on butdoes not rise.
Fully charged Battery:All green battery indication
LEDs are illuminated.
2/3 charged Battery:Two green battery indication
LEDs are illuminated.
1/3 charged Battery:One green battery indication
LED is illuminated.
No LED illuminated orlow Battery
Control panel does notlight up.
None
None
None
Replace Battery with chargedBattery before next use.
Replace Battery with chargedBattery before next use.
Ensure a Battery isinstalled. Ensure Battery is fully
charged. Ensure Batterycompartment is secured shut.
Ensure patient does not weighmore than 350 lbs.
Ensure that installed Batteryis charged.
Visual LED Indication User Action
Indications and Alerts During Normal Operation
Refer to the table below to find the reason for LED alerts during normal operation.

24
9 Technical Description EleGARD™ Patient Positioning SystemInstructions for Use | 40000, Rev. 2
[10.7in]27.2cm
[12.5in]31.7cm
[13.0in]33.1cm
[18.7in]47.5cm
[13.0in]33.1cm
[18.7in]47.5cm
[27.0in]68.5cm
[29.8in]75.7cm
[27.0in]68.5cm
[29.8in]75.7cm
Weight
EleGARD™: 10.5 Kg [~23 lbs], with LUCAS 3 back plate installed and Battery inserted,without Carrying Case or spare Battery.
Carrying Case: 1.3 Kg [~2.9 lbs]
Spare Battery: 0.23 Kg [~0.5 lbs]
Operating Environment
Temperature: -20 to +40 ˚C [-4 to 104 ˚F]
Humidity: 15 to 90% relative humidity, non-condensing
Altitude: ≤3,000 meters [9,843 feet]
Atmospheric Pressure: ≤62 kPa
Physical Dimensions
Fully Lowered Position:
Fully Raised Position:

25
EleGARD™ Patient Positioning SystemInstructions for Use | 40000, Rev. 2
Top surface, center point of LUCAS back plate (back of torso).
Center point of headrest surface (back of head), in position 1 (lowest) with slide adjusted for 50% human model.
Center point of headrest surface (back of head), in position 2 (middle) with slide adjusted for 50% human model.
Center point of headrest surface (back of head), in position 3 (highest) with slide adjusted for 50% human model.
7.2 cm [2.8in]
13.5 cm [5.3 in]
14.5 cm [5.7 in]
16.1 cm [6.3 in]
8.5 cm [3.4 in]
21.5 cm [8.5 in]
23.2 cm [9.1 in]
25.3 cm [10.0 in]
Measurement Point Fully Lowered Fully Raised
Transport and Storage Environment
Temperature: -20 to +70 ˚C [-4 to 158˚F]
Humidity: <90% relative humidity, non-condensing
Power Input Requirements
Rechargeable Lithium-Ion Battery: 15V / 3.2 Ah / 48 Wh
Patent Positioning
Approximate measurements above ground level.
Movement Timing
Time to fully raised position from fully lowered position: 120 +/- 10% seconds
Time to fully lowered position from fully raised position: 6 +/- 10% seconds

26
EleGARD™ Patient Positioning SystemInstructions for Use | 40000, Rev. 2
-20˚C
40˚C
15%
90%
Duty Cycle/Capacity
Duty cycle: Maximum 6 actuations per hour
Capacity: Up to 20 actuations per fully charged Battery
Timer Feature
Elapsed time in seconds from 00:00 to 99:99 from press of Timer Start
Flashing display beginning at 02:00 from press of Timer Start
Timer may be stopped/restarted
Timer resets to 00:00 on Power On or after holding the Timer Stop button for 2 seconds
Labeling
Name/rating label scheme:
An over-label as depicted above is located on the EleGARD back, underneath the headrest.
Information contained on this label includes:
Manufacturer name and contact information
Operating Temperature Range
Operating Range Relative Humidity (non-condensing)
Defibrillator-proof applied part type BFNOTE: “applied part” for the EleGARD refers to the part of the vinyl cover and plastic and foam areas/components the patient may contact
Consult Instructions for Use (this document) for proper operations
27
EleGARD™ Patient Positioning SystemInstructions for Use | 40000, Rev. 2
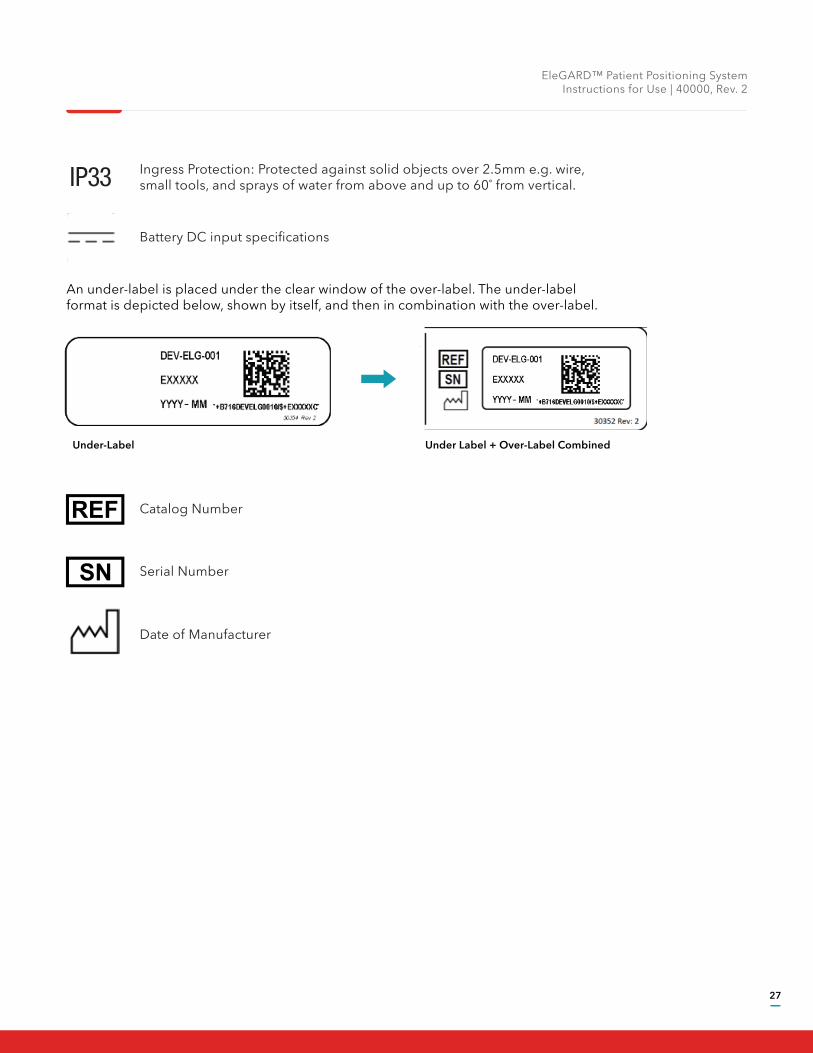
Ingress Protection: Protected against solid objects over 2.5mm e.g. wire,small tools, and sprays of water from above and up to 60˚ from vertical.
Battery DC input specifications
An under-label is placed under the clear window of the over-label. The under-labelformat is depicted below, shown by itself, and then in combination with the over-label.
Catalog Number
Serial Number
Date of Manufacturer
Under Label + Over-Label CombinedUnder-Label

28
EleGARD™ Patient Positioning SystemInstructions for Use | 40000, Rev. 2
Accessories
Battery: ACS Catalog Number ACC-ELG-002
Battery Charger (single): ACS Catalog Number ACC-ELG-003
Battery Charger Input Requirements: 100-240V - 15% / +10%, 50/60Hz
Battery Charge Time (from fully depleted to 100%): Less than 8 hours (approx. 3 hours typical)
Carrying Case: ACS Catalog Number ACC-ELG-001
Disposal
The Battery is a Lithium Ion type and must be disposed of according to the rules/regulationsof your health care organization and local authorities.
The EleGARD unit contains a motor and electronic circuits which must be disposed of accordingto the rules/regulations of your health care organization and local authorities.
29
10 General Information EleGARD™ Patient Positioning SystemInstructions for Use | 40000, Rev. 2
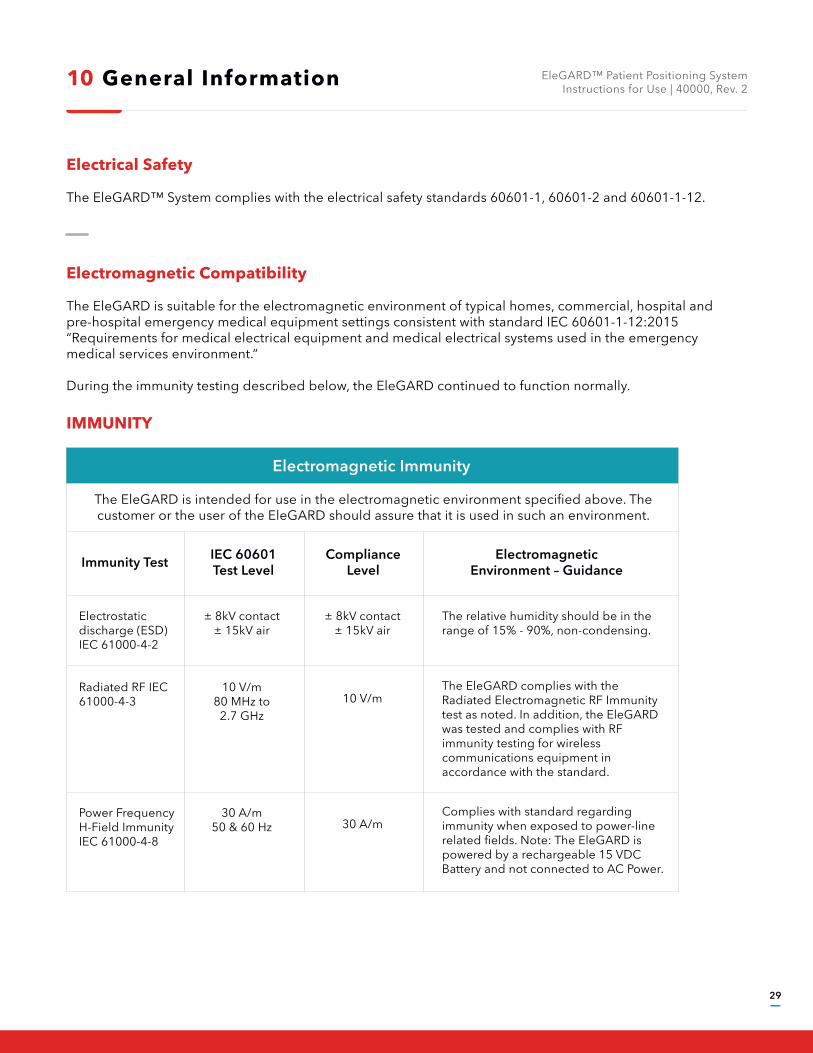
Electromagnetic Immunity
The EleGARD is intended for use in the electromagnetic environment specified above. The customer or the user of the EleGARD should assure that it is used in such an environment.
Immunity Test
Electrostaticdischarge (ESD)IEC 61000-4-2
± 8kV contact± 15kV air
± 8kV contact± 15kV air
The relative humidity should be in therange of 15% - 90%, non-condensing.
Radiated RF IEC61000-4-3
10 V/m80 MHz to
2.7 GHz10 V/m
The EleGARD complies with the Radiated Electromagnetic RF Immunity test as noted. In addition, the EleGARD was tested and complies with RF immunity testing for wireless communications equipment in accordance with the standard.
Power FrequencyH-Field ImmunityIEC 61000-4-8
30 A/m50 & 60 Hz 30 A/m
Complies with standard regarding immunity when exposed to power-line related fields. Note: The EleGARD is powered by a rechargeable 15 VDC Battery and not connected to AC Power.
IEC 60601Test Level
ComplianceLevel
ElectromagneticEnvironment – Guidance
Electrical Safety
The EleGARD™ System complies with the electrical safety standards 60601-1, 60601-2 and 60601-1-12.
Electromagnetic Compatibility
The EleGARD is suitable for the electromagnetic environment of typical homes, commercial, hospital and pre-hospital emergency medical equipment settings consistent with standard IEC 60601-1-12:2015 “Requirements for medical electrical equipment and medical electrical systems used in the emergency medical services environment.”
During the immunity testing described below, the EleGARD continued to function normally.
IMMUNITY
30
EleGARD™ Patient Positioning SystemInstructions for Use | 40000, Rev. 2
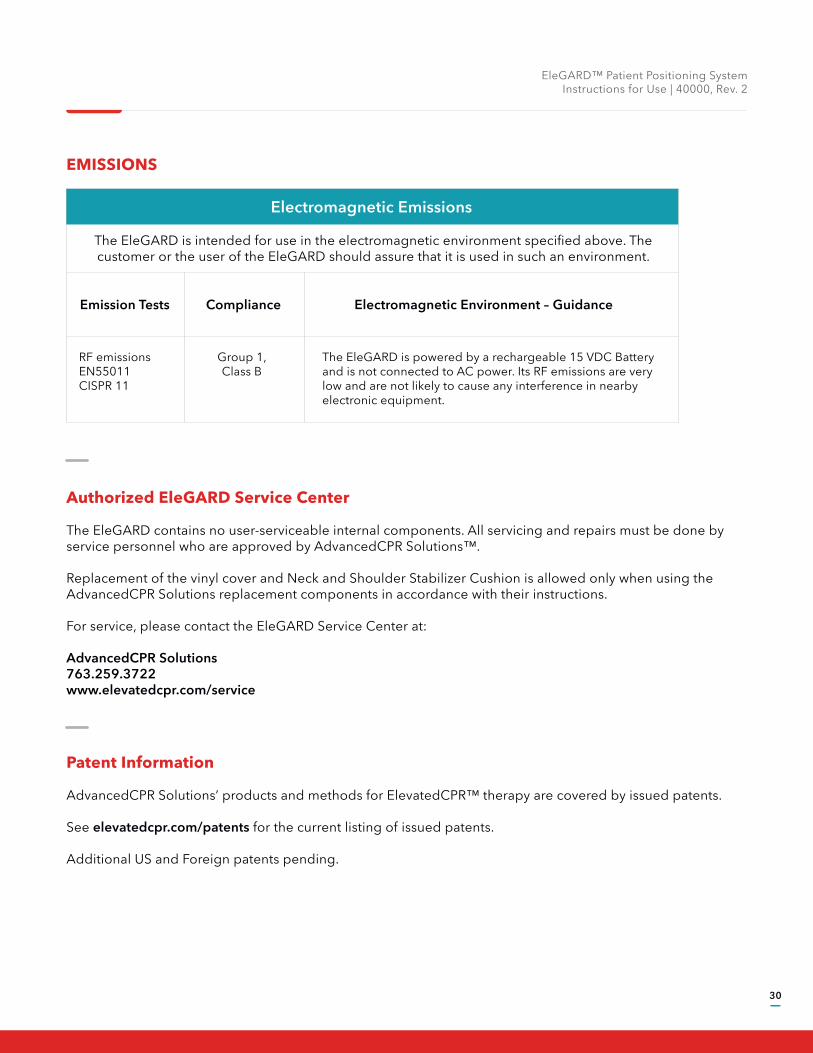
Electromagnetic Emissions
The EleGARD is intended for use in the electromagnetic environment specified above. The customer or the user of the EleGARD should assure that it is used in such an environment.
Emission Tests
RF emissionsEN55011CISPR 11
Group 1,Class B
The EleGARD is powered by a rechargeable 15 VDC Batteryand is not connected to AC power. Its RF emissions are verylow and are not likely to cause any interference in nearbyelectronic equipment.
Compliance Electromagnetic Environment – Guidance
Authorized EleGARD Service Center
The EleGARD contains no user-serviceable internal components. All servicing and repairs must be done by service personnel who are approved by AdvancedCPR Solutions™.
Replacement of the vinyl cover and Neck and Shoulder Stabilizer Cushion is allowed only when using the AdvancedCPR Solutions replacement components in accordance with their instructions.
For service, please contact the EleGARD Service Center at:
AdvancedCPR Solutions763.259.3722 www.elevatedcpr.com/service
Patent Information
AdvancedCPR Solutions’ products and methods for ElevatedCPR™ therapy are covered by issued patents.
See elevatedcpr.com/patents for the current listing of issued patents.
Additional US and Foreign patents pending.
EMISSIONS