eletta flow meter m-series m-win 0.9 softwaresqrt cutoff square root cutoff minimum resolution of...
TRANSCRIPT

60A7E6
Eletta Flow Meter M-series M-WIN 0.9 Software
User’s Manual

60A7E6 2
About this manual This manual describes how to install and use the M-WIN software. In this manual, arrows , rings , or rectangles are used to emphasize which areas to pay attention to.
• This manual relates to the M-WIN 0.9 software which is created for the Eletta M-series.
• Note that the latest version of this manual is always
available as a PDF file on our web site www.eletta.com.
• On our site you also find other information such as leaflets, newsletters and application reports.
Proprietary Rights This manual contains confidential technical data, including trade secrets and proprietary information, that are the property of Eletta Flow AB, Sweden. Any changes or alterations to downloaded or printed Eletta original documentation such as manuals, drawings, leaflets, newsletters etc, are not permitted without a written permission from Eletta Flow AB, Sweden. These data are only disclosed to you under permission of limited use within your company. Use for manufacturing or processing is not permitted. Any other use of data and information is strictly prohibited without prior written permission from Eletta Flow AB, Sweden.

60A7E6 3
Customer Service
Customer Service Center Our Customer Service Center will answer any of your commercial or technical questions during normal office hours* 8.00 - 16.30 C.E.T., (8 am - 4.30 pm Central European Time). Our switchboard is manned 7.00 – 19.00 C.E.T. During non-office hours Monday- Friday you can always leave a message to the operator, and our Customer Service staff will contact you as soon as possible. Questions or inquires will be responded to immediately, either by phone, fax or e-mail. *The normal office hours are not valid during National Holidays and annual plant close down, such as Christmas and summer holidays.
About Troubleshooting We have tried to make this manual as clear and comprehensive as possible, but naturally we understand that you might run into problems that are not described in this manual. If this would happen, we kindly ask you to first check the manual once again before contacting our Distributors or Eletta Flow AB in Sweden. This is to save valuable time for any of us involved in Eletta products. If you after this check still are not able to solve your problem, our Customer Service staff is more than happy to help you.
Contact Phone + 46 8 603 07 70 Switchboard
+ 46 8 603 07 80 Orders and Inquires Fax + 46 8 646 10 40 Postal Mail Eletta Flow AB P.O. Box 5084 SE-141 05 Huddinge
SWEDEN E-mail [email protected] Web www.eletta.com
Distributors Eletta has appointed a number of distributors all over the world. You will find more information about your closest distributor on our web site www.eletta.com, or by contacting our Customer Service Center.

60A7E6 4
Contents
ABOUT THIS MANUAL ..................................................................................2
Proprietary Rights..................................................................................................................................2
CUSTOMER SERVICE....................................................................................3
Customer Service Center .......................................................................................................................3
About Troubleshooting ..........................................................................................................................3
Contact ....................................................................................................................................................3
Distributors .............................................................................................................................................3
CONTENTS .....................................................................................................4
1 GENERAL INFORMATION.......................................................................6
1.1 General Description ..................................................................................................................6
1.2 Previous knowledge...................................................................................................................7
1.3 Technical requirements.............................................................................................................7
2 INSTALLATION........................................................................................8
2.1 Installation directory.................................................................................................................8
3 OVERVIEW.............................................................................................11
3.1 Terminology and abbreviations .............................................................................................11
3.2 Start using M-Win...................................................................................................................11
3.3 Online/Offline ..........................................................................................................................12
3.4 Connect Flow Meter................................................................................................................13
3.5 The program window..............................................................................................................13
3.6 Parameter units .......................................................................................................................13
3.7 Main bar...................................................................................................................................14
3.8 Sub pages..................................................................................................................................14
3.9 The Read page .........................................................................................................................15
3.10 The Set page.............................................................................................................................15

60A7E6 5
3.11 The Factory Default page .......................................................................................................16
3.12 The Eletta page ........................................................................................................................17
3.13 Flow Meter information..........................................................................................................17
4 DETAILED DESCRIPTION.....................................................................18
4.1 Main bar...................................................................................................................................18
4.2 Q range.....................................................................................................................................18
4.3 The Read page .........................................................................................................................19 4.3.1 Pressure and Temperature .....................................................................................................19
4.3.1.1 dP .................................................................................................................................19 4.3.1.2 P1 .................................................................................................................................19 4.3.1.3 P2 .................................................................................................................................20 4.3.1.4 Temp ............................................................................................................................20 4.3.1.5 dP range........................................................................................................................20 4.3.1.6 Sqrt cutoff.....................................................................................................................20 4.3.1.7 P max............................................................................................................................21 4.3.1.8 Temp range...................................................................................................................21
4.3.2 Output ...................................................................................................................................21 4.3.2.1 Output...........................................................................................................................21 4.3.2.2 Min ...............................................................................................................................21 4.3.2.3 Max ..............................................................................................................................22
4.3.3 Alarm ....................................................................................................................................22 4.3.3.1 On.................................................................................................................................22 4.3.3.2 Off ................................................................................................................................22
4.4 The Set page.............................................................................................................................23 4.4.1 Confirm.................................................................................................................................23 4.4.2 Configurable fields................................................................................................................23
4.4.2.1 Q- range........................................................................................................................23 4.4.2.2 dP Range ......................................................................................................................24 4.4.2.3 Sqrt cutoff.....................................................................................................................24 4.4.2.4 Min and max signal output...........................................................................................25 4.4.2.5 Alarm settings ..............................................................................................................25
4.5 Factory default page................................................................................................................27 4.5.1 Confirm factory deafult.........................................................................................................27 4.5.2 Zero P1 and P2......................................................................................................................28
5 THE OUTPUT SIGNAL...........................................................................29
5.1 Turn down................................................................................................................................29
5.2 Zero based and non-zero based calibration ..........................................................................29 5.2.1 Zero based calibration...........................................................................................................30 5.2.2 Non-zero based calibration ...................................................................................................31 5.2.3 Customized range..................................................................................................................31
6 ERROR MESSAGES ..............................................................................32

60A7E6 6
1 General Information 1.1 General Description M-WIN is a software developed by Eletta Flow to communicate with the Eletta M-series Flow Meter. The Eletta M-series Flow Meter is used to measure and control flows of liquids and gases in pipes. The M-WIN software communicates with an M-series Flow Meter via a PC and a RS 485 converter.
M-series Flow Meter PC/lap top The communication between the software and the Flow Meter is bi-directional. This means that the software reads existing data and parameters from the Flow Meter, but it also allows you to reconfigurate the Flow Meter from the software. The software kit includes the below described parts.
Carrying box
CD, M-Win software
Converter K107 RS 232 / RS 485
Battery Power supply
Converter K 107
M-Win

60A7E6 7
1.2 Previous knowledge Even if the software is straight-forward and easy to understand, it is assumed that you have basic knowledge about how to use a computer mouse and Windows based programs. To follow this manual, it is also assumed that you are familiar with measuring flows using the Differential Pressure Principle, and that you have a basic understanding of the parts of the Flow Meter hardware. You must have an Administrator rights for your computer to successfully implement the M-Win software.
1.3 Technical requirements M-WIN is designed for use with Windows operating systems XP, 2000, NT, 98 and 95. The PC must have an available COM-port. If a Com-port is not available ( on newer models of laptops) and only a USB-port is fitted, a standard USB-to-serial communication converter must be used (not included). The total size of the M-Win software is approximately 15 MB. The size of the pdf manual is approximately 2 MB.
60A7E6 8
2 Installation This section describes how to install the M-WIN 0.9 software.
2.1 Installation directory Note For later Windows versions you need to have Administrator authority to be able to install software on your computer.
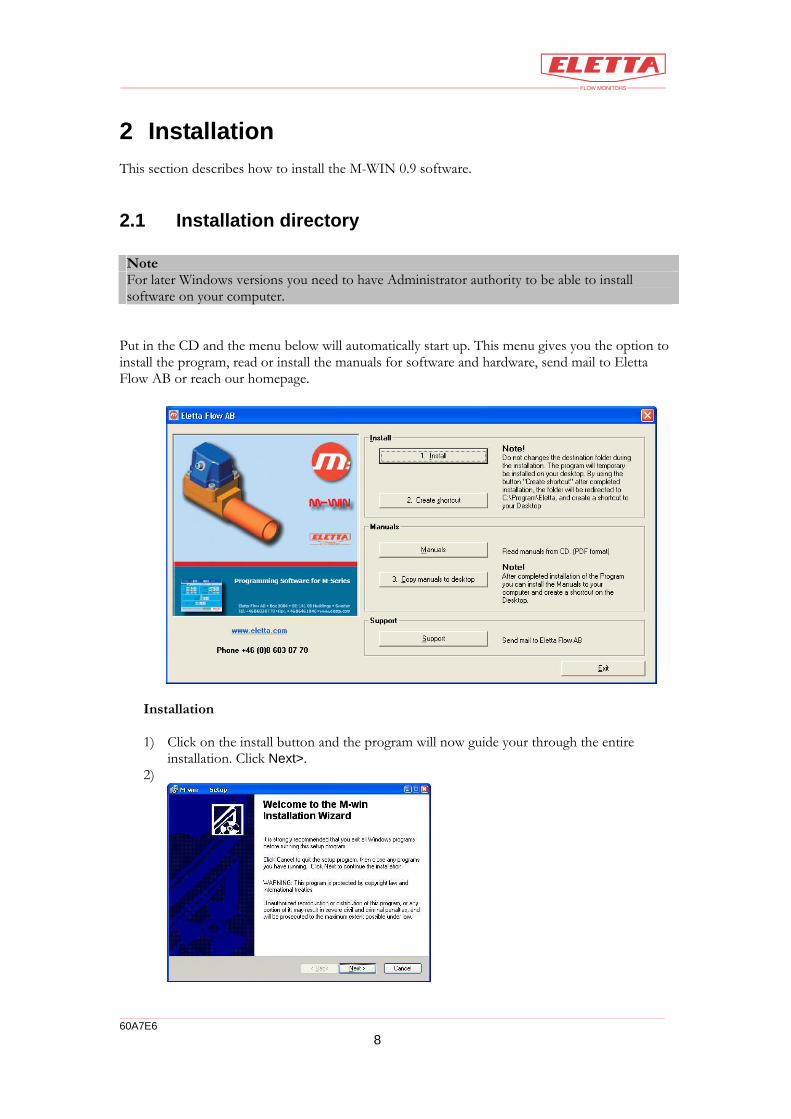
Put in the CD and the menu below will automatically start up. This menu gives you the option to install the program, read or install the manuals for software and hardware, send mail to Eletta Flow AB or reach our homepage.
Installation 1) Click on the install button and the program will now guide your through the entire
installation. Click Next>. 2)

60A7E6 9
3) Do not change the Destination Folder, just Click Next>. The installation defaults to a pre-defined directory.
4) Click Next> to start the installation.
The installation starts.

60A7E6 10
5) M-WIN has been successfully installed. Click Finish to exit the setup program and you will return to the start menu.
6) Click on button “2 Create shortcut”. This function will move the installation from your Desktop to C:\Program\Eletta\, and create a shortcut on your Desktop.
7) You have now also the possibillity to copy all the manuals for the produkt and the software to your computer by click on button “3 Copy manuals to desktop”. This will create a shortcut on your desktop and store the folder with the pdf-files in the same place as the program. When the installation is complete, store the M-Win CD in a safe place. If something happens to your working files, you will be able to reinstall M-Win with the original CD.

60A7E6 11
3 Overview 3.1 Terminology and abbreviations The table below lists terms and abbreviations that are used in the program.
Term Means
N/A Not Applicable
Q Flow
dp Differential pressure
P1 Static pressure at the upstream pressure sensor.
P2 Static pressure at the downstream pressure sensor.
Pmax Maximum static line pressure
Sqrt cutoff Square root cutoff Minimum resolution of the square root calculation, see section 4.3.1.6
Temp. Temperature
3.2 Start using M-Win Click on the M-Win icon or open the folder where you have installed the program. The program opens.

60A7E6 12
3.3 Online/Offline The M-Win software can be used without connecting a flow meter to your computer – i.e. using M-Win in the “Offline” mode. This feature is useful when you want to learn how to use the program or show it to others. In “offline” mode, the program window is passive (the colors are slightly faded) and the red text “Connect cable to flow meter” is shown at the bottom of the window.
Click the “Run Offline” button. The window will now turn active.
Note that all fields show ”N/A” since there is no flow meter connected to the computer. It is not possible to change parameters and store them when you run the M-Win offline and it is only meant to serve as guide how the software works.
Offline button
60A7E6 13
3.4 Connect Flow Meter Connect the serial connector to the back of your computer, COM 1, and the round connector into the M-series Flow meter. Since there is no power supplied through the serial output from the computer you need also to plug in the power supply to 230 VAC mains or install the battery provided in the K-107 Converter. You now have access to the stored information in the M-series Flow Meter.
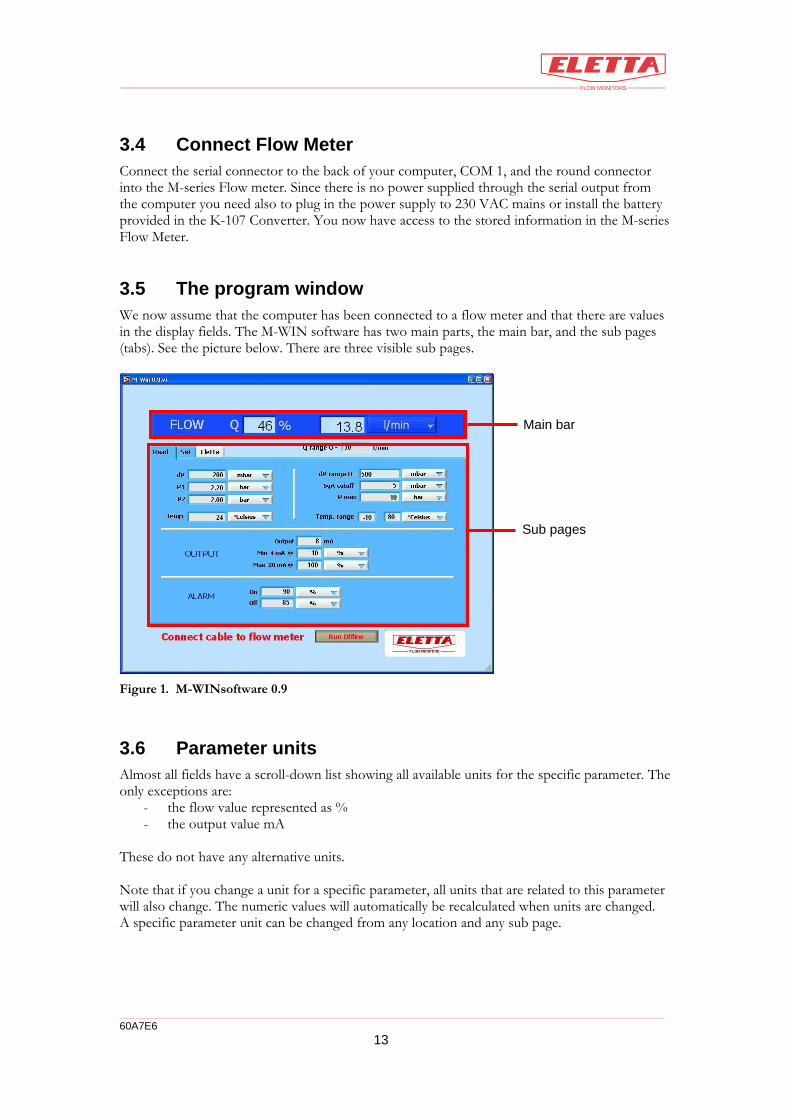
3.5 The program window We now assume that the computer has been connected to a flow meter and that there are values in the display fields. The M-WIN software has two main parts, the main bar, and the sub pages (tabs). See the picture below. There are three visible sub pages.
Figure 1. M-WINsoftware 0.9
3.6 Parameter units Almost all fields have a scroll-down list showing all available units for the specific parameter. The only exceptions are:
- the flow value represented as % - the output value mA
These do not have any alternative units. Note that if you change a unit for a specific parameter, all units that are related to this parameter will also change. The numeric values will automatically be recalculated when units are changed. A specific parameter unit can be changed from any location and any sub page.
Main bar
Sub pages

60A7E6 14
3.7 Main bar At the top there is the main bar that shows the present flow in percent and even volume/time if the software has been configured to show this. If not configured, the window will show N/A. Please refer to section 4, Detailed description, on how to configure the different parameters. The main bar is always visible.
Figure 2. Main bar
3.8 Sub pages The area below the main bar is used for the sub pages: the Read, Set, and Eletta pages.
Figure 3. Sub pages
Most of the parameter fields on these pages are found on the same place on both the Read and Set pages. The difference is that on the Read page you can only read them, but on the Set page, some values can be changed. Fields that can be edited have a white background, read-only fields (non-editable) have grey backgrounds,
Figure 4. Editable field
whereas read fields have a greyish background.
Figure 5. Read-only field (non-editable)
60A7E6 15
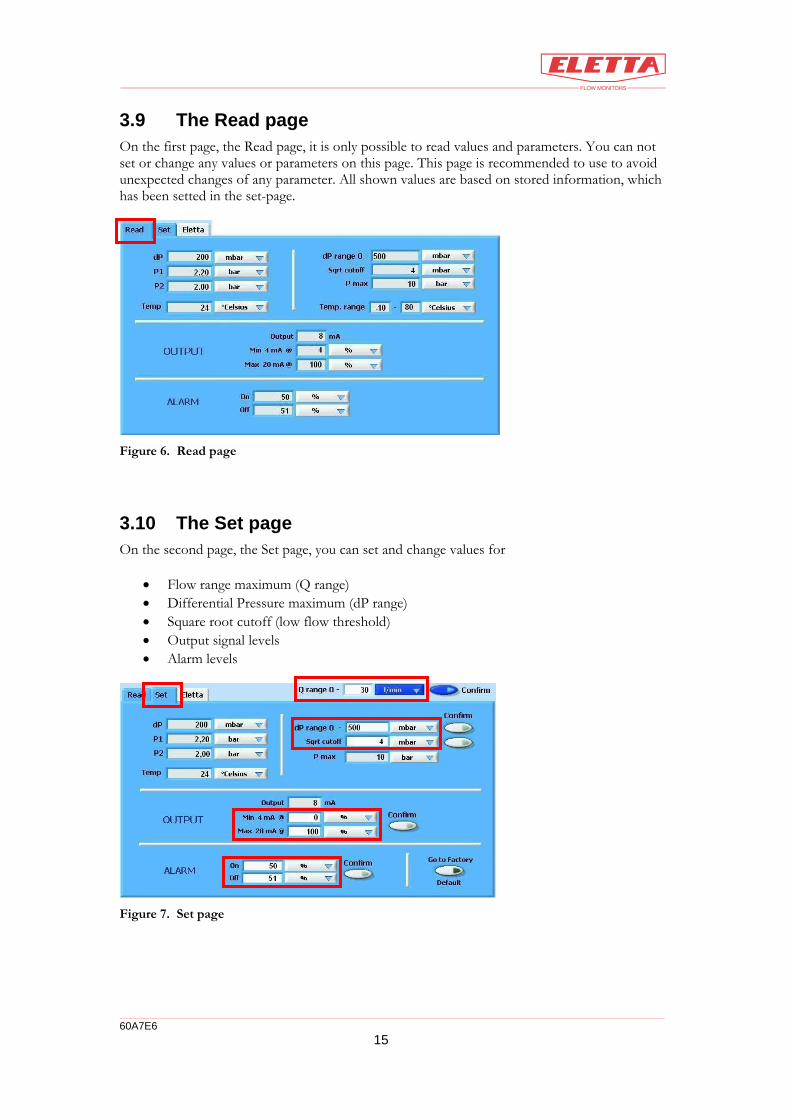
3.9 The Read page On the first page, the Read page, it is only possible to read values and parameters. You can not set or change any values or parameters on this page. This page is recommended to use to avoid unexpected changes of any parameter. All shown values are based on stored information, which has been setted in the set-page.
Figure 6. Read page
3.10 The Set page On the second page, the Set page, you can set and change values for
• Flow range maximum (Q range) • Differential Pressure maximum (dP range) • Square root cutoff (low flow threshold) • Output signal levels • Alarm levels
Figure 7. Set page

60A7E6 16
3.11 The Factory Default page At the bottom of the Set page you find the “Factory Default” button. When clicking it, a new sub page will open.
This page shows the factory default settings values, which may be useful if you want to know which values that were initially set. Using this page you can easily load all the factory default settings to the flow meter by clicking the “Confirm Default” button. You also can zero P1-P2. (dp) from this page
You find more information about this page in section 4.5.

60A7E6 17
3.12 The Eletta page The third page, the Eletta page, tells you how to contact Eletta Flow AB.
Figure 8. Eletta page
3.13 Flow Meter information For more information about the data for your specific flow meter, see the type plate and flow conditions label on your flow meter. Examples of type plate and flow conditions are shown below.
60A7E6 18
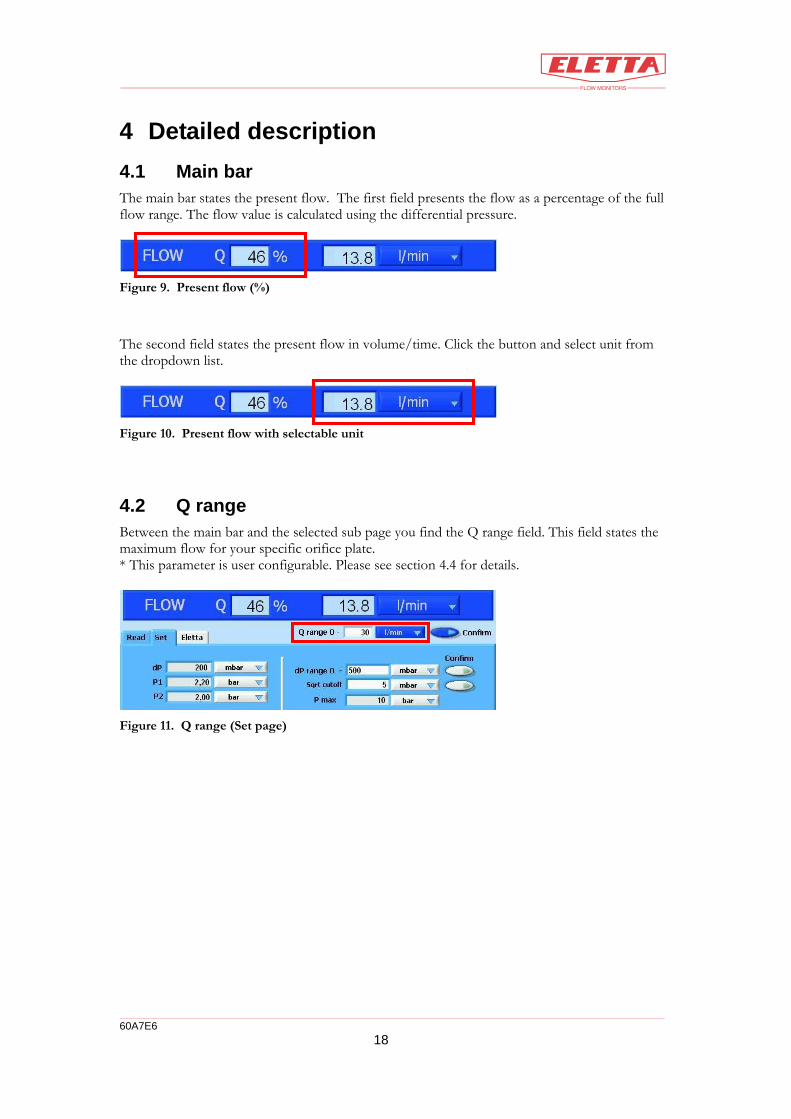
4 Detailed description 4.1 Main bar The main bar states the present flow. The first field presents the flow as a percentage of the full flow range. The flow value is calculated using the differential pressure.
Figure 9. Present flow (%)
The second field states the present flow in volume/time. Click the button and select unit from the dropdown list.
Figure 10. Present flow with selectable unit
4.2 Q range Between the main bar and the selected sub page you find the Q range field. This field states the maximum flow for your specific orifice plate. * This parameter is user configurable. Please see section 4.4 for details.
Figure 11. Q range (Set page)
60A7E6 19
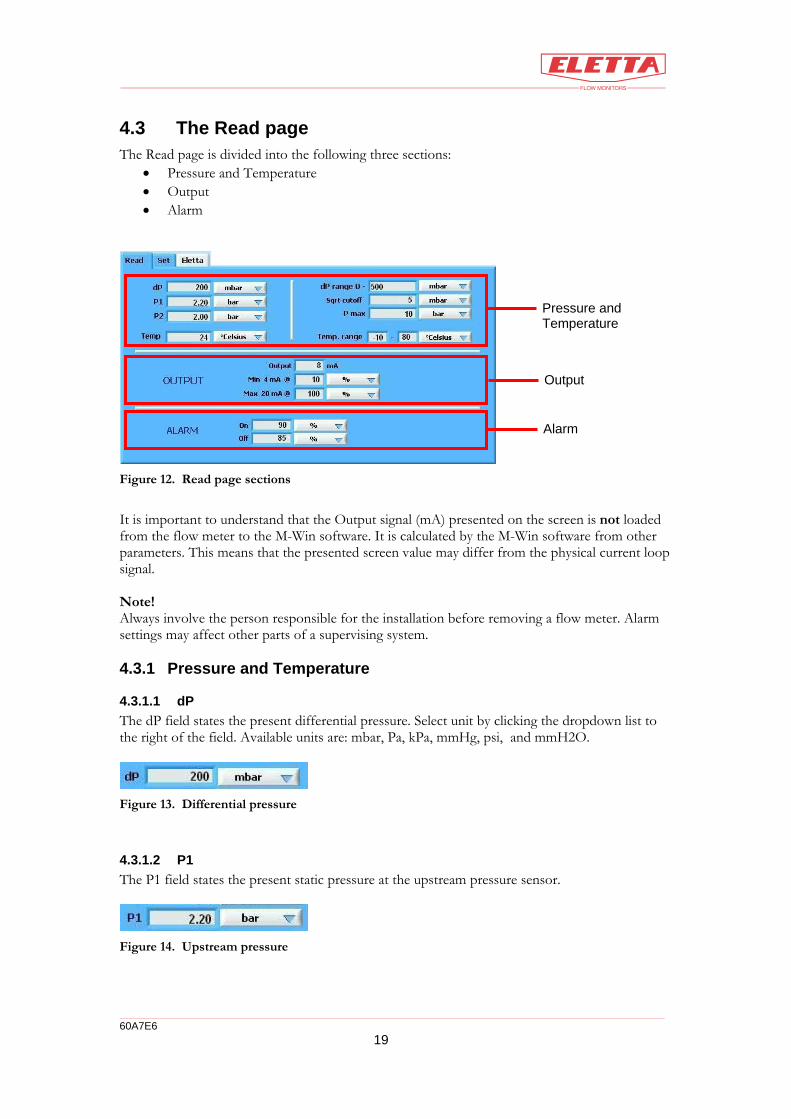
4.3 The Read page The Read page is divided into the following three sections:
• Pressure and Temperature • Output • Alarm
Figure 12. Read page sections
It is important to understand that the Output signal (mA) presented on the screen is not loaded from the flow meter to the M-Win software. It is calculated by the M-Win software from other parameters. This means that the presented screen value may differ from the physical current loop signal. Note! Always involve the person responsible for the installation before removing a flow meter. Alarm settings may affect other parts of a supervising system.
4.3.1 Pressure and Temperature
4.3.1.1 dP The dP field states the present differential pressure. Select unit by clicking the dropdown list to the right of the field. Available units are: mbar, Pa, kPa, mmHg, psi, and mmH2O.
Figure 13. Differential pressure
4.3.1.2 P1 The P1 field states the present static pressure at the upstream pressure sensor.
Figure 14. Upstream pressure
Pressure and Temperature
Output
Alarm

60A7E6 20
Select unit by clicking the dropdown list to the right of the field. Available units are: bar, kPa, mmHg, psi, and mmH2O.
4.3.1.3 P2 The P2 field states the present static pressure at the downstream pressure sensor.
Figure 15. Downstream pressure
Select unit by clicking the dropdown list to the right of the field. Available units are: bar, kPa, mmHg, psi, and mmH2O.
4.3.1.4 Temp The Temp field states the present system media temperature. The temperature is meassured at the upstream pressure sensor.
Figure 16. Temperature
Select unit by clicking the dropdown list to the right of the field. Available units are: °Celcius, °Fahrenheit and Kelvin.
4.3.1.5 dP range The dP range field states the measurement range for the differential pressure. * This parameter is user configurable. Please see section 4.4 for details.
Figure 17. dP measurement range
Select unit by clicking the dropdown list to the right of the field. Available units are: mbar, Pa, kPa, mmHg, psi, and mmH2O.
4.3.1.6 Sqrt cutoff The flow is calculated using a formula where the flow is a function of the differential pressure (Q= √dp). This formula uses a square root expression. This field shows where the flow meter stops to measure and the output signal and flow indication window in the M-Win goes down to zero. This is to prevent the meter showing erratic flow at zero or close to zero condition. * This parameter is user configurable. Please see section 4.4 for details.
Figure 18. Square root cutoof

60A7E6 21
Select unit by clicking the dropdown list to the right of the field. Available units are: mbar, Pa, kPa, mmHg, psi, and mmH2O.
4.3.1.7 P max The Pmax field states the maximum allowed static pressure. This is limited by the pressure sensors installed in the Flow Meter.
Figure 19. Maximum static line pressure
Select unit by clicking the dropdown list to the right of the field. Available units are: bar, kPa, mmHg, psi, and mmH2O.
4.3.1.8 Temp range The Temp field range states the temperature range for the system media for which the measurement results are shown with high accuracy, i.e. temperature compensated.
Figure 20. Compensated temperature range
Select unit by clicking the dropdown list to the right of the field. Available units are: °Celcius, °Fahrenheit and Kelvin.
4.3.2 Output
4.3.2.1 Output The Output field states the present value of the mA-signal. Note that this is value is calculated by the software flow meter processor using both values from the input sensors and M-Win software settings.
Figure 21. Present output signal
4.3.2.2 Min The Min field states which flow that shall correspond to 4 mA, which is the lowest available value for the output signal. * This parameter is user configurable. Please see section 4.4 for details.

60A7E6 22
Figure 22. Fow corresponding to 4 mA
Select unit by clicking the dropdown list to the right of the field. Available units are: %, l/min, m3/h, US Gpm, l/sec.
4.3.2.3 Max The Max field states which flow that shall correspond to 20 mA, which is the highest available value for the output signal. * This parameter is user configurable. Please see section 4.4 for details.
Figure 23. Flow corresponding to 20 mA
Select unit by clicking the dropdown list to the right of the field. Available units are: %, l/min, m3/h, US Gpm, l/sec.
4.3.3 Alarm
4.3.3.1 On The On field states from which flow the alarm shall be turned on. * This parameter is user configurable. Please see section 4.4 for details.
Figure 24. Alarm On level
Select unit by clicking the dropdown list to the right of the field. Available units are: %, l/min, m3/h, US Gpm, l/sec.
4.3.3.2 Off The Off field states at which flow the alarm shall be turned off. * This parameter is user configurable. Please see section 4.4 for details.
Figure 25. Alarm Off level
Select unit by clicking the dropdown list to the right of the field. Available units are: %, l/min, m3/h, US Gpm, l/sec.

60A7E6 23
4.4 The Set page The Set page looks almost the same as the Read page. Most of the fields on this page are the same as on the Read page. However, some of them now have a white background which means that the fields now can be edited. Edit a field by clicking on it.
Figure 26. Editable field
There is also a couple of additional buttons not found on the Read page. This chapter will only describe such fields and buttons that are different compared to the Read page.
4.4.1 Confirm By clicking the confirm button, a value that has been entered into the field is loaded to the Flow Meter and entered into the M-Win software.
Figure 27. Confirm button
Note that you have to perform this step, otherwise the new value is only shown in the field, it is not loaded to the Flow Meter. Note that the corresponding field on the Read page will not change until you have clicked the confirm button.
4.4.2 Configurable fields The Flow Meter is factory calibrated and configured with default values making it possible to install the Flow Meter without any programming in the field. In the below section there is shown how to edit the different parameters in order to reconfigure the flow meter to suit any application.
4.4.2.1 Q- range
Figure 28. Q range (Set page)

60A7E6 24
The max q range for your M-series Flow Meter can be found on the flow condition label on the blue housing. The Flow Meter is calibrated to show the flow in percentage of the full possible flow range and the correct max flow value in ordered units i.e. l/min, m3/h etc. but if you want to change the flow range to other values, this is the window to edit. When you edit this field the values will be stored in the processor of the Flow Meter. NOTE!!! If you change the flow range you must also install a new orifice plate, which matches the new values. There is no need to change the signal output configuration as this is connected to the flow percentage value If you do not change the orifice plate, the changed values you enter seems right on the M-Win software, but the processor is still using the max flow value determined by the orifice plate installed when it calculates the mA-output and alarm settings. This will results in a false reading of the flow. Remember to confirm new values when you change them otherwise the processor will not be updated.
4.4.2.2 dP Range
Figure 29. dP range (Set page)
This parameter determines the differential pressure span from where the processor calculates the flow. The orifice plate installed is calculated to give maximum flow (Q=100%) at 500 mbar differential pressure as default. Normally this is not to be changed when you are using the M-series Flow Meter. Do not change this field without checking the orifice plate versus dP range. If you want use the M-series to other primary elements, venturis, annubars, pipe bends etc, you must set the correct flow range versus the dP range so that max. dP corresponds to max. flow. Please consult the technical specifications for your primary element for the right values Remember to confirm new values when you change them, otherwise the processor will not be updated.
4.4.2.3 Sqrt cutoff

60A7E6 25
Figure 30. Sqrt cutoff (Set page)
This field shows where the flow meter stops to measure and the output signal and flow indication in the M-Win will go down to zero. This is to prevent the meter showing erratic flow at zero condition. The default value is set to 4 mbar meaning that no flow just below 10% of max flow will be shown. If you see an unstable flow when you have a no-flow condition, you can raise this value to avoid seeing this. Vibrations can cause these erratic small values for example and therefore you want to cut them off. It is possible to adjust this parameter all the way up to max. dP range. Remember to confirm new values when you change them otherwise the processor will not be updated.
4.4.2.4 Min and max signal output
Figure 31. Output (Set page)
This field shows what flow value that should correspond to 4 mA and 20 mA respectively. The default values are 4mA @ 0 % flow and 20mA @ 100% flow. Here you can set the output values to suit the input of an external display or DCS/PLC. Please refer to section 5 for detailed information regarding the characteristic of the output signal at different settings. Remember to confirm new values when you change them otherwise the processor will not be updated.
4.4.2.5 Alarm settings
Figure 32. Alarm settings (Set page)
The alarm output must be connected to an external relay or PLC in order to work. If not, the alarm levels will only be shown in the M-Win and no action will be seen elsewhere. The M-series Flow Meter has one (1) alarm output, with adjustable hystereses, which can be set to trip when a flow has decreased below, or increased above, a certain flow. The alarm levels are pre set at the factory according to customer specification before delivery. If not specified, the default settings are; ON= 51% and OFF=50%. It is also possible though, to readjust the settings in the field using the optional M-WIN software. The alarm function has two possible settings in order to create suitable hystereses for the actual application, the “ON-and ”OFF”- mode and they can be used as follows; In the “ON” mode, the voltage level on the output is the same as the supplied power (8 – 28 VDC) In the “OFF” mode, the voltage drops to zero (0) volt.

60A7E6 26
Note!!! Please do not set the hystereses with a too small gap as this can create a ripple of the alarm. Please see example graph below with an assumed power supply of 24Vdc: Example # 1. “ON” higher than “OFF” When the flow increases and reach the 60%, the alarm switches at “ON” mode from 0 Vdc to 24Vdc and when the flow decrease and reach the “OFF” mode (55%), the voltage drops to 0 Vdc again. Example # 2 “ON” lower than “OFF”
0 % Flow 100 % Flow
0 VDC
24 VDC 0 VDC
24 VDC
Alarm ON set at 55% flow
Alarm OFF set at 60% flow
0 % Flow 100 % Flow
24 VDC
0 VDC 24 VDC
0 VDC
Alarm ON set at 60% flow
Alarm OFF set at 55% flow

60A7E6 27
4.5 Factory default page
Figure 33. Go to factory deafult (Set page)
If for some reason you are unable to get correct readings from the Flow Meter, we recommend to use the factory default page.
4.5.1 Confirm factory deafult Note! You must set the field “Q range” to the value “Unknown” and confirm before confirming factory default in order to get correct values.
Figure 34. Factory deafult page
The factory default values for changeable parameters are; DP range = 500 mbar Sqrt cutoff = 4 mbar 4 mA = 0% flow 20 mA = 100% flow Alarm on = 51% of max flow Alarm off = 50% of max flow

60A7E6 28
4.5.2 Zero P1 and P2
Figure 35. Factory deafult page
This button allows the user to ”zero” both pressure sensors at the same time according to the actual conditions. The M-series Flow Meter is calculating the flow trough by means of measuring the differential pressure over an orifice plate placed in the Pipe Section. To do this correctly, two independent absolute pressure sensors are used to measure P1 and P2 and they are mounted in separated pressure chambers. If for some reason, these two pressure sensors are not “zeroed” at the same pressure, a difference in measuring of the pressure between the two will occur and hence the wrong differential pressure will cause an error in the flow reading. Before leaving the factory, the sensors are “zeroed” at the atmospheric pressure valid at the altitude in Sweden (or at the Distributors site) at that day they were finalized. There is normally no need to make an on-site zeroing, as the atmospheric pressure at the site has no influence on the flow reading. The M-series Flow Meter is only using the differential pressure for calculating the flow. The only time there is a need to do a zeroing is when P1 and P2 are showing different values at no flow condition. Please use this button carefully and follow the instructions given on the screen when using this feature. Note!!! If the Flow Meter is zeroed at no flow condition and there is a line pressure exceeding the atmospheric pressure, there will be an error in the reading of the static pressure after the zeroing.

60A7E6 29
5 The Output Signal 5.1 Turn down Each orifice plate is designed and optimized for a specific flow range and fluid. This means that there is a maximum flow value for a specific orifice plate. This value is represented by the flow percentage 100%. A flow value higher than the maximum flow value will not be measured with the same accuracy. The analogue output signal from the Control Unit is always in the range 4-20 mA. This means that the maximum flow (100%), for any specific orifice plate, corresponds to the output level 20 mA. However, the minimum flow 0% is merely theoretical since it is not possible to use the differential pressure principle if there is no flow at all. There has to be a certain minimum flow to create the different pressures on the upstream and downstream side of the orifice plate. This minimum flow therefore will correspond to a flow percentage higher than 0 %. Therefore, the Flow Meter is said to have a turn down of 1:10. In this very case, the lowest flow must be 10% of the maximum flow in order for the Flow Meter to be able to work.
Note!!! The turn-down is dependent on the measured liquid or gas and can therefore be less than 1:10. The 1:10 turn-down is only valid for water and air
5.2 Zero based and non-zero based calibration The question is now, regarding what has been said so far, what happens when the flow is less than 10%? The answer is that it depends on which calibration that has been chosen. There are two ways of representing the output signal:
• zero based calibration • non-zero based calibration

60A7E6 30
5.2.1 Zero based calibration Using zero based calibration the full output signal range will correspond linear to the full flow range (0-100%), and not only the measurement range (10-100%). An output signal of 12 mA will simply correspond to 50% of the maximum flow.
Zero-based calibration is the pre-calibrated standard as it is often appreciated as being more intuitive. Many customers use receiving instruments, with digital or analogue readout, that shows 0-100%. Flow less than 10% However, we now return to the question what happens with the output signal when the flow is less than 10%. As we have described above, due to the measurement principle, the Flow Meter cannot work properly below this level. So, what in fact happens is that the Control Unit sets the output signal to 4 mA when the flow gets below the lowest allowed flow. If a square root cut-off of 4 mbar is used, the lowest allowed level will be 9% flow. See the graph below. Therefore, the output signal can be used to indicate if the flow has decreased below the minimum level. As soon as the output signal drops from 5.4 to 4 mA, the flow has decreased below 9% (square root cut-off 4 mbar).
60A7E6 31
Example A Flow Meter with a turn down of 1:10 will have the output signal showing 4 mA between 0 and 9% of the maximum flow for which the orifice plate is designed. (A square rott cut-off 4 mbar is assumed.) When the flow reaches 9% the output signal will jump to 5,4 mA. From this point the output signal is linear to the flow up to the maximum flow 100%. The output signal at 10% is 5,6 mA. Therefore, for the flow measurement range 10 to 100%, the output signal is in the range 5,6 – 20 mA. (End of Example)
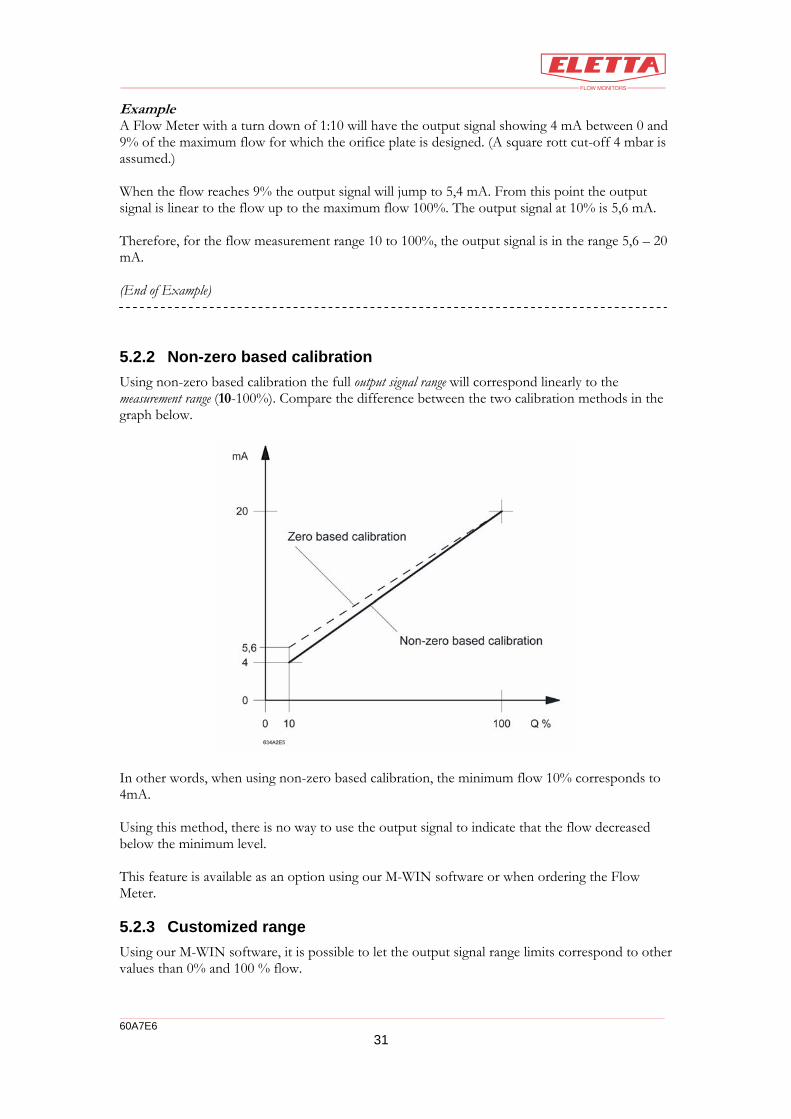
5.2.2 Non-zero based calibration Using non-zero based calibration the full output signal range will correspond linearly to the measurement range (10-100%). Compare the difference between the two calibration methods in the graph below.
In other words, when using non-zero based calibration, the minimum flow 10% corresponds to 4mA. Using this method, there is no way to use the output signal to indicate that the flow decreased below the minimum level. This feature is available as an option using our M-WIN software or when ordering the Flow Meter.
5.2.3 Customized range Using our M-WIN software, it is possible to let the output signal range limits correspond to other values than 0% and 100 % flow.
60A7E6 32
In this way, if your application always has a flow of 40-60% of the possible flow measurment range, you can “zoom in” on this range and let 4 mA correspond to 40% flow, and 20 mA correspond to 60% flow..
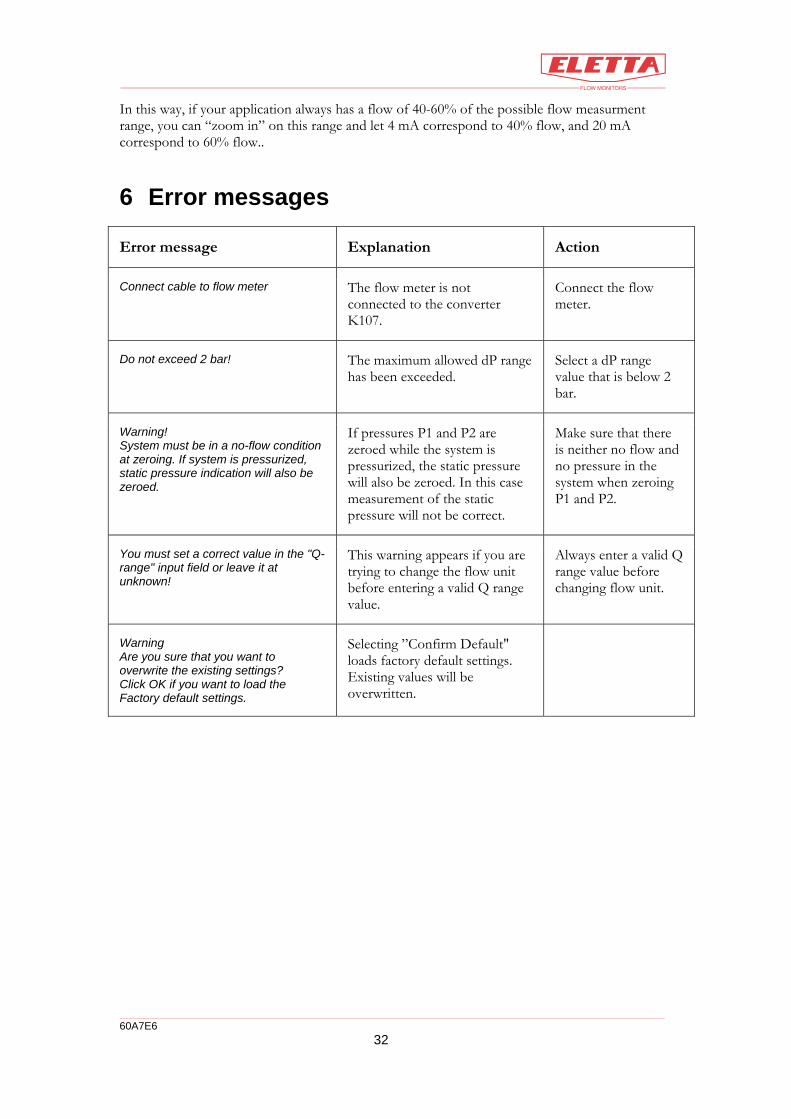
6 Error messages
Error message Explanation Action
Connect cable to flow meter The flow meter is not connected to the converter K107.
Connect the flow meter.
Do not exceed 2 bar! The maximum allowed dP range has been exceeded.
Select a dP range value that is below 2 bar.
Warning! System must be in a no-flow condition at zeroing. If system is pressurized, static pressure indication will also be zeroed.
If pressures P1 and P2 are zeroed while the system is pressurized, the static pressure will also be zeroed. In this case measurement of the static pressure will not be correct.
Make sure that there is neither no flow and no pressure in the system when zeroing P1 and P2.
You must set a correct value in the "Q-range" input field or leave it at unknown!
This warning appears if you are trying to change the flow unit before entering a valid Q range value.
Always enter a valid Q range value before changing flow unit.
Warning Are you sure that you want to overwrite the existing settings? Click OK if you want to load the Factory default settings.
Selecting ”Confirm Default" loads factory default settings. Existing values will be overwritten.

60A7E6 33
Eletta Flow AB P.O. Box 5084
SE-141 05 Huddinge SWEDEN
E-mail [email protected] www.eletta.com Phone + 46 8 603 07 70 Switchboard + 46 8 603 07 80 Orders and Inquires Fax + 46 8 646 10 40