elizabeth craft designs - the crafters' chronicle: holiday head start
DESCRIPTION
ÂTRANSCRIPT

The Crafters’ Chronicle:HOLIDAY HEAD START
WINTER & HOLIDAY EDITION 2016

2.
Holiday Head Start- Our First eBook!
Thank you for downloading our very first eBook! It’s been a labor of love and we couldn’t be more excited to finally share it with you. Without you, Elizabeth Craft Designs would not exist, so thank you for being a part of our family. Our talented designers have created 14 brand new and exclusive projects for you to try your hand at. We’ve included oodles of photos and step-by-step instructions; projects that are ideal for paper crafters from beginner to more experienced. Regardless of your level, you will find plenty of projects to either recreate or put your own mark on. Don’t forget, you can always start with the idea and head in a totally new direction. It’s all about having fun, finding inspiration and taking the ‘me-time’ that being creative allows you.
We know that you are going to fall head over heels in love with all of the projects in this eBook, so we wanted to make it as easy as possible for you to have a go at re-creating each project. For that very reason, throughout the pages of this eBook you will find your own discount code to use on our web site, links to all of the Elizabeth Craft Designs supplies used in each project, and links to Buy it All’s that have been created especially for each project. And don’t forget, if you need extra support in making any of these projects, head over to the Elizabeth Craft Designs YouTube channel to watch our how-to videos.
Happy Crafting!
TAKE 20% OFF YOUR ENTIRE ORDER WITH
THE CODEHOLIDAY15AT CHECKOUT!

Table of Contents
SECTION 1 WITH Els van de Burgt FRAMES & ORNAMENTS CARD 4
MERRY CHRISTMAS GIFT CARD ENVELOPE 10
SECTION 2 WITH Joset van de Burgt MERRY CHRISTMAS STOCKINGS CARD 16
SNOWMAN IN FRAME CARD 22
SECTION 3 WITH Karen Burniston HOWDY CHRISTMAS CARD 28
HOLIDAY HOUSE RECTANGLE ACCORDION CARD 34
SECTION 4 WITH Susan Tierney-Cockburn MERRY CHRISTMAS POINSETTIA CARD 40
CAROLINA CHRISTMAS WINDOW SCENE CARD 46
SECTION 5 WITH Suzanne Cannon SPECIAL HELLO HOLIDAY CARD 56
TANGLED SEASON’S GREETINGS CARD 60
SECTION 6 WITH Bianca Petroschi HOLIDAY HEDGEHOG TAG CARD 66
HEDGEHOG DAISY’S HOLIDAY WISHES 72
SECTION 7 WITH Judi Kauffman SHIMMER SHEETZ & SNOWFLAKE CARDS 82
SHIMMER SHEETZ & EMBOSSED SNOWFLAKES CARD 88

4.
Frames & Ornaments Card
WITH ELS VAN DE BURGT
I love winter – the cold crisp air, the blue skies, being outdoors in nature, seeing the first footprints in fresh snow. I can’t wait to see my new granddaughter’s tiny prints between her parents’ larger ones! And I love Christmas time – putting up the tree, sitting by the fireplace, candles flickering, cookies baking, hot chocolate in a jumbo mug. Another of my favorite things about winter is making Christmas cards. Some years I start as early as October so I have plenty by December, but I usually need to whip up most of them after Thanksgiving when time is in short supply. Like most people, I make the most elaborate cards for my immediate family. Ornaments have such interesting shapes and they bring such happy memories. For my two projects I had elegance in mind so I made die cut ornaments and kept the layout and the color combination very simple: Fitted Frames for the borders, touches of red for the berries, and heat embossing for texture and sparkle. One ornament or several – either way the card will be beautiful!

5.
Frames & Ornaments Card
• Cardstock - Brown, White, Light Brown
• Patterned Paper - Graphic 45
• WOW! Embossing Powder - Metallic Platinum Sparkle (WS26R)
• WOW! Embossing Powder - White Pearl Regular (WE10R)
• Viva Décor Pearl Pen 400 Red
• Embossing Heat Tool
• Els van de Burgt Studio- Fitted Frames 1 - Lace Rectangles - 1061
• Els van de Burgt Studio- Leaf & Berry Branches - 1074
• Els van de Burgt Studio- Berry Branch - 758
• Els van de Burgt Studio- Ornament Set 4 - 1065
• Clear Double Sided Adhesive Tape 8.5” x 11”- 502
• Shimmer Sheetz (Silver Metallic) - SS 0211
• Transparent/Silver Glitter Dots - 7018
• Borders Assorted Peel-Off Stickers - Silver 1167
• Metal Adaptor Plate - 803
• Fine Pointed Tweezers - 801
SuppliesELIZABETH CRAFT DESIGNS
Additional Supplies

6.
FRAMES & ORNAMENTS CARD
Creating the Card Base
Create a 5 ½” x 8 ½” side-fold card base from brown cardstock.
Create an A2 (4 ¼” x 5 ½”) side-fold card base from brown cardstock.
Die cut Fitted Frames 1 - Lace Rectangles from patterned paper backed with Clear Double Sided Adhesive Tape.
Remove release sheet from largest and smallest frames and adhere to card front.
Cut the following using Ornament Set 4:• 3 solid ornaments from white cardstock backed with Clear Double Sided Adhesive Tape.• 3 ornament overlays from white cardstock backed with Clear Double Sided Adhesive Tape.• 3 ornament caps from Silver Metallic Shimmer Sheetz backed with Clear Double Sided Adhesive Tape.
*A Metal Adaptor Plate is required when die cutting Shimmer Sheetz.
Fitted Frames 1 - Lace Rectangles Die
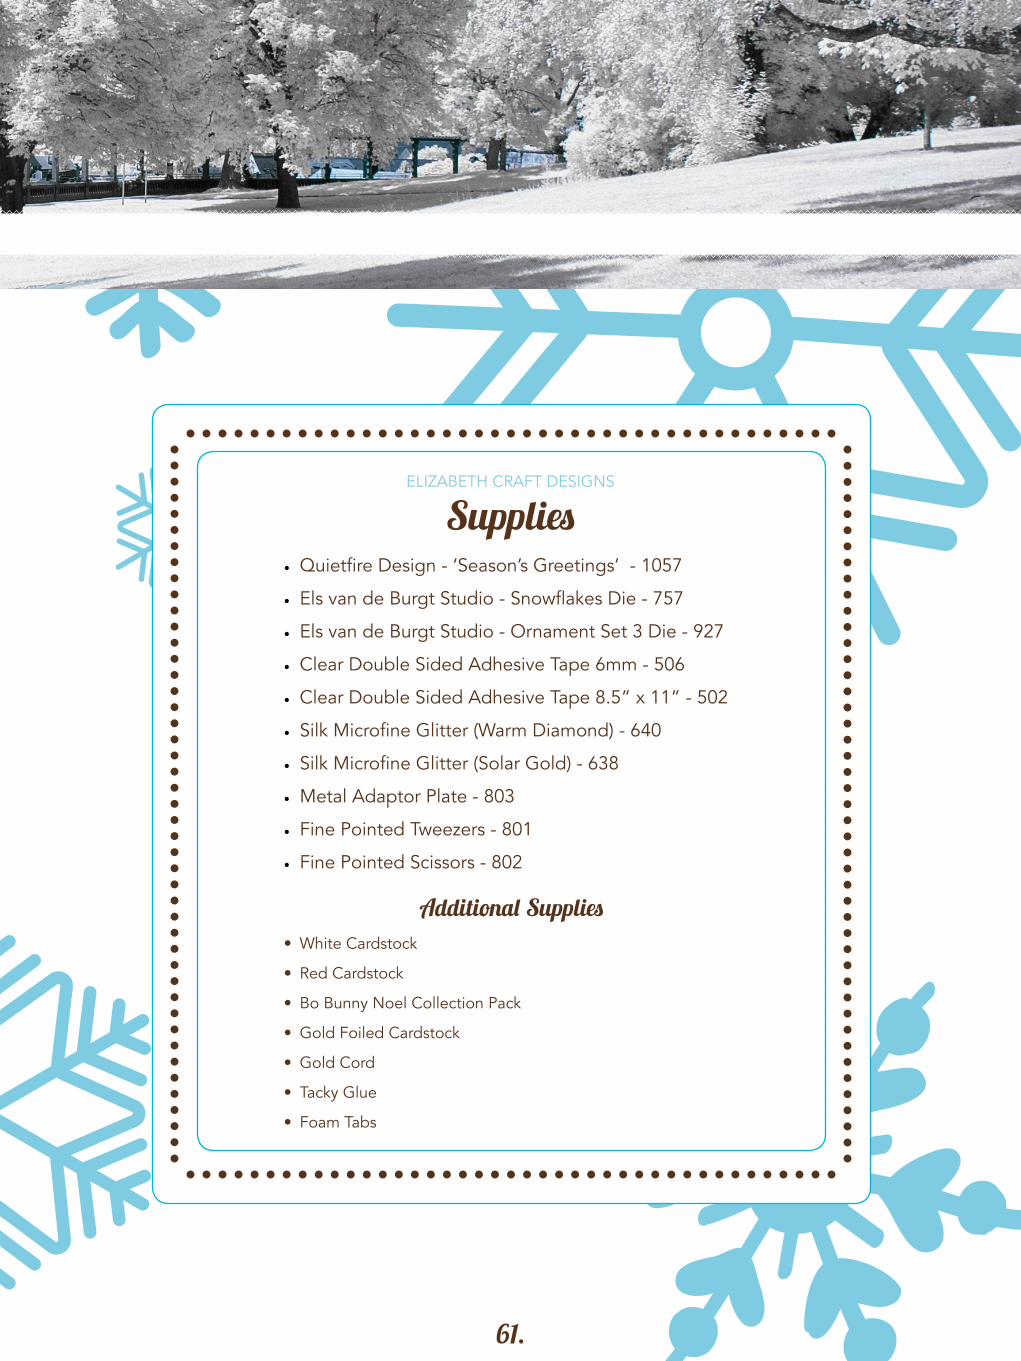
2
1
4
3
5
Click here for a video
tutorial on
Fitted Frames
Ornament Set 4
Click here for a video tutorial
on cutting Shimmer
Sheetz with the
Metal Adaptor
Plate

7.
Remove the release sheet from ornament overlays. Cover exposed adhesive with Metallic Platinum Sparkle Embossing Powder and use the heat tool to emboss.
Remove the release sheet from solid ornaments and place embossed ornament overlays on top of exposed adhesive
6
7

8.
FRAMES & ORNAMENTS CARD
Cover the exposed adhesive with White Pearl Embossing Powder and use the heat tool to emboss. (Do not overheat or the Metallic Platinum Sparkle Embossing Powder will re-melt and smear!)
Remove release sheet from Shimmer Sheetz ornament caps and adhere caps to ornaments.
Cut 1 set of the Leaf & Berry Branches from Silver Metallic Shimmer Sheetz and 1 Berry Branch from brown cardstock.
Leaf & Berry Branch
Ornament Set 4 (Continued)
9
8
10
9.
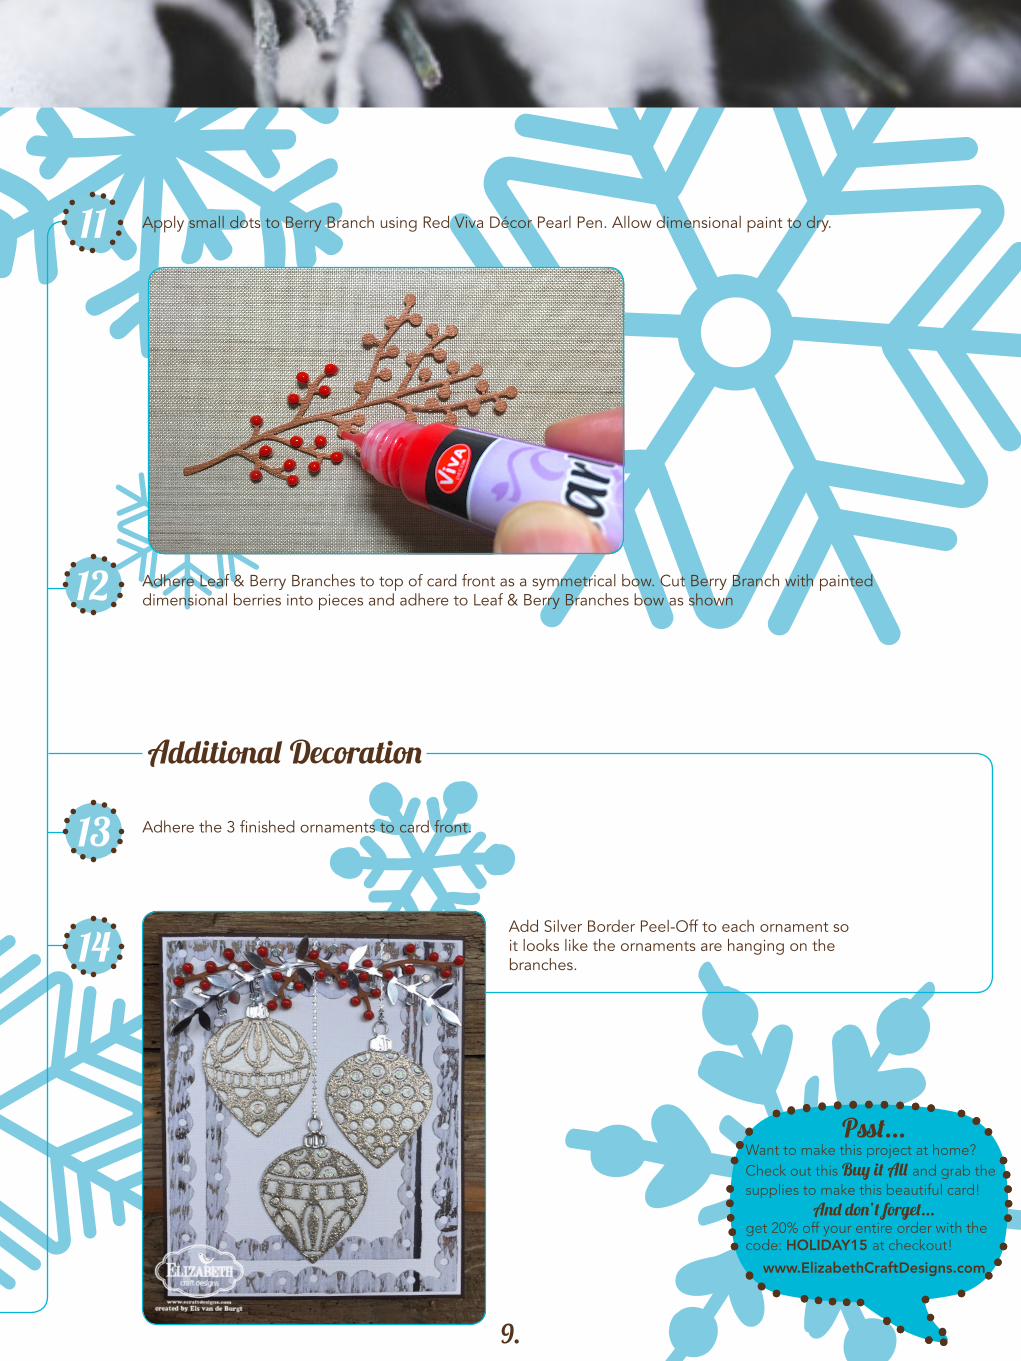
Apply small dots to Berry Branch using Red Viva Décor Pearl Pen. Allow dimensional paint to dry.
Adhere Leaf & Berry Branches to top of card front as a symmetrical bow. Cut Berry Branch with painted dimensional berries into pieces and adhere to Leaf & Berry Branches bow as shown
Adhere the 3 finished ornaments to card front.
Add Silver Border Peel-Off to each ornament so it looks like the ornaments are hanging on the branches.
12
13
11
Additional Decoration
14
Psst...Want to make this project at home? Check out this Buy it All and grab the supplies to make this beautiful card!
And don’t forget...get 20% off your entire order with the code: HOLIDAY15 at checkout!
www.ElizabethCraftDesigns.com

10.
Merry ChristmasGift Card Envelope
WITH ELS VAN DE BURGT
Gift cards deserve a very special envelope, don’t you think? When you’re ready to branch out you can easily customize Gift Card Envelopes for birthdays and other
occasions. Simply change the sentiment and the color palette and substitute different flowers for the poinsettias.

11.
Merry ChristmasGift Card Envelope
• Paper trimmer or craft knife, straight edge and cutting mat
• Ranger Industries, Inc. Fired Brick and Forest Moss Distress Ink
• Mini Ink Blending Tool
• 1” piece of adhesive-backed hook and loop tape(Velcro brand or other)
• Optional: Non-stick craft mat
• Soft Finish Cardstock 100lb - PSF102
• Els van de Burgt Studio - Tags & More 9 Sparkle die set - 1077
• Els van de Burgt Studio - Ribbons & Jewels dies - 1070
• Els van de Burgt Studio - Poinsettia die - 1067
• Els van de Burgt Studio - Merry Christmas - 944
• Transparent/Gold Glitter Dots - 7018
• Clear Double Sided Adhesive Tape 8.5” x 11”- 502
• Clear Double Sided Adhesive Tape 6mm - 506
• Fine Pointed Tweezers - 801
SuppliesELIZABETH CRAFT DESIGNS
Additional Supplies

12.
MERRY CHRISTMAS GIFT CARD ENVELOPE
Creating the Envelope Base
Cut a 4 1/4” x 7 3/4” piece of Soft Finish Cardstock. Score at 3” on one short end. Die cut tag shape on the other short end of this piece using the basic tag shape die from Tags & More 9 Sparkle. Line up the snowflake decorative overlay die and cut as shown.
Cut a 4 1/4” x 8” piece of Soft Finish Cardstock. Score at 2 1/5” from one short end. Apply a piece of Clear Double Sided Adhesive Tape on each side of the cardstock below the scored line. Remove release sheet and fold up the bottom 2 1/5” to create a pocket for the gift card.
2
1
Click here for a video
tutorial on
Tags & More 9 -
Sparkle Die

13.
4
3 Apply Clear Double Sided Adhesive Tape to the top part of the cardstock, above the gift card pocket, and adhere to the cardstock with the tag shape cut at the top.
Using a Mini Ink Blending Tool to apply the ink, add Forest Moss Distress Ink to the front of the tag shape. Use a circular motion to apply the ink. Tip: Work on top of a non-stick craft mat. Start your circular motion on the mat and work toward the edge of the cardstock. This keeps the color soft and diffuse. Clean the mat after coloring is completed. Clean and dry the Blending Tool. (It will be needed again for step 7.)

14.
Decorating the Gift Card Envelope
Die cut the following from Soft Finish Cardstock using the Poinsettia and Merry Christmas dies:
• 1 large solid poinsettia• 1 decorative poinsettia overlay• 5 small solid poinsettias• 3 poinsettia centers• 1 Merry Christmas
MERRY CHRISTMAS GIFT CARD ENVELOPE
Die cut 2 Ribbons & Jewels strips from Soft Finish Cardstock backed with Clear Double Sided Adhesive Tape.
Using the Mini Ink Blending Tool apply Fired Brick Distress Ink to Poinsettia overlay and small poinsettias.
5
6
7
Click here for a video tutorial on How to Die Cut

15.
Assemble poinsettias in this order: Large poinsettia - Adhere overlay to solid poinsettia. Adhere 2 small solid poinsettias on top with petals offset. Adhere a center. Small poinsettia – Adhere 2 small solid poinsettias, with petals offset, and the center. Smallest poinsettia – Adhere a center to the remaining small solid poinsettia.
Apply 2 Ribbons & Jewels strips to front of gift card envelope. (Refer to photo of finished project for placement.) Adhere the poinsettias and Merry Christmas.
Apply a small piece of adhesive-backed hook and loop tape on the inside of the flap as a closure.
Embellish the centers of the poinsettias with Transparent/Gold Glitter Dots.
8
9
10
11
Click here for a video
tutorial on
Glitter DotsPsst...
Want to make this project at home? Check out this Buy it All and grab the supplies to make this beautiful card!
And don’t forget...get 20% off your entire order with the code: HOLIDAY15 at checkout!
www.ElizabethCraftDesigns.com

16.
Merry ChristmasStockings Card WITH JOSET VAN DE BURGT
Christmas time is probably one of my favorite times of the year and living in the mountains, we almost always have a white Christmas. I love being out in the cold to go skiing or just going for a beautiful walk. Christmas and wintertime also remind me of building a snowman when I was a kid. Who doesn’t love building snowmen?! I brought back those great memories in one of my cards. The Snowman in Frame Peel-Off is so much fun to use and in combination with the Silk Microfine Glitter you have the perfect card for the holidays. My second card is a quick one but just as much fun. If you’re just like me and wait till the last minute to create your Christmas cards, those quick ones come in handy. Hope you enjoy creating your own holiday cards this year!

17.
• Els van de Burgt Studio - Fitted Frames 3 - Curvy Rectangles - 1063
• Joset Designs- Stockings Solid - 932
• Joset Designs- Stocking Overlay Set 1 - 931
• Clear Double Sided Adhesive Tape 8.5” x 11” - 502
• Shimmer Sheetz (Gold) - SS 0212
• Silk Microfine Glitter (Cool Diamond) - 641
• Transparent/Gold Glitter Dots - 7018
• Merry Christmas Peel-Off Stickers - Black 351
• Metal Adaptor Plate - 803
• Cardstock - white, green, beige
• Patterned paper - Graphic 45
SuppliesELIZABETH CRAFT DESIGNS
Additional Supplies

18.
MERRY CHRISTMAS STOCKINGS CARD
Creating the Card Base
Create an A2 (4 ¼” x 5 ½”) side-fold card base from white cardstock.
Die cut Fitted Frames 3 - Curvy Rectangles from red patterned paper backed with Clear Double Sided Adhesive.
Remove release sheet from back of largest frame. Adhere frame to card front as shown in the picture. Save the rest of the frames and decorative pieces for other projects.
Fitted Frames 3 - Curvy Rectangles
1
3
2
Click here for a video
tutorial on
Fitted Frames

19.
Stocking Solid and Stocking Overlay Set 1 Dies
Die cut:• 2 Solid stockings from white cardstock• 2 Cuffs from white cardstock covered with Clear Double Sided Adhesive*• Cuff hangers from white cardstock covered with Clear Double Sided Adhesive*• 2 Toe pieces cut from Gold Metallic Shimmer Sheetz* • 2 Heel pieces from Gold Metallic Shimmer Sheetz* • 2 Nails from Gold Metallic Shimmer Sheetz* • 1 Stocking overlay from green cardstock • 1 Stocking overlay from beige cardstock
*Back Shimmer Sheetz and cardstock with Clear Double Sided Adhesive Tape before die cuttingDon’t forget: To die cut Shimmer Sheetz you must have a Metal Adapter Plate.
Remove the release sheet from cuffs and stocking hangers and cover exposed adhesive with Silk Microfine Glitter (Cool Diamond). Rub with fingertip to polish glitter and bring out the sparkle.
Click here for a video
tutorial on
Silk Microfine
Glitter
5
4

20.
MERRY CHRISTMAS STOCKINGS CARD
Stocking Solid and Stocking Overlay Set 1 Dies (Continued)
Assemble stockings and adhere them, along with the hanger pieces and nails, to the front of the card.
Additional Decoration
Decorate stockings with Transparent and Gold Glitter Dot Peel-Off Stickers.
Click here for a video
tutorial on
Glitter Dots
6
7

21.
Add a Merry Christmas Peel-off to the upper right corner of the card front, angled downward as shown so the words are parallel to the cuff of the stockings.
8
Psst...Want to make this project at home? Check out this Buy it All and grab the supplies to make this beautiful card!
And don’t forget...get 20% off your entire order with the code: HOLIDAY15 at checkout!
www.ElizabethCraftDesigns.com

22.
Snowman in Frame Card
WITH JOSET VAN DE BURGT
Even if you live in a warm climate where it never snows you can still enjoy making holiday cards with snowmen on them. Put on your imaginary mittens and boots so your hands and feet don’t freeze!
23.
Snowman in Frame Card
• Cardstock - White, Light Blue
• Patterned Paper - Graphic 45
• Foam Adhesive
• Copic markers (or other Alcohol markers)
• Colorless blender pen
• Els van de Burgt Studio- Fitted Frames 3 - Curvy Rectangles - 1063
• Snowman in Frame Peel-Off Sticker - Black 2583
• Merry Christmas Peel-Off Stickers - Black 351
• Clear Double Sided Adhesive Tape 8.5” x 11”- 502
• Silk Microfine Glitter - Cool Diamond - 641
• Fine Pointed Scissors - 802
SuppliesELIZABETH CRAFT DESIGNS
Additional Supplies

24.
Creating the Card Base
Create an A2 (4 ¼” x 5 ½”) top-fold (tent-fold) card base from light blue cardstock.
Fitted Frames 3 - Curvy Rectangles Die
Die cut Fitted Frames 3 - Curvy Rectangles from red patterned paper backed with Clear Double Sided Adhesive.
Remove release sheet from back of largest frame. Adhere frame to card front as shown. Save the rest of the frames and decorative pieces for other projects.
Peel-Off Stickers
Cut a piece of white cardstock big enough for all of these peel-offs: A Snowman in Frame, 1 candy cane, 3 Christmas ornaments, 1 broom and 1 holly berry with leaves.
SNOWMAN IN FRAME CARD
1
3
2
4
Click here for a video
tutorial on
Peel-Off
Stickers

25.
Remove the release sheet and place it upside down on your work table. Place the Peel-Offs upside down on the release sheet (sticky side up).
Take your white cardstock and place it with the Clear Double Sided Adhesive Tape facing down onto the stickers.6
5

26.
Take off release sheet and cover the exposed adhesive and peel-offs with Silk Microfine Glitter (Cool Diamond). Polish with your finger for maximum sparkle. Brush off the excess glitter and return it to the jar.
Peel-Off Stickers (Continued)
SNOWMAN IN FRAME CARD
8

27.
Color Peel-Offs with alcohol markers and carefully cut around each image using Fine Pointed Scissors.
Cut a piece of white cardstock big enough to fit behind the smallest frame from Fitted Frames 3 cut in step 2. Put Clear Double Sided Adhesive on top. Remove release sheet and cover exposed adhesive with Silk Microfine Glitter (Cool Diamond). Add Merry Christmas Peel-Off to the glittered cardstock and position it inside the curvy frame.
Assemble the card front. Adhere the Snowman in Frame, holly berry with leaves, framed greeting, and 2 ornaments using Foam Tape for dimension.
Decorate the inside of the card with the candy cane, remaining ornament, and broom from step 9.
10
11
12
9
Psst...Want to make this project at home? Check out this Buy it All and grab the supplies to make this beautiful card!
And don’t forget...get 20% off your entire order with the code: HOLIDAY15 at checkout!
www.ElizabethCraftDesigns.com

28.
Howdy Christmas CardWITH KAREN BURNISTON
The very best part of winter in south Texas can be summed up in two words: sweater weather! OK, yes, it’s most likely a very light sweater with jacket optional, but at least the weather is not blisteringly hot like in summer. I do get nostalgic at times for our previous home state
of Colorado, with its pretty white winters, but then I remind myself that I no longer own a snow
shovel, that here in Texas, “bundling up” really just means zipping up. My first card is a western Christmas scene like you’d find in Texas, with a Santa horse, barbed wire and cowboy boots hung on a fence like stockings.

29.
• Cardstock - Red, Kraft, White, Cream, Black, Green• Acrylic block, red, green, watermark and brown ink• WOW! Embossing Powder - Copper Pearl Regular WE04R• Small clear rhinestones, small black rhinestones, brown twine, two small brown brads• Patterned Paper - American Crafts and Authentique• Liquid glue in a fine tip bottle
• Karen Burniston Pop it Ups - Rectangle Pull Card - 974
• Karen Burniston Pop it Ups - Fence Pop Stand - 1045
• Karen Burniston Pop it Ups - Props 6 - 1098
• Karen Burniston Pop it Ups - Western Edges - 1047
• Karen Burniston Pop it Ups - Outdoor Edges - 914
• Karen Burniston Pop it Ups - Cocoa the Horse - 1044
• Karen Burniston Pop it Ups - Jolly the Mouse - 1038
• Karen Burniston Pop it Ups - Merry & Bright Clear Stamps - CS003
• Karen Burniston Pop it Ups - Homegrown Greetings Clear Stamps - CS002
• Els van de Burgt Studio - Candle - 919
• Clear Double Sided Adhesive Tape - 6 mm - 506
• Transparent/Silver Glitter Dot Peel-Offs - 7018
• Silk Microfine Glitter - 639 Warm Diamond, 624 Bluebell, 629 Soft Teal, 603 Silver
• Fine Pointed Scissors - 802
• Fine Pointed Tweezers - 801
SuppliesELIZABETH CRAFT DESIGNS
Additional Supplies

30.
HOWDY CHRISTMAS CARD
Score a 6” x 9” piece of white cardstock at 3.75” from the left edge. Add two pieces of patterned paper to the upper parts of the panels. On the left side the piece should measure 3.5” x 3.75”. On the right side the piece should measure 5” x 3.75”.
Creating the Card Base
2 Cut two pieces of a coordinating patterned paper to be the grass portion of the card. The left side piece should be 3.5” x 2.5”. The right side piece should be 5” x 2.5”. Die cut the top edge of both pieces with the grass die from the Outdoor Edges. Attach the pieces inside the card. Line up the Rectangle Pull Card die with the fold of the card and die cut.piece should measure 5” x 3.75”.
1

31.
HOWDY CHRISTMAS CARD
Fold the card according to the package instructions. Use the decorator rectangle die to die cut another piece of patterned paper/grass mix for the front of the card.
Card Decoration
Add the decorator rectangle to the front of the card as shown.
Die cut a Cocoa the Horse shadow layer from kraft cardstock. Die cut a Cocoa the Horse detail layer from black cardstock with Double-Sided Adhesive on the back. Carefully line up the shadow layer die over the die cut detail layer and die cut again, creating a thin outline with details for the horse. Use the fine pointed scissors to remove the black circle for the eye.
Click here for a video tutorial on the assembly of Character Dies
5
3
4

32.
Carefully remove the liner on the thin black detail outline and add it to the shadow layer of the horse.
Card Decoration (Continued)
Die cut Cocoa’s nose area, mane and tail from cream cardstock. Die cut the Props 6 bandana and cowboy hat from red cardstock. Die cut the cowboy hat again from white cardstock and trim out the bottom portion to glue to the red hat. Die cut the hooves from black cardstock. Add all pieces as shown to create the horse, using flat-black rhinestones for the eyes and a foam dot under the bandana for dimension.
Die cut a barbed wire from black cardstock, pounce with watermark ink and emboss with Copper embossing powder. Add it to the front of the card. Embellish with two green die cut evergreen sprigs from the Candle die.
6
7
8
HOWDY CHRISTMAS CARD

33.
For the interior decoration, die cut and assemble two Fences from white cardstock. (Click here for a video tutorial on assembling the Fence Pop Stand die: https://www.youtube.com/watch?v=h_RDDTWXkq4 ) Die cut two boots from the Props 6 die and assemble four candy canes from the Jolly the Mouse die set. Add twine hangers to the boots and hang from the fence using small brown brads after adding the straight parts of the candy canes to the boots. Add the fence pieces inside the card and embellish with more evergreen sprigs. Add the Spinner die from the Rectangle Pull card inside the card as shown in the photo. (Click here for a video tutorial on the Rectangle Pull Card (slide to 6:45): https://www.youtube.com/watch?v=SdvpKkG4WwM )
Embellish the ends of the evergreen sprigs with die cut berries from the Candle set. Stamp the “Howdy!” from the Homegrown Greetings Clear Stamp set in red ink and then the “Christmas” from the Merry & Bright Clear Stamp set in green ink on a piece of white cardstock. Cut out the greeting with the Candle die. Embellish with a red poinsettia from the Candle die embellished with clear rhinestones. Add the label to the left side of the Spinner.
Click here for a video
tutorial on
assembling the
Fence Pop-Stand
Click here for a video tutorial on the Rectangle Pull Card
9
10
HOWDY CHRISTMAS CARD
Psst...Want to make this project at home? Check out this Buy it All and grab the supplies to make this beautiful card!
And don’t forget...get 20% off your entire order with the code: HOLIDAY15 at checkout!
www.ElizabethCraftDesigns.com

34.
Holiday House Rectangle Acordion CardWITH KAREN BURNISTON
Having made the move from Colorado to Texas, my white Christmases are made of paper now. I love that by using dies I can always choose my colors, textures, patterns and themes. My second card is a snowy scene like you’d find in Colorado, with a pretty red house all decked out for Christmas and nestled among the winter trees. Both of my cards use rectangle dies - the Rectangle Accordion and the Rectangle Pull Card. A feature of these two dies is that they share sizing in the main rectangle, meaning that the decorator dies can swap between the two sets - Colorado Christmas to a Texas hoedown holiday.

35.
• Cardstock - Red, Brown, White, Light Blue• Acrylic block, black and brown ink• Light gray marker• White paint marker• Liquid glue in a fine tip bottle• Clear embossing powder and heat tool
• Karen Burniston Pop it Ups - Rectangle Accordion - 972
• Karen Burniston Pop it Ups - Flourish Gift Frame - 1096
• Karen Burniston Pop it Ups - Holiday House - 918
• Karen Burniston Pop it Ups - All Seasons Tree - 781
• Karen Burniston Pop it Ups - Beach Edges - 981
• Karen Burniston Pop it Ups - Merry & Bright Clear Stamps - CS003
• Clear Double Sided Adhesive Tape - 6 mm - 506, 6x6 - 503
• Transparent/Silver Glitter Dot Peel-Offs - 7018
• Silk Microfine Glitter - 639 Warm Diamond, 624 Bluebell, 629 Soft Teal, 603 Silver
• Fine Pointed Scissors - 802
• Fine Pointed Tweezers - 801
SuppliesELIZABETH CRAFT DESIGNS
Additional Supplies

36.
Die cut three Rectangle Accordion pages from light blue cardstock and use 6mm Double Sided Adhesive Tape to join them together using the long side tabs.
Creating the Card Base with Rectangle Accordion
Die cut four Flourish Frames from the same light blue cardstock. (Hint: run intricate dies through the machine at an angle to get the best pressure) Use the largest snowflake stamp on the Merry & Bright Clear Stamps set to stamp brown snowflakes randomly on all the frames.
3 Use a fine glue around the outer portion of the frames to add them to the Accordion pages. The inside edge of the frames will overhang into the opening slightly. Use Fine Pointed Scissors to snip away a bit of the frame around the pivot points on each page so they can pivot freely without hitting the frames.
1
2
HOLIDAY HOUSE RECTANGLE ACCORDION CARD

37.
Die cut white cardstock with the hills edge from the Beach Edges die. Use the largest decorator die that comes included with the Flourish Gift Frame to cut the edges to fit the pages. Also cut several All Seasons Trees from white cardstock and use the stencil feature with a light gray marker to add the detailing to the trunks. Trim off some branches to make the trees look taller and more like birch trees. Add the forest to pages 1 and 3 and snow banks to all three pages. Use glitter dots in the frames and sky as desired.
Card Decoration
Die cut all the pieces for the Holiday House from red, brown, white w/tape and light blue cardstock and assemble. Use Warm Diamond Silk Microfine Glitter on the white roofline pieces and window backers. Use Silver glitter on the wreath. For the light strands, carefully peel up and snip away the liner on every other light and dip into Soft Teal glitter. Next, carefully peel up and snip away the liner on the remaining lights and dip into Bluebell glitter. Finally, peel up the remaining liner and dip into Silver glitter.
5
4
HOLIDAY HOUSE RECTANGLE ACCORDION CARD

38.
Card Decoration(Continued)
Add the finished Holiday House to the center page and add the light strands to the house and the two sets of trees.
Stamp Merry Christmas on brown cardstock in black ink and emboss with clear powder. Use a white paint pen to add snow to the word Christmas and then trim around the word into a fishtail banner shape. Add a small red heart from the door piece of the Holiday House. Assemble the album by using the small tabs between the pages to connect the rectangles, alternating the folds opposite to the large pages.
6
7
Click here for a video
tutorial on
the Holiday
House Assembly
Click here for a video tutorial on Rectangle Accordion Assembly
HOLIDAY HOUSE RECTANGLE ACCORDION CARD

39.
Close the album and add the final Flourish Gift Frame to the front of the album. Embellish with glitter dots. Add another white snow bank at the bottom of the rectangle
8
HOLIDAY HOUSE RECTANGLE ACCORDION CARD
Psst...Want to make this project at home? Check out this Buy it All and grab the supplies to make this beautiful card!
And don’t forget...get 20% off your entire order with the code: HOLIDAY15 at checkout!
www.ElizabethCraftDesigns.com

40.
Merry ChristmasPoinsettia CardWITH SUSAN TIERNEY-COCKBURN
I fell in love with poinsettias when we moved to California in 1980. I looked forward to perusing the acres of greenhouses full of color with this plant to decorate our home. Since we were not used to sunny, warm holidays poinsettias were the answer to take away the homesickness and, for me, they always say “Merry Christmas.”
This card looks elegant with its gold accessories, but the simplicity of this beautiful flower, whose leaves are forced into color, is the focal point. My Garden Notes techniques makes this an easy project to create memories for your holidays.

41.
• Graphic 45 Paper - Twelve Days of Christmas
• Cardstock in Ivory, Forest Green, Bright Green
• Metallic Gold Paper
• Olive Green Ribbon
• Beacon Kid’s Choice Glue
• USArtQuest Go Green Prills
• Quietfire Design- ‘Merry Christmas’ - 1056
• Susan’s Garden Club- Garden Notes - Poinsettia - 1090
• Els van de Burgt Studio- Fitted Frames 1 - Lace Rectangles - 1061
• Karen Burniston Pop it Ups- Paris Edges - 979
• Clear Double Sided Adhesive Tape 8.5” x 11”- 502
• PanPastel Kit 1 & 2
• Susan’s Garden Club - Tool Set - 808
• Susan’s Garden Club - Molding Pad - 810
• Susan’s Garden Club - Leaf Pad - 811
• Metal Adaptor Plate - 803
SuppliesELIZABETH CRAFT DESIGNS
Additional Supplies

42.
Create a 5 1/2” x 5 1/2” tent-fold card base from ivory cardstock.
Creating the Card Base with Paris Edge
Cut the Graphic 45 patterned paper 5 1/2” x 10”, crease at the 5 1/2” mark for the fold-over.
Die cut the top edge of the patterned paper with Paris Edge.
Adhere the Graphic 45 patterned paper to the ivory card base with Clear Double Sided Adhesive Tape.
Fitted Frames 1 - Lace Rectangles Die & ‘Merry Christmas’ Die
Adhere Clear Double Sided Adhesive Tape to Gold Metallic paper and die cut Lace Rectangle & 4 small corners.
Adhere Clear Double Sided Adhesive Tape to ivory cardstock and die cut ‘Merry Christmas.’
Lift the Graphic 45 patterned paper flap and adhere the rectangle to the side; adhere ‘Merry Christmas’ on top of the rectangle; adhere two corners to the front flap and two corners to the bottom of the patterned paper.
MERRY CHRISTMAS POINSETTIA CARD
4
1
2
3
7
5
6
43.
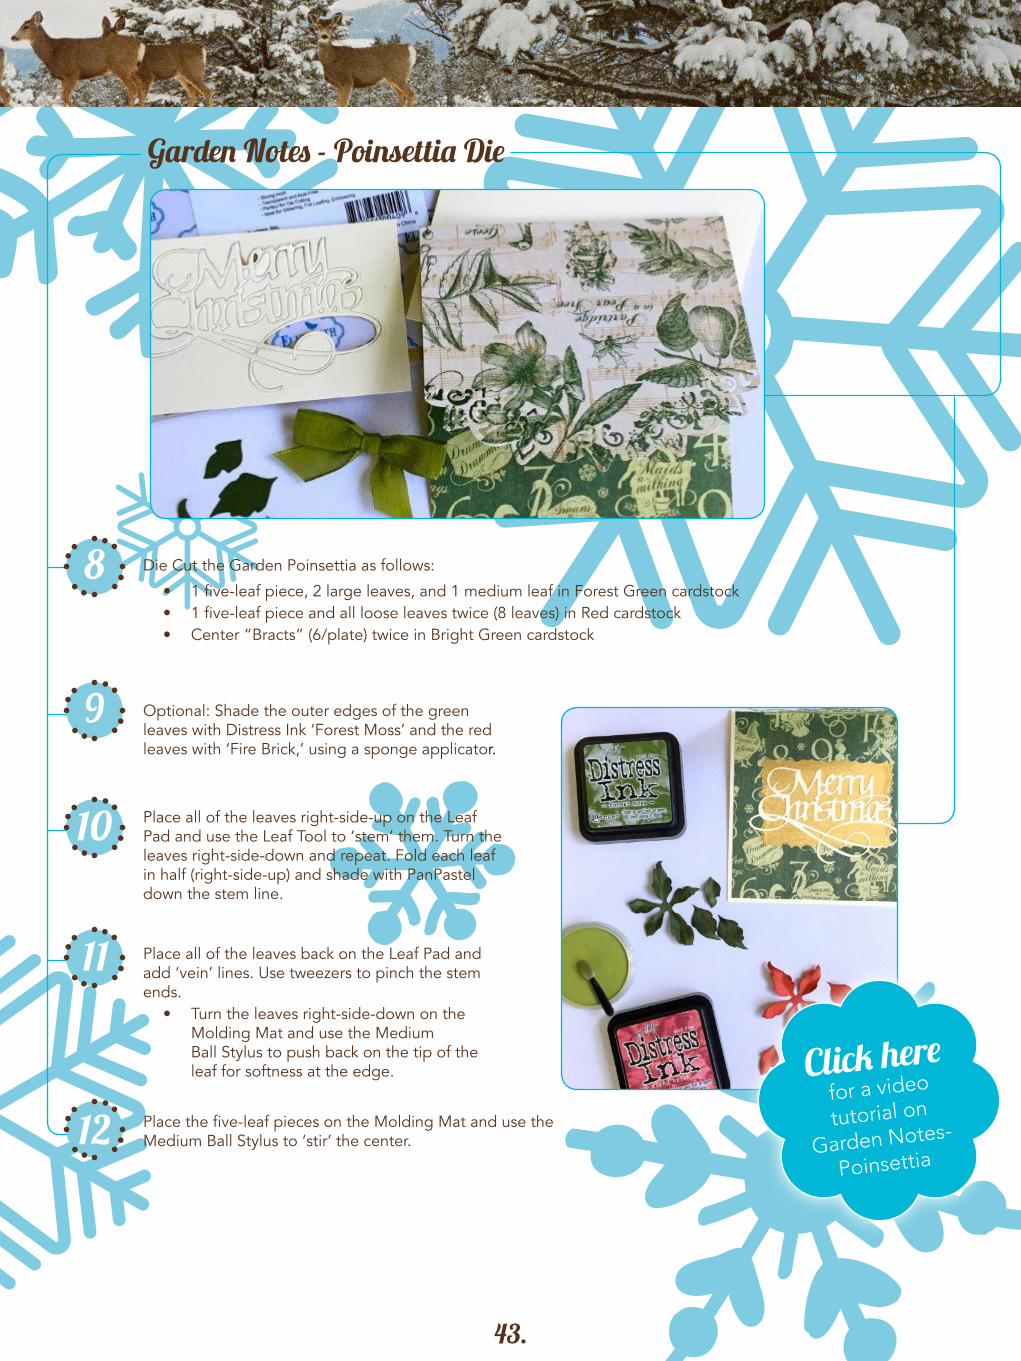
Die Cut the Garden Poinsettia as follows:
• 1 five-leaf piece, 2 large leaves, and 1 medium leaf in Forest Green cardstock• 1 five-leaf piece and all loose leaves twice (8 leaves) in Red cardstock• Center “Bracts” (6/plate) twice in Bright Green cardstock
Garden Notes - Poinsettia Die
Optional: Shade the outer edges of the green leaves with Distress Ink ‘Forest Moss’ and the red leaves with ‘Fire Brick,’ using a sponge applicator.
Place all of the leaves right-side-up on the Leaf Pad and use the Leaf Tool to ‘stem’ them. Turn the leaves right-side-down and repeat. Fold each leaf in half (right-side-up) and shade with PanPastel down the stem line.
Place all of the leaves back on the Leaf Pad and add ‘vein’ lines. Use tweezers to pinch the stem ends.
• Turn the leaves right-side-down on the Molding Mat and use the Medium Ball Stylus to push back on the tip of the leaf for softness at the edge.
Place the five-leaf pieces on the Molding Mat and use the Medium Ball Stylus to ‘stir’ the center.12
8
9
10
11
Click here for a video
tutorial on
Garden Notes-
Poinsettia

44.
Building Garden Notes - Poinsettia
Build the Poinsettia right on top of the front flap of the card. First, use a toothpick to apply a small amount of glue to the underside of the green five-leaf piece and adhere to the card as shown. Repeat with the red five-leaf piece.
Continue to build the red leaves, off-setting between the five-leaf piece.
For the center bracts - place round pieces, right-side-down, on a firm printing or carving block. Use the Small Ball Stylus (opposite end of the Leaf Tool) to cup the pieces. Hold 1-concave piece with tweezers and apply a small amount of glue to the underside with a toothpick. Adhere to the center of the flower. Next, hold 1-convex piece with tweezers and apply a small amount of glue to the edges and adhere to the concave piece just set in place. Repeat with all 12 pieces.
13
14
MERRY CHRISTMAS POINSETTIA CARD
15
Click here for a video
tutorial on
the Poinsettia
Die
45.
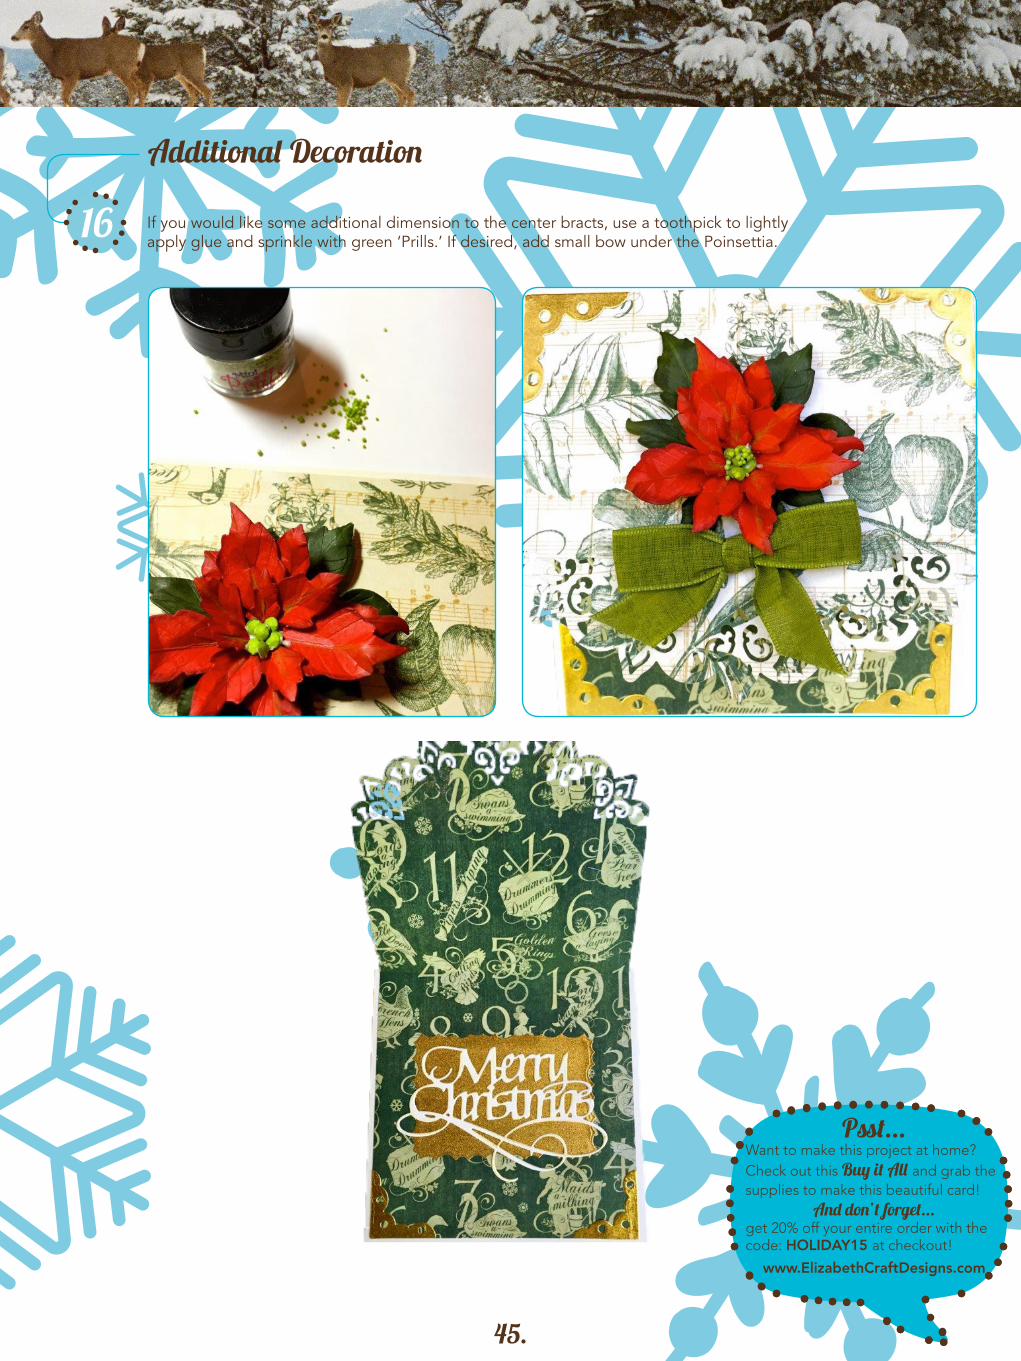
If you would like some additional dimension to the center bracts, use a toothpick to lightly apply glue and sprinkle with green ‘Prills.’ If desired, add small bow under the Poinsettia.
Additional Decoration
16
Psst...Want to make this project at home? Check out this Buy it All and grab the supplies to make this beautiful card!
And don’t forget...get 20% off your entire order with the code: HOLIDAY15 at checkout!
www.ElizabethCraftDesigns.com

46.
Carolina ChristmasWindow Scene CardWITH SUSAN TIERNEY-COCKBURN
One of our family holiday traditions, when our daughters were growing up, was to drive around neighborhoods and see all the decorations families had done on their homes. Although the
Christmas lights brought oohs and aahs from our daughters, it was the simple
decorations on unique architectural homes that caught my eye.
Stone homes are my favorite. So, when I created my CountryScapes New England
Stonewall & Gate, I immediately pictured making a background wall for my Carolina Window to go
on. I love working in miniatures (I helped my mother and grandfather to build a dollhouse in the 70s), and this project was so relaxing, as well as bringing back that precious time with my mother. An urn of poinsettias, evergreen boughs to adorn the window and wrought iron fence (done from the gate pieces), and a tiny wreath of holly on an easy to build stone home.
These pieces from CountryScapes are so versatile--mixing and matching to makes stories from memories. You can’t help but smile.

47.
Carolina ChristmasWindow Scene Card
• Beacon Kid’s Choice Glue
• Prills
• Copic Markers
• Cardstock in White, Glossy Black, Dark Green, Red
• Rosie’s Roadshow Baubles Stamp
• Susan’s Garden Club- Country Scapes - Carolina Window & Shutters - 1086
• Susan’s Garden Club- Country Scapes - New England Stonewall & Gate - 1084
• Susan’s Garden Club - Country Scapes - Backyard 4 - 1079
• Susan’s Garden Club - Country Scapes - Backyard 2 - 1010
• Susan’s Garden Club - Country Scapes - Critters 1 - 989
• Susan’s Garden Club - Garden Notes - Holiday & Holly Berries - 1088
• Els van de Burgt Studio - Tags & More 6 - Daisy - 959
• Susan’s Garden Club - Tool Kit - 808
• Susan’s Garden Club - Large Molding Pad - 810
• Susan’s Garden - Leaf Pad - 811
• Clear Double Sided Adhesive Tape - 505 & 506
• Silk Microfine Glitter (Warm Diamond) - 640
• Red/Gold Glitter Dots - 7018
• PanPastels - Kit 3 - 30117
• Fine Pointed Tweezers - 801
SuppliesELIZABETH CRAFT DESIGNS
Additional Supplies

48.
Create an A6 card (6 1/4” x 4 1/2”) and a rectangle (6” x 4 1/4”) from white cardstock.
Shade the rectangle with Neutral Gray Shade from PanPastels Kit 3.
Die cut Carolina Window & Shutters twice from white cardstock. Back one of the pieces of cardstock with Double Sided Adhesive Tape before cutting. After cutting, adhere the two layers for all three pieces (window, 2 shutters).
Carolina Window & Shutters Die
Place window shape on top of the shaded rectangle and use a pencil to mark the inside lines. This will show you where you don’t need to place the stones.
CAROLINA CHRISTMAS WINDOW SCENE CARD
Creating the Card Base
1
2
3
4

49.
Use Copic Markers or other alcohol-based markers of choice to color the window.
Die cut a 2 ¼” x 3 ½” backing for the picture that will appear behind the window using Els van de Burgt Studio Tags & More 6 Daisy die. Stamp and color a small Christmas tree. Decorate the tree with Glitter Dots Peel-offs (smallest size on the sheet). Option: Instead of a stamped tree, cut one from scrapbook paper or an old greeting card.
5
6

50.
Adhere Clear Double Sided Adhesive Tape to white cardstock and die cut the loose stones 4 times.
Shade the stone pieces with Neutral Gray Shade, Raw Umber, and Orange Shade (PanPastels Set 3).
New England Stonewall & Gate Die
7
8
CAROLINA CHRISTMAS WINDOW SCENE CARD
Click here for a video
tutorial on the
New England
Stonewall &
Gate Die

51.
Start building the wall. Place the stones about 1/8” from the top of the gray rectangle. For the second row and all subsequent rows offset the stones. Continue this pattern, avoiding the window area, until the rectangle is filled.
Once the wall is done, adhere it to the A6 card base with Clear Double Sided Adhesive Tape (6 mm). Adhere Clear Double Sided Adhesive Tape to glossy black cardstock and die cut 1 urn from Backyard 2. Next, adhere Carolina Window & Shutters, the wrought-iron gate, and urn to the card.
Add Clear Double Sided Adhesive to white cardstock. Remove the release paper and cover the exposed adhesive with Silk Microfine Glitter (Warm Diamond). Rub with a fingertip to polish the Glitter and bring out the sparkle. Die cut the snow mounds from the glittered cardstock and adhere a small mound to the windowsill.
10
11
12

52.
Holiday Decoration
Trim the window and fences with pine boughs and bows. Next, create a holiday holly wreath in the following steps.
Wreath & Bow from Backyard 2:Adhere Clear Double Sided Adhesive Tape to dark green cardstock and red cardstock. Die cut 1 wreath from the dark green cardstock; 1 bow from the red cardstock.
Boughs, Mini Poinsettias, & Loose Leaves from Backyard 4:Die cut boughs 4 times from dark green cardstock, loose leaves 4 times from dark green cardstock, and mini poinsettias 4 times from red cardstock.
13
14
CAROLINA CHRISTMAS WINDOW SCENE CARD
Click here for a video
tutorial on
the Backyard 4
die set

53.
Die cut the miniature leaves and berries from the Garden Notes Holiday Holly & Berries die. Holly is formed on the Leaf Pad. Draw a line down the center of the holly using the Leaf Tool. Use Elizabeth Craft Designs’ Fine Pointed Tweezers to pinch the leaf, then lightly dip the end into the glue and place it on the wreath form. Fill the wreath.
Use a toothpick to apply a small amount of glue to the berries and place a cluster of three around the wreath. Use a toothpick to apply the bow as well. Embellish the boughs with Glitter Dot Peel-Off Stickers.
15
16
Click here for a video
tutorial on
the Holiday Holly
& Berries Die

54.
Apply a small amount of glue and set in place on top of the urn from Country Scapes Backyard 2 - starting with the green leaves, then, red leaves, and finally the individual leaves are placed.
Poinsettias are formed by placing them on the Leaf Pad. Draw a line down the center of each petal using the Leaf Tool. Then, place the petal on the molding pad - cup the flower using the Smallest Ball Stylus (opposite end of the Leaf Tool).
Holiday Decoration (Continued)
17
18
CAROLINA CHRISTMAS WINDOW SCENE CARD

55.
Add a few Prills to finish the center.
Adhere Clear Double Sided Adhesive Tape on white cardstock. Cut 1 cardinal from CountryScapes Critters 1 die set out of white cardstock and color with copic markers.
19
20
Psst...Want to make this project at home? Check out this this Buy it All and grab the supplies to make this beautiful card!
And don’t forget...get 20% off your entire order with the code: HOLIDAY15 at checkout!
www.ElizabethCraftDesigns.com

56.
Special Hello Holiday CardWITH SUZANNE CANNON
Make your Hello stand out from the crowd!
For this project, I wanted to make something that was versatile and could be used any time of year, not just for Christmas and during the holiday season. A special Hello greeting works any time for friends or family. For this design, all sorts of embellishments may be substituted for the snowflake. By changing the colour palette the card will be perfect for lots of occasions. Try using pastels for a spring theme, with a flower in place of the snowflake or some tiny CountryScapes animals to say Hello to a child. I chose several shades of red and picked gold cardstock for the special Hello that stands out from the crowd of Hellos. I love dimension in a project and use it any chance I get, adding extra layers! By overlapping the Hello die cuts, a crowd is created. By adding a golden Hello if shows how much you care for the recipient.

57.
• White, Red, & Burgundy Cardstock
• Gold foiled Cardstock
• Adhesive Tabs
• Quietfire Design - ‘Hello’ - 1055
• Els van de Burgt Studio - Snowflakes Die - 757
• Clear Double Sided Adhesive Tape 6mm - 506
• Clear Double Sided Adhesive Tape 8.5” x 11”- 502
• Silk Microfine Glitter (Warm Diamond) - 640
• Metal Adaptor Plate - 803
• Fine Pointed Tweezers - 801
• Fine Pointed Scissors - 802
SuppliesELIZABETH CRAFT DESIGNS
Additional Supplies

58.
1 Create a 5” x 7” side-fold card base.
2 Cut 2 coordinating panels, one measuring 4 ¼” x 6” and one measuring 4 ½” x 6 ¼”. Adhere panels together with Clear Double Sided Adhesive Tape.
Adhere joined panels to card base with Adhesive Tabs for dimension.
Adhere Clear Double Sided Adhesive Tape to the lightest of three shades of coordinating cardstock. Die cut ‘Hello’ from this tape-backed piece.
Die cut ‘Hello’ two more times from middle value and darker value cardstock in the same color family as the cardstock used in step 4. Also cut ‘Hello’ from gold metallic cardstock.
‘Hello’ Die
Creating the Card Base
SPECIAL HELLO HOLIDAY CARD
Click here for a video
tutorial on
Quietfire
Design Dies
3
5
4

59.
Adhere Clear Double Sided Adhesive Tape to white cardstock and die cut the smallest snowflake from the white cardstock.
Snowflake Die
7 Remove the release paper from the snowflake and cover exposed adhesive with Silk Microfine Glitter (Warm Diamond). Rub finger over the glittered surface to polish it and bring out the sparkle.
Remove the release paper from tape-backed ‘Hello’ and place the word at the top of the card.
Assembling the Card
Using foam tabs for dimension, overlap and adhere the second and third ‘Hello’ as shown.
Slide one loop of the snowflake over the flourish of the gold ‘Hello’ and attach both to the card with Adhesive Tabs.
6
Click here for a video
tutorial on
Silk Microfine
Glitter
10
8
9
Psst...Want to make this project at home? Check out this Buy it All and grab the supplies to make this beautiful card!
And don’t forget...get 20% off your entire order with the code: HOLIDAY15 at checkout!
www.ElizabethCraftDesigns.com

60.
Tangled Season’s Greetings CardBY SUZANNE CANNON
The string for the Christmas ornament has become tangled!
Add some additional interest to your card by tangling and wrapping cord around our Season’s Greetings die cut. You’re adding extra flourishes! And it never hurts to add more gold.
For this design, I wanted something rich and elegant so I chose colours of burgundy and green with lots of gold
highlights. Finding patterned paper in this style is not always easy, so for
this card I dug deep into my treasured archives. I love my layered and textured
cards, as each layer adds importance to the next by framing it. Layering also allows lots of
opportunity for color coordination.
Finally, glitz up the holiday season by attaching a glittered ornament and snowflake to an already elegant card.
61.
• White Cardstock
• Red Cardstock
• Bo Bunny Noel Collection Pack
• Gold Foiled Cardstock
• Gold Cord
• Tacky Glue
• Foam Tabs
• Quietfire Design - ‘Season’s Greetings’ - 1057
• Els van de Burgt Studio - Snowflakes Die - 757
• Els van de Burgt Studio - Ornament Set 3 Die - 927
• Clear Double Sided Adhesive Tape 6mm - 506
• Clear Double Sided Adhesive Tape 8.5” x 11” - 502
• Silk Microfine Glitter (Warm Diamond) - 640
• Silk Microfine Glitter (Solar Gold) - 638
• Metal Adaptor Plate - 803
• Fine Pointed Tweezers - 801
• Fine Pointed Scissors - 802
SuppliesELIZABETH CRAFT DESIGNS
Additional Supplies

62.
TANGLED ‘SEASON’S GREETINGS’ CARD
Create a 7 1/2” x 6” tent-fold card base from red cardstock.
Cut a dark green 6 ½” x 5” panel from patterned paper and cut a mat 1/8” larger all around from gold cardstock. Adhere panels together with Clear Double Sided Adhesive Tape.
Adhere joined panels to card base with Adhesive Foam Tabs
Cut a light green 5 3/4” x 3 3/4” panel and cut a mat 1/8” all around from gold. Adhere panels together with Clear Double Sided Adhesive Tape.
Layer the joined panels to the previous panels with Adhesive Foam Tabs.5
‘Season’s Greetings’ Die
Die cut ‘Season’s Greetings’ from red cardstock.
Creating the Card Base
1
2
3
4
6
Click here for a video
tutorial on
Quietfire
Design Dies

63.
Ornament Die & Snowflake Die
Adhere Clear Double Sided Adhesive Tape to white cardstock and die cut the ornament from the cardstock.
Remove the release paper from the ornament and cover exposed adhesive with Silk Microfine Glitter (Warm Diamond). Rub finger over the glittered surface to polish it and bring out the sparkle.
Adhere Clear Double Sided Adhesive Tape to white cardstock and die cut the smallest snowflake from the white cardstock.
Remove the release paper from the snowflake and cover exposed adhesive with Silk Microfine Glitter (Solar Gold). Rub finger over the glittered surface to polish it and bring out the sparkle
Die cut a second plain ornament and an ornament hanger from gold metallic cardstock.
Click here for a video
tutorial on
Silk Microfine
Glitter
11
7
8
9
10

64.
Assembling the Card
Thread the gold cord through the flourishes of ‘Season’s Greetings’ so the ends are at the bottom center of the die cut. Leave extra cord so you can adjust it, if needed
Attach ‘Season’s Greetings’ to the layered panels with Foam Tabs.
Thread the ends of the cord through the Thread one cut end of the cord through the ornament hanger from front to back. Arrange the cord around the flourishes, ending with the second cut end also threaded through the ornament hanger from front to back. Tape cut ends to the spot where the ornament will cover them.
Attach the snowflake to the ornament with Adhesive Foam Tabs. Use Fine Pointed Scissors and Fine Pointed Tweezers to cut and handle the small pieces of Adhesive Foam Tab. Attach the hanger to the top of the glittered ornament and the gold ornament behind so it is just peeking out from behind as shown in the photo.
12
13
14
15
TANGLED ‘SEASON’S GREETINGS’ CARD

65.
Attach the ornament to the panel with Foam Tabs.
Optional: Use a toothpick or corsage pin to apply tiny dabs of Tacky Glue in a few spots to hold the gold cord in place.
16
17
Psst...Want to make this project at home? Check out this Buy it All and grab the supplies to make this beautiful card!
And don’t forget...get 20% off your entire order with the code: HOLIDAY15 at checkout!
www.ElizabethCraftDesigns.com

66.
Holiday HedgehogTag CardWITH BIANCA PETROSCHI
Winter has always been an inspiring time for me, bringing me back to my childhood and of course back the to the beautiful moments spent with family during the holidays.
One of my favorite memories of the holidays was when my son was little and my husband and I would sneak in as Santa to bring the presents to the tree, inventing all types of things to distract his attention. It is with this memory and the magic of the holiday season that inspired the creation of the Holiday Hedgehog Tag Card.

67.
Holiday HedgehogTag Card
• Vellum
• Tim Holtz Distress Markers
• Water Brush
• Ranger Archival Permanent Black Ink Pad
• Memento Tangelo Ink Pad
• Synthetic Fiber Ribbons
• Paper Glue
• Sponge Dauber
• Tim Holtz Dried Marigold Distress Ink Pad
• Tim Holtz Distresser Tool
• White Pearl Countour Liner
• Els van de Burgt Studio - Tags & More 9 Sparkle die set - 1077
• Sprig Embossing Folder - E127
• Silk Microfine Glitter (White) - 604
• Karen Burniston Pop it Ups - Oval Flourish Frame Edges - 777
• Clear Double Sided Adhesive Sheet - 6” x 6” - 503
• Els van de Burgt Studio - Tags - 763
• Petroschi Designs by Bianca - Hedgehog Daisy Christmas - CS005
• Susan’s Garden Club - Garden Notes - Whitepine Boughs & Pinecone- 1091
SuppliesELIZABETH CRAFT DESIGNS
Additional Supplies

68.
Creating Tags & More 9 - Sparkle Die
Die cut a 4 ¼” x 11” tag base from pale mint green cardstock, using the basic shape from the Tags & More 9 Sparkle die set.
Use a sponge dauber and Memento ink to distress the edges and decorative areas of the tag.
Stamp the tag with snowflakes from the Hedgehog Daisy Christmas clear stamps set using Momento Tangelo ink pad.
Addtional Tag Decoration
Emboss a 5 7/8” x 4 1/8” piece of vellum with the Sprig embossing folder.
Adhere Clear Double Sided Adhesive Sheet on both sides of a piece of white cardstock (150 GSM recommended weight). Die cut with Oval Flourish Frame Edges. Use Fine Pointed Tweezers to poke out the waste pieces. Peel off the release sheet from one side of the four edges and cover exposed adhesive with Silk Microfine Glitter (White). Rub with fingertip to polish the Glitter and bring out the sparkle.
Die cut the decorative openings in the top of the tag using the overlay die as shown.
Click here for a video
tutorial on
Silk Microfine
Glitter
HOLIDAY HEDGEHOG TAG CARD
3
1
2
4
5
6
Click here for a video
tutorial on
Tags & More 9 -
Sparkle Die

69.
Use a White Pearl Contour Liner to trace some of the stamped snowflakes, adding dimension. Set tag aside until dry.
Adhere Clear Double Sided Adhesive Tape to the back of the embossed vellum and place onto the tag. Remove the release sheet from the Oval Flourish Frame edges and stick them onto the vellum so that they form a frame.
7
8

70.
Small Tag Die
Die cut white cardstock using the biggest tag from Tags die set.
Using Ranger Archival Permanent Black ink pad stamp Daisy on the Lantern onto the white tag
Have fun coloring the tag using markers, colored pencils or watercolors. Use a sponge dabber and the Tim Holtz Dried Marigold ink Pad combined with Momento Tangelo ink pad as well as the Tim Holtz Disresser Tool to distress the edges of the tag.
12 Tie a raffia bow to top of tag. Attach the tag, centered within the Oval Flourishes Frame using Foam Tabs to add dimension
10
9
11
HOLIDAY HEDGEHOG TAG CARD

71.
Whitepine Boughs & Pinecone Die
Cut and shape Whitepine Boughs & Pine. Attach the boughs under the bow - 3 on each side. Glue the Pinecone in the middle.
Click here for a video
tutorial on
Whitepine Boughs
& Pinecone Die
13
Psst...Want to make this project at home? Check out this Buy it All and grab the supplies to make this beautiful card!
And don’t forget...get 20% off your entire order with the code: HOLIDAY15 at checkout!
www.ElizabethCraftDesigns.com

72.
Hedgehog Daisy’sHoliday WishesWITH BIANCA PETROSCHI
When my son was growing up, every time it would snow my
family and I would spend the day playing outside. My mother and I would create slopes in the yard for my son to sleigh down and we would always build a giant snowman. When reminiscing on winter memories it is these snowy days that I hold close to my heart.
These fond memories have served as the inspiration for Hedgehog Daisy’s Holiday Wishes. This is a card for that special someone! It is oversized and has a 3D window, it’s not one that can be whipped up in a few minutes but it’s well worth the time. You could even consider yourself to be that special someone: Instead of sending it, keep it as part of your holiday décor, display each year on the mantel or hang it, centered in the middle of a wreath.

73.
Supplies
ELIZABETH CRAFT DESIGNS
Additional Supplies• Plaid Cardstock 300 GSM
• Scrapbooking Paper from “The Citrus Stack Collection”
• White Paper 250-300 GSM
• 1 Sheet of Transparent Acetate
• Beacon GemTac glue (or other adhesive for non-porous surfaces
• Sequins, Beads, Rhinestones, Small Charms, Ribbon, Small Christmas Bells
• Hot Glue & Gun
• Clear Double Sided Adhesive Tape 8.5” x 11”- 502
• Clear Double Sided Adhesive Tape 6mm - 506
• Silk Microfine Glitter (White) - 604
• Silk Microfine Glitter (Teal) - 628
• Els van de Burgt Studio - Fitted Frames 3 Curvy Rectangles - 1063
• Best Wishes - 1050
• Susan’s Garden Club - Garden Notes- Whitepine Boughs & Pinecone- 1091
• Petroschi Designs by Bianca - Hedgehog Daisy All Seasons - CS007

74.
Make a 9 1/8” x 12” side fold card base from gingham check patterned paper. (Note: You will need to overlap and adhere more than one piece of gingham paper to make this oversized card. (See photo in step 6 where card is shown open and flat.)
Trim 2 strips of scrapbooking paper to 8 ¼” x 3” and 8 ¼” x ½”. Attach strips onto the card at left and right using Clear Double Sided Adhesive Tape.
‘Best Wishes’ Die
Adhere Clear Double Sided Adhesive Sheet to both sides of white cardstock. Die cut Best Wishes. Peel the release sheet from the front of the words and cover the exposed adhesive with Silk Microfine Glitter, alternating colors for each word. Rub with a fingertip to polish the Glitter and bring out the sparkle. Remove the release sheet from the back of the words and place the sentiment at the top of the card.
Adhere Clear Double Sided Adhesive Sheet to both sides of white cardstock measuring 5 ½” x 4 ½” (200 GSM). Peel off the release sheet and cover exposed adhesive with Silk Microfine Glitter (Teal & White). Rub with a fingertip to polish the Glitter and bring out the sparkle.
Creating the Card Base
HEDGEHOG DAISY’S HOLIDAY WISHES
2
1
4
3

75.
Die cut the glittered white cardstock with Fitted Frames 3 Curvy Rectangles. Die cut an Adhesive Sheet-backed piece of patterned (predominantly black) scrapbook paper with the same die. Keep the 2 largest frames (glittered and patterned) for the next step. Set aside the other pieces for later in the project.
Fitted Frames 3 - Curvy Rectangle Die Set
Position the largest patterned frame and next-to-largest glittered frame on card front. Cut out the window opening as shown.
6
5
Click here for a video
tutorial on
Fitted Frames

76.
Transparent Box
Place a piece of white cardstock inside the window opening and trace around the rectangle taking care not to get any pencil marks on the glittered frame
Next, mark around the edges to create scoring, cutting and folding lines: 2 parallel lines – one at 3/16” (4mm) and the other at ¼” (6mm). Cut out the excess at the corners and fold as shown below.
8
7
HEDGEHOG DAISY’S HOLIDAY WISHES

77.
Make the same template out of a transparent acetate sheet. Overlap the acetate sheet over the paper template and trace the lines - using a ruler and bone folder. Put Clear Double Sided Adhesive Tape (6 mm) on the margins of the transparent sheet. Place and adhere the acetate sheet on the card, from the interior.
Using Ranger Archival Permanent Black ink pad stamp Daisy with the Snowman onto white cardstock. Have fun coloring the image using watercolors, markers, and/or colored pencils. Fussy cut around the stamped image using Fine Pointed Scissors
9
10

78.
Transparent Box (Continued)
Glue Daisy with the Snowman on the outside of the transparent box.
Fill the transparent box with sequins, beads, rhinestones, etc. and while it is turned face down so the bits won’t fall out, cover the BACK of the window with a piece of glittered white cardstock that measures at least ½” beyond the window opening. (This gives Daisy and the snowman a white background, not a gingham check background.)
12
11
HEDGEHOG DAISY’S HOLIDAY WISHES

79.
Inside of the Card
Add 2 more frames from Fitted Frames 3 - Curvy Rectangles around the white paper inside of the card. Use this space for a photo or special Christmas sentiment.
White Pine Pinecone & Bough Die
Die cut the branches from green cardstock using the Whitepine Boughs & Pinecone die set.
13
14
Click here for a video tutorial on Whitepine Boughs & Pinecone Die

80.
White Pine Pinecone & Bough Die
Place the boughs beneath the clear window box. Add a bow, bells and small die cut snowflake using hot glue or Tombow Power Adhesive Tabs to hold the embellishments in place.
15
HEDGEHOG DAISY’S HOLIDAY WISHES
Click here for a video
tutorial on
Whitepine Boughs
& Pinecone Die

81.
Additional Decoration
Complete the stamped scene with some of the leftover pieces from the die cut Fitted Frames 3 Curvy Rectangles. Use the small circles as snowflakes, use the longer curved shapes as mounds of snow.
16
Psst...Want to make this project at home? Check out this Buy it All and grab the supplies to make this beautiful card!
And don’t forget...get 20% off your entire order with the code: HOLIDAY15 at checkout!
www.ElizabethCraftDesigns.com

82.
Shimmer Sheetz & Snowflake CardsWITH JUDI KAUFFMAN
I’m not one of those people who like basking on the beach. Summertime is pure torture to me. I linger in the frozen food aisle at the grocery store and hide in air conditioned spaces, grumbling about the humidity and impatiently waiting for winter! There’s nothing I like better than taking a walk through fresh snow. And watching the flakes sparkle as they fall is my idea of heaven. I get up early to shovel, reveling in the fact that my legs are still working and happy at the thought of hot chocolate with a jumbo marshmallow on top. I frequently use snowflakes as the focus of my holiday cards. They are universal, equally appropriate for Season’s Greetings, Christmas, and New Year’s wishes. I’ve even topped a 6-point Star of David with a 6-arm snowflake for a twist on a Chanukah card now and then. In nature, they are one-of-a-kind, sparkly and beautiful, just like my friends and family members, so I think they’re an apt theme. When I use snowflakes on cards for folks in Florida they can pat themselves on the back for escaping from the cold. But friends in Minnesota, Montana, Massachusetts, and other points north sense in me a kindred spirit. My card projects are very easy. (My mantra has always been Easy Isn’t Cheating!) They incorporate two things I enjoy very much: Altering Shimmer Sheetz with alcohol inks and playing with peel-offs. And how convenient that Elizabeth Craft Designs offers a snowflake embossing folder and Glitter Snowflake peel-offs in two styles. The finishing touch: Glitter Dots peel-offs to accent the snowflakes and add even more sparkle.

83.
Supplies• Shimmer Sheetz (Turquoise Gemstone) - SS 0217
• Shimmer Sheetz (Light Blue Metallic) - SS 0230
• Silver Glitter Snowflakes Peel-Off Stickers - 7055
• Transparent Glitter Snowflakes Peel-Off Stickers - 2551
• Quietfire Design- ‘Merry Christmas’ - 1056
• Metal Adaptor Plate - 803
• Clear Double Sided Adhesive Tape of choice
• Fine Pointed Tweezers - 801
• Fine Pointed Scissors - 802
ELIZABETH CRAFT DESIGNS
Additional Supplies
• Adhesive Tabs
• Alcohol Inks (shades of dark blue and teal)
• Gold Metallic Alcohol Ink
• Ink Applicator Tool
• A2 Cards (Silver and Dark Brown)
• Craft Knife
• Non-stick Scissors (to cut Adhesive Tabs)
• Fine Grit Sanding Block

84.
SHIMMER SHEETZ & SNOWFLAKE CARDS
Create an A2 (4.25” x 5.5”) side-fold card base from silver cardstock.
Cut a 4” x 5” piece of Turquoise Gemstone Shimmer Sheetz.
Alter the Shimmer Sheetz with alcohol inks in two or more shades of blue plus gold metallic. Dab on the inks with an ink applicator tool, leaving some of the Turquoise visible. Next, add droplets of inks to create pools of color, again leaving some of the original Turquoise visible.
Creating the Card Base
Shimmer Sheetz Panel
Set aside the Shimmer Sheetz to dry. It takes only a few minutes.
2
4
3
1

85.
Merry Christmas Die (Optional)
Very lightly sand a piece of Light Blue Metallic Shimmer Sheetz at an angle, and then again at the opposite angle, to tone down the shine.
Adhere Clear Double Sided Adhesive Tape to the un-sanded side of the Shimmer Sheetz.
Die cut ‘Merry Christmas’ from the sanded Light Blue Metallic Shimmer Sheetz side using the Metal Adapter Plate.
For the card with Transparent Glitter Snowflakes, attach the ink-altered Shimmer Sheetz panel to the card base with Clear Double Sided Adhesive Tape (3 mm is recommended). For the card with Silver Glitter Snowflakes, attach the ink-altered Shimmer Sheetz panel to the card base after trimming Snowflakes in step 10.
Attach ‘Merry Christmas’ with small slivers of Adhesive Tabs for extra dimension.9
Assembling the Card Front
Click here for a video tutorial
on cutting Shimmer
Sheetz with the
Metal Adaptor
Plate
7
5
6
8

86.
Add some glittery circles from the sheet of Transparent Snowflakes Peel-Off Stickers to create the effect of tiny snowflakes falling from the sky
Embellishing the Card with Glitter Peel-Off Stickers
Add Transparent or Silver Glitter Snowflakes into the Shimmer Sheetz with the help of the Fine Pointed Tweezers. Trim the Silver Glitter Snowflakes with the Fine Pointed Scissors so that they don’t extend past the Shimmer Sheetz rectangle. Allow the Transparent Glitter Snowflakes to extend past the Shimmer Sheetz to the edges of the card base.
10
11
SHIMMER SHEETZ & SNOWFLAKE CARDS

87.
Bonus
Cards! Make extra cards by placing the leftovers from the Transparent and Silver Glitter Snowflakes sheet onto unaltered Bronze Metallic or Turquoise Gemstone Shimmer Sheetz! (Shown: Bronze)
Psst...Want to make this project at home? Check out this Buy it All and grab the supplies to make this beautiful card!
And don’t forget...get 20% off your entire order with the code: HOLIDAY15 at checkout!
www.ElizabethCraftDesigns.com

88.
Shimmer Sheetz & Embossed Snowflakes CardWITH JUDI KAUFFMAN
I’m madly in love with the four ingredients in this project: Shimmer Sheetz, embossing folders, Glitter Dots peel-offs, and alcohol inks. Putting them together to create Embossed Snowflakes cards is a lot of fun. It takes some extra time to encrust each of the embossed snowflakes with Glitter Dots but the results are well worth it. Vary the ways you position the Glitter Dots and just like in nature, each of your snowflakes will be one-of-a-kind!

89.
SuppliesELIZABETH CRAFT DESIGNS
Additional Supplies
• Alcohol Inks in Shades of Dark Blue and Teal
• Gold Metallic Alcohol Ink
• Ink Applicator Tool
• Silver Cardstock
• Craft Knife
• Fine Grit Sanding Block
• Shimmer Sheetz (Turquoise Gemstone) - SS 0217
• Snowflakes Embossing Folder - E126
• Silver Glitter Snowflakes Peel-Off Stickers - 7055
• Transparent Glitter Snowflakes Peel-Off Stickers - 2551
• Transparent/Silver Glitter Dots - 7018
• Metal Adaptor Plate - 803
• Clear Double Sided Adhesive Tape of choice
• Fine Pointed Tweezers - 801

90.
Create an A2 (4.25” x 5.5”) side-fold card base from silver cardstock.
Shimmer Sheetz Panel
Cut a 4” x 5” piece of Turquoise Gemstone Shimmer Sheetz
Alter the Shimmer Sheetz with alcohol inks in two or more shades of blue plus gold metallic. Dab on the inks with an ink applicator tool, leaving some of the Turquoise visible. Next, add droplets of inks to create pools of color, again leaving some of the original Turquoise visible.
Set aside the Shimmer Sheetz to dry. It takes only a few minutes.
Emboss the ink-altered Shimmer Sheetz rectangle with the Snowflakes embossing folder, making sure that the snowflakes are raised (not de-bossed) on the altered side.
Lightly sand to reveal the silver core in the Shimmer Sheetz on the raised side.
Creating the Card Base
SHIMMER SHEETZ & EMBOSSED SNOWFLAKES CARD
1
6
2
3
4
5
Click here for a video tutorial
on Embossing
Shimmer Sheetz

91.
SHIMMER SHEETZ & EMBOSSED SNOWFLAKES CARD
Position a Silver Glitter Snowflake Peel-Off Sticker, centered, on each embossed snowflake. Trim the snowflakes with the Craft Knife so they do not extend past the Shimmer Sheetz rectangle.
Embellishing the Card with Glitter Peel-Off Stickers
9 Heavily embellish the 6 arms of each snowflake with Transparent & Silver Glitter Dots Peel-Off Stickers using the Fine Pointed Tweezers.
Attach the ink-altered, embossed Shimmer Sheetz panel to the card base with the help of the Clear Double Sided Adhesive Tape (3 mm is recommended).
Assembling the Card Front
Click here for a video tutorial on Glitter Peel-Off Stickers!
7
8
Psst...Want to make this project at home? Check out this Buy it All and grab the supplies to make this beautiful card!
And don’t forget...get 20% off your entire order with the code: HOLIDAY15 at checkout!
www.ElizabethCraftDesigns.com