email: converting cvt email account to another email … cvt email to...you may see a folder below...
TRANSCRIPT
1
Email: Converting CVT Email Account to Another Email Account
If you need any assistance with this process, please contact us:
Copper Valley Telecom – Solutions Team 329 Fairbanks Drive, Valdez, AK 99686
907.255.TECH | Tech Support 907.834.HELP |24 Hr Help Desk
Step 1: Select or create a NEW free email account Many excellent FREE options for email exist! If you already have another email account you plan to use — skip to Step 2.
If you need a new address, CVT recommends the following free email platforms: 1. Gmail.com (Google) - great if you have an Android device (you may already have one set up!). Instructions specific to Gmail
are found on page 5 under Step 4a. 2. Outlook.com, Live.com, or Hotmail.com (Microsoft) - Instructions specific to Outlook are found on page 8 under Step 4b. 3. Me.com or iCloud.com (Apple) - great if you have Apple products (you may already have one set up!) Instructions specific to
iCloud are found on page 11 under Step 4c.
Step 2: Forward your Copper Valley Telephone (CVT) Email to your new Email Account
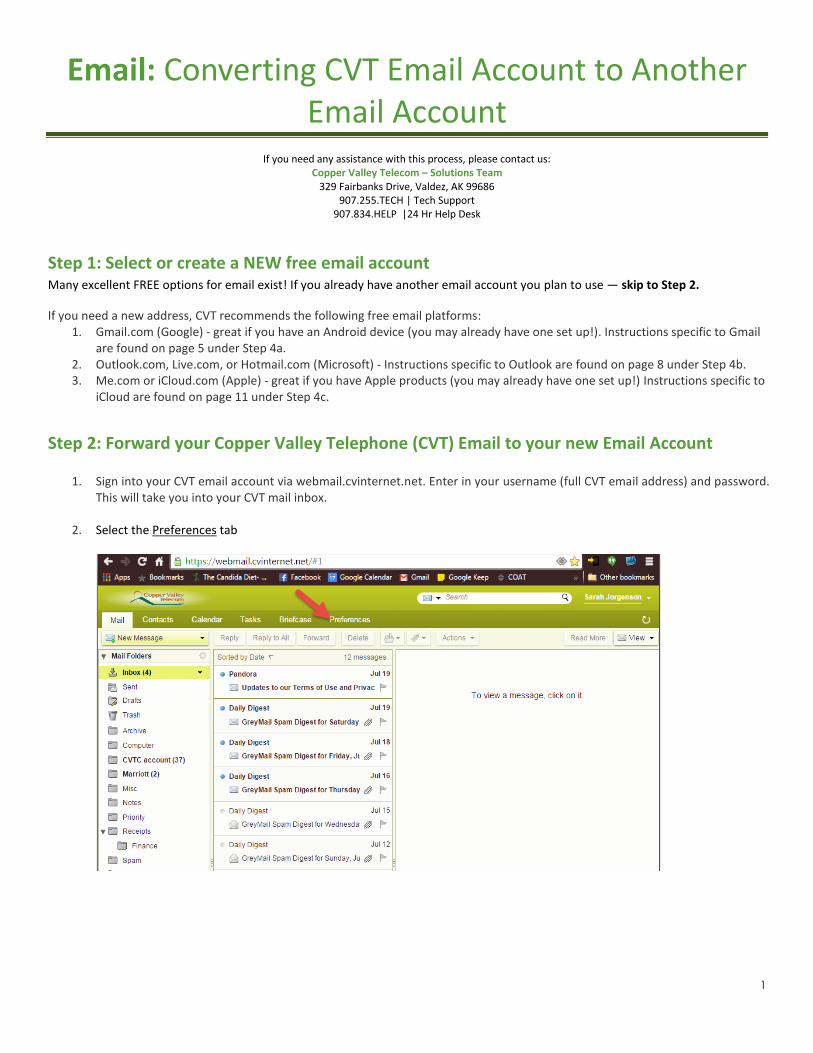
1. Sign into your CVT email account via webmail.cvinternet.net. Enter in your username (full CVT email address) and password. This will take you into your CVT mail inbox.
2. Select the Preferences tab
2
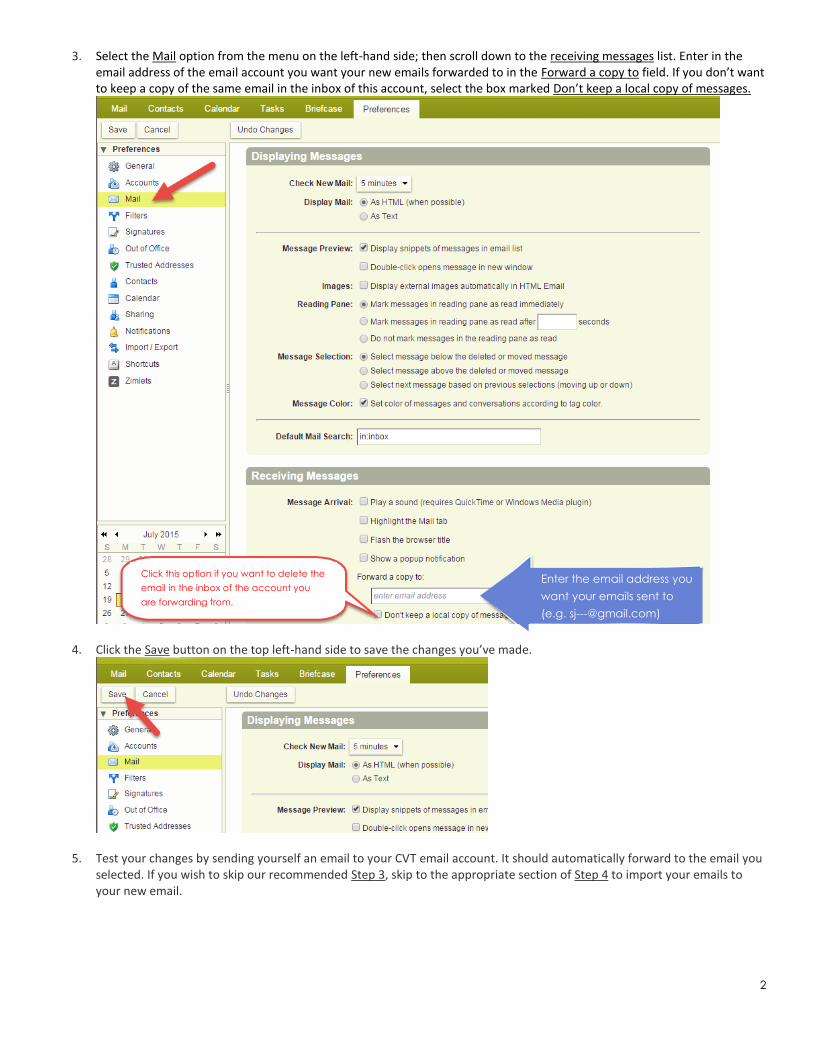
3. Select the Mail option from the menu on the left-hand side; then scroll down to the receiving messages list. Enter in the email address of the email account you want your new emails forwarded to in the Forward a copy to field. If you don’t want to keep a copy of the same email in the inbox of this account, select the box marked Don’t keep a local copy of messages.
4. Click the Save button on the top left-hand side to save the changes you’ve made.
5. Test your changes by sending yourself an email to your CVT email account. It should automatically forward to the email you selected. If you wish to skip our recommended Step 3, skip to the appropriate section of Step 4 to import your emails to your new email.
Click this option if you want to delete the
email in the inbox of the account you
are forwarding from.
Enter the email address you
want your emails sent to
(e.g. [email protected])
3
Step 3: Set up Reply-To and Auto-Reply on current CVT Email Account *optional “Reply-to” setting will ease your contacts into contacting you at or replying to you at your new address. You can also set up an auto-reply from your CVT email account that will alert all your contacts to your new email address. Set up Reply-To
1. Sign into your CVT email account by going to webmail.cvinternet.net. Enter your username (full CVT email address) and password. This will take you into your CVT email inbox.
2. Select the Preferences tab
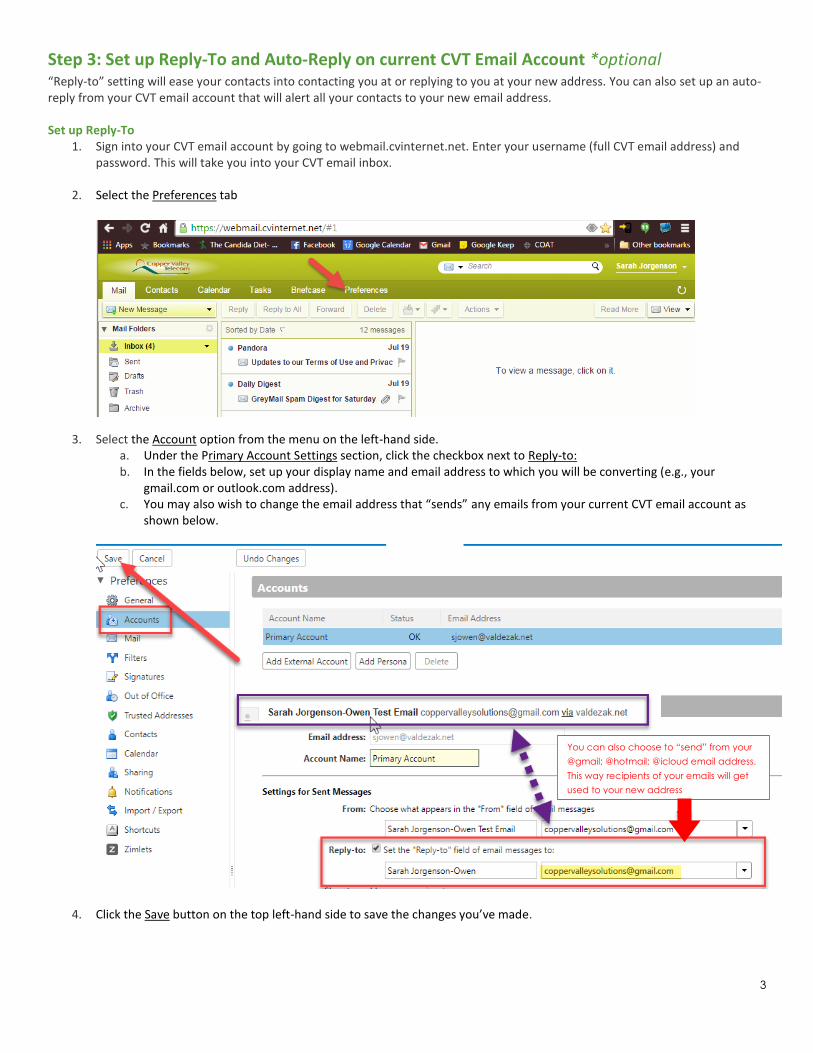
3. Select the Account option from the menu on the left-hand side. a. Under the Primary Account Settings section, click the checkbox next to Reply-to: b. In the fields below, set up your display name and email address to which you will be converting (e.g., your
gmail.com or outlook.com address). c. You may also wish to change the email address that “sends” any emails from your current CVT email account as
shown below.
4. Click the Save button on the top left-hand side to save the changes you’ve made.
You can also choose to “send” from your
@gmail; @hotmail; @icloud email address.
This way recipients of your emails will get
used to your new address
4
Set up Auto-Reply Setting an auto-reply message like the one below gives anyone who sent an email to your old CVT email account the information regarding your new email account. While this step isn’t necessary for the conversion, it could be helpful for giving all your contacts a ‘heads up’ on your new address.
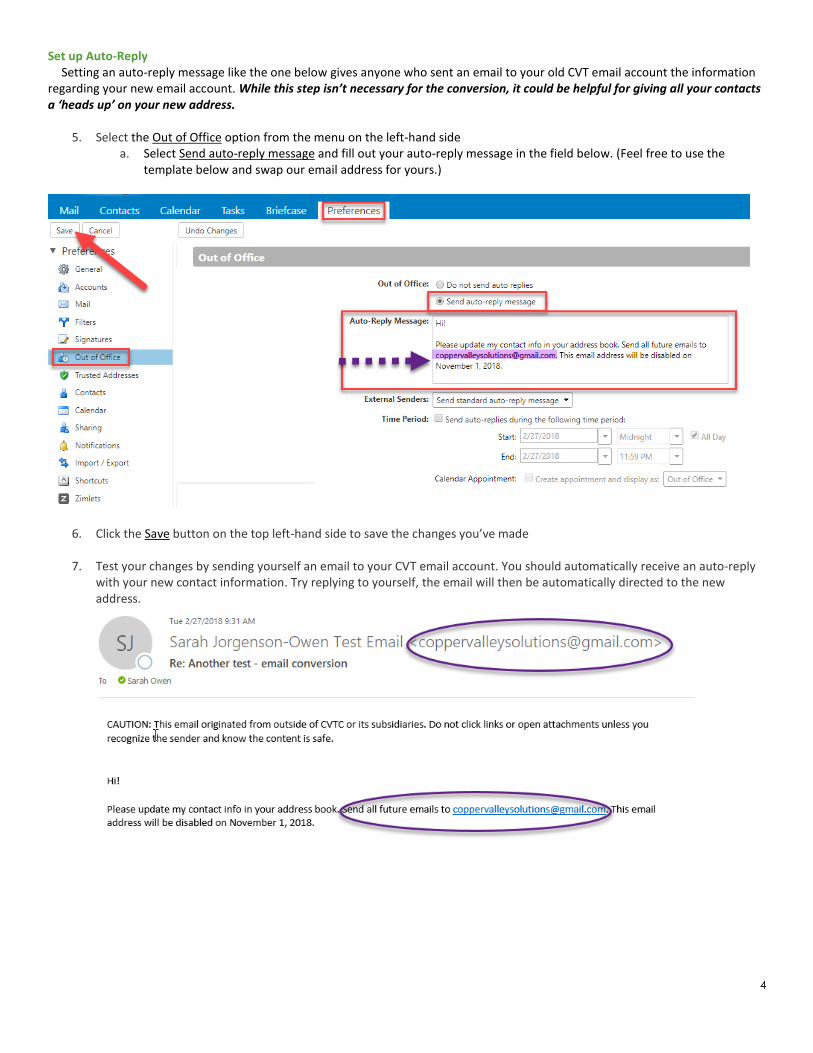
5. Select the Out of Office option from the menu on the left-hand side a. Select Send auto-reply message and fill out your auto-reply message in the field below. (Feel free to use the
template below and swap our email address for yours.)
6. Click the Save button on the top left-hand side to save the changes you’ve made
7. Test your changes by sending yourself an email to your CVT email account. You should automatically receive an auto-reply with your new contact information. Try replying to yourself, the email will then be automatically directed to the new address.
5
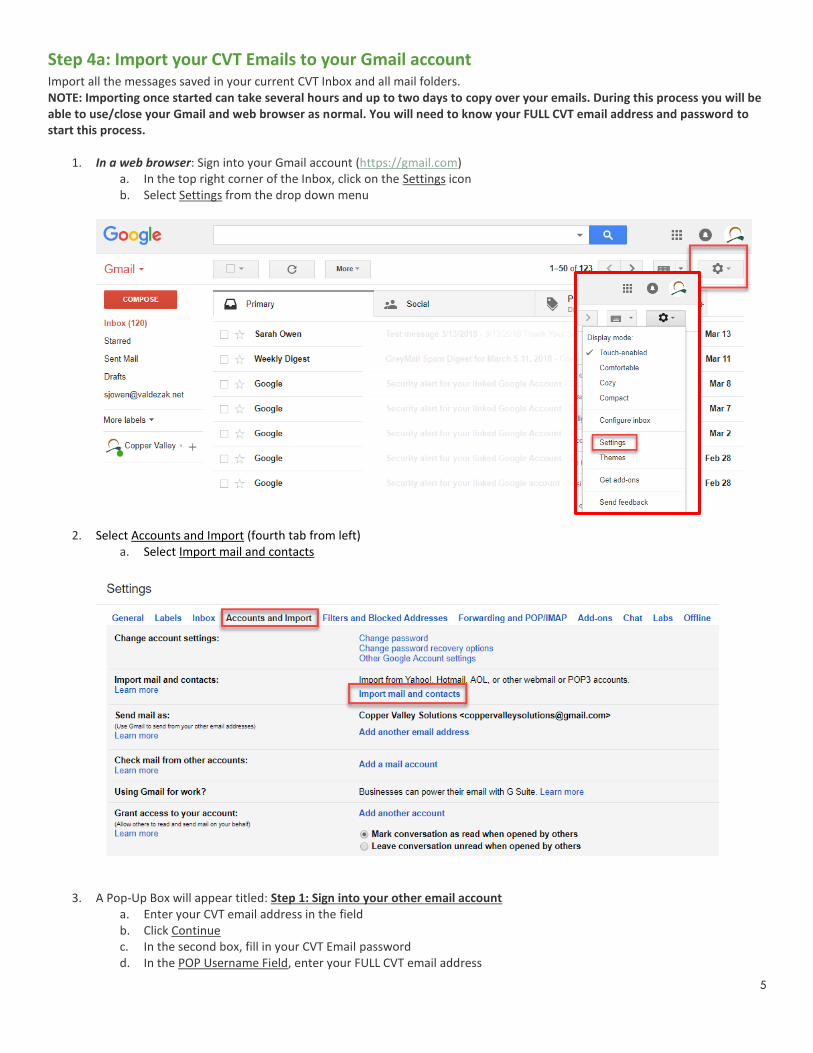
Step 4a: Import your CVT Emails to your Gmail account Import all the messages saved in your current CVT Inbox and all mail folders. NOTE: Importing once started can take several hours and up to two days to copy over your emails. During this process you will be able to use/close your Gmail and web browser as normal. You will need to know your FULL CVT email address and password to start this process.
1. In a web browser: Sign into your Gmail account (https://gmail.com) a. In the top right corner of the Inbox, click on the Settings icon b. Select Settings from the drop down menu
2. Select Accounts and Import (fourth tab from left) a. Select Import mail and contacts
3. A Pop-Up Box will appear titled: Step 1: Sign into your other email account
a. Enter your CVT email address in the field b. Click Continue c. In the second box, fill in your CVT Email password d. In the POP Username Field, enter your FULL CVT email address
6
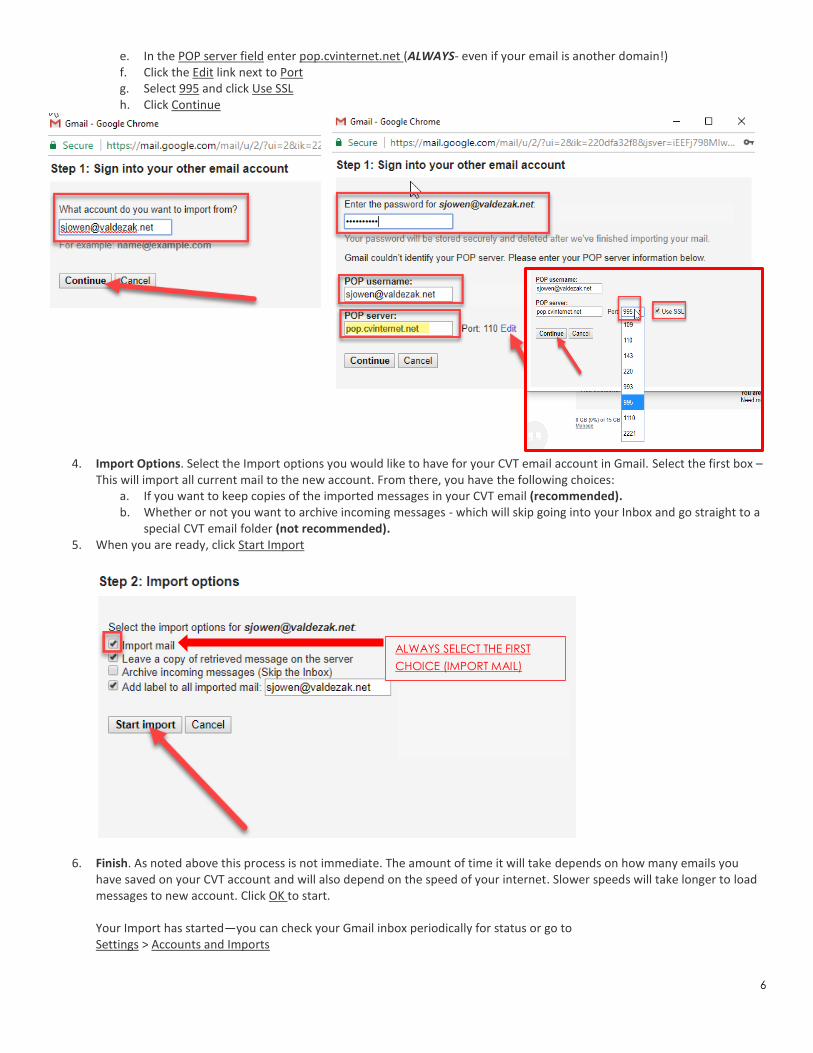
e. In the POP server field enter pop.cvinternet.net (ALWAYS- even if your email is another domain!) f. Click the Edit link next to Port g. Select 995 and click Use SSL h. Click Continue
4. Import Options. Select the Import options you would like to have for your CVT email account in Gmail. Select the first box –
This will import all current mail to the new account. From there, you have the following choices: a. If you want to keep copies of the imported messages in your CVT email (recommended). b. Whether or not you want to archive incoming messages - which will skip going into your Inbox and go straight to a
special CVT email folder (not recommended). 5. When you are ready, click Start Import
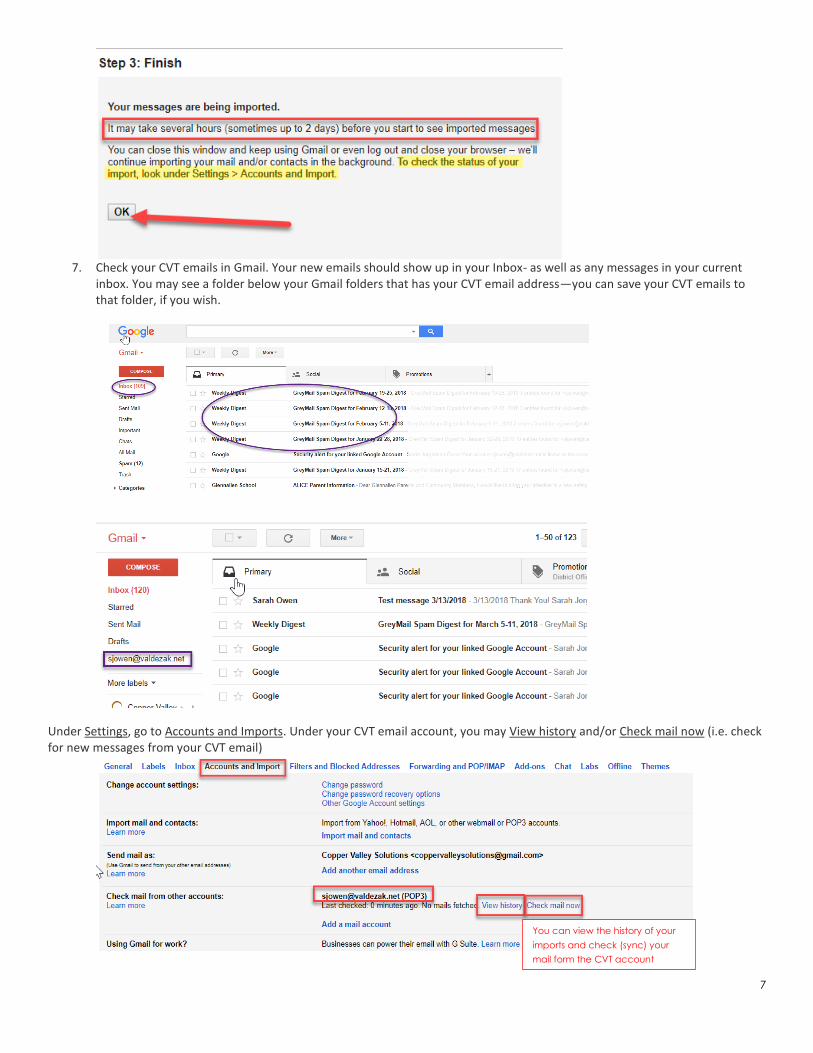
6. Finish. As noted above this process is not immediate. The amount of time it will take depends on how many emails you have saved on your CVT account and will also depend on the speed of your internet. Slower speeds will take longer to load messages to new account. Click OK to start. Your Import has started—you can check your Gmail inbox periodically for status or go to Settings > Accounts and Imports
ALWAYS SELECT THE FIRST
CHOICE (IMPORT MAIL)
7
7. Check your CVT emails in Gmail. Your new emails should show up in your Inbox- as well as any messages in your current
inbox. You may see a folder below your Gmail folders that has your CVT email address—you can save your CVT emails to that folder, if you wish.
Under Settings, go to Accounts and Imports. Under your CVT email account, you may View history and/or Check mail now (i.e. check for new messages from your CVT email)
You can view the history of your
imports and check (sync) your
mail form the CVT account
8
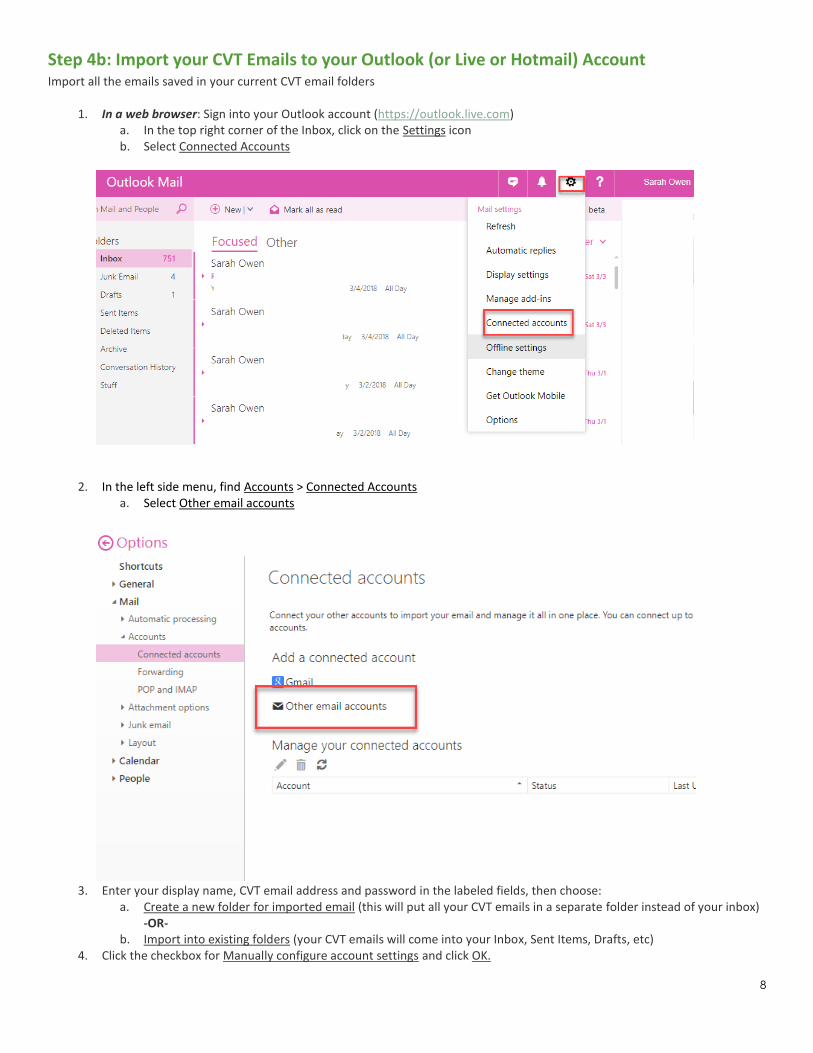
Step 4b: Import your CVT Emails to your Outlook (or Live or Hotmail) Account Import all the emails saved in your current CVT email folders
1. In a web browser: Sign into your Outlook account (https://outlook.live.com) a. In the top right corner of the Inbox, click on the Settings icon b. Select Connected Accounts
2. In the left side menu, find Accounts > Connected Accounts
a. Select Other email accounts
3. Enter your display name, CVT email address and password in the labeled fields, then choose:
a. Create a new folder for imported email (this will put all your CVT emails in a separate folder instead of your inbox) -OR-
b. Import into existing folders (your CVT emails will come into your Inbox, Sent Items, Drafts, etc) 4. Click the checkbox for Manually configure account settings and click OK.
9
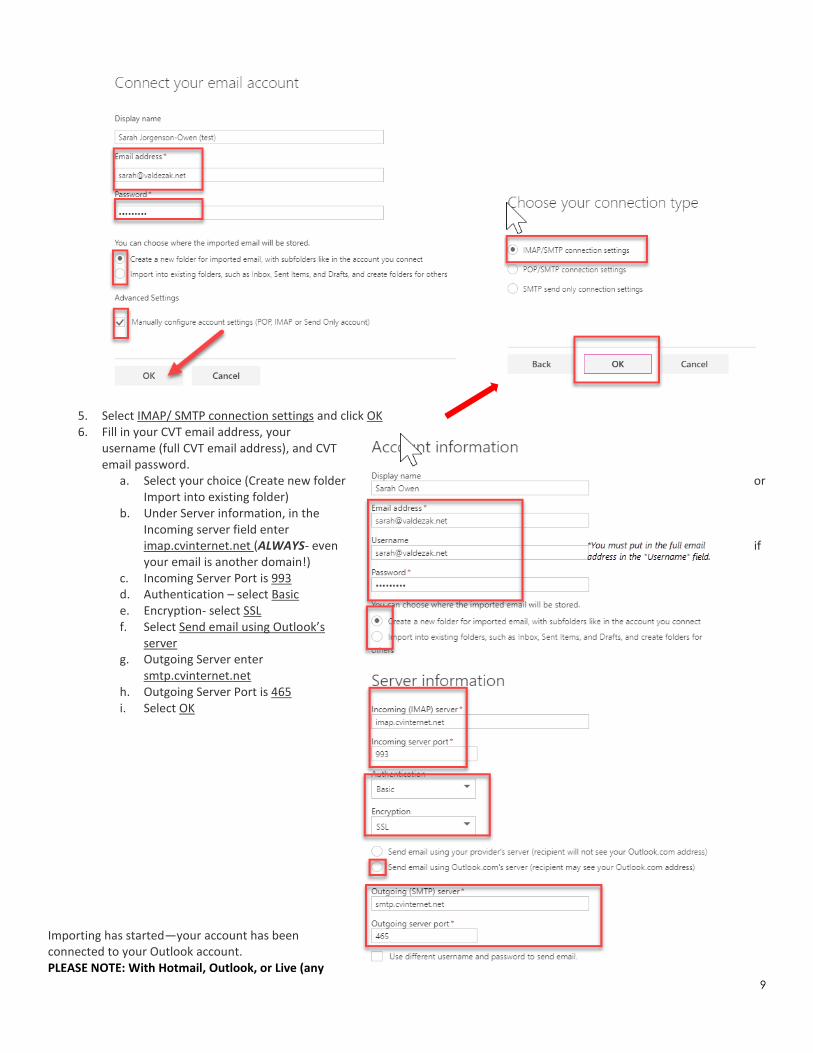
5. Select IMAP/ SMTP connection settings and click OK 6. Fill in your CVT email address, your
username (full CVT email address), and CVT email password.
a. Select your choice (Create new folder or Import into existing folder)
b. Under Server information, in the Incoming server field enter imap.cvinternet.net (ALWAYS- even if your email is another domain!)
c. Incoming Server Port is 993 d. Authentication – select Basic e. Encryption- select SSL f. Select Send email using Outlook’s
server g. Outgoing Server enter
smtp.cvinternet.net h. Outgoing Server Port is 465 i. Select OK
Importing has started—your account has been connected to your Outlook account. PLEASE NOTE: With Hotmail, Outlook, or Live (any
10
Microsoft account) email, you may experience a 5-10 minute delay in receiving or sending emails to and from your CVT Email account.
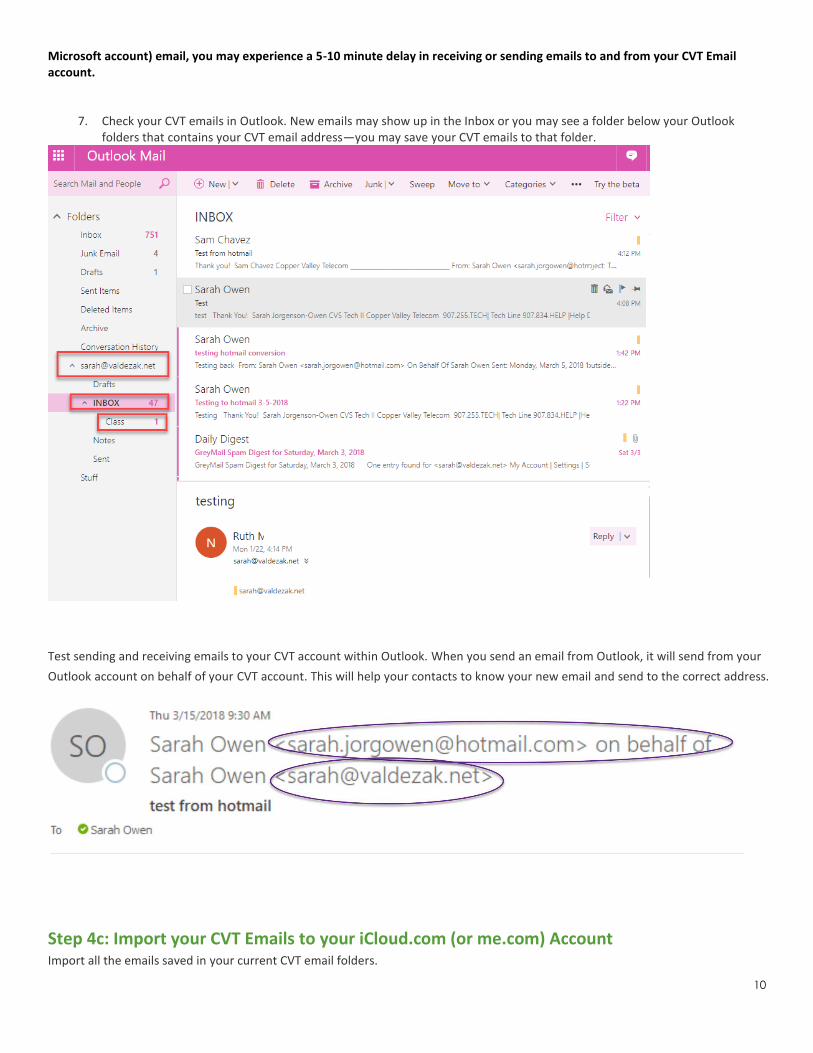
7. Check your CVT emails in Outlook. New emails may show up in the Inbox or you may see a folder below your Outlook folders that contains your CVT email address—you may save your CVT emails to that folder.
Test sending and receiving emails to your CVT account within Outlook. When you send an email from Outlook, it will send from your
Outlook account on behalf of your CVT account. This will help your contacts to know your new email and send to the correct address.
Step 4c: Import your CVT Emails to your iCloud.com (or me.com) Account Import all the emails saved in your current CVT email folders.

11
1) Must use MACMAIL CLIENT on a computer: Both CVT account and iCloud account must be set up in MacMail client.
a) If you already set up your CVT account in MacMail, skip to step b)
With MacMail open, Select Mail in top left corner of desktop
Click on Add Accounts
Choose Other Mail Account > then Continue
Enter your CVT email address
Username is your FULL CVT Email address
Enter CVT email password
Account type - IMAP
Incoming Mail Server - imap.cvinternet.net
Outgoing Mail Server - smtp.cvinternet.net
Click Sign In
On the next pop-up select DONE
b) If you have already set up your iCloud account in MacMail skip to step c)
12
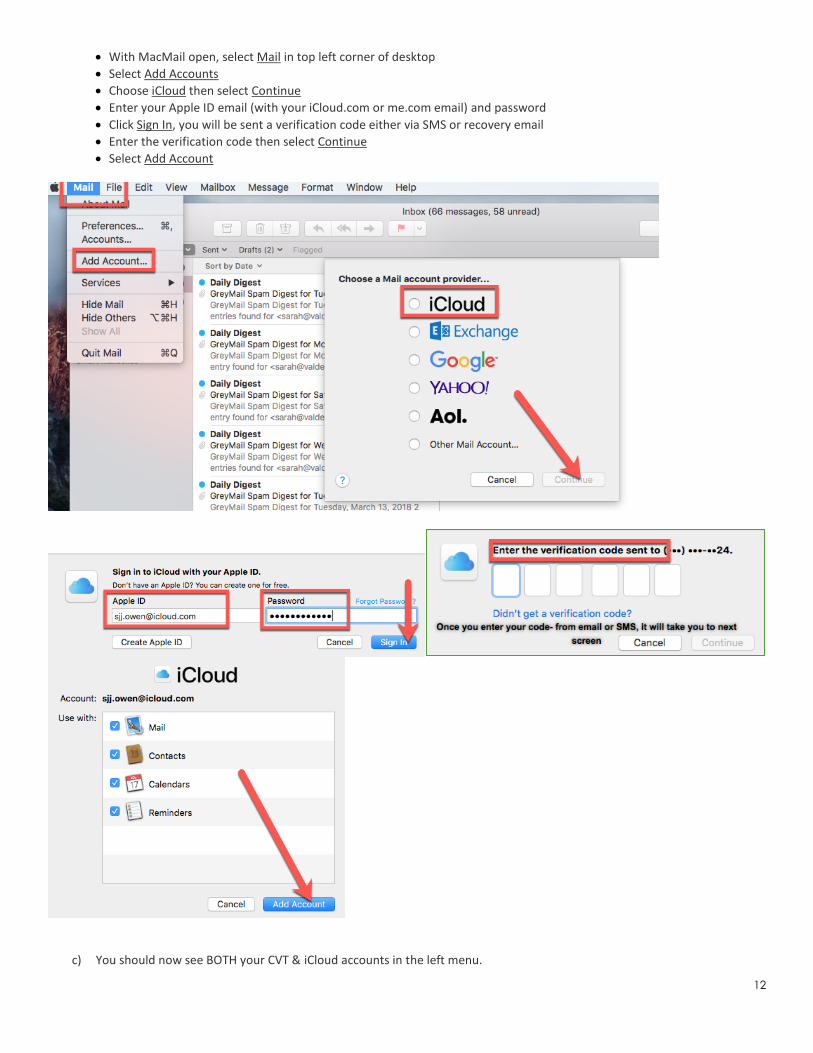
With MacMail open, select Mail in top left corner of desktop
Select Add Accounts
Choose iCloud then select Continue
Enter your Apple ID email (with your iCloud.com or me.com email) and password
Click Sign In, you will be sent a verification code either via SMS or recovery email
Enter the verification code then select Continue
Select Add Account
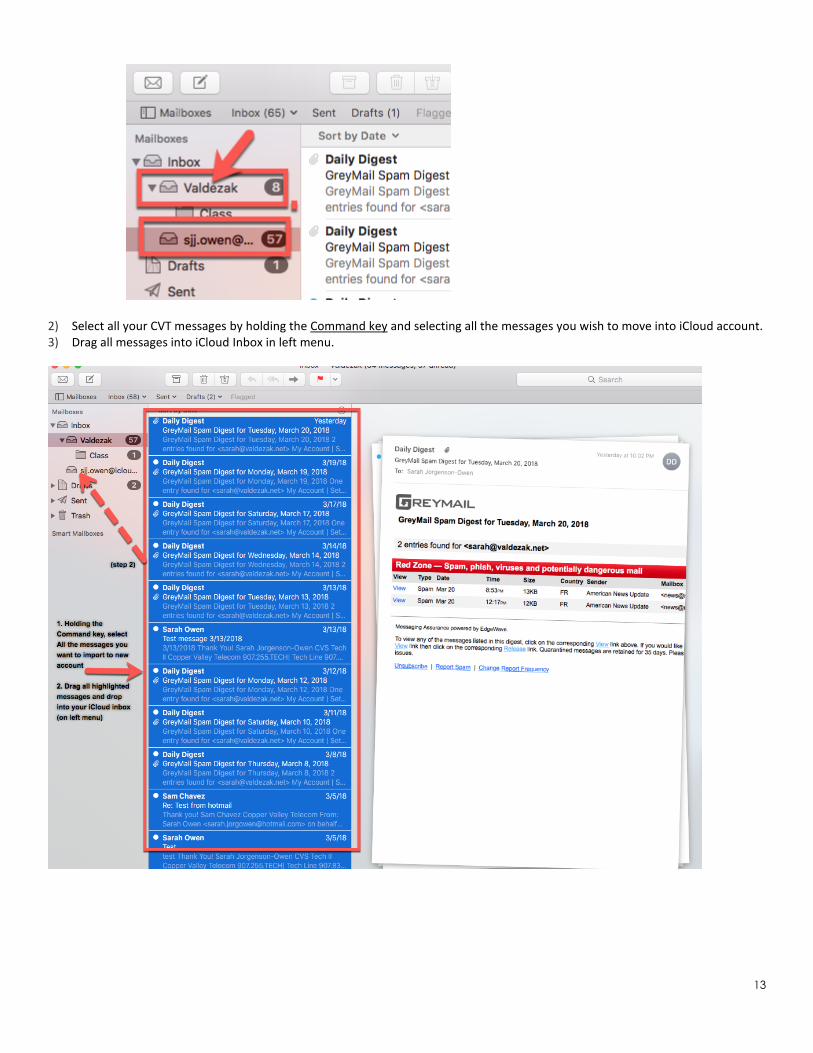
c) You should now see BOTH your CVT & iCloud accounts in the left menu.
13
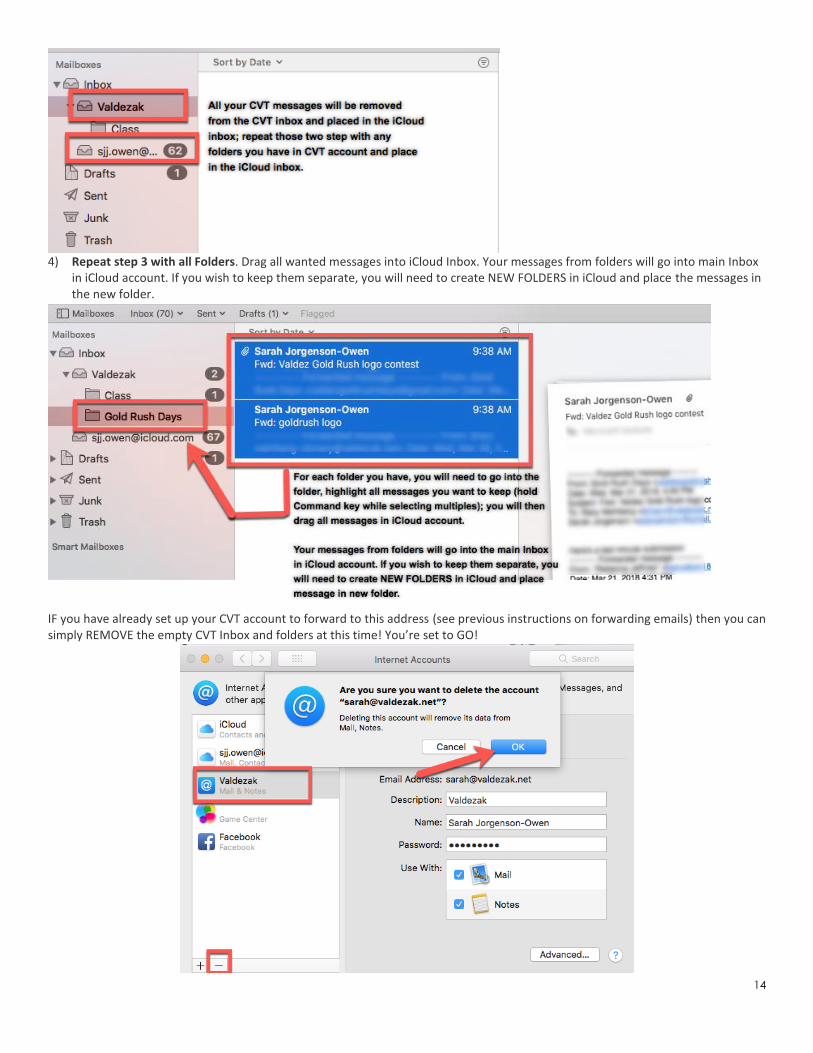
2) Select all your CVT messages by holding the Command key and selecting all the messages you wish to move into iCloud account. 3) Drag all messages into iCloud Inbox in left menu.
14
4) Repeat step 3 with all Folders. Drag all wanted messages into iCloud Inbox. Your messages from folders will go into main Inbox
in iCloud account. If you wish to keep them separate, you will need to create NEW FOLDERS in iCloud and place the messages in the new folder.
IF you have already set up your CVT account to forward to this address (see previous instructions on forwarding emails) then you can simply REMOVE the empty CVT Inbox and folders at this time! You’re set to GO!
15
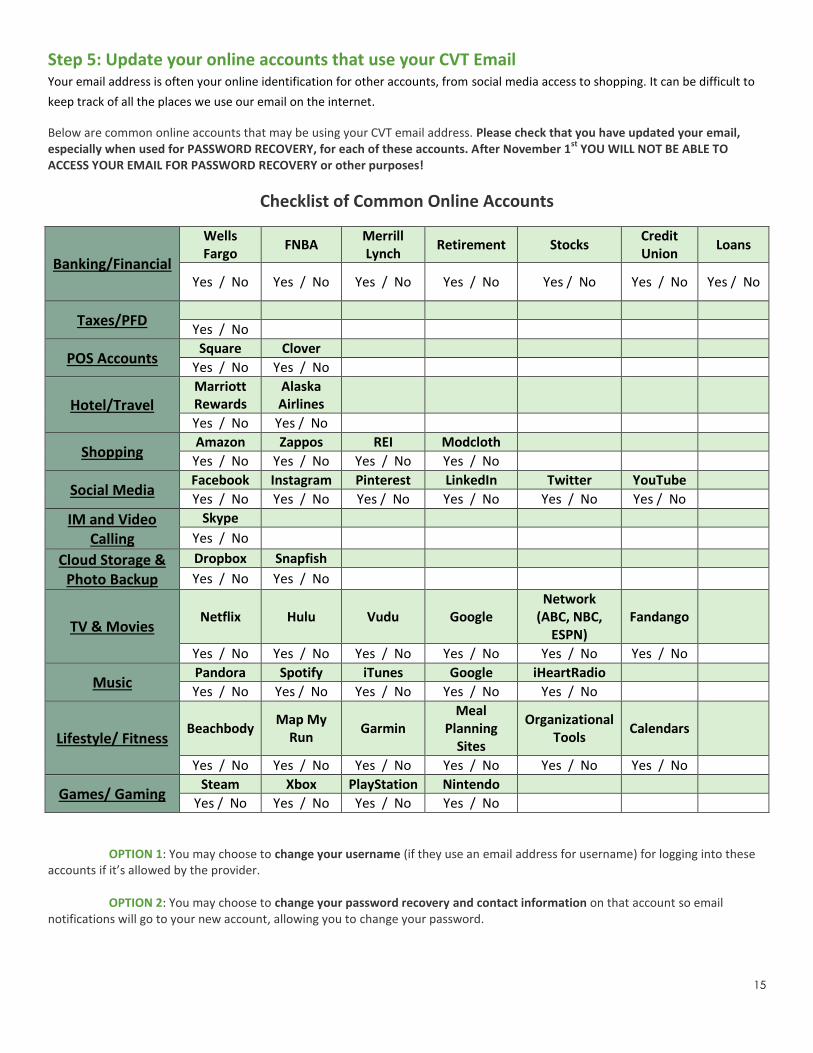
Step 5: Update your online accounts that use your CVT Email Your email address is often your online identification for other accounts, from social media access to shopping. It can be difficult to
keep track of all the places we use our email on the internet.
Below are common online accounts that may be using your CVT email address. Please check that you have updated your email, especially when used for PASSWORD RECOVERY, for each of these accounts. After November 1
st YOU WILL NOT BE ABLE TO
ACCESS YOUR EMAIL FOR PASSWORD RECOVERY or other purposes!
Checklist of Common Online Accounts
OPTION 1: You may choose to change your username (if they use an email address for username) for logging into these accounts if it’s allowed by the provider. OPTION 2: You may choose to change your password recovery and contact information on that account so email notifications will go to your new account, allowing you to change your password.
Banking/Financial
Wells Fargo
FNBA Merrill Lynch
Retirement Stocks Credit Union
Loans
Yes / No Yes / No Yes / No Yes / No Yes / No Yes / No Yes / No
Taxes/PFD
Yes / No
POS Accounts Square Clover
Yes / No Yes / No
Hotel/Travel Marriott Rewards
Alaska Airlines
Yes / No Yes / No
Shopping Amazon Zappos REI Modcloth
Yes / No Yes / No Yes / No Yes / No
Social Media Facebook Instagram Pinterest LinkedIn Twitter YouTube
Yes / No Yes / No Yes / No Yes / No Yes / No Yes / No
IM and Video Calling
Skype
Yes / No
Cloud Storage & Photo Backup
Dropbox Snapfish
Yes / No Yes / No
TV & Movies Netflix Hulu Vudu Google
Network (ABC, NBC,
ESPN) Fandango
Yes / No Yes / No Yes / No Yes / No Yes / No Yes / No
Music Pandora Spotify iTunes Google iHeartRadio
Yes / No Yes / No Yes / No Yes / No Yes / No
Lifestyle/ Fitness Beachbody
Map My Run
Garmin Meal
Planning Sites
Organizational Tools
Calendars
Yes / No Yes / No Yes / No Yes / No Yes / No Yes / No
Games/ Gaming Steam Xbox PlayStation Nintendo
Yes / No Yes / No Yes / No Yes / No