email marketing for beauty business. how to launch email marketing campaign for beauty business in...
TRANSCRIPT


This slideshow will teach you step by step how to design and launch Email Marketing campaign for your beauty business. Paymash encourages you to send out beautiful emails to your
clients.
So once you are done, post the link to your email campaign screenshot in the comments below and receive a $99 bonus from
Paymash.com to use our services.
How to Launch Email Marketing Campaign for Beauty Business
in Mailchimp
Step by Step Guide

Register

Start your browser and type mailchimp.com in the address field.
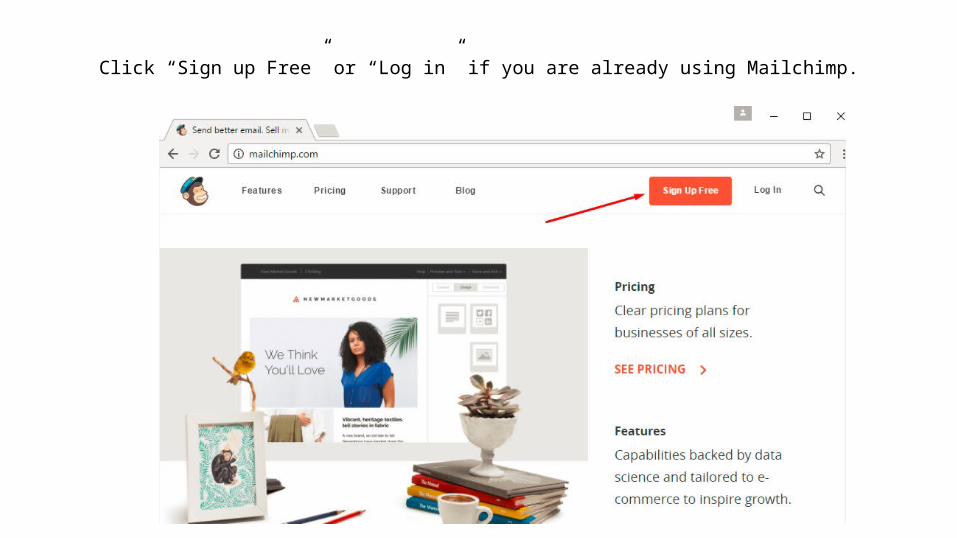
Click “Sign up Free” or “Log in” if you are already using Mailchimp.
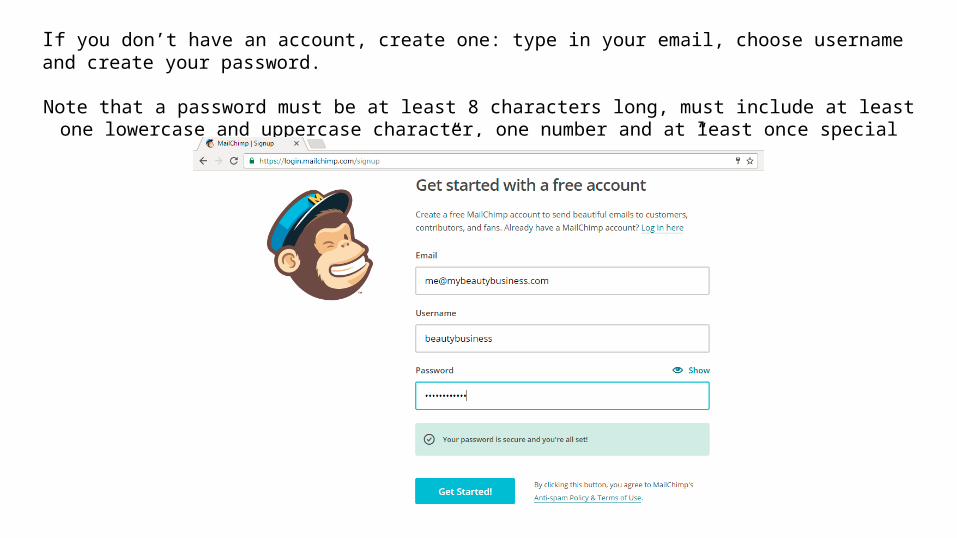
If you don’t have an account, create one: type in your email, choose username and create your password.
Note that a password must be at least 8 characters long, must include at least one lowercase and uppercase character, one number and at least once special character (e.g. “-”). Click “Get Started”.
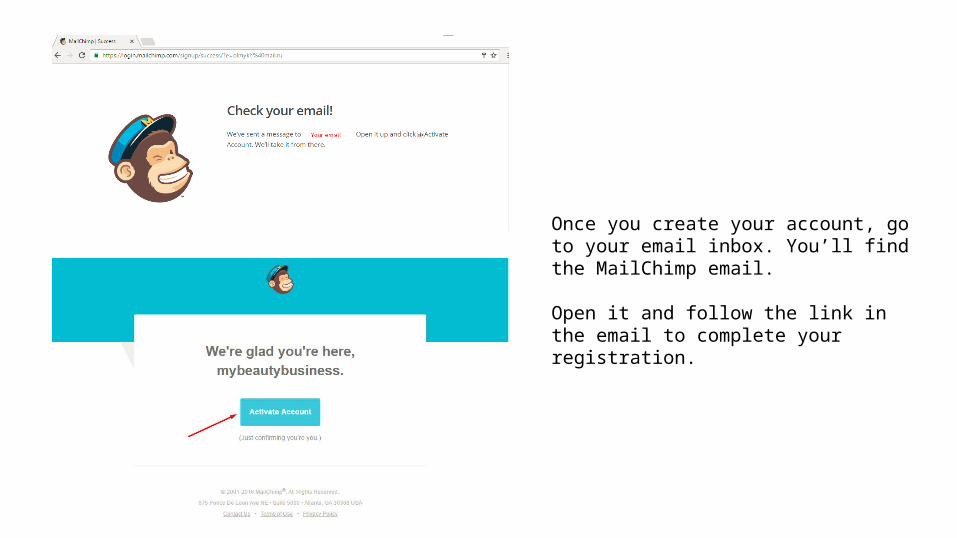
Once you create your account, go to your email inbox. You’ll find the MailChimp email.
Open it and follow the link in the email to complete your registration.
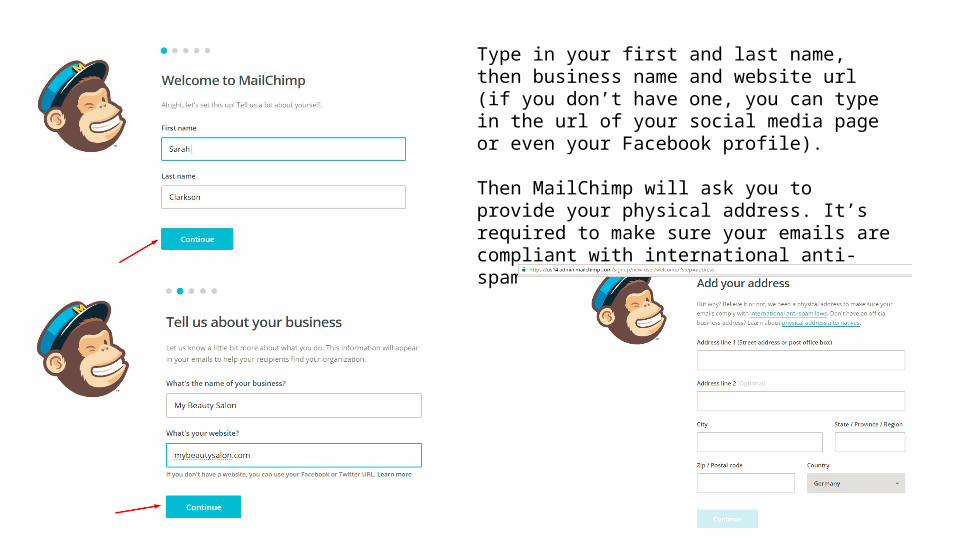
Type in your first and last name, then business name and website url (if you don’t have one, you can type in the url of your social media page or even your Facebook profile).
Then MailChimp will ask you to provide your physical address. It’s required to make sure your emails are compliant with international anti-spam laws.
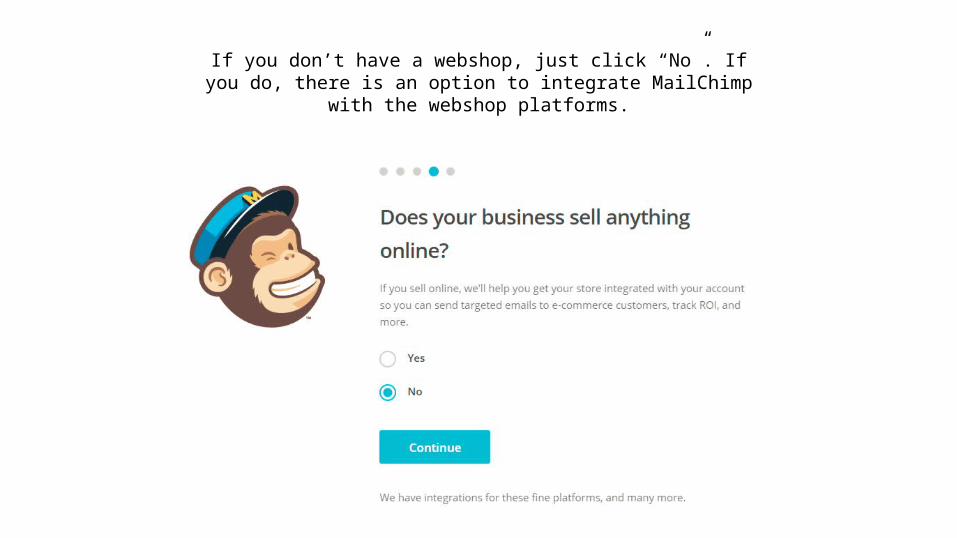
If you don’t have a webshop, just click “No”. If you do, there is an option to integrate MailChimp with the webshop platforms.

You can skip these steps by clicking the buttons and get back to them later
if you wish.
Create a Campaign

Now you are all set up. Click “Create Campaign”.

Select “Regular campaign”.
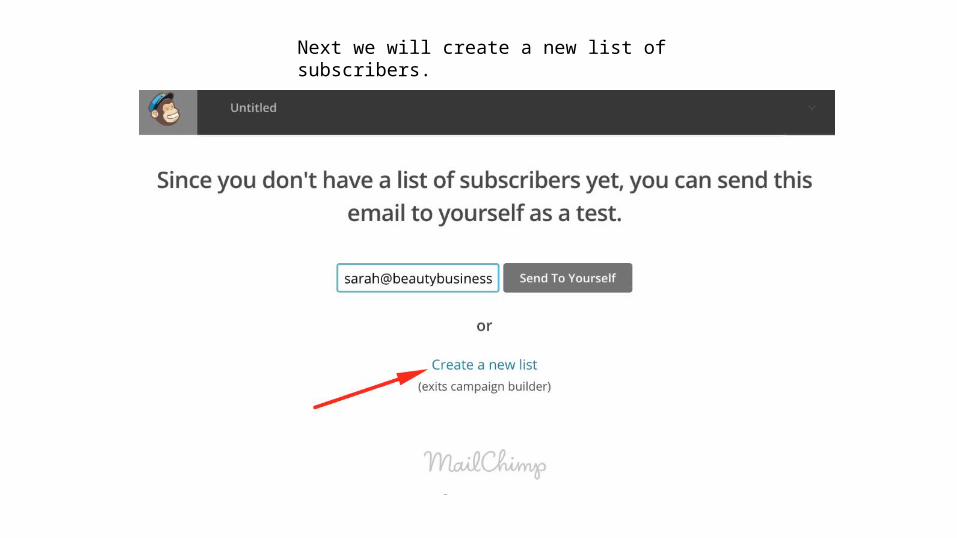
Next we will create a new list of subscribers.

Create Mailing List
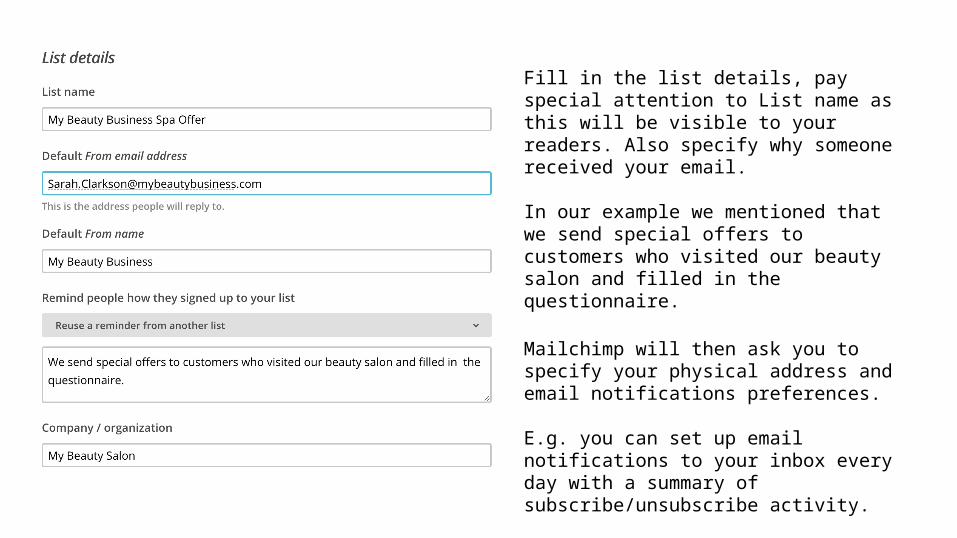
Fill in the list details, pay special attention to List name as this will be visible to your readers. Also specify why someone received your email.
In our example we mentioned that we send special offers to customers who visited our beauty salon and filled in the questionnaire.
Mailchimp will then ask you to specify your physical address and email notifications preferences.
E.g. you can set up email notifications to your inbox every day with a summary of subscribe/unsubscribe activity.

You can either add subscribers manually (one by one) or import subscribers from a list. We’ve chosen to import Active subscribers from Paymash POS analytics.
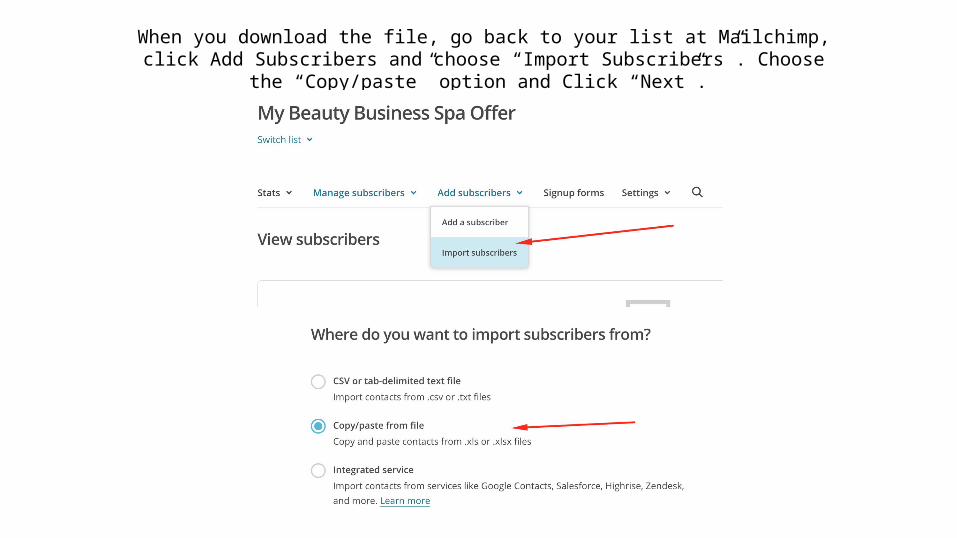
When you download the file, go back to your list at Mailchimp, click Add Subscribers and choose “Import Subscribers”. Choose the “Copy/paste” option and Click “Next”.
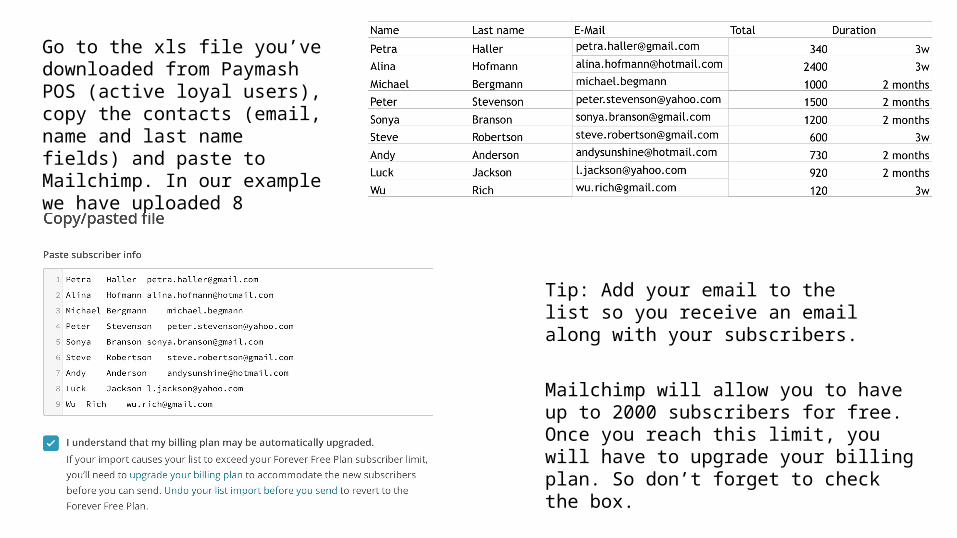
Go to the xls file you’ve downloaded from Paymash POS (active loyal users), copy the contacts (email, name and last name fields) and paste to Mailchimp. In our example we have uploaded 8 contacts.
Mailchimp will allow you to have up to 2000 subscribers for free. Once you reach this limit, you will have to upgrade your billing plan. So don’t forget to check the box.
Tip: Add your email to the list so you receive an email along with your subscribers.
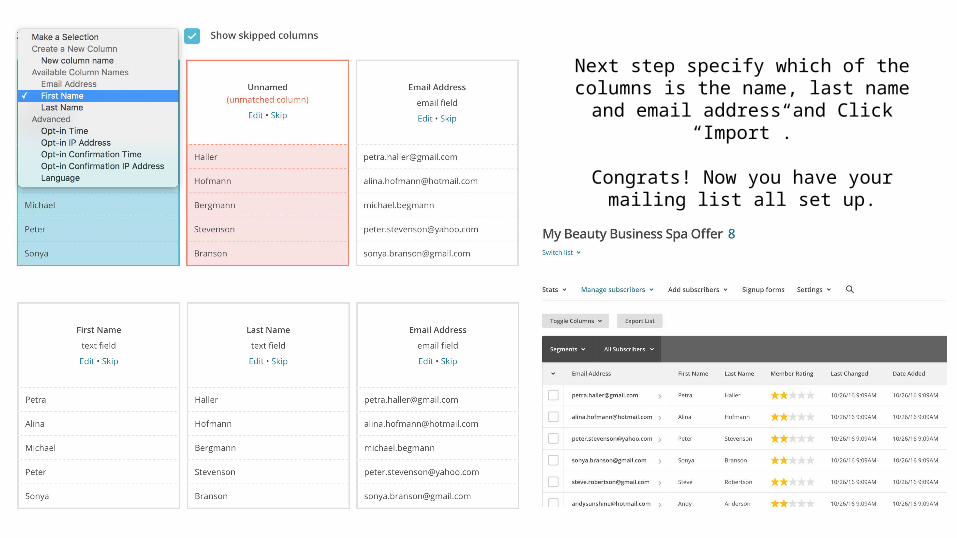
Next step specify which of the columns is the name, last name and email address and
Click “Import”.
Congrats! Now you have your mailing list all set up.
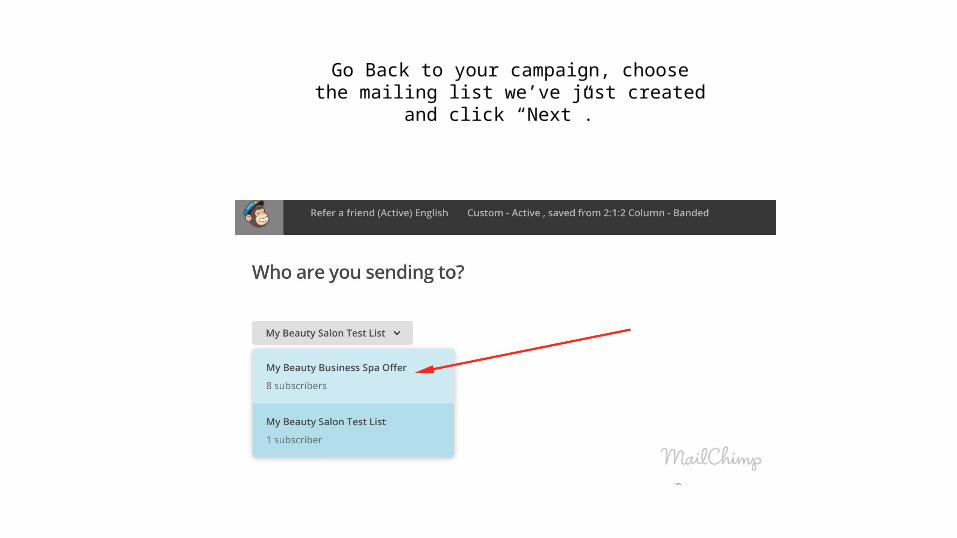
Go Back to your campaign, choose the mailing list we’ve just created and click “Next”.

Setup a Campaign
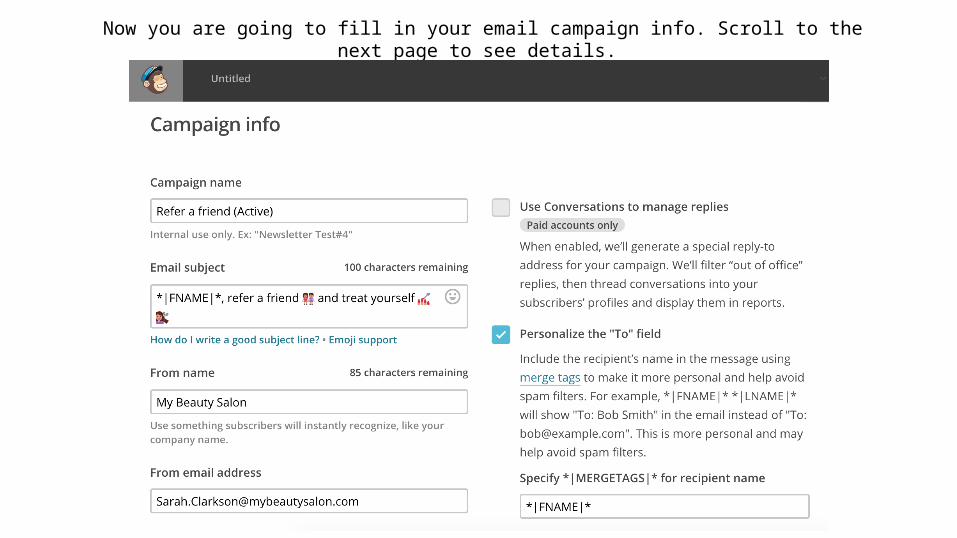
Now you are going to fill in your email campaign info. Scroll to the next page to see details.

Campaign name:Name your campaign so it’s easy for you to find it in the future among others. Include a name of a segment the campaign will be targeting (e.g. active/inactive, women/men, loyal, etc).
Email subject:● Think of an attractive call to action email subject (or just copy ours). ● By inserting *|FNAME|* tag in the subject line, Mailchimp will display your recipient's first name. This creates a
personal approach and may increase the open rate. ● Another cool option - you can use emoji in the email subject. However, not all email providers support emoji in the
email subject line, so avoid replacing words with emoji. Make sure your subject still makes sense when emoji couldn’t be displayed.
From name:You can either use your business name or, if the clients know your personally - your name.
From email address:Even though it’s still possible with Mailchimp to send emails from a free email provider address like yahoo and gmail (e.g. [email protected]), it’s preferable to use the email address of the domain you own (e.g. [email protected]) to improve deliverability. If you choose the domain email, Mailchimp will ask you to verify it - it will send verification email to your address with a link you should follow in order to verify.
Personalize the “To” field:Check this box and insert *|FNAME|* tag. This way your recipient's name will appear at the To: field. This helps to avoid spam filters and creates personalized approach to your clients.

When you scroll down you will see the tracking options. You can leave them as is for now.
Scroll down again you will see social media automation checkboxes. You can connect your Twitter and Facebook accounts to Mailchimp.
This way an auto post/tweet will appear at your social accounts after campaign would be sent.
You can skip this option if you don’t have the accounts or not willing to auto post.

Design an email

Next step you will choose the template for your email campaign. We have chosen 2:1:2 Column layout for our campaign.

Select the text area and click the pencil icon to edit it. You will notice the text editor appears at the right. We typed our text and made a few edits to the text:
Font: HelveticaSize:16Text colors: black, purple

Save and close the previous block. Then choose the text block, drag and drop it right before the image upper section. This will be your email title. We recommend to put it in the beginning of the email so your
readers know what is it about. Next step we type in our title:“Refer a Friend & Treat Yourself” (Font: Helvetica, Size: Arial, Color: Black, Align: Center)
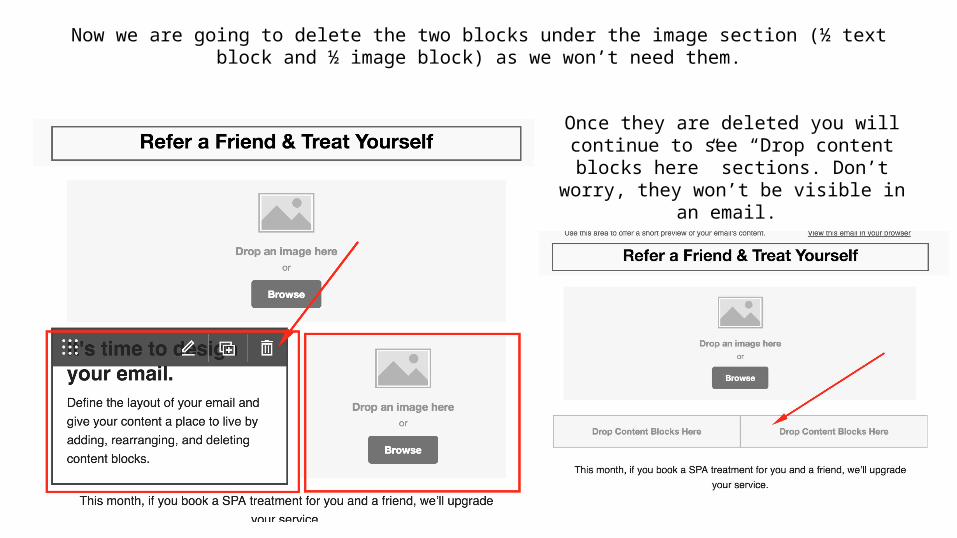
Now we are going to delete the two blocks under the image section (½ text block and ½ image block) as we won’t need them.
Once they are deleted you will continue to see “Drop content blocks here” sections. Don’t worry, they won’t be visible in an
email.
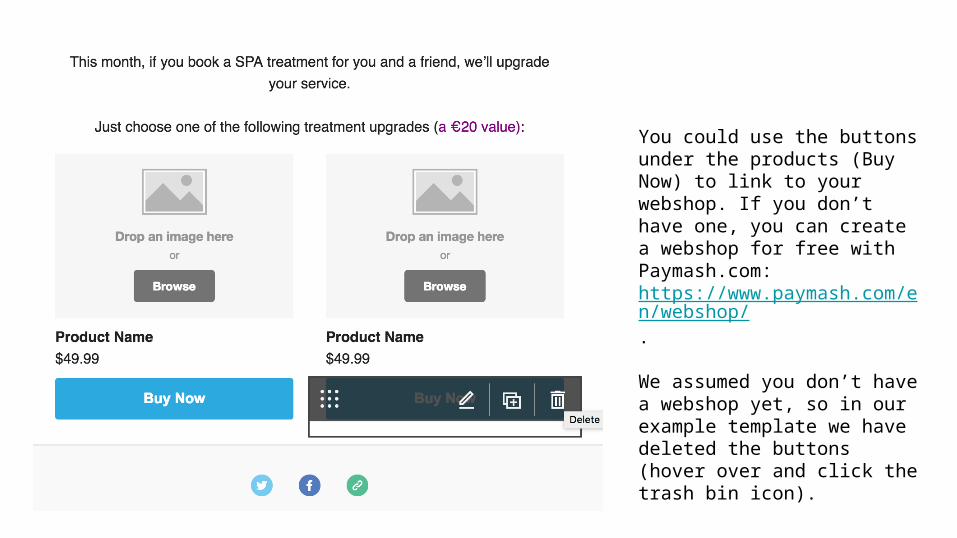
You could use the buttons under the products (Buy Now) to link to your webshop. If you don’t have one, you can create a webshop for free with Paymash.com: https://www.paymash.com/en/webshop/.
We assumed you don’t have a webshop yet, so in our example template we have deleted the buttons (hover over and click the trash bin icon).

Then we duplicated the product blocks to have 4 products.

We will now edit each of the products (in our case - services) by adding the name and the price. As you can see we have kept the initial text formatting.

Let’s also edit the social follow buttons. Type the url of your social media business accounts in the link text blocks. You can choose which social buttons to add/delete (e.g. you can add Instagram or
Pinterest). If your business doesn’t have social accounts, you can insert social share buttons instead (see next slide).

Drag and drop social share buttons block to enable them in your email. Now your readers will be able to share this email with their friends.
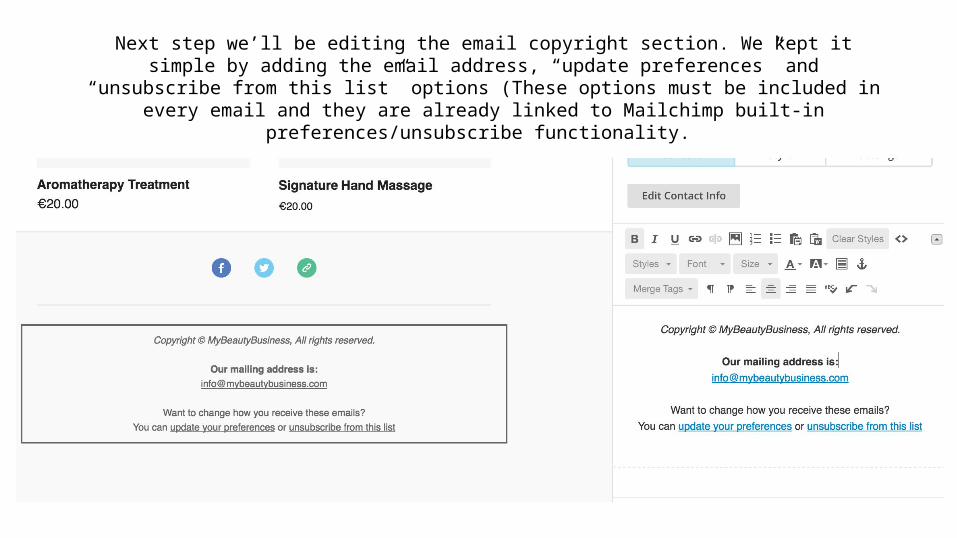
Next step we’ll be editing the email copyright section. We kept it simple by adding the email address, “update preferences” and “unsubscribe from this list” options (These options must be
included in every email and they are already linked to Mailchimp built-in preferences/unsubscribe functionality.
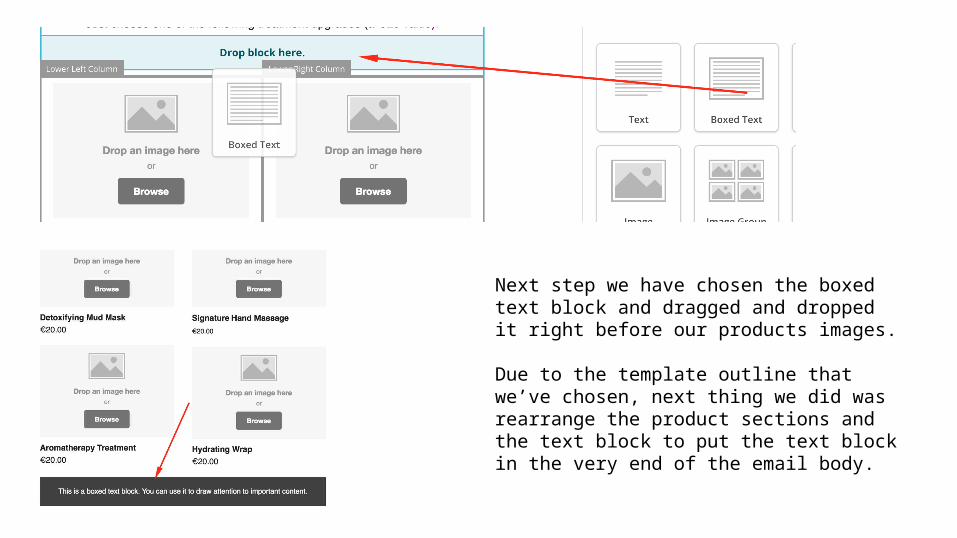
Next step we have chosen the boxed text block and dragged and dropped it right before our products images.
Due to the template outline that we’ve chosen, next thing we did was rearrange the product sections and the text block to put the text block in the very end of the email body.
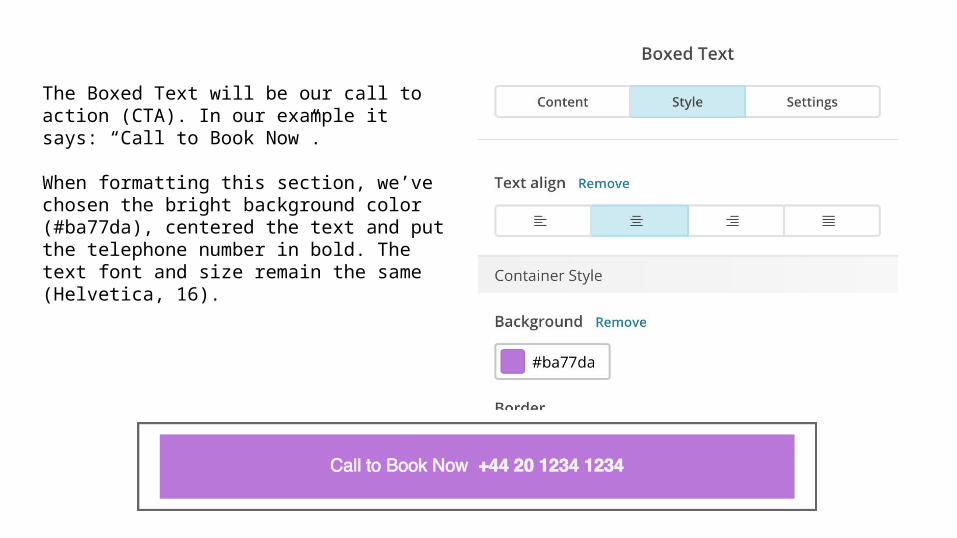
The Boxed Text will be our call to action (CTA). In our example it says: “Call to Book Now”.
When formatting this section, we’ve chosen the bright background color (#ba77da), centered the text and put the telephone number in bold. The text font and size remain the same (Helvetica, 16).
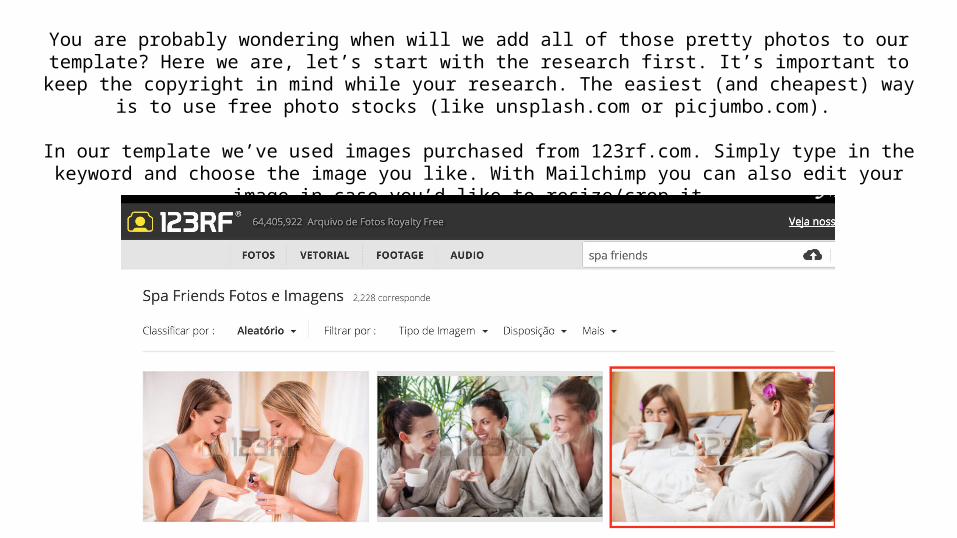
You are probably wondering when will we add all of those pretty photos to our template? Here we are, let’s start with the research first. It’s important to keep the copyright in mind while your research. The
easiest (and cheapest) way is to use free photo stocks (like unsplash.com or picjumbo.com).
In our template we’ve used images purchased from 123rf.com. Simply type in the keyword and choose the image you like. With Mailchimp you can also edit your image in case you’d like to resize/crop it.
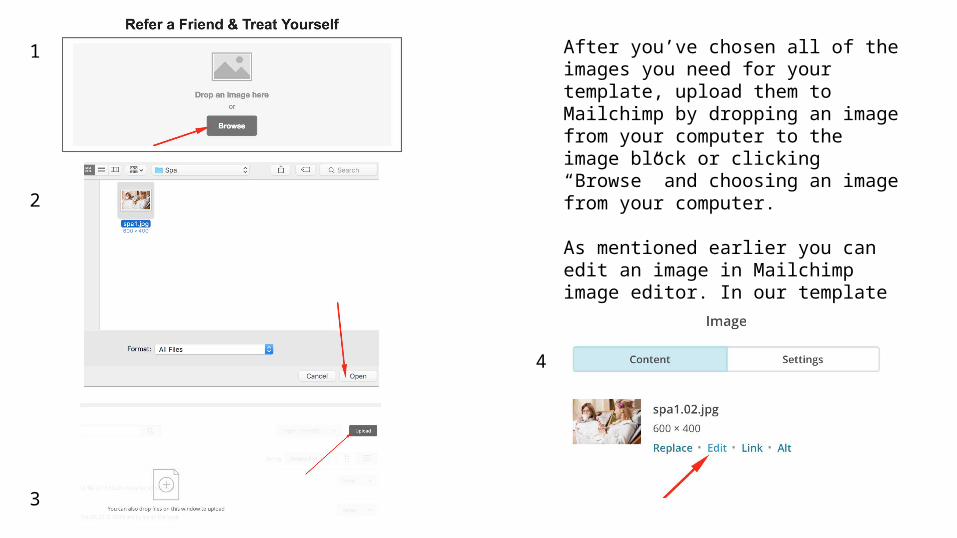
After you’ve chosen all of the images you need for your template, upload them to Mailchimp by dropping an image from your computer to the image block or clicking “Browse” and choosing an image from your computer.
As mentioned earlier you can edit an image in Mailchimp image editor. In our template we’ve cropped the image to make it shorter (see next slide).
1
3
4
2

After cropping, Click “Apply” and “Save”.
Repeat same steps with other image blocks.
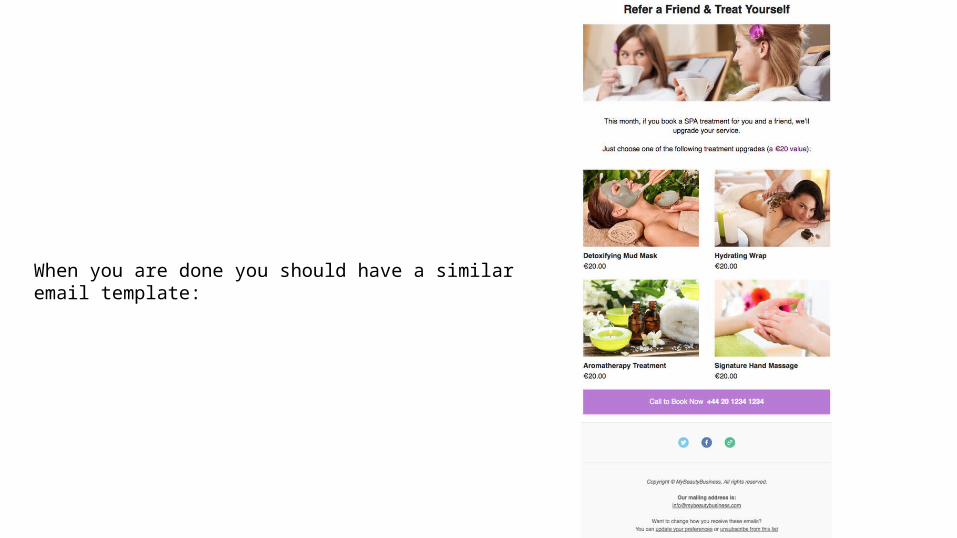
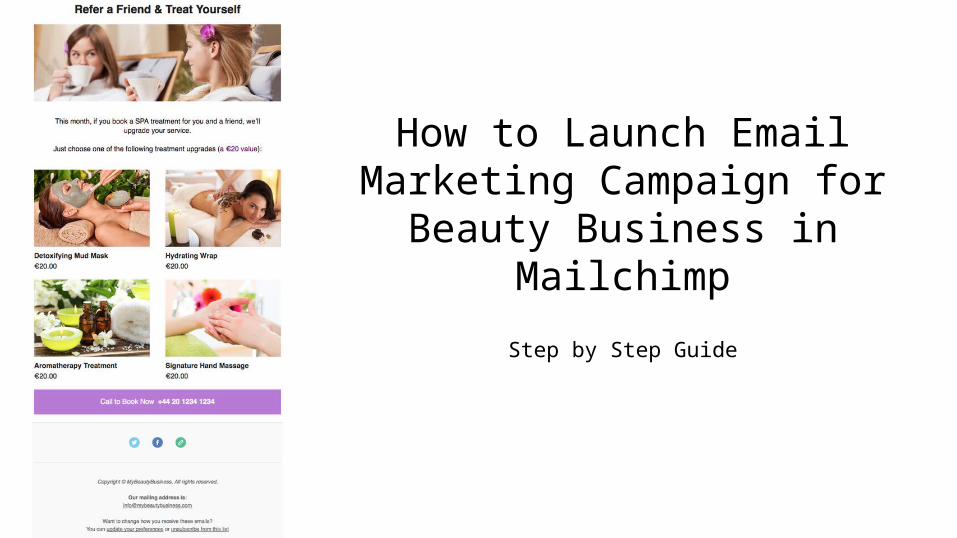
When you are done you should have a similar email template:

You are now ready to send an email to your list of subscribers.
Mailchimp also lets you schedule the emails, so you can choose what day/time to send.

Sent!

Congrats!
Paymash encourages you to send out beautiful emails to your clients. Post the link to your email campaign screenshot in the
comments below and receive a $99 bonus from Paymash.com to use our services.
Sign up for our newsletter at Paymash.com to receive other useful tips from Paymash for your beauty business.