emc solutions enabler installation and … 11 preface 13 revision history.....18 installation...
TRANSCRIPT
Solutions EnablerVersion 8.3
Installation and Configuration GuideREV 03
Copyright © 2015-2016 EMC Corporation All rights reserved.
Published November 2016
Dell believes the information in this publication is accurate as of its publication date. The information is subject to changewithout notice.
THE INFORMATION IN THIS PUBLICATION IS PROVIDED “AS-IS.“ DELL MAKES NO REPRESENTATIONS ORWARRANTIES OF ANY KIND WITH RESPECT TO THE INFORMATION IN THIS PUBLICATION, AND SPECIFICALLYDISCLAIMS IMPLIED WARRANTIES OF MERCHANTABILITY OR FITNESS FOR A PARTICULAR PURPOSE. USE,COPYING, AND DISTRIBUTION OF ANY DELL SOFTWARE DESCRIBED IN THIS PUBLICATION REQUIRES ANAPPLICABLE SOFTWARE LICENSE.
Dell, EMC, and other trademarks are trademarks of Dell Inc. or its subsidiaries. Other trademarks may be the property oftheir respective owners. Published in the USA.
EMC CorporationHopkinton, Massachusetts 01748-91031-508-435-1000 In North America 1-866-464-7381www.EMC.com
2 Solutions Enabler 8.3 Installation and Configuration Guide
9
11
Preface 13Revision history...........................................................................................18
Installation prerequisites 19Introduction................................................................................................20Before you begin........................................................................................ 20
General tasks.................................................................................20UNIX-specific tasks....................................................................... 20Windows-specific tasks..................................................................21z/OS-specific tasks........................................................................21Linux on System z-specific tasks...................................................23SYMAPI home directory................................................................ 24
Interoperability information........................................................................ 24Solutions Enabler...........................................................................25SMI-S Provider..............................................................................25
Environment and system requirements.......................................................28Solutions Enabler...........................................................................28VSS Provider..................................................................................31SMI-S Provider..............................................................................37z/OS-specific requirements.......................................................... 38Backward/forward compatibility for applications.......................... 40Storage systems............................................................................40
Client or server installation......................................................................... 43Remote connection........................................................................43Client/server IP communication.................................................... 43Client/server security....................................................................43Client/server system installation................................................... 44
Installation checklist................................................................................... 44Windows installation check list...................................................... 45UNIX installation check list............................................................ 47
Installation 51Installing Solutions Enabler on UNIX and Linux...........................................52
Step 1: Download the installation package..................................... 52Step 2: Run the install script..........................................................52Step 3: Select the installation directories...................................... 58Step 4: Select installation options................................................. 60Step 5: Complete the installation...................................................63
Installing Solutions Enabler on Windows.....................................................64Using the InstallShield wizard........................................................ 65Using the command line.................................................................70Using a response file...................................................................... 74
Installing Solutions Enabler on z/OS...........................................................75
Figures
Tables
Chapter 1
Chapter 2
CONTENTS
Solutions Enabler 8.3 Installation and Configuration Guide 3
Step 1: Copy the files.....................................................................75Step 2: Receive the transmit file....................................................76Step 3: Extract the additional files from the XMITLIB....................76Step 4: Customize the JCL............................................................ 77Step 5: Run the jobs...................................................................... 79Step 6: Manage z/OS Lockbox password......................................82Step 7: Complete the installation...................................................86Starting over................................................................................. 86Restoring the RIMLIB.................................................................... 87
Installing Solutions Enabler on OpenVMS................................................... 87Step 1: Accessing the software......................................................87Step 2: Install the software............................................................87
Installing Solutions Enabler on Solaris 11......................................................91Setup local repository.................................................................... 91Setup the publisher....................................................................... 93Installing Solutions Enabler IPS in Global Zone.............................. 93Uninstalling Solutions Enabler IPS in Global Zone.......................... 94Installing Solutions Enabler IPS kit on Non-Global Zones...............94Uninstalling Solutions Enabler on Solaris 11 in Non-Global Zone fromGlobal Zone................................................................................... 95Installing Solutions Enabler on Solaris 11 in Non-Global Zone fromGlobal Zone................................................................................... 95Installing Solutions Enabler on Solaris 11 in Non-Global Zone fromGlobal Zone................................................................................... 96
Upgrading SMI-S Provider......................................................................... 96Installing the Solutions Enabler Virtual Appliance .......................................97
UNIX Native installation 99Before you begin.......................................................................................100PureNative installation kits....................................................................... 100Installing Solutions Enabler....................................................................... 104
Installing on AIX............................................................................104Installing on HP-UX...................................................................... 104Installing on Linux.........................................................................105Installing on Solaris...................................................................... 106
Uninstalling Solutions Enabler................................................................... 108Uninstalling from AIX....................................................................108Uninstalling from HP-UX.............................................................. 108Uninstalling from Linux.................................................................109Uninstalling from Solaris...............................................................109
Uninstalling Solutions Enabler 111Overview................................................................................................... 112
Stopping the application processes...............................................112Uninstalling the software.............................................................. 112
Uninstalling Solutions Enabler from UNIX.................................................. 113Using the script.............................................................................113Using native tools......................................................................... 114
Uninstalling Solutions Enabler from Windows............................................ 116Using the InstallShield wizard....................................................... 116Using the command line................................................................ 116Removing the msi image............................................................... 117Using the Windows Add/Remove Programs dialog....................... 118Using the Windows Programs and Features dialog........................118
Chapter 3
Chapter 4
CONTENTS
4 Solutions Enabler 8.3 Installation and Configuration Guide
Uninstalling Solutions Enabler from OpenVMS.......................................... 118Uninstalling Solutions Enabler from z/OS.................................................. 119Rolling back an upgrade............................................................................. 119
Post-Installation configuration for UNIX, Windows, OpenVMS,and z/OS 121eLicensing................................................................................................. 122
Upgrade to an eLicensed array..................................................... 122Host-based licenses..................................................................... 123Managing arrays running different Enginuity versions.................. 124Installing array-based licenses......................................................125Installing host-based licenses....................................................... 126Displaying licenses........................................................................127Querying licenses......................................................................... 129Deleting licenses........................................................................... 131
Initial post-installation configuration of Solutions Enabler..........................131Building the SYMAPI database..................................................... 132Setting environment variables...................................................... 132Setting access permissions to directories.....................................132Starting the SCSI generic driver...................................................132Verifying the existence of dedicated gatekeepers........................ 133
Setting the CLI path..................................................................................133Setting the online help path...................................................................... 134Managing database and gatekeeper locking.............................................. 134
Setting parallel SYMCLI access to the SYMAPI database.............134Semaphore requirements on UNIX............................................... 135Meeting semaphore requirements................................................ 135Refreshing the semaphores..........................................................135De-allocating semaphores............................................................ 135Windows locking.......................................................................... 136
Avoidance and selection files.................................................................... 136Editing and file format.................................................................. 136gkavoid and gkselect.................................................................... 136inqfile........................................................................................... 137symavoid...................................................................................... 137
Changing the default behavior of SYMCLI.................................................137Editing the options file................................................................. 138Removing default options.............................................................138Options file parameters................................................................ 138
Oracle multiple instances through a remote server................................... 138Client/server RDBMS environment variable behavior.................. 139
Setting up daemons for distributed application support............................ 139Starting daemons..........................................................................141Stopping daemons........................................................................142Viewing daemons..........................................................................142Setting daemons to auto-start on boot........................................ 142Authorizing daemon connections..................................................142Controlling daemon behavior........................................................ 144Controlling daemon logging.......................................................... 144
Managing the base daemon.......................................................................145Starting the base daemon............................................................ 146Stopping the base daemon........................................................... 146Setting the optional base daemon behavior parameters............... 146
Setting up the event daemon for monitoring............................................. 148Event sources.............................................................................. 149
Chapter 5
CONTENTS
Solutions Enabler 8.3 Installation and Configuration Guide 5
Threshold events..........................................................................149Starting the event daemon........................................................... 151Reloading the daemon_options settings....................................... 151Listing supported event categories............................................... 151Stopping the event daemon......................................................... 152Configuring event logging............................................................ 152Event output examples................................................................. 161Event message formats................................................................162Miscellaneous options.................................................................. 174Test mode.................................................................................... 175
VSS Provider environment variables......................................................... 176SMI-S Provider Windows authentication settings..................................... 176VMAX arrays............................................................................................. 176
ECC and Unisphere for VMAX 1.0 coexistence: symapi_db.bindatabase sharing...........................................................................177
ECOM....................................................................................................... 177Setting up administrator authentication....................................... 177ECOM certificate management.................................................... 178Starting and stopping ECOM........................................................179
Disabling ports.......................................................................................... 180SMI-S Provider runtime settings...............................................................182RedHat Enterprise Linux 6.0/6.2 [GA] - x86_64 installation..................... 183Adding the SSL certificate........................................................................ 184Vendor SNIA libraries needed for HBA information................................... 184z/OS Post installation configuration......................................................... 185
SYMAPI server security preparation............................................ 185Configuring Solutions Enabler...................................................... 187Remote control operations........................................................... 197Controlling the server...................................................................201Running the base daemon on z/OS............................................. 204Running the event daemon on z/OS............................................205
Remote Operations 209SYMCLI through a remote server..............................................................210Client configuration...................................................................................210
Editing the netcnfg file.................................................................210Considerations for specifying server_node_name andserver_network_address..............................................................213Setting environment variables for remote access.........................214
Client/server IP interoperability................................................................ 214IPv6 addresses.............................................................................215IPv4 address mapping.................................................................. 215Server operation.......................................................................... 215Client operation............................................................................216
Client/server security............................................................................... 216Specifying server behavior........................................................................ 217Controlling the server............................................................................... 219
Starting the server....................................................................... 219Stopping the server......................................................................219Showing server details................................................................. 219Displaying networking information................................................221Reloading the daemon_options file.............................................. 222Summarize active SYMAPI sessions............................................ 222Show session details....................................................................222
Controlling and using the storsrvd log files............................................... 223
Chapter 6
CONTENTS
6 Solutions Enabler 8.3 Installation and Configuration Guide
Numbered messages issued by storsrvd...................................... 223
Technical Notes and Configuration 225Solutions Enabler technical notes.............................................................226
Changes to default port flag settings...........................................226AIX Object Data Model Environment Variable.............................. 228
VSS Provider technical notes................................................................... 229Enable debugging for VSS Provider.............................................229Log file.........................................................................................229Registry keys...............................................................................229Remote snapshots....................................................................... 236Enforcing a strict BCV rotation policy..........................................236Enforcing a mapped device policy................................................236Using SymmetrixStaticMount to disable LUN masking andunmasking....................................................................................237Enforcing TimeFinder Clone as default plex snapshot technology....237Enforcing a clone retention policy................................................237Enforcing TimeFinder VP Snap as default differential snapshottechnology...................................................................................237Enforcing a VP Snap retention policy.......................................... 238Enforcing SnapVX as default snapshot technology on HYPERMAXOS 5977.......................................................................................238LUN resynchronization................................................................ 238VSF (Veritas Storage Foundation) 5.1 SP1 for Windows..............239Windows Server 2008 R2 CSV (Cluster Shared Volumes)...........239Windows Server 2012 or 2012 R2 CSV.........................................239Using DPM to back up virtual machines deployed on CSV........... 239
SMI-S Provider technical notes................................................................239Global mode.................................................................................239Mirror replication in two-provider configurations.........................239Object paths in SMI-S Provider V8.3...........................................240CIM interop namespace...............................................................240Unexpected termination: Windows dump file...............................240Statistics collection interval.........................................................240Logging in with the LDAP user.....................................................240SMI-S Provider user roles............................................................ 241
Linux on System z technical note.............................................................. 241HBA libraries................................................................................ 241
z/OS technical notes................................................................................ 241Thread dumps in the zOS server..................................................242#04DDDEF.................................................................................. 242#05RECEV.................................................................................. 242#12CNTRL................................................................................... 243STEPLIB APF authorization......................................................... 243Disabling control functions.......................................................... 243Security considerations if you do not disable control functions... 243
HP-UX technical note...............................................................................243HP applications link-edited with prior versions of Solutions Enabler..243
OpenVMS technical note..........................................................................244Hyper-V technical notes........................................................................... 244
Hyper-V Server setup..................................................................245Hyper-V gatekeepers...................................................................245SIU support for Hyper-V guest OS.............................................. 245
Chapter 7
CONTENTS
Solutions Enabler 8.3 Installation and Configuration Guide 7
SIU support for multiple log files..................................................245Virtual Appliance technical notes..............................................................245
Linux only support when using ovftool.........................................246Daemon behavior during import/export operations......................246Login page cursor not focused.....................................................246Server hostname requirement..................................................... 246SSL certificate generation...........................................................246Gatekeeper devices..................................................................... 246Host ESX Server configuration....................................................246SMC daemon service...................................................................246Flash Player version.....................................................................246Changing the IP address.............................................................. 247SYMCLI commands executed/submitted as root......................... 247Least privileged permission requirements.................................... 247
Gatekeeper Device Configuration 249Overview.................................................................................................. 250
How SYMCLI uses gatekeepers...................................................250Gatekeeper candidates................................................................250Using the gkavoid and gkselect files.............................................251Sizing gatekeepers....................................................................... 251VMware setup............................................................................. 252
Creating gatekeeper devices.................................................................... 253Displaying gatekeeper information............................................................254
Displaying gatekeeper statistics.................................................. 254Displaying gatekeeper candidates and gatekeeper states............ 255
Host specific behaviour running Solutions Enabler 257General issues.......................................................................................... 258
Host system semaphores.............................................................258HP-UX-specific issues..............................................................................258
Creating pseudo-devices for gatekeepers and BCVs................... 258swverify command not supported................................................260
HP OpenVMS-specific issues....................................................................261IBM AIX-specific issues.............................................................................261
Oracle database mapping............................................................. 261BCV devices lost after reboot...................................................... 261
Solutions Enabler Directories 263UNIX directories....................................................................................... 264Windows directories................................................................................. 265OpenVMS directories............................................................................... 267z/OS Unix System Services directories....................................................268
UNIX Installation Log Files 271Understanding the UNIX installer log files.................................................272
275
Chapter 8
Appendix A
Appendix B
Appendix C
Index
CONTENTS
8 Solutions Enabler 8.3 Installation and Configuration Guide

A VMAX array in the client/server system..................................................................43Destination folder dialog box...................................................................................... 66Setup type dialog box................................................................................................. 67Custom setup dialog box............................................................................................ 68Service list dialog box................................................................................................. 70Requesting and obtaining licenses.............................................................................122
123456
FIGURES
Solutions Enabler 8.3 Installation and Configuration Guide 9

FIGURES
10 Solutions Enabler 8.3 Installation and Configuration Guide
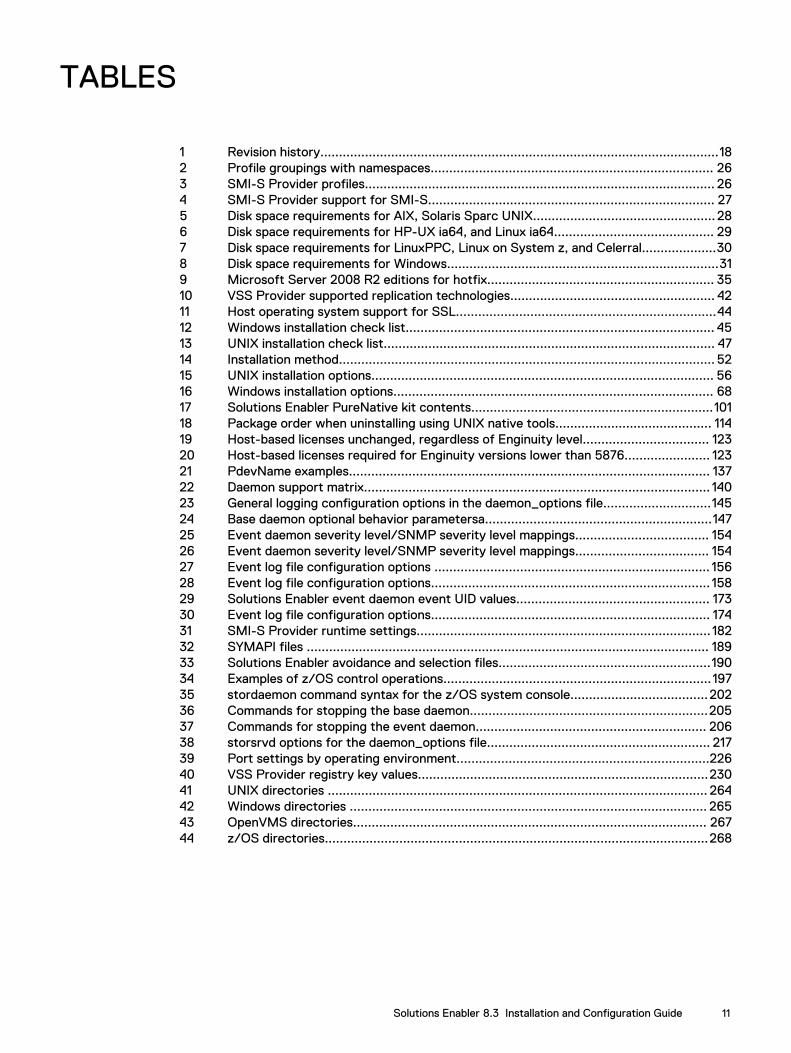
Revision history...........................................................................................................18Profile groupings with namespaces............................................................................ 26SMI-S Provider profiles.............................................................................................. 26SMI-S Provider support for SMI-S............................................................................. 27Disk space requirements for AIX, Solaris Sparc UNIX................................................. 28Disk space requirements for HP-UX ia64, and Linux ia64........................................... 29Disk space requirements for LinuxPPC, Linux on System z, and Celerral....................30Disk space requirements for Windows.........................................................................31Microsoft Server 2008 R2 editions for hotfix............................................................. 35VSS Provider supported replication technologies....................................................... 42Host operating system support for SSL......................................................................44Windows installation check list................................................................................... 45UNIX installation check list......................................................................................... 47Installation method..................................................................................................... 52UNIX installation options............................................................................................ 56Windows installation options...................................................................................... 68Solutions Enabler PureNative kit contents.................................................................101Package order when uninstalling using UNIX native tools.......................................... 114Host-based licenses unchanged, regardless of Enginuity level.................................. 123Host-based licenses required for Enginuity versions lower than 5876....................... 123PdevName examples................................................................................................. 137Daemon support matrix............................................................................................. 140General logging configuration options in the daemon_options file.............................145Base daemon optional behavior parametersa.............................................................147Event daemon severity level/SNMP severity level mappings.................................... 154Event daemon severity level/SNMP severity level mappings.................................... 154Event log file configuration options .......................................................................... 156Event log file configuration options........................................................................... 158Solutions Enabler event daemon event UID values.................................................... 173Event log file configuration options........................................................................... 174SMI-S Provider runtime settings............................................................................... 182SYMAPI files ............................................................................................................ 189Solutions Enabler avoidance and selection files.........................................................190Examples of z/OS control operations........................................................................197stordaemon command syntax for the z/OS system console.....................................202Commands for stopping the base daemon................................................................205Commands for stopping the event daemon.............................................................. 206storsrvd options for the daemon_options file............................................................ 217Port settings by operating environment....................................................................226VSS Provider registry key values..............................................................................230UNIX directories ...................................................................................................... 264Windows directories ................................................................................................ 265OpenVMS directories............................................................................................... 267z/OS directories.......................................................................................................268
1234567891011121314151617181920212223242526272829303132333435363738394041424344
TABLES
Solutions Enabler 8.3 Installation and Configuration Guide 11

TABLES
12 Solutions Enabler 8.3 Installation and Configuration Guide
Preface
As part of an effort to improve its product lines, EMC periodically releases revisions ofits software and hardware. Therefore, some functions described in this documentmight not be supported by all versions of the software or hardware currently in use.The product release notes provide the most up-to-date information on productfeatures.
Contact your EMC representative if a product does not function properly or does notfunction as described in this document.
Note
This document was accurate at publication time. New versions of this document mightbe released on EMC Online Support (https://support.emc.com). Check to ensure thatyou are using the latest version of this document.
PurposeThis document describes how to install and configure EMC® Solutions Enablersoftware.
Related documentationThe following documents provide additional information about Solutions Enabler:
EMC Solutions Enabler, VSS Provider, and SMI-S Provider Release Notes
Describes new features and any known limitations.
EMC Solutions Enabler Installation and Configuration Guide
Provides host-specific installation instructions.
EMC Solutions Enabler CLI Command Reference
Documents the SYMCLI commands, daemons, error codes and option fileparameters provided with the Solutions Enabler man pages.
EMC Solutions Enabler Array Controls and Management CLI User Guide
Describes how to configure array control, management, and migration operationsusing SYMCLI commands.
EMC Solutions Enabler SRDF Family CLI User Guide
Describes how to configure and manage SRDF environments using SYMCLIcommands.
EMC Solutions Enabler TimeFinder SnapVX CLI User Guide
Describes how to configure and manage TimeFinder SnapVX environments usingSYMCLI commands.
EMC Solutions Enabler SRM CLI User Guide
Provides Storage Resource Management (SRM) information related to variousdata objects and data handling facilities.
EMC SRDF/Metro vWitness Configuration Guide
Describes how to install, configure and manage SRDF/Metro using vWitness.
Preface 13
VMAX Management Software Events and Alerts Guide
Documents the SYMAPI daemon messages, asynchronous errors and messageevents, and SYMCLI return codes.
The following provide additional information:
EMC VMAX3 Family Product Guide for VMAX 100K, VMAX 200K, VMAX 400K withHYPERMAX OS
Provides product information regarding the purchase of a VMAX3 Family 100K,200K, 400K.
EMC VMAX3 Family Site Planning Guide for VMAX 100K, VMAX 200K, VMAX 400K withHYPERMAX OS
Provides planning information regarding the purchase and installation of a VMAX3Family 100K, 200K, 400K.
EMC VMAX All Flash and VMAX3 Family Security Configuration Guide
Describes how to securely deploy a VMAX3 Family (100K, 200K, 400K) or VMAXAll Flash (250F, 450F, 850F) array with HYPERMAX OS.
EMC VMAX All Flash Product Guide for VMAX 250F, 450F, 850F with HYPERMAX OS
Provides product information regarding the purchase of a VMAX 250F, 450F,850F with HYPERMAX OS.
EMC VMAX All Flash Site Planning Guide for VMAX 250F, 450F, 850F with HYPERMAXOS
Provides planning information regarding the purchase and installation of a VMAX250F, 450F, 850F with HYPERMAX OS.
EMC VMAX All Flash and VMAX3 Family Security Configuration Guide
Describes how to securely deploy a VMAX3 Family (100K, 200K, 400K) or VMAXAll Flash (250F, 450F, 850F) array with HYPERMAX OS.
EMC VMAX Family Viewer
Illustrates system hardware, incrementally scalable system configurations, andavailable host connectivity offered for VMAX arrays.
E-Lab™ Interoperability Navigator (ELN)
Provides a web-based interoperability and solution search portal. You can find theELN at https://elabnavigator.EMC.com.
SolVe Desktop
Provides links to documentation, procedures for common tasks, and connectivityinformation for 2-site and 3-site SRDF configurations. To download the SolVeDesktop tool, go to EMC Online Support at https://support.EMC.com and searchfor SolVe Desktop. Download the SolVe Desktop and load the VMAX All Flash,VMAX3 Family, VMAX, and DMX procedure generator.
Note
You need to authenticate (authorize) your SolVe Desktop. After it is installed,familiarize yourself with the information under Help tab.
Conventions used in this documentEMC uses the following conventions for special notices:
Preface
14 Solutions Enabler 8.3 Installation and Configuration Guide
CAUTION
CAUTION, used with the safety alert symbol, indicates a hazardous situationwhich, if not avoided, could result in minor or moderate injury.
Note
A note presents information that is important, but not hazard-related.
Note
An important notice contains information essential to software or hardware operation.
Typographical conventionsEMC uses the following type style conventions in this document:
Normal Used in running(nonprocedural) text for:
l Names of interfaceelements, such as namesof windows, dialog boxes,buttons, fields, andmenus
l Names of resources,attributes, pools, Booleanexpressions, buttons,DQL statements,keywords, clauses,environment variables,functions, and utilities
l URLs, pathnames,filenames, directorynames, computer names,links, groups, servicekeys, file systems, andnotifications
Bold Used in running(nonprocedural) text fornames of commands,daemons, options, programs,processes, services,applications, utilities, kernels,notifications, system calls,and man pages
Used in procedures for:
l Names of interfaceelements, such as namesof windows, dialog boxes,buttons, fields, andmenus
Preface
15
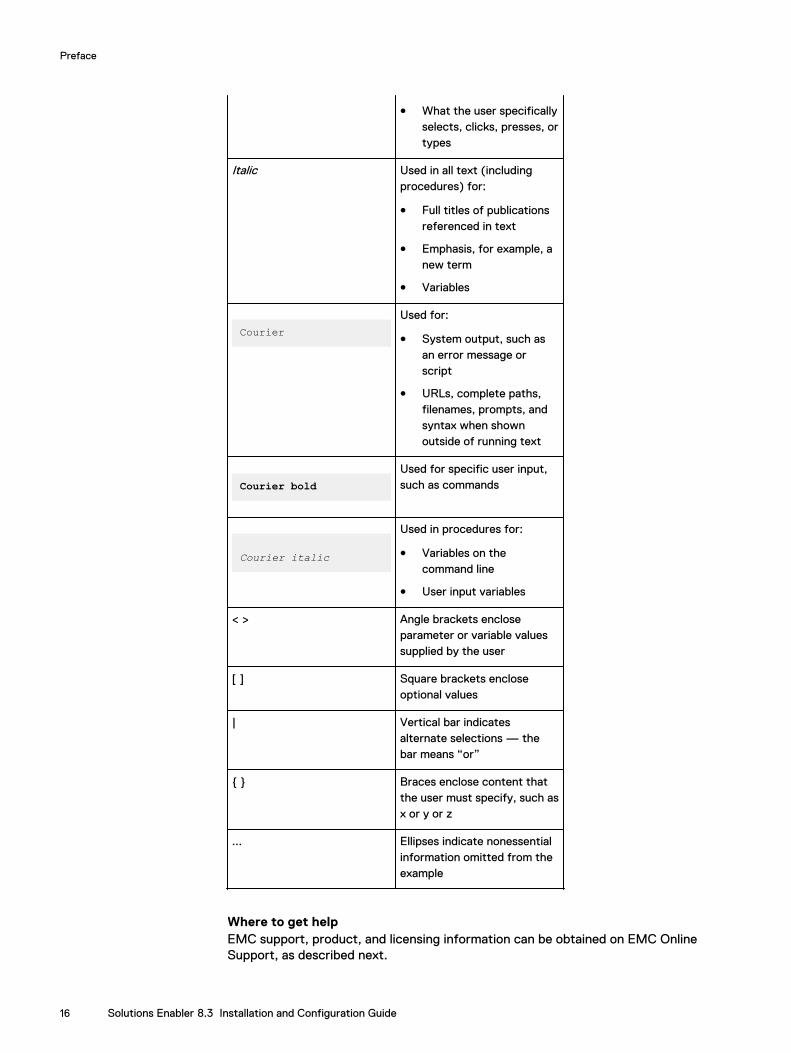
l What the user specificallyselects, clicks, presses, ortypes
Italic Used in all text (includingprocedures) for:
l Full titles of publicationsreferenced in text
l Emphasis, for example, anew term
l Variables
CourierUsed for:
l System output, such asan error message orscript
l URLs, complete paths,filenames, prompts, andsyntax when shownoutside of running text
Courier boldUsed for specific user input,such as commands
Courier italic
Used in procedures for:
l Variables on thecommand line
l User input variables
< > Angle brackets encloseparameter or variable valuessupplied by the user
[ ] Square brackets encloseoptional values
| Vertical bar indicatesalternate selections — thebar means “or”
{ } Braces enclose content thatthe user must specify, such asx or y or z
... Ellipses indicate nonessentialinformation omitted from theexample
Where to get helpEMC support, product, and licensing information can be obtained on EMC OnlineSupport, as described next.
Preface
16 Solutions Enabler 8.3 Installation and Configuration Guide
Note
To open a service request through EMC Online Support, you must have a valid supportagreement. Contact your EMC sales representative for details about obtaining a validsupport agreement or to answer any questions about your account.
Product informationFor documentation, release notes, software updates, or for information about EMCproducts, licensing, and service, go to EMC Online Support (registration required) at:
https://support.EMC.com
Technical supportEMC offers a variety of support options.
Support by Product
EMC offers consolidated, product-specific information on the Web at: https://support.EMC.com/products
The Support by Product web pages offer quick links to Documentation, WhitePapers, Advisories (such as frequently used Knowledgebase articles), andDownloads, as well as more dynamic content, such as presentations, discussion,relevant Customer Support Forum entries, and a link to EMC Live Chat.
EMC Live Chat
Open a Chat or instant message session with an EMC Support Engineer.
eLicensing supportTo activate your entitlements and obtain your license files, visit the Service Center on https://support.EMC.com, as directed on your License Authorization Code (LAC)letter emailed to you.
For help with missing or incorrect entitlements after activation (that is, expectedfunctionality remains unavailable because it is not licensed), contact your EMCAccount Representative or Authorized Reseller.
For help with any errors applying license files through Solutions Enabler, contact theEMC Customer Support Center.
If you are missing a LAC letter, or require further instructions on activating yourlicenses through the Online Support site, contact EMC's worldwide Licensing team at mailto:[email protected] or call:
l North America, Latin America, APJK, Australia, New Zealand: SVC4EMC(800-782-4362) and follow the voice prompts.
l EMEA: +353 (0) 21 4879862 and follow the voice prompts.
Your commentsYour suggestions help us improve the accuracy, organization, and overall quality of thedocumentation. Send your comments and feedback to: [email protected]
Preface
17
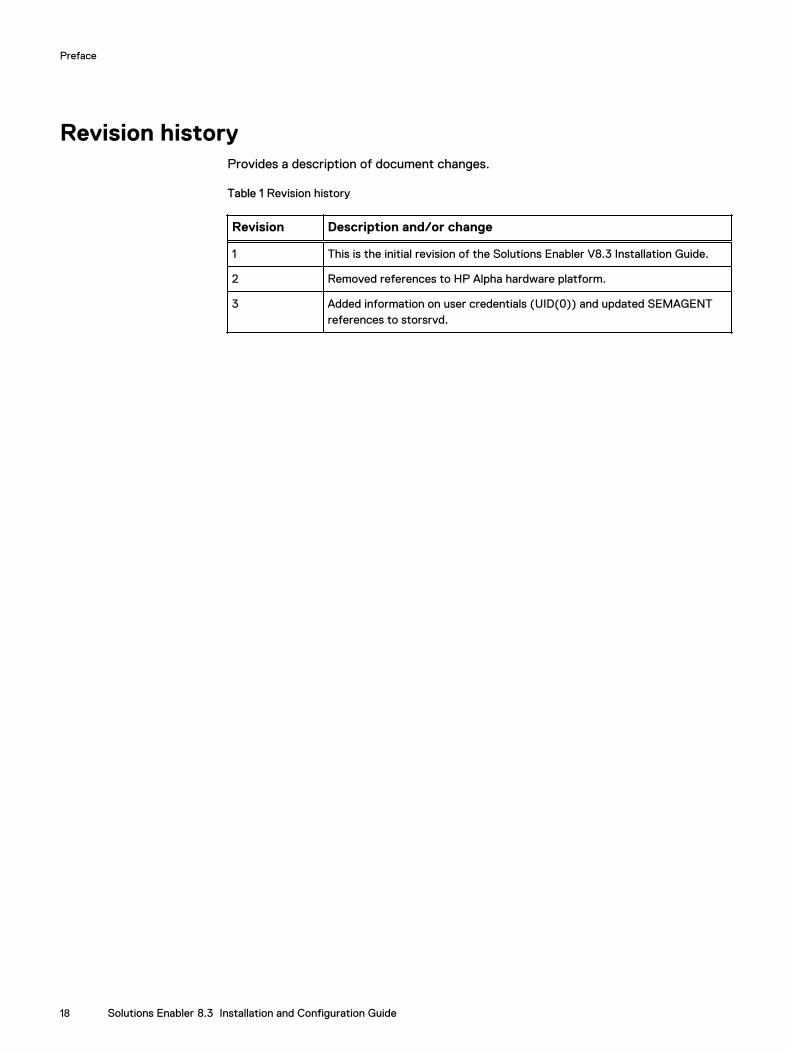
Revision historyProvides a description of document changes.
Table 1 Revision history
Revision Description and/or change
1 This is the initial revision of the Solutions Enabler V8.3 Installation Guide.
2 Removed references to HP Alpha hardware platform.
3 Added information on user credentials (UID(0)) and updated SEMAGENTreferences to storsrvd.
Preface
18 Solutions Enabler 8.3 Installation and Configuration Guide
CHAPTER 1
Installation prerequisites
This chapter explains the tasks that you should perform before installing SolutionsEnabler.
l Introduction....................................................................................................... 20l Before you begin................................................................................................20l Interoperability information................................................................................24l Environment and system requirements.............................................................. 28l Client or server installation.................................................................................43l Installation checklist...........................................................................................44
Installation prerequisites 19
IntroductionAn EMC Solutions Enabler install provides your host with SYMAPI, CLARAPI, andSTORAPI shared libraries for use by Solutions Enabler applications, and the SymmetrixCommand Line Interface (SYMCLI) for use by storage administrators and systemsengineers.
SYMCLI is a specialized library of UNIX-formatted commands that can be invoked oneat a time. It supports single command line entries and scripts to map and performcontrol operations on devices and data objects toward the management of yourstorage complex. It also monitors device configuration and status of devices that makeup the storage environment. The target storage environments are typically VMAXarrays.
Before you beginBefore you begin to install Solutions Enabler, be sure to complete the tasks listed inthis section.
General tasksThe following tasks apply to all supported platforms:
1. Obtain the software. Solutions Enabler is distributed as a platform-specific filedownload from the EMC Online Support at https://support.EMC.com
2. Review the interoperability information in the E-Lab™ Interoperability Navigatorwhich can be reached at http://elabnavigator.EMC.com
3. https://support.emc.com Review the EMC Solutions Enabler v8.3 Release Notes.
4. If you are upgrading from a previous version, verify that all application processesthat use the Solutions Enabler libraries and binaries are stopped. Stopping theapplication processes on page 112 provides instructions.
5. If you are upgrading from a previous version, create copies of the host databaseand configuration directories. These copies will be useful should you want to rollback to the previous version of Solutions Enabler. The location of these directoriesvary according to the operating system. Solutions Enabler Directories on page263 provides more information.
6. EMC recommends that you read the EMC VMAX Family Security ConfigurationGuide and apply the settings after installation.
UNIX-specific tasksThe following task is specific to UNIX environments:
l AIX does not allow changes to the destination path during installation. All binariesand libraries are installed under /opt/emc.If there is insufficient disk space under /opt, create a soft link to /opt/emc/ asshown below and then run the installer:
ln -s NewInstallationDir /opt/emc
Installation prerequisites
20 Solutions Enabler 8.3 Installation and Configuration Guide
The root user must have write permission on the NewInstallationDir.
Windows-specific tasksBefore starting the installation process, all Windows applications should be closed.This includes Windows Services and the Windows Event Viewer.
During the installation process, the Service List dialog will open so you can select thedaemons to start. You can prepare for this by reading the section Setting up daemonsfor distributed application support on page 139.
z/OS-specific tasksThe following tasks are specific to z/OS Mainframe environments:
l Verify that you have a Windows host running a version of PKZIP or WinZip thatsupports 2.04 G compression.You will need the Windows host to FTP the installation files to the z/OS host.
l Install ResourcePak® Base.At start up, Solutions Enabler checks that a minimum version of EMCResourcePak Base 7.6.0 is installed. However as ResourcePak versions go out ofsupport or array requirements change, you must install the version of EMCResourcePak Base required to support all host visible local or remote arrays.
Note
To work with VMAX3 arrays running HYPERMAX OS 5977 when using SolutionsEnabler installed on z/OS, you need ResourcePak Base version 8.0.0.
If you have already installed ResourcePak Base Version 7.6.0 or higher as part ofanother product installation, you do not need to re-install it. However, you shouldensure that all recommended maintenance is applied.
l Choose an installation/configuration user account.To run the installation jobs, you must choose a TSO account in your system thathas an OMVS segment defined in the security database. Since Solutions Enablerruns with the IBM Language Environment option POSIX(ON), the softwarerequires that you either have a base OMVS segment defined or have access to aninstallation default profile. Before running any Solutions Enabler jobs, ensure thatyou have a correctly defined the OMVS segment.
Note
The installation jobs OMVS segment must be defined with UID(0).
You should use this user's high-level qualifier when uploading the Solutions Enablerdistribution file from the installation to the host.
For more information on defining OMVS segments, see the IBM publication z/OSSecurity Server RACF Security Administrators' Guide.
l Gather the following customization information:
n Solutions Enabler dataset name prefixChoose the prefix for all the product data sets to be allocated for theinstallation. The prefix includes the high-level qualifier and all secondaryqualifiers except the last. For example, if you choose the defaultEMC.SSEM830 as the prefix, you will allocate EMC.SSEM830.LOADLIB,EMC.SSEM830.PARMLIB, and so on.
Installation prerequisites
Windows-specific tasks 21
Note
This should be the same prefix as the one you choose when you upload thedistribution file from the installation CD.
n SMP/E dataset name prefixIdentify the prefix for the SMP/E datasets of the environment into which youhave installed or will install the ResourcePak Base (EMCSCF). The defaultvalue is EMC.SMPE, which is the default for the ResourcePak Base product.
n SCF subsystem IDThe EMCSCF server address space uses a z/OS subsystem identifier (SSID) tomake itself known to applications that use its services. Solutions Enabler musthave the same SCF SSID as the ResourcePak Base started task that yourequire it to use. The default is EMC.
n SCF linklib prefixIdentify the prefix for the product datasets into which you have installed or willinstall the ResourcePak Base (EMCSCF) version 7.6.0 or higher. The defaultvalue is EMC.SSCF760, which is the default for the ResourcePak Baseproduct, version 7.6.0. The EMCSCF Linklib will be added to the STEPLIB DDstatement of the Solutions Enabler execution JCL.
n Disk unit name and volume serialChoose the unit name and a corresponding disk volume serial where you willinstall the Solutions Enabler product datasets. The default for unit name isSYSDA; there is no default for the volume serial.
n SYMAPI base directorySpecify a Unix System Services directory under which SYMAPI runtime subdirectories will be created.
By default, the SYMAPI base directory is /var/symapi. However, during theexecution of the Solutions Enabler SEMJCL installation procedure, you canchange the default to any directory you want, provided that the securitysettings for the userids that run the Solutions Enabler jobs have read/write/execute permissions for the entire SYMAPI base directory tree.
n SYMAPI base directory space requirementsThe space requirements for the SYMAPI base directory vary according to theactivities requested by clients (such as EMC Unisphere for VMAX) of theSolutions Enabler tasks. In addition, the logging options (type, detail, retentionperiod) you select will also affect the space requirements for the SYMAPI basedirectory. In most cases, 50 to 100 MB should be sufficient.
If you intend to configure the server to use SYMAPI_LE_DUMP_LOGDIR, youshould consider providing additional space. For more information onSYMAPI_LE_DUMP_LOGDIR, refer to the VMAX Management Software Eventsand Alerts Guide.
n Time zoneThe time stamp on messages written by Solutions Enabler to its internal logswill use the Portable Operating System Interface (POSIX) default—normallyCoordinated Universal Time (UTC). If you prefer a local time stamp, you willneed to provide a POSIX-compliant time zone value.
Configuring for local time zone on page 196 provides more information.
l Define the UNIX system services requirements:The following requirements apply to the userid of the installer which is the useridassigned to the started tasks or batch jobs used to run Solutions Enabler tasks
Installation prerequisites
22 Solutions Enabler 8.3 Installation and Configuration Guide

such as the SYMAPI server, storapid and event daemons. All userids runningSolutions Enabler tasks must have an OMVS segment and full read/write/executepermissions to the SYMAPI base directory (by default /var/symapi) and all thesub-directories.
Note
The installation jobs OMVS segment must be defined with UID(0).
Note
Throughout the rest of this manual, this directory will be referred to as thesymapi_installation_directory.
n Define the OMVS segment requirementWhen you are configuring Solutions Enabler JCL and your system to executethe SYMAPI server, you may need to add definitions to your local securitysystem.
If you are using IBM RACF, you may see message ICH408I when the serverinitializes. If you do, you must define an OMVS segment for the user or userswho will run the server job. The following sample message assumes the jobname and step name of the server are storsrvd:
*ICH408I JOB(storsrvd) STEP(storsrvd) CL(process) OMVS SEGMENT NOT DEFINED
If you are running the server as a started task, the user identity associated withthe STC must have an OMVS segment defined. This is also true for the useridassigned to the batch job running the server (if you choose to run it that way).
Note
For information on defining an OMVS segment for each user, refer to the IBMpublication z/OS Security Server RACF Security Administrator's Guide.
In addition, the userids must have full read/write permissions for the entiredirectory tree (specified during the install) of thesymapi_installation_directory. The Solutions Enabler daemons must all run withUID(0), because they need to delete/create/modify files or directories in theinstallation directory.
If these permissions are not granted to the installer or the SYMAPI tasks, thenvarious security error messages may be issued during the install or serversetup.
For example:
ICH408I USER(user) Group(group) Name(username) 035035 /var/symapi CL(DIRACC ) FID(01C8C6E2F0F0F200010D000000000003)035 INSUFFICIENT AUTHORITY TO MKDIR035 ACCESS INTENT(-W-) ACCESS ALLOWED(OTHER R-X)035 EFFECTIVE UID(0000888888) EFFECTIVE GID(0000000900)
Linux on System z-specific tasksThe following tasks are specific to Linux for IBM System z environments:
Installation prerequisites
Linux on System z-specific tasks 23
Note
Once you have completed the tasks in this section, continue with the UNIX installationprocedure in Installation prerequisites on page 19.
l Verify that you have a supported version of Linux for System z.l Verify that the installer is using root during both pre -and- post installation phases.l If Linux on System z is running as a guest under IBM's z/VM:
Verify that all VMAX CKD devices are defined as z/VM unsupported DASD andattached to the Linux guest. The devices must be defined to z/VM (by way of SETRDEV) as:
TYpe UNSUPported DEVCLass DASD DPS Yes RESERVE_RELease Yes
For example:
Set RDEVice 1300 TYpe UNSUPported DEVClass DASD DPS Yes RESERVE_RELease Yes
By default, these devices will all function as gatekeepers. However, you canindividually manage them by way of the gatekeeper select/avoid configurationfiles, as required.
MVS formatted devices (regular MVS volumes) accessible by Linux on System zwill appear in the Linux device tree. However, Solutions Enabler will not "discover"them, nor will it allow you to manage them by device name (such as, /dev/dasdf). In certain cases, you will be able to manage these devices by devicenumber (for example, on the symdg command). Any gatekeepers though must bedefined as unsupported DASD.
SYMAPI home directoryThe example procedures in this document assume that the Solutions Enabler<SYMAPI_HOME> directory is located at:
l Windows: c:\Program Files\EMC\SYMAPI...l UNIX: /var/symapi/ ...l z/OS: /var/symapi/ ...Pathnames presented in this document use a UNIX/specific format: forward slashes(/) instead of the backslashes (\) typically used on Windows platforms.
Note
By default, the location of <SYMAPI_HOME> is the same for both z/OS and UNIX.
Interoperability informationFor information on previously released Solutions Enabler, VSS Provider, and SMI-SProvider features, refer to the corresponding release notes located on EMC OnlineSupport at:
https://support.EMC.com
For detailed interoperability information, refer to E-Lab Interoperability Navigator at:
Installation prerequisites
24 Solutions Enabler 8.3 Installation and Configuration Guide
http://elabnavigator.EMC.com
Solutions Enabler
Support announcements
EMC lists the End of Service Life (EOSL) dates for the Solutions Enabler versions onEMC Online Support at https://support.EMC.com. On the EMC Online Support site,click Support > Support By Product in the main navigation bar. In the Find aProduct box, type Solutions Enabler and click the arrow. The Solutions Enabler pagewill appear and the Service Life details are available on the left-hand side of the page.
Solutions Enabler target revisions and adoption rates
EMC has established product target codes to ensure stable and reliable environments.As a best practice, it is recommended that you operate at the recommended targetcode or above to benefit from the latest enhancements and fixes.
To view the latest recommendations, search for Solutions Enabler Target Revisionsand Adoption Rates on EMC support.
Secure client/server root certificate replacement
The Solutions Enabler root certificate is used to generate and digitally sign subjectcertificates for use in SSL-secured client/server communications. The certificate isstored in the symapisrv_trust.pem file in the <SYMAPI_HOME>/config/certdirectory. The file shipped with releases of Solutions Enabler prior to V7.5 expired inJuly, 2014.
An updated root certificate is included with Solutions Enabler V7.5 and higher with anexpiration date of November, 2021.
Upon expiration of the older certificate, any client or server hosts which have notupgraded to Solutions Enabler V7.5 or higher will experience secure sessionnegotiation failures. EMC recommends upgrading to V8.3 or higher as soon as possibleto avoid outages due to the expiration of the older certificate.
For more information on certificate files, refer to the VMAX Family SecurityConfiguration Guide.
Solutions Enabler compatibility with other products
If you are using products that rely on Solutions Enabler, please review the EMCSupport Matrix at www.emc.com to verify that the product version you have issupported and fully compatible with this version of Solutions Enabler.
SMI-S Provider
Supported profiles
Table 2 on page 26 shows the SMI-S Provider supported profile groupings and theirnamespaces.
Installation prerequisites
Solutions Enabler 25
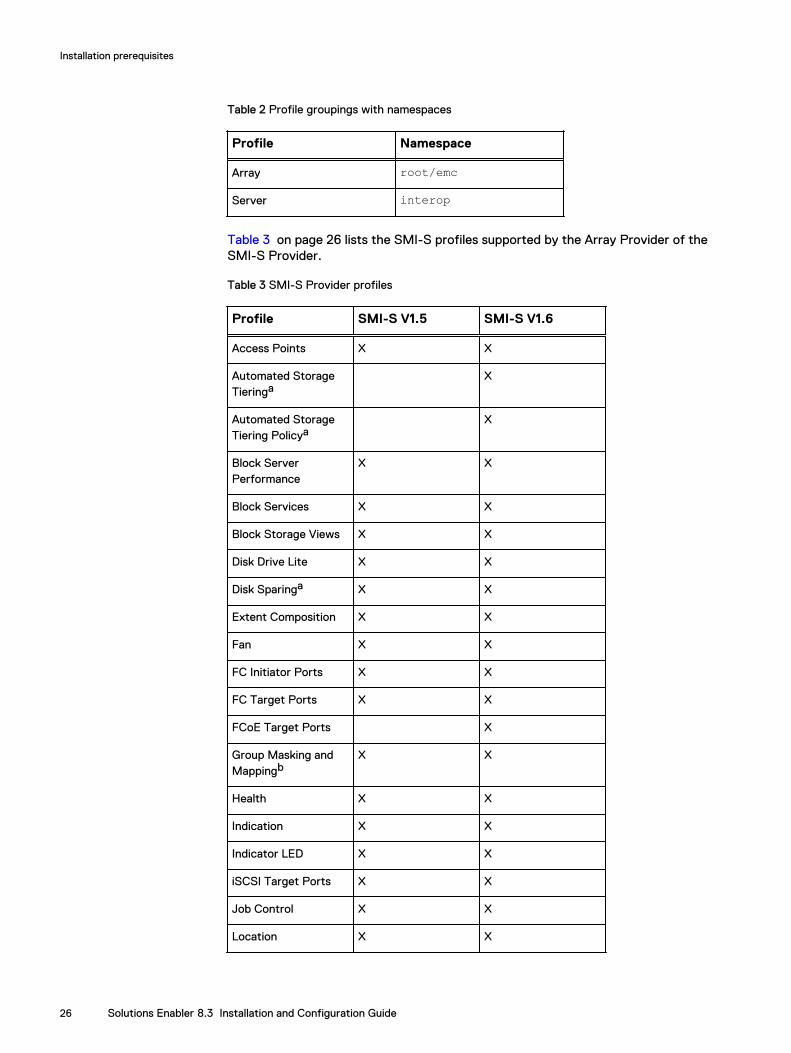
Table 2 Profile groupings with namespaces
Profile Namespace
Array root/emc
Server interop
Table 3 on page 26 lists the SMI-S profiles supported by the Array Provider of theSMI-S Provider.
Table 3 SMI-S Provider profiles
Profile SMI-S V1.5 SMI-S V1.6
Access Points X X
Automated StorageTieringa
X
Automated StorageTiering Policya
X
Block ServerPerformance
X X
Block Services X X
Block Storage Views X X
Disk Drive Lite X X
Disk Sparinga X X
Extent Composition X X
Fan X X
FC Initiator Ports X X
FC Target Ports X X
FCoE Target Ports X
Group Masking andMappingb
X X
Health X X
Indication X X
Indicator LED X X
iSCSI Target Ports X X
Job Control X X
Location X X
Installation prerequisites
26 Solutions Enabler 8.3 Installation and Configuration Guide
Table 3 SMI-S Provider profiles (continued)
Profile SMI-S V1.5 SMI-S V1.6
Multiple ComputerSystem
X X
Physical Package X X
Pools from Volumesb X X
Power Supply X X
Replication Servicesb X X
Software X X
Software Inventory X
Storage ElementProtectionb
X X
Storage Relocationb X
Thin Provisioningb X X
Volume Compositiona X X
a. Only supported for VMAX 10k/20k/40k arrays.b. This profile is considered experimental and may change in future releases. As a result,
backward compatibility cannot be guaranteed with the next release. Please contact EMCfor permission to use this profile.
Supported products and specifications
Table 4 on page 27 lists the SMI-S schemas and specifications supported by SMI-SProvider V8.3.
Table 4 SMI-S Provider support for SMI-S
Supported schemas and specifications
Distributed Management Task Force Common Information Model (DMTF CIM) SchemaV2.42.0
Storage Management Initiative Specification (SMI-S) V1.5.0, V1.6.0, V1.6.1
EMC ECOM V2.8.3.0.0.109a
a. This is included as part of the SMI-S Provider installation.
Rated metrics from VMAX3 arrays
SMI-S Provider V8.3 supports returning rated metrics from VMAX3 arrays. Ratedmetrics are obtained from a running instance of the Unisphere for VMAX applicationand provide the statistics in a calculated form per unit of time. The rates returned toSMI applications enable clients to consume the data directly without the need for anyformulas or derivations.
Installation prerequisites
SMI-S Provider 27

Environment and system requirements
Solutions EnablerConsider the following when working with Solutions Enabler V8.3.
Host systems and Enginuity support
Solutions Enabler runs on a wide range of 64-bit operating systems and works withcertain VMAX array versions. For detailed interoperability information, refer to E-LabInteroperability Navigator at:
http://elabnavigator.EMC.com
Disk space requirements
Table 5 on page 28 through Table 8 on page 31 list the disk space requirementsfor supported platforms.
Note
A value of 0 KBs means the component is not supported on that platform.
Table 5 Disk space requirements for AIX, Solaris Sparc UNIX
Install components(in KBs)
AIX Solaris Sparc
Persistent data files 2853 852
SSL Certificatecomponent
75 41
Thincore components 39158 11323
Base component (basestorage, base mapping,and control storagelibraries)
73681 38253
Command line tools(optional component)
91170 59379
Database mappings -SRM (optionalcomponent)
3390 659
SMI-S Provider (optionalcomponent)
0 0
Java Native Interface(optional component)
126576 52668
Symrecover includingPERL 5.8 for Star(optional component)
19623 18541
Installation prerequisites
28 Solutions Enabler 8.3 Installation and Configuration Guide
Table 5 Disk space requirements for AIX, Solaris Sparc UNIX (continued)
Install components(in KBs)
AIX Solaris Sparc
Enable 64-bit componentinstall
125290 38376
Table 6 Disk space requirements for HP-UX ia64, and Linux ia64
Installcomponents (inKBs)
HP-UX (ia64) Linux (ia64)
Persistent data files 2853 992
SSL Certificatecomponent
81 50
Thincore components 38649 24089
Base Component(Base Storage, BaseMapping, and ControlStorage libraries
79982 48195
Command line tools(optional component)
174732 98761
Database mappings -SRM (optionalcomponent)
934 820
SMI-S Provider(optionalcomponent)a
0 0
Java Native Interface(optional component)
0 0
Symrecover includingPERL 5.8 for Star(optional component)
24189 20416
Enable 64-bitcomponent install
0 0
a. SMI-S is listed strictly for sizing purposes and is installed with Solutions Enabler as part ofthe SMI-S Provider kit.
Installation prerequisites
Solutions Enabler 29
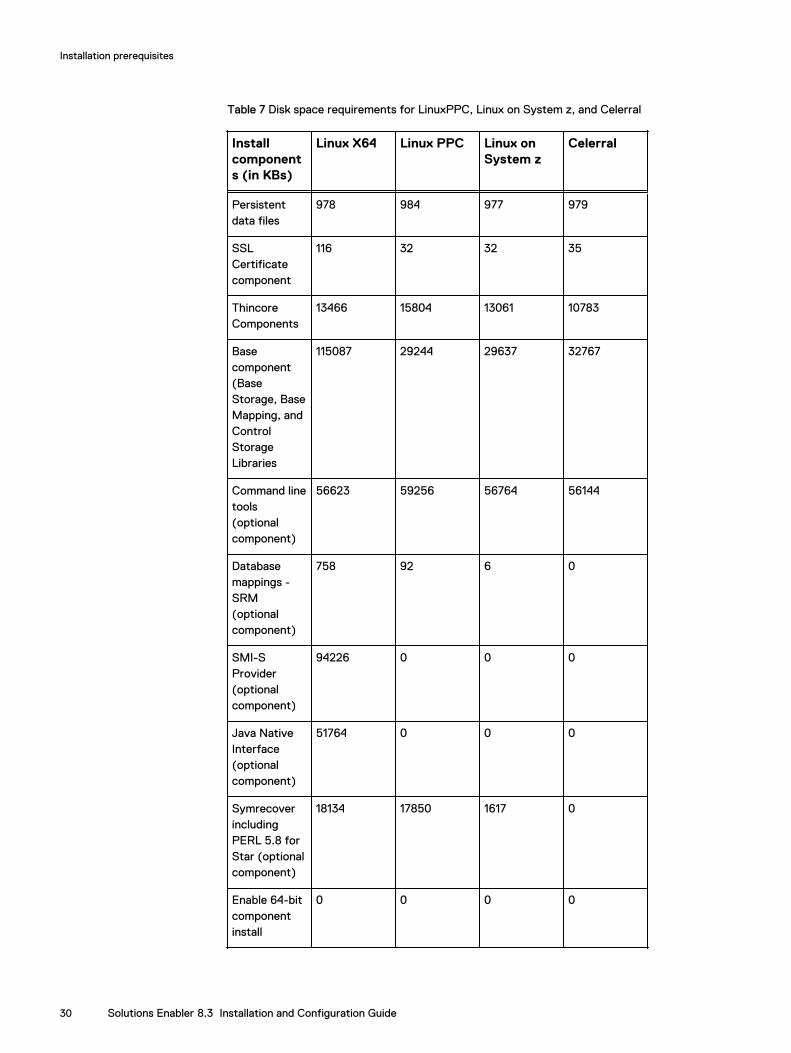
Table 7 Disk space requirements for LinuxPPC, Linux on System z, and Celerral
Installcomponents (in KBs)
Linux X64 Linux PPC Linux onSystem z
Celerral
Persistentdata files
978 984 977 979
SSLCertificatecomponent
116 32 32 35
ThincoreComponents
13466 15804 13061 10783
Basecomponent(BaseStorage, BaseMapping, andControlStorageLibraries
115087 29244 29637 32767
Command linetools(optionalcomponent)
56623 59256 56764 56144
Databasemappings -SRM(optionalcomponent)
758 92 6 0
SMI-SProvider(optionalcomponent)
94226 0 0 0
Java NativeInterface(optionalcomponent)
51764 0 0 0
SymrecoverincludingPERL 5.8 forStar (optionalcomponent)
18134 17850 1617 0
Enable 64-bitcomponentinstall
0 0 0 0
Installation prerequisites
30 Solutions Enabler 8.3 Installation and Configuration Guide
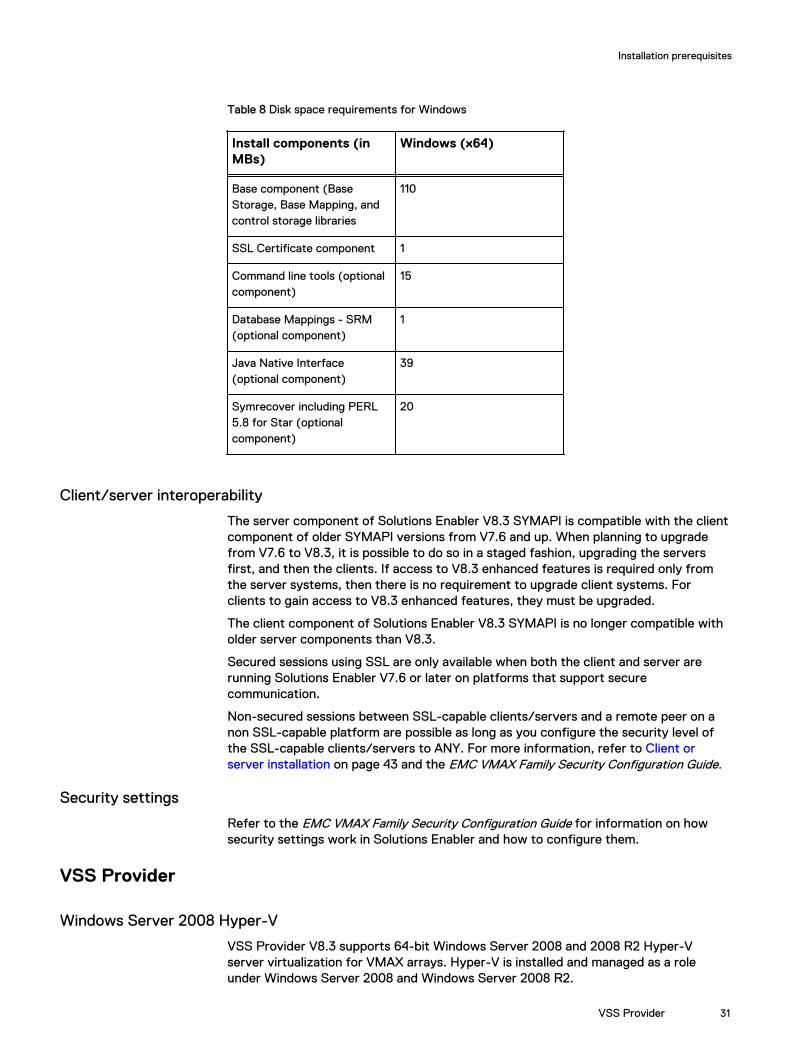
Table 8 Disk space requirements for Windows
Install components (inMBs)
Windows (x64)
Base component (BaseStorage, Base Mapping, andcontrol storage libraries
110
SSL Certificate component 1
Command line tools (optionalcomponent)
15
Database Mappings - SRM(optional component)
1
Java Native Interface(optional component)
39
Symrecover including PERL5.8 for Star (optionalcomponent)
20
Client/server interoperability
The server component of Solutions Enabler V8.3 SYMAPI is compatible with the clientcomponent of older SYMAPI versions from V7.6 and up. When planning to upgradefrom V7.6 to V8.3, it is possible to do so in a staged fashion, upgrading the serversfirst, and then the clients. If access to V8.3 enhanced features is required only fromthe server systems, then there is no requirement to upgrade client systems. Forclients to gain access to V8.3 enhanced features, they must be upgraded.
The client component of Solutions Enabler V8.3 SYMAPI is no longer compatible witholder server components than V8.3.
Secured sessions using SSL are only available when both the client and server arerunning Solutions Enabler V7.6 or later on platforms that support securecommunication.
Non-secured sessions between SSL-capable clients/servers and a remote peer on anon SSL-capable platform are possible as long as you configure the security level ofthe SSL-capable clients/servers to ANY. For more information, refer to Client orserver installation on page 43 and the EMC VMAX Family Security Configuration Guide.
Security settings
Refer to the EMC VMAX Family Security Configuration Guide for information on howsecurity settings work in Solutions Enabler and how to configure them.
VSS Provider
Windows Server 2008 Hyper-V
VSS Provider V8.3 supports 64-bit Windows Server 2008 and 2008 R2 Hyper-Vserver virtualization for VMAX arrays. Hyper-V is installed and managed as a roleunder Windows Server 2008 and Windows Server 2008 R2.
Installation prerequisites
VSS Provider 31
VSS Provider supports the following guest operating systems with Windows server2008 R2 (x64) as a parent operating system:
l Windows 2008 x64l Windows 2008 R2 x64l Windows Server 2012
Windows Server 2012 Hyper-V
VSS Provider V8.3 supports 64-bit Windows Server 2012 and 2012 R2 Hyper-V servervirtualization for VMAX arrays. Hyper-V is installed and managed as a role underWindows Server 2012 and 2012 R2.
VSS Provider supports the following guest operating systems with Windows server2012 or Windows server 2012 R2 as a parent operating system:
l Windows 2008 R2 x64l Windows 2012l Windows 2012 R2
Configuring the Hyper-V environment
For configuration instructions, refer to the Hyper-V Getting Started Guide andVirtualization with Hyper-V: FAQ located in the Microsoft TechNet Library.
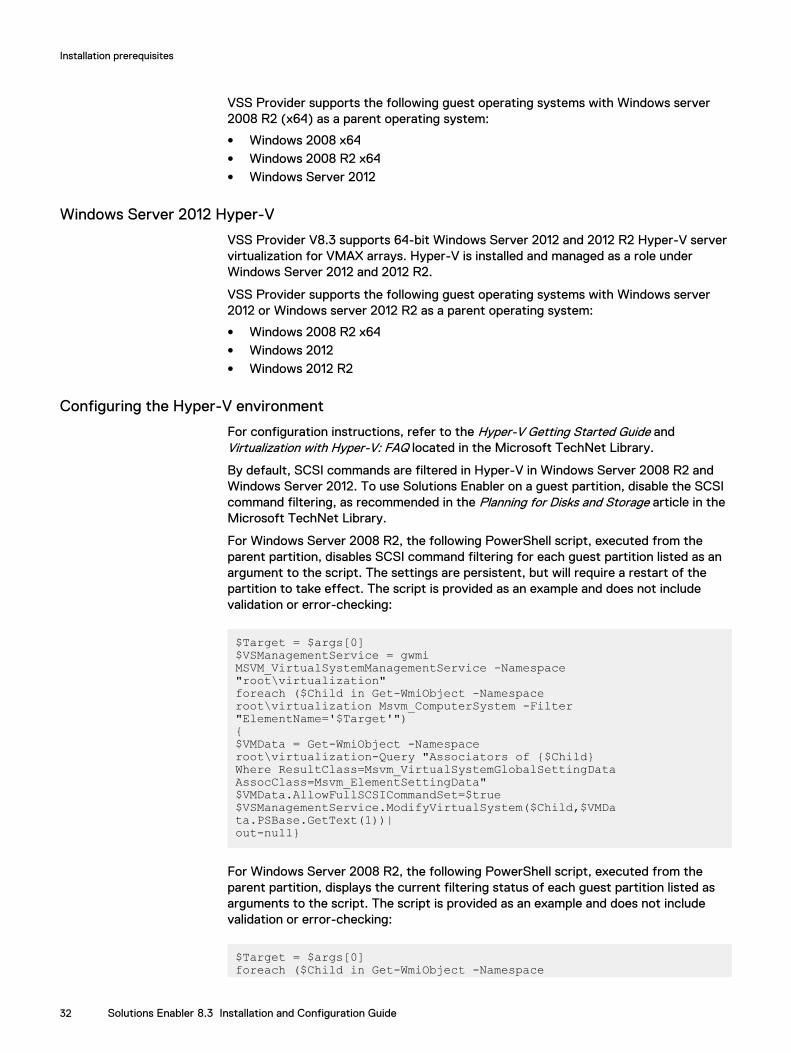
By default, SCSI commands are filtered in Hyper-V in Windows Server 2008 R2 andWindows Server 2012. To use Solutions Enabler on a guest partition, disable the SCSIcommand filtering, as recommended in the Planning for Disks and Storage article in theMicrosoft TechNet Library.
For Windows Server 2008 R2, the following PowerShell script, executed from theparent partition, disables SCSI command filtering for each guest partition listed as anargument to the script. The settings are persistent, but will require a restart of thepartition to take effect. The script is provided as an example and does not includevalidation or error-checking:
$Target = $args[0]$VSManagementService = gwmiMSVM_VirtualSystemManagementService -Namespace"root\virtualization"foreach ($Child in Get-WmiObject -Namespaceroot\virtualization Msvm_ComputerSystem -Filter"ElementName='$Target'"){$VMData = Get-WmiObject -Namespaceroot\virtualization-Query "Associators of {$Child}Where ResultClass=Msvm_VirtualSystemGlobalSettingDataAssocClass=Msvm_ElementSettingData"$VMData.AllowFullSCSICommandSet=$true$VSManagementService.ModifyVirtualSystem($Child,$VMData.PSBase.GetText(1))|out-null}
For Windows Server 2008 R2, the following PowerShell script, executed from theparent partition, displays the current filtering status of each guest partition listed asarguments to the script. The script is provided as an example and does not includevalidation or error-checking:
$Target = $args[0]foreach ($Child in Get-WmiObject -Namespace
Installation prerequisites
32 Solutions Enabler 8.3 Installation and Configuration Guide
root\virtualizationMsvm_ComputerSystem -Filter "ElementName='$Target'"){$VMData= Get-WmiObject -Namespaceroot\virtualization-Query "Associators of {$Child}Where ResultClass=Msvm_VirtualSystemGlobalSettingDataAssocClass=Msvm_ElementSettingData"Write-host "VirtualMachine:" $VMData.ElementNameWrite-Host "CurrentlyByPassingSCSIFiltering:"$VMData.AllowFullSCSICommandSet}
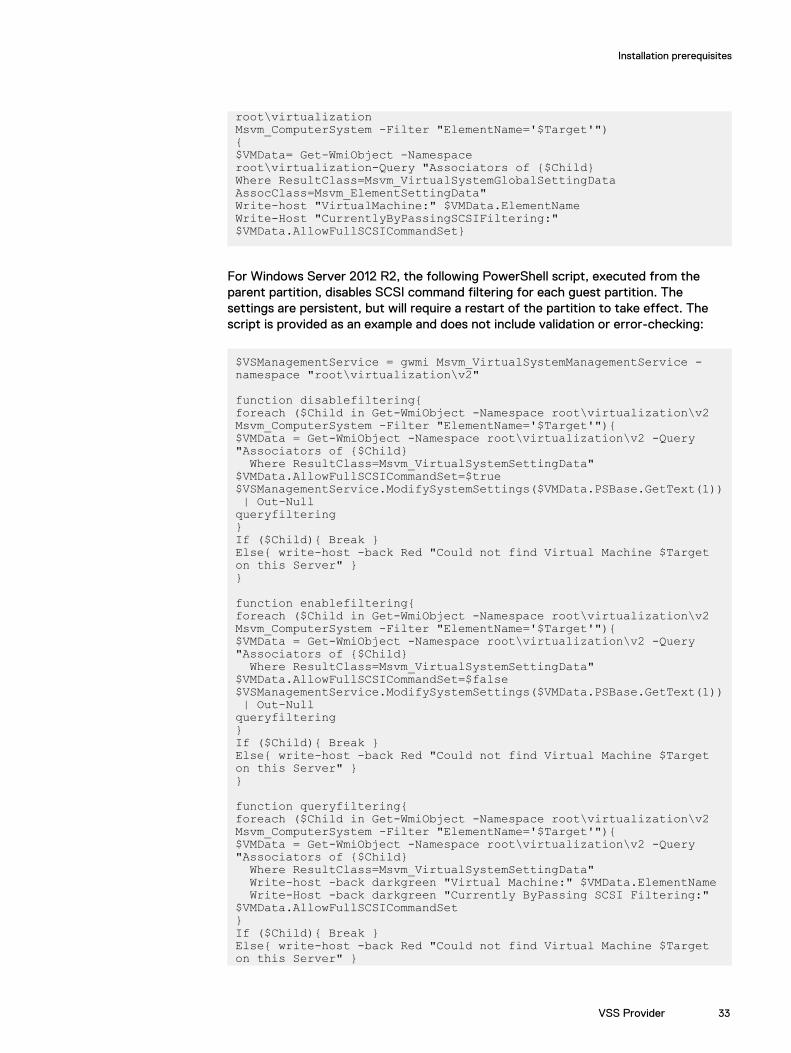
For Windows Server 2012 R2, the following PowerShell script, executed from theparent partition, disables SCSI command filtering for each guest partition. Thesettings are persistent, but will require a restart of the partition to take effect. Thescript is provided as an example and does not include validation or error-checking:
$VSManagementService = gwmi Msvm_VirtualSystemManagementService -namespace "root\virtualization\v2"
function disablefiltering{foreach ($Child in Get-WmiObject -Namespace root\virtualization\v2 Msvm_ComputerSystem -Filter "ElementName='$Target'"){$VMData = Get-WmiObject -Namespace root\virtualization\v2 -Query "Associators of {$Child} Where ResultClass=Msvm_VirtualSystemSettingData"$VMData.AllowFullSCSICommandSet=$true$VSManagementService.ModifySystemSettings($VMData.PSBase.GetText(1)) | Out-Nullqueryfiltering}If ($Child){ Break }Else{ write-host -back Red "Could not find Virtual Machine $Target on this Server" }}
function enablefiltering{foreach ($Child in Get-WmiObject -Namespace root\virtualization\v2 Msvm_ComputerSystem -Filter "ElementName='$Target'"){$VMData = Get-WmiObject -Namespace root\virtualization\v2 -Query "Associators of {$Child} Where ResultClass=Msvm_VirtualSystemSettingData"$VMData.AllowFullSCSICommandSet=$false$VSManagementService.ModifySystemSettings($VMData.PSBase.GetText(1)) | Out-Nullqueryfiltering}If ($Child){ Break }Else{ write-host -back Red "Could not find Virtual Machine $Target on this Server" }}
function queryfiltering{foreach ($Child in Get-WmiObject -Namespace root\virtualization\v2 Msvm_ComputerSystem -Filter "ElementName='$Target'"){$VMData = Get-WmiObject -Namespace root\virtualization\v2 -Query "Associators of {$Child} Where ResultClass=Msvm_VirtualSystemSettingData" Write-host -back darkgreen "Virtual Machine:" $VMData.ElementName Write-Host -back darkgreen "Currently ByPassing SCSI Filtering:" $VMData.AllowFullSCSICommandSet}If ($Child){ Break }Else{ write-host -back Red "Could not find Virtual Machine $Target on this Server" }
Installation prerequisites
VSS Provider 33
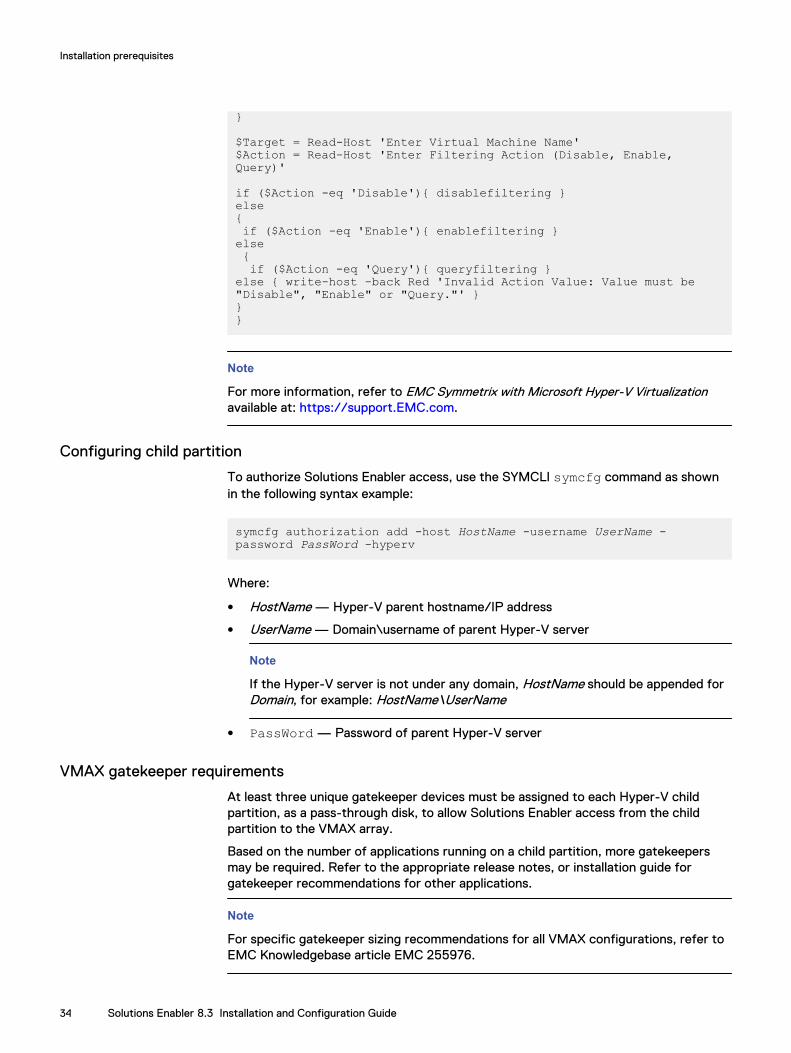
}
$Target = Read-Host 'Enter Virtual Machine Name'$Action = Read-Host 'Enter Filtering Action (Disable, Enable, Query)'
if ($Action -eq 'Disable'){ disablefiltering }else{ if ($Action -eq 'Enable'){ enablefiltering }else { if ($Action -eq 'Query'){ queryfiltering }else { write-host -back Red 'Invalid Action Value: Value must be "Disable", "Enable" or "Query."' }}}
Note
For more information, refer to EMC Symmetrix with Microsoft Hyper-V Virtualizationavailable at: https://support.EMC.com.
Configuring child partition
To authorize Solutions Enabler access, use the SYMCLI symcfg command as shownin the following syntax example:
symcfg authorization add -host HostName -username UserName -password PassWord -hyperv
Where:
l HostName — Hyper-V parent hostname/IP address
l UserName — Domain\username of parent Hyper-V server
Note
If the Hyper-V server is not under any domain, HostName should be appended forDomain, for example: HostName\UserName
l PassWord — Password of parent Hyper-V server
VMAX gatekeeper requirements
At least three unique gatekeeper devices must be assigned to each Hyper-V childpartition, as a pass-through disk, to allow Solutions Enabler access from the childpartition to the VMAX array.
Based on the number of applications running on a child partition, more gatekeepersmay be required. Refer to the appropriate release notes, or installation guide forgatekeeper recommendations for other applications.
Note
For specific gatekeeper sizing recommendations for all VMAX configurations, refer toEMC Knowledgebase article EMC 255976.
Installation prerequisites
34 Solutions Enabler 8.3 Installation and Configuration Guide
Hyper-V connectivity support issues
Fibre Channel and iSCSI connectivity to the Hyper-V server is supported for VMAXarrays running HYPERMAX OS 5977 and Enginuity 5876.
VSS Provider V8.3 does not support snapshot creation using iSCSI connected deviceson guest virtual machines hosted on the Hyper-V server though devices connectedthrough Fibre Channel are supported on guest VMs.
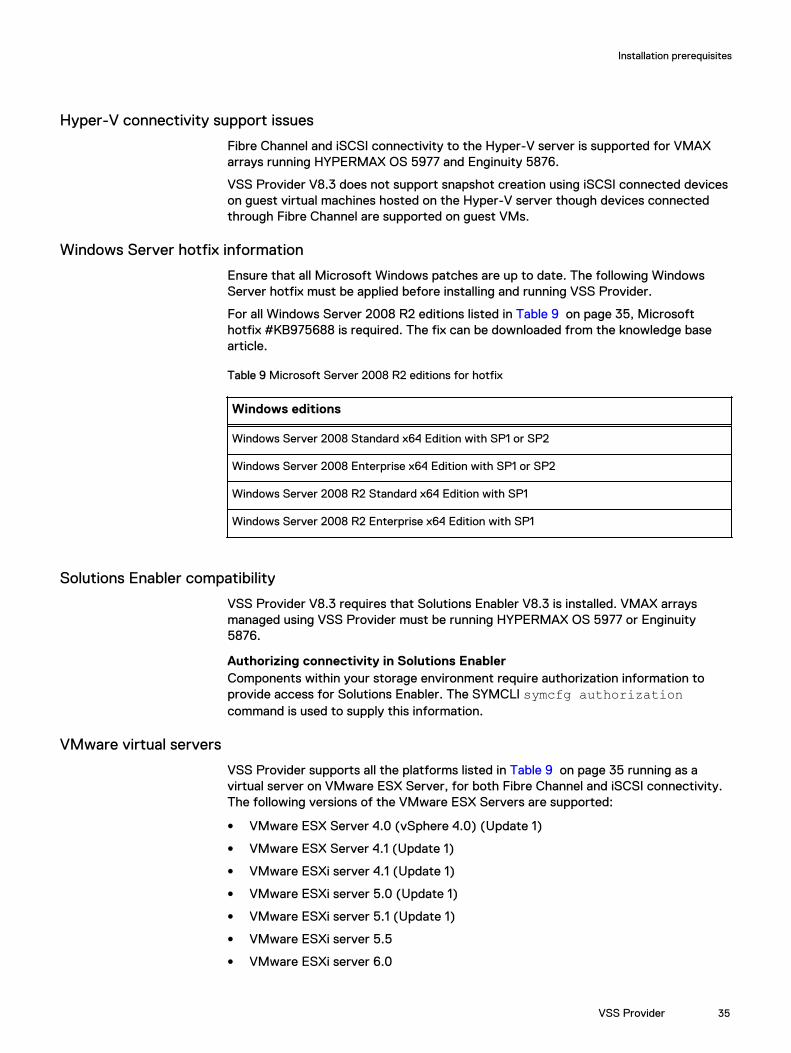
Windows Server hotfix information
Ensure that all Microsoft Windows patches are up to date. The following WindowsServer hotfix must be applied before installing and running VSS Provider.
For all Windows Server 2008 R2 editions listed in Table 9 on page 35, Microsofthotfix #KB975688 is required. The fix can be downloaded from the knowledge basearticle.
Table 9 Microsoft Server 2008 R2 editions for hotfix
Windows editions
Windows Server 2008 Standard x64 Edition with SP1 or SP2
Windows Server 2008 Enterprise x64 Edition with SP1 or SP2
Windows Server 2008 R2 Standard x64 Edition with SP1
Windows Server 2008 R2 Enterprise x64 Edition with SP1
Solutions Enabler compatibility
VSS Provider V8.3 requires that Solutions Enabler V8.3 is installed. VMAX arraysmanaged using VSS Provider must be running HYPERMAX OS 5977 or Enginuity5876.
Authorizing connectivity in Solutions EnablerComponents within your storage environment require authorization information toprovide access for Solutions Enabler. The SYMCLI symcfg authorizationcommand is used to supply this information.
VMware virtual servers
VSS Provider supports all the platforms listed in Table 9 on page 35 running as avirtual server on VMware ESX Server, for both Fibre Channel and iSCSI connectivity.The following versions of the VMware ESX Servers are supported:
l VMware ESX Server 4.0 (vSphere 4.0) (Update 1)
l VMware ESX Server 4.1 (Update 1)
l VMware ESXi server 4.1 (Update 1)
l VMware ESXi server 5.0 (Update 1)
l VMware ESXi server 5.1 (Update 1)
l VMware ESXi server 5.5
l VMware ESXi server 6.0
Installation prerequisites
VSS Provider 35
Refer to VMware vSphere and ESX documentation sets for detailed configurationinstructions for ESX Server. You can find the most up-to-date VMware technicaldocumentation on the VMware website.
VMware configuration guidelines for ESX virtual server
To configure an ESX virtual server to properly run the VSS Provider, follow theseconfiguration steps:
Procedure
1. Install VMware tools on each virtual server where the VSS Provider is installed.
2. After creating your virtual machine, run the vicfg.exe utility to create anentry for the symcfg authorization database to configure communication withESX Server.
3. For a virtual machine running on VMware ESX Server 4.0, configure the virtualmachine with the fully qualified domain name (FQDN).
VMware configuration guidelines for ESXi virtual server
To configure an ESXi virtual server to properly run the VSS Provider, follow theseconfiguration steps:
Procedure
1. Install VMware tools on each virtual sever where the VSS Provider is installed.
2. Use the SYMCLI symcfg command as shown in the following example:
symcfg authorization add -host HostName -username UserName -password PassWord -namespace NameSpace -port Port -vmware
Where:
l HostName — ESXi server hostname/IP address
l UserName — username of ESXi server. Should be a root user.
l PassWord — password of ESXi server
l NameSpace — namespace which qualifies the VMware web service address
l Port — port at which the VMware web service is listening
Additional VMware virtual server support issues
Note the following support issues when running VSS Provider with VMware virtualservers:
l For VMAX arrays, the SPC-2 port flag must be set on all front-end ports to whichthe virtual server is connected.
l For VMAX arrays, the ACLX port flag must be enabled on the front-end directors.
l Fibre Channel connectivity to the ESX Server is supported. iSCSI connectivity isnot supported for VMAX3 arrays running HYPERMAX OS 5977.
l For iSCSI support for VMAX 10K, 20K, 40K arrays running Enginuity 5876, theiSCSI initiator name on the ESX Server and virtual machine must be the same.Refer to your VMware documentation for enabling iSCSI on virtual machines.
Installation prerequisites
36 Solutions Enabler 8.3 Installation and Configuration Guide
l At least three unique gatekeeper devices must be assigned to each ESX/ESXi VM.
SMI-S Provider
VMAX gatekeeper requirements
When using the SMI-S Provider V8.3 to manage VMAX arrays, it is recommended thatsix gatekeepers be present for use by the provider.
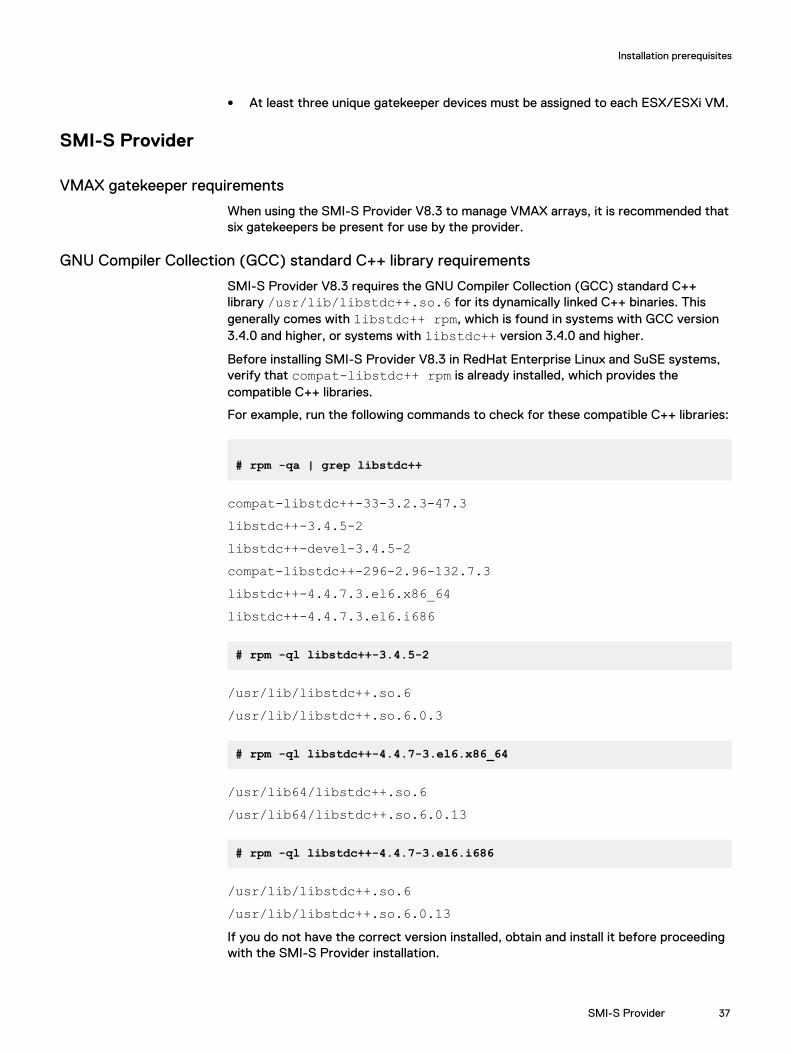
GNU Compiler Collection (GCC) standard C++ library requirements
SMI-S Provider V8.3 requires the GNU Compiler Collection (GCC) standard C++library /usr/lib/libstdc++.so.6 for its dynamically linked C++ binaries. Thisgenerally comes with libstdc++ rpm, which is found in systems with GCC version3.4.0 and higher, or systems with libstdc++ version 3.4.0 and higher.
Before installing SMI-S Provider V8.3 in RedHat Enterprise Linux and SuSE systems,verify that compat-libstdc++ rpm is already installed, which provides thecompatible C++ libraries.
For example, run the following commands to check for these compatible C++ libraries:
# rpm -qa | grep libstdc++
compat-libstdc++-33-3.2.3-47.3libstdc++-3.4.5-2libstdc++-devel-3.4.5-2compat-libstdc++-296-2.96-132.7.3libstdc++-4.4.7.3.el6.x86_64libstdc++-4.4.7.3.el6.i686
# rpm -ql libstdc++-3.4.5-2
/usr/lib/libstdc++.so.6/usr/lib/libstdc++.so.6.0.3
# rpm -ql libstdc++-4.4.7-3.el6.x86_64
/usr/lib64/libstdc++.so.6/usr/lib64/libstdc++.so.6.0.13
# rpm -ql libstdc++-4.4.7-3.el6.i686
/usr/lib/libstdc++.so.6/usr/lib/libstdc++.so.6.0.13If you do not have the correct version installed, obtain and install it before proceedingwith the SMI-S Provider installation.
Installation prerequisites
SMI-S Provider 37
Run the following command to install the library:
# rpm -ivh compat-libstdc++*.rpm
WBEM infrastructure
SMI-S Provider V8.3 utilizes an EMC-based WBEM (Web-Based EnterpriseManagement) infrastructure called EMC CIM Object Manager (ECOM). This WBEMinfrastructure is used for both proxy and embedded environments across all EMChardware and software platforms to ensure consistent implementation and experienceacross EMC products.
For detailed information about ECOM, see the ECOM Deployment and ConfigurationGuide.
z/OS-specific requirementsThe following are the z/OS-specific requirements.
Note
The following Solutions Enabler features are not supported on z/OS: RDF daemon,SRM, and Star. For more information, refer to Table 22 on page 140.
Platform requirements
EMC Solutions Enabler for z/OS runs on all IBM supported releases of z/OS, and itrequires a pre-existing SMP/E environment.
Some of the z/OS components that Solutions Enabler for z/OS uses are:
l Language Environment services.
l UNIX System Services socket support.
l TCP/IP protocol stack.
Note
Only IBM TCP/IP has been qualified by EMC. Support for other TCP/IP protocolstacks must be requested through the EMC Request for Price Quotation (RPQ)process.
There are no special requirements to enable IBM TCP/IP support.
z/OS-specific directory structure requirements
With the introduction of SSL-protected client/server sessions, the installation processlooks for the installer's instructions about where to place the SYMAPI base directory.The base directory specifies a high-level location where the standard SYMAPIdirectory will reside. Since use of SSL was optional, the Unix System Servicesdirectories were not required to be created.
The SYMAPI directory structure is required on any host running Solutions EnablerV7.6 or higher. Configuration files must reside in the config directory under the basedirectory, and log files will be stored in the log directory.
Installation prerequisites
38 Solutions Enabler 8.3 Installation and Configuration Guide
Unix System Services file system requirements
The following are z/OS Unix System Services file system requirements:
LoggingThe server, base, and event daemon write data to log files in the Unix System Servicesfile system. Summary log data is written to SYSPRINT DD , but the comprehensivedetail is written to Unix System Services files.
SYMAPI log fileSolutions Enabler writes all SYMAPI log data to a standard dated log file in theSYMAPI log directory.
Unix System Services file system options
The following Unix System Services file system options can be configured to meetyour environment:
SYMAPI databaseMVS datasets (via DD SYM$DB) are not supported. The Unix System Services filesystem will always be used to store the database.
Avoid, Gatekeeper Avoid and Select, and INQ filesStarting with release V7.6, Solutions Enabler does not read select or avoid files usingJCL definitions. In other words, relevant DD statements (SYM$AVD, SYM$GAVD, SYM$GSEL, and/or SYM$INQ) are no longer supported in JCL. If they are present, anySymInit received will fail with an error messageSYMAPI_C_FILE_TYPE_NOT_SUPPORTED.
DD statements such as SYM$ENV and SCR$xxxx are still valid.
For more information on the avoidance and selection files, refer to Avoidance andselection files on page 190.
Running z/OS as a guest
When running z/OS as a guest under the z/VM operating system, the TimeFinder andSRDF utilities require special consideration. Devices must be defined to z/VM (SETRDEV) as:
TYpe UNSUPported DEVCLass DASD DPS Yes RESERVE_RELease Yes
These devices must be attached to the z/OS guest.
Note
VM does not allow volumes defined as unsupported to be attached to SYSTEM, orused to IPL a virtual machine.
Virtual memory requirements
Solutions Enabler software always uses allocated memory above the 16 MB line. Theactual region required depends on many factors such as the number of active tasksand connections, the number of managed VMAX arrays, and devices. It is not unusualfor Solutions Enabler tasks (especially the server and base daemons) to consumemany hundreds of megabytes of memory. If this is a possibility, consult with yoursystem programmer to ensure that paging environments are adjusted accordingly.
Installation prerequisites
z/OS-specific requirements 39
EMC recommends specifying REGION=0M on the JOB card or EXEC card for thefollowing jobs:
l #10ECCINl #STORSRV and any other JCL which uses #STORSRV as a model
l #STORAPI and any other JCL which uses #STORAPI as a model
l #STOREVT and any other JCL which uses #STOREVT as a model
l #STORGNS and any other JCL which uses #STORGNS as a model
These members are distributed with REGION=0M already specified on the EXEC cards.Your site may have SMF or JES exits or security rules established which restrict theuse of REGION=0M. Check with your system programmer to verify that the submittinguser has the authority to use REGION=0M.
Backward/forward compatibility for applicationsSolutions Enabler V8.3 can only read databases previously written by SolutionsEnabler V7.6 or higher. Database files earlier than V7.6 must be rebuilt. For details onrebuilding the SYMAPI and Base Daemon databases, see Knowledgebase article000009813.
In client/server mode, Solutions Enabler V8.3 servers only support clients runningSolutions Enabler V7.6 or higher.
Note
SYMAPI database access is not forward compatible because a SYMAPI library cannotaccess a database created by a newer version of a SYMAPI application. If, forexample, the version of the local library becomes out of sync with the version of thelocal SYMAPI database (as a V7.5 SYMAPI library call from a SYMAPI clientattempting to access a V8.3 database) it will return error:SYMAPI_C_DB_FILE_TOO_NEW. This restriction relates only to local databases. Inclient/server environments, accesses to a server database of a later version areautomatically resolved by the SYMAPI, which performs all necessary translation ofinformation between the client and the server.
Storage systemsThis section identifies storage system array models, operating software versions, andconfiguration requirements for the supported VMAX arrays.
VNX or CLARiiON arraysFrom Solutions Enabler V8.0, VNX and CLARiiON arrays are no longer supported.
SMI-S Provider array support
SMI-S Provider V8.3 supports the following VMAX storage families:
l VMAX3 Family (VMAX 100K, 200K and 400K)
l VMAX Family (VMAX 10K, 20K and 40K)
VSS Provider array support
VSS Provider supports VMAX Family arrays with Enginuity 5876 and VMAX3 Familyarrays with HYPERMAX OS 5977.
Installation prerequisites
40 Solutions Enabler 8.3 Installation and Configuration Guide

Supported HYPERMAX OSVMAX arrays managed using VSS Provider must be running Enginuity 5876 orHYPERMAX OS 5977.
ConnectivityBoth Fibre Channel and iSCSI connectivity are supported for VMAX arrays runningEnginuity 5876 and VMAX3 arrays running HYPERMAX OS 5977.
VMAX array configuration requirementsConfiguration requirements for using VSS Provider with VMAX arrays are as follows:
l Director flagsWhen using the VSS Provider with storage arrays, the following director flagsmust be enabled on all directors connecting to the VSS host:
n VCM director flag (VCM_state) — Enables the Volume Logix software on theVMAX array so that the VSS Provider can perform device masking. If this flagis not enabled, then the VSS Provider fails to create and import snapshots, dueto the lack of device masking capabilities.
n SPC-2 (SPC2_Protocol_Version) director flag— Forces the VMAX array toreport its device identifiers in a way that VSS recognizes. If this flag is notenabled, then the VSS service fails all snapshots before the VSS Provider iseven called.
n ACLX director flag — Must be enabled on the directors of VMAX arrays. Thisdirector flag enables the Auto-provisioning Groups software on the array sothat the VSS Provider can perform device masking. If this flag is not enabled,then the VSS Provider fails to create and import snapshots, due to the lack ofdevice masking capabilities.
l VMAX array masking viewAt least one masking view must be present before proceeding with any VSSProvider operations.
l TimeFinder MirrorVSS Provider requires a BCV to be paired with the source LUN. This requiresperforming a full Establish operation at some point. Multiple BCVs are supportedfor a given source LUN. Currently synchronized BCVs are used first, followed bythe oldest split BCV (longest time since last split).
TimeFinder Mirror is not supported when EnforceDefaultToClone is set toTrue in the registry.
VSS Provider supports both Thin BCV (TDEV+BCV) and thick BCV deviceconfigurations on VMAX 10K, 20K, and 40K arrays running Enginuity 5876.
l TimeFinder CloneTimeFinder Clone is supported only through EMC Requestors, which require theVSS requestor to handle all configuration requirements whenEnforceDefaultToClone is set to False in the registry. VSS expects thetarget clone to be in the Created or Recreated state whenRetainCloneSession is set to False in the registry.
l TimeFinder VP SnapVSS Provider supports TimeFinder VP Snap only when the registry keyEnforceVPSnap is set to True. With differential snapshots, VSS Provider looksfirst for a valid VP Snap replica. If a VP Snap session does not exist, the providerexits with a valid error message.
l Remote (SRDF ® ) TimeFinder Mirror (Remote BCV)
Installation prerequisites
Storage systems 41
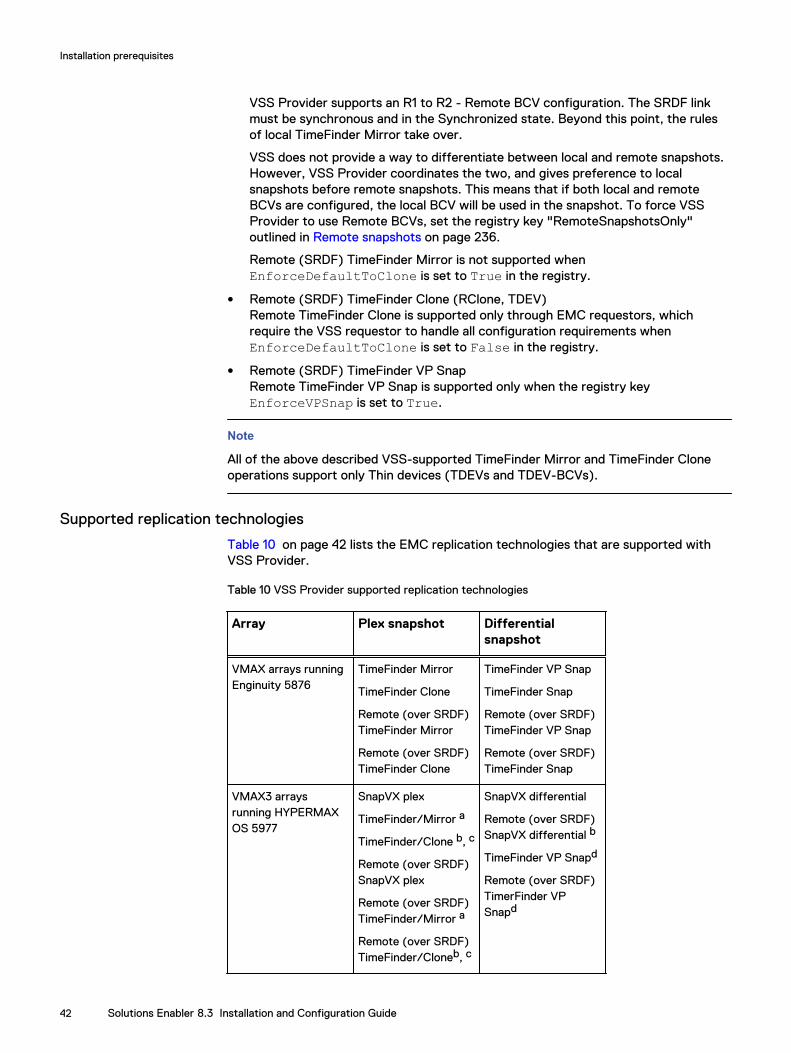
VSS Provider supports an R1 to R2 - Remote BCV configuration. The SRDF linkmust be synchronous and in the Synchronized state. Beyond this point, the rulesof local TimeFinder Mirror take over.
VSS does not provide a way to differentiate between local and remote snapshots.However, VSS Provider coordinates the two, and gives preference to localsnapshots before remote snapshots. This means that if both local and remoteBCVs are configured, the local BCV will be used in the snapshot. To force VSSProvider to use Remote BCVs, set the registry key "RemoteSnapshotsOnly"outlined in Remote snapshots on page 236.
Remote (SRDF) TimeFinder Mirror is not supported whenEnforceDefaultToClone is set to True in the registry.
l Remote (SRDF) TimeFinder Clone (RClone, TDEV)Remote TimeFinder Clone is supported only through EMC requestors, whichrequire the VSS requestor to handle all configuration requirements whenEnforceDefaultToClone is set to False in the registry.
l Remote (SRDF) TimeFinder VP SnapRemote TimeFinder VP Snap is supported only when the registry keyEnforceVPSnap is set to True.
Note
All of the above described VSS-supported TimeFinder Mirror and TimeFinder Cloneoperations support only Thin devices (TDEVs and TDEV-BCVs).
Supported replication technologies
Table 10 on page 42 lists the EMC replication technologies that are supported withVSS Provider.
Table 10 VSS Provider supported replication technologies
Array Plex snapshot Differentialsnapshot
VMAX arrays runningEnginuity 5876
TimeFinder Mirror
TimeFinder Clone
Remote (over SRDF)TimeFinder Mirror
Remote (over SRDF)TimeFinder Clone
TimeFinder VP Snap
TimeFinder Snap
Remote (over SRDF)TimeFinder VP Snap
Remote (over SRDF)TimeFinder Snap
VMAX3 arraysrunning HYPERMAXOS 5977
SnapVX plex
TimeFinder/Mirror a
TimeFinder/Clone b, c
Remote (over SRDF)SnapVX plex
Remote (over SRDF)TimeFinder/Mirror a
Remote (over SRDF)TimeFinder/Cloneb, c
SnapVX differential
Remote (over SRDF)SnapVX differential b
TimeFinder VP Snapd
Remote (over SRDF)TimerFinder VPSnapd
Installation prerequisites
42 Solutions Enabler 8.3 Installation and Configuration Guide
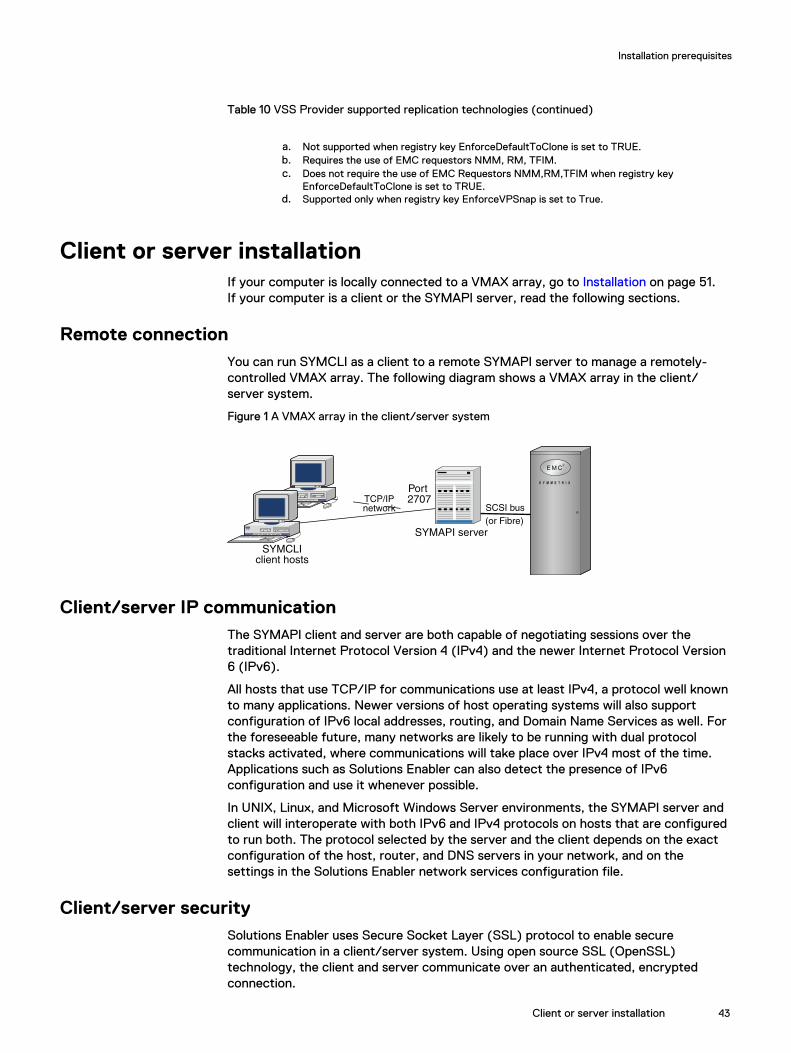
Table 10 VSS Provider supported replication technologies (continued)
a. Not supported when registry key EnforceDefaultToClone is set to TRUE.b. Requires the use of EMC requestors NMM, RM, TFIM.c. Does not require the use of EMC Requestors NMM,RM,TFIM when registry key
EnforceDefaultToClone is set to TRUE.d. Supported only when registry key EnforceVPSnap is set to True.
Client or server installationIf your computer is locally connected to a VMAX array, go to Installation on page 51.If your computer is a client or the SYMAPI server, read the following sections.
Remote connectionYou can run SYMCLI as a client to a remote SYMAPI server to manage a remotely-controlled VMAX array. The following diagram shows a VMAX array in the client/server system.
Figure 1 A VMAX array in the client/server system
SYMCLI client hosts
TCP/IP network
SYMAPI server
SCSI bus
(or Fibre)
Port 2707
Client/server IP communicationThe SYMAPI client and server are both capable of negotiating sessions over thetraditional Internet Protocol Version 4 (IPv4) and the newer Internet Protocol Version6 (IPv6).
All hosts that use TCP/IP for communications use at least IPv4, a protocol well knownto many applications. Newer versions of host operating systems will also supportconfiguration of IPv6 local addresses, routing, and Domain Name Services as well. Forthe foreseeable future, many networks are likely to be running with dual protocolstacks activated, where communications will take place over IPv4 most of the time.Applications such as Solutions Enabler can also detect the presence of IPv6configuration and use it whenever possible.
In UNIX, Linux, and Microsoft Windows Server environments, the SYMAPI server andclient will interoperate with both IPv6 and IPv4 protocols on hosts that are configuredto run both. The protocol selected by the server and the client depends on the exactconfiguration of the host, router, and DNS servers in your network, and on thesettings in the Solutions Enabler network services configuration file.
Client/server securitySolutions Enabler uses Secure Socket Layer (SSL) protocol to enable securecommunication in a client/server system. Using open source SSL (OpenSSL)technology, the client and server communicate over an authenticated, encryptedconnection.
Installation prerequisites
Client or server installation 43
When a client attempts to connect to a server, the two machines exchange ahandshake in which they both identify their security expectations and capabilities. Iftheir security capabilities are the same, the two will negotiate the appropriate type ofsession (secure or non-secure). If their security capabilities are different, either theclient or the server will reject the session.
The SYMAPI client and server are initially configured to communicate via securesessions. You must modify this behavior if a platform in the environment does notsupport secure communications. The EMC VMAX Family Security Configuration Guideprovides instructions on modifying this default behavior.
Table 11 on page 44 lists the host operating systems that support SSL.
Table 11 Host operating system support for SSL
Supported operatingsystem
AIX (64-bit)
HP-UX (64-bit)
HP-UX Itanium (64-bit)
Linux Itanium (64-bit)
Linux AMD (64-bit)
Solaris (64-bit)
Windows AMD (64-bit)
z/OS
Client/server system installationThe following information outlines procedures for installing Solutions Enabler in aclient/server system:
Procedure
1. Install Solutions Enabler software in the machine designated as the client,according to the procedures in Installation on page 51.
2. Install the same Solutions Enabler software in the machine designated as theserver, according to the procedures in Installation on page 51.
3. Edit the netcnfg file in the client machine to include the host name or IPaddress of the server. SYMCLI through a remote server on page 210 providesinstructions.
4. Issue a stordaemon start storsrvd command on the server machine. SYMCLI through a remote server on page 210 provides instructions.
5. Set environment variables SYMCLI_CONNECT and SYMCLI_CONNECT_TYPE onthe client. SYMCLI through a remote server on page 210 provides instructions.
Installation checklistThis section provides operating system-specific checklists with high-level installationand configuration steps that advanced Windows and UNIX users may find useful:
Installation prerequisites
44 Solutions Enabler 8.3 Installation and Configuration Guide
l Windows installation check list on page 45
l UNIX installation check list on page 47
Windows installation check list
Table 12 Windows installation check list
Task More Information Done
Pre-Installation
Ready theenvironment forSolutions Enabler.
For instructions andrequirements, refer to Before you begin onpage 20 and Environment andsystem requirementson page 28,respectively.
Installation
1. Download theinstallation package
N/A
2. Start theinstallation wizard byrunning the following:
se8300-WINDOWS-x64.exe
For information onrunning theinstallation from thecommand line, referto Using thecommand line on page70.
If you select thecustom installationoption, Table 16 onpage 68 describesthe available options.
Post installation
1. Enable theSolutions Enablerfeatures with thefollowing command:
symlmf add
For more information,refer to "Licensingyour software" onpage 85.
2. Build the SYMAPIdatabase by enteringthe followingcommand:
symcfg discover
For more information,refer to "Building theSYMAPI database" onpage 107.
3. Set theenvironment variablesso you can directly
For more information,refer to "Settingenvironment
Installation prerequisites
Windows installation check list 45
Table 12 Windows installation check list (continued)
Task More Information Done
access the SYMCLIcommands byensuring that thefollowing SYMCLIdirectory is appendedto the MS-DOSvariable path:
C:\Program Files\EMC\SYMCLI\bin
variables" on page108.
4. Optional: Read theEMC VMAX FamilySecurity ConfigurationGuide and applyrelated securitysettings.
For more information,refer to EMC VMAXFamily SecurityConfiguration Guide.
5. Optional: Modifythe scope/performance of theSYMCLI commandswith the gkavoid,
gkselect,
inqfile, symavoidfiles.
For more information,refer to Avoidanceand selection files onpage 136.
6. Optional: Create anoptions file to modifythe default behaviorof Solutions Enabler.This file is initiallyinstalled asREADME.options in
the SYMAPIconfigurationdirectory.
For more information,refer to "Changingthe default behaviorof SYMCLI" on page112.
7. Optional: Configurethe necessarydaemons for theenvironment.
For instructions, referto:
l Setting updaemons fordistributedapplicationsupport on page139
l "Managing thebase daemon" onpage 119
l "Setting up theevent daemon for
Installation prerequisites
46 Solutions Enabler 8.3 Installation and Configuration Guide
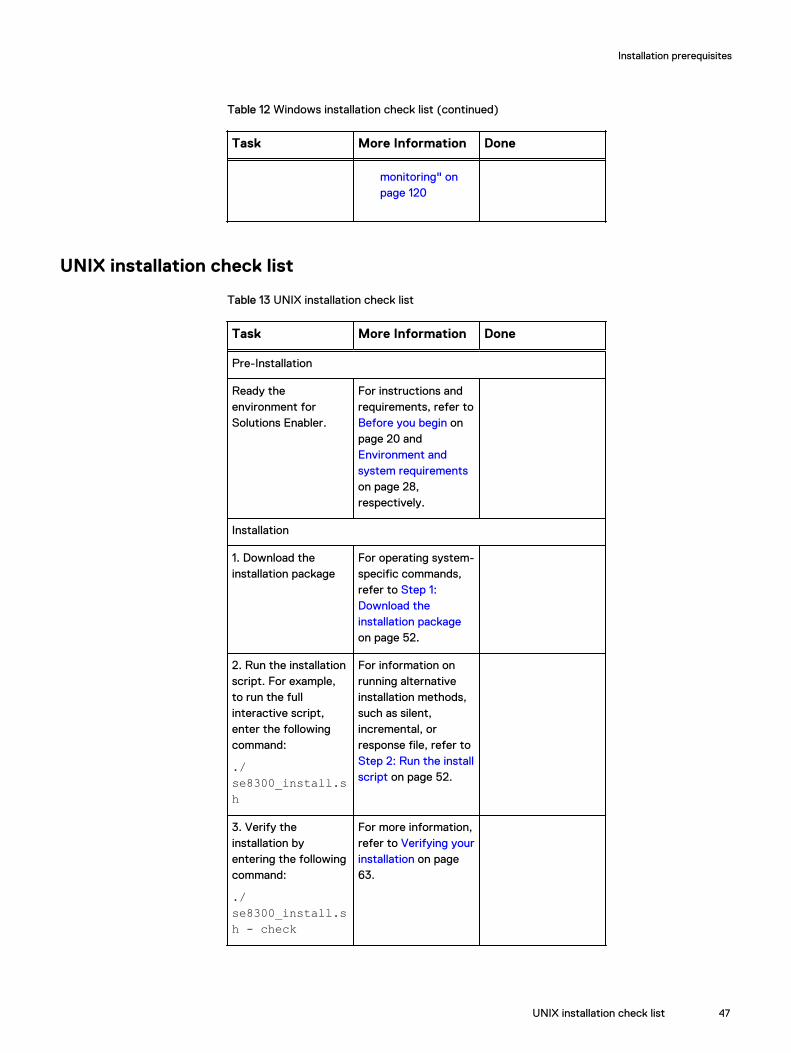
Table 12 Windows installation check list (continued)
Task More Information Done
monitoring" onpage 120
UNIX installation check list
Table 13 UNIX installation check list
Task More Information Done
Pre-Installation
Ready theenvironment forSolutions Enabler.
For instructions andrequirements, refer to Before you begin onpage 20 and Environment andsystem requirementson page 28,respectively.
Installation
1. Download theinstallation package
For operating system-specific commands,refer to Step 1:Download theinstallation packageon page 52.
2. Run the installationscript. For example,to run the fullinteractive script,enter the followingcommand:
./se8300_install.sh
For information onrunning alternativeinstallation methods,such as silent,incremental, orresponse file, refer to Step 2: Run the installscript on page 52.
3. Verify theinstallation byentering the followingcommand:
./se8300_install.sh - check
For more information,refer to Verifying yourinstallation on page63.
Installation prerequisites
UNIX installation check list 47
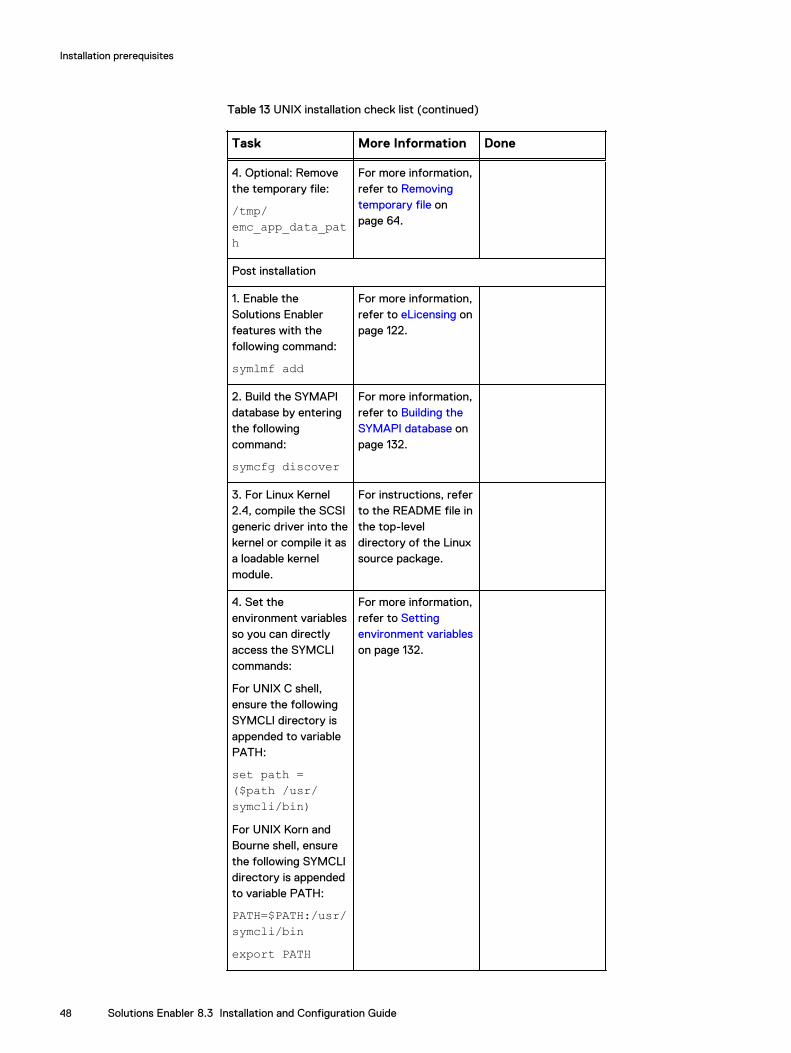
Table 13 UNIX installation check list (continued)
Task More Information Done
4. Optional: Removethe temporary file:
/tmp/emc_app_data_path
For more information,refer to Removingtemporary file onpage 64.
Post installation
1. Enable theSolutions Enablerfeatures with thefollowing command:
symlmf add
For more information,refer to eLicensing onpage 122.
2. Build the SYMAPIdatabase by enteringthe followingcommand:
symcfg discover
For more information,refer to Building theSYMAPI database onpage 132.
3. For Linux Kernel2.4, compile the SCSIgeneric driver into thekernel or compile it asa loadable kernelmodule.
For instructions, referto the README file inthe top-leveldirectory of the Linuxsource package.
4. Set theenvironment variablesso you can directlyaccess the SYMCLIcommands:
For UNIX C shell,ensure the followingSYMCLI directory isappended to variablePATH:
set path =($path /usr/symcli/bin)For UNIX Korn andBourne shell, ensurethe following SYMCLIdirectory is appendedto variable PATH:
PATH=$PATH:/usr/symcli/binexport PATH
For more information,refer to Settingenvironment variableson page 132.
Installation prerequisites
48 Solutions Enabler 8.3 Installation and Configuration Guide
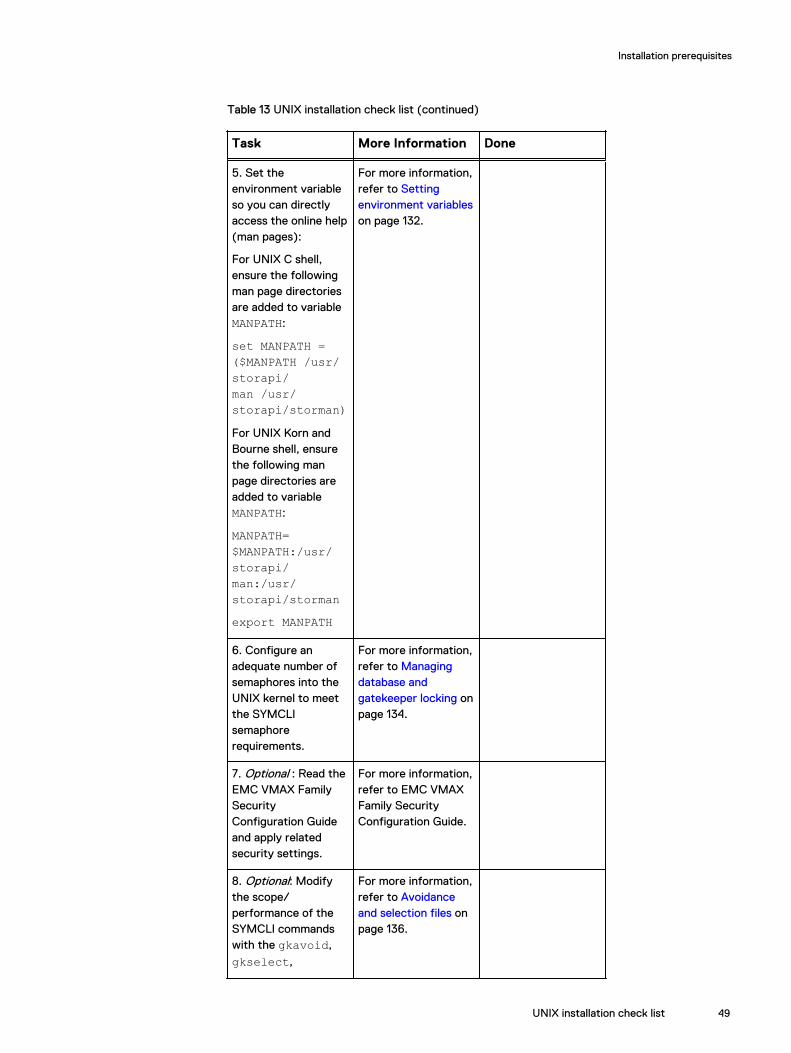
Table 13 UNIX installation check list (continued)
Task More Information Done
5. Set theenvironment variableso you can directlyaccess the online help(man pages):
For UNIX C shell,ensure the followingman page directoriesare added to variableMANPATH:
set MANPATH =($MANPATH /usr/storapi/man /usr/storapi/storman)For UNIX Korn andBourne shell, ensurethe following manpage directories areadded to variableMANPATH:
MANPATH=$MANPATH:/usr/storapi/man:/usr/storapi/stormanexport MANPATH
For more information,refer to Settingenvironment variableson page 132.
6. Configure anadequate number ofsemaphores into theUNIX kernel to meetthe SYMCLIsemaphorerequirements.
For more information,refer to Managingdatabase andgatekeeper locking onpage 134.
7. Optional : Read theEMC VMAX FamilySecurityConfiguration Guideand apply relatedsecurity settings.
For more information,refer to EMC VMAXFamily SecurityConfiguration Guide.
8. Optional: Modifythe scope/performance of theSYMCLI commandswith the gkavoid,
gkselect,
For more information,refer to Avoidanceand selection files onpage 136.
Installation prerequisites
UNIX installation check list 49
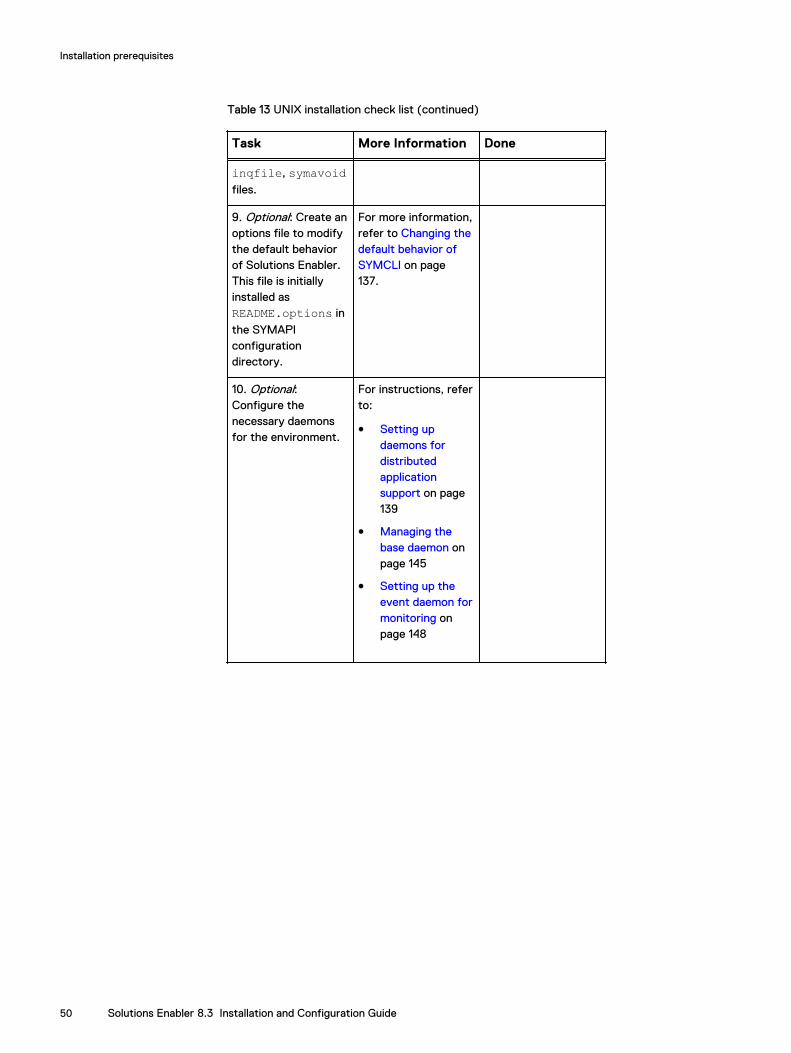
Table 13 UNIX installation check list (continued)
Task More Information Done
inqfile, symavoidfiles.
9. Optional: Create anoptions file to modifythe default behaviorof Solutions Enabler.This file is initiallyinstalled asREADME.options in
the SYMAPIconfigurationdirectory.
For more information,refer to Changing thedefault behavior ofSYMCLI on page137.
10. Optional:Configure thenecessary daemonsfor the environment.
For instructions, referto:
l Setting updaemons fordistributedapplicationsupport on page139
l Managing thebase daemon onpage 145
l Setting up theevent daemon formonitoring onpage 148
Installation prerequisites
50 Solutions Enabler 8.3 Installation and Configuration Guide
CHAPTER 2
Installation
This chapter explains how to install/upgrade Solutions Enabler and its components.
Note
As an alternative to the in-depth UNIX and Windows procedures in this chapter, Installation checklist on page 44 provides operating-system-specific checklists withhigh-level installation and configuration steps that advanced users may find useful.
l Installing Solutions Enabler on UNIX and Linux.................................................. 52l Installing Solutions Enabler on Windows............................................................ 64l Installing Solutions Enabler on z/OS.................................................................. 75l Installing Solutions Enabler on OpenVMS...........................................................87l Installing Solutions Enabler on Solaris 11............................................................. 91l Upgrading SMI-S Provider................................................................................. 96l Installing the Solutions Enabler Virtual Appliance .............................................. 97
Installation 51
Installing Solutions Enabler on UNIX and LinuxThis section describes how to install/upgrade Solutions Enabler on UNIX and Linuxhosts.
Please consider the following before starting the installation procedure:
l Solutions Enabler V8.3 is fully upgradeable, that is, you do not have to remove theprevious version before installing V8.3.
l Before starting this procedure, be sure to review pre-install considerations in Installation prerequisites on page 19.
l The default responses to the prompts in this section are in brackets [ ].
Step 1: Download the installation packageTo download the installation package:
Procedure
1. Log onto the host system as root.
2. Open a browser and visit the EMC online support website at https://support.EMC.com.
3. Download the installation package for your platform and extract the content toa temporary directory.
Note
To download the software for Solutions Enabler V8.3, please contact your EMCrepresentative.
Step 2: Run the install scriptTo run the installation script:
Procedure
1. Change directory to the location of the Solutions Enabler kit by entering thefollowing:
cd /tmp_directory
2. Select an installation method from Table 14 on page 52 , and then run theappropriate command. For descriptions of the command options, refer to Table15 on page 56.
Table 14 Installation method
Method Command Comments
Interactive ./se8300_install.sh-install
Starts theinteractive scriptdocumented in theremainder of this
Installation
52 Solutions Enabler 8.3 Installation and Configuration Guide
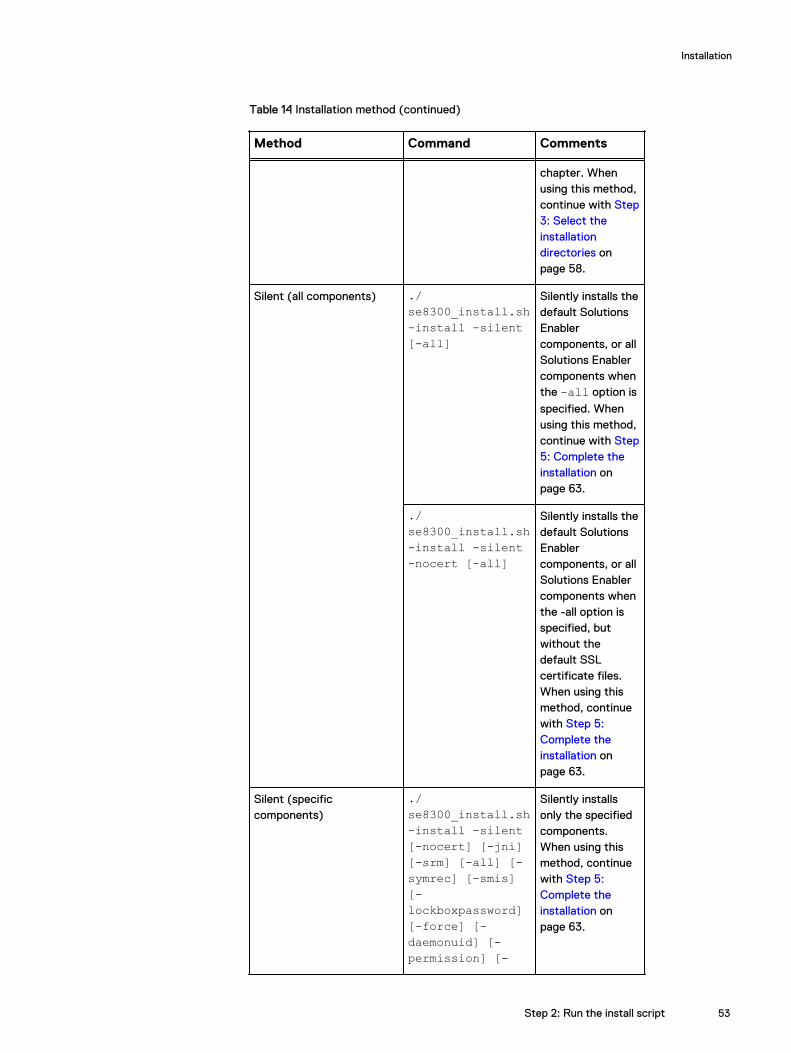
Table 14 Installation method (continued)
Method Command Comments
chapter. Whenusing this method,continue with Step3: Select theinstallationdirectories onpage 58.
Silent (all components) ./se8300_install.sh-install -silent[-all]
Silently installs thedefault SolutionsEnablercomponents, or allSolutions Enablercomponents whenthe -all option is
specified. Whenusing this method,continue with Step5: Complete theinstallation onpage 63.
./se8300_install.sh-install -silent-nocert [-all]
Silently installs thedefault SolutionsEnablercomponents, or allSolutions Enablercomponents whenthe -all option isspecified, butwithout thedefault SSLcertificate files.When using thismethod, continuewith Step 5:Complete theinstallation onpage 63.
Silent (specificcomponents)
./se8300_install.sh-install -silent[-nocert] [-jni][-srm] [-all] [-symrec] [-smis][-lockboxpassword][-force] [-daemonuid] [-permission] [-
Silently installsonly the specifiedcomponents.When using thismethod, continuewith Step 5:Complete theinstallation onpage 63.
Installation
Step 2: Run the install script 53
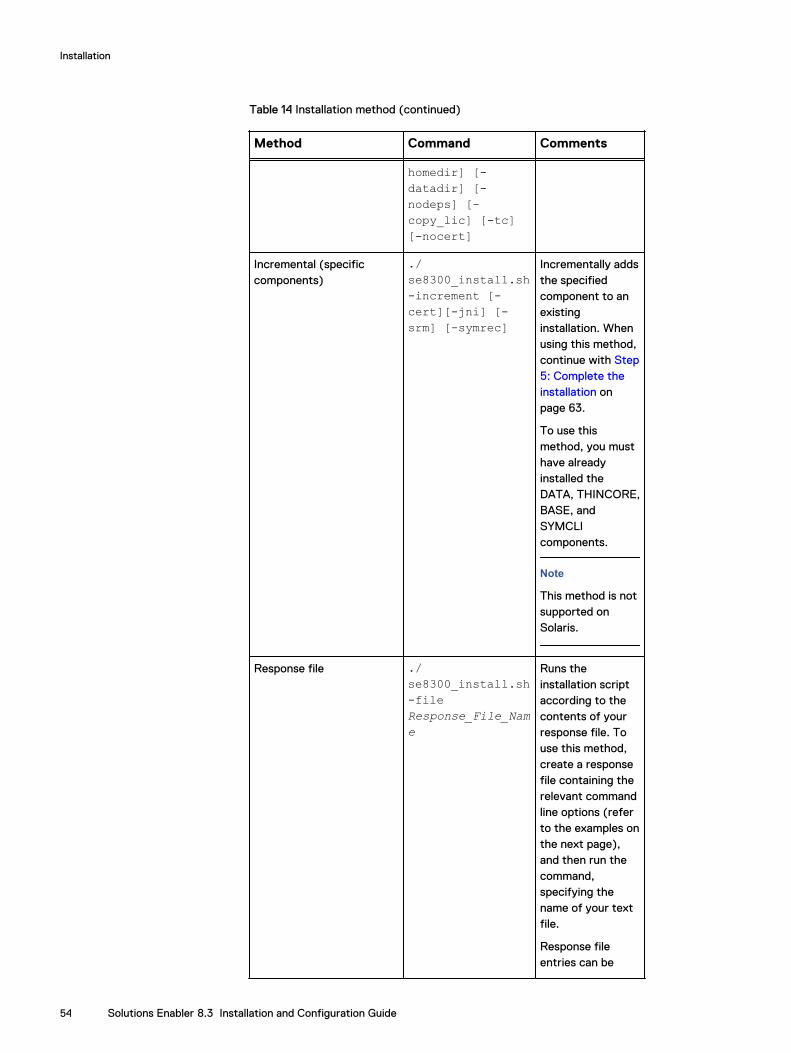
Table 14 Installation method (continued)
Method Command Comments
homedir] [-datadir] [-nodeps] [-copy_lic] [-tc][-nocert]
Incremental (specificcomponents)
./se8300_install.sh-increment [-cert][-jni] [-srm] [-symrec]
Incrementally addsthe specifiedcomponent to anexistinginstallation. Whenusing this method,continue with Step5: Complete theinstallation onpage 63.
To use thismethod, you musthave alreadyinstalled theDATA, THINCORE,BASE, andSYMCLIcomponents.
Note
This method is notsupported onSolaris.
Response file ./se8300_install.sh-fileResponse_File_Name
Runs theinstallation scriptaccording to thecontents of yourresponse file. Touse this method,create a responsefile containing therelevant commandline options (referto the examples onthe next page),and then run thecommand,specifying thename of your textfile.
Response fileentries can be
Installation
54 Solutions Enabler 8.3 Installation and Configuration Guide
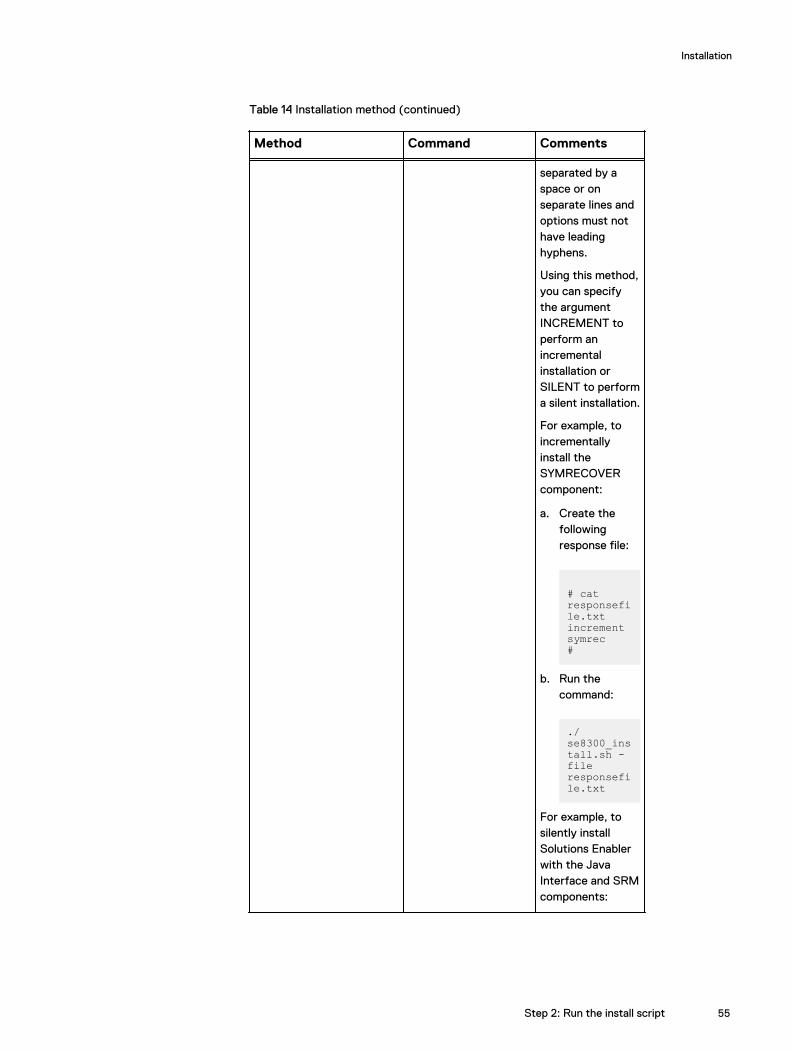
Table 14 Installation method (continued)
Method Command Comments
separated by aspace or onseparate lines andoptions must nothave leadinghyphens.
Using this method,you can specifythe argumentINCREMENT toperform anincrementalinstallation orSILENT to performa silent installation.
For example, toincrementallyinstall theSYMRECOVERcomponent:
a. Create thefollowingresponse file:
# cat responsefile.txtincrementsymrec#
b. Run thecommand:
./se8300_install.sh -file responsefile.txt
For example, tosilently installSolutions Enablerwith the JavaInterface and SRMcomponents:
Installation
Step 2: Run the install script 55
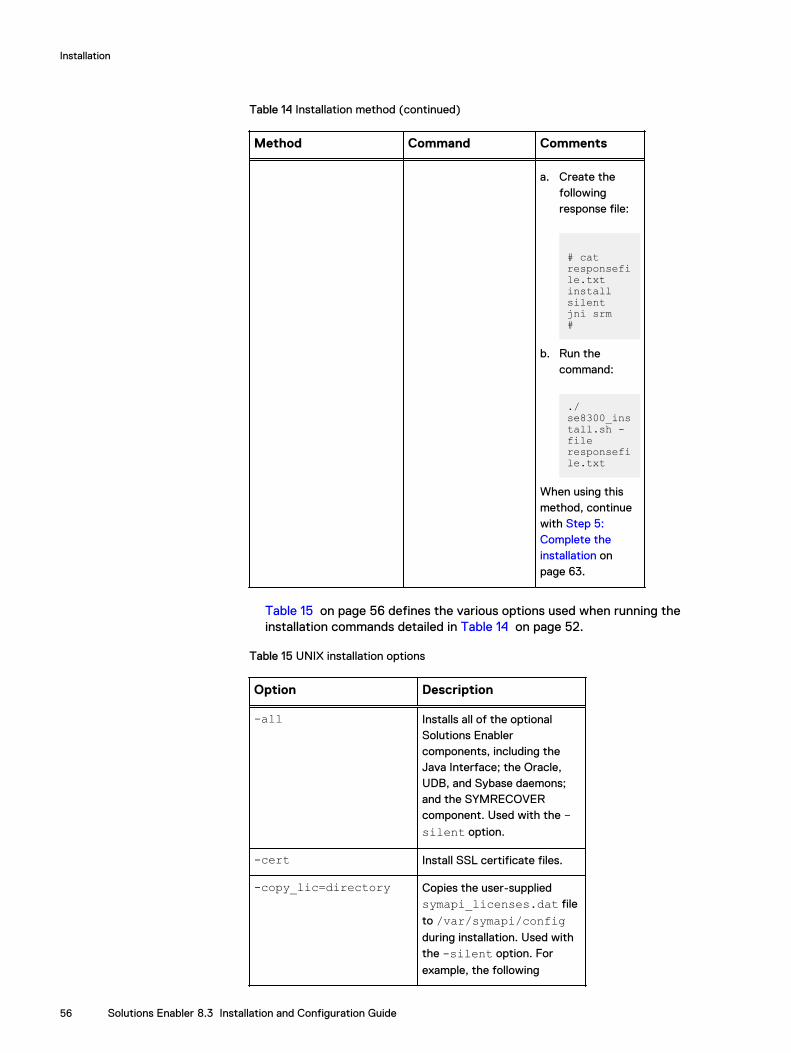
Table 14 Installation method (continued)
Method Command Comments
a. Create thefollowingresponse file:
# cat responsefile.txtinstall silentjni srm#
b. Run thecommand:
./se8300_install.sh -file responsefile.txt
When using thismethod, continuewith Step 5:Complete theinstallation onpage 63.
Table 15 on page 56 defines the various options used when running theinstallation commands detailed in Table 14 on page 52.
Table 15 UNIX installation options
Option Description
-all Installs all of the optionalSolutions Enablercomponents, including theJava Interface; the Oracle,UDB, and Sybase daemons;and the SYMRECOVERcomponent. Used with the -silent option.
-cert Install SSL certificate files.
-copy_lic=directory Copies the user-suppliedsymapi_licenses.dat file
to /var/symapi/configduring installation. Used withthe -silent option. For
example, the following
Installation
56 Solutions Enabler 8.3 Installation and Configuration Guide

Table 15 UNIX installation options (continued)
Option Description
command will copy thesymapi_licenses.dat file
from /tmp to /var/symapi/config:
bash-3.00# ./se8300_install.sh -install -copy_lic=/tmp-silent
-daemonuid=Name Changes ownership of somedaemons to non root user.Used with the -silentoption. For information onwhich daemons are affectedby this option, refer to thestordaemon man page in theEMC Solutions EnablerSYMCLI Command ReferenceGuide.
-datadir=directory Sets the working rootdirectory [/usr/emc]. Used
with the -silent option.
-decrement Uninstall of cert, jni, srm, smis(Linux only), symrec. Thisoption is not valid for Solarishosts
-file Specifies to install SolutionsEnabler with a response file.
-force Kills all processes using theSYMAPI libraries. Used withthe -silent option.
-homedir=directory Sets the install root directory[/opt/emc]. Used with the -silent option.
-increment Incremental installation of thecert, jni, srm, smis (Linux
only), and symrec options.
This option is not valid forSolaris hosts!
-jni Installs the Solutions EnablerJava Interface component.
-nocert Do not install SSL certificatefiles.
Installation
Step 2: Run the install script 57
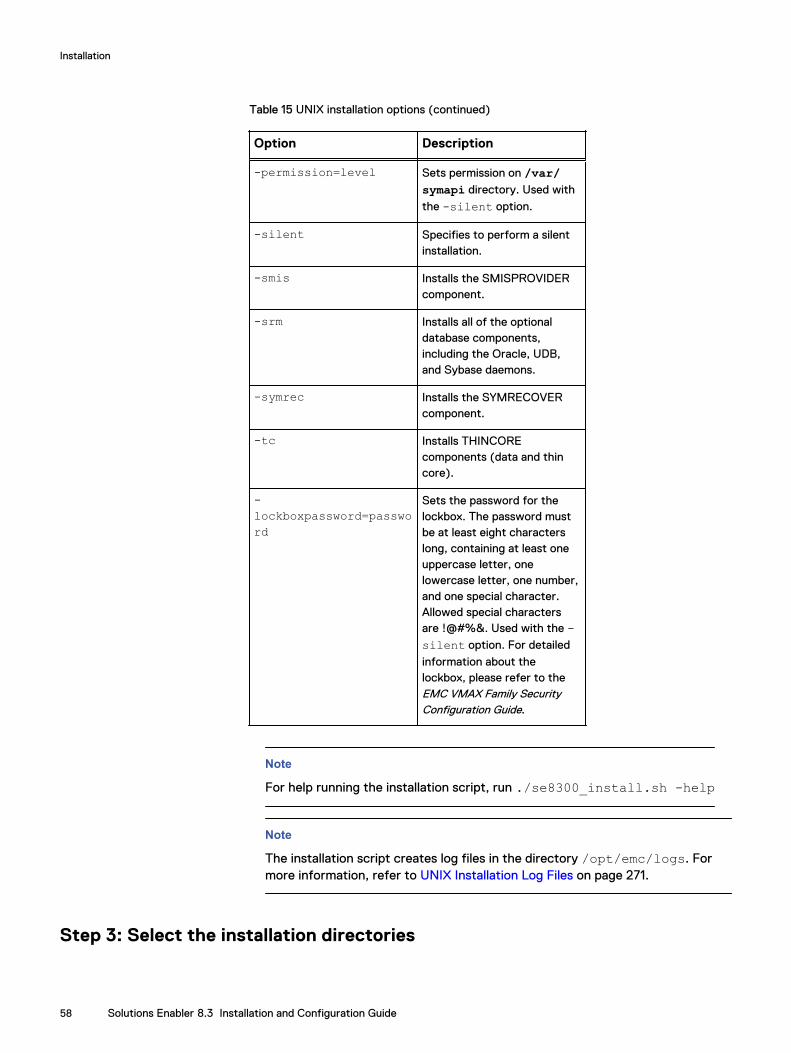
Table 15 UNIX installation options (continued)
Option Description
-permission=level Sets permission on /var/symapi directory. Used with
the -silent option.
-silent Specifies to perform a silentinstallation.
-smis Installs the SMISPROVIDERcomponent.
-srm Installs all of the optionaldatabase components,including the Oracle, UDB,and Sybase daemons.
-symrec Installs the SYMRECOVERcomponent.
-tc Installs THINCOREcomponents (data and thincore).
-lockboxpassword=password
Sets the password for thelockbox. The password mustbe at least eight characterslong, containing at least oneuppercase letter, onelowercase letter, one number,and one special character.Allowed special charactersare !@#%&. Used with the -silent option. For detailed
information about thelockbox, please refer to theEMC VMAX Family SecurityConfiguration Guide.
Note
For help running the installation script, run ./se8300_install.sh -help
Note
The installation script creates log files in the directory /opt/emc/logs. Formore information, refer to UNIX Installation Log Files on page 271.
Step 3: Select the installation directories
Installation
58 Solutions Enabler 8.3 Installation and Configuration Guide
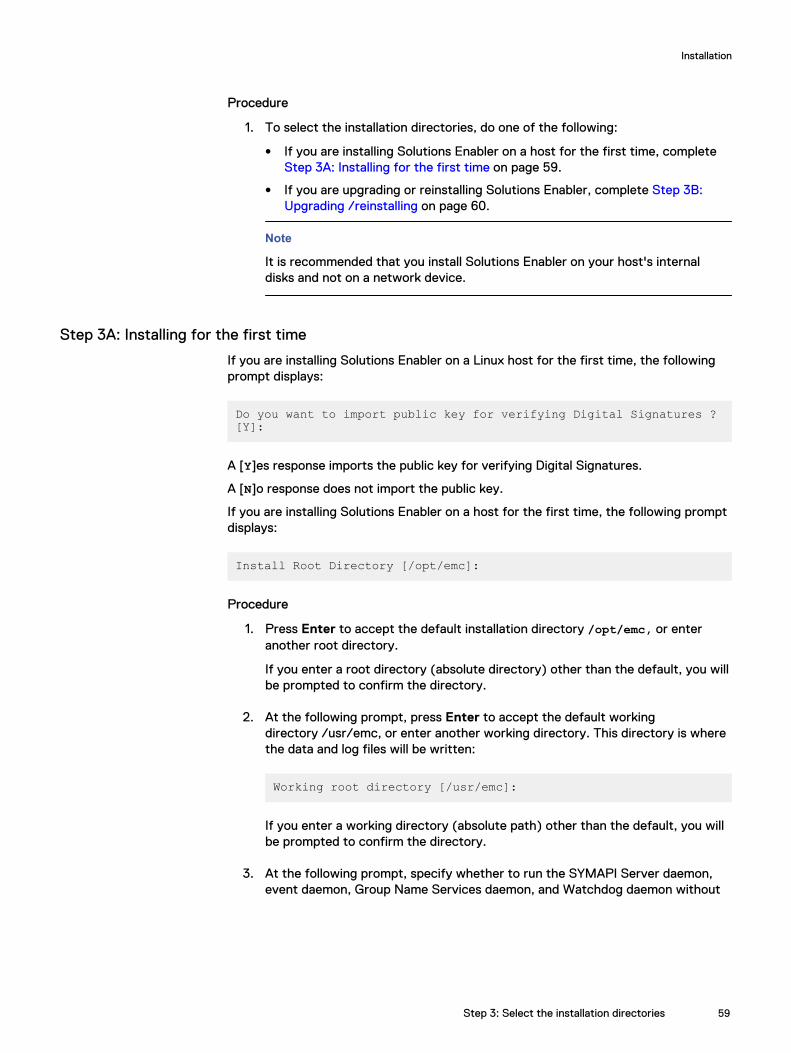
Procedure
1. To select the installation directories, do one of the following:
l If you are installing Solutions Enabler on a host for the first time, complete Step 3A: Installing for the first time on page 59.
l If you are upgrading or reinstalling Solutions Enabler, complete Step 3B:Upgrading /reinstalling on page 60.
Note
It is recommended that you install Solutions Enabler on your host's internaldisks and not on a network device.
Step 3A: Installing for the first time
If you are installing Solutions Enabler on a Linux host for the first time, the followingprompt displays:
Do you want to import public key for verifying Digital Signatures ? [Y]:
A [Y]es response imports the public key for verifying Digital Signatures.
A [N]o response does not import the public key.
If you are installing Solutions Enabler on a host for the first time, the following promptdisplays:
Install Root Directory [/opt/emc]:
Procedure
1. Press Enter to accept the default installation directory /opt/emc, or enteranother root directory.
If you enter a root directory (absolute directory) other than the default, you willbe prompted to confirm the directory.
2. At the following prompt, press Enter to accept the default workingdirectory /usr/emc, or enter another working directory. This directory is wherethe data and log files will be written:
Working root directory [/usr/emc]:
If you enter a working directory (absolute path) other than the default, you willbe prompted to confirm the directory.
3. At the following prompt, specify whether to run the SYMAPI Server daemon,event daemon, Group Name Services daemon, and Watchdog daemon without
Installation
Step 3: Select the installation directories 59
root privileges. A [Y]es response will enable you to specify a non-root user torun the daemons:
Following daemons can be set to run as a non-root user:storevntd, storgnsd, storrdfd, storsrvd, storstpd, storwatchdDo you want to run these daemons as a non-root user? [N]:
4. Continue with Step 4: Select installation options on page 60.
Step 3B: Upgrading /reinstalling
If you are upgrading or reinstalling Solutions Enabler, the following prompt displays:
Install root directory of previous installation: /opt/emcDo you want to change Install root Directory ? [N]:
Procedure
1. Respond [N]o to install Solutions Enabler into the same root directories (installand working) as the previous installation, or respond [Y]es to display thefollowing prompts in which you can enter other root directories:
Install root directory [/opt/emc]:Working root directory [/usr/emc]:
If you enter a root directory (absolute directory) other than the default, you willbe prompted to confirm the directory.
2. If you are upgrading, the following prompt displays asking whether to backupthe previous installation. A [Y]es response backs up the SYMCLI binaries in theinstall root directory under symcli_old :
Do you want to save /opt/emc/SYMCLI/ ? [N]:
3. At the following prompt, specify whether to run the SYMAPI Server daemon,event daemon, Group Name Services daemon, and Watchdog daemon withoutroot privileges. A [Y]es response will enable you to specify a non-root user torun the daemons:
Following daemons can be set to run as a non-root user:storevntd, storgnsd, storrdfd, storsrvd, storstpd, storwatchdDo you want to run these daemons as a non-root user? [N]:
4. If the installation program detects that there are daemons currently running,the following prompt displays asking whether to shut them down or exit theinstallation. A [Y]es response shuts down the daemons. A [X] response exits theinstallation:
Do you want to shutdown SYMCLI daemons [Y] or Exit setup [X]? [Y]:
5. Continue with Step 4: Select installation options on page 60.
Step 4: Select installation optionsTo select your installation options:
Installation
60 Solutions Enabler 8.3 Installation and Configuration Guide
Procedure
1. At the following prompt, specify whether to install Solution Enabler SSLcertificate files:
Install EMC Solutions Enabler Certificates for secure Client/Server operation? [Y]:
l A [Y]es response installs ssl.rnd, symapisrv_install.cnf,symapisrv_trust.pem, symapisrv_trust_v8.3.pem in /var/symapi/config/cert. The subject certificate and key filessymapisrv_cert.pem, symapisrv_key.pem,symapisrv_cert_v8.3.pem, symapisrv_key_v8.3.pem will also begenerated.
l A [N]o response does not install CERT component.
Note
If you do not install SSL certificate files at this time but intent to use secureclient/server communication with Solutions Enabler, you must install your owncertificate files after the installation is completed. For detailed information onhow to do that, please refer to the EMC VMAX Family Security ConfigurationGuide
2. At the following prompt, specify whether to install all of the Solutions Enablerlibraries:
Install All EMC Solutions Enabler Shared Libraries and Run Time Environment? [Y]:
l A [Y]es response installs all the libraries, including persistent data, Thin Core,and Base (which includes the StorBase, StorCtrl, and StorMap librarycomponents).
l A [N]o response installs only persistent data and Thin Core.
3. At the following prompt, specify whether to install the collection of binariesknown as SYMCLI. A [Y]es response installs the SYMCLI binaries:
Install Symmetrix Command Line Interface (SYMCLI)? [Y]:
4. At the following prompt, specify whether to install the Solutions Enabler Javainterface component. You should install this component if your SolutionsEnabler application uses a Java interface. A [Y]es response installs the JNIcomponent:
Install Option to Enable JNI Interface for EMC Solutions Enabler APIs? [N]:
5. If you are installing Solutions Enabler on a host with a Linux, HP-UX, SunOS, orAIX operating system, the following prompt displays, asking whether to installoptional database components:
Install EMC Solutions Enabler SRM Components? [N]:
Installation
Step 4: Select installation options 61
A [Y]es response installs the following SRM database subcomponents,depending on the operating system:
l SRM Oracle Database filesInstalls the optional Oracle daemon on operating systems where SolutionsEnabler supports Oracle.
l SRM Sybase Database filesInstalls the optional Sybase daemon on operating systems where SolutionsEnabler supports Sybase.
l IBM UDB Database filesInstalls the optional UDB daemon on operating systems where SolutionsEnabler supports UDB.
6. At the following prompt, specify whether to install the Solutions Enabler SRDFsession recovery component. A [Y]es response installs the SYMRECOVERcomponent:
Install EMC Solutions Enabler SYMRECOVER Components ? [Y]:
7. At the following prompt, specify whether to install the Solutions Enabler SMI-SProvider component. A [Y]es response installs the SMISPROVIDER component:
Install EMC Solutions Enabler SMIS Component ? [N]:
8. At the following prompt, specify whether to change the default UNIX filepermissions. [Y]es response displays another prompt in which you can specify anew value:
Do you want to change default permission on /var/symapi directory from [755] ? [N]:
9. At the following prompt, specify whether you want to use the default lockboxpassword. A [N]o response leaves the default password unchanged and theinstallation continues:
Do you want to use the default Lockbox Password? [N]:
A [Y]es response results in a confirmation request to make sure you reallyintend to use the default password for the lockbox:
Please confirm that you want to use the default Lockbox Password [N]:
A [N]o response results in a prompt for the new password:
Please enter the Lockbox Password:
If the password meets the recommended password complexity, the installationasks you to re-enter the same password for confirmation:
Please re-enter the Password for confirmation:
Installation
62 Solutions Enabler 8.3 Installation and Configuration Guide
Note
If you choose to use the default lockbox password generated by the installationprogram, you will have to make a note of it for future use if you need to resetthe lockbox Stable System Values or generate certificates for client/serveroperation. See the EMC VMAX Family Security Configuration Guide for adescription of how the default lockbox password is generated.
Note
If you change the default lockbox password, the default ECOM password is alsochanged from admin/#1Password to admin/<specified passwordduring installation>.
10. If you are upgrading, the following prompt displays, asking whether to move thedata files of the previous installation to the symapi_old directory. A [Y]esresponse moves your persistent data from the /usr/emc/API/symapidirectory to /usr/emc/API/symapi_old. A [N]o response retains yourpersistent data:
Do you want to move this data to /usr/emc/API/symapi_old ? [N]:
11. At the following prompt, decide whether you want to use the default lockboxpassword. A [N]o response leaves the default password unchanged and theinstallation continues:
Do you want to use the default Lockbox Password? [N]:
Step 5: Complete the installationThis section explains how to complete your Solutions Enabler installation.
Verifying your installation
To verify your installation, run the following command:
./se8300_install.sh -check
The output of this command depends on the installation options selected during theinstallation steps. This command produces an output similar to the following examplein a Linux environment:
-bash-2.05b# ./se8300_install.sh -check
#--------------------------------------------------------------------# EMC Installation Manager#---------------------------------------------------------------------Copyright (c) [1997-2016] EMC Corporation. All Rights Reserved.This software contains the intellectual property of EMC Corporation or is licensed to EMC Corporation from third parties. Use of this software and the intellectual property contained therein is
Installation
Step 5: Complete the installation 63
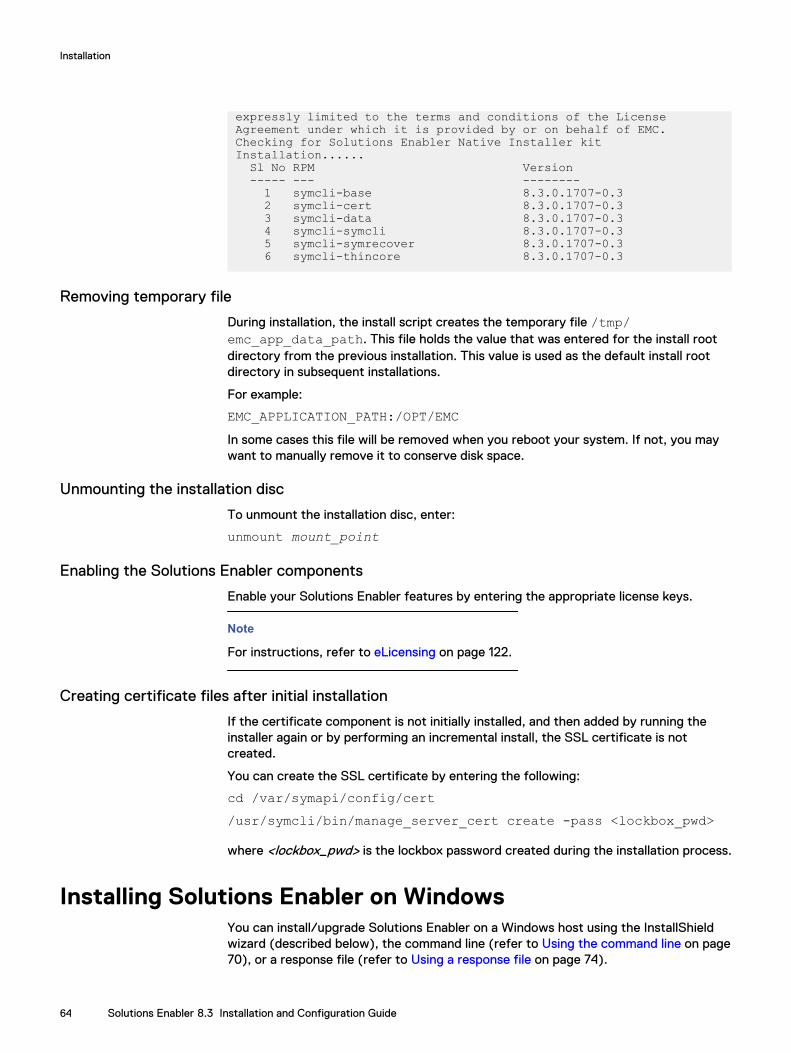
expressly limited to the terms and conditions of the License Agreement under which it is provided by or on behalf of EMC.Checking for Solutions Enabler Native Installer kit Installation...... Sl No RPM Version ----- --- -------- 1 symcli-base 8.3.0.1707-0.3 2 symcli-cert 8.3.0.1707-0.3 3 symcli-data 8.3.0.1707-0.3 4 symcli-symcli 8.3.0.1707-0.3 5 symcli-symrecover 8.3.0.1707-0.3 6 symcli-thincore 8.3.0.1707-0.3
Removing temporary file
During installation, the install script creates the temporary file /tmp/emc_app_data_path. This file holds the value that was entered for the install rootdirectory from the previous installation. This value is used as the default install rootdirectory in subsequent installations.
For example:
EMC_APPLICATION_PATH:/OPT/EMCIn some cases this file will be removed when you reboot your system. If not, you maywant to manually remove it to conserve disk space.
Unmounting the installation disc
To unmount the installation disc, enter:
unmount mount_point
Enabling the Solutions Enabler components
Enable your Solutions Enabler features by entering the appropriate license keys.
Note
For instructions, refer to eLicensing on page 122.
Creating certificate files after initial installation
If the certificate component is not initially installed, and then added by running theinstaller again or by performing an incremental install, the SSL certificate is notcreated.
You can create the SSL certificate by entering the following:
cd /var/symapi/config/cert/usr/symcli/bin/manage_server_cert create -pass <lockbox_pwd>
where <lockbox_pwd> is the lockbox password created during the installation process.
Installing Solutions Enabler on WindowsYou can install/upgrade Solutions Enabler on a Windows host using the InstallShieldwizard (described below), the command line (refer to Using the command line on page70), or a response file (refer to Using a response file on page 74).
Installation
64 Solutions Enabler 8.3 Installation and Configuration Guide
Note
Solutions Enabler V8.3 is fully upgradeable. That is, you do not have to remove theprevious version before installing V8.3.
Note
Before starting this procedure, review the pre-install considerations in Installationprerequisites on page 19.
Using the InstallShield wizardTo install/upgrade Solutions Enabler using the InstallShield wizard:
Procedure
1. Open a browser and visit the EMC online support website at https://support.EMC.com.
2. Download the installation package for your platform and extract the content toa temporary directory.
3. Save all files and exit all Windows applications.
4. Change directory to the location of the Solutions Enabler kit by entering thefollowing:
cd \tmp_directory5. Start the installation program by running the following se8300-WINDOWS-
x64.exe file.
Note
If you do not have the required Visual C libraries installed on the host to runSolutions Enabler, you will be prompted to install them. If this is the case, clickInstall in the message dialog.
Note
If you are upgrading from a previous version of Solutions Enabler and theinstallation program detects that there are daemons running, you will beprompted to shut them down. Click Yes to shutdown the daemons and continuewith the installation. Click No to leave the daemons running and exit theinstallation program.
6. In the Welcome to the Installation program for EMC Solutions Enablerdialog box, click Next.
7. In the Destination Folder dialog box, select an installation directory and clickNext.
Installation
Using the InstallShield wizard 65
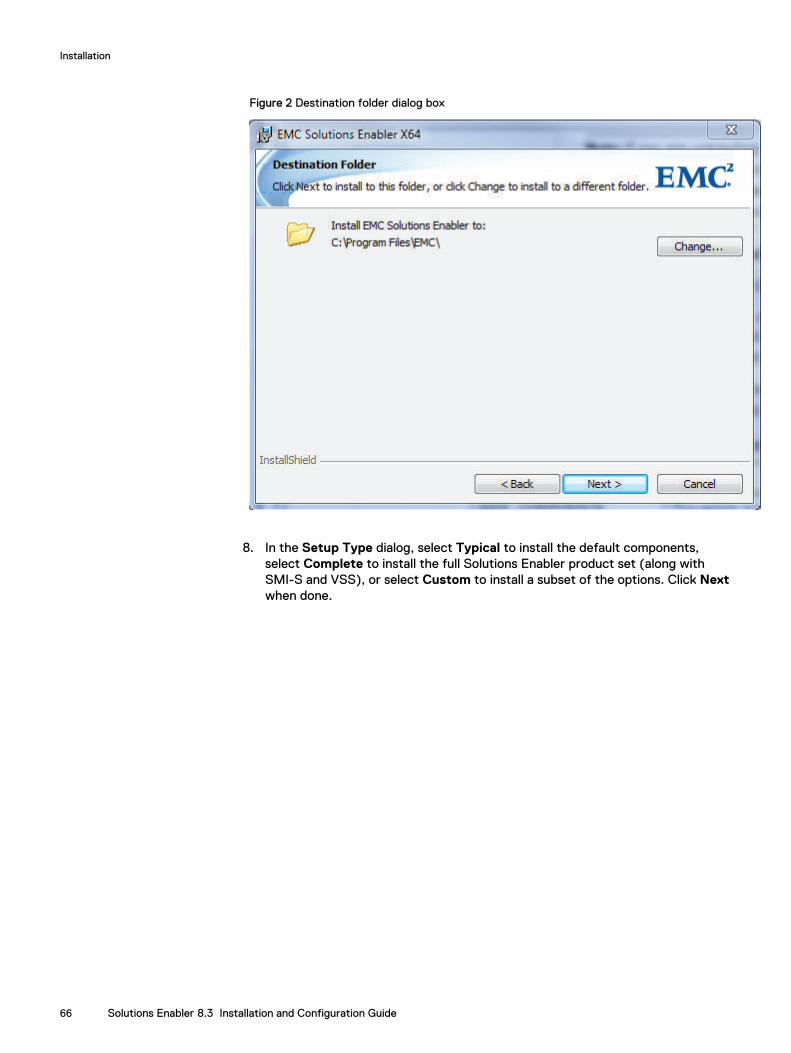
Figure 2 Destination folder dialog box
8. In the Setup Type dialog, select Typical to install the default components,select Complete to install the full Solutions Enabler product set (along withSMI-S and VSS), or select Custom to install a subset of the options. Click Nextwhen done.
Installation
66 Solutions Enabler 8.3 Installation and Configuration Guide
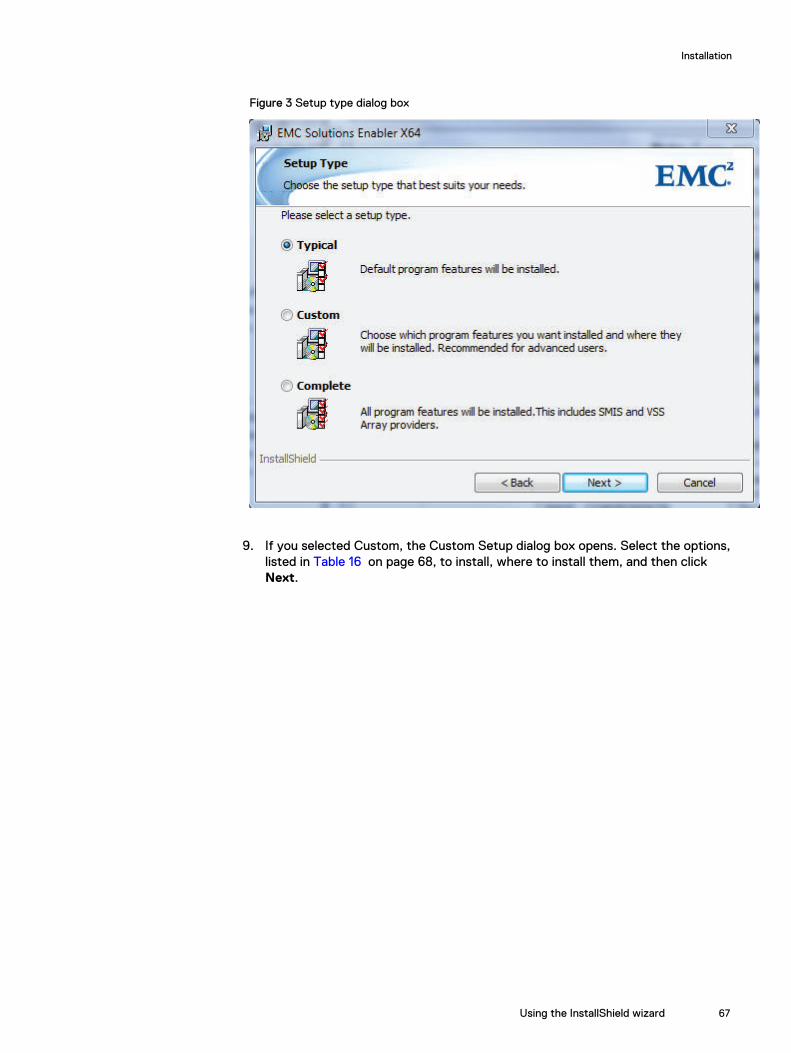
Figure 3 Setup type dialog box
9. If you selected Custom, the Custom Setup dialog box opens. Select the options,listed in Table 16 on page 68, to install, where to install them, and then clickNext.
Installation
Using the InstallShield wizard 67
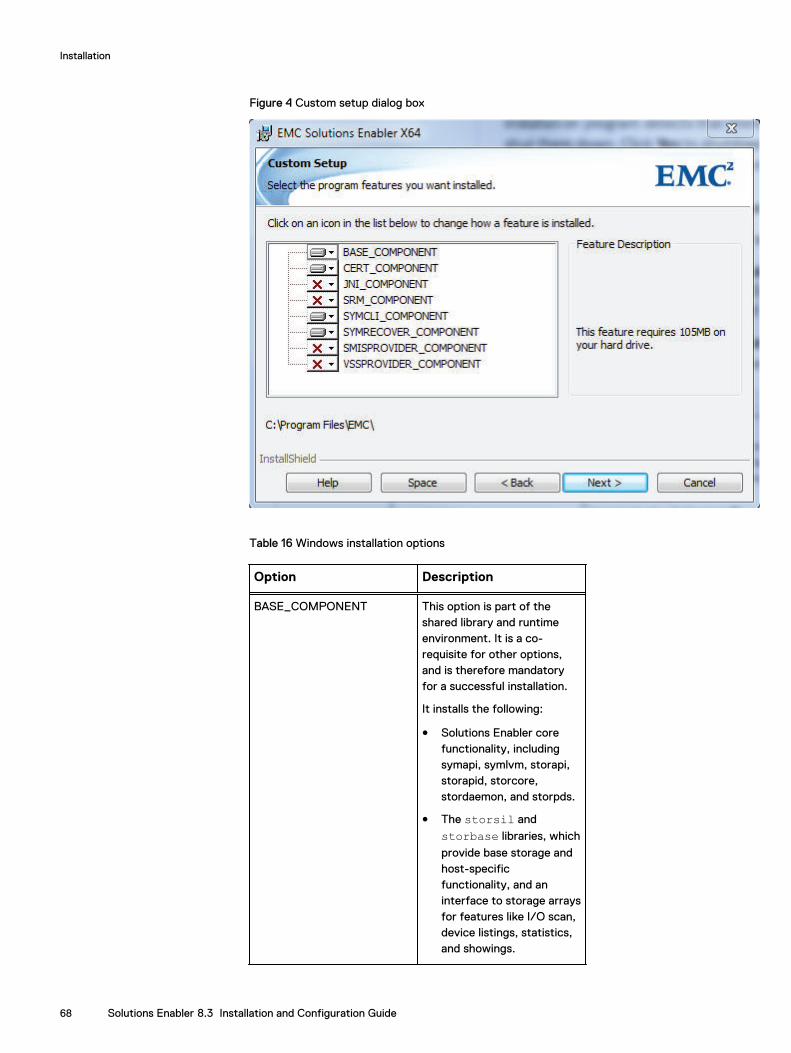
Figure 4 Custom setup dialog box
Table 16 Windows installation options
Option Description
BASE_COMPONENT This option is part of theshared library and runtimeenvironment. It is a co-requisite for other options,and is therefore mandatoryfor a successful installation.
It installs the following:
l Solutions Enabler corefunctionality, includingsymapi, symlvm, storapi,storapid, storcore,stordaemon, and storpds.
l The storsil and
storbase libraries, which
provide base storage andhost-specificfunctionality, and aninterface to storage arraysfor features like I/O scan,device listings, statistics,and showings.
Installation
68 Solutions Enabler 8.3 Installation and Configuration Guide
Table 16 Windows installation options (continued)
Option Description
l The control storagelibraries, which includefeatures like Snap, devicemasking, and devicemonitoring.
l The Storage ResourceManagement basemapping library.
CERT_COMPONENT Installs the ssl.rnd,
symapisrv_install.cnf,
symapisrv_trust.pem,symapisrv_trust_v8.3.pem in C:\Program Files\EMC\SYMAPI\config\cert. The subject
certificate and key filessymapisrv_cert.pem,
symapisrv_key.pem,symapisrv_cert_v8.3.pem,symapisrv_key_v8.3.pemwill also be generated.a
JNI_COMPONENT Installs the Solutions EnablerJava Interface component.You should install thiscomponent if your SolutionsEnabler application uses aJava interface.
SRM_COMPONENT Installs the IBM UDB,SQLServer, and Oraclecomponents (depending onthe host platform).
SYMCLI_COMPONENT Installs the collection ofbinaries known as SYMCLI.
SYMRECOVER_COMPONENT
Installs the SRDF sessionrecovery component.
SMISPROVIDER_COMPONENT
Installs the SMI-S Providercomponent.
VSSPROVIDER_COMPONENT
Installs the VSS Providercomponent.
a. If you do not install SSL certificate files but intents to use secure client/servercommunication with Solutions Enabler, you must install your own certificate files after theinstallation is completed. For detailed information on how to do that, please refer to theEMC VMAX Family Security Configuration Guide.
Installation
Using the InstallShield wizard 69
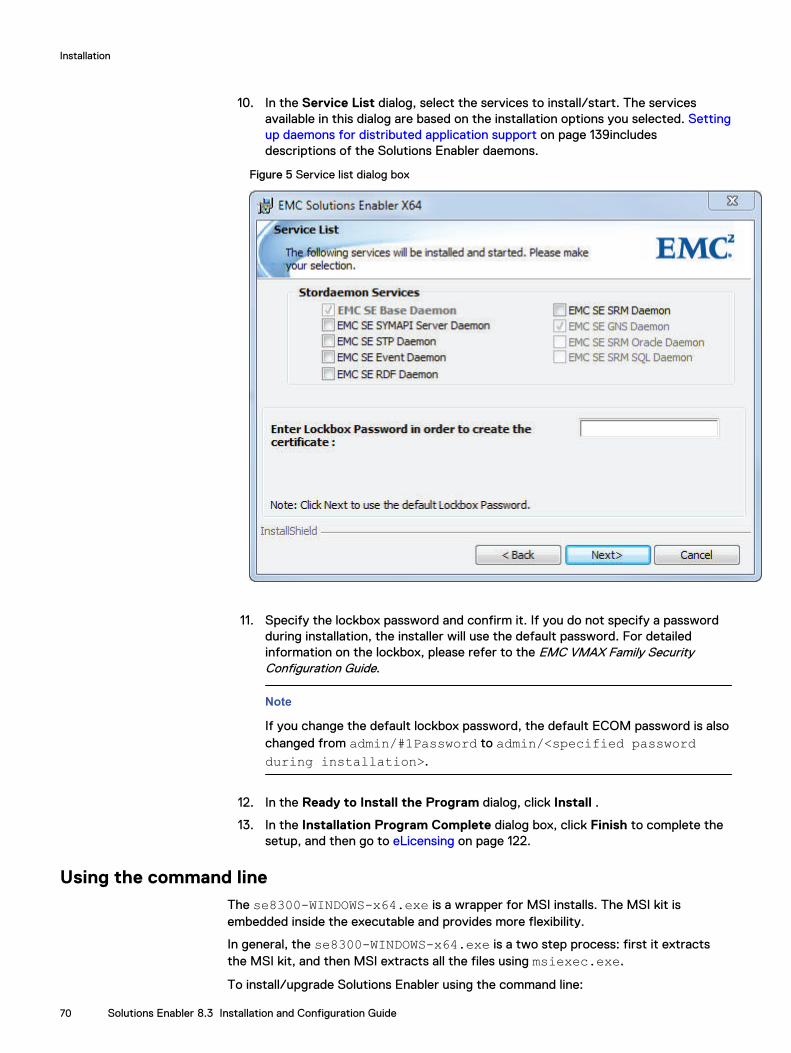
10. In the Service List dialog, select the services to install/start. The servicesavailable in this dialog are based on the installation options you selected. Settingup daemons for distributed application support on page 139includesdescriptions of the Solutions Enabler daemons.
Figure 5 Service list dialog box
11. Specify the lockbox password and confirm it. If you do not specify a passwordduring installation, the installer will use the default password. For detailedinformation on the lockbox, please refer to the EMC VMAX Family SecurityConfiguration Guide.
Note
If you change the default lockbox password, the default ECOM password is alsochanged from admin/#1Password to admin/<specified passwordduring installation>.
12. In the Ready to Install the Program dialog, click Install .
13. In the Installation Program Complete dialog box, click Finish to complete thesetup, and then go to eLicensing on page 122.
Using the command lineThe se8300-WINDOWS-x64.exe is a wrapper for MSI installs. The MSI kit isembedded inside the executable and provides more flexibility.
In general, the se8300-WINDOWS-x64.exe is a two step process: first it extractsthe MSI kit, and then MSI extracts all the files using msiexec.exe.
To install/upgrade Solutions Enabler using the command line:
Installation
70 Solutions Enabler 8.3 Installation and Configuration Guide
Procedure
1. Open a browser and visit the EMC online support website at https://support.EMC.com .
2. Download the installation package for your platform and extract the content toa temporary directory.
3. Save all files and exit all Windows applications.
4. Select one of the MSI wrapper script installation options, detailed in theremainder of this section.
Note
By default, the installation program will generate a verbose log(SE_RTinstall_Verbose.log) for each install in the TEMP directory.
Silent mode
To install Solutions Enabler in silent mode, enter:
start /wait se8300-WINDOWS-x64.exe /s /v/qn
Where:
/S or /s is the silent option for the wrapper script. The /s option is used for silentextraction of MSI kit from the wrapper to a temp folder. The /s option is not relatedto the MSI kits.
/V or /v is the option used by the wrapper to parse the parameters to msiexec.exewhen MSI kits are run after extraction. In other words, it is a gateway for themsiexec.exe. Whatever valid MSI parameters are passed after /V will be parsed tothe msiexec.exe.
/qn is a regular msiexec option to install the MSI kits in silent mode.
Note
If the /s and /v options are entered as capital letters (/S /V), and a space is used toseparate the /v and /qn options, the installation starts in Wizard mode.
Non-default location
To install Solutions Enabler in a non-default location, enter:
start /wait se8300-WINDOWS-x64.exe /s /V"INSTALLDIR=C:\EMC /qn"
Where:
/V or /v is the option used by the wrapper script to parse the parameters tomsiexec.exe when MSI kits are run after extraction. In other words, it is a gatewayfor the msiexec.exe. Whatever valid MSI parameters passed after /V will be parsedto the msiexec.exe.
INSTALLDIR is a MSIEXEC public property. By using this as shown in the example, youcan redirect your installation to a non default directory.
Installation
Using the command line 71
Space in directory name
To install in a non-default path with a space in the directory name or path, enter:
start /wait se8300-WINDOWS-x64.exe /S /V”INSTALLDIR=\”C:\Program Files\ Non DefaultPath\” /qn”
Where:
\ is the escape character to insert the codes (“”) if there is a space in the directorypath.
/qn is a regular MSIEXEC option to install the MSI kits in silent mode.
Adding non-default features
To perform a custom install (incremental) to add non-default Solutions Enablerfeatures, enter:
start /wait se8300-WINDOWS-x64.exe /S /V"ADDLOCAL=JNI_COMPONENT,SRM_COMPONENT LOCKBOXPASSWORD=<PASSWORD> /qn"
Where:
ADDLOCAL is a MSIEXEC public property. By using this as shown in the example, youcan install optional features.
/qn is a regular MSIEXEC option to install the MSI kits in silent mode.
ADDLOCAL=ALL will perform a complete installation.
Note
If the LOCKBOXPASSWORD argument is not passed, then the default lockbox passwordwill be used.
Removing non-default features
To perform a custom install (decremental) to remove non-default Solutions Enablerfeatures, enter:
start /wait se8300-WINDOWS-x64.exe /s/V”REMOVE=JNI_COMPONENT,SRM_COMPONENT /qn”
Where:
REMOVE is a MSIEXEC public property. By using this as shown in the example, you canremove optional features.
/qn is a regular MSIEXEC option to remove the MSI kits in silent mode.
Note
REMOVE=ALL will uninstall completely.
Installation
72 Solutions Enabler 8.3 Installation and Configuration Guide
Multiple commands
To have multiple commands passed:
start /wait se8300-WINDOWS-x64.exe /S /V”INSTALLDIR=\”C:\Program Files\Some Folder\“ ADDLOCAL=SRM_COMPONENT /qn”
Overwrite mode
To run installer in overwrite mode:
start /wait se8300-WINDOWS-x64.exe /S /V”REINSTALLMODE=VOMUS REINSTALL=ALL /qn”
Where:
REINSTALLMODE & REINSTALL are MSIEXEC public property
/qn is a regular MSIEXEC option to install the MSI kits in silent mode.
Maintenance mode
To run the installer in Maintenance custom mode:
start /wait se8300-WINDOWS-x64.exe /S /V”REINSTALLMODE=VOMUS ADDLOCAL=SRM_COMPONENT /qn”
Starting services
To start three Solutions Enabler services, use the silent install command:
start /wait se8300-WINDOWS-x64.exe /S /V”ADDLOCAL=ALL STORAPID=1 STOREVNTD=1 STORSRVD=1 /qn”
Where:
ADDLOCAL=ALL will install every Solutions Enabler feature, including SMI-S and VSS,STORAPID=1 STOREVNTD=1 STORSRVD=1 will install, start, and set the storapid,storevntd, and storsrvd services to start automatically.
Starting the storstpd daemon
When installing Solutions Enabler on a Windows host, the option to install/start theperformance collector service (storstpd daemon) in the Select Services dialog boxwill only install the daemon; it will not start it. To start the daemon after you havefinished the installation, use the following command:
stordaemon start storstpd
Installation
Using the command line 73
Default Solutions Enabler components
With the exception of the CORE component, all the following can be blocked frominstallation using the REMOVE command:
CERT_COMPONENTSYMCLI_COMPONENTSYMRECOVER_COMPONENT
Non-default Solutions Enabler components
The non-default components can be installed using the ADDLOCAL command:
JNI_COMPONENTSRM_COMPONENT
Using a response fileSolutions Enabler provides the option of using a response file for installing on Windowshosts.
To install Solutions Enabler using a response file:
start /wait se8300-WINDOWS-x64.exe /s /V”WSC_CONFIG_FILE=path_to_response_file_with_the_filename /qn”
To use this method, create a response file similar to the following example, and thenrun the command, specifying the name of your file.
In the response file:
l Set the components you want to install to True and the components that you donot want to install to False.
l Set the daemons you want to automatically start to 1 and the daemons you do notwant to automatically start to 0.
Sample response file and contents:
[COMPONENTSELECTION]
CERT_COMPONENT:TRUESYMRECOVER_COMPONENT:TRUEJNI_COMPONENT:TRUESYMCLI_COMPONENT:TRUESRM_COMPONENT:TRUE
[PATHSELECTION]
EMC_ROOT_PATH="C:\Program Files\EMC\"EMC_DATA_ROOT_PATH="C:\Program Files\EMC\SYMAPI\"WIDESKY_SDK_KEY="xxxx-xxxx-xxxx-xxxx"
[DAEMONSSELECTION]
STORAPID=1STOREVNTD=0
Installation
74 Solutions Enabler 8.3 Installation and Configuration Guide
STORGNSD=0STORORAD=0STORRDFD=0STORSQLD=0STORSRMD=0STORSRVD=1STORSTPD=0
Installing Solutions Enabler on z/OSThis section describes how to install Solutions Enabler on a z/OS host to operate as aSYMAPI server.
The following procedure can be used for either a new installation, or to upgrade anexisting installation.
Note
Before starting this procedure, be sure to review the pre-install considerations in Installation prerequisites on page 19.
Step 1: Copy the filesTo copy files:
Procedure
1. Open a browser and visit the EMC online support website at https://support.EMC.com .
2. Download the installation package for z/OS emc.ssem830.zip and extractthe content to a temporary directory.
3. In the temporary directory, extract the files from the .zip file, and thenexecute the command uploadSE.bat.
4. When prompted, provide the following information:
l The name or IP address of the z/OS host on which you are installing.
l The userid and password to login to the FTP server on the z/OS host, andother optional FTP information.
l The high-level qualifier of the dataset name to use during allocation of thedistribution file.
l The name of a volume and esoteric unit name on which to allocate thedistribution file.
Once the upload completes, the distribution file will be ready for remaininginstallation steps.
5. Once the files are uploaded, login to the z/OS host and continue theinstallation.
Installation
Installing Solutions Enabler on z/OS 75
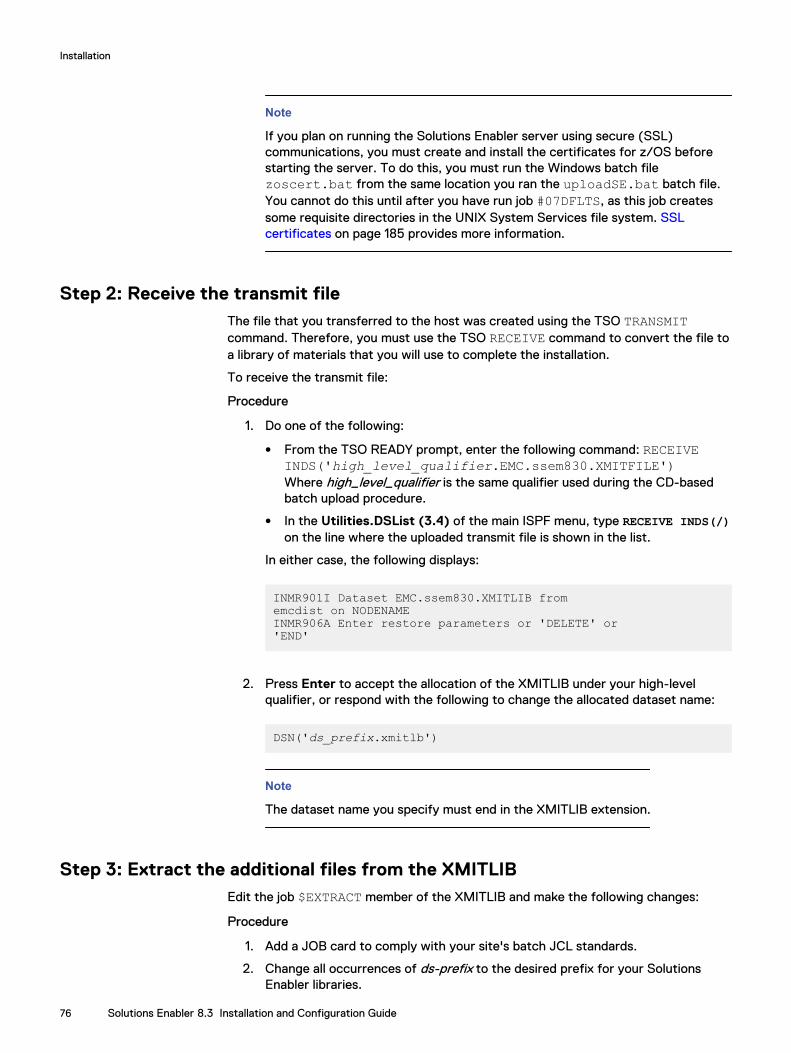
Note
If you plan on running the Solutions Enabler server using secure (SSL)communications, you must create and install the certificates for z/OS beforestarting the server. To do this, you must run the Windows batch filezoscert.bat from the same location you ran the uploadSE.bat batch file.You cannot do this until after you have run job #07DFLTS, as this job createssome requisite directories in the UNIX System Services file system. SSLcertificates on page 185 provides more information.
Step 2: Receive the transmit fileThe file that you transferred to the host was created using the TSO TRANSMITcommand. Therefore, you must use the TSO RECEIVE command to convert the file toa library of materials that you will use to complete the installation.
To receive the transmit file:
Procedure
1. Do one of the following:
l From the TSO READY prompt, enter the following command: RECEIVEINDS('high_level_qualifier.EMC.ssem830.XMITFILE')Where high_level_qualifier is the same qualifier used during the CD-basedbatch upload procedure.
l In the Utilities.DSList (3.4) of the main ISPF menu, type RECEIVE INDS(/)on the line where the uploaded transmit file is shown in the list.
In either case, the following displays:
INMR901I Dataset EMC.ssem830.XMITLIB fromemcdist on NODENAMEINMR906A Enter restore parameters or 'DELETE' or'END'
2. Press Enter to accept the allocation of the XMITLIB under your high-levelqualifier, or respond with the following to change the allocated dataset name:
DSN('ds_prefix.xmitlb')
Note
The dataset name you specify must end in the XMITLIB extension.
Step 3: Extract the additional files from the XMITLIBEdit the job $EXTRACT member of the XMITLIB and make the following changes:
Procedure
1. Add a JOB card to comply with your site's batch JCL standards.
2. Change all occurrences of ds-prefix to the desired prefix for your SolutionsEnabler libraries.
Installation
76 Solutions Enabler 8.3 Installation and Configuration Guide
3. Change all occurrences of DVOL to the volume on which you want to allocatethe libraries.
4. Change all occurrences of DISK-UNIT to the disk unit name that includes thevolume you specified in the DVOL change above.
5. Submit the job, and look for a zero return code. The $EXTRACT job createssome temporary data sets which will be deleted by the #99ECLN job after theinstallation is complete. It also creates some data sets for permanent use withSolutions Enabler.
Step 4: Customize the JCLSolutions Enabler includes a REXX exec program, SEMJCL, to expedite the JCLcustomization process by allowing you to create a site-specific ISPF edit macro inyour CLIST library and then running it against every member of the RIMLIB whosename starts with a pound sign (#).
Note
If you prefer to manually customize the JCL, customize the # prefixed members asnecessary, and then continue with Step 5: Run the jobs on page 79.
To use SEMJCL:
Procedure
1. In the Utilities.DSList (3.4) of the main ISPF menu, type the first few qualifiersof your RIMLIB dataset name, and then press Enter.
The RIMLIB displays as part of the DSLIST.
2. Scroll to the RIMLIB dataset and type M in the command field.
The member list for the RIMLIB dataset displays.
3. Scroll to the SEMJCL member in the RIMLIB, and then type exec (or ex ) in theinput area to the left of the member name.
This executes the SEMJCL exec, which displays the customization screen:
Installation
Step 4: Customize the JCL 77
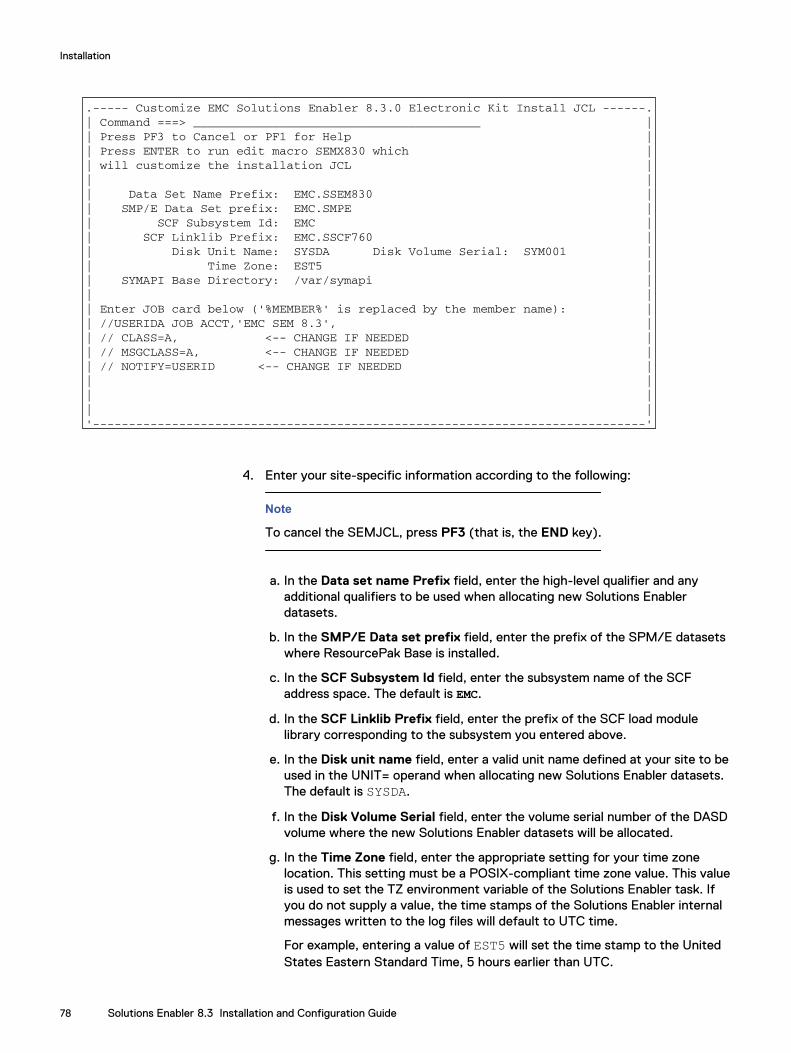
EMC.SSEM620.RIMLIBSEMX620
6.3.0.----- Customize EMC Solutions Enabler 8.3.0 Electronic Kit Install JCL ------.| Command ===> ________________________________________ || Press PF3 to Cancel or PF1 for Help || Press ENTER to run edit macro SEMX830 which || will customize the installation JCL || || Data Set Name Prefix: EMC.SSEM830 || SMP/E Data Set prefix: EMC.SMPE || SCF Subsystem Id: EMC || SCF Linklib Prefix: EMC.SSCF760 || Disk Unit Name: SYSDA Disk Volume Serial: SYM001 || Time Zone: EST5 || SYMAPI Base Directory: /var/symapi || || Enter JOB card below ('%MEMBER%' is replaced by the member name): || //USERIDA JOB ACCT,'EMC SEM 8.3', || // CLASS=A, <-- CHANGE IF NEEDED || // MSGCLASS=A, <-- CHANGE IF NEEDED || // NOTIFY=USERID <-- CHANGE IF NEEDED || || || |'-----------------------------------------------------------------------------'
4. Enter your site-specific information according to the following:
Note
To cancel the SEMJCL, press PF3 (that is, the END key).
a. In the Data set name Prefix field, enter the high-level qualifier and anyadditional qualifiers to be used when allocating new Solutions Enablerdatasets.
b. In the SMP/E Data set prefix field, enter the prefix of the SPM/E datasetswhere ResourcePak Base is installed.
c. In the SCF Subsystem Id field, enter the subsystem name of the SCFaddress space. The default is EMC.
d. In the SCF Linklib Prefix field, enter the prefix of the SCF load modulelibrary corresponding to the subsystem you entered above.
e. In the Disk unit name field, enter a valid unit name defined at your site to beused in the UNIT= operand when allocating new Solutions Enabler datasets.The default is SYSDA.
f. In the Disk Volume Serial field, enter the volume serial number of the DASDvolume where the new Solutions Enabler datasets will be allocated.
g. In the Time Zone field, enter the appropriate setting for your time zonelocation. This setting must be a POSIX-compliant time zone value. This valueis used to set the TZ environment variable of the Solutions Enabler task. Ifyou do not supply a value, the time stamps of the Solutions Enabler internalmessages written to the log files will default to UTC time.
For example, entering a value of EST5 will set the time stamp to the UnitedStates Eastern Standard Time, 5 hours earlier than UTC.
Installation
78 Solutions Enabler 8.3 Installation and Configuration Guide

CAUTION
The default time zone value is UTC time.
h. In the SYMAPI Base Directory field, specify the location of the Unix SystemServices directory under which the SYMAPI runtime directories will becreated.
Note
The userid used in the Solutions Enabler batch jobs must have write accessto the entire SYMAPI base directory.
i. In the Job Card Information field, specify up to four statements for your jobcard.
A default job card is filled in, including a place holder for accounting field,programmer name value, CLASS=A, MSGCLASS=A, and NOTIFY operands.The JOBNAME and NOTIFY= operands use the TSO ID of the user runningthe SEMJCL process.
If you use %member% in the jobname field in the job card, the RIMLIBmember name will be used as the job name.
Note
Statement syntax is not validated until jobs are submitted.
j. Press Enter.
SEMJCL generates an edit macro and uses the ISPF editor to apply thespecified values to all the installation jobs. At this point in the procedure, allof the installation jobs have been edited with site-specific information andare ready to run.
Step 5: Run the jobsProcedure
1. Run each of the following jobs:
l #01ALLOCCreates all the datasets not allocated by the $EXTRACT job for installing theproduct, and copies sample configuration members from the RIMLIB into theSolutions Enabler PARMLIB.
l #04DDDEFCreates the DD definitions for all three SMP/E global zones.
l #05RECEVGets the SYSMODS and HOLDDATA. It also gets the FMID function,FMID(SSEM830), which delivers the Solutions Enabler for z/OS software.
Installation
Step 5: Run the jobs 79

Note
If job #05RECEV fails with the message: GIM23401T the programIEV90 was required for SMP/E but was not availableRun#ASMHA to define IEV90, and then re-run #05RECEV
l #06APPLYSelectively applies the function received in the previous job:
apply select(SSEM830)
At this point you have installed the load library members into the target loadlibrary. The next few jobs execute programs in the load library, which haveadditional requirements. Be sure to check each program's requirementsbefore submitting each job.
l #07DFLTS
Note
Before running job #07DFLTS, decide first if you want to use a specificlockbox password as opposed to the default one. Setting up the lockboxpassword is mandatory and must be completed before running job#10ECCIN. Refer to Step 6: Manage z/OS Lockbox password on page 82before proceeding.
This job assembles and links the assembler source in member #SYMDFLT.#SYMDFLT will have been updated when the exec SEMJCL was run. This jobalso creates the SYMAPI directory structure, based on your specification ofthe SYMAPI Base directory on the SEMJCL Customization panel.
n #08SLMFRuns the Solutions Enabler License Management Facility (symlmf) inbatch mode. You must use an editor to customize the input, entering thelicense keys from the key cards that were received with your SolutionsEnabler package.
The symlmf program normally runs in batch in z/OS, and the input tothe program is specified in the SYSIN DD statement. The statementsthere satisfy the dialog that symlmf would normally have with aninteractive user on non-z/OS platforms.
The dialog sequence is as follows:
a. At the following prompt, enter Y to begin the registration process:Do you want to enter a registration key? Y
b. At the following prompt, enter the 19-byte key value as specified onthe key card:Enter the license key:
c. At the following prompt, enter Y to register another key value, or N tocomplete the registration process:Do you want to enter a registration key? N
Installation
80 Solutions Enabler 8.3 Installation and Configuration Guide
Entering N causes symlmf to finish updating the license file and endthe job step. The sample input below shows the appearance of theSYSIN DD statement coded to enter two keys:
000045 //SYMLMFI EXEC PGM=SYMLMF000046 //STEPLIB DD DSN=EMC.SSEM830.LOADLIB,DISP=SHR000047 //SYSPRINT DD SYSOUT=*000048 //SYSOUT DD SYSOUT=*000049 //SYSIN DD *000050 Y000051 0000-1111-2222-3333000052 Y000053 3333-2222-1111-0000000054 N000055 /*
Note
For more on the new licensing mechanism, refer to eLicensing onpage 122. For alternative ways of installing licenses in z/OS, refer to Installing using alternative methods on page 126.
Note
From this point on, the Solutions Enabler load library must be APF-authorized. The EMCSCF linklib will have been APF-authorized forSCF to operate. Use the desired method at your site to authorize theSolutions Enabler load library.
Also, the user who runs jobs from this point must have an OMVSsegment defined. For more information, refer to Before you begin onpage 20.
The ResourcePak Base (EMCSCF) address space must be active andmust specify the same subsystem identifier (SSID) as the onespecified on the JCL Customization panel.
n #10ECCIN
Note
The Solutions Enabler Base Daemon (storapid) must be started beforejob #10ECCIN is run.
This job creates the SYMAPI database for SYMCLI clients. Job#10ECCIN attempts to discover every VMAX system connected to yourMainframe host. If there are many VMAX arrays connected, this job mayrun for a considerable period of time. If there are VMAX arrays that youdo not want remote clients to view, you may exclude them from thediscover process. See section "symavoid" on page 112 for details onexcluding devices.
Installation
Step 5: Run the jobs 81
Note
If the configuration of any VMAX array attached to a host is changed,then you must re-run job #10ECCIN to correctly discover the changedVMAX array. Alternatively, run a SYMAPI discover from any client whichprovides this capability.
Note
All 12 digits of the serial number are required.
n #16CFGCPCopies the sample configuration files to the SYMAPI configurationdirectory.
Step 6: Manage z/OS Lockbox passwordSolutions Enabler V8.3 on z/OS has an ISPF interface (SEMLB) for managing thelockbox password. During the z/OS installation phase, the lockbox password will beset to the default value when the job #07DFLTS is run, during this step:
//LOCKBOX EXEC PGM=LOCKBOX
To complete the lockbox installation, follow these steps:
Procedure
1. If you wish to have the default lockbox password set during the initial installphase, then continue to step 2. If you do not wish to have the default lockboxpassword set during the initial installation phase, then delete (or comment out)the lockbox step before the job #07DFLTS is run for the first time.
Note
The lockbox step may be deleted (or commented out) before or after theSEMJCL configuration.
2. Complete the SEMJCL setup.
3. Run the job #07DFLTS.
4. Once job #07DFLTS has run (with or without the lockbox step), the SEMLBinterface can be used. For details, see The SEMLB interface on page 83.
Note
The lockbox setup process must be completed before any daemons are startedand job #10ECCIN is run.
5. Start daemons.
6. Run the job #10ECCIN.
Installation
82 Solutions Enabler 8.3 Installation and Configuration Guide
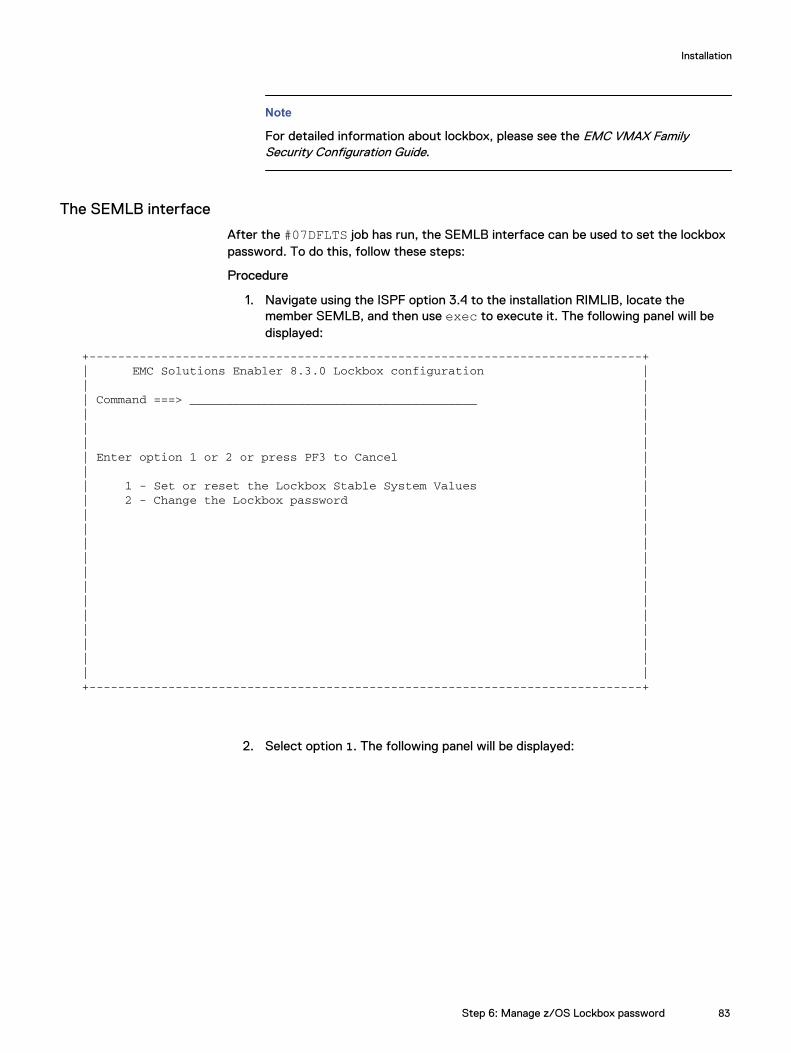
Note
For detailed information about lockbox, please see the EMC VMAX FamilySecurity Configuration Guide.
The SEMLB interface
After the #07DFLTS job has run, the SEMLB interface can be used to set the lockboxpassword. To do this, follow these steps:
Procedure
1. Navigate using the ISPF option 3.4 to the installation RIMLIB, locate themember SEMLB, and then use exec to execute it. The following panel will bedisplayed:
+-----------------------------------------------------------------------------+| EMC Solutions Enabler 8.3.0 Lockbox configuration || || Command ===> ________________________________________ || || || || Enter option 1 or 2 or press PF3 to Cancel || || 1 - Set or reset the Lockbox Stable System Values || 2 - Change the Lockbox password || || || || || || || || || || || || |+-----------------------------------------------------------------------------+
2. Select option 1. The following panel will be displayed:
Installation
Step 6: Manage z/OS Lockbox password 83
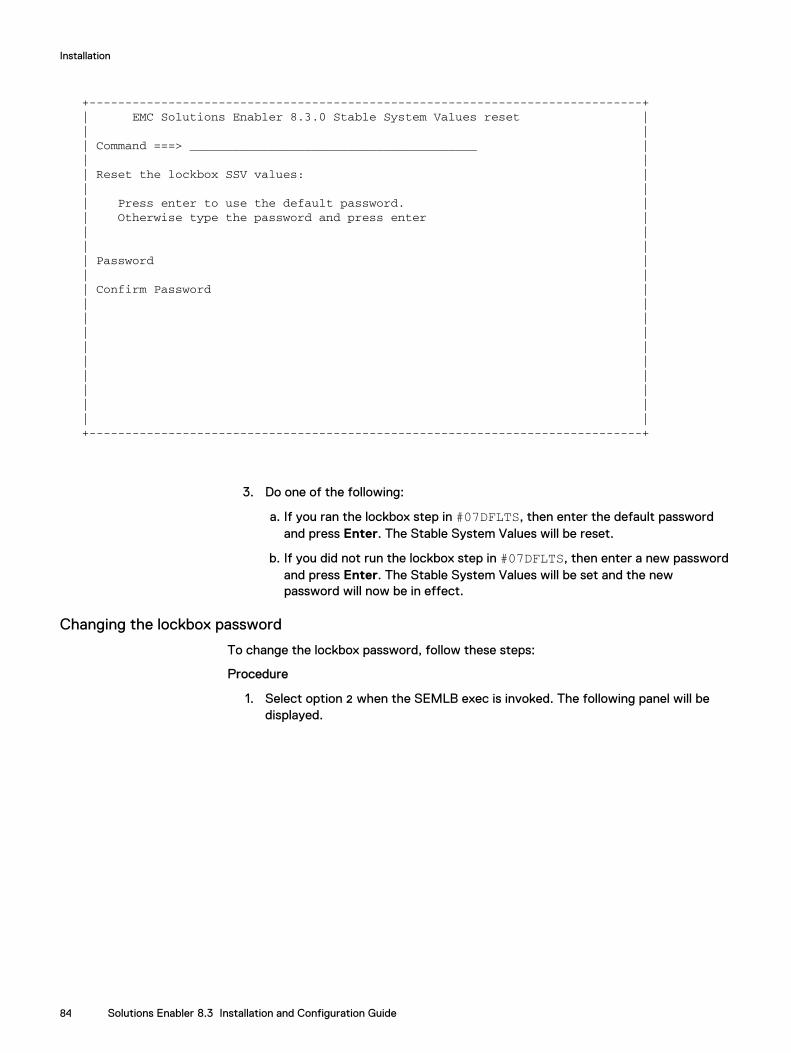
+-----------------------------------------------------------------------------+| EMC Solutions Enabler 8.3.0 Stable System Values reset || || Command ===> ________________________________________ || || Reset the lockbox SSV values: || || Press enter to use the default password. || Otherwise type the password and press enter || || || Password || || Confirm Password || || || || || || || || || |+-----------------------------------------------------------------------------+
3. Do one of the following:
a. If you ran the lockbox step in #07DFLTS, then enter the default passwordand press Enter. The Stable System Values will be reset.
b. If you did not run the lockbox step in #07DFLTS, then enter a new passwordand press Enter. The Stable System Values will be set and the newpassword will now be in effect.
Changing the lockbox password
To change the lockbox password, follow these steps:
Procedure
1. Select option 2 when the SEMLB exec is invoked. The following panel will bedisplayed.
Installation
84 Solutions Enabler 8.3 Installation and Configuration Guide
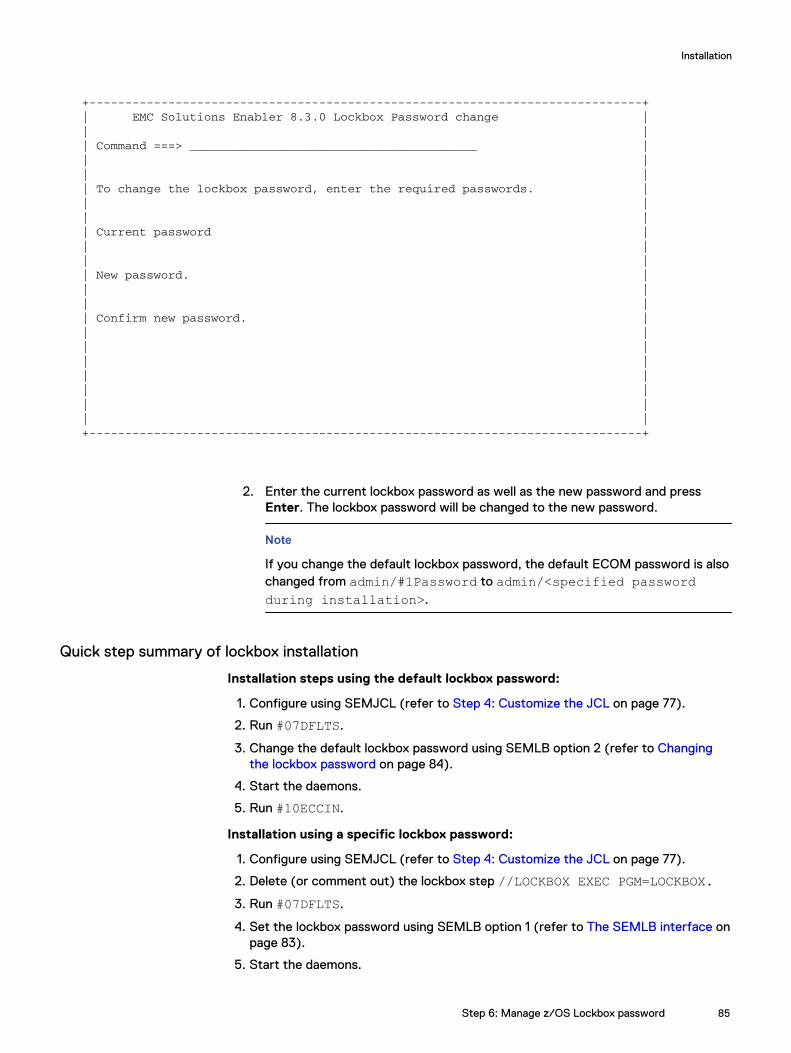
+-----------------------------------------------------------------------------+| EMC Solutions Enabler 8.3.0 Lockbox Password change || || Command ===> ________________________________________ || || || To change the lockbox password, enter the required passwords. || || || Current password || || || New password. || || || Confirm new password. || || || || || || || |+-----------------------------------------------------------------------------+
2. Enter the current lockbox password as well as the new password and pressEnter. The lockbox password will be changed to the new password.
Note
If you change the default lockbox password, the default ECOM password is alsochanged from admin/#1Password to admin/<specified passwordduring installation>.
Quick step summary of lockbox installation
Installation steps using the default lockbox password:
1. Configure using SEMJCL (refer to Step 4: Customize the JCL on page 77).
2. Run #07DFLTS.
3. Change the default lockbox password using SEMLB option 2 (refer to Changingthe lockbox password on page 84).
4. Start the daemons.
5. Run #10ECCIN.
Installation using a specific lockbox password:
1. Configure using SEMJCL (refer to Step 4: Customize the JCL on page 77).
2. Delete (or comment out) the lockbox step //LOCKBOX EXEC PGM=LOCKBOX.3. Run #07DFLTS.
4. Set the lockbox password using SEMLB option 1 (refer to The SEMLB interface onpage 83).
5. Start the daemons.
Installation
Step 6: Manage z/OS Lockbox password 85
6. Run #10ECCIN.
Step 7: Complete the installationDo the following to complete the installation:
Procedure
1. Perform all other customizing and any testing as required. Sample startup jobsare provided in the RIMLIB for the SYMAPI daemons:
l #STORAPI - Base Daemon
l #STOREVT - Event Daemon
l #STORGNS - GNS Daemon
l #STORSRV - Server Daemon
Note that you can either run STORSRV as a batch job or convert it to run as astarted task.
2. Customize and run job #11ACCPT. This job accepts the FMID SSEM830 into thedistribution zone.
3. By default, control functions such as authorization, SRDF or TimeFinder areallowed from hosts external to the z/OS host (via client/server). To disable thiscapability, an optional zap must be applied. This zap is located in the RIMLIB inmember #12CNTRL. Refer to both that job and Remote control operations onpage 197 for further details.
Your Solutions Enabler installation is now complete. Next, you need to establishyour server environment by performing the configuration and setup proceduresexplained in z/OS Post installation configuration on page 185.
Note
If you plan on using the optional Secure Socket Layer (SSL) encryptedcommunications between the SYMAPI server and its connecting clients, andyou plan on running the server in SECURE or ANY modes, you must create andinstall the SSL certificates before starting the server. For more information,refer to SSL certificates on page 185.
Starting overIf, while installing the product, you decide that you want to back out and start theinstallation over, you can do so up until you run job #11ACCPT.
There are two utility jobs in the RIMLIB that allow you to back out of an installation.Both are customized by the SEMJCL process along with other installation JCL. Themembers are:
l #99RESTR — Executes the SMP/E RESTORE command, which reverses theeffect of an APPLY function. Use this job if you have successfully run #06APPLYand want to back out of that step.
l #99REJCT — Executes the SMP/E REJECT command, which reverses the effectof a RECEIVE function. Use this job if you have successfully run #05RECEV andwant to back out of that step. You cannot REJECT an FMID that has been applied.You must RESTORE it before REJECTing it.
Installation
86 Solutions Enabler 8.3 Installation and Configuration Guide
Note
#99RESTR and #99REJCT are not normally used in the installation process. Youshould only use these jobs to redo your installation.
Restoring the RIMLIBIn the event that customization of the RIMLIB has rendered it difficult to work with,you can use job #RIMREST in the RIMLIB to re-create the RIMLIB. This job will createa new RIMLIB with the suffix .REST and will not alter the original RIMLIB. However,you should verify that the JCL in #RIMREST is appropriate before running the job.
Installing Solutions Enabler on OpenVMSThis section describes how to install/upgrade Solutions Enabler on an OpenVMS host.
Note
Before starting this procedure, review the pre-install considerations in Installationprerequisites on page 19.
Step 1: Accessing the softwareSolutions Enabler is distributed as a platform-specific file download from EMC onlinehelp at:
https://support.EMC.com
Possible filenames are:
SE830RIA.SAV HP Integrity hardwareplatform.
Note
Throughout the remainder of this installation procedure, substitute the appropriatefilename for any occurrence of the variable InstallKit
To access the software from EMC online help:
Procedure
1. On EMC Online Support, click Support by Product. Type SolutionsEnabler in the “Find a Product: ” search field and press Enter. The SolutionsEnabler product page appears.
2. Click Download and then the platform-specific installation kit.
3. Save the installation kit to the host's disk drive and run the following commandagainst it:
set file/attr=(RFM:FIX,LRL:32256) InstallKit
Step 2: Install the softwareTo install the software:
Installation
Restoring the RIMLIB 87
Procedure
1. Extract the command procedure after setting [set DEF SYS$SYSDEVICE:[EMC.KITS] by entering:
backup/select=instcli.com InstallKit /sav instcli.com;
2. With both files (instcli.com and InstallKit ) in the same temporary directory,run the installation procedure by entering:
@instcli.com
3. At the following prompt, specify whether to allow lower privileged users toexecute sym* commands.
Do you want to enable lower privilege user capability?
A [Y]es response will enable lower privileged users to execute commands. Step6 describes the privileges these users require.
4. At the following prompt, specify whether to use the default password for thelockbox. This prompt will not appear if the lockbox already exists. For detailedinformation on the lockbox, please refer to the EMC VMAX Family SecurityConfiguration Guide.
Do you want to use the default password for the lockbox?
A [Y]es response will use the default password. A [N]o response will allow usersto enter their own password.
If [N]o response was entered, the following prompt will be displayed to allow theentry of a lockbox password:
The Lockbox password must be at least 8 characters long, contain an uppercase character, contain an lowercase character, contain a numeric value and an special character (!@#%&). Enter lockbox password:
The installation produces the following DCL command procedures:
l emc_cli.com should be called by the system login.com or by each user'slogin procedure.
l emc_install_sys_specific.com is generated to provide a way toinstall the data directories in the sys$specific directory on each node ina cluster. At this point in the installation, this DCL procedure has alreadybeen executed on the machine where Solutions Enabler was installed.
Installation
88 Solutions Enabler 8.3 Installation and Configuration Guide
Note
After the installation, all the data files from the installation will be located inthe sys$specific:[emc.symapi] directories. If there were data fileslocated in a previous installation area, the following files will be copied fromthe previous installation area to the sys$specific:[emc.symapi]directories:
n The config directory files are copied from the previous installation areato the sys$specific:[emc.symapi.config] directory.
n The database file for the machine on which Solutions Enabler is beinginstalled is copied from the previous installation area to the sys$specific:[emc.symapi.db] directory.
n The log directory files are copied from the previous installation area tothe sys$specific:[emc.symapi.log]directory.
The previous installation area data files and directories will remain intact untilall the nodes in a cluster have executed theemc_install_sys_specific.com at which time they could be deleted.Even though they remain intact they are not used by the just installedsoftware.
5. Ensure that each SYMCLI user's login procedure calls the emc_cli.comprocedure to establish their proper SYMCLI environment.
6. Each user must have the following privileges for the SYMCLI to properlyfunction. Take care when granting these privileges.
l NETMBX — Can create network device.
l SYSLCK — Can lock system wide resources.
l SYSNAM — Can insert in the system logical name table.
l CMKRNL — Can change mode to kernel.
In addition to the above privileges, users who will be installing and controllingthe daemons, require the following privileges:
l DIAGNOSE — Can diagnose devices.
l PHY_IO — Can perform physical I/O.
l SHMEM — Can create/delete objects in shared memory.
l SYSPRV — Can access objects by way of system protection.
l WORLD — Can affect other processes in the world.
l Users with lower privileges require the EMCSERVERS right so they can runthe sym* commands.
7. Set the following minimum process quotas for each user account:
l FILLM:1000
l BIOLM:300
l DIOLM:300
l ASTLM:500
l ENQLM:4000
l BYTLM:500000
Installation
Step 2: Install the software 89

l WSEXTENT:32768
8. You can use the following formulas to calculate an approximation of the WSdefand Pgflquo quotas you should use. Depending on the configuration, you mayneed to set these values higher. You should re-valuate these values if theconfiguration changes significantly.
l For the WSdef quota, use the following formula:(B + ((S * SN) + (D * DN) + (V * VN) + (P * PN) + (H * HN) + (G * GN))
l For the Pgflquo quota, use the following formula:(B + (S *SN) + (S * RN) + (D * DN) + (V * VN) + (P * PN) + (H * HN) +(G * GN))
Where:
B = Minimum base of 10000pagelets.
S = 14900 pagelets per array.
SN = Number of locally attachedarrays.
RN = Number of remotelyattached arrays.
D = Two pagelets per disk.
DN = Number of disks. This is thetotal number of devices whenadding up single devices,RAID members, metamembers, etc. that SolutionsEnabler will see in all arraysattached to the host.
V = One pagelet per volume.
VN = Number of volumes. This isthe number of OpenVMSvolumes ($1$DGAxxxx as wellas shadow volumes) that thishost will see on all arraysvisible to this host.
G = 12 pagelets per group.
GN = Number of groups. This isthe total number of SolutionsEnabler disk groups thatSolutions Enabler will be ableto see on all arrays connectedto this host.
P = One pagelet per physicaldisk.
PN = Number of physical disks.This the total number of all
Installation
90 Solutions Enabler 8.3 Installation and Configuration Guide
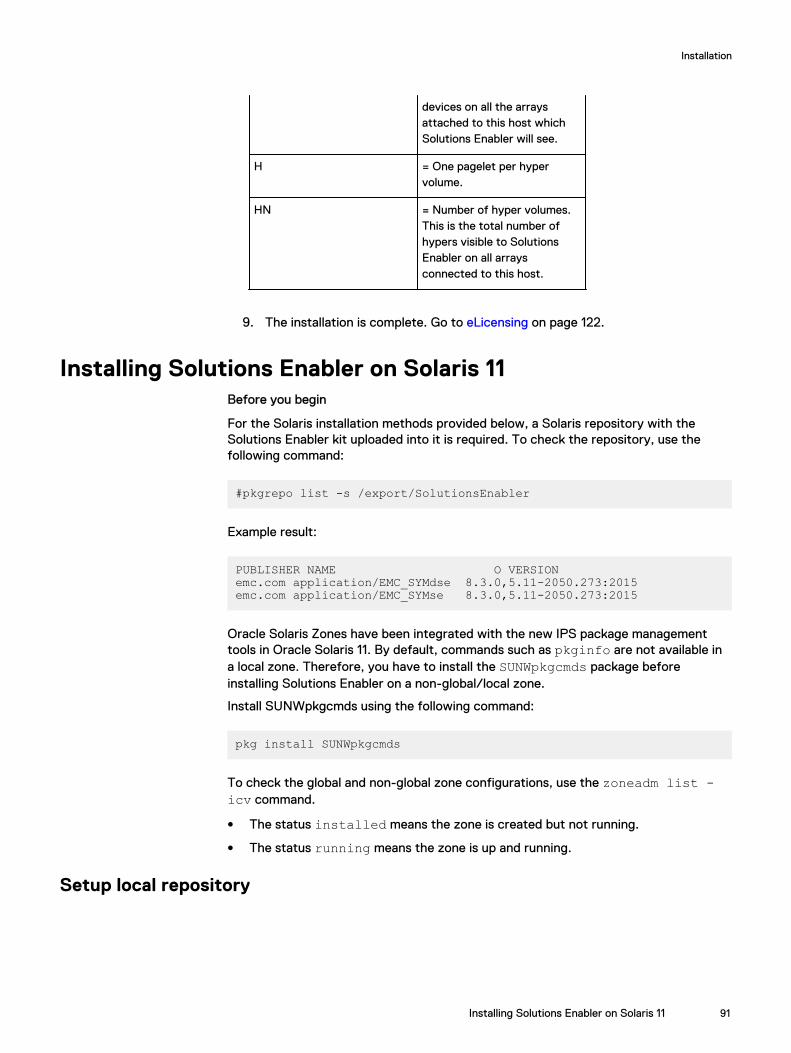
devices on all the arraysattached to this host whichSolutions Enabler will see.
H = One pagelet per hypervolume.
HN = Number of hyper volumes.This is the total number ofhypers visible to SolutionsEnabler on all arraysconnected to this host.
9. The installation is complete. Go to eLicensing on page 122.
Installing Solutions Enabler on Solaris 11Before you begin
For the Solaris installation methods provided below, a Solaris repository with theSolutions Enabler kit uploaded into it is required. To check the repository, use thefollowing command:
#pkgrepo list -s /export/SolutionsEnabler
Example result:
PUBLISHER NAME O VERSIONemc.com application/EMC_SYMdse 8.3.0,5.11-2050.273:2015emc.com application/EMC_SYMse 8.3.0,5.11-2050.273:2015
Oracle Solaris Zones have been integrated with the new IPS package managementtools in Oracle Solaris 11. By default, commands such as pkginfo are not available ina local zone. Therefore, you have to install the SUNWpkgcmds package beforeinstalling Solutions Enabler on a non-global/local zone.
Install SUNWpkgcmds using the following command:
pkg install SUNWpkgcmds
To check the global and non-global zone configurations, use the zoneadm list -icv command.
l The status installed means the zone is created but not running.
l The status running means the zone is up and running.
Setup local repository
Installation
Installing Solutions Enabler on Solaris 11 91
Procedure
1. Create a dedicated Oracle Solaris ZFS File System. It allows using technologiessuch as clones and snapshots, to easily manage data.
# zfs create rpool/export/SolutionsEnabler
root@speb204:~# zfs create rpool/export/SolutionsEnabler
2. Create the Oracle Solaris 11 Solutions Enabler repository.
# pkgrepo create /export/SolutionsEnabler
3. Populate the Oracle Solaris 11 Solutions Enabler repository with the contents ofSolutionsEnabler kit .p5p format.
# pkgrecv -s se830_2026_15-SunOS11-ni.p5p –d \ /export/SolutionsEnabler '*'
Example result:
Processing packages for publisher emc.com ...Retrieving and evaluating 2 package(s)...PROCESS ITEMS GET (MB) SEND (MB)Completed 2/2 133.7/133.7 307.4/307.4
To list packages available in the repository, use the following command:
# pkgrepo list -s /export/SolutionsEnabler
Example result:
PUBLISHER NAME O VERSIONemc.com application/EMC_SYMdse 8.3.0,5.11-2050.273:20150515emc.com application/EMC_SYMse 8.3.0,5.11-2050.273:20150515
4. As a result, Solutions Enabler IPS package is available in the repository. Toverify this, use the following command:
#pkgrepo list -s /export/SolutionsEnabler
Example result:
PUBLISHER NAME O VERSIONemc.com application/EMC_SYMdse 8.3.0,5.11-2050.273:20150515emc.com application/EMC_SYMse 8.3.0,5.11-2050.273:20150515
Installation
92 Solutions Enabler 8.3 Installation and Configuration Guide
Setup the publisherProcedure
1. Set the publisher with the following command:
# pkg set-publisher -p file:///export/SolutionsEnabler emc.com
Example result:
pkg set-publisher: Added publisher(s): emc.com
2. List publishers on host:
# pkg publisher
Example result:
PUBLISHER TYPE STATUS P LOCATIONsolaris origin online F http://pkg.oracle.com/solaris/release/emc.com origin online F file:///export/SolutionsEnabler/#
3. The publisher is set successfully.
Installing Solutions Enabler IPS in Global ZoneProcedure
1. A Solaris repository with the Solutions Enabler kit uploaded into it is required.To check the repository, use the following command:
e.g: #pkgrepo list -s /export/SolutionsEnabler
Example result:
PUBLISHER NAME O VERSIONemc.com application/EMC_SYMdse 8.3.0,5.11-2050.273:20150515emc.com application/EMC_SYMse 8.3.0,5.11-2050.273:20150515
2. To install the latest version kit from repository use the following command:
pkg install application/EMC_SYMse
To install a particular version from repository use:
pkg install application/EMC_SYMse@product_version application/EMC_SYMdse@product_version
Installation
Setup the publisher 93
where product_version is the particular version that is to be installed fromthe repository, for example 8.3.0,5.11-2151.287.
3. To verify that Solutions Enabler kit is installed on Global Zone, use the followingcommand:
#pkg list | grep EMC
Example result:
application/EMC_SYMdse (emc.com) 8.3.0-2026.23 i--application/EMC_SYMse (emc.com) 8.3.0-2026.23 i--
Uninstalling Solutions Enabler IPS in Global ZoneProcedure
1. To uninstall Solaris11 SE kit on Global Zone, run the following command:
#pkg uninstall application/EMC_SYMse application/EMC_SYMdse
2. To verify the uninstallation, run the following command:
#pkg list | grep EMC
Installing Solutions Enabler IPS kit on Non-Global ZonesProcedure
1. Log in to Non Global Zone using one of the following ways:
l If Non Global zone is configured with IP and network configuration, thenlogin using putty session.
l If Non Global Zone is not configured with IP and network configuration, thenlogin to Global Zone first and then login to Non-Global Zone by using thecommand zlogin <Non-Global Zone Name>
2. To install the latest version kit from the repository on the Non-Global Zone, usethe following command:
#pkg install application/EMC_SYMse
To install a particular version from repository, use:
# pkg install application/EMC_SYMse@product_version application/EMC_SYMdse@product_version
where product_version is the particular version that is to be installed fromthe repository, for example 8.3.0,5.11-2151.287.
3. To verify that Solutions Enabler kit is installed on Non-Global Zone, use thefollowing command:
#pkg list | grep EMC
Installation
94 Solutions Enabler 8.3 Installation and Configuration Guide
Example result:
application/EMC_SYMdse (emc.com) 8.3.0-2026.23 i--application/EMC_SYMse (emc.com) 8.3.0-2026.23 i--
Uninstalling Solutions Enabler on Solaris 11 in Non-Global Zone from GlobalZone
Procedure
1. To uninstall Solaris 11 SE kit in Non-Global Zone from Global Zone, run thefollowing command:
zlogin <Non-Global Zone Name> pkg uninstall application/EMC_SYMse application/EMC_SYMdse
2. To verify the uninstallation, run the following command:
zlogin <Non-Global Zone Name> pkg list | grep EMC
Installing Solutions Enabler on Solaris 11 in Non-Global Zone from Global ZoneProcedure
1. To install the latest version kit from the repository on the Non-Global Zone, usethe following command:
zlogin <Non Global Zone Name> pkg install application/EMC_SYMse
To install a particular version from repository, use:
zlogin <Non-Global Zone Name> pkg install application/EMC_SYMse@product_version application/EMC_SYMdse@product_version
where product_version is the particular version that is to be installed fromthe repository, for example 8.3.0,5.11-2151.287.
2. To verify that Solutions Enabler kit is installed on Non-Global Zone, use thefollowing command:
zlogin <Non Global Zone Name> pkg list | grep EMC
Example result:
application/EMC_SYMdse (emc.com) 8.3.0-2026.23 i--application/EMC_SYMse (emc.com) 8.3.0-2026.23 i--
Installation
Uninstalling Solutions Enabler on Solaris 11 in Non-Global Zone from Global Zone 95
Installing Solutions Enabler on Solaris 11 in Non-Global Zone from Global ZoneProcedure
1. To install the latest version kit from the repository on the Non-Global Zone, usethe following command:
zlogin <Non-Global Zone Name> pkg install application/EMC_SYMse
To install a particular version from repository, use:
zlogin <Non-Global Zone Name> pkg install application/EMC_SYMse@product_version application/EMC_SYMdse@product_version
where product_version is the particular version that is to be installed fromthe repository, for example 8.3.0,5.11-2151.287.
2. To verify that Solutions Enabler kit is installed on Non-Global Zone, use thefollowing command:
zlogin <Non-Global Zone Name> pkg list | grep EMC
Example result:
application/EMC_SYMdse (emc.com) 8.3.0-2026.23 i--application/EMC_SYMse (emc.com) 8.3.0-2026.23 i--
Upgrading SMI-S ProviderTo upgrade SMI-S Provider:
Procedure
1. Stop ECOM service.
2. Make a backup of these folders:
On Windows:
C:\Program Files\EMC\ECIM\ECOM\conf\cst C:\Program Files\EMC\ECIM\ECOM\conf\ssl
On Linux:
/opt/emc/ECIM/ECOM/conf/cst/opt/emc/ECIM/ECOM/conf/ssl
3. Uninstall the existing version of SMI provider.
4. Install SMI Provider V8.3 with the Solutions Enabler V8.3 installer.
Installation
96 Solutions Enabler 8.3 Installation and Configuration Guide
5. Replace the folders mentioned in Step 2 with the backup you made.
6. Start ECOM service.
Note
Affected platforms are: Windows 64-bit and Linux 64-bit.
Installing the Solutions Enabler Virtual ApplianceThe Solutions Enabler Virtual Appliance is a VMware ESX server virtual machine thatprovides all the components you need to manage your storage environment using thestorsrvd daemon and Solutions Enabler network client access.
For detailed installation steps on the Solutions Enabler Virtual Appliance, please referto the Solutions Enabler Virtual Appliance Installation Guide.
Installation
Installing the Solutions Enabler Virtual Appliance 97

Installation
98 Solutions Enabler 8.3 Installation and Configuration Guide
CHAPTER 3
UNIX Native installation
This chapter describes how to install/upgrade Solutions Enabler using UNIXPureNative installation kits.
l Before you begin.............................................................................................. 100l PureNative installation kits............................................................................... 100l Installing Solutions Enabler............................................................................... 104l Uninstalling Solutions Enabler...........................................................................108
UNIX Native installation 99
Before you beginBefore you begin to install/upgrade Solutions Enabler, be sure to complete the taskslisted in this section.
Procedure
1. Review the following best practices:
l Backup persistent data and uninstall previous versions of Solutions Enablerbefore performing major upgrades.
l Use the response file method for mass deployments.
l The automated installers: Kickstart, Jumpstart, and Ignite are recommended.
l To achieve full installation functionality, use the Solutions Enablerinstallation wrapper script.
2. For AIX and Solaris hosts with GPG installed, import the public key and verifythe digital signature:
a. Locate the public key (public_key) and the signature. For example, thedigital signature for AIX is:
SYMCLI.8.3.0.0.bff.sig
b. Import the key, by entering:
gpg --import public_key
c. Verify the imported key using, by entering:
-bash-3.00# gpg --list-key
d. Edit the imported key and trust it ultimately, by entering:
-bash-3.00# gpg --edit-key C4E34013
e. Verify the digital signatures, by entering:
gpg --verify SigFile
Where SigFile is the name of the digital signature.
For example, to verify the digital signature for AIX, enter:
gpg --verify SYMCLI.8.3.0.0.bff.sig
f. For Linux hosts, import the ascii public key, by entering:
rpm --import sepubkey.asc
PureNative installation kitsSolutions Enabler PureNative kits are available for the following UNIX platforms:
l AIX
l HP-UX (PA/RISC and ia64)
l Linux (ia64, PPC64, and 390)
UNIX Native installation
100 Solutions Enabler 8.3 Installation and Configuration Guide
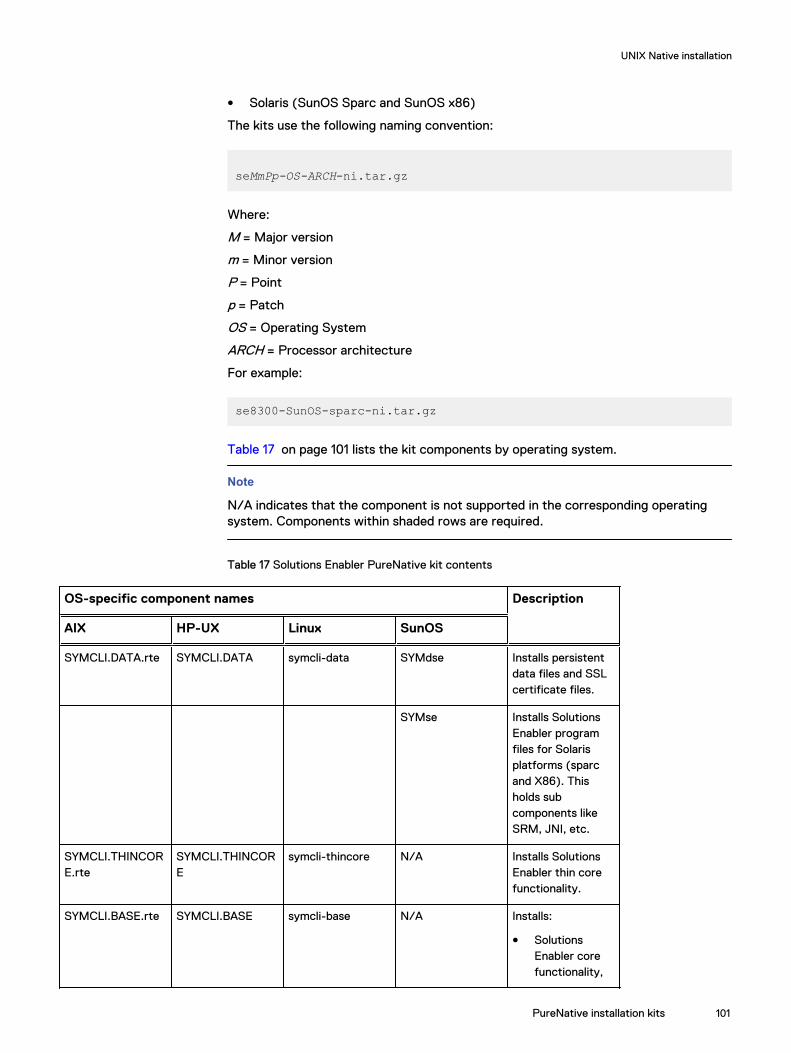
l Solaris (SunOS Sparc and SunOS x86)
The kits use the following naming convention:
seMmPp-OS-ARCH-ni.tar.gz
Where:
M = Major version
m = Minor version
P = Point
p = Patch
OS = Operating System
ARCH = Processor architecture
For example:
se8300-SunOS-sparc-ni.tar.gz
Table 17 on page 101 lists the kit components by operating system.
Note
N/A indicates that the component is not supported in the corresponding operatingsystem. Components within shaded rows are required.
Table 17 Solutions Enabler PureNative kit contents
OS-specific component names Description
AIX HP-UX Linux SunOS
SYMCLI.DATA.rte SYMCLI.DATA symcli-data SYMdse Installs persistentdata files and SSLcertificate files.
SYMse Installs SolutionsEnabler programfiles for Solarisplatforms (sparcand X86). Thisholds subcomponents likeSRM, JNI, etc.
SYMCLI.THINCORE.rte
SYMCLI.THINCORE
symcli-thincore N/A Installs SolutionsEnabler thin corefunctionality.
SYMCLI.BASE.rte SYMCLI.BASE symcli-base N/A Installs:
l SolutionsEnabler corefunctionality,
UNIX Native installation
PureNative installation kits 101
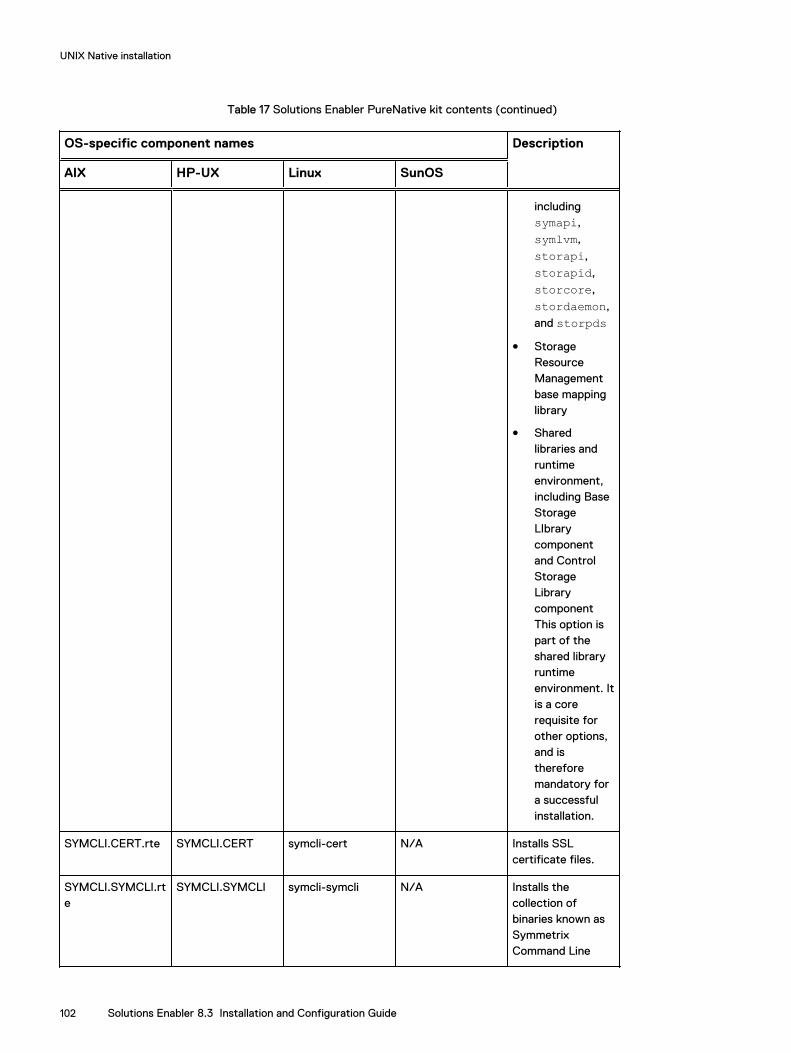
Table 17 Solutions Enabler PureNative kit contents (continued)
OS-specific component names Description
AIX HP-UX Linux SunOS
includingsymapi,
symlvm,
storapi,
storapid,
storcore,
stordaemon,
and storpdsl Storage
ResourceManagementbase mappinglibrary
l Sharedlibraries andruntimeenvironment,including BaseStorageLIbrarycomponentand ControlStorageLibrarycomponentThis option ispart of theshared libraryruntimeenvironment. Itis a corerequisite forother options,and isthereforemandatory fora successfulinstallation.
SYMCLI.CERT.rte SYMCLI.CERT symcli-cert N/A Installs SSLcertificate files.
SYMCLI.SYMCLI.rte
SYMCLI.SYMCLI symcli-symcli N/A Installs thecollection ofbinaries known asSymmetrixCommand Line
UNIX Native installation
102 Solutions Enabler 8.3 Installation and Configuration Guide
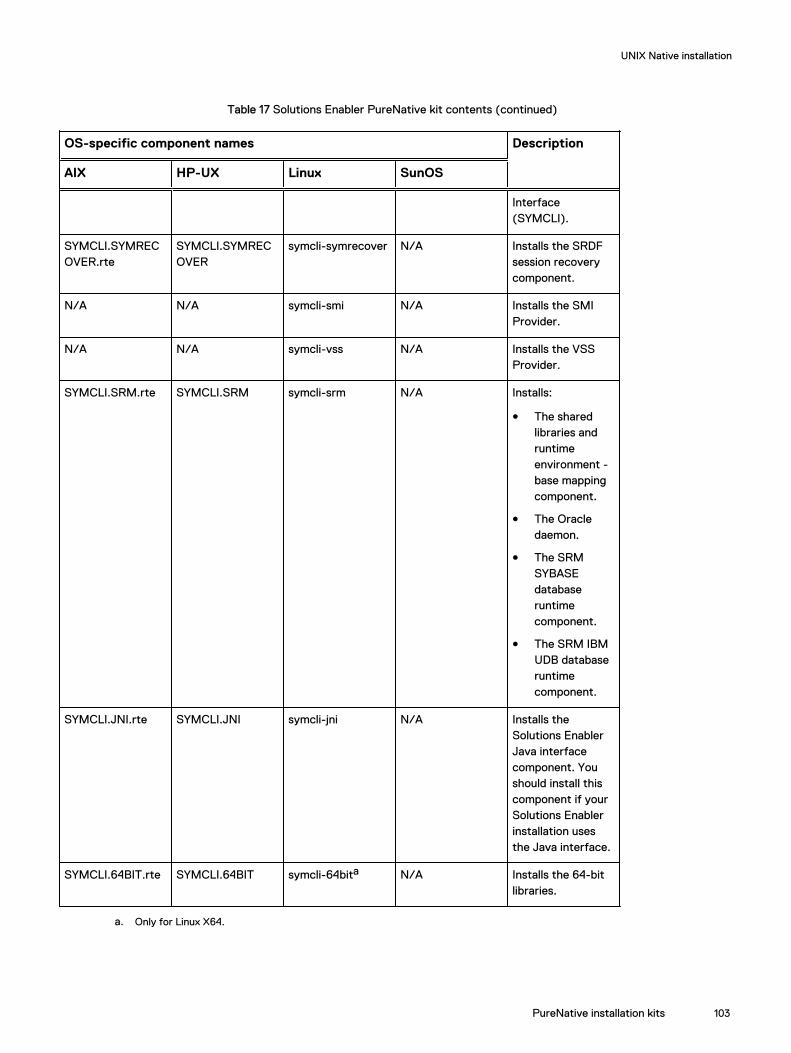
Table 17 Solutions Enabler PureNative kit contents (continued)
OS-specific component names Description
AIX HP-UX Linux SunOS
Interface(SYMCLI).
SYMCLI.SYMRECOVER.rte
SYMCLI.SYMRECOVER
symcli-symrecover N/A Installs the SRDFsession recoverycomponent.
N/A N/A symcli-smi N/A Installs the SMIProvider.
N/A N/A symcli-vss N/A Installs the VSSProvider.
SYMCLI.SRM.rte SYMCLI.SRM symcli-srm N/A Installs:
l The sharedlibraries andruntimeenvironment -base mappingcomponent.
l The Oracledaemon.
l The SRMSYBASEdatabaseruntimecomponent.
l The SRM IBMUDB databaseruntimecomponent.
SYMCLI.JNI.rte SYMCLI.JNI symcli-jni N/A Installs theSolutions EnablerJava interfacecomponent. Youshould install thiscomponent if yourSolutions Enablerinstallation usesthe Java interface.
SYMCLI.64BIT.rte SYMCLI.64BIT symcli-64bita N/A Installs the 64-bitlibraries.
a. Only for Linux X64.
UNIX Native installation
PureNative installation kits 103
Installing Solutions EnablerThis section describes how to install/upgrade Solutions Enabler using native installercommands.
Installing on AIXTo install on an AIX host:
Procedure
1. Uncompress and untar the installation kit.
2. Do either of the following depending on whether you want to perform a full orcustomized installation:
l To perform a full installation, run the following command:
installp -ac -d absolute_path_to_SYMCLI*.bff_file all
l To perform a custom installation and install only specific components, runthe following command:
installp -a -d absolute_path_to_SYMCLI*.bff_file FileSetName
Where FileSetName is a component name from Table 17 on page 101.
3. Run the following command to verify the component installation:
lppchk -f FileSetName
A 0 value is returned for a successful installation.
4. Repeat steps 2 and 3 for each component to install.
Installing on HP-UXYou can install Solutions Enabler on a HP-UX host using either a command line optionor a response file.
Using the command line
To install on an HP-UX host using the command line:
Procedure
1. Uncompress and untar the installation kit.
2. From the local file system, run the following commands to start the installation:
swreg -l depot AbsolutePathtoSYMCLI.depot
swinstall -s AbsolutePathtoSYMCLI.depot FileSetName:InstallPath
Where FileSetName is a component name from Table 17 on page 101.
UNIX Native installation
104 Solutions Enabler 8.3 Installation and Configuration Guide
3. Repeat step 2 for each component to install.
Using a response file
To install on an HP-UX host using a response file:
Procedure
1. Create a response file similar to the following:
#cat response_file_binSYMCLI.THINCORE:/opt/emcSYMCLI.BASE:/opt/emcSYMCLI.SRM:/opt/emcSYMCLI.SYMCLI:/opt/emcSYMCLI.SYMRECOVER:/opt/emcSYMCLI.JNI:/opt/emcSYMCLI.64BIT:/opt/emc
#cat response_file_dataSYMCLI.DATA:/usr/emcSYMCLI.CERT:/usr/emc
2. Run the following command, specifying the location of the installation packageand the name of your response file:
swinstall -s AbsolutePathtoSYMCLI.depot -f ResponseFile
Installing on LinuxYou can install Solutions Enabler on a Linux host using either RPM, or a response file.
Using RPM
To install on a Linux host using the command line:
Procedure
1. Uncompress and untar the installation kit.
2. Run the following command to start the installation:
rpm -i symcli*8.3.0*.rpm
3. Run the following command to verify the component installation:
rpm -qa | grep symcli
4. Run the following command to verify the component installation:
rpm -i symcli*8.3.0*.rpm
5. Run the following command to set lockbox password:
/usr/symcli/install/set_lockbox.sh
Using a response file
To install on a Linux host using a response file:
UNIX Native installation
Installing on Linux 105
Procedure
1. Create a response file similar to the following in /usr/temp/emc_se_linux_response_file :
-bash-2.05b# cat emc_se_linux_response_fileEMC_APPLICATION_PATH:/opt/emcEMC_VAR_PATH:/usr/emcADDITIONAL_COMPONENTS:jni srm
2. Run the following command to start the installation:
rpm -i symcli*8.3.0*.rpm
3. Run the following command to verify the installation:
rpm -qa | grep symcli
Installing on SolarisYou can install/upgrade Solutions Enabler on a Solaris host using either a commandline option, or a response file.
Using the command line
To install on a Solaris host using the command line:
Procedure
1. Uncompress and untar the installation kit.
2. Run the following command to view a list of packages:
pkgadd -d .
3. Run the following, depending on whether you want to start an interactive orsilent installation:
Interactive: pkgadd -d . PkgName
pkgadd -G -d . PkgName (onSolaris 10 or higher)
Silent: pkgadd -n -d . -aFull_path_to_ADMINFile -rResponseFile PkgName
pkgadd -G -n -d . -aFull_path_to_ADMINFile -rResponseFile PkgName (onSolaris 10 or higher)
Where ResponseFile is the name of your response file and PkgName is acomponent name from Table 17 on page 101.
The Solutions Enabler Solaris installation kit consists of two components:SYMdse and SYMse. SYMdse contains persistent data files and SYMse containsprogram files. SYMse accommodates classes (sub components), which are used
UNIX Native installation
106 Solutions Enabler 8.3 Installation and Configuration Guide
to custom-install required Solutions Enabler features like SRM, JNI, etc., usinga response file.
Install the components in the following order:
a. SYMdseb. SYMse
4. Run the following command to verify the installation:
pkgchk -f PkgName
A 0 value is returned for a successful installation.
5. Repeat steps 3 and 4 for each component to install.
Using a response file
To install on Solaris host using a response file:
Procedure
1. Uncompress and untar the installation kit.
2. Create a response file similar to the following:
-bash-2.05b# cat response_file_binCLASSES=none thincore base symcli symrecover srm 64bit jniBASEDIR=/opt/emc
-bash-2.05b# cat response_file_dataCLASSES=none data certBASEDIR=/usr/emc
3. Create the following admin file:
#cat admin_filemail=basedir=defaultrunlevel=quitconflict=nochecksetuid=nocheckaction=nocheckpartial=nocheckinstance=overwriteidepend=quitrdepend=quitspace=quit
4. Run the following command to start the installation:
pkgadd -n -d . -a Full_path_to_ADMINFile -r ResponseFile PkgName
pkgadd -G -n -d . -a Full_path_to_ADMINFile -r ResponseFile PkgName (on Solaris 10 or higher)
Where ResponseFile is the name of your response file and PkgName is acomponent name from Table 17 on page 101.
UNIX Native installation
Installing on Solaris 107
5. Install the components in the following order:
a. data
b. cert
c. thincore
d. base
e. symcli
f. symrecover
g. srm
h. 64bit
i. jni
Note
For component descriptions, refer to Table 17 on page 101.
6. Run the following command to verify the installation:
pkginfo
7. Repeat steps 2 through 6 for each component to install.
Uninstalling Solutions EnablerThis section describes how to uninstall Solutions Enabler using native installercommands.
Uninstalling from AIXTo uninstall from an AIX host, run the following command:
installp -u FileSetName
Where
FileSetName is a component name from Table 17 on page 101.
Uninstalling from HP-UXTo uninstall from an HP-UX host, run the following command:
swremove FileSetName
Where
FileSetName is a component name from Table 17 on page 101.
UNIX Native installation
108 Solutions Enabler 8.3 Installation and Configuration Guide
Uninstalling from LinuxTo uninstall from a Linux host, run the following command:
rpm -e 'rpm -qa |grep -i symcli'
Uninstalling from SolarisTo uninstall from a Solaris host, run the following, depending on whether you want tostart an interactive or silent uninstall:
Interactive: pkgrm PkgName
Silent: pkgrm -n -aFull_path_to_ADMINFile PkgName
Where
PkgName is a component name from Table 17 on page 101.
UNIX Native installation
Uninstalling from Linux 109

UNIX Native installation
110 Solutions Enabler 8.3 Installation and Configuration Guide
CHAPTER 4
Uninstalling Solutions Enabler
This chapter explains how to uninstall Solutions Enabler:
l Overview........................................................................................................... 112l Uninstalling Solutions Enabler from UNIX..........................................................113l Uninstalling Solutions Enabler from Windows....................................................116l Uninstalling Solutions Enabler from OpenVMS.................................................. 118l Uninstalling Solutions Enabler from z/OS..........................................................119l Rolling back an upgrade.....................................................................................119
Uninstalling Solutions Enabler 111
OverviewTo uninstall Solutions Enabler from a UNIX host, you must first shutdown theapplication processes that use the Solutions Enabler libraries and binaries, and thenuninstall the software.
Note
This is not necessary on Windows hosts since the uninstall program will prompt you toshut down the application processes. If you are uninstalling from a Windows host, skipthis step and go to Uninstalling Solutions Enabler from Windows on page 116.
Stopping the application processesTo stop the application processes:
Procedure
1. For UNIX, issue the following command to identify any applications using theSolutions Enabler libraries:
fuser /usr/symcli/shlib/libsym* /usr/symcli/shlib/libstor*
For AIX, issue:
fuser -x -f /usr/symcli/shlib/library_name
2. Issue the following command to stop the Solutions Enabler daemons:
stordaemon shutdown all
Note
For more information on this command, refer to Stopping daemons on page142.
3. Issue the following command to verify that the daemon(s) have stopped:
stordaemon list -running
Note
For more information on this command, refer to Viewing daemons on page 142.
Uninstalling the softwareTo uninstall the Solutions Enabler software, refer to the following:
Uninstalling Solutions Enabler
112 Solutions Enabler 8.3 Installation and Configuration Guide
l For UNIX, refer to Uninstalling Solutions Enabler from UNIX on page 113.
l For Windows, refer to Uninstalling Solutions Enabler from Windows on page 116
l For OpenVMS, refer to Uninstalling Solutions Enabler from OpenVMS on page118.
Uninstalling Solutions Enabler from UNIXYou can uninstall Solutions Enabler from a UNIX host using either the SolutionsEnabler uninstall script or your native install tools (for example, rpm --erase onLinux).
CAUTION
Take care when removing Solutions Enabler, as it may be a prerequisite for otherinstalled products.
Using the scriptTo use the script to uninstall Solutions Enabler from all supported UNIX hosts, changedirectory to /usr/symcli/install and run the following script:
./se8300_install.sh -uninstall
For help running the uninstall script, run the following script:
./se8300_install.sh -help
The uninstall script creates log files in the install root directory /opt/emc/logs inthe format SE_NI_KitVersion_TimeStamp.log, where TimeStamp is in the formYYMMDD_HHmmSS.
Persistent data
The persistent data will remain under /usr/emc/API/symapi or in the datadirectory selected during installation.
The persistent data will remain accessible from the softlink /var/symapi.
Decremental method
To uninstall a single Solutions Enabler component you can use the -decrementoption:
./se8300_install.sh -decrement [-cert][-jni] [-srm] [-symrec]
Note
This method is not supported on Solaris.
Uninstalling Solutions Enabler
Uninstalling Solutions Enabler from UNIX 113
For example, to uninstall the Solutions Enabler SYMRECOVER component, enter:
./se8300_install.sh -decrement -symrec
Using native toolsWhen using your native tools to uninstall Solutions Enabler, you must uninstall theSolutions Enabler packages in the following order:
Table 18 Package order when uninstalling using UNIX native tools
Order Solaris For all other UNIXoperating systems
1 SYMse SMI
2 SYMdse 64BIT
3 SRM
4 JNI
5 SYMRECOVER
6 SYMCLI
7 BASE
8 THINCORE
9 DATA
10 CERT
In addition, you must also verify that all application processes using the SolutionsEnabler libraries and binaries are stopped. For instructions, refer to Stopping theapplication processes on page 112.
Uninstalling from Linux
Use the following commands when uninstalling Solutions Enabler from a Linux host:
rpm -qa|grep symcli
Lists all of the installed RPMs.
rpm -ql <RPM entry from the installed list>
Lists all of the files in the specified RPM. For example, to list all of the files in the corecomponent, enter:
rpm -ql symcli-thincore-8.3.0.1701-116.1
rpm -e <RPM entry from the installed list>
Uninstalling Solutions Enabler
114 Solutions Enabler 8.3 Installation and Configuration Guide
Uninstalls the specified RPM. For example, to uninstall the core component, enter:
rpm -e symcli-thincore-8.3.0.1701-116.1
Uninstalling from AIX
Use the following commands when uninstalling Solutions Enabler from an AIX host:
lslpp -L | grep SYMCLI
Lists all installed Solutions Enabler filesets.
installp -u FilesetName
Uninstalls a fileset. For example, to uninstall the core component, enter:
installp -u SYMCLI.THINCORE
Uninstalling from HPUX
Use the following commands when uninstalling Solutions Enabler from an HPUX host:
swlist -l fileset | grep SYMCLI
Lists all of the installed Solutions Enabler filesets.
swremove FilesetName
Uninstalls a fileset. For example, to uninstall the Solutions Enabler core component,enter:
swremove SYMCLI.THINCORE
Uninstalling from Solaris
Use the following commands when uninstalling Solutions Enabler from a Solaris host:
pkginfo | grep SYM
Lists all of the installed Solutions Enabler packages.
pkgrm PackageName
Uninstalling Solutions Enabler
Using native tools 115
Uninstalls a package. For example, to uninstall the Solutions Enabler SYMsecomponent, enter:
pkgrm SYMse
Uninstalling Solutions Enabler from WindowsThis section describes the various methods available for uninstalling Solutions Enablerfrom a Windows host.
CAUTION
Take care when removing Solutions Enabler, as it may be a prerequisite for otherinstalled products.
Using the InstallShield wizardTo uninstall Solutions Enabler using the InstallShield wizard:
Procedure
1. Change the directory to the location of the Solutions Enabler kit by entering thefollowing:
cd \Install_disk_mount_point\Windows
2. Start the uninstall by running the following:
se8300-WINDOWS-x64.exe
3. In the InstallShield Wizard for Solutions Enabler Welcome dialog box, clickNext.
4. In the Program Maintenance dialog box, select Remove and click Next.
5. In the Remove the Program dialog box, click Remove.
6. In the Installation Program Complete dialog box, click Finish to complete theremoval process.
Using the command lineTo uninstall Solutions Enabler from the command line using the msi installer options,run the following command:
start /wait FullPathToInstallImage\se8300-WINDOWS-x64.exe /s /x /v/qn
Where:
FullPathToInstallImage is the path to the executable.
/s is the command to run silently.
/x is the command to uninstall.
/v is the command gateway for msiexec.exe.
Uninstalling Solutions Enabler
116 Solutions Enabler 8.3 Installation and Configuration Guide

/qn is the silent option.
Note
If the /s and /v options are entered as capital letters (/S /V), and a space is used toseparate the /v and /qn options, the uninstallation starts in Wizard mode.
Removing the msi imageYou can use either of the following methods to uninstall the msi image:
Procedure
1. Enter the following command, specifying the GUID of the product to uninstall:
start /wait msiexec.exe /x {GUID} /qn
Possible values for GUID are:
{A2A6F36B-9F18-41fe-BCA1-FECF2DE9F5BC} Solutions Enabler
{CA1446F4-FF86-46ff-9783-C9E1AF21FE5E} STORBLK
{DFFEB2C8-5442-45e2-B2E1-9D90AF84BCF5} SDK
{E4D9E227-D0F3-4666-8BEF-34C577CE562B} TCLIENT
2. Use the Windows Installer Clean Up utility, msicuu2.exe:
a. Download the msicuu2.exe from Microsoft and install it on the host.
b. From the Windows Start menu, select All Programs.
c. Select the application to remove and click Remove.
d. Stop the following services in the order listed below. You can do this fromeither the cmd prompt or the Services dialog.
Storsrvd
Storgnsd
Storrdfd
Storevntd
Storsrmd
Storstpd
Stororad
Storsqld
Storudbd
Storapid
ECOM
slpd
e. Remove the list of files from System32. The list of files is the same as thosein InstallDir\Symcli\shlib.
f. Remove the Symcli directory and all its subdirectories.
Uninstalling Solutions Enabler
Removing the msi image 117
g. Remove the ECOM directory and all its subdirectories.
h. Remove the subdirectories from Symapi , except for the Config and dbdirectories.
i. Remove the following registry entries:
HKEY_LOCAL_MACHINE\SOFTWARE\EMC\EMC Solutions Enabler
HKEY_LOCAL_MACHINE\SOFTWARE\EMC\SYMCLI
HKEY_LOCAL_MACHINE\SOFTWARE\EMC\WideSky
j. From under the following registry key, remove the entries that only point tothe SYMAPI or SYMCLI:
HKEY_LOCAL_MACHINE\SOFTWARE\Microsoft\Windows\CurrentVersion\SharedDlls
Using the Windows Add/Remove Programs dialogTo uninstall Solutions Enabler from the Windows Add or Remove Programs dialog:
Procedure
1. From the Windows Start menu, select Settings | Control Panel | Add orRemove Programs.
2. In the Add or Remove Programs dialog, select EMC Solutions Enabler andclick Uninstall.
Using the Windows Programs and Features dialogTo uninstall Solutions Enabler from the Windows Programs and Features dialog:
Procedure
1. From the Windows Start menu, select Control Panel.
2. Click Programs and Features.
3. Under Programs , click Uninstall a Program.
4. Select EMC Solutions Enabler and click Uninstall.
Uninstalling Solutions Enabler from OpenVMSTo uninstall Solutions Enabler from an OpenVMS host:
CAUTION
Take care when removing Solutions Enabler, as it may be a prerequisite for otherinstalled products.
Procedure
1. Verify that all application processes that use the Solutions Enabler libraries andbinaries are stopped.
2. If file emc$root:[-]emc_disable_autostart.com exists then executethe following: @emc$root:[-]emc_disable_autostart.com
Uninstalling Solutions Enabler
118 Solutions Enabler 8.3 Installation and Configuration Guide
3. Delete all the files in the sys$specific:[emc] and sys$specific:[000000]emc.dir directories. If the environment is a cluster, delete thesefiles from every node in the cluster where Solutions Enabler was running.
4. Delete all the files from the installation directory.
Uninstalling Solutions Enabler from z/OSTo uninstall Solutions Enabler from a z/OS host:
Procedure
1. Verify that all jobs or Started Tasks that use the Solutions Enabler datasets arestopped.
2. Delete the installation datasets as required.
3. Delete Unix System Services files (if required).
Note
This may be /var/symapi or a different directory, depending on the choicesmade for the install job #07dflts.
Rolling back an upgradeTo roll back your upgrade, you must have created copies of the host database andconfig directories, as explained in Before you begin on page 20:
Procedure
1. Verify that all application processes that use the Solutions Enabler libraries andbinaries are stopped.
Note
For instructions, refer to Stopping the application processes on page 112.
2. Export all device groups from the current SYMAPI database:
a. Issue a symdg list command to list all the device groups.
b. Issue a symdg export command to export the device groups.
c. Issue a symcg list command to list all the composite groups.
d. Issue a symcg export command to export the composite groups.
Note
This export is necessary because older versions of Solutions Enabler may notbe able to read a database once a newer version of Solutions Enabler hasconverted it.
Uninstalling Solutions Enabler
Uninstalling Solutions Enabler from z/OS 119
Note
For more information on these commands, refer to the EMC SolutionsEnabler Array Management CLI User Guide.
3. Uninstall your software according to the platform-specific procedures earlier inthis chapter.
4. Install the desired version of Solutions Enabler.
5. Once the installation is complete, issue a symcfg list command to verifythat the SYMAPI database can be used by the older version:
a. If the database can be used, the rollback is done.
b. If the database cannot be used, issue a symcfg discover command tocreate an array host database file, symapi_db.bin, and import all theexported device groups.
Uninstalling Solutions Enabler
120 Solutions Enabler 8.3 Installation and Configuration Guide
CHAPTER 5
Post-Installation configuration for UNIX,Windows, OpenVMS, and z/OS
After you have installed Solutions Enabler, you need to perform certain follow-upprocedures to enable your software's features and to establish your commandenvironment. This chapter provides the follow-up procedures for a Solutions Enablerinstallation in UNIX, Windows, OpenVMS, and z/OS environments:
Note
As an alternative to the in-depth UNIX and Windows procedures in this chapter, Installation checklist on page 44 provides operating-system-specific checklists withhigh-level installation and configuration steps that advanced users may find useful.
l eLicensing.........................................................................................................122l Initial post-installation configuration of Solutions Enabler................................. 131l Setting the CLI path......................................................................................... 133l Setting the online help path.............................................................................. 134l Managing database and gatekeeper locking......................................................134l Avoidance and selection files............................................................................ 136l Changing the default behavior of SYMCLI........................................................ 137l Oracle multiple instances through a remote server........................................... 138l Setting up daemons for distributed application support....................................139l Managing the base daemon.............................................................................. 145l Setting up the event daemon for monitoring.................................................... 148l VSS Provider environment variables................................................................. 176l SMI-S Provider Windows authentication settings.............................................176l VMAX arrays.....................................................................................................176l ECOM............................................................................................................... 177l Disabling ports.................................................................................................. 180l SMI-S Provider runtime settings...................................................................... 182l RedHat Enterprise Linux 6.0/6.2 [GA] - x86_64 installation.............................183l Adding the SSL certificate................................................................................184l Vendor SNIA libraries needed for HBA information........................................... 184l z/OS Post installation configuration................................................................. 185
Post-Installation configuration for UNIX, Windows, OpenVMS, and z/OS 121
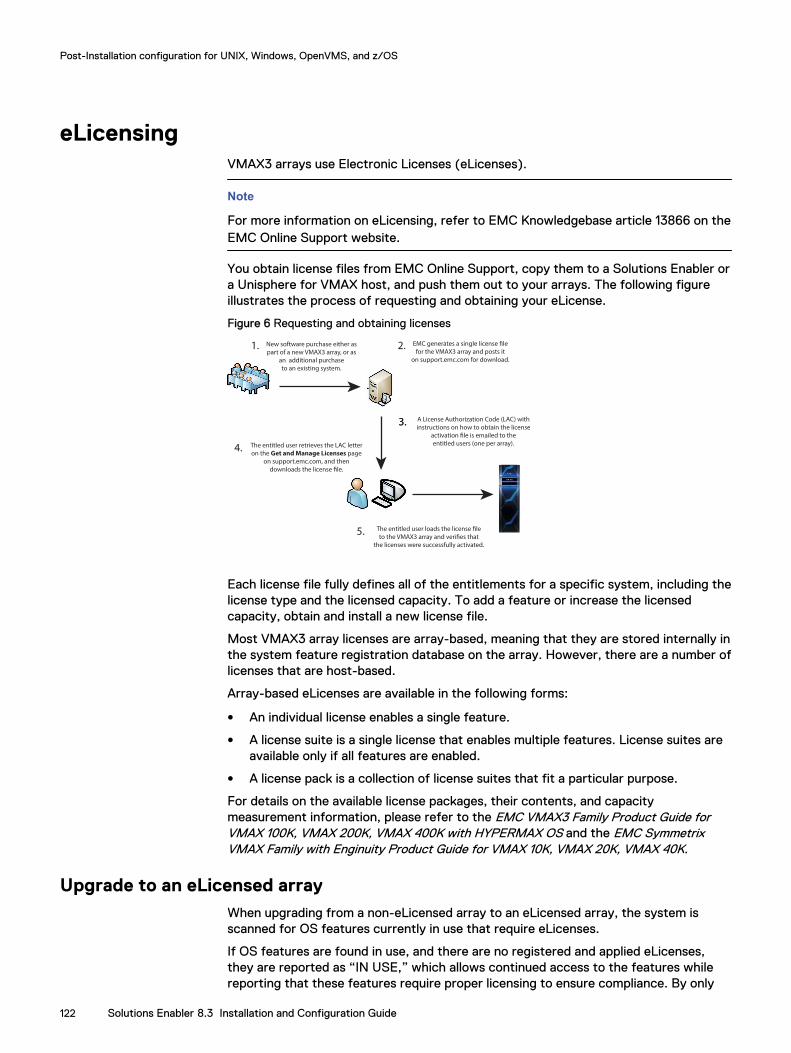
eLicensingVMAX3 arrays use Electronic Licenses (eLicenses).
Note
For more information on eLicensing, refer to EMC Knowledgebase article 13866 on theEMC Online Support website.
You obtain license files from EMC Online Support, copy them to a Solutions Enabler ora Unisphere for VMAX host, and push them out to your arrays. The following figureillustrates the process of requesting and obtaining your eLicense.
Figure 6 Requesting and obtaining licenses
New software purchase either as
part of a new VMAX3 array, or as
an additional purchase
to an existing system.
1. EMC generates a single license �le
for the VMAX3 array and posts it
on support.emc.com for download.
2.
A License Authorization Code (LAC) with
instructions on how to obtain the license
activation �le is emailed to the
entitled users (one per array).
3.3.
The entitled user retrieves the LAC letter
on the Get and Manage Licenses page
on support.emc.com, and then
downloads the license �le.
4.
The entitled user loads the license �le
to the VMAX3 array and veri�es that
the licenses were successfully activated.
5.
Each license file fully defines all of the entitlements for a specific system, including thelicense type and the licensed capacity. To add a feature or increase the licensedcapacity, obtain and install a new license file.
Most VMAX3 array licenses are array-based, meaning that they are stored internally inthe system feature registration database on the array. However, there are a number oflicenses that are host-based.
Array-based eLicenses are available in the following forms:
l An individual license enables a single feature.
l A license suite is a single license that enables multiple features. License suites areavailable only if all features are enabled.
l A license pack is a collection of license suites that fit a particular purpose.
For details on the available license packages, their contents, and capacitymeasurement information, please refer to the EMC VMAX3 Family Product Guide forVMAX 100K, VMAX 200K, VMAX 400K with HYPERMAX OS and the EMC SymmetrixVMAX Family with Enginuity Product Guide for VMAX 10K, VMAX 20K, VMAX 40K.
Upgrade to an eLicensed arrayWhen upgrading from a non-eLicensed array to an eLicensed array, the system isscanned for OS features currently in use that require eLicenses.
If OS features are found in use, and there are no registered and applied eLicenses,they are reported as “IN USE,” which allows continued access to the features whilereporting that these features require proper licensing to ensure compliance. By only
Post-Installation configuration for UNIX, Windows, OpenVMS, and z/OS
122 Solutions Enabler 8.3 Installation and Configuration Guide
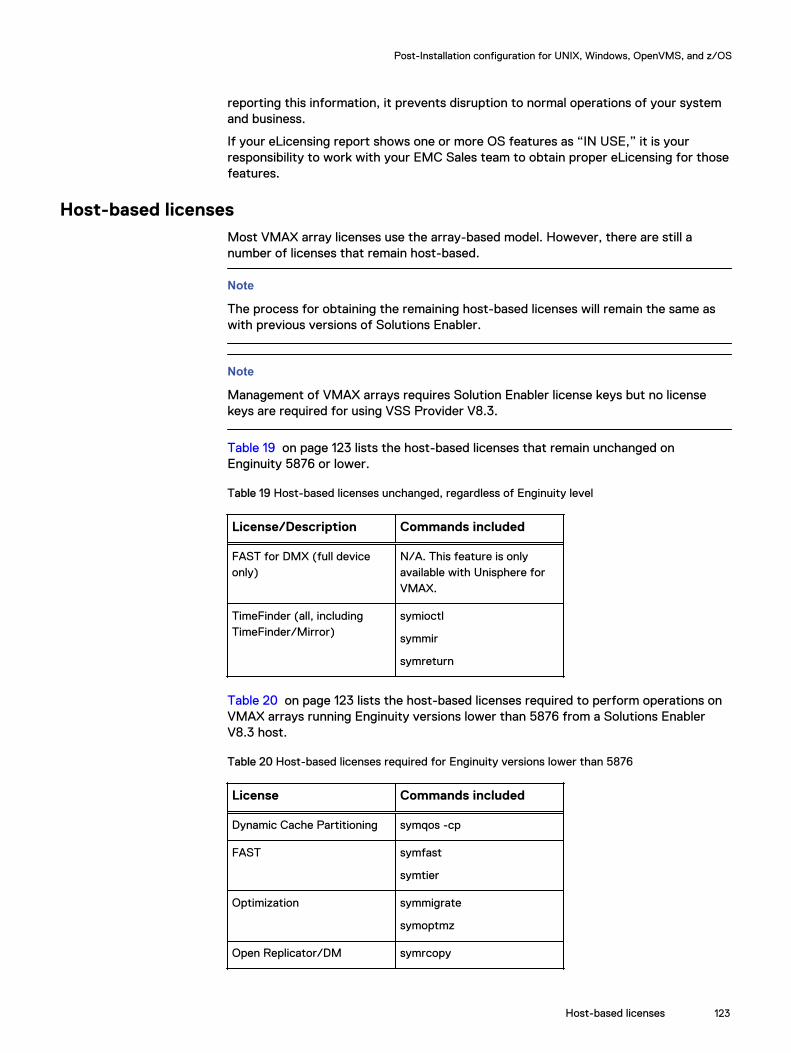
reporting this information, it prevents disruption to normal operations of your systemand business.
If your eLicensing report shows one or more OS features as “IN USE,” it is yourresponsibility to work with your EMC Sales team to obtain proper eLicensing for thosefeatures.
Host-based licensesMost VMAX array licenses use the array-based model. However, there are still anumber of licenses that remain host-based.
Note
The process for obtaining the remaining host-based licenses will remain the same aswith previous versions of Solutions Enabler.
Note
Management of VMAX arrays requires Solution Enabler license keys but no licensekeys are required for using VSS Provider V8.3.
Table 19 on page 123 lists the host-based licenses that remain unchanged onEnginuity 5876 or lower.
Table 19 Host-based licenses unchanged, regardless of Enginuity level
License/Description Commands included
FAST for DMX (full deviceonly)
N/A. This feature is onlyavailable with Unisphere forVMAX.
TimeFinder (all, includingTimeFinder/Mirror)
symioctl
symmir
symreturn
Table 20 on page 123 lists the host-based licenses required to perform operations onVMAX arrays running Enginuity versions lower than 5876 from a Solutions EnablerV8.3 host.
Table 20 Host-based licenses required for Enginuity versions lower than 5876
License Commands included
Dynamic Cache Partitioning symqos -cp
FAST symfast
symtier
Optimization symmigrate
symoptmz
Open Replicator/DM symrcopy
Post-Installation configuration for UNIX, Windows, OpenVMS, and z/OS
Host-based licenses 123

Table 20 Host-based licenses required for Enginuity versions lower than 5876 (continued)
License Commands included
SRDF symrdf add RDF group
symconfigure add RDF mirror
symconfigure create SAVEdevices
symconfigure set dynamicRDF attribute
SRDF/Async symrdf set mode async
symconfigure SRDF/Asettings and add RDF mirror
symrdf create dynamic pair inasynchronous mode
SRDF/Star symstara
SRDF/Synchronous symconfigure add rdf mirror
symrdf create dynamic pair insynchronous mode
Symmetrirx Priority Control symqos -pst
TimeFinder/Clone symclone and symmir (usingclone emulation)
TimeFinder/Snap symsnap
symconfigure create snappool and SAVE devices
a. Also requires SRDF/A and SRDF/S licenses.
Managing arrays running different Enginuity versionsThe operations that you can perform from a host are based on the host-based licensesin the host's symapi_licenses.dat file, if any, and the array-based licenses in thearray's feature registration database (Enginuity 5876 or higher).
Note
The location of this symapi_licenses.dat file varies according to the operatingsystem. For more information, refer to Solutions Enabler Directories on page 263.
The remainder of this section describes how the operations you can perform from aSolutions Enabler host are determined when accessing various Enginuity versions.
Solutions Enabler V7.6 (or higher) host
When accessing an array running Enginuity 5876 or higher from a host runningSolutions Enabler V7.6 or higher, the operations you can perform on the array arebased on:
l The licenses in the array's feature registration database.
Post-Installation configuration for UNIX, Windows, OpenVMS, and z/OS
124 Solutions Enabler 8.3 Installation and Configuration Guide
l The licenses in the host's symapi_licenses.dat file, if using any of the host-based features listed in Table 19 on page 123.
When accessing an array running Enginuity version 5773 from the same host, theoperations you can perform on the array are based on the licenses in the host'ssymapi_licenses.dat file, if using any of the host-based features listed in Table19 on page 123 and Table 20 on page 123. If not, you can only perform operations thatdo not require a license.
When accessing an array upgraded to Enginuity 5876 or higher from a host upgradedto Solutions Enabler V7.6 or higher, any product title that you were currently using willstill function (even if it does not have an entitlement). However, to use any of the newEnginuity 5876 product titles or any of the older product titles you were not using, youmust obtain and install an array-based license file on the array. Installing array-basedlicenses on page 125 describes how to install license files.
Installing array-based licensesThis section explains how to use the symlmf add command to install array-basedlicenses.
Note
Installing licenses requires an authorization role of Storage Admin or higher.
You can only install array-based licenses from a host running one of the followingoperating systems:
l Windows: AMD64
l Linux: AMD64, ia64
l Solaris: 64 bit (Sparc)
l HP-UX 11.21: ia64
l AIX 5.3 and 6.1: PPC 64
For instructions on installing from a host running a supported operating system, referto Installing from a supported host on page 125. For instructions on installing from ahost running a non-supported operating system, refer to Installing using alternativemethods on page 126.
Note
To obtain array-based licenses from EMC Online Support you will need the LicenseAuthorization Code (LAC) identification number from the LAC letter e-mailed to you.
Installing from a supported host
To install an array-based license file from a host running a supported operatingsystem:
1. Obtain a license file from EMC Online Support and copy it to your host.
2. Use the following symlmf command to push the license file to the VMAX array:
symlmf add -type emclm -sid SymmID -file FileName -v
Where:
SymmID — Specifies the array on which you are installing the license file.
Post-Installation configuration for UNIX, Windows, OpenVMS, and z/OS
Installing array-based licenses 125
FileName — Specifies the name of the license file.
Output similar to the following appears:
License SYMM_VMAX_SPC 000000001234 15-Jan-2014: Processed successfully License SYMM_VMAX_DCP 000000001234 15-Jan-2014: Processed successfully License SYMM_VMAX_FAST_VP 000000001234 15-Jan-2014: Processed successfully License SYMM_VMAX_FAST 000000001234 15-Jan-2014: Processed successfully License SYMM_VMAX_OPTIMIZER 000000001234 15-Jan-2014: Processed successfully License SYMM_VMAX_TF_SNAP 000000001234 15-Jan-2014: Processed successfully License SYMM_VMAX_TF_CLONE 000000001234 15-Jan-2014: Processed successfully License SYMM_VMAX_SRDF_STAR 000000001234 15-Jan-2014: Processed successfully License SYMM_VMAX_SRDF_S 000000001234 15-Jan-2014: Processed successfully License SYMM_VMAX_SRDF_A 000000001234 15-Jan-2014: Processed successfully License SYMM_VMAX_SRDF 000000001234 15-Jan-2014: Processed successfully License SYMM_VMAX_ENGINUITY 000000001234 15-Jan-2014: Processed successfully License SYMM_VMAX_OR-DM 000000001234 15-Jan-2014: Processed successfully License SYMM_VMAX_SMC 000000001234 15-Jan-2014: Processed successfully Total Licenses Processed: 13 Total host-based eLicense ignored: 0 Total Licenses Not Processed: 0
Note
Issuing the add command without the -v option will eliminate all but the last threelines of the above output.
Installing using alternative methods
To install an array-based license file from a host running a non-supported operatingsystem, use one of the following methods:
l Run symlmf directly on the VMAX service processor. This method requires thatyou contact EMC Customer Support.
l Run symlmf on one of the unsupported platforms via client/server to a SYMAPIserver on one of the supported platforms.
Installing host-based licenses
Note
Installing licenses requires an authorization role of Storage Admin or higher.
To install a host-based license:
Procedure
1. Use the following symlmf command to install a license key on a host:
symlmf add -type se -license LicenseNumber
2. Use the following command to list the licenses installed on the host:
symlmf list -type se
Post-Installation configuration for UNIX, Windows, OpenVMS, and z/OS
126 Solutions Enabler 8.3 Installation and Configuration Guide
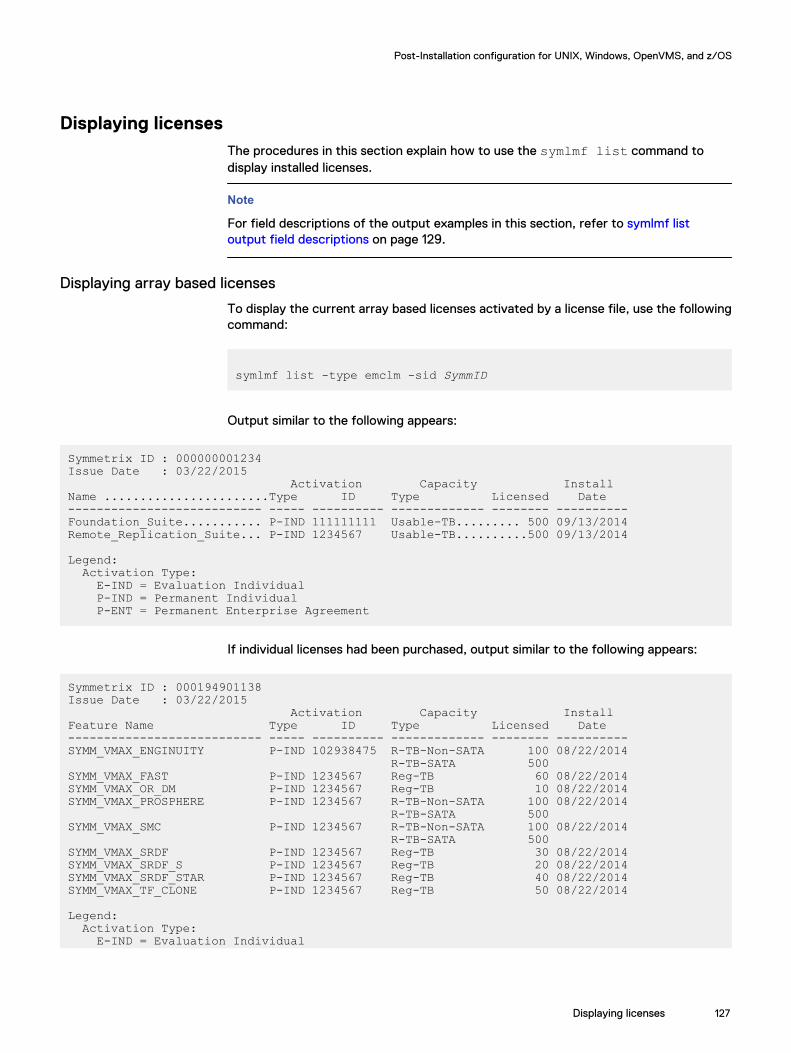
Displaying licensesThe procedures in this section explain how to use the symlmf list command todisplay installed licenses.
Note
For field descriptions of the output examples in this section, refer to symlmf listoutput field descriptions on page 129.
Displaying array based licenses
To display the current array based licenses activated by a license file, use the followingcommand:
symlmf list -type emclm -sid SymmID
Output similar to the following appears:
Symmetrix ID : 000000001234Issue Date : 03/22/2015 Activation Capacity InstallName .......................Type ID Type Licensed Date--------------------------- ----- ---------- ------------- -------- ----------Foundation_Suite........... P-IND 111111111 Usable-TB......... 500 09/13/2014Remote_Replication_Suite... P-IND 1234567 Usable-TB..........500 09/13/2014
Legend: Activation Type: E-IND = Evaluation Individual P-IND = Permanent Individual P-ENT = Permanent Enterprise Agreement
If individual licenses had been purchased, output similar to the following appears:
Symmetrix ID : 000194901138Issue Date : 03/22/2015 Activation Capacity InstallFeature Name Type ID Type Licensed Date--------------------------- ----- ---------- ------------- -------- ----------SYMM_VMAX_ENGINUITY P-IND 102938475 R-TB-Non-SATA 100 08/22/2014 R-TB-SATA 500SYMM_VMAX_FAST P-IND 1234567 Reg-TB 60 08/22/2014SYMM_VMAX_OR_DM P-IND 1234567 Reg-TB 10 08/22/2014SYMM_VMAX_PROSPHERE P-IND 1234567 R-TB-Non-SATA 100 08/22/2014 R-TB-SATA 500SYMM_VMAX_SMC P-IND 1234567 R-TB-Non-SATA 100 08/22/2014 R-TB-SATA 500SYMM_VMAX_SRDF P-IND 1234567 Reg-TB 30 08/22/2014SYMM_VMAX_SRDF_S P-IND 1234567 Reg-TB 20 08/22/2014SYMM_VMAX_SRDF_STAR P-IND 1234567 Reg-TB 40 08/22/2014SYMM_VMAX_TF_CLONE P-IND 1234567 Reg-TB 50 08/22/2014
Legend: Activation Type: E-IND = Evaluation Individual
Post-Installation configuration for UNIX, Windows, OpenVMS, and z/OS
Displaying licenses 127
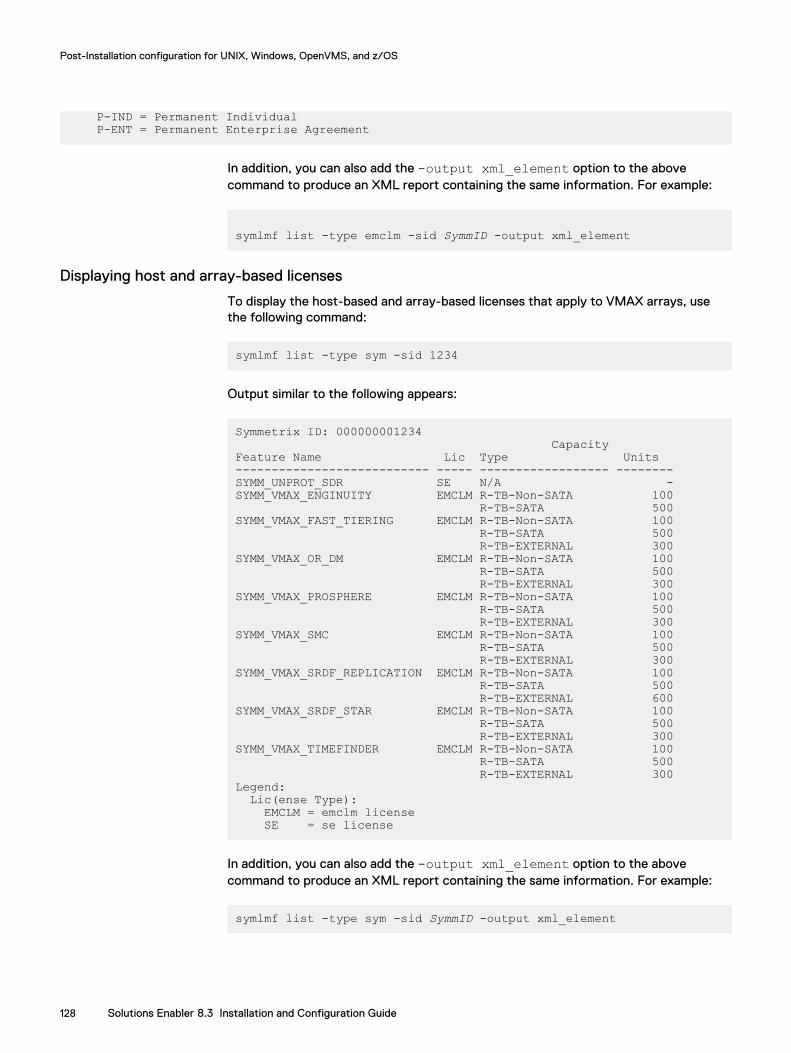
P-IND = Permanent Individual P-ENT = Permanent Enterprise Agreement
In addition, you can also add the -output xml_element option to the abovecommand to produce an XML report containing the same information. For example:
symlmf list -type emclm -sid SymmID -output xml_element
Displaying host and array-based licenses
To display the host-based and array-based licenses that apply to VMAX arrays, usethe following command:
symlmf list -type sym -sid 1234
Output similar to the following appears:
Symmetrix ID: 000000001234 CapacityFeature Name Lic Type Units--------------------------- ----- ------------------ --------SYMM_UNPROT_SDR SE N/A -SYMM_VMAX_ENGINUITY EMCLM R-TB-Non-SATA 100 R-TB-SATA 500SYMM_VMAX_FAST_TIERING EMCLM R-TB-Non-SATA 100 R-TB-SATA 500 R-TB-EXTERNAL 300SYMM_VMAX_OR_DM EMCLM R-TB-Non-SATA 100 R-TB-SATA 500 R-TB-EXTERNAL 300SYMM_VMAX_PROSPHERE EMCLM R-TB-Non-SATA 100 R-TB-SATA 500 R-TB-EXTERNAL 300SYMM_VMAX_SMC EMCLM R-TB-Non-SATA 100 R-TB-SATA 500 R-TB-EXTERNAL 300SYMM_VMAX_SRDF_REPLICATION EMCLM R-TB-Non-SATA 100 R-TB-SATA 500 R-TB-EXTERNAL 600SYMM_VMAX_SRDF_STAR EMCLM R-TB-Non-SATA 100 R-TB-SATA 500 R-TB-EXTERNAL 300SYMM_VMAX_TIMEFINDER EMCLM R-TB-Non-SATA 100 R-TB-SATA 500 R-TB-EXTERNAL 300Legend: Lic(ense Type): EMCLM = emclm license SE = se license
In addition, you can also add the -output xml_element option to the abovecommand to produce an XML report containing the same information. For example:
symlmf list -type sym -sid SymmID -output xml_element
Post-Installation configuration for UNIX, Windows, OpenVMS, and z/OS
128 Solutions Enabler 8.3 Installation and Configuration Guide

symlmf list output field descriptions
The following explains the output for the symlmf list command:
l Activation ID: Activation ID assigned to the license.
l Activation Type: The feature's license can be assigned to:
n Ind(ividual) storage arrays,
n Individual storage arrays but with a limited Eval(uation) time period, or to
n All the storage arrays in the Ent(erprise).
l Capacity Licensed: The maximum quantity of data which the functionality of thesoftware is licensed to use, in Terabytes. If the capacity type is Engine , this is themaximum quantity of engines which the functionality of the software is licensed touse.
l Capacity Type: Qualifies the capacity licensed. Possible values are:
n R-TB-Non-SATA: Indicates that the capacity licensed applies to the rawcapacity of all devices on the array, excluding SATA.
n R-TB-SATA: Indicates that the capacity licensed applies to the raw capacity ofall SATA devices on the array.
n REG-TB: Indicates that the capacity licensed applies to the registered capacityof the VMAX array.
n Usable-TB: Indicates that the capacity licensed applies to the usable capacityof the VMAX array.
n R-TB External: Indicates that the capacity licensed applies to the raw capacityof the virtualized LUNs in external storage.
n Engine: Indicates that the capacity licensed applies to the number of engines inthe VMAX array.
l Capacity Units: The maximum quantity of data for which the functionality of thesoftware is licensed to use, in Terabytes. If the capacity type is Engine , this is themaximum quantity of engines which the functionality of the software is licensed touse.
l Days Until Expr: Displays the number of days until expiration. For a Permanentlicense, this field displays a hyphen (-). This field only applies to Unisphere forVMAX.
l Expiration Date: Displays the expiration date. For a Permanent license, this fielddisplays a hyphen (-).
l Feature Name: The name of the licensed feature.
l Install Date: The date the license was installed.
l Lic(ense Type): Whether the license is host-based (SE ) or array-based(EMCLM ).
l SymmID: The array to which the license is applied.
Querying licensesThe symlmf query command displays the current state and usage numbers for alllicenses activated on a VMAX array.
Post-Installation configuration for UNIX, Windows, OpenVMS, and z/OS
Querying licenses 129
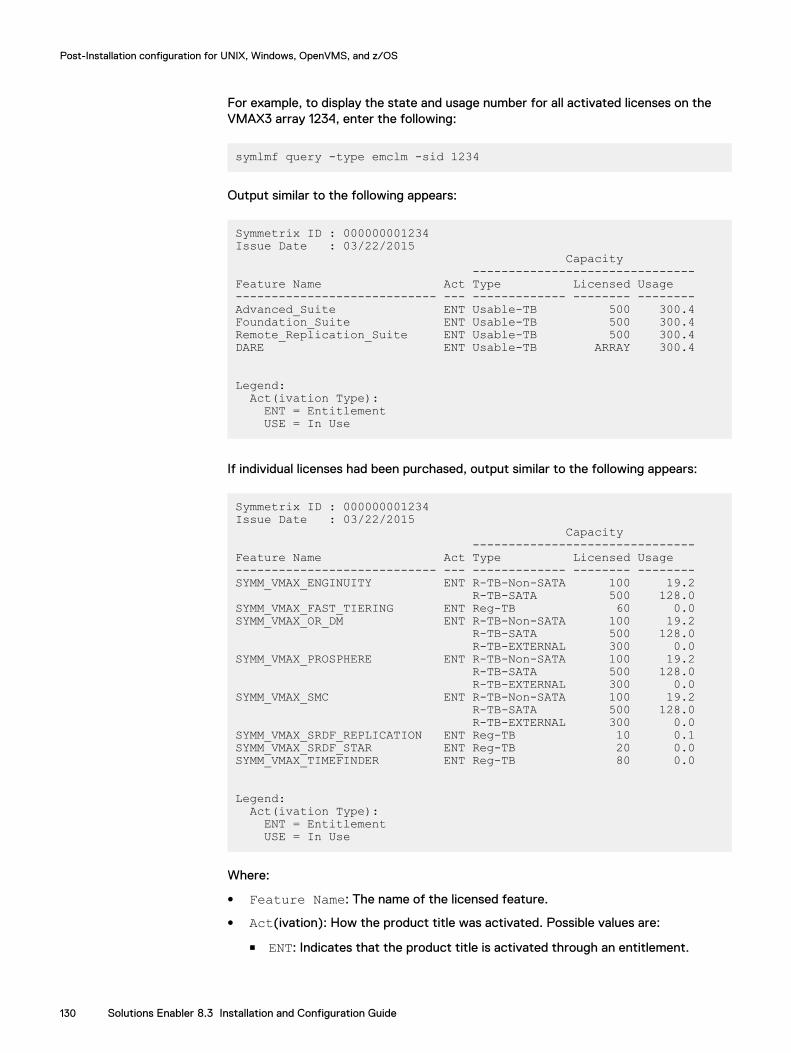
For example, to display the state and usage number for all activated licenses on theVMAX3 array 1234, enter the following:
symlmf query -type emclm -sid 1234
Output similar to the following appears:
Symmetrix ID : 000000001234Issue Date : 03/22/2015 Capacity -------------------------------Feature Name Act Type Licensed Usage---------------------------- --- ------------- -------- --------Advanced_Suite ENT Usable-TB 500 300.4Foundation_Suite ENT Usable-TB 500 300.4Remote_Replication_Suite ENT Usable-TB 500 300.4DARE ENT Usable-TB ARRAY 300.4
Legend: Act(ivation Type): ENT = Entitlement USE = In Use
If individual licenses had been purchased, output similar to the following appears:
Symmetrix ID : 000000001234Issue Date : 03/22/2015 Capacity -------------------------------Feature Name Act Type Licensed Usage---------------------------- --- ------------- -------- --------SYMM_VMAX_ENGINUITY ENT R-TB-Non-SATA 100 19.2 R-TB-SATA 500 128.0SYMM_VMAX_FAST_TIERING ENT Reg-TB 60 0.0SYMM_VMAX_OR_DM ENT R-TB-Non-SATA 100 19.2 R-TB-SATA 500 128.0 R-TB-EXTERNAL 300 0.0SYMM_VMAX_PROSPHERE ENT R-TB-Non-SATA 100 19.2 R-TB-SATA 500 128.0 R-TB-EXTERNAL 300 0.0SYMM_VMAX_SMC ENT R-TB-Non-SATA 100 19.2 R-TB-SATA 500 128.0 R-TB-EXTERNAL 300 0.0SYMM_VMAX_SRDF_REPLICATION ENT Reg-TB 10 0.1SYMM_VMAX_SRDF_STAR ENT Reg-TB 20 0.0SYMM_VMAX_TIMEFINDER ENT Reg-TB 80 0.0
Legend: Act(ivation Type): ENT = Entitlement USE = In Use
Where:
l Feature Name: The name of the licensed feature.
l Act(ivation): How the product title was activated. Possible values are:
n ENT: Indicates that the product title is activated through an entitlement.
Post-Installation configuration for UNIX, Windows, OpenVMS, and z/OS
130 Solutions Enabler 8.3 Installation and Configuration Guide
n USE: Indicates that the product title is activated because it was in use prior toupgrading to Enginuity 5876. In addition, this can also indicate that the producttitle was entitled in an earlier license file and not the current license file.Product titles in use (USE) are not considered properly entitled, in which caseyou should contact EMC for proper entitlement.
l Capacity Type: Qualifies the capacity licensed. Possible values:
n R-TB-Non-SATA: Indicates that the capacity licensed applies to the rawcapacity of all devices on the array, excluding SATA.
n R-TB-SATA: Indicates that the capacity licensed applies to the raw capacity ofall SATA devices on the array.
n REG-TB: Indicates that the capacity licensed applies to the registered capacityof the VMAX array.
n Usable-TB: Indicates that the capacity licensed applies to the usable capacityof the VMAX array.
n R-TB External: Indicates that the capacity licensed applies to the rawcapacity of the virtualized LUNs in external storage.
n Engine: Indicates that the capacity licensed applies to the number of enginesin the VMAX array.
l Capacity Licensed: The maximum quantity of data which the functionality ofthe software is licensed to use, in Terabytes. If the capacity type is Engine , thisis the maximum quantity of engines which the functionality of the software islicensed to use
l Capacity Usage: The amount of Capacity Licensed currently being used.In addition, you can also add the -output xml_element option to the abovecommand to produce an XML report containing the same information. Forexample:
symlmf query -type emclm -sid SymmID -output xml_element
Deleting licensesUse the following command to delete a host-based license:
symlmf delete -type se -license LicenseName
Where LicenseName is one of the licenses in Table 19 on page 123 and Table 20 onpage 123.
Note
You cannot delete array-based licenses.
Initial post-installation configuration of Solutions EnablerThis section describes the initial steps you must consider before you begin usingSolutions Enabler SYMCLI commands.
Post-Installation configuration for UNIX, Windows, OpenVMS, and z/OS
Deleting licenses 131
Building the SYMAPI databaseBefore using the SYMCLI commands, you need to run the symcfg discovercommand to build your configuration (SYMAPI) database. This needs to be done onceafter installation, and after any changes are made to your VMAX array configuration.
Setting environment variablesAfter installing Solutions Enabler, you should set the environment variables or paths soyou can directly access both the SYMCLI commands and the online help (man pages).The online help path allows you direct access to descriptions of the command set.
Note
For information on setting these variables, refer to Setting the CLI path on page 133and Setting the online help path on page 134.
SYMCLI also provides additional environment variables that you can preset tostreamline your command line session. These variables can be set to commonargument values for a series of associated commands, which eliminates repeated keystrokes for your session.
To view a list of environment variables that can be set for a given SYMCLI session,enter:
symcli -env
To view the environment variables that you currently have set, enter:
symcli -def
Note
For a complete list of the SYMCLI environment variables, refer to the EMC SolutionsEnabler SYMCLI Command Reference Guide
Setting access permissions to directoriesBy default, the completed Solutions Enabler installation disables write access to otherusers beyond the owner. If you desire a different permission scheme, you can changeit now. Refer to the EMC VMAX Family Security Configuration Guide for moreinformation.
Starting the SCSI generic driverLinux Kernel 2.4 requires that the SCSI generic driver be running. You can eithercompile it into the kernel or compile it as a loadable kernel module.
Note
For instructions, refer to the README file in the top level directory of your Linux sourcepackage.
Post-Installation configuration for UNIX, Windows, OpenVMS, and z/OS
132 Solutions Enabler 8.3 Installation and Configuration Guide

Note
The SCSI generic driver is not required in Linux Kernel 2.6 or higher.
Verifying the existence of dedicated gatekeepersTo verify that there are dedicated gatekeepers available for use, run the followingcommand:
stordaemon action storapid -cmd show -gk_stats
Note
For more information on this command, refer to Displaying gatekeeper statistics onpage 254.
Setting the CLI pathBefore using SYMCLI, append the SYMCLI binary directories to your PATHenvironment variable according to your operating system.
UNIXFor UNIX C shell, ensure the following SYMCLI directory is appended to variablePATH:
set path = ($path /usr/symcli/bin)
For UNIX Korn or Bourne shell, ensure the following SYMCLI directory is appended tovariable PATH:
PATH=$PATH:/usr/symcli/binexport PATH
WindowsFor Windows, ensure the following SYMCLI directory is appended to the MS-DOSvariable PATH:
C:\Program Files\EMC\SYMCLI\bin
OpenVMSFor OpenVMS, ensure the following SYMCLI directory has been defined for all users(use emc_cli.com in the system login.com):
SHOW LOGICAL SYMCLI$BIN
Post-Installation configuration for UNIX, Windows, OpenVMS, and z/OS
Verifying the existence of dedicated gatekeepers 133

Setting the online help pathA complete set of online help (man pages) is provided for SYMCLI. To access theseman pages in your environment, perform the following tasks according to youroperating system.
UNIXFor UNIX C shell, ensure the following man page directories are added to variableMANPATH:
set MANPATH = ($MANPATH /usr/storapi/man /usr/storapi/storman)
For UNIX Korn and Bourne shell, ensure the following man page directories are addedto variable MANPATH:
MANPATH=$MANPATH:/usr/storapi/man:/usr/storapi/stormanexport MANPATH
WindowsFor Windows, the manual pages are located, by default, in the following directories:
C:\Program Files\EMC\SYMCLI\manC:\Program Files\EMC\SYMCLI\storman
To open a file, double-click it and select NotePad from the Open With dialog box.
Note
In Windows 2008 R2, double-clicking opens these files in WordPad by default.
OpenVMSFor OpenVMS, you can view help pages with the DCL utility SYMHELP.
Managing database and gatekeeper lockingWithin a SYMCLI session, gatekeeper and database locks are used to avoid conflicts inaccessing a VMAX array by way of gatekeepers or the configuration database.
Setting parallel SYMCLI access to the SYMAPI databaseIf an environment is configured to run many SYMAPI based applications on the sameserver, users might experience an issue when the SYMAPI_DB.bin is locked. This iscaused by the SYMCLI_CTL_ACCESS environment variable that is set to EXCLUSIVEby default. This means only one command is allowed to execute at a time, and thiscommand has an exclusive lock on the database.
To overcome the SYMAPI_DB.bin is locked issue, set the SYMCLI_CTL_ACCESSenvironment variable to PARALLEL. This mode enables multiple commands to have aread-only access to the SYMAPI database at the same time, while commands thatneed to modify the database would still have an exclusive lock on the database.
Post-Installation configuration for UNIX, Windows, OpenVMS, and z/OS
134 Solutions Enabler 8.3 Installation and Configuration Guide
Semaphore requirements on UNIXYou do not need to modify semaphore settings on the host when using its defaultconfiguration (default options). However, some settings (for example, in thedaemon_options file) will lead to semaphore allocation. In which case, you shouldconfigure the UNIX kernel to meet the SYMCLI semaphore requirements as follows:
l One semaphore ID for each VMAX gatekeeper device.The number of system-wide semaphores is specified by the UNIX kernelparameter semmns, or its equivalent.
l A minimum of three semaphores per semaphore set.The maximum number of semaphores per semaphore set is specified by the UNIXkernel parameter semmsl, or its equivalent.
l A minimum of three operations per semop call.The maximum number of operations per semop call is specified by the parametersemopn, or its equivalent.
See Setting the optional base daemon behavior parameters on page 146 for moreinformation.
These requirements are usually within the bounds of the default semaphore parametersettings on a UNIX system. However, for information about maximizing theseparameters on your specific platform, refer to Host specific behaviour runningSolutions Enabler on page 257.
Meeting semaphore requirementsIf the requirements are not within the bounds of the default semaphore parametersettings on a UNIX system, the UNIX kernel must be reconfigured. If the UNIX kernelis not reconfigured, the SYMCLI gatekeeper locking may fail. For more informationabout adjusting semaphore parameters for your operating system, refer to Hostspecific behaviour running Solutions Enabler on page 257.
Refreshing the semaphoresAfter you have reconfigured the UNIX kernel, you may need to reboot the UNIXsystem to refresh the kernel semaphore structures.
You can use the following UNIX command to view the currently allocated systemsemaphores:
ipcs -s
De-allocating semaphoresIf you exceed the maximum number of semaphores allocated, you may need to de-allocate system semaphores in order to obtain more semaphores.
To de-allocate a system semaphore, use the following UNIX command:
ipcrm -s IpcID
Post-Installation configuration for UNIX, Windows, OpenVMS, and z/OS
Semaphore requirements on UNIX 135
Windows lockingOn Windows, SYMCLI allocates named mutexes to accomplish locking. These mutexesare automatically de-allocated from the system when the last thread which hasopened the mutex finishes accessing the mutex, or is terminated. There is no mutexkernel configuration requirement. The mutex name is derived from the gatekeeperpathname.
Avoidance and selection filesThe following optional files can exist in the SYMAPI configuration directory1, and limitthe scope or change the performance of SYMCLI online commands, particularly,symcfg discover and syminq:
l gkavoid
l gkselect
l inqfile
l symavoid
Note
These files and the following text are for experienced SYMCLI or SYMAPI users andare not a prerequisite for normal use.
These files can be used to customize and streamline command line coding to yourspecific environment.
CAUTION
Be sure to delete these files when they are no longer needed as they can causeunexpected behavior and command limitations.
Editing and file formatThese are editable files with device names or array IDs you can use to limit SYMCLI orSYMAPI from seeing certain VMAX arrays, devices, or gatekeepers which wouldotherwise be affected by various commands.
The files hold either physical device names (PdevNames) or array IDs (Symmids) withline entries having only one device name or ID per line. Lines beginning with a “#”(comment) are ignored by SYMCLI.
gkavoid and gkselectThe gkavoid and gkselect files affect calls to various online SYMCLI commandsthat use a gatekeeper to communicate with a VMAX array.
Note
For more information on using these files, refer to Using the gkavoid and gkselect fileson page 251.
1. The location of this directory varies according to the operating system. For more information, refer to Solutions Enabler Directories onpage 263.
Post-Installation configuration for UNIX, Windows, OpenVMS, and z/OS
136 Solutions Enabler 8.3 Installation and Configuration Guide
inqfileThe inqfile file configures calls to syminq and symcfg discover to find only thePdevNames specified in this file. This can be useful if you want to limit thecommand(s) to view only certain devices from your host. The inquiry file is formattedwith physical (host) device names with one PdevName per line.
Table 21 on page 137 provides platform specific PdevName examples.
Table 21 PdevName examples
Operating system Example Pdevname
UNIX /dev/rdsk/c2t0d2s2
Windows \\.\PHYSICALDRIVE1
z/OS VOL001
Note
For more information on PdevNames, refer to the EMC Solutions Enabler ArrayManagement CLI User Guide.
symavoidThe symavoid file affects the operation of symcfg discover so that it does notlook for devices that belong to the arrays specified in this file. This may be useful ifthere are multiple VMAX arrays connected to the host that you want SYMCLI toavoid. The array avoidance file is formatted with 12-character array IDs with one IDper line.
To obtain a list of array IDs, enter:
syminq -symmids
Changing the default behavior of SYMCLIThe options file (initially installed as README.options) in the SYMAPIconfiguration directory contains behavior parameters that can be set to criticallychange the default behavior of SYMCLI operations, SYMAPI calls, and their controlactions. It can be used to impart certain global restrictions as well as customize andstreamline command line coding to your specific environment.
CAUTION
This file and the text in this chapter are for experienced SYMCLI or SYMAPIusers and are not a prerequisite for normal use. Improper adjustment of theseparameters can impose unwanted restriction of features or possibly render yourVMAX environment inoperative.
Post-Installation configuration for UNIX, Windows, OpenVMS, and z/OS
inqfile 137
The options file must be created and placed in the SYMAPI configuration directory.2
Editing the options fileOnce this file is created, you can edit it to change the default behavior of certainSYMCLI or SYMAPI command options. The file contains editable parameters to setcertain optional defaults in the line entries. SYMAPI ignores lines beginning with a “#”(comment).
Removing default optionsTo remove a default option, remove the line entry, rename the file, or comment theline by adding a pound (#) sign at the beginning of the line entry.
Options file parametersFor options file parameter descriptions, refer to EMC Solutions Enabler SYMCLICommand Reference Guide.
Oracle multiple instances through a remote serverIf you are using Storage Resource Management (SRM) and intend to performdatabase mapping calls from your host to a remote server that has more than oneOracle instance, you must complete the following procedure:
Procedure
1. With the remote SYMAPI service stopped, set the remote server UNIXenvironment variables ORACLE_HOME and ORACLE_SID for the systemrequirements. When set, re-start storsrvd.
2. Configure Oracle SQL*Net (V7) or Net8 to include other instance names (TNSnames) in a network service. The TNS names are located in the$ORACLE_HOME/network/admin/tnsnames.ora file. The Oracle instanceto which your ORACLE_HOME points is the only instance that must have theTNS names registered.
3. Configure the Oracle listener service for the other Oracle instances with whichyou need to work.
4. Test your Oracle environment for a valid configuration by running$ORACLE_HOME/bin/sqlplus as follows:
sqlplus user/passwd@service
where:
user/passwd describes your Oracle username and password.
service is the TNS name you registered for the Oracle instance.
Note
For more information about configuring SQL*Net or Net8, refer to theappropriate Oracle documentation.
2. The location of this directory varies according to the operating system. For more information, refer to Solutions Enabler Directories onpage 263.
Post-Installation configuration for UNIX, Windows, OpenVMS, and z/OS
138 Solutions Enabler 8.3 Installation and Configuration Guide
5. Set the EMC environment variable SYMCLI_RDB_CONNECT to describe youruser name, password, and service name with the format usr/passwd@service to the instance of choice.
Client/server RDBMS environment variable behaviorThe commands symioctl and symrdb scan the client's current environmentvariables and apply them across the client/server connection. For example, when thefollowing is invoked from the client:
symrdb -type oracle list
symrdb will search for ORACLE_HOME and ORACLE_SID on the client side. If found,the variables are passed to the SYMAPI server and used with subsequent databasemapping calls.
Set theLD_LIBRARY_PATH environment variable for all databases except Oracle andSQL Server.
Setting up daemons for distributed application supportTo improve performance on a number of applications or scripts running at once, youcan employ Solutions Enabler daemons (services) that run in the background with rootprivileges to a local storage resource. Applications do not have to run as a privilegeduser.
The base daemon (storapid) coordinates all VMAX array locks and parallelapplication syscalls to your operating system kernel, which optimizes their operations(such as TimeFinder-type actions).
For SRM applications, there are a number of vendor-specific database daemonsavailable to improve the speed of database access or mapping operation. SRMdatabase performance is improved by using a persistent database connection, a fastcommunication mechanism, and parallel operations. For SRM, a single databasedaemon can support connections to multiple instances/databases. In addition, there isalso an SRM daemon (storsrmd and storsrmd64) that allows non-root users andnon-administrators to perform certain SRM operations.
When your host is locally-connected to the VMAX array, applications and daemonsmust reside in that host. However, for client/server systems, the storage managementapplications reside in the client, and most of the daemons must reside in the SYMAPIserver. The one exception to this is the event daemon, which runs on both the clientand server.
Table 22 on page 140 lists the available daemons. Additional information is containedin the specific documentation for each. Note that on certain platforms, only some ofthese daemons are supported.
Post-Installation configuration for UNIX, Windows, OpenVMS, and z/OS
Client/server RDBMS environment variable behavior 139
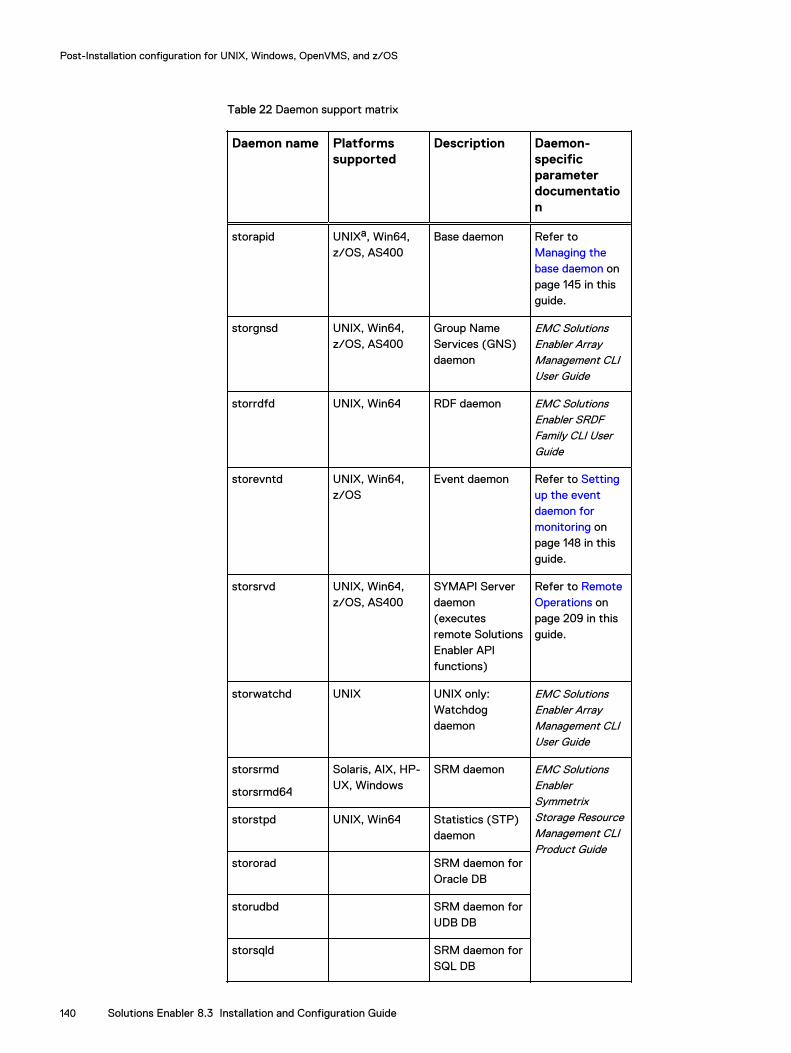
Table 22 Daemon support matrix
Daemon name Platformssupported
Description Daemon-specificparameterdocumentation
storapid UNIXa, Win64,z/OS, AS400
Base daemon Refer to Managing thebase daemon onpage 145 in thisguide.
storgnsd UNIX, Win64,z/OS, AS400
Group NameServices (GNS)daemon
EMC SolutionsEnabler ArrayManagement CLIUser Guide
storrdfd UNIX, Win64 RDF daemon EMC SolutionsEnabler SRDFFamily CLI UserGuide
storevntd UNIX, Win64,z/OS
Event daemon Refer to Settingup the eventdaemon formonitoring onpage 148 in thisguide.
storsrvd UNIX, Win64,z/OS, AS400
SYMAPI Serverdaemon(executesremote SolutionsEnabler APIfunctions)
Refer to RemoteOperations onpage 209 in thisguide.
storwatchd UNIX UNIX only:Watchdogdaemon
EMC SolutionsEnabler ArrayManagement CLIUser Guide
storsrmd
storsrmd64
Solaris, AIX, HP-UX, Windows
SRM daemon EMC SolutionsEnablerSymmetrixStorage ResourceManagement CLIProduct Guide
storstpd UNIX, Win64 Statistics (STP)daemon
stororad SRM daemon forOracle DB
storudbd SRM daemon forUDB DB
storsqld SRM daemon forSQL DB
Post-Installation configuration for UNIX, Windows, OpenVMS, and z/OS
140 Solutions Enabler 8.3 Installation and Configuration Guide
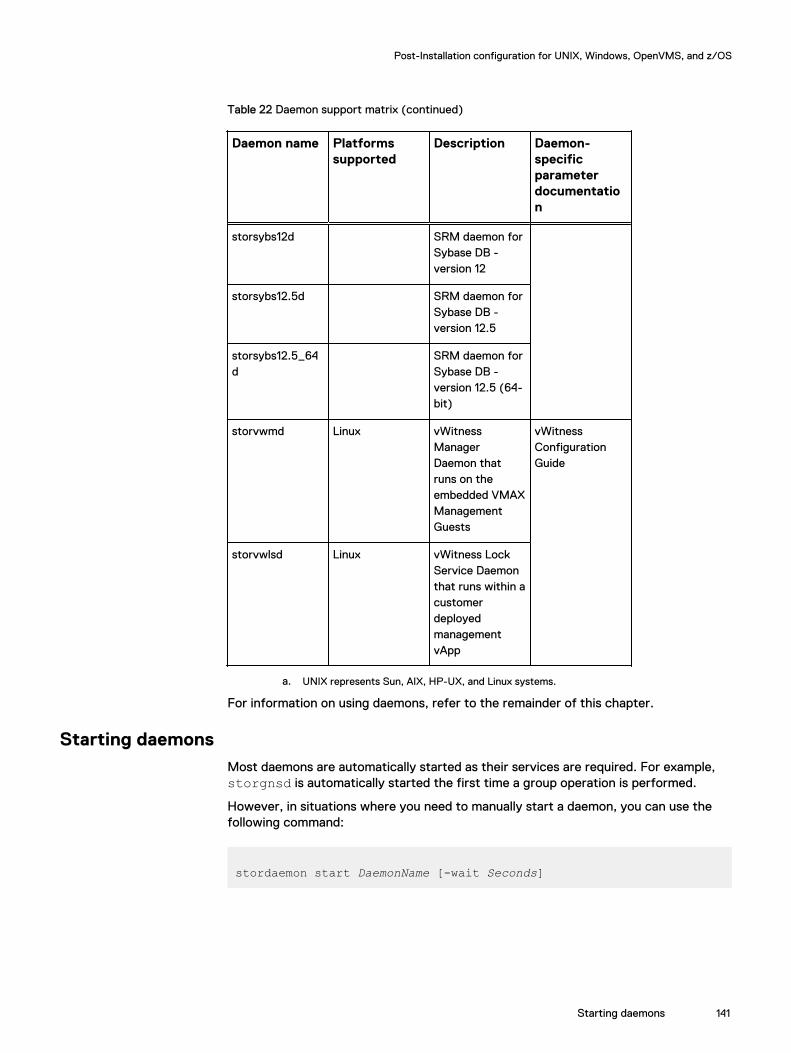
Table 22 Daemon support matrix (continued)
Daemon name Platformssupported
Description Daemon-specificparameterdocumentation
storsybs12d SRM daemon forSybase DB -version 12
storsybs12.5d SRM daemon forSybase DB -version 12.5
storsybs12.5_64d
SRM daemon forSybase DB -version 12.5 (64-bit)
storvwmd Linux vWitnessManagerDaemon thatruns on theembedded VMAXManagementGuests
vWitnessConfigurationGuide
storvwlsd Linux vWitness LockService Daemonthat runs within acustomerdeployedmanagementvApp
a. UNIX represents Sun, AIX, HP-UX, and Linux systems.
For information on using daemons, refer to the remainder of this chapter.
Starting daemonsMost daemons are automatically started as their services are required. For example,storgnsd is automatically started the first time a group operation is performed.
However, in situations where you need to manually start a daemon, you can use thefollowing command:
stordaemon start DaemonName [-wait Seconds]
Post-Installation configuration for UNIX, Windows, OpenVMS, and z/OS
Starting daemons 141

By default, the stordaemon command waits 30 seconds to verify that the daemon isrunning. To override this, use the -wait option. For example, to start an SRM daemonfor an Oracle database and wait five seconds for it to come up, enter:
stordaemon start stororad -wait 5
Stopping daemonsTo stop a daemon, apply the following command:
stordaemon shutdown DaemonName |all [-wait Seconds] [-immediate] [-abort]
By default, stopping a daemon causes it to no longer accept commands from clientprocesses using its services; it does not actually exit until all client programs using itsservices exit first.
The -immediate option causes the daemon to exit regardless of whether there arestill client programs connected to it.
The -abort option sends a KILL signal, instead of asking the specified daemon toshut itself down. Only privileged users (root) can use this option. (Supported on UNIXonly.)
Viewing daemonsTo view what daemons are present, enter either of the following:
stordaemon list [-running] [-all] [-v]
or
stordaemon show DaemonName
For the database daemons, an instance identifier is appended to the daemon name.For example, a stororad daemon started with the instance name ords would displayas stororadords.
Setting daemons to auto-start on bootTo set a daemon to automatically start upon reboot of your system, enter thefollowing:
stordaemon install DaemonName -autostart
Authorizing daemon connectionsTypically, daemons run with root/administrator privileges, which enable them tohandle the tasks required by SYMCLI commands (and any SYMAPI call) that requireprivileged access. This enables non-privileged users to run the SYMAPI application.
Post-Installation configuration for UNIX, Windows, OpenVMS, and z/OS
142 Solutions Enabler 8.3 Installation and Configuration Guide
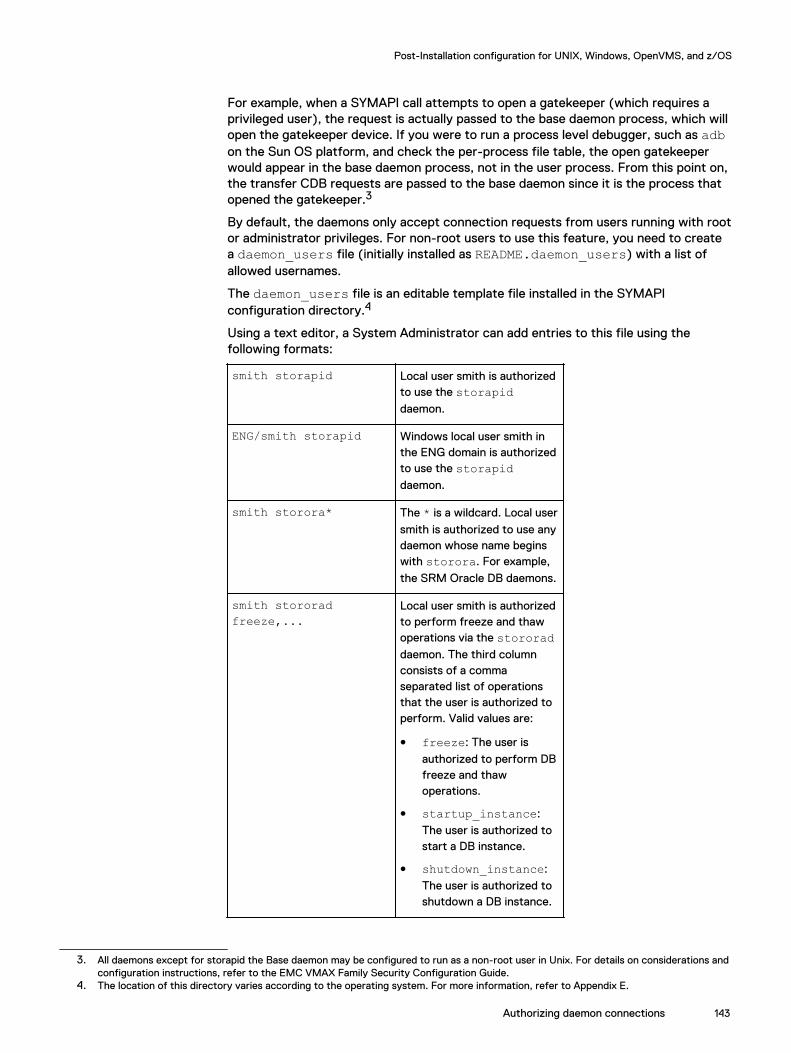
For example, when a SYMAPI call attempts to open a gatekeeper (which requires aprivileged user), the request is actually passed to the base daemon process, which willopen the gatekeeper device. If you were to run a process level debugger, such as adbon the Sun OS platform, and check the per-process file table, the open gatekeeperwould appear in the base daemon process, not in the user process. From this point on,the transfer CDB requests are passed to the base daemon since it is the process thatopened the gatekeeper.3
By default, the daemons only accept connection requests from users running with rootor administrator privileges. For non-root users to use this feature, you need to createa daemon_users file (initially installed as README.daemon_users) with a list ofallowed usernames.
The daemon_users file is an editable template file installed in the SYMAPIconfiguration directory.4
Using a text editor, a System Administrator can add entries to this file using thefollowing formats:
smith storapid Local user smith is authorizedto use the storapiddaemon.
ENG/smith storapid Windows local user smith inthe ENG domain is authorizedto use the storapiddaemon.
smith storora* The * is a wildcard. Local user
smith is authorized to use anydaemon whose name beginswith storora. For example,
the SRM Oracle DB daemons.
smith stororadfreeze,...
Local user smith is authorizedto perform freeze and thawoperations via the stororaddaemon. The third columnconsists of a commaseparated list of operationsthat the user is authorized toperform. Valid values are:
l freeze: The user is
authorized to perform DBfreeze and thawoperations.
l startup_instance:
The user is authorized tostart a DB instance.
l shutdown_instance:
The user is authorized toshutdown a DB instance.
3. All daemons except for storapid the Base daemon may be configured to run as a non-root user in Unix. For details on considerations andconfiguration instructions, refer to the EMC VMAX Family Security Configuration Guide.
4. The location of this directory varies according to the operating system. For more information, refer to Appendix E.
Post-Installation configuration for UNIX, Windows, OpenVMS, and z/OS
Authorizing daemon connections 143
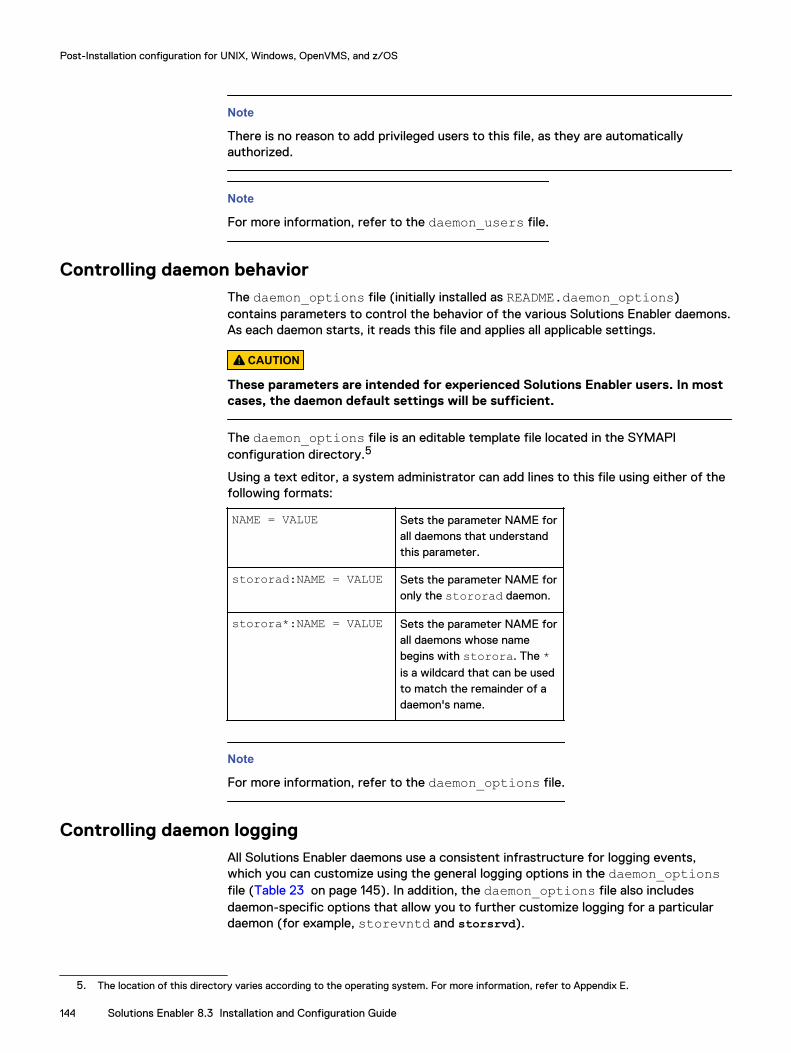
Note
There is no reason to add privileged users to this file, as they are automaticallyauthorized.
Note
For more information, refer to the daemon_users file.
Controlling daemon behaviorThe daemon_options file (initially installed as README.daemon_options)contains parameters to control the behavior of the various Solutions Enabler daemons.As each daemon starts, it reads this file and applies all applicable settings.
CAUTION
These parameters are intended for experienced Solutions Enabler users. In mostcases, the daemon default settings will be sufficient.
The daemon_options file is an editable template file located in the SYMAPIconfiguration directory.5
Using a text editor, a system administrator can add lines to this file using either of thefollowing formats:
NAME = VALUE Sets the parameter NAME forall daemons that understandthis parameter.
stororad:NAME = VALUE Sets the parameter NAME foronly the stororad daemon.
storora*:NAME = VALUE Sets the parameter NAME forall daemons whose namebegins with storora. The *is a wildcard that can be usedto match the remainder of adaemon's name.
Note
For more information, refer to the daemon_options file.
Controlling daemon loggingAll Solutions Enabler daemons use a consistent infrastructure for logging events,which you can customize using the general logging options in the daemon_optionsfile (Table 23 on page 145). In addition, the daemon_options file also includesdaemon-specific options that allow you to further customize logging for a particulardaemon (for example, storevntd and storsrvd).
5. The location of this directory varies according to the operating system. For more information, refer to Appendix E.
Post-Installation configuration for UNIX, Windows, OpenVMS, and z/OS
144 Solutions Enabler 8.3 Installation and Configuration Guide

By default, each daemon records its log data in a pair of files (daemon_name.log0and daemon_name.log1) in the Solutions Enabler logging directory. Using thismethod, the daemons will alternate logging from one file to the other as they becomefull.
Optionally, you can configure each daemon to record its logs to a dated log file in theform daemon_name-yyyymmdd.log. Using this method, each daemon will beginrecording to a newly dated log file on the first write after 12 A.M.
Table 23 on page 145 shows the general logging configuration options you can use tocustomize the Solutions Enabler daemon log files. For details on the syntax and values,refer to the <SYMAPI_HOME>/config/daemon_options file installed in theconfiguration directory.
Table 23 General logging configuration options in the daemon_options file
Option Description
logfile_type Controls file switchingstrategy. Possible values areWRAP or DATED.
logfile_size Used for wrapping log files,this option specifies themaximum number of KBs towrite before a switch to theother file of the pair.
logfile_retention Used for dated log files, thisoption indicates how manydays to retain old log files.
logfile_perms Specifies the permissions onany newly created log files.
For logging configuration options specific to the event daemon, refer to Setting up theevent daemon for monitoring on page 148, and for options specific to the SYMAPIserver daemon, refer to Specifying server behavior on page 217.
Managing the base daemonThe base daemon (storapid) provides centralized gatekeeper device managementfor all Solutions Enabler applications requiring access to VMAX arrays, along with theGNS and RDF daemons. This alleviates contention when there are limited gatekeeperresources available and also eliminates the need for every client to constantly select,open, lock, and ping for an available gatekeeper device for every online function.
Additionally, the base daemon monitors Symmetrix External Locks (SEL) and DeviceExternal Locks (DEL), and automatically releases any SELs and DELs (except forpersistent DELs) when an application (normally or abnormally) exits. The base daemonalso eliminates the need for Solutions Enabler applications to run as root.
Note
For more on gatekeepers, refer to Gatekeeper Device Configuration on page 249.
Post-Installation configuration for UNIX, Windows, OpenVMS, and z/OS
Managing the base daemon 145
Starting the base daemonBy default, the base daemon will automatically start the first time a Solutions Enablerapplication attempts to access a VMAX array. In addition, you can use either of thefollowing methods to start the base daemon:
l Manually start the daemon via the stordaemon command line utility as follows:
stordaemon start storapid [-wait Seconds]
Note
For more information on this command, refer to Starting daemons on page 141.
l Set the base daemon to automatically start every time the local host is bootedusing the following command:
stordaemon install storapid -autostart
Note
storapid is installed with the -autostart option set by default.
Manually pre-starting the daemon will eliminate any performance delay incurred whenthe base daemon needs to be started by an application the first time it tries toconnect.
If the base daemon abnormally terminates, the Solutions Enabler watchdog daemon(storwatchd) will automatically restart it. This ensures that the base daemon isalways running.
Stopping the base daemonTo stop the base daemon, use the following command:
stordaemon shutdown storapid | all [-wait Seconds] [-immediate] [-abort]
Specifying all as the DaemonName will stop all of the daemons currently running.
If there are applications with connections to the base daemon, you can use the -immediate option to shut it down immediately; otherwise, it will not shutdown untilthe applications are done using it.
The -abort option sends a KILL signal, instead of asking the base daemon to shutitself down. Only privileged users (root) can use this option. (Supported on UNIXonly.)
Setting the optional base daemon behavior parametersThe daemon_options file contains a set of parameters that can be modified toaffect base daemon behavior. The file contains editable behavior parameters set to
Post-Installation configuration for UNIX, Windows, OpenVMS, and z/OS
146 Solutions Enabler 8.3 Installation and Configuration Guide
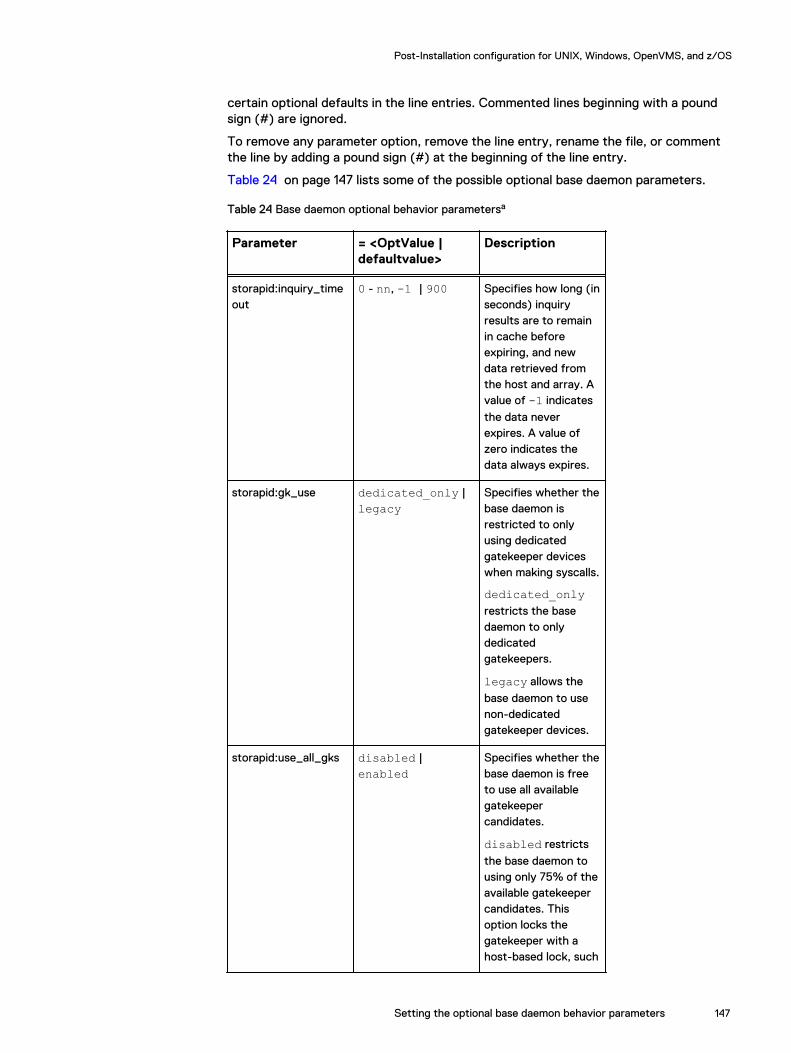
certain optional defaults in the line entries. Commented lines beginning with a poundsign (#) are ignored.
To remove any parameter option, remove the line entry, rename the file, or commentthe line by adding a pound sign (#) at the beginning of the line entry.
Table 24 on page 147 lists some of the possible optional base daemon parameters.
Table 24 Base daemon optional behavior parametersa
Parameter = <OptValue |defaultvalue>
Description
storapid:inquiry_timeout
0 - nn, -1 | 900 Specifies how long (inseconds) inquiryresults are to remainin cache beforeexpiring, and newdata retrieved fromthe host and array. Avalue of -1 indicates
the data neverexpires. A value ofzero indicates thedata always expires.
storapid:gk_use dedicated_only |legacy
Specifies whether thebase daemon isrestricted to onlyusing dedicatedgatekeeper deviceswhen making syscalls.
dedicated_onlyrestricts the basedaemon to onlydedicatedgatekeepers.
legacy allows the
base daemon to usenon-dedicatedgatekeeper devices.
storapid:use_all_gks disabled |enabled
Specifies whether thebase daemon is freeto use all availablegatekeepercandidates.
disabled restricts
the base daemon tousing only 75% of theavailable gatekeepercandidates. Thisoption locks thegatekeeper with ahost-based lock, such
Post-Installation configuration for UNIX, Windows, OpenVMS, and z/OS
Setting the optional base daemon behavior parameters 147
Table 24 Base daemon optional behavior parametersa (continued)
Parameter = <OptValue |defaultvalue>
Description
as a semaphore ormutex.
enabled allows the
base daemon to useall availablegatekeepercandidates. Thisoption locks thegatekeeper with aninternal lockingmechanism.
If you are runningInfoMover, you mustset this option todisabled.
aFor more information on the available parameters, refer to the daemon_optionsfile.
Setting up the event daemon for monitoringThe Solutions Enabler event daemon (storevntd) acts as a clearinghouse for events,also known as alerts, on a host. It supports two modes of operation. This sectionconcentrates on the second mode of operation.
l Under the first mode, applications register for events (an event is defined by oneor more conditions) in which they are interested through Solutions Enabler APIcalls. These requests are forwarded to the event daemon which then begins towatch for the conditions of interest. When an event is detected, it triggers anasynchronous callback to the application.Clients such as Unisphere for VMAX and SMI Provider all make use of thismechanism.
l Under the second mode, the event daemon actively watches for conditions ofinterest — independently of any applications. Options settings (described in Configuring event logging on page 152) specify the events for which the daemonshould monitor and how it should log them when they occur. Possible loggingoptions are:
n file: record to a file on disk
n system: record through the logging service provided by the host operatingsystem. On UNIX-like systems, this is the local syslog service. On Windows,this is the Windows event log.
n syslog: use the syslog wire protocol to forward event records to a remotesyslog server, that is, an RSA enVision server.
n snmp: forward event records to a remote SNMP listener. Solutions Enableronly supports SNMP version 1 traps.
Post-Installation configuration for UNIX, Windows, OpenVMS, and z/OS
148 Solutions Enabler 8.3 Installation and Configuration Guide
Note
Only events for VMAX arrays are supported in this mode.
Event sourcesThe events daemon monitors for events from the following sources:
l Events that are directly generated by a storage array, and are merely routed bythe event daemon to interested parties.
l Events manufactured by the event daemon by periodically polling the storagearray and tracking various conditions. For example, an event tied to the overallutilization (as a percentage) of a Snap pool.
l Events that are generated by a different process entirely, and are forwarded tothe event daemon to be routed to any interested parties. For example, the GNS(storgnsd) and Base (storapid) daemons both generate events thatapplications can register to receive
l The event daemon can also be directed to map records from the Audit log intoevents.
l Non-array events raised by applications such as Unisphere for VMAX.
Events, when delivered, contain a number of pieces of information including, but notlimited to, the following:
l The entity to which the event relates. This will usually be an array ID.
l The sub-component to which the event relates, when there is one. The following isa list of the most relevant sub-components.
n A device number as a 4-digit hexadecimal number, for example, 0007 or 0123.
n A disk ID using the standard Solutions Enabler syntax, for example, 16B:C2.
n A director ID using the standard Solutions Enabler syntax, for example, FA-3B.
n A port on a director, for example, SA-03C:2.
n A Snap, DSE, or thin pool using the pool name, for example, finance orcambridge.
l The identifier of the event corresponding to the SYMAPI_AEVENT2_UID_Tenumeration found in the symapi.h header file that is shipped with the SDK.
l A severity level. Possible values are: NORMAL, INFO, WARNING, MINOR,MAJOR, FATAL, and CRITICAL. The NORMAL severity is relevant to thresholdevents described in the next section.
l The date/time that the event was generated.
l For certain events, a numerical value, which is used to determine the severity ofthe events. This concept is described in the following section.
l A description of the event along with some auxiliary textual data.
Threshold eventsCertain events are associated with a numeric value. This value is compared with a setof threshold values, which determine whether the event is delivered and, if so, withwhat severity. These events are known as threshold events. Each threshold event hasa set of default threshold filters defined for it.
Post-Installation configuration for UNIX, Windows, OpenVMS, and z/OS
Event sources 149
For example, the SYMAPI_AEVENT2_UID_THRESH_POOL_FREESPACE eventtracks as a percentage (0% - 100%) the space utilization within DSE, Snap and thinpools and has the following default threshold filters defined:
l If value is 100%, deliver event with FATAL severity
l If value is >= 80%, deliver event with CRITICAL severity
l If value is >= 70%, deliver event with MAJOR severity
l If value is >= 65%, deliver event with MINOR severity
l If value is >= 60%, deliver event with WARNING severity
When registering for events, you can specify a custom filter to replace the default onefor that event. Each filter contains a set of rules composed of:
l A comparison function: either >= or <=.
l A number (integer) to compare the event value against.
l A severity to deliver the event with - if the comparison succeeds.
These threshold filters define bands of event value. Events are generated as the valuecrosses from one band to another. For the thresholds in the earlier example, a pool'sutilization that rose gradually from 60% to 92% and then dropped back to 50% againwould result in delivery of the following events:
WARNING — severity when the value passes 60%
MINOR — severity when the value passes 65%
MAJOR — severity when the value passes 70%
CRITICAL — severity when the value passes 80%
MAJOR — severity when the value drops below 80%
MINOR — severity when the value drops below 70%
WARNING — severity when the value drops below 65%
NORMAL — severity when the value drops below 60%
If an event's value crosses into a range that does not match any of the configuredthresholds, the event daemon will automatically deliver an event with a severity ofNORMAL to indicate that it no longer falls into one of the defined threshold bands. Inessence, NORMAL should serve as an "all-OK" indicator.
There is never a reason to explicitly specify a threshold for the NORMAL severity. Itshould cover everything that is not explicitly matched.
Note
Many of the threshold events that indicate a percentage will only trigger at incrementsof 5%.
If the supplied threshold list has only a single filter that performs a comparison againstzero, the event daemon will deliver an event every time the event value changes. Forexample, specifying the following filter:
"If value >= 0 : WARNING"will deliver an event with WARNING severity every time the value changes.
Post-Installation configuration for UNIX, Windows, OpenVMS, and z/OS
150 Solutions Enabler 8.3 Installation and Configuration Guide
Starting the event daemonBy default, the event daemon will automatically start the first time a Solutions Enablerapplication requires its services. However, you can also manually start the eventdaemon via the stordaemon command line utility as follows:
stordaemon start storevntd [-wait Seconds]
Note
For more information on this command, refer to Starting daemons on page 141.
In addition, you can also set the daemon to automatically start every time the localhost is booted using the following command:
stordaemon install storevntd -autostart
Note
Configure the daemon to automatically start at system boot when you will be using itto log events to a Syslog, Event log, SNMP, or file on disk.
Reloading the daemon_options settingsTo reload the event daemon settings, run the following command:
stordaemon action storevntd -cmd reload
Issuing the reload command causes the daemon to re-read the contents of thedaemon_options file.
Listing supported event categoriesTo view a list of event categories currently supported by a running event daemon:
Procedure
1. Run the following command to load the array event module:
stordaemon action storevntd -cmd load_plugin Symmetrix
2. Run the following command to list the supported event categories:
stordaemon action storevntd -cmd list -categories
Post-Installation configuration for UNIX, Windows, OpenVMS, and z/OS
Starting the event daemon 151
Stopping the event daemonTo stop the event daemon, run the following command:
stordaemon shutdown storevntd [-wait Seconds]
Note
For more information on using the shutdown command, refer to Stopping daemonson page 142.
Configuring event loggingThe daemon_options file contains a set of parameters that can be modified toaffect event daemon behavior. The file contains editable behavior parameters set tocertain optional defaults in the line entries. Commented lines beginning with a poundsign (#) are ignored.
To remove any parameter option, remove the line entry, rename the file, or commentthe line by adding a pound sign (#) at the beginning of the line entry.
Configuring event logging involves the following steps:
1. Specify logging targets.
2. Configure an event target.
3. Specify events to log.
The remainder of this section explains daemon_options file settings required tocomplete each of these steps.
Note
Changes made to the daemon_options file while the daemon is running will not takeeffect until you issue a stordaemon reload command, as described in Reloadingthe daemon_options settings on page 151.
Step 1: Specify logging targets
To specify a logging mechanism, define the following parameter in thedaemon_options file:
storevntd:log_event_targets = snmp syslog system file
Note
You must set this parameter to one or more of the valid values; otherwise, eventlogging will not occur. When specifying multiple values, separate them with a space.
where:
snmp specifies to log events by way of SNMP traps. Solutions Enabler only supportsSNMP version 1 traps.
Post-Installation configuration for UNIX, Windows, OpenVMS, and z/OS
152 Solutions Enabler 8.3 Installation and Configuration Guide
syslog (supported on all platforms) specifies to log events to a Syslog server acrossthe network, bypassing (if on UNIX) the local host's Syslog service and itsconfiguration settings.
system does the following depending on the operating system:
l In UNIX, it specifies to log events to local host's Syslog services. The Syslog'sconfiguration settings control where it directs the message.
l In Windows, it specifies to log events to the Windows Event Log.file specifies to log events to a file on disk.
For example:
storevntd:log_event_targets = snmp system
Step 2: Configure an event target
To configure an event target, do the following based on the logging mechanism youspecified in Step 1: Specify logging targets on page 152 above:
l If you specified to log events by way of SNMP (snmp option), complete Step 2A:Configure an SNMP event target on page 153.
l If you specified to log events in a log file (file option), continue with Step 2B:Configure a log file on page 155.
l If you specified to log events to the Syslog server across the network (syslogoption), continue with Step 2C: Configure a Syslog target on page 158.
l If you specified to log events to Syslog or the Windows Event Log, (systemoption), you do not have to configure an event target. In this case, you shouldcontinue with Step 3: Specifying events to log on page 158.
Step 2A: Configure an SNMP event target
The event daemon provides the necessary SNMP MIB support and trap generationservices required to monitor the status of VMAX storage environments from third-party enterprise management frameworks.
The event daemon includes a loadable SNMP library which, once enabled andconfigured in the daemon_options file, acts as a self contained SNMP agent. It isresponsible for maintaining internal Fibre Alliance MIB (V3.0) tables, responding toSNMP browse requests, and generating traps in response to events.
For an application to receive SNMP trap information from the event daemon, youmust specify it as a trap target by defining the following parameter in thedaemon_options file:
storevntd:snmp_trap_client_registration = IP,Port,Filter,State
where:
IP is the application's IP address.
Port is the port on which the application will be listening for the trap. The default portis 162.
Filter is the trap filtering severity level as defined in the FC-management MIB. Theapplication will only receive traps of the specified severity level (or lesser). The defaultvalue is 10 (Mark), which means that all events are delivered.
Post-Installation configuration for UNIX, Windows, OpenVMS, and z/OS
Configuring event logging 153

Table 25 on page 154 maps the event daemon severity level to the SNMP severitylevels, as specified in the FC-management MIB.
Table 25 Event daemon severity level/SNMP severity level mappings
Event daemon severity SNMP trap severity
1 (Unknown)
fatal 2 (Emergency)
3 (Alert)
critical 4 (Critical)
major 5 (Error)
minor 5 (Error)
warning 6 (Warning)
info 8 (Info)
normal 8 (Info)
9 (Debug)
-- 10 (Mark)
State is the start up row state in the trap_client_registration table in the FC-management MIB. Possible values are ACTIVE and INACTIVE.
Multiple entries can be on the same line, separated by a blank space. In addition, theycan be on their own line, delineated with a backslash (\) character on the precedingline.
For example, the following registration file specifies that the daemon will only sendSNMP traps to the indicated clients when it detects an event of a severity level lessthan or equal to 5 (that is, Error, Critical, Emergency). The daemon will ignore eventswith a severity level greater than 5:
storevntd:snmp_trap_client_registration = 10.2.12.30,162,5,ACTIVE \ 12.250.130.200,162,5,ACTIVE
Object IDsObject Identifiers (OIDs) are entries in the Management Information Base (MIB).
Table 26 Event daemon severity level/SNMP severity level mappings
Object name Object identifier Description
connUnitEventId 1.3.6.1.3.94.1.11.1.3 This is the event index, mainlyfor internal use.
connUnitEventSeverity 1.3.6.1.3.94.1.11.1.6 The SNMP trap severity. Thevalues are listed in Table 25 on page 154.
connUnitEventType 1.3.6.1.3.94.1.11.1.7 This is the event type.Possible values are:
Post-Installation configuration for UNIX, Windows, OpenVMS, and z/OS
154 Solutions Enabler 8.3 Installation and Configuration Guide
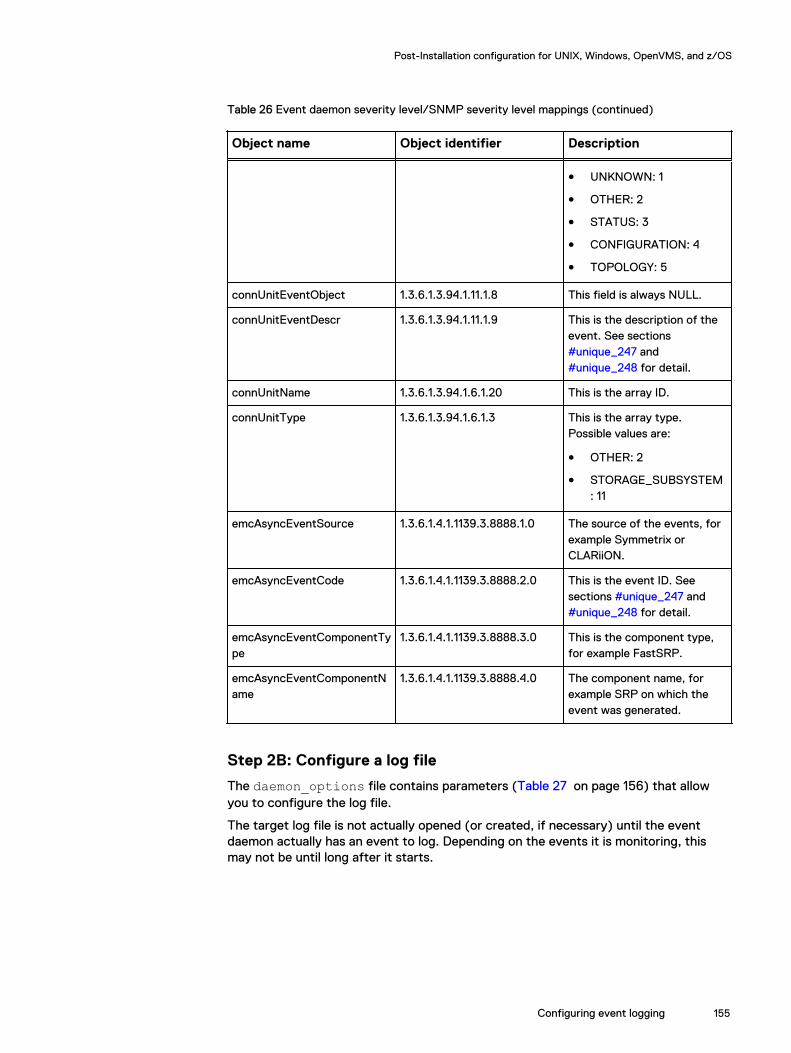
Table 26 Event daemon severity level/SNMP severity level mappings (continued)
Object name Object identifier Description
l UNKNOWN: 1
l OTHER: 2
l STATUS: 3
l CONFIGURATION: 4
l TOPOLOGY: 5
connUnitEventObject 1.3.6.1.3.94.1.11.1.8 This field is always NULL.
connUnitEventDescr 1.3.6.1.3.94.1.11.1.9 This is the description of theevent. See sections #unique_247 and #unique_248 for detail.
connUnitName 1.3.6.1.3.94.1.6.1.20 This is the array ID.
connUnitType 1.3.6.1.3.94.1.6.1.3 This is the array type.Possible values are:
l OTHER: 2
l STORAGE_SUBSYSTEM: 11
emcAsyncEventSource 1.3.6.1.4.1.1139.3.8888.1.0 The source of the events, forexample Symmetrix orCLARiiON.
emcAsyncEventCode 1.3.6.1.4.1.1139.3.8888.2.0 This is the event ID. Seesections #unique_247 and #unique_248 for detail.
emcAsyncEventComponentType
1.3.6.1.4.1.1139.3.8888.3.0 This is the component type,for example FastSRP.
emcAsyncEventComponentName
1.3.6.1.4.1.1139.3.8888.4.0 The component name, forexample SRP on which theevent was generated.
Step 2B: Configure a log file
The daemon_options file contains parameters (Table 27 on page 156) that allowyou to configure the log file.
The target log file is not actually opened (or created, if necessary) until the eventdaemon actually has an event to log. Depending on the events it is monitoring, thismay not be until long after it starts.
Post-Installation configuration for UNIX, Windows, OpenVMS, and z/OS
Configuring event logging 155
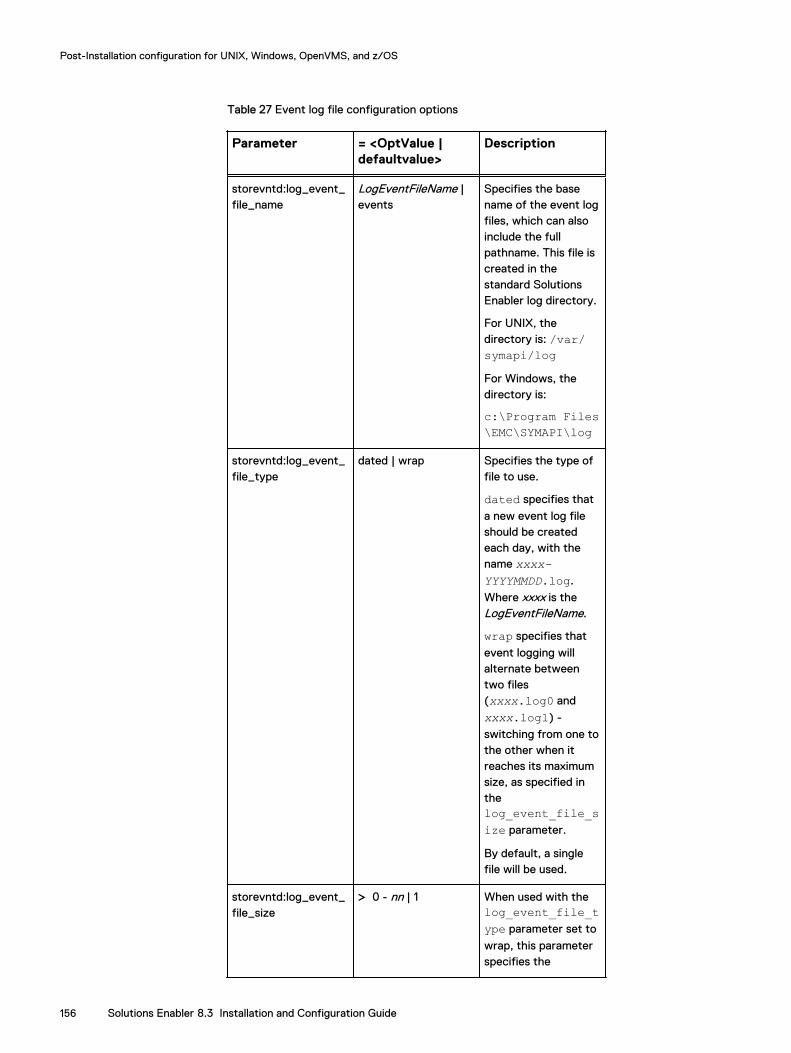
Table 27 Event log file configuration options
Parameter = <OptValue |defaultvalue>
Description
storevntd:log_event_file_name
LogEventFileName |events
Specifies the basename of the event logfiles, which can alsoinclude the fullpathname. This file iscreated in thestandard SolutionsEnabler log directory.
For UNIX, thedirectory is: /var/symapi/logFor Windows, thedirectory is:
c:\Program Files\EMC\SYMAPI\log
storevntd:log_event_file_type
dated | wrap Specifies the type offile to use.
dated specifies that
a new event log fileshould be createdeach day, with thename xxxx-YYYYMMDD.log.
Where xxxx is theLogEventFileName.
wrap specifies that
event logging willalternate betweentwo files(xxxx.log0 and
xxxx.log1) -
switching from one tothe other when itreaches its maximumsize, as specified inthelog_event_file_size parameter.
By default, a singlefile will be used.
storevntd:log_event_file_size
> 0 - nn | 1 When used with thelog_event_file_type parameter set to
wrap, this parameterspecifies the
Post-Installation configuration for UNIX, Windows, OpenVMS, and z/OS
156 Solutions Enabler 8.3 Installation and Configuration Guide
Table 27 Event log file configuration options (continued)
Parameter = <OptValue |defaultvalue>
Description
maximum file size (inKB) allowed beforewrapping to thealternate file. Thisvalue should be adecimal numbergreater than zero.
Note: The maximumvalue for thelog_event_file_size is 2097152 KB.
storevntd:log_event_file_retention
> 0 - nn | 3 When used with thelog_event_file_type parameter set to
dated, this parameterspecifies the numberof days to retain thelog files. This valueshould be a decimalnumber greater thanzero.
storevntd:log_event_file_perms
rw, n | r Specifies thepermissions for theevent log files.
rw specifies that
anyone can read orwrite to the files.
r specifies that
anyone can read thefiles, but only theroot/administrator (orwhatever identity theevent daemon isrunning as) can writeto the files.
n specifies that only
the root/administrator (orwhatever identity theevent daemon isrunning as) can readand write to the files.
Post-Installation configuration for UNIX, Windows, OpenVMS, and z/OS
Configuring event logging 157
Step 2C: Configure a Syslog target
The daemon_options file contains parameters (Table 28 on page 158) that allowyou to configure a Syslog target.
Table 28 Event log file configuration options
Parameter = <OptValue |defaultvalue>
Description
storevntd:log_event_syslog_host
SyslogHostName Specifies the name ofthe host on which theSyslog server isrunning. This valuemust be supplied.
storevntd:log_event_syslog_port
nnn | 514 Specifies the port onwhich the server islistening.
Step 3: Specifying events to log
Solutions Enabler provides the ability to capture both array events and non-arrayevents from certain application to log files. This is accomplished by building event lists,which is a mechanism for specifying the types of events for which to generate traps.These event lists are defined in the daemon_options file.
Array eventsTo build an array event list, define the following parameter in the daemon_optionsfile:
Note
Many array events are organized into categories. These categories are hierarchical inthat a category can contain individual events, as well as other categories.
storevntd:log_symmetrix_events = [sid=SymmID,] UID|Category ... [,sev=SEV] [,tgt=TGT] [,comp=COMP] [,comp_type=CPMP_TYPE] [thresh_critical=Percent, thresh_maj=Percent, thresh_warn=Percent, thresh_info=Percent, thresh=Percent] [,ignore]
where:
sid— Specifies the 12-digit ID of the VMAX array to which the record applies. Youmust specify the full SID (12 digits). If this field is missing, the registration applies toall local and remote VMAX arrays.
UID — The numerical event UID value.
Category — One or more of the following event categories, separated with a comma:
For events in the 1150 - 1199 range:
l events (all events in this category)
l array subsystem
Post-Installation configuration for UNIX, Windows, OpenVMS, and z/OS
158 Solutions Enabler 8.3 Installation and Configuration Guide

l checksum
l diagnostic
l environmental
l device pool
l service processor
l srdf system
l srdf link
l srdf session
l srdf consistency group
l director
l device
l disk
For events in the 1200 - 1999 range:
l status (general component state change)
l optimizer (Optimizer/FAST related)
l groups (Group (DG/CG) related)
Note
Each of the event categories may contain numerous individual events, as described inthe VMAX Management Software Events and Alerts Guide.
sev— Specifies the minimum severity level for which events should be logged. Allevents with a severity level at or above the specified severity will be logged. Take carewhen setting this option. Possible values are:
l normal
l info
l warning
l minor
l major
l critical
l fatal
tgt — Specifies the target to which the daemon should log the events. Possible valuesare: snmp, syslog, system, and file.
The value you specify for TGT must match one of the values you specified in thelog_event_targets parameter; otherwise, the daemon will not log events for thisrecord.
The target you specify here will override the global log_event_targets settingdescribed in Step 1: Specify logging targets on page 152.
comp — Specifies the specific sub-component for which you want to log events. Forexample, a particular device, disk, pool, etc. When you specify a value for this field,the event daemon will only log events for the specified component. You can eitherspecify a single component or a comma separated list of components. If the latter, youmust enclose the list with double quotes.
For example:
Post-Installation configuration for UNIX, Windows, OpenVMS, and z/OS
Configuring event logging 159
comp=0100 a single device
"comp=0100,0200,030" multiple devices
"comp=finance,sales" multiple pools
cmpnt_type — Specifies a type of component. When present, only events for thespecified component type are delivered. If omitted, events for any component typeare delivered. This is most useful for events that can be delivered against multipletypes of components.
An example is the Pool Status events, which can be generated for DSE, Thin or SnapPools. Possible values are: device, disk, director, port, dsepool,tpdatapool, snappool, dg, cg, sg, srdf-grp and migrsess.
thresh_critical=Percent
thresh_maj=Percentthresh_warn=Percentthresh_inf=Percentthresh=Percent
Specifies the threshold levelat which the daemon deliversan event and at what severityit is delivered. This settingoverrides the defaultthreshold levels for an event.These parameters are onlyused when specifyingthreshold type events.
Only a subset of the fullthreshold functionalitydescribed in Thresholdevents on page 149 issupported. The MINOR andFATAL severities cannot bespecified and a >=comparison is assumed.
The thresh=nnn setting is
an alias for thresh_maj.
ignore — Indicates that events matched by this record are not to be delivered, even ifthey are matched by some other record. The order of records doesn't matter. If anevent is matched by any record with the ignore parameter, it will be ignored.
Only a single log_symmetrix_events option can be present. Since this canbecome quite long, it can be spread across multiple lines in the file via the use of '\'continuation characters at the end of a line.
Note
The comment character (#) has no effect if it follows a line with the continuationcharacter (/).
Post-Installation configuration for UNIX, Windows, OpenVMS, and z/OS
160 Solutions Enabler 8.3 Installation and Configuration Guide
Non-array events
To build a non-array event list, define the following parameter in the daemon_optionsfile:
storevntd:log_app_events = [appid=appid,] CAT[category,] [comp=COMP,] [comp_type=COMP_TYPE,] [,tgt=TGT]
where:
appid— Specifies an application id. By default, all application events will be monitored.
CAT — Specifies event(s) to be monitored. This can be either the name of an eventcategory or a numerical event ID. This is the only field that is required. One or morevalues (comma separated) may be present. The Supported categories are: SMC andSPA.
comp — Certain events apply to specific sub-components within the application. Thisfield specifies that only events for the specified component (or components) shouldbe delivered. If more than one component is present, the entire field must be enclosedin double quotes.
For example:
comp=name a single component
"comp=name1,name2,name3"
multiple components
comp_type — Specifies events to be monitored. This must be one or more of thepredefined types. The supported component types are: univmax, univspa,univspv, jboss, and dbms.
tgt — Specifies the target to which the daemon should log the events. Possible valuesare: snmp, syslog, system, and file.
The value you specify for TGT must match one of the values you specified in thelog_event_targets parameter; otherwise, the daemon will not log events for thisrecord.
The target you specify here will override the global log_event_targets settingdescribed in Step 1: Specify logging targets on page 152.
An example with 4 records or separate registrations is as follows:
storevntd:log_event_targets = syslog filestorevntd:log_symmetrix_events = \ sid=000192600356, 1200,1201,1202 ;\ sid=000192600357, "comp=0001,0002,0003",1204,1205 ;\ 1212,1213, thresh_major=60, thresh_warning=50, thresh_info=30 ;\ tgt=file, sid=000194900123, status
Event output examplesThe following examples illustrate the format of the various event outputs. For a moredetailed description of the event formats, refer to Event message formats on page162.
In these examples:
Post-Installation configuration for UNIX, Windows, OpenVMS, and z/OS
Event output examples 161
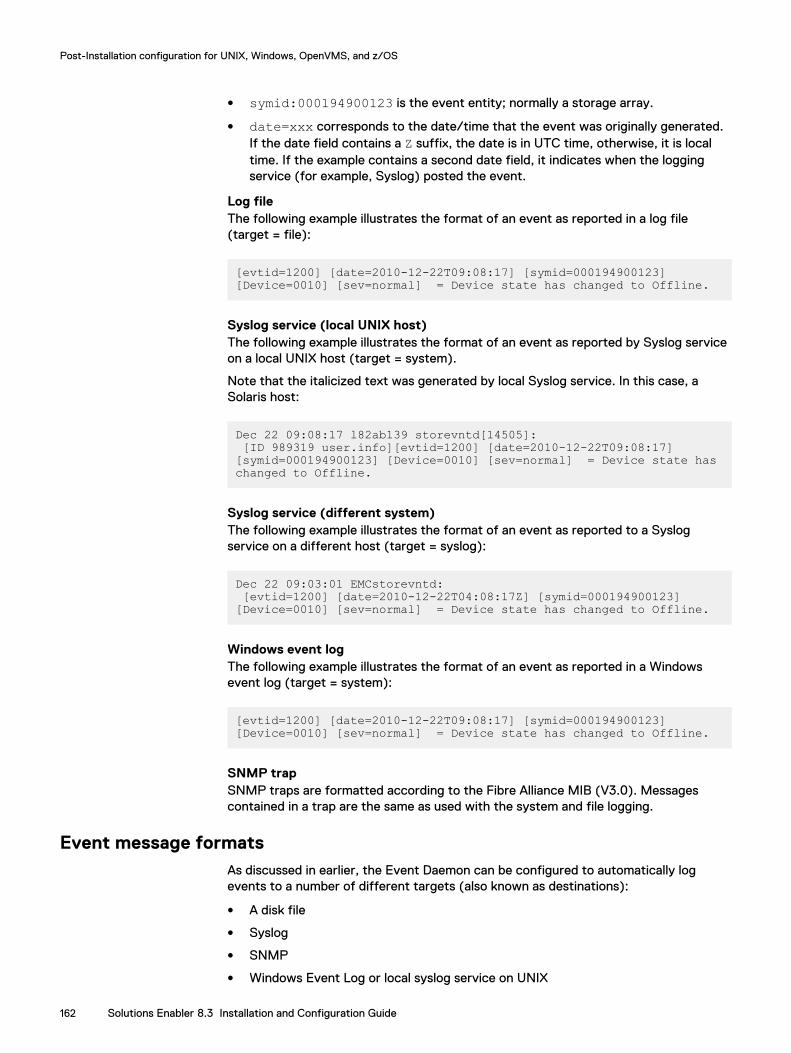
l symid:000194900123 is the event entity; normally a storage array.
l date=xxx corresponds to the date/time that the event was originally generated.If the date field contains a Z suffix, the date is in UTC time, otherwise, it is localtime. If the example contains a second date field, it indicates when the loggingservice (for example, Syslog) posted the event.
Log fileThe following example illustrates the format of an event as reported in a log file(target = file):
[evtid=1200] [date=2010-12-22T09:08:17] [symid=000194900123] [Device=0010] [sev=normal] = Device state has changed to Offline.
Syslog service (local UNIX host)The following example illustrates the format of an event as reported by Syslog serviceon a local UNIX host (target = system).
Note that the italicized text was generated by local Syslog service. In this case, aSolaris host:
Dec 22 09:08:17 l82ab139 storevntd[14505]: [ID 989319 user.info][evtid=1200] [date=2010-12-22T09:08:17] [symid=000194900123] [Device=0010] [sev=normal] = Device state has changed to Offline.
Syslog service (different system)The following example illustrates the format of an event as reported to a Syslogservice on a different host (target = syslog):
Dec 22 09:03:01 EMCstorevntd: [evtid=1200] [date=2010-12-22T04:08:17Z] [symid=000194900123] [Device=0010] [sev=normal] = Device state has changed to Offline.
Windows event logThe following example illustrates the format of an event as reported in a Windowsevent log (target = system):
[evtid=1200] [date=2010-12-22T09:08:17] [symid=000194900123] [Device=0010] [sev=normal] = Device state has changed to Offline.
SNMP trapSNMP traps are formatted according to the Fibre Alliance MIB (V3.0). Messagescontained in a trap are the same as used with the system and file logging.
Event message formatsAs discussed in earlier, the Event Daemon can be configured to automatically logevents to a number of different targets (also known as destinations):
l A disk file
l Syslog
l SNMP
l Windows Event Log or local syslog service on UNIX
Post-Installation configuration for UNIX, Windows, OpenVMS, and z/OS
162 Solutions Enabler 8.3 Installation and Configuration Guide
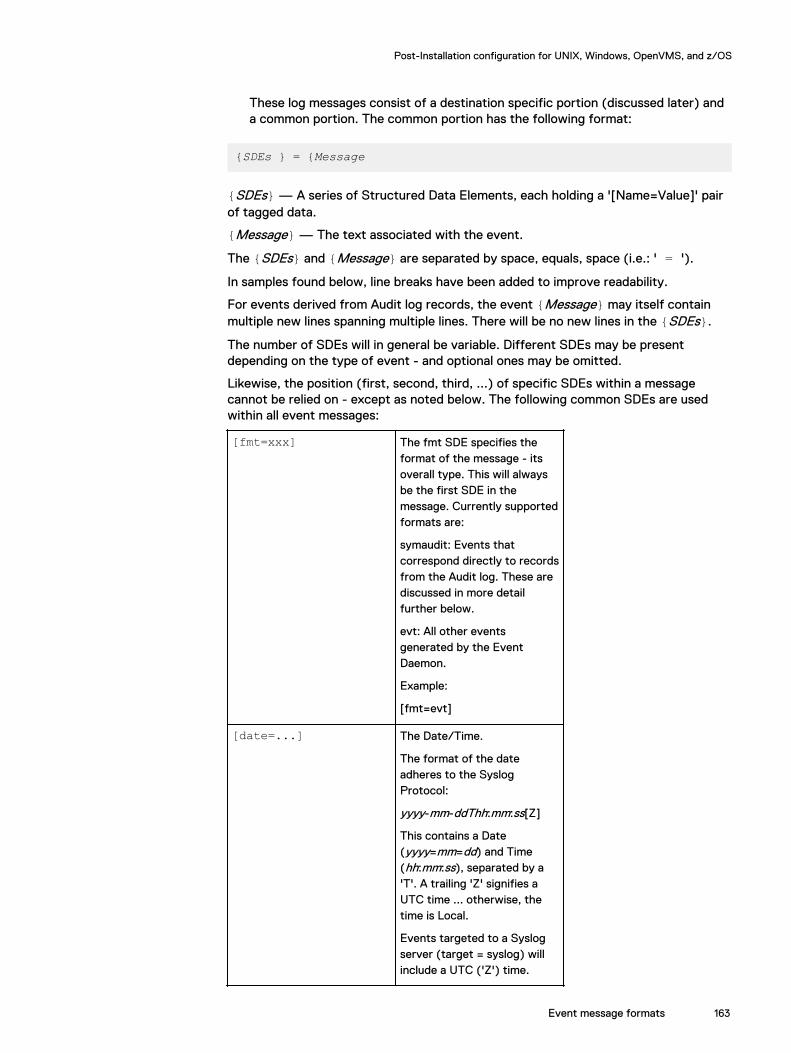
These log messages consist of a destination specific portion (discussed later) anda common portion. The common portion has the following format:
{SDEs } = {Message
{SDEs} — A series of Structured Data Elements, each holding a '[Name=Value]' pairof tagged data.
{Message} — The text associated with the event.
The {SDEs} and {Message} are separated by space, equals, space (i.e.: ' = ').
In samples found below, line breaks have been added to improve readability.
For events derived from Audit log records, the event {Message} may itself containmultiple new lines spanning multiple lines. There will be no new lines in the {SDEs}.
The number of SDEs will in general be variable. Different SDEs may be presentdepending on the type of event - and optional ones may be omitted.
Likewise, the position (first, second, third, ...) of specific SDEs within a messagecannot be relied on - except as noted below. The following common SDEs are usedwithin all event messages:
[fmt=xxx] The fmt SDE specifies theformat of the message - itsoverall type. This will alwaysbe the first SDE in themessage. Currently supportedformats are:
symaudit: Events thatcorrespond directly to recordsfrom the Audit log. These arediscussed in more detailfurther below.
evt: All other eventsgenerated by the EventDaemon.
Example:
[fmt=evt]
[date=...] The Date/Time.
The format of the dateadheres to the SyslogProtocol:
yyyy-mm-ddThh:mm:ss[Z]
This contains a Date(yyyy=mm=dd) and Time(hh:mm:ss), separated by a'T'. A trailing 'Z' signifies aUTC time ... otherwise, thetime is Local.
Events targeted to a Syslogserver (target = syslog) willinclude a UTC ('Z') time.
Post-Installation configuration for UNIX, Windows, OpenVMS, and z/OS
Event message formats 163
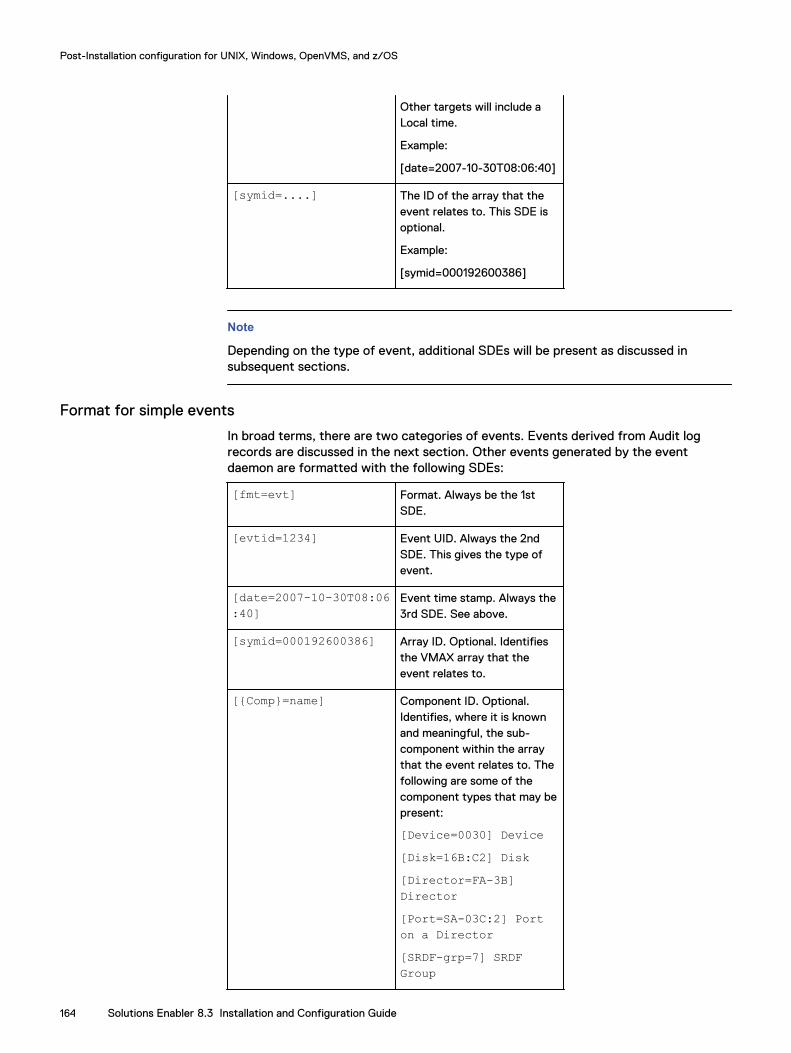
Other targets will include aLocal time.
Example:
[date=2007-10-30T08:06:40]
[symid=....] The ID of the array that theevent relates to. This SDE isoptional.
Example:
[symid=000192600386]
Note
Depending on the type of event, additional SDEs will be present as discussed insubsequent sections.
Format for simple events
In broad terms, there are two categories of events. Events derived from Audit logrecords are discussed in the next section. Other events generated by the eventdaemon are formatted with the following SDEs:
[fmt=evt] Format. Always be the 1stSDE.
[evtid=1234] Event UID. Always the 2ndSDE. This gives the type ofevent.
[date=2007-10-30T08:06:40]
Event time stamp. Always the3rd SDE. See above.
[symid=000192600386] Array ID. Optional. Identifiesthe VMAX array that theevent relates to.
[{Comp}=name] Component ID. Optional.Identifies, where it is knownand meaningful, the sub-component within the arraythat the event relates to. Thefollowing are some of thecomponent types that may bepresent:
[Device=0030] Device[Disk=16B:C2] Disk[Director=FA-3B]Director[Port=SA-03C:2] Porton a Director[SRDF-grp=7] SRDFGroup
Post-Installation configuration for UNIX, Windows, OpenVMS, and z/OS
164 Solutions Enabler 8.3 Installation and Configuration Guide
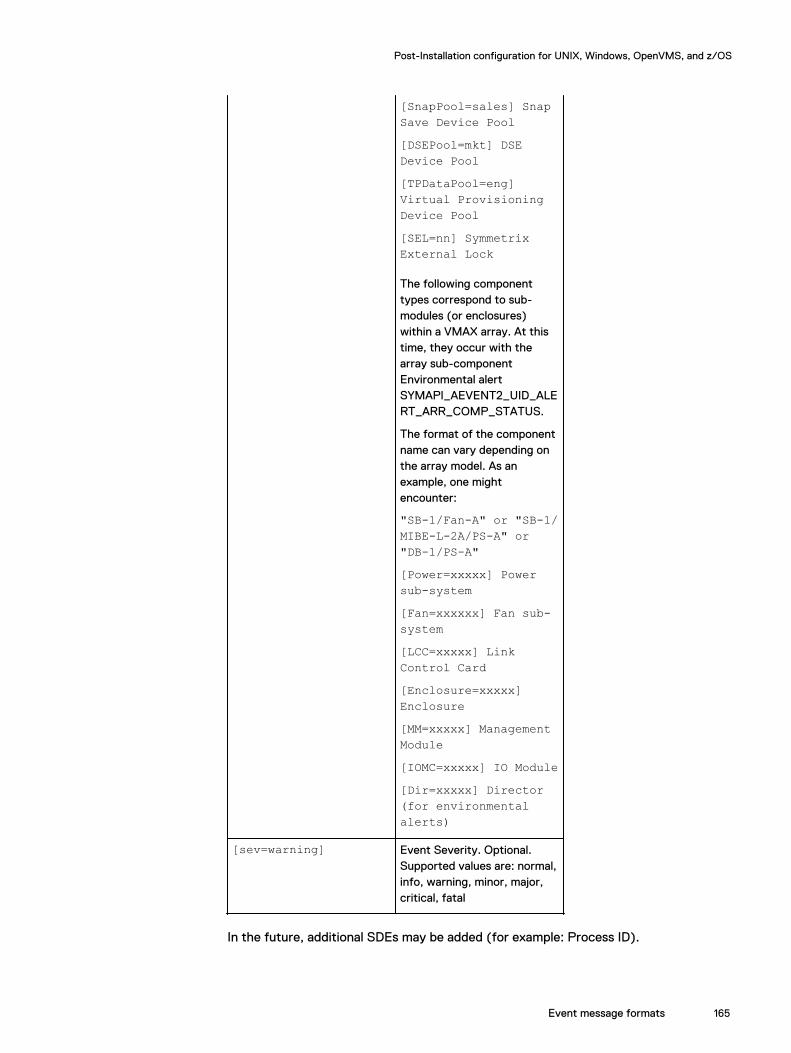
[SnapPool=sales] SnapSave Device Pool[DSEPool=mkt] DSEDevice Pool[TPDataPool=eng]Virtual ProvisioningDevice Pool[SEL=nn] SymmetrixExternal Lock
The following componenttypes correspond to sub-modules (or enclosures)within a VMAX array. At thistime, they occur with thearray sub-componentEnvironmental alertSYMAPI_AEVENT2_UID_ALERT_ARR_COMP_STATUS.
The format of the componentname can vary depending onthe array model. As anexample, one mightencounter:
"SB-1/Fan-A" or "SB-1/MIBE-L-2A/PS-A" or"DB-1/PS-A"[Power=xxxxx] Powersub-system[Fan=xxxxxx] Fan sub-system[LCC=xxxxx] LinkControl Card[Enclosure=xxxxx]Enclosure[MM=xxxxx] ManagementModule[IOMC=xxxxx] IO Module[Dir=xxxxx] Director(for environmentalalerts)
[sev=warning] Event Severity. Optional.Supported values are: normal,info, warning, minor, major,critical, fatal
In the future, additional SDEs may be added (for example: Process ID).
Post-Installation configuration for UNIX, Windows, OpenVMS, and z/OS
Event message formats 165
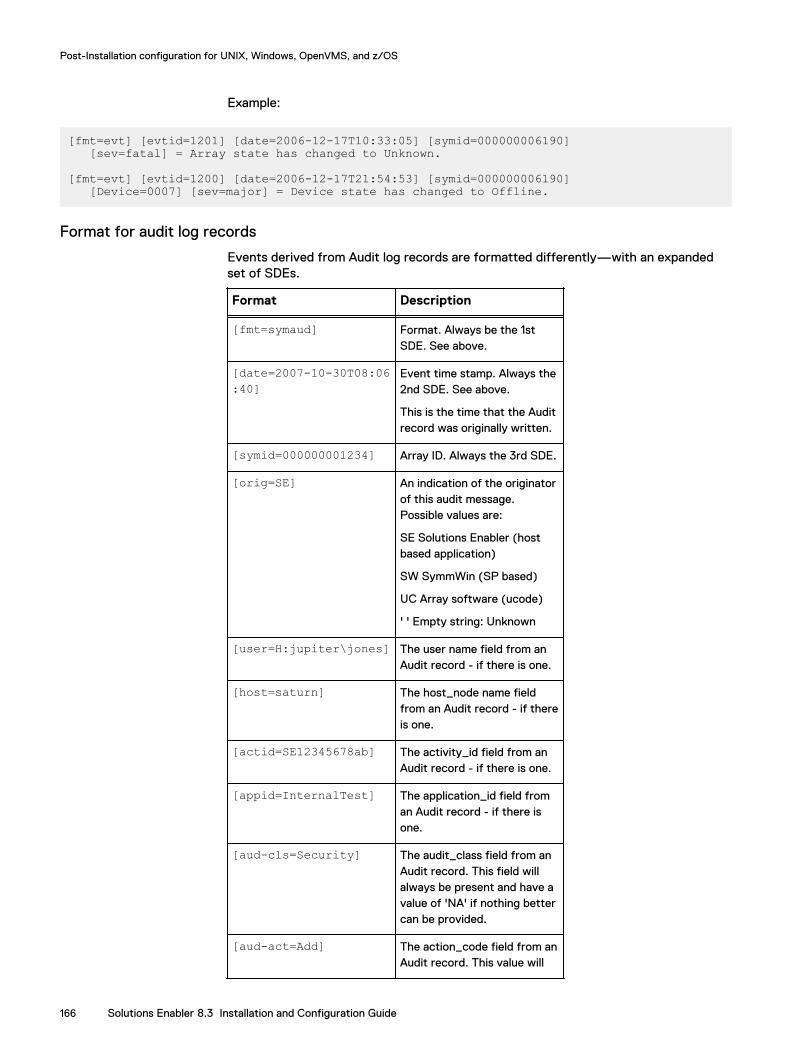
Example:
[fmt=evt] [evtid=1201] [date=2006-12-17T10:33:05] [symid=000000006190] [sev=fatal] = Array state has changed to Unknown.
[fmt=evt] [evtid=1200] [date=2006-12-17T21:54:53] [symid=000000006190] [Device=0007] [sev=major] = Device state has changed to Offline.
Format for audit log records
Events derived from Audit log records are formatted differently—with an expandedset of SDEs.
Format Description
[fmt=symaud] Format. Always be the 1stSDE. See above.
[date=2007-10-30T08:06:40]
Event time stamp. Always the2nd SDE. See above.
This is the time that the Auditrecord was originally written.
[symid=000000001234] Array ID. Always the 3rd SDE.
[orig=SE] An indication of the originatorof this audit message.Possible values are:
SE Solutions Enabler (hostbased application)
SW SymmWin (SP based)
UC Array software (ucode)
' ' Empty string: Unknown
[user=H:jupiter\jones] The user name field from anAudit record - if there is one.
[host=saturn] The host_node name fieldfrom an Audit record - if thereis one.
[actid=SE12345678ab] The activity_id field from anAudit record - if there is one.
[appid=InternalTest] The application_id field froman Audit record - if there isone.
[aud-cls=Security] The audit_class field from anAudit record. This field willalways be present and have avalue of 'NA' if nothing bettercan be provided.
[aud-act=Add] The action_code field from anAudit record. This value will
Post-Installation configuration for UNIX, Windows, OpenVMS, and z/OS
166 Solutions Enabler 8.3 Installation and Configuration Guide
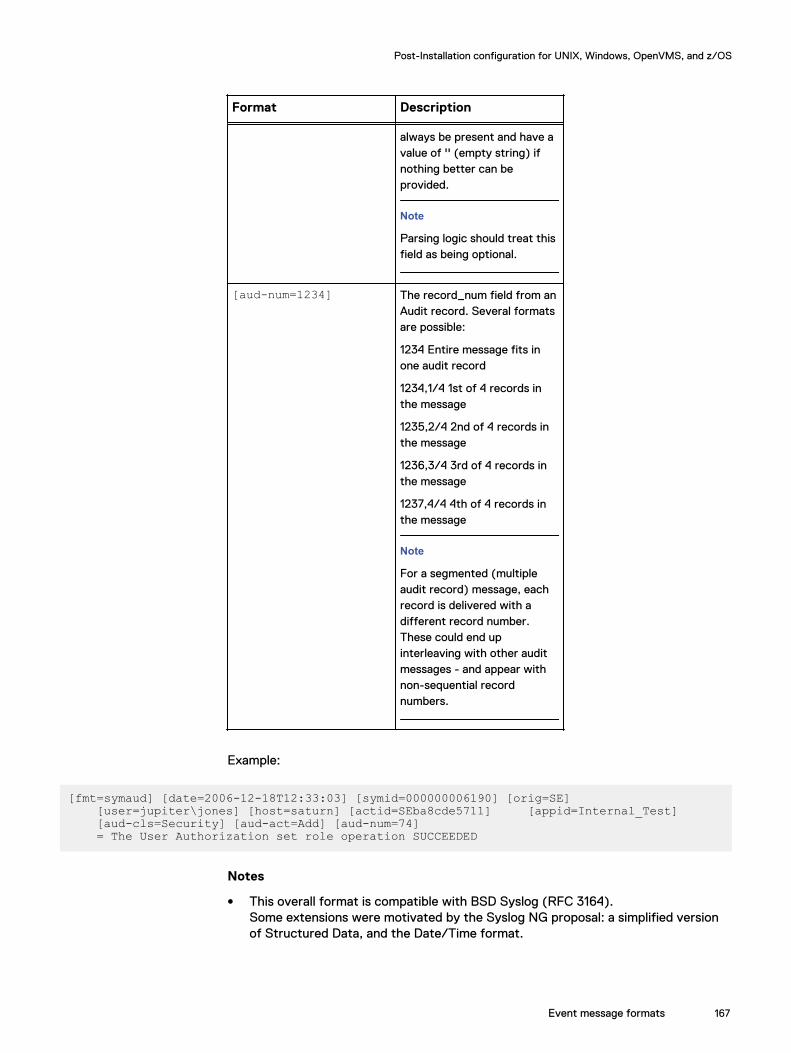
Format Description
always be present and have avalue of '' (empty string) ifnothing better can beprovided.
Note
Parsing logic should treat thisfield as being optional.
[aud-num=1234] The record_num field from anAudit record. Several formatsare possible:
1234 Entire message fits inone audit record
1234,1/4 1st of 4 records inthe message
1235,2/4 2nd of 4 records inthe message
1236,3/4 3rd of 4 records inthe message
1237,4/4 4th of 4 records inthe message
Note
For a segmented (multipleaudit record) message, eachrecord is delivered with adifferent record number.These could end upinterleaving with other auditmessages - and appear withnon-sequential recordnumbers.
Example:
[fmt=symaud] [date=2006-12-18T12:33:03] [symid=000000006190] [orig=SE] [user=jupiter\jones] [host=saturn] [actid=SEba8cde5711] [appid=Internal_Test] [aud-cls=Security] [aud-act=Add] [aud-num=74] = The User Authorization set role operation SUCCEEDED
Notes
l This overall format is compatible with BSD Syslog (RFC 3164).Some extensions were motivated by the Syslog NG proposal: a simplified versionof Structured Data, and the Date/Time format.
Post-Installation configuration for UNIX, Windows, OpenVMS, and z/OS
Event message formats 167
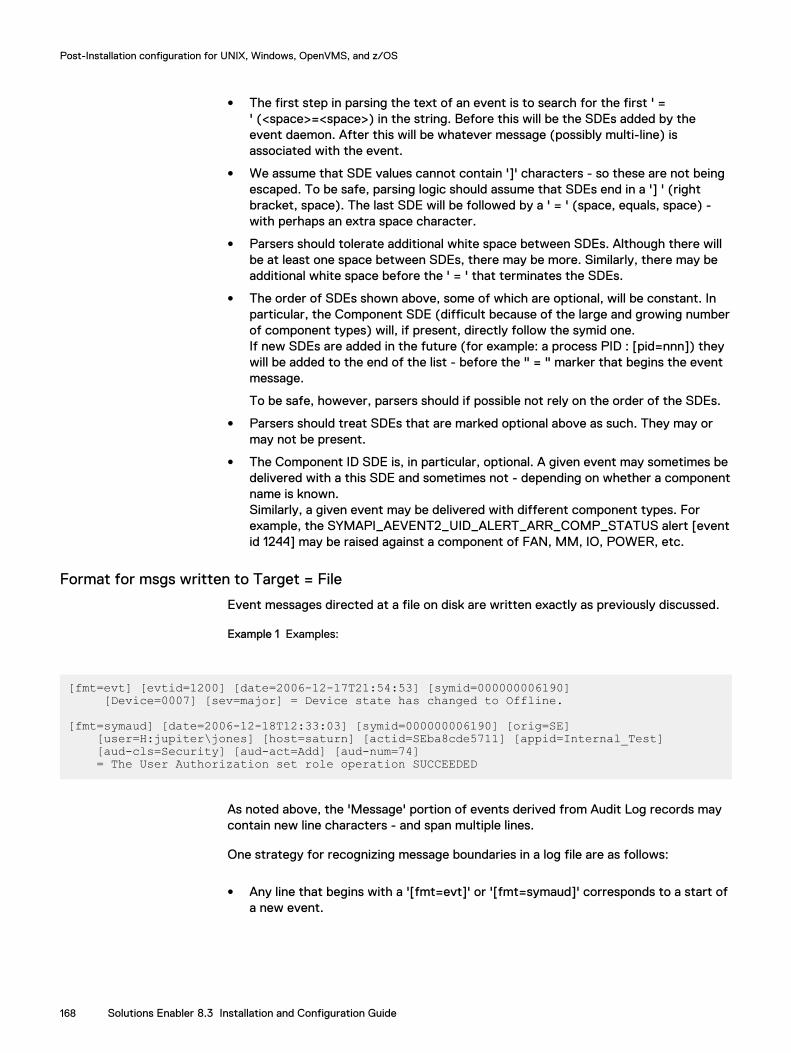
l The first step in parsing the text of an event is to search for the first ' =' (<space>=<space>) in the string. Before this will be the SDEs added by theevent daemon. After this will be whatever message (possibly multi-line) isassociated with the event.
l We assume that SDE values cannot contain ']' characters - so these are not beingescaped. To be safe, parsing logic should assume that SDEs end in a '] ' (rightbracket, space). The last SDE will be followed by a ' = ' (space, equals, space) -with perhaps an extra space character.
l Parsers should tolerate additional white space between SDEs. Although there willbe at least one space between SDEs, there may be more. Similarly, there may beadditional white space before the ' = ' that terminates the SDEs.
l The order of SDEs shown above, some of which are optional, will be constant. Inparticular, the Component SDE (difficult because of the large and growing numberof component types) will, if present, directly follow the symid one.If new SDEs are added in the future (for example: a process PID : [pid=nnn]) theywill be added to the end of the list - before the " = " marker that begins the eventmessage.
To be safe, however, parsers should if possible not rely on the order of the SDEs.
l Parsers should treat SDEs that are marked optional above as such. They may ormay not be present.
l The Component ID SDE is, in particular, optional. A given event may sometimes bedelivered with a this SDE and sometimes not - depending on whether a componentname is known.Similarly, a given event may be delivered with different component types. Forexample, the SYMAPI_AEVENT2_UID_ALERT_ARR_COMP_STATUS alert [eventid 1244] may be raised against a component of FAN, MM, IO, POWER, etc.
Format for msgs written to Target = File
Event messages directed at a file on disk are written exactly as previously discussed.
Example 1 Examples:
[fmt=evt] [evtid=1200] [date=2006-12-17T21:54:53] [symid=000000006190] [Device=0007] [sev=major] = Device state has changed to Offline.
[fmt=symaud] [date=2006-12-18T12:33:03] [symid=000000006190] [orig=SE] [user=H:jupiter\jones] [host=saturn] [actid=SEba8cde5711] [appid=Internal_Test] [aud-cls=Security] [aud-act=Add] [aud-num=74] = The User Authorization set role operation SUCCEEDED
As noted above, the 'Message' portion of events derived from Audit Log records maycontain new line characters - and span multiple lines.
One strategy for recognizing message boundaries in a log file are as follows:
l Any line that begins with a '[fmt=evt]' or '[fmt=symaud]' corresponds to a start ofa new event.
Post-Installation configuration for UNIX, Windows, OpenVMS, and z/OS
168 Solutions Enabler 8.3 Installation and Configuration Guide
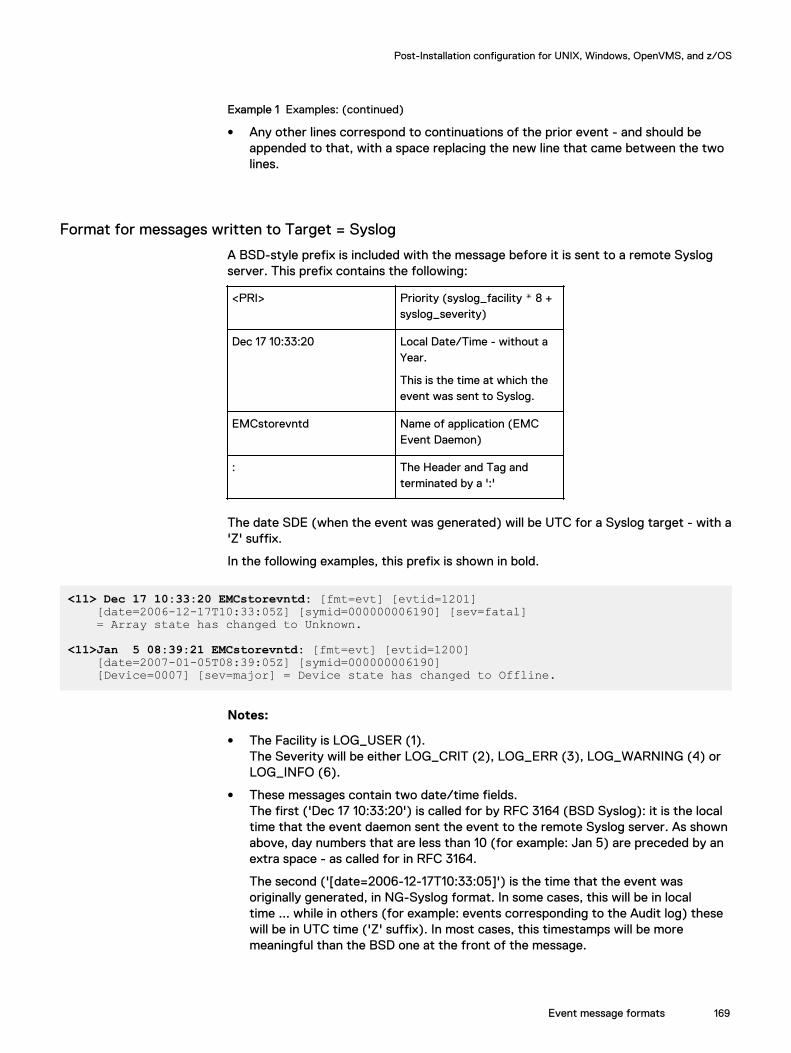
Example 1 Examples: (continued)
l Any other lines correspond to continuations of the prior event - and should beappended to that, with a space replacing the new line that came between the twolines.
Format for messages written to Target = Syslog
A BSD-style prefix is included with the message before it is sent to a remote Syslogserver. This prefix contains the following:
<PRI> Priority (syslog_facility * 8 +syslog_severity)
Dec 17 10:33:20 Local Date/Time - without aYear.
This is the time at which theevent was sent to Syslog.
EMCstorevntd Name of application (EMCEvent Daemon)
: The Header and Tag andterminated by a ':'
The date SDE (when the event was generated) will be UTC for a Syslog target - with a'Z' suffix.
In the following examples, this prefix is shown in bold.
<11> Dec 17 10:33:20 EMCstorevntd: [fmt=evt] [evtid=1201] [date=2006-12-17T10:33:05Z] [symid=000000006190] [sev=fatal] = Array state has changed to Unknown.
<11>Jan 5 08:39:21 EMCstorevntd: [fmt=evt] [evtid=1200] [date=2007-01-05T08:39:05Z] [symid=000000006190] [Device=0007] [sev=major] = Device state has changed to Offline.
Notes:
l The Facility is LOG_USER (1).The Severity will be either LOG_CRIT (2), LOG_ERR (3), LOG_WARNING (4) orLOG_INFO (6).
l These messages contain two date/time fields.The first ('Dec 17 10:33:20') is called for by RFC 3164 (BSD Syslog): it is the localtime that the event daemon sent the event to the remote Syslog server. As shownabove, day numbers that are less than 10 (for example: Jan 5) are preceded by anextra space - as called for in RFC 3164.
The second ('[date=2006-12-17T10:33:05]') is the time that the event wasoriginally generated, in NG-Syslog format. In some cases, this will be in localtime ... while in others (for example: events corresponding to the Audit log) thesewill be in UTC time ('Z' suffix). In most cases, this timestamps will be moremeaningful than the BSD one at the front of the message.
Post-Installation configuration for UNIX, Windows, OpenVMS, and z/OS
Event message formats 169
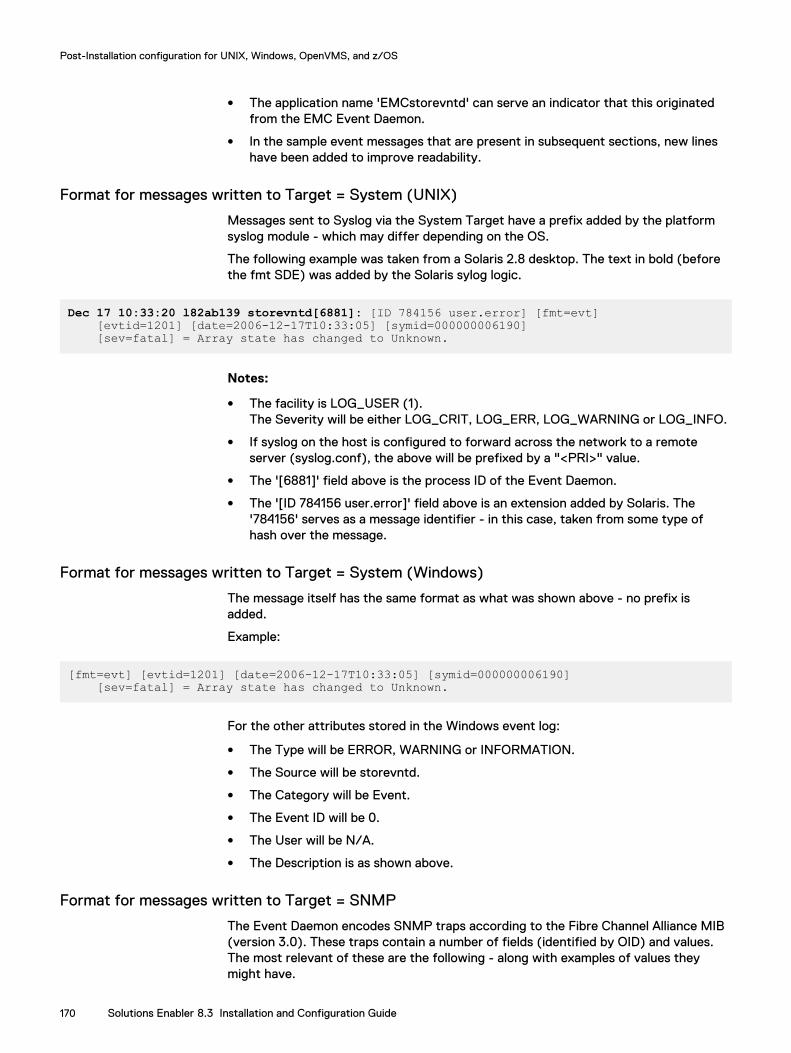
l The application name 'EMCstorevntd' can serve an indicator that this originatedfrom the EMC Event Daemon.
l In the sample event messages that are present in subsequent sections, new lineshave been added to improve readability.
Format for messages written to Target = System (UNIX)
Messages sent to Syslog via the System Target have a prefix added by the platformsyslog module - which may differ depending on the OS.
The following example was taken from a Solaris 2.8 desktop. The text in bold (beforethe fmt SDE) was added by the Solaris sylog logic.
Dec 17 10:33:20 l82ab139 storevntd[6881]: [ID 784156 user.error] [fmt=evt] [evtid=1201] [date=2006-12-17T10:33:05] [symid=000000006190] [sev=fatal] = Array state has changed to Unknown.
Notes:
l The facility is LOG_USER (1).The Severity will be either LOG_CRIT, LOG_ERR, LOG_WARNING or LOG_INFO.
l If syslog on the host is configured to forward across the network to a remoteserver (syslog.conf), the above will be prefixed by a "<PRI>" value.
l The '[6881]' field above is the process ID of the Event Daemon.
l The '[ID 784156 user.error]' field above is an extension added by Solaris. The'784156' serves as a message identifier - in this case, taken from some type ofhash over the message.
Format for messages written to Target = System (Windows)
The message itself has the same format as what was shown above - no prefix isadded.
Example:
[fmt=evt] [evtid=1201] [date=2006-12-17T10:33:05] [symid=000000006190] [sev=fatal] = Array state has changed to Unknown.
For the other attributes stored in the Windows event log:
l The Type will be ERROR, WARNING or INFORMATION.
l The Source will be storevntd.
l The Category will be Event.
l The Event ID will be 0.
l The User will be N/A.
l The Description is as shown above.
Format for messages written to Target = SNMP
The Event Daemon encodes SNMP traps according to the Fibre Channel Alliance MIB(version 3.0). These traps contain a number of fields (identified by OID) and values.The most relevant of these are the following - along with examples of values theymight have.
Post-Installation configuration for UNIX, Windows, OpenVMS, and z/OS
170 Solutions Enabler 8.3 Installation and Configuration Guide
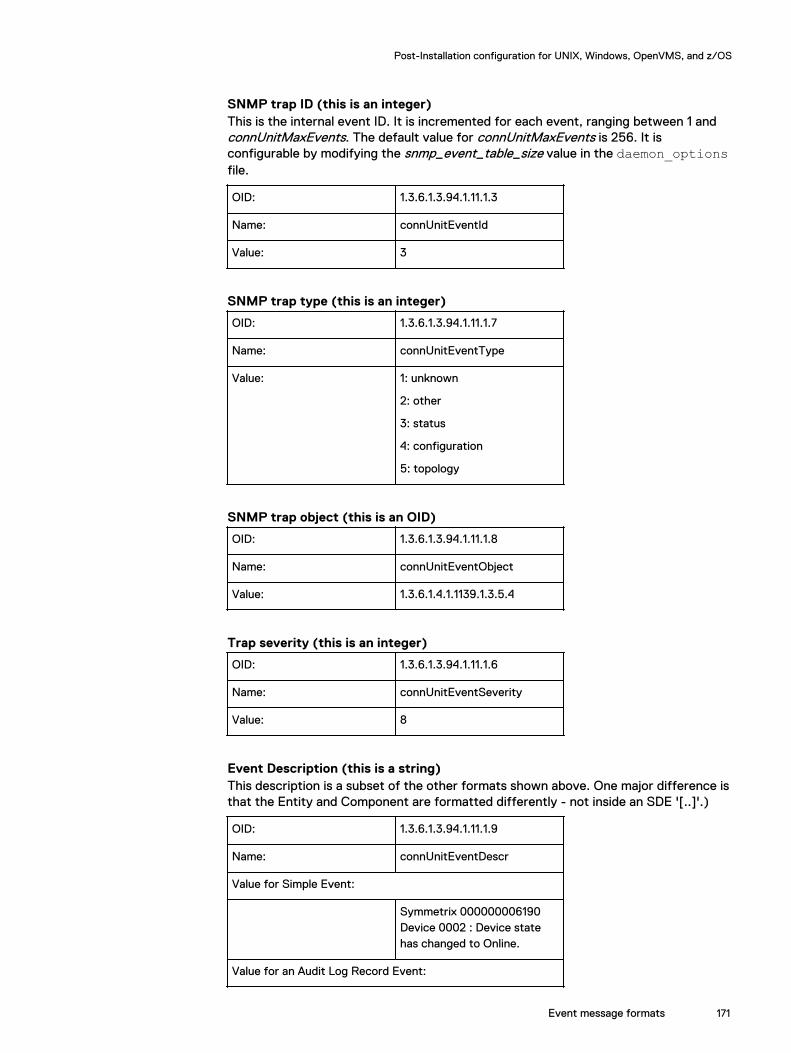
SNMP trap ID (this is an integer)This is the internal event ID. It is incremented for each event, ranging between 1 andconnUnitMaxEvents. The default value for connUnitMaxEvents is 256. It isconfigurable by modifying the snmp_event_table_size value in the daemon_optionsfile.
OID: 1.3.6.1.3.94.1.11.1.3
Name: connUnitEventId
Value: 3
SNMP trap type (this is an integer)
OID: 1.3.6.1.3.94.1.11.1.7
Name: connUnitEventType
Value: 1: unknown
2: other
3: status
4: configuration
5: topology
SNMP trap object (this is an OID)
OID: 1.3.6.1.3.94.1.11.1.8
Name: connUnitEventObject
Value: 1.3.6.1.4.1.1139.1.3.5.4
Trap severity (this is an integer)
OID: 1.3.6.1.3.94.1.11.1.6
Name: connUnitEventSeverity
Value: 8
Event Description (this is a string)This description is a subset of the other formats shown above. One major difference isthat the Entity and Component are formatted differently - not inside an SDE '[..]'.)
OID: 1.3.6.1.3.94.1.11.1.9
Name: connUnitEventDescr
Value for Simple Event:
Symmetrix 000000006190Device 0002 : Device statehas changed to Online.
Value for an Audit Log Record Event:
Post-Installation configuration for UNIX, Windows, OpenVMS, and z/OS
Event message formats 171
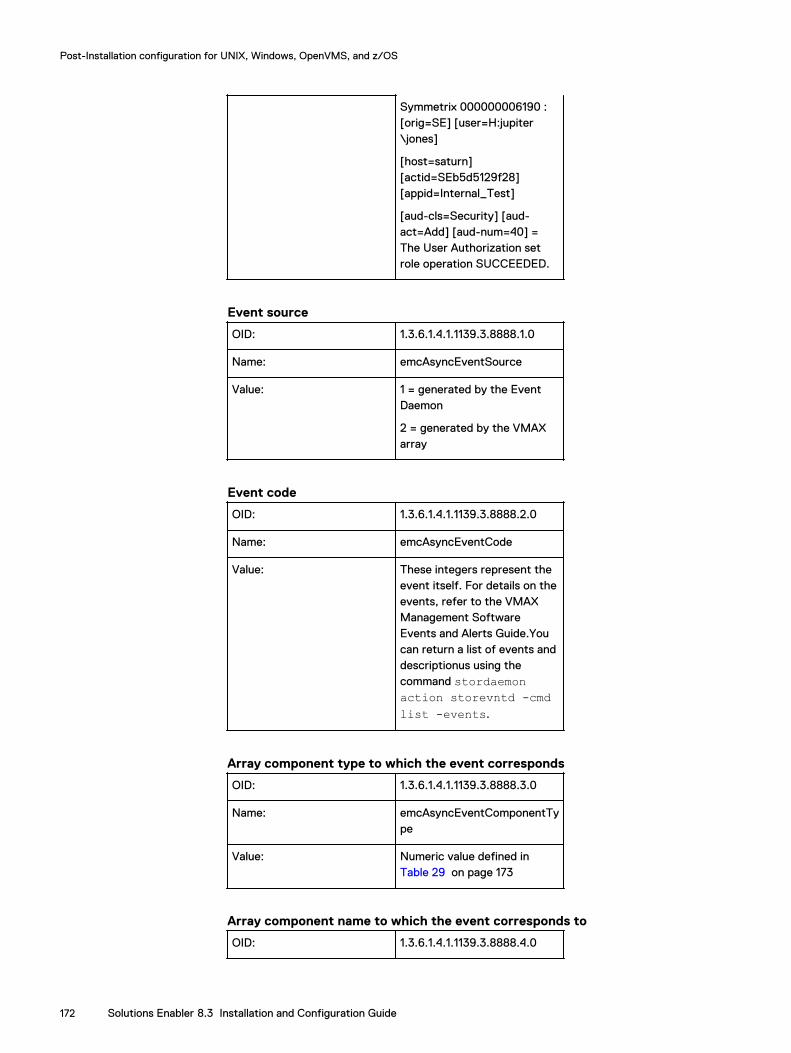
Symmetrix 000000006190 :[orig=SE] [user=H:jupiter\jones]
[host=saturn][actid=SEb5d5129f28][appid=Internal_Test]
[aud-cls=Security] [aud-act=Add] [aud-num=40] =The User Authorization setrole operation SUCCEEDED.
Event source
OID: 1.3.6.1.4.1.1139.3.8888.1.0
Name: emcAsyncEventSource
Value: 1 = generated by the EventDaemon
2 = generated by the VMAXarray
Event code
OID: 1.3.6.1.4.1.1139.3.8888.2.0
Name: emcAsyncEventCode
Value: These integers represent theevent itself. For details on theevents, refer to the VMAXManagement SoftwareEvents and Alerts Guide.Youcan return a list of events anddescriptionus using thecommand stordaemonaction storevntd -cmdlist -events.
Array component type to which the event corresponds
OID: 1.3.6.1.4.1.1139.3.8888.3.0
Name: emcAsyncEventComponentType
Value: Numeric value defined in Table 29 on page 173
Array component name to which the event corresponds to
OID: 1.3.6.1.4.1.1139.3.8888.4.0
Post-Installation configuration for UNIX, Windows, OpenVMS, and z/OS
172 Solutions Enabler 8.3 Installation and Configuration Guide
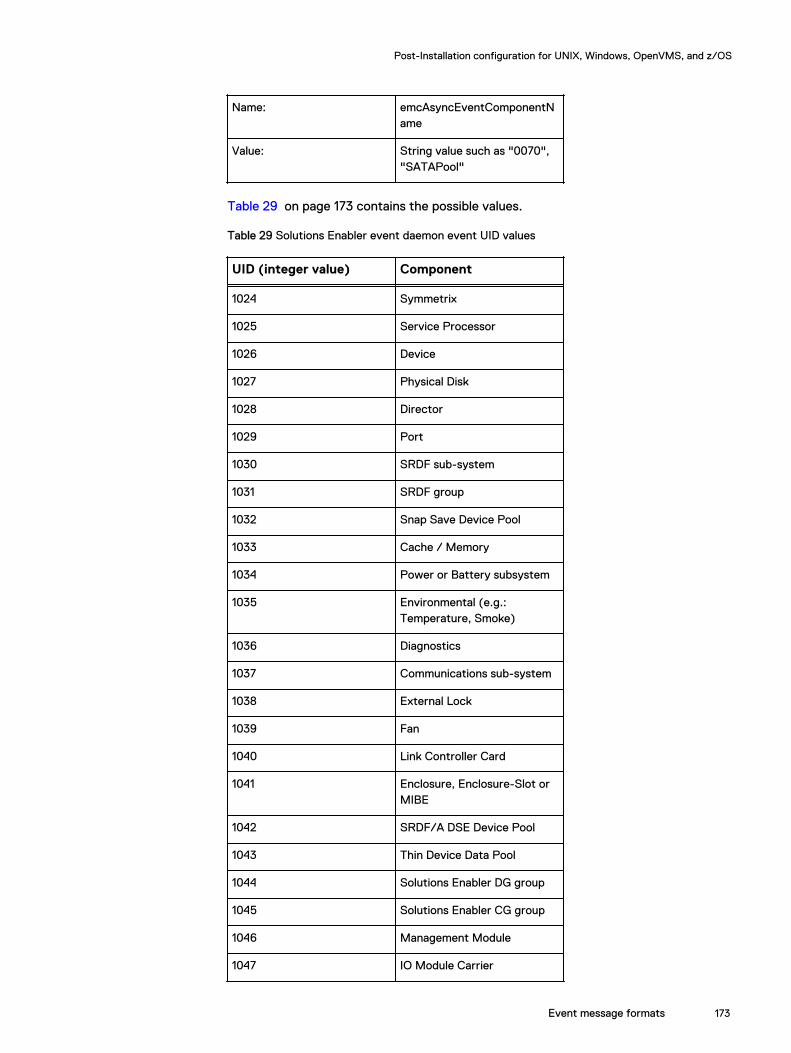
Name: emcAsyncEventComponentName
Value: String value such as "0070","SATAPool"
Table 29 on page 173 contains the possible values.
Table 29 Solutions Enabler event daemon event UID values
UID (integer value) Component
1024 Symmetrix
1025 Service Processor
1026 Device
1027 Physical Disk
1028 Director
1029 Port
1030 SRDF sub-system
1031 SRDF group
1032 Snap Save Device Pool
1033 Cache / Memory
1034 Power or Battery subsystem
1035 Environmental (e.g.:Temperature, Smoke)
1036 Diagnostics
1037 Communications sub-system
1038 External Lock
1039 Fan
1040 Link Controller Card
1041 Enclosure, Enclosure-Slot orMIBE
1042 SRDF/A DSE Device Pool
1043 Thin Device Data Pool
1044 Solutions Enabler DG group
1045 Solutions Enabler CG group
1046 Management Module
1047 IO Module Carrier
Post-Installation configuration for UNIX, Windows, OpenVMS, and z/OS
Event message formats 173

Table 29 Solutions Enabler event daemon event UID values (continued)
UID (integer value) Component
1048 Director - Environmental
1049 Storage Group
1050 Migration Session
1051 Symmetrix Disk Group
Event host
OID: 1.3.6.1.4.1.1139.3.8888.4.0
Value: Actually name of thecomponent effected, such asthe disk ID or device name.
Miscellaneous optionsThe daemon_options file contains parameters (Table 30 on page 174) that allowyou to configure a Syslog target.
Table 30 Event log file configuration options
Parameter = <OptValue |defaultvalue>
Description
storevntd:log_event_network_pad
1 -10 | 0 Specifies the rate at whichevents are transmitted to thesyslog or SNMP targets.Events are delivered to thetargets using the UDPnetwork protocol, for whichcertain recipient hosts (ornetwork intermediaries) willdrop messages if they arrivetoo quickly.
This option defines how longto wait (in milliseconds)between event transmissions.Use this option carefully, astoo large a value can result inan event delivery rate thatcannot keep pace with thegeneration rate, which canlead to queue overflows (andeven loss) within the eventdaemon. The default value of0 means that there is no delaybetween transmissions.
Post-Installation configuration for UNIX, Windows, OpenVMS, and z/OS
174 Solutions Enabler 8.3 Installation and Configuration Guide
Table 30 Event log file configuration options (continued)
Parameter = <OptValue |defaultvalue>
Description
storevntd:symm_poll_interval nnn | 60 (seconds) Specifies how often the eventdaemon checks (polls) forevents to transmit. Its valueindicates how often the basicevent polling loop runs, inseconds.
The event daemon does notcheck for every type of eventduring every polling cycle. Itchecks for some events every2 cycles, 3 cycles, 4 cycles,etc.
storevntd:symm_recovery_interval
nn | 30 (minutes) Specifies the period of timeuntil the recovery tablebecomes invalid.
For events beingautomatically logged to syslogor SNMP by the eventdaemon, the event daemonloads a recovery table when itstarts up in order to avoidinglosing track of events when itwas not running. This optiondefines how long the recoverytable is considered valid forthe event daemon to load onstartup.
Test modeTest mode is a convenient way for you to verify that the event daemon has beencorrectly configured. For example, if you wanted to see if you have configured theSNMP trap correctly, without the test mode, you would have to use stordaemonsetflt to inject various events. However, such testing can also stress the VMAXarray as event daemon will try to sync up the state from the array.
To test without stressing the array, test mode is provided in the event daemon. Whentest mode is enabled for the event daemon, it will not sync its state with the array.
This is accomplished by specifying a parameter in the daemon_options file:
storevntd:test_mode = ENABLE|DISABLE
The default value for this option is DISABLE. The option will not take effect onstordaemon reload command. The daemon needs to be restarted for any changeto this option to take effect.
Post-Installation configuration for UNIX, Windows, OpenVMS, and z/OS
Test mode 175
VSS Provider environment variablesUpdate the environment variable for path to include the Solutions Enabler installationdirectory, which by default is C:\Program Files\EMC\SYMCLI\bin, to run thecommand line utilities from any directory.
SMI-S Provider Windows authentication settingsTo enable Windows authentication, you must modify default settings in thesecurity_settings.xml file. On Windows platforms, this file resides in c:\program files\emc\ecim\ecom\conf.
To enable Windows authentication:
Procedure
1. If ECOM is running, stop it, as explained in Starting and stopping ECOM onpage 179.
2. Modify the following default settings in security_settings.xml:
<ECOMSetting Name="NonCIMRequest_AuthenticationEnabled "Type="boolean" Value="false"/>
<ECOMSetting Name="HTTPChallengeMechanism"Type="string" Value="Basic"/>
to:
<ECOMSetting Name="NonCIMRequest_AuthenticationEnabled "Type="boolean" Value="true"/>
<ECOMSetting Name="HTTPChallengeMechanism"Type="string" Value="Basic,WindowsAuth"/>
3. Restart ECOM.
VMAX arraysWhen using the SMI-S Provider to manage VMAX arrays, it is recommended that youconfigure six gatekeepers for each array accessed by the provider. Only set up thesegatekeepers for the host on which the SMI-S Provider is running. When started, theSMI-S Provider automatically discovers all arrays connected to the host on which theArray Provider is running. No other action is required, such as running the symcfgdiscover command.
When deploying the SMI-S Provider for VMAX arrays, ensure that only the arrays thatwill be managed by the provider are made visible to the SMI-S Provider.
As part of the Solutions Enabler discovery of VMAX arrays, those arrays that areSRDF connected to the local array being discovered will also be discovered.
If your client application only manages local arrays please symavoid these remotestorage systems by creating a file called symavoid in c:\program files\emc\symapi\config on Windows or /var/symapi/config on Linux. In the file placethe Symmetrix ID of the system to be avoided, one ID per line. The file should benamed just symavoid - ensure it doesn't have any extension such as
Post-Installation configuration for UNIX, Windows, OpenVMS, and z/OS
176 Solutions Enabler 8.3 Installation and Configuration Guide
symavoid.txt. Once the file is in place shut down ECOM and remove the filesymapi_db.bin from c:\program files\emc\symapi\db on Windowsor /var/symapi/db on Linux and the startup ECOM.
Doing this reduces unnecessary syscall traffic which would otherwise be consumingSRDF link resources.
ECC and Unisphere for VMAX 1.0 coexistence: symapi_db.bin databasesharing
When the SMI-S Provider is installed on the same host as the ECC Symmetrix agentand/or the Unisphere for VMAX 1.0, you may see the following memory allocationerrors in the syampi log file:
EMC:SMBASE __iload_db_osl pdsDbRecRead() failed : OSL:CONN_INFO ([PDS/DB] (Unable to allocate memory)
EMC:SMBASE emcSymDBLoad Error encountered while reading from DB file [C:\Program Files\EMC\SYMAPI\db\symapi_db.bin] (SYMAPI_C_MEMORY_ALLOC_ERROR)
The factors determining these memory allocation errors are governed by the amountof physical memory on the host as well as the number and size of the arrayconfigurations. Because it is difficult to predict how much memory is required for thistype of installation scenario, perform the following steps to prevent the above errorsfrom occurring:
1. Instruct SMI-S Provider to use its own symapi database by editing the c:\program files\emc\ecim\ecom\providers\oslsprovider.conf file.
2. Change the following line in oslsprovider.conf:
#OSLSProvider/com.emc.cmp.osls.se.array.StorApi.database.filename =
to:
OSLSProvider/com.emc.cmp.osls.se.array.StorApi.database.filename = c:/program files/emc/symapi/db/symapi_smi_db.bin
3. Stop ECOM, the ECC Symmetrix agents, Unisphere for VMAX 1.0, and theSolutions Enabler daemons.
4. Remove the existing symapi_db.bin file, and save all device group informationto be later restored to the new symapi database.
5. Restart ECOM, the ECC Symmetrix agents, Unisphere for VMAX 1.0, and theSolutions Enabler daemons.
ECOMThe ECOM post-installation tasks require that you set up an administrator role, supplycertificates to both the ECOM server and its client, and then start ECOM.
Setting up administrator authenticationAuthentication is required to query the EMC CIM Server. An initial setup is required onthe EMC CIM Server to create a CIM user. This can be done as follows:
Post-Installation configuration for UNIX, Windows, OpenVMS, and z/OS
ECC and Unisphere for VMAX 1.0 coexistence: symapi_db.bin database sharing 177

Procedure
1. Go to the URL https://<ipaddress>:5989/ecomconfig, and log in usingthe username admin and the password #1Password.
2. Click Add User and create a user with the role of Administrator. This newlycreated username can now be used to obtain access to the SMI-S Provider.
Note
For security reasons, change the default password of the user admin.
ECOM certificate managementIn order for SSL communications between two peers to be authenticated, one of thefollowing conditions must exist:
l If a peer presents a self-signed certificate, the host receiving the self-signedcertificate must have its trust store seeded with that certificate.
l If a peer presents a CA-signed certificate, the host receiving the CA-signedcertificate must have its trust store seeded with a chain of certificates startingfrom the issuer of the peer's certificate and ending with the root certificate.
Installing certificates in trust stores is performed at configuration time, not at runtime.The following sections describe how to supply certificates to both the ECOM serverand its client.
Supplying a client with the ECOM server certificateProcedure
1. Obtain the ECOM certificate (ecomtls.crt) from the directory <ECOM_Home\conf\ssl.
2. If ecomtls.crt does not exist, point your browser to the ECOM Admin pagehttps://<server>:<port>/ECOMConfig. The connection fails as the truststore Is not yet set up but the certificate is generated.
3. Add the ECOM certificate (ecomtls.crt) to the client's trust store. Thecertificate is in PEM format.
Supplying ECOM with the client certificate
To authenticate the client certificate, you must import the client certificate into theECOM trust store. To do this, you must append the certificate to the fileecomtls.ca found in the directory <ECOM_HOME>\conf\ssl.
Follow these steps:
Procedure
1. Obtain the client certificate from an SSL certificate provider.
Note
ECOM accepts certificates in PEM format only at this time.
2. Point your browser to the ECOM Administration Login page:
https://<ServerName>:5989/ECOMConfig
Post-Installation configuration for UNIX, Windows, OpenVMS, and z/OS
178 Solutions Enabler 8.3 Installation and Configuration Guide
3. Select the SSL Certificate Management submenu.
4. Select Import CA certificate file to import the certificate. You do this by cut/pasting the certificate to the end of the list of already existing certificates if anyexist.
5. Re-start ECOM.
Starting and stopping ECOMECOM runs on both Windows and UNIX environments. After installation completion,ECOM automatically starts. You can use the following commands to manually stop andrestart the service should the need arise.
ECOM failure to start
If ECOM does not start, review the problem resolutions in the following sections.
Security initialization failureRed Hat and SuSE Linux platforms may generate the following set of errors whenECOM does not start:
02-Nov-2010 15:09:52.091 -3086366416-W- ECOM: CST Lockbox Initialization Error:ERR_LIB_NOT_INIT
02-Nov-2010 15:09:52.091 -3086366416-C- ECOM: -E- Security manager initialization failed. Check whether the security plugin exists and is set up properly.
If you receive the above errors, complete the following steps:
1. Change directory to /opt/emc/ECIM/ECOM/thirdparty and issue thefollowing command:
[root@losaz134 thirdparty]# ./cstadmin initialize /opt/emc/ECIM/ECOM/conf/cst
2. A request for a lockbox passphrase displays. Enter a text string for thepassphrase:
Enter lockbox passphrase:Confirm passphrase:
Unsupported SELinux setting is enabled
The following error indicates an unsupported SELinux setting is enabled, which is thedefault for Red Hat, and must be disabled:
cstadmin: Failure initializing lockbox/opt/emc/ECIM/ECOM/conf/cst. [The cryptography library was not initialized.] [-48]Failed to retrieve Log Service: The cryptography library was not initialized. [/opt/emc/ECIM/ECOM/conf/cst/csp.clb]
Post-Installation configuration for UNIX, Windows, OpenVMS, and z/OS
Starting and stopping ECOM 179
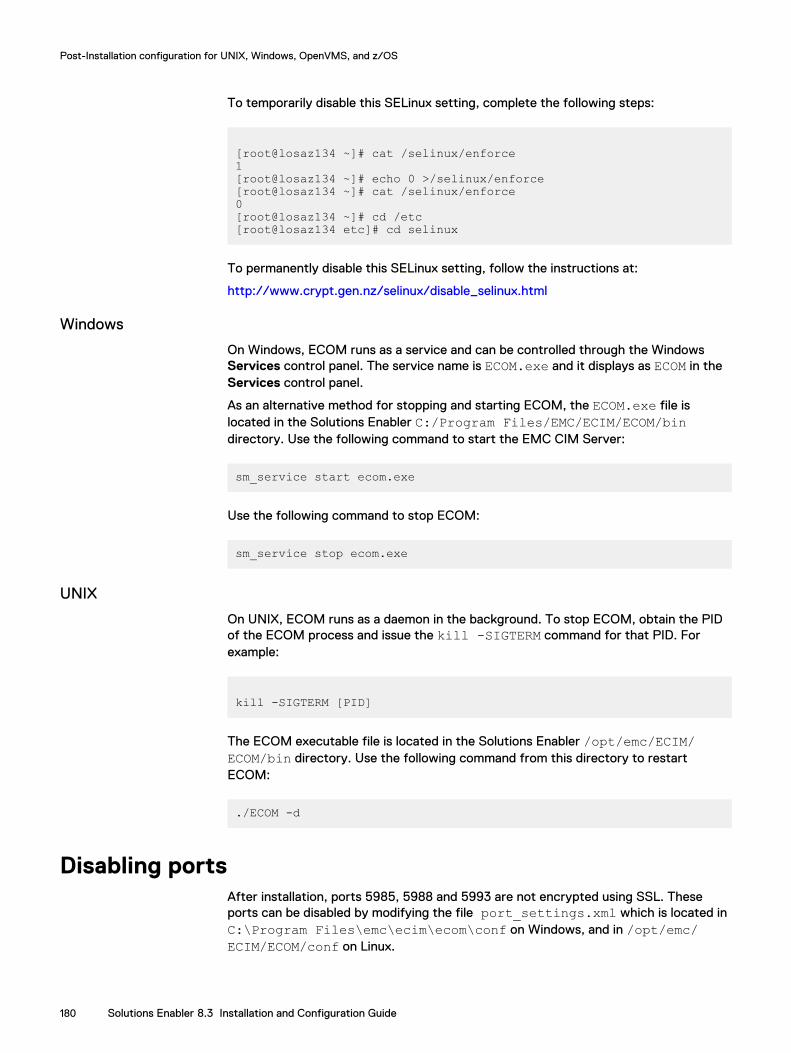
To temporarily disable this SELinux setting, complete the following steps:
[root@losaz134 ~]# cat /selinux/enforce1[root@losaz134 ~]# echo 0 >/selinux/enforce[root@losaz134 ~]# cat /selinux/enforce0[root@losaz134 ~]# cd /etc[root@losaz134 etc]# cd selinux
To permanently disable this SELinux setting, follow the instructions at:
http://www.crypt.gen.nz/selinux/disable_selinux.html
Windows
On Windows, ECOM runs as a service and can be controlled through the WindowsServices control panel. The service name is ECOM.exe and it displays as ECOM in theServices control panel.
As an alternative method for stopping and starting ECOM, the ECOM.exe file islocated in the Solutions Enabler C:/Program Files/EMC/ECIM/ECOM/bindirectory. Use the following command to start the EMC CIM Server:
sm_service start ecom.exe
Use the following command to stop ECOM:
sm_service stop ecom.exe
UNIX
On UNIX, ECOM runs as a daemon in the background. To stop ECOM, obtain the PIDof the ECOM process and issue the kill -SIGTERM command for that PID. Forexample:
kill -SIGTERM [PID]
The ECOM executable file is located in the Solutions Enabler /opt/emc/ECIM/ECOM/bin directory. Use the following command from this directory to restartECOM:
./ECOM -d
Disabling portsAfter installation, ports 5985, 5988 and 5993 are not encrypted using SSL. Theseports can be disabled by modifying the file port_settings.xml which is located inC:\Program Files\emc\ecim\ecom\conf on Windows, and in /opt/emc/ECIM/ECOM/conf on Linux.
Post-Installation configuration for UNIX, Windows, OpenVMS, and z/OS
180 Solutions Enabler 8.3 Installation and Configuration Guide
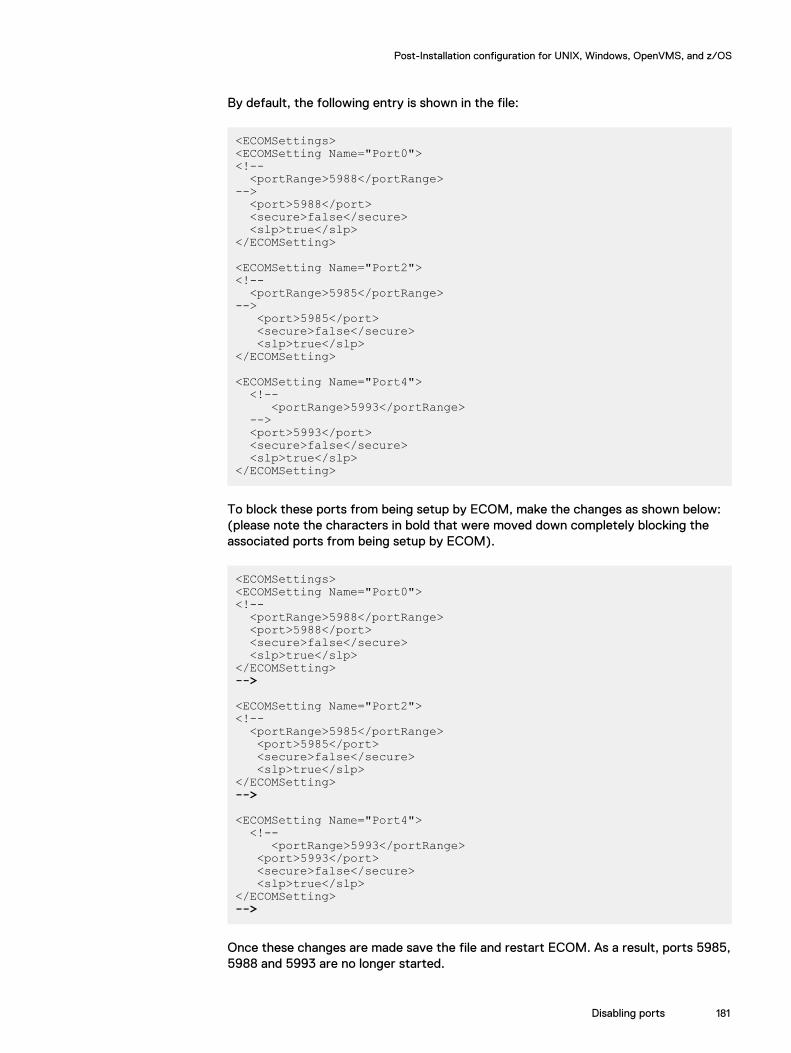
By default, the following entry is shown in the file:
<ECOMSettings><ECOMSetting Name="Port0"><!-- <portRange>5988</portRange>--> <port>5988</port> <secure>false</secure> <slp>true</slp></ECOMSetting>
<ECOMSetting Name="Port2"><!-- <portRange>5985</portRange>--> <port>5985</port> <secure>false</secure> <slp>true</slp></ECOMSetting>
<ECOMSetting Name="Port4"> <!-- <portRange>5993</portRange> --> <port>5993</port> <secure>false</secure> <slp>true</slp></ECOMSetting>
To block these ports from being setup by ECOM, make the changes as shown below:(please note the characters in bold that were moved down completely blocking theassociated ports from being setup by ECOM).
<ECOMSettings><ECOMSetting Name="Port0"><!-- <portRange>5988</portRange> <port>5988</port> <secure>false</secure> <slp>true</slp></ECOMSetting>-->
<ECOMSetting Name="Port2"><!-- <portRange>5985</portRange> <port>5985</port> <secure>false</secure> <slp>true</slp></ECOMSetting>-->
<ECOMSetting Name="Port4"> <!-- <portRange>5993</portRange> <port>5993</port> <secure>false</secure> <slp>true</slp></ECOMSetting>-->
Once these changes are made save the file and restart ECOM. As a result, ports 5985,5988 and 5993 are no longer started.
Post-Installation configuration for UNIX, Windows, OpenVMS, and z/OS
Disabling ports 181
SMI-S Provider runtime settingsThe OSLSProvider.conf file allows you to control the runtime behavior of the SMI-S Provider. You can find this file in the following directories of the Solutions Enabler:
l Windows platforms: C:/Program Files/EMC/ECIM/ECOM/Providersl UNIX platforms: /opt/emc/ECIM/ECOM/providersTable 31 on page 182 describes the SMI-S Provider runtime settings. In order forthese runtime settings to take effect, you must stop and then restart ECOM.
Table 31 SMI-S Provider runtime settings
SMI-S Providerpropertiesa
= <OptVal|DefaultVal>
Description
OSLSProvider/com.emc.cmp.osls.se.symm.SymApiService.database.discover
true | false Specifies whether toperform a one-timediscover upon startinga CIM Server. This isdone beforeprocessing the firstrequest received bythe CIM Server.
*/com.emc.cmp.ofl.log.Control.severity.id
FATAL, ERROR,WARNING, NOTICE,INFO
Specifies the severitylevels for the eventlogs:
FATAL — Eventsleading to shutdownof the system
ERROR — Internal orclient error conditions
WARNING —Potential errors
NOTICE — Veryimportant information(default if notpresent)
INFO —Informational, non-error messages
Each setting causesmessages of the setseverity and moresevere to beappended to the log.
#OSLSProvider/com.emc.cmp.osls.se.symm.Session.All.controls.enable
false | true If false, disables allcontrols. A falsesetting takesprecedence over all
Post-Installation configuration for UNIX, Windows, OpenVMS, and z/OS
182 Solutions Enabler 8.3 Installation and Configuration Guide
Table 31 SMI-S Provider runtime settings (continued)
SMI-S Providerpropertiesa
= <OptVal|DefaultVal>
Description
control settingspreviously explainedin this table.
a. The path shown is a UNIX-specific default installation path. Your actual install path maydiffer.
RedHat Enterprise Linux 6.0/6.2 [GA] - x86_64 installationSolutions Enabler V8.3 installation requires i686 version of glibc (GNU C Library)and libgcc (Library of GCC support routines) packages pre-installed.
Example 2 RHEL 6.0
If your RHEL 6.0 (x86_64) host does not have glibc and libgcc, use the followingcommands to install glibc and libgcc:
# cd media/<RHEL_6.0 x86_64 Disc mount point>/Packages# rpm -ivh glibc-2.12-1.7.el6.i686.rpm glibc-devel-2.12-1.7.el6.i686.rpmnss-softokn-freebl-3.12.7-1.1.el6.i686.rpm libgcc-4.4.4-13.el6.i686.rpmPreparing... ########################################### [100%]1:libgcc ########################################### [ 25%]2:nss-softokn-freebl ########################################### [ 50%]3:glibc ########################################### [ 75%]4:glibc-devel ########################################### [100%]
After the installation, query the rpm as shown below:
# rpm -qa | grep i686 | grep libglibc-devel-2.12-1.7.el6.i686libgcc-4.4.4-13.el6.i686glibc-2.12-1.7.el6.i686# rpm -qa | grep i686 | grep nssnss-softokn-freebl-3.12.7-1.1.el6.i686
Example 3 RHEL 6.2
If your RHEL 6.2 (x86_64) host does not have glibc and libgcc, use the followingcommands to install glibc and libgcc:
# cd media/<RHEL_6.2 x86_64 Disc mount point>/Packages# rpm -ivh glibc-2.12-1.47.el6.i686.rpm nss-softokn-freebl-3.12.9-11.el6.i686.rpmPreparing... ########################################### [100%]1:nss-softokn-freebl ########################################### [ 50%]
Post-Installation configuration for UNIX, Windows, OpenVMS, and z/OS
RedHat Enterprise Linux 6.0/6.2 [GA] - x86_64 installation 183
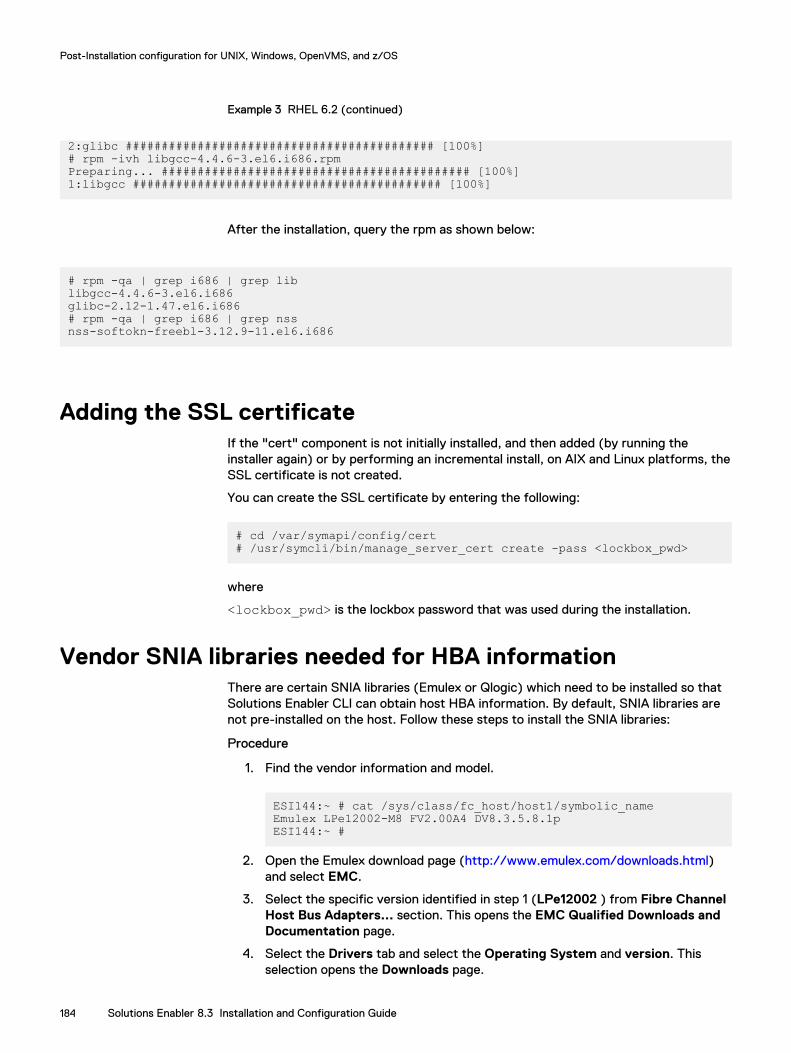
Example 3 RHEL 6.2 (continued)
2:glibc ########################################### [100%]# rpm -ivh libgcc-4.4.6-3.el6.i686.rpmPreparing... ########################################### [100%]1:libgcc ########################################### [100%]
After the installation, query the rpm as shown below:
# rpm -qa | grep i686 | grep liblibgcc-4.4.6-3.el6.i686glibc-2.12-1.47.el6.i686# rpm -qa | grep i686 | grep nssnss-softokn-freebl-3.12.9-11.el6.i686
Adding the SSL certificateIf the "cert" component is not initially installed, and then added (by running theinstaller again) or by performing an incremental install, on AIX and Linux platforms, theSSL certificate is not created.
You can create the SSL certificate by entering the following:
# cd /var/symapi/config/cert# /usr/symcli/bin/manage_server_cert create -pass <lockbox_pwd>
where
<lockbox_pwd> is the lockbox password that was used during the installation.
Vendor SNIA libraries needed for HBA informationThere are certain SNIA libraries (Emulex or Qlogic) which need to be installed so thatSolutions Enabler CLI can obtain host HBA information. By default, SNIA libraries arenot pre-installed on the host. Follow these steps to install the SNIA libraries:
Procedure
1. Find the vendor information and model.
ESI144:~ # cat /sys/class/fc_host/host1/symbolic_nameEmulex LPe12002-M8 FV2.00A4 DV8.3.5.8.1pESI144:~ #
2. Open the Emulex download page (http://www.emulex.com/downloads.html)and select EMC.
3. Select the specific version identified in step 1 (LPe12002 ) from Fibre ChannelHost Bus Adapters... section. This opens the EMC Qualified Downloads andDocumentation page.
4. Select the Drivers tab and select the Operating System and version. Thisselection opens the Downloads page.
Post-Installation configuration for UNIX, Windows, OpenVMS, and z/OS
184 Solutions Enabler 8.3 Installation and Configuration Guide
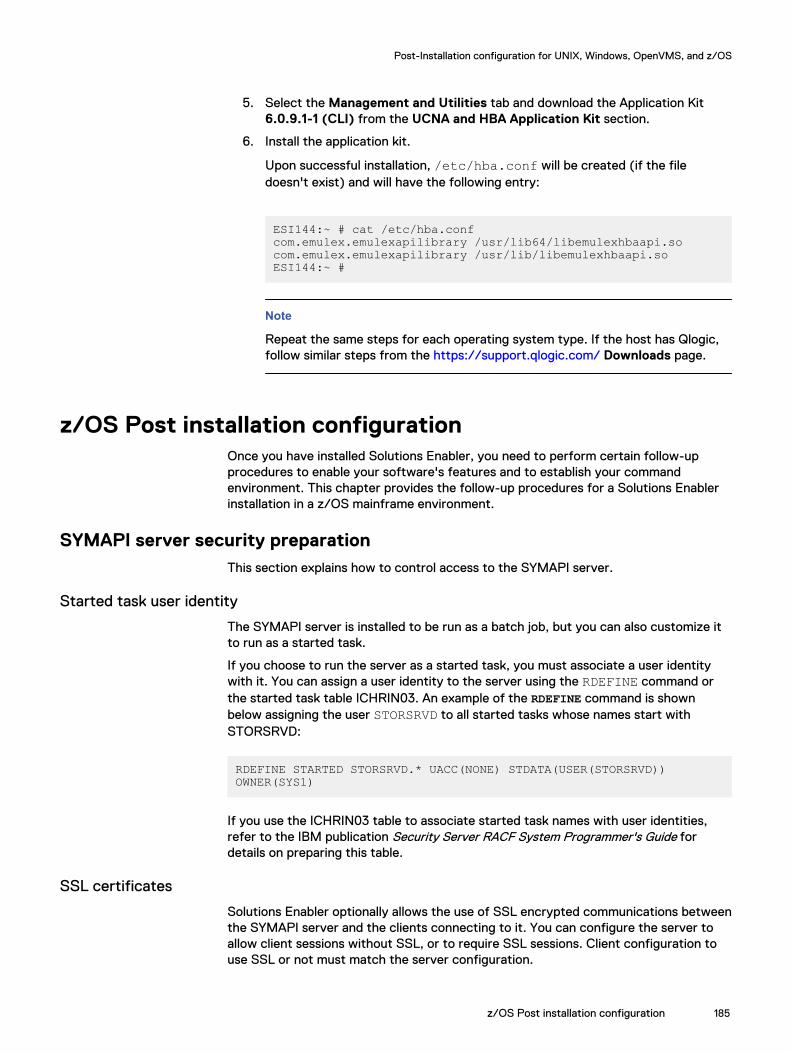
5. Select the Management and Utilities tab and download the Application Kit6.0.9.1-1 (CLI) from the UCNA and HBA Application Kit section.
6. Install the application kit.
Upon successful installation, /etc/hba.conf will be created (if the filedoesn't exist) and will have the following entry:
ESI144:~ # cat /etc/hba.confcom.emulex.emulexapilibrary /usr/lib64/libemulexhbaapi.socom.emulex.emulexapilibrary /usr/lib/libemulexhbaapi.soESI144:~ #
Note
Repeat the same steps for each operating system type. If the host has Qlogic,follow similar steps from the https://support.qlogic.com/ Downloads page.
z/OS Post installation configurationOnce you have installed Solutions Enabler, you need to perform certain follow-upprocedures to enable your software's features and to establish your commandenvironment. This chapter provides the follow-up procedures for a Solutions Enablerinstallation in a z/OS mainframe environment.
SYMAPI server security preparationThis section explains how to control access to the SYMAPI server.
Started task user identity
The SYMAPI server is installed to be run as a batch job, but you can also customize itto run as a started task.
If you choose to run the server as a started task, you must associate a user identitywith it. You can assign a user identity to the server using the RDEFINE command orthe started task table ICHRIN03. An example of the RDEFINE command is shownbelow assigning the user STORSRVD to all started tasks whose names start withSTORSRVD:
RDEFINE STARTED STORSRVD.* UACC(NONE) STDATA(USER(STORSRVD)) OWNER(SYS1)
If you use the ICHRIN03 table to associate started task names with user identities,refer to the IBM publication Security Server RACF System Programmer's Guide fordetails on preparing this table.
SSL certificates
Solutions Enabler optionally allows the use of SSL encrypted communications betweenthe SYMAPI server and the clients connecting to it. You can configure the server toallow client sessions without SSL, or to require SSL sessions. Client configuration touse SSL or not must match the server configuration.
Post-Installation configuration for UNIX, Windows, OpenVMS, and z/OS
z/OS Post installation configuration 185
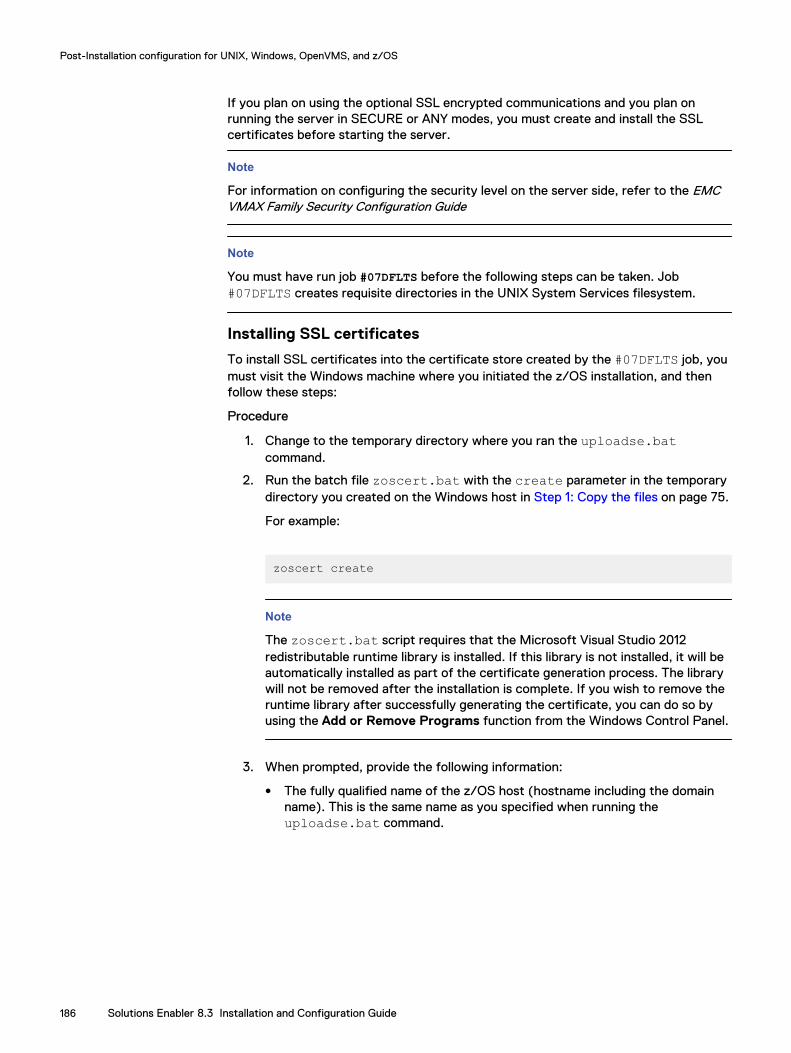
If you plan on using the optional SSL encrypted communications and you plan onrunning the server in SECURE or ANY modes, you must create and install the SSLcertificates before starting the server.
Note
For information on configuring the security level on the server side, refer to the EMCVMAX Family Security Configuration Guide
Note
You must have run job #07DFLTS before the following steps can be taken. Job#07DFLTS creates requisite directories in the UNIX System Services filesystem.
Installing SSL certificates
To install SSL certificates into the certificate store created by the #07DFLTS job, youmust visit the Windows machine where you initiated the z/OS installation, and thenfollow these steps:
Procedure
1. Change to the temporary directory where you ran the uploadse.batcommand.
2. Run the batch file zoscert.bat with the create parameter in the temporarydirectory you created on the Windows host in Step 1: Copy the files on page 75.
For example:
zoscert create
Note
The zoscert.bat script requires that the Microsoft Visual Studio 2012redistributable runtime library is installed. If this library is not installed, it will beautomatically installed as part of the certificate generation process. The librarywill not be removed after the installation is complete. If you wish to remove theruntime library after successfully generating the certificate, you can do so byusing the Add or Remove Programs function from the Windows Control Panel.
3. When prompted, provide the following information:
l The fully qualified name of the z/OS host (hostname including the domainname). This is the same name as you specified when running theuploadse.bat command.
Post-Installation configuration for UNIX, Windows, OpenVMS, and z/OS
186 Solutions Enabler 8.3 Installation and Configuration Guide
Note
In the case of multi-homed hosts, more than one fully qualified hostnamemay be specified, separated by spaces, in response to the prompt for thehostnames. If you enter more than one hostname at the host prompt, thefirst name will be used as the Common Name in the certificates, and allnames after the first are used in the Subject Alternative Names. You mayspecify IP addresses in addition to host names for either the Common Nameor Subject Alternative Names. The first name entered is also the targetaddress of the FTP command used to send certificates to the mainframe.
l The FTP port number (default 21) of the z/OS host.
l The z/OS userid for sign in to the FTP service on the mainframe. The usermust have write permission to the SYMAPI base directory and allsubdirectories.
l The SYMAPI base directory (specified when running the SEMJCL exec on z/OS).
l The password for the z/OS userid.
Once generated, the certificates will be uploaded to the correct location insidethe Unix System Services file system on the z/OS host. For example, if youspecified the SYMAPI base directory as /var/symapi, the certificates will beuploaded to the directory /var/symapi/config/cert.
The certificate configuration is now complete and the server is capable ofrunning in a secure mode.
Note
For more information on certificate management, refer to the EMC VMAX FamilySecurity Configuration Guide.
Configuring Solutions EnablerThis section explains how to configure Solutions Enabler in a z/OS environment.
SYMAPI database support
Solutions Enabler for z/OS supports the SYMAPI database and all the associatedaccess modes. Solutions Enabler will refer to the database (or create one if it doesn'texist) in the symapi_installation_directory/db directory in Unix SystemServices.
A SYMAPI application can specify the database by providing a name associated withthe database using the following formats:
/path/to/db.file
where:
/path/to is a valid, existing, writable Unix System Services path and db.file is thename of the SYMAPI database.
Solutions Enabler uses the following conventions to identify the database that it willassociate with a particular session. The SYMAPI application specifies the databasename in the SymInit( ) function call:
Post-Installation configuration for UNIX, Windows, OpenVMS, and z/OS
Configuring Solutions Enabler 187
l As the database default name (by specifying NULL in the database argument)
l With an explicit database name
Note
If an explicit location is specified for the database, SYMAPI will use it; otherwise,specifying just a filename will result in the file being stored in thesymapi_installation_directory/db directory.
Server default database locking
The default database is described in the fully qualified Unix System Services path ofthe database. When a session requests the default database, SYMAPI attempts to usethe fully qualified Unix System Services path, handling locking for read-only and read/write sessions appropriately. If the session obtains database locks successfully,SYMAPI loads the database for the session in the mode (read-only, or read/write)desired.
Multiple users can share a database file in a read-only and read/write mode. Writeintegrity to the database is guaranteed by internal locking mechanisms. No twosessions can request read/write mode concurrently.
Once a read/write session has been started, the SYMAPI server will prevent multipleread/write sessions by failing to initialize subsequent SymInit() requests, or byblocking them until the first read/write session releases the database.
Note that the locking behavior applies to the fully qualified path.
Gatekeeper devices
The use of gatekeeper-defined devices in a VMAX array configuration does not applyto z/OS installations. However, z/OS servers do communicate to the system using aUCB on the first device found in the storage array. The SYMAPI protocol selects thefirst on-line device as its gatekeeper. It is possible that this auto-select mechanismmay not always be appropriate. For example, you may not want to have the systempaging device or a JES SPOOL volume selected as the communication portal. The highI/O rate produced from the SYMAPI may adversely affect system performance. Tocontrol gatekeeper use by the SYMAPI server tasks, you can define specific devices tobe used as gatekeepers, and also specify devices to be avoided as gatekeepers.
Note
For more information on gatekeepers, refer to Gatekeeper Device Configuration onpage 249. For more information on specifying devices to use/avoid from using asgatekeepers, refer to Avoidance and selection files on page 190.
SYMAPI files
Table 32 on page 189 lists and maps the SYMAPI files to corresponding DDstatements. It also shows which files can be defined in PARMLIB members or indatasets, and which files can optionally be defined in Unix System Services files.
Note
For Unix System Services supported files, SYMAPI will only use a Unix SystemServices location if the corresponding DD name is not specified in the SYMAPI serverJCL (comment it out or delete it).
Post-Installation configuration for UNIX, Windows, OpenVMS, and z/OS
188 Solutions Enabler 8.3 Installation and Configuration Guide
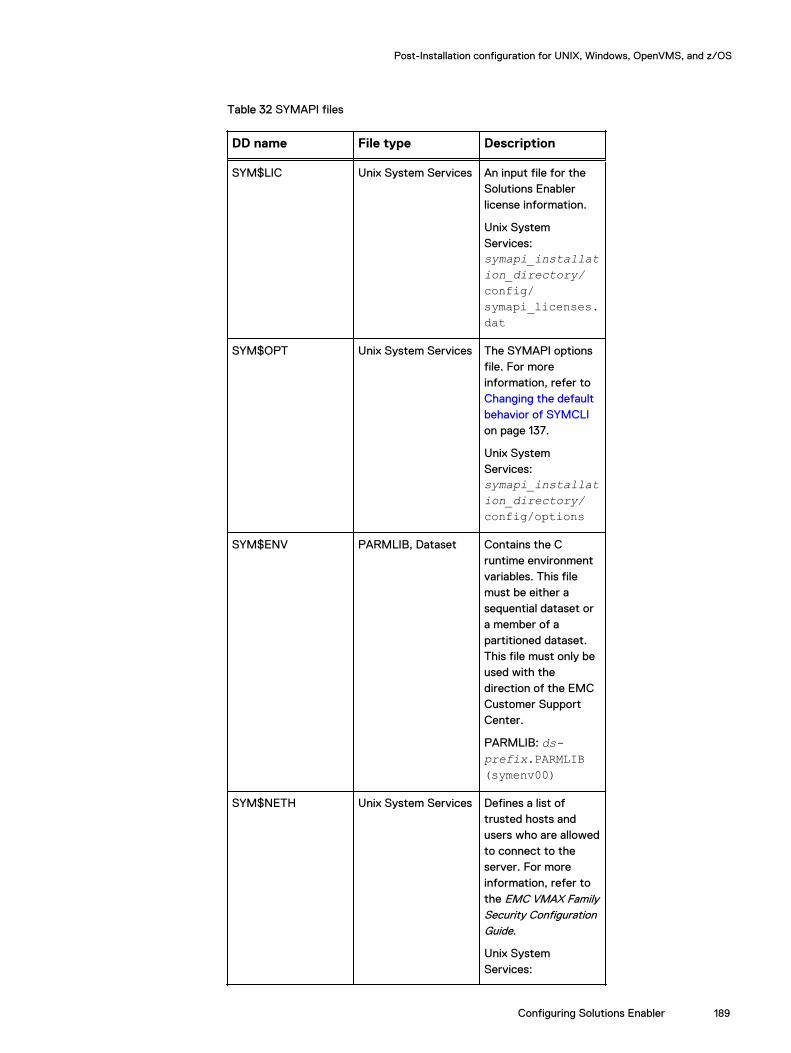
Table 32 SYMAPI files
DD name File type Description
SYM$LIC Unix System Services An input file for theSolutions Enablerlicense information.
Unix SystemServices:symapi_installation_directory/config/symapi_licenses.dat
SYM$OPT Unix System Services The SYMAPI optionsfile. For moreinformation, refer to Changing the defaultbehavior of SYMCLIon page 137.
Unix SystemServices:symapi_installation_directory/config/options
SYM$ENV PARMLIB, Dataset Contains the Cruntime environmentvariables. This filemust be either asequential dataset ora member of apartitioned dataset.This file must only beused with thedirection of the EMCCustomer SupportCenter.
PARMLIB: ds-prefix.PARMLIB(symenv00)
SYM$NETH Unix System Services Defines a list oftrusted hosts andusers who are allowedto connect to theserver. For moreinformation, refer tothe EMC VMAX FamilySecurity ConfigurationGuide.
Unix SystemServices:
Post-Installation configuration for UNIX, Windows, OpenVMS, and z/OS
Configuring Solutions Enabler 189
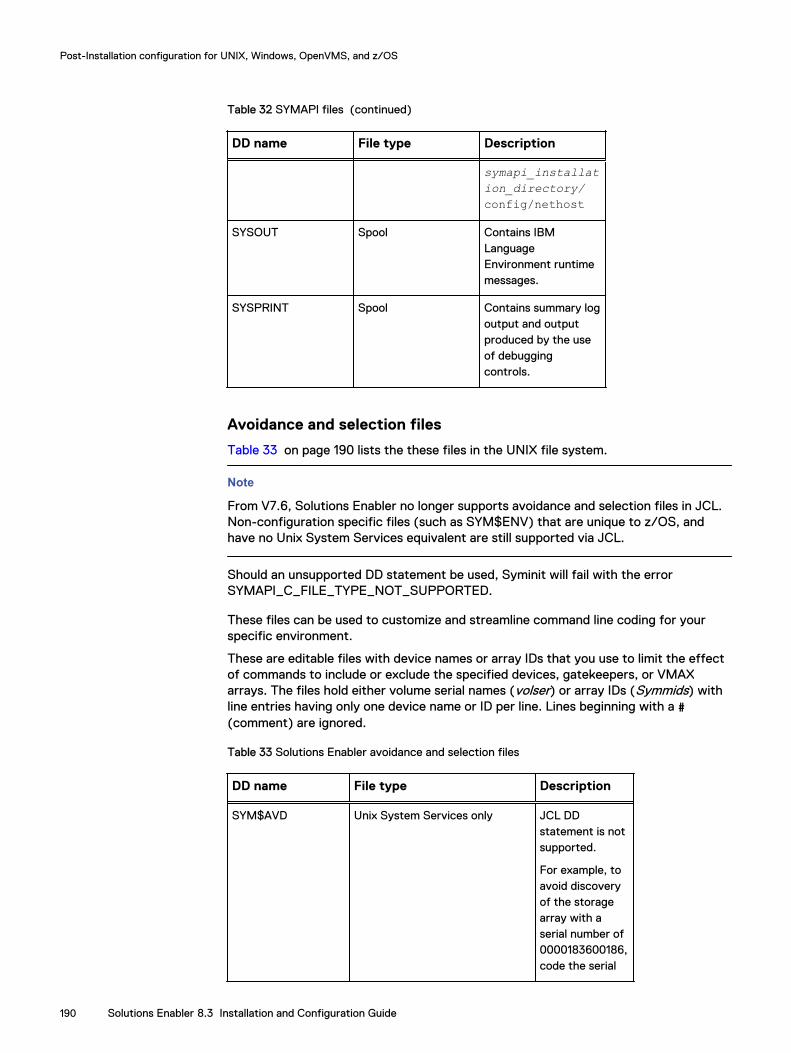
Table 32 SYMAPI files (continued)
DD name File type Description
symapi_installation_directory/config/nethost
SYSOUT Spool Contains IBMLanguageEnvironment runtimemessages.
SYSPRINT Spool Contains summary logoutput and outputproduced by the useof debuggingcontrols.
Avoidance and selection files
Table 33 on page 190 lists the these files in the UNIX file system.
Note
From V7.6, Solutions Enabler no longer supports avoidance and selection files in JCL.Non-configuration specific files (such as SYM$ENV) that are unique to z/OS, andhave no Unix System Services equivalent are still supported via JCL.
Should an unsupported DD statement be used, Syminit will fail with the errorSYMAPI_C_FILE_TYPE_NOT_SUPPORTED.
These files can be used to customize and streamline command line coding for yourspecific environment.
These are editable files with device names or array IDs that you use to limit the effectof commands to include or exclude the specified devices, gatekeepers, or VMAXarrays. The files hold either volume serial names (volser) or array IDs (Symmids) withline entries having only one device name or ID per line. Lines beginning with a #(comment) are ignored.
Table 33 Solutions Enabler avoidance and selection files
DD name File type Description
SYM$AVD Unix System Services only JCL DDstatement is notsupported.
For example, toavoid discoveryof the storagearray with aserial number of0000183600186,code the serial
Post-Installation configuration for UNIX, Windows, OpenVMS, and z/OS
190 Solutions Enabler 8.3 Installation and Configuration Guide
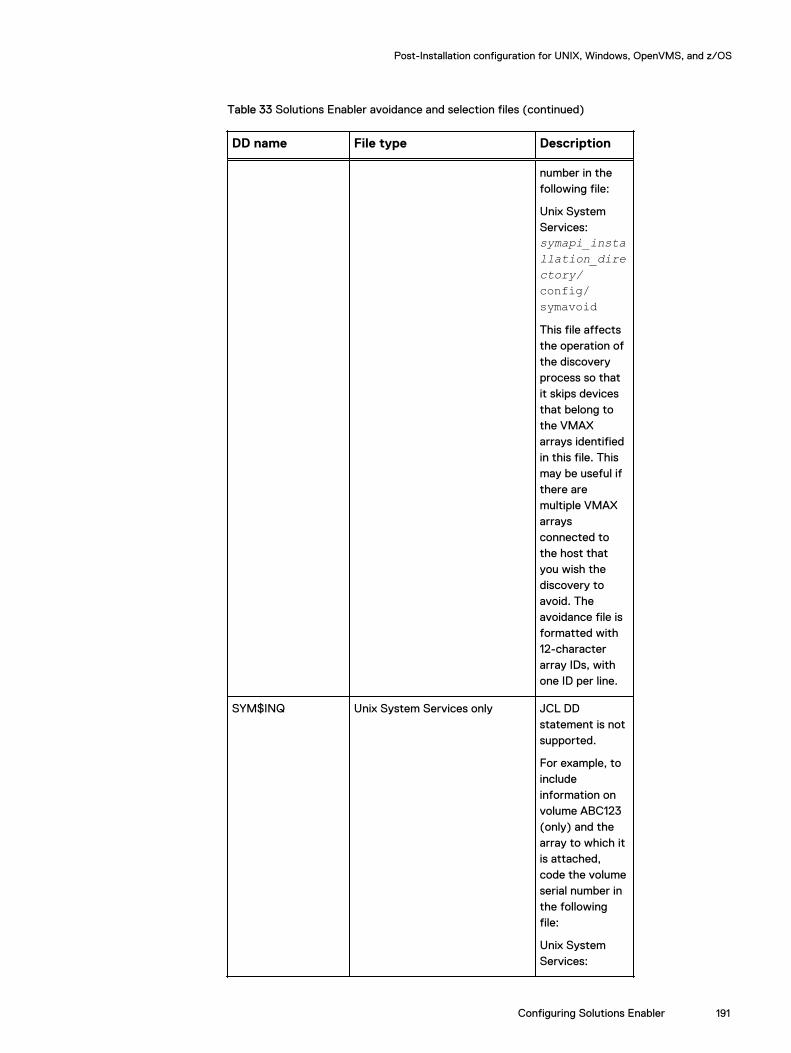
Table 33 Solutions Enabler avoidance and selection files (continued)
DD name File type Description
number in thefollowing file:
Unix SystemServices:symapi_installation_directory/config/symavoidThis file affectsthe operation ofthe discoveryprocess so thatit skips devicesthat belong tothe VMAXarrays identifiedin this file. Thismay be useful ifthere aremultiple VMAXarraysconnected tothe host thatyou wish thediscovery toavoid. Theavoidance file isformatted with12-characterarray IDs, withone ID per line.
SYM$INQ Unix System Services only JCL DDstatement is notsupported.
For example, toincludeinformation onvolume ABC123(only) and thearray to which itis attached,code the volumeserial number inthe followingfile:
Unix SystemServices:
Post-Installation configuration for UNIX, Windows, OpenVMS, and z/OS
Configuring Solutions Enabler 191
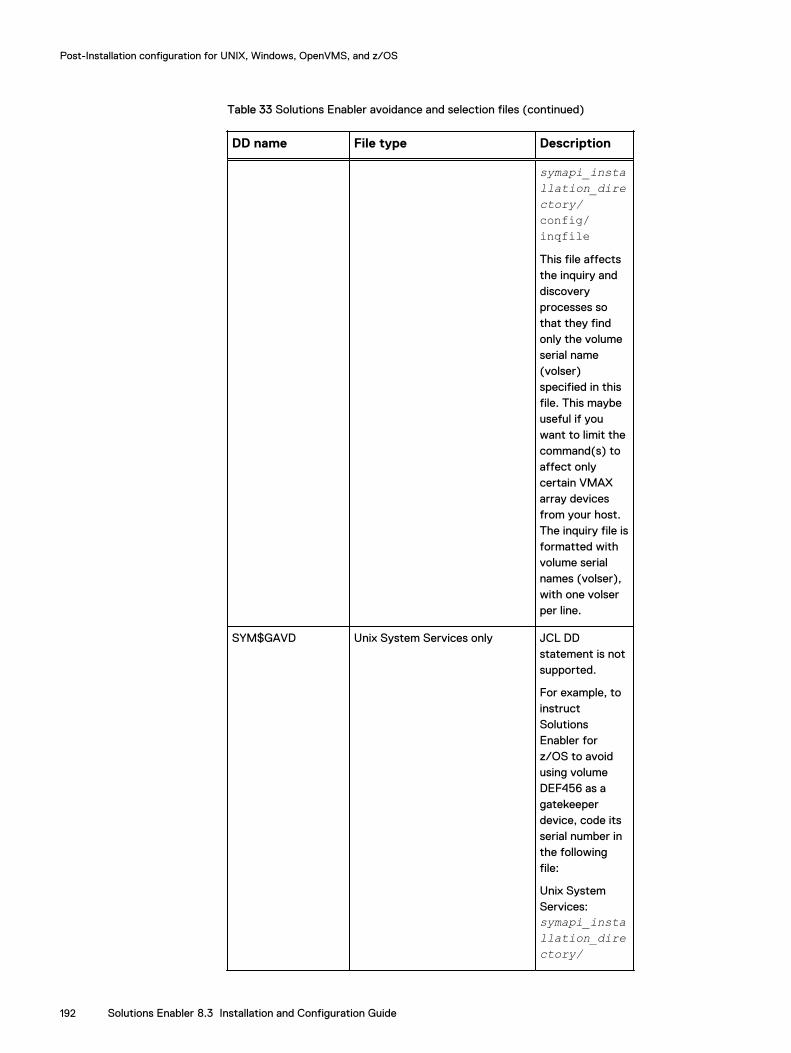
Table 33 Solutions Enabler avoidance and selection files (continued)
DD name File type Description
symapi_installation_directory/config/inqfileThis file affectsthe inquiry anddiscoveryprocesses sothat they findonly the volumeserial name(volser)specified in thisfile. This maybeuseful if youwant to limit thecommand(s) toaffect onlycertain VMAXarray devicesfrom your host.The inquiry file isformatted withvolume serialnames (volser),with one volserper line.
SYM$GAVD Unix System Services only JCL DDstatement is notsupported.
For example, toinstructSolutionsEnabler forz/OS to avoidusing volumeDEF456 as agatekeeperdevice, code itsserial number inthe followingfile:
Unix SystemServices:symapi_installation_directory/
Post-Installation configuration for UNIX, Windows, OpenVMS, and z/OS
192 Solutions Enabler 8.3 Installation and Configuration Guide
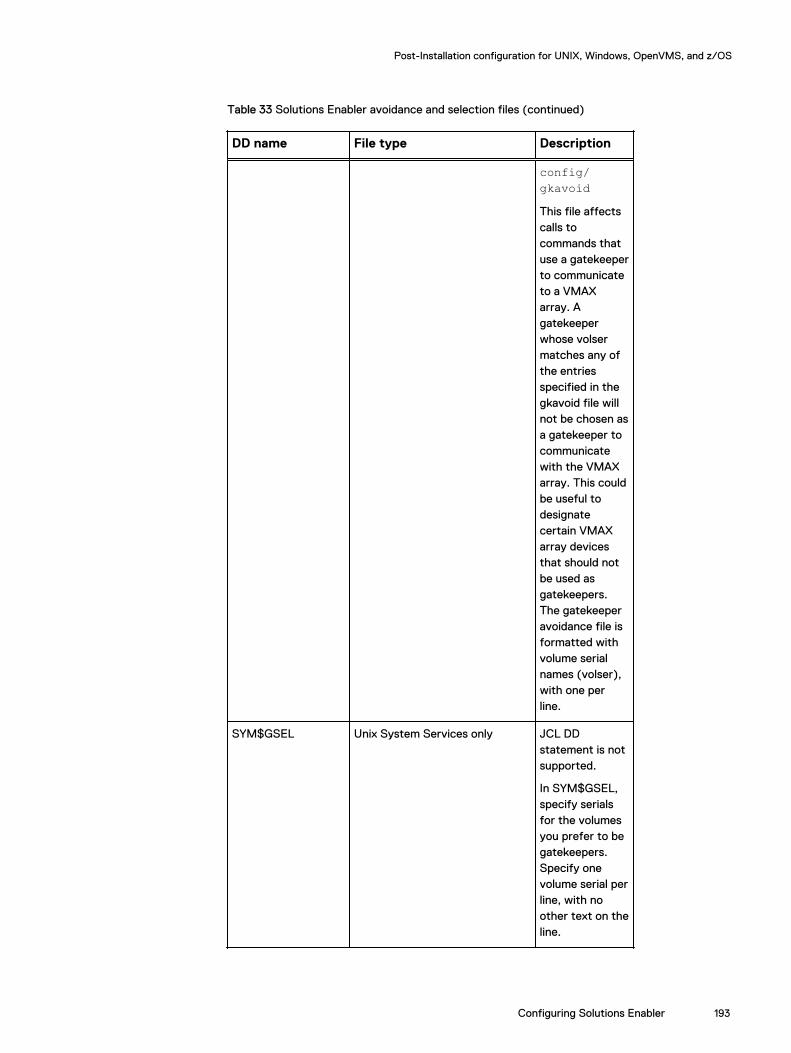
Table 33 Solutions Enabler avoidance and selection files (continued)
DD name File type Description
config/gkavoidThis file affectscalls tocommands thatuse a gatekeeperto communicateto a VMAXarray. Agatekeeperwhose volsermatches any ofthe entriesspecified in thegkavoid file willnot be chosen asa gatekeeper tocommunicatewith the VMAXarray. This couldbe useful todesignatecertain VMAXarray devicesthat should notbe used asgatekeepers.The gatekeeperavoidance file isformatted withvolume serialnames (volser),with one perline.
SYM$GSEL Unix System Services only JCL DDstatement is notsupported.
In SYM$GSEL,specify serialsfor the volumesyou prefer to begatekeepers.Specify onevolume serial perline, with noother text on theline.
Post-Installation configuration for UNIX, Windows, OpenVMS, and z/OS
Configuring Solutions Enabler 193
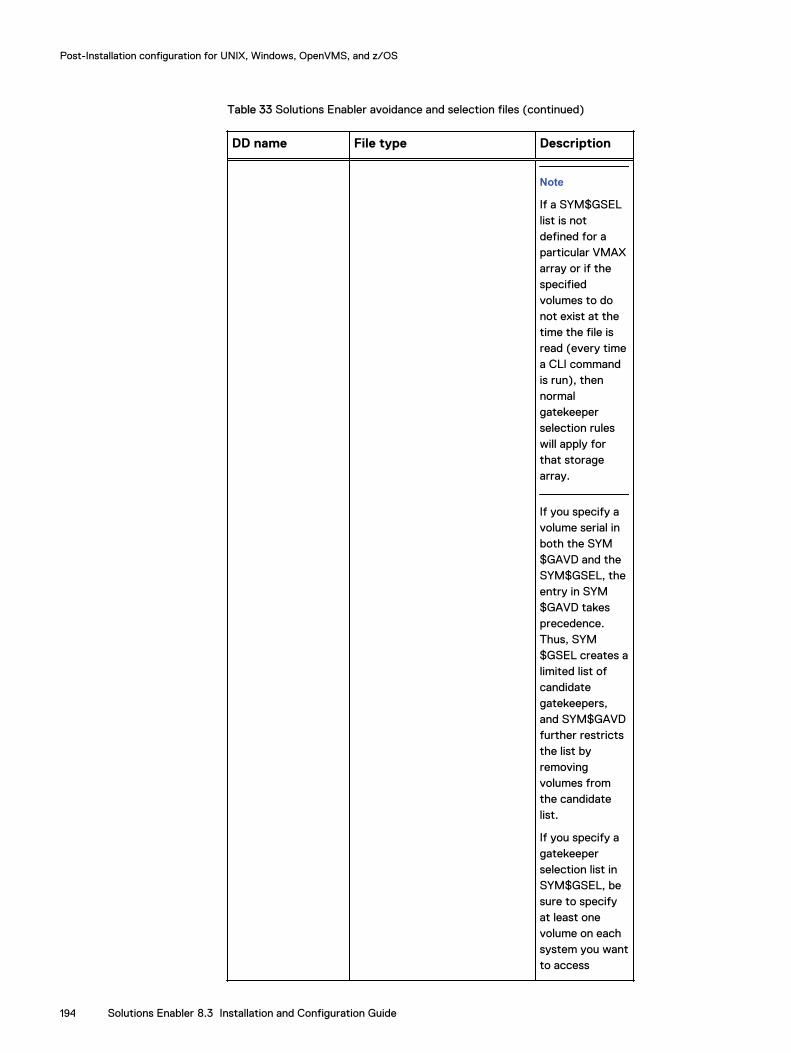
Table 33 Solutions Enabler avoidance and selection files (continued)
DD name File type Description
Note
If a SYM$GSELlist is notdefined for aparticular VMAXarray or if thespecifiedvolumes to donot exist at thetime the file isread (every timea CLI commandis run), thennormalgatekeeperselection ruleswill apply forthat storagearray.
If you specify avolume serial inboth the SYM$GAVD and theSYM$GSEL, theentry in SYM$GAVD takesprecedence.Thus, SYM$GSEL creates alimited list ofcandidategatekeepers,and SYM$GAVDfurther restrictsthe list byremovingvolumes fromthe candidatelist.
If you specify agatekeeperselection list inSYM$GSEL, besure to specifyat least onevolume on eachsystem you wantto access
Post-Installation configuration for UNIX, Windows, OpenVMS, and z/OS
194 Solutions Enabler 8.3 Installation and Configuration Guide
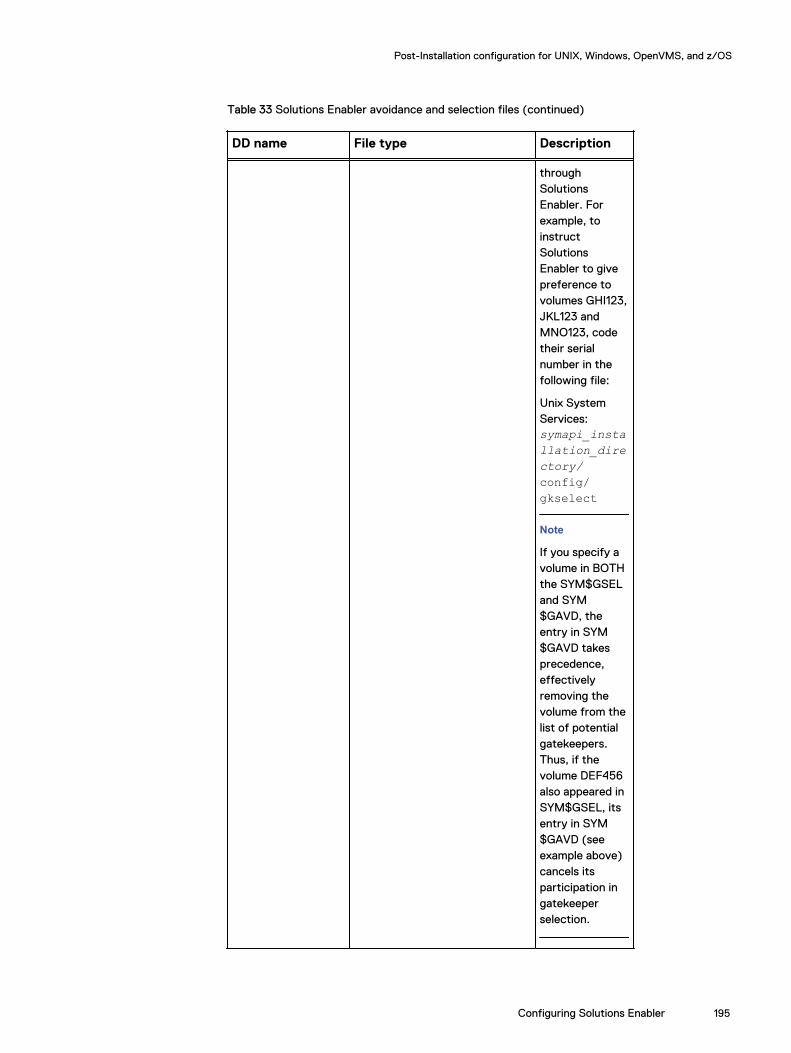
Table 33 Solutions Enabler avoidance and selection files (continued)
DD name File type Description
throughSolutionsEnabler. Forexample, toinstructSolutionsEnabler to givepreference tovolumes GHI123,JKL123 andMNO123, codetheir serialnumber in thefollowing file:
Unix SystemServices:symapi_installation_directory/config/gkselect
Note
If you specify avolume in BOTHthe SYM$GSELand SYM$GAVD, theentry in SYM$GAVD takesprecedence,effectivelyremoving thevolume from thelist of potentialgatekeepers.Thus, if thevolume DEF456also appeared inSYM$GSEL, itsentry in SYM$GAVD (seeexample above)cancels itsparticipation ingatekeeperselection.
Post-Installation configuration for UNIX, Windows, OpenVMS, and z/OS
Configuring Solutions Enabler 195
Configuring for local time zone
The SYMAPI server software uses IBM Language Environment runtime library, andmust execute with the LE option POSIX(ON). One of the side effects of running withPOSIX(ON) is that the local time displays are influenced by the POSIX time semanticdefinitions. The default behavior defined by POSIX for local time interpretation maynot fit your operation.
You can use the TZ environment variable to cause LE to display local time properly.There are several places where time stamps are displayed — the storsrvd log filesand SYMAPI log file are the most important places. Use the TZ environment variableto establish your local offset from Coordinated Universal Time (UTC). The validsettings for TZ are standardized by the POSIX standard and are described in manypublications, including the IBM Language Environment books.
In the PARMLIB member SYMENV00, you can set TZ. The sample setting in thedistributed member causes the local time zone to be set to United States EasternStandard Time, offset five hours from UTC (also known as Greenwich Mean Time orGMT), and EDT time may apply. The following example shows the same specificationusing an Instream dataset set for SYM$ENV:
//SYM$ENV DD *TZ=EST5EDT/*
In the Time Zone field of the SEMJCL panel (4. on page 70), you can enter theappropriate setting for your time zone. Installing Solutions Enabler on z/OS on page75 includes more information.
Note
Due to the way Language Environment processes a TZ variable passed in by SYM$ENV, a TZ variable with no DST in the string results in exactly the same time as a TZvariable with DST. For example, the variable MST7 will be processed the same asMST7DST and will have the same resultant time zone.
To workaround this, for any of the z/OS daemons, the TZ variable should be specifiedas part of the PARM on the EXEC DD statement. For example:
//STORSRVD EXEC PGM=STORSRVD,REGION=0M,// PARM='ENVAR(TZ=MST7)/'
Modifying default behavior with the options file
The options file contains statements that can be modified to change the defaultbehavior of SYMCLI operations, SYMAPI calls, and their control actions. It can be usedto impart certain global restrictions as well as customize and streamline command linecoding to your specific environment. Each sample statement is commented, and canbe enabled by removing the # in the first column.
Note
For descriptions of the options file parameters, refer to EMC Solutions EnablerSYMCLI Command Reference Guide.
Post-Installation configuration for UNIX, Windows, OpenVMS, and z/OS
196 Solutions Enabler 8.3 Installation and Configuration Guide
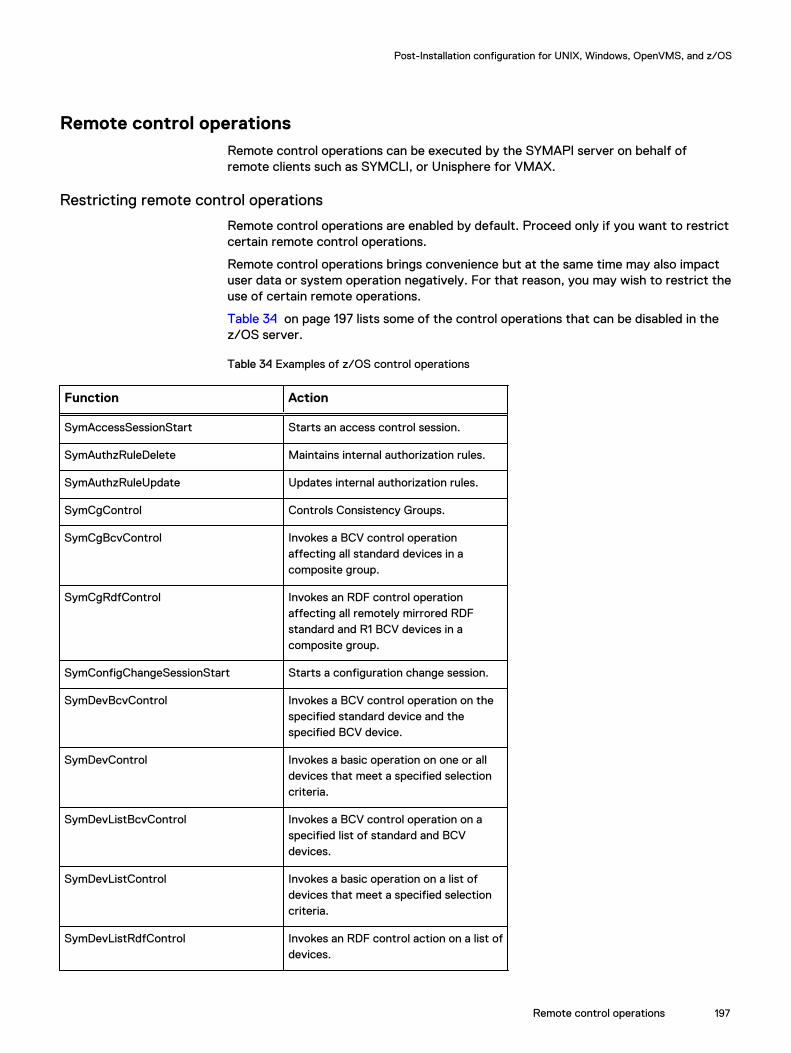
Remote control operationsRemote control operations can be executed by the SYMAPI server on behalf ofremote clients such as SYMCLI, or Unisphere for VMAX.
Restricting remote control operations
Remote control operations are enabled by default. Proceed only if you want to restrictcertain remote control operations.
Remote control operations brings convenience but at the same time may also impactuser data or system operation negatively. For that reason, you may wish to restrict theuse of certain remote operations.
Table 34 on page 197 lists some of the control operations that can be disabled in thez/OS server.
Table 34 Examples of z/OS control operations
Function Action
SymAccessSessionStart Starts an access control session.
SymAuthzRuleDelete Maintains internal authorization rules.
SymAuthzRuleUpdate Updates internal authorization rules.
SymCgControl Controls Consistency Groups.
SymCgBcvControl Invokes a BCV control operationaffecting all standard devices in acomposite group.
SymCgRdfControl Invokes an RDF control operationaffecting all remotely mirrored RDFstandard and R1 BCV devices in acomposite group.
SymConfigChangeSessionStart Starts a configuration change session.
SymDevBcvControl Invokes a BCV control operation on thespecified standard device and thespecified BCV device.
SymDevControl Invokes a basic operation on one or alldevices that meet a specified selectioncriteria.
SymDevListBcvControl Invokes a BCV control operation on aspecified list of standard and BCVdevices.
SymDevListControl Invokes a basic operation on a list ofdevices that meet a specified selectioncriteria.
SymDevListRdfControl Invokes an RDF control action on a list ofdevices.
Post-Installation configuration for UNIX, Windows, OpenVMS, and z/OS
Remote control operations 197
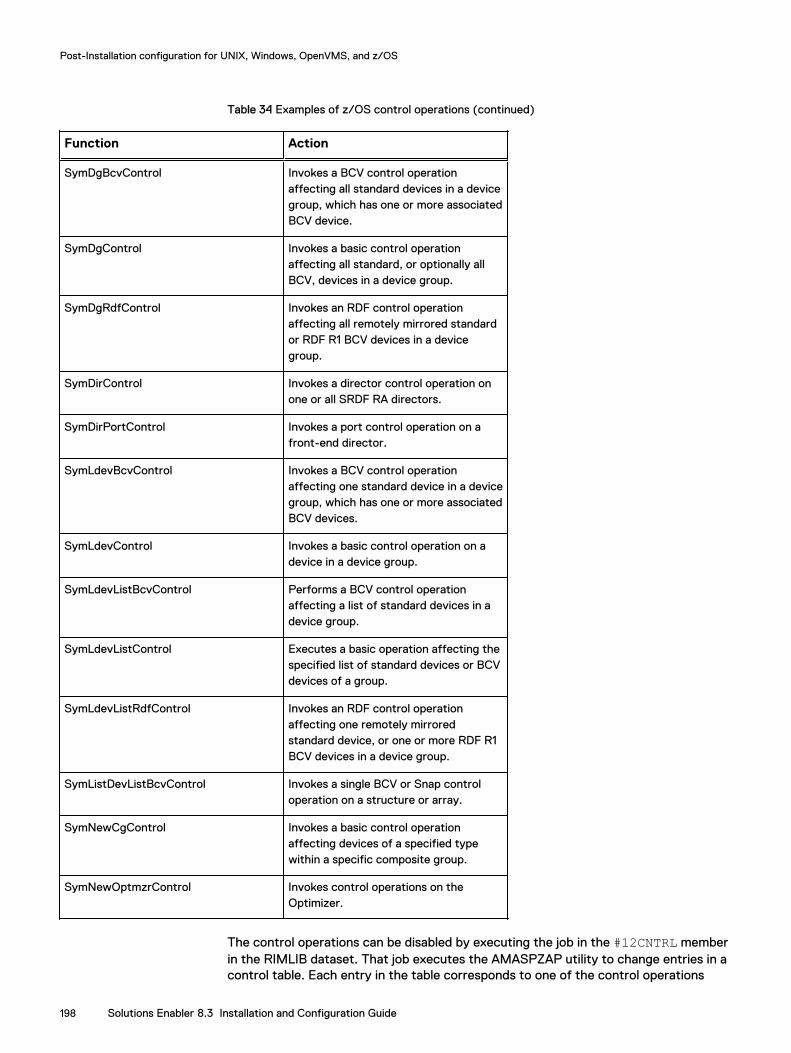
Table 34 Examples of z/OS control operations (continued)
Function Action
SymDgBcvControl Invokes a BCV control operationaffecting all standard devices in a devicegroup, which has one or more associatedBCV device.
SymDgControl Invokes a basic control operationaffecting all standard, or optionally allBCV, devices in a device group.
SymDgRdfControl Invokes an RDF control operationaffecting all remotely mirrored standardor RDF R1 BCV devices in a devicegroup.
SymDirControl Invokes a director control operation onone or all SRDF RA directors.
SymDirPortControl Invokes a port control operation on afront-end director.
SymLdevBcvControl Invokes a BCV control operationaffecting one standard device in a devicegroup, which has one or more associatedBCV devices.
SymLdevControl Invokes a basic control operation on adevice in a device group.
SymLdevListBcvControl Performs a BCV control operationaffecting a list of standard devices in adevice group.
SymLdevListControl Executes a basic operation affecting thespecified list of standard devices or BCVdevices of a group.
SymLdevListRdfControl Invokes an RDF control operationaffecting one remotely mirroredstandard device, or one or more RDF R1BCV devices in a device group.
SymListDevListBcvControl Invokes a single BCV or Snap controloperation on a structure or array.
SymNewCgControl Invokes a basic control operationaffecting devices of a specified typewithin a specific composite group.
SymNewOptmzrControl Invokes control operations on theOptimizer.
The control operations can be disabled by executing the job in the #12CNTRL memberin the RIMLIB dataset. That job executes the AMASPZAP utility to change entries in acontrol table. Each entry in the table corresponds to one of the control operations
Post-Installation configuration for UNIX, Windows, OpenVMS, and z/OS
198 Solutions Enabler 8.3 Installation and Configuration Guide
listed above. The comments in the AMASPZAP input indicate the relationship of thezap to the operation.
Control statements
The entries in the control table are mostly VER statements and REP statementsgrouped together respectively. A VER or VERIFY statement is composed of thecommand phrase VER, a hexadecimal address and an eight-byte hexadecimal value.The following is an example:
VER 0001D8 0000,0000
The VER statement checks to see if the value at the address given is the same as thevalue provided in the statement. If true, then the following statement will be executed.If not, the following statements will be ignored and job #12CNTRL will quit.
A REP statement is composed of the command phrase REP, a hexadecimal addressand an eight-byte hexadecimal value. The following is an example:
REP 0001D8 0000,0001
The REP statement replace the current value at the given address with the valueprovided in the statement.
Note
HINT: Make a copy of member #12CNTRL for backup purposes before making anychanges.
Modifying the control table
Job #12CNTRL is customized during the SEMJCL process, but does require a manualedit by the submitter before it can be used because it contains an invalid VERstatement to force failure. This VER statement should be commented out or removed:
VER 0001D8 READ,DOC COMMENT OUT THIS LINE TO RUN THE JOB
This invalid VER statement provides additional protection against accidental disablingof control operations. No change will take place if the job is submitted without makingany changes.
Once the invalid VER statement is removed, the first entry in the table provides thecapability to enable or disable control operations listed in Table 34 on page 197 as awhole. The following is how the first VER entry in the control table is configured bydefault:
VER 0001D8 0000,0000 IF ALL 0, CONTROLS ARE ENABLED
This statement verifies the value at address 0001D8. If it is 0, that means SolutionsEnabler does not check individual control operations. It simply allows all remotecontrol operations.
To enable checking of individual operations, simply find the REP statement with thesame address, 0001D8; remove the leading asterisk to uncomment the statement andchange the value following the address to 0000,0001.
Post-Installation configuration for UNIX, Windows, OpenVMS, and z/OS
Remote control operations 199

This effectively disables all control operations because you have just enabled checkingof individual operations and all of them are set to disable by default.
To enable selective operations, find the REP statement with the same address as theVER statement for the desired operations, remove the leading asterisk, and changethe value of the REP statement to 0000,0000.
Note
HINT: Use the backup copy of the job as a reference.
For example, if you want to enable remote director control:
1. Find the VER statement for director control using the comment:
VER 0001F8 0000,0870 DIRECTOR CONTROL
2. Find the REP statement with the address 0001F8:
*REP 0001F8 0000,0870
3. Remove the leading asterisk to uncomment the statement and change the valuefrom 0000,0870 to 0000,0000.
4. Save job #12CNTRL.
Repeat these steps for each control operation you want to enable.
WARNING
Running multiple iterations of #12CNTRL could get the table into state wherethere are VERs failing due to prior changes, so plan accordingly by keeping anpristine backup copy of #12CNTRL.
Additional Work
In addition to executing the #12CNTRL member, the SYMAPI_CTRL_VIA_SERVERoption can be set to ENABLE or DISABLE. The default value of the option is ENABLE,which corresponds to the #12CNTRL setting.
If you want to enable or disable control operations, you must:
l Verify that the SYMAPI_CTRL_VIA_SERVER option is set to ENABLE orDISABLE.Or
l Edit the #12CNTRL member in the RIMLIB as previously discussed.
CAUTION
By leaving control operations enabled, you enable open systems users to makechanges to the array configuration on your mainframe system.
You may undo the changes you made using #12CNTRL by reversing any VER and REPchanges and resubmitting the job.
Note
The server will need to be restarted if any #12CNTRL changes are applied.
Post-Installation configuration for UNIX, Windows, OpenVMS, and z/OS
200 Solutions Enabler 8.3 Installation and Configuration Guide

Controlling the serverYou can inspect and control the behavior of the server using the stordaemoncommand or the system console. For information on the commands accepted by theSYMAPI server, refer to Controlling the server on page 219.
This section describes specific methods of entering the commands.
Starting the server
To start the SYMAPI server, you can submit the job stream contained in the#STORSRV member of the Solutions Enabler RIMLIB for batch execution.
Note
#STORSRV was customized when you used SEMJCL to specify configurationinformation appropriate for your site during the installation procedure.
You can execute the SYMAPI server program storsrvd as a started task. You canprepare a catalogued procedure for use as a started task. No such procedure isprovided with the installation kit.
You cannot use stordaemon start in the z/OS environment to start the server.
Stopping the server
To stop the SYMAPI server, you can use the stordaemon shutdown command, orthe equivalent command from the z/OS system console.
You can also use the z/OS STOP command regardless of whether the server is runningas a started task or as a batch job. Using the STOP command (for example, “PSTORSRVD”) starts a normal shutdown, waiting for all SYMAPI sessions to terminatenormally.
Using the console
You can control the SYMAPI server while it is running by issuing operator commandsusing the the z/OS system command MODIFY (abbreviated F):
F jobname,command
where:
jobname is the name of the batch job or started task under which the SYMAPI serveris running.
command is the text of the command passed to SYMAPI server.
Usage notesWhen issuing commands from the system console, you should be aware of thefollowing:
l While stordaemon commands are sent to the daemons without upper caseconversion, text entered on the system console (and all virtualized consoles) isnormally folded to uppercase by the operating system. Enclosing the text inapostrophes (not quotes) alters the behavior, resulting in the command text beingsent as is to the application.
Post-Installation configuration for UNIX, Windows, OpenVMS, and z/OS
Controlling the server 201
l Commands issued using the stordaemon action verb must be entered withapostrophes to preserve the case. Complete enclosure in apostrophes is notnecessary; a leading apostrophe is sufficient to preserve case. A closingapostrophe will be accepted and ignored.
l Dashed options are not required. The SYMAPI server allows the specification oromission of the dash on the command options. The console command parsing logicwill accept a dash if specified, but ignore it for the purposes of optionidentification.
l Commands entered from the console are directed to a specific running daemon.Thus the multi-daemon commands and operands are not supported when enteredfrom the console. The list command and the all option of the shutdown,setvar, getvar commands are not supported when entered at the console.
l The daemon name must be omitted in the command text, since the MODIFYsystem command specifies the jobname which directs the command to the correctdaemon. Thus, the command text will begin with the verb.
l The action verb can be omitted only if the -cmd verb and/or operands canunambiguously distinguish the command from all general commands. For example,in the case of storsrvd , the general show command will show basic statusinformation. The action -cmd show command will show other detailed informationspecific to storsrvd.
l The -cmd option can be omitted also. If either action or -cmd are specified, thecommand text will be passed to the running daemon for execution. If the daemonapplication log parses the command text successfully, it may execute thecommand and produce the appropriate output. If the application logic does notrecognize the command, an error message will be generated and written to theconsole.
l Commands that change the environment outside of the daemon will not beaccepted from the console. These are start, install, and uninstall.
l The -wait option of the stordaemon shutdown command is not supported andwill be ignored if entered from the console.
l The showlog command is not supported from the console.
ExamplesTable 35 on page 202 compares the syntax of the stordaemon commands issuedfrom a Unix System Services shell to the syntax of the same commands entered onthe z/OS console. Assume that the jobname of the server is STORSRVD, and thedaemon name is also storsrvd. Note that the z/OS system command MODIFY aliasis 'F'.
Table 35 stordaemon command syntax for the z/OS system console
Command stordaemon syntax Console syntax
Show daemon status long.
Show daemon status (state).
stordaemon showstorsrvdstordaemon showstorsrvd -brief
F STORSRVD,SHOWF STORSRVD,SHOW[-]BRIef
Stop the daemon.
Stop the daemonimmediately.
stordaemon shutdownstorsrvd
F STORSRVD,SHUTDOWN
F STORSRVD,SHUTDOWN[-]IMMediate
Post-Installation configuration for UNIX, Windows, OpenVMS, and z/OS
202 Solutions Enabler 8.3 Installation and Configuration Guide
Table 35 stordaemon command syntax for the z/OS system console (continued)
Command stordaemon syntax Console syntax
stordaemon shutdownstorsrvd -immediate
Show the current value of anoperational variable (port inthis example).
stordaemon getvarstorsrvd -name port
F STORSRVD,'getvar[-]name port'
Change the current value ofan daemon option (takeseffect immediately.
stordaemon setvarstorsrvd -namelog_filter=SESSION,APIREQ
F STORSRVD, 'setvar [-[namelog_filter=SESSION,APIREQ'
Note
The -name option can be
abbreviated to 3 chars andthe dash can be omitted.
Store a new value of adaemon option for reload orsubsequent execution. In thisexample, change the port to2708.
stordaemon setoptionstorsrvd -nameport=2708
setoption is not supported
from the console in thisrelease.
Issue a storsrvd extending
action. In this example, showdetails for SYMAPI sessionnumber 4.
stordaemon actionstorsrvd -cmd show -session -num 4
F STORSRVD,'actionshow -ses -num 4
Note
In this example the -cmdkeyword is omitted, and aclosing quote is also omitted.
Show network information. stordaemon actionstorsrvd -cmd show -netinfo
F STORSRVD, 'actionshow -netinfo'
In general, command-generated output shown on the z/OS console will suppress blanklines for the sake of brevity and to reduce messages rolling off the console screen.
Using stordaemon TSO commands
In the TSO command shell, the stordaemon command operates as it does on allplatforms. If the Solutions Enabler load library is in the TSO STEPLIB or CMDLIB, youcan issue the stordaemon command as shown in the following example:
IKJ56455I USER1 LOGON IN PROGRESS AT 13:33:01 ON APRIL 1, 2015,IKJ56951I NO BROADCAST MESSAGES,REXX/SOCKETS z/OS V1R6 January 5, 2007,READY STORDEMN show storsrvd<output will show here>
Post-Installation configuration for UNIX, Windows, OpenVMS, and z/OS
Controlling the server 203
CALL 'EMC.SSEM830.LOADLIB(STORDEMN)' 'show storsrvd'<output will show here>
Optionally, you can trap all output of the stordaemon command with the REXXlanguage function outtrap(). In which case, all output will be saved in a REXX variablearray, where it can be processed programmatically.
Using stordaemon in a Unix System Services shell
The following example illustrates how you can configure stordaemon to run fromUnix System Services. For the sake of this example, assume that you have alreadylogged in to the z/OS Unix System Services shell either via rlogin or the TSO OMVScommand:
$ cd /var/symapi$ mkdir bin$ cd bin$ ln -e STORDEMN stordaemon$ export STEPLIB=EMC.SSEM830.LOADLIB$ stordaemon show storsrvd$ stordaemon shutdown storsrvd
In the example, the user makes an external link from a Unix System Services file to theSolutions Enabler load library module. By setting the STEPLIB environment variable,the shell follows the link from the Unix System Services file to the load library, findingthe member stored there. The load library member executes the stordaemonapplication. Any z/OS supported stordaemon functions can be used in thisenvironment.
Running the base daemon on z/OSThe base daemon (storapid) is required for z/OS SYMAPI server services andshould be running at all times. The base daemon provides numerous benefits for thez/OS environment, including improved performance and enhanced array lockmanagement.
Most of the information in this section is similar to the daemon information describedin Post-Installation configuration for UNIX, Windows, OpenVMS, and z/OS on page121; however, this section describes it from the z/OS point of view.
Starting the base daemon
Once the SYMAPI server is running, start the base daemon by submitting the job#STORAPI in the RIMLIB. This job will have been correctly configured when theSEMJCL process was run. If necessary, you can modify this job and convert it to runas a started task. You cannot use the stordaemon command to start the basedaemon.
Note
As there is no watchdog daemon in z/OS, the base daemon will not automaticallystart/restart.
Stopping the base daemon
Table 36 on page 205 lists the commands for stopping the base daemon.
Post-Installation configuration for UNIX, Windows, OpenVMS, and z/OS
204 Solutions Enabler 8.3 Installation and Configuration Guide

Table 36 Commands for stopping the base daemon
From Use the command
Console F STORAPID,SHUTDOWN
TSO stordemn shutdownstorapid
Unix System Services shell stordaemon shutdownstorapid
For more information on using these methods, refer to Controlling the server on page201.
Using and configuring the base daemon
The base daemon behavior is determined by parameters set in the configuration filedaemon_options. This file is found in the symapi_installation_directory/config folder. It is a standard text file that you can edit by way of oedit or any othertext editor. For detailed information on editing the parameters in this file, refer to Controlling daemon behavior on page 144.
Base daemon logging
Solutions Enabler daemons all use a common infrastructure mechanism for loggingmessages and events. For information on the options available to manage the way thebase daemon uses its log files, refer to Controlling daemon logging on page 144.
Avoidance and selection files and the base daemon
The base daemon will not recognize or use JCL specified selection and avoidance files.It will only use the appropriate files in the symapi_installation_directory/config folder in Unix System Services.
You should not use both MVS datasets (for the server) and Unix System Services files(base daemon) for these selection and avoidance files. Doing so will likely result ininconsistent definitions and confusion. If you use the base daemon, you should placethe avoidance and selection files for both the SYMAPI server and the base daemon inthe relevant Unix System Services location. For the SYMAPI server, the relevantDDnames in the job should be removed or commented out, so that the server will referto the correct files in Unix System Services.
For more information on the avoidance and selection files, refer to Avoidance andselection files on page 190.
Running the event daemon on z/OSThe use of the event daemon (storevtd) is optional for the z/OS SYMAPI server.For information regarding the event daemon, refer to Setting up the event daemon formonitoring on page 148.
In the z/OS context, the event daemon is primarily used to enable monitoringcapabilities on behalf of other clients. The only client expected to use the eventdaemon is EMC Unisphere for VMAX.
Post-Installation configuration for UNIX, Windows, OpenVMS, and z/OS
Running the event daemon on z/OS 205
Starting the event daemon
Once the SYMAPI server is running, start the event daemon by submitting the job#STOREVT in the RIMLIB. This job will have been correctly configured when you ranthe SEMJCL process. If necessary, you can modify this job and convert it to run as astarted task. You cannot use the stordaemon command to start the event daemon.
Note
As there is no watchdog daemon in z/OS, the event daemon will not automaticallystart/restart.
Stopping the event daemon
Table 37 on page 206 lists the commands for stopping the event daemon.
Table 37 Commands for stopping the event daemon
From Use the command
Console F STOREVTD,SHUTDOWN
TSO stordaemon shutdownstorevntd
Unix System Services shell stordaemon shutdownstorevntd
For more information on using these methods, refer to Controlling the server on page201.
Using and configuring the event daemonThe event daemon behavior is determined by parameters set in the configuration filedaemon_options. This file is found in the symapi_installation_directory/config folder. It is a standard text file that you can edit by way of oedit or anyother text editor. For detailed information on editing the parameters in this file, referto Controlling daemon behavior on page 144.
Event daemon logging
Solutions Enabler daemons use a common infrastructure mechanism for loggingmessages and events. For information on the options available to manage the way theevent daemon uses its log files, refer to Controlling daemon logging on page 144.
The z/OS Event Daemon supports two logging targets, namely syslog and system.
syslogThe syslog target routes event messages to a UNIX style syslog daemon(syslogd).
Note
This is a syslog daemon supporting the protocols as defined by RFC 5424 - The SyslogProtocol.
Post-Installation configuration for UNIX, Windows, OpenVMS, and z/OS
206 Solutions Enabler 8.3 Installation and Configuration Guide
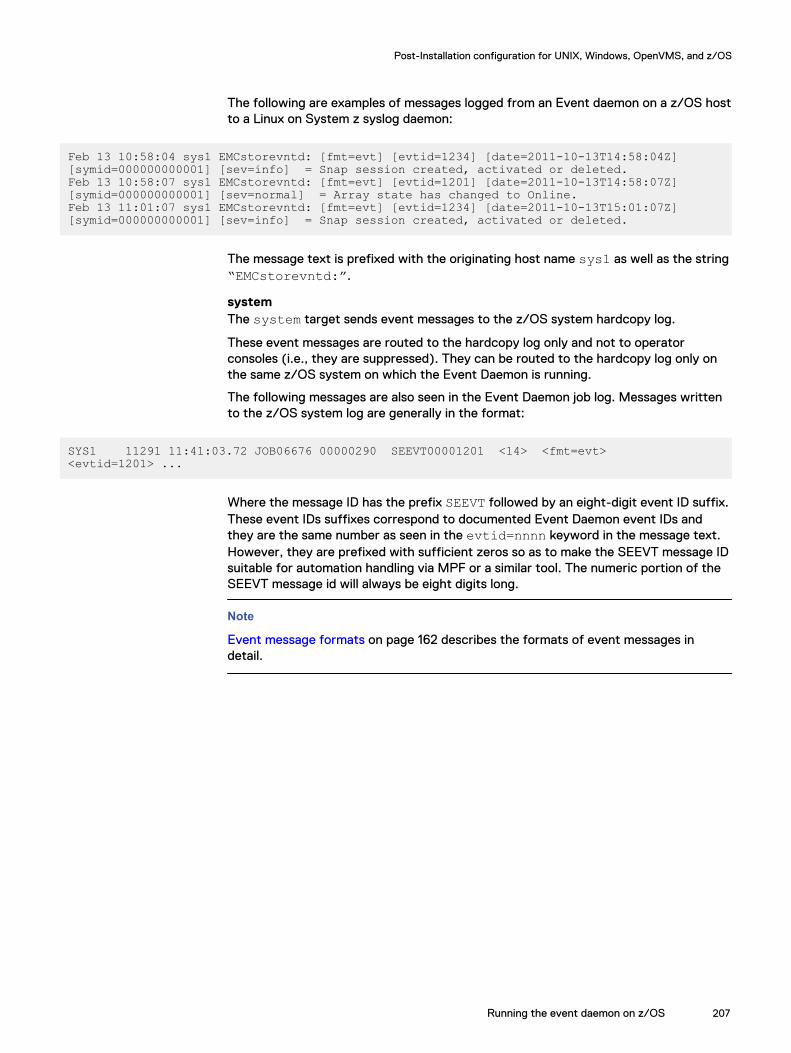
The following are examples of messages logged from an Event daemon on a z/OS hostto a Linux on System z syslog daemon:
Feb 13 10:58:04 sys1 EMCstorevntd: [fmt=evt] [evtid=1234] [date=2011-10-13T14:58:04Z] [symid=000000000001] [sev=info] = Snap session created, activated or deleted.Feb 13 10:58:07 sys1 EMCstorevntd: [fmt=evt] [evtid=1201] [date=2011-10-13T14:58:07Z] [symid=000000000001] [sev=normal] = Array state has changed to Online.Feb 13 11:01:07 sys1 EMCstorevntd: [fmt=evt] [evtid=1234] [date=2011-10-13T15:01:07Z] [symid=000000000001] [sev=info] = Snap session created, activated or deleted.
The message text is prefixed with the originating host name sys1 as well as the string“EMCstorevntd:”.
systemThe system target sends event messages to the z/OS system hardcopy log.
These event messages are routed to the hardcopy log only and not to operatorconsoles (i.e., they are suppressed). They can be routed to the hardcopy log only onthe same z/OS system on which the Event Daemon is running.
The following messages are also seen in the Event Daemon job log. Messages writtento the z/OS system log are generally in the format:
SYS1 11291 11:41:03.72 JOB06676 00000290 SEEVT00001201 <14> <fmt=evt> <evtid=1201> ...
Where the message ID has the prefix SEEVT followed by an eight-digit event ID suffix.These event IDs suffixes correspond to documented Event Daemon event IDs andthey are the same number as seen in the evtid=nnnn keyword in the message text.However, they are prefixed with sufficient zeros so as to make the SEEVT message IDsuitable for automation handling via MPF or a similar tool. The numeric portion of theSEEVT message id will always be eight digits long.
Note
Event message formats on page 162 describes the formats of event messages indetail.
Post-Installation configuration for UNIX, Windows, OpenVMS, and z/OS
Running the event daemon on z/OS 207

Post-Installation configuration for UNIX, Windows, OpenVMS, and z/OS
208 Solutions Enabler 8.3 Installation and Configuration Guide

CHAPTER 6
Remote Operations
This chapter provides information on configuring and operating Solutions Enabler in aclient/server environment:
l SYMCLI through a remote server..................................................................... 210l Client configuration.......................................................................................... 210l Client/server IP interoperability........................................................................214l Client/server security.......................................................................................216l Specifying server behavior................................................................................217l Controlling the server....................................................................................... 219l Controlling and using the storsrvd log files.......................................................223
Remote Operations 209
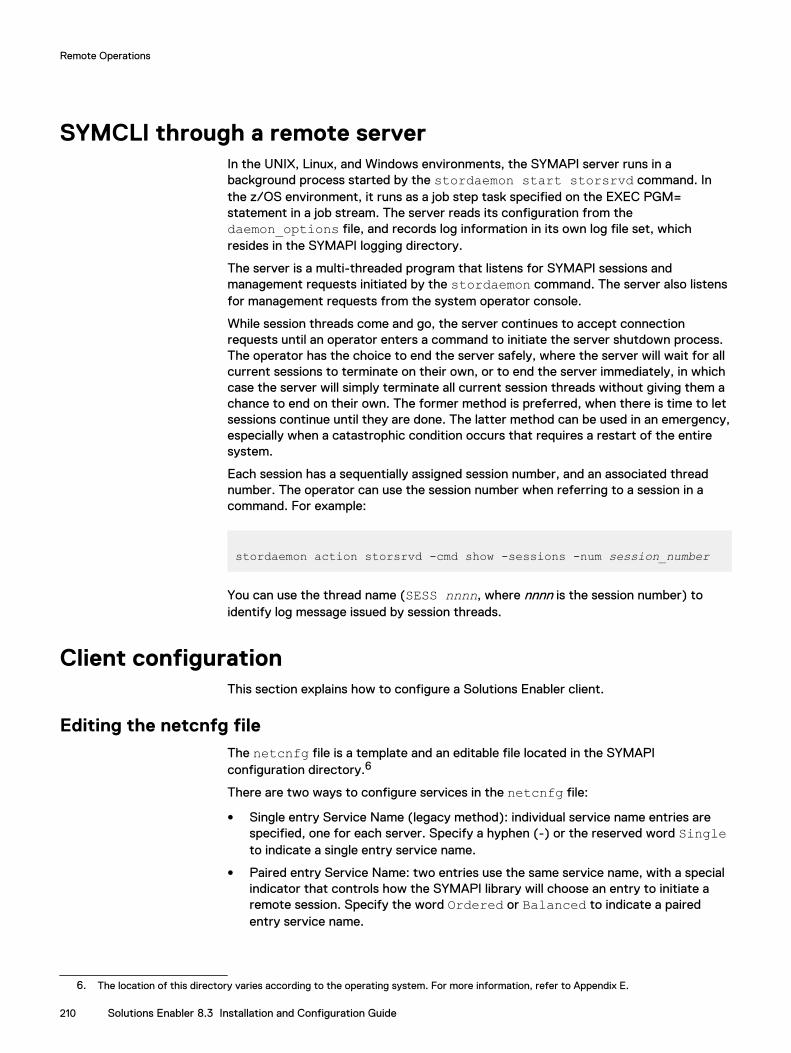
SYMCLI through a remote serverIn the UNIX, Linux, and Windows environments, the SYMAPI server runs in abackground process started by the stordaemon start storsrvd command. Inthe z/OS environment, it runs as a job step task specified on the EXEC PGM=statement in a job stream. The server reads its configuration from thedaemon_options file, and records log information in its own log file set, whichresides in the SYMAPI logging directory.
The server is a multi-threaded program that listens for SYMAPI sessions andmanagement requests initiated by the stordaemon command. The server also listensfor management requests from the system operator console.
While session threads come and go, the server continues to accept connectionrequests until an operator enters a command to initiate the server shutdown process.The operator has the choice to end the server safely, where the server will wait for allcurrent sessions to terminate on their own, or to end the server immediately, in whichcase the server will simply terminate all current session threads without giving them achance to end on their own. The former method is preferred, when there is time to letsessions continue until they are done. The latter method can be used in an emergency,especially when a catastrophic condition occurs that requires a restart of the entiresystem.
Each session has a sequentially assigned session number, and an associated threadnumber. The operator can use the session number when referring to a session in acommand. For example:
stordaemon action storsrvd -cmd show -sessions -num session_number
You can use the thread name (SESS nnnn, where nnnn is the session number) toidentify log message issued by session threads.
Client configurationThis section explains how to configure a Solutions Enabler client.
Editing the netcnfg fileThe netcnfg file is a template and an editable file located in the SYMAPIconfiguration directory.6
There are two ways to configure services in the netcnfg file:
l Single entry Service Name (legacy method): individual service name entries arespecified, one for each server. Specify a hyphen (-) or the reserved word Singleto indicate a single entry service name.
l Paired entry Service Name: two entries use the same service name, with a specialindicator that controls how the SYMAPI library will choose an entry to initiate aremote session. Specify the word Ordered or Balanced to indicate a pairedentry service name.
6. The location of this directory varies according to the operating system. For more information, refer to Appendix E.
Remote Operations
210 Solutions Enabler 8.3 Installation and Configuration Guide
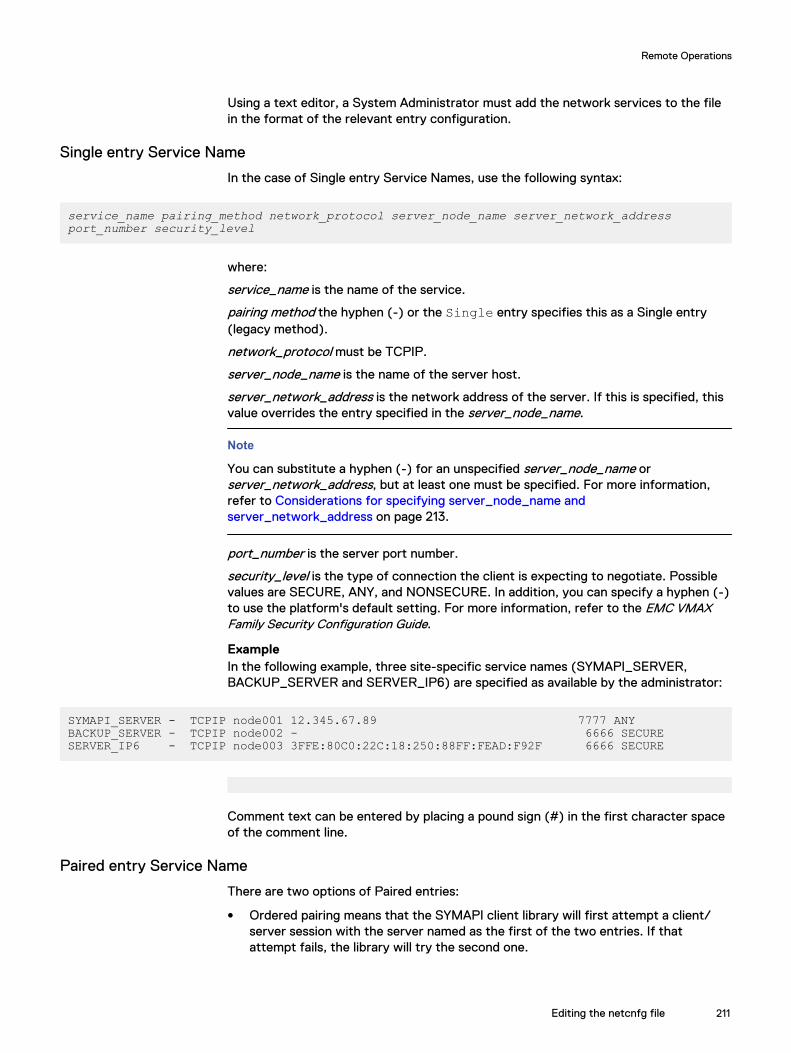
Using a text editor, a System Administrator must add the network services to the filein the format of the relevant entry configuration.
Single entry Service Name
In the case of Single entry Service Names, use the following syntax:
service_name pairing_method network_protocol server_node_name server_network_address port_number security_level
where:
service_name is the name of the service.
pairing method the hyphen (-) or the Single entry specifies this as a Single entry(legacy method).
network_protocol must be TCPIP.
server_node_name is the name of the server host.
server_network_address is the network address of the server. If this is specified, thisvalue overrides the entry specified in the server_node_name.
Note
You can substitute a hyphen (-) for an unspecified server_node_name orserver_network_address, but at least one must be specified. For more information,refer to Considerations for specifying server_node_name andserver_network_address on page 213.
port_number is the server port number.
security_level is the type of connection the client is expecting to negotiate. Possiblevalues are SECURE, ANY, and NONSECURE. In addition, you can specify a hyphen (-)to use the platform's default setting. For more information, refer to the EMC VMAXFamily Security Configuration Guide.
ExampleIn the following example, three site-specific service names (SYMAPI_SERVER,BACKUP_SERVER and SERVER_IP6) are specified as available by the administrator:
SYMAPI_SERVER - TCPIP node001 12.345.67.89 7777 ANYBACKUP_SERVER - TCPIP node002 - 6666 SECURESERVER_IP6 - TCPIP node003 3FFE:80C0:22C:18:250:88FF:FEAD:F92F 6666 SECURE
Comment text can be entered by placing a pound sign (#) in the first character spaceof the comment line.
Paired entry Service Name
There are two options of Paired entries:
l Ordered pairing means that the SYMAPI client library will first attempt a client/server session with the server named as the first of the two entries. If thatattempt fails, the library will try the second one.
Remote Operations
Editing the netcnfg file 211
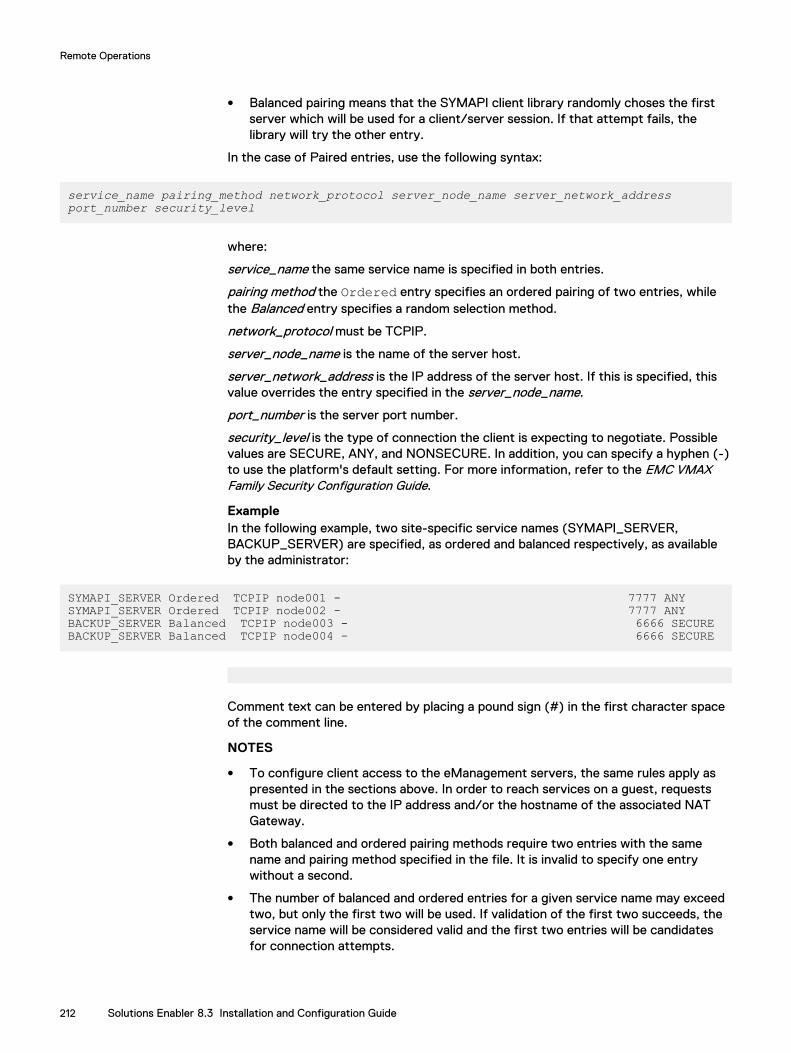
l Balanced pairing means that the SYMAPI client library randomly choses the firstserver which will be used for a client/server session. If that attempt fails, thelibrary will try the other entry.
In the case of Paired entries, use the following syntax:
service_name pairing_method network_protocol server_node_name server_network_address port_number security_level
where:
service_name the same service name is specified in both entries.
pairing method the Ordered entry specifies an ordered pairing of two entries, whilethe Balanced entry specifies a random selection method.
network_protocol must be TCPIP.
server_node_name is the name of the server host.
server_network_address is the IP address of the server host. If this is specified, thisvalue overrides the entry specified in the server_node_name.
port_number is the server port number.
security_level is the type of connection the client is expecting to negotiate. Possiblevalues are SECURE, ANY, and NONSECURE. In addition, you can specify a hyphen (-)to use the platform's default setting. For more information, refer to the EMC VMAXFamily Security Configuration Guide.
ExampleIn the following example, two site-specific service names (SYMAPI_SERVER,BACKUP_SERVER) are specified, as ordered and balanced respectively, as availableby the administrator:
SYMAPI_SERVER Ordered TCPIP node001 - 7777 ANYSYMAPI_SERVER Ordered TCPIP node002 - 7777 ANYBACKUP_SERVER Balanced TCPIP node003 - 6666 SECUREBACKUP_SERVER Balanced TCPIP node004 - 6666 SECURE
Comment text can be entered by placing a pound sign (#) in the first character spaceof the comment line.
NOTES
l To configure client access to the eManagement servers, the same rules apply aspresented in the sections above. In order to reach services on a guest, requestsmust be directed to the IP address and/or the hostname of the associated NATGateway.
l Both balanced and ordered pairing methods require two entries with the samename and pairing method specified in the file. It is invalid to specify one entrywithout a second.
l The number of balanced and ordered entries for a given service name may exceedtwo, but only the first two will be used. If validation of the first two succeeds, theservice name will be considered valid and the first two entries will be candidatesfor connection attempts.
Remote Operations
212 Solutions Enabler 8.3 Installation and Configuration Guide
l The server_node_name fields in both paired entries may be different, or one orboth may be a hyphen indicating that the value is omitted.
l The IP_address fields in both paired entries may be different or may both be ahyphen indicating that the host name must be used. Whenever there is no IPaddress specified, the server_node_name must be specified.
l DNS queries may return more than one IP address for a given host name. If a hostname is mapped to two different IP addresses, the SYMAPI client library willattempt to connect to the first one. If the connection fails, the client library will trythe second one. If both addresses in the first entry fail, the client library will repeatthe process with all IP addresses associated with the second host.
l The port_number fields in both paired entries may be different.
l The security_level must be the same for both paired entries.
Considerations for specifying server_node_name andserver_network_address
Although the syntax of each service definition allows you to specify both the nodename and the network address, only one is in fact required. Specifying both can serveas documentation for your expectation of the mapping between node and address, butit has no real effect on connections established between the client and the server.
Any unspecified tokens in the service definition must be replaced with a hyphen, so ifeither the server_node_name or server_network_address are to be omitted, be sureto place a hyphen character in its position.
Use the following general rules to decide whether to specify a real value forserver_node_name or server_network_address:
l If you do not want to have to remember or look up IP addresses, or if your networkadministrator discourages routing by address, then specify a real value forserver_node_name and place a hyphen in the server_network_address field. TheSYMAPI client library will look up the node name in DNS, and will attempt toconnect to the server using the list of known addresses for the node. If youspecify server_node_name, however, you cannot predict the address that will beused to successfully connect.Note that the value specified in the server_node_name can generally be a localnode without qualifying domain, or it can be a fully-qualified domain name (FQDN).Your results depend on the configuration of name resolution in your network.
Another key reason for using node name is that the client will try all eligiblenetwork addresses for a given node to complete the connection. Even though youhave no specific control over the protocol or address used, the server availabilitymay be improved using node name.
l If you want more control over the network address chosen (including the protocol)for the connection, specify a real value for server_network_address and place ahyphen in the server_node_name field. In fact, if any value is specified in theaddress field, it will be used, regardless of the value specified in theserver_node_name field.Note that specifying the address implies that you know the protocols that will bein use on the server host. For example, if you specify an IPv4 address for a serverwhich is no longer using IPv4 (not likely for years to come), the connection willfail. If you specify an IPv6 address for a server host whose IPv6 link is inoperative,the connection will fail. A host in this state might still be reachable over IPv4; byusing the node name instead, the connection might succeed.
You can specify an IPv4 address or an IPv6 address. You may be able to use an IPv4-mapped address, but a successful connection using the mapped address will depend
Remote Operations
Considerations for specifying server_node_name and server_network_address 213
on the whether the operating system of the server host is one that uses V4-mapping.In general, using IPv4-mapped addresses is discouraged.
Setting environment variables for remote accessTo use SYMCLI through a remote SYMAPI service, you should set environmentvariable SYMCLI_CONNECT to an available service name of the server connection(defined in netcnfg). For example, for service name SYMAPI_SERVER, set theenvironment variable as follows:
setenv SYMCLI_CONNECTSYMAPI_SERVER
for UNIX C shell
define SYMCLI_CONNECTSYMAPI_SERVER
for OpenVMS
setSYMCLI_CONNECT=SYMAPI_SERVER
for Windows
To determine what network services are configured, enter:
symcfg list -service
Connection variable SYMCLI_CONNECT_TYPE should define the local/remote mode ofthe local host (client). Possible values for the client are:
REMOTEDefines a client operation in which all the remote SYMCLI commands are strictlyexecuted on the server, and the VMAX array database is strictly read and updatedremotely.
LOCALDefines a local connection to the VMAX array. (Not used for a client-serverconnection.)
ExampleTo set the connection environment variables for a locally-cached remote operation,enter:
setenv SYMCLI_CONNECT_TYPE REMOTE
Client/server IP interoperabilityIn a UNIX, Linux, or Windows environment, the SYMAPI client and server are bothcapable of negotiating sessions over the traditional Internet Protocol Version 4 (IPv4)and the newer Internet Protocol Version 6 (IPv6).
The IPv6 designers expected migration from the old protocol to the new protocol totake years. They designed the new protocol for interoperation in networks where bothare present. A network administrator can introduce the IPv6 protocol as a supplementto IPv4, where IPv4 hosts and IPv6-capable hosts can interoperate with minimaldisruption. Over time, as network configuration is improved and problems are reducedand eliminated, IPv4 protocols can be dropped in favor of IPv6. Such a transition
Remote Operations
214 Solutions Enabler 8.3 Installation and Configuration Guide
scheme is essential in environments where continual operation is a key businesssuccess factor.
In the UNIX, Linux, and Microsoft Windows Server environments, Solutions Enableralso supports the transition from IPv4 to IPv6 in a seamless fashion. With properconfiguration of host operating systems, routers, and DNS servers, Solutions Enablersupports concurrent connections from clients using both IPv4 and IPv6. The client andserver software will choose either IPv4 or IPv6 to communicate, depending onspecification in configuration files of the host operating system and Solutions Enabler.
IPv6 addressesThe IPv4 address is familiar to most computer users: a 32-bit unsigned integer isdisplayed in a dotted-decimal string. For example, 172.23.191.20 (0xAC17BF14).
The IPv6 address supports many addressing features, but the most obvious attributeis its much wider addressing space: a 128-bit code is displayed as a series 16-bitgroupings (represented in hexadecimal) separated by colons. Shorthand notation rulesimprove the usability of the IPv6 display address; nonetheless, an IPv6 address is not ahuman-friendly object. For example, one machine might be represented with thisaddress:
3ffe:80c0:22c:18:250:8bff:fead:f92f(0x3FFE80C0022C001802508BFFFEADF92F)
IPv4 address mappingThe interoperation of IPv4 and IPv6 varies from one operating system to another,according to the specification of IPv6. On some host operating systems, IPv4connections are made through the native IPv4 protocol, and IPv4 addresses arerepresented as the dotted-decimal addresses which are familiar.
Other OS vendors have chosen to complete client connections from an IPv4 machineover IPv6, where the IPv4 address is represented as an IPv4-mapped address. AnIPv4-mapped address appears in colonated-hexadecimal form, where the last 32-bitsof the address are shown as the dotted-decimal IPv4 address (they may also beshown as two pairs of hexadecimal bytes). Immediately preceding the IPv4 address isthe string ::FFFF:. For example, a host whose IPv4 address is 172.23.191.20 can berepresented as a IPv4-mapped address as follows:
::FFFF:AC17:BF14
or
::FFFF:172.23.191.20
(0x00000000000000000000FFFFAC17BF14)
IPv4-mappped addresses are used by operating systems that do not supportconcurrent binding to the same port over both IPv6 and IPv4. AIX, and Linux generallyuse IPv4-mapped addresses.
SunOS, HP-UX, and Microsoft Windows 2003 allow concurrent binding on both IPv6and IPv4 protocols.
Server operationThe SYMAPI server listens for arrival of client connections on either IPv6 or IPv4protocols, or on both where possible. The server begins by attempting to bind to theunspecified address using the IPv6 protocol. It then attempts to bind the unspecifiedaddress using the IPv4 protocol.
Remote Operations
IPv6 addresses 215
The unspecified address is a special-purpose internet address used primarily by serverapplications. It indicates that an application is ready to receive a connection on anyinternet address configured on the host with a matching protocol. For hosts that havemultiple network interfaces, it increases the availability of the server application bynot limiting connections to arrive by way of a specific address.
The server insists on at least one successful bind on either IPv6 or IPv4 protocols, andwill use both if available to continue initializing. If both bind attempts fail, the serverwill terminate immediately, since no network is accessible or the port is in use.
When the server has finished initializing for network communication, it will write thefollowing message to its SYMAPI log file and to the terminal device, if one is available:
ANR0020I SYMAPI server listening on port port over protocolsWhere port is the decimal port number to which client connections should be directed,and protocols are the protocols the server is using to listen for client connections.Possible values are:
l IPv6 and IPv4 — Indicates that the server will accept connections from clientsrunning either IPv6 or IPv4.
l IPv6 with IPv4 mapping — Also indicates that the server will acceptconnections from clients running either IPv6 or IPv4. Connections from IPv4clients will be represented on the server side as an IPv4-mapped address (refer to IPv4 address mapping on page 215).
l IPv4 only — Indicates that IPv6 bind failed. Connections can only be acceptedfrom IPv4 clients.
Client operationThe SYMAPI client library will attempt to connect to the server either by node nameor by internet address, depending on how the service name is specified in thenetcnfg file.
If the internet address of the server is specified, the client makes a single attempt toconnect to the server. The client chooses the protocol based on the nature of theaddress: if it is an IPv4 address, it will specify IPv4 as the protocol. Similarly,specifying an IPv6 address (including an IPv4-mapped address) will result in the clientusing the IPv6 protocol to connect to the server.
If the node name of the server is specified, the client will lookup the server host byname. Such a lookup operation can return a list of candidate addresses, potentiallyincluding both IPv4 and IPv6 addresses. The client library will try to connect to alleligible addresses until either a connection attempt succeeds, or the list is exhaustedwith no successes. The list of eligible server addresses depends on the static anddynamic name resolution configuration of the host on which the client is running.
Client/server securityBy default, the SYMAPI client and server, on platforms that will support it, are initiallyconfigured to negotiate only secure sessions. To modify this default behavior, you canconfigure the security level at which the client and server are operating. You can alsochange many other aspects of secure client/server operation. Refer to the EMC VMAXFamily Security Configuration Guide for more information on client/server security andhow to configure related settings.
Remote Operations
216 Solutions Enabler 8.3 Installation and Configuration Guide
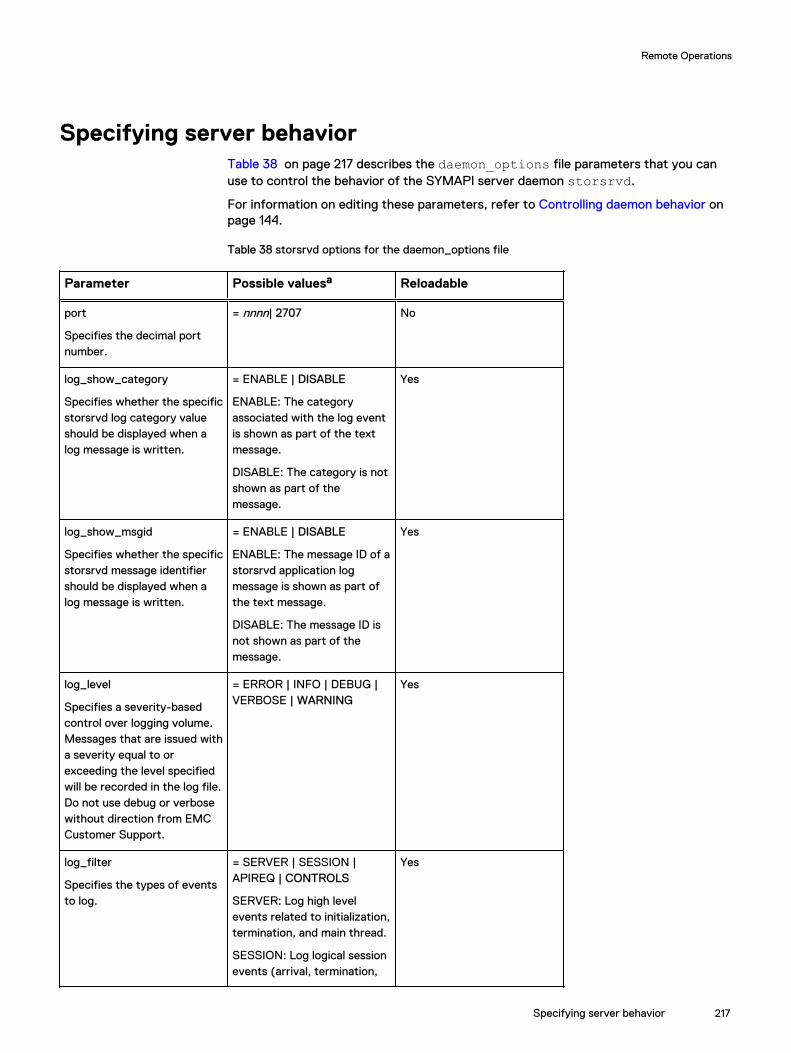
Specifying server behaviorTable 38 on page 217 describes the daemon_options file parameters that you canuse to control the behavior of the SYMAPI server daemon storsrvd.
For information on editing these parameters, refer to Controlling daemon behavior onpage 144.
Table 38 storsrvd options for the daemon_options file
Parameter Possible valuesa Reloadable
port
Specifies the decimal portnumber.
= nnnn| 2707 No
log_show_category
Specifies whether the specificstorsrvd log category valueshould be displayed when alog message is written.
= ENABLE | DISABLE
ENABLE: The categoryassociated with the log eventis shown as part of the textmessage.
DISABLE: The category is notshown as part of themessage.
Yes
log_show_msgid
Specifies whether the specificstorsrvd message identifiershould be displayed when alog message is written.
= ENABLE | DISABLE
ENABLE: The message ID of astorsrvd application logmessage is shown as part ofthe text message.
DISABLE: The message ID isnot shown as part of themessage.
Yes
log_level
Specifies a severity-basedcontrol over logging volume.Messages that are issued witha severity equal to orexceeding the level specifiedwill be recorded in the log file.Do not use debug or verbosewithout direction from EMCCustomer Support.
= ERROR | INFO | DEBUG |VERBOSE | WARNING
Yes
log_filter
Specifies the types of eventsto log.
= SERVER | SESSION |APIREQ | CONTROLS
SERVER: Log high levelevents related to initialization,termination, and main thread.
SESSION: Log logical sessionevents (arrival, termination,
Yes
Remote Operations
Specifying server behavior 217
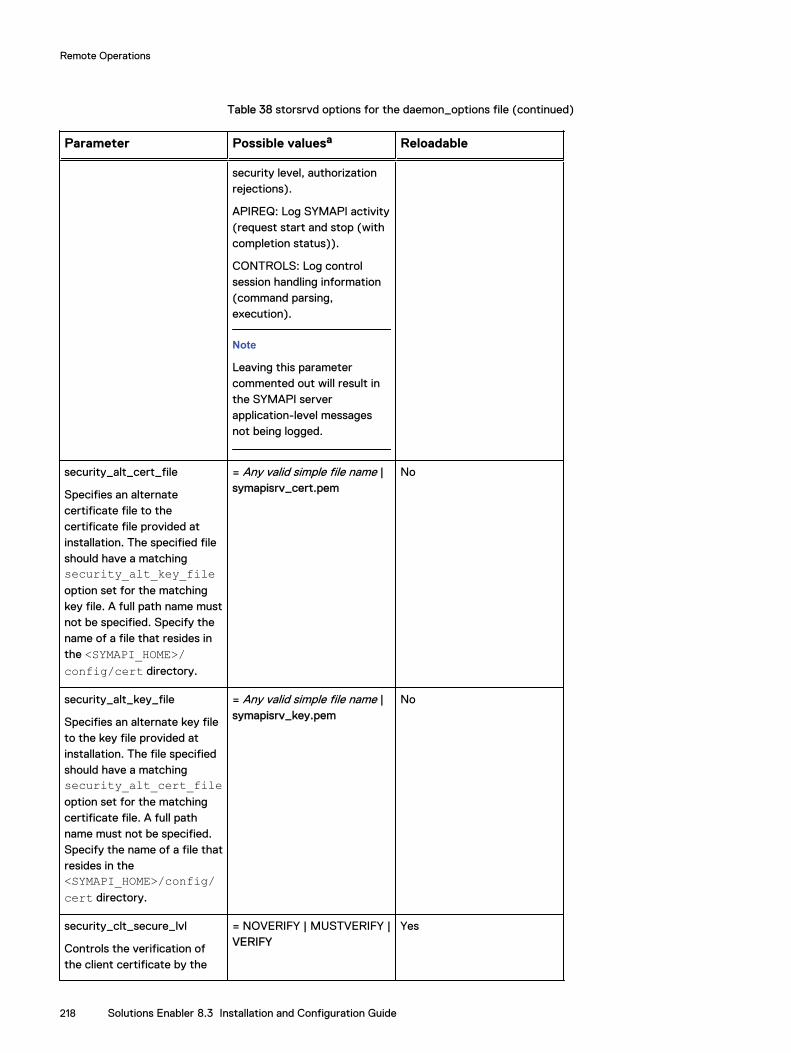
Table 38 storsrvd options for the daemon_options file (continued)
Parameter Possible valuesa Reloadable
security level, authorizationrejections).
APIREQ: Log SYMAPI activity(request start and stop (withcompletion status)).
CONTROLS: Log controlsession handling information(command parsing,execution).
Note
Leaving this parametercommented out will result inthe SYMAPI serverapplication-level messagesnot being logged.
security_alt_cert_file
Specifies an alternatecertificate file to thecertificate file provided atinstallation. The specified fileshould have a matchingsecurity_alt_key_fileoption set for the matchingkey file. A full path name mustnot be specified. Specify thename of a file that resides inthe <SYMAPI_HOME>/config/cert directory.
= Any valid simple file name |symapisrv_cert.pem
No
security_alt_key_file
Specifies an alternate key fileto the key file provided atinstallation. The file specifiedshould have a matchingsecurity_alt_cert_fileoption set for the matchingcertificate file. A full pathname must not be specified.Specify the name of a file thatresides in the<SYMAPI_HOME>/config/cert directory.
= Any valid simple file name |symapisrv_key.pem
No
security_clt_secure_lvl
Controls the verification ofthe client certificate by the
= NOVERIFY | MUSTVERIFY |VERIFY
Yes
Remote Operations
218 Solutions Enabler 8.3 Installation and Configuration Guide
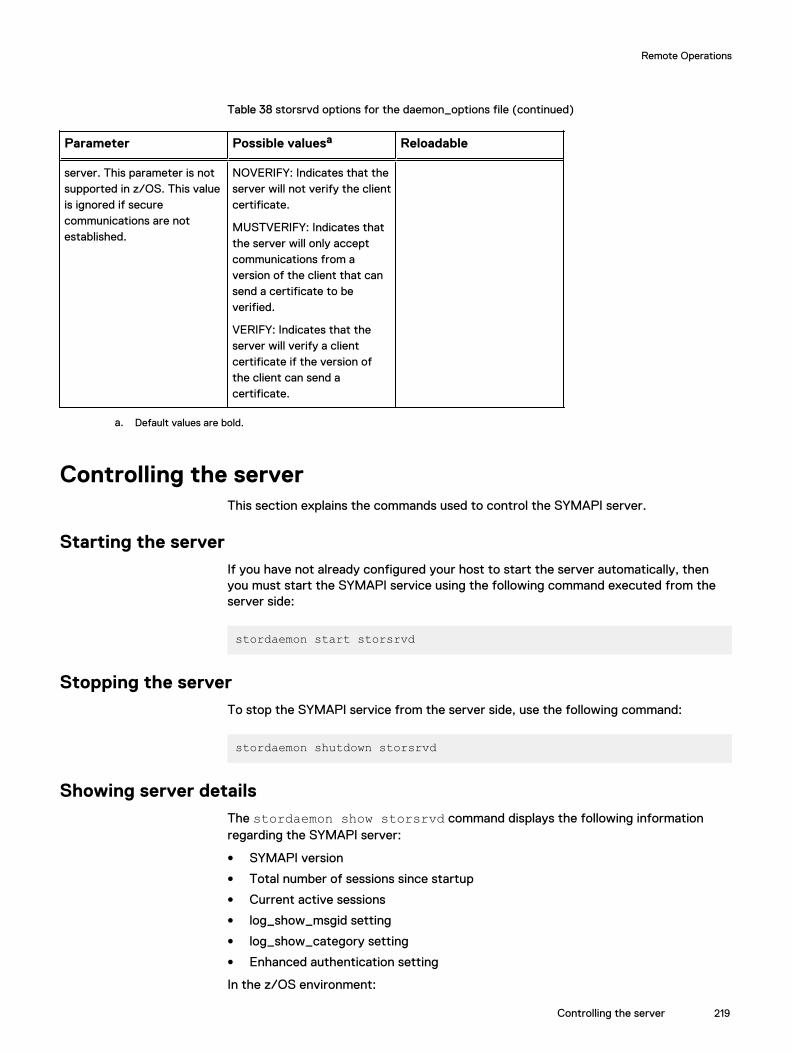
Table 38 storsrvd options for the daemon_options file (continued)
Parameter Possible valuesa Reloadable
server. This parameter is notsupported in z/OS. This valueis ignored if securecommunications are notestablished.
NOVERIFY: Indicates that theserver will not verify the clientcertificate.
MUSTVERIFY: Indicates thatthe server will only acceptcommunications from aversion of the client that cansend a certificate to beverified.
VERIFY: Indicates that theserver will verify a clientcertificate if the version ofthe client can send acertificate.
a. Default values are bold.
Controlling the serverThis section explains the commands used to control the SYMAPI server.
Starting the serverIf you have not already configured your host to start the server automatically, thenyou must start the SYMAPI service using the following command executed from theserver side:
stordaemon start storsrvd
Stopping the serverTo stop the SYMAPI service from the server side, use the following command:
stordaemon shutdown storsrvd
Showing server detailsThe stordaemon show storsrvd command displays the following informationregarding the SYMAPI server:
l SYMAPI version
l Total number of sessions since startup
l Current active sessions
l log_show_msgid setting
l log_show_category setting
l Enhanced authentication setting
In the z/OS environment:
Remote Operations
Controlling the server 219
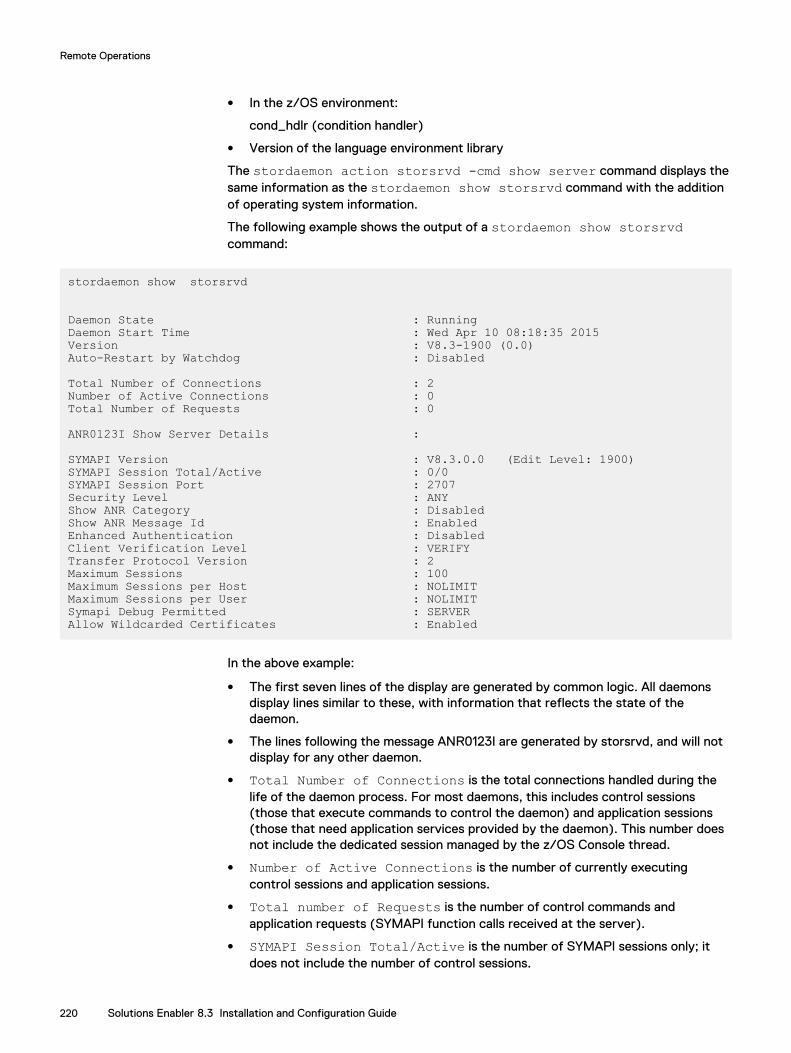
l In the z/OS environment:
cond_hdlr (condition handler)
l Version of the language environment library
The stordaemon action storsrvd -cmd show server command displays thesame information as the stordaemon show storsrvd command with the additionof operating system information.
The following example shows the output of a stordaemon show storsrvdcommand:
stordaemon show storsrvd
Daemon State : RunningDaemon Start Time : Wed Apr 10 08:18:35 2015Version : V8.3-1900 (0.0)Auto-Restart by Watchdog : Disabled
Total Number of Connections : 2Number of Active Connections : 0Total Number of Requests : 0
ANR0123I Show Server Details : SYMAPI Version : V8.3.0.0 (Edit Level: 1900)SYMAPI Session Total/Active : 0/0SYMAPI Session Port : 2707Security Level : ANYShow ANR Category : DisabledShow ANR Message Id : EnabledEnhanced Authentication : DisabledClient Verification Level : VERIFYTransfer Protocol Version : 2Maximum Sessions : 100Maximum Sessions per Host : NOLIMITMaximum Sessions per User : NOLIMITSymapi Debug Permitted : SERVERAllow Wildcarded Certificates : Enabled
In the above example:
l The first seven lines of the display are generated by common logic. All daemonsdisplay lines similar to these, with information that reflects the state of thedaemon.
l The lines following the message ANR0123I are generated by storsrvd, and will notdisplay for any other daemon.
l Total Number of Connections is the total connections handled during thelife of the daemon process. For most daemons, this includes control sessions(those that execute commands to control the daemon) and application sessions(those that need application services provided by the daemon). This number doesnot include the dedicated session managed by the z/OS Console thread.
l Number of Active Connections is the number of currently executingcontrol sessions and application sessions.
l Total number of Requests is the number of control commands andapplication requests (SYMAPI function calls received at the server).
l SYMAPI Session Total/Active is the number of SYMAPI sessions only; itdoes not include the number of control sessions.
Remote Operations
220 Solutions Enabler 8.3 Installation and Configuration Guide
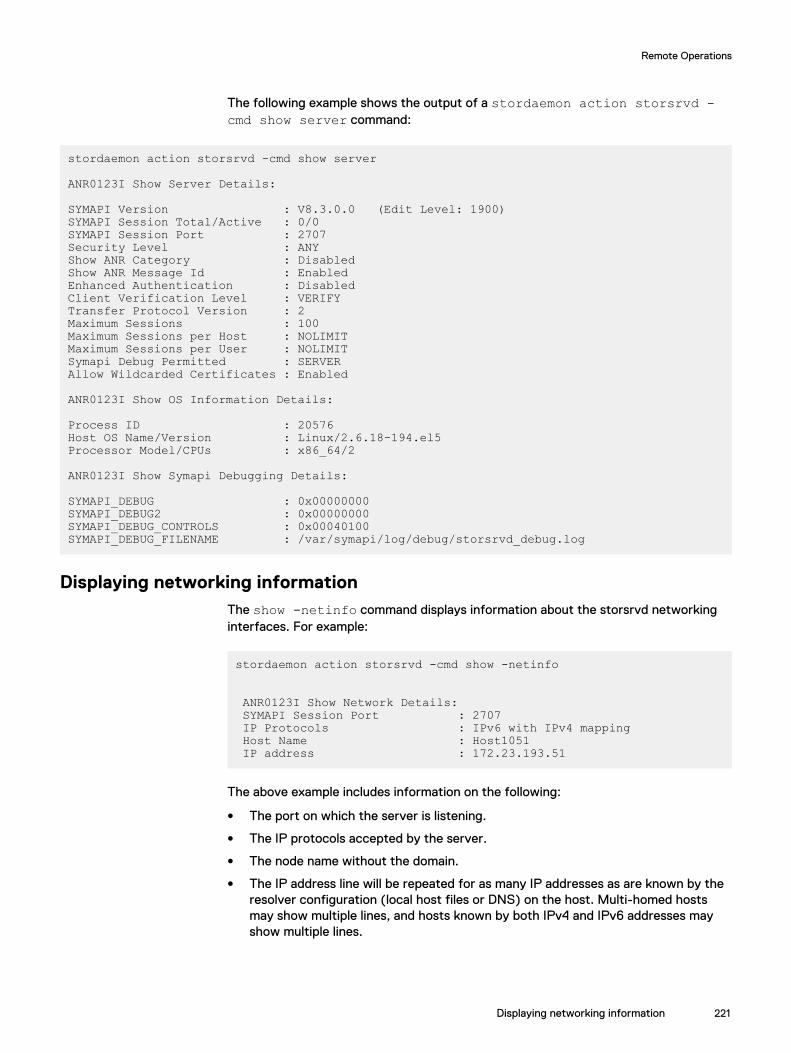
The following example shows the output of a stordaemon action storsrvd -cmd show server command:
stordaemon action storsrvd -cmd show server
ANR0123I Show Server Details:
SYMAPI Version : V8.3.0.0 (Edit Level: 1900)SYMAPI Session Total/Active : 0/0SYMAPI Session Port : 2707Security Level : ANYShow ANR Category : DisabledShow ANR Message Id : EnabledEnhanced Authentication : DisabledClient Verification Level : VERIFYTransfer Protocol Version : 2Maximum Sessions : 100Maximum Sessions per Host : NOLIMITMaximum Sessions per User : NOLIMITSymapi Debug Permitted : SERVERAllow Wildcarded Certificates : Enabled
ANR0123I Show OS Information Details:
Process ID : 20576Host OS Name/Version : Linux/2.6.18-194.el5Processor Model/CPUs : x86_64/2
ANR0123I Show Symapi Debugging Details:
SYMAPI_DEBUG : 0x00000000SYMAPI_DEBUG2 : 0x00000000SYMAPI_DEBUG_CONTROLS : 0x00040100SYMAPI_DEBUG_FILENAME : /var/symapi/log/debug/storsrvd_debug.log
Displaying networking informationThe show -netinfo command displays information about the storsrvd networkinginterfaces. For example:
stordaemon action storsrvd -cmd show -netinfo
ANR0123I Show Network Details: SYMAPI Session Port : 2707 IP Protocols : IPv6 with IPv4 mapping Host Name : Host1051 IP address : 172.23.193.51
The above example includes information on the following:
l The port on which the server is listening.
l The IP protocols accepted by the server.
l The node name without the domain.
l The IP address line will be repeated for as many IP addresses as are known by theresolver configuration (local host files or DNS) on the host. Multi-homed hostsmay show multiple lines, and hosts known by both IPv4 and IPv6 addresses mayshow multiple lines.
Remote Operations
Displaying networking information 221
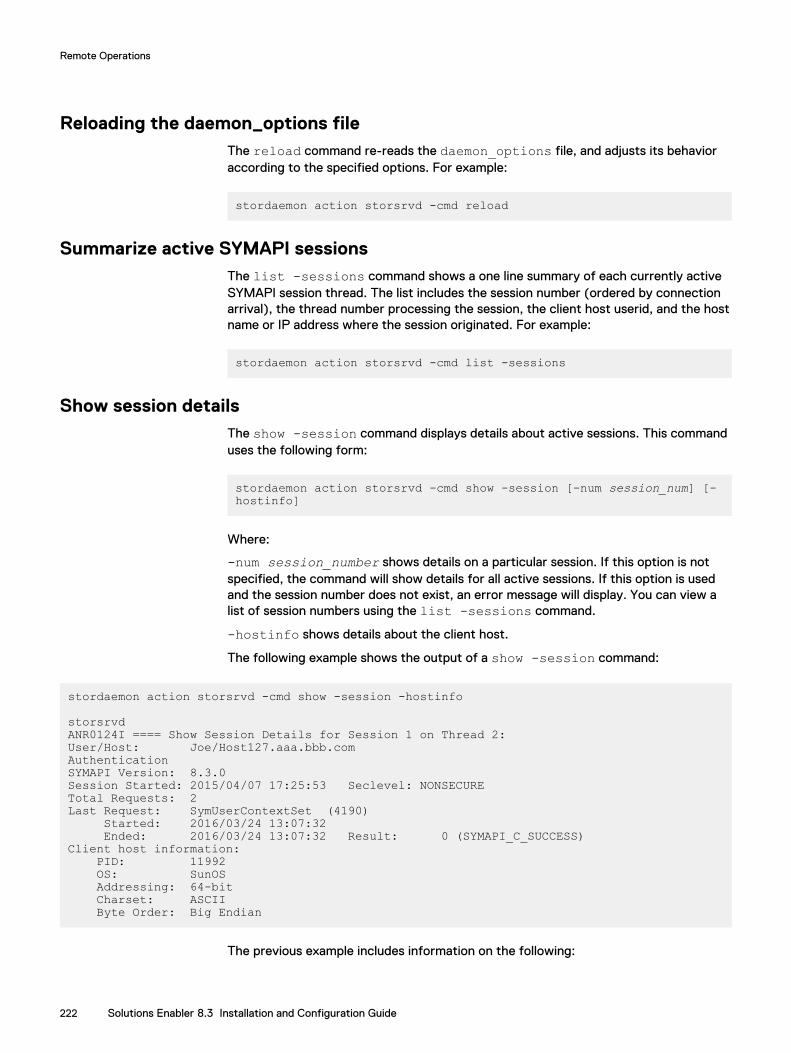
Reloading the daemon_options fileThe reload command re-reads the daemon_options file, and adjusts its behavioraccording to the specified options. For example:
stordaemon action storsrvd -cmd reload
Summarize active SYMAPI sessionsThe list -sessions command shows a one line summary of each currently activeSYMAPI session thread. The list includes the session number (ordered by connectionarrival), the thread number processing the session, the client host userid, and the hostname or IP address where the session originated. For example:
stordaemon action storsrvd -cmd list -sessions
Show session detailsThe show -session command displays details about active sessions. This commanduses the following form:
stordaemon action storsrvd -cmd show -session [-num session_num] [-hostinfo]
Where:
-num session_number shows details on a particular session. If this option is notspecified, the command will show details for all active sessions. If this option is usedand the session number does not exist, an error message will display. You can view alist of session numbers using the list -sessions command.
-hostinfo shows details about the client host.
The following example shows the output of a show -session command:
stordaemon action storsrvd -cmd show -session -hostinfo
storsrvd ANR0124I ==== Show Session Details for Session 1 on Thread 2:User/Host: Joe/Host127.aaa.bbb.comAuthenticationSYMAPI Version: 8.3.0 Session Started: 2015/04/07 17:25:53 Seclevel: NONSECURETotal Requests: 2Last Request: SymUserContextSet (4190) Started: 2016/03/24 13:07:32 Ended: 2016/03/24 13:07:32 Result: 0 (SYMAPI_C_SUCCESS)Client host information: PID: 11992 OS: SunOS Addressing: 64-bit Charset: ASCII Byte Order: Big Endian
The previous example includes information on the following:
Remote Operations
222 Solutions Enabler 8.3 Installation and Configuration Guide
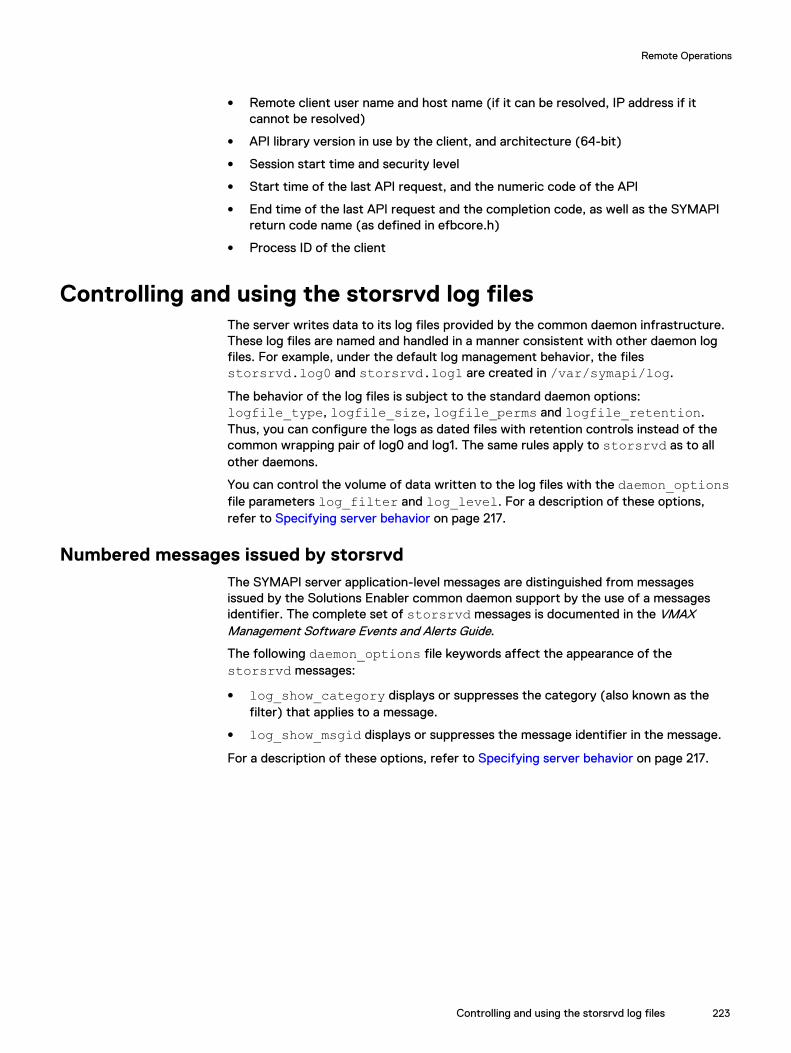
l Remote client user name and host name (if it can be resolved, IP address if itcannot be resolved)
l API library version in use by the client, and architecture (64-bit)
l Session start time and security level
l Start time of the last API request, and the numeric code of the API
l End time of the last API request and the completion code, as well as the SYMAPIreturn code name (as defined in efbcore.h)
l Process ID of the client
Controlling and using the storsrvd log filesThe server writes data to its log files provided by the common daemon infrastructure.These log files are named and handled in a manner consistent with other daemon logfiles. For example, under the default log management behavior, the filesstorsrvd.log0 and storsrvd.log1 are created in /var/symapi/log.
The behavior of the log files is subject to the standard daemon options:logfile_type, logfile_size, logfile_perms and logfile_retention.Thus, you can configure the logs as dated files with retention controls instead of thecommon wrapping pair of log0 and log1. The same rules apply to storsrvd as to allother daemons.
You can control the volume of data written to the log files with the daemon_optionsfile parameters log_filter and log_level. For a description of these options,refer to Specifying server behavior on page 217.
Numbered messages issued by storsrvdThe SYMAPI server application-level messages are distinguished from messagesissued by the Solutions Enabler common daemon support by the use of a messagesidentifier. The complete set of storsrvd messages is documented in the VMAXManagement Software Events and Alerts Guide.
The following daemon_options file keywords affect the appearance of thestorsrvd messages:
l log_show_category displays or suppresses the category (also known as thefilter) that applies to a message.
l log_show_msgid displays or suppresses the message identifier in the message.
For a description of these options, refer to Specifying server behavior on page 217.
Remote Operations
Controlling and using the storsrvd log files 223

Remote Operations
224 Solutions Enabler 8.3 Installation and Configuration Guide
CHAPTER 7
Technical Notes and Configuration
This chapter provides technical notes for advanced configuration of Solutions Enabler,VSS Provider, and SMI-S Provider.
l Solutions Enabler technical notes.....................................................................226l VSS Provider technical notes...........................................................................229l SMI-S Provider technical notes....................................................................... 239l Linux on System z technical note......................................................................241l z/OS technical notes........................................................................................ 241l HP-UX technical note...................................................................................... 243l OpenVMS technical note................................................................................. 244l Hyper-V technical notes...................................................................................244l Virtual Appliance technical notes..................................................................... 245
Technical Notes and Configuration 225
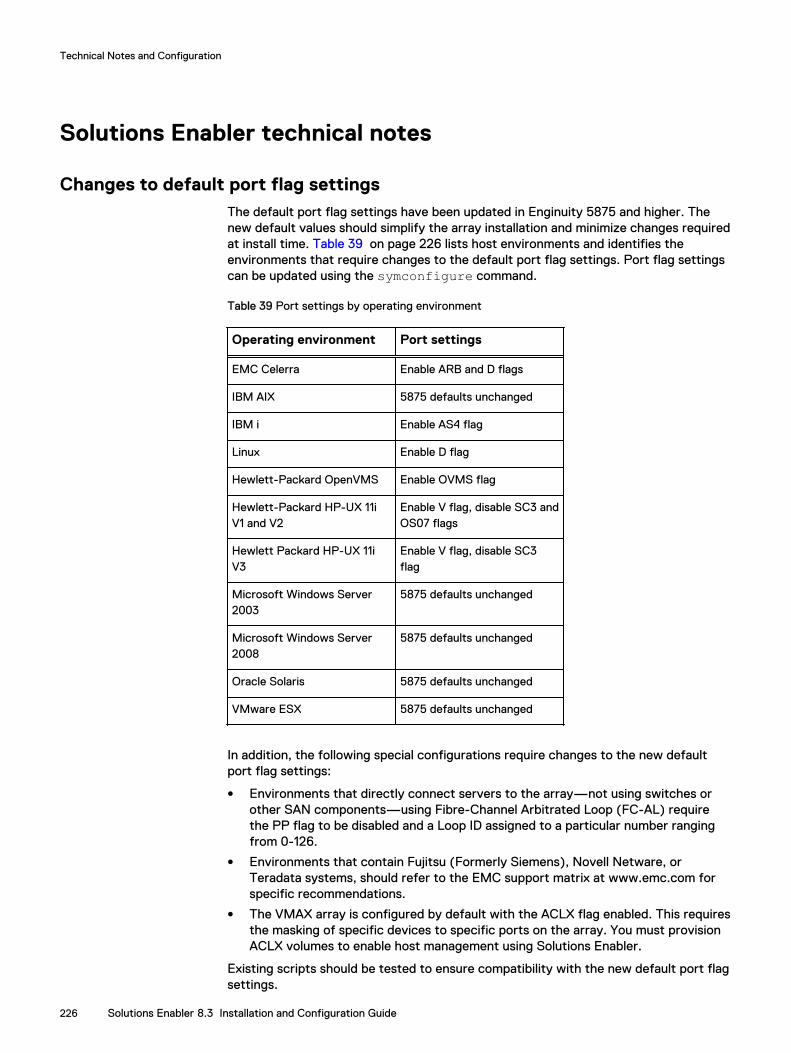
Solutions Enabler technical notes
Changes to default port flag settingsThe default port flag settings have been updated in Enginuity 5875 and higher. Thenew default values should simplify the array installation and minimize changes requiredat install time. Table 39 on page 226 lists host environments and identifies theenvironments that require changes to the default port flag settings. Port flag settingscan be updated using the symconfigure command.
Table 39 Port settings by operating environment
Operating environment Port settings
EMC Celerra Enable ARB and D flags
IBM AIX 5875 defaults unchanged
IBM i Enable AS4 flag
Linux Enable D flag
Hewlett-Packard OpenVMS Enable OVMS flag
Hewlett-Packard HP-UX 11iV1 and V2
Enable V flag, disable SC3 andOS07 flags
Hewlett Packard HP-UX 11iV3
Enable V flag, disable SC3flag
Microsoft Windows Server2003
5875 defaults unchanged
Microsoft Windows Server2008
5875 defaults unchanged
Oracle Solaris 5875 defaults unchanged
VMware ESX 5875 defaults unchanged
In addition, the following special configurations require changes to the new defaultport flag settings:
l Environments that directly connect servers to the array—not using switches orother SAN components—using Fibre-Channel Arbitrated Loop (FC-AL) requirethe PP flag to be disabled and a Loop ID assigned to a particular number rangingfrom 0-126.
l Environments that contain Fujitsu (Formerly Siemens), Novell Netware, orTeradata systems, should refer to the EMC support matrix at www.emc.com forspecific recommendations.
l The VMAX array is configured by default with the ACLX flag enabled. This requiresthe masking of specific devices to specific ports on the array. You must provisionACLX volumes to enable host management using Solutions Enabler.
Existing scripts should be tested to ensure compatibility with the new default port flagsettings.
Technical Notes and Configuration
226 Solutions Enabler 8.3 Installation and Configuration Guide
Note
Some of these new default values are different from earlier Enginuity settings.Connecting a host to arrays running Enginuity 5875 and arrays running an earlyEnginuity version may require changes to the 5875 defaults. Alternatively, you can setthe flags at the initiator to match the previously installed array with its existingconnection to the server. Changes to flag settings become effective after rebootingthe host.
Parallel Access Volumes
From DMX-3, DMX-3 950, DMX-4, DMX-4 950 and higher, both Dynamic ParallelAccess Volumes and Hyper Parallel Access Volumes use a pool of aliases for theControl Unit image. Aliases are not dedicated to specific devices and they do notappear in the device specific Aliases column of the symcfg show -cuimagecommand.
SIU support for ESX Server V4.0
The Symmetrix Integration Utilities (SIU) supports VMware ESX Server V4.1 Update 1.
Access Control setup
Use of the Symmetrix Access Control feature requires the help of EMC CustomerService to initially set up your array. For more information, contact your EMCRepresentative and refer to EMC Solutions Enabler Array Management CLI User Guideand EMC VMAX Family Security Configuration Guide.
Note
The Solutions Enabler (symacl) command provides full support for open systems.Access Control can be enforced for SYMAPI-based applications on z/OS platforms.However, z/OS and IBM i cannot be used as the Access Control administration node.
Note
CREATEDV access can only be granted to ALL devices or on !INPOOLS when thereare no accpools defined.
When host access IDs are tied to the host hardware, (refer to Alternate access IDearlier) upgrading or changing hardware components might result in a change to thehost access ID. For information about changing a host's Alternate access ID, see theEMC VMAX Family Security Configuration Guide.
Solutions Enabler access control requirementsIf Solutions Enabler Access Control is enabled on the VMAX array, then the host onwhich the SMI-S Provider is running must have sufficient privileges to perform thenecessary operations. At a minimum, the host on which the SMI-S Provider is runningmust be in a group that has access to ALL_DEVS with BASE and VLOGIX privileges.
Solutions Enabler Windows 2008 configuration requirements
Solutions Enabler supports Windows 2008 and requires some additional configurationdue to changes in Windows permissions.
The Solutions Enabler SYMCLI binaries require that the user executing them havewrite access to the following folders:
Technical Notes and Configuration
Changes to default port flag settings 227
l C:\Program Files\EMC\SYMAPI\dbl C:\Program Files\EMC\SYMAPI\logl C:\Program Files\EMC\SYMAPI\ldbThese folders are created during the Solutions Enabler installation and inheritpermissions from C:\Program Files. On most platforms, the resulting ACLs onthese folders will grant write privileges to the Administrators Group.
Using Windows Server versions prior to Server 2008, any member of theAdministrator's Group can execute the SYMCLI binaries. Using Windows Server 2008,and its User Access Control (UAC), only the built-in Administrator is by defaultgranted Administrative privileges.
Other members of the Administrator's Group will run in a degraded mode—as anordinary User—and therefore cannot execute the SYMCLI binaries. As a result, thereare several options for running Solutions Enabler binaries on Windows Server 2008:
l Log in as the built-in Administrator. This account may have been disabled by aSystems Administrator when Windows Server 2008 was installed.
l Log in using a different account and temporarily elevate your privileges to run as afull Administrator. For example, right-mouse-click on the CMD.EXE command iconand select Run as administrator from the menu. This will open a command shellrunning with full administrative privileges.
l Change the protection on the folders listed above to grant write access to theusers you want executing Solutions Enabler binaries.
CQL support statements
The SMI-S Provider supports CIM ExecQuery operations using CQL statements. Theperformance and scalability of these CQL operations can vary widely depending uponthe type and scope of the query being used along with the number of objects thatmust be evaluated in order to return a result. If you intend to use CQL queries as partof your application, please contact EMC through normal customer support channelswith a list of your CQL queries so that they can be evaluated.
In compliance with the CQL Specification, the syntax for the “not equal” operator is“<>”. If your client application uses “!=”, it must be modified to be in compliance withthe CQL specification. For example, below is a compliant CQL query using the “notequal” operator:
select * from CIM_StorageVolume where CIM_StorageVolume.Usage <> 2
AIX Object Data Model Environment VariableIf the ODMDIR environment variable in the running shell is not configured properly, aThe host System Stable Values do not match the current systemconfiguration error message is displayed when the user tries to run SolutionsEnabler commands from a script using third party applications when logged in withnon-root user ID.
The ODMDIR environment variable in the running shell should point to the directorywhere the AIX Object Data Model DB is located.
Technical Notes and Configuration
228 Solutions Enabler 8.3 Installation and Configuration Guide
Set the environment variable ODMDIR=/etc/objrepos from the UserId used to runthe script, or export the Environment Variable from the 3rd party script/applicationby:
export ODMDIR=/etc/objrepos
VSS Provider technical notes
Enable debugging for VSS ProviderTo enable debug logging for VSS Provider on a given host, perform the followingsteps:
Procedure
1. Select Run from the Windows Start menu, type regedit in the Open selectionwindow, and click OK. This opens the Registry Editor.
2. Select the following registry key from those listed:
HKEY_LOCAL_MACHINE\Software\EMC\ShadowCopy
Note
The EMCVssProvider service must have been previously started and a snapshotattempted for a key to exist in the list.
3. Change the LogLevel value from Error to Debug.
4. Close the regedit.exe program.
5. Stop and restart the EMCVssProvider and VolumeShadowCopyServiceservices.
Log fileBy default, VSS Provider writes all errors and notable information messages to a logfile (hwprov.log) located in the Solutions Enabler log folder (C:\Program Files\EMC\SYMAPI\log). This file provides necessary information for troubleshootingoperations of VSS Provider.
Note
To change the location of the VSS Provider log file, edit the Log file registry keylocated in the HKEY_LOCAL_MACHINE\Software\EMC\ShadowCopy directory.
Registry keysTable 40 on page 230 lists the VSS Provider registry key fields and the possiblevalues.
Technical Notes and Configuration
VSS Provider technical notes 229
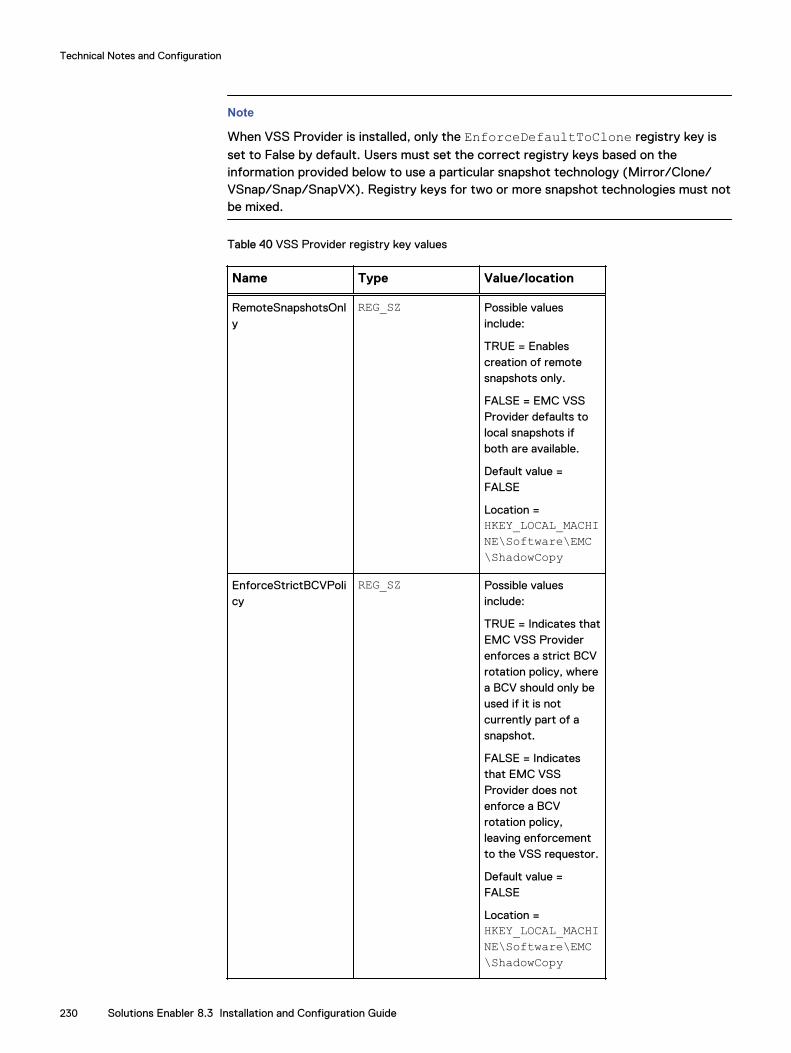
Note
When VSS Provider is installed, only the EnforceDefaultToClone registry key isset to False by default. Users must set the correct registry keys based on theinformation provided below to use a particular snapshot technology (Mirror/Clone/VSnap/Snap/SnapVX). Registry keys for two or more snapshot technologies must notbe mixed.
Table 40 VSS Provider registry key values
Name Type Value/location
RemoteSnapshotsOnly
REG_SZ Possible valuesinclude:
TRUE = Enablescreation of remotesnapshots only.
FALSE = EMC VSSProvider defaults tolocal snapshots ifboth are available.
Default value =FALSE
Location =HKEY_LOCAL_MACHINE\Software\EMC\ShadowCopy
EnforceStrictBCVPolicy
REG_SZ Possible valuesinclude:
TRUE = Indicates thatEMC VSS Providerenforces a strict BCVrotation policy, wherea BCV should only beused if it is notcurrently part of asnapshot.
FALSE = Indicatesthat EMC VSSProvider does notenforce a BCVrotation policy,leaving enforcementto the VSS requestor.
Default value =FALSE
Location =HKEY_LOCAL_MACHINE\Software\EMC\ShadowCopy
Technical Notes and Configuration
230 Solutions Enabler 8.3 Installation and Configuration Guide
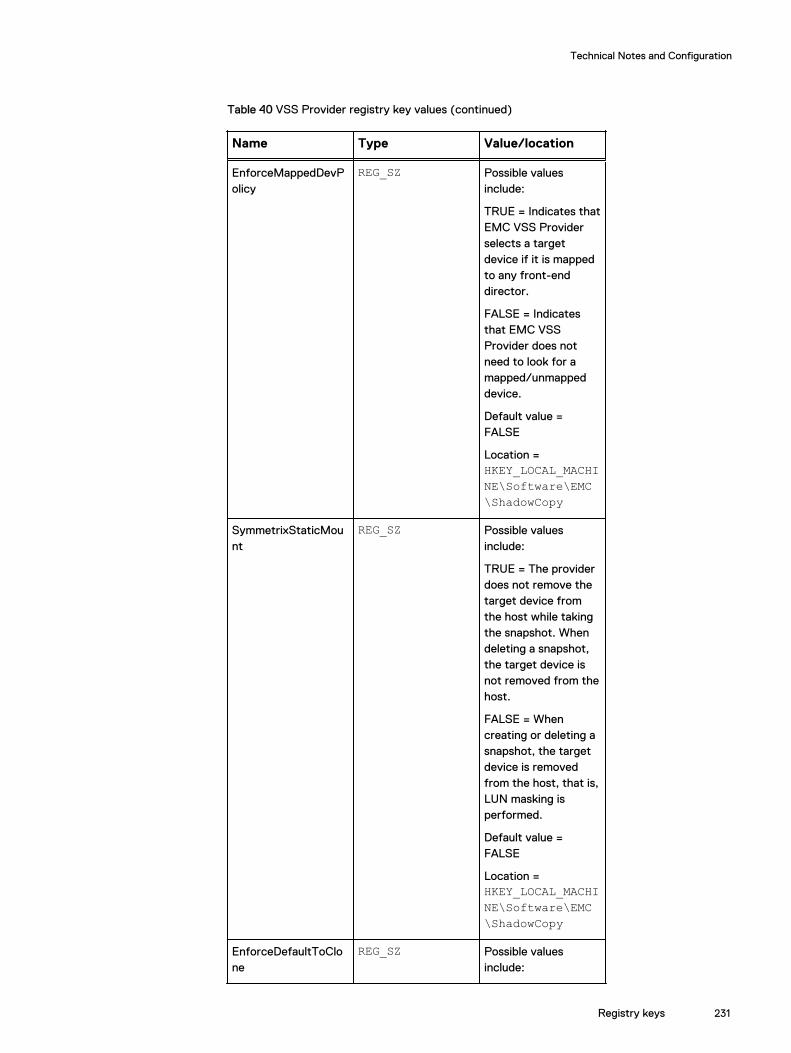
Table 40 VSS Provider registry key values (continued)
Name Type Value/location
EnforceMappedDevPolicy
REG_SZ Possible valuesinclude:
TRUE = Indicates thatEMC VSS Providerselects a targetdevice if it is mappedto any front-enddirector.
FALSE = Indicatesthat EMC VSSProvider does notneed to look for amapped/unmappeddevice.
Default value =FALSE
Location =HKEY_LOCAL_MACHINE\Software\EMC\ShadowCopy
SymmetrixStaticMount
REG_SZ Possible valuesinclude:
TRUE = The providerdoes not remove thetarget device fromthe host while takingthe snapshot. Whendeleting a snapshot,the target device isnot removed from thehost.
FALSE = Whencreating or deleting asnapshot, the targetdevice is removedfrom the host, that is,LUN masking isperformed.
Default value =FALSE
Location =HKEY_LOCAL_MACHINE\Software\EMC\ShadowCopy
EnforceDefaultToClone
REG_SZ Possible valuesinclude:
Technical Notes and Configuration
Registry keys 231
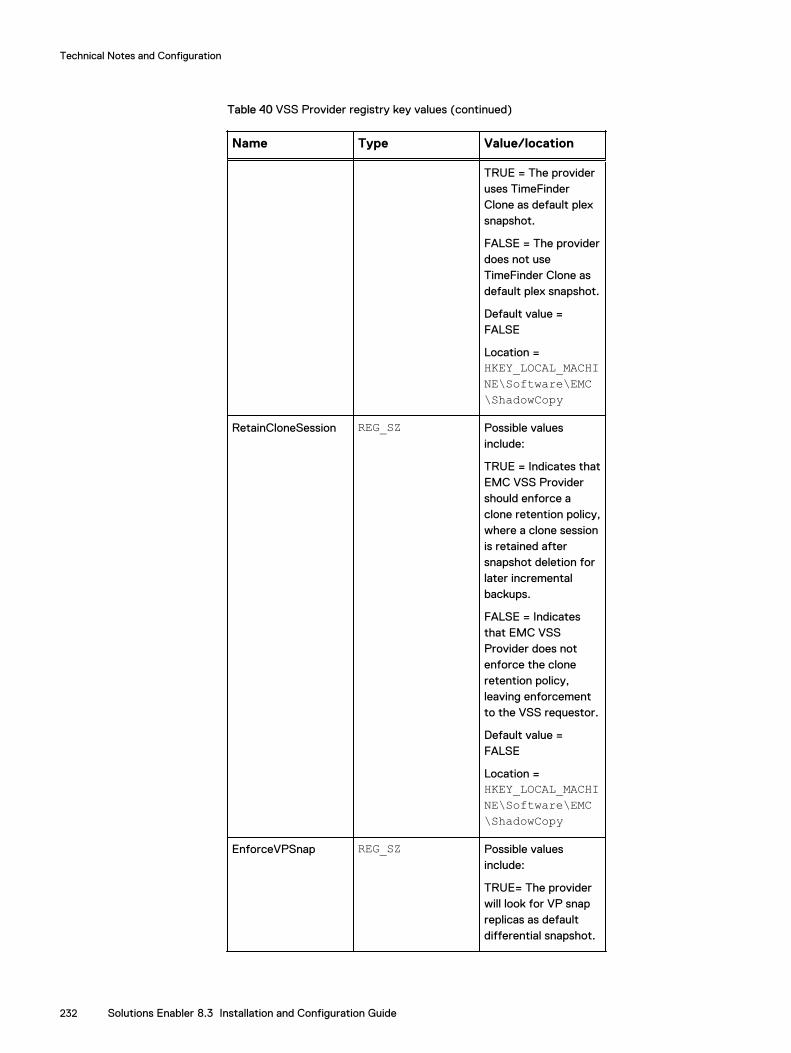
Table 40 VSS Provider registry key values (continued)
Name Type Value/location
TRUE = The provideruses TimeFinderClone as default plexsnapshot.
FALSE = The providerdoes not useTimeFinder Clone asdefault plex snapshot.
Default value =FALSE
Location =HKEY_LOCAL_MACHINE\Software\EMC\ShadowCopy
RetainCloneSession REG_SZ Possible valuesinclude:
TRUE = Indicates thatEMC VSS Providershould enforce aclone retention policy,where a clone sessionis retained aftersnapshot deletion forlater incrementalbackups.
FALSE = Indicatesthat EMC VSSProvider does notenforce the cloneretention policy,leaving enforcementto the VSS requestor.
Default value =FALSE
Location =HKEY_LOCAL_MACHINE\Software\EMC\ShadowCopy
EnforceVPSnap REG_SZ Possible valuesinclude:
TRUE= The providerwill look for VP snapreplicas as defaultdifferential snapshot.
Technical Notes and Configuration
232 Solutions Enabler 8.3 Installation and Configuration Guide
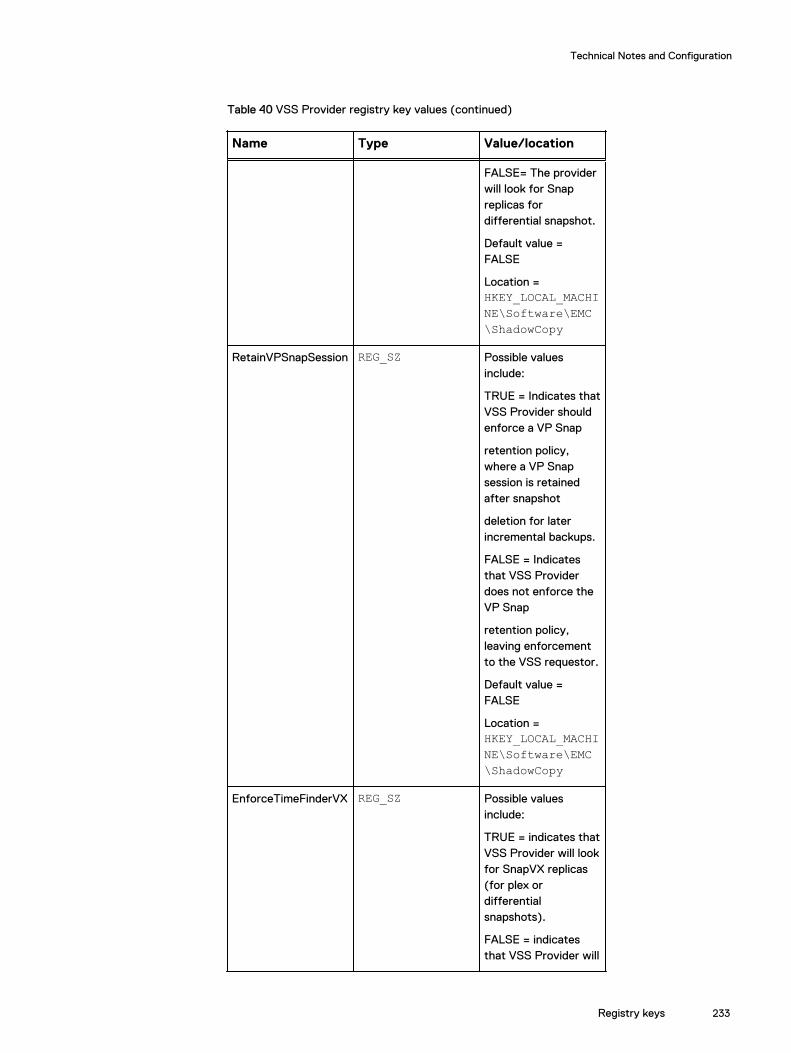
Table 40 VSS Provider registry key values (continued)
Name Type Value/location
FALSE= The providerwill look for Snapreplicas fordifferential snapshot.
Default value =FALSE
Location =HKEY_LOCAL_MACHINE\Software\EMC\ShadowCopy
RetainVPSnapSession REG_SZ Possible valuesinclude:
TRUE = Indicates thatVSS Provider shouldenforce a VP Snap
retention policy,where a VP Snapsession is retainedafter snapshot
deletion for laterincremental backups.
FALSE = Indicatesthat VSS Providerdoes not enforce theVP Snap
retention policy,leaving enforcementto the VSS requestor.
Default value =FALSE
Location =HKEY_LOCAL_MACHINE\Software\EMC\ShadowCopy
EnforceTimeFinderVX REG_SZ Possible valuesinclude:
TRUE = indicates thatVSS Provider will lookfor SnapVX replicas(for plex ordifferentialsnapshots).
FALSE = indicatesthat VSS Provider will
Technical Notes and Configuration
Registry keys 233
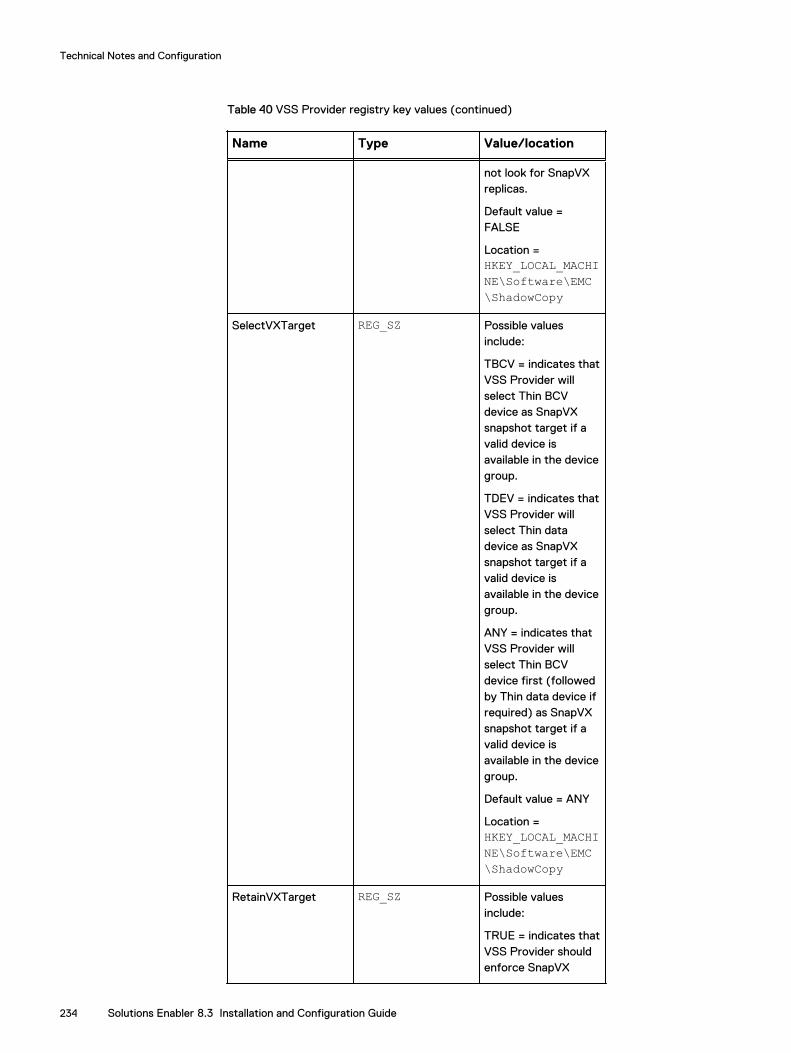
Table 40 VSS Provider registry key values (continued)
Name Type Value/location
not look for SnapVXreplicas.
Default value =FALSE
Location =HKEY_LOCAL_MACHINE\Software\EMC\ShadowCopy
SelectVXTarget REG_SZ Possible valuesinclude:
TBCV = indicates thatVSS Provider willselect Thin BCVdevice as SnapVXsnapshot target if avalid device isavailable in the devicegroup.
TDEV = indicates thatVSS Provider willselect Thin datadevice as SnapVXsnapshot target if avalid device isavailable in the devicegroup.
ANY = indicates thatVSS Provider willselect Thin BCVdevice first (followedby Thin data device ifrequired) as SnapVXsnapshot target if avalid device isavailable in the devicegroup.
Default value = ANY
Location =HKEY_LOCAL_MACHINE\Software\EMC\ShadowCopy
RetainVXTarget REG_SZ Possible valuesinclude:
TRUE = indicates thatVSS Provider shouldenforce SnapVX
Technical Notes and Configuration
234 Solutions Enabler 8.3 Installation and Configuration Guide
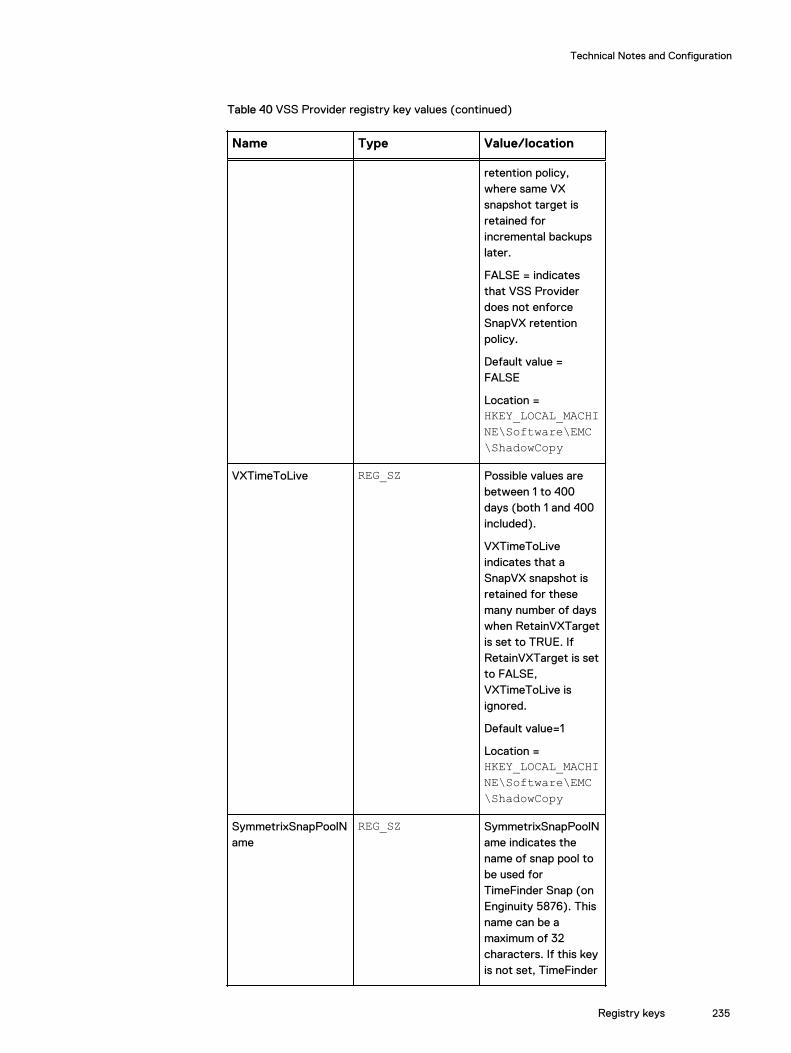
Table 40 VSS Provider registry key values (continued)
Name Type Value/location
retention policy,where same VXsnapshot target isretained forincremental backupslater.
FALSE = indicatesthat VSS Providerdoes not enforceSnapVX retentionpolicy.
Default value =FALSE
Location =HKEY_LOCAL_MACHINE\Software\EMC\ShadowCopy
VXTimeToLive REG_SZ Possible values arebetween 1 to 400days (both 1 and 400included).
VXTimeToLiveindicates that aSnapVX snapshot isretained for thesemany number of dayswhen RetainVXTargetis set to TRUE. IfRetainVXTarget is setto FALSE,VXTimeToLive isignored.
Default value=1
Location =HKEY_LOCAL_MACHINE\Software\EMC\ShadowCopy
SymmetrixSnapPoolName
REG_SZ SymmetrixSnapPoolName indicates thename of snap pool tobe used forTimeFinder Snap (onEnginuity 5876). Thisname can be amaximum of 32characters. If this keyis not set, TimeFinder
Technical Notes and Configuration
Registry keys 235
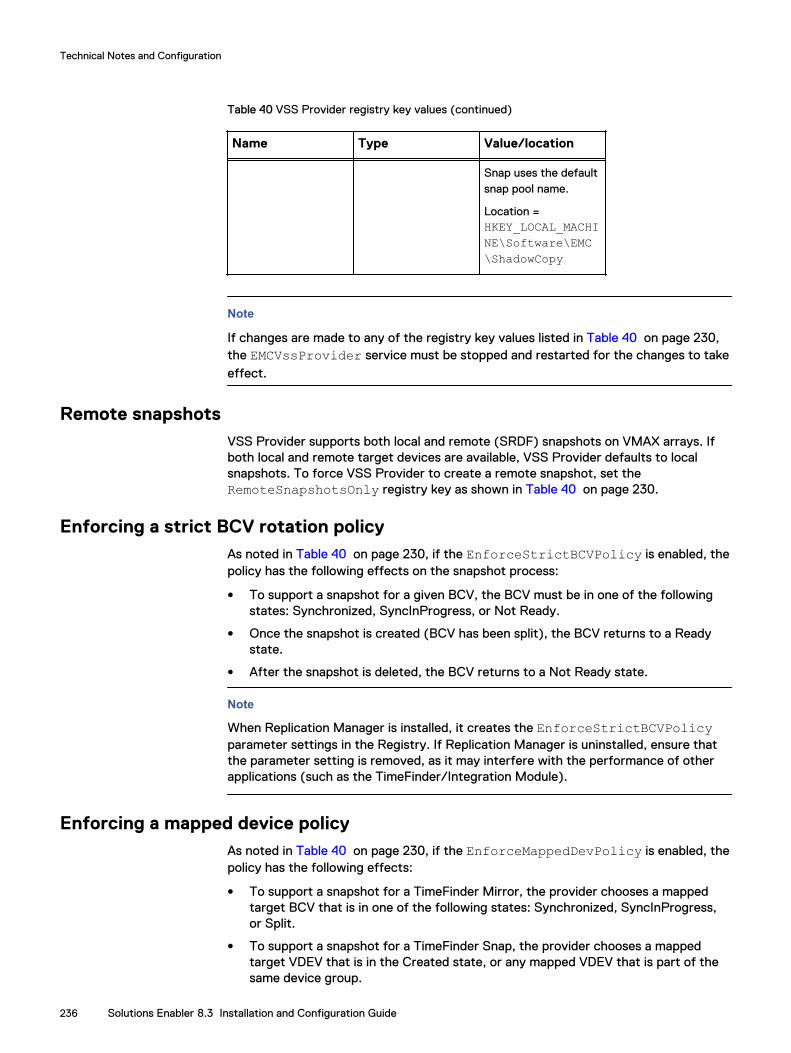
Table 40 VSS Provider registry key values (continued)
Name Type Value/location
Snap uses the defaultsnap pool name.
Location =HKEY_LOCAL_MACHINE\Software\EMC\ShadowCopy
Note
If changes are made to any of the registry key values listed in Table 40 on page 230,the EMCVssProvider service must be stopped and restarted for the changes to takeeffect.
Remote snapshotsVSS Provider supports both local and remote (SRDF) snapshots on VMAX arrays. Ifboth local and remote target devices are available, VSS Provider defaults to localsnapshots. To force VSS Provider to create a remote snapshot, set theRemoteSnapshotsOnly registry key as shown in Table 40 on page 230.
Enforcing a strict BCV rotation policyAs noted in Table 40 on page 230, if the EnforceStrictBCVPolicy is enabled, thepolicy has the following effects on the snapshot process:
l To support a snapshot for a given BCV, the BCV must be in one of the followingstates: Synchronized, SyncInProgress, or Not Ready.
l Once the snapshot is created (BCV has been split), the BCV returns to a Readystate.
l After the snapshot is deleted, the BCV returns to a Not Ready state.
Note
When Replication Manager is installed, it creates the EnforceStrictBCVPolicyparameter settings in the Registry. If Replication Manager is uninstalled, ensure thatthe parameter setting is removed, as it may interfere with the performance of otherapplications (such as the TimeFinder/Integration Module).
Enforcing a mapped device policyAs noted in Table 40 on page 230, if the EnforceMappedDevPolicy is enabled, thepolicy has the following effects:
l To support a snapshot for a TimeFinder Mirror, the provider chooses a mappedtarget BCV that is in one of the following states: Synchronized, SyncInProgress,or Split.
l To support a snapshot for a TimeFinder Snap, the provider chooses a mappedtarget VDEV that is in the Created state, or any mapped VDEV that is part of thesame device group.
Technical Notes and Configuration
236 Solutions Enabler 8.3 Installation and Configuration Guide
Note
In case of single source paired with multiple target devices, VSS Provider selects thefirst mapped target device if available.
Using SymmetrixStaticMount to disable LUN masking and unmaskingAs noted in Table 40 on page 230, if SymmetrixStaticMount is enabled, this hasfollowing effects during snapshot creation and deletion:
l Provider will not remove target device from the host while creating the snapshot.
l During import of the snapshot, Provider will not attempt to add target device tohost.
l Provider will not remove target device from the host while deleting the snapshot.
Note
To take snapshots with registry key SymmetrixStaticMount enabled, it is requiredthat target devices are made visible to the VM or host before the snapshot creation.User should see target devices under Disk Management on Windows Server operatingsystem.
Enforcing TimeFinder Clone as default plex snapshot technologyInstallation of VSS Provider creates registry key EnforceDefaultToClone with adefault value of FALSE.
When the registry key EnforceDefaultToClone is set to TRUE, the VSS Provideruses TimeFinder Clone as the default plex snapshot. In this case, snapshot creationwith TimeFinder Mirror sessions is not supported.
When the registry key EnforceDefaultToClone is set to FALSE (Default), theVSS Provider does not use TimeFinder Clone as the default plex snapshot. TimeFinderClone operations requires the use of EMC requestors.
Enforcing a clone retention policyThe clone retention policy is applicable to TimeFinder Clone operations. As noted in Table 40 on page 230, if RetainCloneSession is enabled, then the policy has thefollowing effects on the snapshot process:
l To support a snapshot, the target device must be in one of the following states:Created, Recreated, or Not Ready.
l Once the snapshot is created, the target device returns to a Ready state.
l After the snapshot is deleted, the target returns to a Not Ready state.
Enforcing TimeFinder VP Snap as default differential snapshot technologyTo create differential snapshots for VP Snap Sessions, use the EnforceVPSnap flag.
When the registry key EnforceVPSnap is set to TRUE, the VSS Provider usesTimeFinder VP Snap as the default differential snapshot.
When the registry key EnforceVPSnap is set to FALSE (default), and theEnforceTimeFinderVX is set to FALSE (default), the VSS Provider usesTimeFinder Snap as the default differential snapshot technology.
Technical Notes and Configuration
Using SymmetrixStaticMount to disable LUN masking and unmasking 237

Enforcing a VP Snap retention policyThe VP Snap retention policy is applicable to TimeFinder VP Snap operations. Asnoted in Table 40 on page 230, if RetainVPSnapSession is enabled, then thepolicy has the following effects on the snapshot process:
l To support a snapshot, the target device must be in one of the following states:Created, Recreated, or Not Ready.
l Once the snapshot is created, the target device returns to a Ready state.
l After the snapshot is deleted, the target returns to a Not Ready state.
Enforcing SnapVX as default snapshot technology on HYPERMAX OS 5977When the registry key EnforceTimeFinderVX is set to TRUE, VSS Provider V8.3uses SnapVX as the default snapshot technology. Snapshot context - plex ordifferential - is specified by VSS requester during backup operation. If no context isspecified by requestor for SnapVX, VSS Provider uses differential context as default.
When the registry key EnforceTimeFinderVX is set to FALSE (default), the VSSProvider does not use SnapVX as the default snapshot technology.
Note
If registry key EnforceTimeFinderVX is set to TRUE, then user must not setEnforceDefaultToClone to TRUE or EnforceVPSnap to TRUE. This is by designto avoid mixing of these registry keys. VSS Provider will return appropriate errormessage if these keys are mixed.
LUN resynchronizationVSS Provider supports the LUN Resynchronization (restore) feature for transportableshadow copies that is provided with Microsoft Volume Shadow Copy Service onWindows platforms for VMAX arrays. The LUN Resynchronization feature allows asource LUN to be restored from the destination LUN, in the event that there is dataloss on the source LUN. The Diskshadow VSS requestor tool should be used to initiateand perform the resynchronization.
LUN resynchronization support on VMAX arrays
The following information applies to using the LUN resynchronization feature onVMAX arrays:
l LUN resynchronization is supported for TimeFinder Mirror, Clone, VP Snap, Snapand SnapVX.
l For TimeFinder Mirror and Clone, LUN resynchronization is supported to bothexisting and new LUNs. For this, the new LUN must be a DATA device that isonline.
l For SnapVX, VP Snap and Snap LUN resynchronization is supported to existingLUNs only.
l On successful LUN resynchronization operations, the devices are in a restoredstate. The requesting application, or the user, is responsible for termination of therestored session.
Technical Notes and Configuration
238 Solutions Enabler 8.3 Installation and Configuration Guide
VSF (Veritas Storage Foundation) 5.1 SP1 for WindowsFrom VSS Provider V8.0, Veritas Storage Foundation (VSF) is no longer supported.
Windows Server 2008 R2 CSV (Cluster Shared Volumes)From VSS Provider V8.0, snapshots of CSV on VMAX arrays are supported. For CSVbackup, the requestor used should include Hyper-V writers.
Windows Server 2012 or 2012 R2 CSVFrom VSS Provider V8.0, snapshots of CSV on VMAX arrays are supported. For CSVbackup, the requestor used should include Hyper-V writers.
Using DPM to back up virtual machines deployed on CSVWhen using System Center Data Protection Manager as a requestor application,virtual machines deployed on CSV with VSS Provider can be backed up serially.
Note
VSS Provider does not support parallel backups.
SMI-S Provider technical notes
Global modeThese steps must be completed before any replication group operations are initiated.
Procedure
1. Shut down ECOM service.
2. Shut down Solutions Enabler daemons.
3. In the SYMAPI/config/options file add/enable this setting:
SYMAPI_USE_GNS = ENABLE4. Start ECOM service. ECOM service will automatically start the Solutions
Enabler daemons.
Mirror replication in two-provider configurationsThese steps must be completed to enable mirror replication for two-providerconfigurations:
Procedure
1. Shut down ECOM service.
2. Shut down Solutions Enabler daemons.
3. In the SYMAPI/config/options file add/enable these settings:
SYMAPI_USE_GNS = ENABLESYMAPI_USE_RDFD = ENABLE
Technical Notes and Configuration
VSF (Veritas Storage Foundation) 5.1 SP1 for Windows 239
4. In the <SYMAPI_HOME>/config/daemon_options file add/enable thissetting:
storgnsd:GNS_REMOTE_MIRROR = enable5. Start ECOM service. ECOM service will automatically start the Solutions
Enabler daemons.
To examine the running daemon, use the stordaemon list command.
To stop all of the daemons, use the stordaemon shutdown all -immediatecommand.
To start a daemon, use the stordaemon start <daemon name> command.
Object paths in SMI-S Provider V8.3The key values of the object path in SMI-S Provider V8.3 are different than the keyvalues of previous SMI-S provider versions. As a result, an object path in SMI-SProvider V8.3 is incompatible with the previous versions, and vice versa.
CIM interop namespaceThe CIM interop namespace for the SMI-S Provider is:
interop
Unexpected termination: Windows dump fileSMI-S Provider produces a dump file on the Microsoft Windows platform should theprovider terminate unexpectedly.
If an unexpected termination occurs on the Windows platform, a dump file is producedin the Program Files\EMC\ECIM\ECOM\Providers directory with the nameECOM.exe.dmp. If this occurs, send this file along with the remaining contents of thelog directory to EMC Customer Support for analysis.
Statistics collection intervalBy default the Block Server Performance Subprofile collects statistics from an arrayevery 15 minutes once the collection of statistics for that array is initiated. EMC doesnot support changing that interval to anything less than 15 minutes.
Logging in with the LDAP userUse the following format when logging into the ECOM server using LDAP:
<domain>\<username>@<ldapserver>
or
<username>@<ldapserver>
Technical Notes and Configuration
240 Solutions Enabler 8.3 Installation and Configuration Guide
For example, User1 in the ABCDomain attempting to connect to LDAPserver1 shoulduse the following credentials:
ABCDomain\User1@LDAPserver1
or
User1@LDAPserver1
SMI-S Provider user rolesA role is a predefined set of permissions, or access types, that determine theoperations a user can perform. Roles are predefined in SMI-S Provider and cannot bemodified. The following list details the user roles defined in SMI-S Provider along withthe associated privileges and capabilities:
l Administrator - User will have access to all administrative and storagemanagement interfaces and configuration data.
l Manager - User will have visibility of all storage system configuration data and willbe able to perform all storage management operations.
l Monitor - User will have visibility of all storage system configuration data, but willnot be able to perform any storage management operations.
l Security administrator - User will only be able to perform SMI-S security tasks andwill not have visibility of any storage system configuration data.
l VM User - This role is deprecated.
Linux on System z technical noteThe following technical notes are specific to the Linux on System z operatingenvironment:
HBA librariesTo run commands, such as syminq hba, version 1.3 (not version 1.4) of the zfcp HBAlibrary has to be built and installed on the guest.
The IBM developerWorks "Useful add-ons" website documents the building andinstallation of the zfcp HBA API library.
After the zfcp HBA API library is installed, the driver must be loaded into the kernelusing the following command:
modprobe zfcp_hbaapi
Various releases of Linux on System z have different names for the HBA API library.By default, Solutions Enabler V8.3 uses /usr/lib64/libzfcphbaapi.so.0If this is not the correct library, link /usr/lib64/libzfcphbaapi.so.0 (using ln) tothe correct library.
z/OS technical notes
Technical Notes and Configuration
SMI-S Provider user roles 241
Thread dumps in the zOS serverBy default, the Solutions Enabler server on z/OS is configured to take thread dumpsto spool via Language Environment dynamically allocated files. In the event of a threadcrash, these are the issued messages:
ANR0222E ConditionHandler invoked on thread 13, writing dump to DD DMP00013 ANR0223E Dump to DMP00013 is complete; thread 13 will be terminated
You might prefer that these thread dumps are not written to spool. To do this, use DDSYM$ENV in the server's JCL and add this environment variable:
SYMAPI_LE_DUMP_LOGDIR = 1
Using this variable redirects the dump output to files in the Solutions EnablerInstallation log directory. These files will have the same name as seen in theANR0222E message text. Restart the server after changing the environment variablefile.
In the event of a thread crash, the following messages are issued:
ANR0222E ConditionHandler invoked on thread 3, writing dump to DMP00003 in SYMAPI log directory ANR0223E Dump to DMP00003 in SYMAPI log directory is complete; thread 3 will be terminated
The log directory contains the thread dump output.
For example:
# ls /var/symapi/log DMP00003
#04DDDEFSince you will install Solutions Enabler into the same SMP/E zone as the SSCF720FMID, #04DDDEF will replace temporary and permanent DD definitions in the targetand distribution zones. If these DD definitions do not exist, the SMP/E DDDEFREPLACE statement will end with condition code 4, indicating that there was nothingto replace. This is generally expected, and is not an error.
#05RECEVThe #05RECEV job may end with a return code of 16 if your site default assemblerversion does not point to IEV90. The SMP/E message is:
GIM23401T ** PROGRAM IEV90 WAS REQUIRED FOR SMP/E PROCESSING BUT WAS NOT AVAILABLE.GIM20501I RECEIVE PROCESSING IS COMPLETE. THE HIGHEST RETURN CODE WAS 16.
If this message appears, customize and run the ASMHA job provided in the RIMLIBand then resubmit #05RECEV.
Technical Notes and Configuration
242 Solutions Enabler 8.3 Installation and Configuration Guide
#12CNTRLThe #12CNTRL job disables control operations which are now enabled by default inSolutions Enabler.
STEPLIB APF authorizationSince Solutions Enabler needs SCF to run, the SCF link lib must be included in theSTEPLIB concatenation for the RMLIB member #STORAPI. The SCF link library mustalready be authorized for SCF to execute, so if SCF is active, and if the SolutionsEnabler load library is APF authorized, the APF requirements for #STORAPI aresatisfied.
Note that the SCF link library may also be specified in the system link list or LPA, inwhich case you may comment out the DD statement that points to the SCF linklibrary.
Disabling control functions
CAUTION
The #12CNTRL job disables control operations which are now enabled by defaultin Solutions Enabler.
CAUTION
All control functions are enabled by default.
All control functions are now enabled when shipped. As control functions are enabled,they will execute in an unprotected state on the z/OS host. For example, controlfunctions allow remote open system hosts/clients to establish and split BCV andSRDF pairs from outside the IBM host. A zap is provided in the RIMLIB (job#12CNTRL). This zap allows these functions to be disabled, should a site determinethat it is necessary.
Security considerations if you do not disable control functionsUse caution when leaving these functions enabled, as security checks are notperformed. If security is an issue at your installation, do not leave the control functionsenabled. For complete information, refer to the EMC Solutions Enabler InstallationGuide.
HP-UX technical noteThe following technical note is specific to HP-UX operating environments:
HP applications link-edited with prior versions of Solutions EnablerApplications link-edited with Solutions Enabler 7.2.1 or earlier on any HP platformincluding PA-RISC 64-bit, and HP Itanium, may experience problems. The problem willbe seen during initialization with an error message indicating an unresolved symbol hasbeen detected. Refer to Knowledgebase article EMC269976 available on EMCSupport.
Technical Notes and Configuration
#12CNTRL 243
OpenVMS technical noteA CLI runtime problem occurs on OVMS 8.4 hosts running on Itanium hardware. Thisproblem only occurs with some CLI commands, such as symsnap. The symptom is anerror message like this:
%DCL-W-ACTIMAGE, error activating image EMC$LIBSTORPDS-CLI-E-IMAGEFNF, image file not found $1$DKA0:[SYS0.SYSCOMMON.][SYSLIB]EMC$LIBSTORPDS.EXE;
The resolution to this problem is documented in EMC Knowledgebase articleEMC278037.
Hyper-V technical notesBy default, SCSI commands are filtered in Hyper-V in Windows Server 2008 R2. Inorder to use Solutions Enabler in a guest partition, this filtering must be bypassed asrecommended in Planning for Disks and Storage article in the Microsoft TechNetLibrary.
The following PowerShell script, executed from the parent partition will disablefiltering for each child partition listed as arguments to the script. The settings arepersistent, but will require a restart of the virtual machine to take effect. The script isprovided as an example as-is, and includes no validation or error checkingfunctionality.
$Target = $args[0]
$VSManagementService = gwmi MSVM_VirtualSystemManagementService -namespace "root\virtualization"
foreach ($Child in Get-WmiObject -Namespace root\virtualization Msvm_ComputerSystem -Filter "ElementName='$Target'")
{$VMData = Get-WmiObject -Namespace root\virtualization -Query "Associators of {$Child}Where ResultClass=Msvm_VirtualSystemGlobalSettingDataAssocClass=Msvm_ElementSettingData"
$VMData.AllowFullSCSICommandSet=$true
$VSManagementService.ModifyVirtualSystem($Child, $VMData.PSBase.GetText(1)) |out-null
}
The following PowerShell script, executed from the parent partition will display thecurrent filtering status of each child partition listed as arguments to the script. Thescript is provided as an example as-is, and includes no validation or error checkingfunctionality.
$Target = $args[0]
Technical Notes and Configuration
244 Solutions Enabler 8.3 Installation and Configuration Guide
foreach ($Child in Get-WmiObject -Namespace root\virtualizationMsvm_ComputerSystem -Filter "ElementName='$Target'")
{$VMData = Get-WmiObject -Namespace root\virtualization -Query "Associators of {$Child}Where ResultClass=Msvm_VirtualSystemGlobalSettingDataAssocClass=Msvm_ElementSettingData"
Write-host "Virtual Machine:" $VMData.ElementNameWrite-Host "Currently ByPassing SCSI Filtering:" $VMData.AllowFullSCSICommandSet}
For more information, refer to the EMC Symmetrix with Microsoft Hyper-V Virtualizationwhite paper available on EMC Support.
Hyper-V Server setupIn Hyper-V setups where Solutions Enabler is installed on VMs, the VM names mustmatch the hostnames of the VMs. This ensures that the syminq commands on VMswork properly.
Hyper-V gatekeepersAt least three unique gatekeepers must be assigned to each virtual machine, as a pass-through disk, to provide Solutions Enabler capabilities to each virtual machine. Basedon the number of applications running on the guest, more gatekeepers may berequired.
For detailed information on gatekeeper management, refer to the EMC SolutionsEnabler Installation Guide. For specific gatekeeper sizing recommendations for all arrayconfigurations, refer to Knowledgebase article EMC255976 available on EMCSupport.
SIU support for Hyper-V guest OSSymmetrix Integration Utilities now supports Hyper-V guest operating systems onWindows Server 2008 R2 (and above). Refer to Hyper-V technical notes on page 244for details about configuring a Hyper-V environment.
Note
Only Windows Server editions are supported as Hyper-V guest operating systems.
SIU support for multiple log filesSymmetrix Integration Utilities (SIU) supports multiple log files for concurrentexecution of symntctl commands. This can be achieved by setting the environmentvariable SYMNTCTL_LOGFILE_NAME to a custom log file name in each commandprompt window. Alternatively, if it is set as a system environment variable, SIU willalways log all entries into the custom log file specified.
Virtual Appliance technical notes
Technical Notes and Configuration
Hyper-V Server setup 245
Linux only support when using ovftoolVirtual Appliance deployment using the ovftool is supported only on the Linuxplatform. It is not supported on the MicroSoft Windows platform.
Daemon behavior during import/export operationsTo ensure the integrity of persistent data, all active Solutions Enabler daemons will beshutdown during any import/export operation of persistent data. This causes aninterruption in the daemon service. The daemons will automatically restart at the endof an import/export operation.
Login page cursor not focusedAfter launching the Virtual Appliance from Firefox, the cursor does not default to theUser field. If you click Alt+Tab, leaving the application and then returning to it, thecursor will be in the User field. You can also place the cursor in the User fieldmanually. This issue applies to the Firefox browser only.
Server hostname requirementFor the Virtual Appliance to resolve a hostname, you should only use a fully qualifiedhostname (as entered in DNS server) while configuring nethosts and ESX Servers (foradding gatekeeper devices).
SSL certificate generationThe Virtual Appliance generates an SSL certificate (storsrvd - client/server setup)during the initial boot after the IP address is provided, and during every IP change orreboot.
Gatekeeper devicesThe Virtual Appliance will not allow more than 14 gatekeeper devices to be added tothe Virtual Appliance. Attempting to add more than 14 gatekeepers returns an errormessage.
Host ESX Server configurationHost ESX Server authentication is validated each time the GateKeeper Config tab isselected. If the authentication fails, the Host ESX Server login credentials andhostname information will be removed from Virtual Appliance records and must beadded again.
SMC daemon serviceWhen SMC daemon service is shutdown from the vApp Manager, the user is loggedout of the Virtual Appliance and the browser is closed.
Flash Player versionAdobe Flash Player version 11.2 or higher is required for running the Virtual Applianceon a web browser.
Technical Notes and Configuration
246 Solutions Enabler 8.3 Installation and Configuration Guide
Changing the IP addressStop all daemons with the vApp Manager before changing the IP address of theappliance.
SYMCLI commands executed/submitted as rootWhen using the vApp Manager with the seconfig account, SYMCLI commands areexecuted/submitted as root.
Least privileged permission requirementsConsult the appropriate VMware documentation for guidance on the least privilegedpermissions required to deploy a virtual appliance.
Technical Notes and Configuration
Changing the IP address 247

Technical Notes and Configuration
248 Solutions Enabler 8.3 Installation and Configuration Guide
CHAPTER 8
Gatekeeper Device Configuration
This chapter describes the function of gatekeepers and how to create them.
l Overview..........................................................................................................250l Creating gatekeeper devices............................................................................253l Displaying gatekeeper information................................................................... 254
Gatekeeper Device Configuration 249
OverviewSolutions Enabler is an EMC software component used to control the storage featuresof VMAX arrays. It receives user requests via CLI, GUI, or other means, and generatessystem commands that are transmitted to the VMAX array for action.
Gatekeeper devices are LUNs that act as the target of command requests toEnginuity-based functionality. These commands arrive in the form of disk I/Orequests. As more commands are issued in parallel from the host, and as thecommands grow in complexity, more gatekeepers will be required to handle thecommands in a timely manner.
A gatekeeper is not intended to store data and is usually configured as a small device.Users are encouraged to not build gatekeepers in larger sizes as the small size can beused as a characteristic to locate gatekeepers. Gatekeeper devices should be mappedand masked to single hosts only and should not be shared across hosts.
Starting with Enginuity 5876, multipath gatekeeper support has been expandedbeyond using PowerPath to include a limited set of third-party multipathing solutionson a limited set of platforms.
Note
For specific gatekeeper sizing recommendations for all configurations, refer to EMCKnowledgebase solution emc255976 available on EMC Online Support.
How SYMCLI uses gatekeepersWhen selecting a gatekeeper to process system commands, Solutions Enabler startswith the highest priority gatekeeper candidate (Priority 1, as described in Gatekeepercandidates on page 250). If there are no gatekeeper candidates at that priority, or thedevice is not accessible or currently in use, then Solutions Enabler tries to use theremaining gatekeeper candidates, in priority order, until it successfully obtains agatekeeper, or it has tried all gatekeeper candidates.
When Solutions Enabler successfully obtains a gatekeeper, it locks the device, andthen processes the system commands. Once Solutions Enabler has processed thesystem commands, it closes and unlocks the device, freeing it for other processing.
If the base daemon is performing gatekeeper management, gatekeepers are openedand locked, then used repeatedly to process system commands. The base daemoncloses and unlocks gatekeepers after they have not been used for at least 60 seconds.
Gatekeeper candidatesSolutions Enabler selects certain devices from the list of all PDEVs to be gatekeepercandidates and automatically excludes the following PDEVS from the candidate list:
l BCVs
l Meta devices
l Virtual devices (VDEVs)
Note
From HYPERMAX OS 5977, gatekeepers must always be thin devices.
Gatekeeper Device Configuration
250 Solutions Enabler 8.3 Installation and Configuration Guide
Solutions Enabler selects a gatekeeper from the candidate list based on a pre-established priority scheme. The gatekeeper priority list includes all gatekeepercandidates prioritized from the highest to the lowest, as shown below:
1. Small (< 10 cylinders) devices, marked by the storage array with the inquirygatekeeper flag.
2. Standard non-RDF and non-metadevices.
3. RDF R1 devices.
4. RDF R2 devices.
5. VCM/ACLX devices.
Using the gkavoid and gkselect filesThe gkavoid file specifies the VMAX devices that should not be used as gatekeepers.The gatekeeper avoidance file contains physical device names with one PdevName(/dev/rdsk/c2t0d1s2) per line.
The gkselect file specifies only those VMAX devices to be used as gatekeepers. Thefile contains physical device names, with one PdevName (for example, /dev/rdsk/c2t0d1s2) per line.
When determining which of these files is appropriate for your environment, considerthe following:
Note
In the following list, data device refers to a non-dedicated gatekeeper device.
l If too many gatekeepers are in the gkavoid file, Solutions Enabler may end upselecting a data device as a gatekeeper. This could potentially cause significantimpact on host application performance.
l If there are not enough gatekeepers in the gkselect file, array control operationsmay time out. However, no extra maintenance is required when adding new datadevices, as would be necessary when using only the gkavoid file.
Note
If there are no devices listed in the gkselect file for a particular VMAX array, or if allof the devices listed in the file are offline or do not exist at the time the file is read,then normal gatekeeper selection rules apply, as explained in Gatekeeper candidateson page 250. This may also result in Solutions Enabler choosing a data device as agatekeeper and that could impact host application performance. (The base daemonpicks up all changes to the gkselect and gkavoid files dynamically.)
Note
If a device is listed in both the gkavoid file and the gkselect file, the device will beavoided.
Sizing gatekeepersWhen a VMAX array is installed, the EMC Customer Engineer selects and configuresVMAX devices with less than 10 cylinders (less than 5 MB) for use as gatekeeperdevices.
Gatekeeper Device Configuration
Using the gkavoid and gkselect files 251
However, the gatekeeper device must be at least as large as the minimum volume sizeaccessible by your host, which is usually, 6 cylinders, 2.8 MB. Consult your hostdocumentation for the minimum device size accessible by your particular host todetermine the minimum gatekeeper device size for your environment.
Note
For specific gatekeeper sizing recommendations for all array configurations, refer toEMC Knowledgebase article emc255976 available on EMC Online Support.
You can determine the storage size of a VMAX device using:
l The sympd command using the list and show arguments as follows:list — Displays a list of physical device names and storage size (in MBs) for aspecific VMAX array.
show — Displays the parameters of a specified physical device that includes thedevice capacity or size in blocks and megabytes.
l The syminq command and specifying the physical device name.
Note
Sometimes the EMC Customer Service Engineer configures a few VMAX devices foruse as dedicated gatekeepers. You can distinguish these devices in the output of thesyminq command by locating a symbol GK next to the PdevName (physical devicename). Devices listed in the gkselect file are not required to have the GK attribute,though it is highly recommended. Listing non-dedicated gatekeeper devices in the filemay cause significant impact on host application performance.
Note
For Windows platforms in a clustered environment, gatekeepers must be a minimum of8 MB in size and have a signature. In a non-clustered environment, gatekeeper devicessmaller than 8 MB will show up in the new Disk Manager as devices with no availableinformation. (Disk Manager just displays the disk number and a blank bar.) The devicesare still addressable at the SCSI level, and SYMCLI scripts continue to work. (Theremay be some implications for device naming, since the Windows Device Manager doesnot create some of the normal device objects for devices smaller than 8 MB).
Note
For specific gatekeeper sizing recommendations for all array configurations, refer toEMC Knowledgebase article emc255976 available on EMC Online Support.
VMware setupUnique gatekeepers must be assigned to each virtual machine, as a raw device, toprovide Solutions Enabler capabilities to each virtual machine. Individual applicationsmay have specific requirements for gatekeepers.
For specific gatekeeper sizing recommendations for all array configurations, refer toKnowledgebase article EMC255976 available on EMC Support.
Gatekeeper Device Configuration
252 Solutions Enabler 8.3 Installation and Configuration Guide
Creating gatekeeper devicesThe symconfigure command automates the process of creating gatekeeperdevices. These gatekeeper devices are sized as follows:
l Enginuity 5771 or higher — 3 cylinders
l Enginuity versions lower than 5771 — 6 cylinders
Both sizes of gatekeeper devices are protection type RAID1.
Use the following syntax in a command file to create gatekeeper devices:
create gatekeeper count=n, emulation=EmulationType, [, type=thin [, binding to pool=<PoolName>]] [, mvs_ssid=n] [, sg=<SgName>] [, [mapping to dir DirNum:PortNum [starting] target = scsi_target , lun=scsi_lun, vbus=fibre_vbus [starting] base_address=cuu_address]...] [host_id=compatible|native];
Where:
count — Indicates the number of devices to create.
emulation— Specifies the device emulation type.
type=thin — Specifies that the gatekeeper is a thin gatekeeper.
binding to pool — Specifies the existing device pool to which the newly createdthin GK should be bound.
mvs_ssid — Specifies the subsystem ID group value for the newly created device.
sg= <SgName> — Specifies the SG to which the gatekeeper is added upon creation.
mapping to dir— Specifies the director/port addresses to which the newlycreated gatekeeper should be mapped.
target — Indicates a hex value for the SCSI target ID.
lun — Indicates a hex value for the SCSI logical unit number.
vbus — Specifies the virtual bus address if mapping to an FA port using volume setaddressing.
base_address — Indicates a base or alias address for a device being mapped to anEA or EF port.
host_id — Indicates the host ID format, that is either the new Federated ID format(NATIVE) or an ID compatible with the previous ID format (COMPATIBLE) that is anon-portable ID value only unique within the array. Additionally, you can change thedevice's host ID on an existing device to either a native ID or a compatible ID.
RestrictionsOn Enginuity versions lower than 5874, this command only allows the creation of agatekeeper device. It does not allow the mapping of the newly created device to beperformed at the same time as the creation of the new device.
Gatekeeper Device Configuration
Creating gatekeeper devices 253
On HYPERMAX OS 5977, this command only allows the creation of thin gatekeeperdevices.
Native ID is not supported for iSeries (D910_099) devices.
The following restrictions apply for SBC and VMAXe series platforms:
l You are not allowed to create any disk group provisioned devices using thecreate dev command, except for DATA devices. It is advised to use the creategatekeeper command introduced in Solutions Enabler V7.3 to create gatekeeperdevices.
l A gatekeeper device created with the create dev command will have a fixedsize of 6 cylinders for DMX 800/1000/2000/3000, and 3 cylinders for DMX-3,DMX-3 950, DMX-4, DMX-4 950 or higher. There are no options to specify otherdevice sizes.
l The gatekeeper device created using the create dev command has a fixedprotection type of RAID 1. There are no options to specify another deviceprotection type.
Displaying gatekeeper informationThe stordaemon commands in this section display information on gatekeeper usage.
Displaying gatekeeper statisticsTo display information on the number of gatekeeper candidates, dedicatedgatekeepers, unique gatekeepers, open gatekeepers, and gatekeeper utilizationinformation, use the following command:
stordaemon action storapid -cmd show -gk_stats [-sid SymmID]
Where:
SymmID specifies the VMAX array for which you want to display information. Issuingthis command without the -sid option will display information on all storage arrays.
For example:
stordaemon action storapid -cmd show -gk_stats -sid 343
And the above command produces output similar to the following:
G A T E K E E P E R S T A T I S T I C S
Symmetrix ID: 000195700343
Total Paths Unique Paths ----------- ------------ Pdevs 232 232 GK Candidates 232 232 Dedicated GKs 40 40 VCM/ACLX devs 0 0 Pdevs in gkavoid 32 Pdevs in gkselect 0 Max Available GKs 8 Num Open GKs 3
Gatekeeper Device Configuration
254 Solutions Enabler 8.3 Installation and Configuration Guide
Gatekeeper Utilization Current 0 % Past Minute 10 % Past 5 Minutes 11 % Past 15 Minutes 11 % Since Midnight 0 % Since Starting 0 % Highwater Open Gatekeepers 4 Time of Highwater 01/19/2014 10:57:03 Gatekeeper Utilization 25 % Time of Highwater 01/19/2014 09:48:07 Gatekeeper Timeouts Since starting 0 Past Minute 0 Time of last timeout N/A
Displaying gatekeeper candidates and gatekeeper statesTo display which devices are gatekeeper candidates and the state of each gatekeeper(opened or closed), use the following command:
stordaemon action storapid -cmd show -gk_pdevs [-sid SymmID] [-v]
Where:
SymmIDspecifies the storage array for which you want to display information. Issuingthis command without the -sid option will display information on all storage arrays.The -v option specifies to display a verbose listing.
For example:
stordaemon action storapid -cmd show -gk_pdevs -sid 343
Gatekeeper Device Configuration
Displaying gatekeeper candidates and gatekeeper states 255

Gatekeeper Device Configuration
256 Solutions Enabler 8.3 Installation and Configuration Guide
APPENDIX A
Host specific behaviour running SolutionsEnabler
This section describes the issues in running Solutions Enabler on various hardwareplatforms. You will find additional information in the Release Notes, which aredistributed in hard copy with the Solutions Enabler kits.
The information in this section is organized by hardware platform and operatingsystem:
l General issues.................................................................................................. 258l HP-UX-specific issues..................................................................................... 258l HP OpenVMS-specific issues........................................................................... 261l IBM AIX-specific issues.................................................................................... 261
Host specific behaviour running Solutions Enabler 257
General issuesThis section describes issues that apply to all supported platforms.
Host system semaphores
Note
This section only applies if you manually changed the storapid:use_all_gks todisabled in the daemon_options file. Otherwise, this section may be skipped.
In UNIX and Linux environments, Solutions Enabler uses semaphores to serializeaccess to the gatekeeper devices. You or the System Administrator may need tooptimize the host system semaphore parameter settings. When optimizing thesemaphore parameters, the following values are recommended:
l semmni — Specifies the number of semaphore identifiers for the host. SolutionsEnabler requires one identifier for each gatekeeper, and one for each SYMAPIdatabase. The minimum recommended value for this parameter is 256.
l semmns — Specifies the number of semaphores for the host. Solutions Enablerrequires one semaphore for each gatekeeper, and one for each SYMAPI database.The minimum recommended value for this parameter is 256.
l semmnu — Specifies the number of undo structures for the host. SolutionsEnabler requires one undo structure for each gatekeeper, and one for eachSYMAPI database. The minimum recommended value for this parameter is 256.
l semume — Specifies the number of undo structures per process. The minimumrecommended value for this parameter is 256.
RDF daemon thread requirements
The RDF daemon allocates threads based on the number of locally attachedSymmextrix arrays visible to its host. On some host operating system configurationsthe default number of threads allowed per process may not be enough toaccommodate the RDF daemon's requirements. Although the exact number of threadsneeded for a given daemon cannot be exactly predicted, the recommended practice isto allow 16 threads per locally attached VMAX array.
HP-UX-specific issuesThis section describes the HP-UX system issues concerned with compatibility with theSYMCLI/SYMAPI database file, gatekeeper, and BCV device requirements.
Creating pseudo-devices for gatekeepers and BCVsIf the device you want to use as a gatekeeper or BCV device is accessed through theHP-PB (NIO) SCSI bus controller and you want the device to be visible to your host,you must create a pseudo-device for that device. (A pseudo-device is necessary forevery device you want visible to the host.)
Host specific behaviour running Solutions Enabler
258 Solutions Enabler 8.3 Installation and Configuration Guide
Note
Your HP-UX operating system may require a patch to support the HP-PB (NIO) SCSIboard. Patches for the HP-PB SCSI Pass-Thru driver (spt0) are available for HP-UXV11.20 and higher from HP on an Extension Media CD. Consult your HP representativeabout spt drivers for your specific system.
Note
If your HP system is configured with an HSC fast-wide differential SCSI interfaceboard and a device accessed through the HSC SCSI bus is available, you can specifythe gatekeeper devices through the procedure outlined in the EMC Solutions EnablerArray Management CLI User Guide.
To create pseudo-devices and specify devices as gatekeepers and BCV devices:
Procedure
1. Execute the ioscan command and find the full pathnames of the gatekeeperand BCV devices.
For example, the full pathname of the array volume designated to be thegatekeeper is /dev/rdsk/c1t2d1.
2. Enter the lsdev command and note the output. For example:
lsdev -d spt0Character Block Driver Class 80 -1 spt0 spt
Note
The wide SCSI Pass-Thru is identified as spt0. If there is no output response tothis command, the spt0 driver is missing. Install the proper driver beforeproceeding.
Note
There is also an spt driver. The spt driver will not work in this environment.
3. Create the device node for the gatekeeper device.
Note
This step creates a pseudo-device that is incapable of functioning like a normaldevice. It can only be used as a gatekeeper device or to process TimeFindercontrol functions directed to a BCV device.
For example, to create the device node:
mknod /dev/rdsk/pseudo_c1t2d1 c 80 0x012100
where:
Host specific behaviour running Solutions Enabler
Creating pseudo-devices for gatekeepers and BCVs 259
/dev/rdsk/pseudo_c1t2d1 is the full pathname of the pseudo-deviceassociated with /dev/rdsk/c1t2d1.
c specifies character (raw) device node creation.
80 is the character value from the output of the lsdev command. This is themajor number of the device file.
0x012100 is the minor number of the device file. The individual values of theminor number are:
l 0x indicates that the number is hexadecimal.
l 01 is the hexadecimal number of the controller referenced by /dev/rdsk/c1t2d1
l 2 is the hexadecimal number of the target ID referenced by /dev/rdsk/c1t2d1
l 1 is the hexadecimal number of the LUN referenced by /dev/rdsk/c1t2d1
l 00 must be the last two digits of the minor number.
4. Repeat step 3 for all BCV devices and alternate gatekeeper devices.
CAUTION
Do not perform I/O through the device (/dev/rdsk/cxtxdx) associatedwith the pseudo-device, nor use the pseudo-device as a normal device. Ifyou do, you have two paths to the same device from two different devicedrivers. Unknown results may occur.
5. To create the mapping information of standard devices to pseudo-devices,create the file:
/var/symapi/config/pseudo_devices
For each gatekeeper and BCV device, add a mapping to a pseudo-device. Forexample, in the pseudo_devices file, add the following line to map thepseudo-device filename (in bold), to the array device file:
/dev/rdsk/c1t0d0 /dev/rdsk/pseudo_c1t0d0
SYMAPI will then use this pseudo-device instead of the physical device filename.
When the SymDiscover() function is used, the pseudo-device mappings getposted in the log file (/var/symapi/log/symapi*.log).
swverify command not supportedThe native UNIX command swverify is not supported from Solutions Enabler V7.6and higher.
Host specific behaviour running Solutions Enabler
260 Solutions Enabler 8.3 Installation and Configuration Guide
HP OpenVMS-specific issuesThe default client/server communication security level is SECURE (on platforms thatwill support it). This can cause communication failures between OpenVMS hosts andnon OpenVMS hosts since OpenVMS does not support secure communication. Toworkaround this, you must change the security level on the host which the OpenVMSCLI commands will connect (SYMCLI_CONNECT) to ANY. For instructions, refer tothe EMC VMAX Family Security Configuration Guide.
IBM AIX-specific issuesThis section describes the IBM AIX system issues concerned with Oracle databasemapping and rebooting a system.
Oracle database mappingOracle 8 database mapping with SYMCLI is supported on 32-bit AIX V4.3 and above.
You may need to create the Oracle library, libclntsh.so.
To determine if the library exists for Oracle 8, execute the following:
ls $ORACLE_HOME/lib/libclntsh.so
If the library does not exist, execute the following command:
make -f $ORACLE_HOME/rdbms/lib/ins_rdbms.mk client_sharedlib
The Oracle 8 OCI executable is linked dynamically. You must set the followingenvironment variable as follows:
setenv LIBPATH $ORACLE_HOME/lib
BCV devices lost after rebootWhen a system comes back up after a reboot, it will not recognize your mapped BCVs.To work around this problem, you should run the following special BCV script(mkbcv):
cd /./inq.AIX | more (look for no gaps in the numbers, ie.. rhdisk0, rhdisk1, rhdisk3... - rhdisk2 is missing)cd /usr/lpp/Symmetrix/bin./mkbcv -a ALLcd /./inq.AIX | more (look for no gaps in the numbers, ie.. rhdisk0, rhdisk1, rhdisk2... - rhdisk2 is not missing)
It is recommended to have ./mkbcv -a ALL in your AIX boot procedures.
Host specific behaviour running Solutions Enabler
HP OpenVMS-specific issues 261

Note
inq.AIX can be found on the EMC FTP site.
Host specific behaviour running Solutions Enabler
262 Solutions Enabler 8.3 Installation and Configuration Guide
APPENDIX B
Solutions Enabler Directories
This appendix contains the directory list for UNIX, Windows, OpenVMS and UNIXSystem Services directories for z/OS installations:
l UNIX directories...............................................................................................264l Windows directories.........................................................................................265l OpenVMS directories....................................................................................... 267l z/OS Unix System Services directories........................................................... 268
Solutions Enabler Directories 263
UNIX directoriesTable 41 on page 264 lists the directories for UNIX platforms. Your directories maydiffer from this list since the location of these directories is configurable atinstallation.
Table 41 UNIX directories
Contents Directories Details
Binaries forexecutables
/usr/storapi/storbin
/usr/storapi/bin
STORCLI binaries.
SYMCLI binaries.
Shared libraries /usr/storapi/shlib All shared libraries.
Database engines /usr/storapi/shlib/sql/IBMUDB/
/usr/storapi/shlib/sql/ORACLE/
/usr/storapi/shlib/sql/SYBASE/
IBM database engine.
Oracle databaseengine.
Sybase databaseengine.
Language interfaces /usr/storapi/interfaces/java/
/usr/storapi/interfaces/xml/
Java languageinterface.
XML examples.
SYMCLI manpages /usr/symcli/storman/man3
/usr/symcli/man/man1
/usr/symcli/man/man3
STORCLI andSTORAPI man pages.
SYMCLI man pages.
SYMAPI andCLARAPI man pages.
SYMAPI MessageCatalogs
/usr/storapid/locales/en
SYMAPI ErrorMessage Catalog forEnglish.
Daemons /usr/symcli/daemons/
Location of thedaemon executables.
Configurationdatabase file(s)
/var/symapi/db/ Contains theconfigurationdatabase file(s) forSYMAPI, CLARAPI,and STORAPI.
SYMAPI environmentand system files
/var/symapi/config Includes licenses,avoidance, options,daemon_options,
daemon_users, and
nethost files.
Solutions Enabler Directories
264 Solutions Enabler 8.3 Installation and Configuration Guide
Table 41 UNIX directories (continued)
Contents Directories Details
It is recommendedthat you back up thisdirectory frequently.
SYMAPI certificatefiles
/var/symapi/config/cert
Contains server andtrusted certificatefiles and support filesfor certificatecreation. Used forclient/server security.
Security data /var/symapi/authz_cache
Acts as a cache ofauthorization datafrom attachedstorage arrays.
Log files /var/symapi/log Contains SYMAPIlogs and daemon logs.
Windows directoriesTable 42 on page 265 lists the default directories for Windows. Your directories maydiffer from this list since the location of these directories is configurable atinstallation.
Table 42 Windows directories
Contents Directories Details
Binaries forexecutables
C:\Program Files\EMC\SYMCLI\storbin
C:\Program Files\EMC\SYMCLI\bin
STORCLI binaries.
SYMCLI binaries.
Shared libraries C:\Program Files\EMC\SYMCLI\shlib
All shared libraries.
Database engines C:\Program Files\EMC\SYMCLI\shlib\sql\Oracle
C:\Program Files\EMC\SYMCLI\shlib\sql\SQLSERVER
C:\Program Files\EMC\SYMCLI\shlib\sql\ASM
Oracle databaseengine.
SQL server databaseengine.
ASM databaseengine.
Solutions Enabler Directories
Windows directories 265
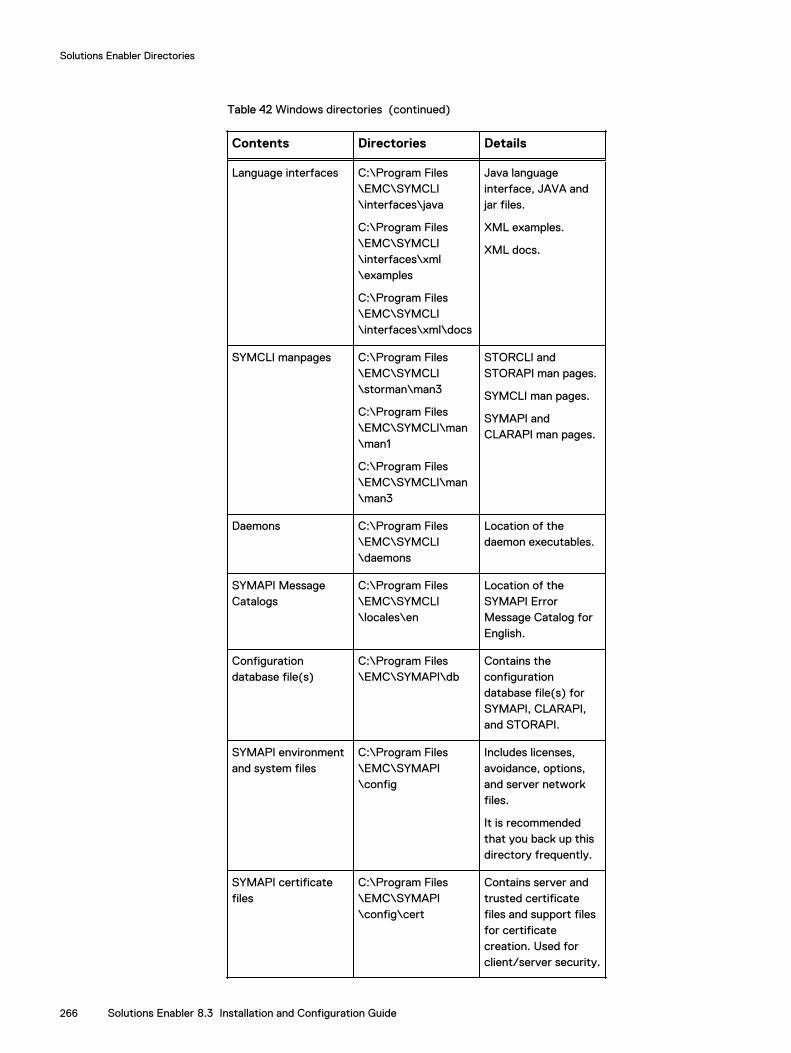
Table 42 Windows directories (continued)
Contents Directories Details
Language interfaces C:\Program Files\EMC\SYMCLI\interfaces\java
C:\Program Files\EMC\SYMCLI\interfaces\xml\examples
C:\Program Files\EMC\SYMCLI\interfaces\xml\docs
Java languageinterface, JAVA andjar files.
XML examples.
XML docs.
SYMCLI manpages C:\Program Files\EMC\SYMCLI\storman\man3
C:\Program Files\EMC\SYMCLI\man\man1
C:\Program Files\EMC\SYMCLI\man\man3
STORCLI andSTORAPI man pages.
SYMCLI man pages.
SYMAPI andCLARAPI man pages.
Daemons C:\Program Files\EMC\SYMCLI\daemons
Location of thedaemon executables.
SYMAPI MessageCatalogs
C:\Program Files\EMC\SYMCLI\locales\en
Location of theSYMAPI ErrorMessage Catalog forEnglish.
Configurationdatabase file(s)
C:\Program Files\EMC\SYMAPI\db
Contains theconfigurationdatabase file(s) forSYMAPI, CLARAPI,and STORAPI.
SYMAPI environmentand system files
C:\Program Files\EMC\SYMAPI\config
Includes licenses,avoidance, options,and server networkfiles.
It is recommendedthat you back up thisdirectory frequently.
SYMAPI certificatefiles
C:\Program Files\EMC\SYMAPI\config\cert
Contains server andtrusted certificatefiles and support filesfor certificatecreation. Used forclient/server security.
Solutions Enabler Directories
266 Solutions Enabler 8.3 Installation and Configuration Guide
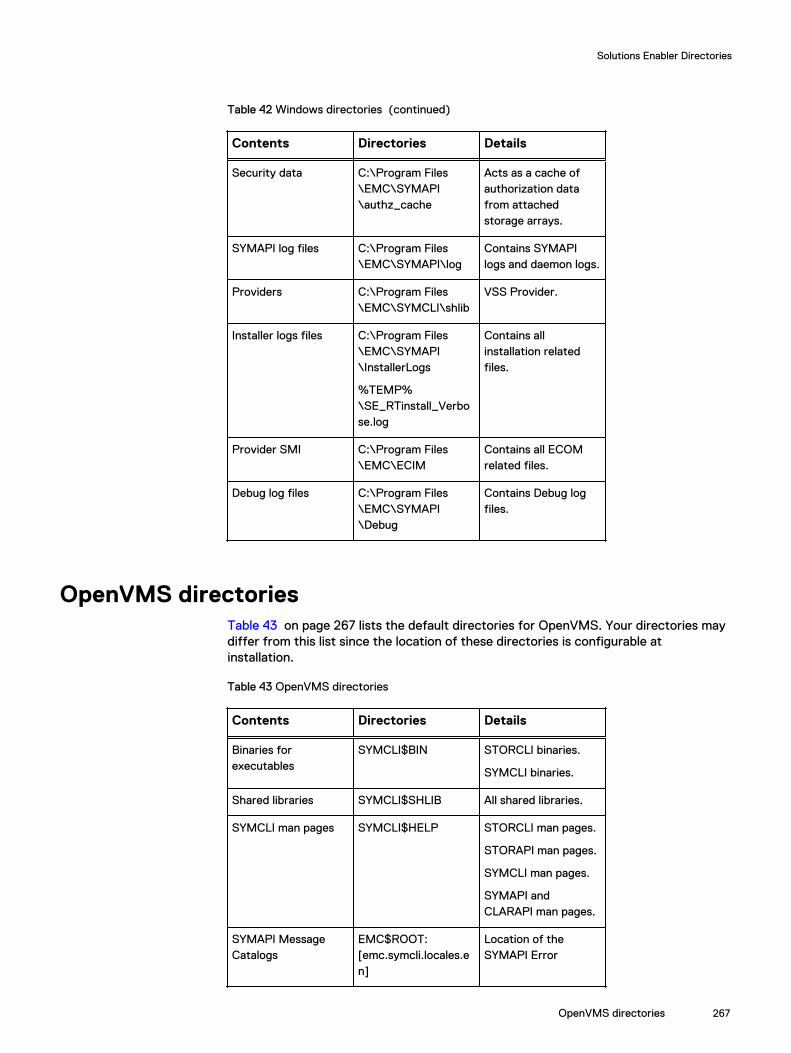
Table 42 Windows directories (continued)
Contents Directories Details
Security data C:\Program Files\EMC\SYMAPI\authz_cache
Acts as a cache ofauthorization datafrom attachedstorage arrays.
SYMAPI log files C:\Program Files\EMC\SYMAPI\log
Contains SYMAPIlogs and daemon logs.
Providers C:\Program Files\EMC\SYMCLI\shlib
VSS Provider.
Installer logs files C:\Program Files\EMC\SYMAPI\InstallerLogs
%TEMP%\SE_RTinstall_Verbose.log
Contains allinstallation relatedfiles.
Provider SMI C:\Program Files\EMC\ECIM
Contains all ECOMrelated files.
Debug log files C:\Program Files\EMC\SYMAPI\Debug
Contains Debug logfiles.
OpenVMS directoriesTable 43 on page 267 lists the default directories for OpenVMS. Your directories maydiffer from this list since the location of these directories is configurable atinstallation.
Table 43 OpenVMS directories
Contents Directories Details
Binaries forexecutables
SYMCLI$BIN STORCLI binaries.
SYMCLI binaries.
Shared libraries SYMCLI$SHLIB All shared libraries.
SYMCLI man pages SYMCLI$HELP STORCLI man pages.
STORAPI man pages.
SYMCLI man pages.
SYMAPI andCLARAPI man pages.
SYMAPI MessageCatalogs
EMC$ROOT:[emc.symcli.locales.en]
Location of theSYMAPI Error
Solutions Enabler Directories
OpenVMS directories 267
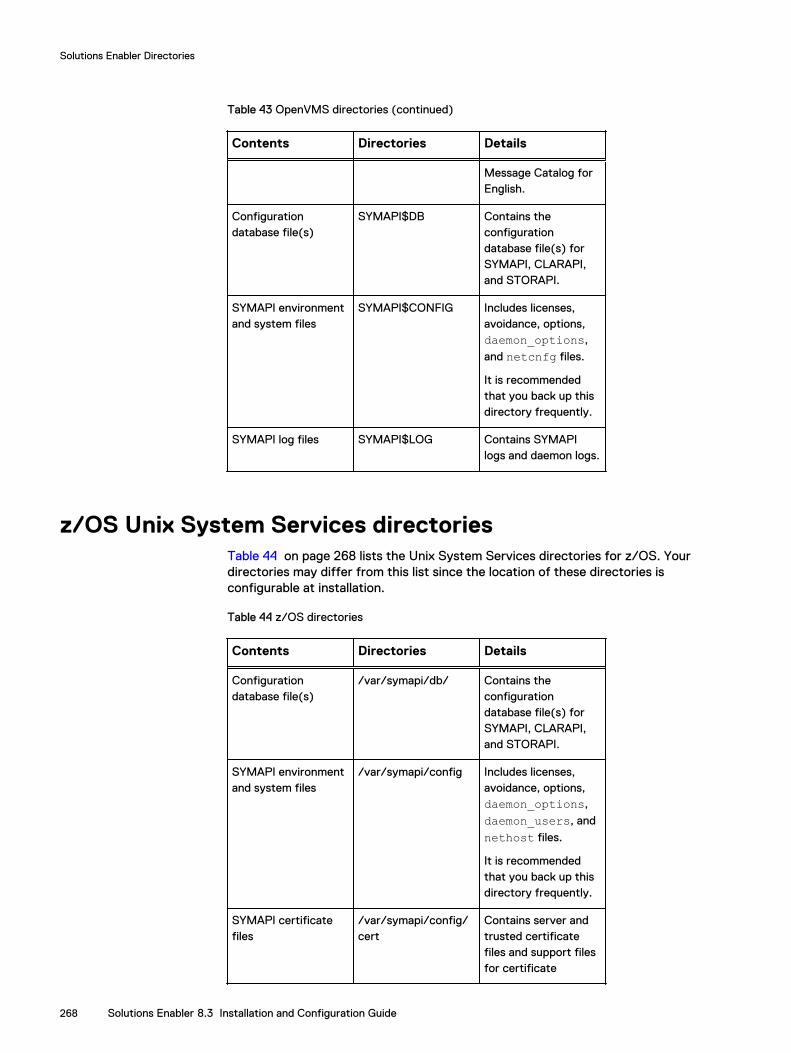
Table 43 OpenVMS directories (continued)
Contents Directories Details
Message Catalog forEnglish.
Configurationdatabase file(s)
SYMAPI$DB Contains theconfigurationdatabase file(s) forSYMAPI, CLARAPI,and STORAPI.
SYMAPI environmentand system files
SYMAPI$CONFIG Includes licenses,avoidance, options,daemon_options,
and netcnfg files.
It is recommendedthat you back up thisdirectory frequently.
SYMAPI log files SYMAPI$LOG Contains SYMAPIlogs and daemon logs.
z/OS Unix System Services directoriesTable 44 on page 268 lists the Unix System Services directories for z/OS. Yourdirectories may differ from this list since the location of these directories isconfigurable at installation.
Table 44 z/OS directories
Contents Directories Details
Configurationdatabase file(s)
/var/symapi/db/ Contains theconfigurationdatabase file(s) forSYMAPI, CLARAPI,and STORAPI.
SYMAPI environmentand system files
/var/symapi/config Includes licenses,avoidance, options,daemon_options,
daemon_users, and
nethost files.
It is recommendedthat you back up thisdirectory frequently.
SYMAPI certificatefiles
/var/symapi/config/cert
Contains server andtrusted certificatefiles and support filesfor certificate
Solutions Enabler Directories
268 Solutions Enabler 8.3 Installation and Configuration Guide
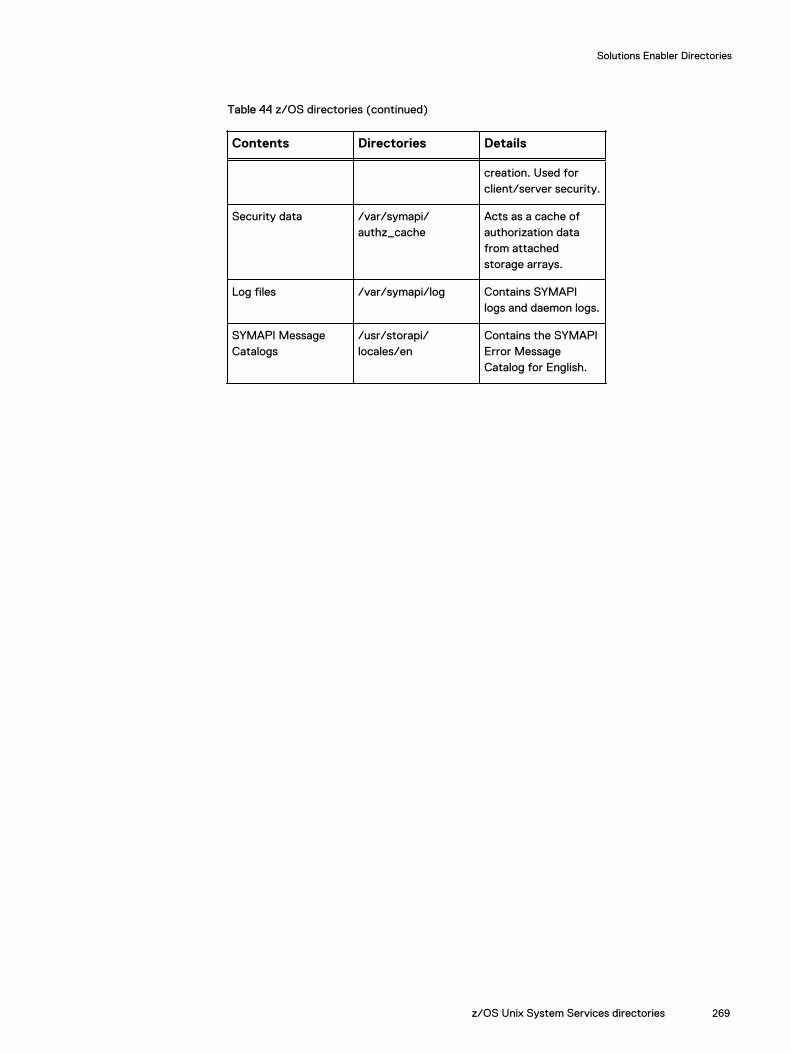
Table 44 z/OS directories (continued)
Contents Directories Details
creation. Used forclient/server security.
Security data /var/symapi/authz_cache
Acts as a cache ofauthorization datafrom attachedstorage arrays.
Log files /var/symapi/log Contains SYMAPIlogs and daemon logs.
SYMAPI MessageCatalogs
/usr/storapi/locales/en
Contains the SYMAPIError MessageCatalog for English.
Solutions Enabler Directories
z/OS Unix System Services directories 269

Solutions Enabler Directories
270 Solutions Enabler 8.3 Installation and Configuration Guide
APPENDIX C
UNIX Installation Log Files
This appendix describes the UNIX log files created by the Solutions Enabler installscript:
l Understanding the UNIX installer log files........................................................ 272
UNIX Installation Log Files 271
Understanding the UNIX installer log filesThe Solutions Enabler installer script se8300_install.sh creates log files in installroot directory /opt/emc/logs.
FormatThe log files are named using the following convention:
SE_NI_<V M.m.P>_<TimeStamp>.log
For example:
SE_NI_V8.3.0.110525_175707.log
Where:
SE Solutions Enabler
NI Native installation
V Letter portion of version
M Version major
m Version minor
P Version point
TimeStamp File creation time stamp in theformat:yymmdd_hhmmss
Log file contentsThe log files contain the following information:
l Date
l Script name
l User running the script
l Operating system and hardware type
l Script command line options
l Location of native install (NI) kit if the kit is found
l Previous Install root directory
l Previous working root directory
l Install root directory
l Minimum operating system version required
l Existing operating system version in system
l Installed product version
l Current product Version
l Selected components
UNIX Installation Log Files
272 Solutions Enabler 8.3 Installation and Configuration Guide
l Information on active processes (if any)
l Information on active daemons (if any)
l Information on active components
l Package/fileset/rpm being installed/uninstalled
l List of files installed by package/fileset/rpm only during install
l Successful completion of install /uninstall
Note
In addition to the above information, the log files will also contain operatingsystem-specific information useful in trouble shooting native installations.
UNIX Installation Log Files
Understanding the UNIX installer log files 273

UNIX Installation Log Files
274 Solutions Enabler 8.3 Installation and Configuration Guide
INDEX
#01ALLOC 79#04DDDEF 79#05RECEV 79#06APPLY 79#07DFLTS 79#08SLMF 79#10ECCIN 79#11ACCPT 86#12CNTRL 86
Aasynchronous events
monitoring on z/OS 205avoid file 190avoidance files 136
Ccertificate files
installing in z/OS 185, 186UNIX directory location 264, 268Windows directory location 265
CLI path, setting 133client installs 43Client/Server
IP interoperability 214client/server security 43
Ddaemon options file
base daemon parameters 146, 152event daemon parameters 155, 158, 174general logging parameters 144
daemon_options filecontrolling daemons 144
daemon_users fileauthorizing non-root users 142
daemons 139, 141, 142, 144, 145, 205base daemon support 145controlling 144event daemon on z/OS 205setting to auto-start on boot 142starting 141stopping 142viewing 142
database file 258database locks 134decremental method of uninstalling 113Device External Locks (DEL) 145
EeLicensing 122environment variables, setting 132, 134event daemon
on z/OS 205event list, building 158event logging, enabling 152
Ffiles
options 137, 185avoidance 136netcnfg 210selection 136
Ggatekeeper devices 134, 188, 250, 251
definition 250choosing 250locking 134sizing 251
gatekeepersverifying the existence of dedicated 133
gkavoid file 136gkselect file 136
Hhelp path, setting 134HOLDDATA 79HP-UX issues 258http
//www.crypt.gen.nz/selinux/disable_selinux.html179
Iincremental installation
UNIX 52inqfile file 137installation
rolling back 119help files 134incremental mode
UNIX 52man pages 134mutexes for Windows NT 136OpenVMS 87respose file, UNIX 52semaphore requirements for UNIX 135silent mode
UNIX 52UNIX 52UNIX directories 58verifying in UNIX 63Windows 64z/OS 75
installation diskunmounting from UNIX 64
Solutions Enabler 8.3 Installation and Configuration Guide 275

installation options, Windows 65installation, starting over 86instance identifier 142Interop Namespace 240IP interoperability, Client/Server 214
JJava interface component 60
Llicense keys 79License Management Facility
using 79Linux
starting the SCSI generic driver 132locking
Windows 136log files, UNIX 272
Mman pages 134
Nnetcnfg file
editing 210
OOpenVMS
installing in 87issues 261unistalling 118, 119
optional librariesinstalling in UNIXoptional libraries
installing in UNIX 60options file 137, 185, 196
changing default SYMCLI behavior 137, 185options, removing defaults 138Oracle multiple instances 138Oracle on AIX issues 261Oracle remote server 138
PPdevName examples 137permissions, setting 132persistent data
saving in UNIX 113pseudo-devices, creating 258
RRDBMS environment variables 139response file, UNIX 52
SSCSI generic driver, starting 132Secure Socket Layer (SSL) 43security preparation 21security, client/server 43
semaphoresde-allocating 135refreshing 135requirements 135
server installs 43silent installation
UNIX 52SNMP event reporting
on z/OS 205SRDF-TimeFinder Manager operations 86storapid daemon
open systems support 145optional parameters 146, 152starting 146stopping 146z/OS support 204
storevntd daemonenabling event logging 152enabling SNMP 153listing supported event categories 151on z/OS 205optional parameters 155, 158, 174reloading 151starting 151stopping 152
SYM$AVD file 190SYM$ENV DD statement 188SYM$GAVD file 190SYM$GSEL DD statement 190SYM$INQ file 190SYM$LIC DD statement 188SYM$NETH DD statement 188SYM$OPT file 188SYMAPI base directory, default location 21SYMAPI database support 187SYMAPI database, building 132SYMAPI server 43, 201, 219
controlling 201installing 43showing details 219starting 219stopping 219
SYMAPI Serversecurity preparation 21
symavoid file 137symcfg discover command 132SYMCLI 20SYMDB 187SYMLMF, using 79Symmetrix External Locks (SEL) 145sympd command 251SYSMODS 79SYSOUT DD statement 188SYSPRINT DD statement 188
TTCP/IP communication 43temporary files, removing 64time zone, configuring for local time 77, 196traps
filtering 153
Index
276 Solutions Enabler 8.3 Installation and Configuration Guide

registerging a client 153
Uuninstall 112UNIX
installation directories 58installing in 52log files 272mount point 52uninstalling 113
upgradeOpenVMS 87rolling back 119UNIX 52Windows 64z/OS 75
user identity, associating with the SYMAP Server 185
WWindows
installation options 65installing in 64issues 251locking 136uninstalling 116
write access, setting 132
Zz/OS
installing in 75
Index
Solutions Enabler 8.3 Installation and Configuration Guide 277

Index
278 Solutions Enabler 8.3 Installation and Configuration Guide