eml 4905 senior design project organization prepared in
TRANSCRIPT

EML 4905 Senior Design Project Organization
A B.S. THESIS PREPARED IN PARTIAL FULFILLMENT OF THE
REQUIREMENT FOR THE DEGREE OF BACHELOR OF SCIENCE
IN MECHANICAL ENGINEERING
F-1U PREDATOR:
SAE BRAZIL 2012 AERODESIGN COMPETITION
Jorge Larrarte Alex Rosales
Miguel Verdia
Advisor: Professor Dr. Andrés Tremante
November 21, 2012
This report is written in partial fulfillment of the requirements in EML 4511. The contents represent the opinion of the authors and not the Department of Mechanical and Materials
Engineering.

P a g e | i
Ethics Statement and Signatures
The work submitted in this B.S. thesis is solely prepared by a team consisting of Jorge Larrarte,
Alex Rosales, and Miguel Verdia and it is original. Excerpts from others’ work have been clearly
identified, their work acknowledged within the text and listed in the list of references. All of the
engineering drawings, computer programs, formulations, design work, prototype development
and testing reported in this document are also original and prepared by the same team of
students.
Jorge Larrarte
Team Member
Alex Rosales
Team Member
Miguel Verdia
Team Member
Dr. Andrés Tremante
Faculty Advisor
Dr. Sabri Tosunoglu
Faculty Advisor

P a g e | ii
Table of Contents
Ethics Statement and Signatures ................................................................................................................... i
List of Tables ............................................................................................................................................... vii
List of Figures ............................................................................................................................................... ix
Abstract ......................................................................................................................................................... 1
1. Introduction .......................................................................................................................................... 3
1.1. Problem Statement ....................................................................................................................... 3
1.2. Motivation ..................................................................................................................................... 4
1.3. Literature Survey ........................................................................................................................... 5
1.3.1. History of Aviation ................................................................................................................ 5
1.3.2. Unmanned Aerial Vehicles .................................................................................................... 8
1.3.3. Remote Controlled Airplanes .............................................................................................. 10
1.3.4. Present Technologies .......................................................................................................... 10
1.3.5. Future of the Discipline ....................................................................................................... 13
2. Project Formulation ............................................................................................................................ 15
2.1. Major Components ..................................................................................................................... 15
2.1.1. Airfoil ................................................................................................................................... 15
2.1.2. Wings and Tail Configuration .............................................................................................. 16
2.1.3. Fuselage .............................................................................................................................. 18
2.1.4. Power Plant ......................................................................................................................... 19

P a g e | iii
3. Design Alternatives ............................................................................................................................. 20
3.1. Airfoil Selection ........................................................................................................................... 20
3.2. Vertical Wing Location Considerations ....................................................................................... 20
3.3. High Wing .................................................................................................................................... 21
3.3.1. Mid Wing ............................................................................................................................. 22
3.3.2. Low Wing ............................................................................................................................. 23
3.4. Tail Wing Considerations ............................................................................................................ 24
3.5. Landing Gear Considerations ...................................................................................................... 25
3.6. Proposed Design ......................................................................................................................... 26
4. Analytical Analysis ............................................................................................................................... 31
4.1. Inverse Design Method ............................................................................................................... 34
4.1.1 Background Theory of the Inverse Calculation Method ..................................................... 35
4.2. Optimization ............................................................................................................................... 37
4.2.1. Gradient Methods .............................................................................................................. 37
4.2.2. Non Gradient Methods ....................................................................................................... 39
4.2.3. Hybrid Methods .................................................................................................................. 42
4.2.4. Zhukovsky to NACA ................................................................................................................... 45
4.2.5. Conjugate Gradient ................................................................................................................. 47
4.2.6. Hybrid Method .................................................................................................................... 51
4.2.7. Conclusion of Optimization ................................................................................................. 57

P a g e | iv
5. Airfoil Selection ................................................................................................................................... 59
5.1 Wing Theory ...................................................................................................................................... 59
5.2 Wing Loading .................................................................................................................................... 60
5.3 Stall Considerations........................................................................................................................... 60
Thick Airfoil ( ) .................................................................................................................... 60
Moderate Airfoil ( ) ................................................................................................... 61
Thin Airfoil ( ) ........................................................................................................................ 61
Taper Ratio .......................................................................................................................................... 62
5.4 Wing Incidence and Dihedral angles. ................................................................................................ 63
5.5 Take-Off Properties Calculations ...................................................................................................... 64
5.6 Selection Process .............................................................................................................................. 68
5.7 Computational Fluid Dynamics Simulation ................................................................................. 74
5.7.1 Introduction to CFD .................................................................................................................... 74
5.7.2 Simulation Set up ................................................................................................................ 75
5.7.3 Simulation Results ............................................................................................................... 76
5.8 Static Thrust Force Calculation ......................................................................................................... 81
6. Structural Analysis............................................................................................................................... 86
6.1 Static analysis .................................................................................................................................... 86
6.2 Wing Loading Test ............................................................................................................................. 89
7 Airplane Construction .............................................................................................................................. 90

P a g e | v
7.1 Overview ........................................................................................................................................... 90
7.2 Body .................................................................................................................................................. 91
7.3 Ribs .................................................................................................................................................... 92
7.3.1 Front Rib ..................................................................................................................................... 92
7.3.2 Middle Rib .................................................................................................................................. 94
7.3.3 Secondary Middle Rib ................................................................................................................ 95
7.3.4 Back Rib ...................................................................................................................................... 97
7.4 Mount ............................................................................................................................................... 99
7.5 Backbone or Aluminum Tube .......................................................................................................... 100
7.6 Plate ................................................................................................................................................ 101
7.7 Connectors ...................................................................................................................................... 102
7.7.1 “L” Connector ........................................................................................................................... 102
7.7.2 Butterfly Connector ................................................................................................................. 103
7.8 Fuselage .......................................................................................................................................... 104
7.8.1 Cowl.......................................................................................................................................... 104
7.8.2 Body Fuselage .......................................................................................................................... 107
7.9 Tail and Wings Construction ........................................................................................................... 109
7.10 Monokote...................................................................................................................................... 114
7.11 Electronic Components ................................................................................................................. 114
8 Design Considerations ............................................................................................................................ 117

P a g e | vi
8.1 Assembly and Disassembly ............................................................................................................. 117
8.2 Maintenance of the system ............................................................................................................ 120
8.3 Environmental Impact ..................................................................................................................... 121
9 Project Management ........................................................................................................................ 123
9.1 Organization of Work and Timeline .......................................................................................... 123
9.2 Project Breakdown .......................................................................................................................... 123
9.3 Research and Development Cost .............................................................................................. 124
9.4 Project Expenses Cost ............................................................................................................... 126
9.5 Commercialization .................................................................................................................... 127
10 Conclusion ..................................................................................................................................... 128
11 References .................................................................................................................................... 130
12 Appendix .............................................................................................................................................. 131
12.1 Appendix A: FIU CNC METAL CUTTING SERVICES ......................................................................... 131
12.2 Appendix B: FLORIDA HOTWIRE TECHNICIANS ............................................................................. 132
12.3Appendix C: WESTON HOBBY STORE: HOUSE OF POWER ............................................................. 133
12.4 Appendix D: TECHNICAL DRAWINGS ............................................................................................ 134

P a g e | vii
List of Tables
Table 1 - Advantages and Disadvantages of High Wing Configuration ....................................................... 21
Table 2 - Advantages and Disadvantages of the Mid Wing Configuration ................................................. 22
Table 3 -Advantages and Disadvantages of the Low Wing Configuration .................................................. 23
Table 4 - Advantages Compilation .............................................................................................................. 25
Table 5 - Case 2 Parameters........................................................................................................................ 45
Table 6 - Case 1 Parameters........................................................................................................................ 51
Table 7 - Case 1 Results ............................................................................................................................... 52
Table 8 - Case 1 algorithm sequence .......................................................................................................... 53
Table 9 - Case 2 Parameters........................................................................................................................ 55
Table 10 - Case 2 Results ............................................................................................................................. 55
Table 11 - Case 2 Algorithm Sequence ....................................................................................................... 56
Table 12 - Wing Area ................................................................................................................................... 70
Table 13 - Air Properties ............................................................................................................................. 70
Table 14 - Desired Weight of Aircraft ......................................................................................................... 70
Table 15 - Take-off Calculations results ...................................................................................................... 71
Table 16 - Calculations of the airfoil ........................................................................................................... 72
Table 17 - Optimized results and selection of airfoil .................................................................................. 73
Table 18- Initial parameters to consider in the flow simulation ................................................................. 75
Table 19 - SCFS Simulation Results ............................................................................................................. 76
Table 20 - 13X4 1st Pitch Propeller results ................................................................................................. 81
Table 21 - 13X4 Wide Pitch Propeller results .............................................................................................. 82
Table 22 - 14X7 Propeller results ................................................................................................................ 83

P a g e | viii
Table 23 - Break Down of Responsibilities by Task and Team Member ................................................... 124
Table 24 – Material and Accessories Expenses ......................................................................................... 126
Table 25 - Engine Specifications and Cost ................................................................................................. 127

P a g e | ix
List of Figures
Figure 1 - Caley's Glider Design [3] ............................................................................................................... 5
Figure 2 - Image of Wright Brothers during their first flight [3] ................................................................... 6
Figure 3 - Image of a Predator Drone [4] ...................................................................................................... 9
Figure 4 - Front Wing of a Formula 1 Car used to create Down force ........................................................ 11
Figure 5 - Example of Inverse Design of an Airfoil ...................................................................................... 12
Figure 6 - Example of Optimization Software ............................................................................................. 13
Figure 7 - Airplane Structure ....................................................................................................................... 15
Figure 8 - Structural Scheme of an Airplane Wing ...................................................................................... 17
Figure 9 - Empennage Configuration Types ................................................................................................ 18
Figure 10 - Types of Fuselage ...................................................................................................................... 19
Figure 11 - Examples of Airfoils Designs [1] ................................................................................................ 20
Figure 12 - High Wing Configuration Example [1] ....................................................................................... 21
Figure 13 - Mid Wing Configuration Example [1]........................................................................................ 22
Figure 14 - Low Wing Configuration Example [1] ....................................................................................... 23
Figure 15 - Tail Wings Examples Configurations [1] .................................................................................... 24
Figure 16 - Landing Gear Configurations [1] ............................................................................................... 25
Figure 17 - High Wing Configuration Selection for the Final Prototype ..................................................... 27
Figure 18 - High Wing Configuration Selection for the Final Prototype 2 .................................................. 27
Figure 19 - Structure of the Airplane .......................................................................................................... 27
Figure 20 - Landing Gear Configuration Selection for the Final Prototype ................................................. 28
Figure 21 - Tail Wing Configuration for the Final Prototype ....................................................................... 29
Figure 22 - Aircraft Conceptual Design Concept ......................................................................................... 31

P a g e | x
Figure 23 - Propeller Configuration of the Airplane ................................................................................... 32
Figure 24 - Propeller Selection Table & Formula ........................................................................................ 32
Figure 25 - Lift Coefficient Graph & Formula .............................................................................................. 33
Figure 26 - Takeoff Distance Formulation ................................................................................................... 33
Figure 27 Examples of unimodal and multimodal single design variable functions ................................... 38
Figure 28 - Example of Differential Evolution Structure and Sequence .................................................... 41
Figure 29 Particle Swarm Sequence and Structure ..................................................................................... 42
Figure 30 - Evolution of Airfoil .................................................................................................................... 44
Figure 31 - Case 1 Local Error ...................................................................................................................... 44
Figure 32 - Case 1 Total Error ...................................................................................................................... 45
Figure 33 - Case 2 Guess, Target and Final Airfoil ....................................................................................... 46
Figure 34 - Case 2 Evolution of Airfoil ......................................................................................................... 46
Figure 35 - Case 2 Local Error ...................................................................................................................... 46
Figure 36 - Case 2 Total Error ..................................................................................................................... 47
Figure 37 - Convergence path of Conjugate gradient Method ................................................................... 48
Figure 38 - Value of variable X convergence vs. iterations ......................................................................... 49
Figure 39 - Value of Y variable vs. iterations ............................................................................................... 50
Figure 40 - Max error vs. iterations ............................................................................................................ 50
Figure 41 - Objective function convergence vs. iterations ........................................................................ 51
Figure 42 - Screenshot of Case 1 ................................................................................................................. 51
Figure 43 - Case 1 Convergence History ..................................................................................................... 52
Figure 44 - Case 1 Overall Function Evaluation Convergence .................................................................... 53
Figure 45 - Path Convergence ..................................................................................................................... 53
Figure 46 - Screenshot of ............................................................................................................................ 54

P a g e | xi
Figure 47 - Case 2 Convergence History ..................................................................................................... 55
Figure 48 - Case 2 Overall Function Evaluation Convergence .................................................................... 55
Figure 49 - Path Convergence ..................................................................................................................... 56
Figure 50 - Pareto Front Analysis ................................................................................................................ 58
Figure 51 - Airfoil Thickness List .................................................................................................................. 60
Figure 52 – Span/Mesh vs. Span location plot ............................................................................................ 62
Figure 53 - Incidence Angle Picture ............................................................................................................ 63
Figure 54 - Antonov 225 .............................................................................................................................. 63
Figure 55 - XFOIL 6.96 Interface .................................................................................................................. 69
Figure 56 - SolidWorks Calculation screen of the CFD Simulation .............................................................. 74
Figure 57 - CAD model of wing and its computational domain .................................................................. 76
Figure 58 - Pressure distribution on the top surface .................................................................................. 77
Figure 59 - Pressure distribution on the bottom surface ........................................................................... 77
Figure 60 - Cut Plot of Pressure .................................................................................................................. 78
Figure 61 - Flow trajectories of the pressure on the top surface ............................................................... 78
Figure 62 - Flow trajectories of the pressure on the bottom surface......................................................... 79
Figure 63 - Flow Trajectories of the Velocity .............................................................................................. 79
Figure 64 - Cut plot of the velocity.............................................................................................................. 80
Figure 65 - Flow trajectories of the Vorticity .............................................................................................. 80
Figure 66 - Thrust Force vs. RPM ................................................................................................................ 83
Figure 67 - Test Bench 1 .............................................................................................................................. 84
Figure 68 - Test Bench 2 .............................................................................................................................. 85
Figure 69 - Flight Mechanics ....................................................................................................................... 86
Figure 70 - Conceptual Structural Design with Forces ................................................................................ 87

P a g e | xii
Figure 71 - Displacement in X ..................................................................................................................... 88
Figure 72 - Displecement in Z...................................................................................................................... 88
Figure 73 - Von Misses stress ...................................................................................................................... 88
Figure 74 - Wing Load Testing Process ....................................................................................................... 89
Figure 75 - Body Design Inspiration ............................................................................................................ 91
Figure 76 - Front Rib Design and Features .................................................................................................. 93
Figure 77 - Parts Attached to the Front Rib ................................................................................................ 93
Figure 78 - Front Rib Servos ........................................................................................................................ 93
Figure 79 - Middle Rib Design and Features ............................................................................................... 94
Figure 80 - Wing and Ribs connection ........................................................................................................ 95
Figure 81 - Secondary Rib Design and Features .......................................................................................... 96
Figure 82 - Secondary rib location and configuration ................................................................................. 96
Figure 83 - Back Rib Design and Features ................................................................................................... 97
Figure 84 - Back Rib with rear landing gear, arms suspension and shock absorbers ................................. 98
Figure 85 - Suspension Arm design and Features ....................................................................................... 98
Figure 86 - Plastic Engine Mount ................................................................................................................ 99
Figure 87 - Aluminum Engine Mount ........................................................................................................ 100
Figure 88 - Backbone or Main Tube Design and Specifications ................................................................ 100
Figure 89 - Bending process of the Aluminum Tube or Backbone ........................................................... 101
Figure 90 - Plate design and Dimensions .................................................................................................. 102
Figure 91 - L shape Aluminum connectors Design .................................................................................... 103
Figure 92 - Butterfly connection ............................................................................................................... 104
Figure 93 - First Two steps of the manufacturing process of the Cowl .................................................... 105
Figure 94 - Steps 3 and 4 of the manufacturing process of the Cowl ....................................................... 106

P a g e | xiii
Figure 95 - Final steps of the Cowl manufacturing process ...................................................................... 106
Figure 96 - Fuselage Foam Design............................................................................................................. 107
Figure 97 - CNC Foam Cutting of the Body Fuselage ................................................................................ 108
Figure 98 - Fuselage Assembly .................................................................................................................. 109
Figure 99 - CNC Wing manufacturing process .......................................................................................... 110
Figure 100 - Main Wing Cutting process ................................................................................................... 110
Figure 101 - Holes Diameters and locations in the Main Wing ................................................................ 111
Figure 102 - Balsa wood reinforcement profiles....................................................................................... 111
Figure 103 - Tail Wings Elevators construction ......................................................................................... 112
Figure 104 - Tail Wings Assembly ............................................................................................................. 112
Figure 105 - Ailerons Design ..................................................................................................................... 113
Figure 106 - Flaps Design .......................................................................................................................... 113
Figure 107 - Futaba Servos ........................................................................................................................ 114
Figure 108 - 6 Channel Receiver ............................................................................................................... 115
Figure 109 - Splitter Cable ......................................................................................................................... 115
Figure 110 - Transmitter and Battery........................................................................................................ 116
Figure 111 - Servos and Channels Diagram .............................................................................................. 116
Figure 112 - Screenshot of the exploded view ......................................................................................... 117
Figure 113 - Tube Support from SolidWorks ............................................................................................ 118
Figure 114 - Tube Support Prototype ....................................................................................................... 118
Figure 115 - Connection of the plates to the ribs using L-shape support ................................................. 119
Figure 116 - Structure of the airplane and its main components ............................................................. 120
Figure 117 - Servo controller of the front wheel ...................................................................................... 121
Figure 118 - Timeline Representation ....................................................................................................... 123

P a g e | xiv
Figure 119 - Project Task Division ............................................................................................................. 125

P a g e | 1
Abstract
One of the greatest challenges in modern science is multifaceted aerodynamic
design. This is due to the nature of the discipline and the complexity of the calculations
required. In the last 20 years, the discipline of CFD (computational fluid dynamics) has
made great strides in trying to accurately predict fluid behavior around a specific shape.
The team composed of Alex Rosales, Jorge Larrarte, and Miguel Verdia will develop an
aerodynamic shape not only with the help of inverse design techniques, but also taking
advantage of design optimization techniques. The shape developed will be used in an
aircraft to compete in an aerodynamic competition.
The SAE Brazil Aero Design 2012 is an international competition held by the
Society of Automotive Engineers. The aim of this event is to challenge student teams
from different academic institutes with the goal of achieving a handcrafted aircraft with
the particular capability of being able to fly with the maximum payload possible.
Attending this competition will prepare the team members for the challenges of
working in challenging situations with high incentives.
The research and design phase of this project will involve the modeling of airfoil
shapes and wing geometries using computational fluid dynamics (CFD), with frictionless
models integrated in the simulation in order to better account for the fluid forces and
aerodynamic analysis of the lift coefficient and its changes with varying angle of attack.
Some of the phases for this project comprise of:

P a g e | 2
• Design of an airfoil cross section in several of Dr. Dulikravich's software codes
in order to create and predict the theoretical values of the CL (lift coefficient).
• CFD simulation of wing geometries accounting for turbulence and vortex
generation
• Wing structurally analyzed in Solidworks and ANSYS for load failure.
Once these research or studies have been performed, the design team will focus
on the fuselage creation. This stage will consist of landing gear selection and design,
engine components location selection, electrical mechanism integration, and most
importantly load compartment design. The design team expects that this careful task
oriented approach to aerodynamic design will serve to guide future competitors from
FIU College of Engineering in this type of event.

P a g e | 3
1. Introduction
1.1. Problem Statement
The purpose of this design project was to successfully compete in the SAE Brazil
Aero Design competition by designing an aircraft that would be able to gain first prize
due to its flying load capacity. A secondary goal was to be able to do this while
complying with all the rules and regulations established by SAE. Focusing on the
aerodynamic design part of the design process has shown the benefits of optimization
techniques.
A main obstacle in aerodynamic design applications has been the fact that the
most used method to achieve aerodynamic shapes is inverse design. Inverse design
methods consist of selecting a particular lift or pressure signature with the help of a CFD
software. At this point, calculations are then made in order to predict a specific shape
that will create the preconceived selection. This type of method has been recurrently
used in the last 20 to 30 years in the design of aircrafts and wing blades. The problem
with this type of approach is that it has required a predetermined pressure goals that
might negatively affect an array of secondary effects such as a rapid loss of pressure
with a slight angle of attacks. Using optimization methods, which depend more upon
results and behaviors than input pressure distributions, have very recently began to
prove to be more efficient at obtaining ideal aerodynamic shapes that later will become
wings, rotor blades, etc.

P a g e | 4
1.2. Motivation
The Senior Design team feels very passionate about the opportunity to be able
to represent FIU and compete in the SAE Brazil Aero Design competition. This society
gives future engineers the chance to display their abilities against each other. These are
abilities that students have accumulated through the completion of a bachelor of
engineering and abilities that the members of our team have obtained through several
of the courses taught in this university. Motivation is necessary in order to build an
aircraft from the ground up and to completely design every aspect of it. Motivation is
something that must already reside in anyone that chooses the mechanical engineering
field as a career. Additional motivation was gained from the fact that all of the members
of this design team are very passionate about the field of fluid dynamics and aerospace
in general, therefore this type of project was second nature to the team. Another
important aspect of this challenge was the material selection process combined with the
stress analysis study required for an aircraft design. This creative endeavor has taken
our group through load analysis problems not typical for everyday common
applications. Also, the time it has taken to make selections corresponding to materials,
specific densities, and allowed factors of safety have been more important than in most
other projects due to the fact that weight is such an important aspect of the
competition and aero shape design in general.

P a g e | 5
1.3. Literature Survey
1.3.1. History of Aviation
Aviation has always been a dream throughout human history. Since the
beginning, birds were the source of admiration and inspiration for the human mind;
flying was something one aspired to obtain. In the fifth century, the kite was developed,
and was widely held as not a real advance, but it still proved the possibility of flight for a
species different from birds. It was not until the nineteenth century when George Caley,
an English aeronautical engineer, who was able to carry people from different places
using kites and gliders. He also designed a helicopter-shaped device powered by a
propeller that was situated on the horizontal axis.
Figure 1 - Caley's Glider Design [3]
Since Caley, the history of aviation entered into a stage of progress and promise,
an era where many researchers developed studies and inventions in order to design
something that would finally allow for human flight.

P a g e | 6
Figure 2 - Image of Wright Brothers during their first flight [3]
December 17, 1903, was a key date for modern aviation history. On that day,
Oliver and Wilbur Wright managed to rise about 260 meters from the ground in a
motor-powered aircraft, which was heavier than air for a period of 59 seconds. From
that day, the Wright brothers are considered to be the pioneers of aviation around the
world. After this important achievement, aeronautical sciences began a rapid advance,
making it difficult to believe everything that was accomplished considering that its
history had initiated in the fifth century.
During World War I, airplanes and aircrafts lighter than air were used as
weapons. The designers built special models for reconnaissance and attack. As a
consequence, more pilots were trained and more planes were built in the four year
conflict than in the thirteen years since the first flight. After the war, the progress in
airplanes and engines design increased considerably. Two-winged aircraft, with engines
and propellers placed at the rear were soon replaced by aircraft with engines located at
the front. Much of the military surplus was sold to the airmen that trained with it; they

P a g e | 7
used it to do any activity that would produce income. These activities included
passenger transport, aerial photography, flight instructions, and air racing or aerobatic
shows.
One of the largest international aircraft companies that operated at the
beginning of the World War II was Pan America World Airways. Along with its
subsidiaries and affiliates it served a network of 82,000 miles on routes that reached 47
countries around the world. The demands of war accelerated the development of
aircraft and significant progress was achieved in attack such as bombing, dog fighting, as
well as air transportation of troops, tanks, and heavy equipment. Thus, for the first time
in history, aviation became a decisive factor in the development of the war. Also, the
fabrication of small airplanes was rapidly increased. In 1941, American military aircrafts
were operated on all fronts. The aviation industry employed 450,000 people compared
to the 190,000 it had prior to the war. That year, 3,375,000 passengers were carried by
the 18 American airlines, one million more than in 1940. The payload and mail increased
by about 30 percent.
Towards the end of the war, air battles grew in intensity and duration, and
aircraft production peaked. Experience in the manufacturing of military aircraft during
the war was used in the construction of civilian aircraft around the end of the hostilities.
Airlines arranged for larger and faster aircrafts with advances such as pressurized
cabins. Airports, weather forecasting, and navigational aids were improved in order to
be more efficient and reliable in order to meet public demand for the air transportation

P a g e | 8
of passengers and cargo. This expansion grew to unidentified levels due to the sudden
prosperity of the postwar period.
The experiments in the field of aerodynamics, design of new metals, new power
plants, and electronic advances brought the development of high-speed turbojet
airplanes that were designed for transoceanic flights, supersonic flight, aircraft rockets,
and experimental aircraft for short takeoff and vertical takeoff used for rockets.
1.3.2. Unmanned Aerial Vehicles
The history of unmanned aerial vehicles is related to war. It started in the
American Civil War with a basic concept of launching balloons with explosive devices to
explode on the enemy side. The Japanese tried the same method during World War II,
but proved to be inefficient for the objective. In 1960, the United States began to design
the famous “drones”, which are unmanned vehicles used for reconnaissance and
combat roles.
The first time that drones were used was in the Vietnam War. Those drones
were called “Fire bees” and they were assigned to the task of reconnaissance. The initial
technology carried by these drones was simple daylight cameras. Later improvements
such as communication devices and thermal sensors with night vision cameras were
added. Israel has been at the forefront of the study and development of the UAV
technology. Some examples that are extensively used by the US Air Force are the Hunter
and Pioneer drones, which are directly derived from Israeli technology. One of the most
popular drones used by the United States is the Predator, which is loaded with high class

P a g e | 9
missiles and can stay in the air for almost forty hours. This fact has repeatedly
demonstrated that the drone was developed for long-range purposes.
Figure 3 - Image of a Predator Drone [4]
UAV's are not only used for military purposes, they also have a lot of other
commercial and security applications such as in the agricultural industry, mineral
exploration, border and coastal surveillance, air and ground traffic control, etc. Also,
some competitions have been established for students interested in the aerospace field,
allowing them to research and develop a specified type of remote controlled aircraft,
which has the ability to travel a specified distance and carry a specified weight. For the
future, constant development and research will allow drones to be smaller, affordable,
and more precise. For now, all of the work is focused on the military field.

P a g e | 10
1.3.3. Remote Controlled Airplanes
Air modeling is considered a sport where the objective is to model an aircraft
heavier than air on a scale smaller than a regular aircraft, which can fly at a certain
height and carry a certain load. This sport is directly related to aerospace and
mechanical engineering, for its high engineering concept design and testing. It has many
categories, but the most popular one is radio controlled airplanes. The sport has grown
throughout the years, which can be seen by the increasing number of competitions for
students and hobbyists.
The first radio controls were designed with vacuum tubes and had a few buttons
which made the plane head to a specific position. The transmitter used radio waves,
which were received by the receiver device inside the plane. This receiver transformed
and sent the electrical impulses to electromechanical devices which allowed the person
to control the airplane, but its big size and the multiple failures resulted in many
complications for the users at that time.
These days, any radio control has an internal microprocessor and regular
software, which allows the user to program and record different parameters for
different models, making the flight easier and safer.
1.3.4. Present Technologies
The aerodynamic design of aircraft and aerodynamic structures is currently being
heavily influenced by inverse design methods. Desired behaviors are predetermined as

P a g e | 11
an ideal in a particular area or shape to be designed. Airfoils are a great example of this
technology. Many of the concepts being currently used applicable to inverse design
maintain a certain common logic. They have the common ability to converge to a
specific shape, but vary in the amount of computer time required to do so, which is
referred to as iterations. Some of these concepts are currently being used to achieve
shapes that are used in turbo machinery and propeller designs in general. The
automotive industry uses them to identify some of the aerodynamic shapes employed
by sports cars. The auto performance industry heavily relies on these methods to create
front wings and spoilers which are responsible for creating the crucial down force. This
exemplifies the typical situation where inverse design techniques have become essential
to performance. This down force could be calculated, in the case of the racing industry,
by the maximum turning radius and velocity. Given this parameter, determining what
the wing airfoil should look like becomes a simple problem with the use of inverse
design.
Figure 4 - Front Wing of a Formula 1 Car used to create Down force

P a g e | 12
Another great advantage of inverse design techniques is their ability to very
rapidly converge to a shape with the desired capabilities. This was and is still of great
importance to design companies due to the high cost that long computer times could
represent. These are some of the reasons that inverse design methods play a crucial role
in today's technology field. The future of the discipline will be shaped by the strengths
and weaknesses of the current technology. One main drawback that hinders inverse
design methods is the necessity for a given derived behavior of the shape to be created.
In the case of airfoil design, an experienced aerodynamicist might conclude after
extensive research that airfoil shapes with a high coefficient of lift would be superior to
those without. He would then determine an expected lift coefficient behavior to be used
in the inverse design of a new airfoil. This can be seen in Figure 5.
Figure 5 - Example of Inverse Design of an Airfoil
The bottom portion of the image represents an airfoil, and the lines emanating
from this shape represent the performance of the lift coefficient in this case. This lift

P a g e | 13
coefficient has several lines, which represent initial, current, and any changes in the lift
coefficient as it reaches or converges to the previously determined target, also included.
The one inherent flaw or limitation of such a process depends upon the abilities of the
previously mentioned aerodynamicist. However, no matter the skill it should be
understood that the final design could not possibly be truly ideal given the great amount
of variables.
1.3.5. Future of the Discipline
Great innovations were produced during the years from the use of inverse
design methods, but understanding its shortcomings also helps to understand the path
that the discipline must take in order to improve. Optimization is in all regards another
tool in CFD and aero shape design in general, but it holds a definite advantage over its
predecessors. Optimization mainly consists of leaving certain parameters fixed. This
could be volume, length, or surface area in the case of a wing. The program will then
iterate all possible solutions in order to create a three dimensional representation of the
parameters left unfixed.
Figure 6 - Example of Optimization Software

P a g e | 14
As shown in Figure 6, the CFD optimization technique will display all of an
option’s signature behaviors in this type of a graphical display. Superimposing other
parameters of the design will allow the designer to be able to select the best design
conditions regardless of any preconceived notions. Some optimization methods also
allow the user to specify the sensitivity of the design manufacturing tolerances.
Optimization techniques represent the next step in the evolution of the
aerospace discipline. These methods will create the path for newer and better turbines
and also fluid displacing machinery. Optimization methods are not subject to the
aerospace industry alone. They could also play a crucial role in all design disciplines
including chemistry, computer science, new materials, etc.

P a g e | 15
2. Project Formulation
2.1. Major Components
The SAE Brazil competition has specified all the restraints each team should
meet in order to be able to compete. Those restraints have been divided between the
major components of the aircraft and flight requirements. The major components of the
remote aircraft are wings, airfoil, tail configuration, fuselage, landing gear, material,
engine, radio control, servos, and battery.
Figure 7 - Airplane Structure
2.1.1. Airfoil
The airfoil is one of the most important components to be studied at the design
stage of any aircraft. Its importance is due to the fact that the cross-section of the wing
is what makes it possible that an aircraft can move through the air by producing an
P a g e | 16
aerodynamic force called “Lift Force”, which is perpendicular to the direction of the
airplane's motion.
There are different types of airfoils for different types of airplanes and their
specifications. For this project, the McNair Fellowship program allowed one of the team
members to research, design, and test a unique type of airfoil that would satisfy the
lifting requirements of the competition. This research was conducted by Miguel Verdia
during the summer of 2012 as a part of his McNair Fellowship investigation. The
specifications of this particular airfoil are described in the Analytical Analysis of this
thesis report.
2.1.2. Wings and Tail Configuration
The wings of any aircraft are a structure composed of airfoils attached to each of
the side of the fuselage which support the airplane during flight. The position of the
wings along the fuselage varies depending of the airplanes needs, which could be
attached to the middle, top, or to the lower body of the fuselage. Also, the number of
wings are subjective to the design's concept, but a single set of wings are the most
common amongst the industry.
Wings have three main structural parts which are the ribs, spars, and stringers.
At the rear of the airplane wings are two different control surfaces called ailerons and
flaps. Ailerons create aerodynamic forces to make the airplane roll, while the flaps move
down at the same time as the airplane in order to increment the lifting force of the wing
during takeoff and landing.

P a g e | 17
Figure 8 - Structural Scheme of an Airplane Wing
The wing tail configuration or empennage gives the airplane a way to control its
rolling movement as well as a way to manage the direction of its flight. It is composed of
vertical and horizontal stabilizer surfaces, along with a rudder, and an elevator which
allows the plane to move its nose right or left; and trim tabs which are designed to
reduce the control pressure. Other empennages use a stabilator, which increases the
aerodynamic load at the tail and causes the nose of the airplane to move up.

P a g e | 18
Figure 9 - Empennage Configuration Types
2.1.3. Fuselage
The fuselage is the main body of any aircraft and is designed for carrying
objectives in addition to it being the structural connection for the wings and tail
assembly. For this project it will have a space designed to carry the weight required to
compete, which will be approximately 24 pounds. There are different types of fuselage,
but the most popular are the monocoque, single shell structure; and the
semimonocoque, which half of the single shell structure.

P a g e | 19
Figure 10 - Types of Fuselage
2.1.4. Power Plant
The power plant is the assembly of the engine ad propeller, whose primary
function is to generate through the engine, the required power necessary to produce
the thrust force that will make the airplane fly. For the competition, the engine is one of
the restrictions where the team has to choose among three types that are similar in all
the specifications, changing only the weight and the propeller size. The cost analysis and
specifications of the three types of engines are shown in the project breakdown section
of this report.

P a g e | 20
3. Design Alternatives
3.1. Airfoil Selection
One important part of this design process has been the research and selection of
an ideal airfoil. In other similar competitions, teams have selected airfoils from
hundreds of different choices like NACA or Zhukovsky. These selections follow a
historical perspective, consider aircraft velocity, and mission profile. Once an airfoil is
selected, it must be analyzed in order to verify that the lift coefficient, drag coefficient
and optimal angle of attack all work with the original design.
Figure 11 - Examples of Airfoils Designs [1]
3.2. Vertical Wing Location Considerations
Historically, wing position with respect to the fuselage has been as the figures
show below. Each different selection offers a variety of distinct advantages and
disadvantages. Some of the relationships that exist between wing position selection and
advantages will be explored.

P a g e | 21
3.3. High Wing
Figure 12 - High Wing Configuration Example [1]
Table 1 - Advantages and Disadvantages of High Wing Configuration
Advantages Disadvantages
Allows placing the fuselage closer to the
ground.
Easy the cargo loading/unloading.
Engines have sufficient ground
clearance.
Wingtips are not likely strike the ground.
For low speed aircraft external struts can
be used. They reduce the wing’s weight,
but they increase the drag.
Simplifies connection to the fuselage
Increases the weight of fuselage.
Strengthened to support landing gear
loads.
Flattened at the bottom (for simplified
loading/unloading) – weight is increased
Cylindrical top requires fairing with the
wings.

P a g e | 22
3.3.1. Mid Wing
Figure 13 - Mid Wing Configuration Example [1]
Table 2 - Advantages and Disadvantages of the Mid Wing Configuration
Advantages Disadvantages
Very good arrangement for aerobatic
airplanes.
Does not restrict rear visibility.
Structural carrythrough presents the
major problem
Requires carrythrough box or use of ring
frames built into the fuselage.
P a g e | 23
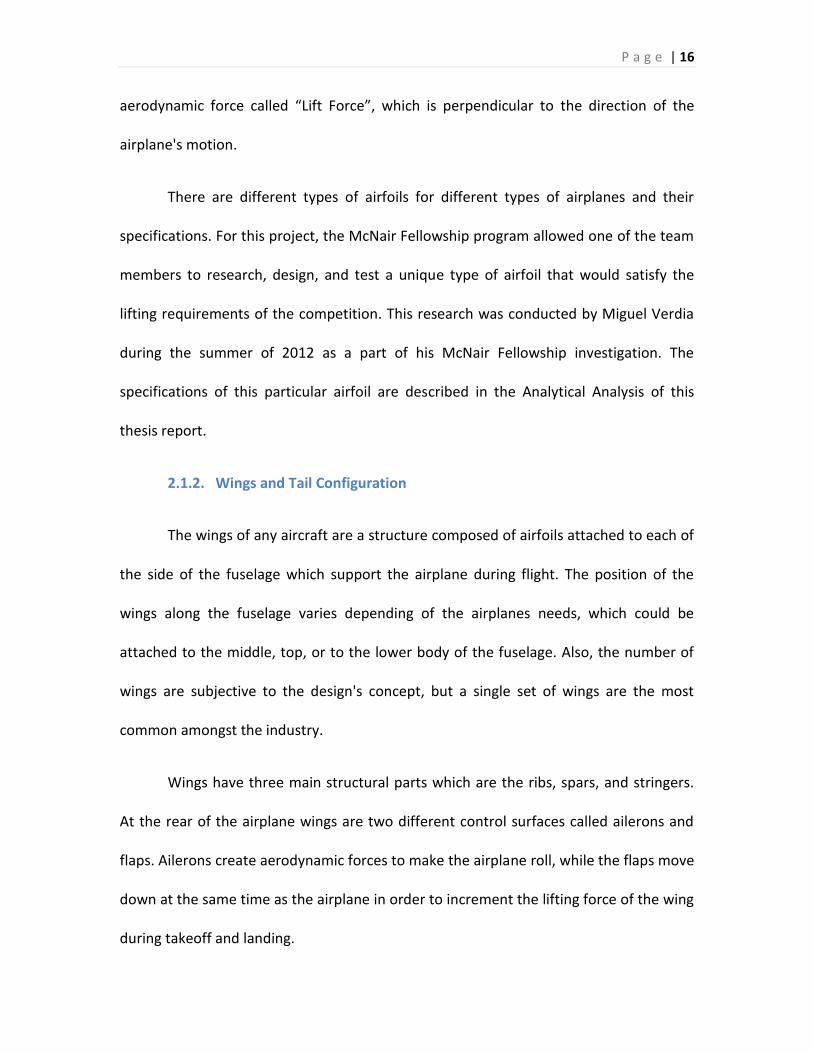
3.3.2. Low Wing
Figure 14 - Low Wing Configuration Example [1]
Table 3 -Advantages and Disadvantages of the Low Wing Configuration
Advantages Disadvantages
Major advantage – landing gear storage.
To provide engine clearance the
fuselage has to be placed farther off the
ground than a high wing aircraft.
Provides greater fuselage clearance.
Provides an added lift when close to the
ground.
Low wing arrangement requires special
ground equipment for
loading/unloading.
Dihedral angle is determined from
clearance requirements.
Propeller engines are mounted above
the wing – increases interference and
fuel consumption.
Added lift creates floating effect when
landing.

P a g e | 24
3.4. Tail Wing Considerations
Tail wing selections, as shown in Figure 15, usually depend on previous mid wing
selection, due to the fact that aerobatic interferences might be present. Another
important factor to consider in tail selection is storage capability. It is easy to appreciate
how the H-tail is a derived version of the conventional option.
Due to the competition restrictions for the regular class, weight is a primary
factor to consider. Therefore the V-tail and Conventional will be tried initially for their
ease of construction and low volume.
Figure 15 - Tail Wings Examples Configurations [1]

P a g e | 25
3.5. Landing Gear Considerations
For simple aircraft, two types of landing gears are the norm. These two types can
be seen in Figure 16. They offer simple construction but the differ in the style of landing
approach. Conventional small planes usually and historically rely on the conventional
landing gear. This refers to the taildragger configuration shown in the figure below. It
would seem logical for the team to prefer this due to its ease of construction, however,
this design has proven problematic in this type of competition. In past events, aircrafts
with this configuration have fallen victim to ground loops, and have also became hard to
control when attmepting takeoff.
Figure 16 - Landing Gear Configurations [1]
Table 4 - Advantages Compilation
Advantages High Wing Mid Wing Low Wing Ground Clearance XX X Ground Lift effect X
Simple connection to Fuselage XX X Construction XX X
Low weight in Design XX X

P a g e | 26
3.6. Proposed Design
The proposed design was selected after careful consideration of all the
alternatives mentioned before. Considering the size and mission objective of the
proposed design, it was decided that the fuselage will be structurally defined by a light
metal rod, or certain type of plastic that would be able to handle the necessary forces.
The body design called for a backbone at the top which would support ribs at the
bottom part of the structure. The main idea was to build an aircraft that would be able
to fly without any of the skin surrounding the fuselage. This skin would have been added
later as molded Styrofoam pieces that would have been able to be attached to this
structural skeleton. This idea differed from previous designs in that it did not use wood
plates in order to create a panel that would support the aircraft. By doing away with
these, it was believed that the aircraft would gain a great weight advantage over its
predecessors.

P a g e | 27
Figure 17 - High Wing Configuration Selection for the Final Prototype
Figure 18 - High Wing Configuration Selection for the Final Prototype 2
Figure 19 - Structure of the Airplane

P a g e | 28
The selection of wing location compared to the fuselage was also a bit intricate.
It was the team’s opinion that for pure flight reasons a low wing would add certain
advantages that would benefit the purpose of the competition. Mid wing would also
have offered great benefits, but it was decided against this type of configuration due to
the problems it would have created in the manufacturing and loading. The choice
became a high wing configuration since it allowed for the greatest benefits of
construction ease and wing edge clearance in the event of instability. Even though the
low wing choice was very attractive, it was agreed that the concern over wing tip low
clearance and the added material needed to join the two wings together was too much
of a disadvantage. Having looked back at other models in these competitions, it became
evident that high wing design had been the preferred choice.
Figure 20 - Landing Gear Configuration Selection for the Final Prototype

P a g e | 29
For the landing gear it was determined that a tricycle configuration was
necessary due to the fact that a tail dragger has been proven unreliable in this type of
competition. Another reason that tricycle was chosen is that once the aircraft is loaded
to capacity, about 40 lbs., there would have been a very pronounced critical structural
point right after the first wheel. Therefore, a three wheel set-up became ideal. One
thing that needed to be accounted for is that the center of gravity of the plane would
need to be maintained between these two sets of wheels.
In order to facilitate these conditions, the aircraft center of gravity would have to
be designed at exactly the same location as the middle of the cargo bay. This would
have ensured that our center of gravity would not have changed throughout the
competition.
Figure 21 - Tail Wing Configuration for the Final Prototype
For the tail design the team leaned toward an inverted Y arrangement. The team
felt that such a choice is something that was not usually tried in conventional aircrafts,
but due to the low velocities the model would experience it was thought that the

P a g e | 30
disadvantages of such a choice would not have been significantly observed, and would
have added stability to the airplane.

P a g e | 31
4. Analytical Analysis
Figure 22 - Aircraft Conceptual Design Concept
Aircraft design of any kind is a constant process of revision. Like the diagram in
Figure 20 shows, new proposed ideas start the process of conceptual design. After this
process is started the sequential order of the process ensures that the concept is
realistic enough to endure preliminary calculations of performance. To create an
example, weight calculation is done prior to deciding upon the power plant. This creates
a situation where one must decide on a propulsion strong enough to work with the
initial guess, but subsequently such a propulsion device must now be part of that initial
estimated weight guess. This process creates the need for several iteration techniques
as this is a delicate and peculiar type of design process since most changes affect the
weight of the aircraft, and weight is of a extreme importance in aerodynamic design.

P a g e | 32
Figure 23 - Propeller Configuration of the Airplane
Propeller selection is the one of the main challenges for the team in order to
select the best and appropriate propeller for the airplane. Generally speaking, the
higher propeller diameter, a higher efficiency can be obtained. There are important
considerations in this process, due to the fact, that many propellers shapes can give
different vantages to the airplane. Some of them, offer high velocity during the flight,
and other ones can provide more thrust power during the takeoff. The team used
formula displayed in Figure 21 to determine the best propeller.
Figure 24 - Propeller Selection Table & Formula
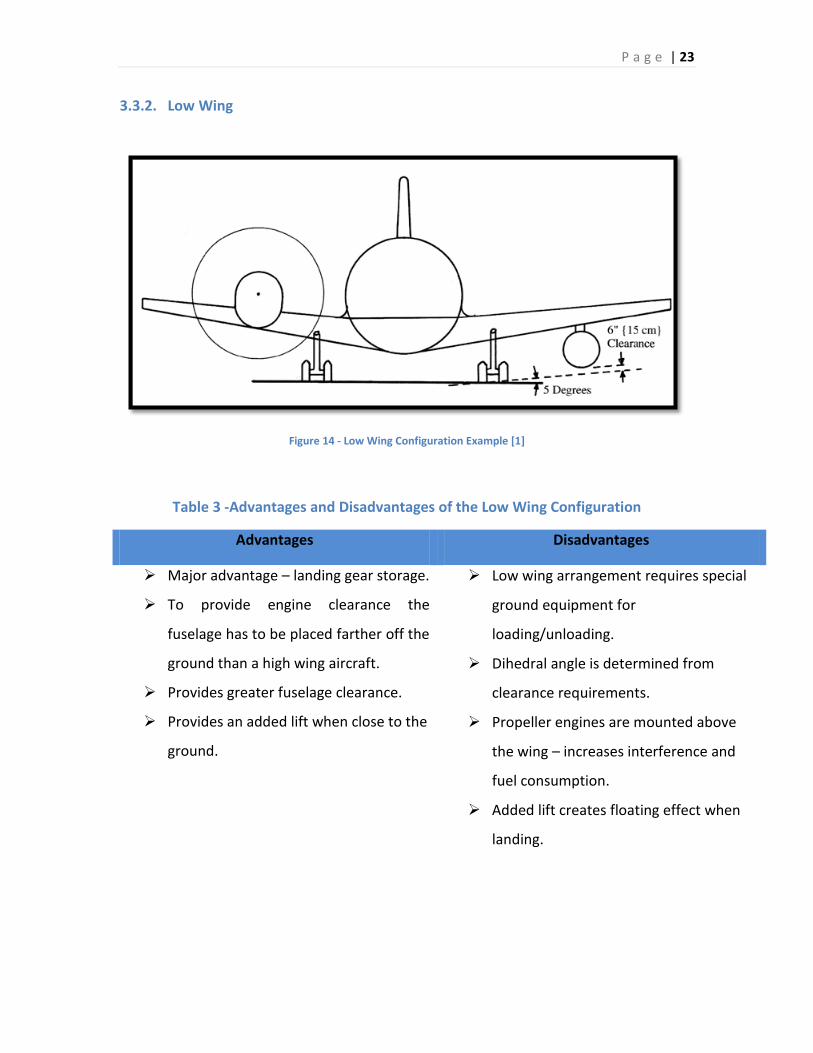
The maximum lift coefficient of the wing will usually determine the wing area,
this strongly affects the aircraft takeoff weight to perform the design mission of the
airplane. The following graph represents how important is to have a good airfoil design,
in order to find the best lift coefficient in the airplane.
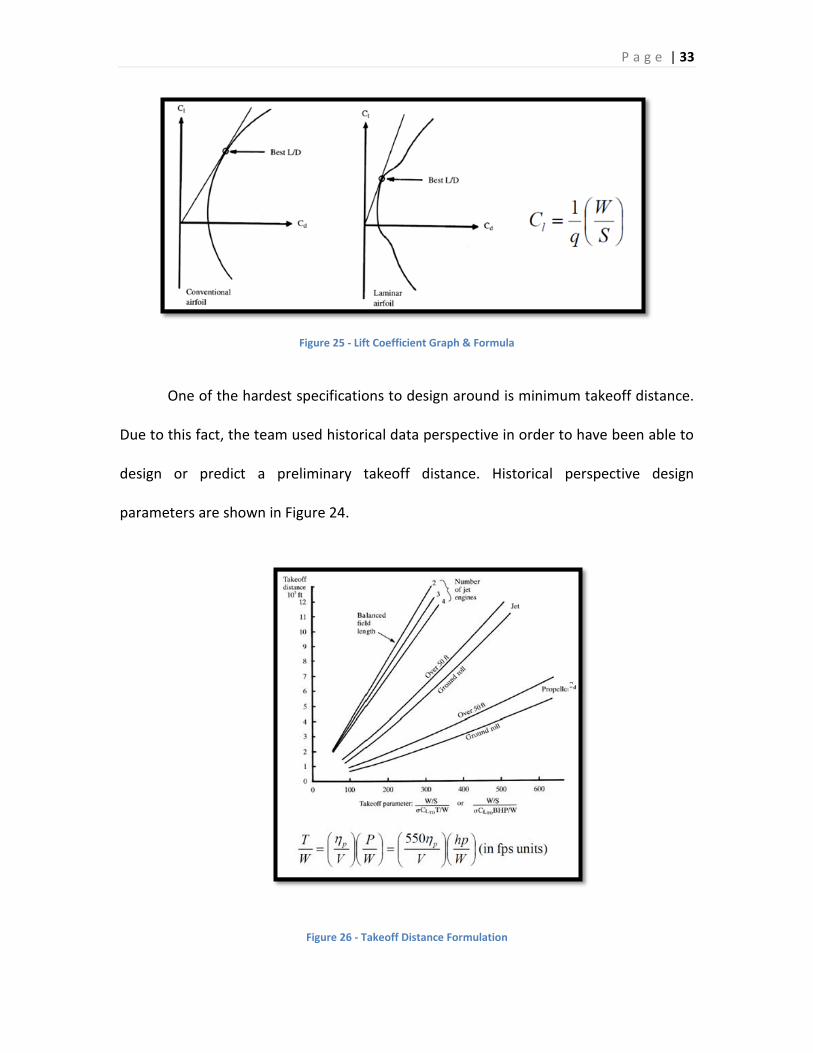
P a g e | 33
Figure 25 - Lift Coefficient Graph & Formula
One of the hardest specifications to design around is minimum takeoff distance.
Due to this fact, the team used historical data perspective in order to have been able to
design or predict a preliminary takeoff distance. Historical perspective design
parameters are shown in Figure 24.
Figure 26 - Takeoff Distance Formulation

P a g e | 34
4.1. Inverse Design Method
Design of aerodynamic components has historically been composed of two kinds
of categories: inverse design and shape optimization. Inverse design method requires
the user to know specific parameters of the final configuration in order to use them as a
goal for the final shape computation. Optimization in the other hand simply tries to find
global properties of a preliminary design and from this point inch closer to an "optimal"
solution to what the inverse design uses as a goal. It is important to note that although
inverse design solutions require very little iteration, compared to optimization, they do
require an intuitive knowledge of what the specified parameters would do as the
aerodynamic shape changes flying conditions.
Final designs come from specified constrains given by the designer. This process will be
shown in the inverse design data portion of the report. Surface pressure distribution will
serve as the parameter that any initial shape would try to conform. The particular
pressure distribution consideration is most likely a derived signature of an already
successful design, or more simply the informed idea of an experienced aerodynamic
designer. These improvements come about in the constant race to create a better
design, but most importantly, in the likely chance that certain behaviors like flow
separation might be minimized or prevented all together.

P a g e | 35
4.1.1 Background Theory of the Inverse Calculation Method
Stream function method will substitute the two-dimensional airfoil's potential
flow by a vortex sheet aligned at the surface of the airfoil. For this condition to be
satisfied there must be absolutely no flow through the surface of the two-dimensional
airfoil shape. Total stream function must remain constant along the surface, therefore
for a closed surface airfoil; the velocity distribution is equal to the vortex distribution as
seen in equation (1).
( )
∮ ( ) (
) (1)
= stream function along airfoil surface
= free stream velocity
= angle of attack
(x,y) = coordinate of point on airfoil surface
( ) = vorticity distribution along airfoil surface
r = distance from vortex density contribution on point (x,y)
s = curvilinear coordinate along airfoil surface
The integral equation could be solved by dividing the vortex sheet into bounded
elements of varying density values. This is done generally in the case of boundary
element approach. The integral in equation (1) is solved by dividing the airfoil surface

P a g e | 36
into straight line boundary elements, or panels, with linearly varying vortex strength.
Therefore, the stream function equation for boundary element nodes becomes
( ) ∑(
) (2)
Where n is the number of boundary elements, and are vortex strengths at
node j and j+1 and and . From equation (2), the expression for the y coordinate
of any panel node yi on the airfoil surface can be written as
∑(
) ( ) (3)
If vortex strength at the nodes are prescribed and xi locations of panel
endpoints defined, knowing that will be constant along the airfoil surface we can
iteratively solve for the y locations yi of all panels which define the airfoil. This method
will then produce an airfoil shape that satisfies pressure distribution input, which would
be equivalent to vortex distribution as previously explained. The pictures below show
examples of the process explained.

P a g e | 37
4.2. Optimization
4.2.1. Gradient Methods
Optimization is the process of maximizing or minimizing a given function in order
to find optimum levels for the active variables. The purpose of the optimization is to find
an optimum value for the objective function, or the cost function as is sometimes called.
This function is simply a combination of the variables found in the problem in such a
way that it describes with its magnitude the value of the system it represents. A
common example of this could be a function that describes the negative or beneficial
parameters of a wing. In such type of problem we could suppose that three main
ingredients come together to describe an optimum wing geometry. These three factors
that could be considered are lift, friction and moment, creating a summation formula
such that, as it gets larger, it becomes more ideal would entail maximization, contrary
using the reciprocal of said summation would instead indicate minimization. The main
point is that it is relatively easy to set up the search direction as one to minimize or
maximize, but a quantitatively realistic summation might sometimes prove hard to
conjure.
( ) { }
Another parameter used in optimization is constrained. The way one might set up the
objective formula could lead for the numerical solution where, one of the parameters
being described falls in a range that it's not physically logical. In the previous example
wing cross sectional area could in a numerical analysis solution become represented as a

P a g e | 38
negative number. This should be avoided, for this reason constrains are built so the
process could only develop possible optimum values. Another reason constrains or
inequalities are used is for single objective optimizations where the optimum solution
leads to a undesirable characteristic. It is however important to know where this could
lead in situations where the number of variables becomes too large to visualize.
Objective functions have another possible particularity; they may be unimodal or
multimodal. Unimodal functions are the ones where only one maximum or minimum
exists inside the range being analyzed. Contrary to that, multimodal functions have two
or more maximums or minimums in the range of analysis. This classification does not
indicate that the function needs to be continuous during such range, just that the
indicated extreme point or points exist.
Figure 27 Examples of unimodal and multimodal single design variable functions

P a g e | 39
Gradient based methods are said to be deterministic since they rely in the functions
gradient in order to find a possible extreme value. The major drawback of these
methods is that their reliance in local gradient makes them unable to locate an extreme
point that is uphill of the initial guess. These methods work like a fluid in a mountainous
terrain, they will always a lower point, but they could not climb out no matter the
magnitude of a nearby global minimum. In general these methods are used to zero in
function valleys once the vicinity of the global minimum has being established. The basic
equation of gradient methods is as follows:
Where:
X is the vector of design variables
α is the search step size
d is the direction of descent
k is the iteration counter
4.2.2. Non Gradient Methods
Differential Evolution
This method is very similar to the generic algorithm and most of the non-
gradient based methods, it also an evolutionary method which works just like Darwin's
theory of surviving of the fittest where the strongest individual will survive and take its

P a g e | 40
genes to the future generation by combining its chromosomes with those of a mate in a
process called crossover. This specific algorithm works by placing individual collections
of variables, which will be called individuals next to predators. These predators will seek
out the weakest individual closest to them in order to allow for evolution to take place.
Some weak individuals that are not nearby will survive in order to allow such individual
to pass certain traits that are not beneficial at the moment. This type of set up will
prevent the algorithm from decaying into a local minimum. Mutation will also affect the
parameters of the individuals with the chance of producing an improved individual.
After several trials the D.E. method will demonstrate that the choice of mutation and
nearby predators is one of the most important differences benefiting this non gradient
optimization technique.
The formula use for the iterative process is:
γβαPP Fk
i
k
i 21
1
Where P = the number of individual vector of parameters
K = number of generation.
1, 2 = functions that define the mutation.
F = constant that define the mutation between .5 and 1
, , = 3 random individuals in the population

P a g e | 41
Figure 28 - Example of Differential Evolution Structure and Sequence
Particle swarm
Here there is another non-based method which was created by an electrical engineer
and social psychologist called James Kennedy. This method is an alternative to the
generic algorithm and works by using social behavior and tries to find the balance
between individuality and sociability of the individual of the population in order to find
an ideal interest. It is important to find a balance because if the sociability is too high
then all individual will converge to the first place they find, and if individuality is too high
then individuals may never find an ideal spot. Here the formula used was:
Here the values for and are between 0 to 1 and 1 to 2 respectively also:
P = the number of individual vector of parameters
r1i , r2 = random number with uniform distribution between 1 and 0

P a g e | 42
v = 0 when k = 0
I, g = best value found by the number of individual P, and best value of entire
population
Figure 29 Particle Swarm Sequence and Structure
4.2.3. Hybrid Methods
Deterministic algorithms used for optimization, also known as gradient based
methods, contain the ability to converge to an extreme point or global minimum in any
case as long as the function is of the unimodal variety. In some cases these deterministic
methods could reach a global extreme in a multimodal function, this situation however
a product of the selection of initial points is as long as the initial parameters allow the
gradient based method to search towards a region subject to negative gradient
boundaries. These methods have the attribute of achieving this local convergence
extremely fast. For such reasons, deterministic approach becomes the obvious choice as

P a g e | 43
a final extreme finding tool, for systems that can employ two or more algorithms in
optimization purposes.
Stochastic methods differ completely from gradient based algorithms, where
one falls short the other excels. Differential Evolution and Particle Swarm work as a
cloud of some sort. These methods evolve or hover around the area being analyzed
showing a numerical preference towards a global minimum. This numerical preference
does not impede the algorithm from exploring areas or points nowhere near the global
extreme. After a number of iterations the preference begins to form a path of
convergence. The great feature of such methods is the fact that they don't relay in local
topology to create new path or populations as in the case of evolution. This is of great
importance since it allows the system to climb out a local minimum in the search of a
global one. These methods are constructed with certain values or coefficients in some
cases that guide the magnitude in which the system prefers or selects convergence. If
such parameters are left for the user's opinion there is the possibility that the algorithm
will unfortunately converge to a local extreme, in the same way, it may be the case that
other values will create a very low global convergence preference making finding a
minimum point lengthy or impossible. Due to those concerns we find that with changing
topologies different stochastic methods will behave very differently.
Hybrid Optimization Algorithms are a mixture of the two types of methods
discussed above, that take turns at attempting extreme global convergence with a
numerical system that decides when each different method might become beneficial.

P a g e | 44
-0.05
0
0.05
0.1
0.15
0.2
-0.05 0.15 0.35 0.55 0.75 0.95
Y
X
NACA to Zhukovsky
Iteration1
Iteration 5
Iteration 10
Iteration 20
Target
Below is a diagram of a common Hybrid Structure using Genetic Algorithms (GA),
Simulated Annealing (SA), Nelder-Mead (NM), and finally DFP Gradient search.
Figure 30 - Evolution of Airfoil
Figure 31 - Case 1 Local Error
Surface Points
Local Error

P a g e | 45
Figure 32 - Case 1 Total Error
4.2.4. Zhukovsky to NACA
Case 2 studies he evolution of a Zhukovsky airfoil into the target NACA8636
Airfoil. Table 3 shows the parameters for these two airfoils.
Table 5 - Case 2 Parameters
Target Airfoil
NACA
Camber 8%
Position from L.E 60%
Thickness 36%
Guessed Airfoil
Zhukovsky Camber 0%
Relative thickness 12%
Iterations
Total Error

P a g e | 46
Figure 33 - Case 2 Guess, Target and Final Airfoil
Figure 34 - Case 2 Evolution of Airfoil
Figure 35 - Case 2 Local Error
Y
X
Zhukovsky to NACA
Target
Guess
Final Shape
Y
X
Zhukovsky to NACA Target
Iteration 1
Iteration 2
Iteration 5
Iteration 10
Iteration 20
Surface Points
Local Error

P a g e | 47
Figure 36 - Case 2 Total Error
4.2.5. Conjugate Gradient
The steepest descent method, in common, converges gradually for non-
quadratic functions, since optimum search step sizes produce orthogonal gradients
between two consecutive iterations. There is an entire class of variations to the steepest
descent method that jointly can be called conjugate gradient methods (CGM). The
underlying postulation used by these methods is that, near a minimum, the cost
function can be approximated reasonably accurately by a quadratic function. The
Conjugate Gradient method improves the convergence rate of the steepest descent
method by choosing directions of descent that reach the minimum value of the
objective function much more rapidly. The Conjugate Gradient method uses the same
iterative procedure for the objective function.
Iterations
Total Error

P a g e | 48
Figure 37 - Convergence path of Conjugate gradient Method
Conjugate gradient method used a conjugation of the gradient to obtain the
direction of descent for all iterations, and it can be calculated by using Flettcher-Reeves
or Polack-Ribiere method.
Flettcher-Reeves
Polack-Ribiere
On this case, the optimizer was tested in order to know how it behaved when a random
point was selected on the objective function, as explained before, this cases works very
good at finding the nearest local minimum to the initial guess, from the following graphs
is noticeable how fast this method will converge. Also, it is important to notice that the
steps sizes where set to 0.1.

P a g e | 49
On Figure . the value of X was compared against the number of iterations performed,
from this graph is clear that the x value will converge to a point ensuring the
convergence of the local minimum.
Figure 38 - Value of variable X convergence vs. iterations
On Figure 17 . the value of Y was compared against the number of iterations performed,
from this graph is clear that the y value will converge to a point ensuring the
convergence of the local minimum but before converging the y value will have a jump or
a discontinuity letting the user know that the initial guess for the Y portion is not of
good quality.
X-
Val
ue
Number of iterations
Y-
Val
ue
Number of iterations

P a g e | 50
Figure 39 - Value of Y variable vs. iterations
The next figure depicts the plotting of the maximum error against the number of
iteration, as the number of iteration increases the maximum error make the opposite
path and start decreases until it reaches the desirable value and converges.
Figure 40 - Max error vs. iterations
The most telling analysis can be appreciated below on Fig 19. The main goal of
the operation is shown when it could be seen that the objective function was able to be
minimized to reach an asymptote region.
Max
err
or
Number of iterations
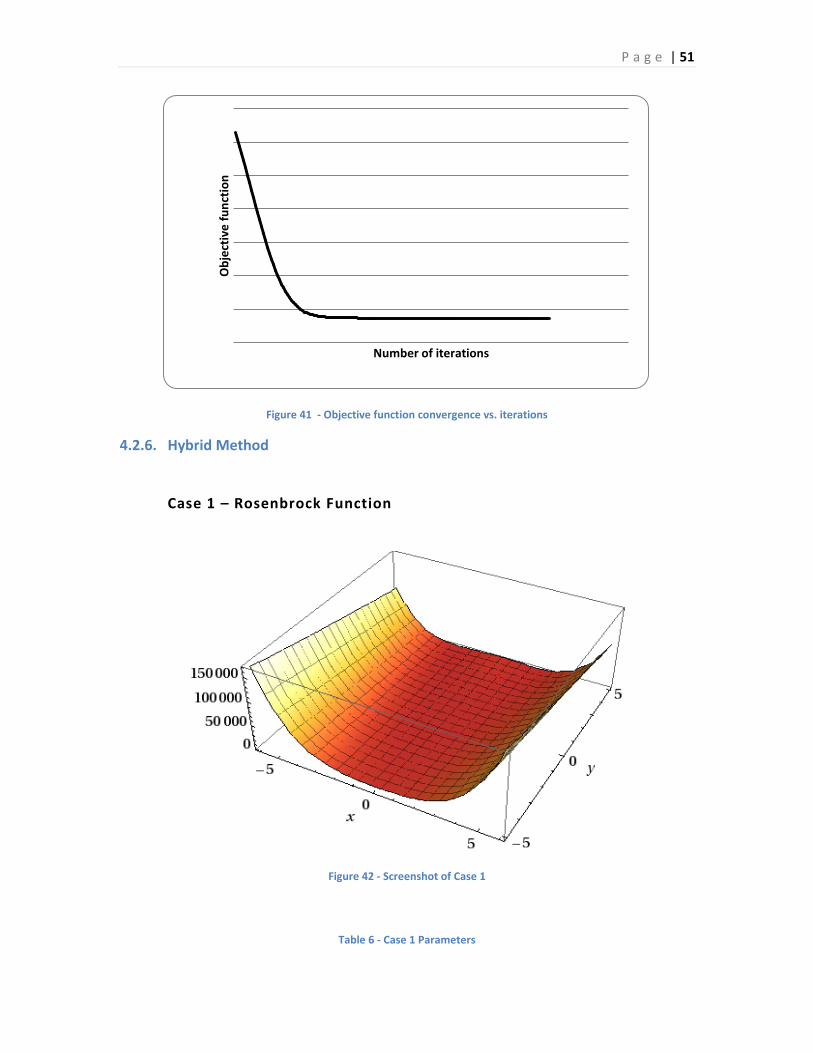
P a g e | 51
Figure 41 - Objective function convergence vs. iterations
4.2.6. Hybrid Method
Case 1 – Rosenbrock Function
Figure 42 - Screenshot of Case 1
Table 6 - Case 1 Parameters
Ob
ject
ive
fu
nct
ion
Number of iterations

P a g e | 52
Function ( ) ( ) ( )
Range and
Known Optimum ( ) ( )
Table 7 - Case 1 Results
x (guess 3
y (guess) 2
x (converged) 0.61013085
y (converged) 0.37277063
z (minimum/converged) 0.15202406
Total iterations 205
Figure 43 - Case 1 Convergence History

P a g e | 53
Figure 44 - Case 1 Overall Function Evaluation Convergence
Figure 45 - Path Convergence
Table 8 - Case 1 algorithm sequence
Method Iterations
Differential Evolution 22
Davidson-Fletcher-Powell 26
initial point final point path

P a g e | 54
Nelder-Mead 10
Sequential Quadratic Programming 21
Linearization Method 2
Davidson-Fletcher-Powell 1
Differential Evolution 20
Genetic Algorithm 5
Nelder-Mead 1
Sequential Quadratic Programming 21
Linearization Method 2
Davidson-Fletcher-Powell 1
Differential Evolution 20
Genetic Algorithm 1
Nelder-Mead 1
Sequential Quadratic Programming 21
Linearization Method 2
Davidson-Fletcher-Powell 1
Differential Evolution 20
Case 2 – Rastrigin Function
Figure 46 - Screenshot of

P a g e | 55
Table 9 - Case 2 Parameters
Function ( ) ( )
( )
Range and
Known Optimum ( ) ( )
Table 10 - Case 2 Results
x (guess 5
y (guess) 5
x (converged) -4.9999892 x 10⁻⁵
y (converged) -4.9999892 x 10⁻⁵
z (minimum/converged) 4.99997909 x 10⁻⁹
Total iterations 207
Figure 47 - Case 2 Convergence History
Figure 48 - Case 2 Overall Function Evaluation Convergence

P a g e | 56
Figure 49 - Path Convergence
Table 11 - Case 2 Algorithm Sequence
Method Iterations
Differential Evolution 22
Genetic Algorithm 3
Nelder-Mead 17
Sequential Quadratic Programming 2
Linearization Method 2
Davidson-Fletcher-Powell 1
Differential Evolution 20
Genetic Algorithm 7
Nelder-Mead 7
Sequential Quadratic Programming 3
Linearization Method 2
Davidson-Fletcher-Powell 1
Differential Evolution 20
Genetic Algorithm 4
Nelder-Mead 1
Sequential Quadratic Programming 4
Linearization Method 2
Davidson-Fletcher-Powell 1
Differential Evolution 20
initial point final point path

P a g e | 57
Genetic Algorithm 1
Nelder-Mead 1
Sequential Quadratic Programming 5
Linearization Method 2
Davidson-Fletcher-Powell 1
Differential Evolution 20
Genetic Algorithm 1
Nelder-Mead 1
Sequential Quadratic Programming 6
Linearization Method 2
Davidson-Fletcher-Powell 1
Differential Evolution 20
4.2.7. Conclusion of Optimization
Unfortunately after all the methods were studied in depth it was not possible to
implement them in the creation or design of an airfoil. It will require some more
expertise in the area of programming to be able to write a code that would create the
data necessary while also being able to compute behavior models. This could be done
manually, but it would take a very long time, considering that the main advantage of the
optimization methods is particularly this condition. In order to obtain workable data a
smaller amount of data was gathered manually.

P a g e | 58
Figure 50 - Pareto Front Analysis
The result of the work researched during the summer served to gain the
knowledge necesary toachieve the preceding graphical representation. Each point
represents the specific signature in the condition of (5.5e05) Reynolds value.The pareto
front shown in red demostrates a limit where an infinite amount of solutions arrive at
ideal conditions. This is the greatest contribution in optimization, the realization that the
ideal condition is not a particular solution, but an ideal relationship between objectives.
Dra
g
Lift
All Airfoils
Best L/D values
Pareto Front

P a g e | 59
5. Airfoil Selection
5.1 Wing Theory
Before selections or design are made for the wing, it was necessary to understand the
basics of what can be affected and changed. The rules for the competition require a plane to
take off in a particular runway's distance. Do to this rule, it was decided to design characteristics
to work ideally at the moment where the aircraft reached a lift equal to the total weight of the
aircraft. This happens when the plane is at level flight, but it also occurs at the beginning of the
takeoff action. In commercial aviation a pilot must wait past this point in order to ensure safety
but also to create a lift force that is significantly larger than total weight. In the competition
scenario we could assume this point to be the same, and in this way, use it for convergence of
the optimization.
Chord – a straight line from the leading edge to the trailing edge
Camber – curvature characteristic
Mean camber line – set of points equidistant from upper and lower surfaces
Thickness distribution – the distance from the upper surface to the lower
surface measured perpendicular to the mean camber line
Airfoil thickness ratio (t/c) = max thickness/chord
In order to properly select the wing that would ideally aid the design
(In level flight and in our takeoff scenario.)

P a g e | 60
5.2 Wing Loading
This parameter is usually seen as one from which to determine the stress that is
experienced on the wing. In our case the aircraft to be design and subsequently tested is only to
be ideal at taking off. Therefore turning performance was neglected. We have an approximate
value of wing loading of 14.5. The wings could resist higher loads with a few modifications;
however our thrust would have not been able to handle such situations.
5.3 Stall Considerations
In order to base the assumptions in theory as well as in historical trends, the design or
selection of airfoil takes into account the expected computed behavior as well as common traits
that certain airfoils experience.
Thickness of the airfoil as a percentage of chords could determine three types of
common outcomes.
Figure 51 - Airfoil Thickness List
Thick Airfoil (
)
Airfoils with round leading edges display a layer separation occurring from the trailing
edge to a point on the upper surface. This type of airfoils show a gradual lost of lift which is

P a g e | 61
dependent on the amount of layer separation, this usually occurs after the angle of attack goes
beyond 10 degrees.
Moderate Airfoil (
)
Airfoils from this range of thickness display layer separation occurring at the leading edge with
potential for reattachment. This condition is possible at very low angles of attack, getting
progressively worst to the point where the layer separation totally fails to reattach, this creates
an abrupt change in lift.
Thin Airfoil (
)
Thin airfoils do not display the type of problems from the previous two categories,
however they do create large changes in pitching moment. Once this conditions where
understood it was decided that the airfoil should fall in the range depicted by the moderate
category. It is understood that moderate thickness airfoils tend to display a particular set of
problems which our design is trying to avoid, however it is also necessary to evaluate if selecting
thin or thick airfoils would have severe drawbacks in weight and structural fragility.

P a g e | 62
Taper Ratio
The taper ratio is simply a number that describes the lift across the length of the wing,
in the following chart it is illustrated how different ratios divide the lift across the wingspan. In
many aircrafts this graph is of severe importance, since some aircraft display a twist in the airfoil
geometry, this variation or twist is created in order to create a wing that never experiences total
stall conditions.
Figure 52 – Span/Mesh vs. Span location plot
The model built for the senior project does not exhibit such twist in airfoil geometry,
therefore the taper ratio works only to project structure loads, and to predict conditions with

P a g e | 63
historical perspective. Based on recommended values for taper ratios we tried to stay away
from values smaller than 0.2.
5.4 Wing Incidence and Dihedral angles.
The wing incidence of the design is a factor that was optimized as a part the wing and
airfoil parameters. The angle of incidence found a particular ideal value of 7 degrees.
Figure 53 - Incidence Angle Picture
The dihedral angle is sometimes required on aircrafts with high wing location. Again,
due to time considerations, we selected a conservative dihedral value of negative 4%. The use of
a negative dihedral value in a plane similar to our in concept is shown below in the Antonov 225.
Figure 54 - Antonov 225

P a g e | 64
5.5 Take-Off Properties Calculations
In order to reach equations that will serve to understand what happens during takeoff it
is important to break down the forces behind this action.
L = Lift force
R = Ground Normal force
W = Aircraft's weight
T = Thrust
T0 = Static Thrust
D = Drag force
μ = Coefficient of rolling friction
m = mass
g = Gravity constant
ρ = Air density
S = Wing area
V = Aircraft's velocity
CDg = Coefficient of drag during ground run
S = Distance
CLg = Coefficient of lift during ground run
a = Constant used to calculate T using T0
t =

P a g e | 65
The team calculated a summation of forces in the vertical and horizontal directions.
Since after the thrust is applied the aircraft begins to
accelerate, we end up with an equation that will give
horizontal acceleration.
Rearrange using W and L
Rearrange again leaving acceleration by itself and substituting Lift and Drag equations we obtain
the following formula.
In some applications or situations we can assume thrust to be constant during takeoff. In
propeller aircraft this is not the case, but if we want to arrive at precise values we must account for this
change.
Following some changes we obtain a new formula that accounts for changing thrust.

P a g e | 66
In order to better visualize the factors that influence the system it is important to separate the
values into two secondary equations. In A there will be conditions not depending on velocity, and B will
consist of factors that change with speed.
At this point we can clearly construct a formula that will give us the time it takes for the aircraft
to be able to become airborne.
Since factor B could possibly fall in the negative range, we must create a different result for such
occasion.

P a g e | 67
The team established that the formulas previously discussed will predict the moment and
aircraft could become airborne. This does not mean that in real life situation pilots should use these
values. A commonly used ratio is displayed below that ensures that the aircraft is safely above minimum
lift conditions or as is called stall.
Assuming that the aircraft takes off from complete rest, we can further simplify the formula to
the following:
Now that take off time is known we could arrive at equations that will predict the distance
required to achieve take off.
After integration the following is obtained.

P a g e | 68
Finally we arrive at a point where, assuming total rest at the beginning, the two factors
previously described could be seen in how they affect the task of reducing take off distance.
This theoretical calculations were used to double check the approximations done by the
optimization of the wing parameters. At the end a certain convergence was found in the lift generated
at the end of the run way length and the runway needed for takeoff as described above.
5.6 Selection Process
The Airfoil selection for this design is being analyzed by using MIT software called XFoil
version 6.96, which let the team analyze the shape and the coefficient of lift and drag of
different shapes of NACA airfoils. In total, the team analyzed a total of 84 airfoil profiles.

P a g e | 69
Figure 55 - XFOIL 6.96 Interface
The team selected the airfoil based on the optimum trade off situation that allowed for
the best lift situation at takeoff. The following steps explain how the team was able to obtain
the results in Microsoft Excel.
Using total lift as a constant, computing some common airfoils and after arriving at the
approximate velocity that the plane would reach at the end of the runway specified by the
regulations the team was able to concur on an fixed wing geometry. This geometry was then
used as a constant from which the optimization could be generated. The first step of the
process was to establish the shape of the wing. In this case, the shape was a tapered at the end,

P a g e | 70
for wing loading considerations, as one can see in the following table; also, it shows the
dimensions of the wing and the value of the area for a total wing span.
Table 12 - Wing Area
Wing Area
s (m) 1.4
B1 (m) 0.6
B2 (m) 0.3
A (m2) 1.26
Bx (m) 0.45
Then, the team set up the conditions such as the air properties, and the desired cargo
weight of the aircraft.
Table 13 - Air Properties
Air Properties
μ (kg/s*m) 1.80E-04
ρ (kg/m^3) 1.204
Table 14 - Desired Weight of Aircraft
Plane mass and weight
Weight (N) 147.15
Mass (Kg) 15.00

P a g e | 71
From the previous section and the results of the thrust experiment, the team was able to
calculate the take-off properties required for the plane to fly.
Table 15 - Take-off Calculations results
Take-off Analysis
So (m) 60
T (N) 30
Vto (m/s) 12
Re 3.61E+04
Once the take-off results were obtained the team used XFoil software to analyze a total
of 84 airfoil profiles. The goal of this step is to feed data to our objective function, which at this
point, was able to calculate total lift at the moment the aircraft reached the end of the run way.
It is important to note that contrary to intuition, the best scenario did not occurred at the
iteration with the highest lift coefficient, but instead, it happened when the combination of
drag and lift coefficient where optimal to our specific situation. The lift and drag coefficient
helped the team to calculate the lift and drag forces of the airfoil. As mentioned before the
team studied 84 profiles further separated in angles of attack, this methodology gave us about
1200 design scenarios. Performing an optimization process through the best 20 profiles, and
finally selecting the best airfoil-alpha combination that guaranteed the best possible lift
maintaining the design considerations.
In the following table, one can see a small portion used to create the parameters of
study and the results obtained. The color red shows the best results of each profile.

P a g e | 72
Table 16 - Calculations of the airfoil
NACA # α CL CD k Do (N) vTo (m/s) Re n Lo (N) L Lo (lbf) L/D
0.50 0.0591 0.02299 0.0174384 3.906 14.967 4.51E+04 10.042 6.455309 2.257554 2.570683
1.00 0.0901 0.0244 0.0185079 4.129 14.936 4.50E+04 15.246 9.841342 3.427378 3.692623
1.50 0.1194 0.02626 0.0199187 4.419 14.895 4.48E+04 20.093 13.04169 4.517034 4.546839
2.50 0.285 0.02933 0.0222474 4.891 14.828 4.46E+04 47.528 31.12966 10.6847 9.717013
3.00 0.4713 0.02746 0.020829 4.605 14.868 4.48E+04 79.030 51.47863 17.76676 17.16315
3.50 0.5508 0.02569 0.0194864 4.330 14.907 4.49E+04 92.845 60.16217 20.87249 21.44025
4.00 0.5974 0.02657 0.0201539 4.467 14.888 4.48E+04 100.439 65.25214 22.57962 22.484
4.50 0.6451 0.02854 0.0216482 4.771 14.845 4.47E+04 107.830 70.46226 24.24125 22.60336
5.00 0.6925 0.03132 0.0237568 5.193 14.784 4.45E+04 114.811 75.63961 25.81044 22.11047
5.50 0.7403 0.03435 0.0260552 5.645 14.719 4.43E+04 121.649 80.86066 27.34785 21.55167
6.00 0.7805 0.03811 0.0289072 6.194 14.638 4.41E+04 126.853 85.25158 28.51775 20.48019
6.50 0.8191 0.04249 0.0322295 6.818 14.545 4.38E+04 131.440 89.46774 29.54901 19.27748
7.00 0.8386 0.0493 0.037395 7.757 14.402 4.34E+04 131.944 91.59766 29.6622 17.01014
7.50 0.8628 0.05552 0.042113 8.581 14.274 4.30E+04 133.347 94.24095 29.97756 15.54035
8.00 0.7142 0.09179 0.0696246 12.812 13.565 4.08E+04 99.689 78.00984 22.411 7.780804
0.50 0.0254 0.02494 0.0189175 4.213 14.924 4.49E+04 4.291 2.774363 0.964666 1.018444
1.00 0.0537 0.02656 0.0201463 4.466 14.888 4.48E+04 9.029 5.865483 2.029731 2.021837
1.50 0.1232 0.02926 0.0221943 4.881 14.829 4.46E+04 20.550 13.45675 4.619741 4.210526
2.00 0.325 0.03132 0.0237568 5.193 14.784 4.45E+04 53.882 35.49874 12.1132 10.37676
2.50 0.4755 0.02907 0.0220502 4.852 14.833 4.46E+04 79.357 51.93738 17.84023 16.35707
3.00 0.5529 0.02733 0.0207304 4.585 14.871 4.48E+04 92.749 60.39154 20.85086 20.23052
3.50 0.6029 0.02766 0.0209807 4.635 14.864 4.47E+04 101.038 65.85289 22.71432 21.79682
4.00 0.6484 0.02967 0.0225053 4.943 14.820 4.46E+04 108.022 70.82271 24.28431 21.85372
4.50 0.6957 0.03214 0.0243788 5.316 14.766 4.44E+04 115.064 75.98914 25.86734 21.64592
5.00 0.7383 0.0351 0.0266241 5.755 14.702 4.43E+04 121.055 80.64221 27.21415 21.03419
5.50 0.7802 0.03866 0.0293244 6.273 14.626 4.40E+04 126.601 85.21881 28.4611 20.18107
6.00 0.8081 0.04393 0.0333218 7.020 14.515 4.37E+04 129.135 88.26624 29.03063 18.39517
6.50 0.831 0.04968 0.0376833 7.808 14.394 4.33E+04 130.605 90.76754 29.3612 16.72705
7.00 0.8188 0.05933 0.045003 9.070 14.197 4.27E+04 125.176 89.43497 28.14068 13.80078
7.50 0.7879 0.0721 0.0546893 10.631 13.942 4.20E+04 116.172 86.05986 26.11659 10.92788
0.50 -0.0099 0.02708 0.0205407 4.546 14.877 4.48E+04 -1.662 -1.08135 -0.37362 -0.36558
1.00 0.0162 0.02887 0.0218985 4.821 14.838 4.47E+04 2.705 1.769475 0.608164 0.561136
1.50 0.1665 0.03247 0.0246291 5.365 14.759 4.44E+04 27.511 18.18628 6.184767 5.12781
2.00 0.3432 0.03327 0.025236 5.484 14.742 4.44E+04 56.575 37.48667 12.71854 10.3156
2.50 0.4748 0.03105 0.023552 5.152 14.790 4.45E+04 78.780 51.86092 17.7105 15.29147
3.00 0.558 0.02899 0.0219895 4.839 14.835 4.47E+04 93.148 60.9486 20.94047 19.24802
3.50 0.6065 0.02925 0.0221867 4.879 14.829 4.46E+04 101.167 66.2461 22.74314 20.73504
4.00 0.6523 0.0308 0.0233624 5.114 14.795 4.45E+04 108.311 71.24869 24.34931 21.17857
4.50 0.6947 0.03316 0.0251525 5.468 14.744 4.44E+04 114.555 75.87991 25.75297 20.94994
5.00 0.7379 0.03616 0.0274281 5.911 14.680 4.42E+04 120.614 80.59851 27.11521 20.40653
5.50 0.772 0.04018 0.0304773 6.491 14.594 4.39E+04 124.717 84.32315 28.03754 19.21354
6.00 0.8024 0.04456 0.0337997 7.108 14.501 4.36E+04 127.990 87.64365 28.77327 18.00718
6.50 0.8226 0.05024 0.038108 7.883 14.383 4.33E+04 129.076 89.85003 29.01756 16.37341
7.00 0.821 0.0587 0.0445251 8.990 14.209 4.28E+04 125.738 89.67527 28.26706 13.98637
2110
2111
2112

P a g e | 73
The following table shows the final 20 profiles, and the color green shows the airfoil-alpha
selected for the aircraft, the color yellow shows the second best option but due to design considerations
. It has to be mentioned that a Computational fluid dynamics simulation was performed in order to
compare the theoretical and experimental results.
Table 17 - Optimized results and selection of airfoil
NACA # α CL CD k Do (N) L Lo (lbf) L/D
2310 7.00 0.93720 0.03691 0.027997 6.020 138.593 31.1570 23.0222
8.00 1.01840 0.03637 0.027587 5.941 150.601 33.8564 25.3483
2311 7.00 0.90330 0.04309 0.032685 6.903 133.580 30.0300 19.3521
7.50 0.95630 0.04253 0.03226 6.824 141.418 31.7919 20.7236
3110 6.50 0.91040 0.04982 0.037789 7.827 134.630 30.2660 17.2010
7.00 0.90160 0.05971 0.045291 9.118 133.329 29.9735 14.6219
3111 6.00 0.88750 0.04359 0.033064 6.973 131.243 29.5047 18.8228
6.50 0.90210 0.04985 0.037812 7.831 133.402 29.9901 17.0354
3210 6.00 0.88840 0.04399 0.033367 7.028 131.377 29.5346 18.6923
6.50 0.91400 0.04905 0.037205 7.723 135.162 30.3857 17.5012
4110 6.00 0.92900 0.05183 0.039314 8.096 137.380 30.8844 16.9696
6.50 0.92940 0.06071 0.04605 9.245 137.440 30.8977 14.8668
4111 6.00 0.93300 0.05107 0.038738 7.994 137.972 31.0173 17.2586
6.50 0.93270 0.05907 0.044806 9.037 137.928 31.0074 15.2623
4210 5.50 0.89880 0.04649 0.035264 7.374 132.914 29.8804 18.0241
6.00 0.93370 0.05069 0.038449 7.944 138.075 31.0406 17.3820
5110 5.00 0.93190 0.04782 0.036272 7.556 137.809 30.9808 18.2381
5.50 0.95040 0.05430 0.041188 8.422 140.545 31.5958 16.6888
5111 5.50 0.95790 0.05297 0.040179 8.247 141.654 31.8451 17.1771
6.00 0.96210 0.06039 0.045807 9.204 142.275 31.9848 15.4573
5210 4.50 0.90740 0.04181 0.031714 6.722 134.186 30.1663 19.9608
5.00 0.94300 0.04567 0.034642 7.261 139.451 31.3498 19.2044
6110 4.50 0.95550 0.05078 0.038518 7.956 141.299 31.7653 17.7609
5.00 0.92910 0.06175 0.046839 9.375 137.395 30.8877 14.6550
6111 4.50 0.95700 0.04968 0.037683 7.808 141.521 31.8152 18.1251
5.00 0.94350 0.05839 0.04429 8.950 139.525 31.3664 15.5885
6210 4.50 0.94510 0.04928 0.03738 7.754 139.761 31.4196 18.0242
5.00 0.96080 0.05541 0.04203 8.566 142.083 31.9415 16.5861
7110 3.50 0.94480 0.04863 0.036887 7.666 139.717 31.4096 18.2251
4.00 0.97150 0.05395 0.040922 8.376 143.665 32.2973 17.1527
7111 4.00 0.93750 0.05579 0.042318 8.616 138.637 31.1669 16.0912
4.50 0.93240 0.06434 0.048803 9.697 137.883 30.9974 14.2193
7210 3.50 0.97350 0.04301 0.032624 6.891 143.961 32.3638 20.8900
4.00 0.95560 0.05211 0.039526 8.133 141.314 31.7687 17.3757
8110 2.50 0.92090 0.05048 0.03829 7.915 136.183 30.6151 17.2046
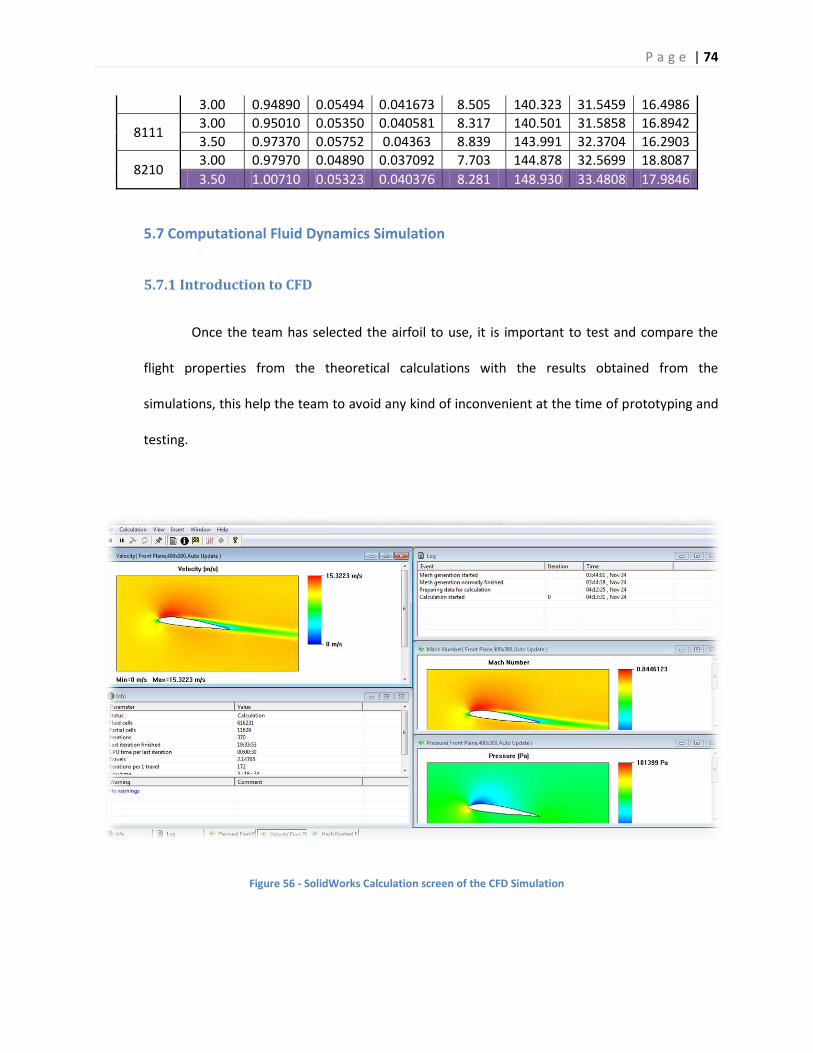
P a g e | 74
3.00 0.94890 0.05494 0.041673 8.505 140.323 31.5459 16.4986
8111 3.00 0.95010 0.05350 0.040581 8.317 140.501 31.5858 16.8942
3.50 0.97370 0.05752 0.04363 8.839 143.991 32.3704 16.2903
8210 3.00 0.97970 0.04890 0.037092 7.703 144.878 32.5699 18.8087
3.50 1.00710 0.05323 0.040376 8.281 148.930 33.4808 17.9846
5.7 Computational Fluid Dynamics Simulation
5.7.1 Introduction to CFD
Once the team has selected the airfoil to use, it is important to test and compare the
flight properties from the theoretical calculations with the results obtained from the
simulations, this help the team to avoid any kind of inconvenient at the time of prototyping and
testing.
Figure 56 - SolidWorks Calculation screen of the CFD Simulation

P a g e | 75
Also, It has to be mentioned that different flow speeds will produce different results, so
for that reason, computational flow dynamics simulation are extremely important for a total
verification of the calculations which were performed through extensive periods of research.
The software used for this task was SolidWorks 2012 and its add-in option of Flow
simulation to solve for the amount of lift and drag force. Due to the lack of software the team
was limited to use only one kind of software analysis.
5.7.2 Simulation Set up
In order to be able of performing the simulations, the team has to establish some initial
parameters to run them and to have the right case of study. From the theoretical calculations
the team has obtained the thrust force generated by the engine, the theoretical lift and drag
forces, Reynolds number and the take-off velocity. The parameters are shown in the following
table and were introduced in the flow simulation analysis performed in SolidWorks.
Table 18- Initial parameters to consider in the flow simulation
Initial Parameters Value (SI) Value (Eng)
Thrust Force 30.00 N 6.74 lbf
Take-off Velocity 15.00 m/s 472.44 in/s
Take-off Distance 60.00 m 2362.20 in
Reynolds Number 4.203E+04 4.203E+04
Lift Force (Desired) 141.42 N 31.79 lbf
Drag Force (Desired) 6.82 N 1.53 lbf
In the following figure, one can see the entire wing; which was made using the NACA
2311 airfoil profile; and the computational domain, which is the calculation zone selected by the
user.

P a g e | 76
Figure 57 - CAD model of wing and its computational domain
The team input a total of 4 surface goals, which are:
- SG Normal Force (X)
- SG Normal Force (Y)
- SG Force (X)
- SG Force (Y)
5.7.3 Simulation Results
The simulations gave the following results for the surface goals with a little variation
between the forces with same axial components because they are expected to be approximately
the same.
Table 19 - SCFS Simulation Results
Goal Name Unit Value
SG Normal Force (X) 1 [N] 16.84139689
SG Normal Force (Y) 1 [N] 103.3567046
SG Force (X) 1 [N] 17.40393591
SG Force (Y) 1 [N] 103.2563398

P a g e | 77
In the following figures, one can show the pressure distribution of the airplane in the top and
bottom surface and a cut plot viewed from the right plane.
Figure 58 - Pressure distribution on the top surface
Figure 59 - Pressure distribution on the bottom surface

P a g e | 78
Figure 60 - Cut Plot of Pressure
Figure 61 - Flow trajectories of the pressure on the top surface

P a g e | 79
Figure 62 - Flow trajectories of the pressure on the bottom surface
The velocity and the vorticity were other points of consideration in this study, and in the
following figures one can see their flow trajectories and cut plots.
Figure 63 - Flow Trajectories of the Velocity

P a g e | 80
Figure 64 - Cut plot of the velocity
Figure 65 - Flow trajectories of the Vorticity

P a g e | 81
5.8 Static Thrust Force Calculation
This section of the project was done in order to differentiate the research and theoretical
calculations from teams in the past. The team proposed to calculate the static thrust force of the engine
in order to develop more accurate theoretical calculations.
The experiment was made by using a test bench where the engine will pull a force gauge. The
team had tested the three different types of propeller, 13x4 1st pitch, 13x4 wide pitch, and 14x7.
In the following tables, it can be seen the results obtained from the test for each of the
propellers.
Table 20 - 13X4 1st Pitch Propeller results
Speed Force (N) Force (lbf) RPM
Iddle 5.0 1.124 9300.00
Low 13.0 2.923 14912.00
Mid 23.0 5.171 20400.00
High 28.0 6.295 21400.00
Speed Force (N) Force (lbf) RPM
Iddle 4.0 0.899 9200.00
Low 10.0 2.248 13400.00
Mid 22.0 4.946 19700.00
High 27.0 6.070 21500.00
Speed Force (N) Force (lbf) RPM
Iddle 3.0 0.674 8600.00
Low 9.0 2.023 12720.00
Mid 21.0 4.721 18500.00
High 27.0 6.070 21200.00
Speed Force (N) Force (lbf) RPM
Iddle 4.0 0.899 9033.33
Low 10.7 2.398 13677.33
Mid 22.0 4.946 19533.33
High 27.3 6.145 21366.67
Trial #1
Trial #2
Trial #3
Propeller 13x4 (1st Pitch)
Average

P a g e | 82
Table 21 - 13X4 Wide Pitch Propeller results
Speed Force (N) Force (lbf) RPM
Iddle 6.0 1.349 10700.00
Low 11.0 2.473 12550.00
Mid 20.0 4.496 19700.00
High 29.0 6.519 21800.00
Speed Force (N) Force (lbf) RPM
Iddle 5.8 1.304 10000.00
Low 11.0 2.473 12500.00
Mid 23.0 5.171 20100.00
High 27.0 6.070 21200.00
Speed Force (N) Force (lbf) RPM
Iddle 4.0 0.899 9500.00
Low 10.0 2.248 13500.00
Mid 20.5 4.609 20400.00
High 28.5 6.407 21300.00
Speed Force (N) Force (lbf) RPM
Iddle 5.3 1.184 10066.67
Low 10.7 2.398 12850.00
Mid 21.2 4.758 20066.67
High 28.2 6.332 21433.33
Propeller 13x4 (Wide Pitch)
Trial #2
Trial #2
Average
Trial #1

P a g e | 83
Table 22 - 14X7 Propeller results
Figure 66 - Thrust Force vs. RPM
Speed Force (N) Force (lbf) RPM
Iddle 6.0 1.349 10300.00
Low 11.0 2.473 11200.00
Mid 20.0 4.496 19550.00
High 31.0 6.969 23500.00
Speed Force (N) Force (lbf) RPM
Iddle 5.4 1.214 10050.00
Low 12.0 2.698 13500.00
Mid 26.0 5.845 21050.00
High 29.0 6.519 21200.00
Speed Force (N) Force (lbf) RPM
Iddle 6.5 1.461 9650.00
Low 11.2 2.518 12300.00
Mid 21.0 4.721 19300.00
High 29.5 6.632 21900.00
Speed Force (N) Force (lbf) RPM
Iddle 6.0 1.341 10000.00
Low 11.4 2.563 12333.33
Mid 22.3 5.021 19966.67
High 29.8 6.707 22200.00
Propeller 14x7 (Wide Pitch)
Trial #1
Trial #2
Trial #2
Average

P a g e | 84
From the graph above, the team selected the propeller 14x7 because it gives more static thrust
force in a similar RPM scale.
The dynamic thrust force was also important for the team, but a priority was to know the take-
off velocity required, and also due to the lack of resources the team could not implemented the dynamic
test.
In the following figures, one can see the set-up and the run of the test.
Figure 67 - Test Bench 1

P a g e | 85
Figure 68 - Test Bench 2

P a g e | 86
6. Structural Analysis
6.1 Static analysis
The ability of an aircraft to withstand the aerodynamic forces during flight is another
important part of the science of structures. The team was focused on the design and build of an
aircraft structure having two goals in mind, the first was to minimize the load of every single
part to be used in the airplane, and the second one was the structural failure analysis, to
prevent the aircraft from disintegrating during the flight. Therefore, the final design of the
airplane must have been lightweight, but strong at the same time. The aircraft structure must
also have been able to remain intact even through high wind speeds or unsafe flight
maneuvers.
Figure 69 - Flight Mechanics

P a g e | 87
There are four important forces involved during any flight, these forces are (lift, drag,
thrust, and the weight of the airplane itself). The airplane must have sufficient lift force to get
the total weight of the aircraft, plus the desired weight to be successful in the competition.
Several factors must be considered before a plane is ready for takeoff. The total weight should
be raised before the 50 meters track is finished. Having had this restriction in the competition,
the takeoff weight became very important since the distance to be covered may have required
more fuel, making it necessary to find a balance between all these variables.
The following picture shows a schematic during the simulation process of the structural
design.
Figure 70 - Conceptual Structural Design with Forces
In the following figure, one can see the displacement in x and z, the Von misses stress of
the structure of the airplane. The simulations were performed using Autodesk Inventor.

P a g e | 88
Figure 71 - Displacement in X
Figure 72 - Displecement in Z
Figure 73 - Von Misses stress

P a g e | 89
6.2 Wing Loading Test
After having obtained a theoretical solution for wing failure, the team performed an
actual failure test on a wing structure comparable to the ones that were designed for the
prototype. This was to serve as a last review of possible structural weaknesses. This type of test
consisted of literally loading the wings of the aircraft upside down.
Figure 74 - Wing Load Testing Process
From the experiment, the team has obtained an allowable distributed load of 22lbf along the
wing which guarantees that the plane plus the load reach 40lbf; the wings will remain intact during the
flight.

P a g e | 90
7 Airplane Construction
7.1 Overview
One of the specific goals of this Senior Design Project was to develop an assembly that
would closely resemble one of a real life aircraft. It was for this reason that the materials used
were not common to airplanes of similar dimensions. All the part that makes up the overall
assembly consists of materials commonly used in modern aviation with one exception. The
wings were designed and manufactured primarily with foam, resin, and wood. The inclusion of
wood in the wing structure came as a substitution to carbon fiber tubes and rods. The carbon
fiber would have dramatically increased the stability and strength of the wing structure,
however the team decided against it due to price considerations, due to the fact that wood
rods were significantly less costly.
At the end of the construction our goal was to create an aircraft that could realistically
be disassembled and reassembled depending on need. This anticipation allowed the members
of the team to gain valuable experience in Design for Manufacturability techniques (DFM),
which are currently very important factors and skills to consider moving forward with our
professional endeavors. The easy route would have included the reliance in balsa wood and
resin in an overwhelming form throughout the structure. Making the structure more
realistically built aided the final design quality and, as mentioned before, benefited the
members with valuable experience.

P a g e | 91
7.2 Body
It is the main airplane structure or chassis. Supporting all airplane components as well as
static and dynamic forces generated during the flight. The airplane body must meet a perfect
combination of conditions for a successful performance: Strong, to handle all flight stresses and
lighter, so the carrying capacity or airplane payload is increased; an important aspect of the
competition.
As part of the body creation, our team adopted a body design inspired by a bird
skeleton that it is basically composed of ribs located along the backbone. Please refer to figure
below for a better understanding.
Figure 75 - Body Design Inspiration
After doing some research and gathering professional opinions about the best material
to use to create the body of the airplane, as a team we decided to use Aluminum TS-6061 with
a thickness of 1/16 of an inch mainly because of its easy handling and cutting by CNC machines
cutters; specifically, we used the one at the FIU laboratory under Professor Zicarelli’s guidance

P a g e | 92
(See Appendix A and D for design dimensions of the body). It is also important to mention that
screws, washers and nuts were selected instead of considering welding to hold all pieces
together.
7.3 Ribs
All ribs were carefully designed to guarantee an easy assembly and disassembly, so
serves, wings and accessories could be added later on during the building process. A short
description of each rib can be found as follows:
7.3.1 Front Rib
It is located at the front of the airplane or beginning of the aluminum tube or backbone.
Main functionalities of this rib include holding the engine mount, front servos, landing gear and
the engine cover. For a better understanding please refer to the pictures below

P a g e | 93
Figure 76 - Front Rib Design and Features
Figure 77 - Parts Attached to the Front Rib
Figure 78 - Front Rib Servos

P a g e | 94
7.3.2 Middle Rib
It is located at 6 inches behind the front rib. Main functionalities of this rib include wing
support attached to the airplane body, as well as stabilizing the plane by avoiding horizontal
movement or deflection created by lateral forces during the flight. More details can be found in
the following pictures.
Figure 79 - Middle Rib Design and Features

P a g e | 95
Figure 80 - Wing and Ribs connection
7.3.3 Secondary Middle Rib
With the same function of the middle rib previously described, it performs as a
secondary attachment from the wings to the whole structure, and its located 7 inches behind
the middle rib.

P a g e | 96
Figure 81 - Secondary Rib Design and Features
Figure 82 - Secondary rib location and configuration

P a g e | 97
7.3.4 Back Rib
It is located at 13.5 inches behind the middle rib. Main functionalities of this rib
include rear landing gear support and shocks absorbers arms support. For a better
understanding, please refer to the picture below.
Figure 83 - Back Rib Design and Features
Attached to the back rib, two aluminum TS-6061 arms were also created by the same
CNC cutting process. These two arms basically transfer the forces generated by landing or
takeoff maneuvers directly to the shock absorbers. Such arms are located as shown in the
picture below.

P a g e | 98
Figure 84 - Back Rib with rear landing gear, arms suspension and shock absorbers
Figure 85 - Suspension Arm design and Features

P a g e | 99
7.4 Mount
The aluminum mount was designed with the necessity of increasing the possibilities of
the engine final location. The first choice for the engine mount was one conventional adjustable
plastic mount from the hobby store. Adjustable refers the fact that the mount was compatible
to hold engines from .46 up to .71 cc, in our case the engine was .61cc but, the problem of this
mount was the fact that only provides one specific location or horizontal distance from the
engine to the front rib. This problem can be seen in the following picture.
Figure 86 - Plastic Engine Mount
The final mount was made of aluminum TS-6061; we used the same CNC cutting process
for the ribs and suspension arms for better results. Three 90 degree bends were performed
after the aluminum sheet was cut. A required structure was important to hold the engine
without any problem. These bends were performed in 3 different locations and they can be
seen with more details in the picture below.

P a g e | 100
Figure 87 - Aluminum Engine Mount
7.5 Backbone or Aluminum Tube
The Airplane backbone consists of an Aluminum TS-6060 tube. Dimensions of this tube
are 1 inch of outer diameter and thickness of approximately 1/16 of an inch. Such tube goes
through all three ribs previously mentioned above.
Figure 88 - Backbone or Main Tube Design and Specifications

P a g e | 101
This tube required two bends of 20 degree angle each. The Bending process was
performed by using a tube bending machine located at FIU’s machine shop. Each bend required
heat application during the bending process to successfully reach the 20 degree angle without
generating any crack or material rupture.
Dimensions and specifications can be found in the picture below.
Figure 89 - Bending process of the Aluminum Tube or Backbone
7.6 Plate
This part was created from the same Aluminum TS-6061 sheet mentioned for the ribs
and arms. A Hacksaw was used to cut this piece instead of a CNC machine as it didn’t require a
precise dimension as well as to save money and time. This plate goes through every single rib
and its main functionality is to create the airplane floor and structure as well, where the gas
tank, receiver, servos are located.

P a g e | 102
Figure 90 - Plate design and Dimensions
7.7 Connectors
7.7.1 “L” Connector
It is located between the airplane ribs and plate. Its 90 degree angle facilitates the
attachment of horizontal and vertical parts. Holes were carefully measured and created in each
edge of the connector, and screws were inserted through such wholes to complete the
assembly. For more details please refer to the picture below.

P a g e | 103
Figure 91 - L shape Aluminum connectors Design
7.7.2 Butterfly Connector
A total of four (4) butterfly connectors were created to successfully hold the airplane
backbone to its three ribs and secondary middle rib, preventing the horizontal movement that
ribs could cause to the tube. Each piece was created from Aluminum TS-6060 tube with a 1” ID
and a thickness of 1/16 of an inch.
The use of heat was required to successfully meet the shape of each connector as can be seen
in the image below.

P a g e | 104
Figure 92 - Butterfly connection
7.8 Fuselage
In contrast to conventional airplane design, the fuselage of this airplane is not part of its
main structure; instead, its main function is to cover the aluminum structure or body previously
described in an aerodynamic way.
Its main components are as follows:
7.8.1 Cowl
The cowl goes on the front of the airplane covering the engine unit. Taking into
consideration a 7 inch distance from the propeller to the front rib, we used floral foam with the
help of sandpapers to create the mold and to get the desired final shape. The team was able to

P a g e | 105
create a unique and aerodynamic engine front cover using Fiber glass composite and resin after
the creation of the mold. How this process was performed can be seen in the images below:
Figure 93 - First Two steps of the manufacturing process of the Cowl

P a g e | 106
Figure 94 - Steps 3 and 4 of the manufacturing process of the Cowl
Figure 95 - Final steps of the Cowl manufacturing process

P a g e | 107
7.8.2 Body Fuselage
It was originally designed by using a 3D CAD loft tool between the three rib profiles.
Such loft tool consists of generating a single solid part by using a transitional algorithm trough
many profiles at the same time, this feature was created by using the Autodesk inventor 2012
software. Due to the distance between ribs, the single 3D part was divided in two. The first part
covers between front and middle rib while the second part happens to be between the middle
and back rib. For more details please refer to the following picture.
Figure 96 - Fuselage Foam Design
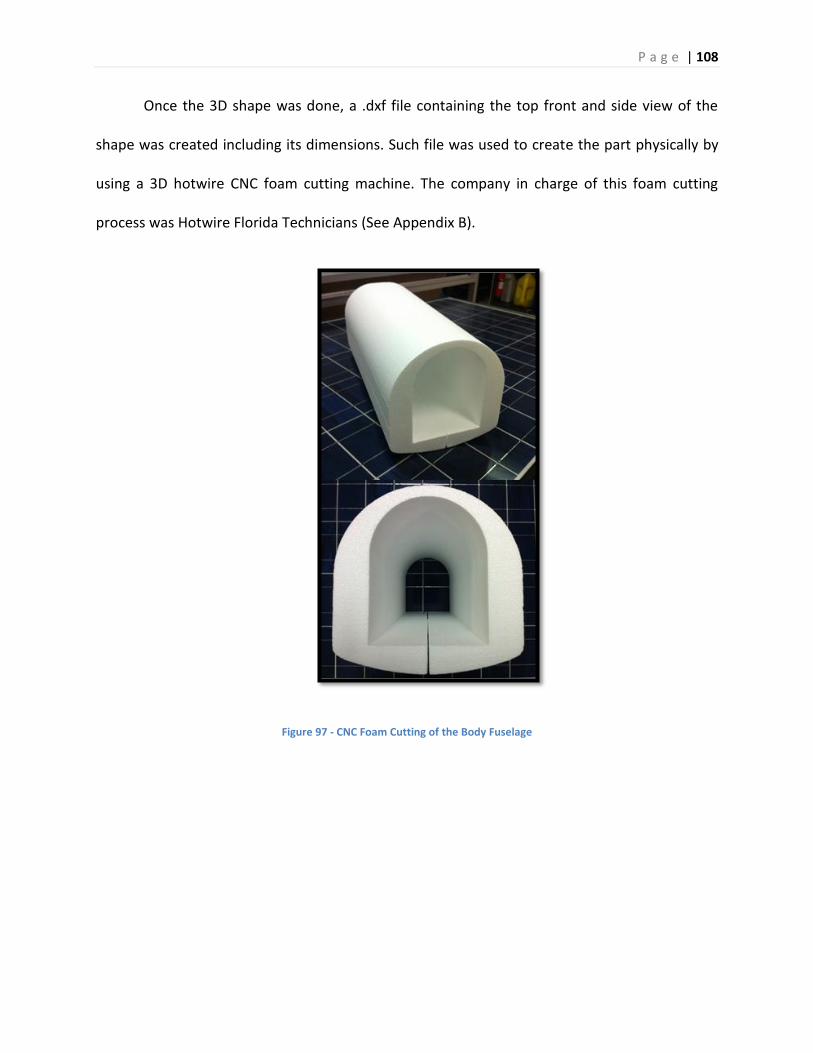
P a g e | 108
Once the 3D shape was done, a .dxf file containing the top front and side view of the
shape was created including its dimensions. Such file was used to create the part physically by
using a 3D hotwire CNC foam cutting machine. The company in charge of this foam cutting
process was Hotwire Florida Technicians (See Appendix B).
Figure 97 - CNC Foam Cutting of the Body Fuselage

P a g e | 109
Figure 98 - Fuselage Assembly
7.9 Tail and Wings Construction
Two identical wings were created by using a CNC foam cutting machine; both wings
were designed to have the airfoil shape described in the Airfoil selection section. Due to the
large wingspan, the cutting process was as follows:
1. The hotwire moved along both profiles at the same time with a distance between them
equal to 1.4 meters (55.11 inches) generating the wing.

P a g e | 110
Figure 99 - CNC Wing manufacturing process
2. Each wing was divided into three sections. First two sections 0.5 meters (19.69 inches)
and third part 0.4 meters (15.75 inches). This division was required for an easy handling.
Figure 100 - Main Wing Cutting process

P a g e | 111
3. Holes were created in the middle of the wing among the two first sections in order to
place two wood sticks to support the internal wing structure. Holes dimensions equal to
0.9 inches and 0.5 inches respectively.
Figure 101 - Holes Diameters and locations in the Main Wing
4. Balsa wood was used to reinforce each wing foam section in order to insert the wood
sticks.
Figure 102 - Balsa wood reinforcement profiles

P a g e | 112
5. After the process above was culminated, flaps and ailerons were created by cutting the
sections one and three of the wing by using basically the procedure of the following
pictures.
Figure 103 - Tail Wings Elevators construction
Figure 104 - Tail Wings Assembly

P a g e | 113
Figure 105 - Ailerons Design
Figure 106 - Flaps Design

P a g e | 114
7.10 Monokote
Wings, fuselage and empennage structures are covered with Monokote. Monokote is a light
plastic utilized to protect and give aerodynamic shape to components. It is available in various
colors, as well as transparent tones. White Monokote is utilized on wings and empennage
structures. Solid red Monokote is utilized in the fuselage section.
Process of adhering Monokote is quite simple, but at the same time it must be performed very
carefully in order to obtain the quality results. Material is cut in the required size and one of the
sides of Monokote is adhesive. The material adheres to the balsa after heat is applied, with the
use of a hot iron.
Once the Monokote is fixed into the structure, a heat gun is utilized in order to firm
material and remove wrinkles. It is highly noticeable where heat gun has been applied. By
applying heat gun in the complete structure of wings and empennage, aerodynamic
performance is increased due to the new wrinkle-free surface.
7.11 Electronic Components
Figure 107 - Futaba Servos

P a g e | 115
Figure 108 - 6 Channel Receiver
Figure 109 - Splitter Cable

P a g e | 116
Figure 110 - Transmitter and Battery
Figure 111 - Servos and Channels Diagram

P a g e | 117
8 Design Considerations
8.1 Assembly and Disassembly
The process of assembly and disassembly of aircraft is one of the principal
considerations of this project. Due to the size of the airplane, the transportation has to be easy
and with no possibilities of damaging the airplane. The entire wing span is divided in two pieces
which are connected to the fuselage by an aluminum plate and four security screws and lock
nuts in each side of the wing. The nose, the fuselage and the tail were constructed and joined
together as a single entity connected through the main tube made of aluminum which leads to
the tail wings.
Figure 112 - Screenshot of the exploded view
The process of assembly and disassembly takes about 15 to 20 minutes, and a minimum
of two persons to do it. The most of the time consumed is taken by the process of tightening all

P a g e | 118
the security screws and lock nuts. The fuselage is the main component of the airplane. It is
composed by 4 principal ribs connected by the main tube through three tube supports
(Butterflies) designed by the team in order to create the stability needed for the body of the
plane.
Figure 113 - Tube Support from SolidWorks
Figure 114 - Tube Support Prototype

P a g e | 119
The plate is another source of stability of the plane; which is connected to the ribs
through 2 L-shape supports in each of the ribs and to avoid the parallelogram effect, the team
implemented two diagonal supports to maintain the rigidity of the structure.
Figure 115 - Connection of the plates to the ribs using L-shape support
Once the wings are assembled to the aircraft, access to the middle section is possible
due to disassemble of the fuselage cover which can be done either right or left section.
In the following figure, one can see the entire structure of the airplane and its main
components.

P a g e | 120
Figure 116 - Structure of the airplane and its main components
8.2 Maintenance of the system
After the airplane is assembled and flight has been performed, maintenance is required
upon completion of the tasks.
The gasoline tank must be fueled for further testing, and checking process of the fuel
pipes to make sure they are tight enough and gasoline is delivered properly to the engine. Also,
the propeller nut and spinner must be re-tightened.

P a g e | 121
Servos must be checked for proper functioning because they are in charge of the
aerodynamic movement capacity of the airplane. Also, they control the thrust of the engine by
delivering a secure rotation to the intake valve located in the engine’s carburetor.
Figure 117 - Servo controller of the front wheel
Finally, the team has to clean any residues of fuel that could be on the fuselage or the
wing assembly, in order to prevent any damage to the foam structure of those components.
8.3 Environmental Impact
When constructing the airplane, it is important to maintain the damage to the
environment as miniscule as possible. This is an important concept to follow, since new
regulations are being targeted at producing less pollution and are more eco-friendly.
The groups that are competing in the Regular Class of the event will use 10%
Nitromethane fuel. This type of fuel is hazardous to humans if ingested and if it comes into eye

P a g e | 122
and skin contact. It causes severe damage to the kidneys, nervous system, and liver. Its vapor
and mist is also irritating to the eyes, mucous membrane, and upper respiratory tract. According
to studies, long term degradation products may arise from this type of fuel. In order to minimize
the exposure of toxic fumes and CO2, the testing of the engine was done outside in an open field
away from flammable objects. Also, it is believed that Nitromethane will not have severe
damage to a person’s growth and their internal organs.

P a g e | 123
9 Project Management
9.1 Organization of Work and Timeline
The timeline below represents the actual and future scenario of the work performed by
the team, which is subject to change during the whole project.
Figure 118 - Timeline Representation
9.2 Project Breakdown
In order to achieve the purpose of design and build the remote aircraft to compete in
the SAE aero-design competition in Brazil, the team considered imperative to divide the entire
project into the following main tasks:
Theoretical Research: it describes all the hours spent during investigations and
analysis of each of the parts of the remote aircraft.
Theoretical Analysis: for this part, the team will spend time doing the necessary
calculations to achieve an acceptable design, modeling the aircraft in
SolidWorks.
CFD Simulation: Computational Fluid Dynamics simulation will study the
dynamics of the aircraft.

P a g e | 124
Prototyping: it is the part of the project where the team spends time building
the prototype to be used at the competition.
Testing: It will be the part of the project where all the testing plans designed by
the team are going to be performed and it is the final step where the remote
aircraft would be capable to meet the goals previously described in this report.
9.3 Research and Development Cost
An estimated summary of the tasks realized by each member of the team is displayed in
table 6, specifying the hours inverted and the percentage of each task among the entire project.
The man-hour salary value selected for this project was $30, which is below the average
industry salary.
Table 23 - Break Down of Responsibilities by Task and Team Member
Larrarte Rosales Verdia
Task Day
s Man-Hours Cost($30/hour) Percentage
Hours Percentage
Hours Percentage
Hours
Theoretical Research 67 98.7 $2,961.00 22.50% 22.2 22.50% 22.2 55.00%
54.3
Theoretical Analysis 39 65.3 $1,959.00 33.30% 21.7 33.30% 21.7 33.30%
21.7
CFD and Simulation 35 75.0 $2,250.00 35.00% 26.3 35.00% 26.3 30.00%
22.5
Prototyping 45 103.6 $3,108.00 33.00% 34.5 33.00% 34.5 33.00% 34.5
Testing 26 35.0 $1,050.00 33.00% 11.7 33.00% 11.7 33.00% 11.7
Total 212 377.6 $11,328.00 116.
4 116.
4 144.7

P a g e | 125
Figure shows the graphical representation of the task division. It has been mentioned
that theoretical research and prototyping are the tasks where the team will spend most of their
time because of its importance and also to prevent any possible failures that could arise during
this project.
Figure 119 - Project Task Division
Project Task Division
Theoretical Research
Theoretical Analysis
CFD and Simulation
Prototyping
Testing

P a g e | 126
9.4 Project Expenses Cost
The team has calculated the total expenses made during the realization of this project.
The first table shows the total expenses made in materials and required accessories, and in the
second table one can see the two major processes done, the CNC of the aluminum ribs; service
provided by Prof. Zicarelli; and the CNC of the foam components for the wings and fuselage
assembly, which was provided by Florida Hotwire Technicians.
Table 24 – Material and Accessories Expenses
Item Total Price Purchase Date Purchase Type Store
1 Magnum XLS-61A Engine $104.99 7/30/2012 Online Ebay
2 Starter Kit $19.57 8/18/2012 Online Amazon
3 Du-bro Fuel Tank $8.25 8/18/2012 Online Amazon
4 Traxxas Shocks $13.56 8/18/2012 Online Amazon
5 Silicone fuel Tube $5.46 8/21/2012 Store Pickup House of Power at Weston
6 Powermaster Fuel $16.99 8/21/2012 Store Pickup House of Power at Weston
7 OS Glow Plugs $13.98 8/21/2012 Store Pickup House of Power at Weston
8 APC Propeller 11x7 $2.99 8/21/2012 Store Pickup House of Power at Weston
9 ADJ Engine Mount $4.49 8/21/2012 Store Pickup House of Power at Weston
10 ToolBox $9.58 8/24/2012 Store Pickup Home Depot
11 6x32 1 in screws & bolts $1.18 8/24/2012 Store Pickup Home Depot
12 2 Props 13x4 $12.66 8/30/2012 Store Pickup House of Power at Weston
13 1 Prop 14x4w $12.78 9/10/2012 Online Ebay
14 Rear Landing/wheels & others $22.29 9/14/2012 Store Pickup House of Power at Weston
15 PVC Pipe, Wood, Screws & Nuts $12.86 9/14/2012 Store Pickup House of Power at Weston
16 Radio Control 6 ch, Resin, Battery, Fiber Glass $220.95 9/25/2012 Store Pickup House of Power at Weston
17 Foam (front) $13.00 9/26/2012 Store Pickup Michael's
18 Aluminum 2x4 ft^2 & 7 ft pipe 1" OD $70.50 10/16/2012 Store Pickup Simmons
19 Plywood 2x4 ft and scissors $12.50 10/16/2012 Store Pickup Lowes
20 plate and micellaneous $9.84 10/26/2012 Store Pickup Simmons
21 epoxy, wood stick, bolts nuts and springs $39.77 10/27/2012 Store Pickup Home Depot
22 Bigger OD aluminum pipe, bolts, nuts & washers $30.00 10/28/2012 Store Pickup Simmons
23 Birch wood, sticks $46.13 11/2/2012 Store Pickup Michael's
24 3 servos, wood, cables, arms, hinges etc $126.00 11/2/2012 Store Pickup House of Power at Weston
25 birch and balsa wood, stick $30.86 11/3/2012 Store Pickup Michael's
26 Monokote paper high temperature and Resin $34.98 11/3/2012 Store Pickup House of Power at Weston
27 Iron $18.55 11/6/2012 Store Pickup House of Power at Weston
28 Monokote paper 2 rolls $23.30 11/8/2012 Store Pickup House of Power at Weston
29 wire contectors servos $10.39 11/10/2012 Store Pickup House of Power at Weston
30 balsa wood $9.60 11/11/2012 Store Pickup Michael's
31 screws, sand paper pipe holders etc $16.00 11/11/2012 Store Pickup home depot
32 Replacement of Receiver, paper, battery $86.92 11/12/2012 Store Pickup House of Power at Weston
33 Red Aerosol, 3m tape, screws etc $22.57 11/23/2012 Store Pickup home depot
34 Battery charger, splitters, spinner etc $60.37 11/23/2012 Store Pickup House of Power at Weston
35
36
37
38
39
40
41
Total $1,143.86

P a g e | 127
Table 25 - Engine Specifications and Cost
9.5 Commercialization
Even though the remote aircraft used in this project was not as commercial as a hobby
store's remote airplane, it could have had other uses such as security, equipment
transportation, and also be used in the agricultural industry. The realization of this senior
design could also be used for other Florida International University students as a guideline for
any SAE aero design competition.
TOTAL PRICE TP/3
FOAM $391.62 $130.54
CNC $175.00 $58.33
Total $566.62

P a g e | 128
10 Conclusion
This senior design project combined ideas and knowledge acquired during the last three
semesters of the team's career. All of the team members were taking classes in the aerospace
track. These additional classes gave the team an added motivation as well as an added comfort
of the topics and materials needed for this type of competition. Some of the steps of
conceptual aircraft design which are being taught in FIU were used in the realization of our
models and prototypes. The tools or logic used in the development of aerodynamic shapes can
be appreciated in the design and selection behind the tail configuration. This one part of the
airplane affects all other parameters and components, which is a situation not unlike from
many other components in this type of design. The team must had for these reasons taken a
careful approach in the selection of all the components in the aircraft, understanding how each
selection would affect the others was also paramount. Because of this reason, a detailed
selection of each component is a must in aero shape design.
Some of the design selections were more essential to the overall flight capabilities of the
aircraft. These selections are wing cross-sectional shape or airfoil, wing geometry, wing position
relative to fuselage, and tail configuration. The team had for these reasons spent the majority
of their time fine tuning these crucial components. Relevant to this design topic have been the
research that was done during the summer in airfoil and wing geometry optimization. One of
the members of the team worked with optimization codes in order to create an original airfoil
design that would have benefited the type of mission objective particular to this type of

P a g e | 129
competition. Without a doubt, working in this project has helped the members of the team
learn and appreciate some of the common problems found in the aerospace industry.

P a g e | 130
11 References
1. D. Raymer.Aircraft Design: A Conceptual Approach,Fourth Edition, American
Institute of Aeronautics, 2006, p. 54-157
2. J. Anderson.Modern Compressible Flow: With Historical Perspective,Third
Edition, McGraw-Hill, 2002, p. 100-125.
3. George S. Dulikravich, Thomas Martin, Brian Dennis. Proceedings of Inverse
Problems in Engineering: Theory and Practice. 3rd International Conference on Inverse Problems
in Engineering, June, 1999, [Cited: April 01, 2012]
4. George S. Dulikravich. Aerodynamic Shape Design and Optimization: Status and
Trends. Journal of Aircraft, Volume 29, November – December 1992, [Cited: April 01, 2012]
5. George S.Dulikravich. A Criteria for Surface Pressure Specification in
Aerodynamic Shape Design. 28th Aerospace Sciences Meeting. January, 1990, [Cited: April 04,
2012]
6. George S.Dulikravich. Shape inverse Design and Optimization for Three-
Dimensional Aerodynamics. 33rd Aerospace Sciences Meeting and Exhibit, January, 1995, [Cited:
April 10, 2012]
7. Fast Company. Fastcompany.com. Inside the Lawsuit That Could Ground Deadly
CIA Predator Drones. [Online] October, 2010. http://www.fastcompany.com/1695219/cia-
predator-drones-facing-ip-lawsuit
8. USGC. Usgc.mil. The Indispensable Man. [Online] January, 2012.
http://www.uscg.mil/history/articles/indispensable_men.asp

P a g e | 131
12 Appendix
12.1 Appendix A: FIU CNC METAL CUTTING SERVICES

P a g e | 132
12.2 Appendix B: FLORIDA HOTWIRE TECHNICIANS

P a g e | 133
12.3Appendix C: WESTON HOBBY STORE: HOUSE OF POWER

P a g e | 134
12.4 Appendix D: TECHNICAL DRAWINGS

P a g e | 135

P a g e | 136

P a g e | 137

P a g e | 138

P a g e | 139

P a g e | 140

P a g e | 141