emotiv software development kit - es.ele.tue.nl · directory of figures figure 1 emotiv beta sdk...
TRANSCRIPT

Emotiv
Software Development Kit User Manual for Beta Release 1.0.x

TABLE OF CONTENTS
DIRECTORY OF FIGURES _______________________________________________ 4
DIRECTORY OF TABLES ________________________________________________ 5
DIRECTORY OF LISTINGS _______________________________________________ 6
1. Introduction________________________________________________________ 7
1.1 Glossary _______________________________________________________________ 7
1.2 Trademarks ____________________________________________________________ 8
2. Getting Started ____________________________________________________ 9
2.1 Hardware Components ________________________________________________ 9 2.1.1 Charging the Neuroheadset Battery ________________________________________ 9
2.2 Emotiv SDK Installation_________________________________________________10 2.2.1 Minimum Hardware and Software requirements ____________________________ 10 2.2.2 Included Emotiv SDK software _____________________________________________ 10 2.2.3 USB Receiver Installation___________________________________________________ 10 2.2.4 Emotiv SDK Installation ____________________________________________________ 10
2.3 Start Menu Options____________________________________________________12
3. Emotiv Control Panel™ ____________________________________________ 13
3.1 EmoEngine Status Pane _______________________________________________13 3.1.1 Engine Status _____________________________________________________________ 14 3.1.2 User Status________________________________________________________________ 14 3.1.3 Sensor Contact Quality Display ____________________________________________ 14
3.2 Headset Setup ________________________________________________________15 3.2.1 Achieving Good Signal Quality ____________________________________________ 16
3.3 Expressiv™ Suite_______________________________________________________17 3.3.1 Understanding the Expressiv Suite Panel Display_____________________________ 17 3.3.2 Sensitivity Adjustment Panel _______________________________________________ 18 3.3.3 Training Panel ____________________________________________________________ 19
3.4 Affectiv™ Suite _______________________________________________________20 3.4.1 Affectiv Suite Introduction _________________________________________________ 20 3.4.2 Understanding the Affectiv Panel Display___________________________________ 20 3.4.3 Affectiv Suite Detection Details ____________________________________________ 21
3.5 Cognitiv™ Suite _______________________________________________________21 3.5.1 Cognitiv Suite Introduction ________________________________________________ 21 3.5.2 Understanding the Cognitiv Panel Display __________________________________ 22 3.5.3 Cognitiv Training __________________________________________________________ 23 3.5.4 Training Neutral ___________________________________________________________ 25 3.5.5 Clear Training Button ______________________________________________________ 25 3.5.6 Advanced Cognitiv Options_______________________________________________ 25 3.5.7 Cognitiv Tips ______________________________________________________________ 25
4. Emotiv SDK Tools __________________________________________________ 27
4.1 Introduction to EmoKey™______________________________________________27

4.1.1 Connecting EmoKey to Emotiv EmoEngine _________________________________ 27 4.1.2 Configuring EmoKey Rules _________________________________________________ 28 4.1.3 EmoKey Keyboard Emulation ______________________________________________ 29 4.1.4 Configuring EmoKey Rule Trigger Conditions _______________________________ 30 4.1.5 Saving Rules to an EmoKey Mapping file ___________________________________ 31
4.2 EmoComposer™ usage _______________________________________________31 4.2.1 Interactive mode _________________________________________________________ 32 4.2.2 EmoScript Mode __________________________________________________________ 34
5. Programming with the Emotiv SDK__________________________________ 36
5.1 Overview _____________________________________________________________36
5.2 Introduction to the Emotiv API and Emotiv EmoEngine™_________________36
5.3 Development Scenarios Supported by EE_EngineRemoteConnect _______38
5.4 Example 1 – EmoStateLogger __________________________________________38
5.5 Example 2 – Expressiv™ Demo _________________________________________41
5.6 Example 3 – Profile Management ______________________________________46
5.7 Example 4 – Cognitiv™ Demo _________________________________________48 5.7.1 Training for Cognitiv_______________________________________________________ 49
5.8 Example 5 – EEG Logger Demo ________________________________________52
5.9 DotNetEmotivSDK Test _________________________________________________54
Appendix 1 EML Language Specification _____________________________ 56
A1.1 Introduction ______________________________________________________56
A1.2 EML Example _____________________________________________________56 A1.2.1 EML Header _________________________________________________________ 57 A1.2.2 EmoState Events in EML ______________________________________________ 57
Appendix 2 Emotiv EmoEngine™ Error Codes _________________________ 63
Appendix 3 Emotiv EmoEngine™ Events ______________________________ 65
Appendix 4 Redistributing Emotiv EmoEngine™ with your application___ 66

DIRECTORY OF FIGURES
Figure 1 Emotiv Beta SDK Setup ____________________________________________________ 9
Figure 2 The Emotiv SDK CD Contents _____________________________________________ 10
Figure 3 Emotiv SDK Setup wizard _________________________________________________ 11
Figure 4 Installation Complete dialog______________________________________________ 12
Figure 5 Windows Firewall warning about Emotiv Control Panel – select Unblock _____ 13
Figure 6 EmoEngine Status Pane __________________________________________________ 14
Figure 7 Headset Setup Panel_____________________________________________________ 15
Figure 8 Expressiv Suite Sensitivity Adjustment Panel ________________________________ 17
Figure 9 Expressiv Suite Training Panel _____________________________________________ 19
Figure 10 Affectiv Suite Panel ____________________________________________________ 20
Figure 11 Cognitiv Suite Panel____________________________________________________ 22
Figure 12 Cognitiv training in action______________________________________________ 23
Figure 13 Accepting or Rejecting a Cognitiv Training Session_______________________ 24
Figure 14 EmoKey Connect Menu ________________________________________________ 27
Figure 15 Example EmoKey Mapping _____________________________________________ 28
Figure 16 EmoKey System Tray Icon_______________________________________________ 29
Figure 17 Defining Keys and Keystroke Behavior ___________________________________ 30
Figure 18 Defining an EmoKey Condition _________________________________________ 31
Figure 19 EmoComposer interactive mode _______________________________________ 32
Figure 20 EmoComposer EmoScript Mode ________________________________________ 34
Figure 21 Using the API to communicate with the EmoEngine ______________________ 37
Figure 22 Expressiv training command and event sequence _______________________ 43
Figure 23 Cognitiv training _______________________________________________________ 50
Figure 24 Normal and Triangle template shapes___________________________________ 60
Figure 25 Morphing a template __________________________________________________ 61
Figure 26 Morphed template ____________________________________________________ 61

DIRECTORY OF TABLES
Table 1 EmoKey Rule Definition Fields _____________________________________________ 29
Table 2 EmoKey Trigger Condition Fields __________________________________________ 31
Table 3 BlueAvatar control syntax ________________________________________________ 42
Table 4 Time values in EML documents____________________________________________ 58
Table 5 Detection groups in EML document _______________________________________ 60
Table 6 Attributes for an event specification ______________________________________ 62
Table 7 Emotiv EmoEngine™ Error Codes _________________________________________ 64
Table 8 Emotiv EmoEngine™ Events ______________________________________________ 65

DIRECTORY OF LISTINGS
Listing 1 Connect to the EmoEngine 39
Listing 2 Buffer creation and management 40
Listing 3 Disconnecting from the EmoEngine 40
Listing 4 Excerpt from ExpressivDemo code 41
Listing 5 Extracting Expressiv event details 44
Listing 6 Training “smile” and “neutral” in ExpressivDemo 46
Listing 7 Retrieve the base profile 46
Listing 8 Get the profile for a particular user 47
Listing 9 Setting a user profile 47
Listing 10 Managing profiles 48
Listing 11 Querying EmoState for Cognitiv detection results 49
Listing 12 Extracting Cognitiv event details 50
Listing 13 Training “push” and “neutral” with CognitivDemo 52
Listing 14 Access to EEG data 53
Listing 15 Start Acquiring Data 53
Listing 16 Acquiring Data 54
Listing 17 EML Document Example 57
Listing 18 EML Header 57
Listing 19 Sequence in EML document 58
Listing 20 Configuring detections to automatically reset 60

1. Introduction This document is intended as a guide for Emotiv Beta SDK and SDKLite developers. It
describes different aspects of the Emotiv Software Development Kit (SDK), including:
• Getting Started: Basic information about installing the Emotiv SDK hardware
and software.
• Emotiv Control Panel™: Introduction to Emotiv Control Panel, an application that
configures and demonstrates the Emotiv detection suites.
• Emotiv SDK Tools: Usage guide for EmoKey™ and EmoComposer™, tools that
help you develop applications with the Emotiv SDK.
• Emotiv API Introduction: Introduction to programming with the Emotiv API and an
explanation of the code examples included with the SDK.
If you have any queries beyond the scope of this document, please contact the Emotiv
SDK support team.
1.1 Glossary
Affectiv™ The detection suite that deciphers a user’s emotional state.
Beta SDK
Neuroheadset
The headset worn by the user, which interprets brain signals and
sends the information to Emotiv EmoEngine™.
Cognitiv™ The detection suite that recognizes a user’s conscious thoughts.
Default Profile A generic profile template that contains default settings for a new
user. See Profile.
Detection A high-level concept that refers to the proprietary algorithms running
on the neuroheadset and in Emotiv EmoEngine which, working
together, recognize a specific type of facial expression, emotion, or
mental state. Detections are organized into three different suites:
Expressiv, Affectiv, and Cognitiv.
EML EmoComposer™ Markup Language – an XML-based syntax that can
be interpreted by EmoComposer to playback predefined EmoState
values.
Emotiv API Emotiv Application Programming Interface: a library of functions,
provided by Emotiv to application developers, which enables them
to write software applications that work with Emotiv neuroheadsets
and the Emotiv detection suites.
Emotiv EPOC™ The neuroheadset that will be available with Emotiv’s consumer
product.
Emotiv SDK The Emotiv Software Development Kit: a toolset that allows
development of applications and games to interact with Emotiv
EmoEngine™ and Emotiv neuroheadsets.
Emotiv SDKLite™ A version of the Emotiv SDK that uses neuroheadset emulation to
allow integration with new and existing software. Software
developed with the SDKLite will be compatible with the Emotiv
EPOC™ headset.
EmoComposer™ An Emotiv EmoEngine™ emulator designed to speed-up the

development of Emotiv-compatible software applications.
Emotiv
EmoEngine™
A logical abstraction exposed by the Emotiv API. EmoEngine
communicates with the Emotiv neuroheadset, manages user-
specific and application-specific settings, and translates the Emotiv
detection results into an EmoState.
EmoKey™ Tool to translate EmoStates™ into signals that emulate traditional
input devices (such as keyboard).
EmoScript™ A text file containing EML, which can be interpreted by
EmoComposer to automate the generation of predefined
EmoStates. Also refers to the operational mode of EmoComposer in
which this playback occurs.
EmoState™ A data structure containing information about the current state of all
activated Emotiv detections. This data structure is generated by
Emotiv EmoEngine and reported to applications that use the Emotiv
API.
Expressiv™ The detection suite that identifies a user’s facial expressions.
Player Synonym for User.
Profile A user profile contains user-specific data created and used by the
EmoEngine to assist in personalizing Emotiv detection results. When
created with Emotiv Control Panel, all users’ profiles are saved to the
profile.bin file in the Emotiv program files directory.
User A person who is wearing a neuroheadset and interacting with
Emotiv-enabled software. Each user should have a unique profile.
1.2 Trademarks
The following are trademarks of Emotiv Systems, Inc.
The absence of a product or service name or logo from this list does not constitute a
waiver of Emotiv Systems’ trademark or other intellectual property rights concerning that
name or logo.
Affectiv™
Cognitiv™
EmoComposer™
EmoKey™
EmoScript™
EmoState™
Emotiv Control Panel™
Emotiv EmoEngine™
Emotiv EPOC™
Emotiv SDKLite™
Expressiv™

2. Getting Started
2.1 Hardware Components
The Emotiv Beta SDK consists of one or two Beta SDK neuroheadsets, one or two USB
wireless receivers, and an installation CD. Emotiv SDKLite does not ship with any
hardware components. The neuroheadsets capture users’ brainwave (EEG) signals.
After being converted to digital form, the brainwaves are processed, and the results are
wirelessly transmitted to the USB receivers. A post-processing software component called
Emotiv EmoEngine™ runs on the PC and exposes Emotiv detection results to applications
via the Emotiv Application Programming Interface (Emotiv API).
Figure 1 Emotiv Beta SDK Setup
For more detailed hardware setup and neuroheadset fitting instructions, please see the
“Emotiv SDK Hardware Setup.pdf” file shipped to Beta SDK customers.
2.1.1 Charging the Neuroheadset Battery
The neuroheadset contains a built-in battery which is designed to run for approximately
12 hours when fully charged. To charge the neuroheadset battery, set the power switch
to the “off” position, and plug the neuroheadset into the Emotiv battery charger using
the mini-USB cable provided with the neuroheadset. Using the battery charger, a fully-
drained battery can be recharged to 100% capacity in approximately 100 minutes;
charging for 15 minutes usually yields about a 10% increase in charge.
Alternatively, you may recharge the neuroheadset by connecting it directly to a USB port
on your computer. However, please note that this method takes substantially longer to
charge the battery.

The neuroheadset contains a status LED located next to the power switch at the back of
the headband. When the power switch is set to the “on” position, the LED will illuminate
and appear blue if there is sufficient charge for correct operation. The LED will appear
red during battery charging; when the battery is fully-charged, the LED will display green.
2.2 Emotiv SDK Installation
This section guides you through the process of installing the Emotiv Software
Development Kit on a Windows PC.
2.2.1 Minimum Hardware and Software requirements
• 2.4 GHz Intel Pentium 4 processor (or equivalent).
• Microsoft Windows XP with Service Pack 2 or Microsoft Windows Vista.
• 1GB RAM.
• 50 MB available disk space.
• One or two unused USB 2.0 ports (depending on the number of neuroheadsets you
wish to use simultaneously)
2.2.2 Included Emotiv SDK software
SDKLite developers will download the compressed file Emotiv_SDKLite_v1.0.x.exe, which
contains both the SDKLite software and this User Manual.
Beta SDK developers will receive a CD that has all software needed for Emotiv SDK
installation. Insert the CD into your CDROM drive and run Windows Explorer to inspect it.
Its contents should be as shown in Figure 2 below.
Emotiv SDK-v1.0.x Emotiv Software Development Kit
Emotiv_Development_Kit_v1.0.x_Installer.exe Emotiv SDK Installer Program
Emotiv SDK Hardware Setup.pdf Neuroheadset Setup Instructions
README.txt Readme file
Figure 2 The Emotiv SDK CD Contents
2.2.3 USB Receiver Installation
(This section is not relevant for SDKLite developers).
Plug the provided Emotiv USB receiver(s) into an unused USB port on your computer.
Each receiver should be recognized and installed automatically by your computer as a
USB Human Interface Device. The receivers follow the USB Human Interface Device
standard so no additional hardware drivers are required to be installed. Please wait for a
moment until Windows indicates that the new hardware is installed and ready to use.
2.2.4 Emotiv SDK Installation
This section explains the steps involved in installing the Emotiv SDK software. If an older
version of the Emotiv SDK is present in your computer, we recommend that you uninstall it
before proceeding.
Step 1 Using Windows Explorer, access the Emotiv SDK CD and browse the Emotiv SDK-
v1.0.x folder.
Step 2 Run the Emotiv_Development_Kit_v1.0.x_Installer.exe file. An Emotiv Development
Kit 1.0.x Setup window will appear after a few seconds.

Figure 3 Emotiv SDK Setup wizard
Step 3 Click Next to start the installation process.
Step 4 If you haven’t uninstalled and older version of the Emotiv SDK, you may be asked if
you wish to uninstall the older copy before proceeding. Multiple copies of the SDK can
coexist on the same machine but you must be careful not to “mix and match”
components from multiple installations.
Step 5 After a few seconds, an Installation Complete dialog will appear.

Figure 4 Installation Complete dialog
Step 6 Click Finish to complete the installation.
2.3 Start Menu Options
Once you have installed the SDK, you will find the following in Start > Programs:
Emotiv SDK v1.0.x
Control Panel
Control Panel A program to test and tune detection suites
available in the Emotiv SDK.
Documentation
API Reference Emotiv API programmer’s reference guide
User Manual This document
Tools
EmoComposer An EmoEngine emulator
EmoKey Tool to map EmoStates to keyboard input to other
programs.
Uninstall To uninstall the Emotiv SDK

3. Emotiv Control Panel™ This section explains how to use Emotiv Control Panel to explore the Emotiv detection
suites. Refer to Section 5, Programming with the Emotiv SDK, for information about using
the Control Panel to assist application development with the Emotiv SDK.
Launch Emotiv Control Panel by selecting Windows Start → Programs → Emotiv
Development Kit v1.0.x → Control Panel → Control Panel. When the Control Panel is
launched for the first time, your firewall software (if installed on your computer) may
notify you that the Control Panel is trying to accept connections from the network (port
3008). The notification message may be similar to the dialog shown in Figure 5. For
proper operation, you must allow Emotiv Control Panel to use this port by selecting
Unblock (or a similar option, depending on your firewall software).
Figure 5 Windows Firewall warning about Emotiv Control Panel – select Unblock
Emotiv delivers the Emotiv API in the form of a dynamically linked library named edk.dll.
Emotiv Control Panel provides a GUI (graphical user interface)that interfaces with Emotiv
EmoEngine through the Emotiv API. The Control Panel user interface showcases the
EmoEngine’s capabilities to decipher brain signals and present them in useful forms using
Emotiv’s detection suites.
3.1 EmoEngine Status Pane
The top pane of Emotiv Control Panel is known as the EmoEngine Status Pane. This pane
displays indicators that provide real-time information about EmoEngine status and
neuroheadset sensor contact quality. It also exposes user profile management controls.

Figure 6 EmoEngine Status Pane
3.1.1 Engine Status
By default, the Control Panel will automatically connect to the EmoEngine when
launched. In this mode, it will automatically discover attached USB receivers and Emotiv
neuroheadsets. Alternatively, you may choose to connect to EmoComposer, Emotiv’s
EmoEngine emulator tool, from the Connect menu. SDKLite Developers: you will need to
change this menu setting and connect to EmoComposer. Please note that
EmoComposer should be launched prior to selecting this option in Control Panel.
There are four status indicators:
• System Status: A summary of the general EmoEngine status.
• System Up Time: The timestamp (in seconds) attached to the most recently received
EmoState event. Generally, this corresponds to the length of time that the
EmoEngine has been running with a neuroheadset connected to the USB receiver
• Wireless Signal: This displays the quality of the connection between the neuroheadset
and the Emotiv wireless USB receiver connected to your machine. If you have not yet
connected, the display will show “No Signal”. If the wireless signal strength drops too
low (displayed as “Bad” or “No Signal”) then no detection results will be transmitted
and the Control Panel will disable its detection suite UI controls.
• Battery Power: Displays an approximation of the remaining charge in the
neuroheadset’s built-in battery. Not yet supported by all Beta SDK neuroheadsets.
3.1.2 User Status
Use the controls in this section to manage user profiles and assign a specific user (via their
profile) to a specific attached neuroheadset. Although the EmoEngine supports up to
two simultaneously connected neuroheadsets, Emotiv Control Panel only displays status
information and detection results for a single neuroheadset at a time. The Headset
combo box allows you to specify the neuroheadset that has the current “focus.” In
Figure 6, the User Status controls tell us that the Control Panel is currently displaying
information for the user with profile “ec”, wearing neuroheadset “0.” Note: headset
numbering begins with 0 and not 1 as you might expect.
Other operations that are supported include adding, saving, removing, and switching
between user profiles. Note: Emotiv Control Panel will automatically save user profile
data to disk when it exits so it is generally not necessary to use the Save Profile button.
3.1.3 Sensor Contact Quality Display
Accurate detection results depend on good sensor contact and EEG signal quality. This
display is a visual representation of the current contact quality of the individual
neuroheadset sensors. The display is a smaller copy of the contact quality visualization
found on the Control Panel’s Headset Setup tab. Please see Section 3.2 for more
information about fitting the neuroheadset and achieving good EEG signal quality.

3.2 Headset Setup
The Headset Setup panel is displayed by default when starting Emotiv Control Panel. The
main function of this panel is to display contact quality feedback for the neuroheadset’s
EEG sensors and provide guidance to the user in fitting the neuroheadset correctly. It is
extremely important for the user to achieve the best possible contact quality before
proceeding to the other Emotiv Control Panel tabs. Poor contact quality will result in
poor Emotiv detection results.
Figure 7 Headset Setup Panel
The image on the left is a representation of the sensor locations when looking down from
above onto the user’s head. Each circle represents one sensor and its approximate
location when wearing the Beta SDK headset. The color of the sensor circle is a
representation of the contact quality. To achieve the best possible contact quality, all of
the sensors should show as green. Other sensor colors indicate:
Black No signal
Red Very poor signal
Orange Poor signal
Yellow Fair signal
Green Good signal
The setup procedure used to achieve good contact quality is outlined below. Only after
the neuroheadset sensor contact quality has been verified, should you move on to other
Emotiv Control Panel tabs.

3.2.1 Achieving Good Signal Quality
Note to SDKLite Developers: This section is not required, but it may be useful to
understand how contact quality information may need to be conveyed to the user for
standalone, Emotiv-enabled applications.
Step 1 Before putting on the Beta SDK neuroheadset, ensure that each of the 16
electrode recesses are fitted with a moist felt pad. If the pads are not already moist, wet
them with saline solution before inserting into the headset, or, alternatively, use a
medicine dropper to carefully moisten the pads while already in place.
Step 2 Switch on the neuroheadset, and verify that the built-in battery is charged and is
providing power by looking for the blue LED located near the power switch at the back
of the headset. If the headset battery needs charging, then set the power switch to the
off position, and plug the headset into the Emotiv battery charger using the mini-USB
cable provided with the neuroheadset. Allow the neuroheadset battery to charge for at
least 15 minutes before trying again.
Step 3 Verify that the Wireless Signal reception is reported as “Good” by looking at the
Engine Status area in the EmoEngine Status Pane (described in Section 3.1). If the Wireless
Signal status is reported as “Bad” or “No Signal”, then make sure that the Emotiv Wireless
USB Receiver is inserted into a USB port on your computer and that the single LED on the
top half of the receiver is on continuously or flickering very rapidly. If the LED is blinking
slowly or is not illuminated, then remove the receiver from the computer, reinsert it, and
try again. Remove any metallic or dense physical obstructions located near the receiver
or the neuroheadset, and move away from any powerful sources of electromagnetic
interference, such as microwave ovens, large motors, or high-powered radio transmitters.
Step 4 Put on the neuroheadset by gently pulling apart the headband and lowering the
sensor arms onto your head from the top down, near the rear of the skull. Next, slide the
headset forward until the sensors closest to the headset pivot points are located directly
above your ears and as close to your hairline as possible. Adjust the fit so that the
rectangular compartments at the front ends of the headband sit comfortably just above
and behind your ears. Tilt the headset so that the two lowest, frontmost sensors are
symmetric on your forehead and positioned 2 to 2.5 inches above your eyebrows.
Finally, check that all sensors are touching your head and, if not, then fine tune the
headset fit by gently sliding the headset in small increments until an ideal fit has been
achieved.
Step 5 Starting with the two sensors just above and behind your ears (these are reference
sensors for which good contact with your scalp is essential), adjust the sensors so they
make proper contact with your scalp (i.e. show green on the contact quality display). If
the indicators are:
Black: Check that the sensor has a felt pad fitted. Check that the felt pad is pressing
firmly against your scalp. Then try re-moistening the felt pad. If problems persist, this
may indicate a problem with the neuroheadset.
Yellow, Orange, or Red: The sensor has not established a good conductive path with
your scalp. Check that the felt pad is making comfortable, yet firm, contact with your
scalp. Try shifting the headset slightly back and forth on your head, or press gently on
the troublesome sensor to improve contact. If the contact is adequate, ensure that
the felt pad is moist. If the sensor’s indicator color becomes lighter, the signal quality is
improving. If the sensor’s indicator color is getting darker the signal quality is
deteriorating. If problems still persist, try parting the hair in the vicinity of the electrode
so the felt pad touches your scalp.

Step 6 Repeat Step 5 for each of the remaining sensors until all of the sensors have
adequate contact quality (i.e. are predominantly showing green).
If at any time the reference sensors (located just above and behind your ears) no longer
have a good connection (i.e. are not showing green), immediately restore these sensors
to green before proceeding further.
3.3 Expressiv™ Suite
Figure 8 Expressiv Suite Sensitivity Adjustment Panel
3.3.1 Understanding the Expressiv Suite Panel Display
On the left-hand side of the Expressiv Suite panel is a simple avatar. The avatar will
mimic your facial expressions, in camera view (i.e. not mirrored).
In the center of the panel is a series of graphs, indicating the various expression
detection event signals. These graphs show a short history of the detections listed. The
graphs should be interpreted as follows:
• Blink: low level indicates a non-blink state, while a high level indicates a blink.
• Right Wink / Left Wink: these two detections share a common graph line. A center
level indicates no wink, low level indicates a left wink and high level indicates a right
wink.
• Look Right / Left: these two detections share a common graph line and a single
sensitivity slider control. A center level indicates eyes looking straight ahead, while a
low level indicates eyes looking left, and a high level indicates eyes looking right.
• Raise Brow: low level indicates no expression has been detected, high level indicates
a maximum level of expression detected. The graph level will increase or decrease
depending on the level of expression detected.

• Furrow Brow: low level indicates no expression has been detected, high level
indicates a maximum level of expression detected. The graph level will increase or
decrease depending on the level of expression detected.
• Smile: low level indicates no expression has been detected, high level indicates a
maximum level of expression detected. The graph level will increase or decrease
depending on the level of expression detected.
• Clench: low level indicates no expression has been detected, high level indicates a
maximum level of expression detected. The graph level will increase or decrease
depending on the level of expression detected.
• Right Smirk / Left Smirk: these two detections share a common graph line. A center
level indicates no smirk, low level indicates a left smirk and high level indicates a right
smirk.
• Laugh: low level indicates no expression has been detected, high level indicates a
maximum level of expression detected. The graph level will increase or decrease
depending on the level of expression detected.
On the right-hand side of the panel are two additional panels: Sensitivity and Training.
These panels are explained further in the following two sections.
3.3.2 Sensitivity Adjustment Panel
The Control Panel offers sensitivity adjustments for the Expressiv Suite detections. This is
controlled through sliders to the right of corresponding graph.
For each facial expression, check the performance of the detection. If you feel that the
Expressiv detection is not responding readily to a particular expression, then increase the
sensitivity for that expression. If you feel that it is too easy to trigger a particular
expression, or you are seeing “false positive” expressions, then decrease the sensitivity for
that expression. Sensitivity can be increased or decreased by moving the sensitivity slider
to the right or left, respectively.
Expressiv supports two types of “signatures” that are used to classify input from the
neuroheadset as indicating a particular facial expression. The icon to the right of the
sliders is an indicator of whether the Universal Signature or Trained Signature is being
used. A circle with three dots is shown when the Universal Signature is active, while a
circle with one dot inside indicates that a Trained Signature is active. An empty circle
indicates that a Trained Signature has been selected, but that no training data has been
collected for this action, and so it is currently disabled. The default signature, the
Universal Signature, is designed to work well for a large population of users for the
supported facial expressions.
If the application or user requires more accuracy or customization, then you may decide
to use a Trained Signature as described below.

3.3.3 Training Panel
Figure 9 Expressiv Suite Training Panel
In this mode, Expressiv requires the user to train the system by performing the desired
action before it can be detected. As the user supplies more training data, the accuracy
of the Expressiv detection typically improves. If you elect to use a Trained Signature, the
system will only detect actions for which the user has supplied training data. The user
must provide training data for a neutral expression and at least one other supported
expression before the Trained Signature can be activated with the Use Trained Signature
checkbox. Important note: not all Expressiv expressions can be trained. In particular, eye
and eyelid-related expressions (i.e. “blink”, “wink”, “look left”, and “look right”) can not
be trained and always rely on the Universal Signature.

3.4 Affectiv™ Suite
Figure 10 Affectiv Suite Panel
3.4.1 Affectiv Suite Introduction
The Affectiv Suite reports real time changes in the subjective emotions experienced by
the user. Emotiv currently offers three distinct Affectiv detections: Engagement,
Instantaneous Excitement, and Long-Term Excitement. See Section 3.4.3 below for a
description of these detections. The Affectiv detections look for brainwave
characteristics that are universal in nature and don’t require an explicit training or
signature-building step on the part of the user. However, individual data is collected for
each user and is saved in the user’s profile while the Affectiv Suite runs. This data is used
to rescale the Affectiv Suite results and improve the detection accuracy over time. For
this reason, it is very important that a new user profile is selected when a new user puts on
the neuroheadset.
3.4.2 Understanding the Affectiv Panel Display
The Affectiv Suite panel contains two graphs which can be customized to display
different combinations of detections and time scales. By default, the top chart is
configured to plot 30 seconds of data for the Engagement and Instantaneous
Excitement detections. The bottom chart defaults to display 5 minutes worth of data for
the Long-Term Excitement detection. The values that are plotted on the graphs are the
output scores returned by the Affectiv detections.
The controls to the right of the charts can be used to select the detection output to be
plotted and to customize the color of each plot. The Display Length edit box allows you
to customize the time scale for the associated chart.

3.4.3 Affectiv Suite Detection Details
Instantaneous Excitement is experienced as an awareness or feeling of physiological
arousal with a positive value. Excitement is characterized by activation in the
sympathetic nervous system which results in a range of physiological responses including
pupil dilation, eye widening, sweat gland stimulation, heart rate and muscle tension
increases, blood diversion, and digestive inhibition.
Related emotions: titillation, nervousness, agitation
Scoring behavior: In general, the greater the increase in physiological arousal the greater
the output score for the detection. The Instantaneous Excitement detection is tuned to
provide output scores that more accurately reflect short-term changes in excitement
over time periods as short as several seconds.
Long-Term Excitement is experienced and defined in the same way as Instantaneous
Excitement, but the detection is designed and tuned to be more accurate when
measuring changes in excitement over longer time periods, typically measured in
minutes.
Engagement is experienced as alertness and the conscious direction of attention
towards task-relevant stimuli. It is characterized by increased physiological arousal and
beta waves (a well-known type of EEG waveform) along with attenuated alpha waves
(another type of EEG waveform). The opposite pole of this detection is referred to as
“Boredom” in Emotiv Control Panel and the Emotiv API; however, please note that this
does not always correspond to a subjective emotional experience that all users describe
as boredom.
Related emotions: alertness, vigilance, concentration, stimulation, interest
Scoring behavior: The greater the attention, focus and cognitive workload, the greater
the output score reported by the detection. Examples of engaging video game events
that result in a peak in the detection are difficult tasks requiring concentration,
discovering something new, and entering a new area. Deaths in a game often result in
bell-shaped transient responses. Shooting or sniping targets also produce similar transient
responses. Writing something on paper or typing typically increase the engagement
score, while closing the eyes almost always rapidly decreases the score.
3.5 Cognitiv™ Suite
3.5.1 Cognitiv Suite Introduction
The Cognitiv detection suite evaluates a user’s real time brainwave activity to discern the
user’s conscious intent to perform distinct physical actions on a real or virtual object. The
detection is designed to work with up to 13 different actions: 6 directional movements
(push, pull, left, right, up and down) and 6 rotations (clockwise, counter-clockwise, left,
right, forward and backward) plus one additional action that exists only in the realm of
the user’s imagination: disappear.
Cognitiv allows the user to choose up to 4 actions that can be recognized at any given
time. The detection reports a single action or neutral (i.e. no action) at a time, along
with an action power which represents the detection’s certainty that the user has
entered the cognitive state associated with that action.

Increasing the number of concurrent actions increases the difficulty in maintaining
conscious control over the Cognitiv detection results. Almost all new users readily gain
control over a single action quite quickly. Learning to control multiple actions typically
requires practice and becomes progressively harder as additional actions are added.
Although Emotiv Control Panel allows a user to select up to 4 actions at a time, it is
important that each user masters the use of the Cognitiv detection one action at a time,
only increasing the number of concurrent actions after he has first gained confidence
and accuracy with a lower number of actions.
Figure 11 Cognitiv Suite Panel
3.5.2 Understanding the Cognitiv Panel Display
The Cognitiv Suite panel uses a virtual 3D cube to display an animated representation of
the Cognitiv detection output. This 3D cube is also used to assist the user in visualizing the
intended action during the training process. The Power gauge to the left of the 3D
display is an indicator of the “action power”, or relative certainty that the user is
consciously visualizing the current action.
The default tab on the Cognitiv panel is the Action tab. This tab displays information
about the current state of the Cognitiv detection and allows the user to define the
current set of actions.
In order to enable the Cognitiv detection, each chosen action, plus the Neutral action,
must first be trained. For more information about the training process please refer to
Section 3.5.3 below. Alongside each currently selected action is another gauge
displaying a Skill Rating. This skill rating is calculated during the training process and
provides a measure of how consistently the user can mentally perform the intended
action. It is necessary to train the same action at least two times before the action skill is
updated. The Overall Skill Rating is simply the average of all the individual action skills

and can be used as a general measure of the user’s skill with the selected set of actions
and existing training data.
A green checkmark is used to indicate that the corresponding action has been trained;
a red X indicates a lack of training data. Remember, in order for the Cognitiv detection
to be activated, all actions, plus Neutral (the user’s background mental state) must be
trained.
Use the Add, Remove, and Edit push buttons to modify the number and type of enabled
actions.
3.5.3 Cognitiv Training
The Cognitiv training process enables the EmoEngine to analyze your brainwaves and
develop a personalized signature which corresponds to each particular action, as well as
the background state, or “neutral”. As the EmoEngine learns and refines the signatures
for each of the actions, as well as neutral, detections become more precise and easier
to perform.
Figure 12 Cognitiv training in action
The Training tab contains the user interface controls that support the Cognitiv training
process. The training process consists of three steps:
First, select an action from the dropdown list. Actions that have already been trained
are paired with a green checkmark; actions with no training data are paired with a red
X. Only actions that have been selected on the Action tab are available for training.
The default action is one without training data; otherwise the default action is “Neutral.”
Next, when you are ready to begin imagining or visualizing the action you wish to train,
press the Start Training button. During the training process it is very important to maintain
your mental focus for the duration of the training period (currently 8 seconds). Physical

gestures, such as pushing an imaginary object with one hand, may be used to heighten
your focus on the intended action, but are not required. You should also refrain from
making substantial head movements or dramatic facial expressions during the training
period, as these actions can interfere with the recorded EEG signal.
Initially, the cube on screen will not move, as the system has not yet acquired the training
data necessary to construct a personalized signature for the current set of actions. After
Neutral and each enabled action have been trained at least once, the Cognitiv
detection is activated and the cube will respond to the Cognitiv detection, and your
mental control, in real time.
Some users will find it easier to maintain the necessary mental focus if the cube is
automatically animated to perform the intended action as a visualization aid during
training. If you think you will benefit from this, then you may select the Move cube
according to training action checkbox. Otherwise, the cube will remain stationary or, if
you have already supplied training data and the detection is active, will be animated by
the current detection results for the action being trained, while you supply new training
data.
Finally, you are prompted to accept or reject the training recording. Ideal Cognitiv
detection performance is typically achieved by supplying consistent training data (i.e. a
consistent mental visualization on the part of the user) across several training sessions for
each enabled action. The ability to reject the last training recording allows you to
decide whether you were able to remain mentally focused on the appropriate action
during the last training session. Alternatively, you may press the Abort Training button to
abort the training recording if you are interrupted, become distracted, or notice
problems with the neuroheadset contact quality indicators during the recording.
A training session is automatically discarded if the wireless signal strength or EEG signal
quality is poor for a significant portion of the training period. A notification will be
displayed to the user if this has occurred.
Figure 13 Accepting or Rejecting a Cognitiv Training Session

3.5.4 Training Neutral
The Neutral “action” refers to the user’s passive mental state; one that isn’t associated
with any of the selected Cognitiv actions. While training Neutral, you should enter a
mental state that doesn’t involve the other Cognitiv actions. Typically this means
engaging in passive mental activities such as reading or just relaxing. However, to
minimize “false-positive” Cognitiv action results (i.e. incorrect reporting of unintended
actions), it may also be helpful to emulate other mental states and facial expressions that
are likely to be encountered in the application context and environment in which you’ll
be using Cognitiv. For many users, providing more Neutral training data will result in
better overall Cognitiv performance. In order to facilitate the acquisition of this data,
and because most users have an easier time maintaining a relaxed mental state for
longer periods of time, the Training tab provides a second method for training Neutral.
The Record Neutral button allows you to record up to 30 seconds of Neutral training
data. The recording will automatically finish, and the Cognitiv signature will be rebuilt,
after 30 seconds, or you may press the Stop Training button at any time you feel sufficient
data has been collected. Note: at least 6 seconds of recorded data will be required to
update the signature with data collected using the Record Neutral button.
3.5.5 Clear Training Button
Occasionally, you may find that a particular trained action doesn’t work as well as it
once did. This may indicate that the training data used to construct your personalized
Cognitiv signature was “contaminated” by a more recent, inconsistent training session or
that some characteristics of your brainwaves have changed over time. It may also
happen that you wish to change the mental imagery or technique that you associate
with a particular action. In either situation, you can use the Clear Training button to
delete the training data for the selected action. Keep in mind that doing so will disable
the Cognitiv detection until new training data has been recorded for this action.
3.5.6 Advanced Cognitiv Options
The Advanced tab exposes settings and controls that allow you to customize the
behavior of the Cognitiv detection. By default, the Cognitiv detection is pre-configured
in a manner that produces the best results for the largest population of users and
environments. It is strongly recommended that you only change these settings with the
guidance of Emotiv personnel who are better acquainted with the internal details of the
Emotiv EmoEngine.
3.5.7 Cognitiv Tips
Mental dexterity with the Cognitiv Suite is a skill that will improve over time. As you learn
to train distinct, reproducible mental states for each action, the detection becomes
increasingly precise. Most users typically achieve their best results after training each
action several times. Overtraining can sometimes produce a decrease in accuracy –
although this may also indicate a lack of consistency and mental fatigue. Practice and
experience will help determine the ideal amount of training required for each individual
user.
If it becomes hard for you to return to neutral (i.e. to stop the cube from moving) you
should try refreshing your mental state by momentarily shifting your focus away from the
screen and relaxing. It is easy to become immersed in the experience and to have the
Cognitiv actions at the “front of your mind” while trying to be neutral.

Successful training relies on consistency and focus. For best results, you must perform the
intended action continuously for the full training period. It is common for novice users to
become distracted at some point during the training period and then mentally restart an
action, but this practice will result in poorer results than training with a mental focus that
spans the entire training period.
A short latency, of up to two seconds, in the initiation and cessation of the cube’s
animated action on screen is typical.

4. Emotiv SDK Tools This section explains the software utilities provided with the Emotiv SDK: EmoKey™ and
EmoComposer™.
EmoKey allows you to connect detection results received from the EmoEngine to
predefined keystrokes according to easy-to-define, logical rules. This functionality may
be used to experiment with the headset as an input controller during application
development. It also provides a mechanism for integrating the Emotiv neuroheadset
with a preexisting application via the application’s legacy keyboard interface.
EmoComposer emulates the behavior of the EmoEngine with an attached Emotiv
neuroheadset. It is intended to be used as a development and testing tool; it makes it
easy to send simulated EmoEngine events and request responses to applications using
the Emotiv API in a transparent and deterministic way.
4.1 Introduction to EmoKey™
EmoKey translates Emotiv detection results to predefined sequences of keystrokes
according to logical rules defined by the user through the EmoKey user interface. A set
of rules, known as an “EmoKey Mapping”, can be saved for later reuse. EmoKey
communicates with Emotiv EmoEngine in the same manner as would a third-party
application: by using the Emotiv API exposed by edk.dll.
4.1.1 Connecting EmoKey to Emotiv EmoEngine
By default, EmoKey will attempt to connect to Emotiv Control Panel when the
application launches. If Emotiv Control Panel isn’t running, then EmoKey will display a
warning message above the system tray. The reason EmoKey connects to the Control
Panel, instead of connecting directly to the EmoEngine and the neuroheadset, is to allow
the user to select his profile, configure the detection suite settings, and get contact
quality feedback through the Control Panel user interface. Please see Section 5.3 for
more details about when Emotiv SDK developers might wish to follow a similar strategy.
EmoKey can also be connected to EmoComposer. This is useful when creating and
testing a new EmoKey Mapping since the user can easily generate EmoState update
events that satisfy the conditions for rules defined in EmoKey. Refer to Section 4.2 for
more information about EmoComposer.
Figure 14 EmoKey Connect Menu
EmoKey’s connection settings can be changed by using the application’s Connect
menu. If EmoKey is not able to connect to the target application (usually because the
connection target is not running), then the EmoKey icon in the system tray will be drawn
as gray, instead of orange). If this occurs, then run the desired application (either Emotiv
Control Panel or EmoComposer) and then select Reconnect from the Connect menu.

4.1.2 Configuring EmoKey Rules
Figure 15 Example EmoKey Mapping
Figure 15 shows an example of an EmoKey Mapping as it might be configured to
communicate with an Instant Messenger (IM) application. In this example, EmoKey will
translate Laugh events generated by Emotiv’s Expressiv Suite to the text “LOL” (as long as
the Affectiv Suite’s Instantaneous Excitement detection is also reporting a score > 0.3),
which causes the IM program to send “LOL” automatically when the user is laughing.
The topmost table in EmoKey contains user interface controls that allow you to define
rules that specify which keystrokes are emulated. Rules can be added by clicking on the
Add Rule button. Existing rules can be deleted by selecting the appropriate row and
pressing the Delete Rule button. In Figure 15, two rules, named “LOL” and “Wink”, were
added. Rules can be edited as outlined below, in Table 1.

Field Description Notes
Enabled Checkbox to selectively enable or
disable individual rules
The indicator “light” will turn green
when the rule conditions are
satisfied.
Player Identifies the neuroheadset that is
associated with this rule
Player 1 corresponds to user ID 0 in
EmoComposer and Control Panel.
Name User-friendly rule name Edit by double clicking on the cell.
Key Keystroke sequence to be sent to
the Windows input queue
Edit by double clicking on the cell.
Behavior Checkbox to control whether the
key sequence is sent only once, or
repeatedly, each time an
EmoState update satisfies the rule
conditions
If checked, then EmoKey must
receive an EmoState update that
does NOT satisfy the rule’s
conditions before this rule can be
triggered again.
Table 1 EmoKey Rule Definition Fields
4.1.3 EmoKey Keyboard Emulation
EmoKey emulates a Windows-compatible keyboard and sends keyboard input to the
Windows operating system’s input queue. The application with the input focus will
receive the emulated keystrokes. In practice, this often means that EmoKey is run in the
background. Please note that closing the EmoKey window will only hide the application
window and that it will continue to run. When running, the EmoKey/Emotiv icon will be
visible in the Windows system tray. Double-click on this icon to bring EmoKey back to the
foreground. Choose Quit from the Application or system-tray menu to really quit the
application.
Figure 16 EmoKey System Tray Icon
Double-clicking in the Key field of a rule will bring up the Keys dialog as shown in 0.

Figure 17 Defining Keys and Keystroke Behavior
The Keys dialog allows the user to specify the desired keystrokes and customize the
keystroke behavior. The customizable options include:
• Holding a key press: hold the key down for the duration of the rule activation period.
The Hold the key checkbox is only enabled when a single key has been specified in
the keystroke edit box.
• Hot keys or special keyboard keys: any combination of control, alt, shift, the Windows
key, and another keystroke. You may also use this option if you need to specify
special keys such as Caps Lock, Shift, or Enter.
• Key press duration and delay times: some applications, especially games, are
sensitive to the timing of key presses. If necessary, use these controls to adjust the
simulated keyboard behavior.
4.1.4 Configuring EmoKey Rule Trigger Conditions
The Trigger Conditions table in EmoKey contains user interface controls that allow you to
define logical conditions that determine when the corresponding rule is activated.
Clicking on a new rule in the Rules table will refresh the contents of the Trigger Conditions
table, causing it to display only the conditions associated with the selected rule.
Conditions can be added by clicking on the Add Condition button. Existing rules can be
deleted by selecting the appropriate condition and pressing the Delete Condition
button. In Figure 15, two conditions, which examine the state of the Expressiv Laugh
detection and the Affectiv Instantaneous Excitement detection, respectively, are
associated with the LOL rule. All enabled conditions must be satisfied by the most recent
EmoState update received from Emotiv Control Panel or EmoComposer for a rule to be
triggered.
The fields of the Trigger Conditions table are described below, in Table 2.

Field Description
Enabled Checkbox to selectively enable or disable individual trigger
conditions
Action The name of the Expressiv expression, Affectiv detection, or Cognitiv
action being examined by this condition.
Trigger Description of the trigger condition being evaluated
Value For non-binary trigger conditions, the value being compared to the
action score returned by the designated detection
Table 2 EmoKey Trigger Condition Fields
Double-clicking on any of the fields of a condition in the Trigger Conditions table will
reveal the Configure Condition dialog box, as shown in Figure 18. Use the controls on this
dialog to specify an action (or detection) name, a comparison function, and a value,
that must evaluate to true for this condition to be satisfied.
Figure 18 Defining an EmoKey Condition
4.1.5 Saving Rules to an EmoKey Mapping file
EmoKey allows you to save the current set of rule definitions to an EmoKey Mapping file
that can be reloaded for subsequent use. Use the appropriate command in EmoKey’s
Application menu to rename, save, and load EmoKey mapping files.
4.2 EmoComposer™ usage
EmoComposer allows you to send user-defined EmoStates™ to Emotiv Control Panel,
EmoKey, or any other application that makes use of the Emotiv API. EmoComposer
supports two modes of EmoState generation: Interactive mode and EmoScript mode. In
addition to generating EmoStates, EmoComposer can also simulate Emotiv EmoEngine’s
handling of profile management and training requests.

SDKLite users will rely on EmoComposer to simulate the behavior of Emotiv EmoEngine
and Emotiv neuroheadsets. However, it is a very useful tool for all Emotiv SDK developers,
allowing for easy experimentation with the Emotiv API early in the development process,
and facilitating manual and automated testing later in the development cycle.
4.2.1 Interactive mode
Figure 19 EmoComposer interactive mode
EmoComposer Interactive mode allows you to define and send specific EmoState values
to any application using the Emotiv SDK. The user interface settings are described below.
• Player: choose the player number who’s EmoState you wish to define and send. The
player number defaults to 0. When the player number is changed for the first time, an
application connected to EmoComposer will receive an EE_UserAdded event with
the new player number reported as the user ID.
• Wireless: sets the simulated wireless signal strength. Note: if the signal strength is set to
“Bad” or “No Signal” then EmoComposer™ simulates the behavior of the EmoEngine
by setting subsequent EmoState detection values and signal quality values to 0.
• Contact Quality tab: this tab allows you to adjust the reported contact quality for
each sensor on the Emotiv neuroheadset. When the Contact Quality tab is active, all
other EmoState detection values are set to 0. You can choose between typical
sensor signal quality readings by selecting a preset from the General Settings drop-
down list box. If you choose the Custom preset, each sensor value can be controlled

individually by clicking on a sensor and then selecting a new CQ Status value in the
Sensor Details box. Note that the two sensors above and behind the ears,
correspond to the reference sensors on the Emotiv Beta SDK Neuroheadset, must
always report a CQ value of Good and cannot be adjusted.
• Detection tab: this tab allows you to interactively control EmoState™ detection values
and training result values. When the Detection tab is active, the contact quality
values for generated EmoStates will always be set to EEG_CQ_GOOD.
• EmoState: define the detection settings in an EmoState™ by selecting the particular
event type for each detection group in the appropriate drop-down list box. Set the
event’s value in the spin box adjacent to the event name. You can define your own
time value in the Time edit box, or allow EmoComposer™ to set the value
automatically by incrementing it by the value of the EmoState Interval spin box after
each EmoState™ is sent. The Affectiv™ Excitement state is unique in that the
EmoEngine returns both short-term (for Instantaneous Excitement) and long-term
values. EmoComposer™ simulates the long-term value calculation adequately
enough for testing purposes but does not reproduce the exact algorithm used by the
Affectiv detection suite in EmoEngine™. Note that the value for the eye detections is
binary (Active or Inactive) and that it is automatically reset to be Inactive after an
EmoState™ is sent. If Auto Repeat mode is active, then you can press and hold the
Activate button to maintain a particular eye state across multiple time intervals. Also
note that the value for a neutral Cognitiv™ detection is automatically set to 0.
• Training Results: specify the desired return value for EmoEngine™ requests generated
for the current player by the EE_CognitivSetTrainingControl and
EE_ExpressivSetTrainingControl functions.
• EmoEngine Log: contents are intended to give developers a clearer picture about
how the EmoEngine processes requests generated by various Emotiv API functions.
The log displays three different output types: Request , Reply , CogResult, and ExpResult . An API function call that results in a new request to the EmoEngine will
cause a Request output line to be displayed in the log. The multitude of API
functions are translated to roughly a dozen different strings intended to allow the
Emotiv SDK developer to see that an API function call has been serviced . These
strings include: PROFILE_ADD_USER, PROFILE_CHANGE_USER, PROFILE_REMOVE_USER, PROFILE_LIST_USER, PROFILE_GET_CURRENT_USER, PROFILE_LOAD, PROFILE_SAVE, EXPRESSIV_GET, EXPRESSIV_SET, AFFECTIV_GET, AFFECTIV_SET, COGNITIV_SET
and COGNITIV_GET. Because of the comparatively complex API protocol used to
facilitate training the Cognitiv™ algorithms, we display additional detail when we
receive training control messages generated by the
EE_CognitivSetTrainingControl API function. These strings are: COGNITIV_START, COGNITIV_ACCEPT, and COGNITIV_REJECT, which correspond to the
EE_TrainingControl_t constants exposed to developers in edk.h. Similar strings are
used for the equivalent Expressiv messages. All other request types are displayed as
API_REQUEST. The Reply output line displays the error code and is either green or
red, depending on whether an error has occurred (i.e. the error code != 0). The
CogResult and ExpResult outputs are used to inform the developer of an
asynchronous response sent from the EmoEngine via an EmoState update as the
result of an active Cognitiv or Expressiv training request.
• Send: sends the EmoState™ to a connected application or the Emotiv Control Panel.
Note that Control Panel will display “Cannot Acquire Data” until the first EmoState™ is
received from EmoComposer.
• Auto Repeat: check this box to tell EmoComposer™ to automatically send
EmoStates™ at the time interval specified in the EmoState™ Interval spin box. Use the

Start/Stop button to turn the automated send on and off. You may interact with the
EmoState™ controls to dynamically change the EmoState™ values while the
automated send is active. Note: switching between the Contact Quality and
Detection tabs in Interactive mode will automatically stop an automated send.
4.2.2 EmoScript Mode
Figure 20 EmoComposer EmoScript Mode
EmoComposer™ EmoScript mode allows you to playback a predefined sequence of
EmoState™ values to any application using the EmoEngine. The user interface settings
are described below. EmoScript files are written in EML (EmoComposer™ Markup
Language). EML syntax details can be found in the EML Language Specification section
in Appendix 1 of this document.
• Player: choose the player number to associate with the generated EmoStates™.
• File: click the “...” button to select and load an EmoScript file from disk. If the file
loads successfully then the timeline slider bar and Start button will be activated. If an
error occurs, a message box will appear with a description and approximate location
in the file.
• Timeline Slider: move the slider control to see the EmoState™ and signal quality
values for any point on the timeline defined by the EmoScript file.
• Start/Stop button: starts and stops the playback of the EmoState™ values generated
by the EmoScript file.
• Wireless: the wireless signal strength setting is disabled while in EmoScript mode and
the wireless signal strength is always set to “Good.”

• Contact Quality tab: the indicators on the head model correspond to the values
defined by the contact_quality tag at specific time code in the EmoScript file. If
no contact_quality tag has been specified then the contact quality values in the
generated EmoStates default to CQ_GOOD. • Detection tab: this tab allows you to view EmoState detection values and provides
interactive control over training result values. Unlike Real Time Interactive mode, the
signal quality and detection values are determined entirely by the contents of the
EmoScript file and you can switch between the Signal Quality tab and the Detection
tab to view the appropriate data during playback or timeline navigation.
• EmoState: the values displayed correspond to the EmoState™ values for a particular
point in time as defined by the EmoScript file. Note that these EmoScript values are
not interactive and can not be modified by the user (use the Interactive mode for this
instead).
• Training Results and EmoEngine Log: these controls operate exactly the same as they
do in Interactive Mode. See the Interactive Mode documentation (above) for more
details.

5. Programming with the Emotiv SDK
5.1 Overview
This section introduces key concepts for using the Emotiv SDK to build software that is
compatible with Emotiv headsets. It also walks you through some sample programs that
demonstrate these concepts and serve as a tutorial to help you get started with the
Emotiv API. The sample programs are written in C++ and are intended to be compiled
with Microsoft Visual Studio 2005 (Visual Studio 2008 is also supported). They are installed
with the Emotiv SDK and are organized into a Microsoft Visual Studio 2005 solution,
EmoTutorials.sln, which can be found in the \doc\Examples directory of your installation.
5.2 Introduction to the Emotiv API and Emotiv EmoEn gine™
The Emotiv API is exposed as an ANSI C interface that is declared in 3 header files (edk.h,
EmoStateDLL.h, edkErrorCode.h) and implemented in 2 Windows DLLs (edk.dll and
edk_utils.dll). C or C++ applications that use the Emotiv API simply include edk.h and link
with edk.dll. See Appendix 4 for a complete description of redistributable Emotiv SDK
components and installation requirements for your application.
The Emotiv EmoEngine refers to the logical abstraction of the functionality that Emotiv
provides in edk.dll. The EmoEngine communicates with the Emotiv headset, receives
preprocessed EEG and gyroscope data, manages user-specific or application-specific
settings, performs post-processing, and translates the Emotiv detection results into an
easy-to-use structure called an EmoState. Emotiv API functions that modify or retrieve
EmoEngine settings are prefixed with “EE_.”
EmoEngine (EDK.dll)
EmoState Buffer
Emotiv API
EmoState and EmoEvent query
handling
Game Process
Emotiv EpocEEG and Gyro
Post-ProcessingControl Logic
Game AI
Game Input Loop
Game UI
Figure 1 Integrating the EmoEngine and Emotiv EPOC with a videogame
An EmoState is an opaque data structure that contains the current state of the Emotiv
detections, which, in turn, reflect the user’s facial, emotional and cognitive state.
EmoState data is retrieved by Emotiv API functions that are prefixed with “ES_.”

EmoStates and other Emotiv API data structures are typically referenced through
opaque handles (e.g. EmoStateHandle and EmoEngineEventHandle ). These data
structures and their handles are allocated and freed using the appropriate Emotiv API
functions (e.g. EE_EmoEngineEventCreate and EE_EmoEngineEventFree ).
Open a connection to
EmoEngine
Close the connection
to EmoEngine
New EmoEngine
Event
Code to handle the
EmoEngine Event
Continue ...
Some Code Blocks ...
YES NO
Figure 21 Using the API to communicate with the EmoEngine
Figure 21 above shows a high-level flow chart for applications that incorporate the
EmoEngine. During initialization, and prior to calling Emotiv API functions, your
application must establish a connection to the EmoEngine by calling EE_EngineConnect
or EE_EngineRemoteConnect . Use EE_EngineConnect when you wish to communicate
directly with an Emotiv headset. Use EE_EngineRemoteConnect if you are using SDKLite
and/or wish to connect your application to EmoComposer or Emotiv Control Panel.
More details about using EE_EngineRemoteConnect follow in Section 5.3.

The EmoEngine communicates with your application by publishing events that can be
retrieved by calling EE_EngineGetNextEvent() . For near real-time responsiveness, most
applications should poll for new EmoStates at least 10-15 times per second. This is
typically done in an application’s main event loop or, in the case of most videogames,
when other input devices are periodically queried. Before your application terminates,
the connection to EmoEngine should be explicitly closed by calling
EE_EngineDisconnect() .
There are three main categories of EmoEngine events that your application should
handle:
• Hardware-related events: Events that communicate when users connect or
disconnect Emotiv input devices to the computer (e.g. EE_UserAdded ).
• New EmoState events: Events that communicate changes in the user’s facial,
cognitive and emotional state. You can retrieve the updated EmoState by calling
EE_EmoEngineEventGetEmoState() . (e.g. EE_EmoStateUpdated ).
• Suite-specific events: Events related to training and configuring the Cognitiv and
Expressiv detection suites (e.g. EE_CognitivEvent ).
A complete list of all EmoEngine events can be found in Appendix 3 .
Most Emotiv API functions are declared to return a value of type int. The return value
should be checked to verify the correct operation of the API function call. Most Emotiv
API functions return EDK_OK if they succeed. Error codes are defined in edkErrorCode.h
and documented in Appendix 2.
5.3 Development Scenarios Supported by EE_EngineRem oteConnect
The EE_EngineRemoteConnect() API should be used in place of EE_EngineConnect()
in the following circumstances:
1. The application is being developed with Emotiv SDKLite. This version of the SDK
does not include an Emotiv headset so all Emotiv API function calls communicate
with EmoComposer, the EmoEngine emulator that is described in Section 4.2.
EmoComposer listens on port 1726 so an application that wishes to connect to an
instance of EmoComposer running on the same computer must call
EE_EngineRemoteConnect(“127.0.0.1”, 1726) .
2. The developer wishes to test his application’s behavior in a deterministic fashion
by manually selecting which Emotiv detection results to send to the application.
In this case, the developer should connect to EmoComposer as described in the
previous item.
3. The developer wants to speed the development process by beginning his
application integration with the EmoEngine and the Emotiv headset without
having to construct all of the UI and application logic required to support
detection tuning, training, profile management and headset contact quality
feedback. To support this case, Emotiv Control Panel can act as a proxy for
either the real, headset-integrated EmoEngine or EmoComposer. Control Panel
listens on port 3008 so an application that wishes to connect to Control Panel
must call EE_EngineRemoteConnect(“127.0.0.1”, 3008).
5.4 Example 1 – EmoStateLogger
This example demonstrates the use of the core Emotiv API functions described in Sections
5.2 and 5.3. It logs all Emotiv detection results for the attached users after successfully
establishing a connection to Emotiv EmoEngine™ or EmoComposer™.

// ... print some instructions... std::string input; std::getline(std::cin, input, '\n'); option = atoi(input.c_str()); switch (option) { case 1: { if (EE_EngineConnect() != EDK_OK) { throw exception("Emotiv Engine start up failed." ); } break; } case 2: { std::cout << "Target IP of EmoComposer? [127.0.0. 1] "; std::getline(std::cin, input, '\n'); if (input.empty()) { input = std::string("127.0.0.1"); } if (EE_EngineRemoteConnect(input.c_str(), 1726) ! = EDK_OK){ throw exception("Cannot connect to EmoComposer!" ); } break; } default: throw exception("Invalid option..."); break; }
Listing 1 Connect to the EmoEngine
The program first initializes the connection with Emotiv EmoEngine™ by calling
EE_EngineConnect() or, with EmoComposer™, via EE_EngineRemoteConnect ()
together with the target IP address of the EmoComposer machine and the fixed port
1726. It ensures that the remote connection has been successfully established by
verifying the return value of the EE_EngineRemoteConnect() function.

EmoEngineEventHandle eEvent = EE_EmoEngineEventCrea te(); EmoStateHandle eState = EE_EmoStateCreate(); unsigned int userID = 0; while (...) { int state = EE_EngineGetNextEvent(eEvent); // New event needs to be handled if (state == EDK_OK) { EE_Event_t eventType = EE_EmoEngineEventGetType(e Event); EE_EmoEngineEventGetUserId(eEvent, &userID); // Log the EmoState if it has been updated if (eventType == EE_EmoStateUpdated) { // New EmoState from user EE_EmoEngineEventGetEmoState(eEvent, eState); // Log the new EmoState logEmoState(ofs, userID, eState, writeHeader); writeHeader = false; } } }
Listing 2 Buffer creation and management
An EmoEngineEventHandle is created by EE_EmoEngineEventCreate() . An
EmoState™ buffer is created by calling EE_EmoStateCreate() . The program then
queries the EmoEngine to get the current EmoEngine event by invoking
EE_EngineGetNextEvent() . If the result of getting the event type using
EE_EmoEngineEventGetType() is EE_EmoStateUpdated , then there is a new detection
event for a particular user (extract via EE_EmoEngineEventGetUserID() ). The function
EE_EmoEngineEventGetEmoState() can be used to copy the EmoState™ information
from the event handle into the pre-allocated EmoState buffer.
Note that EE_EngineGetNextEvent() will return EDK_NO_EVENT if no new events have
been published by EmoEngine since the previous call. The user should also check for
other error codes returned from EE_EngineGetNextEvent() to handle potential
problems that are reported by the EmoEngine.
Specific detection results are retrieved from an EmoState by calling the corresponding
EmoState accessor functions defined in EmoState.h . For example, to access the blink
detection, ES_ExpressivIsBlink(eState) should be used.
EE_EngineDisconnect(); EE_EmoStateFree(eState); EE_EmoEngineEventFree(eEvent);
Listing 3 Disconnecting from the EmoEngine
Before the end of the program, EE_EngineDisconnect() is called to terminate the
connection with the EmoEngine and free up resources associated with the connection.
The user should also call EE_EmoStateFree() and EE_EmoEngineEventFree() to free
up memory allocated for the EmoState buffer and EmoEngineEventHandle .
Before compiling the example, use the Property Pages and set the Configuration
Properties����Debugging����Command Arguments to the name of the log file you wish to
create, such as log.txt, and then build the example.

To test the example, launch EmoComposer. Start a new instance of EmoStateLogger
and when prompted, select option 2 (Connect to EmoComposer). The EmoStates
generated by EmoComposer will then be logged to the file log.txt.
Tip: If you examine the log file, and it is empty, it may be because you have not used the
controls in the EmoComposer to generate any EmoStates. SDKLite users should only
choose option 2 to connect to EmoComposer since option 1 (Connect to EmoEngine)
assumes that the user will attach a neuroheadset to the computer.
5.5 Example 2 – Expressiv™ Demo
This example demonstrates how an application can use the Expressiv™ detection suite to
control an animated head model called BlueAvatar. The model emulates the facial
expressions made by the user wearing an Emotiv headset. As in Example 1,
ExpressivDemo connects to Emotiv EmoEngine™ and retrieves EmoStates™ for all
attached users. The EmoState is examined to determine which facial expression best
matches the user’s face. ExpressivDemo communicates the detected expressions to the
separate BlueAvatar application by sending a UDP packet which follows a simple, pre-
defined protocol.
The Expressiv state from the EmoEngine can be separated into three groups of mutually-
exclusive facial expressions:
• Upper face actions: Raised eyebrows, furrowed eyebrows
• Eye related actions: Blink, Wink left, Wink right, Look left, Look right
• Lower face actions: Smile, Smirk left, Smirk right, Clench, Laugh
EmoStateHandle eState = EE_EmoStateCreate(); ... EE_ExpressivAlgo_t upperFaceType = ES_ExpressivGetUpperFaceAction(eState); EE_ExpressivAlgo_t lowerFaceType = ES_ExpressivGetLowerFaceAction(eState); float upperFaceAmp = ES_ExpressivGetUpperFaceAction Power(eState); float lowerFaceAmp = ES_ExpressivGetLowerFaceAction Power(eState);
Listing 4 Excerpt from ExpressivDemo code
This code fragment from ExpressivDemo shows how upper and lower face actions can
be extracted from an EmoState buffer using the Emotiv API functions
ES_ExpressivGetUpperFaceAction() and ES_ExpressivGetLowerFaceAction(),
respectively. In order to describe the upper and lower face actions more precisely, a
floating point value ranging from 0.0 to 1.0 is associated with each action to express its
“power”, or degree of movement, and can be extracted via the
ES_ExpressivGetUpperFaceActionPower() and
ES_ExpressivGetLowerFaceActionPower() functions .
Eye and eyelid-related state can be accessed via the API functions which contain the
corresponding expression name such as ES_ExpressivIsBlink() ,
ES_ExpressivIsLeftWink() , ES_ExpressivIsLookingRight() , etc.
The protocol that ExpressivDemo uses to control the BlueAvatar motion is very simple.
Each facial expression result will be translated to plain ASCII text, with the letter prefix
describing the type of expression, optionally followed by the amplitude value if it is an
upper or lower face action. Multiple expressions can be sent to the head model at the

same time in a comma separated form. However, only one expression per Expressiv
grouping is permitted (the effects of sending smile and clench together or blinking while
winking are undefined by the BlueAvatar). Table 3 below excerpts the syntax of some of
expressions supported by the protocol.
Expressiv™ action type Corresponding ASCII Text
(case sensitive)
Amplitude value
Blink B n/a
Wink left l n/a
Wink right r n/a
Look left L n/a
Look right R n/a
Eyebrow b 0 to 100 integer
Smile S 0 to 100 integer
Clench G 0 to 100 integer
Table 3 BlueAvatar control syntax
Some examples:
• Blink and smile with amplitude 0.5: B,S50
• Eyebrow with amplitude 0.6 and clench with amplitude 0.3: b60, G30
• Wink left and smile with amplitude 1.0: l, S100
The prepared ASCII text is subsequently sent to the BlueAvatar via UDP socket.
ExpressivDemo supports sending expression strings for multiple users. BlueAvatar should
start listening to port 30000 for the first user. Whenever a subsequent Emotiv USB receiver
is plugged-in, ExpressivDemo will increment the target port number of the associated
BlueAvatar application by one. Tip: when an Emotiv USB receiver is removed and then
reinserted, ExpressivDemo will consider this as a new Emotiv EPOC and still increases the
sending UDP port by one.
In addition to translating Expressiv results into commands to the BlueAvatar, the
ExpressivDemo also implements a very simple command-line interpreter that can be
used to demonstrate the use of personalized, trained signatures with the Expressiv suite.
Expressiv supports two types of “signatures” that are used to classify input from the Emotiv
headset as indicating a particular facial expression.
The default signature is known as the universal signature, and it is designed to work well
for a large population of users for the supported facial expressions. If the application or
user requires more accuracy or customization, then you may decide to use a trained
signature. In this mode, Expressiv requires the user to train the system by performing the
desired action before it can be detected. As the user supplies more training data, the
accuracy of the Expressiv detection typically improves. If you elect to use a trained
signature, the system will only detect actions for which the user has supplied training
data. The user must provide training data for a neutral expression and at least one other
supported expression before the trained signature can be activated. Important note:
not all Expressiv expressions can be trained. In particular, eye and eyelid-related
expressions (i.e. “blink”, “wink”, “look left”, and “look right”) can not be trained.
The API functions that configure the Expressiv detections are prefixed with “EE_Expressiv.”
The training_exp command corresponds to the EE_ExpressivSetTrainingAction()

function . The trained_sig command corresponds to the
EE_ExpressivGetTrainedSignatureAvailable() function. Type “help” at the
ExpressivDemo command prompt to see a complete set of supported commands.
The figure below illustrates the function call and event sequence required to record
training data for use with Expressiv. It will be useful to first familiarize yourself with the
training procedure on the Expressiv tab in Emotiv Control Panel before attempting to use
the Expressiv training API functions.
Figure 22 Expressiv training command and event sequence
The below sequence diagram describes the process of training an Expressiv facial
expression. The Expressiv-specific training events are declared as enumerated type
EE_ExpressivEvent_t in EDK.h . Note that this type differs from the EE_Event_t type
used by top-level EmoEngine Events.

EmoEngineEventHandle eEvent = EE_EmoEngineEventCrea te(); if (EE_EngineGetNextEvent(eEvent) == EDK_OK) { EE_Event_t eventType = EE_EmoEngineEventGetType(eE vent); if (eventType == EE_ExpressivEvent) { EE_ExpressivEvent_t cEvt=EE_ExpressivEventGetType (eEvent); ... }
Listing 5 Extracting Expressiv event details
Before the start of a training session, the expression type must be first set with the API
function EE_ExpressivSetTrainingAction() . In EmoStateDLL.h , the enumerated
type EE_ExpressivAlgo_t defines all the expressions supported for detection. Please
note, however, that only non-eye-related detections (lower face and upper face) can
be trained. If an expression is not set before the start of training, EXP_NEUTRAL will be
used as the default.
EE_ExpressivSetTrainingControl() can then be called with argument EXP_START to
start the training the target expression. In EDK.h , enumerated type
EE_ExpressivTrainingControl_t defines the control command constants for Expressiv
training. If the training can be started, an EE_ExpressivTrainingStarted event will be
sent after approximately 2 seconds. The user should be prompted to engage and hold
the desired facial expression prior to sending the EXP_START command. The training
update will begin after the EmoEngine sends the EE_ExpressivTrainingStarted
event. This delay will help to avoid training with undesirable EEG artifacts resulting from
transitioning from the user’s current expression to the intended facial expression.
After approximately 8 seconds, two possible events will be sent from the EmoEngine™:
EE_ExpressivTrainingSucceeded : If the quality of the EEG signal during the training
session was sufficiently good to update the Expressiv algorithm’s trained signature, the
EmoEngine will enter a waiting state to confirm the training update, which will be
explained below.
EE_ExpressivTrainingFailed : If the quality of the EEG signal during the training session
was not good enough to update the trained signature then the Expressiv training process
will be reset automatically, and user should be asked to start the training again.
If the training session succeeded (EE_ExpressivTrainingSucceeded was received)
then the user should be asked whether to accept or reject the session. The user may wish
to reject the training session if he feels that he was unable to maintain the desired
expression throughout the duration of the training period. The user’s response is then
submitted to the EmoEngine through the API call EE_ExpressivSetTrainingControl()
with argument EXP_ACCEPT or EXP_REJECT. If the training is rejected, then the
application should wait until it receives the EE_ExpressivTrainingRejected event
before restarting the training process. If the training is accepted, EmoEngine™ will
rebuild the user’s trained Expressiv™ signature, and an
EE_ExpressivTrainingCompleted event will be sent out once the calibration is done.
Note that this signature building process may take up several seconds depending on
system resources, the number of expression being trained, and the number of training
sessions recorded for each expression.

To run the ExpressivDemo example, launch the Emotiv Control Panel and EmoComposer.
In the Emotiv Control Panel select Connect����To EmoComposer, accept the default
values and then enter a new profile name. Next, navigate to the
doc\Examples\example2\blueavatar folder and launch the BlueAvatar application.
Enter 30000 as the UDP port and press the Start Listening button. Finally, start a new
instance of ExpressivDemo, and observe that when you use the Upperface, Lowerface or
Eye controls in EmoComposer, the BlueAvatar model responds accordingly.
Next, experiment with the training commands available in ExpressivDemo to better
understand the Expressiv training procedure described above. Listing 6 shows a sample
ExpressivDemo sessions that demonstrates how to train an expression.
Emotiv Engine started! Type "exit" to quit, "help" to list available comma nds... ExpressivDemo> New user 0 added, sending Expressiv animation to lo calhost:30000... ExpressivDemo> trained_sig 0 ==> Querying availability of a trained Expressiv si gnature for user 0... A trained Expressiv signature is not available for user 0 ExpressivDemo> training_exp 0 neutral ==> Setting Expressiv training expression for user 0 to neutral... ExpressivDemo> training_start 0 ==> Start Expressiv training for user 0... ExpressivDemo> Expressiv training for user 0 STARTED! ExpressivDemo> Expressiv training for user 0 SUCCEEDED! ExpressivDemo> training_accept 0 ==> Accepting Expressiv training for user 0... ExpressivDemo> Expressiv training for user 0 COMPLETED! ExpressivDemo> training_exp 0 smile ==> Setting Expressiv training expression for user 0 to smile... ExpressivDemo> training_start 0 ==> Start Expressiv training for user 0... ExpressivDemo> Expressiv training for user 0 STARTED! ExpressivDemo> Expressiv training for user 0 SUCCEEDED! ExpressivDemo> training_accept 0 ==> Accepting Expressiv training for user 0... ExpressivDemo> Expressiv training for user 0 COMPLETED! ExpressivDemo> trained_sig 0 ==> Querying availability of a trained Expressiv si gnature for user 0... A trained Expressiv signature is available for use r 0

ExpressivDemo> set_sig 0 1 ==> Switching to a trained Expressiv signature for user 0... ExpressivDemo>
Listing 6 Training “smile” and “neutral” in ExpressivDemo
5.6 Example 3 – Profile Management
User-specific detection settings, including trained Cognitiv™ and Expressiv™ signature
data, currently enabled Cognitiv actions, Cognitiv and Expressiv sensitivity settings, and
Affectiv calibration data, are saved in a user profile that can be retrieved from the
EmoEngine and restored at a later time.
This example demonstrates the API functions that can be used to manage a user’s profile
within Emotiv EmoEngine™. Please note that this example requires the Boost C++ Library
in order to build correctly. Boost is a modern, open source, peer-reviewed, C++ library
with many powerful and useful components for general-purpose, cross-platform
development. For more information and detailed instructions on installing the Boost
library please visit http://www.boost.org.
if (EE_EngineConnect() == EDK_OK) { // Allocate an internal structure to hold profi le data EmoEngineEventHandle eProfile = EE_ProfileEvent Create(); // Retrieve the base profile and attach it to the eProfile handle EE_GetBaseProfile(eProfile); }
Listing 7 Retrieve the base profile
EE_EngineConnect() or EE_EngineRemoteConnect() must be called before
manipulating EmoEngine profiles. Profiles are attached to a special kind of event handle
that is constructed by calling EE_ProfileEventCreate() . After successfully connecting
to EmoEngine, a base profile, which contains initial settings for all detections, may be
obtained via the API call EE_GetBaseProfile() .
This function is not required in order to interact with the EmoEngine profile mechanism – a
new user profile with all appropriate default settings is automatically created when a user
connects to EmoEngine and the EE_UserAdded event is generated - it is, however, useful
for certain types of applications that wish to maintain valid profile data for each saved
user.
It is much more useful to be able to retrieve the custom settings of an active user. Listing
8 demonstrates how to retrieve this data from EmoEngine.
if (EE_GetUserProfile(userID, eProfile) != EDK_OK) { // error in arguments... } // Determine the size of a buffer to store the user ’s profile data unsigned int profileSize; if (EE_GetUserProfileSize(eProfile, &profileSize) ! = EDK_OK) { // you didn’t check the return value above… }

// Copy the content of profile byte stream into loc al buffer unsigned char* profileBuffer = new unsigned char[pr ofileSize]; int result; result=EE_GetUserProfileBytes(eProfile, profileBuff er, profileSize);
Listing 8 Get the profile for a particular user
EE_GetUserProfile() is used to get the profile in use for a particular user. This function
requires a valid user ID and an EmoEngineEventHandle previously obtained via a call to
EE_ProfileEventCreate() . Once again, the return value should always be checked.
If successful, an internal representation of the user’s profile will be attached to the
EmoEngineEventHandle and a serialized, binary representation can be retrieved by
using the EE_GetUserProfileSize() and EE_EngineGetUserProfileBytes()
functions, as illustrated above.
The application is then free to manage this binary profile data in the manner that best fits
its purpose and operating environment. For example, the application programmer may
choose to save it to disk, persist it in a database or attach it to another app-specific data
structure that holds its own per-user data.
unsigned int profileSize = 0; unsigned char* profileBuf = NULL; // assign and populate profileBuf and profileSize c orrectly ... if (EE_SetUserProfile(userID, profileBuf, profileSi ze) != EDK_OK) { // error in arguments... }
Listing 9 Setting a user profile
EE_SetUserProfile() is used to dynamically set the profile for a particular user. In
Listing 9, the profileBuf is a pointer to the buffer of the binary profile and profileSize
is an integer storing the number of bytes of the buffer. The binary data can be obtained
from the base profile if there is no previously saved profile, or if the application wants to
return to the default settings. The return value should always be checked to ensure the
request has been made successfully.
... EE_Event_t eventType = EE_EmoEngineEventGetType(eEv ent); EE_EmoEngineEventGetUserId(eEvent, &userID); switch (eventType) { // New Emotiv device connected case EE_UserAdded: ... break; // Emotiv device disconnected case EE_UserRemoved: ... break;

// Handle EmoState update case EE_EmoStateUpdated: ... break; default: break; } ...
Listing 10 Managing profiles
Examples 1 and 2 focused chiefly on the proper handling of the EE_EmoStateUpdated
event to accomplish their tasks. Two new event types are required to properly manage
EmoEngine profiles in Example 3:
1. EE_UserAdded : Whenever a new Emotiv USB receiver is plugged into the
computer, EmoEngine will generate an EE_UserAdded event. In this case, the
application should create a mapping between the Emotiv user ID for the new
device and any application-specific user identifier. The Emotiv USB receiver
provides 4 LEDs that can be used to display a player number that is assigned by
the application. After receiving the EE_UserAdded event, the
EE_SetHardwarePlayerDisplay() function can be called to provide a visual
indication of which receiver is being used by each player in a game.
2. EE_UserRemoved : When an existing Emotiv USB receiver is removed from the host
computer, EmoEngine™ will send an EE_UserRemoved event to the application
and release internal resources associated with that Emotiv device. The user
profile that is coupled with the removed Emotiv EPOC™ will be embedded in the
event as well. The developer can retrieve the binary profile using the
EE_GetUserProfileSize() and EE_GetUserProfileBytes() functions as
described above. The binary profile can be saved onto disc to decrease
memory usage, or kept in the memory to minimize the I/O overhead, and can be
reused at a later time if the same user reconnects.
5.7 Example 4 – Cognitiv™ Demo
This example demonstrates how the user’s conscious mental intention can be recognized
by the Cognitiv™ detection and used to control the movement of a 3D virtual object. It
also shows the steps required to train the Cognitiv suite to recognize distinct mental
actions for an individual user.
The design of the CognitivDemo application is quite similar to the ExpressivDemo
covered in Example 2. In Example 2, ExpressivDemo retrieves EmoStates™ from Emotiv
EmoEngine™ and uses the EmoState data describing the user’s facial expressions to
control an external avatar. In this example, information about the cognitive mental
activity of the users is extracted instead. The output of the Cognitiv detection indicates
whether users are mentally engaged in one of the trained Cognitiv actions (pushing,
lifting, rotating, etc.) at any given time. Based on the Cognitiv results, corresponding
commands are sent to a separate application called EmoCube to control the movement
of a 3D cube.
Commands are communicated to EmoCube via a UDP network connection. As in
Example 2, the network protocol is very simple: an action is communicated as two
comma-separated, ASCII-formatted values. The first is the action type returned by
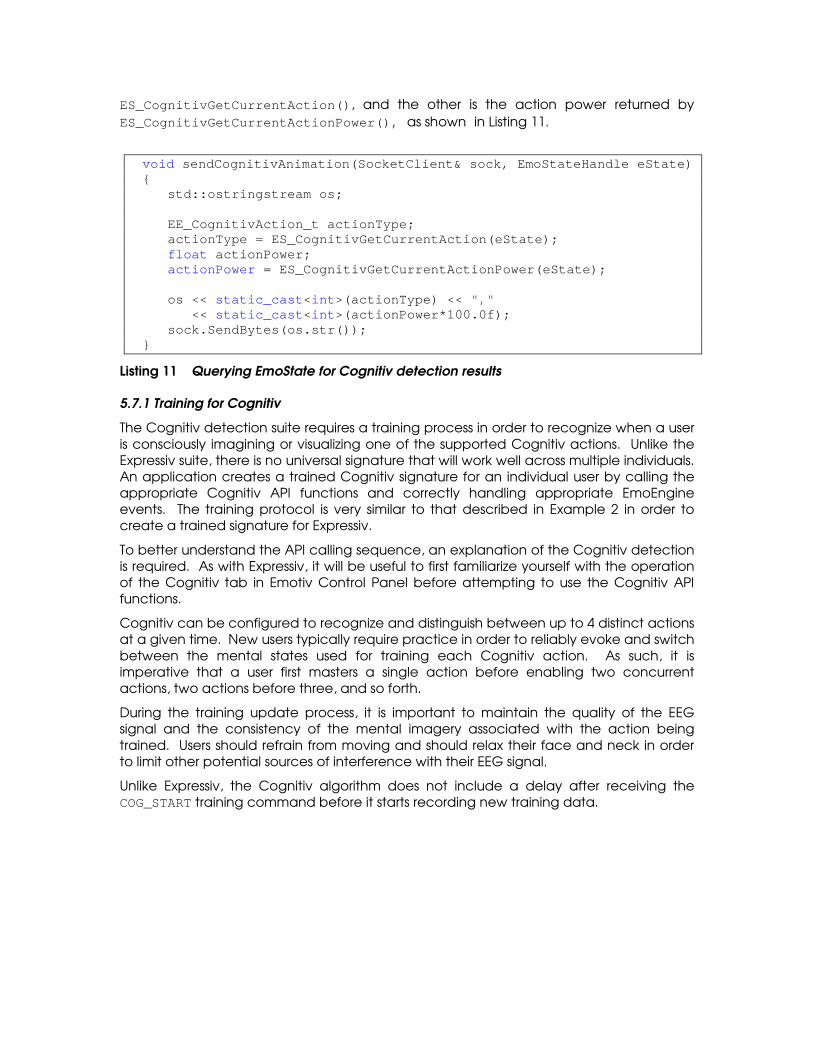
ES_CognitivGetCurrentAction() , and the other is the action power returned by
ES_CognitivGetCurrentActionPower(), as shown in Listing 11.
void sendCognitivAnimation(SocketClient& sock, EmoState Handle eState) { std::ostringstream os; EE_CognitivAction_t actionType;
actionType = ES_CognitivGetCurrentAction(eState); float actionPower;
actionPower = ES_CognitivGetCurrentActionPower(eState); os << static_cast <int >(actionType) << ","
<< static_cast <int >(actionPower*100.0f); sock.SendBytes(os.str()); }
Listing 11 Querying EmoState for Cognitiv detection results
5.7.1 Training for Cognitiv
The Cognitiv detection suite requires a training process in order to recognize when a user
is consciously imagining or visualizing one of the supported Cognitiv actions. Unlike the
Expressiv suite, there is no universal signature that will work well across multiple individuals.
An application creates a trained Cognitiv signature for an individual user by calling the
appropriate Cognitiv API functions and correctly handling appropriate EmoEngine
events. The training protocol is very similar to that described in Example 2 in order to
create a trained signature for Expressiv.
To better understand the API calling sequence, an explanation of the Cognitiv detection
is required. As with Expressiv, it will be useful to first familiarize yourself with the operation
of the Cognitiv tab in Emotiv Control Panel before attempting to use the Cognitiv API
functions.
Cognitiv can be configured to recognize and distinguish between up to 4 distinct actions
at a given time. New users typically require practice in order to reliably evoke and switch
between the mental states used for training each Cognitiv action. As such, it is
imperative that a user first masters a single action before enabling two concurrent
actions, two actions before three, and so forth.
During the training update process, it is important to maintain the quality of the EEG
signal and the consistency of the mental imagery associated with the action being
trained. Users should refrain from moving and should relax their face and neck in order
to limit other potential sources of interference with their EEG signal.
Unlike Expressiv, the Cognitiv algorithm does not include a delay after receiving the
COG_START training command before it starts recording new training data.

Figure 23 Cognitiv training
The above sequence diagram describes the process of carrying out Cognitiv training on
a particular action. The Cognitiv-specific events are declared as enumerated type
EE_CognitivEvent_t in EDK.h . Note that this type differs from the EE_Event_t type
used by top-level EmoEngine Events. The code snippet in Listing 12 illustrates the
procedure for extracting Cognitiv-specific event information from the EmoEngine event.
EmoEngineEventHandle eEvent = EE_EmoEngineEventCrea te(); if (EE_EngineGetNextEvent(eEvent) == EDK_OK) { EE_Event_t eventType = EE_EmoEngineEventGetType(eE vent); if (eventType == EE_CognitivEvent) { EE_CognitivEvent_t cEvt = EE_CognitivEventGetType (eEvent); ... }
Listing 12 Extracting Cognitiv event details

Before the start of a training session, the action type must be first set with the API function
EE_CognitivSetTrainingAction() . In EmoStateDLL.h , the enumerated type
EE_CognitivAction_t defines all the Cognitiv actions that are currently supported
(COG_PUSH, COG_LIFT, etc.). If an action is not set before the start of training,
COG_NEUTRAL will be used as the default.
EE_CognitivSetTrainingControl() can then be called with argument COG_START to
start the training on the target action. In EDK.h , enumerated type
EE_CognitivTrainingControl_t defines the control command constants for Cognitiv
training. If the training can be started, an EE_CognitivTrainingStarted event will be
sent almost immediately. The user should be prompted to visualize or imagine the
appropriate action prior to sending the COG_START command. The training update will
begin after the EmoEngine sends the EE_CognitivTrainingStarted event. This delay
will help to avoid training with undesirable EEG artifacts resulting from transitioning from a
“neutral” mental state to the desired mental action state.
After approximately 8 seconds, two possible events will be sent from the EmoEngine™:
EE_CognitivTrainingSucceeded : If the quality of the EEG signal during the training
session was sufficiently good to update the algorithms trained signature, EmoEngine™ will
enter a waiting state to confirm the training update, which will be explained below.
EE_CognitivTrainingFailed : If the quality of the EEG signal during the training session
was not good enough to update the trained signature then the Cognitiv™ training
process will be reset automatically, and user should be asked to start the training again.
If the training session succeeded (EE_CognitivTrainingSucceeded was received) then
the user should be asked whether to accept or reject the session. The user may wish to
reject the training session if he feels that he was unable to evoke or maintain a consistent
mental state for the entire duration of the training period. The user’s response is then
submitted to the EmoEngine through the API call EE_CognitivSetTrainingControl()
with argument COG_ACCEPT or COG_REJECT. If the training is rejected, then the
application should wait until it receives the EE_CognitivTrainingRejected event
before restarting the training process. If the training is accepted, EmoEngine™ will
rebuild the user’s trained Cognitiv™ signature, and an EE_CognitivTrainingCompleted
event will be sent out once the calibration is done. Note that this signature building
process may take up several seconds depending on system resources, the number of
actions being trained, and the number of training sessions recorded for each action.
To test the example, launch the Emotiv Control Panel and the EmoComposer. In the
Emotiv Control Panel select Connect����To EmoComposer and accept the default values
and then enter a new profile name. Navigate to the \example4\EmoCube folder and
launch the EmoCube, enter 20000 as the UDP port and select Start Server. Start a new
instance of CognitivDemo, and observe that when you use the Cognitiv control in the
EmoComposer the EmoCube responds accordingly.
Next, experiment with the training commands available in CognitivDemo to better
understand the Cognitiv training procedure described above. Listing 13 shows a sample
CognitivDemo session that demonstrates how to train.

CognitivDemo> set_actions 0 push lift ==> Setting Cognitiv active actions for user 0... CognitivDemo> Cognitiv signature for user 0 UPDATED! CognitivDemo> training_action 0 push ==> Setting Cognitiv training action for user 0 to "push"... CognitivDemo> training_start 0 ==> Start Cognitiv training for user 0... CognitivDemo> Cognitiv training for user 0 STARTED! CognitivDemo> Cognitiv training for user 0 SUCCEEDED! CognitivDemo> training_accept 0 ==> Accepting Cognitiv training for user 0... CognitivDemo> Cognitiv training for user 0 COMPLETED! CognitivDemo> training_action 0 neutral ==> Setting Cognitiv training action for user 0 to "neutral"... CognitivDemo> training_start 0 ==> Start Cognitiv training for user 0... CognitivDemo> Cognitiv training for user 0 STARTED! CognitivDemo> Cognitiv training for user 0 SUCCEEDED! CognitivDemo> training_accept 0 ==> Accepting Cognitiv training for user 0... CognitivDemo> Cognitiv training for user 0 COMPLETED! CognitivDemo>
Listing 13 Training “push” and “neutral” with CognitivDemo
5.8 Example 5 – EEG Logger Demo
This example demonstrates how to extract live EEG data using the EmoEngineTM in C++.
Data is read from the headset and sent to an output file for later analysis. This examples
only works with the SDK versions that allow raw EEG access (Research, Education and
Enterprise Plus).
The example starts in the same manner as the earlier examples (see Listing 1 & 2, Section
5.4). A connection is made to the EmoEngine through a call to EE_EngineConnect(), or to
EmoComposer through a call to EE_EngineRemoteConnect(). The EmoEngine event
handlers and EmoState Buffer’s are also created as before.
float secs = 1; …

DataHandle hData = EE_DataCreate(); DataSetBufferSizeInSec(secs); std::cout << "Buffer size in secs:" << secs << st d::endl; …==> Setting Cognitiv active actions for user 0.. .
Listing 14 Access to EEG data
Access to EEG measurements requires the creation of a DataHandle, a handle that is
used to provide access to the underlying data. This handle is initialized with a call to
EE_DataCreate(). During the measurement process, EmoEngine will maintain a data
buffer of sampled data, measured in seconds. This data buffer must be initialized with a
call to DataSetBufferSizeInSec(…), prior to collecting any data.
while (…) state = EE_EngineGetNextEvent(eEvent); if (state == EDK_OK) { EE_Event_t eventType = EE_EmoEngineEventGetType(eEvent); EE_EmoEngineEventGetUserId(eEvent, &userID); // Log the EmoState if it has been updated if (eventType == EE_UserAdded) { EE_DataAcquisitionEnable(userID,true); readytocollect = true; } }
Listing 15 Start Acquiring Data
When the connection to EmoEngine is first made via EE_EngineConnect(), the engine will
not have registered a valid user. The trigger for this registration is an EE_UserAdded event,
which is raised shortly after the connection is made. Once the user is registered, it is
possible to enable data acquisition via a call to DataAcquisitionEnable. With this
enabled, EmoEngine will start collecting EEG for the user, storing it in the internal
EmoEngine sample buffer. Note that the developer’s application should access the EEG
data at a rate that will ensure the sample buffer is not overrun.
if (readytocollect) … DataUpdateHandle (0, hData); unsigned int nSamplesTaken=0; DataGetNumberOfSample(hData,&nSamplesTaken);

if (nSamplesTaken != 0) … double* data = new double[nSamplesTaken]; EE_DataGet(hData, targetChannelList[i], data, nSamplesTaken); delete[] data;
Listing 16 Acquiring Data
To initiate retrieval of the latest EEG buffered data, a call is made to
DataUpdateHandle(). When this function is processed, EmoEngine will ready the latest
buffered data for access via the hData handle. All data captured since the last call to
DataUpdateHandle will be retrieved. Place a call to DataGetNumberOfSample() to
establish how much buffered data is currently available. The number of samples can be
used to set up a buffer for retrieval into your application as shown.
Finally, to transfer the data into a buffer in our application, we call the EE_DataGet
function. To retrieve the buffer we need to choose from one of the available data
channels:
ED_COUNTER,ED_AF3, ED_F7, ED_F3, ED_FC5, ED_T7,
ED_P7, ED_O1, ED_O2, ED_P8, ED_T8, ED_FC6, ED_F4,
ED_F8, ED_AF4, ED_GYROX, ED_GYROY, ED_TIMESTAMP,
ED_FUNC_ID, ED_FUNC_VALUE, ED_MARKER, ED_SYNC_SIGNAL
For example, to retrieve the first sample of data held in the sensor AF3, place a call to
EE_DataGet as follows:
EE_DataGet(hData, ED_AF3, databuffer, 1);
You may retrieve all the samples held in the buffer using the bufferSizeInSample
parameter.
Finally, we need to ensure correct clean up by disconnecting from the EmoEngine and
free all associated memory.
EE_EngineDisconnect();
EE_EmoStateFree(eState);
EE_EmoEngineEventFree(eEvent);
5.9 DotNetEmotivSDK Test
The Emotiv SDK comes with C# support. The wrapper is provided at
\doc\examples\DotNet\DotNetEmotivSDK. The test project at
\doc\examples_DotNet\DotNetEmotivSDKTest demonstrates how programmers can
interface with the Emotiv SDK via the C# wrapper.
It’s highly recommended that developers takeing advantage of this test project read
through other sections of this chapters. Concepts about the EmoEngine, the EmoEvents

and EmoState are the same. DotNetEmotivSDK is merely a C# wrapper for the native
C++ Emotiv SDK

Appendix 1 EML Language Specification
A1.1 Introduction
EmoComposer™ is a hardware emulator for the Emotiv Software Development Kit. Using
EmoComposer, game developers can emulate the behavior of Emotiv EmoEngine™
without needing to spend time in the real Emotiv EPOC™. EmoComposer operates in
two modes, interactive and EmoScript playback.
In interactive mode, EmoComposer provides game developers with real time control
over generating emulated detection events. EmoComposer also responds to a game’s
requests in real time. In EmoScript mode, game developers can pre-define these two-
way interactions by preparing an EmoComposer Markup Language (EML) document.
EML documents are XML documents that can be interpreted by EmoComposer. This
section outlines the EML specification.
A1.2 EML Example
A typical EML document is shown in Listing 17 below:
01 <?xml version="1.0" encoding="utf-8"?> 02 <!DOCTYPE EML> 03 <EML version="1.0" language="en_US"> 04 <config> 05 <autoreset value ="1" group="expressiv_eye" e vent="blink" /> 06 <autoreset value ="1" group="expressiv_eye" e vent="wink_left" /> 07 <autoreset value ="1" group="expressiv_eye" e vent="wink_right" /> 08 </config> 09 <sequence> 10 <time value="0s15t"> 11 <cognitiv event="push" value ="0.85" /> 12 <expressiv_upperface event="eyebrow_raised" value ="0.85" /> 13 <expressiv_lowerface event="clench" value = "0.85" /> 14 <expressiv_eye event="blink" value="1" /> 15 <affectiv event="excitement_short_term" val ue="1" /> 16 <affectiv event=”excitement_long_term” val ue=”0.6” /> 17 <contact_quality value="G, G, G, G, G, G, F , F, G, 18 G, G, G, G, G, G, G, G, G" /> 19 </time> 20 <time value="2s4t"> 21 <cognitiv event="push" value ="0" /> 22 <expressiv_upperface event="eyebrow_raised" value ="0.75" /> 23 <expressiv_lowerface event="clench" value = "0.5" /> 24 <expressiv_eye event="blink" value="1" /> 25 <affectiv event="excitement_short_term" val ue="0.7" /> 26 <affectiv event="excitement_long_term" val ue="0.6" /> 27 </time> 28 <time value="3s6t"> 29 <cognitiv event="push" shape="normal" offset_lef t="0.4" offset_right="0.2" 30 scale_width="1.5" scale_height="0.8" /> 31 <expressiv_upperface event="eyebrow_raised" value ="0.85" /> 32 <expressiv_lowerface event="clench" value = "0.85" />

33 <expressiv_eye event="blink" value="1" repe at=”1” 34 repeat_interval=”0.5” repeat_num=”15” / > 35 <affectiv event="excitement_short_term" val ue="0.4" /> 36 <affectiv event="excitement_long_term" valu e="0.5" /> 37 </time> 38 </sequence> 39 </EML>
Listing 17 EML Document Example
Apart from standard headers (lines 1-3 and 39), an EML document consists of two
sections:
• config : Section to configure global parameter for the EmoComposer behaviors.
• sequence : Section to define detection events as they would occur in a real Emotiv
SDK.
A1.2.1 EML Header
Line 1-3 specifies the EML header. EML is a special implementation of a generic XML
document which uses UTF-8 encoding and English US language. Line 2 is a normal XML
comment to specify the document type and is optional. 01 <?xml version="1.0" encoding="utf-8"?> 02 <!DOCTYPE EML> 03 <EML version="1.0" language="en_US">
Listing 18 EML Header
A1.2.2 EmoState Events in EML
EmoState events are defined within the <sequence> element. In Listing 19, the
<sequence> element is between line 9 and line 38:
09 <sequence> 10 <time value="0s15t"> 11 <cognitiv event="push" value ="0.85" /> 12 <expressiv_upperface event="eyebrow_raised" value ="0.85" /> 13 <expressiv_lowerface event="clench" value = "0.85" /> 14 <expressiv_eye event="blink" value="1" /> 15 <affectiv event="excitement_short_term" val ue="1" /> 16 <affectiv event=”excitement_long_term” val ue=”0.6” /> 17 <contact_quality value="G, G, G, G, F, F, P , F, G, 18 G, G, G, G, G, G, G, G, G" /> 19 </time> 20 <time value="2s4t"> 21 <cognitiv event="push" value ="0" /> 22 <expressiv_upperface event="eyebrow_raised" value ="0.75" /> 23 <expressiv_lowerface event="clench" value = "0.5" /> 24 <expressiv_eye event="blink" value="1" /> 25 <affectiv event="excitement_short_term" val ue="0.7" /> 26 <affectiv event="excitement_long_term" val ue="0.6" /> 27 </time> 28 <time value="3s6t"> 29 <cognitiv event="push" shape="normal" offset_lef t="0.4" offset_right="0.2" 30 scale_width="1.5" scale_height="0.8" /> 31 <expressiv_upperface event="eyebrow_raised" value ="0.85" />

32 <expressiv_lowerface event="clench" value = "0.85" /> 33 <expressiv_eye event="blink" value="1" repe at=”1” 34 repeat_interval=”0.5” repeat_num=”15” / > 35 <affectiv event="excitement_short_term" val ue="0.4" /> 36 <affectiv event="excitement_long_term" valu e="0.5" /> 37 </time> 38 </sequence>
Listing 19 Sequence in EML document
The <sequence> section consists of a series of discrete times at which there are events
that will be sent from the EmoComposer to the game. These time events are ascending
in time. Since each second is divided into 32 ticks (or frames), the time value in this
example should be understood as follows:
Time Line Number Description
value = "0s15t" 10 This event is at 0 seconds and 15th frame
value = "2s4t" 20 This event is at 2 seconds and 4th frame
value = "3s6t" 28 This event is at 3 seconds and 6th frame
Table 4 Time values in EML documents
At each time event, game developers can specify up to six different parameters,
corresponding to the five distinct detection groups plus the current signal quality:
Detection Group Events Notes
cognitiv push
pull
lift
drop
left
right
rotate_left
rotate_right
rotate_clockwise
rotate_counter_clockwise
rotate_forwards
rotate_reverse
disappear
expressiv_eye blink
wink_left
wink_right
look_left
look_right
“value ” attribute is treated as
a boolean (0 or not 0) to
determine whether to set the
specified eye state.
expressiv_upperface eyebrow_raised

furrow
expressiv_lowerface smile
clench
laugh
smirk_left
smirk_right
affectiv excitement_short_term
excitement_long_term
engagement_boredom
Notes:
1. The affectiv tag is a
special case in that it is
allowed to appear multiple
times, in order to simulate
output from all the Affectiv
detections.
2. In order to simulate the
behavior of the EmoEngine™,
both short and long term
values should be specified for
excitement.
signal_quality value This tag has been deprecated.
It has been replaced with the
contact_quality tag.
Expects “value ” attribute to
be formatted as 18 comma-
separated floating point values
between 0 and 1. The first two
values must be the same.
contact_quality value Expects “value ” attribute to
be formatted as 18 comma-
separated character codes
that correspond to valid CQ
constants:
G = EEG_CQ_GOOD
F = EEG_CQ_FAIR P = EEG_CQ_POOR VB = EEG_CQ_VERY_BAD NS = EEG_CQ_NO_SIGNAL
The first two values must be the
same, and can only be set to
G, VB, or NS, in order to most
accurately simulate possible
values produced by the Emotiv
neuroheadset hardware.
The order of the character
codes is the same as the
contants in the

EE_InputChannels_enum
declared in EmoStateDLL.h.
Note that two of the channels,
FP1 and FP2, do not currently
exist on the Beta SDK or EPOC
neuroheadsets.
Table 5 Detection groups in EML document
Detection group names are created by grouping mutually exclusive events together. For
example, only one of {blink , wink_left , wink_right , look_left , look_right } can
happen at a given time, hence the grouping expressiv_eye .
Cognitiv detection group belongs to the Cognitiv Detection Suite. Expressiv_eye ,
Expressiv_upperface , and Expressiv_lowerface detection groups belong to the
Expressiv Detection Suite. Affectiv detection group belongs to the Affectiv Detection
Suite.
In its simplest form, a detection definition parameter looks like:
<cognitiv event="push" value="0.85" /> , which is a discrete push action of the
Cognitiv detection group with a value of 0.85. In EML, the maximum amplitude for any
detection event is 1. By default, the detection event retains its value for this detection
group until the game developer explicitly set it to a different value. However, game
developers can also alter the reset behaviors as shown in the config section where the
values for blink , wink_left , wink_right of the expressiv_eye detection group
automatically reset themselves. 04 <config> 05 <autoreset value ="1" group="expressiv_eye" e vent="blink" /> 06 <autoreset value ="1" group="expressiv_eye" e vent="wink_left" /> 07 <autoreset value ="1" group="expressiv_eye" e vent="wink_right" /> 08 </config>
Listing 20 Configuring detections to automatically reset
Instead of a discrete detection event as above, game developers can also define a
series of detection events based on an event template function. An event template
function generates a burst of discrete events according to the following parameters:
• shape : “normal” or “triangle”
• offset_left , offset_right , scale_width : A template has a 1 second width by
default. These three parameters allow game developers to morph the template
shape in the time domain.
• scale_height : A template, by default, has maximum amplitude of 1. This parameter
allows game developers to morph the template’s height.
Normal and Triangle shapes are shown below:
Figure 24 Normal and Triangle template shapes
An example of morphing template to specify detection event is:

29 <cognitiv event="push" shape="normal" offset_lef t="0.4" offset_right="0.2" 30 scale_width="1.5" scale_height="0.8" />
The above detection event can be illustrated as below:
First, start with a normal template with height = 1 and width = 1 . Second, the
template is adjusted by offset_left and offset_right . It now has a height of 1 and
a width of 1-0.4-0.2 = 0.4.
offset_left = 0.4 offset_right=0.2
1
Figure 25 Morphing a template
Last, after height is scaled by scale_height and width is scaled by scale_width , the
template becomes:
Figure 26 Morphed template
Full specifications of an event’s attributes is shown below:
Attribute Description Required
[detection_group] One of six available detection
groups as specified in Table 5.
Yes
event=[event_name] Corresponding values of the
[detection_group] as
specified in Table 5.
Yes
value=[value] A detection event can be
interpreted as either a
discrete event or a series of
events whose values are
determined by an event
Either “value ” or
“shape” attribute must
be specified.
If “value ” is present,

template function.
The presence of the “value ”
attribute indicates that this is a
discrete event.
none of the event
template attributes
(shape , offset_left ,
offset_right ,
scale_width ,
scale_height ) are
allowed
shape=[shape] The presence of the “shape ”
attribute indicates that this
represents the starting point
for a series of events
generated according to an
event template function.
Allowed values are “normal ”
and “triangle ”.
Either “value ” or
“shape ” attribute must
be specified.
If “shape ” is present,
then the “value ”
attribute is not
allowed.
offset_left=[offset_left] This attribute is a parameter of
an event template function
(see above for a detailed
description of its meaning).
offset_left +offset_right
must be less than 1.
The “shape ” attribute
must also be specified.
The “value ” attribute
can not be specified.
offset_right=[offset_right] This attribute is a parameter of
an event template function
(see above for a detailed
description of its meaning).
offset_left+offset_right
must be less than 1.
The “shape ” attribute
must also be specified.
The “value ” attribute
can not be specified.
scale_width=[scale_width] This attribute is a parameter of
an event template function
(see above for a detailed
description of its meaning).
Must be greater than 0.
The “shape ” attribute
must also be specified.
The “value ” attribute
can not be specified.
scale_height=[scale_height] This attribute is a parameter of
an event template function
(see above for a detailed
description of its meaning).
0 < scale_height <= 1
- The “shape ” attribute
must also be specified.
- The “value ” attribute
can not be specified.
Table 6 Attributes for an event specification

Appendix 2 Emotiv EmoEngine™ Error Codes
Every time you use a function provided by the API, the value returned indicates the
EmoEngine™ status. Table 7 below shows possible EmoEngine error codes and their
meanings. Unless the returned code is EDK OK, there is an error. Explanations of these
messages are in Table 7 below.
EmoEngine Error Code Hex
Value Description
EDK_OK 0x0000 Operation has been carried out
successfully.
EDK_UNKNOWN_ERROR 0x0001 An internal fatal error occurred.
EDK_INVALID_PROFILE_ARCHIVE 0x0101 Most likely returned by
EE_SetUserProfile() when the
content of the supplied buffer is not a
valid serialized EmoEngine profile.
EDK_NO_USER_FOR_BASE_PROFILE 0x0102 Returns when trying to query the user
ID of a base profile.
EDK_CANNOT_ACQUIRE_DATA 0x0200 Returns when EmoEngine is unable to
acquire any signal from Emotiv
EPOC™ for processing
EDK_BUFFER_TOO_SMALL 0x0300 Most likely returned by
EE_GetUserProfile() when the size
of the supplied buffer is not large
enough to hold the profile.
EDK_OUT_OF_RANGE 0x0301 One of the parameters supplied to
the function is out of range.
EDK_INVALID_PARAMETER 0x0302 One of the parameters supplied to
the function is invalid (e.g. null
pointers, zero size buffer)
EDK_PARAMETER_LOCKED 0x0303 The parameter value is currently
locked by a running detection and
cannot be modified at this time.
EDK_COG_INVALID_TRAINING_ACTION 0x0304 The specified action is not an
allowed training action at this time.
EDK_COG_INVALID_TRAINING_CONTROL 0x0305 The specified control flag is not an
allowed training control at this time.
EDK_COG_INVALID_ACTIVE_ACTION 0x0306 An undefined action bit has been set
in the actions bit vector.
EDK_COG_EXCESS_MAX_ACTIONS 0x0307 The current action bit vector contains
more than maximum number of
concurrent actions.
EDK_EXP_NO_SIG_AVAILABLE 0x0308 A trained signature is not currently

EmoEngine Error Code Hex
Value Description
available for use – some actions may
still require training data.
EDK_INVALID_USER_ID 0x0400 The user ID supplied to the function is
invalid.
EDK_EMOENGINE_UNINITIALIZED 0x0500 EmoEngine™ needs to be initialized
via calling EE_EngineConnect() or
EE_EngineRemoteConnect() before
calling any other APIs.
EDK_EMOENGINE_DISCONNECTED 0x0501 The connection with EmoEngine™
via EE_EngineRemoteConnect() has
been lost.
EDK_EMOENGINE_PROXY_ERROR 0x0502 Returned by
EE_EngineRemoteConnect() when
the connection to the EmoEngine™
cannot be established.
EDK_NO_EVENT 0x0600 Returned by
EE_EngineGetNextEvent() when
there is no pending event.
EDK_GYRO_NOT_CALIBRATED 0x0700 The gyroscope is not calibrated.
Please ask the user to remain still for
.5 seconds.
EDK_OPTIMIZATION_IS_ON 0x0800 Operation failed due to algorithm
optimization settings.
Table 7 Emotiv EmoEngine™ Error Codes

Appendix 3 Emotiv EmoEngine™ Events
In order for an application to communicate with Emotiv EmoEngine, the program must
regularly check for new EmoEngine events and handle them accordingly. Emotiv
EmoEngine events are listed in Table 8 below:
EmoEngine events Hex
Value Description
EE_UserAdded 0x0010 New user is registered with the EmoEngine
EE_UserRemoved 0x0020 User is removed from the EmoEngine’s user
list
EE_EmoStateUpdated 0x0040 New detection is available
EE_ProfileEvent 0x0080 Notification from EmoEngine in response
to a request to acquire profile of an user
EE_CognitivEvent 0x0100 Event related to Cognitiv detection suite.
Use the EE_CognitivGetEventType function to retrieve the Cognitiv-specific
event type.
EE_ExpressivEvent 0x0200 Event related to the Expressiv detection
suite. Use the EE_ExpressivGetEventType function
to retrieve the Expressiv-specific event
type.
EE_InternalStateChanged 0x0400 Not generated for most applications.
Used by Emotiv Control Panel to inform UI
that a remotely connected application
has modified the state of the embedded
EmoEngine through the API.
EE_EmulatorError 0x0001 EmoEngine internal error.
Table 8 Emotiv EmoEngine™ Events

Appendix 4 Redistributing Emotiv EmoEngine™ with
your application
An application constructed to use Emotiv EmoEngine™ requires that EDK.dll be installed
on the end-user’s computer. EDK.dll has been compiled with Microsoft Visual Studio 2005
(VC 8.0) SP1 and depends upon the shared C/C++ run-time libraries (CRT) that ship with
this version of the compiler. The appropriate shared run-time libraries are installed on the
application developer’s machine by the Emotiv SDK™ Installer, but the developer is
responsible for ensuring that the appropriate run-time libraries are installed on an end-
user’s computer by the developer’s application installer before EDK.dll can be used on
that machine.
If the application developer is using Visual Studio 2005 SP1+ to build her application then
it is likely that no additional run-time libraries, beyond those already required by the
application, need to be installed on the end-user’s computer in order to support EDK.dll.
Specifically, EDK.dll requires that Microsoft.VC80.CRT version 8.0.50727.762 or later be
installed on the end-user’s machine. Please see the following Microsoft documentation:
Redistributing Visual C++ files and Visual C++ Libraries as Shared Side-by-Side Assemblies
for more information about how to install the appropriate Microsoft shared run-time
libraries or contact Emotiv’s SDK support team for further assistance.
If the application is built using an older or newer major version of the Visual Studio
compiler, such as Visual Studio 2003 or 2008, or another compiler altogether, then EDK.dll
and the application will use different copies of the C/C++ run-time library (CRT). This will
usually not cause a problem because EDK.dll doesn’t rely on any shared static state with
the application’s instance of the CRT, but the application developer needs to be aware
of some potentially subtle implications of using multiple instances of the CRT in the same
process. Please refer to Microsoft’s C Run-Time Libraries (CRT) documentation for more
information on this subject. Depending on the particular compiler/run-time library
mismatch involved, Emotiv may be able to provide a custom build of EDK.dll for
developers who wish to use another compiler. Please contact the Emotiv SDK support
team if you think you might require such a custom build.