employee - navigator 7.0 quick job aid - welcome to the...
TRANSCRIPT

Employee - Navigator 7.0
Quick Job Aid
Kronos Log-In Access:
https://coh.kronos.net/wfc/navigator/logon
Version 2- May 2015 832-393-8900 [email protected]
1
2
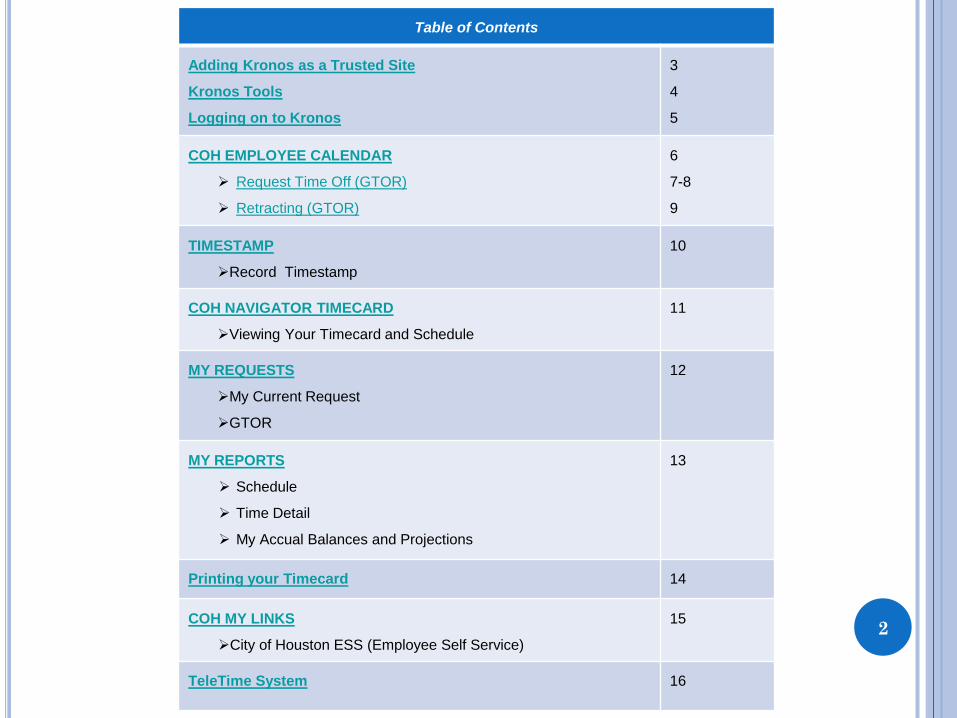
Table of Contents
Adding Kronos as a Trusted Site
Kronos Tools
Logging on to Kronos
3
4
5
COH EMPLOYEE CALENDAR
Request Time Off (GTOR)
Retracting (GTOR)
6
7-8
9
TIMESTAMP
Record Timestamp
10
COH NAVIGATOR TIMECARD
Viewing Your Timecard and Schedule
11
MY REQUESTS
My Current Request
GTOR
12
MY REPORTS
Schedule
Time Detail
My Accual Balances and Projections
13
Printing your Timecard 14
COH MY LINKS
City of Houston ESS (Employee Self Service)
15
TeleTime System 16

1
2
3
4
5
1. Make sure you are on Kronos Workforce Central Version 7.0.7 website, using Internet Explorer https://coh.kronos.net/wfc/navigator/logon 1. Then go to Internet Options 2. Click Security, then Trusted sites 3. Click Add, then Close 4. Click OK 5. Log out 6. Close Internet Explorer 7. Then re-open Internet Explorer for changes to appear.
Adding KRONOS as a Trusted Site
Table of Contents
4a
4b
3

Internet Explorer https://www.microsoft.com/en-us/download/internet-explorer.aspx
Java 7.0 or higher
*Please ensure that your system has the necessary Java updates to use KRONOS. If you are using a PC or MAC the only supported browser that you can use are Internet Explorer or Mozilla Firefox.
KRONOS Tools
Table of Contents
Check to ensure that you have the recommended version of Java installed. https://www.java.com/en/download/installed.jsp
Firefox https://www.mozilla.org/en-US/firefox/new/
4

1
2
https://coh.kronos.net/wfc/navigator/logon
3
Table of Contents
1. Click the active link to access
KRONOS Navigation
2. Enter your user name and
password in their designated
field.
3. Click the Log On button or
press the Enter key on the
keyboard.
Logging on to KRONOS
5

COH Employee Calendar
Table of Contents
JOHN or JANE DOE Sign Out
1
2
You should see your name here
COH Employee Calendar- allow you to view your calendar daily, weekly, or monthly
4 Record Timestamp - allows you to clock-in
recording the time that you work
3
Transfer- Find the applicable Labor
Level transfer item, then click OK
5
Request Time Off- provides an accessible way
to request time off or retract a time off request
6
COH Navigator Timecard- allows you to review for
accuracy, e-mail and/or print
6
COH Employee Workspace

1
Request Time Off
Table of Contents
To use the Request Time Off function:
1) Click Request Time Off
2) Complete the Time Off Request Form
7
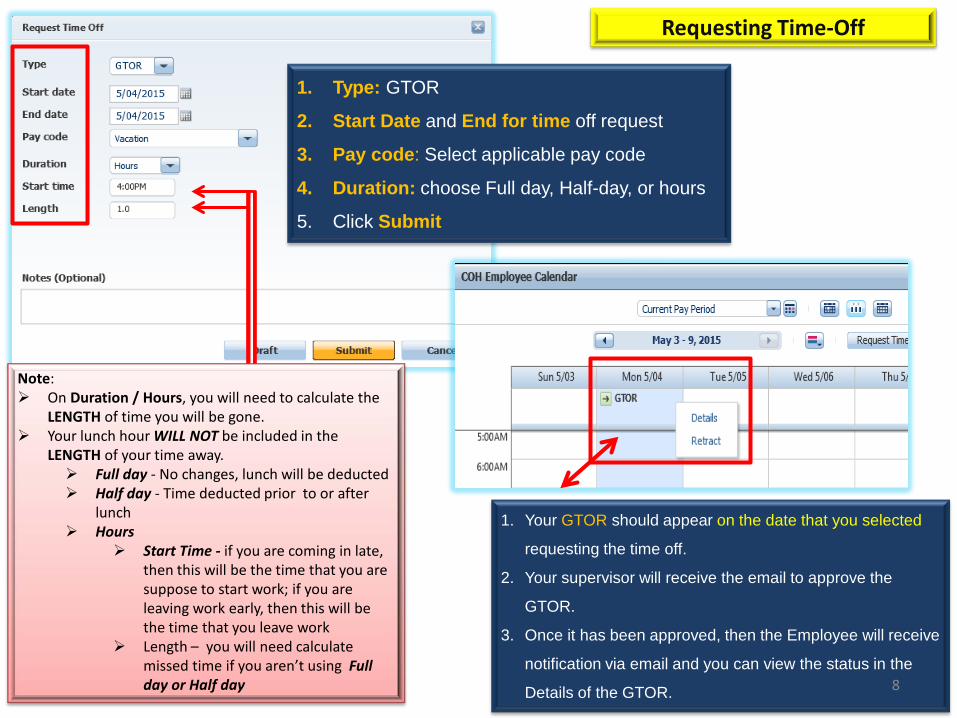
1. Type: GTOR
2. Start Date and End for time off request
3. Pay code: Select applicable pay code
4. Duration: choose Full day, Half-day, or hours
5. Click Submit
Note: On Duration / Hours, you will need to calculate the
LENGTH of time you will be gone. Your lunch hour WILL NOT be included in the
LENGTH of your time away. Full day - No changes, lunch will be deducted Half day - Time deducted prior to or after
lunch Hours
Start Time - if you are coming in late, then this will be the time that you are suppose to start work; if you are leaving work early, then this will be the time that you leave work
Length – you will need calculate missed time if you aren’t using Full day or Half day
Requesting Time-Off
1. Your GTOR should appear on the date that you selected
requesting the time off.
2. Your supervisor will receive the email to approve the
GTOR.
3. Once it has been approved, then the Employee will receive
notification via email and you can view the status in the
Details of the GTOR. 8

Retracting GTOR (Global Time-Off Request)
1. Go to, COH Employee Calendar
2. Next, move your mouse across your GTOR
until you see a blue circle that will allow you to
click DETAILS or RETRACT.
3. Click RETRACT, add NOTES, then SUBMIT.
*It will remain on your calendar as an inactive
GTOR.
4. If your GTOR has been approved by your
Supervisor or if the pay period has closed; you
WILL NOT be able to retract 9

1
2
3
Table of Contents
Timestamp
10
1. Click to view options for moving the
widget using the gear icon.
2. Click Pop-out
3. You can also drag and drop it into the
Main Screen Area
1
Record Timestamp- Entry method that you use to log your time at a PC using the web browser. Time stamping creates punches that identify the time you work.

COH Navigator Timecard
Table of Contents
Totals - Displays timecard totals and schedules
Accruals – Displays accrual codes and available balances
11
Click down arrow next to “More” to approve your
timecard.

12
1. You can check the status of your
GTORs in the My Request widget.
2. You can also submit a GTOR in
this widget on the lower right-hand
side of the screen. Click GTOR,
select your Start date, End Date,
Pay Code, Duration (Full Day or
Hours), and type in Notes area if
needed. Click Submit.
My Request
Table of Contents

13
My Reports
1. Select an Available Report to
view.
1. Schedule
2. Time Detail
3. My Accrual Balances and
Projections
1. Click on calendar to
select a date.
2. Click View Report

1
Print - provides an accessible way to print your timecard File - allows you to save your timecard
Table of Contents
Printing your Timecard
14
15
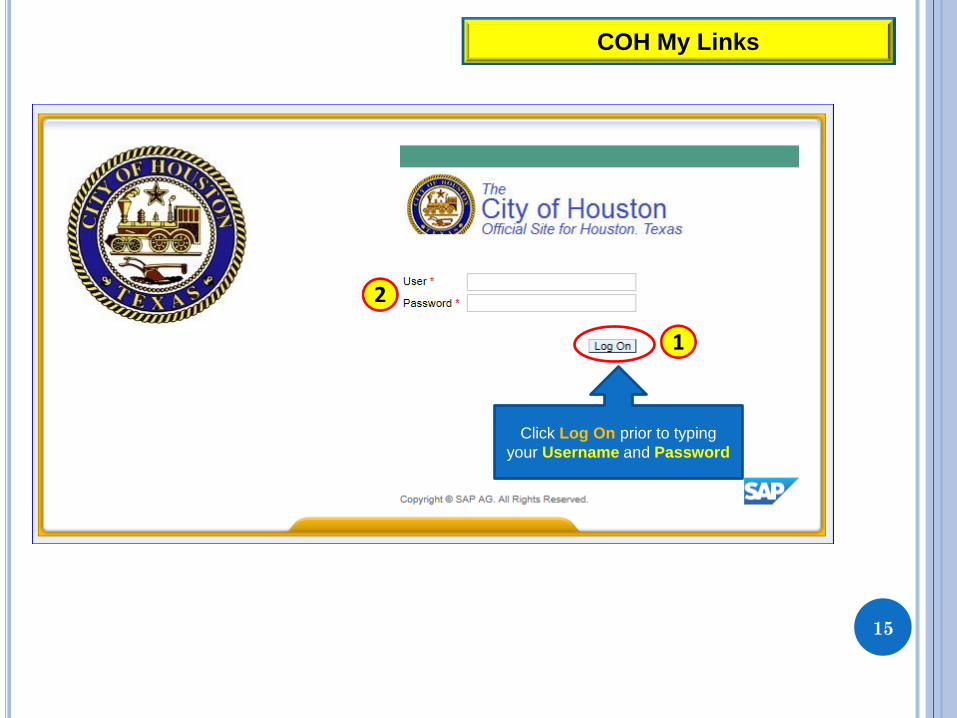
COH My Links
Click Log On prior to typing your Username and Password

TeleTime System
Note: The TeleTime feature is for situations where there are no clocks or computers available. It is easy to use, you can report sick time, review schedules and accrual balances, and see total hours and last time stamp.
Call the telephone number 1-844-268-5412 Note: A message will welcome you to the TeleTime system and identify the time. Enter your (00123456 or 00012345 ) employee ID number followed by the
pound (#) button. If your ID is less than 8 digits, use leading zeros to make 8. Enter your PIN or PASSWORD followed by the pound (#) button. If it’s your first
time or if it has been reset, you’ll be prompted to create a new password.
Accessing the TeleTime System
Access the TeleTime system.
Press 1 from the Main menu.
Record a Time Stamp
Access the TeleTime system.
Press 6 from the Main menu to
access the Inquiry menu.
Press 4 from the Inquiry menu.
Respond to the system prompts.
Reviewing Total Hours
Access the TeleTime system.
Press 6 from the Main menu
to access the Inquiry menu.
From the Inquiry menu, press
1 for the day’s schedule or
press 2 for the week’s
schedule.
Respond to the system
prompts.
Review Schedules
Access the TeleTime system.
Press 6 from the Main menu
to access the Inquiry menu.
Press 5 from the Inquiry
menu. Respond to the system
prompts.
Review Last Time Stamp
Table of Contents 16