en abrasive blasting machines
TRANSCRIPT
CONTRACOR GmbH42327 Wuppertal, Germany Art. 10400100/10400200
Abrasive Blasting Machines BlastRazor Z-100, BlastRazor Z-200OPERATION MANUALVersion 1.5
EN
DE
SandstrahlmaschinenBlastRazor Z-100BlastRazor Z-200BEDIENUNGSANLEITUNGVersion 1.5Seite 12
RU
Аппараты абразивоструйныеBlastRazor Z-100BlastRazor Z-200РУКОВОДСТВО ПО ЭКСПЛУАТАЦИИВерсия 1.5стр. 22
2 CONTRACOR® Version 1.5
Contents1. Safety 3
2. General view 4
3. Set-up, operation and shut-down 6
4. Maintenance and Troubleshooting 8
5. Specification 10
ATTENTION!
READ AND FULLY UNDERSTAND THIS MANUAL BEFORE STARTING WORK.
THE FOLLOWING INFORMATION IS IMPORTANT FOR SAFETY AND HEALTH OF OPERATOR AND PERSONNEL IN VICINITY.
ATTENTION!
BUYING THE MACHINE, PLEASE, REQUEST TO FILL IN THE GUARANTEE CARD CORRECTLY!
FAILURE TO PRODUCE A FILLED-IN FORM WILL MAKE YOUR GUARANTEE INVALID.
3CONTRACOR® BlastRazor Z-100, BlastRazor Z-200 Art. 10400100/10400200
1. Safety.
ATTENTION!
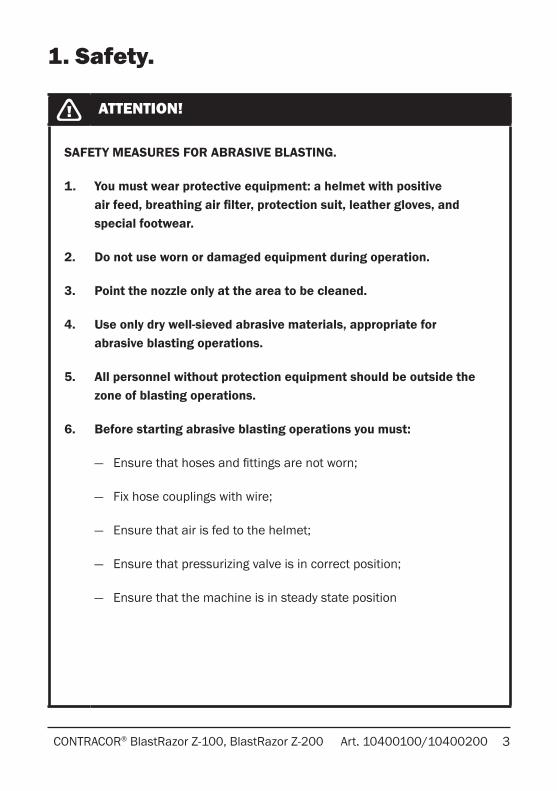
SAFETY MEASURES FOR ABRASIVE BLASTING.
1. You must wear protective equipment: a helmet with positive air feed, breathing air filter, protection suit, leather gloves, and special footwear.
2. Do not use worn or damaged equipment during operation.
3. Point the nozzle only at the area to be cleaned.
4. Use only dry well-sieved abrasive materials, appropriate for abrasive blasting operations.
5. All personnel without protection equipment should be outside the zone of blasting operations.
6. Before starting abrasive blasting operations you must:
— Ensure that hoses and fittings are not worn;
— Fix hose couplings with wire;
— Ensure that air is fed to the helmet;
— Ensure that pressurizing valve is in correct position;
— Ensure that the machine is in steady state position
4 CONTRACOR® Version 1.5
2. General view.
13
9
2
4
7
1
5 6
3
8
12
10
11
5CONTRACOR® BlastRazor Z-100, BlastRazor Z-200 Art. 10400100/10400200
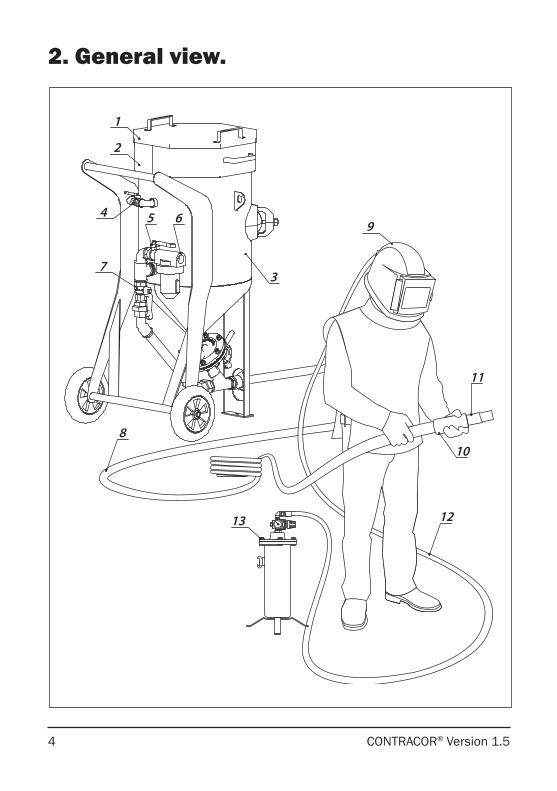
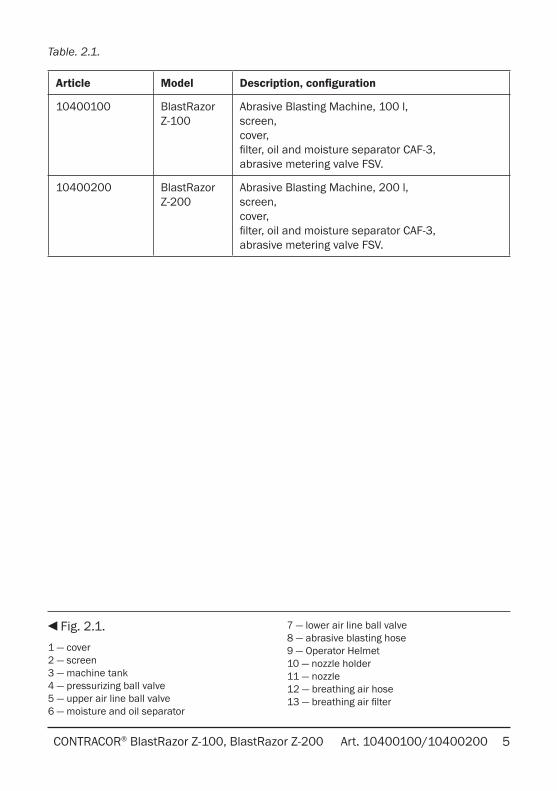
Fig. 2.1.1 — cover2 — screen3 — machine tank4 — pressurizing ball valve5 — upper air line ball valve6 — moisture and oil separator
7 — lower air line ball valve8 — abrasive blasting hose9 — Operator Helmet10 — nozzle holder11 — nozzle12 — breathing air hose13 — breathing air filter
Table. 2.1.
Article Model Description, configuration
10400100 BlastRazor Z-100
Abrasive Blasting Machine, 100 l,screen,cover,filter, oil and moisture separator CAF-3, abrasive metering valve FSV.
10400200 BlastRazor Z-200
Abrasive Blasting Machine, 200 l,screen,cover,filter, oil and moisture separator CAF-3, abrasive metering valve FSV.
6 CONTRACOR® Version 1.5
3. Set-up, operation and shut-down.
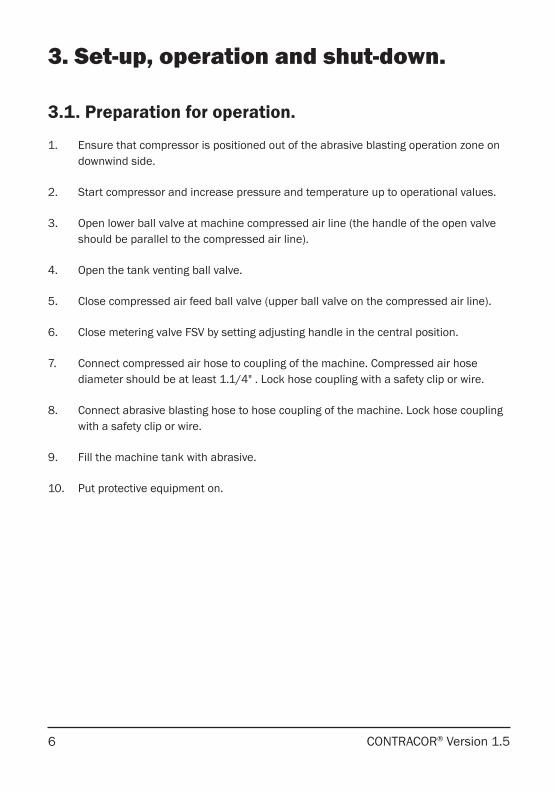
3.1. Preparation for operation.
1. Ensure that compressor is positioned out of the abrasive blasting operation zone on downwind side.
2. Start compressor and increase pressure and temperature up to operational values.
3. Open lower ball valve at machine compressed air line (the handle of the open valve should be parallel to the compressed air line).
4. Open the tank venting ball valve.
5. Close compressed air feed ball valve (upper ball valve on the compressed air line).
6. Close metering valve FSV by setting adjusting handle in the central position.
7. Connect compressed air hose to coupling of the machine. Compressed air hose diameter should be at least 1.1/4" . Lock hose coupling with a safety clip or wire.
8. Connect abrasive blasting hose to hose coupling of the machine. Lock hose coupling with a safety clip or wire.
9. Fill the machine tank with abrasive.
10. Put protective equipment on.
7CONTRACOR® BlastRazor Z-100, BlastRazor Z-200 Art. 10400100/10400200
3.2. Abrasive blasting operations.
1. Feed compressed air to the machine inlet.
ATTENTION!
MACHINE MAXIMUM OPERATING PRESSURE — 10 bar.
2. Close the pressurizing ball valve.
3. Upon the signal of the abrasive blasting operator open the ball valve and feed compressed air into the machine line. The tank is pressurized. Only compressed air is expelled from the nozzle.
4. Adjust metering valve FSV to provide optimal air-abrasive mixture. The general rule for abrasive blasting operations: the less abrasive you use, the better.
5. To stop operation close the compressed air feed ball valve and immediately open the pressurizing ball valve to relieve pressure in the tank.
3.3. Abrasive blasting operation shut-down.
1. Remove the remains of abrasive from the tank. To do this disconnect the nozzle and point the hose into a suitable container for the abrasive remains. Close the pressurizing ball valve and open compressed air feed ball valve.
2. If upon completion of operation the machine is left outside you should cover it with plastic film to avoid ingress of moisture into the tank.
8 CONTRACOR® Version 1.5
4. Maintenance and Troubleshooting.
4.1. Machine maintenance.
Pressurizing valve replacement.
Open the inspection door of the machine to get access to the pressurizing valve. Screw out the guide tube with the valve inside. Install a new valve and screw the guide tube back into its place.
Pressurizing valve ring replacement.
The ring is replaced trough the machine filling orifice. Pull out the old ring, put a new ring into the groove and press it firmly to correct position.
ATTENTIION!
USE ONLY ABRASIVE MATERIALS, APPROPRIATE FOR ABRASIVE BLASTING OPERATIONS.
NEVER USE WET UNSIFTED ABRASIVE MATERIALS.
4.2. Troubleshooting.
Clogging.
If neither abrasive, nor air comes out of the nozzle, relieve pressure and depressurize the machine, then ensure that the nozzle is not clogged. If only air without any abrasive comes out of the nozzle, fully open the metering valve, and then quickly close and open again the lower ball valve of the line. If these actions do not help to relieve the pressure in the machine, open the inspection door and ensure that there is no foreign matter in the tank (stones, paper, etc.).
Abrasive surges.
During start-up of the machine abrasive surges are normal to a certain degree. However, if abrasive surges continue, you should stabilize the abrasive flow by quick closing and opening of the line lower ball valve. Abrasive surges often result from elevated moisture
9CONTRACOR® BlastRazor Z-100, BlastRazor Z-200 Art. 10400100/10400200
content in compressed air system. Installation of additional moisture and oil separator can solve this problem.
Wet abrasive removal.
To remove wet abrasive from machine tank you should disconnect the blasting hose and remove rubber gaskets at machine hose coupling. Then you must fully open the metering valve and close the lower ball valve in the machine compressed air line. With such valve configuration compressed air will only enter the machine tank and press wet abrasive out of the tank.
10 CONTRACOR® Version 1.5
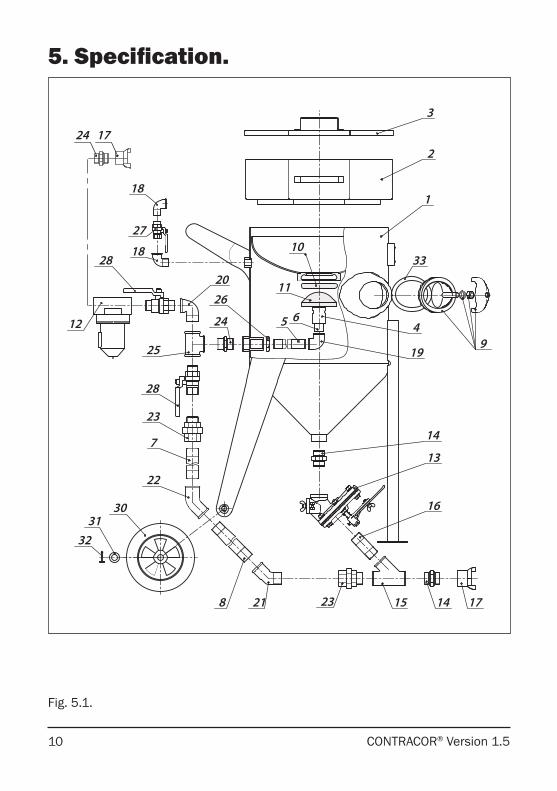
5. Specification.
Fig. 5.1.
1
2
3
45 6
7
8
10
11
12
13
14
15
16
17
18
18
20
21
22
3031
23
23
24
25
26
27
28
28
32
14
19
24 17
9
33
11CONTRACOR® BlastRazor Z-100, BlastRazor Z-200 Art. 10400100/10400200
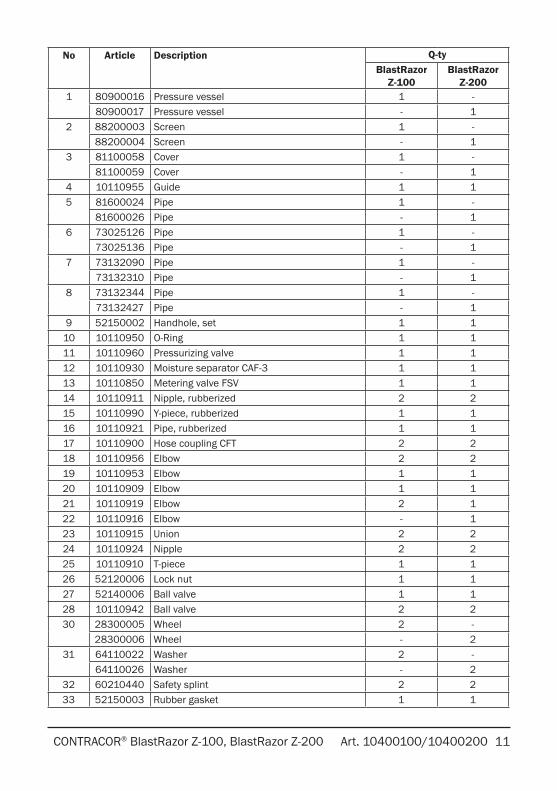
No Article Description Q-tyBlastRazor
Z-100BlastRazor
Z-2001 80900016 Pressure vessel 1 -
80900017 Pressure vessel - 12 88200003 Screen 1 -
88200004 Screen - 13 81100058 Cover 1 -
81100059 Cover - 14 10110955 Guide 1 15 81600024 Pipe 1 -
81600026 Pipe - 16 73025126 Pipe 1 -
73025136 Pipe - 17 73132090 Pipe 1 -
73132310 Pipe - 18 73132344 Pipe 1 -
73132427 Pipe - 19 52150002 Handhole, set 1 1
10 10110950 O-Ring 1 111 10110960 Pressurizing valve 1 112 10110930 Moisture separator CAF-3 1 113 10110850 Metering valve FSV 1 114 10110911 Nipple, rubberized 2 215 10110990 Y-piece, rubberized 1 116 10110921 Pipe, rubberized 1 117 10110900 Hose coupling CFT 2 218 10110956 Elbow 2 219 10110953 Elbow 1 120 10110909 Elbow 1 121 10110919 Elbow 2 122 10110916 Elbow - 123 10110915 Union 2 224 10110924 Nipple 2 225 10110910 T-piece 1 126 52120006 Lock nut 1 127 52140006 Ball valve 1 128 10110942 Ball valve 2 230 28300005 Wheel 2 -
28300006 Wheel - 231 64110022 Washer 2 -
64110026 Washer - 232 60210440 Safety splint 2 233 52150003 Rubber gasket 1 1
12 CONTRACOR® Version 1.5
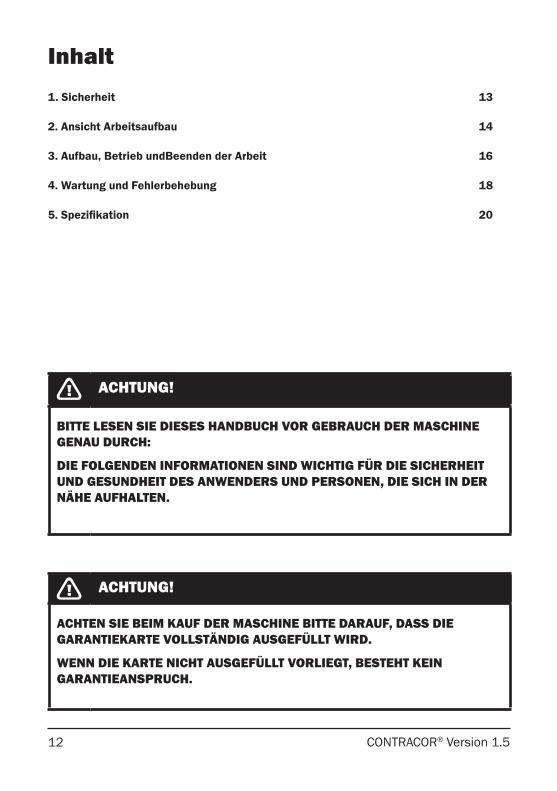
Inhalt1. Sicherheit 13
2. Ansicht Arbeitsaufbau 14
3. Aufbau, Betrieb undBeenden der Arbeit 16
4. Wartung und Fehlerbehebung 18
5. Spezifikation 20
ACHTUNG!
BITTE LESEN SIE DIESES HANDBUCH VOR GEBRAUCH DER MASCHINE GENAU DURCH:
DIE FOLGENDEN INFORMATIONEN SIND WICHTIG FÜR DIE SICHERHEIT UND GESUNDHEIT DES ANWENDERS UND PERSONEN, DIE SICH IN DER NÄHE AUFHALTEN.
ACHTUNG!
ACHTEN SIE BEIM KAUF DER MASCHINE BITTE DARAUF, DASS DIE GARANTIEKARTE VOLLSTÄNDIG AUSGEFÜLLT WIRD.
WENN DIE KARTE NICHT AUSGEFÜLLT VORLIEGT, BESTEHT KEIN GARANTIEANSPRUCH.
13CONTRACOR® BlastRazor Z-100, BlastRazor Z-200 Art. 10400100/10400200
1. Sicherheit.
ACHTUNG!
SICHERHEITSREGELN FÜR STRAHLARBEITEN.
1. Tragen Sie Schutzausrüstung: einen Strahlhelm mit Frischluftzufuhr und Atemluftfilter, einen Schutzanzug, Lederhandschuhe, und spezielles Schuhwerk.
2. Benutzen Sie keine abgenutzte oder beschädigte Ausrüstung.
3. Richten Sie die Düse nur auf den zu bearbeitenden Bereich.
4. Verwenden Sie nur geeignete, trockene und gut durchgesiebte Strahlmaterialien.
5. Alle Personen ohne Schutzausrüstung müssen außerhalb des Arbeitsbereiches bleiben.
6. Bevor Sie mit der Strahlarbeit beginnen, müssen Sie folgendes beachten:
— Stellen Sie sicher, dass Schläuche und Verbindungen unbeschädigt und nicht abgenutzt sind;
— Sichern Sie Schlauchkupplungen mit Sicherungsstift oder Draht;
— Überprüfen Sie die Luftzufuhr des Helmes;
— Stellen Sie sicher, dass das Kesseldruckventil richtig eingestellt ist;
— Überprüfen Sie den festen und sicheren Stand der Maschine.
14 CONTRACOR® Version 1.5
2. Ansicht Arbeitsaufbau.
13
9
2
4
7
1
5 6
3
8
12
10
11
15CONTRACOR® BlastRazor Z-100, BlastRazor Z-200 Art. 10400100/10400200
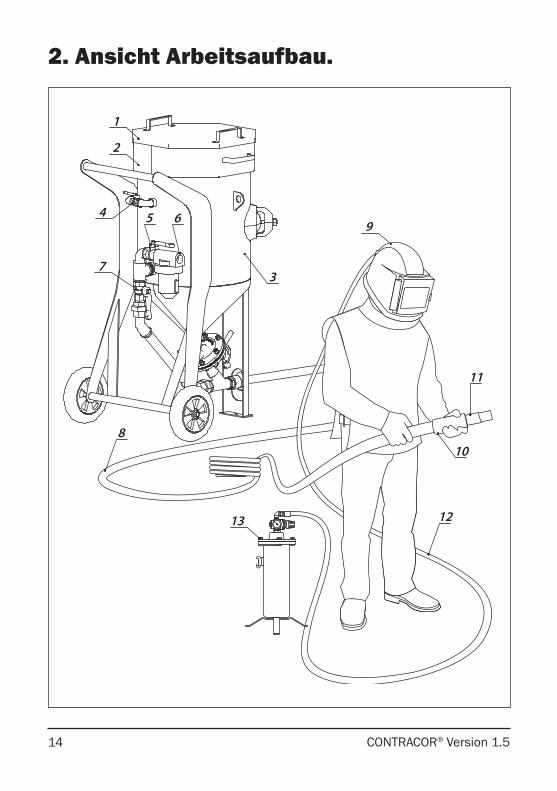
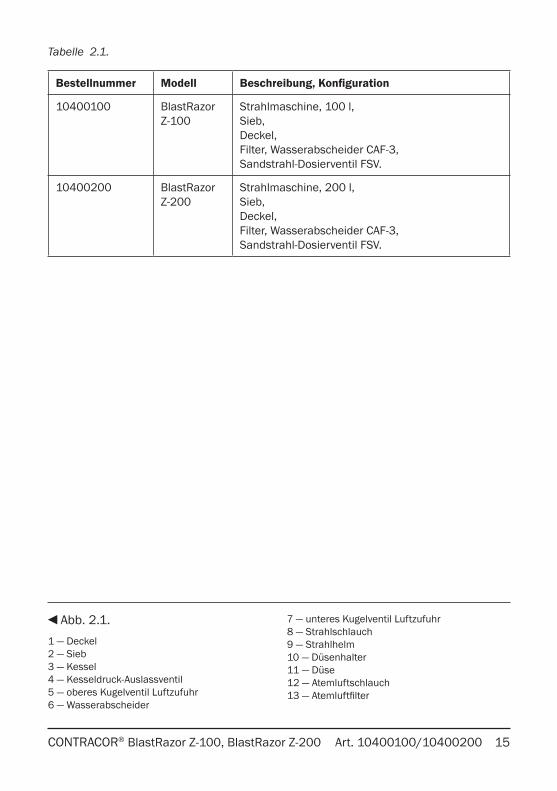
Abb. 2.1.1 — Deckel2 — Sieb3 — Kessel4 — Kesseldruck-Auslassventil5 — oberes Kugelventil Luftzufuhr 6 — Wasserabscheider
7 — unteres Kugelventil Luftzufuhr 8 — Strahlschlauch9 — Strahlhelm10 — Düsenhalter11 — Düse12 — Atemluftschlauch 13 — Atemluftfilter
Tabelle 2.1.
Bestellnummer Modell Beschreibung, Konfiguration
10400100 BlastRazor Z-100
Strahlmaschine, 100 l, Sieb, Deckel, Filter, Wasserabscheider CAF-3, Sandstrahl-Dosierventil FSV.
10400200 BlastRazor Z-200
Strahlmaschine, 200 l, Sieb, Deckel, Filter, Wasserabscheider CAF-3, Sandstrahl-Dosierventil FSV.
16 CONTRACOR® Version 1.5
3. Aufbau, Betrieb und Beenden der Arbeit.
3.1. Arbeitsvorbereitung.
1. Stellen Sie sicher, dass der Kompressor außerhalb der Strahlarbeitszone und nicht in Windrichtung steht.
2. Starten Sie den Kompressor und bringen Sie ihn auf Druck und Betriebstemperatur.
3. Öffnen Sie das untere Kugelventil der Druckluftzufuhr (Bei geöffnetem Ventil steht der Griff parallel zur Druckluftzufuhr).
4. Öffnen Sie das Kugelventil für den Kesseldruck.
5. Schließen Sie die Druckluftzufuhr (Das obere Kugelventil in der Druckluftleitung).
6. Schließen Sie das Sandstrahl-Dosierventil FSV, bringen Sie dazu den Hebel in die Mittelstellung.
7. Verbinden Sie den Druckluftschlauch mit der Schlauchkupplung an der Maschine. Der Schlauchdurchmesser sollte mindestens 1.1/4" betragen. Sichern Sie die Schlauchkupplung mit einem Sicherungsstift oder Draht.
8. Verbinden Sie den Strahlschlauch mit der Schlauchkupplung an der Maschine und sichern Sie die Kupplung mit einem Sicherungsstift oder Draht.
9. Füllen Sie den Tank mit Strahlmittel.
10. Legen Sie die Schutzausrüstung an.
17CONTRACOR® BlastRazor Z-100, BlastRazor Z-200 Art. 10400100/10400200
3.2. Durchführung von Strahlarbeiten.
1. Legen Sie Druckluft am Einlass der Maschine an.
ACHTUNG!
DER MAXIMALE ARBEITSDRUCK DER MASCHINE BETRÄGT 10 bar.
2. Schließen Sie das Kesseldruck-Auslassventil.
3. Auf das Signal der Person, die die Strahlarbeiten durchführt, öffnen Sie das obere Druckluftventil und führen der Maschine Druckluft zu. Der Kessel nun wird unter Druck gesetzt. Aus der Düse tritt nur Druckluft aus.
4. Stellen Sie die optimale Mischung aus Luft und Strahlmittel am Sandstrahl-Dosierventil FSV ein. Im Allgemeinen gilt: je weniger Strahlmittel verwendet wird, desto besser.
5. Zum Beenden des Arbeitsvorgangs schließen Sie die Druckluftzufuhr und öffnen sofort darauf das Kesseldruck-Auslassventil, damit der Druck aus dem Kessel entweichen kann.
3.3. Beenden der Arbeit.
1. Entfernen Sie das restliche Strahlmittel aus dem Kessel. Nehmen Sie dazu die Düse ab und richten den Schlauch in einen geeigneten Behälter. Schließen Sie dann das Kesseldruck-Auslassventil und öffnen Sie das Ventil der Druckluftzufuhr, das restliche Strahlmittel wird so aus dem Kessel herausgedrückt.
2. Falls die Maschine nach Beendigung der Arbeit im Freien verbleibt, sollte sie mit einer Plane abgedeckt werden, um Eindringen von Feuchtigkeit zu vermeiden.
18 CONTRACOR® Version 1.5
4. Wartung und Fehlerbehebung.
4.1. Wartung der Maschine.
Ersetzen des Kesseldruckventils.
Öffnen Sie das Handloch der Maschine um Zugang zum Ventil zu bekommen.
Schrauben Sie das Führungsrohr, in dem sich das Ventil befindet, aus. Installieren Sie ein neues Ventil und schrauben Sie das Führungsrohr wieder ein.
Ersetzen des Dichtungsrings.
Der Ring wird durch die Befüllungsöffnung ausgetauscht. Ziehen Sie den alten Ring heraus, setzen Sie einen neuen Dichtungsring in die Aussparung ein und drücken Sie ihn fest in die korrekte Position.
ACHTUNG!
BENUTZEN SIE NUR GEEIGNETE STRAHLMITTEL.
VERWENDEN SIE KEINE FEUCHTEN ODER UNGESIEBTEN STRAHLMITTEL.
4.2. Fehlerbehebung.
Verstopfen.
Falls weder Strahlmittel noch Luft aus der Düse kommt, lassen Sie den Druck aus der Maschine ab und überprüfen Sie, ob die Düse verstopft ist. Falls nur Luft und kein Strahlmittel austritt, öffnen Sie das Mischventil ganz und schließen und öffnen Sie schnell das untere Ventil der Luftzufuhr. Falls diese Maßnahme nicht hilft, lassen sie den Druck aus dem Kessel ab, öffnen Sie das Handloch und Stellen Sie sicher, dass sich keine Fremdkörper (Steine, Papier) im Kessel befinden.
Stoßweiser Austritt von Strahlmittel.
Bei Inbetriebnahme der Maschine sind gelegentliche Stöße von Strahlmittel normal. Falls das Auftreten von schubweisem Ausstoß jedoch anhält, sollten Sie versuchen, den Strahlmittelfluss durch schnelles Schließen und Öffnen des unteren Druckluftventils zu stabilisieren.
19CONTRACOR® BlastRazor Z-100, BlastRazor Z-200 Art. 10400100/10400200
Strahlmittelstöße sind oft auf erhöhten Feuchtigkeitsgehalt im Druckluftsystem zurückzuführen.
Die Installation eines zusätzlichen Wasserabscheiders kann dieses Problem verhindern.
Entfernen von feuchtem Strahlmittel.
Um feuchtes Strahlmittel aus dem Kessel zu entfernen, sollten Sie das Mischventil schließen, den Strahlschlauch abnehmen und die Gummidichtung aus der Schlauchkupplung herausnehmen. Öffnen Sie dann das Mischventil ganz und schließen das untere Ventil der Druckluftleitung der Maschine. Mit dieser Ventilstellung wird die Druckluft nur in den Kessel geleitet und drückt so das feuchte Strahlmittel heraus.
20 CONTRACOR® Version 1.5
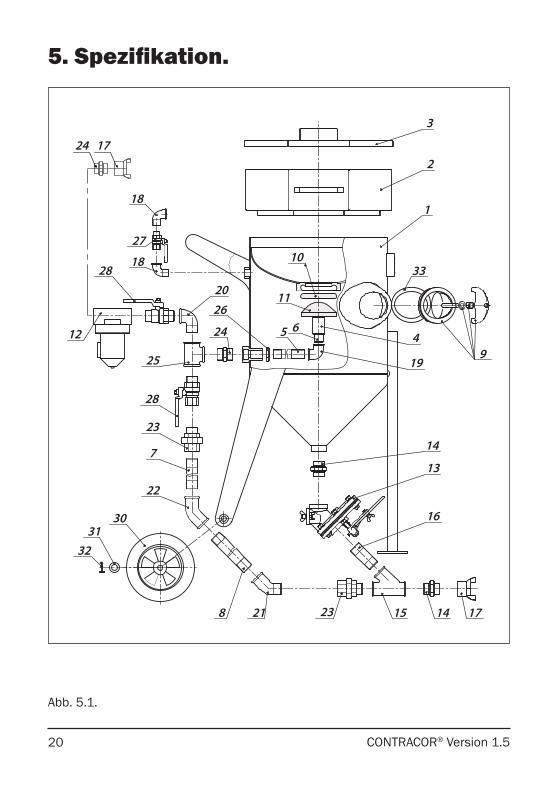
5. Spezifikation.
Abb. 5.1.
1
2
3
45 6
7
8
10
11
12
13
14
15
16
17
18
18
20
21
22
3031
23
23
24
25
26
27
28
28
32
14
19
24 17
9
33
21CONTRACOR® BlastRazor Z-100, BlastRazor Z-200 Art. 10400100/10400200
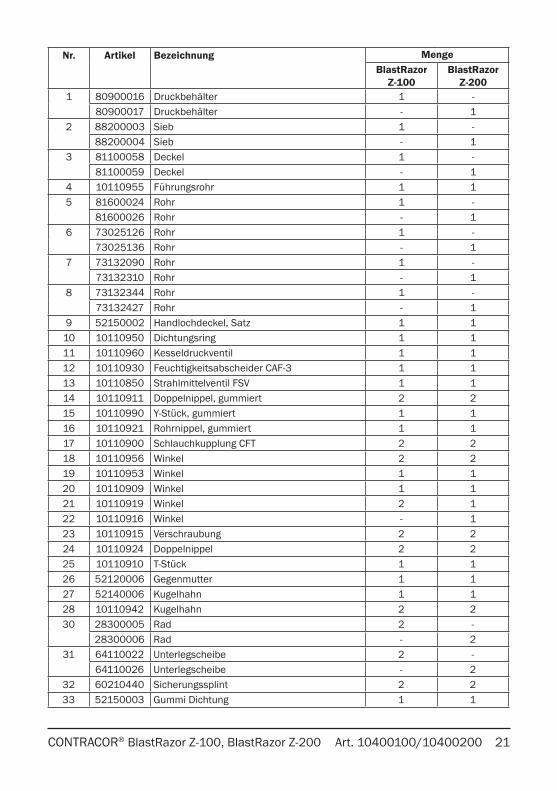
Nr. Artikel Bezeichnung MengeBlastRazor
Z-100BlastRazor
Z-2001 80900016 Druckbehälter 1 -
80900017 Druckbehälter - 12 88200003 Sieb 1 -
88200004 Sieb - 13 81100058 Deckel 1 -
81100059 Deckel - 14 10110955 Führungsrohr 1 15 81600024 Rohr 1 -
81600026 Rohr - 16 73025126 Rohr 1 -
73025136 Rohr - 17 73132090 Rohr 1 -
73132310 Rohr - 18 73132344 Rohr 1 -
73132427 Rohr - 19 52150002 Handlochdeckel, Satz 1 1
10 10110950 Dichtungsring 1 111 10110960 Kesseldruckventil 1 112 10110930 Feuchtigkeitsabscheider CAF-3 1 113 10110850 Strahlmittelventil FSV 1 114 10110911 Doppelnippel, gummiert 2 215 10110990 Y-Stück, gummiert 1 116 10110921 Rohrnippel, gummiert 1 117 10110900 Schlauchkupplung CFT 2 218 10110956 Winkel 2 219 10110953 Winkel 1 1 20 10110909 Winkel 1 121 10110919 Winkel 2 122 10110916 Winkel - 123 10110915 Verschraubung 2 224 10110924 Doppelnippel 2 225 10110910 T-Stück 1 126 52120006 Gegenmutter 1 127 52140006 Kugelhahn 1 128 10110942 Kugelhahn 2 230 28300005 Rad 2 -
28300006 Rad - 231 64110022 Unterlegscheibe 2 -
64110026 Unterlegscheibe - 232 60210440 Sicherungssplint 2 233 52150003 Gummi Dichtung 1 1
22 CONTRACOR® Версия 1.5
Содержание
1. Техника безопасности 23
2. Общий вид 24
3. Подготовка, работа и окончание работы 26
4. Т/О. Поиск и устранение неисправностей 28
5. Спецификация 30
ВНИМАНИЕ!
НЕ ПРИСТУПАЙТЕ К РАБОТЕ С ОБОРУДОВАНИЕМ, НЕ ПРОЧИТАВ ДАННОЕ РУКОВОДСТВО ПО ЭКСПЛУАТАЦИИ И ПОЛНОСТЬЮ ПОНЯВ ЕГО СОДЕРЖАНИЕ.
НИЖЕПРИВЕДЕННАЯ ИНФОРМАЦИЯ ВАЖНА ДЛЯ СОХРАНЕНИЯ ЗДОРОВЬЯ И БЕЗОПАСНОСТИ КАК ОПЕРАТОРА, ТАК И ОКРУЖАЮЩЕГО ПЕРСОНАЛА.
© Contracor ®. Все права защищены.Перепечатка текста и / или использование графики. допускается только с письменного разрешения Contracor ®.Производитель оставляет за собой право без уведомления потребителя вносить изменения в конструкцию изделий для улучшения их технологических и эксплуатационных параметров.Вид изделий может незначительно отличаться от представленных на изображениях.
23CONTRACOR® BlastRazor Z-100, BlastRazor Z-200 Art. 10400100/10400200
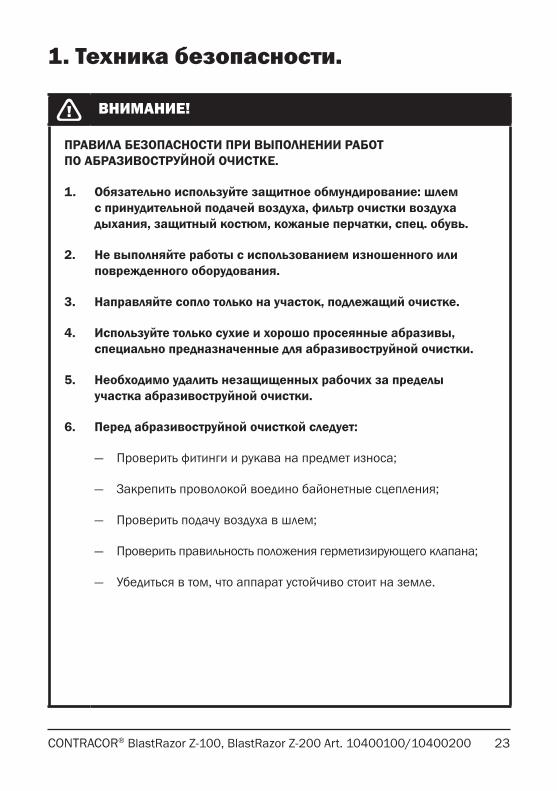
1. Техника безопасности.
ВНИМАНИЕ!
ПРАВИЛА БЕЗОПАСНОСТИ ПРИ ВЫПОЛНЕНИИ РАБОТ ПО АБРАЗИВОСТРУЙНОЙ ОЧИСТКЕ.
1. Обязательно используйте защитное обмундирование: шлем с принудительной подачей воздуха, фильтр очистки воздуха дыхания, защитный костюм, кожаные перчатки, спец. обувь.
2. Не выполняйте работы с использованием изношенного или поврежденного оборудования.
3. Направляйте сопло только на участок, подлежащий очистке.
4. Используйте только сухие и хорошо просеянные абразивы, специально предназначенные для абразивоструйной очистки.
5. Необходимо удалить незащищенных рабочих за пределы участка абразивоструйной очистки.
6. Перед абразивоструйной очисткой следует:
— Проверить фитинги и рукава на предмет износа;
— Закрепить проволокой воедино байонетные сцепления;
— Проверить подачу воздуха в шлем;
— Проверить правильность положения герметизирующего клапана;
— Убедиться в том, что аппарат устойчиво стоит на земле.

24 CONTRACOR® Версия 1.5
2. Общий вид.
13
9
2
4
7
1
5 6
3
8
12
10
11
25CONTRACOR® BlastRazor Z-100, BlastRazor Z-200 Art. 10400100/10400200
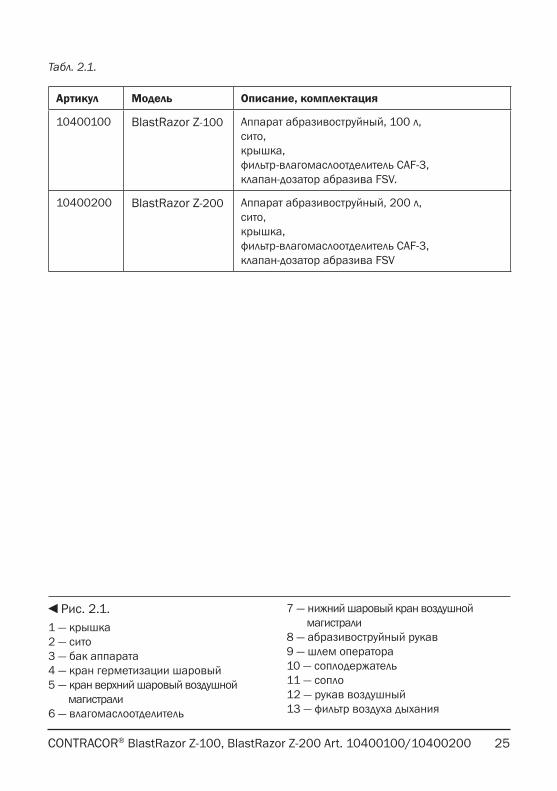
Рис. 2.1.1 — крышка2 — сито3 — бак аппарата4 — кран герметизации шаровый5 — кран верхний шаровый воздушной магистрали 6 — влагомаслоотделитель
7 — нижний шаровый кран воздушной магистрали 8 — абразивоструйный рукав9 — шлем оператора10 — соплодержатель11 — сопло12 — рукав воздушный 13 — фильтр воздуха дыхания
Табл. 2.1.
Артикул Модель Описание, комплектация
10400100 BlastRazor Z-100 Аппарат абразивоструйный, 100 л,сито,крышка,фильтр-влагомаслоотделитель CAF-3,клапан-дозатор абразива FSV.
10400200 BlastRazor Z-200 Аппарат абразивоструйный, 200 л,сито,крышка,фильтр-влагомаслоотделитель CAF-3,клапан-дозатор абразива FSV
26 CONTRACOR® Версия 1.5
3. Подготовка, работа и окончание работы.
3.1. Подготовка к работе.
1. Убедиться, что компрессор расположен за пределами участка абразивоструйной очистки с подветренной стороны.
2. Запустить компрессор и довести давление и температуру компрессора до рабочих.
3. Открыть нижний шаровый кран на магистрали сжатого воздуха аппарата (ручка от-крытого крана должна находиться в положении, параллельном магистрали сжатого воздуха).
4. Открыть шаровый кран разгерметизации бака.
5. Закрыть шаровый кран подачи сжатого воздуха (верхний шаровый кран на маги-страли сжатого воздуха).
6. Закрыть клапан-дозатор абразива FSV, поставив ручку регулировки в центральное положение.
7. Подключить рукав сжатого воздуха к байонетному сцеплению аппарата. Диаметр рукава сжатого воздуха должен быть минимум 1.1/4". Законтрить шпонкой или проволокой байонетные сцепления между собой.
8. Подключить абразивоструйный рукав к байонетному сцеплению аппарата. Закон-трить шпонкой или проволокой байонетные сцепления между собой.
9. Заполнить бак аппарата абразивом.
10. Надеть защитное обмундирование.
27CONTRACOR® BlastRazor Z-100, BlastRazor Z-200 Art. 10400100/10400200
3.2. Работа по абразивоструйной очистке.
1. Подайте сжатый воздух на вход аппарата.
ВНИМАНИЕ!
МАКСИМАЛЬНОЕ РАБОЧЕЕ ДАВЛЕНИЕ АППАРАТА — 10 бар.
2. Закройте шаровый кран герметизации.
3. По сигналу оператора, производящего абразивоструйную очистку, откройте шаро-вый кран и подайте сжатый воздух в магистраль аппарата. Бак герметизируется. Из сопла выходит только сжатый воздух.
4. Регулируйте клапан-дозатор абразива FSV с целью получения оптимальной воз-душно-абразивной смеси. Общее правило: необходимо использовать как можно меньше абразива.
5. Для остановки работы закройте шаровый кран подачи сжатого воздуха и сразу откройте шаровый кран герметизации для сброса давления в баке.
3.3. Окончание работы по абразивоструйной очистке.
1. Удалите остатки абразива из бака. Для этого снимите сопло и направьте рукав в подходящий для отходов абразива контейнер. Закройте кран герметизации и от-кройте кран подачи сжатого воздуха.
2. Если по окончании работ аппарат остается на улице, его необходимо накрыть по-лиэтиленом для предотвращения попадания влаги внутрь бака.
28 CONTRACOR® Версия 1.5
4. Т/О. Поиск и устранение неисправностей.
4.1. Техническое обслуживание аппаратов.
Замена герметизирующего клапана.
Откройте ревизию аппарата с целью получить доступ к герметизирующему кла-пану. Выкрутите направляющую трубку, в которую вставлен клапан. Установите новый клапан и затем закрутите направляющую трубку в прежнее положение.
Замена кольца герметизирующего клапана.
Кольцо заменяется сверху через отверстие заполнения аппарата. Извлеките старое кольцо, вставьте новое кольцо в паз и установите его в правильное положение сильным нажатием.
ВНИМАНИЕ!
ИСПОЛЬЗУЙТЕ ТОЛЬКО ТЕ АБРАЗИВЫ, КОТОРЫЕ СПЕЦИАЛЬНО ПРЕДНАЗНАЧЕНЫ ДЛЯ АБРАЗИВОСТРУЙНОЙ ОЧИСТКИ.
НИКОГДА НЕ ИСПОЛЬЗУЙТЕ НЕПРОСЕЯННЫЕ ИЛИ ВЛАЖНЫЕ АБРАЗИВЫ.
4.2. Поиск и устранение неисправностей.
Засорение.
Если из сопла аппарата не выходит ни абразив, ни воздух, следует вначале сбро-сить давление и разгерметизировать аппарат, а затем проверить сопло на засорение. Если из сопла выходит только воздух без абразива, следует полностью открыть дозирую-щий вентиль, а затем быстро закрыть и открыть нижний шаровый кран магистрали. Если это не помогло сбросить давление в аппарате, открыть ревизию и проверить бак на наличие посторонних предметов (камней, бумаги и т.д.).
Пульсации абразива.
При пуске аппарата пульсации абразива до определенной степени представляют
29CONTRACOR® BlastRazor Z-100, BlastRazor Z-200 Art. 10400100/10400200
собой нормальное явление. Однако если пульсации абразива продолжаются, следует стабилизировать поток абразива быстрым закрытием и открытием нижнего шарового крана магистрали. Пульсации абразива зачастую обусловлены повышенной влажно-стью в системе сжатого воздуха. Эта проблема может быть решена установкой дополни-тельного влаго-маслоотделителя.
Удаление влажного абразива.
Для удаления влажного абразива из бака аппарата необходимо отсоединить пе-скоструйный рукав и снять резиновый уплотнитель на байонетном сцеплении аппарата. Далее необходимо полностью открыть дозирующий вентиль и закрыть нижний шаровый кран в линии сжатого воздуха аппарата. Теперь при подаче сжатого воздуха он будет по-ступать только в бак аппарата и принудительно выдавливать влажный абразив.
30 CONTRACOR® Версия 1.5
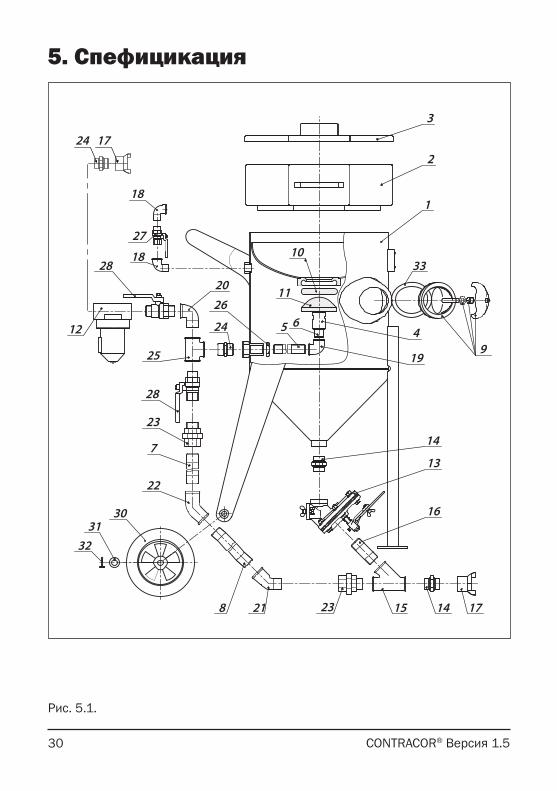
5. Спефицикация
Рис. 5.1.
1
2
3
45 6
7
8
10
11
12
13
14
15
16
17
18
18
20
21
22
3031
23
23
24
25
26
27
28
28
32
14
19
24 17
9
33
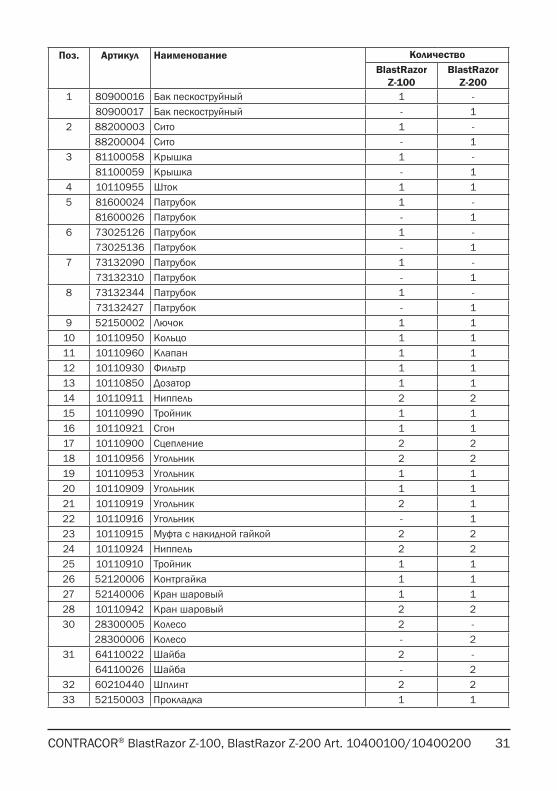
31CONTRACOR® BlastRazor Z-100, BlastRazor Z-200 Art. 10400100/10400200
Поз. Артикул Наименование КоличествоBlastRazor
Z-100BlastRazor
Z-2001 80900016 Бак пескоструйный 1 -
80900017 Бак пескоструйный - 12 88200003 Сито 1 -
88200004 Сито - 13 81100058 Крышка 1 -
81100059 Крышка - 14 10110955 Шток 1 15 81600024 Патрубок 1 -
81600026 Патрубок - 16 73025126 Патрубок 1 -
73025136 Патрубок - 17 73132090 Патрубок 1 -
73132310 Патрубок - 18 73132344 Патрубок 1 -
73132427 Патрубок - 19 52150002 Лючок 1 1
10 10110950 Кольцо 1 111 10110960 Клапан 1 112 10110930 Фильтр 1 113 10110850 Дозатор 1 114 10110911 Ниппель 2 215 10110990 Тройник 1 116 10110921 Сгон 1 117 10110900 Сцепление 2 218 10110956 Угольник 2 219 10110953 Угольник 1 1 20 10110909 Угольник 1 121 10110919 Угольник 2 122 10110916 Угольник - 123 10110915 Муфта с накидной гайкой 2 224 10110924 Ниппель 2 225 10110910 Тройник 1 126 52120006 Контргайка 1 127 52140006 Кран шаровый 1 128 10110942 Кран шаровый 2 230 28300005 Колесо 2 -
28300006 Колесо - 231 64110022 Шайба 2 -
64110026 Шайба - 232 60210440 Шплинт 2 233 52150003 Прокладка 1 1
