en hydraulic chuck hydrochuck
TRANSCRIPT

EN
Installation an Operating Instructions
HYDRAULIC CHUCK HYDROCHUCK


Hydraulic Chuck HydroChuck Installation and Operating Instructions
3
cuttingtools.ceratizit.com
EN
Table of contents 1 Purpose of the installation and operating instructions ......................................................................... 4
2 Contact ............................................................................................................................................... 4
3 Safety ................................................................................................................................................. 5
3.1 Target group ............................................................................................................................................................................. 5
3.2 Correct use ............................................................................................................................................................................... 5
3.3 Incorrect use ............................................................................................................................................................................. 5
3.4 Warranty .................................................................................................................................................................................. 6
3.5 General warnings and safety instructions.................................................................................................................................. 6
4 General information ......................................................................................................................... 11
4.1 Illustration of a hydraulic chuck .............................................................................................................................................. 11
4.2 Illustration of a HydroChuck Compensation ............................................................................................................................ 12
4.3 Marking of the actuating elements ......................................................................................................................................... 13
4.4 Tools and materials required .................................................................................................................................................. 14
4.5 Technical data......................................................................................................................................................................... 14
4.6 Checking the clamping force ................................................................................................................................................... 17
5 Operating the hydraulic chuck ........................................................................................................... 18
5.1 Clamping a tool ....................................................................................................................................................................... 18
5.2 Unclamping a tool ................................................................................................................................................................... 25
5.3 Radial run-out alignment with HydroChuck Compensation ..................................................................................................... 26
5.4 Machine-side adaptation of the coolant supply to Form AD/AF .............................................................................................. 28
6 Care and maintenance ...................................................................................................................... 34
7 Disposal ............................................................................................................................................ 34
Hydraulic Chuck HydroChuck Installation and Operating Instructions
4
cuttingtools.ceratizit.com
EN
1 Purpose of the installation and operating instructions These installation and operating instructions describe the correct operation of the HydroChuck hydraulic chuck with axial and radial tool length adjustment (hereinafter referred to as “hydraulic chuck”). They provide information on how you can clamp and unclamp a tool using the hydraulic chuck and how radial run-out alignment can be performed with HydroChuck Compensation. In addition, the most important safety instructions on handling the hydraulic chuck are explained. Section 5 contains a detailed description of the individual functions and actions necessary to successfully clamp and unclamp tools using the hydraulic chuck. The installation and operating instructions form an integral part of the hydraulic chuck and must be kept in the imme-diate vicinity of the hydraulic chuck where it is accessible to the personnel at all times. A basic precondition for safe working is compliance with all the safety precautions and instructions for working given in these installation and oper-ating instructions. The local safety at work regulations and the general safety regulations for the field of application of the hydraulic chuck must also be observed. Illustrations in these installation and operating instructions are provided for general under-standing and may differ from the actual design.
2 Contact CERATIZIT Deutschland GmbH
Address Daimlerstrasse 70
87437 Kempten, GERMANY
Telephone 0800 921 0000
Fax +49 831 57010 3559
E-mail [email protected]
Internet www.ceratizit.com

Hydraulic Chuck HydroChuck Installation and Operating Instructions
cuttingtools.ceratizit.com 5
EN
3 Safety 3.1 Target group
The hydraulic chuck may only be used by trained, authorised and dependable specialist personnel. The specialist per-sonnel must be able to recognise and avoid hazards and for this purpose must have read this document before using the hydraulic chuck. The health and safety regulations, safety stipulations and instructions from the machine manufacturer are familiar to the specialist personnel and are to be followed and observed during operation of the hydraulic chuck.
3.2 Correct use • The hydraulic chuck is intended exclusively for holding and clamping tools on cutting machines in industrial applica-
tions. • The hydraulic chuck has been specially designed for hydraulic clamping of rotating tools on machine tools for man-
ual and automatic tool changing. • The hydraulic chuck may only be used when observance of all the instructions given in this manual is assured. • Failure to observe these instruction can result in injuries or damage to machines and accessories for which CERA-
TIZIT assumes no liability.
3.3 Incorrect use • The hydraulic chuck may only be used in accordance with the technical data (see section 4.5). • The hydraulic chuck must not be heated on a shrink unit. It is not designed for the shrinking process and the associ-
ated temperatures. • The hydraulic chuck must not be used for workpiece clamping. • The hydraulic chuck must not be modified and used for other applications. • Additional bores, threads and attachment parts may only be attached with the written approval of CERATIZIT. • Unauthorised modifications to the hydraulic chuck or incorrect use of the hydraulic chuck will void all and any war-
ranty claims against CERATIZIT. • The manufacturer assumes no liability for accidents or damage resulting from use for other than the correct use.

Hydraulic Chuck HydroChuck Installation and Operating Instructions
6
cuttingtools.ceratizit.com
EN
3.4 Warranty The warranty period is 24 months from the date of delivery ex works on condition of use for the correct use and ob-servance of the contents of the installation and operating instructions. The warranty is limited to 1-shift operation. The hydraulic chuck including all its components and accessories must not be modified or used for non-authorised ap-plications. Any modification to the hydraulic chuck or any unauthorised use will void all and any warranty claims against CERATIZIT. CERATIZIT expressly declines any liability for accidents or damage resulting from the use of damaged tools or damaged machine parts. Wear parts are not covered by the warranty.
3.5 General warnings and safety instructions
WARNING Danger from use by untrained and unauthorised personnel! The clamping of tools and their installation on a machine tool by untrained and unauthorised personnel can lead to hazardous situations. Only trained, authorised and dependable specialist personnel may clamp tools and install them on a machine
tool. The technical data on the machine connection must be observed by the specialist personnel. The specialist personnel must be able to recognise and avoid hazards.

Hydraulic Chuck HydroChuck Installation and Operating Instructions
cuttingtools.ceratizit.com 7
EN
WARNING Failure to observe the technical data! Failure to observe the technical data can result in serious injury to the operator and in machine damage. Observe the technical data given in section 4.5. During clamping, screw in the clamping screw up to the stop, observing the specified minimum number of rota-
tions. Observe the prescribed values for the minimum clamping depth. Observe the prescribed spindle speed limits for the machine-side connection. Observe the maximum load limit for the machine-side connection in accordance with e.g. VDMA 34181. If irregularities occur during operation, do not use the hydraulic chuck further for safety reasons and send it to
CERATIZIT for inspection or repair.
3.5.1 Dangers from heat development
WARNING
Shrinking or heating the hydraulic chuck can lead to injuries and damage to machines and accessories! Shrinking or heating can cause the hydraulic chuck to become deformed or to burst explosively. Hot oil, oil vapours and metal slivers can then fly around uncontrolled and cause serious injuries to the operator and cause damage to machines and accessories. Do not shrink the hydraulic chuck or heat it above the specified operating temperature.

Hydraulic Chuck HydroChuck Installation and Operating Instructions
8
cuttingtools.ceratizit.com
EN
WARNING Unclamping at excessive clamping chuck temperatures! Unclamping at excessive clamping chuck temperatures can cause parts of the hydraulic chuck to fly off uncontrolled, allowing hot oil to escape. This can lead to serious injuries and cause damage to machines and accessories. Actuate the clamping screw of the hydraulic chuck only at room temperature.
NOTICE Clamping without tool! Clamping without tool can result in damage to the hydraulic chuck. Do not clamp the hydraulic chuck without tool.
3.5.2 Mechanical hazards
WARNING Clamping and unclamping with running machine! Clamping and unclamping the hydraulic chuck with the machine running may result in serious injuries to the opera-tor. Actuate the hydraulic chuck only off the machine and with the machine at a standstill.
Hydraulic Chuck HydroChuck Installation and Operating Instructions
cuttingtools.ceratizit.com 9
EN
WARNING Use of long, projecting and heavy tools or extensions! Use of long, projecting and heavy tools or with extensions can cause the tool or parts of the tool combination to fly off like a projectile and cause serious injuries. When using long, projecting and heavy tools or with extensions, reduce the spindle speed according to the indi-
vidual specifications and at the responsibility of the operator. Observe also the individually specified maximum length and balancing value of the whole system when using
extensions. With special designs, deviating drawing specifications may have to be taken into consideration. Observe the maximum load limit for the machine-side connection.
CAUTION
Sharp cutting edges on the tool! Sharp cutting edges may cause cutting injuries. Wear protective gloves when changing tools.
NOTICE Tool length adjustment with the tool clamped! Performing an axial or radial tool length adjustment while the tool is completely clamped will result in damage to the hydraulic chuck. Do not change the tool length adjustment as long as the tool is clamped.

Hydraulic Chuck HydroChuck Installation and Operating Instructions
10
cuttingtools.ceratizit.com
EN
NOTICE Use of shanks with recesses! Use of shanks with Form B and E (DIN 1835) or shanks with HB and HE (DIN 6535) can result in radial run-out errors and inaccurate balancing value of the whole system. Use only shanks with Form A or fine balance the whole system.
NOTICE Damage to the paint-sealed bleeder screw! In the event of damage to the paint-sealed bleeder screw, the hydraulic chuck is no longer functional and must be taken out of operation immediately. Do not damage or loosen the paint-sealed bleeder screw. If the bleeder screw is damaged, the hydraulic chuck must not be used for safety reasons. In the event of damage, send the hydraulic chuck to CERATIZIT for inspection and repair.
NOTICE Wear due to use of a power screwdriver for tightening the clamping screw! Use of a power screwdriver for tightening the clamping screw will result in increased wear of the clamping set. Tighten the clamping screw only manually.

Hydraulic Chuck HydroChuck Installation and Operating Instructions
cuttingtools.ceratizit.com 11
EN
4 General information 4.1 Illustration of a hydraulic chuck
4.1.1 Hydraulic chuck with axial tool length adjustment
Key
1 | Location bore 2 | Paint-sealed bleeder screw 3 | Clamping screw 4 | Taper of the hydraulic chuck
l1 | Projection length
Individual components of the hydraulic chuck with axial tool length adjustment
Key 1 | Stop screw for axial tool length adjustment
View of the hydraulic chuck from below

Hydraulic Chuck HydroChuck Installation and Operating Instructions
12
cuttingtools.ceratizit.com
EN
4.1.2 Hydraulic chuck with radial tool length adjustment
Key 1 | Clamping screw 2 | Radial tool length setting screw
Individual components of the hydraulic chuck with radial tool length adjustment
4.2 Illustration of a HydroChuck Compensation
Key 1 | Clamping screw 2 | Paint-sealed threaded pins (3 pins) 3 | Locking ring 4 | Adjusting screws for compensation adjustment (3 screws)
Individual components of the HydroChuck Compensa-tion

Hydraulic Chuck HydroChuck Installation and Operating Instructions
cuttingtools.ceratizit.com 13
EN
4.3 Marking of the actuating elements
Marking for checking of the clamping force: Three possible positions on the clamping chuck
Key 1 | + Clamp tool (in clockwise direction) 2 | - Unclamp tool (in anticlockwise direction)
Indication of the direction of rotation for clamping and unclamping the tool

Hydraulic Chuck HydroChuck Installation and Operating Instructions
14
cuttingtools.ceratizit.com
EN
4.4 Tools and materials required • Hex-wrench for the stop screw for axial or radial tool length adjustment • Hex-wrench for the clamping screw
4.5 Technical data
WARNING Failure to observe the technical data! Failure to observe the technical data can result in serious injury to the operator and in machine damage. Observe the technical data given in section 4.5. During clamping, screw in the clamping screw up to the stop, observing the specified minimum number of rota-
tions. Observe the prescribed values for the minimum clamping depth. Observe the prescribed max. operating speeds for the machine-side connection. Observe the maximum load limit for the machine-side connection in accordance with e.g. VDMA 34181. If irregularities occur during operation, do not use the hydraulic chuck further for safety reasons and send it to
CERATIZIT for inspection or repair.

Hydraulic Chuck HydroChuck Installation and Operating Instructions
cuttingtools.ceratizit.com 15
EN
• General technical data: • Material 1,600 N/mm². • Hardness 52+2 HRc. • Tool holders balanced as standard. • Operating temperature 20 to 50 °C. • Coolant pressure maximum 80 bar. • Maximum adjustment path 10 mm. • Cylindrical shanks, with and without reducing sleeves, with shank tolerance h6 according to DIN 1835 forms A,
B, E and according to DIN 6535 forms HA, HB and HE can be clamped. • Specification for checking of the clamping force (see sections 4.3 and 4.6).
• Estimated spindle speed limits for hydraulic chuck with HSK connection
Nominal size HSK
Max. permissible spindle speed limit [rpm]
32 37.500 40 37.500 50 30.000 63 24.000 80 20.000
100 16.000
Indicative values for spindle speed limits

Hydraulic Chuck HydroChuck Installation and Operating Instructions
16
cuttingtools.ceratizit.com
EN
• Technical data [mm]
Clamping diameter [mm] Minimum clamping depth [mm]
Permissible transferrable torque for shank h6 mini-
mum size [Nm] Max. spindle speed [rpm]
l1 ≤ 125 mm l1 > 125 mm 6 27 20
40.000 20.000
8 27 35 10 31 50 12 36 90 14 36 120 16 39 170 18 39 240 20 41 330
20.000 10.000 25 47 400 32 51 650
Technical data [mm]
Hydraulic Chuck HydroChuck Installation and Operating Instructions
cuttingtools.ceratizit.com 17
EN
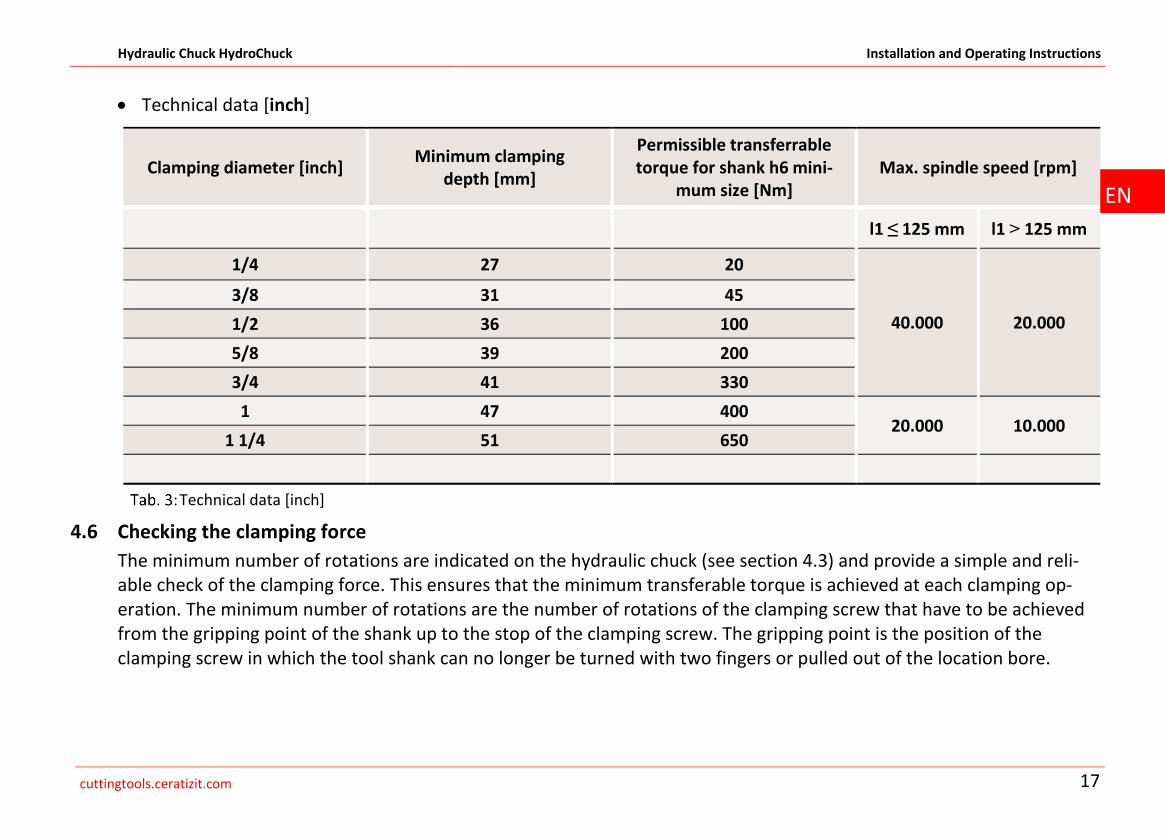
• Technical data [inch]
Clamping diameter [inch] Minimum clamping depth [mm]
Permissible transferrable torque for shank h6 mini-
mum size [Nm] Max. spindle speed [rpm]
l1 ≤ 125 mm l1 > 125 mm
1/4 27 20
40.000 20.000 3/8 31 45 1/2 36 100 5/8 39 200 3/4 41 330
1 47 400 20.000 10.000
1 1/4 51 650
Technical data [inch]
4.6 Checking the clamping force The minimum number of rotations are indicated on the hydraulic chuck (see section 4.3) and provide a simple and reli-able check of the clamping force. This ensures that the minimum transferable torque is achieved at each clamping op-eration. The minimum number of rotations are the number of rotations of the clamping screw that have to be achieved from the gripping point of the shank up to the stop of the clamping screw. The gripping point is the position of the clamping screw in which the tool shank can no longer be turned with two fingers or pulled out of the location bore.

Hydraulic Chuck HydroChuck Installation and Operating Instructions
18
cuttingtools.ceratizit.com
EN
5 Operating the hydraulic chuck 5.1 Clamping a tool
INFORMATION
Actuation of the stop screw of the hydraulic chuck is possible from both sides. The hydraulic chuck can be adjusted either axially or radially, depending on the design.
WARNING
Shrinking or heating the hydraulic chuck can lead to injuries and damage to machines and accessories! Shrinking or heating can cause the hydraulic chuck to become deformed or to burst explosively. Hot oil, oil vapours and metal slivers can then fly around uncontrolled and cause serious injuries to the operator and cause damage to machines and accessories. Do not shrink the hydraulic chuck or heat it above the specified operating temperature.
WARNING Clamping and unclamping with running machine! Clamping and unclamping the hydraulic chuck with the machine running may result in serious injuries to the opera-tor. Actuate the hydraulic chuck only off the machine and with the machine at a standstill.

Hydraulic Chuck HydroChuck Installation and Operating Instructions
cuttingtools.ceratizit.com 19
EN
CAUTION
Sharp cutting edges on the tool! Sharp cutting edges may cause cutting injuries. Wear protective gloves when changing tools.
INFORMATION
Clamp only undamaged and burr-free tools.
Clean the location bore and the tool shank (1).
Cleaning hydraulic chuck and tool
Push the tool, shank first, to the stop screw in the location bore in the hydraulic chuck.
Inserting tool

Hydraulic Chuck HydroChuck Installation and Operating Instructions
20
cuttingtools.ceratizit.com
EN
INFORMATION
Depending on the design of the hydraulic chuck, tool length adjustment can be performed either axially (see section 5.1.1) or radially (see section 5.1.2).
5.1.1 Axial tool length adjustment
NOTICE
Damage from failure to observe the minimum clamping depth in the hydraulic chuck! Observe the prescribed values for the minimum clamping depth (see Tab. 2:Technical data [mm]or Tab. 3: Technical data [inch]).
NOTICE
Damage caused by tool length adjustment with clamped tool! Do not change the tool length adjustment as long as the tool is clamped.

Hydraulic Chuck HydroChuck Installation and Operating Instructions
cuttingtools.ceratizit.com 21
EN
INFORMATION
The stop screw for axial tool length adjustment is not secured to prevent it from falling out. The specified adjusting range cannot be exceeded. Actuation of the stop screw for axial tool length adjustment is possible from both sides.
Adjust the hydraulic chuck to the tool length by turning the stop screw for the axial tool length adjustment using an appropriate hex-wrench with T-handle.
Adjusting tool length (axial)
WARNING Insufficient clamping up to the stop and failure to observe the minimum number of turns! Insufficient clamping up to the stop and failure to observe the minimum number of rotations can cause the work-piece to fly off like a projectile and cause serious injuries. During clamping, screw in the clamping screw up to the stop, observing the specified minimum number of rota-
tions (see section 4.5).
Hydraulic Chuck HydroChuck Installation and Operating Instructions
22
cuttingtools.ceratizit.com
EN
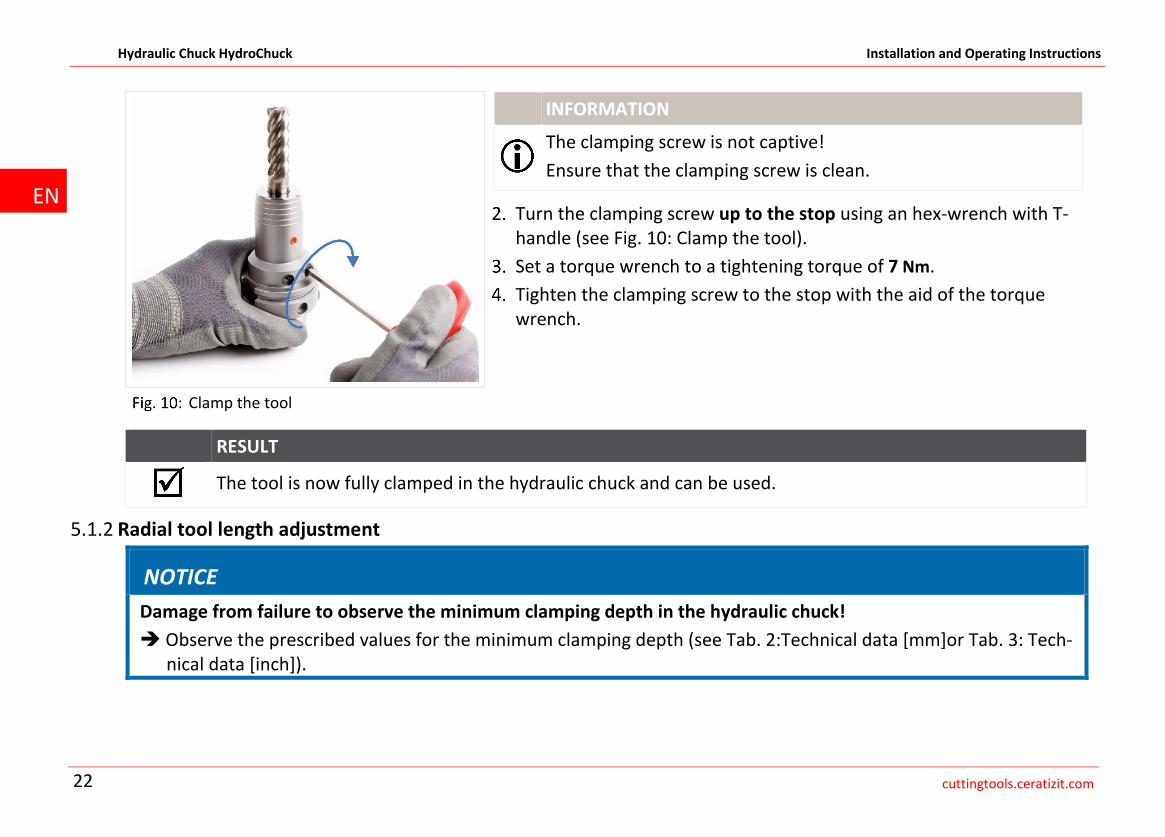
INFORMATION
The clamping screw is not captive! Ensure that the clamping screw is clean.
Turn the clamping screw up to the stop using an hex-wrench with T-handle (see Fig. 10: Clamp the tool).
Set a torque wrench to a tightening torque of 7 Nm. Tighten the clamping screw to the stop with the aid of the torque wrench.
RESULT
The tool is now fully clamped in the hydraulic chuck and can be used.
5.1.2 Radial tool length adjustment
NOTICE
Damage from failure to observe the minimum clamping depth in the hydraulic chuck! Observe the prescribed values for the minimum clamping depth (see Tab. 2:Technical data [mm]or Tab. 3: Tech-
nical data [inch]).
Clamp the tool

Hydraulic Chuck HydroChuck Installation and Operating Instructions
cuttingtools.ceratizit.com 23
EN
NOTICE
Damage caused by tool length adjustment with clamped tool! Do not change the tool length adjustment as long as the tool is clamped.
INFORMATION
The stop screw for radial tool length adjustment is not secured to prevent it from falling out. The specified adjusting range cannot be exceeded.
Adjust the hydraulic chuck to the tool length by turning the screw for radial tool length adjustment using an appropriate hex-wrench with T-handle.
INFORMATION
The tool length is adjusted by means of a bevel gear unit. Adjust-ment is performed in several steps: • Adjust the unclamped tool shank to 0.2 to 0.3 mm below the
target length. • Clamp the tool shank up to the gripping point. • Adjust the desired tool length. The tool shank has to be released again if the tool has to be ad-justed again.
Adjusting tool length (radial)

Hydraulic Chuck HydroChuck Installation and Operating Instructions
24
cuttingtools.ceratizit.com
EN
WARNING Insufficient clamping up to the stop and failure to observe the minimum number of turns! Insufficient clamping up to the stop and failure to observe the minimum number of rotations can cause the work-piece to fly off like a projectile and cause serious injuries. During clamping, screw in the clamping screw up to the stop, observing the specified minimum number of rota-
tions (see section 4.5 Technical data).
INFORMATION
The clamping screw is not captive! Ensure that the clamping screw is clean.
Turn the clamping screw up to the stop using an hex-wrench with T-handle (see Fig. 12: Clamp the tool).
Set a torque wrench to a tightening torque of 7 Nm. Tighten the clamping screw to the stop with the aid of the torque wrench.
RESULT
The tool is now fully clamped in the hydraulic chuck and can be used.
Clamp the tool

Hydraulic Chuck HydroChuck Installation and Operating Instructions
cuttingtools.ceratizit.com 25
EN
5.2 Unclamping a tool
WARNING Unclamping at excessive clamping chuck temperatures! Unclamping at excessive clamping chuck temperatures can cause parts of the hydraulic chuck to fly off uncontrolled, allowing hot oil to escape. This can lead to serious injuries and cause damage to machines and accessories. Actuate the clamping screw of the hydraulic chuck only at room temperature.
INFORMATION
The clamping screw is not captive.
Loosen the clamping screw with 3 to 7 turns using an appropriate hex-wrench with T-handle.
Loosening clamping screw

Hydraulic Chuck HydroChuck Installation and Operating Instructions
26
cuttingtools.ceratizit.com
EN
Remove the tool from the location bore of the hydraulic chuck.
Removing tool
RESULT
The tool has been unclamped and released.
5.3 Radial run-out alignment with HydroChuck Compensation
INFORMATION
The locking ring (3) is secured with paint-sealed threaded pins (2) and must not be removed.
Clamp a tool in the HydroChuck Compensation (see section 5.1). Tighten the three adjusting screws (4) to a tightening torque of 1 Nm.
Tightening the adjusting screws

Hydraulic Chuck HydroChuck Installation and Operating Instructions
cuttingtools.ceratizit.com 27
EN
Measure the radial run-out of the tool using a radial run-out measur-ing instrument.
Measuring the radial run-out
Tighten the adjusting screws (4) (max. 3 Nm) until the tool has the prescribed radial run-out.
Adjusting the radial run-out

Hydraulic Chuck HydroChuck Installation and Operating Instructions
28
cuttingtools.ceratizit.com
EN
Set the desired balancing value using the radial run-out measuring instrument.
Setting the balancing value
RESULT
The radial run-out alignment of the HydroChuck Compensation is complete.
5.4 Machine-side adaptation of the coolant supply to Form AD/AF
WARNING
Risk of burns from hot threaded pin area! Serious burns and injuries can occur during heating and unscrewing the threaded pins. Always wear ISO protective gloves when heating and unscrewing the threaded pins. After heating, wait until the heated threaded pin area has cooled down.
The system for the coolant supply on tool holders to DIN ISO 7388 makes it possible to combine the common forms of coolant supply into one machine-side tool body of Form AD/AF. The system makes it possible to combine the following designs:

Hydraulic Chuck HydroChuck Installation and Operating Instructions
cuttingtools.ceratizit.com 29
EN
• Form AD: Central coolant supply via through bore (normal setting) • Form AF: Central coolant supply via collar To adjust the tool holder to the type of coolant supply on the machine, it is sufficient to adjust the position of two threaded pins. The threaded pins (secured with thread locking compound) seal off the bore for the alternative coolant supply. CERATIZIT After-sales Service is also at your disposal for the changeover.
5.4.1 Normal setting Form AD or JD to DIN ISO 7388
Unless otherwise indicated in the purchase order, the tool holders are delivered in Form AD.
Normal setting of the coolant supply

Hydraulic Chuck HydroChuck Installation and Operating Instructions
30
cuttingtools.ceratizit.com
EN
5.4.2 Change over to Form AF or JF Change over of the normal setting to coolant supply Form AF.
WARNING
Risk of burns from hot threaded pin area! Serious burns and injuries can occur during heating and unscrewing the threaded pins. Always wear ISO protective gloves when heating and unscrewing the threaded pins. After heating, wait until the heated threaded pin area has cooled down.
WARNING
Risk of explosion during heating of the hydraulic elements! During heating of the part of the threaded pin, the chucking section and the pressure application areas can become hot and cause the hydraulic chuck to become deformed or to burst explosively. Hot oil or oil vapour can escape and metal slivers can then fly around uncontrolled and cause serious injuries to the operator. Heat only the area of the threaded pin. Carry out heating only with the hydraulics in the unclamped position. Have the modification carried out by CERATIZIT After-sales Service.
Ensure that the area of the hydraulics is cooled adequately. Heat the threaded pins or the threaded pin area until the threaded pins can be unscrewed.

Hydraulic Chuck HydroChuck Installation and Operating Instructions
cuttingtools.ceratizit.com 31
EN
WARNING Risk of burns from hot threaded pin area! After heating, wait until the heated threaded pin area has cooled down.
Unscrew the threaded pins using an hex-wrench 2.5. Remove the adhesive residues from the threaded pins and threaded bores.
Screw the threaded pins with medium-strength thread locking com-pound (adhesive) into the cooled tool holder at “Pos. 2” (see Fig. 20: Coolant Supply Form AF/JF).
Remove any adhesive residues. After the curing time of the adhesive, check the threaded pins for se-cure fitting and rebalance the tool holder, if necessary.
Use a pull stud with coolant bore for the machine-side sealing of the tool holder.
Coolant Supply Form AF/JF
RESULT
Coolant supply is changed over to Form AF/JF.

Hydraulic Chuck HydroChuck Installation and Operating Instructions
32
cuttingtools.ceratizit.com
EN
5.4.3 Change over to Form AD or JD Change over of the coolant supply from Form AF to Form AD.
WARNING
Risk of burns from hot threaded pin area! Serious burns and injuries can occur during heating and unscrewing the threaded pins. Always wear ISO protective gloves when heating and unscrewing the threaded pins. After heating, wait until the heated threaded pin area has cooled down.
Heat the threaded pins or the threaded pin area until the threaded pins can be unscrewed.
WARNING Risk of burns from hot threaded pin area! After heating, wait until the heated threaded pin area has cooled down.
Unscrew the threaded pins using an hex-wrench 2.5. Remove the adhesive residues from the threaded pins and threaded bores.

Hydraulic Chuck HydroChuck Installation and Operating Instructions
cuttingtools.ceratizit.com 33
EN
Screw the threaded pins with medium-strength thread locking com-pound (adhesive) into the cooled tool holder at “Pos. 1” (see Fig. 21: Coolant Supply Form AD/JD).
Remove any adhesive residues. After the curing time of the adhesive, check the threaded pins for se-cure fitting and rebalance the tool holder, if necessary.
Use a pull stud with coolant bore for the machine-side sealing of the tool holder.
Coolant Supply Form AD/JD
RESULT
Coolant supply is changed over to Form AD/JD.

Hydraulic Chuck HydroChuck Installation and Operating Instructions
34
cuttingtools.ceratizit.com
EN
6 Care and maintenance • Protect the hydraulic chuck against corrosion when stored. • Ensure the hydraulic chuck is stored in the unclamped position. • The clamping screw is to be cleaned and re-lubricated at regular intervals, depending on the operating and ambient
conditions and in the event of frequent loosening and tightening. • If the stop screw for axial tool length adjustment is clamped frequently, it must be cleaned and lubricated at regular
intervals. • Repairs must only be performed at CERATIZIT. • Instructions for cleaning in a washing facility:
- Clean the hydraulic chuck only in the unclamped position. - The clamping screw may only be clamped or relieved at room temperature. - The washing temperature must not exceed 50 °C. - After cleaning, regrease the clamping screw.
7 Disposal Once the hydraulic chuck reaches the end of its service life, it must be disposed of with due care for the protection of the environment. The hydraulic chuck can also be sent to CERATIZIT for proper disposal.

KAL-
HC-D
/E-0
9-00
5-10
18-F
A Pr
inte
d in
Ger
man
y. R
ight
of t
echn
ical
mod
ifica
tion
rese
rved
.
Technische Änderungen vorbehalten. We reserve the right to make technical changes without notice.