eng-old.najah.edu · web viewan-najah national university. computer engineering department....
TRANSCRIPT

AN-Najah National University
Computer Engineering Department
Graduation Project Report
Wireless Headphones with voice recognition control
By
Manar Mousa Al-Hamaidi
Wala’ Amjad Faqeh
Supervised by:
Dr. Aladdin Masri
2012

Wireless Headphones 2012
Table of Contents
Chapter 1 : What is "Wireless Headphones" project?Abstract(1.1) 2
Introduction(1.2) 2
Problematic Description(1. 3) 3
Chapter 2: Project DetailsApplications and features(2. 1) 5
Methodology (2. 2) 6
Hadware Component(2.2.1)…………………………………………………………..6
Software Methodologies(2.2.2) ………………………………………………11
More details (2. 3) 12
Chapter 3 : Problems and Results 21
Chapter 4: Conclusion and Future work 22Conclusion(4. 1) 22
Future Work (4. 2) 22
Chapter 5: References 23
Chapter 6: Appendices 24
Page | 1

Wireless Headphones 2012
Chapter 1:
1.1Abstract:An ordinary Headphone enables you to listen to different sounds and music from a device like computer, laptop, mobile, or even an mp3 player. The connection between the headphone and the device is made by using wires connecting them together.Wireless headphone uses ZigBee technology for transmission, and it is designed in order to facilitate that connection without the need of any wires, so it get rid of the complex and annoying connection of wires which has a limit distance of a less than half meter.Also, you can control the playing sounds even if you be a far distance from the audio player device.You can make orders in two ways:- using different push buttons.- sending orders by voice using the microphone supplied to the headphone.
1.2 Introduction:Headphones are a pair of small loudspeakers which are designed to be held in place close to a user's ears. Headphones have wires which allow them to be connected to a signal source such as an audio amplifier, radio, CD player, or portable media player. In the context of telecommunication, the term headset is used to describe a combination of headphone and microphone.
Headphones may be used both with fixed equipment such as CD or DVD players, home theater, personal computers and with portable devices (e.g. digital audio player/mp3 player, mobile phone, etc.). Cordless headphones are not connected via a wire, receiving a radio or infrared signal encoded using a radio or infrared transmission link, like FM, Bluetooth or Wi-Fi. These are powered receiver systems of which the headphone is only a component.
Why Go Wireless?
Until recently, radio frequency wireless headphones were known for having a terrible sound quality with little bass and constant static. However, with advances in technology, there are now noise cancelling wireless stereo headphones that have a crystal-clear sound and a large range. You can use these devices to listen to music from an MP3 player, a computer or even watch movies while everyone else in your house sleeps.
Using this project one can reproduce audio from a Laptop or computer without disturbing others. It does not use any wire connection between Laptop and headphones. In place of a pair of wires, it uses invisible light to transmit audio signals from Laptop to headphones. A range of up to 100 meters is possible.
Page | 2

Wireless Headphones 2012
1.3 Problematic Description
Wireless Headphones system consists of three parts:
The transmitter. The receiver. Control unit.
The transmitter plugs into the device which you are using as an audio output source, and after you turn on the wireless headphones, the connection should be instant. You will be listening to all your favorite music and movies in no time.
The receiver is the human who has wireless headphones with a microphone. The first action is done by him. All he has to do is to open the software program, choose his personal list of sounds or tracks, and then he sends the order to start playing this list with help of the control unit.
The transmitter, which is an Xbee shield that works on ZigBee protocol, plugged to a laptop or a computer, will receive that request, and if there is no error in the request transmission process or in the file itself, it accepts that request by sending the first sound file of the list –after converting it from digital to analog to the receiver who will be able to listen to it via the speakers of his headphone.
Figure (1, 1): general steps of transmission and reception of the required sound.
And then, the human will be able to make control on the tracks to choose what to listen to and stop or resume the current track.That could be made with help of the control unit by two different ways:
1) By using different Push Buttons:There are four buttons to make an interrupt and control the current playing list of tracks.
Stop button: to stop playing the current track that the user is listening to now. Play button: to start playing a chosen track from the list. Forward: to stop playing the current track and move to the next one in the list and play it. Backward: to stop playing the current track and move to previous one in the list and play it.
2) By using different words spoken in the microphone of the headphone:The user could choose the request he wants (play, stop, backward, forward) by speaking that request in the microphone of its headphone.
That microphone is connected to a voice recognition shield that called EasyVR which has the ability to differentiate between the spoken words. That request is sent to the transmitter via
Page | 3
Sending sounds via wireless
C# sounds player program
Serial
Connection
PIC18F4620

Wireless Headphones 2012
the Xbee shield connected with microcontroller. After that, user request is performed if there are no errors.
Figure (1, 2): work flow of the overall process from sender to receiver
Page | 4
The user open sound playerChoose mp3 files for his list
give order to play
XBee #1 recieve requestSend file from computer to the other XBee
conversion from digital to analog is required
File recieved to XBee #2Headphone play the sound
ready to recieve other requests

Wireless Headphones 2012
Chapter 2:
2.1 Applications and features:Wireless headphone device is designed to facilitate people communication and handling with sounds player from a large distance away from the generating sounds device that can reach about 100 m.You can maintain fantastic sound quality while others sleep. This device is also a terrific choice for listening to music throughout the house and yard while doing the weekend chores.
The software program like any other media player in your computer and it is user friendly and flexible application.
The actual, physical features are simple and uncomplicated. It uses Xbee shield to allow people to listen to sounds for far distance away from the computer larger than the distance that Bluetooth can support and without the need of any wires.
Also, the user can choose different options to control the tracks list he is listening to from far distance and with ease. All he has to do is to push a button or even speak his request in the microphone.
Wireless headphone is a great solution for blind people that enable them to listen and control the tracks by using their voice without asking for help from others to play, stop or even change the current track to another one.
Rechargeable batteries can be used to operate both the transmitter and receiver with a long sustainability that may stay for 10 hours.
Page | 5

Wireless Headphones 2012
2.2 Methodology: Several hardware components have been used in this project, also there is software methodologies were used.
2.2.1Hardware component:
1) PIC Microcontroller: PIC Microcontroller with the number PIC18F4620 that supports NanoWatt Technology and reduces power consumption during operation. It has the following features:
Alternate Run Modes: By clocking the controller from the Timer1 source or the internal oscillator block, power consumption during code execution can be reduced by as much as 90%.
Multiple Idle Modes: The controller can also run with its CPU core disabled but the peripherals still active.
On-the-fly Mode Switching: The power managed modes are invoked by user code during operation, allowing the user to incorporate power-saving ideas into their applications software design.
Low Consumption in Key Modules: The power requirements for both Timer1 and the Watchdog Timer are minimized.
Memory Endurance: The Enhanced Flash cells for both program memory and data EEPROM are rated to last for many thousands of erase/write cycles – up to 100,000 for program memory and1,000,000 for EEPROM. Data retention without refresh is conservatively estimated to be greater than 40 years.
Self-programmability: These devices can write to their own program memory spaces under internal software control. By using a bootloader routine located in the protected Boot Block at the top of program memory, it becomes possible to create an application that can update itself in the field.
Extended Instruction Set: The PIC18f4620 family introduces an optional extension to the PIC18 instruction set, which adds 8 new instructions and an Indexed Addressing mode. This extension, enabled as a device configuration option, has been specifically designed to optimize re-entrant application code originally developed in high-level languages, such as C.
Enhanced CCP module: In PWM mode, this module provides 1, 2 or 4 modulated outputs for controlling half-bridge and full-bridge drivers.
Enhanced Addressable USART: This serial communication module is capable of standard RS-232 operation and provides support for the LIN bus protocol. Other enhancements include automatic baud rate detection and a 16-bit Baud Rate Generator for improved resolution. When the microcontroller is using the internal oscillator block, the USART provides stable operation for applications that talk to the outside world without using an external crystal.
Page | 6

Wireless Headphones 2012
10-bit A/D Converter: This module incorporates programmable acquisition time, allowing for a channel to be selected and a conversion to be initiated without waiting for a sampling period and thus, reduce code overhead.
Extended Watchdog Timer (WDT): This Enhanced version incorporates a 16-bit pre scalar, allowing an extended time-out range that is stable across operating voltage and temperature
Figure (2, 1): pins out of PIC18F4620
The following figure shows the basic circuit of PIC18F4620 with all its components:
Figure (2, 2): basic circuit of PIC18F4620
Page | 7

Wireless Headphones 2012
To upload a hex file into the PIC18F4620 Microcontroller we use a BootLoader. We choose the connected serial COM port number, browse the computer to choose the required hex file, and wait for the microcontroller to be ready to send the code.
Also we can use the Hyper Terminal in the BootLoader to display the output string from the order printf ( ) or putc ().
Figure (2, 3): the BootLoader
2) XBee:
Two XBees for both sender and receiver that use ZigBee technology to make the wireless connection.
XBee modems are one of the easiest ways to create a wireless point-to-point or mesh network. They have error correction, are configured with AT commands, come in multiple flavors and can create a wireless serial link out of the box! , it has the following features:
• Price-to-Performance Value.
• Low Power Consumption and receiver Sensitivity.
Page | 8

Wireless Headphones 2012
• Industrial Temperature Rating.
• Worldwide Acceptance
• Small Form Factor
•UART Data Input (3.3V)
• 4 ADC’s and 8+1 DIO line.
• PWM (RSSI) output
• Network diagnostics.
• No RF HW development risk.
Figure (2, 4): pinout of the XBee Adapter.
Page | 9

Wireless Headphones 2012
3) EasyVR:
EasyVR has been used to help control the tracks list by making voice recognition to the requests spoken in its microphone. It has been used due to the following features:
A host of built-in Speaker Independent (SI) commands for ready to run basic controls in the following languages:
English (US) Italian German French Spanish Japanese
Supports up to 32 user-defined Speaker Dependent (SD) triggers or commands and Voice Passwords. SD custom commands can be spoken in ANY language
Easy-to-use and simple Graphical User Interface to program Voice Commands and Audio Module can be used with any host with an UART interface (powered at 3.3V - 5V)
Page | 10

Wireless Headphones 2012
Simple and robust documented serial protocol to access and program through the host board 3 x GPIO lines (IO1, IO2, IO3) that can be controlled by new protocol commands PWM audio output that supports 8 ohm speakers Sound playback feature of up to 9 minutes of recorded audio or speech.
Figure (2, 5): EasyVR Module
2.2.2 Software Methodologies:
1) PICC Compiler: is a high-performance compiler contains Standard C operators and built-in libraries that are specific to the PIC registers. It has been used to write the code in C language. And that code compiled to a hex file which then uploaded to PIC18F4620.
Features of the compiler include:
ANSI C - full featured and portable Reliable - mature, field-proven technology Multiple C optimization levels An optimizing assembler Full linker, with overlaying of local variables to minimize RAM usage Comprehensive C library with all source code provided Includes support for 24-bit and 32-bit IEEE floating point and 32-bit long data types Mixed C and assembler programming Unlimited number of source files Listings showing generated assembler Compatible - integrates into the MPLAB IDE, MPLAB ICD and most 3rd-party development
tools Runs on multiple platforms: Windows, Linux, UNIX
2) Microsoft Visual C# 2010: it has been used to implement the software program which is sounds player where the user can choose a list of tracks and start playing it.It has been chosen because:
It is a user friendly. Its platform is free. It is an open source language.
Page | 11

Wireless Headphones 2012
Reliable. Robust. Well-known before
3) X-CTU Program: it is used to make the configurations and settings of the XBee Shield.4)EasyVR Commander: it is used to configure and train EasyVR module connected to PC through serial port.
2.3 More details:
First of all, the configurations to both XBee and EasyVR have to be done. We can do this as follows:
Making configurations of XBee:1. Setting the network ID
We read the modem parameters/firmware before starting.For a simple network, we want two modems to talk only to each other. That means if you're in a school, lab or workshop other people's XBee's can interact with yours causing some major confusion.A good way to avoid this is to set the network ID (otherwise known as the PAN - Personal Area Network - ID) to a unique value. By default all XBee's use PAN ID #3332. The ID is 4 bytes of hexadecimal and can range from 0000 to FFFF
Changing the PAN using X-CTU: we select a new ID and we write it to the module
Figure (2, 6): setting Network ID of XBee using X-CTU program
Page | 12

Wireless Headphones 2012
If you are using a terminal to connect, use the ATID command to set and check the PAN ID-> AT (check if XBee modem is responding) <- OK-> ATID (get current PAN) <- 3332 (default, or something else) -> ATID 3137 (set new id) <- OK-> ATID (check again) <- 3137-> ATWR (write the change to flash) <- OK
Figure (2, 7): Writing orders using HyperTerminal
2. Connect one module to PIC microcontroller. First connect +5V and Ground to provide power. Make sure the XBee's green LED is blinking.3. Next connect the RX line (input) of the XBee to the TX line (output) of the microcontroller and vice versa.
Making configurations of EasyVR:
Wordset - built-in set of SI commands.
A. Speech RecognitionThe recognition function of the EasyVR works on a single group at a time, so that users need to group together all the commands that they want to be able to use at the same time.When EasyVR Commander connects to the module, it reads back all the user-defined commands and groups, which are stored into the EasyVR module non-volatile memory.You can add a new command by first selecting the group in which the command needs to be created and then using the toolbar icons or the “Edit” menu.A command should be given a label and then it should be trained twice with the user's voice: the user will be guided throughout this process when the "Train Command" action is invoked.
Page | 13

Wireless Headphones 2012
Figure (2, 8): Guided training dialog
After clicking on Phase 1 or Phase 2 buttons, remember to start speaking only when you see this little window:
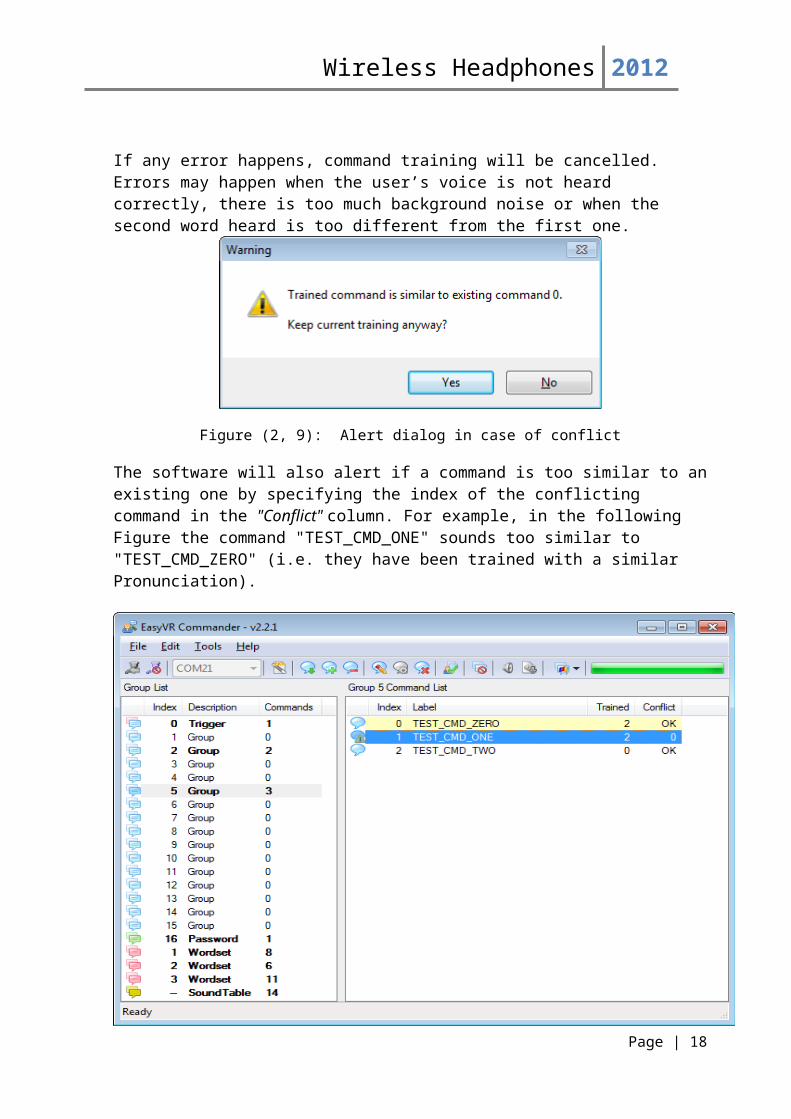
If any error happens, command training will be cancelled. Errors may happen when the user’s voice is not heard correctly, there is too much background noise or when the second word heard is too different from the first one.
Figure (2, 9): Alert dialog in case of conflict
The software will also alert if a command is too similar to an existing one by specifying the index of the conflicting command in the "Conflict" column. For example, in the following Figure the command "TEST_CMD_ONE" sounds too similar to "TEST_CMD_ZERO" (i.e. they have been trained with a similar Pronunciation).
Page | 14

Wireless Headphones 2012
Figure (2, 10): Conflicting commandsThe current status is displayed in the EasyVR Commander List view where groups that already contain commands are highlighted in bold.The selected group of commands can also be tested, by using the icon on the toolbar or the “Tools” menu, to make sure the trained commands can be recognized successfully.We can re-train a command you have to erase the previous training first.Note: "Vocal passwords"(group 16) are much more sensitive to environment noise and distance from the microphone: be sure to train and give the password in similar conditions.
Communication with the EasyVR module uses a standard UART interface compatible with 3.3-5VTTL/CMOS logical levels, according to the powering voltage VCC.A typical connection to an MCU-based host:
Figure (2, 11): EasyVR connection with PIC Microcontroller
The configuration at power on is 9600 baud, 8 bit data, No parity, 1 bit stop. The baud rate can be changed later to operate in the range 9600 - 115200 baud.The communication protocol only uses printable ASCII characters, which can be divided in two main groups: Command and status characters, respectively on the TX and RX lines, chosen among lower-case letters.
Page | 15
PIC Microcontroller

Wireless Headphones 2012
Command arguments or status details, again on the TX and RX lines, spanning the range of capital letters.
Each command sent on the TX line, with zero or more additional argument bytes, receives an answer on the RX line in the form of a status byte followed by zero or more arguments.There is a minimum delay before each byte sent out from the EasyVR module to the RX line, that is initially set to 20 ms and can be selected later in the ranges 0 - 9 ms, 10 - 90 ms, and 100 ms - 1 s. That accounts for slower or faster host systems and therefore suitable also for software-based serial communication (bit banging).
Since the EasyVR serial interface also is software-based, a very short delay might be needed before transmitting a character to the module, especially if the host is very fast, to allow the EasyVR to get back listening to a new character.The communication is host-driven and each byte of the reply to a command has to be acknowledged by the host to receive additional status data, using the space character. The reply is aborted if any other character is received and so there is no need to read all the bytes of a reply if not required.Invalid combinations of commands or arguments are signaled by a specific status byte, that the host should be prepared to receive if the communication fails. Also a reasonable timeout should be used to recover from unexpected failures. If the host does not send all the required arguments of a command, the command is ignored by the module, without further notification, and the host can start sending another command. The module automatically goes to lowest power sleep mode after power on. To initiate communication, send any character to wake-up the module. The c# software application presents two functionalities:
Play the sounds or tracks in PC. Send that sound to the user, so he can listen to this sound in his headphone.
1. Make list of sound files: there is button that opens file dialog, so user can choose different files from different places and put them in list .all files has path and name.
Page | 16

Wireless Headphones 2012
Figure (2, 12): The interface of C# sound player.
2. Play function: the user press a button to start playing his list, we can take the path of files and play it in laptop as any media player in the laptop.If he wants to listen by the wireless headphone then, he press another button which read the file and send it as binary one by serial port.Serial Port is connected with XBee that send the file to the other XBee on the receiver to hear it on the headphone.
3. Forward function: user can choose the next track in the list to play, so the next file in the list will be sent now via XBee and the play function will be executed.
4. Backward function: user can choose the previous track in the list to play, so the next file in the list will be sent now via XBee and the play function will be executed.
5. Stop function: it can stop the current playing sound file.
If you are near the computer, you have the choice to listen the music from the same computer or from wireless headphone.
6. Control volume and rate of sound: user can control the volume of the sound and the baud rate.
7. Thread function: single thread is used to perform the request. If another request comes, this thread appends its work and starts the new work depending on what user like to listen.
threadObj = new Thread(new ThreadStart(ThreadFunc)); threadObj.Start(); threadObj.Abort();
8. Mp3reader class: this class can make file stream and play the mp3 player.
The sound file is transmitted to the receiver depends on its request. This transmission is done by using the XBee Shield that connected to the computer via serial port. The file is sent to MAX232 by serial COM port to pin R1in, then it is transferred to XBee's serial receive pin to (Din) from pin R1out in MAX232.
Page | 17
Wireless Headphones 2012
Figure (2, 13): XBee serial connection with MAX232
This XBee send the file via wireless to the other XBee in the receiver. The second XBee receives data on its serial receive pin (Din) and then send it to the headphone speaker via its serial transmission pin (Dout).That file must be converted from digital to analog before it enters wireless headphones speaker.
User has the ability to make control on what he is listening to. And that can be done in two ways:
1.By using different push buttons connected with PIC Microcontroller.2.By using EasyVR as a voice recognition.
About the first one:Four push buttons are connected to PIC Microcontroller on PORT C, every one of these buttons can make different task. There are used to perform Play, Stop, Backward and Forward functions.
While the user is listening to a track, if he press a button among the four above, it make an interrupt on the PIC and the current track stopped automatically in order to perform the request depending on the user choice.
The XBee which is connected to PIC Microcontroller can also receive that request by its Din and Dout pins that are connected to PORT D on pins D0 and D1 respectively on the Microcontroller that in turn are used to transmit and receive data serially.
Figure (2, 14): XBee connection with PIC Microcontroller
Page | 18
MAX 232 #1 #2

Wireless Headphones 2012
That XBee send the request to open a new file or stop the current one to the XBee #1 connected with the PC.
XBee #1 receive that request and send the new file from the list found in the sound player program again to XBee #2 in the receiver, or it stop the current track depending on the request that reach it from XBee #2.
After the file is received to XBee #2, it transfer it to the headphone connected with it which in turn out this file in the speakers as voice converted from digital to analoge using Low Pass Filter(LPF) .we used this because XBee doesn’t contain DAC.
RC Filter RL Filter
Figure(2, 17): Low Pass Filter
ωc = 1/RC fc = 1/(2πRC) ωc = R/L fc= R/(2πL)
The values that are selected for the LPF can be calculated from the cutoff frequency for the filters with the above equations. Since the output of the LPF is going to be DC a relatively low cutoff frequency can be used.
A cutoff frequency of 187Hz leaves a good amount of room for intentional AC signals to make it through the LPF while significantly attenuating the PWM.
About the other way of control:
After wake up and setup the EasyVR, The user could choose the order he want (play, stop, backward, forward) by speaking that order in the microphone of its headphone. If spoken word is one of these orders that we train the module on ,then the XBee send specific char to another XBee that is connected to PC .The XBee that is connected with serial port , receive that char . Serial port read this char then makes interrupt for pervious procedure and begin executing a new procedure depending on the given order. For example if order is forward, Backward, play, and stop send ‘1’,’2’,’3’,’ and 4’ to XBee respectively.
In the code that used to implement the EasyVR, The pseudo-instruction ( putc) transmits the specified character to the module, while (getc) waits for a reply character (a timeout is not explicitly handled for simple commands, but should be always implemented if possible).
Page | 19

Wireless Headphones 2012
This piece of code is used to make wake up procedure on EasyVR # wake up or interrupt recognition or do nothing# (uses a timeout or max repetition count)DOSEND 'b'LOOP UNTIL RECEIVE = 'o'
And this pseudo code is used to make the setup procedure on EasyVR to make it ready for receiving words that the user speaks in its microphone
# ask firmware idSEND 'x'IF NOT RECEIVE = 'x' THEN ERROR# send ack and read status (expecting id=0)SEND ' 'id = RECEIVEIF id = 'A' THEN# it’s a VRbotELSE IF id = 'B' THEN# it’s an EasyVRELSE# next generation?END IF# set timeout (5 seconds)SEND 'o'SEND 'F'
IF RECEIVE = 'o' THEN OK ELSE ERROR
In EasyVR there are two ways to train it on a group of words. Either by using SI (speaker independent) command which is used if we want to train it on a default group of words. In this project we need to train it on a new group of words so SD(speaker dependent) command is chosen.
This pseudo code is used to make Recognition of an SD command# start recognition in group 1SEND 'd'SEND 'B'# wait for reply:result = RECEIVEIF result = 'r' THEN# successful recognition, ack and read resultSEND ' 'command = RECEIVE – 'A'# perform actions according to commandELSE IF result = 't' THEN# timed out, no word spokenELSE IF result = 'e' THEN# error code, ack and read which oneSEND ' 'error = (RECEIVE – 'A') * 16SEND ' 'error = error + (RECEIVE – 'A')# perform actions according to errorELSE# invalid request or replyERROR
END IF
Page | 20

Wireless Headphones 2012
After characters‘d’ and ‘b’ are received from EasyVR, the user can talk in the microphone to give his required order.
Chapter 3:
Problems and Results:We faced many problems with designing this project:
The first problem we have faced is waiting for a long time for the arrival of the two Xbee shields to the electronics market because there was a problem in the factory which provides them. These two XBees were needed to make the wireless connection and they are a basic part of the transmitter and receiver.
Page | 21

Wireless Headphones 2012
We have tried to use another thing for connection which is a Wi-Fi shield, but it has a Volatile memory and every time we operate it, we have to reconfigure its IP address. So we have decided to return to use the XBee shield due to its applicability and ease in dealing with.
Continuing our work in the project was completely depended on that two XBees, so we have taken a very long time about three weeks to continue and return to our work.
The second problem is that XBee hasn’t DAC . We have used an ordinary speaker from an old device but, we have just heard a noise. Then we have used a crystal speaker, but the result was the same. After that we have used a headphone speaker and a low pass filter but unfortunately, the output remains just a noise. Until now we are working and trying to solve that problem.
A general problem that most students suffer from is that the electronics market is far from the university, so if any IC is broken or cracked or even it is a unique one and we need it strongly, we take a long time to bring it, and sometimes it is not available and we have to wait until it reaches. So, the limited and restricted time to complete our work was the real disastrous problem.
As a result of this project, the wireless connection between the two XBees has done successfully. And a software program to read mp3 files in c# has been done successfully also.The orders of play stop, forward and backward have been reached from transmitter to receiver.Control on sounds tracks that have to be sent to the headphone has been done by two ways:
By using four push buttons. By using voice recognition to several words.
Until now, we are working on minimizing the noise of the output sound as possible
Chapter 4:
4.1 Conclusion:
Wireless headphones project enables the user to listen to a list of sound tracks from its laptop or computer from a far distance without the use of any wires connection.And it has more privileges over the Bluetooth connection due to large distance that the XBee support which can reach up to 100 m. also, the voice transmitted via XBee is received continuously and better than that via Bluetooth.Control on tracks is also possible using two ways:
By push buttonsPage | 22

Wireless Headphones 2012
By voice recognition
4.2 Future Work:We can do several improvements and developments to our project that make it more advanced.
This project can be developed to give you the ability to listen to sounds from any device that outs sounds like mp3 player, TV or even a mobile.
Make chatting by listening and speaking also from a very long distance far from the device.
Add another control way on sound. For example, by hand movement; so you could change the current track by raising up or falling down your finger, play and stop by using a movement of overall hand for instance.
Using other components to make wireless connection which can reach very long distances in Km.
Several choices of sound effects can be performed on the output sound of the headphone.
Chapter 5:References:
Tutorial for XBee Shield:http://www.sparkfun.com/products/9976
Manual for EasyVR:http://www.veear.eu/
DataSheet for PIC18F4620:http://ww1.microchip.com/downloads/en/devicedoc/39626b.pdf
Page | 23

Wireless Headphones 2012
DataSheet for different IC’s:www.alldatasheet.com
C# pieces of codes helped in implementing the sounds player program:http://www.codeproject.com/KB/cs/
Chapter 6:
AppendicesAppendix A: PICC code for implementing control on headphonechar result;int flage ;void main(){
setup_adc_ports(NO_ANALOGS|VSS_VDD); setup_adc(ADC_OFF|ADC_TAD_MUL_0);
Page | 24

Wireless Headphones 2012
setup_psp(PSP_DISABLED); setup_spi(FALSE); setup_wdt(WDT_OFF); setup_timer_0(RTCC_INTERNAL); setup_timer_1(T1_DISABLED); setup_timer_2(T2_DISABLED,0,1); setup_comparator(NC_NC_NC_NC); setup_vref(FALSE); setup_oscillator(False);
flage = 0; result=' ';while(result != 'o'){fputc('b',easy);while(!kbhit(easy)){restart_wdt();}result=fgetc(easy);
}
delay_ms(10);result = ' ';fputc('x',easy);while(!kbhit(easy)){restart_wdt();}result=fgetc(easy);result = ' ';delay_ms(10);fputc(' ',easy);while(!kbhit(easy)){restart_wdt();}result=fgetc(easy);result = ' ';delay_ms(10);fputc('l',easy);fputc('A',easy);while(!kbhit(easy)){restart_wdt();}result=fgetc(easy);result = ' ';
delay_ms(10);fputc('o',easy);fputc('F',easy);while(!kbhit(easy)){restart_wdt();}result=fgetc(easy);
while(true){//for button
Page | 25

Wireless Headphones 2012
if(!input(PIN_B2) ) // if we press a button on portB pin1{
delay_ms(250); fputc('v');}
if(!input(PIN_B1) ) // if we press a button on portB pin2{delay_ms(250);fputc('2');}
if(!input(PIN_B0) ) // if we press a button on portB pin3{
delay_ms(250);printf("3");fputc('3');} flage = 1; restart_wdt();
delay_ms(10); if(flage) { result = ' '; delay_ms(10); fputc('d',easy); fputc('b',easy);while(!kbhit(easy)){restart_wdt();}result=fgetc(easy); if(result == 'r'||result=='s') { delay_ms(10);putc(' ',easy);while(!kbhit(easy)){restart_wdt();}result=fgetc(easy);if(result == 'A'){fputc('4',xbee);}if(result == 'B'){fputc('1');}if(result == 'C'){fputc('2');
Page | 26

Wireless Headphones 2012
}else if(result == 'd'){fputc('3');}
} else if(result == 't') { //timeout } else if(result == 'e') { //error }flage = 0; }restart_wdt();}}
Appendix B: C# sounds player to transmit voice to XBee serially:
private void cmdOpen_Click(object sender, EventArgs e) { OpenFileDialog ofd = new OpenFileDialog(); int Counter; ofd.Multiselect = true; ofd.Title = "Open"; ofd.Filter = "MPEG Files(*.mp3)|*.mp3";
Page | 27

Wireless Headphones 2012
if (ofd.ShowDialog() == DialogResult.OK) { foreach (string Item in ofd.FileNames) {
Counter = LstFiles.Items.Count + 1; LstFiles.Items.Add(Counter + ". " + Item); //Add filename to arraylist Files.Add(Item); } } }
void ThreadFunc() { MessageBox.Show("" + Idx);
if (s == "1" || s == "11") { MessageBox.Show("one is read"); s = "";
Idx = LstFiles.SelectedIndex; Idx++; MessageBox.Show("idx2 is"+Idx);
if (Idx >= LstFiles.Items.Count) { // Idx = (LstFiles.Items.Count - 1); Idx = 0;
} LstFiles.SelectedIndex = Idx; fun_n(); Mp3SrcFile1 = (string)Files[LstFiles.SelectedIndex]; SizeOfaudio = File.ReadAllBytes(Mp3SrcFile1); leng = SizeOfaudio.Length; fun_n(); serialPort1.Write(SizeOfaudio, 0, leng); }//end 1
else if (s == "2") { Idx = LstFiles.SelectedIndex; Idx--;
if (Idx < 0) { Idx = (LstFiles.Items.Count - 1); } LstFiles.SelectedIndex = Idx; fun_n(); Mp3SrcFile1 = (string)Files[LstFiles.SelectedIndex];
SizeOfaudio = File.ReadAllBytes(Mp3SrcFile1);//you sure leng = SizeOfaudio.Length; fun_n();
Page | 28

Wireless Headphones 2012
serialPort1.Write(SizeOfaudio, 0, leng);
//
} else if (s == "3")//pause switch { mp3.Pause(); serialPort1.Write(""); } else if (s == "4")//play { if (Mp3SrcFile != "") { mp3.Filename = Mp3SrcFile;
if (!mp3.isPaused) { mp3.Play(); //Set the volume mp3.SetVolume(tVolume.Value); //Set speed rate mp3.SpeedRate(tRate.Value); } } Mp3SrcFile1 = (string)Files[LstFiles.SelectedIndex];
SizeOfaudio = File.ReadAllBytes(Mp3SrcFile1); leng = SizeOfaudio.Length; fun_n(); serialPort1.Write(SizeOfaudio, 0, leng);
}
Page | 29