engine refresh (top end) paulp38apaulp38a.com/content/01-06-1 engine refresh (top end) _...
TRANSCRIPT

5/28/2019 Engine Refresh (top end) | PaulP38A.com
paulp38a.com/range-rover-p38/engine-refresh/ 1/49
Engine Refresh (top end)
Refreshing the Top of the Rangie V8 with Motronic EMS
This procedure was performed on a 1999 4.0L V8 petrol engine with the Motronic (Bosch/Thor) EngineManagement System (EMS) and will be near identical for all 1999-2002 P38 4.0 or 4.6 V8 engines. Mostmechanical components other than coil packs and inlet manifold are near-identical for 1994-1998 P38 4.0or 4.6 V8 engines, but the EMS will be different (Sagem GEMS).
This started as an investigation in to a slow coolant leak that had been present since I bought the car. Itbecame more visible when I changed the coolant from the normal green stuff to the red stuff. I was goingthough about 0.5L of coolant a week and the leak was most obvious when viewed from underneath aroundthe starter motor, also leaking back to the bell housing. The car had just clicked over 160,000Km so Ifigured I might as well give it a bit of a refresh while I was at it.
No problems with overheating, the temperature always stayed below or at half way. No signs of oil in thewater or water in the oil. In my view the car ran pretty well otherwise.
PaulP38A.comRange Rovers and other Big Boy Toys

5/28/2019 Engine Refresh (top end) | PaulP38A.com
paulp38a.com/range-rover-p38/engine-refresh/ 2/49
Prerequisites required for the job:
1. somewhere dry and preferably warm to carry out the work with lots of space available to lay stuff out2. an understanding spouse3. a spare vehicle to run down to the auto shop when you forget something4. a blanket to throw over the exposed bits of the engine overnight, particularly in cold or damp climates5. a good set of 12 point sockets, 3/8″ and 1/2″ drive ranging from 8mm up to 32mm6. a good set of 6 point sockets, same sizes as above7. a 1/4″ drive with 8mm socket and a variety of extension bars (for the heats shields and coil pack)8. a couple of very good 6 point 16mm sockets (for the head bolts)9. torque wrench with 1/2 drive
10. breaker bar (at least 450mm) with 1/2″ drive11. selection of flat and phillips head screwdrivers12. lots of WD-40 and degreaser13. heaps of rags and cleaning cloths14. scourers, brushes and abrasive cloth for cleaning dirty/greasy bits15. buckets, baths, plastic tubs for cleaning and storing bits16. sheets of paper and pen/pencil for making reminder sheets/templates for miscellaneous parts17. strong work lights above the engine and a couple of torches for fiddly spots18. a digital camera to take photos EVERY STEP so you can remember what goes where19. a couple of benches to lay stuff out on for cleaning and arranging20. ventilation (the cleaning materials will make you sick)21. music (radio will do just fine, but I like to mix it up a little with Queen, Midnight Oil, Scissor Sisters,
Shinedown and Metallica)22. coffee (no alcohol until you have finished for the day)23. old clothes (you will get stuff all over you)24. disposable latex gloves (unless you like to be picking bits of dirt/grease/whatever off your hands for
days after)25. safety glasses (for when you are under the car and bits of dirt/grease/fluid/etc fall on your face)26. air compressor (to adjust the height of the car as required if you have an EAS Emergency bypass kit)
or floor jack27. battery trickle charger (to top up the main battery before strating the car again)28. PC with Rave CD and Internet connection (handy if you have both)
Replacement parts required:
1. VRS kit – contains various gaskets, o-rings and other bits to replace the parts you pull out2. cylinder heads (or get the old ones cleaned while they are out)3. head gaskets – good ones such as Elring4. valley gasket (e.g. Payen) and end seals5. head bolts6. serpentine belt7. spark plugs and leads (optional)8. hoses – optional but you might as well9. selection of worm-drive hose clamps ranging in size from 12mm to 40mm to replace the old ones
10. engine oil and new oil filter11. air filter12. cable ties to replace the ones you break13. a mate who knows more about Rover engines than you do
1.0 Preparation
Take a few photos of the engine bay for a record of what it all looks like and what goes where. Use a goodquality (but lightweight) digital camera with flash and take photos at a higher resolution so you can reviewthem in detail if you need to. For this project I used a Canon IXUS which was small enough to slip in my

5/28/2019 Engine Refresh (top end) | PaulP38A.com
paulp38a.com/range-rover-p38/engine-refresh/ 3/49
pocket so it was always handy, and took photos at 8 MegaPixels. Of course, the photos I’ve published onthe web are much lower resolution.
Move the bonnet up and out of the way to make access easier. Remove the C-clip from the bonnet struts(both sides).
http://paulp38a.com/gallery/var/albums/99RR/Engine/RR-Engine-004.JPG?m=1408714432
Un-hook the struts, and raise the bonnet to the upright position. Either hold the bonnet upright using thehinge extension arms or secure the bonnet from above using rope or an octopus strap.

5/28/2019 Engine Refresh (top end) | PaulP38A.com
paulp38a.com/range-rover-p38/engine-refresh/ 4/49
I found it useful to look around awkward places using a home-made endoscope… a laptop PC with a webcam attached to an inspection mirror. This also allowed me to take photos if I found something interesting.
2.0 Here we go
Disconnect and remove the battery. You won’t be needing it for quite a while.

5/28/2019 Engine Refresh (top end) | PaulP38A.com
paulp38a.com/range-rover-p38/engine-refresh/ 5/49
Start by removing the easy bits like the air inlet pipe, air filter box top and MAF
The MAF multi-plug didn’t want to disconnect so I just moved the MAF out of the way

5/28/2019 Engine Refresh (top end) | PaulP38A.com
paulp38a.com/range-rover-p38/engine-refresh/ 6/49
LHS – use a flat head screwdriver to unclip the IAC air intake hose, and remove the hose
Centre – release the throttle and cruise control cables, and move them out of the way

5/28/2019 Engine Refresh (top end) | PaulP38A.com
paulp38a.com/range-rover-p38/engine-refresh/ 7/49
LHS – Disconnect the EVAP pipe, breather pipe, and TP sensor multiplug.
Centre – remove breather and coolant hoses from throttle body. Use a rag to soak up any coolant leakage.

5/28/2019 Engine Refresh (top end) | PaulP38A.com
paulp38a.com/range-rover-p38/engine-refresh/ 8/49
RHS – disconnect the engine breather from the plenum chamber
RHS – remove the bolt securing the coolant rails

5/28/2019 Engine Refresh (top end) | PaulP38A.com
paulp38a.com/range-rover-p38/engine-refresh/ 9/49
LHS – remove cable ties from engine harness, diconnect multi-plug from IAC valve, and release the HTleads from the clips as shown. Now would be a good time to disconnect the HT leads from the spark plugstoo.
Centre rear – remove the 2 bolts at the top of the coil pack. A universal joint on the socket makes this alittle easier.

5/28/2019 Engine Refresh (top end) | PaulP38A.com
paulp38a.com/range-rover-p38/engine-refresh/ 10/49
Loosen the 2 bolts securing the bottom of the coil pack but don’t remove them yet.
Remove the 6 bolts holding the upper manifold.

5/28/2019 Engine Refresh (top end) | PaulP38A.com
paulp38a.com/range-rover-p38/engine-refresh/ 11/49
With the manifold and gasket removed.
Manifold and associated bits on the bench. Notice the sheet of paper? Each set of bolts sits inside a boxwith a description to make it simpler to remember what goes where.

5/28/2019 Engine Refresh (top end) | PaulP38A.com
paulp38a.com/range-rover-p38/engine-refresh/ 12/49
3.0 Left Hand Rocker Cover
Remove the screw holding the oil dipstick tube
Remove the 4 bolts holding the rocker cover on.

5/28/2019 Engine Refresh (top end) | PaulP38A.com
paulp38a.com/range-rover-p38/engine-refresh/ 13/49
LH rocker cover and gasket removed
4.0 Drain Cooling System
Remove the expansion tank filler cap to prevent vacuum, and remove the drain plug from the bottom of theradiator.

5/28/2019 Engine Refresh (top end) | PaulP38A.com
paulp38a.com/range-rover-p38/engine-refresh/ 14/49
If you use oil pan type containers as shown, you will need 2 of them.
Note: the coolant is actually red below. Must be some oil residue in the pan discolouring it.
5.0 Right Hand Rocker Cover

5/28/2019 Engine Refresh (top end) | PaulP38A.com
paulp38a.com/range-rover-p38/engine-refresh/ 15/49
RHS – remove the bolts holding the coolant rails, and snip the engine harness clips at the right of thephoto below.
If you can, remove the clips holding the heater/cooling hoses at the firewall. I couldn’t so had to come backto it later.

5/28/2019 Engine Refresh (top end) | PaulP38A.com
paulp38a.com/range-rover-p38/engine-refresh/ 16/49
For now, I settled on disconnecting them at the pipes instead.
Remove the bolt holding the inner coolant rail to the inlet manifold as shown below.
With a bit of wiggling (and WD-40) the rail can be removed. Check that the o-ring is intact or be preparedto replace it.

5/28/2019 Engine Refresh (top end) | PaulP38A.com
paulp38a.com/range-rover-p38/engine-refresh/ 17/49
Disconnect the HT leads from the clips on the rocker cover (and spark plugs if you have not already donethis), and move the hoses and pipes clear of the cover as best you can.
Remove the 4 bolts holding the rocker cover and carefully remove the rocker cover and gasket.
So far, so good. Inside of the rockers is covered well in oil and is a red-brown colour. Looks promising.

5/28/2019 Engine Refresh (top end) | PaulP38A.com
paulp38a.com/range-rover-p38/engine-refresh/ 18/49
6.0 Lower Inlet Manifold
Remove the multiplugs from each side of the coil pack.
Now you have better access to the bottom of the coil pack, remove the 2 bolts that you loosened earlier.The coil packs may now be removed.

5/28/2019 Engine Refresh (top end) | PaulP38A.com
paulp38a.com/range-rover-p38/engine-refresh/ 19/49
Release the multiplugs to the injectors.
Unclip the leads from the fuel rails. These are quite brittle and you will probably break one or more of them.

5/28/2019 Engine Refresh (top end) | PaulP38A.com
paulp38a.com/range-rover-p38/engine-refresh/ 20/49
Place a rag underneath the fuel inlet pipe at the rear of the manifold to catch any spillage.
Disconnect the fuel pipe by pressing the tabs on the side and pulling backwards. Cap both exposed partsof the pipe.

5/28/2019 Engine Refresh (top end) | PaulP38A.com
paulp38a.com/range-rover-p38/engine-refresh/ 21/49
6.1 RELEASE THE AUXILLARY DRIVE BELT
Remove the bolt holding the washer bottle neck in place, or in my case, remove the cable tie.
Release the two clips holding the fan shroud in place, and remove the shroud.

5/28/2019 Engine Refresh (top end) | PaulP38A.com
paulp38a.com/range-rover-p38/engine-refresh/ 22/49
RAVE says to remove the fan, but if you are careful this is not necessary.

5/28/2019 Engine Refresh (top end) | PaulP38A.com
paulp38a.com/range-rover-p38/engine-refresh/ 23/49
To improve access around the fan, remove the top radiator hose.
Remove the two bolts and spacers holding the drive belt cover in place, and remove out of the way.

5/28/2019 Engine Refresh (top end) | PaulP38A.com
paulp38a.com/range-rover-p38/engine-refresh/ 24/49
Release the drive belt tensioner and remove the belt.
Hint: use a 15mm spanner or socket on the bolt and lift/rotate clockwise to move the tensioner so the beltcan be removed. The photo below shows the tensionerbeing removed after the belt has been released.
6.2 REMOVE THE ALTERNATOR

5/28/2019 Engine Refresh (top end) | PaulP38A.com
paulp38a.com/range-rover-p38/engine-refresh/ 25/49
Remove the 2 nuts securing leads to the alternator and move the leads out of the way.
Remove the two bolts holding the alternator to the mounting bracket. You may need to use a hammer orlarge screwdriver to persuade the alternator to shift off the collars.
Alternator removed.

5/28/2019 Engine Refresh (top end) | PaulP38A.com
paulp38a.com/range-rover-p38/engine-refresh/ 26/49
6.3 REMOVE THE A/C COMPRESSOR
Disconnect the mutliplug from the compressor.
Remove the four bolts securing the compressor and move the compressor out of the way.

5/28/2019 Engine Refresh (top end) | PaulP38A.com
paulp38a.com/range-rover-p38/engine-refresh/ 27/49
6.4 REMOVE THE POWER STEERING PUMP
Remove the two bolts securing the pump and move it out of the way.
6.5 REMOVE THE JOCKEY PULLEY
Remove the bolt holding the jockey pulley and remove pulley.

5/28/2019 Engine Refresh (top end) | PaulP38A.com
paulp38a.com/range-rover-p38/engine-refresh/ 28/49
6.6 REMOVE LH BRACKET
Remove the four bolts and nut securing the bracket and remove the bracket.
As I had left the fan in place, the bracket could not be removed, so I simply slid the bracket forward on theremaining threaded rod and rotated it out of the way.

5/28/2019 Engine Refresh (top end) | PaulP38A.com
paulp38a.com/range-rover-p38/engine-refresh/ 29/49
6.7 REMOVE TOP HOSE OUTLET PIPE
Remove the bolt securing the top hose outlet pipe to the alternator bracket.
Remove the three bolts holding the pipe flange to the lower manifold.

5/28/2019 Engine Refresh (top end) | PaulP38A.com
paulp38a.com/range-rover-p38/engine-refresh/ 30/49
Remove the coolant temp multiplug.
Remove the temp sensor.

5/28/2019 Engine Refresh (top end) | PaulP38A.com
paulp38a.com/range-rover-p38/engine-refresh/ 31/49
6.8 REMOVE LOWER MANIFOLD AND VALLEY GASKET
Remove the twelve bolts securing the inlet manifold assembly. Refer to RAVE for correct sequence.
The manifold gasket is secured at each end by a clamp plate and bolt. Remove the bolts, clamps, gasketand rubber seals.

5/28/2019 Engine Refresh (top end) | PaulP38A.com
paulp38a.com/range-rover-p38/engine-refresh/ 32/49
I’ve seen much worse looking engine internals than this.
Old valley gasket, rubber end seals and clamps removed.
5/28/2019 Engine Refresh (top end) | PaulP38A.com
paulp38a.com/range-rover-p38/engine-refresh/ 33/49
7.0 Remove RH Exhaust Manifold Gasket
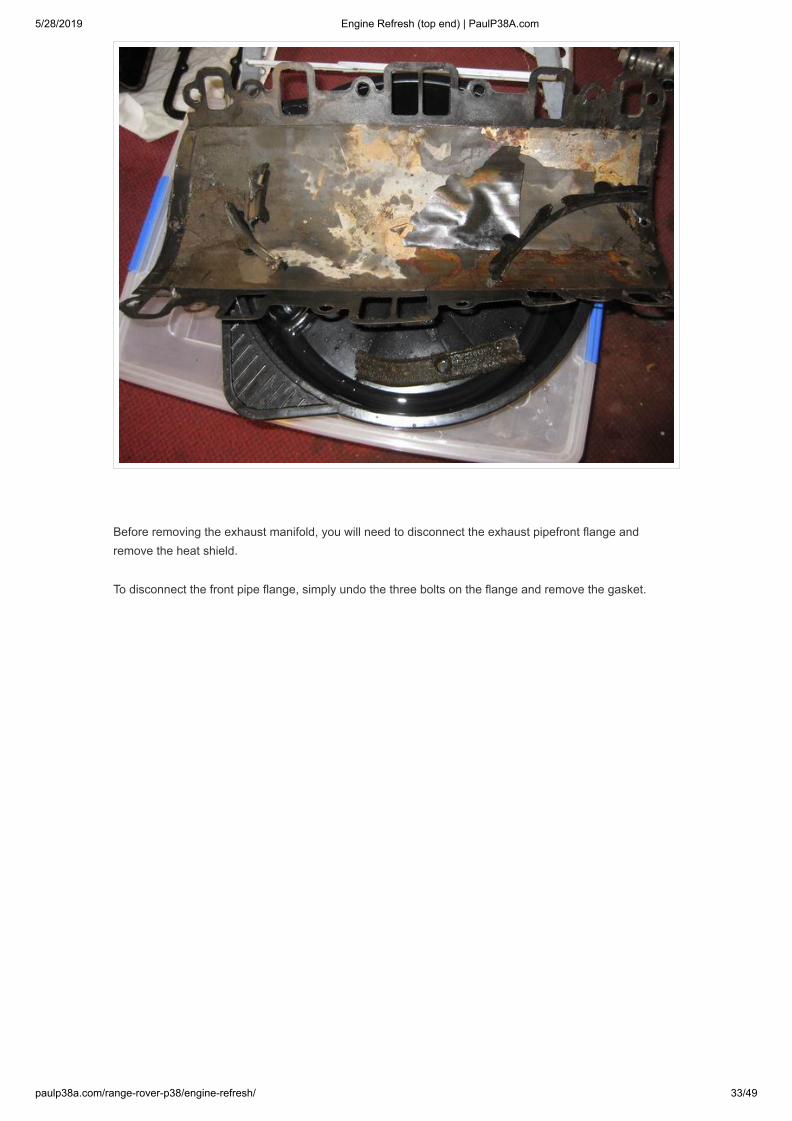
Before removing the exhaust manifold, you will need to disconnect the exhaust pipefront flange andremove the heat shield.
To disconnect the front pipe flange, simply undo the three bolts on the flange and remove the gasket.

5/28/2019 Engine Refresh (top end) | PaulP38A.com
paulp38a.com/range-rover-p38/engine-refresh/ 34/49
To remove the heat shield from the engine bay, you will need to remove the intermediate steering shaft.See Section 7.1 below.
To remove the intermediate steering shaft, it will be somewhat simpler if you remove the RH inner wheelarch lining. I didn’t take photos of this procedure, but there are only about 6 clips holding the inner arch inplace.
There are eight 8mm bolts holding the RH heat shield on.

5/28/2019 Engine Refresh (top end) | PaulP38A.com
paulp38a.com/range-rover-p38/engine-refresh/ 35/49
The bottom bolt caused me a lot of hassles as it was rusted and rounded. Once the RH inner guard wasremoved, I was able to drill out the heat shield and the remnants of the bolt could be removed.
7.1 REMOVE THE STEERING INTERMEDIATE SHAFT
Before removing the shaft, ensure that the steering is locked and the wheels are in the straight-aheadposition. Make sure that the key is removed from the ignition.

5/28/2019 Engine Refresh (top end) | PaulP38A.com
paulp38a.com/range-rover-p38/engine-refresh/ 36/49
With the RH inner guard removed it is reasonably simple to access the bolts holding the steeringintermediate shaft in place.
Spray the shaft and splines with a liberal coating of WD-40 to assist removal.
Remove the bolt holding the upper uni joint to the steering column
Remove the bolt holding the lower uni joint to the shaft.

5/28/2019 Engine Refresh (top end) | PaulP38A.com
paulp38a.com/range-rover-p38/engine-refresh/ 37/49
From above, remove the bolt holding the lower uni joint to the steering box.
Gently work the lower uni joint up the shaft, and the upper uni joint downwards until the shaft can beremoved.

5/28/2019 Engine Refresh (top end) | PaulP38A.com
paulp38a.com/range-rover-p38/engine-refresh/ 38/49
7.2 REMOVE RH EXHAUST MANIFOLD
With the intermediate steering shaft removed and the eight heat shield bolts removed, it is fairly simple toremove the heat shield.
Remove the eight bolts holding the exhaust manifold on, remove the two gaskets and remove the manifoldfrom the engine bay.

5/28/2019 Engine Refresh (top end) | PaulP38A.com
paulp38a.com/range-rover-p38/engine-refresh/ 39/49
7.3 FOUND THE LEAK!
Only after removing the RH heat shield and exhaust manifold did it become obvious where the mysteriouscoolant leak was coming from.
At the bottom of the head gasket near number 8 cylinder there was a small coolant leak, dripping on to thestarter motor. As I would see later when the cylinder head was removed, the leak was external only.

5/28/2019 Engine Refresh (top end) | PaulP38A.com
paulp38a.com/range-rover-p38/engine-refresh/ 40/49
8.0 Remove LH Exhaust Manifold Gasket
By comparison the RH exhaust manifold, the LH one is quite easy.
Undo the three bolts on the front pipe flange.
Remove the seven 8mm bolts holding the heat shield in place and remove the shield.
5/28/2019 Engine Refresh (top end) | PaulP38A.com
paulp38a.com/range-rover-p38/engine-refresh/ 41/49
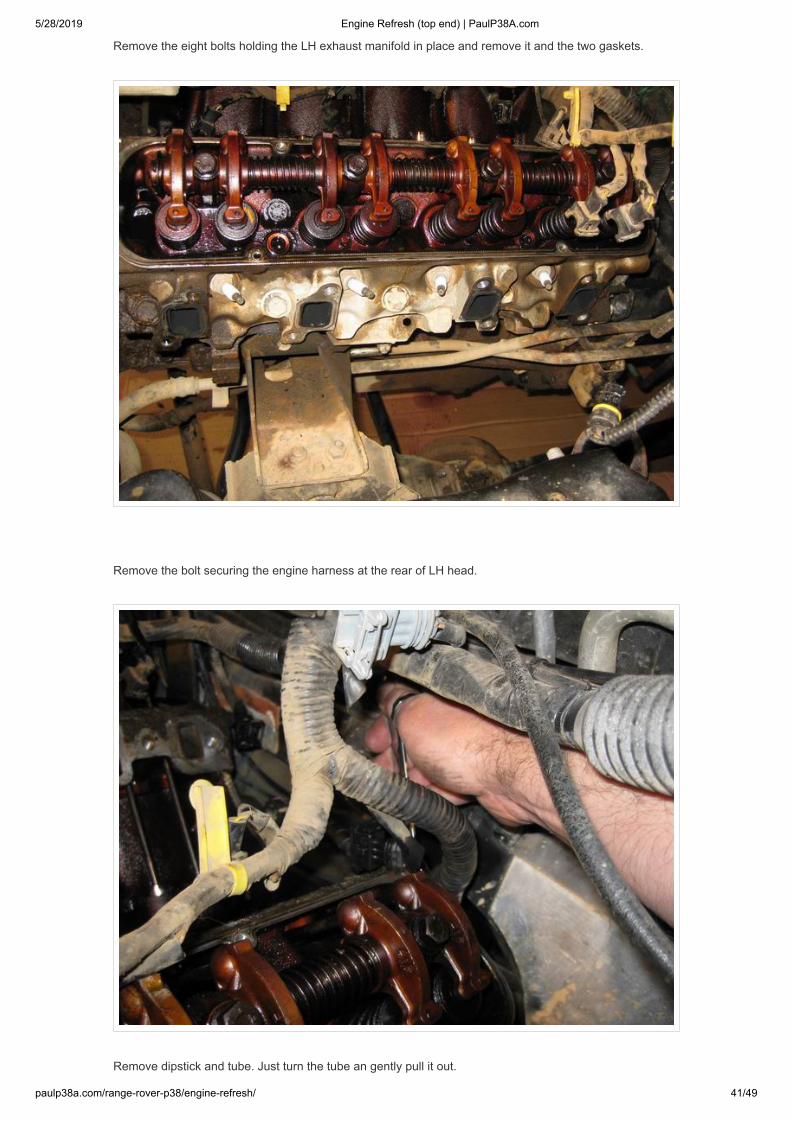
Remove the eight bolts holding the LH exhaust manifold in place and remove it and the two gaskets.
9.0 Remove LH Head Gasket
Remove the bolt securing the engine harness at the rear of LH head.
Remove dipstick and tube. Just turn the tube an gently pull it out.

5/28/2019 Engine Refresh (top end) | PaulP38A.com
paulp38a.com/range-rover-p38/engine-refresh/ 42/49
It will be easier to remove the LH cylinder head if you can move the engine harness out the way. To do thisyou will need to disconnect the LH Knock Sensor cable which runs under the front LH bracket and back upunder the engine.
Disconnect the intermediate bracket on the cable at the LH side of the engine

5/28/2019 Engine Refresh (top end) | PaulP38A.com
paulp38a.com/range-rover-p38/engine-refresh/ 43/49
Remove the Knock Sensor and withdraw the cable to the top of the engine and out of the way of the LHcylinder head.
Remove the rocker shaft assembley, push rods, and cylinder head bolts as described in RAVE. i.e. undothe four rocker shaft bolts progressively, store the push rods in their fitted order, undo the ten cylinder headbolts in the specified order.

5/28/2019 Engine Refresh (top end) | PaulP38A.com
paulp38a.com/range-rover-p38/engine-refresh/ 44/49
LH cylinder head removed.
9.0 Remove RH Head Gasket
Remove the earth lead from the alternator bracket

5/28/2019 Engine Refresh (top end) | PaulP38A.com
paulp38a.com/range-rover-p38/engine-refresh/ 45/49
Remove bolts holding oil cooling pipe below alternator bracket

5/28/2019 Engine Refresh (top end) | PaulP38A.com
paulp38a.com/range-rover-p38/engine-refresh/ 46/49
Remove aux drive belt tensioner (if not already removed previously).
There are four bolts holding the alternator mounting bracket in place. Remove these and the bracket.

5/28/2019 Engine Refresh (top end) | PaulP38A.com
paulp38a.com/range-rover-p38/engine-refresh/ 47/49
Same process as the LH head… remove the rocker shaft assembly, push rods, and cylinder head bolts asdescribed in RAVE. i.e. undo the four rocker shaft bolts progressively, store the push rods in their fittedorder, undo the ten cylinder head bolts in the specified order.
Gently remove the RH cylinder head, taking care to not scratch or gouge the mating surfaces.
With the head removed.

5/28/2019 Engine Refresh (top end) | PaulP38A.com
paulp38a.com/range-rover-p38/engine-refresh/ 48/49
Showing location of the leak on the block.
…and on the head.

5/28/2019 Engine Refresh (top end) | PaulP38A.com
paulp38a.com/range-rover-p38/engine-refresh/ 49/49
…and the old gasket.
Next Page