english - hp® official site | laptop computers, desktops ...h10032. · 1 welcome ... hp image zone...
TRANSCRIPT

HP Photosmart 8200 series User's Guide
English

Copyrights and trademarks© Copyright 2005 Hewlett-PackardDevelopment Company, L.P.The information contained herein issubject to change without notice.Reproduction, adaptation, ortranslation without prior writtenpermission is prohibited, except asallowed under the copyright laws.
NoticeThe only warranties for HP productsand services are set forth in theexpress warranty statementsaccompanying such products andservices. Nothing herein should beconstrued as constituting anadditional warranty. HP shall not beliable for technical or editorial errorsor omissions contained herein.The Hewlett-Packard DevelopmentCompany, L.P. shall not be liable forincidental or consequential damagesin connection with, or arising out ofthe furnishing, performance, or use ofthis document and the programmaterial which it describes.
TrademarksHP, the HP logo, and Photosmart areproperty of Hewlett-PackardDevelopment Company, L.P.The Secure Digital logo is atrademark of the SD Association.Microsoft and Windows are registeredtrademarks of Microsoft Corporation.CompactFlash, CF, and the CF logoare trademarks of the CompactFlashAssociation (CFA).Memory Stick, Memory Stick Duo,Memory Stick PRO, and MemoryStick PRO Duo are trademarks orregistered trademarks of SonyCorporation.MultiMediaCard is a trademark ofInfineon Technologies AG ofGermany, and is licensed to theMMCA (MultiMediaCard Association).Microdrive is a trademark of HitachiGlobal Storage Technologies.xD-Picture Card is a trademark of FujiPhoto Film Co., Ltd., ToshibaCorporation, and Olympus OpticalCo., Ltd.Mac, the Mac logo, and Macintoshare registered trademarks of AppleComputer, Inc.iPod is a trademark of AppleComputer, Inc.
Bluetooth is a trademark owned by itsproprietor and used by Hewlett-Packard Company under license.PictBridge and the PictBridge logo aretrademarks of the Camera & ImagingProducts Association (CIPA).Other brands and their products aretrademarks or registered trademarksof their respective holders.The embedded software in the printeris based in part on the work of theIndependent JPEG Group.The copyrights to certain photoswithin this document are retained bythe original owners.
Regulatory modelidentification numberVCVRA-0503For regulatory identification purposes,the product is assigned a RegulatoryModel Number. The RegulatoryModel Number for the product isVCVRA-0503. This regulatory numbershould not be confused with themarketing name (HP Photosmart8200 series printer) or productnumber (Q3470).
Safety information Always follow basic safetyprecautions when using this productto reduce risk of injury from fire orelectric shock.
Warning To prevent fire orshock hazard, do not exposethis product to rain or anytype of moisture.
● Read and understand allinstructions in theHP Photosmart 8200 seriesQuick Start booklet.
● Use only a grounded electricaloutlet when connecting the unitto a power source. If you do notknow whether the outlet isgrounded, check with a qualifiedelectrician.
● Observe all warnings andinstructions marked on theproduct.
● Unplug this product from walloutlets before cleaning.
● Do not install or use this productnear water or when you are wet.
● Install the product securely on astable surface.
● Install the product in a protectedlocation where no one can step
on or trip over the power cord,and where the power cord willnot be damaged.
● If the product does not operatenormally, see thetroubleshooting information inthe onscreen HP PhotosmartPrinter Help.
● There are no operatorserviceable parts inside. Referservicing to qualified servicepersonnel.
● Use in a well-ventilated area.
Environmental statementsHewlett-Packard Company iscommitted to providing qualityproducts in an environmentally soundmanner.
Protecting the environmentThis printer has been designed withseveral attributes to minimize impacton our environment. For moreinformation, go to HP's Commitmentto the Environment website atwww.hp.com/hpinfo/globalcitizenship/environment/.
Ozone productionThis product generates noappreciable ozone gas (O3).
Paper useThis product is suited for the use ofrecycled paper according to DIN19309.
PlasticsPlastic parts over 24 grams (0.88ounces) are marked according tointernational standards that enhancethe ability to identify plastics forrecycling purposes at the end of theprinter life.
Material safety data sheetsMaterial Safety Data Sheets (MSDS)can be obtained from the HP websiteat www.hp.com/go/msds. Customerswithout Internet access shouldcontact HP Customer Care.
Recycling programHP offers an increasing number ofproduct return and recycling programsin many countries/regions, andpartners with some of the largestelectronics recycling centersthroughout the world. HP conservesresources by reselling some of itsmost popular products.

This HP product contains lead in thesolder, which may require specialhandling at the end of its life.Disposal of waste equipment byusers in private households in theEuropean Union:
This symbol on the product or itspackaging indicates that this productmust not be disposed of with yourother household waste. Instead, it isyour responsibility to dispose of yourwaste equipment by handing it over toa designated collection point for therecycling of waste electrical andelectronic equipment. The separatecollection and recycling of your wasteequipment at the time of disposal willhelp to conserve natural resourcesand ensure that it is recycled in amanner that protects human healthand the environment. For moreinformation about where you can dropoff your waste equipment forrecycling, please contact your localcity office, your household wastedisposal service, or the shop whereyou purchased the product.For more information regarding returnand recycling of HP productsgenerally, please visit: www.hp.com/hpinfo/globalcitizenship/environment/recycle/index.html.

Contents
1 Welcome................................................................................................................3Special features .....................................................................................................3Accessing the onscreen HP Photosmart Printer Help ............................................ 4Printer parts ...........................................................................................................4Available accessories ............................................................................................7Printer menu ..........................................................................................................8
2 Getting ready to print.........................................................................................11Loading paper ......................................................................................................11
Choosing the right paper ..............................................................................11Loading your paper ....................................................................................... 12
Inserting ink cartridges ......................................................................................... 14Purchasing replacement ink cartridges .........................................................14Ink cartridge tips ...........................................................................................14Inserting or replacing the ink cartridges ........................................................15
Inserting memory cards .......................................................................................17Supported file formats ..................................................................................17Inserting a memory card ...............................................................................18Removing a memory card ............................................................................19
3 Printing photos without a computer.................................................................21Selecting a photo layout ......................................................................................21Deciding which photos to print .............................................................................22Selecting photos to print ......................................................................................24Improving photo quality ........................................................................................ 25Getting creative ...................................................................................................26Printing photos .....................................................................................................28
Printing photos from a memory card ............................................................. 28Printing photos from a digital camera ...........................................................31Printing photos from an HP iPod ..................................................................32
4 Getting connected..............................................................................................35Connecting to other devices ................................................................................35Saving photos to a computer ...............................................................................36Connecting through HP Instant Share .................................................................37
5 Printing from a computer...................................................................................39Using creative options in the printer software ......................................................39
HP Image Zone ............................................................................................39HP Image Zone Express ..............................................................................40HP Instant Share ..........................................................................................40
Setting print preferences ...................................................................................... 40Open the onscreen Help ...............................................................................41HP Real Life technologies features ..............................................................41
6 Care and maintenance.......................................................................................43Cleaning and maintaining the printer ...................................................................43
Cleaning the outside of the printer ................................................................43Automatically cleaning the printhead ............................................................43Manually cleaning the ink cartridge contacts ................................................43
HP Photosmart 8200 series User's Guide 1

Printing a self test report ...............................................................................45Aligning the printer ........................................................................................ 46Printing a sample page .................................................................................46
Updating the software ..........................................................................................46Storing and transporting the printer and ink cartridges ........................................47
Storing and transporting the printer ..............................................................47Storing and transporting the ink cartridges ...................................................47
Maintaining the quality of photo paper .................................................................47Storing photo paper ......................................................................................47Handling photo paper ...................................................................................48
7 Troubleshooting.................................................................................................49Printer hardware problems ..................................................................................49Printing problems .................................................................................................50Error messages ...................................................................................................54
Paper errors .................................................................................................54Ink cartridge errors .......................................................................................56Memory card errors ......................................................................................60Computer and connectivity printing errors ....................................................62
8 HP Customer Care .............................................................................................65HP Customer Care by phone ...............................................................................65
Placing a call ................................................................................................66Return to HP repair service (North America only) ................................................66HP Quick Exchange Service (Japan only) ...........................................................67Additional warranty options ..................................................................................67
A Specifications.....................................................................................................69System requirements ...........................................................................................69Printer specifications ...........................................................................................69
B HP Warranty........................................................................................................73Index...........................................................................................................................75
2 HP Photosmart 8200 series

1 Welcome Thank you for purchasing an HP Photosmart 8200 series printer! With this new photoprinter you can print beautiful photos, save photos to a computer, and create fun andeasy projects with or without a computer.This guide primarily explains how to print without connecting a computer. To learnhow to print from a computer, install the printer software and view the onscreen Help.For an overview of using a computer and the printer together, see Printing from acomputer. For information about installing the software, see the Quick Start booklet.Home users can learn how to:● Print borderless photos from the printer or from a computer● Choose a photo layout● Convert a color photo to black and white, or apply a color effect such as Sepia or
AntiqueThe printer comes with the following documentation:● Quick Start booklet: The HP Photosmart 8200 series Quick Start booklet
explains how to set up the printer, install the printer software, and print your firstphoto.
● User's Guide: The HP Photosmart 8200 series User's Guide is the book you arereading. This guide describes the basic features of the printer, explains how touse the printer without connecting a computer, and contains hardwaretroubleshooting information.
● Onscreen HP Photosmart Printer Help: The onscreen HP Photosmart PrinterHelp describes how to use the printer with a computer and contains softwaretroubleshooting information.
Special featuresNew features and media make it easier than ever to produce high-quality photos:● When you use the new HP Advanced Photo Paper (also called HP Photo Paper
in some countries/regions), special sensors in the printer detect a mark on theback of the paper and automatically select the optimal print settings. For moreinformation about this new paper, see Choosing the right paper.
● HP Real Life technologies make it easy for you to get better photos. Automaticred eye removal and adaptive lighting to enhance detail in shadows are just a fewof the many technologies included. You can explore the many editing andenhancing options from both the control panel and from the printer software. Toaccess these features from the control panel, see Improving photo quality. Tolearn how to find them in the software, see HP Real Life technologies features.
HP Photosmart 8200 series User's Guide 3

Accessing the onscreen HP Photosmart Printer HelpAfter you have installed the HP Photosmart printer software on a computer, you canview the onscreen HP Photosmart Printer Help:● Windows PC: From the Start menu, select Programs (in Windows XP, select All
Programs) > HP > Photosmart 8200 series > Photosmart Help.● Macintosh: Select Help > Mac Help in the Finder, then select Help Center >
HP Image Zone Help > HP Photosmart Printer Help.
Printer parts
Front of printer1 On: Press this button to turn on the printer.2 Top cover: Lift this cover to access the ink cartridges and to clear paper jams. To lift the
cover, grasp the top cover below the HP logo and pull upward.3 Printer Screen: Use this screen to view photos, menus, and messages.4 Output tray: Use this tray to catch your printouts. Remove this tray to access the Photo
tray.5 Main tray: Pull out this tray and load plain paper, transparencies, envelopes, or other
media with the side to be printed facing down.6 Photo tray: Remove the Output tray and load small-size paper up to 10 x 15 cm
(4 x 6 inch) into the Photo tray for printing with the side to be printed facing down. Thepaper may be tabbed or untabbed.
7 Memory card slots: Insert memory cards here. For a list of supported memory cards, seeInserting a memory card.
8 Camera port: Connect a PictBridge™ digital camera, the optional HP Bluetooth® wirelessprinter adapter, or an HP iPod.
Back of printer1 Power cord connection: Use this port to connect the power cord included with the printer.2 USB port: Use this port to connect the printer to a computer.3 Rear access door: Remove this door to clear paper jams or to install the optional
HP Automatic Two-sided Printing Accessory. See Available accessories.
Chapter 1
4 HP Photosmart 8200 series

Main and Output trays1 Paper-width guide: Adjust this guide to fit close to the edge of the paper in the Main tray.2 Output tray: Use this tray to catch your printouts. Remove this tray to access the Photo
tray.3 Output tray extender: Pull towards you to extend the Output tray to catch your printouts.4 Main tray: Pull out this tray and load plain paper, transparencies, envelopes, or other
media for printing.5 Main tray release: Pull toward you to extend the Main tray.6 Paper-length guide: Adjust this guide to fit close to the end of the paper in the Main tray.7 Tray grips: Pull on the tray grips to extend the Main tray.
Photo tray1 Paper-width guide: Adjust this guide to fit close to the edge of the paper in the Photo tray.2 Paper-length guide: Adjust this guide to fit close to the end of the paper in the Photo tray.
HP Photosmart 8200 series User's Guide 5

Control panel 1 On: Turn on the printer or put it into power save mode.2 Instant Share: Send the currently selected photo(s) to the HP Instant Share function of
the HP Image Zone software (when connected to a computer).3 Photo tray: Select the correct tray for the next print job sent from the control panel. When
the blue light is on, the printer selects paper from the Photo tray. When the light is off, theprinter selects paper from the Main tray.
4 Layout: Select the print layout for your photos. When a memory card is inserted, theselected layout is displayed in the bottom center of the printer screen.
5 Menu: View the printer menu.6 OK: Select a menu or dialog choice and play/pause a video clip during playback.7 Navigation arrows: Adjust the crop box, navigate menu choices, and control the
playback of a video clip.8 Zoom (+)(-): Zoom in or out of a photo. You can also press Zoom (-) to view photos nine
at a time when viewing a photo at normal magnification.9 Rotate: Rotate a photo or a crop box.10 Select Photos: Select a photo number or menu option.11 Printer screen: View menus and messages.12 Select Photos arrows: Navigate through menu options or photo numbers.13 Print: Print the selected photos from the inserted memory card, or from a camera
connected to the front camera port.14 Cancel: Deselect photos, exit a menu, or stop an action you have requested.
Chapter 1
6 HP Photosmart 8200 series

Indicator lights1 On light: Solid blue if the printer is on, otherwise it is off.2 Photo tray light: When this light is on, the printer uses paper from the Photo tray. When
this light is off, the printer uses paper from the Main tray. Press the button to select thedesired tray.
3 Memory Card light: Solid blue if a memory card is inserted, flashes if the printer isaccessing a memory card, off if no memory card is inserted or if more than one card isinserted.
4 Print light: Solid blue when the printer is on and ready to print, flashes blue when theprinter is printing or busy with self-maintenance.
5 Attention light: Turns on when there is a problem that requires user action. See the printerscreen for instructions. For more information, see The Attention light is on.
Available accessories There are several accessories available for the HP Photosmart 8200 series printerthat enhance its convenience. The appearance of the accessories may vary from whatis shown.To purchase supplies, go to:● www.hpshopping.com (U.S.)● www.hp.com/go/supplies (Europe)● www.hp.com/jp/supply_inkjet (Japan)● www.hp.com/paper (Asia/Pacific)
Accessory name Description
HP Automatic Two-sided PrintingAccessory
This accessory automatically flips eachpage to print on both sides. You willsave money (two-sided printing reducespaper consumption) and time (no needto remove the paper and reinsert it toprint on the back), plus you will makebulky documents more manageable.This accessory may not be available inall countries/regions.
HP Photosmart 8200 series User's Guide 7
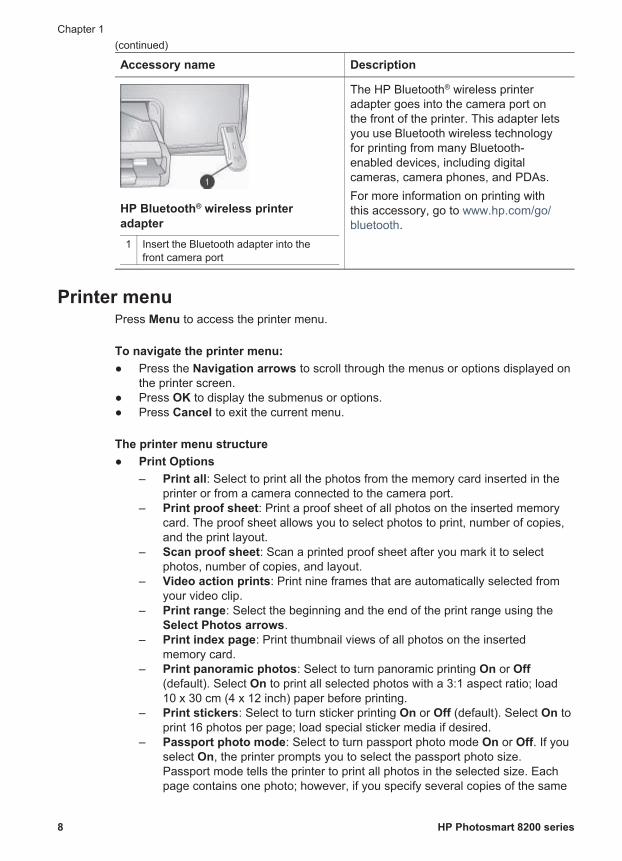
Accessory name Description
HP Bluetooth® wireless printeradapter 1 Insert the Bluetooth adapter into the
front camera port
The HP Bluetooth® wireless printeradapter goes into the camera port onthe front of the printer. This adapter letsyou use Bluetooth wireless technologyfor printing from many Bluetooth-enabled devices, including digitalcameras, camera phones, and PDAs.For more information on printing withthis accessory, go to www.hp.com/go/bluetooth.
Printer menu Press Menu to access the printer menu.
To navigate the printer menu:● Press the Navigation arrows to scroll through the menus or options displayed on
the printer screen.● Press OK to display the submenus or options.● Press Cancel to exit the current menu.
The printer menu structure● Print Options
– Print all: Select to print all the photos from the memory card inserted in theprinter or from a camera connected to the camera port.
– Print proof sheet: Print a proof sheet of all photos on the inserted memorycard. The proof sheet allows you to select photos to print, number of copies,and the print layout.
– Scan proof sheet: Scan a printed proof sheet after you mark it to selectphotos, number of copies, and layout.
– Video action prints: Print nine frames that are automatically selected fromyour video clip.
– Print range: Select the beginning and the end of the print range using theSelect Photos arrows.
– Print index page: Print thumbnail views of all photos on the insertedmemory card.
– Print panoramic photos: Select to turn panoramic printing On or Off(default). Select On to print all selected photos with a 3:1 aspect ratio; load10 x 30 cm (4 x 12 inch) paper before printing.
– Print stickers: Select to turn sticker printing On or Off (default). Select On toprint 16 photos per page; load special sticker media if desired.
– Passport photo mode: Select to turn passport photo mode On or Off. If youselect On, the printer prompts you to select the passport photo size.Passport mode tells the printer to print all photos in the selected size. Eachpage contains one photo; however, if you specify several copies of the same
Chapter 1(continued)
8 HP Photosmart 8200 series

photo, they all appear on the same page (if enough space is available). Allowphotos to dry for one week before laminating.
● Edit– Remove red-eye: Select to remove red eye from the photo displayed on the
printer screen.– Photo brightness: Use the Navigation arrows to increase or decrease the
photo brightness.– Add frame: Use the Navigation arrows to select a pattern and a color for a
frame.– Add color effect: Use the Navigation arrows to select a color effect. The
color effect does not affect frames created with the Add frame option.● Tools
– View 9-up: View nine images at once from the inserted memory card.– Slide show: Select to start a slide show of all the photos on the inserted
memory card. PressCancel to stop the slide show.– Print quality: Choose either Best (default) or Normal print quality.– Print sample page: Select to print a sample page, which is useful for
checking the print quality of the printer. This feature is not available in allprinter models.
– Print test page: Select to print a test page containing information about theprinter that can help in troubleshooting problems.
– Clean printheads: Select to clean the print head when white lines or streaksappear in your printouts. After the cleaning finishes, the printer prints a selftest report. You have the option to clean the print head again if the reportshows print quality problems.
– Align printer: Select to align the printer when white lines or streaks appearin your printouts.
● Bluetooth– Device Address: Some devices with Bluetooth wireless technology require
you to enter the address of the device they are trying to locate. This menuoption shows the printer address.
– Device Name: You can select a name for the printer that appears on otherdevices with Bluetooth wireless technology when they locate the printer.
– Passkey: When the Bluetooth Security level of the printer is set to High,you must enter a passkey to make the printer available to other Bluetoothdevices. The default passkey is 0000.
– Visibility: Select Visible to all (default) or Not visible. When Visibility isset to Not visible, only devices that know the device address can print to it.
– Security level: Select Low or High. The Low setting does not require usersof other devices with Bluetooth wireless technology to enter the printerpasskey. High requires users of other devices with Bluetooth wirelesstechnology to enter the printer passkey.
– Reset Bluetooth options: Select to reset all items in the Bluetooth menu totheir default values.
● Help– Memory cards: Select to see a list of supported memory cards.– Cartridges: Select to see an animation of how to install an ink cartridge.– Photo sizes: Select to see a list of photos sizes and layouts you can choose
from when printing from the control panel.
HP Photosmart 8200 series User's Guide 9

– Paper loading: Select to read paper loading instructions.– Paper jams: Select to see an animation of how to clear a paper jam.– Camera connect: Select to read instructions on how to connect a PictBridge
camera to the printer.● Preferences
Note Some menu options may not be available in all printer models.
– SmartFocus: Select On (default) or Off. This setting improves blurred photos.– Adaptive lighting: Select On (default) or Off. This setting improves lighting
and contrast.– Date/time: Use this option to include the date and/or time on your printed
photos.– Colorspace: Choose a colorspace. The Auto-select default tells the printer
to use the Adobe RGB colorspace, if available. The printer defaults to sRGBif Adobe RGB is not available.
– Paper detect: Select On (default) and the printer will automatically detect thepaper type and size when you print. When you select Off, you will be askedto select the paper type and size each time you print.
– Preview animation: Select On (default) or Off. When this feature is turnedon, after you select a photo the printer will briefly display a print preview ofthe photo in the selected layout. Note: This feature is not available in allprinter models.
– Video enhancement: Select On (default) or Off. When you select On, thequality of photos printed from video clips will be improved.
– Auto remove red-eye: Select to automatically remove red eye from yourphotos.
– Restore defaults: Restores factory settings for all menu items except Selectlanguage and Select country/region (under Language in Preferencemenu) and Bluetooth settings (under Bluetooth in the main printer menu).This setting does not affect HP Instant Share or Network defaults.
– Language: Select to indicate the language you want used on the printerscreen, and the country/region setting. The country/region setting determinesthe supported media sizes.
Chapter 1
10 HP Photosmart 8200 series

2 Getting ready to printThis section contains information on the following:● Loading paper● Inserting ink cartridges● Inserting memory cards
Loading paperLearn how to choose the right paper for your print job and how to load it into thecorrect tray for printing.
Choosing the right paper For a list of available HP inkjet paper or to purchase supplies, go to:● www.hpshopping.com (U.S.)● www.hp.com/go/supplies (Europe)● www.hp.com/jp/supply_inkjet (Japan)● www.hp.com/paper (Asia/Pacific)For the best print quality, HP recommends using HP papers. Choose from these orother high-quality HP papers.
To print Use this paper
High-quality, long-lasting prints andenlargements
HP Premium Plus Photo Paper (alsoknown as Colorfast Photo Paper insome countries/regions)This is the best quality photo paper, withimage quality and fade resistancesuperior to store-processed photos. It isideal for printing high-resolution imagesfor framing or including in a photo album.
Medium- to high-resolution imagesfrom scanners and digital cameras
HP Premium Photo PaperThis paper looks and feels like a store-processed photo and can be mountedunder glass or in a photo album.
Casual and business photos HP Advanced Photo Paper (also calledHP Photo Paper in some countries/regions).This paper generates prints that have alook and feel comparable to a store-processed photo. Special sensors in theHP Photosmart printer detect the papersensor mark on the back of the paperand automatically select the optimal
HP Photosmart 8200 series User's Guide 11

To print Use this paper
print settings. It resists water, smears,fingerprints, and humidity. This paper ismarked on the nonprinting corners withthis symbol:
Everyday photos HP Everyday Photo PaperUse this paper for general photo printing.
Text documents, draft versions, testand alignment pages
HP Premium Inkjet PaperThis paper is the ultimate coated paperfor high-resolution printing. A smooth,matte finish makes it ideal for yourhighest-quality documents.
For guidelines on storing and handling paper to keep it in good condition for printing,see Maintaining the quality of photo paper.
Loading your paper Paper loading tips:● Load paper with the side to be printed facing down.● You can print photos and documents on a wide variety of paper sizes, from
8 x 13 cm (3 x 5 inch) up to 22 x 61 cm (8.5 x 24 inch). The 10 x 15 cm(4 x 6 inch) photo paper is available with and without tabs.
● Before loading paper, pull the Main paper tray out (use the Main tray release orthe tray grips) and slide out the paper-width and paper-length guides to makeroom for the paper. After loading paper, adjust the guides to fit close to the edgesof the paper without bending the paper. When finished loading paper, push theMain tray back in all the way.
● Load only one type and size of paper at a time in the same tray.● After loading paper, extend the Output tray extension to catch your printed pages.Use the directions in the following table to load the most commonly used paper sizesinto the printer.
Paper type How to load Tray to load
Any supportedphoto or plainpaper media
1. Extend the Main tray bypulling it out with the Maintray release or the traygrips.
Load the Main tray
Chapter 2(continued)
12 HP Photosmart 8200 series

Paper type How to load Tray to load
2. Slide the paper-width andpaper-length guides totheir outermost positions.
3. Load paper with the sideto be printed facing down.Check that the stack ofpaper is no higher thanthe top of the paper-length guide.
4. Adjust the paper-widthand paper-length guidesinward until they stop atthe edges of the paper.
5. Push in the Main tray allthe way in.
6. Make sure the light on thePhoto tray button isturned off to enableprinting from the Main tray.
Load paper and adjust guides inward1 Paper-width guide2 Paper-length guide
Push in the Main tray1 Push the Main tray all the way in
Photo paper up to10 x 15 cm(4 x 6 inch) with orwithout tabs,Hagaki cards, A6cards, L-size cards
1. Remove the Output tray.2. Adjust the paper-width
and paper-length guidesoutward to make room forthe paper.
3. Load up to 20 sheets ofpaper into the Photo traywith the side to be printedfacing down. If you areusing tabbed paper, insertthe paper so the tab feedsin last.
4. Adjust the paper-widthand paper-length guidesinward until they stop atthe edges of the paper.
5. Replace the Output tray.6. Make sure the light on the
Photo tray button isturned on to enableprinting from the Phototray.
Load the Photo tray
Remove Output tray and adjustguides outward1 Output tray2 Paper-width guide3 Paper-length guide
(continued)
HP Photosmart 8200 series User's Guide 13

Paper type How to load Tray to load
Load paper and adjust guides inward1 Paper-width guide2 Paper-length guide
Inserting ink cartridges The first time you set up and use your HP Photosmart printer, make sure to install theink cartridges that were shipped with your printer. The ink in these ink cartridges isspecially formulated to mix with the ink in the print head assembly.
Purchasing replacement ink cartridgesWhen purchasing replacement cartridges, refer to the cartridge numbers that appearon the back cover of this guide. These cartridge numbers may vary by country/region.
Note If you have already used the printer several times and you haveinstalled the HP Photosmart printer software, you can also find the cartridgenumbers in the printer software. Windows users: Right-click the HP DigitalImaging Monitor icon in the Windows taskbar, and select Launch/ShowHP Solution Center. Select Settings, then Print Settings, and then PrinterToolbox. Click the Estimated Ink Levels tab, and then click Ink CartridgeInformation. To order ink cartridges, click Shop Online. Macintosh users:Click HP Image Zone in the Dock. Choose Maintain Printer from the Settingspop-up menu. Click Launch Utility, and then choose Supplies Status fromthe pop-up menu.
Ink cartridge tipsHP Vivera Inks deliver true-to-life photo quality and exceptional fade resistanceresulting in vivid colors that last for generations! HP Vivera Inks are specially-formulated and scientifically tested for quality, purity and fade resistance.For best print quality, HP recommends that you install all retail ink cartridges beforethe install-by date stamped on the box.For optimum printing results, HP recommends using only genuine HP ink cartridges.Genuine HP ink cartridges are designed and tested with HP printers to help you easilyproduce great results, time after time.
Note HP cannot guarantee the quality or reliability of non-HP ink. Printerservice or repairs required as a result of printer failure or damage attributableto the use of non-HP ink will not be covered under warranty.
Chapter 2(continued)
14 HP Photosmart 8200 series

Caution The ink supply may become pressurized. Inserting a foreign objectinto the ink supply could result in ink being expelled and coming in contact withpersons or property.
Ink cartridge1 Do not insert objects into these holes
Caution To prevent ink loss or spillage: leave the ink cartridges installedwhile transporting the printer, and avoid leaving used ink cartridge(s) out of theprinter for extended lengths of time.
Inserting or replacing the ink cartridges 1. Make sure the power is on, then lift the top cover. Make sure all packing material
has been removed from inside the printer.
2. Squeeze the gray tab below an ink cartridge slot to release the gray latch insidethe printer, then lift the latch.The ink cartridge areas are color-coded for easy reference. Lift the latch belowthe appropriate color to insert or replace a cartridge. From left to right, the inkcartridges are black, yellow, light cyan, cyan, light magenta, and magenta.
1 Ink cartridge latch for the black ink cartridge2 Ink cartridge area for the color ink cartridges
HP Photosmart 8200 series User's Guide 15

3. If you are replacing a cartridge, remove the old cartridge by pulling it toward youout of its slot.
Recycle the old cartridge. The HP Inkjet Supplies Recycling Program is availablein many countries/regions and lets you recycle used ink cartridges free of charge.For more information, go to www.hp.com/hpinfo/globalcitizenship/environment/recycle/inkjet.html.
4. Remove the new ink cartridge from its packaging, and while holding it by thehandle, slide the ink cartridge into the empty slot.Make sure you insert the ink cartridge into the slot that has the same shaped iconand color as the new cartridge. The copper-colored contacts should be facing theprinter as the ink cartridge is inserted.
Note The first time you set up and use your HP Photosmart printer, makesure to install the ink cartridges that were shipped with your printer. Theink in these ink cartridges is specially formulated to mix with the ink in theprint head assembly.
5. Press down on the gray latch until it clicks into place.
6. Repeat steps 2 through 5 for each ink cartridge you are replacing.You must install all six cartridges. The printer will not work if an ink cartridge ismissing.
7. Close the top cover.
Chapter 2
16 HP Photosmart 8200 series
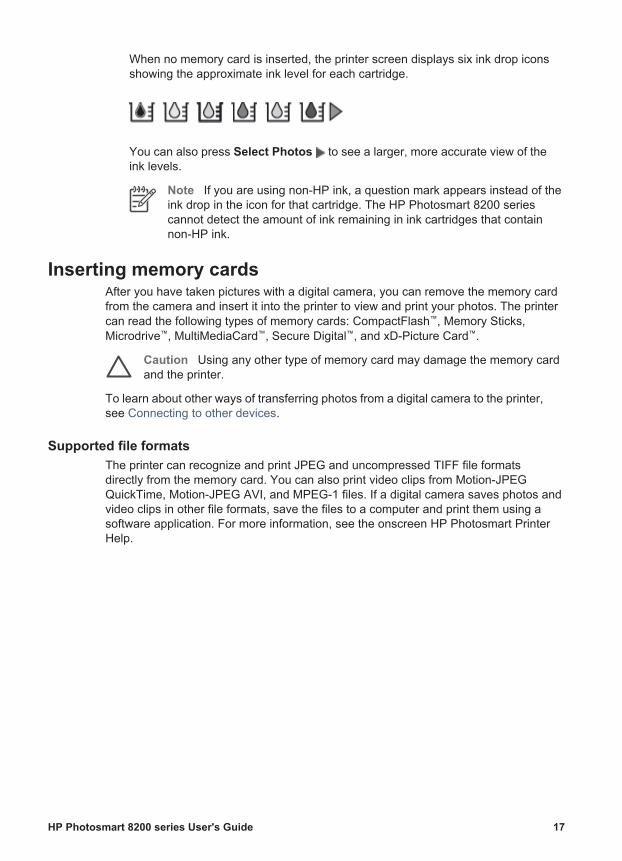
When no memory card is inserted, the printer screen displays six ink drop iconsshowing the approximate ink level for each cartridge.
You can also press Select Photos to see a larger, more accurate view of theink levels.
Note If you are using non-HP ink, a question mark appears instead of theink drop in the icon for that cartridge. The HP Photosmart 8200 seriescannot detect the amount of ink remaining in ink cartridges that containnon-HP ink.
Inserting memory cards After you have taken pictures with a digital camera, you can remove the memory cardfrom the camera and insert it into the printer to view and print your photos. The printercan read the following types of memory cards: CompactFlash™, Memory Sticks,Microdrive™, MultiMediaCard™, Secure Digital™, and xD-Picture Card™.
Caution Using any other type of memory card may damage the memory cardand the printer.
To learn about other ways of transferring photos from a digital camera to the printer,see Connecting to other devices.
Supported file formats The printer can recognize and print JPEG and uncompressed TIFF file formatsdirectly from the memory card. You can also print video clips from Motion-JPEGQuickTime, Motion-JPEG AVI, and MPEG-1 files. If a digital camera saves photos andvideo clips in other file formats, save the files to a computer and print them using asoftware application. For more information, see the onscreen HP Photosmart PrinterHelp.
HP Photosmart 8200 series User's Guide 17

Inserting a memory card
Memory card slots1 Secure Digital, MultiMediaCard (MMC)2 Compact Flash I and II, Microdrive3 Memory Sticks4 xD-Picture Card
Find the memory card in the following table and use the instructions to insert the cardinto the printer.Guidelines:● Insert only one memory card at a time.● Gently push the memory card into the printer until it stops. The memory card
does not insert all the way into the printer; do not try to force it.
Caution Inserting the memory card any other way may damage the card andthe printer.
When the memory card is inserted correctly, the Memory Card light flashes and thenremains solid blue.
Caution Do not pull out a memory card while the Memory Card light isflashing. For more information, see Removing a memory card.
Memory card How to insert the memory card
CompactFlash
● Front label faces up, and if the label has an arrow, the arrowpoints toward the printer
● Edge with metal pinholes goes into the printer first
Chapter 2
18 HP Photosmart 8200 series

Memory card How to insert the memory card
Memory Stick
● Angled corner is on the left● Metal contacts face down● If you are using a Memory Stick Duo™ or Memory Stick PRO
Duo™ card, attach the adapter that came with the card beforeyou insert the card into the printer
Microdrive
● Front label faces up, and if the label has an arrow, the arrowpoints toward the printer
● Edge with metal pinholes goes into the printer first
MultiMediaCard
● Angled corner is on the right● Metal contacts face down
Secure Digital
● Angled corner is on the right● Metal contacts face down
xD-Picture Card
● Curved side of card points toward you● Metal contacts face down
Removing a memory card Wait until the Memory Card light stops flashing, then gently pull the memory card toremove it from the printer.
Caution Do not pull out a memory card while the Memory Card light isflashing. A flashing light means that the printer is accessing the memory card.Removing a memory card while it is being accessed may damage the printerand the memory card or corrupt the information on the memory card.
(continued)
HP Photosmart 8200 series User's Guide 19

Chapter 2
20 HP Photosmart 8200 series

3 Printing photos without acomputer The HP Photosmart 8200 series printer lets you select, enhance, and print photoswithout even turning on the computer. Once you've set up the printer using theinstructions in the Quick Start booklet, you can insert a memory card in the printer andprint your photos using the buttons on the printer control panel.You can also print photos directly from a digital camera. For more information, seePrinting photos from a digital camera.
Selecting a photo layoutPress Layout on the printer control panel to select a layout for the photos you want toprint. Press the button repeatedly to move through the six layout options. When amemory card is inserted, the selected layout is displayed in the bottom center of theprinter screen. All photos selected from the printer control panel will print in theselected layout.
Layout Paper size (photo size)
1 per page borderless 4 x 6 inch (4 x 6 inch)10 x 15 cm (10 x 15 cm)5 x 7 inch (5 x 7 inch)8.5 x 11 inch (8.5 x 11 inch)
1 per page 3.5 x 5 inch (3.25 x 4.75 inch)4 x 6 inch (3.75 x 5.75 inch)10 x 15 cm (9.53 x 14.6 cm)5 x 7 inch (4.75 x 6.75 inch)8 x 10 inch (7.75 x 9.75 inch)8.5 x 11 inch (8 x 10 inch)A6 (9.86 x 14.16 cm)A4 (20 x 25 cm)Hagaki (9.36 x 14.16 cm)L (8.25 x 12.06 cm)
2 per page 3.5 x 5 inch (2.25 x 3.25 inch)4 x 6 inch (2.75 x 3.75 inch)5 x 7 inch (3.25 x 4.75 inch)8 x 10 inch (4.75 x 6.5 inch)8.5 x 11 inch (5 x 7 inch)A6 (6.92 x 9.86 cm)
HP Photosmart 8200 series User's Guide 21

Layout Paper size (photo size)
A4 (13 x 18 cm)Hagaki (6.8 x 9.36 cm)L (5.87 x 8.25 cm)
3 per page 3.5 x 5 inch (1.5 x 2.25 inch)4 x 6 inch (1.75 x 2.625 inch)5 x 7 inch (2.25 x 3.375 inch)8 x 10 inch (3.33 x 5 inch)8.5 x 11 inch (4 x 6 inch)A6 (4.77 x 7.15 cm)A4 (10 x 15 cm)Hagaki (4.52 x 6.78 cm)L (3.96 x 5.94 cm)
4 per page 3.5 x 5 inch (1.5 x 2.25 inch)4 x 6 inch (1.75 x 2.5 inch)5 x 7 inch (2.2 x 3.25 inch)8 x 10 inch (3.5 x 4.75 inch)8.5 x 11 inch (3.5 x 5 inch)A6 (4.77 x 6.92 cm)A4 (9 x 13 cm)Hagaki (4.52 x 6.5 cm)L (3.96 x 5.7 cm)
9 per page 3.5 x 5 inch (1 x 1.375 inch)4 x 6 inch (1.125 x 1.5 inch)5 x 7 inch (1.5 x 2 inch)8 x 10 inch (2.25 x 3 inch)8.5 x 11 inch (2.5 x 3.25 inch) – WalletsizeA6 (3.07 x 4.05 cm)A4 (6.4 x 8.4 cm)Hagaki (2.9 x 3.86 cm)L (2.53 x 3.36 cm)
Note The printer may rotate the photos to fit the layout.
Deciding which photos to print You can decide which photos to print by viewing the photos on the printer screen, byprinting a photo index, or by printing a proof sheet.
Chapter 3(continued)
22 HP Photosmart 8200 series

To decide which photos to print, try one of these options
View photos on the printerscreenYou can view photos one at atime or nine at a time on theprinter screen.
To view photos one at a time:1. Insert a memory card.2. Press Select Photos or . Press and hold
the button to view the photos rapidly. Whenyou reach the last photo in either direction,the display returns to the first or last photoand continues.
To view nine photos at a time:1. Insert a memory card.2. Press OK to enter 9-up view mode, then use
the Navigation arrows to move through thephotos.
To exit 9-up view mode and return to viewing onephoto at a time, press OK.
Tip To move quickly through the photos, pressand hold Select Photos or . When you reachthe last photo in either direction, the displaycontinues with the first or last photo.
Print a photo indexA photo index showsthumbnail views and indexnumbers for up to 2000 photoson a memory card. Use plainpaper instead of photo paperto cut costs.A photo index may be severalpages long.
To print a photo index:1. Insert a memory card.2. Load several sheets of plain paper in the Main
tray. Make sure the Photo tray light is off sothat paper will be selected from the Main tray.
3. Press Menu.4. Select Print options, then press OK.5. Select Print index page, then press OK.
Print a proof sheetA proof sheet showsthumbnail views of all photosstored on a memory card. Aproof sheet is different than aphoto index because itprovides spaces for you toselect photos to print, specifythe number of copies to print,and select the photo layout.You select these options byfilling in small circles with adark pen.For more information onselecting and printing photosfrom a proof sheet, see
To print a proof sheet:1. Insert a memory card.2. Load several sheets of plain paper in the Main
tray. Make sure the Photo tray light is off sothat paper will be selected from the Main tray.
3. Press Menu.4. Select Print options, then press OK.5. Select Print proof sheet, then press OK.
HP Photosmart 8200 series User's Guide 23

To decide which photos to print, try one of these options
Selecting photos to print andPrinting photos.
Selecting photos to print You select the photos you want to print by using the printer control panel.
If you want to… Follow these steps
Select a photo 1. Insert a memory card.
Note Instead of inserting a memory card,you can also select photos from an HP iPodthat is connected to the front camera port. Formore information, see Printing photos from anHP iPod.
2. Press Select Photos or to display thephoto you want to select.
3. Press to select the photo.4. To select additional photos, repeat steps 2
and 3.
Note To select multiple copies of the samephoto, press multiple times. The number ofcopies to be printed appears at the bottom of theprinter screen.
Deselect a photoWhen you deselect a photo,the printer discards anychanges you made to the printsettings for that photo.
Note Deselecting photosdoes not delete them from thememory card.
1. Press Select Photos or to display thephoto you want to deselect.
2. Press Cancel to deselect the displayed photofor printing.
Note If multiple copies of the photo are selected,press Cancel repeatedly until you have removedthe desired number of selections.
Deselect all photos 1. Press Cancel twice. A message appears onthe printer screen asking if you want todeselect all photos.
2. Select Yes, then press OK.
Note If multiple copies of the displayed photo areselected, first press Cancel repeatedly until youhave removed all selections, and then use theabove procedure to deselect all photos.
Select photos on a proofsheet
1. Select the photos you want to print by filling inthe circle below each photo with a dark pen.
Chapter 3(continued)
24 HP Photosmart 8200 series

If you want to… Follow these steps
After you print a proof sheet,you can use it to selectspecific photos to print.For information about printinga proof sheet, see To print aproof sheet:.
2. Select the number of copies you want of eachphoto by filling in the copies section. Makesure to fill in only one choice in the Copiessection.
3. Select a photo layout in the print layoutsection. Make sure to only fill in one choice.
Once you've filled out the proof sheet, scan it toprint the selected photos. For information aboutscanning the proof sheet, see Printing photos.
Improving photo quality The printer provides a variety of enhancements that can improve the quality of a photoprinted from a memory card. These print settings do not change the original photo.They only affect printing.
Problem How to correct it
Photos with poor brightness 1. Press Menu.2. Select Edit, then press OK.3. SelectPhoto Brightness, then
press OK.4. Use the arrows to increase or
decrease the photo brightness tothe desired level, then press OK.
Photos with red eye By default, the automatic red eyeremoval feature is turned on in thePreferences menu. Just before printing,this feature removes red eye from allphotos that are printed in 1-per-pagelayout (bordered or borderless). If youstill have red eye problems, remove redeye from individual photos using theRemove red eye feature in the Editmenu. Both procedures are describedbelow.
Automatic red eye removal (all photos)1. Press Menu.2. Select Preferences, then press OK.3. Select Auto remove red-eye, then
press OK.4. Select On, then press OK.
(continued)
HP Photosmart 8200 series User's Guide 25

Problem How to correct it
Manual red eye removal (one photo ata time)1. Display the photo from which you
want to remove the red eye.2. Press Menu.3. Select Edit, then press OK.4. Select Remove red-eye, then press
OK.
Poor-quality video clipsThis preference affects photos printedfrom video clips.
Note This feature does not improvephotos printed using the Video actionprints feature in the Print Optionsmenu. This feature also does not workwith photos printed in the 9-per-pagelayout.
Improve the quality of photos printedfrom video clips1. Press Menu.2. Select Preferences, then press OK.3. Select Video enhancement, then
press OK.4. Select On, then press OK.For information about printing photosfrom video clips, see Printing photosfrom a memory card.
Getting creative The printer provides a variety of tools and effects that let you use your photos increative ways. These print settings do not change the original photo. They only affectprinting.
To try these features… Follow these steps
Add a color effectYou can set the printer tochange the color optionapplied to a photo from Color(default) to Black & white,Sepia, or Antique.Photos printed in Sepia printin brown tones and looksimilar to photos produced inthe early 1900s. Photosprinted in Antique print in thesame brown tones, but withsome pale colors added togive the appearance that thephotos are hand-colored.
1. Select one or more photos.2. Press Menu.3. SelectEdit, then press OK.4. Select Add color effect, then press OK.5. Select a color effect, then press OK.
Create borderless printsYou can set the printer to printborderless photos.
➔ Press Layout to select the One photo perpage borderless option (this is the defaultselection). The rectangle in the bottom center
Chapter 3(continued)
26 HP Photosmart 8200 series

To try these features… Follow these steps
of the printer screen is solidly filled withorange when this option is selected.
Add the date and time toyour printsYou can print a stamp on thefront of your photos thatshows when the photo wastaken. This preference affectsall prints.
1. Press Menu.2. Select Preferences, then press OK.3. Select Date/time, then press OK.4. Select one of the following date/time stamp
options:– Date/time– Date only– Off
5. Press OK.If you use a computer to modify the photo andthen save your changes, the original date and timeinformation are lost. Changes that you make to thephoto using the printer control panel do not affectthe date and time information.
Change the print qualityYou can change the printquality for photos. Best qualityis the default and producesthe highest quality photos.Normal quality conserves inkand prints faster.
To change the print quality to Normal for oneprint job:1. Press Menu.2. Select Tools, then press OK.3. SelectPrint quality, then press OK.4. Select Normal, then press OK.Print quality will revert to Best after the next printjob.
Crop a photoPress Zoom + and Zoom – toincrease or decrease themagnification by 1.25x. Themaximum level is 5.0x.
1. Press Select Photos or to display thephoto you want to crop.
2. Press Zoom + to increase the magnificationof the photo by 1.25x. The green crop boxappears. Press Zoom + repeatedly until youreach the desired magnification. (Afterzooming in, you can zoom back out bypressing Zoom –.)
Note The crop box changes from green toyellow if printing at the selected magnificationwill noticeably reduce the print quality.
3. At any magnification level, use theNavigation arrows to move the crop box left,right, up, or down.
4. Press OK when the portion of the image youwant to print is in the crop box.Cropping does not change the original photo.It only affects printing.
Print panoramic photos 1. Press Menu.
(continued)
HP Photosmart 8200 series User's Guide 27

To try these features… Follow these steps
2. Select Print options, then press OK.3. Select Print panoramic photos.4. Select On, then press OK. The top of the
printer screen displays Panoramic mode untilyou turn it off in the menu.
5. Load 10 x 30 cm (4 x 12 inch) media. Ifdesired, use the instructions described abovefor cropping a photo before printing. The cropbox has a 3:1 aspect ratio.
Note All photos printed in panoramic mode areprinted borderless.
Print stickers 1. Press Menu.2. Select Print options, then press OK.3. Select Print stickers, then press OK.4. Select On, then press OK. The top of the
printer screen displays Sticker mode untilyou turn it off in the menu.
5. Load Avery C6611 or C6612 photo stickerpaper before printing. This 10 x 15 cm(4 x 6 inch) paper has 16 rectangular or ovalstickers per page.
Printing photos You can print photos without a computer in several different ways:● Insert a memory card with photos on it into one of the memory card slots on the
printer● Connect a PictBridge digital camera to the camera port on the front of the printer● Install the optional HP Bluetooth® wireless printer adapter and print from a digital
camera with Bluetooth wireless technology
Printing photos from a memory card You can print photos from a memory card by inserting the card into the printer andusing the printer control panel to view, select, enhance, and print photos. You canalso print camera-selected photos—photos you marked for printing using a digitalcamera—directly from a memory card.Printing from a memory card is quick and easy, and does not drain the digital camerabatteries.
If you want to… Follow these steps:
Print one or more photosBefore you begin, make surethat the memory card isinserted in the printer and the
1. Press Layout to select a photo layout. Theselected layout appears in the bottom centerof the printer screen.
Chapter 3(continued)
28 HP Photosmart 8200 series

If you want to… Follow these steps:
paper tray you want to use isloaded with the correct paper.Check the Photo tray light toverify that the correct tray isselected — the light should beoff for the Main tray and on forthe Photo tray.
2. Press Select Photos or to display thephoto you want to print, then press .
3. Repeat steps 1 and 2 to select more photos, ifdesired.
4. Press Print.
Print all photos on thememory cardBefore you begin, make surethat the memory card isinserted in the printer and thepaper tray you want to use isloaded with the correct paper.Check the Photo tray light toverify that the correct tray isselected — the light should beoff for the Main tray and on forthe Photo tray.
1. Press Layout to select a photo layout. Theselected layout appears in the bottom centerof the printer screen.
2. Press Menu.3. Select Print options, then press OK.4. Select Print all, then press OK to begin
printing all photos on the memory card.
Print a continuous range ofphotosBefore you begin, make surethat the memory card isinserted in the printer and thepaper tray you want to use isloaded with the correct paper.Check the Photo tray light toverify that the correct tray isselected — the light should beoff for the Main tray and on forthe Photo tray.
1. Press Layout to select a photo layout. Theselected layout is displayed in the bottomcenter of the printer screen.
2. Press Menu.3. Select Print options, then press OK.4. Select Print range, then press OK.5. Press Select Photos or to navigate to
the first photo you want to print, then pressOK. The first photo appears on the left of theprinter screen.
6. Press Select Photos or to navigate tothe last photo you want to print, then pressOK. The last photo appears on the right sideof the printer screen, and then the selectedrange of photos begins printing.
Print camera-selectedphotos from a memory cardWhen you select photos forprinting using a digital camera,the camera creates a DigitalPrint Order Format (DPOF)file that identifies theselected photos. The printercan read DPOF 1.0 and 1.1
1. Use the digital camera to select the photosyou want to print. For more information, seethe documentation that came with the camera.
2. If you select default as the photo layout withthe camera, press the Layout button on theprinter to select a photo layout.If you select a photo layout other than defaultwith the camera, photos print in the camera-selected layout regardless of the printer setting.
3. Load photo paper and check the Photo traylight to verify that the correct tray is selected
(continued)
HP Photosmart 8200 series User's Guide 29

If you want to… Follow these steps:
files directly from a memorycard.
— the light should be off for the Main tray andon for the Photo tray.
4. Remove the memory card from the digitalcamera and insert it into the printer.
5. When a message appears on the printerscreen asking if you want to print the camera-selected photos, press .The photos you selected with the camerabegin printing.
If the printer cannot find or read all of the camera-selected photos on the card, it prints the photosthat it can read.After printing, the printer deletes the DPOF file andunmarks the photos.
Print the photos youselected on a proof sheetAfter you've filled out the proofsheet as described inSelecting photos to print, youcan scan it to print theselected photos. Make surethe same memory card usedwhen you printed the proofsheet is inserted when youscan that proof sheet.
1. Make sure that the memory card is inserted inthe printer.
2. Press Menu.3. Select Print options, then press OK.4. Select Scan proof sheet, then press OK.5. Load the proof sheet in the Main tray with the
printed side facing down and the top of thepage facing toward the printer.
Note If your printed proof sheet spansseveral pages, note that it must be scannedone page at a time; you are then prompted toprint the corresponding photos for that page.Repeat steps 1 through 8 for the next page ofyour proof sheet.
6. Press OK to begin scanning.7. When a message appears on the printer
screen prompting you to load paper, loadphoto paper in the Main tray or Photo tray.Check the Photo tray light to verify that thecorrect tray is selected — the light should beoff for the Main tray and on for the Photo tray.
8. Press OK to start printing the photos youselected on the proof sheet.
Photos printed from a proof sheet use the defaultprint settings. Any print settings you have appliedto photos, such as cropping or color effects, areignored.
Print photos from video clips 1. Press Layout to select a photo layout. Theselected layout appears in the bottom centerof the printer screen.
Chapter 3(continued)
30 HP Photosmart 8200 series

If you want to… Follow these steps:
You can view video clips onthe printer screen, and selectand print individual frames.When you first insert amemory card containing avideo clip, the printer uses thefirst frame of the video clip torepresent the clip on theprinter screen.The printer recognizes videoclips recorded in these formats:● Motion-JPEG AVI● Motion-JPEG QuickTime● MPEG-1The printer ignores video clipsin any other format.Before you begin, make surethat the memory card isinserted in the printer and thepaper tray you want to use isloaded with the correct paper.Check the Photo tray light toverify that the correct tray isselected — the light should beoff for the Main tray and on forthe Photo tray.
2. Press Select Photos or to display thevideo clip you want to print.
3. Press OK to play the video clip.You can fast-forward the video while it isplaying by pressing and holding Navigation .
4. To pause the video while it is playing, press OK.You can play the video in slow motion bypressing and holding Navigation while thevideo is paused.
5. To select the displayed video frame, press .6. Press Print to begin printing.
Print a video action printA video action print is a seriesof nine automatically selectedframes from a video clip.
1. Insert a memory card containing one or morevideo clips.
2. Load photo paper. Check the Photo tray lightto verify that the correct tray is selected — thelight should be off for the Main tray and on forthe Photo tray.
3. Press Menu.4. Select Print options, then press OK.5. Select Video action prints, then press OK.6. Press Select Photos or to highlight the
video clip you want to print as a video actionprint.
7. Press , then press Print.
Stop printing To stop a print job in progress, press Cancel.
Printing photos from a digital camera You can print photos by connecting a PictBridge digital camera directly to the printerwith a USB cable. If you have a digital camera with Bluetooth wireless technology, you
(continued)
HP Photosmart 8200 series User's Guide 31

can insert the optional HP Bluetooth® wireless printer adapter in the printer and sendphotos to the printer wirelessly.When you print from a digital camera, the printer uses the settings that you selectedon the camera. For more information, see the documentation that came with thecamera.
To print photos from a… Follow these steps
Digital camera withBluetooth wirelesstechnologyIf you have a digital camerawith Bluetooth wirelesstechnology, you can purchasethe optional HP Bluetooth®
wireless printer adapter andprint from a camera using aBluetooth wireless connection.
Note You can also print fromother devices with Bluetoothwireless technology, such asPDAs and camera phones.For more information, seeConnecting to other devicesand the documentation thatcame with your Bluetoothadapter.
1. Set the Bluetooth options for the printer usingthe Bluetooth menu on the printer screen. Formore information, see Printer menu.
2. Load photo paper in the printer and check thePhoto tray light to verify that the correct tray isselected — the light should be off for the Maintray and on for the Photo tray.
3. Insert the HP Bluetooth® wireless printeradapter into the camera port on the front ofthe printer.The light on the adapter flashes when theadapter is ready to receive data.
4. Follow the instructions in the documentationthat came with the digital camera to sendphotos to the printer.
Digital camera withPictBridge technology
1. Turn on the PictBridge digital camera andselect the photos you want to print.
2. Load photo paper in the printer and check thePhoto tray light to verify that the correct tray isselected — the light should be off for the Maintray and on for the Photo tray.
3. Make sure the camera is in PictBridge mode,then connect it to the camera port on thefront of the printer using the USB cable thatcame with the camera.Once the printer recognizes the PictBridgecamera, the selected photos printautomatically.
Printing photos from an HP iPodBefore using the steps below to import photos to your HP iPod and print photos fromyour HP iPod, make sure your images and your HP iPod meet the followingrequirements:● The images you copy to the HP iPod must be in JPEG format.● Make sure the HP iPod is formatted in Windows (FAT 32 file structure).
Chapter 3
32 HP Photosmart 8200 series

The HP iPod defaults to the Windows file structure. To check if your HP iPod wasformatted for Windows, go to Settings > About on your HP iPod. If it wasformatted in Windows, it displays Format Windows at the bottom of the screen.If it was not formatted in Windows, you must connect the HP iPod to a WindowsPC using the USB cable that came with the HP iPod and follow the onscreeninstructions.
Note HP iPods that have only been connected to a Macintosh are notcompatible with the printer; however, after connecting to a Windows PC,Macintosh users can still fully synchronize their HP iPods back toMacintosh and Mac iTunes and maintain printer support.
To import photos to an HP iPod1. Copy photos from a memory card to your HP iPod using the Belkin Media Reader
for iPod.2. Verify that photos are on your HP iPod by selecting Photo Import on the HP iPod
menu. Photos appear as Rolls.
To print photos from an HP iPod1. Connect the HP iPod to the camera port on the front of the printer using the USB
cable that came with the HP iPod. The printer screen displays Reading Devicefor up to several minutes while the photos are read. Then the photos appear onthe printer screen.
2. Select the photo(s) you want to print and press Print. For more information onselecting photos, see Selecting photos to print.
If you are unable to print to the HP Photosmart printer using your HP iPod, pleasecontact HP Customer Care. See HP Customer Care.
HP Photosmart 8200 series User's Guide 33

Chapter 3
34 HP Photosmart 8200 series

4 Getting connected Use the printer to stay connected to other devices and people.
Connecting to other devicesThis printer offers several ways of connecting to computers or other devices. Eachconnection type lets you do different things.
Connection type and what you need This lets you...
Memory cards
A memory card
A compatible digital camera memory cardInsert the memory card into theappropriate memory card slot on thefront of the printer.
● Print directly from a memory card tothe printer.
● Save photos from a memory cardinserted in the printer to a computerwhere you can enhance or organizethem in the HP Image Zone or othersoftware. For more information, seeSaving photos to a computer andPrinting photos from a memory card.
USB● A Universal Serial Bus (USB) 2.0
full-speed compliant cable 3 meters(10 feet) or less in length. Forinstructions about connecting theprinter with a USB cable, see theQuick Start booklet.
● A computer with Internet access (touse HP Instant Share).
● Print from a computer to the printer.See Printing from a computer.
● Save photos from a memory cardinserted in the printer to a computerwhere you can enhance or organizethem in the HP Image Zone or othersoftware.
● Share photos through HP InstantShare.
● Print directly from anHP Photosmart direct-printing digitalcamera to the printer. For moreinformation, see Printing photosfrom a digital camera and thecamera documentation.
PictBridge Print directly from a PictBridge-compatible digital camera to the printer.For more information, see Printingphotos from a digital camera and thecamera documentation.
HP Photosmart 8200 series User's Guide 35

Connection type and what you need This lets you...
The PictBridge symbol
A PictBridge-compatible digital cameraand a USB cable.Connect the camera to the camera porton the front of the printer.
BluetoothThe optional HP Bluetooth wirelessprinter adapter.If the printer came with this accessory oryou have purchased it separately, seethe accompanying documentation andthe onscreen Help for instructions.
Print from any device with Bluetoothwireless technology—such as a digitalcamera, a camera phone, or a PDA—tothe printer.If you connect the optional HP Bluetoothwireless printer adapter to the printerthrough the camera port, be sure to setthe Bluetooth printer menu options asneeded. See Printer menu.
HP iPodAn HP iPod and the USB cable thatcame with it. Connect the HP iPod to thecamera port on the front of the printer.
Print directly from an HP iPod (withphotos stored in it) to the printer. Formore information, see Printing photosfrom an HP iPod.
Saving photos to a computer You can save photos to a computer from any memory card inserted in the printer, ifyou set up a USB connection between the two devices.
If you are using a Windows computerUse either of these methods to save photos to your computer.● Insert a memory card into the printer. The HP Image Zone transfer software
(HP Transfer and Quick Print) opens on your computer screen and allows you todesignate a location on the computer to save images. For more information, seethe onscreen HP Image Zone Help.
● Insert a memory card into the printer. The memory card appears in WindowsExplorer as a removable drive. Open the removable drive and drag photos fromthe card to any location on your computer.
If you are using a Macintosh1. Insert a memory card into the printer.2. Wait for iPhoto to start and read the contents of the memory card.3. Click Import to save the photos on the card to your Macintosh.
Chapter 4(continued)
36 HP Photosmart 8200 series

Note The memory card also appears on the desktop as a drive icon. You canopen it and drag photos from the card to any location on your Macintosh.
Connecting through HP Instant Share Use HP Instant Share to share photos with friends and relatives using e-mail, onlinealbums, or an online photo finishing service. Your printer must be connected througha USB cable to a computer with Internet access and have all the HP softwareinstalled. If you try to use HP Instant Share and do not have all the required softwareinstalled or configured, a message prompts you through the required steps.
Use HP Instant Share (USB) to send photos (Windows users):1. Insert a memory card and select some photos.2. Press Instant Share on the printer control panel.3. Follow the instructions on your computer to share the selected photos with others.
Use HP Instant Share (USB) to send photos (Macintosh users):1. Open HP Image Zone and select photos to share. For information about
HP Image Zone, see HP Image Zone.2. Click the Applications tab in HP Image Zone, then double-click HP Instant Share.3. Follow the instructions on your computer to share the selected photos with others.See the onscreen HP Image Zone Help for more information about using HP InstantShare.
HP Photosmart 8200 series User's Guide 37

Chapter 4
38 HP Photosmart 8200 series
5 Printing from a computer To print from a computer, the printer software must be installed. During softwareinstallation, either HP Image Zone (Macintosh users and Windows Full-install users)or HP Image Zone Express (Windows Express-install users) is installed on yourcomputer, allowing you to organize, share, edit, and print photos.For more information on installing the software, see the HP Photosmart 8200 seriesQuick Start booklet. Update the software regularly to ensure you have the latestfeatures and improvements; for instructions, see Updating the software.To work with photos, you need to transfer them to a computer that is connected to theprinter. See Saving photos to a computer.
Note Windows users: HP Image Zone can only be used on computers withprocessors that have Intel® Pentium® III (or equivalent) and higher.
Using creative options in the printer softwareRead through these tips on how to open and use HP Image Zone, HP Image ZoneExpress, and HP Instant Share.
HP Image ZoneHP Image Zone is an easy-to-use software program that gives you everything youneed to have fun with your photos, in addition to basic photo editing and printing. Thissoftware also gives you access to HP Instant Share so that you can easily share yourphotos.
Open HP Image Zone (Windows users)➔ Double-click the HP Image Zone icon on your desktop. If you need help, see the
onscreen Help within HP Image Zone.
Open HP Image Zone (Macintosh users)➔ Click the HP Image Zone icon in the Dock. If you need help, select HP Image
Zone Help from the Help menu.Explore the many features of HP Image Zone:● View — View photos in multiple sizes and ways. Easily organize and manage
your photos.● Edit — Crop your photos and fix photos with red eye. Automatically adjust and
enhance your photos in different sizes and in multiple layouts.● Print — Print your photos in different sizes and in multiple layouts.● Share — Send photos to family and friends without the bulky attachments using
HP Instant Share, a better way to send e-mail.● Create — Easily create album pages, cards, calendars, panoramic photos, CD
labels, and more.● Back-up — Make back-up copies of your photos to store and save.
HP Photosmart 8200 series User's Guide 39

HP Image Zone ExpressHP Image Zone Express is an easy-to-use software program that gives you basicphoto editing and printing capabilities. This software also gives you access toHP Instant Share so that you can easily share your photos. HP Image Zone Expressis only available for Windows users.
Open HP Image Zone Express (Windows users)➔ Double-click the HP Image Zone Express icon on your desktop. If you need
help, see the onscreen Help within HP Image Zone Express.Explore the many features of HP Image Zone Express:● View — View photos in multiple sizes and ways. Easily organize and manage
your photos.● Edit — Crop your photos and fix photos with red eye. Automatically adjust and
enhance your photos to make them perfect.● Print — Print your photos in different sizes and in multiple layouts.● Share — Send photos to family and friends without the bulky attachments with
HP Instant Share, a better way to send e-mail.
HP Instant ShareHP Instant Share allows you to send photos to family and friends without bulky e-mailattachments. For more information, see Connecting through HP Instant Share and theHP Image Zone or HP Image Zone Express onscreen Help.
Open HP Instant Share (Windows users)➔ Click the HP Instant Share tab within HP Image Zone or HP Image Zone Express.
Open HP Instant Share (Macintosh users)➔ Click the Applications tab in HP Image Zone, then double-click HP Instant Share.
Setting print preferencesPrint preferences are set by default, but can be altered to suit your needs. You can setspecific job settings when you print from the computer. When you change settingsbefore printing, the changes only affect the current print job. In some Windowssoftware programs, you need to click Properties or Preferences within the Printdialog box to access the advanced printing features. See the onscreen Help for moreinformation about printing preferences.
Access print preferences (Windows users)1. Open the Print dialog box, usually by selecting Print from the File menu.2. Change the printing preferences in the Print dialog box tabs, or click Properties
or Preferences to access more printing preferences.
Access print preferences (Macintosh users)1. Open the Print dialog box, usually by selecting Print from the File menu.2. Change the printing preferences in the Print dialog box by selecting the print
options you want to change in the Copies & Pages drop-down menu.
Chapter 5
40 HP Photosmart 8200 series

For more information on changing the printing preferences, see the onscreen Help.
Open the onscreen Help
Windows users:● Press F1 on your keyboard.● For field-level help, click the ? in the top right corner of the Print dialog box.
Macintosh users:1. From the Finder menu, select Help, and then Mac Help.2. Select HP Image Zone Help from the Library, and then select HP Photosmart
Printer Help.
HP Real Life technologies featuresExplore the many photo editing and enhancing options in the HP Real Lifetechnologies software features. These features—such as automatic red eye removaland adaptive lighting—make it easy for you to print high-quality photos.
Access Real Life technologies features (Windows users)1. Open the Print dialog box, usually by selecting Print from the File menu.2. Click the Paper/Quality tab, then click the Real Life Digital Photography button
—OR— Click the Properties or Preferences button, and then click the Real LifeDigital Photography button.
Access Real Life technologies features (Macintosh users)1. Open the Print dialog box, usually by selecting Print from the File menu.2. Select Real Life Digital Photography from the Copies & Pages drop-down
menu.
HP Photosmart 8200 series User's Guide 41

Chapter 5
42 HP Photosmart 8200 series

6 Care and maintenanceThe HP Photosmart 8200 series printer requires very little maintenance. Follow theguidelines in this chapter to extend the life span of the printer and printing supplies,and to ensure that the photos you print are always of the highest quality.
Cleaning and maintaining the printerKeep the printer and ink cartridges clean and well maintained using the simpleprocedures in this section.
Cleaning the outside of the printer 1. Turn off the printer, then disconnect the power cord from the back of the printer.2. Wipe the outside of the printer with a soft cloth that has been lightly moistened
with water.
Caution Do not use any type of cleaning solution. Household cleaners anddetergents may damage the printer finish. Do not clean the interior of theprinter. Keep all fluids away from the interior. Do not lubricate the metal rod onwhich the print head slides. Noise is normal when the print head moves backand forth.
Automatically cleaning the printhead If you notice white lines or streaks on the photos you print, or in the color blocks of theself test report, use this procedure to clean the print head. Do not clean the print headunnecessarily, as this wastes ink and shortens the life of the ink nozzles on the printhead.1. Press Menu.2. Select Tools, then press OK.3. Select Clean printheads, then press OK.4. Following the directions on the printer screen, load letter or A4 unused plain white
paper so the printer can print a self test report after cleaning the print head.5. Press OK to begin cleaning the print head. When the printer finishes cleaning the
print head, it prints a self test report. If you are dissatisfied with the print quality inthe self test report, repeat the cleaning. Recycle or discard the self test report.
If print quality still seems poor after you clean the print head, try aligning the printerusing the procedure described in Aligning the printer. If print quality problems persistafter cleaning and aligning, contact HP Customer Care.
Manually cleaning the ink cartridge contacts Clean the copper-colored ink cartridge contacts if a message appears on the printerscreen that says a cartridge is missing or damaged.Before cleaning the ink cartridge contacts, remove the ink cartridge and verify thatnothing is covering the ink cartridge contacts or the ink cartridge slot, then reinstall theink cartridge. If you continue to get a message that says a cartridge is missing ordamaged, clean the ink cartridge contacts. If you still get this message after cleaning
HP Photosmart 8200 series User's Guide 43

the contacts, you will need a replacement ink cartridge. Remove the affected inkcartridge and look at the end-of-warranty date on the bottom, in YYYY/MMM/DDformat. If it is before the end-of-warranty date, contact HP Customer Care to obtain areplacement ink cartridge.
To clean the ink cartridge contacts:1. Gather the following items to clean the contacts:
– Distilled, filtered, or bottled water (tap water may contain contaminants thatcan damage the ink cartridge)
Caution Do not use platen cleaners or alcohol to clean the inkcartridge contacts. These can damage the ink cartridge or theHP Photosmart printer.
– Dry foam rubber swabs, lint-free cloth, or any soft material that will not comeapart or leave fibers.
2. Open the top cover of the printer.3. Squeeze the gray tab below an ink cartridge slot to release the gray latch inside
the printer, then lift the latch.
Caution Do not remove multiple ink cartridges at the same time.Remove and clean each ink cartridge one at a time. Do not leave the inkcartridge outside the printer for more than 30 minutes.
4. Lightly moisten a swab or cloth with water and squeeze out any excess water.5. Hold the ink cartridge by its handle and gently wipe only the copper-colored
contacts with the swab or cloth.
1 Gently wipe only the copper-colored contacts
6. Place the ink cartridge back into the empty slot and press down on the gray latchuntil it clicks into place.
7. Repeat if necessary for the other ink cartridges.8. Close the top cover.
Caution The ink supply may become pressurized. Inserting a foreign objectinto the ink supply could result in ink being expelled and coming in contact withpersons or property.
Chapter 6
44 HP Photosmart 8200 series

Printing a self test report If you are experiencing problems with printing, print a self test report. This two-pagereport—labelled the Extended Self Test Diagnostic Page—can help you diagnoseprinting problems and can provide valuable information if you need to callHP customer support. You can also use this report to check on the approximatepercentage of ink remaining in the ink cartridges.1. Press Menu.2. Select Tools, then press OK.3. Select Print test page, then press OK.The HP Photosmart prints a two-page self test report that contains the followinginformation:● Product information: Includes the model number, serial number, and other
product information.● Revision information: Includes the firmware version number and indicates
whether or not you have an HP two-sided printing accessory (duplexer) installed.● Ink delivery system information: Displays the approximate ink level of each
installed ink cartridge, the status of each ink cartridge, the date each cartridgewas installed, and the expiration date for each cartridge.
● Print head assembly information: Contains information that may be used fordiagnostic purposes if you need to call HP customer support.
● Print head parameters: Contains information that may be used for diagnosticpurposes if you need to call HP customer support.
● Print quality pattern: Displays six color blocks, representing each of the sixinstalled cartridges. When streaks appear through the color blocks, or there aremissing color blocks, clean the print head using the procedure described inAutomatically cleaning the printhead. If the color blocks still show print qualityproblems after cleaning the print head, align the printer using the proceduredescribed in Aligning the printer. If the color blocks continue to show print qualityproblems after cleaning and aligning, contact HP Customer Care.
● History log: Contains information that may be used for diagnostic purposes ifyou need to call HP customer support.
Self test report
HP Photosmart 8200 series User's Guide 45

Aligning the printer Use the following procedure when the self test report shows streaking or white linesthrough any of the blocks of color.If you still have print quality problems after aligning the printer, try cleaning the printhead using the procedure described in Automatically cleaning the printhead. If printquality problems persist after aligning and cleaning, contact HP Customer Care.1. Load letter or A4 unused plain white paper into the Main tray.2. Press Menu.3. Select Tools, then press OK.4. Select Align printer, then press OK.
The printer aligns the print head, prints an alignment page, and calibrates theprinter. Recycle or discard the alignment page.
Printing a sample pageYou can print a sample page to test the printer photo printing quality and to make surethe paper is loaded correctly.1. Load paper in the Main tray. Use plain paper to conserve photo paper.2. Press Menu.3. Select Tools, then press OK.4. Select Print sample page, then press OK.
Updating the softwareDownload the latest printer software update every few months to ensure you have thelatest features and improvements. You can download printer software updates bygoing to www.hp.com/support or by using HP Software Update as described below.
Note The printer software update that you download from the HP websitedoes not update the HP Image Zone software.
Downloading the software (Windows users)
Note Make sure you are connected to the Internet before you useHP Software Update.
1. From the Windows Start menu, select Programs (in Windows XP, select AllPrograms) > HP > HP Software Update. The HP Software Update windowopens.
2. Click Next. HP Software Update searches the HP website for printer softwareupdates. If the computer does not have the most recent version of the printersoftware installed, a software update appears in the HP Software Update window.
Note If the computer has the most recent version of the printer softwareinstalled, the following message appears in the HP Software Updatewindow: “No new updates available”.
3. If a software update is available, click the check box next to the software updateto select it.
4. Click Next.5. Follow the onscreen instructions to complete the installation.
Chapter 6
46 HP Photosmart 8200 series

Downloading the software (Macintosh users)
Note Make sure you are connected to the Internet before you useHP Photosmart Updater.
1. On your Macintosh, open HP Image Zone.2. From the Settings drop-down menu, select HP Photosmart Updater.3. Follow the onscreen instructions to complete the installation.
If you are behind a firewall, you need to enter the proxy server information in theupdater.
Storing and transporting the printer and ink cartridgesProtect the printer and ink cartridges by storing them properly when you are not usingthem.
Storing and transporting the printer The printer is built to withstand long or short periods of inactivity. Store the printerindoors out of direct sunlight in a place without temperature extremes.
Caution To prevent ink loss or spillage: do not transport or store the printeron its side, and leave the ink cartridges installed while storing and transportingthe printer.
Storing and transporting the ink cartridges When you transport or store the printer, always leave the active ink cartridge insidethe printer to prevent the ink from drying out.
Caution 1 To prevent ink loss or spillage: leave the ink cartridges installedwhile storing and transporting the printer, and avoid leaving used ink cartridge(s) out of the printer for extended lengths of time.
Caution 2 Make sure the printer completes its power-down cycle before youunplug the power cord. This allows the printer to store the print head properly.
Follow this tip to help maintain your HP ink cartridges and ensure consistent printquality:Keep all unused ink cartridges in their original sealed packages until they are needed.Store ink cartridges at room temperature (15-35 °C or 59-95 °F).
Maintaining the quality of photo paper For best results with photo paper, follow the guidelines in this section.
Storing photo paper● Store the photo paper in its original packaging or in a resealable plastic bag.● Store the packaged photo paper on a flat, cool, and dry surface.● Return unused photo paper to the plastic bag. Paper left in the printer or exposed
to the elements may curl.
HP Photosmart 8200 series User's Guide 47

Handling photo paper● Always hold photo paper by the edges to avoid fingerprints.● If the photo paper has curled edges, place it in its plastic storage bag and gently
bend it in the opposite direction of the curl until the paper lies flat.
Chapter 6
48 HP Photosmart 8200 series

7 Troubleshooting The HP Photosmart printer is designed to be reliable and easy to use. This chapteranswers frequently asked questions about using the printer and printing without acomputer. It contains information about the following topics:● Printer hardware problems● Printing problems● Error messagesFor additional troubleshooting information, see:● Software installation troubleshooting: The Quick Start booklet that came with
the printer.● Printer software and printing from a computer troubleshooting: The
onscreen HP Photosmart Printer Help. For information about viewing theonscreen HP Photosmart Printer Help, see Welcome. Macintosh users shouldalso check for troubleshooting and readme options on the HP Photosmart Menuin the Dock.
Printer hardware problems Before contacting HP Customer Care, read this section for troubleshooting tips or goto the online support services at www.hp.com/support.
Note If you want to connect the printer to a computer with a USB cable, HPrecommends using a 2.0 full-speed compliant cable 3 meters (10 feet) or lessin length to minimize the potential of interference from high electromagneticfields that may pre-exist in the area around the cable.
The Print light is flashing blue but the printer is not printingSolution The printer is busy processing information; wait for it to finish.
The Attention light is on
Solution● Check the printer screen for instructions. If a digital camera is connected to
the printer, check the camera screen for instructions. If the printer isconnected to a computer, check the computer monitor for instructions.
● Turn off the printer, then unplug its power cord. Wait about 10 seconds, thenplug it in again. Turn on the printer.
If the Attention light stays on after trying the above solutions, go to www.hp.com/support, or contact HP Customer Care for help.
The printer does not find the photos I stored on my memory cardCause The memory card may contain file types the printer cannot read directlyfrom the card.
HP Photosmart 8200 series User's Guide 49

Solution● Save the photos to a computer, then print them from the computer. For more
information, see the onscreen HP Photosmart Printer Help and thedocumentation that came with the camera.
● The next time you take photos, set the digital camera to save them in a fileformat the printer can read directly from the memory card. For a list ofsupported file formats, see Printer specifications. For instructions on settingthe digital camera to save photos in specific file formats, see thedocumentation that came with the camera.
The memory card may need to be reformatted if the problem persists.
The printer is plugged in but will not turn on
Solution● The printer may have drawn too much power. Unplug the printer power cord.
Wait about 10 seconds, then plug the cord back in. Turn on the printer.● The printer may be plugged into a power strip that is turned off. Turn on the
power strip, then turn on the printer.● The power cord could be defective. Make sure the green light on the power
cord is lit.
The printer makes noises when I turn it on, or starts making noises after sittingunused for a while
Solution The printer may make noises after long periods of inactivity(approximately 2 weeks) or when its power supply has been interrupted and thenrestored. This is normal operation. The printer is performing an automaticmaintenance procedure to ensure it produces the best quality output.
All the lights are flashing on the printerSolution The printer has encountered a hardware error and may need to beserviced. Unplug the power cord to the printer. Wait about 10 seconds, and thenplug it in again. Turn on the printer. If the lights are still flashing, please go towww.hp.com/support, or contact HP Customer Care for help.
Printing problemsBefore contacting HP Customer Care, read this section for troubleshooting tips or goto the online support services at www.hp.com/support.
The printer does not print borderless photos when I print from the control panelSolution Press Layout to select the One photo per page borderless option.When a memory card is inserted, the rectangle in the bottom center of the printerscreen is solidly filled with orange to indicate this selection.
Chapter 7
50 HP Photosmart 8200 series

Printing is very slowSolution You may have one of the following situations: 1) you may be printinga PDF or a project containing high-resolution graphics or photos or 2) you mayhave selected the highest resolution for your printout. Large, complex projectscontaining graphics or photos print slower than text documents, especially athigher resolutions.
Paper does not feed into the printer correctly from the Main tray
Solution● There may be too much paper loaded in the tray. Remove some paper and
try printing again.● The Main tray may not be pushed in all the way. Push the Main tray all the
way in.● The paper guides may not be adjusted correctly. Make sure the paper-width
and paper-length guides fit close to the edges of the paper without bendingthe paper.
● Two or more pieces of paper may be sticking together. Remove the paperfrom the Main tray, fan the edges of the stack to separate the sheets ofpaper, then reload the paper and try printing again.
● If the paper is wrinkled or bent, try using different paper.● The paper may be too thin or too thick. Use HP inkjet paper for best results.
For more information, see Choosing the right paper.
Printed pages are dropping off of the Output traySolution Always extend the Output tray extension when you print.
The printout is rippled or curledSolution The project you are printing uses a larger amount of ink than normal.Print the project from a computer, and use the printer software to lower the inksaturation level. See the onscreen HP Photosmart Printer Help for moreinformation.
The document printed at an angle or is off-center
Solution● The paper may not be loaded correctly. Reload the paper, making sure it is
correctly oriented in the Main tray and that the paper-width and paper-length
HP Photosmart 8200 series User's Guide 51

guides fit close to the edges of the paper. For paper-loading instructions, seeLoading your paper.
● If you are using a two-sided printing accessory, try removing it and printingagain.
● The printer may need to be aligned. For more information, see Aligning theprinter.
Colors are not printing satisfactorily
Solution● One of the color ink cartridges may be very low on ink, resulting in another
color being substituted during printing. Check the estimated ink levels byremoving any memory cards, and then pressing Select Photos . If an inkcartridge is low on ink, replace it. For more information, see Inserting inkcartridges.
● The printer may need to be aligned. For more information, see Aligning theprinter.
● The print head may need to be cleaned. For more information, seeAutomatically cleaning the printhead.
No page came out of the printer or the paper jammed while printing
Solution● The printer may need attention. Read the printer screen for instructions.● The power may be off or there may be a loose connection. Make sure the
power is on and the power cord is securely connected.● You may not have any paper in the Main tray or Photo tray. Check that the
paper is loaded correctly. For paper-loading instructions, see Loading yourpaper.
● If the paper jammed while printing, try the following:– Turn off the printer, then unplug it from the power source. Clear the
printer of any paper obstructing the paper path. Remove the rear accessdoor. Gently remove the jammed paper from the printer, then replacethe rear access door. If all jammed paper cannot be removed from therear area of the printer, try removing paper jammed in the middle of theprinter by opening the paper jam door located inside the top cover. Forillustrations of the two places to clear a paper jam, see Paper errors.When you are finished clearing the paper jam, plug the printer back in,turn it on, and try printing again.
– If you were printing labels, make sure a label did not become ungluedfrom the label sheet while going through the printer.
A blank page came out of the printerCause You may have begun printing and then cancelled the print job.
Chapter 7
52 HP Photosmart 8200 series
Solution If you cancelled the print job before printing started, the printer mayhave already loaded paper in preparation for printing. The next time you print, theprinter ejecst the blank page before starting the new printing project.
Cause A print job with a large amount of data may have been sent to the printer.Solution Wait for the printer to service the print head before it continuesprinting.
The printer asked me to print an alignment pageCause Periodically, the printer needs to perform a print head alignment tomaintain optimal print quality.Solution When prompted, load plain letter or A4 paper. Discard or recycle thealignment page.
The photo did not print using the default print settingsSolution You may have changed the print settings for the selected photo. Printsettings you apply to an individual photo override the default print settings.Discard all print settings that have been applied to an individual photo bydeselecting the photo. For more information, see Selecting photos to print.
The printer ejects the paper when preparing to printSolution Direct sunlight could be interfering with the operation of the automaticpaper sensor. Move the printer out of direct sunlight.
Print quality is poor
Solution● One of the ink cartridges may be very low on ink, resulting in another color
being substituted during printing. Check the estimated ink levels by removingany memory cards, and then pressing Select Photos . If an ink cartridge islow on ink, replace it. For more information, see Inserting ink cartridges.
● Use photo paper designed for the printer. For best results, use the papersrecommended in Choosing the right paper.
● You may be printing on the wrong side of the paper. Make sure the paper isloaded with the side to be printed facing down.
HP Photosmart 8200 series User's Guide 53

● You may have selected a low-resolution setting on the digital camera.Reduce the size of the image and try printing again. For better results in thefuture, set the digital camera to a higher photo resolution.
● There may be a problem with an ink cartridge or with the print head. Try thefollowing:– Remove and then reinsert each ink cartridge, one at a time, to make
sure they are all properly seated.– Run the automatic print head cleaning procedure. For more information,
see Automatically cleaning the printhead.– Align the printer. For more information, see Aligning the printer.– If print quality problems persist after you have tried all of the above
solutions, contact HP Customer Care.
Photos are not printing correctly
Solution● You may have loaded the photo paper incorrectly. Load the photo paper with
the side to be printed facing down.● The photo paper may not have fed into the printer correctly. Try the following:
– Check for a paper jam. For more information, see Paper errors.– Insert the photo paper as far as it will go into the Photo tray.– Load one sheet of photo paper at a time.
The photos I marked for printing in the digital camera do not printSolution Some digital cameras let you mark photos for printing in both thecamera's internal memory and on the memory card. If you mark photos in theinternal memory, and then move photos from the camera's internal memory to thememory card, the marks do not transfer. Mark photos for printing after youtransfer them from the digital camera's internal memory to the memory card.
Error messages Before contacting HP Customer Care, read this section for troubleshooting tips or goto the online support services at www.hp.com/support.Error messages that appear on the printer screen can be divided into the followingtypes:● Paper errors● Ink cartridge errors● Memory card errors● Computer printing errors
Paper errorsBefore contacting HP Customer Care, read this section for troubleshooting tips or goto the online support services at www.hp.com/support.
Chapter 7
54 HP Photosmart 8200 series

Error message: Paper jam. Clear jam then press OK.Solution Turn off the printer, then unplug it from the power source. Clear theprinter of any paper that may be obstructing the paper path. Remove the rearaccess door. Gently remove the jammed paper from the printer, then replace therear access door.
1 Remove the rear access door to clear paper jams.
If you cannot remove all jammed paper from the rear area of the printer, tryremoving paper jammed in the middle of the printer by opening the paper jamdoor located inside the top cover.
1 Open the paper jam door to clear paper jams in the middle of the printer.
Plug the printer back in and turn it on.
Error message: Out of paper. Load paper then press OK.Solution Load paper, then press OK to print again. For paper-loadinginstructions, see Loading your paper.
Error message: Unsupported media size.Solution The printer cannot use the size of paper loaded in the paper tray.Press OK, then load a supported paper size instead. For a list of supported papersizes, see Printer specifications.
HP Photosmart 8200 series User's Guide 55

Error message: Automatic paper sensor failed.Solution The automatic paper sensor is obstructed or damaged. Try movingthe printer out of direct sunlight, then press OK and try printing again. If this doesnot work, go to www.hp.com/support or contact HP Customer Care.
Ink cartridge errorsBefore contacting HP Customer Care, read this section for troubleshooting tips or goto the online support services at www.hp.com/support.
Error message: Wrong ink cartridge(s) installedSolution The first time you set up and use your HP Photosmart printer, makesure to install the ink cartridges that were shipped with your printer. The ink inthese ink cartridges is specially formulated to mix with the ink in the print headassembly.To resolve this error, replace the affected ink cartridge(s) with the ink cartridgesthat were shipped with your HP Photosmart printer.For more information on replacing ink cartridges, see Inserting ink cartridges.
Error message: Incorrect ink cartridge Cause The wrong ink cartridge(s) are installed.Solution The indicated ink cartridge(s) cannot be used after the device hasundergone initialization. Replace the ink cartridge(s) with the appropriate inkcartridges for your HP Photosmart printer. The cartridge numbers you can usewith this printer appear on the back cover of this printed guide.For more information on replacing ink cartridges, see Inserting ink cartridges.
Error message: Replace cartridges soon Cause The indicated ink cartridge(s) are low on ink.Solution You might be able to continue printing for a short period of time withink remaining in the print head assembly. Replace the indicated ink cartridge(s) orpress OK to continue.For more information on replacing ink cartridges, see Inserting ink cartridges.
Error message: Ink cartridge(s) are empty Cause The indicated ink cartridge(s) are out of ink.Solution Replace the indicated ink cartridge(s) with new ink cartridge(s).● If the black ink cartridge is empty, you can continue printing with the other
color ink cartridges by selecting that option in the displayed printer screenprompts.
● If a color ink cartridge is empty, you can continue printing with the black inkcartridge by selecting that option in the displayed printer screen prompts.
Chapter 7
56 HP Photosmart 8200 series

Depending on the status of your print job, you can press OK to continue. If theHP Photosmart printer is in the middle of a print job, press Cancel and restartyour print job.
Note Text and photo quality will differ from those printed when using allink cartridges. If the empty ink cartridge(s) are not replaced soon, allprinting will stop.
For more information on replacing ink cartridges, see Inserting ink cartridges.
Error message: Cannot printCause The indicated ink cartridge(s) are out of ink.Solution Replace the indicated ink cartridge(s) immediately so that you canresume printing.The HP Photosmart printer cannot continue printing until the indicated inkcartridge(s) are replaced. All printing will stop.For more information on replacing ink cartridges, see Inserting ink cartridges.
Error message: Ink cartridge problem Cause The indicated ink cartridge(s) are missing or damaged.Solution Replace the indicated ink cartridge(s) immediately so that you canresume printing. If there are no ink cartridges missing from the HP Photosmartprinter, the ink cartridge contacts might need to be cleaned.For more information on replacing ink cartridges, see Inserting ink cartridges. Formore information on cleaning the ink cartridge contacts, see Manually cleaningthe ink cartridge contacts.If there are no ink cartridges missing from the HP Photosmart printer, and you stillreceive this message after cleaning the ink cartridge contacts, you will need areplacement ink cartridge. Remove the affected ink cartridge and look at the end-of-warranty date on the bottom, in YYYY/MMM/DD format. If it is before the end-of-warranty date, contact HP Customer Care to obtain a replacement ink cartridge.
Error message: Ink expiration near Cause The ink in the indicated ink cartridge(s) is near expiration.Solution If the current date is near the expiration date, consider replacing theink cartridge(s) to achieve best print quality. You can continue printing bypressing OK. HP cannot guarantee the quality or reliability of expired ink.For more information on replacing ink cartridges, see Inserting ink cartridges.
Error message: Ink cartridge(s) are expired Cause The ink in the indicated ink cartridge(s) is at the expiration date.
HP Photosmart 8200 series User's Guide 57

Solution If the ink cartridge(s) are expired, replace the ink cartridge(s) toachieve best print quality. You can continue printing by pressing OK. HP cannotguarantee the quality or reliability of expired ink.For more information on replacing ink cartridges, see Inserting ink cartridges.
Error message: Non-HP ink Cause Your HP Photosmart printer has detected non-HP ink.Solution Replace the indicated ink cartridge(s) or press OK to continue.HP recommends that you use genuine HP ink cartridges. Genuine HP inkcartridges are designed and tested with HP printers to help you easily producegreat results, time after time.
Note HP cannot guarantee the quality or reliability of non-HP ink. Printerservice or repairs required as a result of printer failure or damageattributable to the use of non-HP ink will not be covered under warranty.
If you believe you purchased genuine HP ink cartridge(s), go to:www.hp.com/go/anticounterfeit
Error message: Original HP ink depleted Cause The original HP ink in the indicated ink cartridge(s) has been depleted.Solution Replace the indicated ink cartridge(s) or press OK to continue.HP recommends that you use genuine HP ink cartridges. Genuine HP inkcartridges are designed and tested with HP printers to help you easily producegreat results, time after time.
Note HP cannot guarantee the quality or reliability of non-HP ink. Printerservice or repairs required as a result of printer failure or damageattributable to the use of non-HP ink will not be covered under warranty.
If you believe you purchased genuine HP ink cartridge(s), go to:www.hp.com/go/anticounterfeit
Error message: Scheduled maintenance Cause Printer maintenance is required to align and calibrate the print head.Solution You must align the printer to ensure excellent print quality. With letteror A4 unused plain white paper in the Main tray, press OK. The HP Photosmartprinter aligns the print head, calibrates the printer, and then prints a test page.Recycle or discard the test page.
Error message: Calibration errorCause The type of paper loaded in the Main tray cannot be used during printeralignment.
Chapter 7
58 HP Photosmart 8200 series

Solution If you have color or photo paper loaded in the Main tray when youalign the printer, the alignment might fail. Load unused plain white letter or A4paper into the Main tray, and then try the alignment again. If the alignment failsagain, you might have a defective sensor or ink cartridge; contact HP CustomerCare.
Cause The ink cartridge or sensor is defective.Solution Contact HP Customer Care.
Error message: Print cartridge cradle is stuck Cause The print head assembly is blocked.Solution Remove any objects that are blocking the print head assembly.
To clear the print head assembly1. Open the top cover, then open the paper jam door.
1 Open the paper jam door to clear the print head assembly.
2. Remove any objects that are blocking the print head assembly, includingpaper and any packing materials.
3. Turn the printer off, then turn it on again.4. Close the paper jam door and the top cover.
Error message: Ink System Failure Cause The print head assembly or the ink delivery system has failed and theHP Photosmart printer can no longer print.Solution Turn off the printer, then unplug its power cord. Wait about 10seconds, then plug it in again. If this does not clear the error message, pleasecontact HP Customer Care.
HP Photosmart 8200 series User's Guide 59

Memory card errorsBefore contacting HP Customer Care, read this section for troubleshooting tips or goto the online support services at www.hp.com/support.
Error message: Photo is missing. —OR— Some photos are missing.Solution The printer cannot read the file on the memory card, or one or morefiles specified for the job are missing from the memory card. Try saving thephotos to the computer using the digital camera rather than the memory card. If aphoto is missing, you may have accidentally deleted the photo from the card.
Error message: Card access error. Job was cancelled. Press OK.—OR— Filedirectory structure is corrupted. —OR— Card may be damaged. Job wascancelled. Press OK.
Cause The printer cannot read the data on the memory card and cannotcomplete any current print jobs. The data may be corrupted or there may be aphysical problem with the memory card.
Solution● Save the files to the computer and access them from there.● If this does not work, use a new memory card or reformat the memory card
using the digital camera. Any photos on the memory card will be lost.● If this does not work, the photo files may be damaged or unreadable. Before
you contact HP Customer Care, try another memory card to determine if it isthe printer or the memory card that is failing.
Error message: Cannot print photos.Cause More than 10 photos specified for a print job may be corrupted, missing,or are an unsupported file type. For information about supported file types, seePrinter specifications.
Solution● Save the photos to the computer using the digital camera rather than the
memory card.● Save the files to the computer and print from the computer.● Print a photo index and reselect photos. For more information, see Deciding
which photos to print.
Error message: Card is password protected. Cannot access card.Solution The printer cannot read the memory card because the card ispassword-protected. Follow these steps:1. Remove the memory card from the printer.2. Insert the memory card in the device you originally used to store the
password on the memory card.3. Remove the password from the memory card.
Chapter 7
60 HP Photosmart 8200 series

4. Remove the memory card and reinsert it in the printer memory card slot.5. Try printing again.
Error message: Card is locked. Cannot access card.Solution Make sure the lock switch on the card is in the unlocked position.
Error message: Card is not fully inserted. Push card in a little more.Solution The printer can detect the memory card but cannot read it. Push thememory card gently into the memory card slot until it stops. For more information,see Inserting a memory card.
Error message: Use only one (1) card at a time. Please remove a memory card.—OR— Use only one (1) device at a time. Please remove/disconnect a device.
Solution The printer has two or more different types of memory cards insertedsimultaneously, or a memory card is inserted and a digital camera is connected tothe camera port at the same time. Remove memory cards or disconnect thecamera until only one card is in the printer or only a camera is connected.
Error message: Card was removed. Job was cancelled. Press OK.Solution You removed a memory card from the printer while it was busyprinting a file from the card. Follow these steps:1. Press OK.2. Reinsert the memory card and print the selected photos again. The memory
card must remain inserted until the print job is complete.To avoid damage to memory cards in the future, do not remove them from theprinter memory card slot while they are being accessed. For more information,see Removing a memory card.
Error message: Camera selections (DPOF) file has error.Solution The printer is unable to read a DPOF file due to corrupted data or anerror on the memory card. Use the printer control panel to reselect the photos.For more information, see Printing photos from a memory card.
HP Photosmart 8200 series User's Guide 61
Error message: Some camera-selected photos are not on card.Solution Some camera-selected photos are missing or have been deleted. Trythe following:● Confirm that you did not accidentally delete the photo from the memory card.● Reselect the photos again using the digital camera.● Print a new photo index to see the index numbers associated with each
photo. For more information, see Deciding which photos to print.
Error message: Cannot display this photo. —OR— Cannot display all photos. —OR— Photos are corrupted.
Solution The memory card contains image formats the printer does notsupport, or the files are corrupted. For a list of supported image formats, seePrinter specifications. Access photos using the computer. For information aboutaccessing photos through the computer, see Printing from a computer.
Error message: Unsupported card type.Solution Use your camera to transfer the photos to your computer, and thenprint from your computer.
Error message: Some photo numbers are not on card.Solution Use your camera to transfer the photos to your computer, and thenprint from your computer. If some photos are still missing, they may have beendeleted from the memory card.
Computer and connectivity printing errorsBefore contacting HP Customer Care, read this section for troubleshooting tips or goto the online support services at www.hp.com/support.
Error message: Printer memory is full. Job was cancelled. Press OK.Solution The printer encountered a problem when printing photos. Try thefollowing:● To clear the printer memory, turn the printer off, then turn it on again.● Print fewer photos at a time.● Save the photos to the computer and print from there.● Save the files to the computer using a memory card reader and then print
from the computer.
Error message: Communication error. Check computer connection. Press OK. —OR— Data was not received. Check computer connection. Press OK tocontinue. —OR— No response from computer.
Solution The printer cannot communicate properly with the computer. Theprinter software may not be working or a cable may be loose. Make sure the USB
Chapter 7
62 HP Photosmart 8200 series

cable is securely attached to both the computer and to the USB port on the backof the printer. If the cable is secure, verify that the printer software is installed.
Error message: Camera disconnected during print job.Solution The print job will be cancelled. Reattach the USB cable to the cameraand printer and resend the print job.
HP Photosmart 8200 series User's Guide 63

Chapter 7
64 HP Photosmart 8200 series

8 HP Customer Care Note The name of HP support services may vary by country/region.
If you have a problem, follow these steps:1. Check the documentation that came with the printer.
– Quick Start booklet: The HP Photosmart 8200 series Quick Start bookletexplains how to set up the printer and print your first photo.
– User's Guide: The User's Guide is the book you are reading. This bookdescribes the basic features of the printer, explains how to use the printerwithout connecting a computer, and contains hardware troubleshootinginformation.
– Onscreen HP Photosmart Printer Help: The onscreen HP PhotosmartPrinter Help describes how to use the printer with a computer and containssoftware troubleshooting information. See Accessing the onscreenHP Photosmart Printer Help.
2. If you are unable to solve the problem using the information in the documentation,visit www.hp.com/support to do the following:– Access online support pages– Send HP an e-mail message for answers to your questions– Connect with an HP technician by using online chat– Check for software updatesSupport options and availability vary by product, country/region, and language.
3. For Europe only: Contact your local point of purchase. If the printer has ahardware failure, you will be asked to bring the printer to where you purchased it.Service is free during the printer limited warranty period. After the warrantyperiod, you will be quoted a service charge.
4. If you are unable to solve the problem using the onscreen Help or HP web sites,call HP Customer Care using the number for your country/region. For a list ofcountry/region phone numbers, see HP Customer Care by phone.
HP Customer Care by phoneWhile the printer is under warranty, you can obtain free phone support. For moreinformation, see the warranty included in the box, or go to www.hp.com/support tocheck the duration of your free support.After the free phone support period, you can obtain help from HP at an additional cost.Contact your HP dealer or call the support phone number for your country/region forsupport options.To receive HP support by phone, call the appropriate support phone number for yourlocation. Standard phone company charges apply.North America: Call 1-800-474-6836 (1-800–HP-INVENT). U.S. phone support isavailable in both English and Spanish languages 24 hours a day, 7 days a week (daysand hours of support may change without notice). This service is free during thewarranty period. A fee may apply outside the warranty period.
HP Photosmart 8200 series User's Guide 65

Western Europe: Customers in Austria, Belgium, Denmark, Spain, France, Germany,Ireland, Italy, Netherlands, Norway, Portugal, Finland, Sweden, Switzerland, and theUnited Kingdom should go to www.hp.com/support to access phone support numbersin their country/region.Other countries/regions: See the list of support telephone numbers inside the frontcover of this guide.
Placing a callCall HP Customer Care while you are near the computer and printer. Be prepared toprovide the following information:● Printer model number (located on the front of the printer)● Printer serial number (located on the bottom of the printer)● Computer operating system● Version of printer software:
– Windows PC: To see the printer software version, right-click the HP DigitalImaging Monitor icon in the Windows taskbar and select About.
– Macintosh: To see the printer software version, use the Print dialog box.● Messages displayed on the printer screen or on the computer monitor● Answers to the following questions:
– Has the situation you are calling about happened before? Can you recreatethe situation?
– Did you install any new hardware or software on the computer around thetime that the situation occurred?
Return to HP repair service (North America only)HP will arrange to have your product picked up and delivered to an HP Central RepairCenter. We pay for the round-trip shipping and handling. This service is free for theduration of the hardware warranty period.
Chapter 8
66 HP Photosmart 8200 series

HP Quick Exchange Service (Japan only)
Additional warranty optionsExtended service plans are available for the printer at additional costs. Go towww.hp.com/support, select your country/region and language, then explore theservices and warranty area for information about the extended service plans.
HP Photosmart 8200 series User's Guide 67

Chapter 8
68 HP Photosmart 8200 series
A SpecificationsThis section lists the minimum system requirements for installation of the HP Photosmart printersoftware, and provides selected printer specifications.For a complete list of printer specifications and system requirements, see the onscreenHP Photosmart Printer Help. For information about viewing the onscreen HP Photosmart PrinterHelp, see Welcome.
System requirements
Component Windows PC minimum Macintosh minimum
Operating system Microsoft® Windows 98, 2000Professional, Me, XP Home,and XP Professional
Mac® OS X 10.2.x, 10.3.x,and later
Processor Intel® Pentium® II (orequivalent) and higher
G3 or greater
RAM 64 MB (128 MBrecommended)
Mac OS X 10.2.x, 10.3.x,and later: 128 MB
Free disk space 500 MB 150 MB
Video display 800 x 600, 16-bit or higher 800 x 600, 16-bit or higher
CD-ROM drive 4x 4x
Connectivity USB: Microsoft Windows 98,2000 Professional, Me, XPHome, and XP ProfessionalPictBridge: using frontcamera portBluetooth: using optionalHP Bluetooth WirelessAdapter
USB: Front and back ports(Mac OS X 10.2.x, 10.3.x,and later)PictBridge: using frontcamera portBluetooth: using optionalHP Bluetooth WirelessAdapter
Browser Microsoft Internet Explorer5.5 or later
—
Printer specifications
Category Specifications
Connectivity USB: Microsoft Windows 98, 2000 Professional, Me, XPHome, and XP Professional; Mac OS X 10.2.x, 10.3.x,and later
Image file formats JPEG BaselineTIFF 24-bit RGB uncompressed interleavedTIFF 24-bit YCbCr uncompressed interleaved
HP Photosmart 8200 series User's Guide 69

Category Specifications
TIFF 24-bit RGB packbits interleavedTIFF 8-bit gray uncompressed/packbitsTIFF 8-bit palette color uncompressed/packbitsTIFF 1-bit uncompressed/packbits/1D Huffman
Video file formats Motion-JPEG AVIMotion-JPEG QuickTimeMPEG-1
Media specifications Recommended maximum length: 61 cm (24 inch)Recommended maximum paper thickness: 292 µm (11.5mil)Recommended maximum envelope thickness: 673 µm(26.5 mil)
Media sizes supported Supported sizes when printing from a computer7.6 x 12.7 cm to 22 x 61 cm (3 x 5 inch to 8.5 x 24 inch)Supported sizes when printing from the control panelMetric: A6, A4, 10 x 15 cm (with and without tab);Imperial: 3.5 x 5 inch, 4 x 6 inch (with and without tab),4 x 12 inch, 5 x 7 inch, 8 x 10 inch, 8.5 x 11 inch; Other:Hagaki and L-size
Media types supported Paper (plain, inkjet, photo, and panoramic photo)EnvelopesTransparenciesLabelsCards: index, greeting, Hagaki, A6, L-sizeIron-on transfersAvery C6611 and C6612 photo sticker paper: 10 x 15 cm(4 x 6 inch), 16 rectangular or oval stickers per page
Memory cards CompactFlash Type I and IIMicrodriveMultiMediaCardSecure DigitalMemory SticksxD-Picture Card
Memory card-supported fileformats
Printing: See Image file formats earlier in this table.Saving: All file formats
Paper tray – media sizessupported
Main tray8 x 13 cm to 22 x 61 cm (3 x 5 inch to 8.5 x 24 inch)Photo trayUp to 10 x 15 cm (4 x 6 inch), with or without tab
Appendix A(continued)
70 HP Photosmart 8200 series

Category Specifications
Output trayAll supported Main tray and Photo tray sizes
Paper tray capacity Main tray100 sheets of plain paper14 envelopes20–40 cards (depending on thickness)30 sheets of labels25 transparencies, iron-on transfers, or photo paper10 sheets of photo paperPhoto trayOutput tray20 sheets of photo paper50 sheets of plain paper10 cards or envelopes25 sheets of labels or iron-on transfers
Operating environment Recommended temperature range: 15–30 °C (59-86 °F)Maximum temperature range: 5–40 °C (41-104 °F)Storage temperature range: -40–60 °C (-40-140 °F)Recommended humidity range: 20–80% RHMaximum humidity range: 10–80% RH
Physical specifications Height: 16.0 cm (6.30 inch).Width: 44.7 cm (17.6 inch)Depth: 38.5 cm (15.2 inch)Weight: 8.5 kg (18.7 lb).
Power consumption Printing, Average: 75 WPrinting, Maximum: 94 WIdle: 13.3–16.6 W
Power supply model number HP Part # 0957-2093
Power requirement 100–240 VAC (± 10%), 50–60 Hz (± 3 Hz)
Ink cartridges HP Yellow Ink CartridgeHP Cyan Ink CartridgeHP Light Cyan Ink CartridgeHP Magenta Ink CartridgeHP Light Magenta Ink CartridgeHP Black Ink Cartridge
(continued)
HP Photosmart 8200 series User's Guide 71

Category Specifications
Note The cartridge numbers you can use with thisprinter appear on the back cover of this printed guide. Ifyou have already used the printer several times, you canalso find the cartridge numbers in the printer software.For more information, see Inserting ink cartridges.
Print speed (maximum) Black printouts: 32 pages per minuteColor printouts: 31 pages per minutePhotos: 14 seconds for each 10 x 15 cm (4 x 6 inch) photo
USB support Microsoft Windows 98, 2000 Professional, Me, XP Home,and XP ProfessionalMac OS X 10.2.x, 10.3.x, and laterHP recommends using a USB 2.0 full-speed compliantcable 3 meters (10 feet) or less in length.
Appendix A(continued)
72 HP Photosmart 8200 series
A. Extent of limited warranty 1. Hewlett-Packard (HP) warrants to the end-user customer that the HP products specified above will be free from
defects in materials and workmanship for the duration specified above, which duration begins on the date of purchase by the customer.
2. For software products, HP's limited warranty applies only to a failure to execute programming instructions. HP does not warrant that the operation of any product will be uninterrupted or error free.
3. HP's limited warranty covers only those defects that arise as a result of normal use of the product, and does not cover any other problems, including those that arise as a result of:
a. Improper maintenance or modification; b. Software, media, parts, or supplies not provided or supported by HP; c. Operation outside the product's specifications; d. Unauthorized modification or misuse. 4. For HP printer products, the use of a non-HP ink cartridge or a refilled ink cartridge does not affect either the warranty
to the customer or any HP support contract with the customer. However, if printer failure or damage is attributable to the use of a non-HP or refilled ink cartridge, HP will charge its standard time and materials charges to service the printer for the particular failure or damage.
5. If HP receives, during the applicable warranty period, notice of a defect in any product which is covered by HP's warranty, HP shall either repair or replace the product, at HP's option.
6. If HP is unable to repair or replace, as applicable, a defective product which is covered by HP's warranty, HP shall, within a reasonable time after being notified of the defect, refund the purchase price for the product.
7. HP shall have no obligation to repair, replace, or refund until the customer returns the defective product to HP. 8. Any replacement product may be either new or like-new, provided that it has functionality at least equal to that of the
product being replaced. 9. HP products may contain remanufactured parts, components, or materials equivalent to new in performance. 10. HP's Limited Warranty Statement is valid in any country where the covered HP product is distributed by HP. Contracts
for additional warranty services, such as on-site service, may be available from any authorized HP service facility in countries where the product is distributed by HP or by an authorized importer.
B. Limitations of warrantyTO THE EXTENT ALLOWED BY LOCAL LAW, NEITHER HP NOR ITS THIRD PARTY SUPPLIERS MAKES ANY OTHER WARRANTY OR CONDITION OF ANY KIND, WHETHER EXPRESS OR IMPLIED WARRANTIES OR CONDITIONS OF MERCHANTABILITY, SATISFACTORY QUALITY, AND FITNESS FOR A PARTICULAR PURPOSE.
C. Limitations of liability 1. To the extent allowed by local law, the remedies provided in this Warranty Statement are the customer's sole and
exclusive remedies. 2. TO THE EXTENT ALLOWED BY LOCAL LAW, EXCEPT FOR THE OBLIGATIONS SPECIFICALLY SET FORTH IN
THIS WARRANTY STATEMENT, IN NO EVENT SHALL HP OR ITS THIRD PARTY SUPPLIERS BE LIABLE FOR DIRECT, INDIRECT, SPECIAL, INCIDENTAL, OR CONSEQUENTIAL DAMAGES, WHETHER BASED ON CONTRACT, TORT, OR ANY OTHER LEGAL THEORY AND WHETHER ADVISED OF THE POSSIBILITY OF
SUCH DAMAGES.D. Local law 1. This Warranty Statement gives the customer specific legal rights. The customer may also have other rights which vary
from state to state in the United States, from province to province in Canada, and from country to country elsewhere in the world.
2. To the extent that this Warranty Statement is inconsistent with local law, this Warranty Statement shall be deemed modified to be consistent with such local law. Under such local law, certain disclaimers and limitations of this Warranty Statement may not apply to the customer. For example, some states in the United States, as well as some governments outside the United States (including provinces in Canada), may:
a. Preclude the disclaimers and limitations in this Warranty Statement from limiting the statutory rights of a consumer (e.g., the United Kingdom); b. Otherwise restrict the ability of a manufacturer to enforce such disclaimers or limitations; or c. Grant the customer additional warranty rights, specify the duration of implied warranties which the manufacturer
cannot disclaim, or allow limitations on the duration of implied warranties. 3. THE TERMS IN THIS WARRANTY STATEMENT, EXCEPT TO THE EXTENT LAWFULLY PERMITTED, DO NOT
EXCLUDE, RESTRICT, OR MODIFY, AND ARE IN ADDITION TO, THE MANDATORY STATUTORY RIGHTS APPLICABLE TO THE SALE OF THE HP PRODUCTS TO SUCH CUSTOMERS.
HP Limited WarrantyDear Customer,You will find below the name and address of the HP entity responsible for the performance of the HP Limited Warranty in your country. You may have additional statutory rights against the seller based on your purchase agreement. Those rights are not in any way affected by this HP Limited Warranty.Ireland: Hewlett-Packard Ireland Ltd. 30 Herbert Street IRL-Dublin 2United Kingdom: Hewlett-Packard Ltd, Cain Road, Bracknell, GB-Berks RG12 1HN
HP product Duration of limited warrantySoftware 90 daysPrint cartridges Until the HP ink is depleted or the “end of warranty” date printed on the cartridge has been reached, whichever occurs first. This
warranty does not cover HP ink products that have been refilled, remanufactured, refurbished, misused, or tampered with.
Accessories 1 yearPrinter peripheral hardware (see the following for details) 1 year
HP printer limited warranty statement

Appendix B
74 HP Photosmart 8200 series

Index
Aaccessories 7accessories, two-sided
printing 7aligning the printer 46alignment page 46alignment, required 58antique coloration 26
BBluetooth
connecting to printer 35menu settings 8wireless printer adapter 8
borderless prints 26buttons 6
Ccameras
connecting to printer 35PictBridge 31port 4printing from 31
cartridges. See ink cartridgescleaning
copper-colored contacts 43print head 43printer 43
color effects 26CompactFlash 17computer
connecting to printer 35printing from 3, 39saving photos to 36system requirements 69
control panel 6
Ddamaged, ink cartridge 57date and time stamps 26digital cameras. See camerasDigital Print Order Format 29documentation, printer 3DPOF 29
Ee-mailing photos 37error messages 54
Ffile formats, supported 17, 69
Hhelp. See troubleshootinghelp, onscreen 3HP Customer Care 65HP Image Zone 39HP Image Zone Express 39HP Instant Share 35, 37, 40HP iPod 32, 36HP Software Update 46
Iink
checking level 45empty 56replace soon 56
ink cartridgesdamaged 57empty 56expired 57HP ink depleted 58incorrect 56ink level, checking 15inserting 15missing 57non-HP ink 58printer alignment 58replace soon 56replacing 15storing 47testing 45
ink level, checking 15inserting
ink cartridges 15memory cards 18
Instant Share. See HP InstantShare
JJPEG file formats 17
Llayout and photo size 21lights 7loading paper 12
Mmemory cards
inserting 18printing from 28removing 19saving photos to a
computer 36supported types 17
Memory Sticks 17menu, printer 8Microdrive 17missing ink cartridge 57MultiMediaCard 17
Oonscreen Help 3
Ppaper
buying and choosing 11loading 12maintaining 11, 47specifications 69trays 4
photosantique coloration 26cropping 26date and time stamp 26e-mailing 37framing 26improving quality 25printing 28saving to computer 35selecting for print 24sepia tones 26supported file formats 17zooming 26
PictBridge cameras 31print head
cleaning 43failure 59
HP Photosmart 8200 series User's Guide 75

stalled 59printer
accessories 7cleaning 43connecting 35documentation 3error messages 54menu 8parts 4specifications 69storing 47warnings 4
printer software, updating 39,46
printingfrom a computer 3, 39from a memory card 28from cameras 31photo index 22photos 28range of photos 28test page 45thumbnails 22without computer 21
Qquality
photo paper 47photos 25printing test page 45
Rrange, printing 28regulatory notices 77removing memory cards 19replacing ink cartridges 15
Ssaving photos to computer 35Secure Digital 17sepia tones 26specifications 69storing
ink cartridges 47photo paper 47printer 47
system requirements 69
Ttest page 45thumbnails, printing 22TIFF file format 17
trays, paper 4troubleshooting
error messages 54flashing lights 49HP Customer Care 65
two-sided printing 7
UUSB
connection type 35port 4specifications 69
Vvideo action prints 31
XxD-Picture Card 17
76 HP Photosmart 8200 series

Regulatory noticesHewlett-Packard CompanyThis device complies with part 15 of the FCC Rules. Operation is subject to the following two conditions:● This device may not cause harmful interference, and● This device must accept any interference received, including interference that may cause undesired operation.Pursuant to Part 15.21 of the FCC Rules, any changes or modifications to this equipment not expressly approved by Hewlett-Packard Company may cause harmful interference, and void your authority to operate this equipment. Use of a shielded datacable is required to comply with the Class B limits of Part 15 of the FCC Rules.For further information, contact: Hewlett-Packard Company, Manager of Corporate Product Regulations, 3000 HanoverStreet, Palo Alto, CA 94304, (650) 857-1501.NoteThis equipment has been tested and found to comply with the limits for a Class B digital device, pursuant to part 15 of theFCC rules. These limits are designed to provide reasonable protection against harmful interference in a residentialinstallation. This equipment generates, uses, and can radiate radio frequency energy and, if not installed and used inaccordance with the instructions, can cause harmful interference to radio communications. However, there is no guaranteethat interference will not occur in a particular installation. If this equipment does cause harmful interference to radio ortelevision reception, which can be determined by turning the equipment off and on, the user is encouraged to try to correctthe interference by one or more of the following measures:● Reorient or relocate the receiving antenna.● Increase the separation between the equipment and the receiver.● Connect the equipment into an outlet on a circuit different from that to which the receiver is connected.● Consult the dealer or an experienced radio/TV technician for help.LED indicator statementThe display LEDs meet the requirements of EN 60825-1.