english - massagesesselmassagesessel.at/wp-content/uploads/2015/03/panasonic_ep-ma70_… · gb36...
TRANSCRIPT
GB35
English
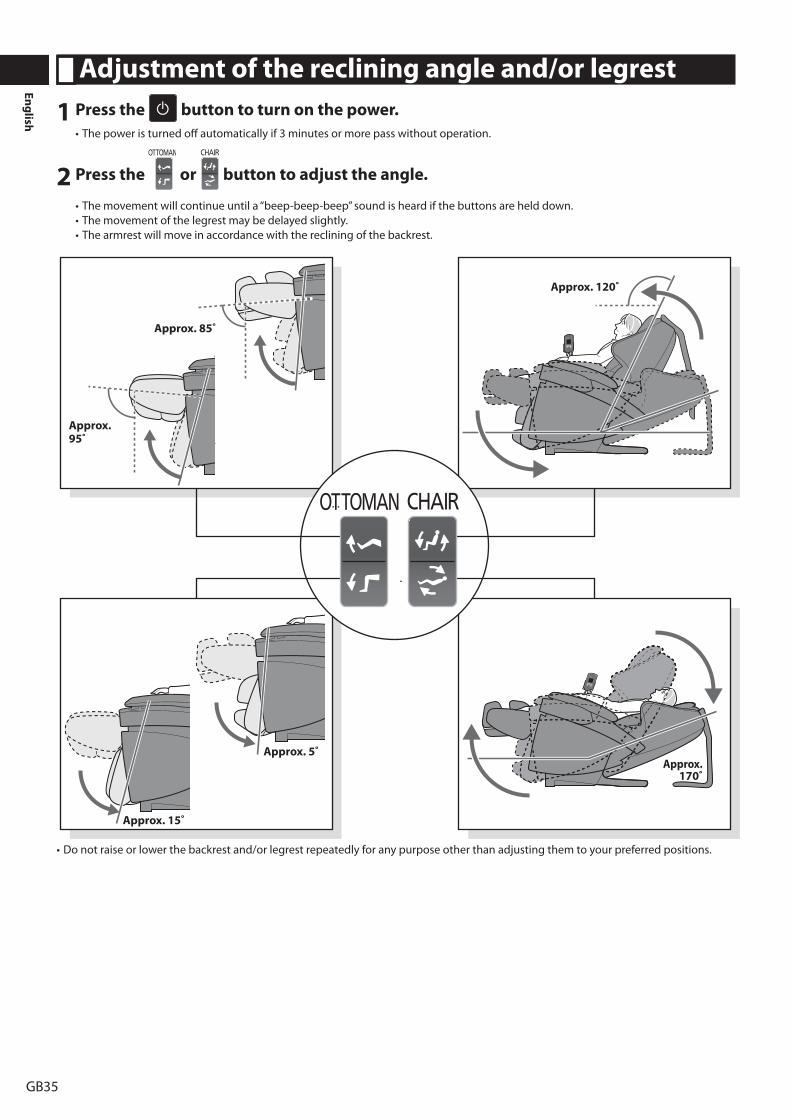
Adjustmentoftherecliningangleand/orlegrest1Pressthe buttontoturnonthepower.
•Thepoweristurnedoffautomaticallyif3minutesormorepasswithoutoperation.
2Pressthe or buttontoadjusttheangle.
•Themovementwillcontinueuntila“beep-beep-beep”soundisheardifthebuttonsarehelddown.•Themovementofthelegrestmaybedelayedslightly.•Thearmrestwillmoveinaccordancewiththerecliningofthebackrest.
Approx.120˚
Approx.170˚
Approx.5˚
Approx.85˚
Approx.15˚
Approx.95˚
•Donotraiseorlowerthebackrestand/orlegrestrepeatedlyforanypurposeotherthanadjustingthemtoyourpreferredpositions.

GB36
Engl
ish
AftercompletingthemassageTimerfunction
Interruptingthemassage
Returnthefeetmassagesectiontotheoriginalpositionandthenpressthe button.
•Themassageheadsmovetotheretractedposition.•Thelegrestlowersandthebackrestraisesautomatically.
(Thebackrestwillmoveafterthemassageheadsretract.)Liftyourfeetslightlyandthelegrestreturns.
Ifyouexperienceanyproblems
Pressthe button.•Alloperationswillstopimmediately.•Getofftheunitcarefullytopreventtheunittippingover.
Returningtonormalchairposition
1Flapthecomfortcushionbackontothebackrest.
Themassagewillcompleteautomaticallyapproximately16minutesafterthestartofoperations.•Thefeetmassagesectionwillretract,andthelegrestwillbelowered
automaticallysoyoucanstandupsafely.
Thefeetmassagesectionwillnotretractallthewaywhenthelegrestisextended,sincethesolemassagesectionwillhitthefloor.Raiseyourlegstoretractalltheway.
•Thebackrestwillnotriseautomatically.•Themassageheadsmovetotheretractedposition.
Thebackrestwillrisebypressing buttontwice.

GB37
English
2Storethelegrest.SeeWarningNo.2onpageGB2,andNo.16andNo.21onpageGB3.
1 Pulltheleverinthedirectionofthearrow.
2 Rotatefromtop.
3 Rotateuntilitlocksintoplace.
4 Releasethelever.
5 Checkthatthelegrestislocked.
11
22
33
44
Pressfirmly.
Letgo.
DisconnectingthepowerSeeWarningNo.1and6onpageGB1,No.12onpageGB2,andOperatingPrecautionsNo.16onpageGB4.
1Slidethepowerswitchtothe“off”position.
2Turnthekeytothe“lock”positionandremoveit.
2
1Powerswitchsection
3Removethepowerplugfromthepowersocket.
4Thekeymustbestoredoutofthereachofchildren.

GB38
Engl
ish
CleaningandMaintenance See Danger No. 2 on page GB1.
Areascoveredwithsyntheticleather
Wipetheseareaswithasoft,drycloth.• When using commercially available leather-care products (wipes), follow its
instructions.• If the synthetic leather is particularly dirty, wipe it in the following manner:
1. Soak a soft cloth in water or a 3% to 5% solution of mild detergent and wring it out thoroughly.
2. Dab the surface with the moistened cloth.3. Rinse the cloth in water, wring it out thoroughly, and then wipe any remaining
detergent from the surface.4. Wipe the surfaces with a soft, dry cloth.5. Allow to dry naturally.
• If it is difficult to remove dirt, soak a commercially available Melamine foam sponge in mild detergent and wipe the unit with it.
• Do not use a hair dryer to dry the surface more quickly.• Since colours may transfer from clothing to the synthetic leather surface, be careful
when using the unit with clothing such as jeans or coloured clothes.• Do not allow these areas to come in contact with plastic for extended periods of time
as this may lead to discolouration.• Never use chemicals such as thinner, benzine, alcohol, etc.
PlasticArea
1Wipetheunitwithaclothmoistenedwithmilddetergentandthoroughlywrungout.• Never use chemicals such as thinner, benzine, alcohol, etc.
2Wipetheunitwithaclothmoistenedwithplainwaterandthoroughlywrungout.• Make sure to wring tightly before wiping the controller.
3Allowtheunittodrynaturally.
SeatFabric
1Wipetheunitwithaclothmoistenedwithmilddetergentandthoroughlywrungout.• Never use chemicals such as thinner, benzine, alcohol, etc.
2Usewateroramilddetergentandbrushonareaswheretheseatfabricisparticularlysoiled.• Be careful not to brush the fabric too much to avoid damage.
3Wipetheunitwithaclothmoistenedwithplainwaterandthoroughlywrungout.
4Allowtheunittodrynaturally.
• Since colour may transfer from clothing to the seat fabric, be careful when using the unit with clothing such as jeans or coloured clothes.

GB39
English
MovingtheUnit See Warning No. 22 on page GB3.
Movingbyliftingitwith2ormorepersons
Movetheunitwith2ormorepeopleinfrontandbackoftheunitholdingonthesideofthelegrestandthegrooveonthebackcoverofthebackrest.
Holdontothesides.
Groove
Placethecontrollerandpowercordontheseat.
LegrestBackcover
Placeyourfingersinthegroove.
Holdontothesidesofthelegrest.
Mat
Donotholdontothefrontside.Thesolemassagesectionmightslide,andinjuriesmayoccur.
* You may damage the floor by dropping the unit if you do not hold it correctly. Never carry it by the armrest, because it may get damaged.
Toputtheunitdownonthefloor• Put the unit down slowly and carefully watch your step.• Put down the legrest by holding it with your hands until it has been set on the floor completely.
If you release your hands before the legrest is fully extended, the legrest will forcefully return to the initial position.

GB40
Engl
ish
Usingthewheelstomovetheunit
Movetheunitbyholdingontothesideofthelegrestandusingthewheels.
Rolltheunitslowly
Placethecontrollerandpowercordontheseat.
Thefloormaygetdamaged,soitisrecommendedtoplaceamatetc.onthefloor.
Wheels
Liftitnohigherthanwaistheight
Holdontothesides.
Holdontothesidesofthelegrest.
Donotholdontothefrontside.Thesolemassagesectionmightslide,andinjuriesmayoccur.
Toputtheunitdownonthefloor• Put the unit down slowly and carefully watch your step.• Put down the legrest by holding it with your hands until it has been set on the floor completely.
If you release your hands before the legrest is fully extended, the legrest will forcefully return to the initial position.
Howtoremovethearmrest
Itiseasiertomovetheunitwiththearmrestremoved.
1 Removetheairplugs.(See Step 3 on page GB14.)
2 Removetheattachmentscrews.(See Step 2-3 on page GB13.)
3 Slidethearmresttowardtherear,thenpullitupholdingonitwithbothhands.

GB41
English
AbouttheAutomaticprogrammes/Aboutthemassagetechniques/Aboutthevoiceguidancefunction
AbouttheAutomaticprogrammes(* Time spent on “Finishing Touches” differs depending on your height and intensity setting.)Refreshprogramme
1) Tap/Swedish on neck/shoulders
2) Tap/knead on lower back Pelvis stretch
3) Tap/knead on neck/lower back Shoulder blade stretch
4) Tap/knead on middle back/lower back
5) Leg stretch 6) Tap/Swedish on neck/shoulders
7) Finishing Touches*
Deepprogramme1) Ultra knead/knead on neck/shoulders
2) Knead/roll on lower back
3) Leg stretch Pelvis stretch
4) Ultra knead/knead on neck/shoulders
5) Shoulder blade stretch
6) Knead/roll on middle back/lower back
7) Finishing Touches*
Shiatsuprogramme1) Shiatsu/ultra knead on neck/shoulders
2) Shiatsu/knead on lower back
3) Shiatsu/roll on middle back Shoulder blade stretch
4) Shiatsu/ultra knead on neck/shoulders
5) Shiatsu/knead on middle back/lower back
6) Pelvis stretch Leg stretch
7) Finishing Touches*
Hipprogramme1) Pelvis stretch 3 times Entire back roll
2) Leg stretch 3) Shoulder blade stretch Entire back roll
4) Pelvis stretch 2 times Entire back roll
5) Leg stretch Entire back roll
6) Pelvis stretch Entire back roll
7) Finishing Touches*
Neck/shoulderprogramme1) Shiatsu/knead on neck/shoulders
2) Roll on middle back Shoulder blade stretch
3) Shiatsu/knead on neck/shoulders
4) Roll on middle back
5) Shiatsu/knead on neck/shoulders
6) Finishing Touches*
Lowerbackprogramme1) Knead/roll on middle back/lower back
2) Knead/roll on middle back/lower back
3) Pelvis stretch Leg stretch
4) Knead/roll on middle back/lower back
5) Knead/roll on middle back/lower back
6) Finishing Touches*

GB42
Engl
ish
Aboutthemassagetechniques(The figures are images of the respective operations.)
ULTRAKNEAD SHIATSU KNEAD SWEDISHFast kneading in small circles. Strong pointed massage. Deep kneading action. Softer planar massage action.
ROLL TAP FULLBACKROLL• The respective techniques are
suitable for specific body parts. Actions of Shiatsu for the “NECK” are different from of the actions for the “SHOULDER”.
Regional roll & stretch massage. Tapping massage. Stretching massage along the backbone.
AboutthevoiceguidancefunctionThis is a function which briefly explains the operation procedures and contents of the actions.
Whenready,selectoneoftheAutoprogrammesfromtheflashingbuttons.
ThisisaprogrammeforthosewhopreferanintenseShiatsu-typemassagefromabovetheshoulders.
Adjustingthevoiceguidancevolume
Pressthe buttontoshiftthevolumelevelbyoneup/down.
Display
Volume “Off” “Soft” “Medium”DefaultSetting “Loud”
Thesinglebeep(whenabuttonispressed)andthetriplebeep(whentheadjustablesettinglimitisreached)willalwaysbeaudible.
This can be used with the volume saved during the Automatic programme. (See page GB24.)

GB43
English
TroubleshootingProblem
CauseandRemedy
MotorNoises• It sounds and feels like the massage heads are straining to get over wrinkles in the cloth.• There is operational noise of kneading or tapping actions.• There is a creaking noise when the massage heads are in operation.• There is a rattling sound when the massage heads move up or down.• The belt can be heard rotating.• The motor groans when it comes under load.• There is a strange sound when the massage heads move in and out.• There is a noise when I sit down.• There is a noise when the comfort cushion moves over the armrest when the seat is reclining.• There is a rubbing sound produced by the massage heads rubbing on the seat fabric.• There is a noise of discharging air.• There is operational noise when applying air pressure.• The legrest rattles.• There is a humming sound from the pump.• There is operational noise of valves under the seat.• There is an unstable sound when air escapes during the leg stretch.
These sounds are perfectly normal and will not have any effect on the operation of the unit.
Themassageheadsstopduringoperation.(Allthedisplaysandbuttonsonthecontrollerwillflashandthenturnoff.)
If excessive force is applied to the massage heads during operation, in the interests of safety the massage heads may stop moving. If all markings and buttons on the controller start to flash, which is extremely unusual, turn off the power switch, wait for approximately 10 seconds and then turn the power switch on again.If the massage heads stop again, position yourself so that your back is not completely in contact with the backrest. (Caution should be exercised particularly when used by persons weighing 100 kg or more.)
Itisnotpossibletoreclinetheunit.Thelegrestcannotberaisedorlowered.(Allthedisplaysandbuttonsonthecontrollerwillflashandthenturnoff.)
If the unit encounters an obstacle or if excessive force is exerted on it during operation, in the interests of safety the unit will come to a stop.When all displays and buttons are flashing and the backrest or the legrest has stopped, turn off the power of the unit once, turn “on” the power again after approximately 10 seconds, and then operate the unit.
Themassageheadsdonotcomeuptotheshoulderorneck.If your head does not contact with the pillow or your back does not contact with the backrest, the shoulder position may be detected as lower than the actual position during the body scanning. Sit on the seat in the deepest position and put your head on the pillow, and then repeat the operations again from the start. (See page GB21.)
Theheightoftheleftandrightmassageheadsisdifferent.An alternating tapping method is employed, which means that this phenomenon will naturally occur. There is nothing wrong with the unit.

GB44
Engl
ish
Problem
CauseandRemedy
“Heat”massageheadsdonotgetwarm.
• button is set to Off.• Sense of warmth from the massage heads will differ depending on your body shape, massage area, massage action, clothing, and
ambient temperature.The“Heat”massageheadsdonotcooldownevenafterthe“Heat”massageheadssettingisturnedoff.
• Because of the structure of the heater, the “Heat” massage heads will feel warm for a while after heating due to the residual heat.• The temperature you feel may rise when you massage the same area for a long time even if the “Heat” massage heads setting is
set to Off.Recliningdoesnottakeplaceeventhoughamassageisstartedinpre-programmes.(Thebackrestdoesnotautomaticallyrecline.)
Automatic reclining will not activate when the backrest is reclined to flat position more than massage position and legrest is in upper position.
Thebackrestdoesnotreturntotheuprightposition.
If the unit is stopped by automatic shut-off or by pressing the button, it will not return automatically.
(To return from the reclined position to the original position, press the button twice.)
Theunitwillnotoperateatall.• Upper body (neck to lower back) massage• Lower body massage• Arm massage
• The power cord has been disconnected. (See page GB18.)• The power switch on the unit has not been turned on.• An Automatic programme button or Manual Operation button hasn’t been pressed after pressing .
Itisnotpossibletomassagehandsandarms.
The air plug on the armrest is disconnected. (See page GB14.)
Sometimesthepowerwon’tturnonwhen ispressedagainwhenamassagehasfinished.
Approximately 5 seconds are required for programme termination after a massage finishes. Wait at least 5 seconds once all movement has stopped before pressing .
Theunithasbeendamaged.
Stop using the unit immediately.
Thepowercordorpowerplugisabnormallyhot.
Stop using the unit immediately.
See Warning No. 17 on page GB1, and No. 9 and 10 on page GB2.

GB45
English
Errordisplay
Contentsoftheerrorwillbedisplayedintheremainingtimedisplayareawhenanerroroccursduringtheoperation.
TimeRemainingDisplay
<Example of error display>• For the error “U10”
and will flash alternately.
Errordisplay Contents
For safety reasons, operation will terminate automatically when it cannot detect if someone is seated. If this error occurs even if you are seated, press the button, sit back all the way to the backrest, and operate from the start again.
Operation is terminated because there is a problem with internal communication.
Operation is terminated because there is a problem with the massage mechanism.
Operation except for the massage mechanism is terminated because there is a problem with the reclining mechanism or the raise/lowering mechanism of the legrest.
*Pleasecontactanauthorizedservicecentre.Serviceandmaintenancewillbecarriedoutsmootheriftheerrornumberiscommunicatedwhencontacting.
GB46
Engl
ish
InformationonDisposalforUsersofWasteElectrical&ElectronicEquipment(privatehouseholds)This symbol on the products and/or accompanying documents means that used electrical and electronic products should not be mixed with general household waste.For proper treatment, recovery and recycling, please take these products to designated collection points, where they will be accepted on a free of charge basis.Alternatively, in some countries you may be able to return your products to your local retailer upon the purchase of an equivalent new product.Disposing of this product correctly will help to save valuable resources and prevent any potential negative effects on human health and the environment which could otherwise arise from inappropriate waste handling. Please contact your local authority for further details of your nearest designated collection point.
Penalties may be applicable for incorrect disposal of this waste, in accordance with national legislation.
ForbusinessusersintheEuropeanUnionIf you wish to discard electrical and electronic equipment, please contact your dealer or supplier for further information.
InformationonDisposalinotherCountriesoutsidetheEuropeanUnionThis symbol is only valid in the European Union.If you wish to discard this product, please contact your local authorities or dealer and ask for the correct method of disposal.

Panasonic Electric Works Co., Ltd.© Panasonic Electric Works Co., Ltd. 2011http://www.panasonic.net/No. 1 GB, DE, NL, SE, DK, FR, RUS
P9310MA70801 Issued date: 2011-01-12
Printed in Japan