enhanced easy-stoptm with plc trailer abs training program
TRANSCRIPT

Enhanced Easy-StopTM with PLC Trailer ABS Training Program
Student Manual
TP-0143Issued 12-01
$2.50
Module 1 — General Information
Module 2 — Diagnostics and Repair
Trailer ABS

Module 1General Information
Enhanced Easy-Stop™
with PLC Trailer ABS
STUDENT MANUAL
For MERITOR WABCOEnhanced Easy-StopTM Trailer ABS ECUs:
P/N 400 500 101 0 2S/IM Basic for Standard TrailersP/N 400 500 104 0 2S/IM Basic for Dollies, Turntables
and SteerablesP/N 400 500 102 0 2S/2M Standard
P/N 400 500 103 0 2S/2M, 4S/2M, or 4S/3M Premium

Enhanced Easy-Stop TM Trailer ABSGeneral Information
TP-0143Issued 12-01 Page 1-1
ContentsCourse Overview ........................................................................................................................ 1-3Module 1 Overview..................................................................................................................... 1-5System Overview ....................................................................................................................... 1-7
Definition of Enhanced Easy-StopTM Trailer ABS ................................................................ 1-7Features ............................................................................................................................. 1-7PLC Communication .......................................................................................................... 1-7Theory of Operation ........................................................................................................... 1-7Terms and Definitions ......................................................................................................... 1-8
System Components and Operation ........................................................................................ 1-11ECU/Single or Dual Modulator Valve Assembly ............................................................... 1-11ABS Modulator Valve ........................................................................................................ 1-12Wheel Speed Sensor Assembly ....................................................................................... 1-18Spring Clip........................................................................................................................ 1-20Sensor Holder .................................................................................................................. 1-20Tooth Wheel ..................................................................................................................... 1-21Sensor Extension Cable ................................................................................................... 1-21
Diagnostic Tools ....................................................................................................................... 1-23TOOLBOXTM Software ...................................................................................................... 1-23PLC/J1708 Adapter .......................................................................................................... 1-24Pro-Link 9000 ................................................................................................................... 1-25Diagnostic Tool ................................................................................................................. 1-25
Trailer ABS Indicator Lamps ..................................................................................................... 1-27Important Information ....................................................................................................... 1-27Trailer-Mounted ABS Indicator Lamp ............................................................................... 1-27Dash-Mounted Trailer ABS Indicator Lamp ...................................................................... 1-27
Cables and Wiring .................................................................................................................... 1-29Cables .............................................................................................................................. 1-29Wiring ............................................................................................................................... 1-30
Installation Illustrations ............................................................................................................. 1-37Sensor Placement ............................................................................................................ 1-37ECU/Valve Assembly Reconfiguration ............................................................................. 1-47
Module 1 Summary .................................................................................................................. 1-49Progress Check ........................................................................................................................ 1-51

TP-0143Page 1-2 Issued 12-01

Enhanced Easy-Stop TM Trailer ABSCourse Overview
TP-0143Issued 12-01 Page 1-3
This course provides a description of the Meritor WABCO EnhancedEasy-StopTM Trailer Anti-Lock Brake System (ABS). The course willexplain the system’s individual components and presenttroubleshooting and repair information.
For service information, refer to Meritor WABCO Maintenance ManualMM-0180.
For information regarding replacement parts, refer to Meritor WABCOParts Book, PB-96133.
For additional assistance, contact the Meritor WABCO CustomerService Center at 800-535-5560.
The object of this training is to provide you with a basic understandingof Enhanced Easy-StopTM:
• How it works• Major components• Troubleshooting• Testing• Component replacement procedures
Upon completion of this course, you will be able to:
• Locate all system components• Describe all system components and their functions• Diagnose system faults• Remove and install components
This course consists of two modules:
• The first module describes Meritor WABCO EnhancedEasy-StopTM Trailer ABS and explains how it works. It includesa description of the components that make up the system, aswell as system configurations
• The second module describes diagnostics, diagnostic toolsand provides instruction in the following areas:
– Locating the cause of the problem– Repairing the problem– Checking the system for proper operation before returning it
to service
Module 1 Overview
Description
Objectives
Content
Course Overview

TP-0143Page 1-4 Issued 12-01

Enhanced Easy-Stop TM Trailer ABSModule 1 Overview
TP-0143Issued 12-01 Page 1-5
This module introduces Enhanced Easy-StopTM Trailer ABS. Itdescribes the system and identifies the components. A description ofhow Enhanced Easy-StopTM operates is also included. All of thecomponents are discussed, as well as all of the available systemconfigurations.
After completing this module, you will be able to:
• Explain the operation of Enhanced Easy-StopTM Trailer ABS• Identify and locate all of the components of Enhanced
Easy-StopTM Trailer ABS• Recognize the different configurations of Enhanced
Easy-StopTM Trailer ABS• Determine the location of sensors based on mounting
orientation of the ECU/dual modulator valve assembly

TP-0143Page 1-6 Issued 12-01

TP-0143Issued 12-01 Page 1-7
Enhanced Easy-Stop TM Trailer ABSSystem Overview
Enhanced Easy-StopTM Trailer ABS is an electronic, self-monitoringsystem that works with standard air brakes. It consists of three majorcomponents with connecting cables:
• Electronic Control Unit (ECU)/ABS modulator valve assembly(single or dual)
• ABS external modulator valve (for 4S/3M)• Wheel speed sensor assembly
The ECU contains a microprocessor which controls the system.Several configurations, consisting of a different number of sensorsand ABS modulator valves, make Enhanced Easy-StopTM Trailer ABSadaptable to nearly every trailer.
Enhanced Easy-StopTM features include:
• Power Line Carrier (PLC) communication• Generic Input and Output (I/O) (future expanded capability)• Dual relay modulator for the 2S/2M Standard, and 2S/2M,
4S/2M and 4S/3M Premium systems• Serviceability — ECU and valve can be replaced individually
PLC stands for Power Line Carrier, which is a method used tocommunicate information by multiplexing data on the same wire usedfor the ABS electrical power. PLC communications convert signalmessages data to a radio frequency (RF) signal on top of the +12Vpower line providing electrical power to the trailer. PLC wasintroduced to meet Federal Motor Vehicle Safety Standards(FMVSS) 121 requirements that call for the trailer ABS indicator lampto illuminate on the instrument panel of the tractor to alert the driver ofa fault in the trailer ABS.
The ECU receives wheel speed information from sensors located inthe wheel ends of the axles. There may be two or four sensors on thetrailer or dolly, depending on the number of axles and the ABSconfiguration.
Sensors continuously monitor wheel speed and send this informationto the ECU. When a wheel starts to lock, the ECU, using thewheel-speed information and programmed data, sends output signalsto control the operation of the ABS modulator valves.
Definition ofEnhancedEasy-Stop TM
Trailer ABS
Features
PLCCommunication
Theory ofOperation

TP-0143Page 1-8 Issued 12-01
The ECU monitors the air pressure in the brake chambers to preventwheel lockup and provide precise braking control during over-braking.ABS takes over control of the air pressure only when a wheel starts tolock up. The ECU controls the ABS modulator valves to modulate airpressure to the brake chambers to prevent wheel lockup.
In the event of a malfunction in the system, the ABS in the affectedwheel(s) is disabled. That wheel still has normal brakes; the otherwheels keep the ABS function.
ABS Axle ControlThe 2S/1M configuration uses one ECU/modulator valve assemblyand two wheel speed sensors. The ABS monitors wheel speed on oneaxle only. This is referred to as axle control.
ABS Side-to-Side ControlThe 2S/2M and 4S/2M configurations use one ECU/dual modulatorvalve assembly, and two or four wheel speed sensors. ABS sensorsare mounted on one or two axles only; the curb and road sides of thetrailer are controlled separately. This is referred to as side-to-sidecontrol.
ABS Modulator (Relay) ValveThis solenoid controlled valve regulates air pressure at the brakechambers during ABS operation.
ABS System ConfigurationThe system configuration defines the number of wheel speed sensors(S) and modulator valves (M) used in the Enhanced Easy-StopTM
Trailer ABS system. These configurations are 2S/1M, 2S/2M, 4S/2Mand 4S/3M.
ABS Trailer Indicator Lamp (Dash Mounted)This lamp illuminates to alert the driver to an ABS fault in the trailerABS.
Terms andDefinitions

TP-0143Issued 12-01 Page 1-9
Enhanced Easy-Stop TM Trailer ABSSystem Overview
ABS Trailer Indicator Lamp (Trailer Mounted)This lamp illuminates to alert the driver to a fault in the trailer ABS andcan be used by the service technician to display blink codes.
Dual Modulator ValveAn assembly comprised of two separate relay valves equipped with atriple solenoid. Dual modulator valves are used in 2S/2M, 4S/2M and4S/3M installations.
ECUAn electronic device that is considered the “brains” of the system. Itreceives various inputs and, based on its programming, will producevarious outputs. There are three types of ECUs for the EnhancedEasy-StopTM ABS system: Basic, Standard and Premium. Thedifferences between each one will be covered later.
Enhanced Easy-Stop TM
Meritor WABCO’s next generation of trailer ABS designed to conformto the March 2001 requirements for an in-cab indicator lamp to alertthe driver to malfunctions in the trailer ABS.
Generic Input/Output (I/O)Generalized functions are used to transfer control and statusinformation over the power line between the tractor and trailer. Typicalapplications include the control of lift axles, sliders, trailer tirepressure information and door-ajar status. The Enhanced Easy-StopTM
system determines the number of generic I/Os that can be supported,as follows:
Number of Generic I/OsSystem That Can be Supported
Basic 1
Standard 1
Premium 5
PLCA method of providing information and power on the same set ofwires. The specific set of wires the PLC uses are the ABS-auxiliarypower (blue wire) and ground (white wire). PLC communicates thetrailer ABS system status to the tractor ECU that controls the in-cabtrailer ABS indicator lamp.

TP-0143Page 1-10 Issued 12-01
ServiceabilityThe ECU can be separated from the valve assembly for replacement.
SolenoidA wire coil with a movable core which changes position by means ofelectromagnetism when current flows through the coil.
TOOLBOXTM SoftwareA program designed to allow the technician to display Meritor WABCOABS faults and wheel speed data, test individual components, verifyinstallation wiring and more.
Wheel Speed SensorA magnetic sensing device mounted at the wheel end to measure thespeed of a tooth wheel rotating with the vehicle’s wheel.

Enhanced Easy-Stop TM Trailer ABSSystem Components and Operation
TP-0143Issued 12-01 Page 1-11
This assembly contains the trailer ABS ECU and a single or dualmodulator valve.
Meritor WABCO offers three types of ECU/modulator valveassemblies:
• 2S/1M Basic with a singlemodulator valve The Basic and Standard
assemblies cannot be• 2S/2M Standard with a upgraded
dual modulator valve
• 2S/2M, 4S/2M and 4S/3M The 3M system requiresPremium with a dual an external Modulator valvemodulator valve
Basic ECU/Single Standard ECU/Dual Premium ECU/DualModulator Valve Modulator Valve Modulator Valve Assembly Assembly Assembly
The ECU is the brains of the ABS. It receives and interprets the wheelspeed signals from the sensors and uses this information todetermine if a wheel is going to lock. It then activates the ABSmodulator valve(s) to regulate air pressure to the brake chambers.
NOTE: The function of the valve and solenoid will be explained indetail in the discussion of the ABS modulator valve.
The 2S/1M Basic ECU/modulator valve assembly is used as astand-alone system and has two wheel speed sensors and onemodulator valve. The ECU/single modulator assembly (2S/1M Basic)may be mounted as one unit, or the ECU and valve may be takenapart and mounted separately. This two-sensor/one-relay valvesystem is recommended for converter dolly and semi-trailerapplications. With one generic input/output system, the Basic meetsminimum FMVSS-121 requirements providing increased vehiclestability.
System ComponentsECU/Single orDual ModulatorValve Assembly

TP-0143Page 1-12 Issued 12-01
The 2S/2M Standard ECU/modulator valve assembly is ideally suitedfor single or tandem axle semi-trailer applications. Like the Basic, theStandard has one generic input/output system; however, in addition toincreased vehicle stability, the Standard can provide increasedprotection against tire flatspotting.
The 2S/2M, 4S/2M or 4S/3M Premium system offers five genericinput/output systems. Recommended applications for this Premiumsystem include tandem axle semi-trailers, multi-axle or full trailers.This system provides the best possible protection against tireflatspotting, plus the benefits of increased braking control and stability.It also offers the greatest opportunity for monitoring and controllingtrailer functions.
All three assemblies:
• Accept an external diagnostic tool for extracting blink codesand for using the Pro-Link 9000 diagnostic tool and PC-baseddiagnostics, Meritor WABCO TOOLBOXTM Software
• Can be replaced individually
The ABS modulator valve is a solenoid-controlled relay valve,consisting of a solenoid control unit, electrically operated solenoidsand a relay valve. The ECU controls the solenoids; these solenoidsare extremely fast-acting. They control air pressure on the relay valvediaphragm opening or closing passages that supply the pressure to,hold the pressure in or release the pressure from, the brake chamber.At no time can this solenoid activity apply more air to the brakechambers than what the driver is asking for with the brake pedal.
There are two modulator valves in a dual modulator valve assembly,and one valve in a single modulator valve assembly. In 3Minstallations a third modulator valve is used, along with a dualmodulator valve assembly.
ABS ModulatorValve
ECU/Single orDual ModulatorValve Assembly(Continued)

Enhanced Easy-Stop TM Trailer ABSSystem Components and Operation
TP-0143Issued 12-01 Page 1-13
The ABS modulator valves are part of the trailer air brake system.During normal (non-ABS) braking, they serve as relay valves fordelivering air pressure to the brake chambers.
The ABS modulator valve regulates air pressure to eachABS-controlled brake. During normal braking, the solenoids are notactivated and the valve acts as a normal relay valve. During ABSoperation, the valve modulates air pressure in the brake chambers tocontrol braking and prevent wheel lockup, as described on thefollowing pages.
Figure 1-1: ABS Modulator Valve with Bayonet Connector
ABS ModulatorValve (Continued)

TP-0143Page 1-14 Issued 12-01
The ABS modulator valve functions in one of four modes:
• At rest when no brakes are applied• During normal brake application• During ABS pressure hold• During ABS pressure release
NOTE: The dual modulator valve has a triple solenoid design with twoinlet solenoids and one common outlet solenoid.
Figure 1-2: At Rest When No Brakes are Applied
In Figure 1-2, air supply pressure is present at Port 1. When thebrakes are not applied, no control pressure is present at Port 4.
INLET OUTLET
AIR DELIVERY PISTON
SPRING
EXHAUST PISTON
SUPPLYAIR
Port 4
Port 1
Port 3 Port 2
ABS ModulatorValve (Continued)

Enhanced Easy-Stop TM Trailer ABSSystem Components and Operation
TP-0143Issued 12-01 Page 1-15
Figure 1-3: Normal Brake Application
When the brakes are applied, control pressure is applied to Port 4.Control pressure flows past the solenoids into the piston chamber,forcing the air delivery piston down.
This moves the exhaust piston downward against the tension of thespring, opening a small gap between the piston crown and the valveseal, allowing air to flow from Port 1 to Port 2 and into the brakechambers.
If control pressure is reduced, the air delivery piston moves up andexcess pressure is vented through the opening of Port 3.
CONTROLAIR
DELIVERYAIR
INLET OUTLET
AIR DELIVERY PISTON
SPRING
SUPPLYAIR
AIRCHAMBER
EXHAUSTPISTON
Port 4
Port 1
Port 3Port 2
ABS ModulatorValve (Continued)

TP-0143Page 1-16 Issued 12-01
Figure 1-4: ABS Pressure Hold
When the ABS is activated, it first goes into pressure hold mode. Theinlet solenoid is energized, interrupting the flow of control pressure tothe air delivery piston chamber.
This causes the pressure on both sides of the exhaust piston toequalize, and the spring forces the piston upward.
This seals off Port 2. Air cannot enter it from Port 1, nor can it exhaustto the atmosphere.
CONTROLAIR
DELIVERYAIR
INLET
SUPPLYAIR
EXHAUSTPISTON
AIR DELIVERY PISTON
Port 4
Port 1
Port 3 Port 2
ABS ModulatorValve (Continued)

Enhanced Easy-Stop TM Trailer ABSSystem Components and Operation
TP-0143Issued 12-01 Page 1-17
Figure 1-5: ABS Pressure Release
If the pressure hold mode does not cause the wheels to stop locking,the ABS enters pressure release mode. The inlet solenoid isde-energized, and the outlet solenoid is energized. The inlet solenoidprevents control pressure from entering the upper chamber, and ventsthe pressure in the air delivery piston chamber through the centralopening in the piston. Both pistons are forced up, opening Port 2 tothe atmosphere through Port 3.
CONTROLAIR
DELIVERYAIR
INLET
SUPPLYAIR
AIR DELIVERY PISTON
OUTLET
EXHAUSTPISTON
Port 4
Port 1
Port 3 Port 2
ABS ModulatorValve (Continued)

TP-0143Page 1-18 Issued 12-01
A wheel speed sensor is installed at the wheel end of a sensed axle.To measure wheel speed, the sensor has a two-wire (twisted pair)cable with a molded-on connector. A sensor extension cable is usedto connect the wheel speed sensor to the ECU. The sensor measuresthe speed of a tooth wheel (turning with the hub) by producing anAlternating Current (AC) voltage signal that has a frequencyproportional to wheel speed.
Figure 1-6: Wheel Speed Sensor Assembly
For optimum performance, the pencil-type wheel speed sensor is acompletely sealed unit and is located at the axle end. A trailer mayhave two or four sensors. The sensors are mounted inside the brakeassembly, at both ends of the axle.
On a tandem axle trailer with a two-sensor ABS, the sensors willnormally be located on the axle that will lock first. This could be eitherthe front or rear axle, and is determined by the type of suspensionthat is on the trailer.
Wheel SpeedSensor Assembly

Enhanced Easy-Stop TM Trailer ABSSystem Components and Operation
TP-0143Issued 12-01 Page 1-19
The wheel speed sensor is a magnetic pickup-type sensor. It consistsof a coil wrapped around a magnet. It is positioned near the toothwheel, which is attached to the wheel hub. As the wheel turns, theteeth (and the spaces between them) pass by the sensor. Thisinfluences the magnetic flow through the field produced by thesensor’s magnet. As the magnetic flow builds and collapses with thepassing of each tooth and gap, voltage pulses are created in the coilwrapped around the magnet. These pulses are sent directly to theECU and are used to determine the relative speed of the wheel.
Figure 1-7: Wheel Speed Sensor Operation
VOLTAGETOOTHWHEEL
SENSOR
TIME
+
VOLTAGE
ONE AC CYCLE
TOOTHWHEEL
SENSOR
TIME
+
–
Wheel SpeedSensor Assembly(Continued)

TP-0143Page 1-20 Issued 12-01
The spring clip holds the wheel speed sensor in place in the sensorholder, in close proximity to the tooth wheel. A Meritor WABCO sensorclip must be used to ensure a proper fit.
Figure 1-8: Spring Clip
The sensor holder is a metal bracket, welded to the axle so thesensor can remain in close contact with the tooth wheel. The wheelspeed sensor and spring clip slide into the holder.
Figure 1-9: Holder
Spring Clip
Sensor Holder

Enhanced Easy-Stop TM Trailer ABSSystem Components and Operation
TP-0143Issued 12-01 Page 1-21
The tooth wheel is a ring of 100 evenly spaced teeth. It is mounted onthe machined surface of the hub on each sensed wheel. Usually it ispre-installed on the hub.
NOTE: Eighty-tooth wheels are available for applications in whichthere is a tire size differential of 15 percent or greater.
Figure 1-10: Tooth Wheel
This is a two-wire (twisted pair) cable with molded connectors. Itconnects the wheel speed sensor to the ECU.
Figure 1-11: Extension Cable with Plug
Tooth Wheel
Sensor ExtensionCable

TP-0143Page 1-22 Issued 12-01

Enhanced Easy-Stop TM Trailer ABSDiagnostic Tools
TP-0143Issued 12-01 Page 1-23
Figure 1-12: TOOLBOX TM Software
Meritor WABCO TOOLBOXTM Software is a PC-based diagnosticprogram. It runs in Windows® 95, 98, NT, 2000 or Me and providesdiagnostic capabilities by communicating with the ECU. TOOLBOXTM
Software is the preferred method of diagnosing Meritor WABCOtractor and trailer ABS. Version 4.1 (or higher) is required forEnhanced Easy-StopTM.
TOOLBOXTM
Software

TP-0143Page 1-24 Issued 12-01
Figure 1-13: PLC/J1708 Adapter
This hand-help adapter can be used as a trailer/tractor tester toensure the PLC is functioning properly.
PLC/J1708Adapter
iagnostic Tools

Enhanced Easy-Stop TM Trailer ABSDiagnostic Tools
TP-0143Issued 12-01 Page 1-25
Figure 1-14: Pro-Link 9000
The Pro-Link 9000 is a diagnostic tool that can be used totroubleshoot the Meritor WABCO trailer ABS system.
The diagnostic tool is a sealed switch and lamp. It attaches to theSAE J1587 diagnostic connector, and is used to activate EnhancedEasy-StopTM trailer ABS blink code diagnostics.
Figure 1-15: Diagnostic Tool
NOTE: For Enhanced Easy-StopTM trailer ABS, the diagnostic toolmay be used, but is not recommended. If used, the blink codes arenot displayed in sequence with the ABS trailer-mounted indicatorlamp. The code will appear one flash at a time, first on the indicatorlamp, then on the tool. This is illustrated in the Diagnostics section,under Fault Code Check.
Pro-Link 9000
Diagnostic Tool

TP-0143Page 1-26 Issued 12-01

TP-0143Issued 12-01 Page 1-27
Enhanced Easy-Stop TM Trailer ABSTrailer ABS Indicator Lamps
When replacing the bulb in an ABS lamp, use an incandescent type,DOT-approved lamp or a Light Emitting Diode (LED) with integral loadresistor.
An indicator lamp is attached to the body of the trailer. The lamp stayslit at all times if a fault condition exists in the ABS. Using the ignitionpower activation procedure, this lamp can be used to read blinkcodes.
The trailer ABS in-cab indicator lamp on the vehicle dash applies tothe trailer ABS only. The lamp is controlled by a signal to the tractorECU, sent over the PLC. When a trailer ABS fault is detected, an ONmessage is sent. When no fault is detected, the ECU receives an OFFmessage. Table A illustrates trailer ABS lamp operation at power-up,or ignition ON. Table B depicts lamp responses that occur duringoperation. Blink codes cannot be displayed on the trailer ABSdash-mounted indicator lamp.
Lamp ON and OFF messages do not turn the lamp on or off instantly.The delay between the receipt of the message and the lamp responsetime is intentional. It prevents erratic lamp activity.
NOTE: For double or triple trailers, the lamp does not distinguishbetween trailers. A system fault in any of the trailers will activate thetrailer ABS in-cab indicator lamp.
Table A: Dash-Mounted Trailer ABS In-Cab Indicator LampOperation — Bulb Check Driver Information
Signal from Trailer to Tractor ECUStatus of Trailer ABSLamp on Vehicle Dash Explanation
Single or Multiple Trailers Trailer ABS lamp comes on atignition; OFF message isdetected within three secondsof ignition; and Trailer ABS lamp goes out.
Bulb Check performed andTrailer ABS system is OK. Inthis case, the lamp is ON for aBulb Check only.
Single or Multiple Trailers Trailer ABS lamp does notcome on within three secondsof ignition.
No Bulb Check performed, trailer added after initial power-up, and system OK. There was no trailer PLCmessage for at least three
Message
Lamp on
Lamp off 0.5sec
OFF OFF OFF OFF OFF OFFOFF
Message
Lamp on
Lamp off
OFF OFF
0.5sec
ign on t > 3 sec
No ON or OFF messages
ON = Turn ON message to “trailer ABS” lampOFF = Turn OFF message to “trailer ABS” lampRemoving a trailer with a fault will cause the ABS lamp to turn off. Remember to have the trailer with the fault repaired assoon as possible before returning to service.
seconds following ignition ON.
ImportantInformation
Cables
Trailer-MountedABS Indicator Lamp
Dash-MountedTrailer ABSIndicator Lamp

TP-0143Page 1-28 Issued 12-01
Signal from Trailer to Tractor ECUStatus of Trailer ABSLamp on Vehicle Dash Explanation Action
Single or Multiple Trailers Trailer ABS lamp does notcome on within threeseconds of ignition.
Not using the PLC system(no trailer connected) ortrailer not equipped withPLC or fault in PLC system.
Use lamp onside of trailerto identifyfault. Makenecessaryrepairs.
Single Trailer Trailer ABS lamp comes on. Trailer ABS fault(s)occurred during operationand still exists.
Multiple Trailers/Dollies
Single Trailer Trailer ABS lamp comes onbut goes out after2.5 seconds after fault isdetected.
Trailer ABS fault occurredduring operation and thefault was corrected.
None
Multiple Trailers/Dollies
Single Trailer ABS lamp is off, comes on,then goes off, 10 secondsafter loss of messages.
ABS fault existed, thensignal was lost becausetrailer disconnected or PLCfault occurred.
Multiple Trailers/Dollies ABS fault existed, thentrailer with fault lost signalbecause trailer wasdisconnected or PLC faultoccurred.
Single Trailer to Multiple Trailers/Dollies ABS lamp is on and stayson when a new trailer withno new fault is added.
There was a fault inexistence before the newtrailer was added and theignition was not turned offbefore the trailer wasadded.
Single Trailer to Multiple Trailers/Dollies ABS lamp is on and stayson when a new trailer with anew fault is added.
ABS fault was in existencebefore the new trailer wasadded and the ignition wasnot turned off before thetrailer was added and thenew trailer has an ABSfault.
Use lamp onside of trailerto identifyfault. Makenecessaryrepairs.
ON = Turn ON message to “trailer ABS” lampOFF = Turn OFF message to “trailer ABS” lampRemoving a trailer with a fault will cause the ABS lamp to turn off. Remember to have the trailer with the fault repaired assoon as possible before returning to service.
Message
Lamp on
Lamp off0.5sec
No ON or OFF messages
Message
Lamp on
Lamp off0.5sec
OFF OFF OFF ON ON ON ON ON
Message
Lamp on
Lamp off0.5sec
OFF OFF OFF ON ON ON ONOFF OFF OFF OFF OFF OFF OFF
Message
Lamp on
Lamp off0.5sec
ON ON OFF OFF OFF OFF OFF OFF
t + 2.5
Message
Lamp on
Lamp off 0.5sec
ON ON OFF OFF OFF OFF OFF OFFOFF OFF OFF OFF OFF OFF OFF
t + 2.5
Message
Lamp on
Lamp off0.5sec
t t + 10 sec
No ON or OFF messagesON ON ON
Message
Lamp on
Lamp off
ON ON
0.5sec
OFF OFF OFF OFF OFF OFF OFF
t + 2.5
Message
Lamp on
Lamp off
ON ON ON ON ON ONOFF OFF OFF
0.5sec
Message
Lamp on
Lamp off
ON ON ON ON ON ONON ON ON
0.5sec
Table B: Dash-Mounted Trailer ABS In-Cab Indicator LampOperation — Service Technician Information

Enhanced Easy-Stop TM Trailer ABSCables and Wiring
TP-0143Issued 12-01 Page 1-29
90007053.eps
POWER/DIAGNOSTIC CABLE WITH INDUSTRY STANDARD CONNECTOR — ALSO AVAILABLE WITH BLUNT CUT
2S/1M BASIC CABLE — 90° CONNECTOR
OPTIONAL POWER/DIAGNOSTIC CABLE
OPTIONAL GENERIC I/O CABLE(2S/2M AND 4S/2M PREMIUM ONLY)
ABS MODULATOR VALVE CABLE(4S/3M ONLY) — STRAIGHT CONNECTORS
OPTIONAL ABS MODULATORVALVE/GENERIC I/O CABLE
(4S/3M ONLY)
Figure 1-16: Cables for Enhanced Easy-Stop TM Trailer ABS
Cables

TP-0143Page 1-30 Issued 12-01
Figure 1-17: 4- or 5-Conductor Power Cable Wiring(5-Conductor Shown)
The power cable delivers power to the ECU from the trailer wiringharness. The ECU has two sources of power. It receives constantpower from the blue wire, which is “hot” any time the tractor ignitionswitch is on. As backup, it also receives power from the stop lampcircuit (red wire). It also uses the white wire for ground and the greenand white wire for controlling the ABS indicator lamp. In the case of aloss of power on the blue wire, the ABS will use power from the stoplamp circuit.
The cable has molded-on connectors at both ends. The rectangularshaped 8-pin connector attaches to the ECU. The 5-pin connectorattaches to the trailer wiring harness.
An optional power/diagnostic Y-cable combines the power anddiagnostic functions.
ECU POWER CONNECTOR
GROUND
7 WAY
WHITE
BLUE
RED
GREEN AND WHITE
TRAILER ABSINDICATOR LAMP
GENERIC I/O (EXPANDED CAPABILITY)
WHITE AND YELLOW
(CONSTANT POWER)
(STOP LAMP)
(GROUND)
BLK
BLU
YEL GRN
BRN
WHT
RED
12
34
56
78
Junction box not shown
Wiring

Enhanced Easy-Stop TM Trailer ABSCables and Wiring
TP-0143Issued 12-01 Page 1-31
Figure 1-18: 4-Conductor Power Cable with Weather PackConnector
Figure 1-19: 4-Conductor Power/Diagnostic Cable withWeather Pack Connector
D
A
B PIN OUT
B
E
C
A PIN OUT
1 2 3 45 6 7 8
Wire Color
SAE BSAE A
Position Position NoteWhite/Green
RedBlueWhite
A - DA - A
A - BA - E
B - 1B - 2B - 3B - 4B - 5B - 6B - 7B - 8
Warning LampSecondary Power
Primary PowerGroundGIO 1
Power Out
Wire Color Wire Color
L 1
A PIN
C PIN
B PIN
B PIN OUTC PIN OUT
F A B
CDEA PIN OUT
A
D
C
E
B
1 2 3 45 6 7 8
L 2Position PositionPosition Note
SAE BSAE A
White/GreenRedBlueWhite
YellowA - DA - A
A - BA - E
C - D B - 1B - 2B - 3B - 4B - 5B - 6B - 7B - 8
Warning LampSecondary PowerPrimary Power
GroundGIO 1
Power Out
C - E
C - CC - BC - A
Red
WhiteGreen
Black

TP-0143Page 1-32 Issued 12-01
Figure 1-20: 5-Conductor Power Cable with Weather PackConnector
Figure 1-21: 5-Conductor Power/Diagnostic Cable withWeather Pack Connector
Wire Color
SAE BSAE A
D
A
B PIN OUT
B
E
C
A PIN OUT
1 2 3 45 6 7 8
Position Position NoteWhite/Green
RedBlue
WhiteWhite/Yellow
A - DA - A
A - BA - EA - C
B - 1B - 2B - 3B - 4B - 5B - 6B - 7B - 8
Warning LampSecondary Power
Primary PowerGroundGIO 1
Power Out
A PIN
C PIN
B PIN
B PIN OUTC PIN OUT
F A B
CDEA PIN OUT
A
D
C
E
B
1 2 3 45 6 7 8
Wire Color Wire Color
L 1 L 2Position PositionPosition Note
SAE B
White/GreenRedBlueWhite
YellowA - DA - A
A - BA - E
C - D B - 1B - 2B - 3B - 4B - 5B - 6B - 7
Warning LampSecondary PowerPrimary Power
GroundGIO 1
Power Out
C - E
C - CC - B
Red
WhiteGreen
A - C White/Yellow

Enhanced Easy-Stop TM Trailer ABSCables and Wiring
TP-0143Issued 12-01 Page 1-33
Figure 1-22: 2S/1M or 4S/3M Modulator Valve Cable (90° StyleConnector is Used with 2S/1M Systems)
A PIN
A-1
A-2
A-3
A-4
A-5
A-6
A-7
A-8
B PIN
A PIN OUT
B PIN OUT
B-1
B-2B-3
B-4
B-5B-6
B-7
Wire ColorPosition Position Notes
Green/Yellow
A - 1
Blue
A - 2A - 3A - 4A - 5A - 6A - 7A - 8
B - 2B - 1B - 3Brown

TP-0143Page 1-34 Issued 12-01
ABS Modulator Valve Cable — Generic I/O Y-CableThe ABS modulator valve cable connects the ECU and the modulatorvalve. In 4S/3M systems, the generic I/O portion is for I/O supportPremium systems.
Figure 1-23: Optional ABS Modulator Valve/Generic I/O Cable(4S/3M Only)
A PIN
A-1
A-2
A-3
A-4
A-5
A-6
A-7
A-8B PIN
C PIN
A PIN OUT
B PIN OUT
B-1
B-2B-3
B-4
B-5B-6
B-7
C PIN OUT
C-1C-4
C-2C-3
Wire Color Wire ColorPosition PositionPosition Notes
Red
Blue
White
A - 1
Yellow
B - 1A - 2A - 3A - 4A - 5A - 5A - 6A - 7
A - 8
B - 2
B - 3B - 7B - 5B - 4
B - 6
C - 2C - 2C - 1C - 3
Black
Green/YellowGreen/YellowGreen/Yellow
Blue
Brown
Brown
Generic I/OGeneric I/OGeneric I/O
Generic I/O
ModulatorModulator
GroundSensor Power Supply

Enhanced Easy-Stop TM Trailer ABSCables and Wiring
TP-0143Issued 12-01 Page 1-35
Figure 1-24: Generic I/O Cable (2S/2M and 4S/2M PremiumSystems Only)
A PIN
A-1
A-2
A-3
A-4
A-5
A-6
A-7
A-8
B PIN
A PIN OUT
B PIN OUT
B-1
B-2B-3
B-4
B-5B-6
B-7
Wire ColorPosition Position Notes
Yellow
A - 1
Green/Yellow
A - 2A - 3A - 4A - 5A - 6A - 7A - 8
B - 5B - 4
B - 6Brown
BlueBlack
B - 2B - 1B - 3White
Red B - 7

TP-0143Page 1-36 Issued 12-01

Enhanced Easy-Stop TM Trailer ABSInstallation Illustrations
TP-0143Issued 12-01 Page 1-37
With Enhanced Easy-StopTM, 2S/2M Standard and 2S/2M, 4S/2M and4S/3M Premium sensor location designations will change dependingon how the ECU/dual modulator valve assembly is mounted. It may bemounted facing either the front or the rear of the trailer. It is importantthat you identify the location of these sensors before beginning anydiagnostics. Sensor locations for both front and rear-facinginstallations are depicted in Figures 1-25 through 1-33.
Sensor locations for the 2S/1M Basic will not change based upon theorientation of the valve.
Sensor PlacementInstallations

TP-0143Page 1-38 Issued 12-01
Figure 1-25: 2S/1M Basic Installation

Enhanced Easy-Stop TM Trailer ABSInstallation Illustrations
TP-0143Issued 12-01 Page 1-39
Figure 1-26: 2S/2M Standard Installation

TP-0143Page 1-40 Issued 12-01
Figure 1-27: 2S/2M Premium Installation

Enhanced Easy-Stop TM Trailer ABSInstallation Illustrations
TP-0143Issued 12-01 Page 1-41
Figure 1-28: 4S/2M Premium Installation

TP-0143Page 1-42 Issued 12-01
Figure 1-29: 4S/2M Premium Typical Tri-Axle Installation

Enhanced Easy-Stop TM Trailer ABSInstallation Illustrations
TP-0143Issued 12-01 Page 1-43
Figure 1-30: 4S/2M Premium Typical Tri-Axle Installation

TP-0143Page 1-44 Issued 12-01
Figure 1-31: 4S/3M Premium Typical Tri-Axle with Front LiftInstallation

Enhanced Easy-Stop TM Trailer ABSInstallation Illustrations
TP-0143Issued 12-01 Page 1-45
Figure 1-32: 4S/3M Premium Typical Tri-Axle Installation

TP-0143Page 1-46 Issued 12-01
Figure 1-33: 4S/3M Premium Typical Four-Axle Pull TrailerInstallation

Enhanced Easy-Stop TM Trailer ABSInstallation Illustrations
TP-0143Issued 12-01 Page 1-47
When a new ECU/dual modulator valve assembly is installed in asystem, it automatically reconfigures itself to that system, based onthe number of sensors and ABS modulator valves that are connectedto it. If a used ECU/dual modulator valve assembly is installed on asystem with fewer sensors or ABS modulator valves, it will have to bereconfigured with TOOLBOXTM Software.
For example, if a 2S/2M Premium ECU/dual modulator valveassembly is installed in a 4S/2M system, no reconfiguration isrequired since that procedure occurs automatically.
NOTE: The 2S/1M Basic and the 2S/2M Standard ECU configurationscannot be changed (reconfigured).
ECU/ValveAssemblyReconfiguration

TP-0143Page 1-48 Issued 12-01

Enhanced Easy-Stop TM Trailer ABSModule 1 Summary
TP-0143Issued 12-01 Page 1-49
This module defined Meritor WABCO Enhanced Easy-StopTM TrailerABS. It described the system and its theory of operation.
The individual components were introduced and briefly described.Illustrations of the components were included.
• ECU• Single and dual modulator valve assemblies• Wheel speed sensors• Cables
You should have learned the theory and operation of the ECU,modulator valve assembly and wheel speed sensors. You should knowand understand how each component affects others.
Descriptions and wiring diagrams were provided for the differentcables that are available for this system. You should be familiar witheach cable and its use.
• Power cable• Power/diagnostic cable• ABS modulator valve cable (4S/3M)• Generic I/O cable• ABS modulator valve cable/generic I/O cable
A brief overview was presented on the diagnostic methods available.You should know and understand how to use the diagnosticequipment. There are three ways to gather diagnostic data fromEnhanced Easy-StopTM Trailer ABS systems:
• TOOLBOXTM Software• Pro-Link 9000• Blink code diagnostics
This module also described the different configurations of the variousEnhanced Easy-StopTM Trailer ABS components and their generalapplications (2S/1M, 2S/2M, 4S/2M and 4S/3M).
Module 1Summary

TP-0143Page 1-50 Issued 12-01

Enhanced Easy-Stop TM Trailer ABSProgress Check
TP-0143Issued 12-01 Page 1-51
Please answer the following review questions.
1. Whether the ECU/dual modulator valve assembly is mounted withthe sensors facing the front or rear of the trailer determinessensor hook-up.
TrueFalse
2. Which component acts as the brains of the system?
A. Tooth wheelB. ABS relay valveC. Wheel speed sensorD. ECU
3. Which input does the ECU monitor in order to modulate brakeaction?
A. Brake pedalB. Modulator valveC. Wheel speedD. Accelerator pedal
4. If the ignition power to the ABS system fails, the ABS will:
A. Receive power from the stop lamp circuitB. Stop functioningC. Cause the trailer brakes to failD. Light an indicator on the instrument panel
5. What do the wheel speed sensor and tooth wheel do?
A. Generate an AC voltage signalB. Generate a DC voltage signalC. Generate electrical resistanceD. Charge the ECU
6. The 2S/2M Standard ECU/dual modulator valve assembly hastwo wheel speed sensors and two:
A. ABS modulator valvesB. SolenoidsC. Delivery portsD. ECU controllers
Progress Check

TP-0143Page 1-52 Issued 12-01

Module 2Diagnostics and Repair
Enhanced Easy-Stop™
with PLC Trailer ABS
STUDENT MANUAL
For MERITOR WABCOEnhanced Easy-StopTM Trailer ABS ECUs:
P/N 400 500 101 0 2S/IM Basic for Standard TrailersP/N 400 500 104 0 2S/IM Basic for Dollies, Turntables
and SteerablesP/N 400 500 102 0 2S/2M Standard
P/N 400 500 103 0 2S/2M, 4S/2M, or 4S/3M Premium

Enhanced Easy-Stop TM Trailer ABSDiagnostics and Repair
TP-0143Issued 12-01 Page 2-1
ContentsModule 2 Overview..................................................................................................................... 2-3Diagnostics ................................................................................................................................. 2-5
Diagnostic Tools ................................................................................................................. 2-5TOOLBOXTM Software ........................................................................................................ 2-5
Main Screen.................................................................................................................. 2-6Valve Activation ............................................................................................................. 2-7Tire Calibration.............................................................................................................. 2-8Service Information ....................................................................................................... 2-8Notebook ...................................................................................................................... 2-9Sensor Test ................................................................................................................. 2-10Sensor Orientation Test............................................................................................... 2-10Report Information ...................................................................................................... 2-11Meritor WABCO ABS Fault Report .............................................................................. 2-12
Pro-Link 9000 ................................................................................................................... 2-13Blink Code Diagnostics .................................................................................................... 2-13
Ignition Power Activation ............................................................................................. 2-15Diagnostic Tool ............................................................................................................ 2-16Fault Code Check ....................................................................................................... 2-17
Component Removal and Installation....................................................................................... 2-19Wheel Speed Sensor ....................................................................................................... 2-19ABS Modulator Valve ........................................................................................................ 2-21ECU/Valve Assembly........................................................................................................ 2-23
Tank-Mounted ............................................................................................................. 2-25Bracket-Mounted to Cross Member ............................................................................ 2-26Mounted to Cross Member ......................................................................................... 2-27
ECU or Modulator Valve ................................................................................................... 2-292S/1M Basic Only ....................................................................................................... 2-29All Standard and Premium Installations ...................................................................... 2-29
Component Testing................................................................................................................... 2-31Wheel Speed Sensors ..................................................................................................... 2-31Sensor Test Procedure ..................................................................................................... 2-31Sensor Output Voltage Test .............................................................................................. 2-32Check ABS Functions ...................................................................................................... 2-32ABS External Modulator Valve ......................................................................................... 2-33
Final Testing with TOOLBOXTM Software .................................................................................. 2-35All Installations ................................................................................................................. 2-35Verify Proper Valve and Lamp Installation ........................................................................ 2-37
2S/1M Basic ................................................................................................................ 2-372S/2M, 4S/2M, 4S/3M Standard and Premium ........................................................... 2-38
Sensor Installation Test .................................................................................................... 2-40

TP-0143Page 2-2 Issued 12-01
Final Testing without TOOLBOXTM Software ............................................................................. 2-422S/1M Basic ................................................................................................................ 2-422S/2M Standard Sensor Installation Check ................................................................ 2-422S/2M Air Line Installation Check ............................................................................... 2-432S/2M, 4S/2M and 4S/3M Premium Sensor Installation Check .................................. 2-442S/2M, 4S/2M and 42/3M Premium Air Line Installation ............................................ 2-45
Final Testing (Standard and Premium Installations) ......................................................... 2-46Sensor Gap Adjustment (All Installations) ........................................................................ 2-47Fault Code Check (All Installations) ................................................................................. 2-47
Trailer Identification .................................................................................................................. 2-49Trailer Label ...................................................................................................................... 2-49
Module 2 Summary .................................................................................................................. 2-51Diagnostic Exercise .................................................................................................................. 2-53Progress Check ........................................................................................................................ 2-55

Enhanced Easy-Stop TM Trailer ABSModule 2 Overview
TP-0143Issued 12-01 Page 2-3
This module describes the diagnostic procedures for EnhancedEasy-StopTM Trailer ABS.
The module will also cover the steps for removing and replacing all ofthe components of Enhanced Easy-StopTM Trailer ABS and how totest the system before putting a trailer back into service.
After completing this module, you will be able to:
• Diagnose problems in the ABS electrical circuits• Use TOOLBOXTM Software to diagnose and test
Enhanced Easy-StopTM Trailer ABS• Read blink codes and retrieve fault information• Locate all components and connectors• Remove and replace system components
Module 2 Overview

TP-0143Page 2-4 Issued 12-01

Enhanced Easy-Stop TM Trailer ABSDiagnostics
TP-0143Issued 12-01 Page 2-5
There are three methods used to get fault information from the ECU:
• TOOLBOXTM Software• Pro-Link 9000• Blink code diagnostics
— Ignition power activation— Diagnostic tool
Meritor WABCO TOOLBOXTM Software is a PC-based diagnosticprogram. Versions 4.1 (or higher) runs in Windows® 95, 98, NT, 2000or Me and provides diagnostic capabilities by communicating with theECU. Trailer ABS screens are described in this workbook.
TOOLBOXTM Software:
• Displays both constant and changing information from the ECUbeing tested
• Displays both active and stored system faults, as well as theappropriate repair instructions
• Activates system components to verify:— System integrity— Proper component operation— Installation wiring
NOTE: A J1587/J1708 to RS232 or PLC to J1708 interface isrequired to run this software.
Diagnostic Tools
TOOLBOXTM
Software
TP-0143Page 2-6 Issued 12-01
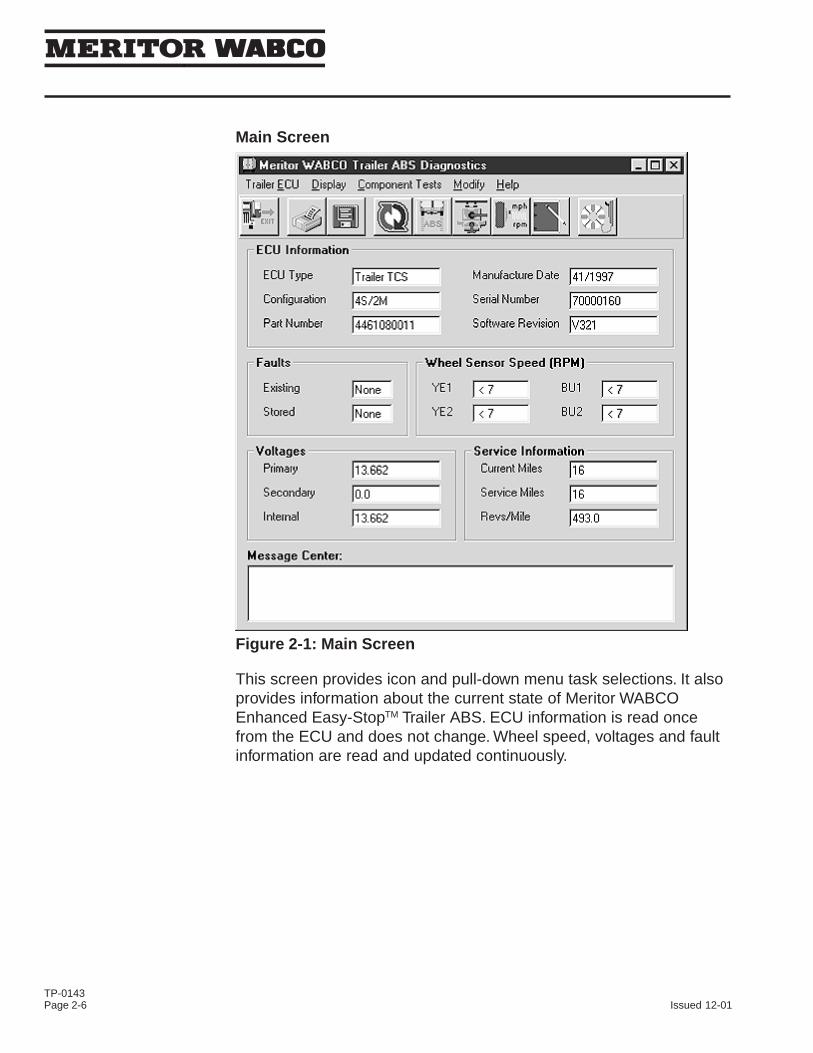
Figure 2-1: Main Screen
This screen provides icon and pull-down menu task selections. It alsoprovides information about the current state of Meritor WABCOEnhanced Easy-StopTM Trailer ABS. ECU information is read oncefrom the ECU and does not change. Wheel speed, voltages and faultinformation are read and updated continuously.
Main Screen

Enhanced Easy-Stop TM Trailer ABSDiagnostics
TP-0143Issued 12-01 Page 2-7
Figure 2-2: Valve Activation Screen
Click on the Valve Activation icon to select and cycle individualEnhanced Easy-StopTM Trailer ABS valves. Listen to ensure the valveis cycling and to verify proper operation, installation and wiring of theEnhanced Easy-StopTM Trailer ABS system.
Select All Valves from the menu to cycle all available EnhancedEasy-StopTM Trailer ABS valves, starting with yellow.
The ABS indicator lamp on the side of the trailer can be tested toverify a complete circuit. When Test is clicked, the lamp will flash eighttimes. The Test Status field will also display the results of this test.
Valve Activation

TP-0143Page 2-8 Issued 12-01
Figure 2-3: Tire Calibration Screen
The programmed number of tire Revs Per Mile is displayed on theTire Calibration screen. The range is 150.0 to 634.0 revolutions permile. The default value is 502.0. To change this valve, type in the RevsPer Mile, then press the Write button.
NOTE: Trailers with 12-1/4-inch brakes use an 80-tooth tone ring(tooth wheel). Use a value of 80 percent of the tire manufacturer’srecommended revolutions per mile (revolutions x 0.80).
Service Information
Figure 2-4: Service Information Screen
The mileage between scheduled maintenances is displayed on theService Information screen in km or miles.
When the mileage displayed elapses, the Enhanced Easy-StopTM
Trailer ABS indicator lamp on the side of the trailer will flash eighttimes. It will continue to flash eight times whenever the ignition switchis turned on until this parameter is changed.
Tire Calibration
Enhanced Easy-Stop TM Trailer ABSDiagnostics
TP-0143Issued 12-01 Page 2-9
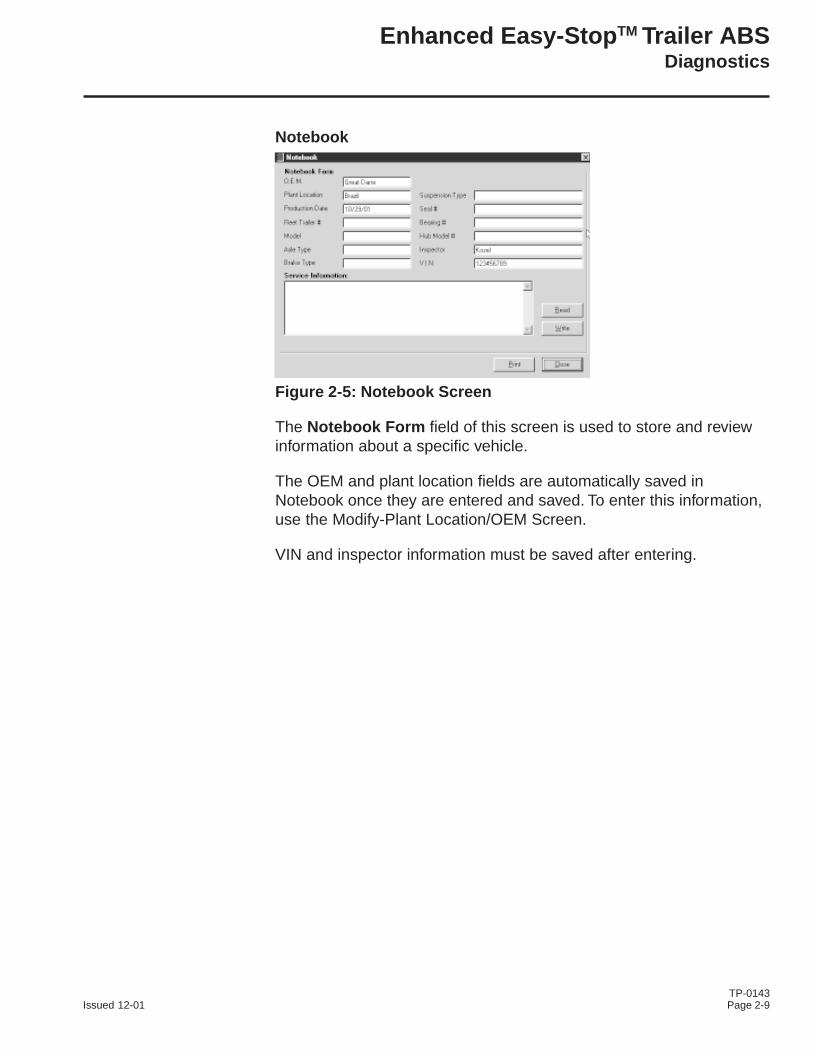
Figure 2-5: Notebook Screen
The Notebook Form field of this screen is used to store and reviewinformation about a specific vehicle.
The OEM and plant location fields are automatically saved inNotebook once they are entered and saved. To enter this information,use the Modify-Plant Location/OEM Screen.
VIN and inspector information must be saved after entering.
Notebook

TP-0143Page 2-10 Issued 12-01
Figure 2-6: Sensor Test Screen
The Sensor Test screen is used to determine the correct installation,wiring and functionality of the wheel speed sensors.
The screen display will provide maximum sensor RPM for installedsensors. Unused sensor positions will be grayed out. Check the Orderfield to verify sensors are installed in the correct location.
Sensor Orientation Test
Figure 2-7: Sensor Orientation Test
The Sensor Orientation Test provides a simple PASS/FAIL message,letting you know immediately whether or not you have a propersensor installation.
Sensor Test

Enhanced Easy-Stop TM Trailer ABSDiagnostics
TP-0143Issued 12-01 Page 2-11
Figure 2-8: Report Information Screen
The Report Information screen allows the user to store and retrieveinformation about a specific vehicle, including the VehicleIdentification Number (VIN) and Employee numbers.
An example of a storable (or printable) report is displayed inFigure 2-9.
To save and print:
1. Click on the heading Trailer ECU and click Save. A window willappear asking for the VIN and Employee number.
2. Provide this information and close the window.3. Go back to the heading Trailer ECU and click Print .4. You will be asked to input the VIN and Employee number.5. Click Print .
Report Information

TP-0143Page 2-12 Issued 12-01
Meritor WABCO ABS Fault Report
Date: September 13, 2000Time: 5:25 PMPage: 1VIN: 12345678Employee Information: KILEYABS System Configuration: 4S/2MECU Revision: V 3 2 2xxxxPart Number: 446-108-000-1Serial Number: 5 9 3 0 3 9 4 8xxxxxxxxxDate of Manufacture: 13/1999Current Miles: 0.0Service Miles: 0.0Tire Calibration: 495.0
Fault# Description Status SID FMI Count
1 Ext. modulator BLUE open circuit detected Active 9 5 12 Ext. modulator BLUE open circuit detected Stored 9 5 1
Sensor Test Results:
Sensor Max RPM Order
YE1 40.0 1YE2 59.0 2BU1 50.0 3BU2 38.0 4
Valve Tests Performed:
Valve Status (Tested / Not Tested / NA)
Yellow TestedBlue TestedRed N/A
Figure 2-9: Meritor WABCO ABS Fault Report
Meritor WABCO ABS Fault Report

Enhanced Easy-Stop TM Trailer ABSDiagnostics
TP-0143Issued 12-01 Page 2-13
The Pro-Link 9000 is a diagnostic tool that can be used totroubleshoot Enhanced Easy-StopTM Trailer ABS. You will need theMultiple Protocol Cartridge (MPC) and a Meritor WABCO applicationscard, version 2.0 or higher. Refer to the Pro-Link operator’s manual forcomplete instructions.
The Enhanced Easy-StopTM Trailer ABS ECU detects any electricalfault in the trailer ABS. Each of the faults has a code. When a faultoccurs, the ECU stores the code for that fault in the memory.
There are two kinds of faults: active and stored. Active faults are thosecurrently existing in the system, such as a broken wire. Stored faultsare faults that have occurred but do not presently exist. Active faultscan be cleared only after repairs are completed.
The ECU signals a malfunction by lighting both the internal in-cab andexternal indicator lamp when a fault exists. The external ABS indicatorlamp is usually mounted on the left rear of the trailer, near the rearwheels.
Pro-Link 9000
Blink CodeDiagnostics

TP-0143Page 2-14 Issued 12-01
Blink codes are flashed from the diagnostic tool LED or by the trailerABS indicator lamp on the side of the trailer. The blink codes are readby counting the number of times the lamp flashes.
Although the ECU can store multiple faults in its memory, it onlydisplays one blink code at a time. This is why it is important to recheckthe blink codes after repairing a fault. If there are additional codes in thememory, they only blink after you have repaired the first fault.
Stored faults, reconfiguration, clear all and final test modes areavailable with the diagnostic tool.
There are two ways to obtain blink codes:
• Ignition power activation (also called constant power activation)• Diagnostic tool
Important Information
Blink Code 17 indicates a PLC failure. If PLC does not seem to beoperating properly, but there is no Blink Code 17, the ECU isfunctioning properly and does not need to be replaced; however, therecould be a problem in the trailer’s wiring harness. Check the wiringsystem and make the necessary repairs. If the problem persists,contact the Customer Service Center at 800-535-5560 for assistance.
Blink CodeDiagnostics(Continued)

Enhanced Easy-Stop TM Trailer ABSDiagnostics
TP-0143Issued 12-01 Page 2-15
Ignition Power Activation
Ignition power activation is the process of using the vehicle’s ignitionswitch (or interrupting the power on the blue wire by some othermeans) to display blink codes on the trailer ABS indicator lamplocated on the side of the trailer. This method is for constant powervehicles only.
To obtain blink codes using ignition power activation, perform thefollowing procedure:
NOTE: For ignition power activation, power is provided by the ignitionswitch.
1. Turn the ignition switch on for no longer than 5 seconds. The ABSindicator lamp will illuminate.
2. Remove power.3. Reapply power.4. The blink code will be displayed three times by the trailer ABS
indicator lamp.5. Find the fault on the following chart.6. Make the necessary repairs.
Blink Code Fault Location3 Sensor BU1
4 Sensor YE1
5 Sensor BU2
6 Sensor YE2
7 External ABS Modulator Valve (Red) 4S/3M only
9 Internal ABS Modulator Inlet Valve #2
10 Internal Modulator Inlet Valve #1
11 Internal Modulator Outlet Valve
14 System Configuration/Power Supply
15 ECU Failure16 SAE J1708 Failure17 SAE J2497 (PLC) Failure18 Generic I/O Failure
Figure 2-10: Blink Code Chart
Blink CodeDiagnostics(Continued)

TP-0143Page 2-16 Issued 12-01
Diagnostic Tool
The red dust cap on the diagnostic tool protects the tool duringshipping. The tool and LED are independently sealed againstcontamination.
The SAE J1587 connector must be protected from contaminationwhen the diagnostic tool is not installed. Reinstall the gray cap whenthe connector is not in use.
Use the following procedure to install the diagnostic tool in the SAEJ1587 connector.
1. Remove the gray protective cap from the J1587 connector. To dothis:
• Turn the cap counterclockwise• Pull off the cap
2. Align the notches on the tool with the notches on the connector.3. Insert the tool firmly in the connector.4. Firmly turn the gray ring of the tool clockwise to secure it in place.5. After removing the diagnostic tool, replace the gray protective cap.
Figure 2-11: Diagnostic Tool Installation
6. Make sure the vehicle is stationary.
• Emergency brake is on• Wheels are properly chocked
7. Provide 12 volts DC power (9.5 to 14 volts is acceptable range) tothe ECU/valve assembly.
8. Check the ABS indicator lamp on the trailer. If:
• The indicator lamp comes on briefly, then goes off, there is nofault in the system
• The indicator lamp comes on and stays on, there is an existingfault. Go to Step 9
Blink CodeDiagnostics(Continued)

Enhanced Easy-Stop TM Trailer ABSDiagnostics
TP-0143Issued 12-01 Page 2-17
9. Press the blink code switch once for one second and release theswitch.
10.When there is an existing fault, the ABS indicator lamp will flashbetween three and eighteen times to identify the existing fault.
11.When there are existing faults, you must repair existing faults.12.After you identify an existing fault, turn the power to the ECU off .
Repair the fault. Turn the power to the ECU back on .13.Repeat Step 9. If there are no other existing faults in the system,
the ABS indicator lamp will come on , go off and remain off .14. If you have just repaired a sensor gap fault, the ECU is “waiting” to
see a 4-mph signal on sensed wheels. Until this 4 mph is sensedby the ECU, the ABS indicator lamp on the trailer will remain on .
Fault Code Check
Use either the blink code tool or the lamp on the side of the trailer tocount the number of flashes, but do not use both. The code isdisplayed on both the trailer ABS indicator lamp and blink code tool,but not in sequence. For example: If the blink code is 4, the lamp willflash once, then the tool will flash once and repeat this until the entirecode has been displayed, as illustrated below:
Figure 2-12: Example of Blink Code Display
Example of Blink Code Display, Blink Code 4
TRAILERABS INDICATOR
LAMP4 FLASHES
BLINKCODETOOL
4 FLASHES
= ONE FLASH
Blink CodeDiagnostics(Continued)

TP-0143Page 2-18 Issued 12-01

Enhanced Easy-Stop TM Trailer ABSComponent Removal and Installation
TP-0143Issued 12-01 Page 2-19
This section presents general replacement procedures. Do not use itfor actual removal and replacement. Use Meritor WABCO installationinstructions in Maintenance Manual MM-0180.
Installation instructions for Enhanced Easy-StopTM are as follows:
2S/IM Basic TP-20212
2S/2M Standard TP-20213
4S/2M, 4S/2M and 4S/3M Premium TP-20214
Removal
Follow the manufacturer’s instructions to back off the slack adjuster.Remove the wheel and drum. Use the following procedure to removea wheel speed sensor.
1. Grasp the sensor, not the cable. Rotate and pull the sensor out ofits holder.
2. Pull the spring clip from the sensor holder.3. Remove the tie wraps attaching the sensor cable to the other
components.4. Disconnect the sensor cable from the extension cable.
Figure 2-13: Wheel Speed Sensor
Wheel SpeedSensor

TP-0143Page 2-20 Issued 12-01
Installation
Installation requires a lubricant. Use a mineral oil-based grease thatcontains molydisulfide. The grease must be anti-corrosive andmaintain its lubricity throughout the temperature range –40 to300 degrees Fahrenheit (–40 degrees Celsius to 150 degreesCelsius).
1. Apply a thin coat of lubricant to the spring clip.2. Push the spring clip into the sensor holder until the tabs touch the
holder.
NOTE: The spring clip must be installed with the tabs on theinboard side of the sensor holder.
3. Apply a thin coat of lubricant to the sensor body.4. Push the sensor body into the spring clip as far as it will go.5. Route the sensor cable safely along the axle housing, avoiding
interference with the operation of the brakes.6. Tie wrap the cable to the axle housing about one inch from the
cable connector using a tie wrap.7. Push the sensor body until it contacts the tooth wheel. After
installation there should be no gap between the sensor and thetooth wheel.
8. Assemble the drum and wheel on the axle.9. Check the sensor output voltage. Minimum output must be greater
than 0.2 volts AC. See Sensor Output Voltage Test on Page 2-32 ofthis manual.
Figure 2-14: Sensor Cable Tie Wrap
Wheel SpeedSensor (Continued)
Enhanced Easy-Stop TM Trailer ABSComponent Removal and Installation
TP-0143Issued 12-01 Page 2-21
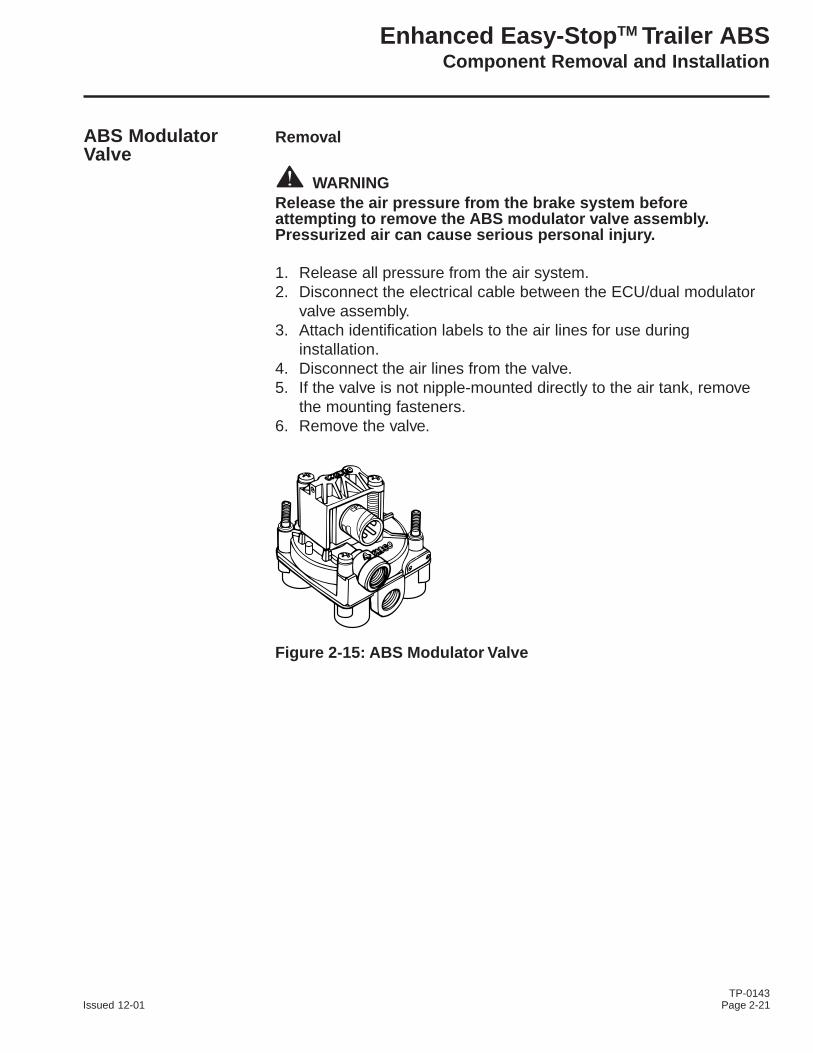
Removal
WARNINGRelease the air pressure from the brake system beforeattempting to remove the ABS modulator valve assembly.Pressurized air can cause serious personal injury.
1. Release all pressure from the air system.2. Disconnect the electrical cable between the ECU/dual modulator
valve assembly.3. Attach identification labels to the air lines for use during
installation.4. Disconnect the air lines from the valve.5. If the valve is not nipple-mounted directly to the air tank, remove
the mounting fasteners.6. Remove the valve.
Figure 2-15: ABS Modulator Valve
ABS ModulatorValve

TP-0143Page 2-22 Issued 12-01
Installation
CAUTIONYou must use Schedule 80 pipe nipple (3/4-inch NPTF) tonipple-mount the ABS relay valve securely to the reinforced airtank to avoid possible serious personal injury and damage tocomponents.
1. Install the valve with two lock nuts and washers as required.Tighten the hex nuts to a torque of 18 lb-ft (24 N•m) ornipple-mount the valve directly to the air tank with Schedule 80pipe nipple (3/4-inch NPTF).
2. Connect the air lines to the ports according to the labels installedwhen the air lines were disconnected.
3. Connect the cable to the valve.4. Pressurize the brake system. Apply the brakes and verify there are
no air leaks.
T
ABS ModulatorValve (Continued)

Enhanced Easy-Stop TM Trailer ABSComponent Removal and Installation
TP-0143Issued 12-01 Page 2-23
Removal
WARNINGRelease all pressure from the air system before you disconnectany components. Pressurized air can cause serious personalinjury.
1. Release all pressure from the air system.2. Attach labels to identify all air lines.3. Disconnect the air lines from the ECU/valve assembly.4. Disconnect the power (or power/diagnostic) cable, additional relay
valve cable (if used) and all sensor cables from the ECU/valveassembly. See Figure 2-16.
5. Remove the ECU/valve assembly from its mounting location:
• Bracket-mounted: Loosen and remove the two mounting boltsand lock nuts that hold the assembly to the cross member.Remove the assembly
• Nipple-mounted to air tank: Unscrew the assembly from the airtank
6. If the assembly being replaced is under warranty, return it to thetrailer OEM for replacement.
ECU/ValveAssembly

TP-0143Page 2-24 Issued 12-01
Figure 2-16: ECU/Valve Assembly
YE 2/6 YE 1/4
EXHAUST PORT(ON UNDERSIDE CENTER)
PORT 4CONTROL
PORT
PORT 1(FRONT OR REAR)SUPPLY PORT
PROTECTIVE CAPSFOR SENSORS
FOUR DELIVERY PORTS (ON UNDERSIDE)
PLUG ALLUNUSEDPORTS
YE2
YE1DELIVERY
YE2DELIVERY
YE1 CONTROLPORT
SUPPLYPORT
EXHAUSTPORT
PLUG ALLUNUSEDPORTS
BUDELIVERY
YEDELIVERY
SUPPLYPORT
EXHAUSTPORT
CONTROLPORT
YE2YE1
BU2BU1
2S/1M Basic
2S/2M Standard
2S/2M, 4S/2M, 4S/3M Premium
ECU/ValveAssembly(Continued)

Enhanced Easy-Stop TM Trailer ABSComponent Removal and Installation
TP-0143Issued 12-01 Page 2-25
Installation
NOTE: The ECU/valve assembly is supplied with black protectivecaps on each sensor connector. When a sensor cable is not pluggedinto a sensor connector, the black cap must remain on the connectorto protect it from dirt and contamination. See Figure 2-16.
CAUTIONYou must use a Schedule 80 pipe nipple (3/4-inch NPTF) to nipplemount the ECU/Valve Assembly securely to the air tank to avoidpossible serious personal injury and damage to components.
Tank-Mounted
WARNINGYou must use a Schedule 80 hex nipple (3/4-inch NPTF) to mountthe ECU/single modulator valve assembly securely to the air tankto avoid possible serious personal injury and damage to thecomponent.
1. Use a 3/4-inch Schedule 80 hex nipple to attach the ECU/singlemodulator valve assembly to a reinforced air tank. Do notovertighten.
NOTE: Meritor WABCO does not recommend use of a vise wheninstalling the hex nipple. Use of a vise may cause overclamping.Overclamping may damage the internal components of the ECU/single modulator valve assembly.
2. Use a 3/4-inch pipe plug to plug the unused supply port (Port 1).Apply SAE-standard, DOT-approved Teflon tape or paste-typethread sealant to all pipe threads beyond the first two threads.Pipes with pre-applied thread sealant may also be used.
3. Rotate and tighten the ECU/single modulator valve assembly untilthe exhaust port faces down and the connection is secure. Use atorque wrench or ratchet with extension at the 3/4-inch pipe pluginstalled on the front supply port (Port 1).
4. Connect the sensor cables, external relay valve cable (if used) andpower or power/diagnostic cable to the ECU/dual modulator valveassembly. Use the black protective connector caps included withthe replacement assembly to cover unused cable connectors.
5. Perform a final check before returning the trailer to service (seePage 2-35 of this manual).
ECU/ValveAssembly(Continued)

TP-0143Page 2-26 Issued 12-01
Bracket-Mounted to Cross Member
1. Install a 3/4-inch NPTF fitting in supply port (Port 1). Use a3/4-inch pipe plug to plug the unused supply port (Port 1).
• Use a 3/4-inch pipe plug to plug the unused supply port(Port 1). Apply SAE-standard, DOT-approved Teflon tape orpaste-type thread sealant to all pipe threads beyond the firsttwo threads. Pipes with pre-applied thread sealant may also beused
2. Attach the mounting bracket to the vehicle cross member midwaybetween the side rails, close to the brake chambers the valveserves.
3. Use two 3/8-inch Grade 8 bolts with prevailing torque nuts andwashers to attach the assembly to the vehicle cross member.Tighten bolts to 18 lb-ft (24 N•m).
Figure 2-17: Single Modulator Valve Installation
4. Connect the sensor cables, external relay valve cable (if used) andpower or power/diagnostic cable to the ECU/dual modulator valveassembly. Use the black protective connector caps included withthe replacement assembly to cover unused cable connectors.
5. Perform a final check before returning the trailer to service (seePage 2-35 of this manual).
T
ECU/ValveAssembly(Continued)
TEMPLATE
PLUG UNUSED PORT
Exhaust port must face DOWN.

Enhanced Easy-Stop TM Trailer ABSComponent Removal and Installation
TP-0143Issued 12-01 Page 2-27
Mounted to Cross Member (Standard and Premium MountingBrackets Not Supplied by Meritor WABCO)
The ECU/dual modulator valve assemby may be mounted to a bracketor directly to the vehicle cross member. Meritor WABCO does notprovide the bracket for the Standard or Premium assemblies. Whenmounting the ECU/dual modulator valve assembly to the trailer crossmember, refer to SAE specification J447, Prevention of Corrosion ofMotor Vehicle Body and Chassis Components. Follow allrecommendations and procedures. Your supervisor should have acopy of this specification.
1. Install a 3/4-inch NPTF fitting in supply port. Use a 3/4-inch pipeplug to plug unused supply port (Port 1).
• Apply SAE-standard, DOT-approved Teflon tape or paste-typethread sealant to all pipe plugs beyond the first two threads.Pipes with pre-applied thread sealant may also be used
2. Use two 3/8-inch Grade 8 bolts with prevailing torque nuts toattach assembly. Tighten bolts to 18 lb-ft (24 N•m).
3. Connect the air lines to the ports. Follow the label markersinstalled when the air lines were disconnected.
4. Connect the sensor cables, external relay valve cable (if used) andpower or power/diagnostic cable to the ECU/dual modulator valveassembly. Use the black protective connector caps included withthe replacement assembly to cover unused cable connectors.
5. Perform a final check before returning the trailer to service (seePage 2-35 of this manual).
T
ECU/ValveAssembly(Continued)

TP-0143Page 2-28 Issued 12-01
Figure 2-18: 2S/2M Dual Modulator Valve Installation
FRONT OFTRAILER
Exhaust portmust face DOWN.
CURBSIDEYE2FRONT OF
TRAILER
Exhaust portmust face DOWN.
ROADSIDEYE1
VALVE MOUNTED WITH SENSORS FACINGREAR OF TRAILER
PLUG ALLUNUSED PORTS
PLUG ALLUNUSED PORTS
VALVE MOUNTED WITH SENSORS FACINGFRONT OF TRAILER
CURBSIDEYE1
ROADSIDEYE2
ECU/ValveAssembly(Continued)

Enhanced Easy-Stop TM Trailer ABSComponent Removal and Installation
TP-0143Issued 12-01 Page 2-29
With Enhanced Easy-StopTM, the ECU and modulator valve may bereplaced individually. To do this, follow the instructions for removingthe complete assembly, then remove the valve from the ECU.
NOTE: For 2S/1M installations where the valve is readily accessible, itmay not be necessary to remove the entire assembly to replace thevalve.
NOTE: For 2S/1M bracket-mounted installations, the bracket does notneed to be removed to replace the ECU or valve.
2S/1M Basic Only
1. To separate the ECU from the bracket, loosen and remove thethree hex nuts from the underside of the bracket. These three hexnuts hold the assembly together.
2. To separate the bracket from the valve, remove the three hex nuts.3. To attach the ECU to the bracket, tighten the three hex nuts to
6 lb-ft (8 N•m).4. To attach the valve to the bracket, tighten the three hex nuts to
12 lb-ft (16 N•m).
All Standard and Premium Installations
1. Loosen and remove the four hex nuts holding the assemblytogether.
2. To attach the valve to the ECU, tighten the four hex nuts to5 lb-ft (6 N•m).
ECU or ModulatorValve
T
T
T

TP-0143Page 2-30 Issued 12-01
Figure 2-19: Modulator Valve
HEX NUTS
HEXNUTS
HEXNUTS
HEX NUT
HEXNUT
HEXNUT
HEXNUT
HEXNUT
BASIC
PREMIUM
STANDARD
ECU or ModulatorValve (Continued)

Enhanced Easy-Stop TM Trailer ABSComponent Testing
TP-0143Issued 12-01 Page 2-31
• At initial installation, no gap must exist between the sensor andthe tooth wheel
• After you install a hub, always check that the sensor is adjustedproperly
Operating the trailer can cause a gap to develop between the sensorand the tooth wheel. If the gap exceeds 0.040-inch, the system maynot function properly.
To adjust the sensor, twist and push the sensor through the sensorbracket as far as possible or until the sensor touches the tooth wheel.
1. Disconnect power to the ECU/valve assembly.2. Disconnect the sensor electrical connector from the ECU/valve
assembly.3. Connect the volt/ohm meter leads to the two wire component
terminals inside the disconnected connector.4. When checking the resistance, the meter must read
900-2000 ohms.5. Check and replace the sensor and cables as required.6. Repeat Steps 1 through 5 for each sensor in the system.
Wheel SpeedSensors
Sensor TestProcedure

TP-0143Page 2-32 Issued 12-01
1. Disconnect power from the ECU/valve assembly.2. Connect the AC volt/ohm meter leads to the sensor terminals
inside the connector.3. Rotate the corresponding wheel at a constant speed of 1/2
revolution per second.4. The output voltage must be greater than 0.2 volt AC.5. When there is no reading:
A. Trace the cable to verify that the cable connects to the wheelyou turned.
B. Check that you turned the correct wheel.C. Check that the system is wired correctly.D. Check that the sensor touches the tooth wheel.
6. If the volt/ohm meter still indicates no reading or a low readingafter following the above procedures, check and replace thecomponent and cables as required.
7. Repeat Steps 1 through 5 for each sensor in the system.
Meritor WABCO recommends that you test a vehicle’s ABS after anew installation and after you diagnose, repair and erase faults in theABS.
• Perform a final check using TOOLBOXTM Software or thePro-Link 9000
Check ABSFunctions
Sensor OutputVoltage Test

Enhanced Easy-Stop TM Trailer ABSComponent Testing
TP-0143Issued 12-01 Page 2-33
Measure resistance across each valve solenoid coil terminal andground on the ABS valve to ensure 4.0 to 8.0 ohms. Valve and cablepinouts are illustrated in Figure 2-20.
1. Exhaust Solenoid2. Inlet Solenoid3. Ground Terminal
Figure 2-20: Valve and Cable Pinouts
• To check the cable and the ABS valve as one unit, measureresistance across pins 5 and 6 and 5 and 7 on the ECUconnector of the harness. Resistance should be between 4.0and 8.0 ohms for each measurement. See Figure 2-21.
5. Ground Terminal6. Exhaust Solenoid7. Inlet Solenoid
Figure 2-21: ECU Connector
• If the resistance is greater than 8.0 ohms, clean the electricalcontacts in the solenoid. Check the resistance again.
ABS ExternalModulator Valve
1 2 3 45 6 7 8
1
2
3
Bayonet-Style Connector

TP-0143Page 2-34 Issued 12-01

Enhanced Easy-Stop TM Trailer ABSFinal Testing with TOOLBOX TM Software
TP-0143Issued 12-01 Page 2-35
Final testing is required on all Enhanced Easy-StopTM Trailer ABSinstallations. To run these tests, Meritor WABCO recommends you useTOOLBOXTM Software.
TOOLBOXTM Software and general test procedures are included inthis manual. If you are using a Pro-Link, refer to the operator’s manualfor test instructions.
NOTE: If you are testing an installation that has a power only cable,temporarily install a Meritor WABCO combination power/diagnosticsY-style cable or use the PLC/J1708 adapter.
1. Connect the diagnostic connector on the cable to the PC serialport/SAE diagnostic interface (J1587/J1708 to RS232 interface).
NOTE: Refer to the TOOLBOXTM Software Owner’s Manual,TP-99102, for instructions for running TOOLBOXTM Software.
2. Display the Trailer ABS Main Screen.3. Verify power supply:
• Apply 12 volts DC to the blue wire (constant). Check the screenfor proper voltage (9.5 to 14 volts). Constant power voltage isdisplayed in the Primary field. See Figure 2-22.
• Apply 12 volts DC to the red wire (stoplight power). Check thescreen for proper voltage (9.5 to 14 volts). Stoplight powervoltage is displayed in the Secondary field. See Figure 2-22.
• The Internal field is not applicable to this test.
4. Check the Faults field on the Main Screen :
NONE = No faults present, proceed with final test.
YES = Faults present, double-click on “YES” to bring up thefault information screen.
All Installations
Final Testing

TP-0143Page 2-36 Issued 12-01
Figure 2-22: Meritor WABCO Trailer ABS Diagnostics Screen
5. Use the information in the Repair Instructions field to make thenecessary repairs. See Figure 2-23.
Figure 2-23: Fault Information Screen
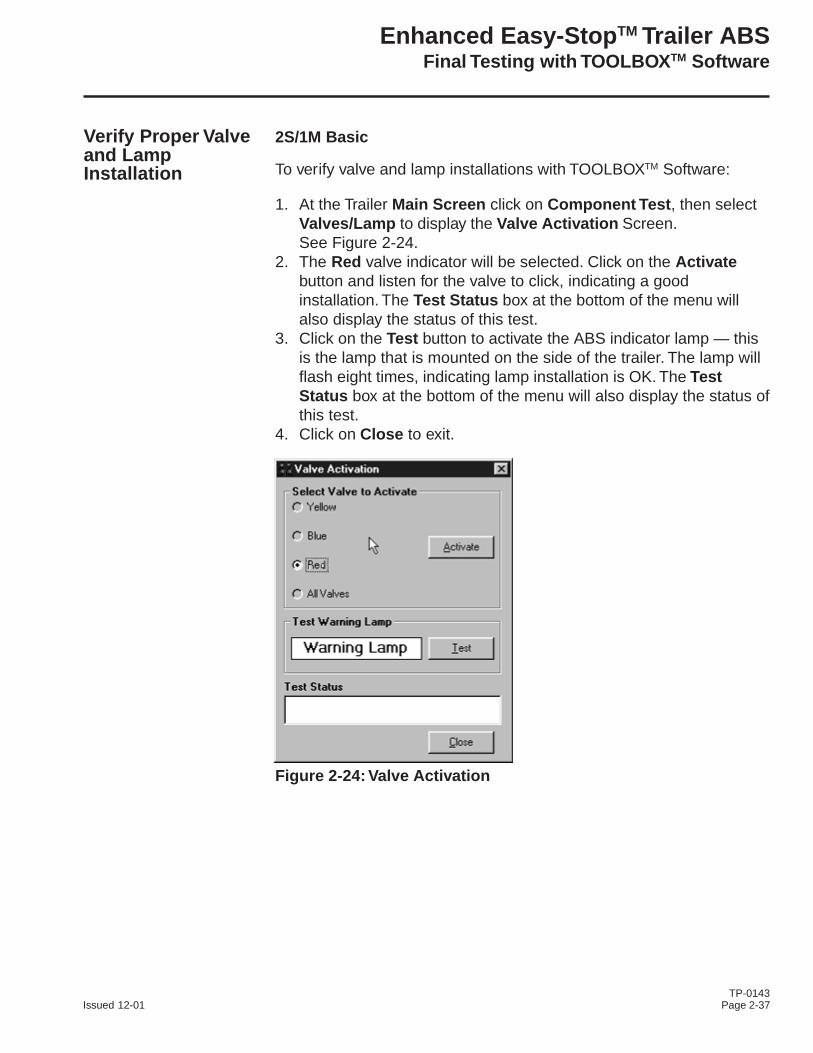
Enhanced Easy-Stop TM Trailer ABSFinal Testing with TOOLBOX TM Software
TP-0143Issued 12-01 Page 2-37
2S/1M Basic
To verify valve and lamp installations with TOOLBOXTM Software:
1. At the Trailer Main Screen click on Component Test , then selectValves/Lamp to display the Valve Activation Screen.See Figure 2-24.
2. The Red valve indicator will be selected. Click on the Activatebutton and listen for the valve to click, indicating a goodinstallation. The Test Status box at the bottom of the menu willalso display the status of this test.
3. Click on the Test button to activate the ABS indicator lamp — thisis the lamp that is mounted on the side of the trailer. The lamp willflash eight times, indicating lamp installation is OK. The TestStatus box at the bottom of the menu will also display the status ofthis test.
4. Click on Close to exit.
Figure 2-24: Valve Activation
Verify Proper Valveand LampInstallation

TP-0143Page 2-38 Issued 12-01
2S/2M, 4S/2M, 4S/3M Standard and Premium
To verify valve and lamp installations with TOOLBOXTM Software:
1. Apply 12 volts DC to the ABS.2. Apply air to the emergency line to fill the air tanks and release the
spring brakes.3. Apply air to the control line.4. At the Trailer Main Screen, click on Component Test , then select
Valves/Lamp to display the Valve Activation Screen. The Yellowvalve indicator will be highlighted. See Figure 2-25.
NOTE: Selecting All Valves will sequence all of the valvesbeginning with the Yellow valve.
5. Click on the Activate button.6. Check for proper air line installation. To do this, observe the slack
adjusters:
• If the ECU faces the front of the trailer , the slack adjusterswill move in and out as the curbside portion of the dualmodulator valve cycles. If this does not happen, the air linesare not properly connected. Make the necessary repairs
• If the ECU faces the rear of the trailer , the slack adjusters willmove in and out as the roadside portion of the dual modulatorvalve cycles. If this does not happen, the air lines are notproperly connected. Make the necessary repairs
NOTE: The Test Status box at the bottom of the menu will displaythe status of this test.
7. Repeat this test for the Blue valve.
A. Repeat Steps 1 through 3.B. Select the Blue valve from the valve activation screen.C. Click on the activate button to verify proper valve installation
(Blue ).D. Check for proper air line installation. To do this, observe the
slack adjusters.
— If the ECU faces the front of the trailer, the slack adjusterswill move in and out as the roadside portion of the dualmodulator valve cycles. If this does not happen, the air linesare not properly connected. Make the necessary repairs

Enhanced Easy-Stop TM Trailer ABSFinal Testing with TOOLBOX TM Software
TP-0143Issued 12-01 Page 2-39
— If the ECU faces the rear of the trailer, the slack adjusterswill move in and out as the curbside portion of the dualmodulator valve cycles. If this does not happen, the air linesare not properly connected. Make the necessary repairs
8. For 4S/3M installations: Repeat this test for the red valve.Red: The external relay valve designated RED (RD) is an axlecontrol valve. It controls brake chambers on one or two axles. It isimportant that delivery lines from Port 2 are plumbed as shown onthe installation drawings. The 4S/3M system is designed to beused with a variety of trailer configurations. Call ArvinMeritor’sCustomer Service Center at 800-535-5560 for additionalinformation.
9. Click on the Test button to activate the ABS indicator lamp — thisis the lamp that is mounted on the side of the trailer. The lamp willflash eight times, indicating lamp installation is OK. The TestStatus box at the bottom of the menu will display the status:
Message StatusComplete OKCritical Error Communication Error (If this
message occurs: Check cableconnections, recycle power)
10. Click on Close to exit.
Figure 2-25: Valve Activation

TP-0143Page 2-40 Issued 12-01
Sensor Installation Testing is required for all installations.
To test the sensor installation:
1. Raise both sensed wheel ends off of the ground.2. Apply air to the emergency line to fill the air tanks and release the
spring brakes so that the wheels can be rotated.3. Apply 12 volts DC to the ABS.4. At the Trailer Main Menu, click on Component Test, then select
Sensor Test to display the Sensor Test screen.5. Click on the Start button to start the test.6. Rotate the sensed wheel ends at a rate of 1/2 revolution per
second. This rate equals a wheel speed of approximately 4 mph(7 kph).
7. Check the screen for sensor output. See Figure 2-26.
• Make sure there is sensor output. If sensor output is displayed,the sensor test is complete
• If there is no sensor output, verify that a tone ring has beeninstalled and that the sensor is pushed all the way in againstthe tone ring. Make the necessary repairs and repeat thesensor test. If the problem persists, contact Meritor WABCO
8. Check Order fields to verify sensors were installed in the rightlocation based on orientation of the valves or run a sensororientation test. See Figures 2-26 and 2-27.
Sensor InstallationTest

Enhanced Easy-Stop TM Trailer ABSFinal Testing with TOOLBOX TM Software
TP-0143Issued 12-01 Page 2-41
Figure 2-26: Sensor Test
Figure 2-27: Sensor Orientation Test

TP-0143Page 2-42 Issued 12-01
2S/1M Basic
1. Apply 12 volts DC power to the ABS.2. The ECU/single modulator valve assembly should click two times.3. If the indicator lamp comes on for three seconds and goes out:
This indicates a proper installation. The final test is complete.
If the ABS indicator lamp comes on and stays on , check thesensor installation:
A. Remove the power from the ABS and raise the sensed wheelsso they may be rotated.
B. Repeat Step 1 and 2.C. Rotate each sensed wheel, one at a time, at a rate less than
25 RPM.
The ABS indicator lamp should now go out and stay out indicatinga proper installation. The final test is complete.
4. If the ABS lamp does not go out, there is a sensor gap problem orhardware fault. Adjust the sensor and, if necessary, perform a faultcode check.
2S/2M Standard Sensor Installation Check
1. Look at the YE2 and YE1 sensor connectors on the ECU/dualmodulator valve assembly. Make sure the connectors are routed tothe proper wheel end location, as follows:
• If the ECU/dual modulator valve assembly is mounted withsensors facing the front of the trailer
— Sensor YE2 must be routed to the curbside wheel endlocation
— Sensor YE1 must be routed to the roadside wheel endlocation
• If the ECU/dual modulator valve assembly is mounted withsensors facing the rear of the trailer
— Sensor YE2 must be routed to the roadside wheel endlocation
— Sensor YE1 must be routed to the curbside wheel endlocation
2. If sensors are not properly installed, make the necessary repairs.
Final Testingwithout TOOLBOX TM
Software

Enhanced Easy-Stop TM Trailer ABSFinal Testing without TOOLBOX TM Software
TP-0143Issued 12-01 Page 2-43
2S/2M Air Line Installation Check
1. Make sure all unused air ports are plugged and that the exhaustport is facing DOWN.
2. Look at the air line installation to make sure all air lines areproperly installed.
• If the ECU/dual modulator valve assembly is mounted with thesensors facing the front of the trailer, the air lines for the threedelivery ports located under the YE2 sensor connector must berouted to curbside ; the air lines for the three delivery ports onthe opposite side of the valve must be routed to roadside. SeeFigure 2-28.
• If the ECU/dual modulator valve assembly is mounted with thesensors facing the rear of the trailer, the air lines for the threedelivery ports located under the YE2 sensor connector must berouted to roadside ; the air lines for the three delivery ports onthe opposite side of the valve must be routed to curbside . SeeFigure 2-29.
3. If air lines are not properly routed, make the necessary repairs.
CURBSIDE YE2
YE1DELIVERYROADSIDE
YE2DELIVERYCURBSIDE
PLUG ALLUNUSEDPORTS
ROADSIDE YE1
VALVE MOUNTED WITH SENSORS FACING FRONT OF TRAILER
ROADSIDE YE2
YE1DELIVERYCURBSIDE
YE2DELIVERYROADSIDE
CURBSIDE YE1
VALVE MOUNTED WITH SENSORS FACING REAR OF TRAILER
PLUG ALLUNUSEDPORTS
Figure 2-28: Valve Mounted with Sensors Facing Front of Trailer
Figure 2-29: Valve Mounted with Sensors Facing Rear of Trailer

TP-0143Page 2-44 Issued 12-01
2S/2M, 4S/2M and 4S/3M Premium Sensor Installation Check
1. Look at the sensor connectors on the ECU/dual modulator valveassembly. Make sure the connectors are routed to the properwheel end location, as follows:
ECU/Dual Modulator Valve Assembly Mounted with SensorsFacing Front of Trailer• 2S/2M
— Connect curbside sensor at YE1.— Connect roadside sensor at BU1.
*• 4S/2M— Connect curbside front sensor at YE1.— Connect curbside rear sensor at YE2.— Connect roadside front sensor at BU1.— Connect roadside rear sensor at BU2.
*• 4S/3M — Sensor locations vary by type of installation. Referto diagrams for specific sensor locations— Connect curbside sensor at YE1.— Connect curbside sensor at YE2.— Connect roadside sensor at BU1.— Connect roadside sensor at BU2.
ECU/Dual Modulator Valve Assembly Mounted with SensorsFacing Rear of Trailer• 2S/2M
— Connect curbside sensor at BU1.— Connect roadside sensor at YE1.
*• 4S/2M— Connect curbside front sensor at BU1.— Connect curbside rear sensor at BU2.— Connect roadside front sensor at YE1.— Connect roadside rear sensor at YE2.
*• 4S/3M — Sensor locations vary by type of installation. Refer todiagrams for specific sensor locations— Connect curbside sensor at BU1.— Connect curbside sensor at BU2.— Connect roadside sensor at YE1.— Connect roadside sensor at YE2.
* If the lift axle is sensed in 4S/2M and 4S/3M installations:Sensors YE2 and BU2 must always be used on the lift axle toavoid an unwanted ABS indicator lamp illumination.
2. If sensors are not properly installed, make the necessary repairs.

Enhanced Easy-Stop TM Trailer ABSFinal Testing without TOOLBOX TM Software
TP-0143Issued 12-01 Page 2-45
2S/2M, 4S/2M and 42/3M Premium Air Line Installation
1. Make sure all unused air ports are plugged and that the exhaustport is facing DOWN.
2. Look at the air line installation to make sure all air lines areproperly installed.
• If the ECU/dual modulator valve assembly is mounted with thesensors facing the front of the trailer, the air lines for the threedelivery ports located under the YE sensor connectors must berouted to curbside ; the air lines for the three delivery ports onthe opposite side of the valve must be routed to roadside . SeeFigure 2-30.
• If the ECU/dual modulator valve assembly is mounted with thesensors facing the rear of the trailer, the air lines for the threedelivery ports located under the YE sensor connectors must berouted to roadside ; the air lines for the three delivery ports onthe opposite side of the valve must be routed to curbside . SeeFigure 2-31.
Figure 2-30: Valve Mounted with Sensors Facing Front of Trailer
Figure 2-31: Valve Mounted with Sensors Facing Rear of Trailer
CURBSIDE YE2
YE1DELIVERYROADSIDE
YE2DELIVERYCURBSIDE
PLUG ALLUNUSEDPORTS
ROADSIDE YE1
VALVE MOUNTED WITH SENSORS FACING FRONT OF TRAILER
ROADSIDE YE2
YE1DELIVERYCURBSIDE
YE2DELIVERYROADSIDE
CURBSIDE YE1
VALVE MOUNTED WITH SENSORS FACING REAR OF TRAILER
PLUG ALLUNUSEDPORTS

TP-0143Page 2-46 Issued 12-01
3. For 4S/3M installations: Repeat this test for the Red valve.
• Red: The external relay valve designated RED (RD) is an axlecontrol valve. It controls brake chambers on one or two axles. Itis important that delivery lines from PORT 2 are plumbed asshown on the installation drawings in Section 1 of this manual.The 4S/3M system is designed to be used with a variety oftrailer configurations. Call ArvinMeritor’s Customer ServiceCenter at 800-535-5560 for additional information
4. If air lines are not properly routed, make the necessary repairs.
1. Apply 12 volts DC power to the ABS.2. The ECU/dual modulator valve assembly should click four times
(six times for a 4S/3M).3. If the indicator lamp comes on for three seconds then goes out ,
this indicates a proper installation. The final test is complete.
If the ABS indicator lamp comes on and stays on , check thesensor installation:
A. Remove the power from the ABS and raise the sensed wheelsso they may be rotated.
B. Apply emergency air to fill the air tanks and release the springbrakes so that the wheels may be rotated.
C. Repeat Step 1 and 2.D. Rotate each sensed wheel, one at a time, at a rate of less
than 25 RPM .
The ABS indicator lamp should now go out and stay out indicatinga proper installation. The final test is complete.
4. If the ABS lamp does not go out, there is a sensor gap problem orhardware fault. Adjust the sensor and, if necessary, perform a faultcode check.
Final Testing(Standard andPremiumInstallations)

Enhanced Easy-Stop TM Trailer ABSFinal Testing without TOOLBOX TM Software
TP-0143Issued 12-01 Page 2-47
1. Push the sensor into its holder until it contacts the tooth wheel. Atinstallation, there must be no gap between the sensor and thetooth wheel.
2. Measure the AC voltage output. Value should be 0.2 volt AC whenthe wheel is rotated at a rate of 1/2 revolution per second.
Use constant power activation to perform the fault code check, asfollows:
1. Apply constant power to the ECU/dual modulator valve assemblyfor more than one, but less than five seconds.
2. Remove power.3. Reapply power.4. Check the trailer ABS indicator lamp on the side of the trailer. The
fault code will be displayed three times.5. Find the fault on the table and make the necessary repairs.6. After making the necessary corrections, repeat the final test.
Sensor GapAdjustment(All Installations)
Fault Code Check(All Installations)

TP-0143Page 2-48 Issued 12-01
Figure 2-32: Blink Codes
BLINK CODES
Blink Code Problem Area Action
3 Sensor BU1 Determine sensor location.
Check sensor installation.
Make necessary repairs.
4 Sensor YE1
5 Sensor BU2
6 Sensor YE2
7 External ABS modulator valve
9 Internal modulator failure, inlet valve #2
10 Internal modulator failure, inlet valve #1
11 Internal modulator failure, outlet valve
14 Power Supply
15 ECU Failure Verify proper installation.If code continues, contact Meritor WABCO for assistance.
16 SAE J1708 Failure
17 SAE J2497 (PLC) Failure
Internal failure, contact Meritor WABCO.
18 Generic I/O Failure
Verify proper electrical installation. Check power supply. Make necessary corrections.
Verify proper electrical installation. Check power supply. Make necessary corrections.
Verify proper electrical installation. Check power supply. Make necessary corrections.
Internal failure, contact Meritor WABCO.
Verify proper installation.If code continues, contact Meritor WABCO for assistance.
Verify proper installation.If code continues, contact Meritor WABCO for assistance.
Verify proper installation.If code continues, contact Meritor WABCO for assistance.
Determine sensor location.
Check sensor installation.
Make necessary repairs.
Determine sensor location.
Check sensor installation.
Make necessary repairs.
Determine sensor location.
Check sensor installation.
Make necessary repairs.

Enhanced Easy-Stop TM Trailer ABSTrailer Identification
TP-0143Issued 12-01 Page 2-49
An Enhanced Easy-StopTM Trailer ABS label is generally affixed to thetrailer near the ABS trailer indicator lamp.
Figure 2-33: Trailer ABS Indicator Label
NOTE: If this label is not included with the assembly, let yoursupervisor know. Labels are available from Meritor WABCO. Ask forpart number TP-95172.
For additional assistance, contact Meritor WABCO at800-535-5560.
Trailer Label
If the ABS indicator lamp
comes on and stays on when you
apply the brakes to a moving vehicle,
the trailer ABS is not working properly.
The ABS must be serviced as soon as
possible upon completion of your trip to
ensure full anti-lock braking capability.
NOTICE:
TP-95172 Rev. 7/01

TP-0143Page 2-50 Issued 12-01

Enhanced Easy-Stop TM Trailer ABSModule 2 Summary
TP-0143Issued 12-01 Page 2-51
This module described diagnostic procedures for the EnhancedEasy-StopTM Trailer ABS. In it we discussed the following areas:
• System diagnostics• Using the proper tool for diagnostics• Understanding the most to least desirable method of code
retrieval• Reading blink codes and retrieving fault information• Proper component testing• Proper component removal and installation• Clearing memory when repairs are complete• Testing the installation
The various methods of code retrieval were demonstrated. Thesemethods include TOOLBOXTM Software, Pro-Link 9000, ignition poweractivation procedure and the diagnostic tool. You have been givenblink code information charts and should know how to interpret thatinformation.
You have seen some diagnostic screens used with TOOLBOXTM
Software. You should be familiar with these screens and theinformation they display.
You learned that TOOLBOXTM Software can show constant andchanging information, display faults and verify system integrity andwiring.
The roles of active and stored faults and blink codes in diagnosticswere demonstrated. Practice on how to use these codes to service atrailer ABS was provided. You should be able to operate theTOOLBOXTM Software, Pro-Link 9000 and be able to retrieve andinterpret blink codes using the ignition power activation procedure, orby using the diagnostic tool.
This module explained removal and installation procedures for systemcomponents.
Final testing procedures for the Enhanced Easy-StopTM Trailer ABSwere discussed. You should know what to do before placing a trailerback into service.
Module 2 Summary

TP-0143Page 2-52 Issued 12-01

Enhanced Easy-Stop TM Trailer ABSDiagnostic Exercise
TP-0143Issued 12-01 Page 2-53
Please answer the following questions.
1. Another term for ignition power is ________ power.
2. After a visual check, what is the first test you should perform on asensor?
A. Road testB. Resistance testC. Amplitude testD. Voltage output test
3. What tool is used to perform a sensor output voltage test?
A. AmmeterB. Pro-Link 9000C. Test lightD. Volt/Ohm meter
4. If the resistance in a sensor is 1200 ohms, what does this mean?
A. Acceptable resistanceB. Acceptable voltageC. Amplitude out of limitsD. Resistance out of limits
5. Acceptable sensor output voltage is?
A. 0 voltsB. Less than 0.2 AC voltsC. Less than 0.2 DC voltsD. Greater than 0.2 AC volts

TP-0143Page 2-54 Issued 12-01

Enhanced Easy-Stop TM Trailer ABSProgress Check
TP-0143Issued 12-01 Page 2-55
Please answer the following review questions.
1. Where are the fault codes stored?
A. Diagnostic toolB. Pro-Link 9000C. ECUD. Diagnostic cable
2. TOOLBOXTM Software is used with:
A. An extra ECUB. A Pro-Link 9000C. A personal computerD. The ignition power activation procedure
3. The ECU does not detect what types of faults?
A. Erratic wheel speedB. Electrical short circuitsC. Air line leaksD. Electrical open circuits
4. Since March 1, 1998, where is the external trailer ABS indicatorlamp located?
A. At the front of the trailer, visible in the rearview mirrorB. At the rear of the trailer on the right side near the rear wheelsC. At the rear of the trailer on the left side near the rear wheelsD. At the rear of the trailer on the right side near the forward
wheels
5. ________ faults and ________ faults are held in memory by theECU.
6. There are two ways to activate blink codes: ________ and__________.
7. Active faults must be ________ before they can be cleared.
8. Sensor location ________ with suspension type and with ABSconfiguration.
9. To obtain access to the wheel speed sensor, it may be necessaryto ________ the wheel and brake drum.
rogress Check

TP-0143Page 2-56 Issued 12-01
10. The body of the wheel speed sensor must ________ the toothwheel at assembly.
11. A sensor gap that occurs during ________, between the toothwheel and the sensor must not exceed 0.040-inch (19 mm).
12. ________ the air pressure from the brake system beforeattempting to remove any ABS valve components.
13. The SAE J1587 connector must be protected from ________when the diagnostic tool is not installed.
14. When testing a wheel speed sensor, measure both the ________and the ________.
15. Before beginning the final check on a trailer, ________ all blinkcodes from ECU memory.

Meritor WABCO
Vehicle Control Systems3331 West Big Beaver Road, Suite 300Troy, MI 48084 USA800-535-5560meritorwabco.com
Information contained in this publication was in effect at the time the publication was approved for printing and is subject to change without notice or liability. ArvinMeritor Commercial Vehicle Systems reserves the right to revise the information presented or discontinue the production of parts described at any time.
Copyright 2001 TP-0143ArvinMeritor, Inc. Issued 12-01All Rights Reserved Printed in the USA 16579/24240