ensign selfix 820
DESCRIPTION
Ensign Selfix 820 camera Instructions for use, clean copy with remastered coversTRANSCRIPT

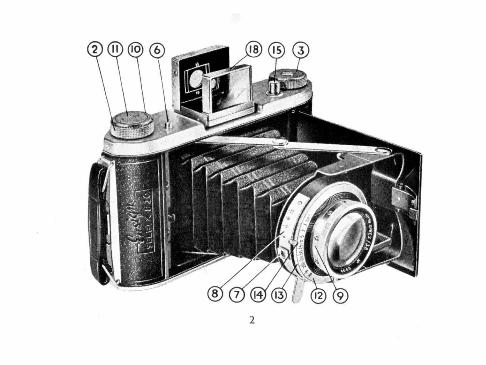
ENSIGN SELFIX 820 CAMERA
2. Spring knob. 1 1. Depth of focus scale plate.
3. Film-winding knob. 12. Shutter front plate with speed
markings.
6. Button for opening camera. 13. Outer milled ring.
7. Aperture Cursor.
8. Aperture scale plate. 14. Shutter setting lever.
15. Shutter release knob. 9. Rotating lens cell.
10. Rotating ring for distance scaie. 18. Albada View finder.
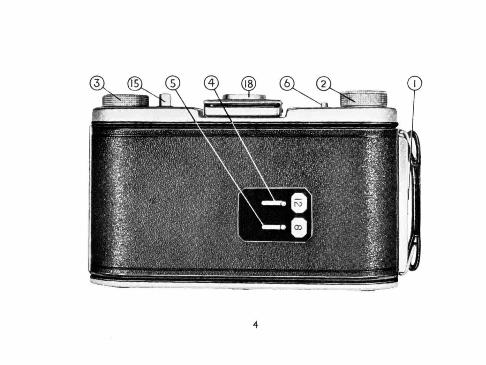
ENSIGN SELFIX 820 CAMERA
1. Catch holding camera back in position.
2. Spring knob.
3. Film-winding knob.
4. Slide covering ruby window for 12 exposures.
5. Slide covering ruby window for 8 exposures.
6, Button for opening camera.
15. Shutter release knob. ,
18. Albada View finder.
Picture sizes :
Eight 2f x 34 in. pictures or twelve 24 x 2f in. pictures.
Roll Film sizes :
Standard size 20 o r 62.
Recommended films :
ENSIGN ULTRACHROME - fast and highly orthochromatic.
ENSIGN FINE GRAIN PAN - a panchromatic film o f fine grain
and medium speed.
LOADING THE CAMERA WITH FILM
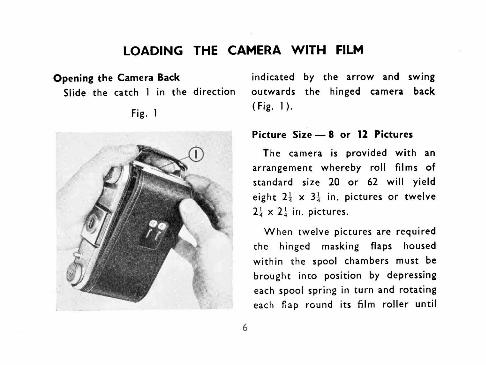
Opening the Camera Back indicated by the arrow and swing
Slide the catch 1 in the direction outwards the hinged camera back (Fig. I ).
Fig. 1
Picture Size- 8 o r 12 Pictures
The camera is provided wi th an
arrangement whereby roll films o f standard size 20 o r 62 wil l yield
eight 2: x 3 f in. pictures o r twelve 2: x 2: in. pictures.
When twelve pictures are required
the hinged masking flaps housed
within the spool chambers must be brought into position by depressing
each spool spring in turn and rotating each flap round its f i lm roller unti l
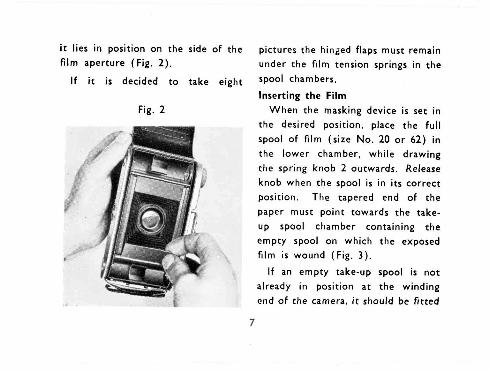
it lies in position on the side of the pictures the hinged flaps must remain film aperture (Fig. 2). under the film tension springs in the
I f it is decided t o take eight chambers. Inserting the Film
Fig. 2 When the masking device is set in the desired position, place the full
spool of film (size No. 20 o r 62) in
the lower chamber, while drawing
the spring knob 2 outwards. Release knob when the spool is in its correct
position. The tapered end of the paper must point towards the take-
up spool chamber containing the empty spool on which the exposed
film is wound (Fig. 3).
I f an empty take-up spool is not already in position at the winding
end o f the camera, it should be fitted
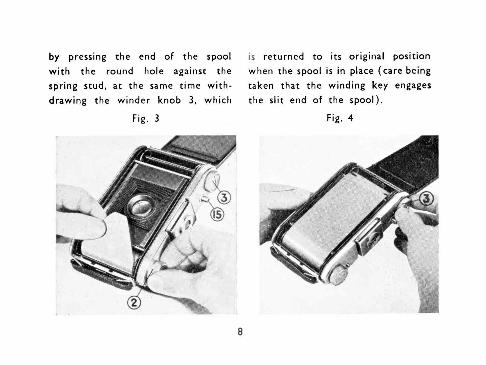
by pressing the end of the spool is returned t o its original position
w i th the round hole against the when the spool is in place (care being
spring stud, at the same time with- taken that the winding key engages
drawing the winder knob 3, which the slit end of the spool).
Fig. 3 Fig. 4
Remove the gummed label which holds the paper leader i n place; pu l l t he la t te r across t h e rol lers and insert the end i n the wide slot o f the empty spool.
G ive one o r t w o turns t o the f i lm winding knob 3 i n a clockwise direc- t i o n t o draw t h e paper leader taut. I n doing th is see tha t the paper leader is nicely centred between the spool flanges. Any tendency t o w i n d crooked must be corrected before proceeding fu r the r (Fig. 4) .
Close the back o f the camera, making sure tha t it is securely fastened by the catch.
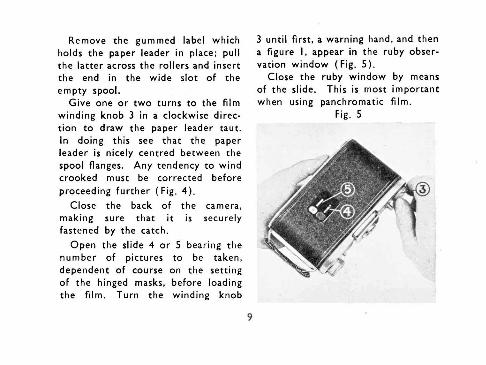
Open the slide 4 o r 5 bearing the number o f pictures t o be taken, dependent o f course o n the sett ing o f the hinged masks, before loading the film. Turn the winding knob
3 un t i l first, a warning hand, and then a figure 1 , appear i n the ruby obser- vat ion w indow (Fig. 5).
Close the ruby w indow by means o f the slide. This is most impor tan t when using panchromatic film.
Fig. 5
MAKING THE EXPOSURE
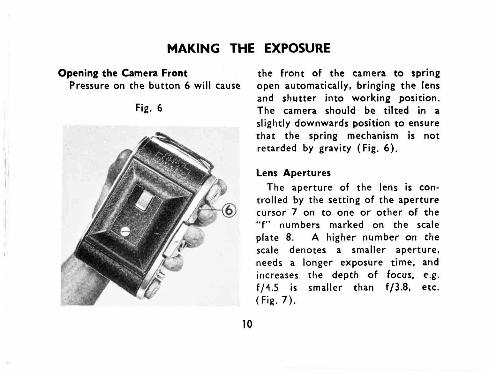
Opening the Camera Front the f ront o f the camera t o spring Pressure on the button 6 wi l l cause open automatically, bringing the lens
and shutter in to working position. Fig. 6 The camera should be ti l ted in a
slightly downwards position t o ensure that the spring mechanism is not retarded by gravity (Fig. 6).
Lens Apertures The aperture of the lens is con-
trol led by the setting o f the aperture cursor 7 on t o one o r other of the "f" numbers marked on the scale plate 8. A higher number on the scale denotes a smaller aperture, needs a longer exposure time, and increases the depth o f focus, e.g. fJ4.5 is smaller than fJ3.8, etc. (Fig. 7).
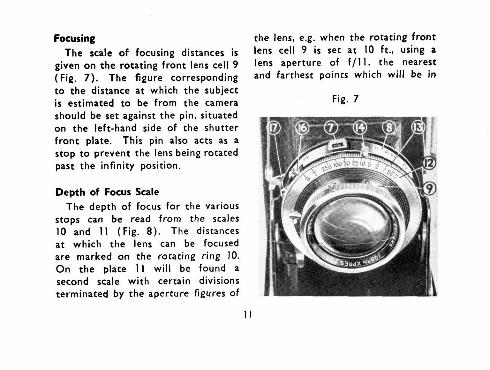
Focusing The scale o f focusing distances is
given on the rotating f ront lens cell 9 (Fig. 7). The figure corresponding t o the distance at which the subject is estimated t o be from the camera should be set against the pin, situated on the left-hand side of the shutter f ront plate. This pin also acts as a stop t o prevent the lens being rotated past the infinity position.
Depth of Focus Scale
The depth o f focus for the various stops can be read from the scales 10 and 1 1 (Fig. 8). The distances at which the lens can be focused are marked on the rotating ring 10. O n the plate 1 1 wi l l be found a second scale w i th certain divisions terminated by the aperture figures o f
the lens, e.g. when the rotating f ront lens cell 9 is set at 10 ft.. using a lens aperture of f / l I, the nearest and farthest points which wi l l be in
Fig. 7
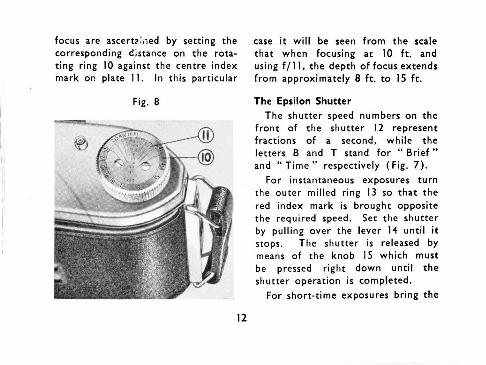
focus are ascertzined by setting the corresponding distance on the rota- t ing ring 10 against the centre index mark on plate 11. In this particular
Fig. 8
case it wi l l be seen from the scale that when focusing at 10 f t . and using f / l I, the depth o f focus extends from approximately 8 ft. t o 15 f t .
The Epsilon Shutter The shutter speed numbers on the
front o f the shutter 12 represent fractions of a second, while the letters B and T stand for " Br ie f " and " T i m e " respectively (Fig. 7).
For instantaneous exposures turn the outer milled ring 13 so that the red index mark is brought opposite the required speed. Set the shutter by pulling over the lever 14 unti l it stops. The shutter is released by means of the knob 15 which must be pressed right down unti l the shutter operation is completed.
For short-time exposures bring the
red index mark opposite the letter B and pull over the setting lever 14. The shutter opens by pressing the knob 15 and closes as soon as the pressure ceases.
When long - t ime exposures are required turn the ring 13 unti l the red index mark is brought opposite the letter T. The flexible wire release supplied w i th the camera is then screwed in socket 16. Af te r the shutter lever 14 has been set by sliding it along in its groove, the shutter is operated by the wire release as follows :-
(a) To open the shutter, press in the head o f the wire release, then remove the pressure.
( b ) Immediately the required ex- posure has been given the
shutter is closed by a further pressure on the head of the wire release.
Special Note
After evcry exposure wind the film on t o the next number. The shutter release knob cannot operate unti l this is done.
Both the shutter and the camera body are provided with a special inter-lock device whereby the shutter release knob 15 cannot be actuated unti l the film has been wound on t o the next picture. and the shutter set by operating the shutter lever 14. This particular device of the Selfix 820 camera renders double exposures impossible.
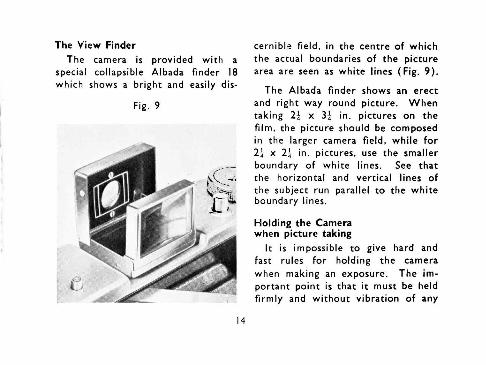
The View Finder cernible field, in the centre o f which The camera is provided with a the actual boundaries of the picture
special collapsible Albada finder 18 area are seen as white lines (Fig. 9). which shows a bright and easily dis-
The Albada finder shows an erect
Fig. 9 and right way round picture. When taking 2; x 3; in. pictures on the film, the picture should be composed in the larger camera field, while fo r 2f x 24 in. pictures, use the smaller boundary o f w h ~ t e lines. See that the horizontal and vertical lines of the subject run parallel t o the white boundary I~nes.
Holding the Camera when picture taking
It is impossible t o give hard and fast rules for holding the camera when making an exposure. The im- portant point is that it must be held firmly and without vibration o f any
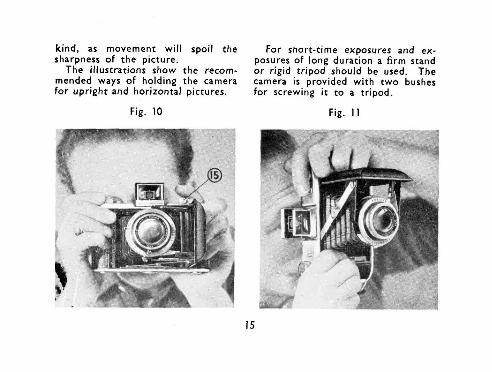
kind, as movement wi l l spoil the sharpness of the picture.
The illustrations show the recom- mended ways of holding the camera for upright and horizontal pictures.
Fig. 10
*m l
For short-time exposures and ex- posures of long duration a f i rm stand o r rigid tr ipod should be used. The camera is provided with t w o bushes for screwing it t o a tripod.
Fig. 1 1
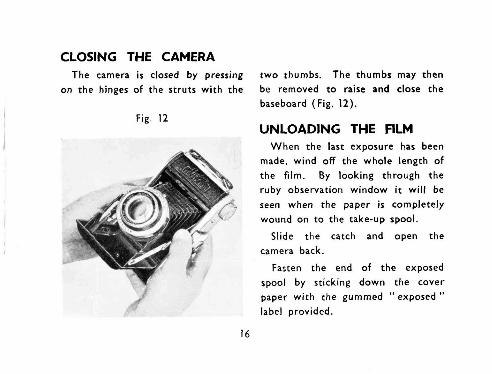
CLOSING THE CAMERA The camera is closed by pressing
on the hinges of the struts w i th the
Fig. 12
two thumbs. The thumbs may then be removed t o raise and close the
baseboard (Fig. 12).
UNLOADING THE FILM When the last exposure has been
made, wind off the whole length of
the film. By looking through the ruby observation window it wi l l be
seen when the paper is completely
wound on t o the take-up spool.
Slide the catch and open the
camera back.
Fasten the end o f the exposed
spool by sticking down the cover paper wi th the gummed "exposed " label provided.
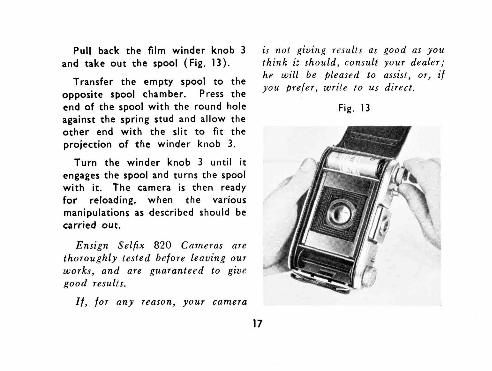
Pull back the film winder knob 3 is not giving results as good as you and take out rhe spool (Fig. 13). think it should, consult your dealer;
he will be pleased to assist, or, i f Transfer the empty spool t o the you prefer, to us direct,
opposite spool chamber. Press the end o f the spool w i th the round hole Fig. 13 against the spring stud and allow the other end wi th the slit t o fit the projection o f the winder knob 3.
Turn the winder knob 3 unti l it engages the spool and turns the spool w i th it. The camera is then ready for reloading, when the various manipulations as described should be carried out.
Ensign Selfix 820 Cameras are thoroughly tested before leaving our works, and are guaranteed to give ~ o o d results.
If , for any reason, your camera
17
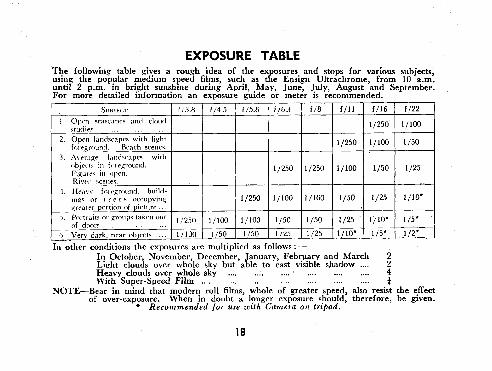
EXPOSURE TABLE The following table gives a rou h idea of the e x p r e s and stops for various subjects using the popular medium spee8 films such as e Ensign Ultrachmme from 10 am: until 2 p.m. in bright sunshme during) April, May, June, July, August 'and September. For more detailed information an exposure guide or meter is recommended.
In other conditions the exposures are multiplied as follows : - I n October November December January February and March 2 Light clouds over whdle sky but'able to iast visible shadow .... 2
. . . . . . . . . . . . . . . . . . . . . . . . Heavy clouds over whole sky With Super-speed Film . . . . . . . . . . . . . . . . . . . . . . . . . . . .
NOTE-Bear in mind that modern roll films whole of greater speed also resist the effect of over-exposure. When in doubt longer exposure should: therefore, be given. * Recommended for use with Camera on tripod.
f/22
1/100
1/50
1/25
l/lOt
115'
f/16
11250
1/100
1/50
1/25
1 1 0
--- S u ~ l ~ c r
1. O p m seascaprs and cloud ~ tud ies . . . . . . . . .
2. Opcn landscaprs with light fol-rqround. Rrach scenrs.
3. Avrraq? Imdscapes with oblectc in fo~ryround. Figurm i r ~ open. Rivw scene5.
I-. Hravv fo~rqround , build- inqc or t r r r s ocrupvlng zrrater portion of picture ...
5. Portraits o' groups taken Out
of doors . . . . . . . . . ... 6 Vers dark, near objects
f / l l
11250
1/100
1/50
1/25
0
f/3.8
1 /250
1 / 100
f/5.6
1/250
1/100
f/4.5
1 /lo0
1/50
f/6.3
1/250
1/100
1/50
f/8
1/250
1/100
1/50
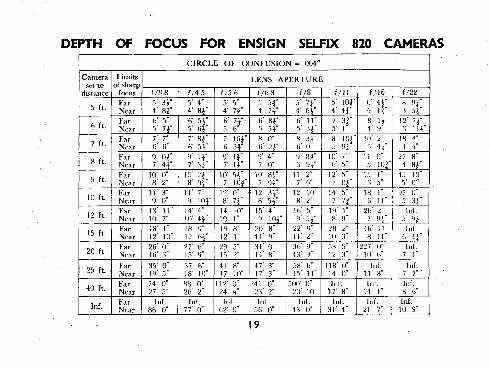
DEPTH OF FOCUS FOR ENSIGN SELFIX 820 CAMERAS CIRCLE O F CONFUSION = 004"
I
25 ft. I%;r ;;: ;; 37' 6" 41' 8" 47' 3" 58' 6 118' Om 18' 10" 17' 10'' 17' 3" 15' 11" 14' 0"
40 f t per $ 88' 0" 112 0" 241' 0" 500' 0" Inf.
26' 2" 24' 4" 23' 2" 20' 10" 17' 8" Inf. Inf. Inf. Inf. Inf. Inf. I n f Er 86' 0" 77' 0" 62' 5 6 0" 4 3 0. 3 1 4"
Inf.