enterprise pnc information collection · measurements can be made as a single line or as a ... (ft)...
TRANSCRIPT

2016
ENTERPRISE PNC INFORMATION COLLECTION
Central Office of Design - Surveying and Mapping Office
FDOT | Florida Department of Transportation605 Suwannee Street Tallahassee, FL 32399
Table of Contents Access and Logging In ................................................................................................................................... 2
Accessing Epic ........................................................................................................................................... 2
To Log In .................................................................................................................................................... 2
Help Window ............................................................................................................................................ 2
Map Navigation ............................................................................................................................................. 2
Zoom Buttons ............................................................................................................................................ 2
Layers ........................................................................................................................................................ 3
Measure Tool ............................................................................................................................................ 3
Legend ....................................................................................................................................................... 3
Legend Symbols .................................................................................................................................... 3
Popup Window ......................................................................................................................................... 3
User Interface ............................................................................................................................................... 4
Top Ribbon ................................................................................................................................................ 4
Basemap Tab ......................................................................................................................................... 4
Zoom Tab .............................................................................................................................................. 5
Search Tab ............................................................................................................................................. 5
Search Results ................................................................................................................................... 6
Update Data .......................................................................................................................................... 6
Update Control(s) .............................................................................................................................. 6
Insert Control .................................................................................................................................... 7
Batch Insert ....................................................................................................................................... 7
Text File Automation ..................................................................................................................... 8
Photos ............................................................................................................................................... 8
Control Sheet(s) .................................................................................................................................... 9
Bottom Ribbon .............................................................................................................................................. 9
Appendix A. ................................................................................................................................................... 9
Data Dictionary ......................................................................................................................................... 9
Appendix B. (Admin Functions)................................................................................................................... 12
Roles ........................................................................................................................................................ 12
Codes ....................................................................................................................................................... 12
Audits .................................................................................................................................................. 12
Legal Information ........................................................................................................................................ 12

Access and Logging In
Accessing Epic
EPIC can be found on the FDOT internet site by navigating to the Maps and Data page. When on
the Maps and Data page a link to EPIC can be found under Applications and Tools. Please
bookmark EPIC on your browser for quick access.
To Log In
Once the application is open, the button can be located on the top right. Once selected
a popup window will appear. FDOT RACF credentials are required to login.
Help Window
The help window is a page where users can find information about EPIC and other resources. This page
contains a Reference Guide, contact information and other helpful links.
Map Navigation
Zoom Buttons
The zoom button is located on the upper left of the screen and can be used when on mobile or
desktop. The mouse wheel can also be used for zooming in and out.
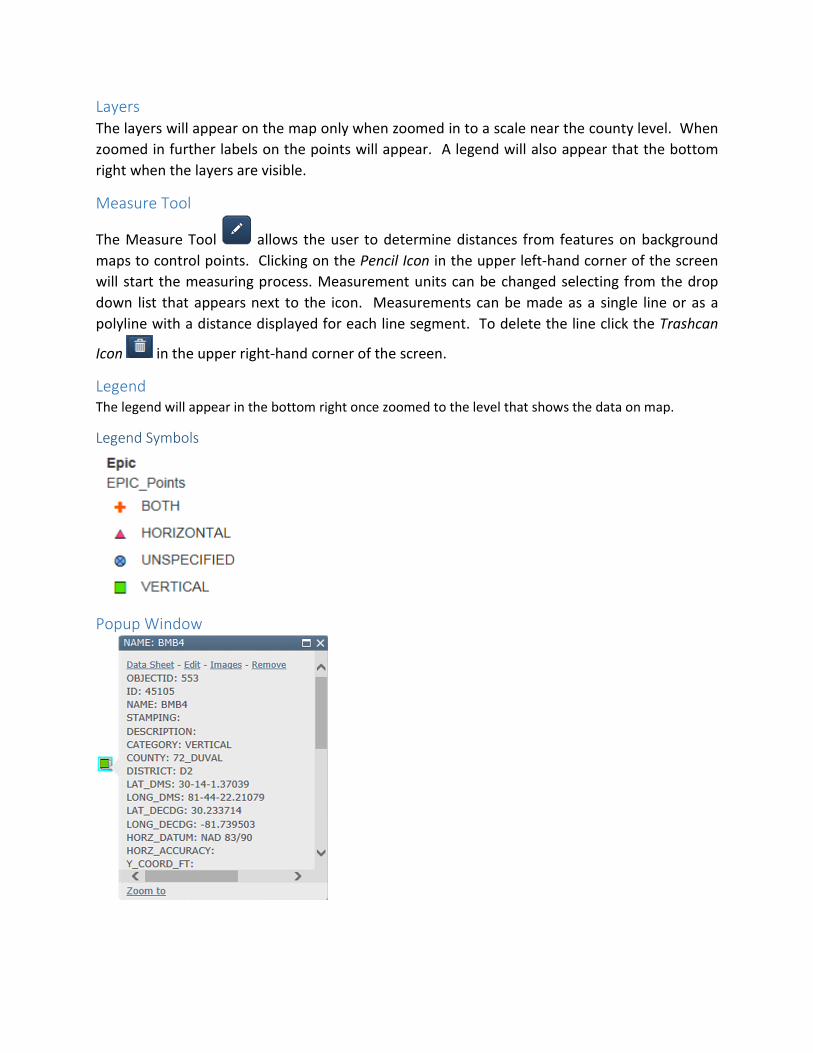
Layers
The layers will appear on the map only when zoomed in to a scale near the county level. When
zoomed in further labels on the points will appear. A legend will also appear that the bottom
right when the layers are visible.
Measure Tool
The Measure Tool allows the user to determine distances from features on background
maps to control points. Clicking on the Pencil Icon in the upper left-hand corner of the screen
will start the measuring process. Measurement units can be changed selecting from the drop
down list that appears next to the icon. Measurements can be made as a single line or as a
polyline with a distance displayed for each line segment. To delete the line click the Trashcan
Icon in the upper right-hand corner of the screen.
Legend
The legend will appear in the bottom right once zoomed to the level that shows the data on map.
Legend Symbols
Popup Window
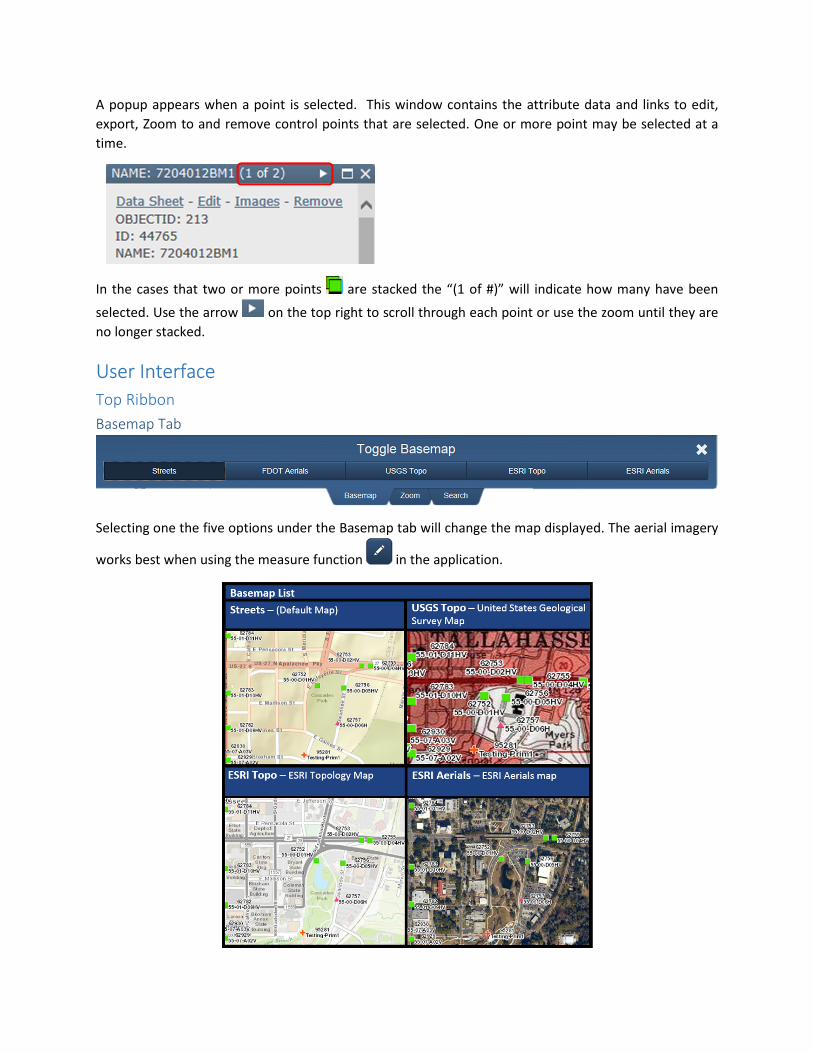
A popup appears when a point is selected. This window contains the attribute data and links to edit,
export, Zoom to and remove control points that are selected. One or more point may be selected at a
time.
In the cases that two or more points are stacked the “(1 of #)” will indicate how many have been
selected. Use the arrow on the top right to scroll through each point or use the zoom until they are
no longer stacked.
User Interface
Top Ribbon
Basemap Tab
Selecting one the five options under the Basemap tab will change the map displayed. The aerial imagery
works best when using the measure function in the application.

Zoom Tab
The “Zoom To” feature allows the user to select a feature from the drop down menu to zoon to.
Search Tab
Polygon – Enables the user to draw a closed figure around the area that the user wants to search.
Rectangle – Enables the user to draw a rectangle around the area that the user want to search.
Item and Item Segment – Allow the user to search by item and item segment using a buffer.
Roadway Section ID – Allow the user to search by a unique eight-digit identification number assigned to a
roadway or section of a roadway.
Attribute – Allow the user to search by the following:
Cities – Allows the user to search by city
PLSS – Allows the user to search by the Public Land Survey System (PLSS) using Section, Township
and Range.
Counties – Allows the user to search by county
EPIC_POINT – Refer to the data dictionary in appendix A for definitions.

Search Results
When search results are generated there are options for editing results, removing results, exporting
results to a spreadsheet and generating data sheets for results. The data sheet is formatted to contain
data fields and photos.
Update Data
Update Control(s)
This feature allows for the user to update a single or batch of control features by searching for
the existing features. Utilize the search function to select the control to be updated. Once the
search function has been completed a result set window will appear. To edit a single record
select edit next to the corresponding record. To edit all records in the result set select “Edit
Results” at the bottom right of the window. All records in the result set will be updated when
this edit is made.
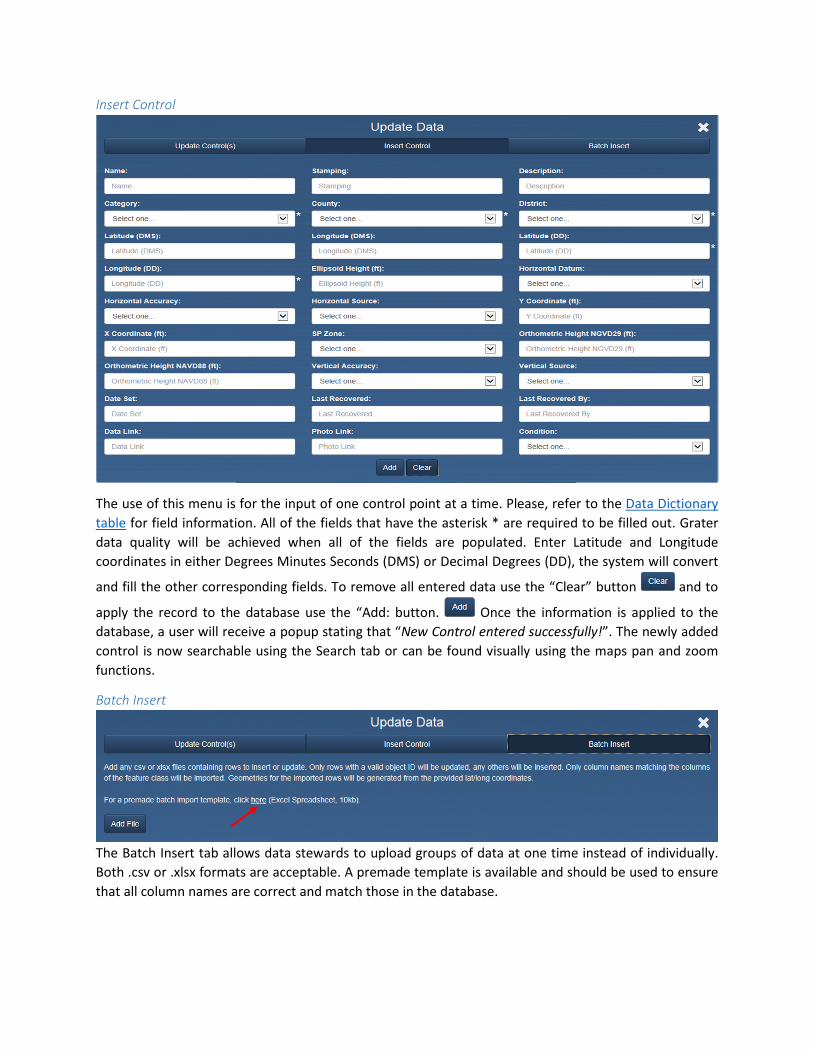
Insert Control
The use of this menu is for the input of one control point at a time. Please, refer to the Data Dictionary
table for field information. All of the fields that have the asterisk * are required to be filled out. Grater
data quality will be achieved when all of the fields are populated. Enter Latitude and Longitude
coordinates in either Degrees Minutes Seconds (DMS) or Decimal Degrees (DD), the system will convert
and fill the other corresponding fields. To remove all entered data use the “Clear” button and to
apply the record to the database use the “Add: button. Once the information is applied to the
database, a user will receive a popup stating that “New Control entered successfully!”. The newly added
control is now searchable using the Search tab or can be found visually using the maps pan and zoom
functions.
Batch Insert
The Batch Insert tab allows data stewards to upload groups of data at one time instead of individually.
Both .csv or .xlsx formats are acceptable. A premade template is available and should be used to ensure
that all column names are correct and match those in the database.

To upload a file, select the Add File Icon and then select the appropriate file. Then, select the
Import Icon to finish uploading the file. If a mistake was made, select the Trashcan Icon to
delete the file. When the user selects the Import Icon the user will be asked “Are you sure a you wish to
import the given file(s)?“ select the OK Icon to continue.
Text File Automation
Using this feature a user can upload a .txt file with the points that were collected in the field. This method
allows for the Name, Coordinate, elevation to be pre populated.
To upload a .txt file, use the Batch Insert tab and select the Add File Icon. Then select the
appropriate file. Now, click the Import Icon to finish uploading the file. If a mistake was made,
select the Trashcan Icon to delete the file.
Photos
To add images to the control points first click on a control point and click images.
Once the window above opens, click the button and select the images you want to be
associated with the control point. Repeat the steps above for all points you want to add images to. To
view the images click Data Sheet in the control point popup.
txt

Control Sheet(s)
Clicking “Data Sheet” on the popup or on the Search Results tab allows a user to download a .zip file
containing a control sheet PDF for each control point selected.
The PDF Control Sheet are dynamically generated by the database each time the user request control
sheets so, it may take a few moments for the download prompt to popup.
Bottom Ribbon
The bottom ribbon contains information links. Hovering the mouse over the icon will give a description
of the link.
Appendix A.
Data Dictionary
No Name Description Option
1 NAME Station Name or Designation. Code Domain
2 STAMPING Information stamped on the face plate of the control.
3 DESCRIPTION Description of the station.
4 * CATEGORY The category of survey control. Horizontal Vertical Both Unspecified
5 * COUNTY Florida county number based on the FDOT county numbers. Example: 55_Leon
FDOT county codes and Names

6 * DISTRICT Name of the FDOT district. D1 D2 D3 D4 D5 D6 D7 TP CO
7 LATITUDE (DMS) Latitude in Deg-Min-Sec format. Up to 5 decimal. Example: 30-28-4.44517
8 LONGITUDE (DMS) Longitude in Deg-Min-Sec format. Up to 5 decimal places. Example: 86-54-38.55693
9 * LATITUDE (DD) Latitude in decimal degrees. Up to 8 decimal places. Example: 28.08774999
10 * LONGITUDE (DD) Longitude in decimal degrees. Up to 8 decimal places. Example: 82.45349999
11 ELLIPSOID HEIGHT (FT) Present if available. The height in US Survey Feet referenced to GRS80 ellipsoid.
12 HORIZONTAL DATUM Name of the horizontal datum. NAD 83/86 NAD 83/90 NAD 83/96 NAD 83/99 NAD 83/02 NAD 83/07 NAD 83/11 NAD 27
13 HORIZONTAL ACCURACY
Horizontal accuracy. Approximate Primary Project Control Secondary Project Control Project Validation Control
14 HORIZONTAL SOURCE Measurement method used to determine the horizontal position.
Conventional Static GPS Rapid Static GPS RTK GPS
15 Y COORDINATE (FT) Y state plane coordinate in US Survey Feet.
16 X COORDINATE (FT) X state plane coordinate in US Survey Feet.
17 SP ZONE State plane zone that X and Y coordinates are referenced to. 901_East 902_West 903_North

18 ORTHOMETRIC HEIGHT NGVD29 (FT)
Present if available. The elevation referenced to the National Geodetic Vertical Datum of 1929 (NGVD 29) in US Survey. Feet to 2 decimal places.
19 ORTHOMETRIC HEIGHT NAVD88 (FT)
Present if available. The elevation referenced to North American Vertical Datum of 1988 (NAVD 88) in US Survey.
Feet to 2 decimal places.
20 VERTICAL ACCURACY Vertical accuracy. First Order per NGS Standards Second Order per NGS Standards Third Order per NGS Standards Standards of Practice MTS
21 VERTICAL SOURCE Measurement method used to determine the elevation. RTK GPS Static GPS Rapid Static GPS Trigonometric Levels Diff Leveling
22 DATE SET Date when the station was first set.
23 LAST RECOVERED Date when the station was last recovered.
24 LAST RECOVERED BY Person or contractor who reported the last condition of the control point.
25 DATA LINK Link to the location of a survey control report.
26 PHOTO LINK Link to the location of a picture of the monument. Use picture upload above
27 CONDITION Last recovered condition of the control point. Good New Disturbed Destroyed Not Found
28 SCALE FACTOR Multiplier for converting between grid and ground coordinates and distances.
29 STATION/OFFSET Distance along a baseline and distance left or right of a baseline.
30 GEOID Representation of the earth’s surface. FPRN GD16 GEOID12A GEOID09 GEOID06 GEOID03 GEOID99 GEOID96

Appendix B. (Admin Functions) Admin Functions: These functions are available when logged in with administrative privileges.
Roles
The Roles tab shows a list of who the current existing users are and what permissions they have.
Permissions can be edited for each existing user and new users can be added from this tab on an as needed
basis
Codes
The Codes tool is used to edit the domain codes which control the drop down or selection data for control
point attributes.
Audits
Manage audits is a tool that shows changes that have been made to the data. There is a search function
to filter down a search.
Legal Information NO WARRANTIES: This map and its content is made available by the Florida Department of Transportation
on an “as is,” “as available” basis without warranties of any kind, express or implied.
DISCLAIMER OF LIABILITY: The user of this map and data assumes all responsibility and risk for the use of
both. Under no circumstances, including negligence, shall the Florida Department of Transportation
(FDOT) or its employees be liable for any DIRECT, INDIRECT, INCIDENTAL, SPECIAL, EXEMPLARY or
CONSEQUENTIAL DAMAGES, or LOST PROFITS that result from the use, misuse or inability to use the map
and data.