enterprise portal sharepoint training user manual€¦ · enterprise portal: sharepoint portal...
TRANSCRIPT

Enterprise Portal: SharePoint Portal Training User Manual Page 1
Page 1
Enterprise Portal
SharePoint Training User Manual
Version 2.1
Date: March 22, 2012
Authors: Quentin D'Souza, Matt Santucci, Raffi Guluyan, Arnold Winterhoff,

Enterprise Portal: SharePoint Portal Training User Manual Page 2
Page 2
Table of Contents
1 Preliminary Concepts .......................................................................................................................................... 5 1.1 Acceptable Use Policy ..................................................................................................................................... 5 1.2 Privacy ............................................................................................................................................................. 5 1.3 Accessibility ..................................................................................................................................................... 5 1.4 Copyright ......................................................................................................................................................... 5 1.5 Where Can I Find Content that I Can Use? ...................................................................................................... 6
2 TCDSB Portal Concepts ........................................................................................................................................ 7 2.1 Permissions ..................................................................................................................................................... 7 2.2 Permissions to View Content .......................................................................................................................... 7 2.3 Publishing Content .......................................................................................................................................... 7 2.4 Web Sites......................................................................................................................................................... 7 2.5 Pages ............................................................................................................................................................... 8 2.6 Lists .................................................................................................................................................................. 8 2.7 Libraries ........................................................................................................................................................... 8 2.8 Web Parts ........................................................................................................................................................ 8
3 URLs Explained .................................................................................................................................................... 9 4 School Site Tour ................................................................................................................................................... 9 5 School Site Organization.................................................................................................................................... 10 6 Basic SharePoint Elements ................................................................................................................................ 11
6.1 Lists and Libraries .......................................................................................................................................... 11 6.2 Sites ............................................................................................................................................................... 11
7 School Site Hierarchy (or Site/SubSite Organization) ........................................................................................ 11 8 School Themer ................................................................................................................................................... 12 9 Content Maintenance ....................................................................................................................................... 13
9.1 Login to the Portal ......................................................................................................................................... 13 9.1.1 Blue Ribbon ........................................................................................................................................... 14
9.2 Ribbon and How it Works ............................................................................................................................. 15 9.2.1 Ribbon Tabs Not Displaying: Show Ribbon option ................................................................................ 15 9.2.2 Browse ................................................................................................................................................... 15 9.2.3 Page ....................................................................................................................................................... 15 9.2.4 Editing Tools: Publish ............................................................................................................................ 15 9.2.5 Editing Tools: Format Text .................................................................................................................... 16 9.2.6 Page Tools: Insert .................................................................................................................................. 16 9.2.7 Web Part Tools: Options ....................................................................................................................... 16 9.2.8 Picture Tools: Design ............................................................................................................................. 16 9.2.9 Link Tools: Format ................................................................................................................................. 16
9.3 Editing Existing Pages –EXERCISE .................................................................................................................. 17 9.3.1 Editing Text ............................................................................................................................................ 18 9.3.2 Edit Styles .............................................................................................................................................. 18 9.3.3 Modifying Pictures ................................................................................................................................ 19
9.3.3.1 Modify Picture: From Computer ....................................................................................................... 20 9.3.3.2 Modify Picture: From Address .......................................................................................................... 20 9.3.3.3 Modify Picture: From SharePoint ...................................................................................................... 21
9.3.4 Modifying Links ..................................................................................................................................... 22 9.4 Save/Close/Check In/Check Out/Submit/Approve ....................................................................................... 23
9.4.1 Save & Close .......................................................................................................................................... 23 9.4.2 Check-in/Check-out ............................................................................................................................... 24 9.4.3 Outstanding Items & the Approval Process .......................................................................................... 25
9.4.3.1 My Documents In Process ................................................................................................................. 26

Enterprise Portal: SharePoint Portal Training User Manual Page 3
Page 3
9.4.3.2 Outstanding Approvals ...................................................................................................................... 27 9.4.3.3 Maintaining Approver Groups .......................................................................................................... 28 9.4.3.4 Admin & Approve Publishing ............................................................................................................ 29 9.4.3.5 Chart explaining each sample Page, who created it and what the Admin/Approver sees. .............. 30 9.4.3.6 Manage Content and Structure View ................................................................................................ 30
9.5 Email Notification .......................................................................................................................................... 31 9.6 Version History .............................................................................................................................................. 32
10 Create a New Page in an Existing Site - Exercise ............................................................................................... 33 10.1.1 New Content ......................................................................................................................................... 34 10.1.2 Apply Styles to the Page Content .......................................................................................................... 35 10.1.3 Insert Picture ......................................................................................................................................... 36 10.1.4 Inserting a Link ...................................................................................................................................... 38
11 Creating a Sub-Site ............................................................................................................................................ 39 11.1 Default Page .................................................................................................................................................. 40
11.1.1 Editing the Title of the Site .................................................................................................................... 41 11.2 Making Pages Appear in the Menu of a Sub-Site .......................................................................................... 42
12 Site Govern ........................................................................................................................................................ 43 12.1 Right Hand Structured Content with Site Govern ......................................................................................... 44
12.1.1 Add Contact information....................................................................................................................... 44 12.1.2 Add Some Useful Links .......................................................................................................................... 46
12.2 News, Events & Home Page Advertising ....................................................................................................... 49 12.2.1 Site Govern Article Page Layout ............................................................................................................ 49 12.2.2 Working with Published Locations ........................................................................................................ 50 12.2.3 Working With News .............................................................................................................................. 51 12.2.4 Working with Scheduling a Calendar Event .......................................................................................... 56
12.3 Home Page Owner ........................................................................................................................................ 58 12.3.1 Scheduling News ................................................................................................................................... 58 12.3.2 Scheduling Events ................................................................................................................................. 61
13 Auto Display Content Pages .............................................................................................................................. 62 13.1 Publishing School and CSAC Documents ....................................................................................................... 62 13.2 Central Content ............................................................................................................................................. 66
13.2.1 EQAO results: Grade 3/6 ....................................................................................................................... 66 13.2.2 EQAO results: Grade 9 Math & OSSLT: Grade 10 ................................................................................. 67 13.2.3 Safe Schools........................................................................................................................................... 67 13.2.4 School Learning Plan (SLP) .................................................................................................................... 68
13.3 School Generated Content ............................................................................................................................ 68 13.3.1 Library SchoolPublishedDocuments...................................................................................................... 68
13.3.1.1 Maintain the Library ...................................................................................................................... 68 13.3.2 Library CsacPublishedDocuments ......................................................................................................... 69 13.3.3 Newsletters ........................................................................................................................................... 70 13.3.4 Calendars ............................................................................................................................................... 70 13.3.5 CSAC Agenda/Minutes .......................................................................................................................... 70
14 Feedback (TO BE REVISED) ................................................................................................................................ 71 14.1 Feedback List & URL ...................................................................................................................................... 71 14.2 Instructions for Viewing Feedback ................................................................................................................ 72
15 Getting Around .................................................................................................................................................. 73 15.1 View All Site Content ..................................................................................................................................... 73 15.2 How to use Manage Content and Structure ................................................................................................. 74
15.2.1 Manage Content and Structure Breakdown. ........................................................................................ 75 15.2.2 Common Symbols in the Manage Content and Structure view. ........................................................... 76 15.2.3 Navigating the Content in the Manage Content and Structure view ................................................... 76

Enterprise Portal: SharePoint Portal Training User Manual Page 4
Page 4
15.2.4 Managing?Creating/Editing the Properties of a Site/Page/Library/List/Item ...................................... 77 16 Appendix A ........................................................................................................................................................ 78

Enterprise Portal: SharePoint Portal Training User Manual Page 5
Page 5
1 Preliminary Concepts
1.1 Acceptable Use Policy Please be sure to follow the TCDSB Acceptable Use Policy when you are publishing any information online. This
document sets out rules and responsibilities for the use of board equipment. It also aims to create and maintain an
effective and safe electronic learning environment for the students of the Toronto Catholic District School Board.
The Policy Documents can be found at: http://www.tcdsb.org/policyregister/AUP/default.htm
1.2 Privacy Please keep in mind that when you publish information online – whether it is initially made available to a small
group of people or publically available on the internet. There is always the possibility that content can be
downloaded or copied and then published again by another person in a different location on the internet.
When you publish content on the TCDSB Portal, you will need to consider the privacy of individuals and if they
would like to be published online. The Privacy and Information Management Taskforce have a number of videos,
online training and a toolkit that will help you to understand some of the privacy concerns when you publish
content online. These resources can be found: at: http://www.pimedu.org/
Whenever you post student names and/or photos online you will need to have a personal information release form
signed. A copy has been included in Appendix A.
1.3 Accessibility The TCDSB Mission Statement includes “that equity, diversity, accessibility and inclusivity are integral to the
Catholic community.” When we are creating online content we need to consider the needs of all the people that
may be viewing the content. A few examples are including alternative text that help screen readers identify
pictures and images online, or when posting online videos that they include closed captioning.
1.4 Copyright The Copyright Act of Canada applies to all materials published in Canada. There are a number of reforms that have
been aimed at modernizing the Copyright Act of Canada over the last few years but none have been passed into
law as of yet. The entire text of the Copyright Act can be found here: http://laws-lois.justice.gc.ca/eng/acts/C-42/
One point of copyright confusion is that elementary and secondary schools can avoid copyright through the
concept of “fair use” and use whatever they want to publish in an educational context. This is an American concept
and does not apply to Canadian schools. Instead we have a concept called “fair dealing” in Canada which limits and
restricts the use of copyrighted materials in education to personal use only and no use within a classroom without
payment to the copyright holder or permission from the creator. Access Copyright provides copying guidelines for
Elementary and Secondary schools which can be found at: http://www.accesscopyright.ca/educators/copying-
guidelines-for-elementary-and-secondary-schools/
When you are posting content on the TCDSB Portal there are a few questions that you need to ask yourself before
you actually start to publish your content on the TCDSB Portal.
Is the content that I am publishing an original work that I created or is it copyrighted? Have I obtained the rights to
publish these materials online?

Enterprise Portal: SharePoint Portal Training User Manual Page 6
Page 6
According to the Copyright Act of Canada, you cannot go to your favourite search engine download an image and
place it on your web site because it is convenient. You need to get permission of the creator or photographer of
the image before you can place it on your web site.
1.5 Where Can I Find Content that I Can Use? You can find authors, videographers and photographers that want you to use their creations on your Portal pages.
There are two types of content that can be used easily into your TCDSB Portal pages, that is Creative Commons
licensed and Public Domain materials.
Creative Commons licensed materials allow creators to communicate which rights they reserve, and which rights
they waive for the benefit of recipients or other creators. In all cases the content creator wants you to attribute the
work to them. In some cases they might allow you to remix or adapt the content. You can learn more about
Creative Commons licensing by visiting: http://creativecommons.org/
For example the photo below is Creative Commons attribution licensed and the photographer has been credited
below the image.
Photo by Joe Shlabotnik
One example of how you can find Creative Commons licensed materials by using the web site
http://search.creativecommons.org/
Public Domain materials have fallen out of copyright. In Canada, 50 years after the author of the work has died, a
work becomes part of the Canadian public domain. This excludes recent translations or annotations of the work.
Materials in the public domain can be built upon and republished. A recent example of this is the Lucy Maud
Montgomery book “Anne of Green Gables” found at http://www.gutenberg.ca/.

Enterprise Portal: SharePoint Portal Training User Manual Page 7
Page 7
2 TCDSB Portal Concepts
2.1 Permissions The TCDSB Portal is essentially two big web sites, one on the Internet and the other on the Intranet. The Internet
site is what you would see if you typed www.tcdsb.org into your web browser. The Intranet site is what you would
see if you typed intranet into your web browser while on a board computer on the board network.
Each person who accesses the portal has different levels of permission to view content.
2.2 Permissions to View Content Let’s look at a member of the general public who wants to see what’s happening at the TCDSB. They might access
the portal on the Internet by going to www.tcdsb.org and would only be able to read materials that have been
made available to them by TCDSB staff.
Some TCDSB Staff will have been set-up with the permissions to edit or approve content in a particular sections of
the TCDSB Portal. This could be a Department at the CEC or access to edit and approve content at a particular
school. This set-up will be done by the TCDSB Portal Administrators.
2.3 Publishing Content Once the proper permissions have been set-up to create, edit and approve content on each TCDSB Portal site, there
is a three-step process for publishing content – edit/create content, submit content for approval, content gets
approved and appears on the TCDSB Portal.
Editors of Content (Contributor)
Some TCDSB Staff will have access to create new pages or edit content in designated areas within the portal. Once
content has been created or edited, it must be approved in order to appear in the TCDSB Portal. Later in this
documentation, there will be a detailed description of submitting content to be approved.
Approvers of Content (Approver)
Once content has been submitted to be published on the portal an Approver must review the content and then the
content will be available for other people visiting the content to see. Approvers of content would have all the same
rights as “Editors of Content” with some additional rights.
In a school the approver would be a school principal or vice-principal, but these rights can also be assigned by the
principal or vice-principal to another person at the school.
2.4 Web Sites The TCDSB Portal is made up of a number of different web sites. Each web site can have different content editors
and approvers. Each site can have a number of different pages within it.
What makes the concept of web site different on the portal is that a school or department web site might be made
up of a number of sites; each site contains a number of pages.
For example, the typical elementary school site would include the following sites:

Enterprise Portal: SharePoint Portal Training User Manual Page 8
Page 8
Usually these sites are referred to as sub-sites to the main school site. Each sub-site can have different content
editors and approvers.
2.5 Pages Pages are found within a TCDSB Portal Site and have different levels of customization. You can customize page
properties and permissions, and also change the content of the page – this refers to text, lists, libraries and web
parts.
2.6 Lists Lists are a collection of information that you can share with other content editors. They can be displayed in
different formats on different pages. What makes lists useful is that you are able to modify them once and they are
automatically updated on the pages that the list appears.
Some lists are created for you by default. These default lists range from a discussion board to a calendar list. If you
have permission, you can also create lists from several types of list templates, which provide structure and settings
to give you a head start in populating a site.
2.7 Libraries Libraries are a collection of specific file types. This could be a collection of pictures, documents, videos all
organized and saved in one location. By keeping these content items all in one spot, it allows these libraries to be
displayed and used in different ways.
2.8 Web Parts Web Parts are also known as a Web Widget. These are modifiable areas that appear within the layout of a portal
page. These web parts allows for content to be inserted and interacted with in variety of different ways.
Usually a Web Part will allow a large amount of information to be easily arranged in a standalone part. Would you
rather see 365 lines over a number of pages each containing a date and an event or a clickable calendar with the
events embedded in it? Content editors can arrange these web parts or hide them based on what information
should be seen on a page. Some examples include the insertion of an event calendar, picture gallery, or document
lists.

Enterprise Portal: SharePoint Portal Training User Manual Page 9
Page 9
3 URLs Explained Description URL
During Development
http://portaltestinter.tcdsb.org/schools/StPaul/pages/default.aspx http://portaltestinter.tcdsb.org/schools/StPaul
Preview http://www.tcdsb.com/schools/StPaul/pages/default.aspx http://www.tcdsb.com/schools/StPaul http://StPaul.tcdsb.com/ (will be redirected to the long URL)
Production http://www.tcdsb.org/schools/StPaul/pages/default.aspx http://www.tcdsb.org/schools/StPaul http://StPaul.tcdsb.org/ (will be redirected to the long URL)
Training http://sptrn01:90/school/StPaul/pages/Defualt.aspx http://sptrn01:90/school/StPaul http://sptrn02:90/school/StPaul/pages/Default.aspx http://sptrn02:90/school/StPaul
4 School Site Tour • Header & Footer • Home Page
• SiteGovern (Spotlight, News, Events) • Contact Info • Themer
• Organization/Structure/Navigation • 2nd level Pages • Navigation • Breadcrumbs

Enterprise Portal: SharePoint Portal Training User Manual Page 10
Page 10
5 School Site Organization #
Lev
School Site (Detailed - Secondary)
School Site (Simplified Elementary)
1. L1 Home Home
2. L1 About Us About Us
3. L2 Admissions And Registration Admissions And Registration
4. L2 Assessment And Testing Assessment And Testing
5. L2
6. L2 Principals Message Principals Message
7. L2 School History And Tradition School History And Tradition
8. L2 School Learning Plan School Learning Plan
9. L2 School Schedules School Schedules
10. L2 School Handbook School Handbook
11. L1 News News
12. L2 2010-2011 2010-2011
13. L2 2009-2010 2009-2010
14. L2 2008-2009 2008-2009
15. L2 Etc… Etc…
16. L1 School Calendar School Calendar
17. L1 Academics Academics
18. L2 Listing Of School Courses
19. L1 Co-curricular Co-curricular
20. L2 Athletics Athletics
21. L2 Clubs Clubs
22. L1 For Parents For Parents
23. L2 CSAC – Catholic School Advisory Council
CSAC – Catholic School Advisory Council
24. L3 Membership
25. L3 Meeting Dates And Minutes
26. L2 Parent Teacher Interviews
27. L2 Parent Volunteers
28. L3 Volunteer Manual
29. L2 Resources
30. L2 Student Transportation
31. L1 Links Links
32. L1 Faculty
33. L1 Alumni
34. L2 Get Alumni List
35. L2 News and Events
36. L2 Subscribe to Schools News
37. L2 Who To Contact

Enterprise Portal: SharePoint Portal Training User Manual Page 11
Page 11
6 Basic SharePoint Elements
6.1 Lists and Libraries • List: A collection of information organized by columns and rows (Announcement, calendar) • Library: A collection of files (documents, pictures, videos, pages)
6.2 Sites • A collection of Lists and Libraries • Based on/Organised by subject/topic
7 School Site Hierarchy (or Site/SubSite Organization)

Enterprise Portal: SharePoint Portal Training User Manual Page 12
Page 12
8 School Themer Access the school themer via the “Site Actions” (Require central Admin Permissions)

Enterprise Portal: SharePoint Portal Training User Manual Page 13
Page 13
9 Content Maintenance
9.1 Login to the Portal Authenticated users have the ability to log-in to the Portal and depending on the permissions level, have access to
modify, create, and delete Pages/Sites/etc.
A) To log in, simply click on the “Login” link on the top black bar.
B) If you are Logging in from a computer, not connected to the TCDSB network, you will be prompted for a
user id and password. When prompted enter your regular TCDSB user id
Note: remember to place the “cec\” prefix before your username.
C) Depending on your brower, you may need to refresh the page you are currently on. This can easily be done
on a Windows PC by pressing the “F5” key on the keyboard.
A blue ribbon will appear at the very top of the page. On the top right is the user id information and
account menu and the top left contains the Site Actions drop down menu.
D) If you are Logging in from a computer connected to the TCDSB network blue ribbon will appear at the very
top of the page. On the top right is the user id information and account menu and the top left contains the
Site Actions drop down menu

Enterprise Portal: SharePoint Portal Training User Manual Page 14
Page 14
9.1.1 Blue Ribbon
The top right drop down menu contains all settings associated with your personal SharePoint Portal account. It also
has the “Sign Out” menu option available.
The top left Site Actions menu contains options for editing and creating new Site/Pages/Lists on SharePoint. This list
will vary depending on the permission level associated with your user id.
Super (Help Desk) Admin (Principal / VP) Contributor (School Staff)

Enterprise Portal: SharePoint Portal Training User Manual Page 15
Page 15
9.2 Ribbon and How it Works The Ribbon menu contains the various buttons required to format the content on the page, insert items, and
modify the properties of the page.
Depending on where the mouse cursor is located on the Page, a different tab on the ribbon will appear along with
its own set of buttons. It is essentially context dependant.
In addition, depending on your permission level, one may see more or less options on the ribbon.
9.2.1 Ribbon Tabs Not Displaying: Show Ribbon option
Sometimes you may only see the “Site Actions” tab on the ribbon. To see the other tabs such as “Browse”, “Page”
or “Publish”, click the “Site Actions” tab and then choose the “Show Ribbon” option from the drop down list.
9.2.2 Browse
This tab is present regardless of where your mouse cursor is located. It hides the ribbon.
9.2.3 Page
This tab is present regardless of where your mouse cursor is located while in the Edit View of the page.
9.2.4 Editing Tools: Publish
This tab is present regardless of where your mouse cursor is located while in the Edit View of the page.

Enterprise Portal: SharePoint Portal Training User Manual Page 16
Page 16
9.2.5 Editing Tools: Format Text
This tab is present under the Editing Tools category when the mouse cursor is placed within the Page Content (body
text) area of the page.
9.2.6 Page Tools: Insert
This tab is present under the Page Tools category when the mouse cursor is placed within the Page Content (body
text) area of the page.
9.2.7 Web Part Tools: Options
This tab is present under the Web Part Tools category when the mouse cursor is placed on a web part within the
Page Content (body text) or web part zone area of the page.
9.2.8 Picture Tools: Design
This tab is present under the Picture Tools category when a picture within the Page Content (body text) area of the
page is selected.
9.2.9 Link Tools: Format
This tab is present under the Editing Tools category when a picture within the Page Content (body text) area of the
page is selected.

Enterprise Portal: SharePoint Portal Training User Manual Page 17
Page 17
9.3 Editing Existing Pages –EXERCISE A) To edit an existing Page, you will first need to navigate to it via the website or by Site Content and
Structure. From there, click on the Site Actions button at the top left and select Edit Page.
B) The Page you are on will now be in edit mode. As mentioned in Section 9.2, depending on what you have
selected on a Page that is in edit mode, the Ribbon toolbar will have various Tabs visible or hidden.
Note 1: If a Page is Checked-Out by another user you may receive a small pop up window informing you that
another user is currently editing the Page. Another possibility is that the Page may reveal the web part zones and
only those become editable.
Note 2: Another issue occurs if the Page has been Submitted for Approval by a user, this time it may be you or
another person, and is in the workflow tasks cue waiting to be Published. In this instance you will get a small pop
up window informing you of the situation. Your two options are to either continue editing the Page by pressing the
“OK” button. Alternatively, you may press the in the top right if you do not wish to proceed to edit the Page.

Enterprise Portal: SharePoint Portal Training User Manual Page 18
Page 18
9.3.1 Editing Text
In order to change the text content of the Page, move your mouse cursor to the Page Content text box and make
your modifications.
Picture this Page Content area like a Word Processor page. Just highlight areas of text to modify. Move the mouse
cursor and type in text. Use the ribbon toolbar on top to stylize the text, insert links, pictures, web parts, etc.
9.3.2 Edit Styles
Within SharePoint there are pre-set styles customized specifically for the Board’s Portal. These have predetermined
fonts, sizes, colours, and other attributes.
To adjust styles, simply select the block of text to be styled, click on the “Styles” button on the ribbon and choose
the appropriate style from the drop down list.
Note: Each page should have only one “Header1” style.
Below is a sample of some of the Styles most
commonly used as they appear on a Page
NOTE: Sometime the Styles on a Page get mixed up and do not function properly. In such circumstances it
isnecessary to select the entire page content (Ctrl + A) and then click the clear style button . The button is
located on the Format Text tab under Editing Tools. Be aware that this will clear all formatting for all text and
tables.

Enterprise Portal: SharePoint Portal Training User Manual Page 19
Page 19
9.3.3 Modifying Pictures
To modify an existing picture on a Page, simply select the picture. You will notice eight small squares appearing
around the picture. These are used to resize the image manually.
In addition, a new “Picture Tools:Design” tab has appeared in the Ribbon. By selecting the tab you get a variety of
options. These are used to modify the properties of the picture.
Symbol Description
This allows you to change the selected picture with another.
This allows you to place a border around a picture.
The URL of the picture.
Alternative text for the picture. Required for AODA for the visually
impaired.
This allows you to place the picture within the body text on the Left,
Right, etc.
Manually adjust the horizontal dimensions of the picture.
Manually adjust the vertical dimensions of the picture.

Enterprise Portal: SharePoint Portal Training User Manual Page 20
Page 20
9.3.3.1 Modify Picture: From Computer
A) Select the “Change Picture” button and select the “From Computer” menu item.
B) Click the “Browse…” button, search for your image from your computer or network location. In the “Upload
to” field, select the library location you want the image to be placed from the drop down. Then press the
“OK” button when complete.
9.3.3.2 Modify Picture: From Address
A) Select the “Change Picture” button and select the “From Address” menu item.
B) Type in the URL of the image in the “Address” field followed by a description for the “Alternative text” and
then press the “OK” button.

Enterprise Portal: SharePoint Portal Training User Manual Page 21
Page 21
9.3.3.3 Modify Picture: From SharePoint
A) Select the “Change Picture” button and select the “From SharePoint” menu item.
B) Browse for the replacement image from the SharePoint Site > Library location on the left partition of the
window. The picture will most likely be in the Images library, but can be in any asset library or document
library, depending on where the user has uploaded it to.
C) Once you have located the image, select it from the right hand partition and then press the “OK” button at
the bottom.

Enterprise Portal: SharePoint Portal Training User Manual Page 22
Page 22
9.3.4 Modifying Links
Existing links usually appears as blue and underlined when selected.
A) While in the Edit Page mode, select the link by clicking on it.
B) A new “Link Tool:Format” tab has appeared in the Ribbon. By selecting the tab you get a variety of options.
These are used to modify the properties of the picture.
Symbol Description
It will bring up the SharePoint Navigation window to change a
SharePoint Link. Not used for external URL’s.
Removes the link from the selected word(s)
This field allows you to manually edit the URL of the link
Description field
Bookmark anchor name
Checking this box will open the link in a new tab or browser,
depending on your web browsers settings.

Enterprise Portal: SharePoint Portal Training User Manual Page 23
Page 23
9.4 Save/Close/Check In/Check Out/Submit/Approve When you are editing items on the TCDSB Portal you will see icons called Save & Close and Check-In and Check-out.
These buttons are very different and understanding how they work will make publishing in the TCDSB Portal much
smoother. Each button also has a drop down with additional options.
9.4.1 Save & Close
Selecting the “Save & Close” button will save the content that you have been working on but will NOT
automatically be published to the live TCDSB Portal. This is used to save your work while only you can view it.
Save & Close: allows you to save the page that you are working on and come back to it later, without it
being published.
Save and Keep Editing: this is useful if you are creating a large Page. Just like an important document, you
want to save your Page every so often to avoid losing the work you have done in case of a power outage,
network problems, computer operating system errors, etc.
Stop Editing: this will cancel all changes since the last time you saved the Page.

Enterprise Portal: SharePoint Portal Training User Manual Page 24
Page 24
9.4.2 Check-in/Check-out
You can check in/out a page or document using the Ribbon.
Check Out: By checking out a page you prevent others from making changes to it while you have it checked
out. This is a way of ensuring that only one person is making changes to any one page at any one time.
Note: When you place a page in “Edit Mode” the page will also be “Checked Out” at the same time.
Note: You may Check Out a page and not place it in edit mode. This way you can lock out a number of
pages that you intend to work on.
Check In: This option performs 2 functions; it first “saves and closes” your work and then checks it in. A
Check In dialoguebox is displayed where a comment describing the change may be entered. It is advised
that you do so. This comment is stored with the new version and provides a record of the change. The page
is now available for others to check out. It does not allow for un-authenticated users to view the contents.
They can only view the content once the page/document/picture has been Published.
Discard Check Out: Using this option removes any changes made to the page and reverts back to the
immediate previous version of the page. This is very handy if you pick the wrong page to edit by mistake, as
it avoids having to go through the process of re-publishing the Page.
Override Check Out: Used to edit a page that has been checked out by another user. This will discard any
changes that the other user has made. Usually not recommended to use this option unless you know for a
fact that it is okay to proceed.
Once you check in a document, you have the option of providing some comments. Once done, click “Continue”.

Enterprise Portal: SharePoint Portal Training User Manual Page 25
Page 25
9.4.3 Outstanding Items & the Approval Process
Located in the “Site Actions” menu are two options for identifying what you have outstanding and for approvers
what is outstanding to be approved. These are very useful buttons as they will display in one convenient location all
the Pages that you have in Draft mode, Checked Out, or those Pending Approval.
The Admin group is made up of Principals and VP’s while the Contributor group is composed of all other school
staff. In addition to these two groups, Admin users may assign individuals to be Approvers for their particular
school to give them the “Publishing” permission. Only the Published Page will be visible on the school’s public
facing Internet.
There are three basic permission levels for schools, plus the two CSAC ones:
User Group Permission Level
Admin Principal & VP’s.
Have the ability to create and Publish Pages to be visible on the public facing internet site.
Can assign a staff member to be an Approver Approve
Assigned by an Admin.
Can create and Publish Pages.
Contributor
All other school staff.
Can create Pages and Submit for Approval.
An Admin or Approve will need to Publish the Page for it to be visible on the public facing internet site.
CSAC CSAC Permission Levels
CSAC Approver Only have access to modify/create content on the CSAC Site level Pages.
Have the ability to create and Publish Pages to be visible on the public facing internet site.
CSAC Contributor Only have access to modify/create content on the CSAC Site level Pages.
Can create Pages and Submit for Approval.
An Admin, Approve, or CSAC Approve will need to Publish the Page for it to be visible on the public facing internet site.
Note: I have used the term “Pages” for the following sections, but the same will be relevant for Pages, Documents,
Images, and Videos.

Enterprise Portal: SharePoint Portal Training User Manual Page 26
Page 26
9.4.3.1 My Documents In Process
The “My Documents In Process” button allows for the user to see what Pages he/she is working on and the status
of those pages. The two sections within My Documents In Progress are:
Not Yet Published – Pages that are currently checked-out
Published But Pending Approval – Pages that you have Submitted for Approval but not yet approved by
the Admin (Principal/VP).
The user may launch the Pages by clicking on the blue link under the Title heading. It will be launched in a new
browser window or tab, depending on your browser settings.
By selecting individual (or many) Pages with the check box , these may be Submitted for Approval by clicking on
the button.
The example below shows the current Pages for the Contributor. (See the chart in Section 10.4.3.5 for details)
Emails will be sent to the Contributor and all Admin/Approvers once a Page has been Submitted for Approval.

Enterprise Portal: SharePoint Portal Training User Manual Page 27
Page 27
9.4.3.2 Outstanding Approvals
The “Outstanding Approvals” button allows for the Admin/Approver user to see what Pages were requested by
contributors to be approved and published to the Portal.
The Admin or Approve user may view the Pages requested to be Published by clicking on the blue link under the
Title heading.
By selecting individual (or many) Pages with the check box , these may be Submitted for Approval by clicking on
the button. A small pop up window will appear confirming your decision. Press the “OK” button to
proceed.
A message indicating the number of items Approved will be displayed, along with a button to allow you to go back
to the previous page to view and or approve more pages. That Page is now removed from the list.
Emails will be sent to the Contributor and the individual Admin/Approver who has Approved and Published (or
rejected) the Page informing that the process is complete.

Enterprise Portal: SharePoint Portal Training User Manual Page 28
Page 28
9.4.3.3 Maintaining Approver Groups
The Admin users (Principal and VP’s) are able to assign any staff member they wish to gain the ability to Publish
Pages on the public facing internet school site.
A) From the Site Actions Menu select “Outstanding Approvals”
B) Click on the “View/Edit 0425_Approve”. The four digit numerical code will refer to your school number.
C) Click on the “New” button

Enterprise Portal: SharePoint Portal Training User Manual Page 29
Page 29
D) Type in the TCDSB user name for the staff member (same as the one they use to log in to Outlook).
E) Click on the little name verification icon.
F) You may also enter a message if desired.
G) Press the “OK” button when completed.
H) The staff member has now been added to the Approve group.
9.4.3.4 Admin & Approve Publishing
Admin and Approve users have the option of Publishing Pages from the “Publish” button in the “Publish” tab when
the page is in edit mode, as opposed to using the “My Documents in Process” button, Section 10.4.3.1

Enterprise Portal: SharePoint Portal Training User Manual Page 30
Page 30
9.4.3.5 Chart explaining each sample Page, who created it and what the Admin/Approver sees. Page Name
Actions taken on Page Page Creator What the Admin (or Approver) sees
Pg-1 Page is created
Page is Published
Admin (Principal)
In this case the Principal created the page. He/she can Publish the page.
Because the principal is in the Admin permission group no further action is required.
Pg-2 Page is created
Submitted for Approval
Contributor
Visible in “Published But Pending Approval”
Admin (or Approver) must Publish
Pg-3 Page is created
Checked In
Submitted for Approval
Contributor
Visible in “Published But Pending Approval”
Admin (or Approver) must Publish
Pg-4 Page is created
Checked In
Contributor
Visible in “Not Yet Published”
Page is in Draft mode
Page requires to be Submitted for Approval when complete
Admin (or Approver) cannot see this Page as it was never submitted for Approval.
Pg-5 Page is created
Save and Close
Contributor
Visible in “Not Yet Published”
Page is Checked Out
Page requires to be Checked-In and Submitted for Approval when complete
Admin (or Approver) cannot see this Page as it was never submitted for Approval.
Pg-6 Page is created
Checked in
Then Checked Out
Contributor
Visible in “Not Yet Published”
Page is Checked Out
Page requires to be Checked-In and Submitted for Approval when complete
Admin (or Approver) cannot see this Page as it was never submitted for Approval.
Pg-7 Page is created
Checked in
Submitted for Approval
Then Checked Out
Contributor
Visible in “Not Yet Published”
Page is Checked Out
Page requires to be Checked-In and Submitted for Approval when complete
Admin (or Approver) cannot see this Page as it was never submitted for Approval.
Pg-8 Submitted for Approval Contributor
Visible in “Published But Pending Approval”
Admin (or Approver) must Publish
9.4.3.6 Manage Content and Structure View

Enterprise Portal: SharePoint Portal Training User Manual Page 31
Page 31
9.5 Email Notification Email notifications are automatically sent between various groups each time a Page or other content is Submitted
for Approval. It is important to make sure that your Page is ready to be displayed before Submitting it to avoid
unnecessary email notifications being delivered.
The Contributor of the Page, along with all Admin and Approve users will receive an email each time a Page is
submitted for Approval.
The Admin or Approve user who Published the Page, along with the Contributor, will receive an email stating the
Page has been successfully Published. The Page is now visible to the general public.
Scenario: Mr. Smith, a teacher at St Bede, has Contributor permission levels. He submits a page for approval. The
Page is currently not visible to the public facing internet as it is waiting for an Admin (Principal or VP) or Approve
(any assigned staff) to finalize and Publish the Page. All Admin and Approvers will receive an email requesting that
Mr. Smith’s page be Published. If the Principal Ms. Fran Approves the request, then she, along with Mr. Smith will
receive an email stating that the Page has been successfully Published.

Enterprise Portal: SharePoint Portal Training User Manual Page 32
Page 32
9.6 Version History When versions are tracked, revisions to the items or files and their properties are stored at each update. This
enables you to better manage content as it is revised or to restore a previous version should you make a mistake in
the current version.
You would then choose “Version History”.
This is an example of version history. From here you can view a past version, and if required use it to replace the
current page/document/file.

Enterprise Portal: SharePoint Portal Training User Manual Page 33
Page 33
10 Create a New Page in an Existing Site - Exercise Navigate to the sub-site where you would like the page to appear. In this example we will be creating a new page
under the “About Us” sub-site. Under the Site Actions menu select “New Page”.
A pop-up window will appear where you can enter a name for the new page. The page will also use the default
layout, which is the “SiteGovern Article Page” layout.
Note: When you create a Page in this fashion, the name you provide becomes the Title as well as the File Name. For
multiple word Page Names, the file name will also contain a dash between each word. E.g. The title “Special
Events” will become “Special-Events.aspx”
A new Page will not show up in the left hand navigation until it has been Checked In at least once. In addition, until
you Check-In the Page, no other user with the same or higher permission level as the Page creator will be able to
see the newly created Page.
Note: Remember to Save your work, as well as Check-In and Publish.

Enterprise Portal: SharePoint Portal Training User Manual Page 34
Page 34
10.1.1 New Content
To add content to a new Page, simply begin typing into the Page Content area. You may also copy & paste text from
a text file, MS Word file, another web site, or any other source.
Note: For content taken from certain pages that have formatting (font colour, font type, size, etc), it may be
required to clear that formatting prior to pasting it into SharePoint. The easiest way to do this is to copy & paste
the text into Microsoft Notepad and then select the text and copy & paste it into SharePoint.
E.g) Picture below of copy & pasting text from a 3rd party website into Microsoft Notepad.

Enterprise Portal: SharePoint Portal Training User Manual Page 35
Page 35
10.1.2 Apply Styles to the Page Content
The next step is to apply styles to the Page Content. The first heading/topic for the page shall be using the “Header
1” Style. Subsequent headers will use the “Header 2” Style, and so on. For the rest of the body content, use the
“Normal Text” Style.
A) Highlight the word(s)
B) Select the “Styles” button
C) Select the appropriate style type from the drop down. In this instance it is Header 1.
D) Repeat this procedure for applying the Styles to all text within a Page.

Enterprise Portal: SharePoint Portal Training User Manual Page 36
Page 36
10.1.3 Insert Picture
Inserting a new picture is very similar to modifying an existing picture (Section 9.3.3). The three main methods to
insert a picture are listed below.
A) Place the mouse cursor in the location where you would like your picture to reside.
B) From the “Editing Tools: Insert” tab, select the “Picture” button and the drop down menu item from where
you want to insert your picture.
(Section 5.4.3 covers the screen shots of the three options below)
Symbol Description
From Computer – If you have a picture on your computer and it is currently not
on the SharePoint Portal. Using this method will automatically upload the
picture onto the Portal.
A new dialogue window will appear for you to fill out information regarding the
picture. At a minimum you should make a habit of modifying or adding
information regarding the “Name”, “Title”, and “Description” of the individual
picture in the appropriate fields.
From Address – this can be an external URL to a picture from another website,
or it can be the URL to a picture from within the Portal.
From SharePoint – using the built in SharePoint explorer you will navigate to
the Site level where the document/image library containing your picture
resides, open up the library and select the image from the right hand partition.

Enterprise Portal: SharePoint Portal Training User Manual Page 37
Page 37
C) Now that the picture is in place you can modify the dimensions using the small squares surrounding the
picture or via the toolbar (See Section 9.3.3 for details).
For this exercise let us manually shrink the size of the image to roughly one quarter the size.
D) To have the text wrap around the picture, select the image, click on the “Picture Tools:Design” tab, and
select the “Position” button drop down. For this exercise the “Right” float has been selected.
As you can see, the image has moved from the position above the text and at the top left to wrapping with
the text on the right side.
E) Adjust the line breaks as required to have the image either in line with the top of the text or more deep
within for an aesthetically appealing Page.

Enterprise Portal: SharePoint Portal Training User Manual Page 38
Page 38
10.1.4 Inserting a Link
Links can be made to a SharePoint Page, Document, Picture, or to any external web site. (See Section 5.4.4 for
details)
A) Highlight the text (single or multiple words) which you want to be linkable.
B) Click on the “Editing Tools: Insert” tab
C) From the “Link” button select the drop down appropriate for your needs.
In this example we will select “From Address”.
D) In the pop up menu type the URL in the “Address” field. For this example type in http://www.google.ca .
Remember to include the “http://” prefix for web addresses.
Note: you can type in a SharePoint Potal address via this method as well
The link will now appear in blue, and will display an underline if you hover your mouse over of it. The link will
appear purple if you have previously visited the link URL address.

Enterprise Portal: SharePoint Portal Training User Manual Page 39
Page 39
11 Creating a Sub-Site A) Navigate to the spot where you want to create the sub-site.
In this case it will be St Victor > About Us > (new site)
B) From the Site Actions menu select “Create New Site”.
C) In the new window select the template that you would like to use. If you are creating a sub-site on an
existing site choose “TCDSB School Content Template” and enter the name of the page and the url name.
D) The new sub-site will appear in your left hand menu.
E) When you edit the Page, you will need to change the Page Layout. Under the Page tab click on the Page
Layout button and select SiteGovern Article Page.
NOTE: This step will be required for Every New Site you create.

Enterprise Portal: SharePoint Portal Training User Manual Page 40
Page 40
11.1 Default Page The default page (home page) is first page that is created automatically when you create a site. It is named
default.aspx and is located in the Pages library.
For example, if your default page was located in St Victor’s About Us site, the URL would be
http://www.tcdsb.org/schools/StVictor/AboutUs/Pages/default.aspx
You would also be able to access it by typing in the URL address prior to the pages library
http://www.tcdsb.org/schools/StVictor/AboutUs . Since the page is the default it will automatically know where to
go.
In addition, the default page is not listed in the left hand navigation as with other pages in that site. You access it by
clicking on the parent site name.

Enterprise Portal: SharePoint Portal Training User Manual Page 41
Page 41
11.1.1 Editing the Title of the Site
When you create a new site (Section 12) you are given the opportunity to give the Site a name and select the URL
to go to the site, however, the default page (default.aspx) is given the Title “Home”. This title appears on the web
browsers top left corner when we change that new Page into a SiteGovern Article Page layout.
A) To change the Page Title, click on the “Edit Properties” button.
B) Now you can highlight the default “Title” called Home and replace it with the name of your Site. I have
replaced the default Title “Home” with “Special Days”.
C) Click on the button at the bottom of the Page.
D) You will be required to Publish the Page to have the new changes come into effect. Refer to Section 10 for
details.
E) The Title “Special Days” is not reflected in the web browsers.

Enterprise Portal: SharePoint Portal Training User Manual Page 42
Page 42
11.2 Making Pages Appear in the Menu of a Sub-Site Pages do not automatically appear in the menu of a sub-site. You will have to make this adjustment for the sub-
sites that you create.
A) Go to the “Site Actions” menu and click on “Site Settings”. B) Under “Look and Feel”site settings, click on “Navigation” C) Click on the “Show Pages” check box and click on the “OK”

Enterprise Portal: SharePoint Portal Training User Manual Page 43
Page 43
12 Site Govern The “Site Govern” features can add structure content to the right hand margin of a page and generate requests to
home page owners to display some of your content, linking back to a page with more details, in the various news
and event lists contained on the various home pages of TCDSB sites.
Note: The “Site Govern” feature is only available on pages using the SiteGovern Article Page layout.
A) Navigate to the page you wish to include in the Site Govern features and go to “Site Actions” drop down
window and select “Edit Page” on an existing Page.
B) Place your cursor in the page content area. The ribbon will expand to display “Editing Tools”. Click on the
“Format Text” tab.
C) Click the “News Article Details and Scheduling” button.
D) A new dialogue box titled “Page Properties” will appear.

Enterprise Portal: SharePoint Portal Training User Manual Page 44
Page 44
12.1 Right Hand Structured Content with Site Govern Note: The three Tabs on the right side of the Site Govern Page Properties dialoge page are used to add some
structured content to the right sidebar of the page using the SiteGovern Article Page layout.
12.1.1 Add Contact information
1. To add contact information select the “Add a Contact” tab.
A) The little red asterisk indicates that you are required to complete the Contact name field.
B) You are also required to enter in one of the Phone number or Email fields.
C) The remaining fields are optional and will display on the page only if there is content entered. Good
practice would dictate that if the “Add a Contact” is being filled in, at a minimum you should fill in
the Contact Name, Phone Number and Email fields.

Enterprise Portal: SharePoint Portal Training User Manual Page 45
Page 45
D) When you have completed your entry click the button at the bottom of the page. You will
see a green “Your content has been successfully saved!” message at the top of the page
confirming your save.
2. To remove a Contact entry select the button at the bottom of the “Add a Contact” page. Look for
the green message “Your content has been successfully deleted!” at the top of the page to confirm your
delete
Note: The button only apears after you do the intial save.
3. Once complete You have the option of selecting the to close the “Page Properties” page or go on to
another tab.
Enterprise Portal: SharePoint Portal Training User Manual Page 46
Page 46
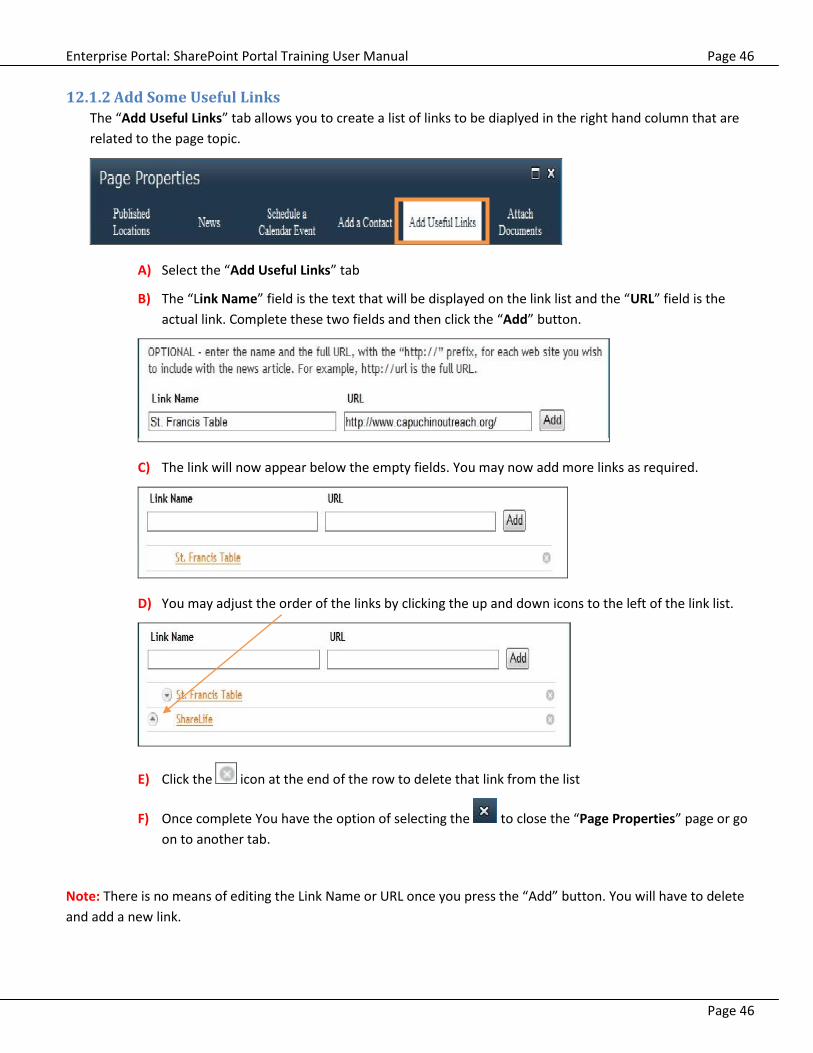
12.1.2 Add Some Useful Links
The “Add Useful Links” tab allows you to create a list of links to be diaplyed in the right hand column that are
related to the page topic.
A) Select the “Add Useful Links” tab
B) The “Link Name” field is the text that will be displayed on the link list and the “URL” field is the
actual link. Complete these two fields and then click the “Add” button.
C) The link will now appear below the empty fields. You may now add more links as required.
D) You may adjust the order of the links by clicking the up and down icons to the left of the link list.
E) Click the icon at the end of the row to delete that link from the list
F) Once complete You have the option of selecting the to close the “Page Properties” page or go
on to another tab.
Note: There is no means of editing the Link Name or URL once you press the “Add” button. You will have to delete
and add a new link.

Enterprise Portal: SharePoint Portal Training User Manual Page 47
Page 47
Attaching Documents
The “Attaching Documents” tab allows you to create a list of links, to documents, to be displayed in the right
hand column of your page that are related to the page topic. The documents are not actually attached to the
page, like in an email, but rather are “linked” in.
Note: Prior to selecting the “Attach Documents” tab you may wish to upload any locally hosted documents you
wish to referenece.
A) Select the “Attach Documents” tab.
B) The “Document Name” field is the text that will be displayed on the link list and the “URL” field is the
actual link to the document. Complete these two fields and then click the “Add” button
B) Once the link appears below the now empty fields the link has been added. You may now add more
documents if you wish.
C) You may adjust the order of the links by clicking the up and down icons to the left of the link list
D) Click the icon at the end of the row to delete that link from the list.
E) As an alternative, for documents and pages stored on your site, you may fill in the “URL” field by clicking
the button to use the “Select an Asset – Web Page Dialog” to graze for locally hosted documents.
Navigate to your document, click once to have it selected then click the “OK” button.
Note: Type, in the “Location (URL)” field at the bottom of the “Asset” page, the relative school root (e.g.,
“/schools/stpaul/”) then hit enter to see the content in your site.

Enterprise Portal: SharePoint Portal Training User Manual Page 48
Page 48
F) Once complete You have the option of selecting the to close the “Page Properties” page or go on to
another tab.
Note: There is no means of editing the Attached Document Name or URL once you press the “Add” button. You will
have to delete and add a new document.

Enterprise Portal: SharePoint Portal Training User Manual Page 49
Page 49
12.2 News, Events & Home Page Advertising The “Published Locations”, “News” and “Schedule a Calendar Event” tabs on the Site Govern “Page Properties”
page are all about interacting with the gadgets on the various TCDSB site home pages.
By making entries here you are in effect requesting that an owner of a home page display some of your content
and links, to some of your pages, on their home page. The owner of the home page always has the right to say no.
12.2.1 Site Govern Article Page Layout
Before proceeding it is necessary that your page is using the SiteGovern Article Page layout.
A) Go to “Site Actions” drop down window and select “Edit Page” on an existing Page.

Enterprise Portal: SharePoint Portal Training User Manual Page 50
Page 50
B) Place your cursor in the page content area (containing the text) inside a web part. The ribbon will expand to
display “Editing Tools”. Click on the “Format Text” tab.
C) Click the “News Article Details and Scheduling” button.
12.2.2 Working with Published Locations
The “Published Locations” tab allows you to make a request of a home page owner to display some of your content
on their home page. The Home Pages you may make a request to, are presented in a hierarchal
expandable/collapsible list, much like windows explorer.
A) Select the “Published Locations” tab
B) You can expand/collapse the items group together by clicking on the “+/-” to the left of the location name.
C) Click the check box next to the sites where you would like to make a request. You may select multiple
locations.
D) Click the multi select icon to select/deselect a whole set of sites (i.e., All Elementary Schools)
E) After making your selections click the button at the bottom of the page. You will see a green “Your
content has been successfully saved!” message at the top of the page confirming your save.

Enterprise Portal: SharePoint Portal Training User Manual Page 51
Page 51
F) To remove your request you may come back later and uncheck the check box and resave the page.
G) Once complete You have the option of selecting the to close the “Page Properties” page or go on to
another tab.
H) The location(s) selected apply to the “News” and “Schedule a Calendar Event” tabs entries.
12.2.3 Working With News
Using the “News” tab you can submit to the
selected home page owners a boiled down,
breviloquent, brief, compact, compendiary,
compendious, condensed, cursory, in a nutshell,
laconic, perfunctory, pithy, recapped, rehashed,
run-down, run-through, short, short and sweet or
succinct text blurb of your page content and a
picture which might be displayed on their home
page.
Note: For ease of entry on the “News” tab, save
off your text blurb and picture to your local drive
because you cannot open your page once the
“News” Tab is open.
A) Select the “News” tab.
B) The “Start” and “End” dates are required. The Start date is automatically filled in with the present date.
The End date can be inserted manually or by selecting the little calendar to the right a desired date will be
inserted when you highlight a particular date. The homepage owner has the right to change the dates at
their discretion on the “Schedule News” page.

Enterprise Portal: SharePoint Portal Training User Manual Page 52
Page 52
C) The “Image URL” creates three version of the picture you wish to associate with your item. Select the
“Browse. . . ” link. If not proceed to the next field.
Note: Here is where you use the picture that you saved off earlier.
D) A new dialogue box called “Upload Image” will appear. It will take you through a series of four steps.
E) Select the “Next” button.
F) Select the “Browse” button to locate your image. Then select “Next” to proceed. (From this stage forward
you have the option of going back or cancelling.)

Enterprise Portal: SharePoint Portal Training User Manual Page 53
Page 53
G) Another window will appear. Here you’ll be able to adjust the size of your image. By selecting “Reset” you
can zoom in.
H) By selecting “Resize – Rotate” more choices become available allowing you to rotate, flop or flip your
image. When you’ve completed this stage select “Next”.
I) Lastly, another window will appear with information about the original and new sizes of the image (file
format, pixel size and file size) and a “Finish” button.
J) You will be returned to the “Page Properties” dialogue box which now will contain your image in the
previously empty “Browse” field. By selecting the hyperlinks you can again make changes to the image.
K) Multiple sizes of the image are automatically created and will be displayed where appropriate.

Enterprise Portal: SharePoint Portal Training User Manual Page 54
Page 54
L) The “News Summary” field is required. Type in a brief description of the announcement.
Note: Here is where you use the text blurb that you saved off earlier.
M) The fifth field, which is optional, is the “Category” field. Specifying a category aids in the search relevance
for the site.

Enterprise Portal: SharePoint Portal Training User Manual Page 55
Page 55
N) If there is a video link associated with the announcement you can copy the url in the last field.
I) Lastly, after you’ve filled in the appropriate fields select the button located at the very bottom. You
will see a green “Your content has been successfully saved!” message at the top of the page confirming
your save.
O) To remove a “News” entry select the button at the bottom of the “News” tab. Look for the red
messag “Your content has been successfully deleted!” at the top of the page to confirm your delete
Note: The button only apears after you do the intial save.

Enterprise Portal: SharePoint Portal Training User Manual Page 56
Page 56
12.2.4 Working with Scheduling a Calendar Event
Using the “Scheduling a Calendar Event” tab you can submit to the selected home page owners a brief text blurb of
your event along with dates and times, which might be displayed on their home page.
Note: For ease of entry on the “Scheduling a Calendar Event” tab, save off your text blurb to your local drive
because you cannot open your page once the “Scheduling a Calendar Event” Tab is open.
A) Select the “Schedule a Calendar Event” Tab.
B) Enter the location of the event.
C) The “Start” and “End” dates and time are required fields. Note that the present date is automatically
entered as the start date. You can manually enter a date or select the calendar, choose the date and it
will automatically appear in the field. Select the appropriate time by selecting the down arrow .
D) The “Description” field is required. Write a brief summary of the event so viewers will learn what the
event is about. This is the text that will be displayed on the various home pages.
Note: Here is where you use the text blurb that you saved off earlier.

Enterprise Portal: SharePoint Portal Training User Manual Page 57
Page 57
E) If the event will last all day select the “All Day Event” box.
F) If the event is a recurring event select the “Recurrence” box.
If you check the box the window will expand allowing you to specify the frequency of the event.
G) You can select the category i.e. “School Event” “CSAC” etc. from a drop down menu. This will give the
viewer a subject to search by.
H) Lastly, after you’ve filled in the appropriate fields select the button located at the very bottom.
You will see a green “Your content has been successfully saved!” message at the top of the page
confirming your save.

Enterprise Portal: SharePoint Portal Training User Manual Page 58
Page 58
I) To remove a “Schedule a Calendar Event” entry select the button at the bottom of the
“Schedule a Calendar Event” tab. Look for the red message “Your content has been successfully
deleted!” at the top of the page to confirm your delete
Note: The button only appears after you do the intial save.
J) Once complete You have the option of selecting the to close the “Page Properties” page or go on
to another tab.
12.3 Home Page Owner No matter how many request are made to the Home page owner to display content on their Home Page, only the
Home Page owner can decide if an item will be displayed, how it will be displayed and for how long it will be
displayed.
12.3.1 Scheduling News
The homepage owner has to manually schedule a news item to be displayed in order for it to appear.
Note: This also applies to news and events for their own site that they might wish to display.
A) Go to the Home Page of your site
B) Choose “Site Actions” and then select “Schedule News” to display the “Schedule News” page.
Note: the “Schedule News” is only available to those with sufficient permissions.

Enterprise Portal: SharePoint Portal Training User Manual Page 59
Page 59
C) The “News (nn)” items lists the requests that have come in.
Click the or to expand/collapse the list.
Click the to see additional items in the list
Hover your cursor over an item in the list to highlight it.
Click the icon to preview the page
Click the icon to demote the item to the “Archive News” list
Click and drag an item to the Spotlight or News Area to display the item on the home page
D) The “Archive News (nn)” list is for items that will no longer be displayed.
Click the or to expand/collapse the list.
Click the to see additional items in the list
Hover your cursor over an item in the list to highlight it.
Click the icon to preview the page
Click the icon to promote the item back to the “News” list
E) The “Spotlight” area list displays a large picture in the Spotlight area of the home page.
Click the or to expand/collapse the list.
You may click and drag items to the Spotlight Area from the “News (nn)” list and the “News” area
Clicking on an item will display the 7 icons
Click the to preview the item
Click the icon to demote the item to the “News (nn)” list
Click the icons to scoll through the dates displayed
Click and drag the ends of the orange date bars to set the display date range
Once the date range has expired the item will be automatically demoted to “News(nn)” List
Note: A special feature of the “Spotlight” gadget is to display upto 4 Board spotlight items if the school has fewer than 4 Spotlight items setup. This way schools will always have afew items displaying on the home page.
Enterprise Portal: SharePoint Portal Training User Manual Page 60
Page 60
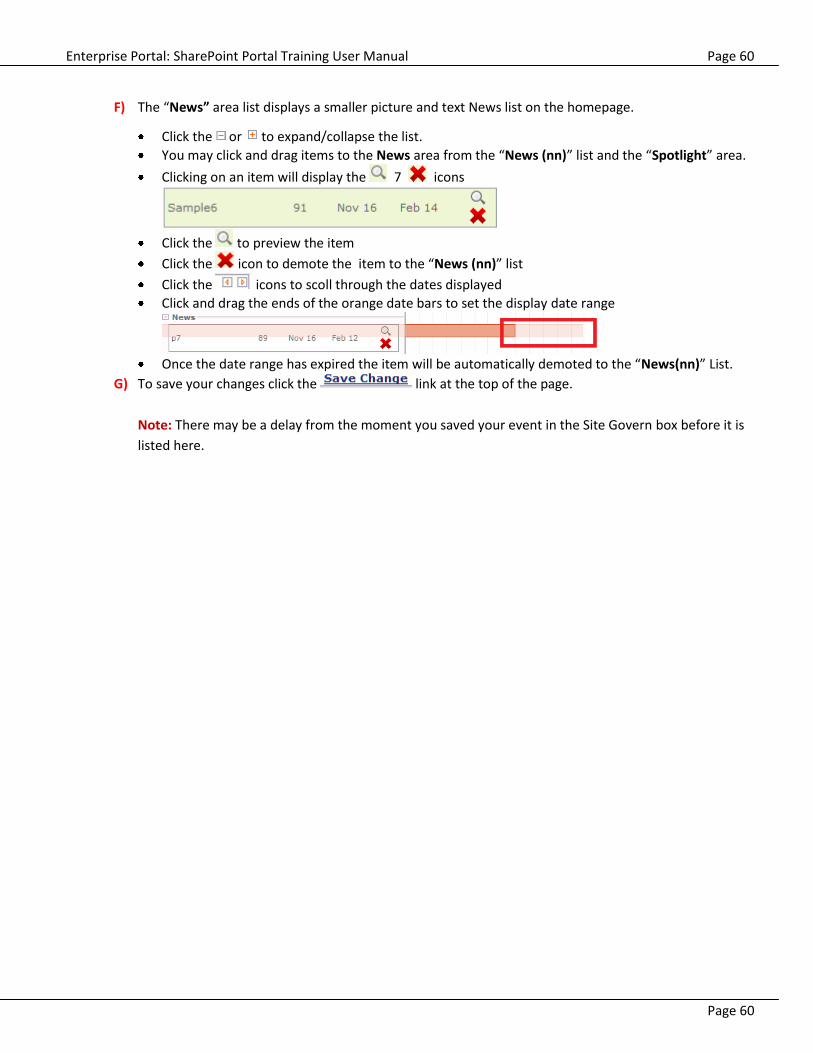
F) The “News” area list displays a smaller picture and text News list on the homepage.
Click the or to expand/collapse the list.
You may click and drag items to the News area from the “News (nn)” list and the “Spotlight” area.
Clicking on an item will display the 7 icons
Click the to preview the item
Click the icon to demote the item to the “News (nn)” list
Click the icons to scoll through the dates displayed
Click and drag the ends of the orange date bars to set the display date range
Once the date range has expired the item will be automatically demoted to the “News(nn)” List.
G) To save your changes click the link at the top of the page.
Note: There may be a delay from the moment you saved your event in the Site Govern box before it is
listed here.

Enterprise Portal: SharePoint Portal Training User Manual Page 61
Page 61
12.3.2 Scheduling Events
Event items are displayed in the Items set
H) If you are the Home page owner you will find a link at the bottom of the “Events” column. The link is
called “Switch to Admin Mode”. Here you can determine whether or not the event will be displayed.
I) After selecting it, it will expand to reveal a list of scheduled events.
J) Under each event is either a or button. When “Show “ is visible then the event is in
hide mode and when “Hide” is visible the event is show mode.
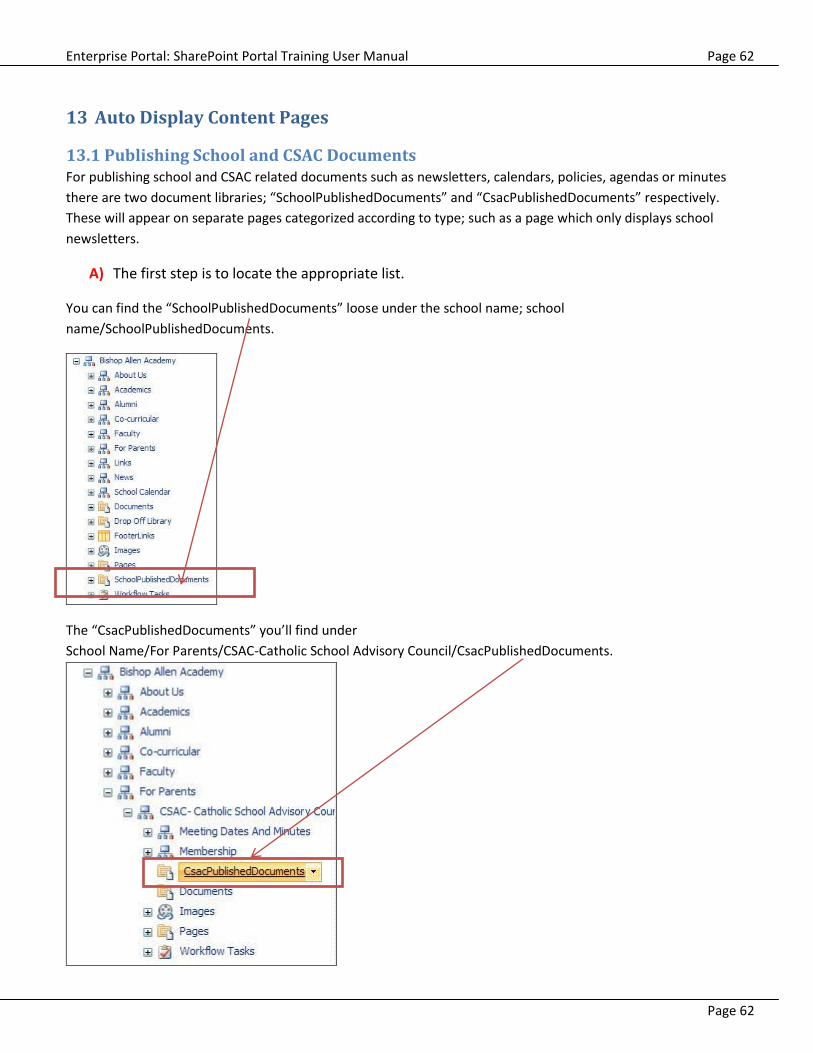
Enterprise Portal: SharePoint Portal Training User Manual Page 62
Page 62
13 Auto Display Content Pages
13.1 Publishing School and CSAC Documents For publishing school and CSAC related documents such as newsletters, calendars, policies, agendas or minutes
there are two document libraries; “SchoolPublishedDocuments” and “CsacPublishedDocuments” respectively.
These will appear on separate pages categorized according to type; such as a page which only displays school
newsletters.
A) The first step is to locate the appropriate list.
You can find the “SchoolPublishedDocuments” loose under the school name; school
name/SchoolPublishedDocuments.
The “CsacPublishedDocuments” you’ll find under
School Name/For Parents/CSAC-Catholic School Advisory Council/CsacPublishedDocuments.

Enterprise Portal: SharePoint Portal Training User Manual Page 63
Page 63
B) Select the appropriate list (School or CSAC). From there we will need to upload the appropriate
documents. In this case it will be a CSAC minutes.
C) Under “New” select “Item”.
D) A new window will come up asking you to locate (browse) your file.

Enterprise Portal: SharePoint Portal Training User Manual Page 64
Page 64
E) This will be followed by yet another window, which you’ll be required to fill out.
F) The name and title of your document will automatically be filled in. You should select the appropriate year
from the drop-down menu (Suggestion: If you type the first two digits it will automatically complete the
correct school year.)
G) Next, select the appropriate document type.

Enterprise Portal: SharePoint Portal Training User Manual Page 65
Page 65
H) If your document doesn’t fall into one of the first seven categories choose “Other” at the bottom. Do not
select the “Specify Your Own Value” radio button.
I) Lastly, select the appropriate month.
J) When you’ve filled in these fields you can select the “Save” button at the bottom of the window.
K) Repeat this step for any other documents you’ve prepared otherwise you’ll need to proceed to either submit
or publish the document(s) for it to appear on the website. Even though you may have publishing rights you
may want to consider using the “Check-In” button to allow “another pair of eyes” to double-check your
document before exposing it the public.
Publish Check in

Enterprise Portal: SharePoint Portal Training User Manual Page 66
Page 66
L) Finally, the document(s) should appear in the related page(s) on your school website.
13.2 Central Content The following pages display links to documents in a central list which is maintained by staff at the CEC. The school
may update the top portion of the page with any relevant content, but should not touch the document list web
part in the bottom zone of the page.
13.2.1 EQAO results: Grade 3/6
/schools/{SchoolName}/aboutus/AssessmentAndTesting/Pages/default.aspx

Enterprise Portal: SharePoint Portal Training User Manual Page 67
Page 67
13.2.2 EQAO results: Grade 9 Math & OSSLT: Grade 10
/schools/{SchoolName}/aboutus/AssessmentAndTesting/Pages/default.aspx
13.2.3 Safe Schools
/schools/{SchoolName}/aboutus/Pages/SafeSchools.aspx (new page)

Enterprise Portal: SharePoint Portal Training User Manual Page 68
Page 68
13.2.4 School Learning Plan (SLP)
/schools/{SchoolName}/ aboutus/SchoolLearningPlan/Pages/default.aspx
13.3 School Generated Content Two TCDSB custom school libraries have been setup at each school. The first library will contain the school’s
monthly newsletters and calendars as well as other content types and the secondary library will contain the CSAC
Agendas , Minutes and other documents. These libraries are maintained by school staff.
13.3.1 Library SchoolPublishedDocuments
/schools/{SchoolName}/SchoolPublishedDocuments/Forms/AllItems.aspx
This library will contain the school’s monthly newsletters and calendars as well as other content types
13.3.1.1 Maintain the Library
A) Navigate to the home page of the school site.
B) From the “ ” menu choose the “ ” option.
C) In the Document Libraries area click the “SchoolPublishDocuments”
D) From the ribbon choose the button to upload a document

Enterprise Portal: SharePoint Portal Training User Manual Page 69
Page 69
E) Use the Browse dialogue box to retrieve your file
F) Fill in the “School Year”, “School Document Type” and “Month” Click save button.
G) Then Check in and Publish the Document.
13.3.2 Library CsacPublishedDocuments
/schools/{SchoolName}/forparents/CSAC/CsacPublishedDocuments
This library will contain the CSAC Agendas , Minutes and other documents.
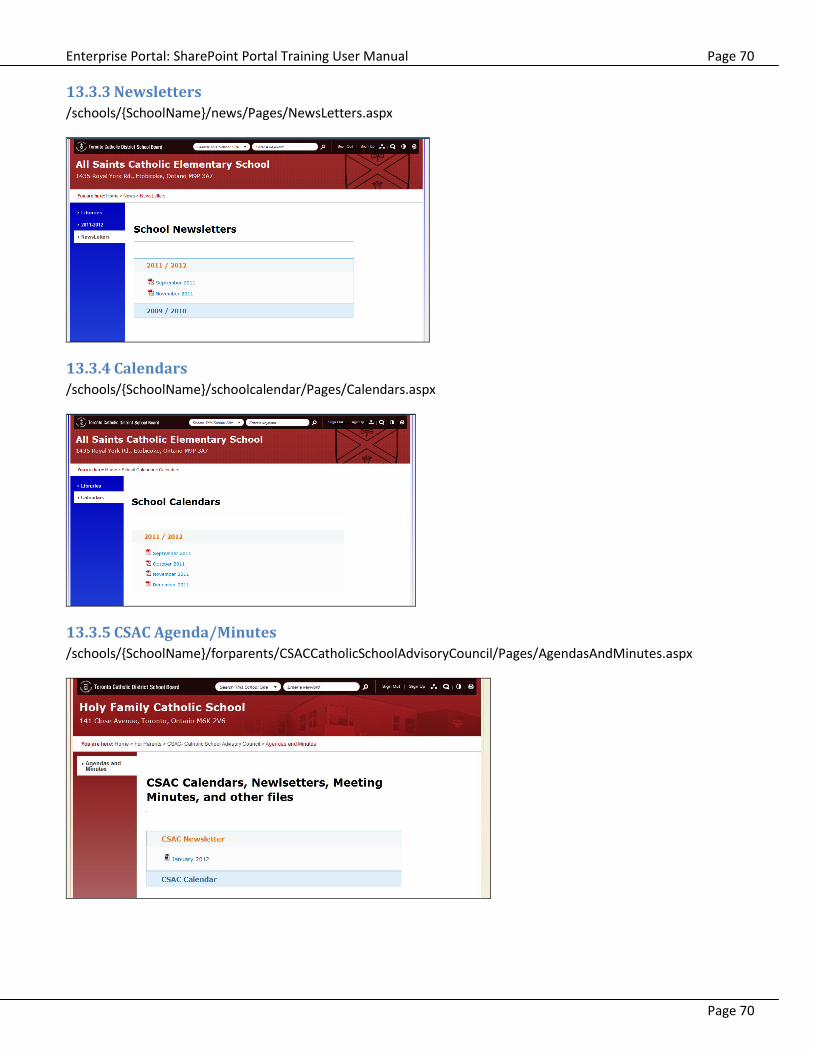
Enterprise Portal: SharePoint Portal Training User Manual Page 70
Page 70
13.3.3 Newsletters
/schools/{SchoolName}/news/Pages/NewsLetters.aspx
13.3.4 Calendars
/schools/{SchoolName}/schoolcalendar/Pages/Calendars.aspx
13.3.5 CSAC Agenda/Minutes
/schools/{SchoolName}/forparents/CSACCatholicSchoolAdvisoryCouncil/Pages/AgendasAndMinutes.aspx

Enterprise Portal: SharePoint Portal Training User Manual Page 71
Page 71
14 Feedback (TO BE REVISED) The Feedback icon at the top and the link at the bottom of all School Pages allows users to leave comments along
with their email address to the school.
Top of Page: Feedback Icon in red box
Bottom of Page: Feedback Link in red box
Feedback Form
14.1 Feedback List & URL The Feedback left by users is saved in a List. This list contains all the feedback accumulated for all schools. The list is
accessible by the following URL;
http://portaltestinter.tcdsb.org/schools/Lists/PageFeedback/AllItems.aspx

Enterprise Portal: SharePoint Portal Training User Manual Page 72
Page 72
14.2 Instructions for Viewing Feedback Using the URL address of the List from the previous step you will be directed to the List. Items appearing in the list
are in chronological order with the oldest messages on the top. Each item contains the date created, URL from
where the feedback comment was generated, User feedback, and their E-mail address.
Note: that List displays only 30 items at a time, so you will need to scroll through to display more items.
Clicking on the “Title” for each list item reveals the individual Feedback in a new pop up window.

Enterprise Portal: SharePoint Portal Training User Manual Page 73
Page 73
15 Getting Around In SharePoint there is approximately 4.3 ways of doing the same thing, such as navigating to a page, maintaining
content from a library etc… There are also many ways to navigate around. The following two methods will assist
you when you are trying to find/maintain underlying lists and libraries
15.1 View All Site Content The option “View All Site Content” allows you to quickly view the list and libraries associated with the current site
A) Click the “Site Actions” link
B) Choose the
C) The “All Site Content” page is then displayed for the site. From here you can go to any of the lists, libraries
or subsites and maintain the content.

Enterprise Portal: SharePoint Portal Training User Manual Page 74
Page 74
15.2 How to use Manage Content and Structure The “Manage Content and Structure” menu item is located under Site Actions in the top blue bar. It is a handy tree
structure way of navigating through SharePoint and all of its structure. It is comparable to using the Windows
Explorer view of navigating a Windows based computer.
There are several common sections to the structure of the Portal. On the left hand you will notice the School Sites,
Libraries, and Lists. The right partition contains the contents of the active Site/Library/List as selected from the lefft
partition.
Some headings and menu items will change depending on permission levels and what item is highlighted, and if you
are within a Site, Library or List. See chart on the following page.

Enterprise Portal: SharePoint Portal Training User Manual Page 75
Page 75
15.2.1 Manage Content and Structure Breakdown.
Symbol Description
Left hand partition Shows the content within a Site
Right hand partition shows the selected content from the left partition
Refreshes the structure of the content. You will need to use this if the browser
is inactive for a given amount of time
Navigate up one level
New menu allows you to create a new Site/Page/List/Folder/etc. This list will
vary depending on what you have selected
Actions menu gives specific menu items for selected items to produce various
results.
Settings menu
View drop down menu, used to change the current view.
By default only 100 items are listed in the right hand partition. Allows you to
increase or decrease the amount of items displayed in the right hand partition
of the Site Content and Structure window from 1-1000. For example if you
change to 10 and you had 20 items, you would have to scroll through more by
click on the

Enterprise Portal: SharePoint Portal Training User Manual Page 76
Page 76
15.2.2 Common Symbols in the Manage Content and Structure view.
Symbol Type Description
Site, Subsite, … Sites contain subsites, libraries, and lists.
Pages Library Where all Pages are stored for a Site.
Documents
Library
You can upload MS Word, Excel, Powerpoint, Adobe PDFs, and any
other documents types. See the Appendix for the file types
supported.
List Lists contain individual Items used as the backbone to populating
Web Parts. There are a variety of List types and each is unique but
also similar.ol.
Asset Library Used to contain Images or Movies. See the Appendix for the file
types supported.
Picture Library A unique Library specifically for pictures.
Workflow Tasks Used to display current outstanding Page submittals waiting to be
Approved.
Expand Located before each Site/Library/List. Clicking the symbol will
allow you to expand the branches of the tree structure. Used for
quickly navigating the different levels of a Site, Subsite, Sub-
Subsite, …
15.2.3 Navigating the Content in the Manage Content and Structure view
There are a few ways navigate your way through the Manage content and Structure view. The one way is to think
of it like the Windows Explorer viewer and using the Expand symbol navigating up and down various Sites and
Folders. To expand an individual item click on the blue coloured title beside the icon.
If you do this on the left hand navigation partiton, that area will be expanded in the right hand partition.
If you click the item on the right hand navigation partition, that individual item will either be expanded in
the right hand partition (in the case of Sites/Libaries/Folders) or will expand in a new window (in the case
of images, videos, etc)

Enterprise Portal: SharePoint Portal Training User Manual Page 77
Page 77
15.2.4 Managing/Creating/Editing the Properties of a Site/Page/Library/List/Item
Another way of accessing certain features for a given Site/Page/Library/List/Item is by moving your mouse over the
name of the item and clicking on the newly appeared drop down . This menu will contain many basic features
specific to the Site/Page/Library/List/Item you have selected. You can use this on both the left and right partitions
of the Site Content and Structure.

Enterprise Portal: SharePoint Portal Training User Manual Page 78
Page 78
16 Appendix A