epi info™ 7 user guide – chapter 7 – data packager web viewto access data...
TRANSCRIPT

Epi Info™ 7 User Guide – Chapter 7 – Data Packager
7. Data Packager: Sharing and Merging Data
Introduction
The Epi Info™ Data Packager tool provides an easy way to share data with other users or to merge data collected by multiple users into a single database for analyses. The Data Packager does this by offering the option to package and export, as well as import data from Epi Info™ projects.
Data Packager also has several security features that allow data to be shared more safely and securely. One security feature is the capability to encrypt data packages with a password. This prevents anyone without the correct password from accessing the data. Another security feature is the capability to de-identify data by omitting specific fields from your database. Users can strip sensitive fields such as name, address, or ID number from the dataset. Users can also subset the data by specifying conditions for record selection. Data Packager also offers the option to save package settings for future use. Once packaged, the Import Data option easily imports the data.
To access Data Packager, select Enter Data from the Epi Info™ 7 main menu options and open a project and form. The Package for Transport option is located in the toolbar under File > Package for Transport and the Import Data from Data Package option is located under File > Import data > From data package.
7-1

Epi Info™ 7 User Guide – Chapter 7 – Data Packager
Package Data for Transport
An Epi Info™ project must be opened with the Enter tool before the data in that project can be packaged for transport.
1. From the Enter screen, open the project and form you wish to transport. If you have related forms in your project, they will not appear in the Project Explorer window of the Enter tool. However, all the data in child forms will be packaged for transport.
2. Select File > Package for Transport. The Package data for Transport dialog box appears.
Figure 7.1: Package Data for Transport dialog box
7-2

Epi Info™ 7 User Guide – Chapter 7 – Data Packager
3. The Project path and Form to package textboxes automatically populate with the project and form information. Click the ellipses to browse and select a Package Path. The package path designates where the data package will be saved. Click OK.
4. Enter a name for the data package in the Package Name field.5. Check the Append Timestamp to File Name checkbox if you wish to add a
timestamp to the file name. The default setting is unselected.6. Enter Password if you wish to encrypt the data package. This increases the
security of your data transmission. Save your password in a safe location, as this password will be required to access the data package. If you do not wish to encrypt your data, leave the Enter Password field blank and proceed to step eight.
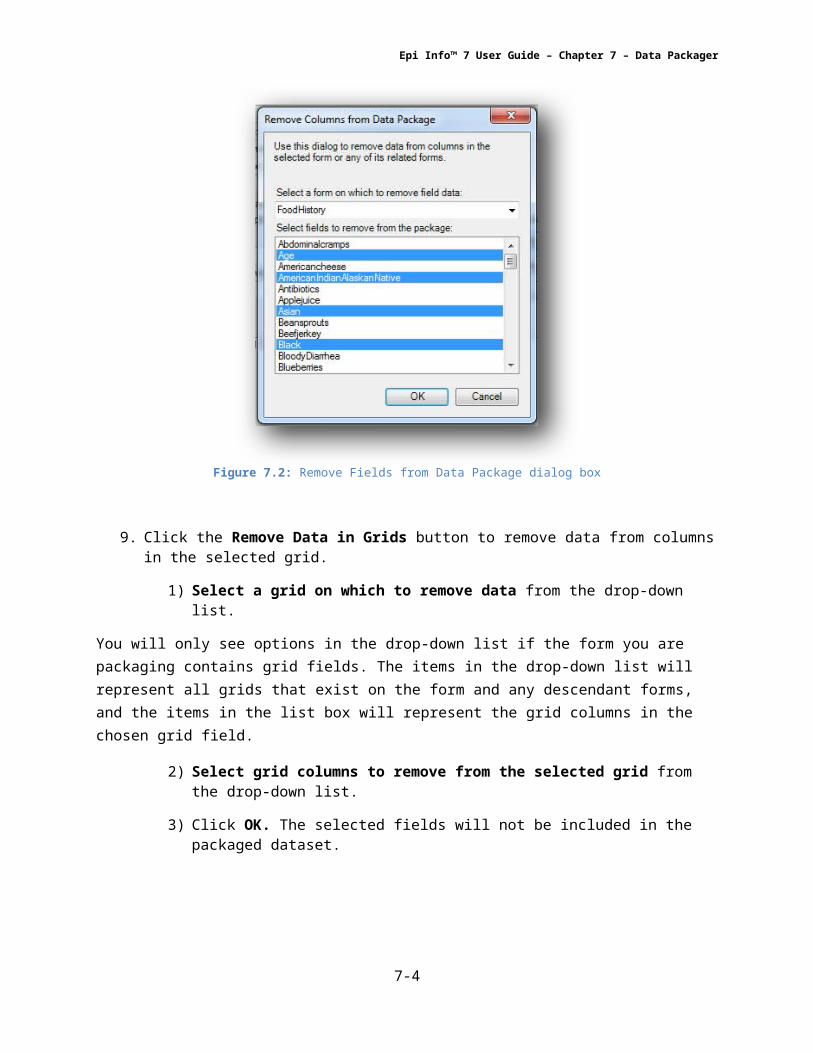
7. To Verify Password, re-enter the password from the step above. There are several options to remove data prior to packaging: Remove Data in Fields, Remove Data in Grids, and Select Records.
8. Click the Remove Data in Fields button to omit specific fields from the data package.
1) Select a form on which to remove field data from the drop-down list.
2) Select fields to remove from the package by clicking on the field names. To select more than one field, hold down the CTRL key.
3) Click OK. The selected fields will not be included in the packaged dataset.
7-3
Epi Info™ 7 User Guide – Chapter 7 – Data Packager
Figure 7.2: Remove Fields from Data Package dialog box
9. Click the Remove Data in Grids button to remove data from columns in the selected grid.
1) Select a grid on which to remove data from the drop-down list. You will only see options in the drop-down list if the form you are packaging contains grid fields. The items in the drop-down list will represent all grids that exist on the form and any descendant forms, and the items in the list box will represent the grid columns in the chosen grid field.
2) Select grid columns to remove from the selected grid from the drop-down list.
3) Click OK. The selected fields will not be included in the packaged dataset.
7-4

Epi Info™ 7 User Guide – Chapter 7 – Data Packager
Figure 7.3: Remove Grids from Data Package dialog box
10.Click the Select Records button to select specific records to include in the data package.
1) Select a Field from the drop-down list.2) Select an Operator from the drop-down list.3) Enter a value in the Value textbox.4) Click the Add Record Filter button. The specified conditions appear in
the textbox. All records that meet this condition will be included in the data package. All other records will be omitted.
5) Click OK.
7-5

Epi Info™ 7 User Guide – Chapter 7 – Data Packager
Figure 7.4: Select Records for Data Package dialog box
11.The Package data for Transport dialog box appears.12.Click the Package button. When complete, the Package Creation Complete
verbiage will appear at the bottom of the dialog box.
7-6

Epi Info™ 7 User Guide – Chapter 7 – Data Packager
Figure 7.5: Package Creation complete
Additional Options:Note that the textbox on the bottom half of the screen is populated with your Data Removal and Security selections. You may save this script to be used at a future time. This will prevent you from having to make each selection manually the next time you wish to package data.
a. The Save Script option will save your settings for future use. Note: The password is not saved in this script.
b. The Load Script option imports and replicates the saved script containing your package settings.
13.Click Close to exit.14.The data package appears at the location (Package Path) specified in step
three.
7-7

Epi Info™ 7 User Guide – Chapter 7 – Data Packager
Import Data from Data Package
1. From the Enter screen, select File > Import Data > From Data Package.
Figure 7.6: Import Encrypted Data Package dialog box
2. Check the Is Batch Import checkbox if attempting to import more than one *.edp7 file. When selected, the batch import will only prompt for the folder location containing the *.edp7 files. All files in the selected folder will be imported at once. This option is unchecked by default.
3. Click the ellipses to browse the location for the Encrypted data package(s) to import.
4. Select the location of your *.edp7 file. Click Open.5. If the data package is encrypted, enter the password in the Password
textbox. This password was created when the data was initially packaged. If the data is not encrypted with a password, leave the password textbox blank and continue to the next step.
7-8

Epi Info™ 7 User Guide – Chapter 7 – Data Packager
Note: When accessing an encrypted data package, if the password is incorrect or left blank, the message below will appear at the bottom of the dialog box. In addition, when using batch import, all files in a directory must contain the same password or you will get the error message below:
Import FAILED. The package was unable to be decrypted. Check to make sure the password is correct and try again.
6. Select the Type of Import from the drop-down list. Update and append records – Records in the destination form
containing the same GlobalRecordId values as the source form will be updated (overwritten) if there is new information. However, values in the destination table will never be overwritten with a null or missing value. All other records will be appended (added) to the end of the table.
Update records only – Records in the destination form containing the same GlobalRecordId values as the source form will be updated (overwritten) if there is new information. However, values in the destination table will never be overwritten with a null or missing value. All other records will be ignored.
Append records only – All records in the source form will be appended (added) to the end of the table. No records will be updated (overwritten).
Note: Import operations are permanent and irreversible. Be sure that the form structures are the same (including all form names and form table names) before proceeding.
7. Click Import. Import Complete will appear at the bottom of the dialog box upon successful completion of the import.
Figure 7.7: Import Complete
8. Click Close to exit the dialog box. The imported data appears in the form on the Enter screen.
7-9