epi suite software user’s guide | id wholesaler · if imageware is de livering the software to...
TRANSCRIPT

Us
er’s Guide
Version 6.3
User’s Guide, July 2004
Copyright © 1994 - 2004 by ImageWare Systems, Inc. All rights reserved.
Microsoft is a registered trademark, and Microsoft Access and Windows are trademarks of Microsoft Corporation. All other trademarks and regis-tered trademarks are the property of their respective owners.
Designed and written in Canada.
ImageWare® Systems, Inc.975 St. Joseph Blvd., Suite 110Gatineau, QuebecCanada J8Z 1W8
Information in this document is accurate up to the time of publication, but does not necessarily reflect the enhancements made to ImageWare® Systems, Inc.’s products, which are released without notice. Companies, names, and data used in examples herein are fictitious unless otherwise noted. The software described in this document is furnished under a license agreement. It is against the law to copy the software on any medium except as specifically allowed in the license or nondisclosure agreement. No part of this guide may be reproduced or transmitted in any form or by any means, electronic or mechanical, including photocopying, recording, or information recording and retrieval systems, for any purpose other than the licensed operator’s personal use, without the express written permission of ImageWare® Systems, Inc.
ImageWare® Systems, Inc. - EPI Suite® Version 6.3 User’s Guide

ImageWare SystemsEnd User License Agreement
*IMPORTANT*CAREFULLY READ THE FOLLOWING TERMS AND CONDITIONS BEFORE USING THIS PRODUCT. IT CONTAINS SOFTWARE, THE USE OF WHICH IS LICENSED BY IMAGEWARE® SYSTEMS, INC., TO ITS CUSTOMERS FOR THEIR USE ONLY AS SET FORTH BELOW. THIS IS A LEGAL AGREEMENT BETWEEN YOU AND IMAGEWARE® SYSTEMS, INC. IF YOU DO NOT AGREE TO THE TERMS AND CONDITIONS OF THIS AGREEMENT, DO NOT USE THE SOFTWARE. USING ANY PART OF THE SOFTWARE INDICATES THAT YOU ACCEPT THESE TERMS.
1.GRANT OF LICENSE. ImageWare Systems, Inc. ("ImageWare") grants you a nonex-clusive, nontransferable, license to install and execute the accompanying software pro-gram(s) (the "SOFTWARE") subject to the terms and restrictions set forth in this License Agreement ("License"). If ImageWare is delivering the SOFTWARE to you electronically via the internet, you are also entitled to download the SOFTWARE to a single computer for use in accordance with this Agreement. This License permits you to use one copy of the specified version of the SOFTWARE on any single computer, provided the SOFTWARE is in use on only one computer at any time. If you have multiple Licenses for the SOFT-WARE, then at any time you may have as many copies of the SOFTWARE in use as you have Licenses. The SOFTWARE is "in use" on a computer when it is loaded into the tem-porary memory (i.e., RAM) or installed into the permanent memory (e.g., hard disk, CD-ROM or other storage device) of that computer, except that a copy installed on a network server for the sole purpose of distribution to other computers is not "in use". If the antici-pated number of users of the SOFTWARE will exceed the number of applicable Licenses, then you must have a reasonable mechanism or process in place to assure that the number of persons using the SOFTWARE concurrently does not exceed the number of Licenses. If the SOFTWARE, or any component thereof, you have licensed is licensed on a limited concurrent user model as evidenced by the quote or purchase order related to such license, then only the number of concurrent users for which you have paid shall be entitled to access and execute the SOFTWARE or relevant component thereof throughout the user community to which you and ImageWare have agreed upon in writing. You must use the ImageWare provided process in place to assure that the number of concurrent users of the SOFTWARE does not exceed the number for which you have paid or, if ImageWare has not provided such a process, you must provide a process to assure that the number of con-current users of the SOFTWARE does not exceed the number for which you have paid.2.INTELLECTUAL PROPERTY RIGHTS. The SOFTWARE and the Intellectual Property Rights related thereto are owned solely and exclusively by ImageWare or its sup-pliers. "Intellectual Property Rights" collectively means any and all right, title and interest in or to any and all patents, patent registrations, patent applications, business processes, copyrights, data rights, trademarks, trade names, service marks, service names, trade secrets, know how or other similar right arising or enforceable under any U.S. law, the law

of any other jurisdiction, or any international treaty regime. This license confers no title or ownership in the SOFTWARE and confers no rights whatsoever in any associated source code or other intellectual property of ImageWare. Except for the limited license set forth in Section 1, this License does not grant you any rights to patents, copyrights, trade secrets, trademarks, or any other rights in respect to the SOFTWARE, and all such rights are reserved by ImageWare or its suppliers. Therefore, you must treat the SOFTWARE like any other copyrighted material (e.g., a book or musical recording) except that you may either (a) make one copy of the SOFTWARE solely for backup or archival purposes, or (b) transfer the SOFTWARE to a single hard disk provided you keep the original solely for backup or archival purposes. You must reproduce and include all copyright notices and any other proprietary rights notices appearing on the SOFTWARE on any copies that you make. You may not copy the written materials accompanying the SOFTWARE. 3.EXPORT RESTRICTIONS AND COMPLIANCE WITH APPLICABLE LAW. You agree that you will not export or re-export the SOFTWARE or accompanying docu-mentation (or any copies thereof) or any products utilizing the SOFTWARE or such docu-mentation in violation of any applicable laws or regulations of the United States or the country in which you obtained them. You also agree to comply with all other applicable laws and regulations governing the use of the SOFTWARE.4.OTHER RESTRICTIONS. This ImageWare License Agreement is your proof of license to exercise the rights granted herein and must be retained by you. You may not (i) modify, reproduce, copy, alter, improve or create derivative works from the SOFTWARE, (ii) sublicense, rent, lease, distribute, loan, export other otherwise transfer or provide access to the SOFTWARE to any third party, (iii) reverse engineer, decompile, disassemble or otherwise attempt to derive the source code of the SOFTWARE, or (iv) use the SOFT-WARE to develop a product that is similar to the SOFTWARE or to operate a service bureau of any kind.5.CONFIDENTIALITY. You acknowledge and agree that the structure, source code, sequence and organization of the SOFTWARE are the valuable trade secrets and confiden-tial information of ImageWare and its suppliers. You agree to protect such confidential information and trade secrets and prohibit the unauthorized duplication, use or disclosure of such confidential information and trade secrets. You also acknowledge and agree that the vector templates and full templates generated by the SOFTWARE ("Templates") shall be treated with the same care as other confidential information.6.LIMITED WARRANTY. ImageWare warrants that the SOFTWARE will perform sub-stantially in accordance with the accompanying written materials for a period of forty-five (45) days after the date of receipt. Some states do not allow limitations on duration of an implied warranty, so the above limitation may not apply to you.7.CUSTOMER REMEDIES. ImageWare's entire liability and your exclusive remedy shall be, at ImageWare's option, either (a) return of the price paid or (b) repair or replace-ment of the SOFTWARE that does not conform to the limited warranty set forth in Section 6 and that is returned to ImageWare with a copy of your receipt. This Limited Warranty is void if failure of the SOFTWARE or hardware has resulted from accident, abuse, or misap-plication, or if a warranty claim is received by ImageWare after the expiration of the forty-five (45) day warranty period. Any replacement SOFTWARE will be warranted for the remainder of the original warranty period or thirty (30) days, whichever is longer. Neither these remedies nor any product support services offered by ImageWare are available for this U.S.A. version product outside of the United States of America.
ImageWare® Systems, Inc. - EPI Suite® Version 6.3 User’s Guide

8.NO OTHER WARRANTIES. IMAGEWARE EXPRESSLY DISCLAIMS ALL OTHER WARRANTIES, EITHER EXPRESS OR IMPLIED, INCLUDING BUT NOT LIMITED TO IMPLIED WARRANTIES OF MERCHANTABILITY AND FITNESS FOR A PARTICULAR PURPOSE, WITH RESPECT TO THE SOFT-WARE, THE ACCOMPANYING WRITTEN MATERIALS, AND ANY ACCOM-PANYING HARDWARE. THIS LIMITED WARRANTY GIVES YOU SPECIFIC LEGAL RIGHTS. YOU MAY HAVE OTHERS WHICH VARY FROM STATE TO STATE.9.NO LIABILITY FOR CONSEQUENTIAL DAMAGES. IN NO EVENT SHALL IMAGEWARE OR ITS SUPPLIERS BE LIABLE FOR ANY CONSEQUENTIAL, SPECIAL, INCIDENTAL, INDIRECT OR EXEMPLARY DAMAGES WHATSO-EVER (INCLUDING, WITHOUT LIMITATION, DAMAGES FOR LOSS OF BUSI-NESS PROFITS, BUSINESS INTERRUPTION, LOSS OF BUSINESS INFORMATION) ARISING OUT OF THE USE OF OR INABILITY TO USE THIS IMAGEWARE PRODUCT, EVEN IF IMAGEWARE HAS BEEN ADVISED OF THE POSSIBILITY OF SUCH DAMAGES. IN NO EVENT SHALL THE TOTAL LIABILITY OF IMAGEWARE AND ITS SUPPLIERS TO YOU OR ANOTHER PERSON OR ENTITY ARISING FROM OR RELATED TO THIS AGREEMENT EXCEED ONE HUNDRED UNITED STATES DOLLARS (US $100). BECAUSE SOME STATES DO NOT ALLOW THE EXCLUSION OR LIMITATION OF LIA-BILITY FOR CONSEQUENTIAL OR INCIDENTAL DAMAGES THE ABOVE LIMITATION MAY NOT APPLY TO YOU.10.U.S. GOVERNMENT END USERS. The SOFTWARE is a "commercial item" as that term is defined at 48 C.F.R. 2.101, consisting of "commercial computer software" and "commercial computer software documentation" as such terms are used in 48 C.F.R. 12.212. Consistent with 48 C.F.R. 12.212 and 48 C.F.R. 227.7202-1 through 227.7202-4, all U.S. Government end users acquire the SOFTWARE with only those rights set forth herein.11.TERM AND TERMINATION. This License is effective as of the date you agree to its terms and remains in effect until terminated. You may terminate this License at any time by destroying the SOFTWARE, documentation and Templates together with all copies and merged portions in any form. This License will also automatically terminate immediately if you fail to comply with any term or condition of this License. Upon such termination you agree to destroy the SOFTWARE and documentation, together with all copies and merged portions in any form. Sections 2, 3, 4, 5, 8, 9, 10, 11, 12, 13 and 14 shall survive any termination of this License.12.GOVERNING LAW. This license shall be governed by the laws of the State of Cali-fornia and by the laws of the United States, excluding their conflicts of laws principles. The United Nations Convention on Contracts for the International Sale of Goods (1980) is hereby excluded in its entirety from application to this License.13.SEVERABILITY. In the event any provision of this License is found to be invalid, illegal or unenforceable, the validity, legality and enforceability of any of the remaining provisions shall not in any way be affected or impaired and a valid, legal and enforceable provision of similar intent and economic impact shall be substituted therefore.14.ENTIRE AGREEMENT. This license constitutes the entire agreement between the parties with respect to the use of the SOFTWARE and related documentation and super-sedes all prior or contemporaneous agreements. No amendment or modification of this

license will be binding unless in writing and signed by a duly authorized representative of ImageWare.15.ASSIGNMENT. You may not assign any of your rights or obligations, in whole or in part, under this Agreement without the advance written consent of ImageWare. Any assignment of this Agreement may require the payment of additional license fees.16.THIRD PARTY SOFTWARE. If the ImageWare SOFTWARE requires use of any third party software, it is your responsibility to legally obtain, either through ImageWare or otherwise, a license to such third party software. If such third party software is obtained through ImageWare and the licensor is Microsoft Corporation ("Microsoft"), then the fol-lowing applies to you: The Microsoft products contained or referenced in the accompany-ing Microsoft software packages or Microsoft license agreements have been integrated or pre-installed as part of the ImageWare solution. Each Microsoft product is subject to its respective Microsoft End User License Agreement contained in the accompanying soft-ware packages or license agreements with the exception that the Microsoft product func-tionality as integrated in the ImageWare solution may differ from a nonintegrated Microsoft product and any issues concerning the functionality or performance of the ImageWare solution and the Microsoft products should be directed to ImageWare and not to Microsoft. Please be advised that if the accompanying Microsoft product software pack-age is in the form of a "Microsoft License Pack," or a "Microsoft Open License" (as opposed to a full packaged product), the right to make additional copies of the Microsoft product has already been exercised by ImageWare in integrating or pre-installing the Microsoft product in this solution. You may not, therefore, make additional copies of the product pursuant to the Microsoft License Pak or the Microsoft Open License notwith-standing any license terms in such document. YOU AGREE TO BE BOUND BY THE TERMS OF THE MICROSOFT END USER LICENSE AGREEMENTS AND THIS PARAGRAPH BY INSTALLING, COPYING, OR OTHERWISE USING THE MICROSOFT PRODUCTS. IF YOU DO NOT AGREE, DO NOT INSTALL OR USE THE PRODUCT; YOU MAY RETURN IT TO YOUR PLACE OF PURCHASE FOR A FULL REFUND.
© 2002-2004 ImageWare Systems, Inc. (LE-ID-PDI)
ImageWare® Systems, Inc. - EPI Suite® Version 6.3 User’s Guide

7
Contents
Introduction
First-Time Computer Users . . . . . . . . . . . . . . . . . . . . . . . . . . . . . 11
Contents Summary . . . . . . . . . . . . . . . . . . . . . . . . . . . . . . . . . . . . 11
Other EPI Suite Documentation. . . . . . . . . . . . . . . . . . . . . . . . . . 12
Basic Concepts . . . . . . . . . . . . . . . . . . . . . . . . . . . . . . . . . . . . . . . 12
Hardware Key Installation Instructions . . . . . . . . . . . . . . . . . . . . 14
GuardCard
What’s New in GuardCard 6 . . . . . . . . . . . . . . . . . . . . . . . . . . . . 19
The GuardCard Workspace . . . . . . . . . . . . . . . . . . . . . . . . . . . . . 20
Data Entry Fields . . . . . . . . . . . . . . . . . . . . . . . . . . . . . . . . . . . . . 22
Signing Operators into GuardCard. . . . . . . . . . . . . . . . . . . . . . . . 25
GuardStation Mode . . . . . . . . . . . . . . . . . . . . . . . . . . . . . . . . . . . 26
Setting Up Card Formats . . . . . . . . . . . . . . . . . . . . . . . . . . . . . . . 26
Maintaining the Database. . . . . . . . . . . . . . . . . . . . . . . . . . . . . . . 27
Images . . . . . . . . . . . . . . . . . . . . . . . . . . . . . . . . . . . . . . . . . . . . . 29
Loading Images from Existing Files . . . . . . . . . . . . . . . . . . . . . . 30
Capturing Images with a Video Camera . . . . . . . . . . . . . . . . . . . 32
Capturing Images with a Scanner . . . . . . . . . . . . . . . . . . . . . . . . 32
Capturing Images with a Signature Pad . . . . . . . . . . . . . . . . . . . . 33
Capturing Images from the Windows Clipboard . . . . . . . . . . . . . 33
8
Cropping Images . . . . . . . . . . . . . . . . . . . . . . . . . . . . . . . . . . . . . 34
Saving Images . . . . . . . . . . . . . . . . . . . . . . . . . . . . . . . . . . . . . . . 35
Deleting Images . . . . . . . . . . . . . . . . . . . . . . . . . . . . . . . . . . . . . . 36
Querying the Database . . . . . . . . . . . . . . . . . . . . . . . . . . . . . . . . . 37
Defining a Query . . . . . . . . . . . . . . . . . . . . . . . . . . . . . . . . . . . . . 37
Running a Query . . . . . . . . . . . . . . . . . . . . . . . . . . . . . . . . . . . . . 42
Modifying a Query. . . . . . . . . . . . . . . . . . . . . . . . . . . . . . . . . . . . 43
Deleting a Query . . . . . . . . . . . . . . . . . . . . . . . . . . . . . . . . . . . . . 44
Checking Cards . . . . . . . . . . . . . . . . . . . . . . . . . . . . . . . . . . . . . . 44
Batch Processing . . . . . . . . . . . . . . . . . . . . . . . . . . . . . . . . . . . . . 45
Card Printing and Encoding. . . . . . . . . . . . . . . . . . . . . . . . . . . . . 46
Overriding the Default Print and Page Setup. . . . . . . . . . . . . . . . 46
Printing Individual Cards . . . . . . . . . . . . . . . . . . . . . . . . . . . . . . . 48
Encoding Cards While Printing . . . . . . . . . . . . . . . . . . . . . . . . . . 49
Encoding Cards on External Devices. . . . . . . . . . . . . . . . . . . . . . 50
Card Status . . . . . . . . . . . . . . . . . . . . . . . . . . . . . . . . . . . . . . . . . . 50
Image Enhancement. . . . . . . . . . . . . . . . . . . . . . . . . . . . . . . . . . . 52
Exposure. . . . . . . . . . . . . . . . . . . . . . . . . . . . . . . . . . . . . . . . . . . . 54
Contrast . . . . . . . . . . . . . . . . . . . . . . . . . . . . . . . . . . . . . . . . . . . . 54
Color Correction on Color Output Devices . . . . . . . . . . . . . . . . . 54
Tips and Tricks. . . . . . . . . . . . . . . . . . . . . . . . . . . . . . . . . . . . . . . 56
Capturing Images with Video Cameras . . . . . . . . . . . . . . . . . . . . 56
ImageWare® Systems, Inc. - EPI Suite® Version 6.3 User’s Guide

9
Suggestions for Taking a Perfect Picture . . . . . . . . . . . . . . . . . . . 56
GuardTool Reports Utility
GuardTool Reports Utility . . . . . . . . . . . . . . . . . . . . . . . . . . . . . . 61
Database Connection . . . . . . . . . . . . . . . . . . . . . . . . . . . . . . . . . . 61
Changing Record Selection Criteria. . . . . . . . . . . . . . . . . . . . . . . 64
Option Availability. . . . . . . . . . . . . . . . . . . . . . . . . . . . . . . . . . . . 65
Logs and Reports . . . . . . . . . . . . . . . . . . . . . . . . . . . . . . . . . . . . . 66
Previewing Reports . . . . . . . . . . . . . . . . . . . . . . . . . . . . . . . . . . . 66
Printing Reports . . . . . . . . . . . . . . . . . . . . . . . . . . . . . . . . . . . . . . 67
Event Logs . . . . . . . . . . . . . . . . . . . . . . . . . . . . . . . . . . . . . . . . . . 67
Glossary
Glossary . . . . . . . . . . . . . . . . . . . . . . . . . . . . . . . . . . . . . . . . . . . . 71
Index. . . . . . . . . . . . . . . . . . . . . . . . . . . . . . . . . . . . . . . . . . . . . . . 81

10
ImageWare® Systems, Inc. - EPI Suite® Version 6.3 User’s Guide

11
Introduction
Welcome to EPI Suite 6.3, the most feature-rich electronic photo identifi-cation system available for the Microsoft Windows environment.
The first step on the road to producing and issuing identification cards is to learn how to use the system. This user’s guide is intended for that purpose. It was written to guide you through the process of creating database records, capturing images, printing cards, performing database queries, and generating reports. The procedures outlined in this guide are straightforward, step-by-step instructions that even first-time computer users will be able to follow.
First-Time Computer Users
If you are uninitiated in the use of computers in general, do not be intimi-dated by some of the terminology used in this guide. These terms are common throughout the computer and photo imaging industries. We have included an extensive glossary at the back of this guide to introduce you to the terms that are associated with using GuardCard and digital imaging. This same glossary, and most of these instructions—as well as extensive reference material—are also available on-line, through each application’s Help menu. Please make ample use of these tools.
Contents Summary
The following are brief descriptions of the chapters in this guide.
GuardCard Introduces you to GuardCard 6.3 and provides detailed instructions for inputting cardholder information, capturing images, and printing ID cards.
GuardTool Reports Explains how to generate reports and security event logs using the GuardTool Reports Utility.
Glossary An extensive list of terms and definitions related to the use of EPI Suite.
Introduction -

12
Other EPI Suite Documentation
Administrator’s Guide
This guide is intended for use by the person or persons responsible for maintaining your company’s computer systems, networks and databases. The procedures described in this guide require the system administrator to sign into the EPI Suite applications using an Administrator level account and password.
EPIDesigner User’s Guide
This guide is intended for use by the person or persons responsible for creating card layouts. This guide provides detailed instructions for using all of EPIDesigner’s functionality to the fullest. The procedures described in this guide are accesible only to Administrator-level users.
Getting Started Guide
This guide provides a quick tutorial on the fundamentals of using EPIDe-signer to design a card layout, and GuardCard to set up and print person records. This guide assumes that EPI Suite 6.3 is already installed on your workstation and requires an Administrator level account.
Online Help System Context-sensitive help is available from within each of the EPI Suite applications by pressing the ‘F1’ key at anytime, or by clicking the Help button whenever it appears in a dialog box. Choosing Contents from the Help menu opens the introductory page of the help system.
Most of the procedures described in this guide are available online, as is the glossary when you click the Glossary folder in the GuardCard Help window.
Basic Concepts
Being a Windows-based software application, EPI Suite is very easy to learn, customize and use. Before you get started, however, there are a few basic concepts you should review which will facilitate your understanding of what EPI Suite can do.
ImageWare® Systems, Inc. - EPI Suite® Version 6.3 User’s Guide

13
Conventions This guide uses the following conventions for menus and shortcuts:
What is EPI Suite? EPI Suite (Electronic Photo Identification Suite) is a collection of comple-mentary software applications that includes EPIDesigner, GuardCard, and various utilities for importing data, customizing, backing up, repairing, and compacting the EPI Suite database, as well as generating system reports and security event logs. It is available for stand-alone PCs (EPI Suite Classic), or as a Professional Edition for large networked systems.
EPI Suite Classic is intended for hospitals, K-through-12 schools, mid-range to large corporations, sports facilities, and more. EPI Suite Classic operates on any ODBC-compliant database, and includes EPIDesigner, GuardCard, GuardTool Updater, GuardTool Importer, GuardTool Database Utility, and GuardTool Reports. EPI Suite Classic supports photograph and signature acquisition, and offers complete reporting, a completely customizable user interface, and hard-to-counterfeit image ghosting and cameo effects (chroma-keys).
EPI Suite Professional is designed for multinational manufacturing concerns, government or military installations, public utilities, financial institutions, universities, and other organizations with thousands or even millions of cardholders. EPI Suite Pro operates across a network on any ODBC-compliant database, and can be integrated into third-party software products like access control, time-and-attendance, or point-of-sale systems. EPI Suite Pro incorporates all of the sophisticated features of the EPI Suite Classic stand-alone package, but also includes acquisition
Example Describes
Choose File > Page Setup Choosing the Page Setup command in the Fi le menu.
Ctr l + n Hold ing down Contro l and pressing the lowercase let ter ‘n ’ .
Ctr l + Shi ft + n Holding down Control and Shi ft , and pressing the let ter ‘n ’ .
Right-c l ick Cl icking the r ight mouse button
Ctr l -c l ick Holding down Control and c l ick ing the left mouse button.
Introduction -

14
support for fingerprints, smart chip encoding, security event logs, rapid multi-record retrieval, CCTV interfacing capabilities for high traffic security areas, and GuardStation Mode allowing GuardCard to be used as an ID card scanner.
What is GuardCard?
GuardCard is a robust, easy-to-operate enrollment workstation appli-cation. Capture images with any Windows-compatible device, or import them from existing files. Print professional quality, full-color IDs on any Windows-compatible card printer, and encode cards at the same time. As the hub of your security management system, GuardCard has the power and flexibility to meet all your security and identification needs.
What are GuardTool Reports?
GuardTool Reports lets you print from a selection of popular report templates, including image-enabled cardholder dossiers and operator activity records.
Hardware Key Installation Instructions
EPI Suite Release 6.3 supports 2 types of hardware keys – parallel port and USB. To install the hardware key, refer to the relevant instructions below.
Installing the USB Hardware Key
Install the EPI Suite software first then plug the USB hardware key into any USB port on the PC.
IMPORTANT: If you insert the USB hardware key into the USB port prior to installing EPI Suite, a New Hardware Wizard dialog will be displayed to install Windows drivers for the key. Click Cancel. Do not install Windows drivers for the hardware key. The required drivers will be installed during the EPI Suite software installation procedure.
Installing the Parallel Port Hardware Key
IMPORTANT: If you do not properly install the hardware key on the appropriate printer port (female DB-25), you may permanently damage the key, void your warranty, and nullify your access to the EPI Suite component modules. Not all DB-25 ports are reserved for printers.
ImageWare® Systems, Inc. - EPI Suite® Version 6.3 User’s Guide
15
How to Identify the Printer Port
Here are a few helpful hints on how to identify your computer’s printer port:
• The port is always a female DB-25 (i.e., it has 25 pinholes).
• The port is most often located at the back of the computer.
• The port is never attached to or located on a SCSI board! (Some SCSI boards have female DB-25 ports. These will damage the key.)
• The port is never attached to the Flashpoint capture board! (The Flash-point has a female DB-25. This is not a printer port, and will damage the key.)
To externally identify the Flashpoint card, look for a female DB-25 video input port (to which the camera will be connected) and a female DB-15 high-density video output port with three rows of pinholes (which should be connected to the monitor).
• The port is most often connected to an I/O board. Sometimes, the computer manufacturer will indicate it on the panel where the connectors are located, at the back of the computer. If the manufacturer has not indicated it, open the computer and examine the I/O board. (You may need to refer to the manual that accompanied your computer.) Typically, an I/O board will also have a male DB-9 (i.e., nine-pin) COM port connected to it.
• The port can sometimes be integrated to the computer’s motherboard. Typically, these can be identified by a monitor port, followed by one printer port (LPT1) and two COM ports.
Installing the Key into the Parallel Port
Plug the male end of the parallel port key into the female DB-25 printer port. The male end of the key contains 25 pins, while the female end contains 25 pinholes.
How to Connect a Parallel Printer
If your computer has two parallel printer ports, connect the hardware key to one of the ports and the printer to the other port.
Introduction -

16
If your computer has only one parallel printer port, and you are using a parallel port hardware key, you may need to plug in both at the same time. To do this, perform these steps:
1. Turn off the printer and the PC.
2. Connect the male end of the printer cable to the female end of the hardware key (ensure that the printer is turned off).
3. Connect the hardware key (and printer cable) to the PC (ensure the PC is shut off).
Warning: Never disconnect the printer from the key, or the key from the computer, while the printer is on. This may irreparably damage the key. If you need to disconnect either device, first shut down the printer and the computer.
Troubleshooting Hardware Key Problems
To avoid any potential problems, always ensure that no other applications (including virus checkers and TSR programs) are running during the setup of EPI Suite. If any programs are running, close them and restart the installation.
• Check the hardware key flavor - it must be the same as the EPI Suite flavor you are installing.
• Reconnect the hardware key to the port.
• (Parallel port only) Check the functionality of the parallel port by printing to a parallel document printer connected to this port. First connect the printer to the hardware key and if the operation is failing try without the hardware key. If the port isn’t functional, install EPI Suite on a machine with a parallel port in good working order.
• If you have another EPI Suite workstation that can use its hardware key, test the problem key on this station. Otherwise, install the driver and the program CBRead.EXE on a different machine and read the key.
• (Parallel port only) If no other machine is available, change your parallel port type to “Standard” (neither ECP nor EPP) and run CBRead.EXE.
ImageWare® Systems, Inc. - EPI Suite® Version 6.3 User’s Guide

17
• If the key is not readable, contact your vendor for a replacement key.
• (Parallel port only) If the key is readable but your printer requires an ECP or an EPP port, you will need to install a second parallel port and connect the key and the printer on different ports. Follow the instruc-tions provided on the EPI Suite CD-ROM or the EPI Suite ftp site to set EPI Suite with this environment.
Introduction -

18
ImageWare® Systems, Inc. - EPI Suite® Version 6.3 User’s Guide

19
GuardCardGuardCard is a robust, easy-to-operate enrollment workstation appli-cation. Customize the EPI Suite database and create unlimited cardholder records with information that is truly relevant to your organization’s security. Capture images with any Windows-compatible device, or import them from existing files. Print professional quality, full-color IDs on any Windows-compatible printer, and encode cards at the same time. Secure your data with multi-user password protection, and track operator activity with a wide range of reports and logs. As the hub of your security management system, GuardCard has the power and flexibility to meet all your organization’s security and identification needs.
What’s New in GuardCard 6
The following list outlines new features in version 6 of GuardCard:
• Automatically reposition elements in a card design before printing if they are outside the boundaries of the printable area.
• Use EPIFaceFinder to capture perfect photos. EPIFaceFinder automati-cally locates a face within an image, centers it, crops it, and then stores the image in EPI Suite. See “EPIFaceFinder” on page 25.
• Use GuardCard as an ID card scanner by enabling GuardStation Mode. See“GuardStation Mode” on page 26.
• Launch EPIDesigner directly from GuardCard so that you can quickly access card designs.
• View the active database name in the GuardCard title bar.
• Toggle between databases from a list of the last five databases used.
• View the image creation date below image fields to identify at a glance the images that need to be updated.
• Right-click on the work area (wallpaper ) background to access the display options.
GuardCard -
20
• Select from an expanded list of image labels to set up as default selec-tions (Pro - 15 images, Classic - 5 images).
• View card designs as thumbnails to help identify the correct layout for your current enrollment application.
• Preview draft cards in the Card Format dialog box.
The GuardCard WorkspaceThe GuardCard workspace is divided into two areas called Data Entry forms:
1. The upper data entry form is reserved for the entry of cardholder infor-mation. Data entry fields can be added or removed, and images can be captured, cropped, edited, and stored.
2. The lower data entry form is used to create cards for the cardholder record. Data entry fields can be added or removed. Entries to the Card Code and Card Format fields are mandatory as new card records cannot be created without this information.
Only one record should be created for each cardholder. However, multiple cards can be created for each cardholder record. This is called a “one-to-many” relationship.
Resizing the Workspace
If the workspace is too small to include all of the fields in the viewing area, on the View menu, click Size to Fit to make the window fit on the screen, or maximize the window, or change the screen resolution to 800 x 600 (this is the minimum setting for EPI Suite 6.3). If the monitor is too small to accommodate the entire application window, scroll bars will be activated. You can also remove the Status Bar to gain more screen space by selecting or clearing Status Bar on the View menu.
The Person Toolbar
The Person Toolbar appears across the top of the application window, below the menu bar. It provides quick access to many GuardCard Person Record menu commands, as well as the Queries list (see Figure 1).
ImageWare® Systems, Inc. - EPI Suite® Version 6.3 User’s Guide

21
Figure 1 GuardCard Person Toolbar
The following tools are available in the GuardCard toolbar:
• Browse arrows - enable the user to look through subsets of records that were retrieved using a query of the EPI Suite database. The arrows indicate the First, Previous, Next, and Last records of the retrieved subset. These buttons perform the same functions as the First Person, Previous Person, Next Person, and Last Person commands located on the Person menu.
When a new record is added to the database, the Browse arrows are disabled and the numeric display columns indicate the user is working on record 1 of a subset of 1.
• Person X of Y - indicates the number of the Person Record you are editing and the total number of Person Records in the database.
• Go to Person - allows you to quickly move to another Person Record within the open subset.
• Add - adds a new person record to the EPI Suite database; Delete - removes the active person record from the database; Save - saves the active person record information to the database.
Only users with an Administrator, Supervisor, or Senior Clerk account can delete a record saved in a previous session.
• Capture - allows you to retrieve photographs, signatures and finger-prints using the commands in the list. The captured images will be displayed in the appropriate fields.
• Queries list - allows you to run predefined system queries and custom queries created using the Define Query command on the Query menu. To run a query available from the list, select the query and GuardCard will run it automatically.
• Run Last Query - allows quick access to the Run Last Query command (also located on the Query menu).
A B C D E
F G H
GuardCard -

22
• Define Query - gives you quick access to the Define Query dialog box (same as pressing F3 on the keyboard).
The Card Toolbar The Card Toolbar appears below the Person Data Entry form and provides quick access to many GuardCard Card menu commands
Figure 2 GuardCard Card Toolbar
Items A through D perform card-related actions similar to those of their counterparts on the Person Toolbar.
• Quick Print - allows you to print the selected card directly to your default printer without opening the Print dialog box.
• Quick Print Preview - allows you to preview the selected card directly without opening the Print dialog box.
The Assign Card Code Button
The Assign Card Code button (located on the Card Data Entry form, next to the Card Code field) displays a dialog that prompts you to pass the pre-encoded card through the card reader. This automatically assigns the encoded identification number of the card to the Card Code field.
To activate the Assign Card Code button, configure your card format so the card code can be manually entered. See “Setting Up Card Formats” on page 26 for more information.
Data Entry FieldsData Entry fields allow you to maintain cardholder information, and related card information, in the EPI Suite database. An Administrator can use the Data Field Setup command on the View menu to add, modify, or delete data entry fields on either the Person Data Entry form or the Card Data Entry form.
The following types of data entry fields can be added to the GuardCard Data Entry forms:
A B C D E F
ImageWare® Systems, Inc. - EPI Suite® Version 6.3 User’s Guide

23
• read-only text boxes
• edit boxes
• dropdown list boxes
• dropdown edit boxes
To move forward from one field to another, press the Tab key on your keyboard. To move backward one field at a time, hold the Shift key while pressing Tab. To move between fields, use the mouse to click on the field of your choice.
Mandatory Fields
The following fields are mandatory and cannot be removed from the Card Data Entry form:
• Card Status - used to determine whether a card is valid or invalid, and is assigned automatically. It can only be overridden by users with Administrator, Supervisor, or Senior Clerk accounts.
• Card Format - consists of a EPIDesigner card template and a card code generation method (an Administrator or Supervisor can set these up using Card Format Setup on the File menu). At print time, card formats are combined with cardholder record contents to produce a finished ID card.
The Card Format list indicates which card format is used to produce a specific ID card type. A default card format is automatically assigned when a new card record is created. Card formats can be changed by selecting a new format from the Card Format list. This operation cannot be performed after the record has been saved to the database.
• Card Code - each new card record must be assigned a unique card code. The card code should be printed or encoded on the badge, so card readers retrieve the correct cardholder record from the EPI Suite database. GuardCard does not allow two different cards to have the same card code.
Card codes can be entered manually by the system operator, or can be automatically generated by GuardCard. See “Setting Up Card Formats” on page 26 for more information on card code generation methods.
GuardCard -

24
Image Display Fields
GuardCard Image Display fields appear in the Person Data Entry form and allow users to store cardholder photographs and signatures. The EPI Suite Pro edition also allows users to store cardholder fingerprints.
When EPI Suite is first installed, the Photograph, Signature and Finger-print Image Display fields appear on the GuardCard workspace. Users with Administrator privileges can modify which image fields display by accessing the Image Setup options on the Image menu.
You may adjust the image appearance at any time by right-clicking on the image and selecting a command from the submenu. The commands available for Clerk users are: Capture, Load from File, Enhance, Adjust by Example, and Save to File. Detailed information about these features is available from the Help file by opening the dialog box and then clicking Help or pressing F1 on your keyboard.
Modifying Image Display Fields
All Image Display fields can be modified using the options on the Image Setup dialog box. To access this, on the Image menu, click Image Setup. Click the Image Type list to select from the available image types. The undefined image types provide more options for storing multiple images. The number of undefined images available depends on your version of EPI Suite:
• Pro - Photograph, Signature, Fingerprint, Image4 - Image15
• Classic - Photograph, Signature, Fingerprint, Image4, Image5
• Lite - Photograph, Signature, Fingerprint
You can also rename a defined image type. For example, if you are not using fingerprints as a component of the identification system and you would rather store two photographs and a signature for each cardholder, the Fingerprint image display field can be modified to store an additional cardholder photo.
Capture Settings To modify the settings for capturing images, follow these steps:
1. In the Image Setup dialog box, click Capture Settings.
2. The Select Image Source dialog box appears. Select from the Capture
ImageWare® Systems, Inc. - EPI Suite® Version 6.3 User’s Guide

25
Profiles list.
3. Click Properties for advanced capture settings options.
4. In the Capture Profile Properties dialog box, select from the 3 tabs to work with Image Enhancements, Image Cropping, and Drivers.
EPIFaceFinder When enabled, EPIFaceFinder automatically locates a face within an image, centers and crops it, and then stores (references) the image in EPI Suite.
To modify the settings for face-finding, follow these steps:
1. In the Image Setup dialog box, select an image from the Image Type list. Note that each image type has to be set up in order to use the face-finding feature.
2. Select the box Automatic face-finding during capture if you want to enable this feature.
3. Click Settings. The EPIFaceFinder Settings dialog box appears.
4. In the options for Display the image cropping and enhancement dialog, select either Always, Only if no face is detected, or Never.
5. Set the Size of cropping area around the face by sliding the indicator on the bar towards Small or Large.
6. (Optional) In the Performance area, select the box to Shrink large images to speed up face detection. Enter the Maximum size in pixels.
Note: Choose this option only if the capture process appears to be slow and you want to improve performance.
7. Click OK.
Signing Operators into GuardCardUsers must sign to the system before starting a new data entry session.
To log on without having to exit and restart the program, follow these steps:
GuardCard -

26
1. On the View menu, click Sign In. The GuardCard Sign In dialog box appears.
2. Enter your user name and password.
3. Click OK. The title bar of GuardCard displays your user name and security level (Viewer, Print Clerk, Clerk, Senior Clerk, Supervisor, or Administrator).
GuardStation Mode
GuardStation Mode allows GuardCard to be used as an ID card scanner.
Note: GuardStation Mode is available in EPI Suite Pro only.
When GuardStation Mode is enabled, the edit fields in GuardCard are disabled, and GuardCard responds to card swipes.
When a card is swiped, GuardCard moves to that record and displays whether the card is valid or not. If the card is invalid, the text “Invalid Card” is displayed at the bottom of each picture in the Person pane.
Note: Before GuardStation Mode can scan ID cards, a card reader has to be enabled.
Enabling GuardStation Mode for Users
The Administrator must enable GuardStation Mode for the different user levels. Any user can enable or disable GuardStation Mode once they log in, but the mode will be reset to the admnistrator-set default when they log back in at a later time.
Setting Up Card FormatsOnly an Administrator has the authority to set up card formats. These must be set up before card records can be created in the EPI Suite database. See the EPI Suite Administrator’s Guide for more information, or contact your System Administrator.
ImageWare® Systems, Inc. - EPI Suite® Version 6.3 User’s Guide

27
Maintaining the Database
Database Records
A cardholder record is a database record that contains information about the cardholder (for example, first name, last name, title, or department). The cardholder record is also used to store images such as the photograph, signature, and fingerprint of that individual.
A card record is a database record that contains information about the card (for example, format, code, or status). One cardholder record should be created for each person. Users can then create as many card records for that cardholder as they wish.
Records can be created by users with Clerk, Senior Clerk, Supervisor, or Administrator privileges. Deleting or modifying records can only be performed by a user with Supervisor, Administrator, or Senior Clerk privi-leges.
Creating New Database Records
GuardCard is used to register cardholders in the EPI Suite database. During the print process, the contents of the cardholder record are automatically merged with a card format and cardholder image to produce a full-color ID card. After the card is issued, it may be used to gain access to secure areas of your site.
When GuardCard is launched, the workspace Data Entry forms are blank. Users must create a new cardholder record, enter the card data, capture the cardholders images, and print the card. To do this, follow these steps:
1. On the Person menu, click Add New Person. A new cardholder record is added to the EPI Suite database. Depending on how system preferences for GuardCard are set, a new card record can be created simultaneously.
2. Enter information into the data entry fields.
3. On the Person menu, click Save Person. The new cardholder record is saved to the database.
4. Capture the cardholder images.
5. On the Card menu, click Save Card. The card record is saved to the
GuardCard -
28
database.
6. Print the card immediately, or print cards in batches at a later time.
7. Repeat steps 1 to 6 as often as necessary.
Creating Additional Card Records for a Cardholder
If you need to add a new card to several persons in your database, an Administrator or Supervisor can perform this task quickly using the Batch Add Card command on the Query menu (refer to the Adminis-trator’s Guide for more information).
To create additional card records (for example, if you need to issue more than one type of card to a cardholder), follow these steps:
1. Query the EPI Suite database to locate the cardholder record you want. See “Defining a Query” on page 37 of this guide for more information.
2. On the Card menu, click Add Card. A new card record is added to the database and related to the cardholder record on the screen. The default card format (specified by the Card Format Setup command on the File menu) appears in the Card Format list and the card status is set to “Unprinted”.
Note: To select a different card format, select it from the Card Format list.
3. Enter information in the data entry fields.
Note: To use the card code from a pre-encoded card, click Assign Card Code and pass the card through an integrated card reader.
4. On the Card menu, click Save Card. The card is saved to the EPI Suite database.
5. Print the card immediately, or print cards in batches at a later time.
6. To create additional cards for this cardholder, repeat steps 2 through 5. To create cards for a different cardholder repeat steps 1 through 5.
ImageWare® Systems, Inc. - EPI Suite® Version 6.3 User’s Guide

29
Note: After printing a card, the status may change from “Unprinted” to “Valid” or “Printed, not validated”. A Supervisor, Administrator, or Senior Clerk can change the status using the Change Card Status command on the Card menu, or the Validate Printed Cards command on the File menu.
Modifying a Record
You can modify records after they have been saved. On the Card menu, click Refresh Card Data. This command returns the data entry fields to their last saved state.
Note: Users with Clerk privileges (or fewer) cannot modify records retrieved by querying the EPI Suite database. Modifying records must be performed by a user with Supervisor, Administrator, or Senior Clerk privileges. However, when the card status is set as "Unprinted", clerks can modify the retrieved card record without authorization. If the card status is other than "Unprinted", users with the Senior Clerk, Adminis-trator, and Supervisor accounts can only modify the non-controlled fields. In the default database, these fields include Description, EndDate and StartDate. See the EPI Suite Administrator’s Guide for more information.
Deleting a Record
Users with Clerk privileges can only delete person records prior to leaving that record or running a new query. Clerks can, however, replace a captured image, modify, or delete a card record at any time. Only a user with Supervisor, Administrator, or Senior Clerk privileges can delete database records. See the EPI Suite Administrator’s Guide for more infor-mation, or contact your system administrator.
ImagesImages can be added to, or deleted from, the cardholder record at any time. Images can be captured from digital cameras, video cameras, image or biometric scanners, signature pads, the Windows Clipboard (depending on how your device captures images), and from previously saved files.
Note: Only a user with Supervisor or Administrator privileges can delete an image from a cardholder record. The image types referred to here are Photograph, Signature, Fingerprint, and Image 4 + (Classic and Pro only).
GuardCard - Images

30
If any of the image names are changed (using Image Setup) the new names appear throughout the GuardCard menu system. Some items may not be available, depending on how the display options are set up.
Selecting Image Sources
To select an image source, follow these steps:
1. On the Image menu, point to Image Setup. The Image Setup dialog box appears.
2. Click Capture Settings and then select an image type. The Select Image Source dialog box appears (see Figure 3).
Figure 3 Select Image Source dialog box
3. From the Capture Profiles list, select the device driver (for example, “Canon Digital ID Camera”). Note: If the images have already been created and saved to disk, select Load image from file.
4. Click OK.
5. Repeat Steps 1 to 3 for each applicable image type.
Loading Images from Existing FilesTo load an image from your local or network drive, follow these steps:
1. Ensure the image source is set to Load image from file. See “Selecting Image Sources” in the EPI Suite Administrator’s Guide.
2. On the Image menu, click Capture.
ImageWare® Systems, Inc. - EPI Suite® Version 6.3 User’s Guide

31
3. Select the image type from the list. The Open dialog box appears (see Figure 4).
Figure 4 Open dialog box
4. Locate the image, and then click Open. The Image Enhancement dialog box appears displaying the selected image.
Figure 5 Image Enhancement dialog box
5. Make any necessary color adjustments (detailed information is available in the Help files by pressing F1 on your keyboard). Also see “Image Enhancement” on page 52 of this guide for more information.
6. Click OK. A digitized image appears in the appropriate Image Display field.
GuardCard - Images

32
Capturing Images with a Video CameraTo capture an image from a video camera, perform these steps:
1. Ensure the image source is set to the driver that came with your camera. See “Selecting Image Sources” in the EPI Suite Administrator’s Guide.
2. On the Image menu, click Capture and select the image type from the list.
3. The video capture dialog box of your camera driver appears displaying the live video image.
4. Click Stop Video (or equivalent) to freeze the live image. The Image Enhancement dialog box appears.
If you are unsatisfied with the result, click Play Video (or equivalent) and repeat this step until a satisfactory still video image appears.
5. Crop the image and make any desired color adjustments. See “Image Enhancement” on page 52 of this guide for more information.
6. Click OK. A digitized image appears in the appropriate Image Display field.
Capturing Images with a ScannerTo capture an image from a scanner, follow these steps:
1. Ensure the image source is set to your installed scanner driver (for example, “HP Scanner”). See “Selecting Image Sources” in the EPI Suite Administrator’s Guide.
2. On the Image menu, click Capture and select the image type from the list. GuardCard launches the manufacturer’s driver that was installed when the scanner was set up.
3. Scan the image using the application, and click Done (or equivalent) when finished. The Image Enhancement dialog box appears displaying the scanned image.
4. Crop the image and make any desired color adjustments. See “Image
ImageWare® Systems, Inc. - EPI Suite® Version 6.3 User’s Guide

33
Enhancement” on page 52 of this guide for more information.
5. Click OK. A digitized image appears in the appropriate Image Display field.
Capturing Images with a Signature PadTo capture an image from a signature pad, follow these steps:
1. Ensure the image source is set to Inforite Signature Pad (or similar). See “Selecting Image Sources” in the EPI Suite Administrator’s Guide.
2. On the Image menu, click Capture and select Signature from the list. GuardCard displays a live “note pad” which interfaces directly with the image capture device.
3. Have the user sign his or her name on the capture device.
4. Click Enter. The Image Enhancement dialog box appears displaying the signature. See “Image Enhancement” on page 52 of this guide for more information.
5. Click OK. A digitized image appears in the appropriate Image Display field.
Capturing Images from the Windows ClipboardSome image capture devices allow the capture of images directly to the Windows Clipboard. The user must then paste the image into the appro-priate display field.
If your device uses this method of image capture, follow these steps:
1. Capture the image to the Windows Clipboard, according to the instruc-tions provided by the device manufacturer.
2. Highlight the appropriate Image Display field.
3. On the Edit menu, click Paste. The Image Enhancement dialog box appears displaying the image. See “Image Enhancement” on page 52 of this guide for more information.
GuardCard - Images

34
4. Make any cropping and color adjustments as required.
5. Click OK. A digitized image appears in the appropriate Image Display field.
Cropping ImagesWhen images are captured, they appear in the Image Enhancement dialog box, which allows you to crop them to your requirements (see Figure 5 on page 31).
In the Original Image area, a cropping rectangle is placed directly over the center of the image. The aspect ratio of the cropping rectangle is automatically set to that of the image and, depending on how the system preferences have been configured, you may be able to resize it. See the EPI Suite Administrator’s Guide for more information.
Capturing a Whole Image
When a captured image appears in the Image Enhancement dialog box, the cropping rectangle will appear over the image according to the dimen-sions and aspect ratio preset in the system preferences. Depending on how your system has been configured, it is possible that you can change the size of the cropping area, but not the shape. Click OK to import the image into your Person record.
Capturing a Portion of an Image
To capture only a portion of an image, follow these steps:
1. With the captured image displayed in the Image Enhancement dialog box, place your mouse over one of the handles of the cropping rectan-gle. The cursor changes to a two-headed arrow allowing you to resize the cropping rectangle.
2. Drag the cropping rectangle handle toward or away from the center of the cropping area. This resizes the cropping rectangle by adjusting one of its sides.
To resize all sides of the rectangle at the same time, place your mouse pointer in the middle of the cropping area, press and hold the right mouse button, and drag the pointer in any direction. This maintains the image’s aspect ratio as it was immediately before performing this
ImageWare® Systems, Inc. - EPI Suite® Version 6.3 User’s Guide

35
action. That is, if you changed the image’s aspect ratio using the cropping rectangle, this is the ratio that will be maintained when you right-click and drag the mouse.
3. Move the cropping rectangle to cover the portion of the image you want to capture.
4. Click OK to import the image into your Person record.
Saving ImagesThese instructions describe how to save an individual image to your hard disk. If you need to save images from more than one cardholder record, you may want to consider the advantages of batch-exporting (Adminis-trator only). See the EPI Suite Administrator’s Guide for more infor-mation.
Note: Only a user with Supervisor, Administrator, or Senior Clerk privi-leges can save an image from a record that was retrieved using a database query.
To save an image to your hard drive, follow these steps:
1. Query the EPI Suite database to locate the cardholder record you require.
2. On the Image menu, click Save to File.
3. Select an image type from the list. The Save As dialog box appears (see Figure 6).
GuardCard - Images

36
Figure 6 Save As dialog box
4. Name the image and specify the folder where it will be stored.
5. Select the file type, color profile and compression quality (detailed information is available in the Help files by clicking the Help button or by pressing F1 on your keyboard).
6. Click Save.
Deleting ImagesGuardCard enables users to delete individual images so they can be replaced with new ones. If you need to remove images from a large number of database records, you should consider the benefits of batch-deletion (Administrator only). See the EPI Suite Administrator’s Guide for more information.
Note: Only a user with Supervisor or Administrator privileges can delete an image from a record that was retrieved using a database query.
Click the appropriate Image Display field within the workspace, and press Delete on the keyboard, or right-click the image and choose Delete from the submenu. GuardCard displays a dialog confirming your actions. Click Yes to delete the image.
ImageWare® Systems, Inc. - EPI Suite® Version 6.3 User’s Guide

37
Querying the DatabaseThese instructions should be reviewed by users who need to retrieve EPI Suite database records or use GuardCard’s batch processing utilities.
Defining a QueryTo define a custom query and save it to the EPI Suite database, perform these steps:
1. On the Query menu, click Define Query (or click the Define Query button on the toolbar, or press F3). The Define Query dialog box appears (see Figure 7).
Figure 7 Define Query dialog box
To search for cardholder records, complete steps 2 to 6 below. To search exclusively for card records, clear the “Value” fields in the Person Data area of this dialog box and proceed directly to step 7.
GuardCard - Querying the Database

38
Note: You will notice that when you open the Define Query dialog box, GuardCard remembers the parameters you set for your last query, whether you saved it or not.
2. Click New to open a blank query form, or click Open to select and modify an existing query.
3. From the Database Field list (or, if you are using an ODBC data source, the Column <Field> Name list) of the Person Data area, select the appropriate database field.
Your selection is used to search for a specific cardholder record, or a subset of cardholder records, by comparing its contents with the value specified in the corresponding Value box.
4. From the Compare list, select any of the following options (this specifies what type of comparison will be made against the contents of your specified field and the value you enter in the corresponding Value box):
• = (equals) - indicates the contents of the field you selected should be equal to the value entered in the corresponding Value box.
• <> (not-equal-to) - indicates the contents of the field you selected should not be equal to the value entered in the corresponding Value box.
• > (greater-than) - indicates the contents of the field you selected should be greater than the value entered in the corresponding Value box.
• < (less-than) - indicates the contents of the field you selected should be less than the value entered in the corresponding Value box.
• >= (greater-than or equal-to) - indicates the contents of the field you selected should be greater than or equal to the value entered in the corresponding Value box.
• <= (less-than or equal-to) - indicates the contents of the field you selected should be less than or equal to the value entered in the corresponding Value box.
• Null - indicates the contents of the field you selected should be null (empty). You do not need to enter a value if you select this option.
• Not Null - indicates the contents of the field you selected should be not null (filled with any type of information). You do not need to enter a value if you select this option.
ImageWare® Systems, Inc. - EPI Suite® Version 6.3 User’s Guide

39
Note: Select this option if you used the option of leaving the Value field blank in EPI Suite 4.0.
5. In the Value field of the Person Data area, enter the value by which the selected database field contents will be compared.
For example, to search for all cardholders whose last names are “Smith,” select the Last_Name field in the Database Fields list, “=” as the comparison option, and type “Smith” in the Value box.
SQL Wildcards - can be used to search for batches of records. For example, to search for all cardholders whose last names begin with the letter “S,” select the Last_Name field in the Database Fields list, “=” as the comparison option, type “S*” (or your appropriate SQL wildcard) in the Value box, and then click OK.
Ask User - This user-definable option is available from any Value dropdown list. If you select this option, GuardCard will prompt you to enter the value for that database field when you run the query (see Figure 8). As well, if you need to perform more than one query in this manner, you can click the “push pin” to keep the dialog box open on top of your GuardCard workspace.
Figure 8 Entry Query Values dialog box
6. Repeat steps 2 to 4 for each additional search parameter you wish to define (up to three levels of parameters may be used to search for cardholder records).
Note: If do not wish to search for records using all three criteria, delete the unwanted criteria by highlighting it and pressing Delete on the keyboard. For example, to search for cardholders by last name, select the Last_Name field as your first search criterion, and then delete the two remaining Database Field criteria.
7. From the Database Field list of the Card Data area, select the field of your choice. Your selection is used to search for a specific card record,
Push pin
GuardCard - Querying the Database

40
or batches of records, by comparing its contents with the value you specify in the corresponding Value box.
Note: This step is not applicable to the Card Format and Card Status listings.
8. From the Compare list, select a comparison option. (For a description of the available options, see Step 3 above).
Note: Only the = (equal to) and <> (not equal to) options are available when searching for cards by format or status.
9. Enter the value by which the selected database field contents will be compared.
In the case of the Card Format database field, you can only select one of the currently available options (you cannot search for a card format that has not yet been set up in Card Format Setup). If you search by Card Status, you can only select one of the hard-coded card status settings.
10. To find only person records with (or without) a certain type of image, select the Select only people: option from the Images area. Then select either With or Without <image type>. This will return only the records that conform to your specified parameters and have (or don’t have) the specified image type. You can specify more than one image type by clicking on each type to select it.
11. To use the default sorting parameters, on the Query menu, click Set Default Sorting, and then click Clear Values.
To change the sorting parameters, select from the options in the Sort Records dialog box (see Figure 10). See “Setting Default Sorting Options” on page 41 of this guide for more information.
12. To run a new query without saving it, click Run.
To save and run a new query, click Run and Save.
To save an existing query under a new name, click Save As. The Save Query As dialog box appears (see Figure 9). Type in the new query name and click OK. You will return to the Define Query dialog box. Click Run to run the query you have just saved.
ImageWare® Systems, Inc. - EPI Suite® Version 6.3 User’s Guide

41
Figure 9 Save Query As dialog box
Setting Default Sorting Options
Default sorting options can be set for custom queries created using the Query > Define Query command. Sorting parameters can be used for new queries, or overridden by modifying a saved query.
To set the default sorting options, follow these steps:
1. On the Query menu, click Set Default Sorting. The Sort Records dia-log box appears.
Figure 10 Sort Records dialog box
2. Select the desired sorting fields from the following Person Data lists:
• Field 1 - select the primary sorting criterion of your choice. For example, if you select the Last_Name field, the database records are sorted alphabetically by the cardholders last name. Leave this field empty if you do not want to specify a primary sorting condition.
• Field 2 - select the secondary sorting criterion of your choice. For example, if you select the Last_Name field as your primary sorting
GuardCard - Querying the Database

42
criterion and the First_Name field as your secondary sorting option, the database records are first sorted alphabetically by the cardholder’s last name, and then by the cardholder’s first name (such as “Andy Smith”, “Brad Smith”, “Carla Smith”). Leave this field empty if you do not want to specify a secondary sorting condition.
• Field 3 - select the third sorting criterion of your choice. For example, if you select the Last_Name field as your primary sorting criterion, the First_Name field as your secondary sorting option, and the Employee_Number field as your third sorting condition, the database records are first sorted alphabetically by the cardholder’s last name, then by the cardholder’s first name, and finally by the cardholder’s employee number. Leave this field empty if you do not want to specify a third sorting condition.
• Ascending/Descending - all criteria can be sorted in ascending or descending order. Select the appropriate option to specify the order for the sorting criteria.
3. To sort records using any three fields in the EPI_CARD table of the EPI Suite database, repeat step 2 for the Card Data area of the dialog box.
4. Click OK.
Each time you define a new query, your records are sorted according to the criteria specified (unless you choose to override these settings).
Running a QuerySaved or predefined system queries can be run using the following three different methods:
• Method One - select a custom or predefined system query from the Queries list on the GuardCard Person toolbar. Here you will see a list of all recently run queries, with the five most recent at the top. (Custom queries must be saved to appear in the list, see “Defining a Query” on page 37 for more information.)
• Method Two - click the Run Last Query button on the toolbar (or click Query > Run Last Query; or press F5). The last selected or defined query is run (whether or not it was saved to the EPI Suite database).
Note: If the last defined query was not saved to the EPI Suite database, this command only works during the current GuardCard session.
ImageWare® Systems, Inc. - EPI Suite® Version 6.3 User’s Guide

43
• Method Three - click Define Query (or on the Query menu, click Define Query and then click Open in the Define Query dialog box). The Open Query dialog box appears (see Figure 11).
Figure 11 Open Query dialog box
Select a saved query and click Open. The query is opened in the Define Query dialog box. Click Run to run the opened query.
Note: This last method is helpful if you want to use a previously configured custom query while defining a batch process.
Modifying a QueryCustom queries that have been saved, and predefined system queries can be modified.
To modify a query, follow these steps:
1. Click the Define Query button (or on the Query menu, click Define Query, or press F3). The Define Query dialog box appears.
2. Click Open. The Open Query dialog box appears (see Figure 11).
3. Select a query and click OK. The query is opened in the Define Query dialog box.
4. Make the required modifications to the searching and sorting param-eters of the query record.
5. Click Save to save the query with the same name, or Save As to save the modified query under a new name.
GuardCard - Querying the Database

44
Deleting a QueryCustom queries that have been saved in the EPI Suite database can be deleted. Predefined system queries can also be deleted.
Note: Only users with a Supervisor or Administrator account can delete a query.
To delete saved queries, follow these steps:
1. On the Query menu, click Delete Queries. The Delete Queries dialog box appears (see Figure 12).
Figure 12 Delete Queries dialog box
2. Select a query and click OK (to delete multiple queries, CTRL-click the selections, then click OK). A dialog appears to confirm the deletions before proceeding.
3. Click Yes. The selected queries are deleted.
Checking CardsIndividual records can be retrieved by passing cards through a card reader. The card reader queries the EPI Suite database by searching for a record using its individual card code. This is called “checking” a card.
To check a card, on the Card menu, click Check Card, or press F4. The Check a Card dialog box appears. Pass the card through the integrated card reader and a message appears indicating whether the card is currently valid or not. If valid, the appropriate cardholder and card records are retrieved from the EPI Suite database and displayed on the GuardCard workspace.
ImageWare® Systems, Inc. - EPI Suite® Version 6.3 User’s Guide

45
Batch ProcessingGuardCard allows you to export, update and delete information and images in batches from the EPI Suite database, add cards to several person records, and print or preview cards in groups.
Note: Only users with a Supervisor or Administrator account can use batch editing processes (all user levels but Viewer can use Batch Print or Batch Preview). For complete instructions on batch processing, See the EPI Suite Administrator’s Guide for more information.
GuardCard - Batch Processing
46
Card Printing and EncodingA printed card is produced by merging a card format with information and images stored in the EPI Suite database. This is an automatic process. If a magnetic stripe or smart chip encoder is installed in the printer, and if the card format (.GDR or .DGN) contains track layout information, cards can also be automatically encoded during the print process.
Note: Cards do not have to be printed to use GuardCard to its fullest capabilities. Cardholder records can be maintained in the EPI Suite database without printing cards and security can be maintained at your site, even if your company does not issue ID cards.
On the File menu, click Quick Print Card and Quick Print Preview Card to automatically save and print or preview your cards on your default printer without accessing the Print dialog box.
Overriding the Default Print and Page SetupAll necessary printer and page information is stored in the card format when it is designed using EPIDesigner. This information can be overridden (for example, if a printer or card stock is unavailable). For instructions on overriding the printer settings of the card format, refer to the Administrator’s Guide.
To override the page settings of a card format, follow these steps:
1. On the File menu, click Page Setup. The Page Setup dialog box appears (see Figure 13).
ImageWare® Systems, Inc. - EPI Suite® Version 6.3 User’s Guide

47
Figure 13 Page Setup dialog box
2. Select a printer from the printer Name list.
3. Select Print Color and K planes on separate pages if your card printer outputs four process colors (cyan, magenta, yellow and black) when they are specified on separate document “pages.”
The first page should be in CMY, and the second in monochrome. This option merges the two pages into one, to output four-color process.
4. (Optional) In the Page Margins area, adjust the left, right, top and bottom page margins by entering new values in the appropriate fields.
Note: If margin settings are switched automatically to negative values, cards cannot be printed according to card size and page layout specifi-cations. The system informs you when this has occurred and gives you the chance to change the settings.
5. In the Page Layout area, type the number of cards to be printed across and down the page. Then set the Horizontal and Vertical Spacing between the printed cards.
6. Click the Duplex tab and select from the options for printing the front and back or cards on the same page. If you click Print fronts and backs
GuardCard - Card Printing and Encoding

48
on separate pages (for double-sided printing), select from the orien-tation options.
7. Click OK.
Printing Individual CardsCards can be printed individually to issue temporary passes or reprint cards that have been lost or stolen. To enroll large numbers of cardholders in a limited period of time, cards can be batch-printed. Refer to the EPI Suite Administrator’s Guide for more information.
Note: Cards can only be printed if the status is set to “Unprinted.”
To print individual cards, follow these steps:
1. Query the EPI Suite database to locate the appropriate cardholder and card records.
2. On the File menu, click Print Card, or click the Print button on the Card entry form toolbar. The Print dialog box appears (see Figure 14).
Figure 14 Print dialog box
3. Select the appropriate card side option from the Print side list. The following options are available:
• Front - to print only the front of the card
• Back - to print only the back of the card
ImageWare® Systems, Inc. - EPI Suite® Version 6.3 User’s Guide

49
• Front and Back - to print both the front and back of the card. This option can be used if you have a duplex printer, or want to manually flip the cards over to print on the back.
4. Click OK. The print process begins.
Quick Print On the File menu, you can select Quick Print and Quick Print Preview. When you choose one of these commands, all changes will be saved and the print job will be sent directly to your default printer’s driver - you will not see the Print dialog box first. As well, the Print and Preview buttons on the Card Toolbar perform these functions instead of opening the Print dialog box.
Encoding Cards While Printing
The process of encoding cards usually takes place during the printing process. ID cards can be encoded by choosing either Print Card or Batch Print Cards on the File menu.
If an ID card printer with an internal smart chip or magnetic stripe encoding module is used, and you want to encode ID cards while printing, ensure that the following preparatory steps have been made:
• The smart chip or magnetic stripe tracks in the EPIDesigner card design have been properly laid out.
• The card design was used to create a card format in GuardCard (see “Setting Up Card Formats” on page 26 of this guide).
• The appropriate ID card printer is selected as the default GuardCard printer (on the File menu, click Page Setup).
• The appropriate device driver is selected (on the File menu, click Card Printer Encoder Setup). Refer to the Administrator’s Guide for more information.
• At least one record is created with the card format that contains the properly laid out Smart Chip or Magnetic Stripe information.
GuardCard - Card Printing and Encoding
50
Encoding Cards on External DevicesThe magnetic stripes of a card can be encoded using an external card encoding device. On the File menu, click External Card Encoder Setup and the External Encoders Setup dialog box appears. Follow the instruc-tions on your screen.
Ensure that the following preparatory steps have been done:
• The magnetic stripe tracks in your EPIDesigner card design have been properly laid out.
• The card design was used to create a card format in GuardCard (see “Setting Up Card Formats” on page 26 of this guide).
• The appropriate device driver is selected (on the File menu, click External Card Encoder Setup). Refer to the EPI Suite Administrator’s Guide for more information.
• At least one record has been created with the card format that contains the properly laid out magnetic stripe information.
• Your card encoder is turned on.
Card Status
GuardCard ID cards can have a card status of “Valid” or several categories of invalidity. Valid cards are those that grant the access of predetermined privileges to the cardholder (such as, facility access or membership benefits). An invalid card will deny the cardholder access to the privileges. Possible reasons for an invalid card status are outlined in the following sections.
Note: All changes to a card’s status require authorization by a Super-visor, Administrator, or Senior Clerk. See the EPI Suite Administrator’s Guide for more information.
Valid Cards A valid card cannot be reprinted until the card status has been changed to “Unprinted”. In GuardCard, a valid card record has a card status of “Valid”. There are circumstances when this is not obvious. For example,
ImageWare® Systems, Inc. - EPI Suite® Version 6.3 User’s Guide

51
when a card is issued and printed prior to its start date, the card record is valid, but the printed card will only be valid (that is, usable) on or after the start date. If the cardholder attempts to use this card prior to the start date, a message will indicate that the card is invalid, but in this case, it is only because the card is outside its valid date range.
A card within its date range is validated by printing (this automatically sets the card status to “Valid”), or by manually changing the card status to “Valid” by choosing Change Card Status on the Card menu (or by pressing F8 on the keyboard).
Invalid Cards A card record (and its related cardholder record) can be invalidated for a number of reasons such as the following:
• If a Supervisor, Administrator, or Senior Clerk changes a card status from “Valid” to “Unprinted” (to allow reprinting), the card is flagged as invalid. The card should be reprinted immediately as the cardholder will not allowed be allow to enter a secured area until his or her card status is “Valid.”
• If a Supervisor, Administrator, or Senior Clerk changes the card status from “Valid” to any of the invalid statuses (because the cardholder is no longer allowed access to a secured area), the card is flagged as invalid. The cardholder is denied entry at access control stations. The card should not be reprinted unless the security clearance of the cardholder changes.
• If data entry fields are included that signify the issue and expiry date of the card, the card is automatically flagged as invalid if the cardholder attempts to enter a secured area before the issue date or after the expiry date.
GuardCard - Card Printing and Encoding

52
Image EnhancementThis chapter addresses general concepts concerning image enhancement including exposure, contrast, color balance, and image cropping.
To access an image, perform these steps:
1. On the Image menu, click Image Setup.
2. In the Image Setup box, select an image type from the Image Type list.
3. Click the Capture Settings button. The Select Image Source dialog box appears.
4. Select the image source from the list (for example, Load Image From File) then click Properties. The Capture Profile Properties dialog box appears.
5. Select the Apply image enhancement to captured images option.
Here, GuardCard provides you with the tools needed to improve and enhance the color quality of the images you use for your photo IDs (see Figure 15), as well as the settings for automating cropping upon capture (see Figure 16).
ImageWare® Systems, Inc. - EPI Suite® Version 6.3 User’s Guide

53
Figure 15 Capture Profile Properties - Image Enhancements Tab
Figure 16 Capture Profile Properties - Image Cropping Tab
GuardCard - Image Enhancement

54
Exposure Adjusting the Exposure setting changes every color by the same amount (blacks, grays, colors, and whites all become darker or lighter at the same rate). If the Exposure setting is increased, the image becomes brighter and if decreased, the image becomes darker.
Note: Decreasing the Exposure setting can cause white to become gray (the same effect as decreasing the Contrast setting). Contrast can be used to compensate for problems caused by Exposure. Most devices print white and black without problems.
Tip: Change Exposure in increments of 5.
Contrast
Adjusting the Contrast setting helps to define objects if they are not clear. If an image appears too harsh, decreasing the Contrast setting may soften it.
Increasing the Contrast setting causes lighter colors to vanish into white and darker colors to merge with black. The remaining middle tones spread along the entire range of grays to increase the distinction between them. Setting the Contrast setting to its maximum (+50) removes most of the middle grays and maps lighter and darker grays into either black or white.
Decreasing the Contrast setting flattens the distinction between gray values (nearly everything becomes a 50% gray (at -100% contrast) and both white and black become gray.
Tip: Change Contrast in increments of 5.
Color Correction on Color Output DevicesGuardCard uses the Windows 24-bit RGB (Red, Green, Blue) color model to define all colors. These are the colors of the phosphors in a color monitor. When viewed on a monitor, they are considered additive colors,
ImageWare® Systems, Inc. - EPI Suite® Version 6.3 User’s Guide
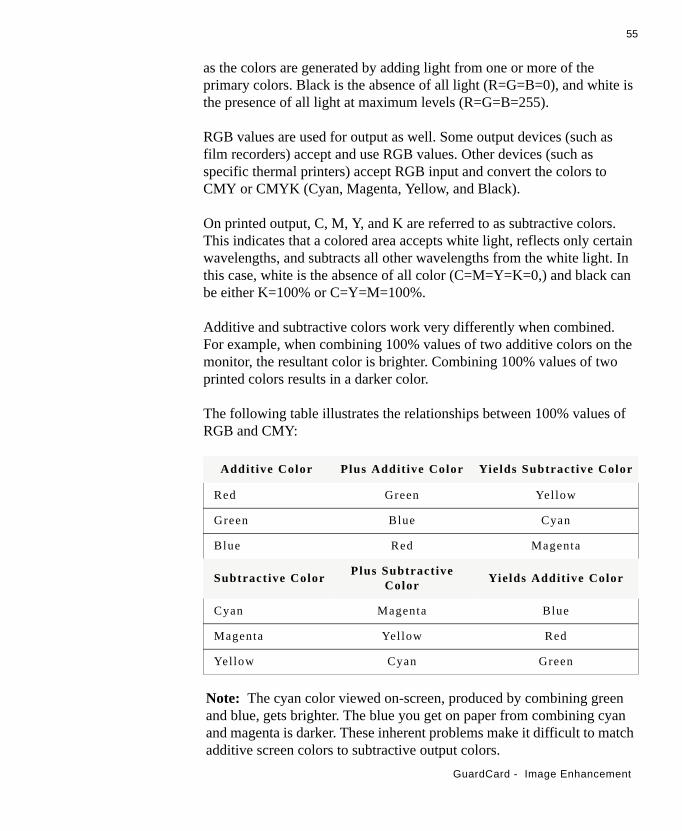
55
as the colors are generated by adding light from one or more of the primary colors. Black is the absence of all light (R=G=B=0), and white is the presence of all light at maximum levels (R=G=B=255).
RGB values are used for output as well. Some output devices (such as film recorders) accept and use RGB values. Other devices (such as specific thermal printers) accept RGB input and convert the colors to CMY or CMYK (Cyan, Magenta, Yellow, and Black).
On printed output, C, M, Y, and K are referred to as subtractive colors. This indicates that a colored area accepts white light, reflects only certain wavelengths, and subtracts all other wavelengths from the white light. In this case, white is the absence of all color (C=M=Y=K=0,) and black can be either K=100% or C=Y=M=100%.
Additive and subtractive colors work very differently when combined. For example, when combining 100% values of two additive colors on the monitor, the resultant color is brighter. Combining 100% values of two printed colors results in a darker color.
The following table illustrates the relationships between 100% values of RGB and CMY:
Note: The cyan color viewed on-screen, produced by combining green and blue, gets brighter. The blue you get on paper from combining cyan and magenta is darker. These inherent problems make it difficult to match additive screen colors to subtractive output colors.
Additive Color Plus Addit ive Color Yields Subtractive Color
Red Green Yellow
Green Blue Cyan
Blue Red Magenta
Subtractive Color Plus Subtractive Color Yields Addit ive Color
Cyan Magenta Blue
Magenta Yellow Red
Yellow Cyan Green
GuardCard - Image Enhancement

56
Tips and Tricks
Capturing Images with Video CamerasWhen capturing images with video cameras, remember the following tips:
• Make sure the subject is well lit. Poor lighting results in a poor photo-graph.
• Do not attempt to photograph a subject who is standing too far away from the camera. Video cameras can zoom in on distant objects, but the image will be grainy with poor color content.
• Photograph subjects against a backdrop. This gives the video camera a large, solid object to focus on. Without a backdrop the camera attempts to compensate for variations in field depth, and there may be problems setting the focus on the subject.
• If the ambient lighting in an office is used (rather than specialized photographic lighting), place the subject against a colorful backdrop (sky blue, red, or green work well). This enhances the flesh tones of the subject and produces a vibrant portrait.
• If using EPIDesigner’s cameo (chromakey) effect, avoid backdrops that have variations in shading or are mottled in color. Instead, place the subject against a well-lit solid-color backdrop. This makes the background pixels easier to remove.
Suggestions for Taking a Perfect Picture
Avoid mixing light sources - use a single type
• Incandescent light: warmer, gives a red cast
• Daylight & Flash: cooler, gives a blue cast
• Florescent light: gives a green cast
ImageWare® Systems, Inc. - EPI Suite® Version 6.3 User’s Guide

57
Distance
• Camera to subject -1.5 meters (Portrait in maximum size).
• Leave 1.5 meters free space between subject and next wall on each side (left and right).
• To reduce shadows behind the subject, move the subject closer to the backdrop.
Changing Settings
• Only change one setting at a time and print a sample after each change.
• If the quality is still poor, reset the last setting and change a different one.
Background Flash
• Use carefully - the portrait will lose contrast if the flash is too bright.
Flash & Camera Position
• Should be installed next to each other.
• Flash should face away from the subject, angled up at 45 degrees and bounced off a reflector so that diffuse light softly illuminates the subject (see Figure 17).
Backdrop Features
• Choose a simple, solid color such as white, pale blue, or light grey for the backdrop.
Position of Subject
• Use a seat with adjustable height and mark its position on the ground. Or modify setup so that subject is standing and height adjustment is done with the camera.
Note: Making extreme height adjustments with the camera can result in a distorted image. Try to keep the camera as close to parallel with the floor as possible.
GuardCard - Tips and Tricks

58
• Subject should sit (or stand) so the background is directly behind their head and shoulders. This is where an adjustable seat works well.
• Subject should sit (or stand) so that their upper body is angled at 45 degrees to one or other side of the camera. Subject should then turn their head to look directly into the camera lens (toward the forward shoulder). This position reduces the “mug shot” quality most ID photos have.
• Subject should look into the lens of the camera - not at the camera operator or the flash.
Subject with glasses
• Have the subject slightly tilt either their head or glasses to avoid reflection from the flash.
Lens Aperture
• Adjustment: small aperture – better sharpness.
• Focus on the subject’s eyes.
Configuration
• Keep it as simple as possible (see diagram that follows)
Image Size
• Capture only the head and shoulders of the subject. Zoom in as close as possible.
ImageWare® Systems, Inc. - EPI Suite® Version 6.3 User’s Guide

59
Figure 17 Setup for Perfect Image Capture
GuardCard - Tips and Tricks

60
ImageWare® Systems, Inc. - EPI Suite® Version 6.3 User’s Guide

61
GuardTool Reports UtilityGuardTool Reports Utility
The GuardTool Reports Utility is used to produce database reports and security event logs.
Database Connection
Photo ID production and card access systems that use more than one database can benefit from reattaching database tables to generate reports for all SQL, Oracle and MS Access databases.
Note: If EPI Suite is not installed in the default directory (listed during the setup procedure), reconnect the EPI Suite Reports module to the database tables before generating reports.
Connecting to a Database
To connect to a database, follow these steps:
1. On the GuardTool Reports main dialog, click Connect to Database. The Select Database Type dialog box appears (see Figure 18).
Figure 18 Select Database Type dialog box
2. From the Data Source list, select the database type whose tables are to be reattached.
3. Click OK. The Select database file dialog box appears (see Figure 19).
GuardTool Reports Utility - GuardTool Reports Utility

62
Figure 19 Select a Database dialog box
4. Navigate to the appropriate directory and select the desired database file.
5. Click Open. The system reconnects the database and returns to the GuardTool Reports dialog box.
Remapping Database Fields
GuardTool Reports gives you the added flexibility of being able to change which fields in your database are mapped (or linked) to the fields in the Reports module. Remapping the database fields allows you to fully customize the preset reports to your specific needs. You can also customize the label names of your reports.
For example, you require a Person - Details report containing information about the cardholders created within the last month. But instead of getting the cardholders’ titles (a default field in the report) you need to see what city they live in. To do this, you would remap the “Title” field in the Person table to gather information from the “City” field. With the new customizable labels, you could then rename the “Title” field label to read “City”.
Note: Only a user with Administrator privileges can remap and rename database fields.
To remap the database fields, follow these steps:
1. On the GuardTool Report main dialog, click Field Name Mapping. The sign in dialog box appears.
ImageWare® Systems, Inc. - EPI Suite® Version 6.3 User’s Guide

63
2. Sign in to the Field Name Mapping dialog box using an Administrator account. The Mapping Report Fields to Database Fields dialog box appears.
Figure 20 Mapping Report Fields dialog box
3. From the dropdown lists available, make any changes required.
4. Click OK. You will return to the main dialog.
To rename the field labels, follow these steps:
1. Follow Steps 1 and 2 above.
2. Change the field labels by deleting the old text and then typing a new one (see Figure 20). You will notice that as in the example given above, the “Title” report field and label now link to the “City” database field and will show “City” as the field label (see Figure 21).
GuardTool Reports Utility - GuardTool Reports Utility

64
Figure 21 Sample Report with Custom Labels
Changing Record Selection CriteriaGuardTool Reports provides you with nine basic report templates. With the exception of the Images - Statistics report, you can modify each report’s selection criteria to make the information presented more meaningful to your requirements. This can be useful when reports are generated for operators to evaluate productivity, or to monitor card printing security.
The selection criteria available for modification will vary depending on the report template you have chosen. Highlight the report to be generated, then click Preview selected report. The Selection Criteria dialog box specific to that report appears. The following are some of the criteria that can be modified:
Date - Defaults to the current date, but can show a fixed date, a range of dates, or the entire history of the database. To change the date, click the Change Date button and define the date range in the Select Date Range dialog box.
Card Format - Defaults to “any” card format, which will return cards created using all card formats within the other selection criteria. To specify a card format, select it from the list.
ImageWare® Systems, Inc. - EPI Suite® Version 6.3 User’s Guide

65
Card Status - Defaults to “any” card status, which will return all cards within the other selection criteria. To specify a card status, select it from the list.
Record selection criteria can be changed using the following methods:
• Highlighting the report to be generated, then click Preview selected report. The Selection Criteria dialog box specific to that report appears.
• Editing within the View Event Log dialog box. (Administrator only)
• Using the Selection Criteria dialog box that appears before a report is printed.
Option AvailabilityThe Selection Criteria dialog box appears before most reports are generated. Not all options are available for modification as they do not all affect the way information is sorted in that particular report. This allows you to modify the selection criteria just prior to printing, if required.
View Event Log Options
Additional selection criteria are available from the View Event Log dialog box. These are:
Operator - Defaults to “any” operator, which will return records created by all operators within the other selection criteria. To specify an operator, type the operator’s user name in the field and press Enter. This is used only by reports that access the log file.
Station - Defaults to “any” station, which will return records created at all stations within the other selection criteria. To specify a station, type the station name in the field and press Enter.This is used only by reports that access the log file.
Person # - this field is linked to the Employee_Number field in the EPI_PERSON table of the EPI Suite database.
If this field is used to identify card holders in the system, it may be useful to sort them using this parameter. If this field is not used to identify card holders in the system, it is not necessary to make an entry
GuardTool Reports Utility - GuardTool Reports Utility

66
when modifying the record selection criteria.
To change the current Person number, enter another alphanumeric code or enter “<any>” to display event logs for all numbers.
Events - this field displays the current security event for which log files will be displayed. For example, when set to Add Card, the log will display all events that include adding a card to the database.
To change the current event, made a selection from the Events list. All log fields pertaining to the event are displayed (to display log files for all events, enter “<all>”).
Card Code - select this option to view event log files related to the use of specific cards at access entry points. To specify a card code, type the card code in the field and press Enter.
Logs and Reports
Previewing ReportsPreviewing a report allows users to view its contents before it is printed to ensure the correct information is displayed.
Reports are classified in the following categories:
• Cards - related to card records maintained in the EPI Suite database.
• Images - related to image records maintained in the EPI Suite database.
• Person - related to cardholder records maintained in the EPI Suite database.
To preview a report, follow these steps:
1. Select the appropriate report from the GuardTool Reports dialog box.
2. Click Preview. The report appears.
ImageWare® Systems, Inc. - EPI Suite® Version 6.3 User’s Guide
67
Note: If selection criteria must be entered before the report can be generated, the system displays a Selection Criteria dialog box. Make the necessary modifications to generate the report and click OK.
3. Click Close on the report window’s toolbar to return to the GuardTool Reports dialog box when finished.
Printing ReportsTo print a report, select it from the GuardTool Reports dialog box, and click the Print selected report button.
Note: If selection criteria must be entered before the report can be generated, the system displays a Selection Criteria dialog box. Make the necessary modifications to generate the report and click OK.
The system outputs the report to the default printer (identified at the bottom of the dialog box). When the report is finished printing, you will return to the GuardTool Reports dialog box.
Note: The reports are designed to work with the EPI Suite database, and assumes entries to the Title, First_Name, Last_Name, and Department fields of the EPI_PERSON table have been made. These fields may be removed from reports by using the Microsoft Access RDBMS.
Event LogsGuardCard can create security event logs that display the following:
• Persons who attempted to gain access to a secured area.
• The time the attempt was made.
• The workstation operator on duty.
• If a video clip or photo was captured during an event.
Log files are automatically recorded in the GA_LOG table in the EPI Suite database, and can be viewed at any time.
Note: Only a user with Administrator privileges can view event logs.
GuardTool Reports Utility - Logs and Reports

68
Viewing Event Logs
1. Click the View Log Table button on the GuardTool Reports dialog box. The sign in dialog box appears.
2. Sign in using an Administrator account. The View Event Log dialog box appears (see Figure 22). The record selection criteria can be changed by modifying the parameters in the Select area of the dialog box.
Figure 22 View Event Log dialog box
3. To view the details of an event, click the square to the left of the Event column to highlight the event.
4. Click the View Details or List button. This displays the information for the highlighted event on one screen (see Figure 23). Change records using the Browse buttons located at the bottom of the dialog box.
ImageWare® Systems, Inc. - EPI Suite® Version 6.3 User’s Guide
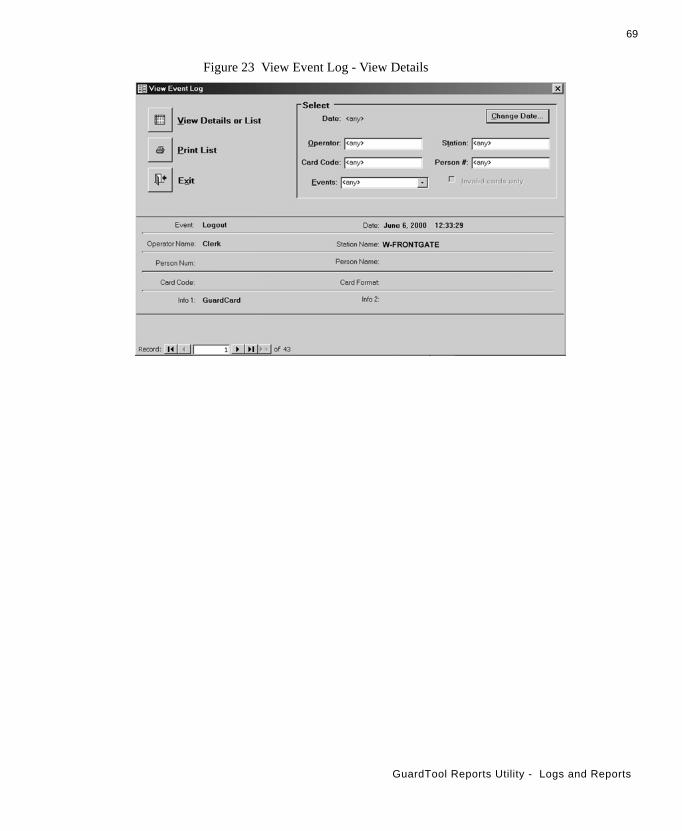
69
Figure 23 View Event Log - View Details
GuardTool Reports Utility - Logs and Reports

70
ImageWare® Systems, Inc. - EPI Suite® Version 6.3 User’s Guide

71
GlossaryGlossary
A
Access Control Station
The EPI Suite access control station is a security guard station that receives data automatically from card readers and manually from keyboards. After receiving the data, the access control station queries the EPI Suite database and displays the image and information of the person who is attempting to enter a secured area.
Administrator The Administrator account has the highest level of security clearance. The Administrator can create, modify, and delete database records, print ID cards, change card statuses, and set up card formats. However, the Admin-istrator also has the ability to customize GuardCard (i.e., add or remove data entry fields, etc.), configure hardware, and maintain user accounts.
Application State GuardCard operates in six different application (or functional) states, each with its own security account and user interface. The six application states are:
• Viewer
• Print Clerk
• Clerk
• Senior Clerk
• Supervisor
• Administrator
The application state is determined by password during the startup procedure, when the user is required to sign into the system.
Aspect Ratio The ratio of the width of an image to its height.
Glossary

72
Attributes Characteristics assigned to objects, with respect to the line and fill. Line attributes include weight (thickness) and color. An object’s fill attribute is a color. Text objects also have attributes, such as the font (typeface), style and color.
B
Bitmap An image composed of a series of dots (pixels). Scanners and paint programs, such as Paintbrush, generate this type of image. By contrast, EPIDesigner creates images using vector objects—shapes stored inter-nally as mathematical equations.
C
Cameo effect An artistic effect that is accomplished by removing the bitmapped image’s background pixels. In the case of photographs, the image backdrop will be removed, and a close-cropped image of the card holder will be placed against the card background.
Card The printed card that has been issued to the cardholder. A card can exist as a record in the database, even if the card itself has never been printed.
Card Background A card background is a high resolution bitmapped image that is imported into the card design. It serves as a scenic backdrop to the graphic objects and static or dynamic data that is printed on the card.
Card Code The card code is a unique number that is assigned to a new card record when it is created in the EPI Suite database. The card code should ideally be printed on the badge as a bar code, or encoded on the badge’s magnetic stripe or smart chip. When a card read is processed, EPI Suite uses the card code to retrieve the cardholder’s record from the database.
Card codes can be manually entered via the keyboard, automatically generated using your own numbering scheme, automatically generated using the ISO/IEC 7812 numbering system, or produced from an auto-
ImageWare® Systems, Inc. - EPI Suite® Version 6.3 User’s Guide

73
combined Person table field and increment. If you intend to use proximity cards, or cards with magnetic stripes or smart chips, they might already have pre-encoded identifiers. In this case the number can be added to the Card Code field through the use of a card reader.
Card Format A card format is a template from which ID cards are produced. It is composed of a EPIDesigner card design (including the cardbackground image, design objects, smart chip or magnetic stripe track layout, and the printer setup information) and the card code generation method.
A card format can only be deleted if there are no cards using the format or if the cards using the format have their statuses set to “Unprinted.”
Card Reader A card reader is an access control hardware device used to read bar codes, magnetic stripes, smart chips, or microwave emissions from the different types of advanced security cards.
Card Status Indicates whether the card is valid or invalid. This, in turn, signifies whether or not the cardholder is allowed access to a secured area.
Cardholder The person for whom an EPI Suite cardholder record is maintained, and to whom the printed card is issued.
Clerk Users who have been assigned Clerk accounts are permitted to create and save database records, and the images stored therein. Clerks also have the ability to query the EPI Suite database, and print ID cards. However, once the information has been entered and saved to the database, the Clerk may not modify or delete it—unless authorization is granted by a Supervisor, Administrator, or Senior Clerk. The Clerk can also update card statuses; but, again, this is done only when a Supervisor, Administrator, or Senior Clerk has authorized the change.
Constrain Holding down the SHIFT key while drawing or resizing an object, to force the object into a specific shape. For example, holding the SHIFT key down while you draw or resize a rectangle forces that object to
Glossary

74
become a perfect square. Images (photographs, fingerprints and signa-tures), when drawn, are automatically constrained to their proper aspect ratios (as determined in GuardCard).
Crop Reducing or increasing the visible area of an image by using the Crop button in the Crop Image dialog box. The area of the image that resides within the rectangle will be cropped and saved to the database. The area of the image that resides outside the rectangle will be discarded.
Cropping Rectangle
In GuardCard, the rectangle with eight handles that signifies the cropping area over a captured image.
D
Data Entry Field Areas in the two GuardCard data entry forms where information, such as the cardholder’s given name, is entered or displayed.
Data Entry Form The window area which is composed of the application’s data entry fields. GuardCard has two data entry forms: 1) The upper Cardholder Record form, which allows you to maintain cardholder information; and 2) The lower Card Record form, which allows you to maintain cards associated with the currently open cardholder record.
Directory A directory is a structure used to organize files on a disk like a drawer in a filing cabinet. Directories have names, and can be divided into subdirec-tories. For example, you can have a directory named CARDS to store your card designs.
Display Box A box that displays, but does not allow you to modify, information about the card holder and his or her related ID cards. This type of field is partic-ularly useful if you have integrated EPI Suite to another database, such as that used by an access control system, and you want to display certain data that should not be changed by anyone—not even the Administrator.
ImageWare® Systems, Inc. - EPI Suite® Version 6.3 User’s Guide

75
Double-click To press and release the left mouse button twice in quick succession.
Drag To move the mouse while holding down the left mouse button.
Drive A device in a computer that spins disks used to store information. Personal computers normally have a fixed, or hard, disk (labeled C) and one or two floppy disk drives (labeled A and B).
Dropdown List A dropdown list allows you to choose commonly-used entries for a specific category of information (such as Blue, Green, Brown or Gray, if you create a pick list for the card holder’s eye color).
Dropdown text box A combination dropdown list box and text box. Allows you to enter data, but maintains that data in a dropdown pick list for future entries.
Dynamic Text Object
A text object in a EPIDesigner card design that has been linked to an EPI Suite database field (e.g., the cardholder’s first name, last name, etc.). Unlike static text, a dynamic text object outputs the variable information that was entered into its associated field.
E
Enrollment Workstation
A computer that operators use to “enroll” new cardholders into the EPI Suite database. A typical enrollment workstation would have GuardCard installed on its hard drive, and be connected to one or more image capture devices and at least one card printer. The operator uses GuardCard on the enrollment workstation to create database records, capture images, and print ID cards.
Expression In EPIDesigner, a combination of operators, constants and names of fields that produce a single value. You can use expressions to combine database fields for magnetic stripe or smart chip encoding, or for database field links to dynamic text objects (e.g., the First_Name and Last_Name fields can be combined into one dynamic text object that prints the cardholder’s full name on a single line).
Glossary

76
Extension Characters following the period in a filename that identify the type of information in the file. For example, the .GDR extension indicates that the file contains a EPIDesigner drawing.
F
Field Label The name which identifies the field. In EPIDesigner, a dynamic text object’s label can be modified using the Object Properties command in the Edit menu.
G
Ghost Image An image or bitmap that is almost transparent, so that the card background can be seen through it.
Grid Markers A series of evenly spaced, intersecting horizontal and vertical dots used to align objects.
H
Handles Small squares that appear on the corners and sides of the cropping rectangle. You can use these handles to resize or move the rectangle over the captured image. The area of the image that resides within the rectangle will be cropped and saved to the database. The area of the image that resides outside the rectangle will be discarded.
Hue The position of a color along the color spectrum. For example, green is located in the spectrum between yellow and blue.
J
Justification The alignment of text in relation to the left, right, top and bottom margins of the text frame.
ImageWare® Systems, Inc. - EPI Suite® Version 6.3 User’s Guide

77
L
Landscape (Page Orientation)
A page oriented so that it prints from left to right across its longest dimension.
Luminosity The brightness of a color on a scale from black to white.
O
Orientation Refers to the direction in which print is oriented on the page. Printing across the width of the page is known as portrait orientation (derived from portraits of people, which are usually vertical in format). Printing across the length of the page is known as landscape orientation (derived from landscape paintings or photographs, which are usually horizontal in format).
P
Pixel Short for “picture element.” Pixels are dots on a computer screen or television that combine to form an image.
Point Size A unit of measurement used primarily in typesetting for designating type sizes. There are approximately 72 points to an inch.
Portrait (Page Orientation)
A page oriented so that it prints from left to right across its shortest dimension.
Print Clerk Print Clerk accounts are assigned to individuals whose soleresponsibility is to print cards. Therefore, Print Clerks are not allowed to modify the EPI Suite database in any way, though full access to the GuardCard printing commands is granted. Also, Print Clerks may change card statuses, but only if a Supervisor, Administrator, or Senior Clerk authorizes the change via password.
Glossary

78
Q
Query To search for and retrieve records from the EPI Suite database, using customizable searching and sorting parameters. New queries can be saved for later use. Unused queries can be deleted.
S
Supervisor The Supervisor account is intended for those individuals in your organi-zation who should be able to create, modify, and delete database records, print ID cards, change card statuses, and set up card formats. The GuardCard menu and button commands related to the full maintenance of the database are available to the Supervisor.
Saturation The purity of a color’s hue, moving from gray to the pure color.
Senior Clerk The Senior Clerk account has all the permissions of the Clerk account, plus the ability to change the card status and edit an existing person and card record without requiring the authorization of a Supervisor or Admin-istrator.
Static Text Object A text object in a EPIDesigner card design that has not been linked to an EPI Suite database field. Unlike dynamic text, a static text object, such as a headline or a field label, remains constant from card to card during the print process.
Symbol PDF417 A two-dimensional symbology that allows you to encode a Portable Data File with ASCII, binary, or numeric data. The Symbol PDF417 is particu-larly useful if you need to encode large amounts of data onto a limited space (e.g., an ID card that requires customer or employee profiles, biometric data, and personal descriptions).
ImageWare® Systems, Inc. - EPI Suite® Version 6.3 User’s Guide

79
T
Text Box A simple text field, which allows you to manually enter alphanumeric or numeric data.
V
Viewer Ordinarily, the Administrator will assign Viewer accounts to users who are responsible for admitting cardholders into a secured area. The Viewer may only query the EPI Suite database to retrieve records. Security clearance may be granted by the Viewer, once he or she has visually deter-mined the validity of the card based on the retrieved data.
The Viewer has the lowest level of application security, and cannot perform database maintenance or card printing functions.
Glossary

80
ImageWare® Systems, Inc. - EPI Suite® Version 6.3 User’s Guide

81
IndexBBatch processing
See EPI Suite Administrator’s Guide
CCard printing and encoding
Encoding cards on external devices 50Encoding while printing 49Individual cards 48Overriding the default settings 46
Card statusInvalid Cards 51Valid cards 50
Color correctionBrightness 54Color output devices 54Contrast 54
CommandsQuick Print 46Quick Print Preview 46
DData entry fields
See also Workspace, GuardCardMandatory fields 23Preconfigured fields 24
DatabaseMaintenance 27
Database recordsCreating 27Creating additional 28Deleting 29Modifying 29
Define Query command 41
EEncoding 49EPIFaceFinder 25Externally Encode Card command 50
GGuardCard
Batch processingSee EPI Suite Administrator’s Guide
Card encodingSee Card printing and encoding.
Card formatsSetting up 26
Card printingSee Card printing and encoding.
Card recordsAdding 28Saving 27, 28
CommandsAdjust by Example 24Batch Print Cards 49Capture 24Card Format Setup 28Change Card Status 29, 51Check Card 44Define Query 37, 43Delete Queries 44Enhance 24External Card Encoder Setup 50Image Setup 30Load from file 24Paste 33Print Card 49Printer Card Encoder Setup 49Quick Print 49Quick Print Preview 49Refresh Card Data 29Run Last Query 42Save to File 24, 35Set Default Sorting 40Sign In 26Validate Printed Cards 29
Database. See Database recordsImages 29–36
Capturing from Clipboard 33Capturing with scanner 32Capturing with signature pad 33Capturing with video camera 32Cropping 34Deleting 36Loading existing files 30Multiple 24Saving 35
Person recordsAdding 27Saving 27
Queries 37–44See also Queries.
Signing in 25GuardStation Mode 26
IImage enhancement 52–55Images
See GuardCard, Images
PPage Setup command 46Print Card command 48Print preview
Batch PreviewSee EPISUITE Administrator’s Guide
Printing 46Batch Printing
See EPISUITE Administrator’s Guide45
Quick Print 46Quick Print Preview 46
QQueries
Checking cards 44Defining 37Deleting 44Modifying 43Running 42Setting default sorting options 41
RReports
Access 67Cards 66Images 66Person 66
SSet Default Sorting command 41Set Image Source command 30
TTips and Tricks
GuardCardCapturing with video cameras 56
WWorkspace, GuardCard
Assign Card Code button 22Data entry fields 22
Image display fields 24
- Index

82
Image setupCapture Settings 24
EPIFaceFinder 25Resizing 20
Tool BarPerson Data 20
ImageWare® Systems, Inc. - EPI Suite® Version 6.3 User’s Guide