espace 7910 ip phone · 2020-01-23 · immediately and unplug all the cables connected to the...
TRANSCRIPT

eSpace 7910 IP Phone
USER GUIDE VODAFONE ONE NET BUSINESS
Issue 05
Date 14/09/2017
HUAWEI TECHNOLOGIES CO., LTD.
The future is exciting.
Ready?

2
No part of this document may be reproduced or transmitted in any form or by any means without prior written consent of Huawei Technologies Co., Ltd.
TRADEMARKS AND PERMISSIONS
and other Huawei trademarks are trademarks of Huawei Technologies Co., Ltd.
All other trademarks and trade names mentioned in this document are the property of their respective holders.
NOTICE
The purchased products, services and features are stipulated by the contract made between Huawei and the customer. All or part of the products, services and features described in this document may not be within the purchase scope or the usage scope. Unless otherwise specified in the contract, all statements, information, and recommendations in this document are provided "AS IS" without warranties, guarantees or representations of any kind, either express or implied.
The information in this document is subject to change without notice. Every effort has been made in the preparation of this document to ensure accuracy of the contents, but all statements, information, and recommendations in this document do not constitute a warranty of any kind, express or implied.
Huawei Technologies Co., Ltd.
Address: Huawei Industrial Base
Bantian, Longgang
Shenzhen 518129
People's Republic of China
Website: http://e.huawei.com
Copyright © Huawei Technologies Co., Ltd. 2017. All rights reserved.
eSpace 7910 IP Phone User Guide One Net

3
eSpace 7910 IP Phone User Guide One Net
SYMBOL DESCRIPTION
DANGER Indicates an imminently hazardous situation which, if not avoided, will result in death or serious injury.
WARNING Indicates a potentially hazardous situation which, if not avoided, could result in death or serious injury.
CAUTION Indicates a potentially hazardous situation which, if not avoided, may result in minor or moderate injury.
NOTICE
Indicates a potentially hazardous situation which, if not avoided, could result in equipment damage, data loss, performance deterioration, or unanticipated results. NOTICE is used to address practices not related to personal injury.
NOTECalls attention to important information, best practices and tips.NOTE is used to address information not related to personal injury, equipment damage, and environment deterioration.
About This Document
OVERVIEW
This document covers the following information about eSpace 7910: overview, configuration, usage, and common troubleshooting methods.
INTENDED AUDIENCE
This document is intended for the end user of Vodafone’s One Net Business service.
SYMBOL CONVENTIONS
The symbols that may be found in this document are defined as follows.

4
eSpace 7910 IP Phone User Guide One Net
eSpace 7910 IP Phone User Guide One Net
TABLE OF CONTENTS
About this document . . . . . . . . . . . . . . . . . . . . . . . . . . . . . . . . . . . . 3
1. Safety precautions . . . . . . . . . . . . . . . . . . . . . . . . . . . . . . . . . . . . . 7
2. Legal statement . . . . . . . . . . . . . . . . . . . . . . . . . . . . . . . . . . . . . . . 10
3. IP Phone overview . . . . . . . . . . . . . . . . . . . . . . . . . . . . . . . . . . . . 12
3.1 Appearance . . . . . . . . . . . . . . . . . . . . . . . . . . . . . . . . . . . . . . . . . . . . 13
3.1.1 Buttons . . . . . . . . . . . . . . . . . . . . . . . . . . . . . . . . . . . . . . . . . . . . . . 14
3.1.2 LED . . . . . . . . . . . . . . . . . . . . . . . . . . . . . . . . . . . . . . . . . . . . . . . . . 16
3.2 Screen . . . . . . . . . . . . . . . . . . . . . . . . . . . . . . . . . . . . . . . . . . . . . . . . 18
3.2.1 Home screen . . . . . . . . . . . . . . . . . . . . . . . . . . . . . . . . . . . . . . . . 19
3.2.2 Icons in the status bar . . . . . . . . . . . . . . . . . . . . . . . . . . . . . . . . 20
3.2.3 Line button icon . . . . . . . . . . . . . . . . . . . . . . . . . . . . . . . . . . . . . 20
3.3 Service . . . . . . . . . . . . . . . . . . . . . . . . . . . . . . . . . . . . . . . . . . . . . . . . 21
4. Phone settings . . . . . . . . . . . . . . . . . . . . . . . . . . . . . . . . . . . . . . . . 23
4.1 Preferences . . . . . . . . . . . . . . . . . . . . . . . . . . . . . . . . . . . . . . . . . . . 24
4.1.1 Ringtone . . . . . . . . . . . . . . . . . . . . . . . . . . . . . . . . . . . . . . . . . . . . . 25
4.1.2 Key tone . . . . . . . . . . . . . . . . . . . . . . . . . . . . . . . . . . . . . . . . . . . . . 25
4.1.3 Brightness . . . . . . . . . . . . . . . . . . . . . . . . . . . . . . . . . . . . . . . . . . . 25
4.1.4 Wallpaper . . . . . . . . . . . . . . . . . . . . . . . . . . . . . . . . . . . . . . . . . . . 25
4.1.5 Buttons . . . . . . . . . . . . . . . . . . . . . . . . . . . . . . . . . . . . . . . . . . . . . . 26
4.1.7 Audio source . . . . . . . . . . . . . . . . . . . . . . . . . . . . . . . . . . . . . . . . . 27
4.1.8 Theme . . . . . . . . . . . . . . . . . . . . . . . . . . . . . . . . . . . . . . . . . . . . . . 27

5
eSpace 7910 IP Phone User Guide One Net
* (Note, adjusting the NTP server settings may cause the time and date display to be incorrect)
4.2 System . . . . . . . . . . . . . . . . . . . . . . . . . . . . . . . . . . . . . . . . . . . . . . . 28
4.2.1 Date and time * . . . . . . . . . . . . . . . . . . . . . . . . . . . . . . . . . . . . . . . 29
4.2.2 Language . . . . . . . . . . . . . . . . . . . . . . . . . . . . . . . . . . . . . . . . . . . 29
4.2.3 Power saving . . . . . . . . . . . . . . . . . . . . . . . . . . . . . . . . . . . . . . . . . 29
4.2.4 Restart . . . . . . . . . . . . . . . . . . . . . . . . . . . . . . . . . . . . . . . . . . . . . . 31
4.3 Status . . . . . . . . . . . . . . . . . . . . . . . . . . . . . . . . . . . . . . . . . . . . . . . . . . . 32
4.3.1 Network . . . . . . . . . . . . . . . . . . . . . . . . . . . . . . . . . . . . . . . . . . . . . 33
4.3.2 About phone . . . . . . . . . . . . . . . . . . . . . . . . . . . . . . . . . . . . . . . . 33
4.4 Advanced . . . . . . . . . . . . . . . . . . . . . . . . . . . . . . . . . . . . . . . . . . . . . 34
4.5 Answering incoming calls . . . . . . . . . . . . . . . . . . . . . . . . . . . . . . 36
4.5.1 Answering calls manually . . . . . . . . . . . . . . . . . . . . . . . . . . . . 37
4.5.2 Ignoring calls . . . . . . . . . . . . . . . . . . . . . . . . . . . . . . . . . . . . . . . . 37
4.5.3 Rejecting calls . . . . . . . . . . . . . . . . . . . . . . . . . . . . . . . . . . . . . . . 37
4.5.4 Muting the phone . . . . . . . . . . . . . . . . . . . . . . . . . . . . . . . . . . . . 37
4.6 Placing calls . . . . . . . . . . . . . . . . . . . . . . . . . . . . . . . . . . . . . . . . . . . 38
4.6.1 Placing calls by entering numbers directly . . . . . . . . . . . . . 39
4.6.2 Placing calls using the Redial button . . . . . . . . . . . . . . . . . . 39
4.6.3 Placing calls using Contacts . . . . . . . . . . . . . . . . . . . . . . . . . . 40
4.6.4 Making calls using Call History . . . . . . . . . . . . . . . . . . . . . . . . 40
4.6.5 Placing calls using Corporate Directory . . . . . . . . . . . . . . . 40
4.7 Switching between Handset, Speaker, and Headset modes 42
4.8 Contacts . . . . . . . . . . . . . . . . . . . . . . . . . . . . . . . . . . . . . . . . . . . . . . 44
4.8.1 Adding contacts . . . . . . . . . . . . . . . . . . . . . . . . . . . . . . . . . . . . . . 45

6
eSpace 7910 IP Phone User Guide One Net
4.8.2 Searching for contacts . . . . . . . . . . . . . . . . . . . . . . . . . . . . . . . . 45
4.8.3 Modifying contacts . . . . . . . . . . . . . . . . . . . . . . . . . . . . . . . . . . . . 45
4.8.4 Deleting contacts . . . . . . . . . . . . . . . . . . . . . . . . . . . . . . . . . . . . . . 46
4.8.5 Adding groups . . . . . . . . . . . . . . . . . . . . . . . . . . . . . . . . . . . . . . . . . 46
4.8.6 Modifying groups . . . . . . . . . . . . . . . . . . . . . . . . . . . . . . . . . . . . . . 47
4.8.7 Deleting groups . . . . . . . . . . . . . . . . . . . . . . . . . . . . . . . . . . . . . . . . 48
4.9 History . . . . . . . . . . . . . . . . . . . . . . . . . . . . . . . . . . . . . . . . . . . . . . . . . . 49
4.9.1 Querying missed calls . . . . . . . . . . . . . . . . . . . . . . . . . . . . . . . . . 50
4.9.2 Querying call details . . . . . . . . . . . . . . . . . . . . . . . . . . . . . . . . . . 50
4.9.3 Deleting call history . . . . . . . . . . . . . . . . . . . . . . . . . . . . . . . . . . . 50
4.9.4 Adding contacts . . . . . . . . . . . . . . . . . . . . . . . . . . . . . . . . . . . . . . . 51
4.10 Call hold . . . . . . . . . . . . . . . . . . . . . . . . . . . . . . . . . . . . . . . . . . . . . . . 53
4.11 Call transfer . . . . . . . . . . . . . . . . . . . . . . . . . . . . . . . . . . . . . . . . . . . . 55
4.12 Call forward . . . . . . . . . . . . . . . . . . . . . . . . . . . . . . . . . . . . . . . . . . . . 57
4.13 Call waiting . . . . . . . . . . . . . . . . . . . . . . . . . . . . . . . . . . . . . . . . . . . . . 60
4.14 Distinctive ringing . . . . . . . . . . . . . . . . . . . . . . . . . . . . . . . . . . . . . . 62
4.15 BLF . . . . . . . . . . . . . . . . . . . . . . . . . . . . . . . . . . . . . . . . . . . . . . . . . . . . . 64
4.16 Local conference . . . . . . . . . . . . . . . . . . . . . . . . . . . . . . . . . . . . . . . 66
4.16.1 Creating a local conference . . . . . . . . . . . . . . . . . . . . . . . . . . . 67
4.16.2 Managing a local conference . . . . . . . . . . . . . . . . . . . . . . . . . 67
4.17 Voicemail . . . . . . . . . . . . . . . . . . . . . . . . . . . . . . . . . . . . . . . . . . . . . . . 69
4.18 Corporate Directory . . . . . . . . . . . . . . . . . . . . . . . . . . . . . . . . . . . . . 71

1 Safety precautions1

8
eSpace 7910 IP Phone User Guide One Net
Safety Precautions 1
BASIC REQUIREMENTS
• Keep the device dry during storage, transportation, and operation.
• Prevent damaging the device during transportation, storage, and operation.
• Do not attempt to dismantle the device. In case of any fault, contact an authorised maintenance centre for assistance or repair.
• Without prior written consent, no organisation or individual is permitted to make any change to the structure or safety and performance design of the device.
• While using the device, observe all applicable laws, directives and regulations, and respect the legal rights of others.
ENVIRONMENT REQUIREMENTS
• Place the device in a well ventilated place. Do not expose the device to direct sunlight.
• Keep the device clean, free of dust and stains.
• Do not place the device near a water source or in a damp area.
• Place the device on a stable surface.
• Do not place any object on the top of the device. Reserve sufficient space around the device to avoid overheating.
• Do not place the device on or near inflammable materials such as foam.
• Keep the device away from heat sources or flames, such as radiators or candles.
• Keep the device away from any household appliances that generate strong magnetic or electromagnetic fields, such as microwave ovens, refrigerators, or mobile phones.
OPERATION REQUIREMENTS
• Do not allow children to play with the device or accessories. Swallowing small parts may be fatal.
• Use only accessories (such as the power adapter and the battery) provided or authorised only by the manufacturer.
• Ensure that the device does not get wet. If water gets into the device, disconnect the power supply immediately and unplug all the cables connected to the device, such as the power cable and the telephone cable, and then contact an authorised maintenance centre.
• When installing the device, comply with Limited Power Source (LPS) and local electric security standards, and use the power supply of Safety Extra Low Voltage (SELV).
• Before connecting or disconnecting any cable, shut down the device and disconnect the power supply.
For safety purposes, read these safety precautions carefully and observe them during operation.

9
eSpace 7910 IP Phone User Guide One Net
Safety Precautions 1
• While connecting or disconnecting any cables, make sure that your hands are dry.
• Do not step on, pull, or bend any cable excessively; doing so may cause damage or device malfunction.
• Do not use old or damaged cables.
• Keep the power plug clean and dry, to prevent electric shock or dangerous situations.
• During lightning, disconnect the device from the power supply, and unplug all the cables connected to the device, such as the power cable and the telephone cable, to avoid short circuit caused by lightning strike.
• If you do not use the device for a long time, disconnect it from power supply.
• If smoke, unusual sound, or smell is emitted from the device, stop using the device immediately, disconnect the power supply, and unplug the power supply and other cables. Contact an authorized maintenance centre for advice and repair.
• Make sure that no objects fall into the device through the speaker.
CLEANING REQUIREMENTS
• Before cleaning the device, stop using it, disconnect the power supply, and unplug all cables, such as the power cable and the telephone cable.
• Do not clean the device’s surface with any cleaning solution or cleanser spray. Use a piece of soft cloth to clean the device shell.
LCD USAGE REQUIREMENTS
• Do not expose the LCD to direct sunlight.
• Do not press, scratch, or damage the LCD; do not place heavy objects on top of it.
• Do not look at the display screen for a long time. This may harm your eyes or blur your vision.
LCD CLEANING REQUIREMENTS
• According to the instructions given in the attached manual, use a piece of soft cloth to remove dust from the surface of the LCD.
• Do not clean the screen with volatile solvent, such as alcohol, benzene or dilution agent. Do not press rubber or plastic against the screen as it might deteriorate the surface gloss of the LCD.
ENVIRONMENTAL PROTECTION
Do not dispose of the device and the accessories in a garbage can. Dispose the device according to local regulations on disposing of packing materials, exhausted batteries and abandoned devices, and support recycling activities.

Legal statement2

11
eSpace 7910 IP Phone User Guide One Net
Legal Statement 2
This booklet is protected by copyright laws; any unauthorised use is liable to civil or criminal charges.
Read the legal information before using the phone.
Access the phone web page, choose View Status > About Phone, and view information in the Legal Statement area.

IP Phone overview3

Appearance3.1

14
eSpace 7910 IP Phone User Guide One Net
Appearance 3.1
3.1.1 BUTTON
Figure 3-1 shows the appearance of the eSpace 7910.Figure 3-1 Appearance
Table 3-1 describes the buttons on the phone.
Table 3-1 Buttons
MWI
Line button
Speaker
Softkeys
Programmable buttonsTramsfer buttons
Conference buttons
Headset buttons
Hold buttons
Speaker buttonsVolume buttons
Mute buttons
Navigation buttonsMessage button
Call History button
Home button
Contacts button
Keypad
Corresponding to buttons beneath the screen.
BUTTON DESCRIPTION
Contacts button Displays the Contacts screen.
Home button Displays the home screen.
Call History button (with an LED)
Displays the History screen.For details about the button LED status, see 3.1.2 LED
Message button Displays the Voicemail screen.
Keypad Allows you to enter digits, lowercase or uppercase letters, and special characters.
Line button (with an LED)
Displays the account status. An unused line button can be used as a programmable button.For details about the button LED status, see 3.1.2 LED. If you also want to learn about the meanings of the icons displayed for a line button, see 3.2.3 Line Button Icon.

15
eSpace 7910 IP Phone User Guide One Net
Appearance 3.1
Softkeys Displays the context sensitive softkeys on the home screen.
Navigation buttons
Consists of four arrow buttons: (up arrow, down arrow, left arrow, and right arrow) and an OK button.
The arrow buttons allow you to move the cursor on the screen.
The OK button functions the same as the highlighted softkey on the current screen, which is used to access the selected main menu.
Transfer buttonTransfers a call to a third party. For details about how to use the call transfer function, see 6.12 Call Transfer.
Hold button• Holds a call.
• Resumes a held call.
Conference buttonCreates a conference call. For details about how to use the conference function, see 6.20 Local Conference.
Volume button
When the phone is idle or ringing, you can:• Press + to turn up the volume of the ringtone.• Press - to turn down the volume of the ringtone.
When the phone is off-hook, dialling, or in an active call, you can:• Press + to turn up the volume of the handset, headset, and
speakerphone.• Press - to turn down the volume of the handset, headset, and
speakerphone.
Speaker button (with an LED)
When a call comes in, you can press the button to answer the call in speaker mode and press the button again to end the call.
For details about the button LED status, see 3.1.2 LED.
Headset button (with an LED)
You can press the button to enable headset mode
For details about the button LED status, see 3.1.2 LED.
Mute button (with an LED)
Turns mute on and off. Mute disables the audio input for your audio devices, such as a headset, speakerphone, or microphone. With mute enabled, you can hear other parties on the call but they cannot hear you.
For details about the button LED status, see 3.1.2 LED.

16
eSpace 7910 IP Phone User Guide One Net
Appearance 3.1
3.1.2 LED
LED DESCRIPTION
Message Waiting Indicator (MWI) LED
• When a call comes in, the MWI blinks red every second.• When there is an unread message, the MWI blinks red every 3 seconds.
Line button LED Displays the home screen.
Headset LEDDisplays the History screen.For details about the button LED status, see 3.1.2 LED
Speaker LED Displays the Voicemail screen.
Mute LED Allows you to enter digits, lowercase or uppercase letters, and special characters.
Call History LED When there is a missed call, the LED is steady red.
Programmable button LED or line button LED when the programmable button or line button is set as the Speed Dial button and the Busy Lamp Field (BLF) function is enabled
LED status:• When the monitored account is in off-hook, dialling, or idle state, the
LED is steady green.• When the monitored account is in talking state or when the monitored
account is initiating a call, the LED is steady red.• When the monitored account is ringing the LED blinks red.• When the monitored account is offline, the LED is off.
Programmable button LED or line button LED when the programmable button or line button is set as the BLF (For details, see 4.1.5 Buttons)NOTEThis LED can be configured only when the BLF button configuration right is enabled.
• When the monitored account is online, the LED is steady red.• When the monitored account is offline, the LED is off.
Programmable button LED or line button LED when the programmable button or line button is set as the Speed Dial button and the BLF function is disabled (For details about how to disable the BLF function, see 4.1.5 Buttons.)
When the phone is in speed dial or talking state, the LED is steady red.

17
eSpace 7910 IP Phone User Guide One Net
Appearance 3.1
Programmable button LED or line button LED when the programmable button or line button is set as the Call Forward button
When the call forward function is enabled on the phone, the LED is steady green.
Programmable button LED or line button LED when the programmable button or line button is set as a Do Not Disturb (DND) button
When the phone is in DND state, the LED is steady red.

Screen3.2

19
eSpace 7910 IP Phone User Guide One Net
Screen 3.2
3.2.1 HOME SCREEN
The phone supports two display modes for its home screen: Classic and Simple, and you can switch between these two modes. For details about how to switch the display mode, see 5.2.6 Theme.
• Classic: The main menu is displayed on the home screen. You can use the navigation buttons to access the corresponding screen.
• Simple: The phone hides the main menu and completely displays the wallpaper on the home screen. You can press the Apps softkey to access the Apps screen.
• In Simple mode, you can press the Contact button, Call History button, Message button, or Apps softkey to access the Contacts, History, Message, or Apps screen.
• By default, the Simple mode is used, but this may differ depending on your administrator’s settings
Figure 3-2 and Figure 3-3 shows the home screen.
NOTE
Status Bar
Status Bar
Main Menu
Status Details
Status Details
Line Button
Line Button
Softkey
Softkey

20
eSpace 7910 IP Phone User Guide One Net
Screen 3.2
3.2.2 ICONS IN THE STATUS BAR
• The status bar on your phone screen displays a maximum of five icons.
• When more than three icons are displayed, the date is automatically hidden.
Table 3-3 describes the icons in the status bar.
Table 3-3 Icons in the status bar
ICON DESCRIPTION
No network cable is connected to the phone.
A network cable is connected to the phone, but an IP address conflict exists on the network.
The phone is muted.
The call forward function is enabled.
Voice quality during a call.
Voice output in headset mode.
Voice output in hands-free mode.
3.2.3 LINE BUTTON ICON
Table 3-4 describes the line button icons.
ICON DESCRIPTION
This icon specifies the registration status of the account.• When the account is successfully registered, the icon is black.• When account registration fails, the icon is grey.
The account is in dialling state.
The account is in callout state.
The account is in talking state.
The account is in active call hold state.
The account is in a conference call.
The line button is set as the Speed Dial button.
The line button is set as the Call Forward button.
The line button is set as the DND button.

Service3.3
22
eSpace 7910 IP Phone User Guide One Net
Service 3.3
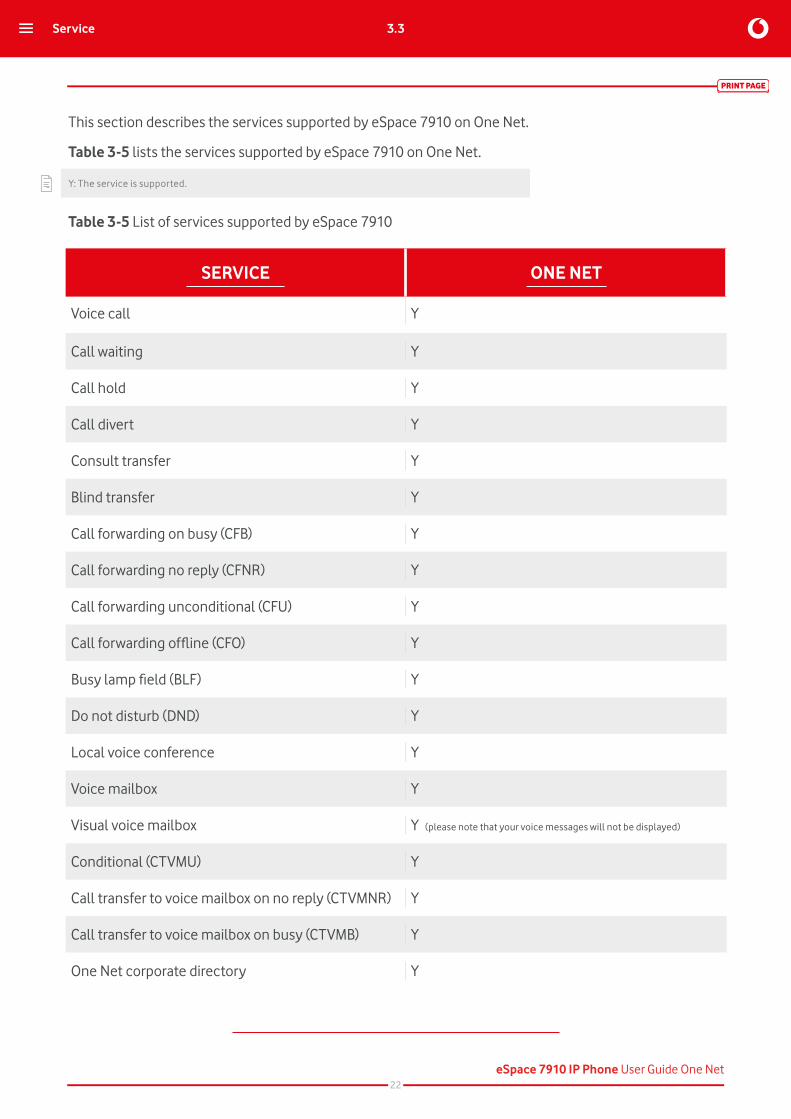
This section describes the services supported by eSpace 7910 on One Net.
Table 3-5 lists the services supported by eSpace 7910 on One Net.
Y: The service is supported.
Table 3-5 List of services supported by eSpace 7910
SERVICE ONE NET
Voice call Y
Call waiting Y
Call hold Y
Call divert Y
Consult transfer Y
Blind transfer Y
Call forwarding on busy (CFB) Y
Call forwarding no reply (CFNR) Y
Call forwarding unconditional (CFU) Y
Call forwarding offline (CFO) Y
Busy lamp field (BLF) Y
Do not disturb (DND) Y
Local voice conference Y
Voice mailbox Y
Visual voice mailbox Y (please note that your voice messages will not be displayed)
Conditional (CTVMU) Y
Call transfer to voice mailbox on no reply (CTVMNR) Y
Call transfer to voice mailbox on busy (CTVMB) Y
One Net corporate directory Y

Phone settings4

4.1 Preferences

25
eSpace 7910 IP Phone User Guide One Net
Phone Settings – Preferences 4.1
4.1.1 RINGTONE
You can perform the following steps to set ringtones for incoming calls:
Step 1 On the home screen, choose Apps > Preferences > Ringtone.
The Ringtone screen is displayed.
Step 2 Select Default Ringtone and press Modify.
Step 3 Select a ringtone to use and press Select.
4.1.2 KEY TONE
You can perform the following steps to set the key tone:
Step 1 On the home screen, choose Apps > Preferences.
Step 2 Select Key Tone and press Enable or Disable.
4.1.3 BRIGHTNESS
You can perform the following steps to adjust the screen brightness:
Step 1 On the home screen, choose Apps > Preferences.
Step 2 Select Brightness and press Modify.
The Brightness dialog box is displayed.
Step 3 Press the Minus and Plus button or the Left arrow and Right arrow to adjust the screen brightness.
Step 4 Press Done.
4.1.4 WALLPAPER
Please perform the following steps to set wallpapers (note that the default wallpaper is the Vodafone One Net imagery:
Step 1 On the home screen, choose Apps > Preferences > Wallpaper.
The Wallpaper screen is displayed.
Step 2 Select a wallpaper to use and press Select.
NOTE The Preview softkey allows you to preview the wallpaper display effect without exiting the wallpaper setting screen.

26
eSpace 7910 IP Phone User Guide One Net
Phone Settings – Preferences 4.1
4.1.5 PROGRAMABLE BUTTONS
You can perform the following steps to check the configurations of the programmable buttons on the IP phone:
Step 1 On the home screen, choose Apps > Preferences > Buttons > Programmable Buttons.
Step 2 Press the Up arrow and Down arrow buttons to check the configurations of the programmable buttons.
FUNCTION USAGE
None No function is configured for the programmable button.
Speed Dial
Press the programmable button to dial the number.
Before using the status monitoring service, ensure that your account has been assigned the status monitoring rights. For any questions, contact your system administrator.
DTMF
On the calling screen, press the programmable button. The IP phone plays the announcement asking you to enter the access code and at the same time, displays the access code on the phone screen.
Group Press the programmable button to go to the screen of the specified group.
Sleep Press the programmable button for the phone to enter sleep mode.
Call Forward
Press the programmable button to go to the call forward setting screen.
For details about the operations related to call forward, see 6.14 Call Forward.
DNDPress the programmable button to enable or disable DND.
For details about DND-related operations, see 6.19 DND.
BLF Press the programmable button to enable real-time status monitoring of the corresponding number.

27
eSpace 7910 IP Phone User Guide One Net
Phone Settings – Preferences 4.1
LINE BUTTONS On the home screen, choose Apps > Preferences > Buttons > Line Buttons and check the configurations of the line buttons on the IP phone.
NOTE The label name of a line button contains a maximum of 63 characters. Only unused line buttons can be set to shortcut buttons. For details about the programmable button usages, see Programmable Buttons.
REDIAL BUTTON The Redial button allows you to redial the last dialled number. For details about how to set and use the Redial button, see 6.5.2 Placing Calls Using the Redial Button.
4.1.7 AUDIO SOURCE
The audio source refers to the audio source device that you use to place or receive a call after pressing the Call or Answer softkey or a line button on the IP phone.
You can perform the following steps to set the audio source:
Step 1 On the home screen, choose Apps > Preferences > Audio Source.
The Audio Source screen is displayed.
Step 2 Select Speaker, or Headset (RJ-9).
NOTE The RJ-9 headset PLANTRONICS HW111N-U10P is recommended.
Step 3 Press Select.
4.1.8 THEME
You can perform the following steps to set a theme:
Step 1 On the home screen, choose Apps > Preferences > Theme.
Step 2 Select Classic or Simple.
Step 3 Press Select.

System4.2

29
eSpace 7910 IP Phone User Guide One Net
Phone Settings – System 4.2
4.2.1 DATE AND TIME
NOTE Adjusting the NTP server settings may cause the time and date display to be incorrect
You can perform the following steps to set the date and time:
Step 1 On the home screen, choose Apps > System > Date and Time.
The Date and Time screen is displayed.
Step 2 Select NTP and press Enable to synchronise the system time with the NTP server.
• If you enable NTP, set the time server IP address. For detailed operations, contact your system administrator.
• If you disable NTP, set Date and Time manually.
Step 3 Set Time Zone, Date Format, and 24-Hour depending on your needs
4.2.2 LANGUAGE
You can perform the following steps to set the language:
Step 1 On the home screen, choose Apps > System > Language.
The Language screen is displayed.
Step 2 Select a language and press Select
4.2.3 POWER SAVING
On the Power Saving screen, you can set the following functions:
AUTO SLEEP If no operation is performed on the phone within a specified period, the phone changes to the sleep state.
SLEEP
AUTO BRIGHTNESS After this function is enabled, the phone automatically decreases the screen brightness when the phone is idle or in an active call.
SCREENSAVER After this function is enabled, the phone automatically changes to the screensaver state if no operation is performed on the phone within a specified period (value for Delay).
NOTE When the sleep mode and screensaver are enabled at the same time, the sleep mode takes effect with preference. When the phone enters the sleep or screensaver state on the home screen, you can press a key on the key pad, the Headset button, or the Speaker button to directly access the dialing screen; you can press the Contact button, Call History button, or Message button to access the contacts, call history, or message screen.

30
eSpace 7910 IP Phone User Guide One Net
SETTING THE SLEEP FUNCTION You can perform the following steps to set the one button to sleep function:
Step 1 On the home screen, choose Apps > System > Power Saving.
The Power Saving screen is displayed.
Step 2 Select Sleep and press Enable.
NOTE You can press any button to disable the sleep function.
ENABLING THEA BRIGHTNESS FUNCTION You can perform the following steps to enable the auto brightness function:
Step 1 On the home screen, choose Apps > System > Power Saving > Auto Brightness.
The Auto Brightness screen is displayed.
Step 2 Press Enable.
The Adjustment Time field is displayed.
Step 3 Select a value and press Select.
NOTE If the value for Sleep After is the same as the value for Adjustment Time, the phone automatically changes to the sleep state at the appointed time.
DISABLING THE AUTO BRIGHTNESS FUNCTION You can perform the following steps to disable the auto brightness function:
Step 1 On the home screen, choose Apps > System > Power Saving > Auto Brightness.
The Auto Brightness screen is displayed.
Step 2 Select Auto Brightness and press Disable.
ENABLING THE SCREENSAVER FUNCTION You can perform the following steps to enable the screensaver function:
Step 1 On the home screen, choose Apps > System > Power Saving > Screensaver.
The Screensaver screen is displayed.
Step 2 Press Enable.
The Delay field is displayed.
Step 3 Set a value and press Select.
Phone Settings – System 4.2

31
eSpace 7910 IP Phone User Guide One Net
DISABLING THE SCREENSAVER FUNCTION You can perform the following steps to disable the screensaver function:
Step 1 On the home screen, choose Apps > System > Power Saving > Screensaver.
The Screensaver screen is displayed.
Step 2 Select Screensaver and press Disable.
4.2.4 RESTART
You can perform the following steps to restart the phone:
Step 1 On the home screen, choose Apps > System.
Step 2 Select Restart and press Select.
The message “Are you sure you want to restart the phone?” is displayed.
Step 3 Press Restart.
Phone Settings – System 4.2

Status4.3

33
eSpace 7910 IP Phone User Guide One Net
Phone Settings – Status 4.3
4.3.1 NETWORK
You can perform the following steps to view network information about the phone, including the IP address, gateway address, and subnet mask:
Step 1 On the home screen, choose Apps > Status.
Step 2 Select Network and press View
4.3.2 ABOUT PHONE
You can perform the following steps to view basic information about the phone, including the software version, boot version, and hardware version:
Step 1 On the home screen, choose Apps > Status.
Step 2 Select About Phone and press View.

4.4 Advanced

35
eSpace 7910 IP Phone User Guide One Net
Phone Settings – Advanced 4.4
On the Advanced screen, you can perform diverse operations including configuring the network, accounts, and server addresses as well as restoring your IP phone to factory defaults.
NOTE A password authenticated by the administrator is required for advanced settings. This option is reserved for Vodafone technical staff only.

4.5 Answering
37
eSpace 7910 IP Phone User Guide One Net
Phone Settings – Answering 4.5
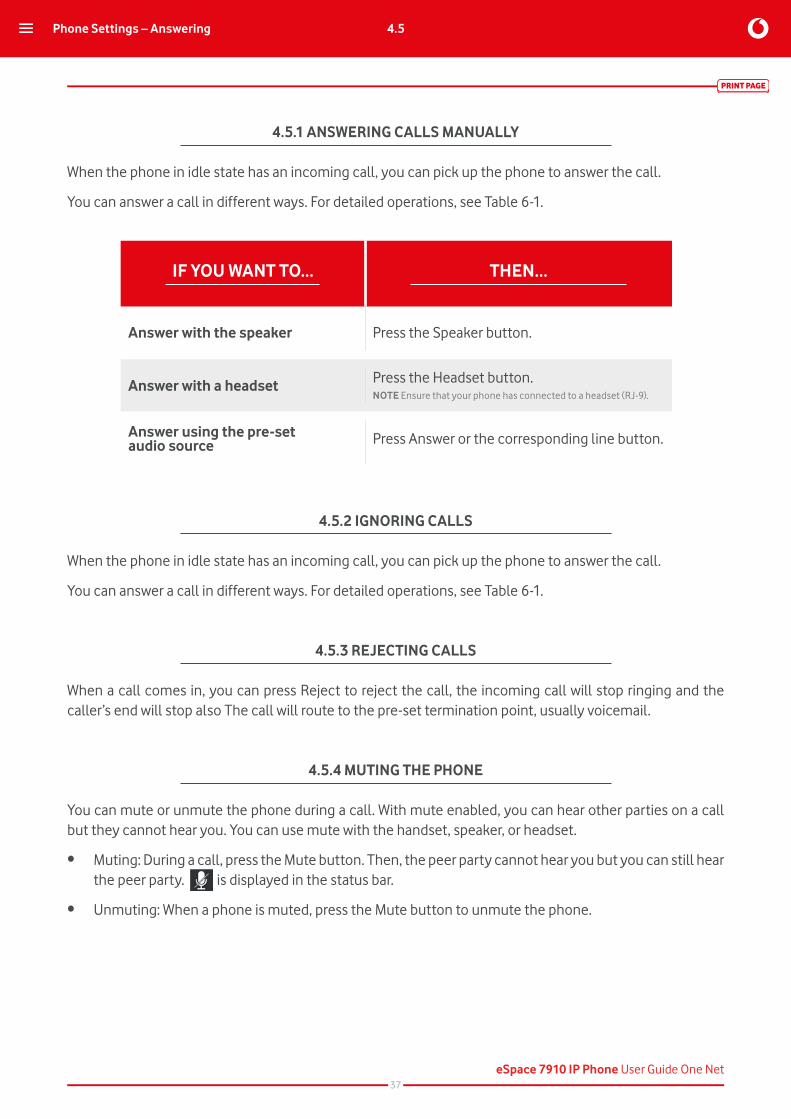
4.5.1 ANSWERING CALLS MANUALLY
When the phone in idle state has an incoming call, you can pick up the phone to answer the call.
You can answer a call in different ways. For detailed operations, see Table 6-1.
4.5.2 IGNORING CALLS
When the phone in idle state has an incoming call, you can pick up the phone to answer the call.
You can answer a call in different ways. For detailed operations, see Table 6-1.
4.5.3 REJECTING CALLS
When a call comes in, you can press Reject to reject the call, the incoming call will stop ringing and the caller’s end will stop also The call will route to the pre-set termination point, usually voicemail.
4.5.4 MUTING THE PHONE
You can mute or unmute the phone during a call. With mute enabled, you can hear other parties on a call but they cannot hear you. You can use mute with the handset, speaker, or headset.
• Muting: During a call, press the Mute button. Then, the peer party cannot hear you but you can still hear the peer party. is displayed in the status bar.
• Unmuting: When a phone is muted, press the Mute button to unmute the phone.
IF YOU WANT TO... THEN...
Answer with the speaker Press the Speaker button.
Answer with a headset Press the Headset button.NOTE Ensure that your phone has connected to a headset (RJ-9).
Answer using the pre-set audio source Press Answer or the corresponding line button.

Placing calls4.6

39
eSpace 7910 IP Phone User Guide One Net
Placing calls 4.6
4.6.1 PLACING CALLS BY DIRECTLY NNTERING NUMBERS
You can perform the following steps to place calls by directly entering numbers.
Step 1 Pick up the phone.
The dialling screen is displayed and the dial tone is played.
The line button LED is steady green.
NOTE You can also enter the dialling screen by pressing the Speaker button, Headset button, or line button of the account.
Step 2 Enter the number of a contact, or press the Up or Down arrow button to select a number
in the existing numbers.
Step 3 Press Call.
NOTE • You can enter a number and then pick up the phone or press the Call softkey, Speaker button, or Headset button to place a call to this number. • When you enter the number of a contact, the phone automatically queries and displays the contact. For local contacts only, not the Corporate Directory. • After a contact is selected, you can press Edit Dial to change the number of the contact. If the plus sign (+) is required when you enter a number, press the * key twice.
End
4.6.2 PLACING CALLS USING THE REDIAL BUTTON
SETTING THE REDIAL BUTTON
Step 1 On the home screen, choose Apps > Preferences > Buttons > Redial Button.
Step 2 Select Redial directly or Display redial list.
• Redial directly: Press Redial to redial the last dialled number.
• Display redial list: Press Redial to display a list of dialled numbers.
Step 3 Press Select.
End
USING THE REDIAL BUTTON
Step 1 Pick up the phone or press the Speaker button, Headset button, or line button of
the account.
Step 2 Press Redial.
If Redial Button is set to Display redial list, a list of dialled numbers is displayed.
You can select a number to dial, and press Call.
End

40
eSpace 7910 IP Phone User Guide One Net
Placing calls 4.6
4.6.3 PLACING CALLS USING CONTACTS
If a contact has been added to Contacts, you can call the contact on the Contacts screen.
Step 1 Press the Contacts button.
The Contacts screen is displayed.
Step 2 Press the up or down arrow button to search for a contact or enter keywords for example,
the first name, last name, full name, or phone number in the Search text box to search
for a contact.
Step 3 Select a contact and press Call.
End
NOTE • When a contact is selected, press More to navigate to Edit dial and press Edit dial to change the number of the contact. • When a contact is selected, press Details to display the details of the contact. Press the arrow buttons to select any number to call.
4.6.4 MAKING CALLS USING CALL HISTORY
If a contact has been added to Contacts, you can call the contact on the Contacts screen.
Step 1 Press the Call History button.
On the displayed All screen, press the Left or Right arrow button to switch between the All
and Missed screens.
Step 2 Press the Up or Down arrow button to select a call record.
Step 3 Press Call.
End
NOTE • When a call record is selected, press More to navigate to Edit Dial and Press Edit dial to change the number of the contact. • You can also press Call or Edit dial on the call details screen to make a call.
4.6.5 PLACING CALLS USING THE CORPORATE DIRECTORY
Step 1 Press the Contacts button.
The Contacts screen is displayed.
Step 2 Press the Right button to switch to the Corporate screen.
NOTE Before using the Redial softkey, ensure that you have placed calls using your IP phone. On the home screen, you can press Redial to display a list of dialled numbers or to redial the last dialled number in speaker mode.

41
eSpace 7910 IP Phone User Guide One Net
Placing calls 4.6
Step 3 Press the Up arrow or Down arrow button to search for a contact or enter keywords for example,
the phone number or name, in the Search text box to search for a contact
Step 4 Select a contact and press Details.
Step 5 Press Call.
NOTE • The Corporate Directory is managed by your systems administrator, please contact them with any queries.
End

Switching between Handset, Speaker, and Headset modes
4.7

43
eSpace 7910 IP Phone User Guide One Net
Switching between handset, speaker, and headset modes 4.7
You can switch the audio output mode of a phone during a call. The mode in use will be displayed in the status bar of the phone screen.
NOTE A headset is required when the audio output mode is set to headset.
• Switching to speaker mode In handset or headset mode, you can press the Speaker button to switch to speaker mode. After the switching, is displayed in the status bar of the phone screen.
• Switching to handset mode The phone in speaker or headset mode automatically switches to handset mode once you pick up the phone.
• Switching to headset mode In speaker or handset mode, you can press the Headset button to switch to headset mode. After the switching, is displayed in the status bar of the phone screen.

Contacts4.8

45
eSpace 7910 IP Phone User Guide One Net
Contacts 4.8
4.8.1 ADDING CONTACTS
Step 1 Press the Contacts button.
The Contacts screen is displayed.
Step 2 Press Add.
The Add contact screen is displayed.
NOTE If the Add softkey is not displayed, you can press the Up or Down arrow button to select a contact and press More to display the Add softkey.
Step 3 Modify the contact information.
Select Office Tel, Family Tel, Mobile Tel, or Other Tel, and press Primary.
The selected number is set to the primary number to dial by default.
NOTE • To change the ringtone for a contact, select Ringtone and press Modify.
Step 4 Press Done.
End
NOTE • On the home screen, select Contacts and press the OK button. The Contacts screen is displayed. • On the Contacts screen, select a contact and choose Details to view, call, modify, or delete the contact information.
4.8.2 SEARCHING FOR CONTACTS
Step 1 Press the Contacts button.
The Contacts screen is displayed.
Step 2 In the search text box, enter keywords of a contact, for example, the first name, last name,
full name, or phone number.
The phone searches for the contacts that match the keywords in the contact list.
End
NOTE If contact groups have been created, you can press the Right arrow button to display the Groups screen and search for contacts by group.

46
eSpace 7910 IP Phone User Guide One Net
Contacts 4.8
4.8.3 MODIFYING CONTACTS
Step 1 Press the Contacts button.
The Contacts screen is displayed.
Step 2 Search for a contact to modify. For details about how to search for a contact, see 6.8.2
Searching for Contacts.
Step 3 Press More to navigate to Edit and press Edit.
The Edit Contact screen is displayed.
Step 4 Modify contact information.
Step 5 Press Done.
End
4.8.4 DELETING CONTACTS
Step 1 Press the Contacts button.
The Contacts screen is displayed.
Step 2 Search for a contact to delete. For details about how to search for a contact, see 6.8.2
Searching for Contacts.
Step 3 Press More to navigate to Delete and press Delete.
Step 4 Press Delete.
End
4.8.5 ADDING GROUPS
Step 1 Press the Contacts button.
The Contacts screen is displayed.
Step 2 Press the Right arrow button to switch to the Groups screen.
Step 3 Press Add.
Step 4 Enter a group name, select Ringtone, and press Add.
The Add screen is displayed.
NOTE • You can select Ringtone and press Modify to select a ringtone for the group. • Add is displayed only when there is at least one contact in the group. • A contact can be added to a group after added to my contacts.
Step 5 Press Select to select a contact.
You can press Clear to deselect a contact
Step 6 Press Done to add a contact to a group.

47
eSpace 7910 IP Phone User Guide One Net
Contacts 4.8
Step 7 Press Done to add a contact to a group.
End
4.8.6 MODIFYING GROUPS
ADDING GROUP MEMBERS
Step 1 Press the Contacts button.
The Contacts screen is displayed.
Step 2 Press the Right arrow button to switch to the Groups screen.
Step 3 Select a group, press More to navigate to Edit, and press Edit.
The Edit screen is displayed.
Step 4 Select Ringtone and press Add.
The Add screen is displayed.
NOTE • You can select Ringtone and press Modify to select a ringtone for the group. • The Add softkey is available in the Group Member option only when the contact that you want to add to the group exists in your contact list. • Only contacts in your contact list can be added to a group.
Step 5 Select a contact to be added to the group and press Select.
You can press Clear to deselect a contact.
Step 6 Press Done. The contact is added to the group.
Step 7 Press Done to save the settings.
End
DELETING GROUP MEMBERS
Step 1 Press the Contacts button.
The Contacts screen is displayed.
Step 2 Press the Right arrow button to switch to the Groups screen.
Step 3 Select a group from which you want to delete contacts, press More to navigate to Edit,
and press Edit.
The Edit page is displayed.
Step 4 Select a contact to delete, and press Delete.
A “Delete the group member?” message is displayed.
Step 5 Press Delete.
End

48
eSpace 7910 IP Phone User Guide One Net
Contacts 4.8
4.8.7 DELETING GROUPS
Step 1 Press the Contacts button.
The Contacts screen is displayed.
Step 2 Press the Right arrow button to switch to the Groups screen.
Step 3 Select a group to delete, press More to navigate to Delete, and press Delete.
The message “Are you sure you want to delete the group?” is displayed.
Step 4 Press Delete.
End

History4.9

50
eSpace 7910 IP Phone User Guide One Net
History 4.9
4.9.1 QUERYING MISSED CALLS
MISSED CALL NOTIFICATION
Missed calls are indicated by the following conditions:
• The call history LED is steady red.
• An icon indicating the number of missed calls is displayed in the upper right corner of the call history main menu.
MISSED CALL QUERY
Step 1 Press the Call History button.
The All screen is displayed.
Step 2 Press the Right arrow button to switch to the Missed screen
End
NOTE After you check the missed calls, the call history LED turns off and the icon indicating the number of missed calls disappears.
4.9.2 QUERYING CALL DETAILS
Step 1 Press the Call history button.
Step 2 Select a call record and press Details.
• : received calls.
• : placed calls.
• : missed calls.
NOTE • The IP phone combines consecutive call records for the same number into one, and displays the call type of the latest record on the call history screen. • On the home screen, you can select History and press OK to access the History screen.
Step 3 Press Details. You can view the calling number, called number, calling time, and call duration.
End
4.9.3 DELETING CALL HISTORY
DELETING A RECORD FROM THE CALL HISTORY
Step 1 Press the Call History button.
The All screen is displayed. You can press the Left or Right arrow button to switch between
the All and Missed screens.
Step 2 Select a record to delete.

51
eSpace 7910 IP Phone User Guide One Net
History 4.9
Step 3 Press More to navigate to Delete and press Delete.
The message “Delete the call record?” is displayed.
Step 4 Press Delete.
End
DELETING ALL RECORDS FROM CALL HISTORY
Step 1 Press the Call History button.
The All screen is displayed. You can press the Left or Right arrow button to switch between
the All and Missed screens.
Step 2 Press More to navigate to Clear and press Clear.
The message “Clear all call records?” is displayed.
Step 3 Press Clear.
End
4.9.4 ADDING CONTACTS
ADDING A CONTACT
You can save a number in the call history as a new contact.
Step 1 Press the Call History button.
The All screen is displayed. You can press the Left or Right arrow button to switch between
the All and Missed screens.
Step 2 Select a call record.
Step 3 Press More to navigate to Delete and press Delete.
The message “Delete the call record?” is displayed.
Step 4 In the dialog box that is displayed, select Save as New Contact and click OK.
The Select a number save type dialog box is displayed.
Step 5 Select a number type and press Select.
The Add Contact screen is displayed.
Step 6 Edit the contact information and press Done.
End

52
eSpace 7910 IP Phone User Guide One Net
History 4.9
MODIFYING AN EXISTING CONTACT
You can modify the information of an existing contact. Please note that it can be also done as described
in 4.8.3 Modifying contacts.
Step 1 Press the Call History button.
The All screen is displayed. You can press the Left or Right arrow button to switch between
the All and Missed screens.
Step 2 Select a call record.
Step 3 Press More to navigate to +Contact and press +Contact.
Step 4 In the dialog box that is displayed, select Save as New Contact and click OK.
The Select a number save type dialog box is displayed.
Step 5 Select the contact to modify and press Select.
The Select a number save type dialog box is displayed.
Step 6 Change the number of the contact.
• If a number exists for the selected number type, press Replace to replace
the existing number.
• If no number exists for the selected number type, press Select to save the number
under this type.
The Edit Contact screen is displayed.
Step 7 Edit the contact information and press Done.
End

Call hold4.10

54
eSpace 7910 IP Phone User Guide One Net
Call hold 4.10
During call hold, the two parties in the call cannot hear each other.
• Holding a call: During a call, press Hold to hold the call.
• Resuming a call: During active call hold, press Resume to resume the call.
• If you have more than one call on hold, you can Merge the calls to create a conference call – press the More key and the Merge key to establish a merged call
NOTE • If the call hold function is enabled by yourself, you cannot end the call. If the call placed on hold is the only call on your phone, the phone reminds you that there is a call on hold by means of periodic sound notifications and the MWI.

Call transfer4.11

56
eSpace 7910 IP Phone User Guide One Net
Call transfer 4.11
During a call, you can transfer the call to a third party.
A call can be transferred in any of the following two modes:
• Blind transfer
A call is transferred to a third party directly.
• Consult transfer
A call is transferred to a third party after the third party answers the call.
NOTE If the call transfer fails, you can press Resume to resume your call.
End
BLIND TRANSFER
Step 1 Press Transfer during a call.
The call is placed on hold.
Step 2 Enter or select a number.
• Enter the number of a third party, press More to navigate to Done, and press Done.
• Press the Up arrow or Down arrow button to select a contact, press Contact to select a contact in the contact list, or press History to select a contact in the call history, and press Done.
NOTE Before the third party answers the call you have transferred in blind mode, you can also perform the blind transfer operation on a call carried over another line.
End
CONSULT TRANSFER
Step 1 Press Transfer during a call.
The call is placed on hold.
Step 2 Enter the number of a third party, press the Up or Down arrow button to select a contact,
press Contact to select a contact in the contact list, or press History to select a contact in
the call history.
Step 3 Press Call.
After the third party answers the call, ask him or her whether to answer the call.
Step 4 If the third party accepts the call, press Done or directly hang up.
End

Call forward4.12

58
eSpace 7910 IP Phone User Guide One Net
Call forward 4.12
Call forward involves two modes: server-based and local.
After the call forward function is enabled, the phone does not ring or have call records for such incoming calls.
The phone supports three types of call forward, namely, call forward all, call forward busy and call forward no answer in descending order of priority.
• Call forward all
All incoming calls are forwarded to voicemail or a specified phone number.
• Call forward busy
When the phone is off-hook, dialing, or in an active call, an incoming call is forwarded to voicemail
or a specified phone number.
• Call forward no answer
When an incoming call is not answered within a specified period, the call is forwarded to voicemail
or a specified phone number.
SETTING THE CALL FORWARD FUNCTION
You can set the call forward function on your phone LCD screen. For detailed operations, see Table 6-2.
Table 4-3 Setting call forward
When the call forward function is set, is displayed in the status bar of the phone screen. If you have enabled call forward all, the home screen also displays the message "Forwarded to ***" (***: phone number).
Assume that call forward all has been enabled on phone B and the call forward destination is phone C. When phone A calls phone B, (for internal One Net calls only).
• Phone A's screen displays a message indicating that the call has been forwarded.
This message disappears in 5s.
WHERE TO SET HOW TO SET
Forward softkey on the phone LCD screen
To enable call forward1. On the home screen, press the Forward softkey.2. Select a forward mode, and press Select.3. Enter the number of a third party, and press Done.To disable call forwardOn the home screen, press the CLR FWD softkey.

59
eSpace 7910 IP Phone User Guide One Net
Call forward 4.12
• Phone C's screen displays a message indicating that the incoming call is from phone A
and forwarded by phone B.
• After the call is ended, phone C's call history adds a call record with phone A, and phone
A's call history adds a call record with phone B.

Call waiting4.13

61
eSpace 7910 IP Phone User Guide One Net
Call waiting 4.13
After the call waiting function is enabled, if the phone that is engaged in an active call has an incoming call, the phone screen displays a message notifying the user of this new incoming call.
USING CALL WAITING
NOTICE
Call waiting takes precedence over auto answer, call forward busy, and call forward no answer, but call forward all and DND take precedence over call waiting.
If the phone that is engaged in an active call has an incoming call, you can:
• Press Answer.
Answer the new call and hold the original call.
• Press Ignore.
Stop the ring of the new call. If the calling party does not hang up, you still can press Answer
to answer the call.
• Press Reject.
Reject the new call and display the original call screen.

Distinctive ringing4.14

63
eSpace 7910 IP Phone User Guide One Net
Distinctive Ringing 4.14
Before using the distinctive ring function, ensure that your account has been assigned the distinctive ring rights. For any questions, contact your system administrator. Distinctive ringing works for local contacts and groups but not for Corporate Directory or Multi-user-Hunt Groups.
You can set distinctive rings for internal and external calls.
For details, see 4.1.1 Ringtone.
The ring priorities in descending order are as follows: contact ring, group ring, internal or external ring, ring that matches the ringtone parameter, and default ring.

BLF4.15

65
eSpace 7910 IP Phone User Guide One Net
BLF 4.15
After the BLF function is enabled, the status of the monitored accounts is displayed on the programmable and line buttons. You can press a programmable button to dial a monitored number.
For details about the LED status, see 3.1.2 LED.

Local conference4.16

67
eSpace 7910 IP Phone User Guide One Net
Local conference 4.16
4.16.1 CREATING A LOCAL CONFERENCE
You can create a local conference using Join or Call Merge. For detailed operations, see Table 6-3.
Table 4-4 Creating a local conference
4.16.2 MANAGING A LOCAL CONFERENCE
After creating a local conference, the initiator can manage the local conference. For detailed operations, see Table 6-4.
Table 4-5 Managing a local conference
IF YOU WANT TO... THEN...
Create a local conference using Join
1. Press Conf to hold an ongoing call. Then, you can hear the dial tone.2. Enter the number of user C.
NOTE You can press Contact to select a contact in your contact list, or press History to select a contact in the call history.
3. Press Call.4. When user C answers the call, you can talk with user C. Then, press Join to create a local conference.
Create a local conference using Call Merge
Press Merge to create a local conference, when the call between you and user B is ongoing and the call between you and user C is placed on hold.
IF YOU WANT TO... THEN...
Add a participant
1. Press Add.2. Enter the number of a contact.
NOTE You can press Contact to select a contact in your contact list, or press History to select a contact in the call history.
3. Press Call.4. Press Join after the contact answers the call.
NOTE The phone supports a local audio conference involving a maximum of six parties.

68
eSpace 7910 IP Phone User Guide One Net
Local conference 4.16
Mute a participant
1. Press the arrow buttons to select a participant to mute.2. Press Mute.
NOTE You can press Unmute to unmute the participant.
Mute or unmute yourself
• Muting: During the conference, press the Mute button. is displayed in the status bar of the phone screen.
• Unmuting: When you are muted, press the Mute button to unmute yourself.
Remove a participant
1. Press the arrow buttons to select a participant to remove.
2. Press More to navigate to Remove and press Remove.
The message “Remove the participant?” is displayed.
3. Press Yes.
Place a conference on hold
• Placing a conference on hold: Press Hold.
• Resuming a conference: Press Resume to connect to a conference that was placed on hold.
NOTE • When the conference initiator presses Hold, the conference is placed on hold. • When a participant presses Hold, only the participant is placed on hold.
End a conference
1. Press More to navigate to End and press End.
The message “End t he conference?” is displayed.
2. Press Yes.
NOTE • When the conference initiator presses End, the conference is ended. • When a participant presses End, only the participant leaves the conference.

Voicemail4.17

70
eSpace 7910 IP Phone User Guide One Net
Voicemail 4.17
The voicemail function allows the calling party to leave voice messages so that you will not miss any calls.
USING VOICEMAIL
When the phone has unread voice messages, the MWI LED blinks every 3 seconds.
Table 4-6 Using voicemail
IF YOU WANT TO... THEN...
Query voice messages
Press the Message button. The Voicemail screen is displayed.
NOTE On the home screen, you can select Message and press OK to access the Voicemail screen, when in Classic view mode.

Corporate Directory4.18

72
eSpace 7910 IP Phone User Guide One Net
Corporate directory 4.18
SEARCHING FOR CONTACTS
You can perform the following operations to search for a contact:
Step 1 Press the Contacts button.
The Contacts screen is displayed.
Step 2 Press the Right arrow button to switch to the Corporate screen.
Step 3 Enter keywords (for example, phone number or name) in the search box to search for a contact.
Step 4 Press Search.
NOTE • You can select a contact and press Details to view the contact details. • A maximum of 20 corporate Directory Contact search records can be displayed on the LCD screen..
End
ADDING CONTACTS IN THE CORPORATE DIRECTORY TO MY CONTACTS
You can perform the following operations to add a contact in the Corporate Directory to my contacts:
Step 1 Press the Contacts button.
The Contacts screen is displayed.
Step 2 Press the Right arrow button to switch to the CorpDir screen.
Step 3 Search for and select the contact that you want to add to my contacts and press +Contacts.
The Add Contact screen is displayed.
Step 4 Modify the contact information.
Step 5 Press Done to save the settings.
End

Huawei Proprietary and Confidential
Copyright © Huawei Technologies Co., Ltd.