ev3dev lessonsev3lessons.com/en/programminglessons/beyond-ev3g/ev3dev-intro… · – programs (and...
TRANSCRIPT

EV3Dev Lessons
Introduction to EV3Dev:Setup with Python

Objectives
■ Learn how to install ev3dev on an EV3
■ Setup Visual Studio Code IDE
■ Prerequisites: none
Copyright © EV3Lessons 2018 (Last Update: Aug. 9, 2018) 2

Materials
■ EV3 brick
■ USB Download Cable
■ Micro SD card (between 2gb and 32gb,
preferably class 8+)
Copyright © EV3Lessons 2018 (Last Update: Aug. 9, 2018) 3

What is ev3dev?
■ ev3dev is a Debian Linux-based operating system that runs on the
LEGO® MINDSTORMS EV3
■ ev3dev allows you to program in different languages (eg. Python, C++)
■ This will also cover installation of Python IDE (Integrated Development
Environment)
– Note that an IDE is not required to write or run ev3dev or Python code on
the EV3
– While you can edit Python code in any editor, an IDE simplifies various
aspects of developing and managing your code.
Copyright © EV3Lessons 2018 (Last Update: Aug. 9, 2018) 4
Step 1: Download ev3dev
■ Download the latest version of EV3dev for EV3:
https://www.ev3dev.org/downloads/
■ Download ev3dev-stretch beta as that is what is needed for usage with
the IDE
– For a detailed explanation of the differences between ev3dev-jessie and
ev3dev-stretch, see the next slide
■ Remember where you downloaded the file
Copyright © EV3Lessons 2018 (Last Update: Aug. 9, 2018) 5

ev3dev-jessie vs. ev3dev-stretch
■ ev3dev-jessie:
– Programs (and motors, sound, etc.) don't stop when you press the back button (unless you write your program in such a way that it does this, which is not exactly easy to do right)
– Doesn't work with VS Code extension
– Battery monitor does not automatically turn off the brick to prevent battery damage
■ ev3dev-stretch:
– Programs (and motors, sound, etc.) should stop when you press the back button.
– Does work with VS Code extension.
– Battery monitor automatically turns of brick when it reaches too low a voltage
– ev3dev2 python package is available, which is easier to use (e.g. it has move steering/move tank type functions)
■ Stretch is recommended for FIRST LEGO League teams because of the support for the IDE and the ev3dev2 library
Copyright © EV3Lessons 2018 (Last Update: Aug. 9, 2018) 6

Step 2: Write Image (Windows, Mac, Linux)■ If you have a favorite tool writing
images to SD cards – use that.
Otherwise, we recommend that
you download and install
Etcher: https://etcher.io/ for
your OS
■ Select the downloaded file for
writing
■ Insert the Micro SD card into
the computer
■ Write to your SD card (in device
dropdown)
Copyright © EV3Lessons 2018 (Last Update: Aug. 9, 2018) 7

Step 3: Boot ev3dev
■ Put the SD Card in your EV3 and power
it on.
■ At first, you will see the MINDSTORMS
boot screen and the red LEDs will be
on. This is immediately followed by the
ev3dev boot screen and the LEDs
changing to orange.
■ The LED button lights on the EV3 brick
will blink to indicate SD card activity.
■ Tip: The SD card can be hard to pull out.
Create a little tab out of tape. (Remove
tape prior to an FLL tournament.)
Copyright © EV3Lessons 2018 (Last Update: Aug. 9, 2018) 8

Step 4: Install Visual Studio Code (VSC)
Copyright © EV3Lessons 2018 (Last Update: Aug. 9, 2018)
Download and install VSC from
https://code.visualstudio.com/
for Mac, Windows, or Linux.
This is the IDE that you can use to
manage your programs.
9
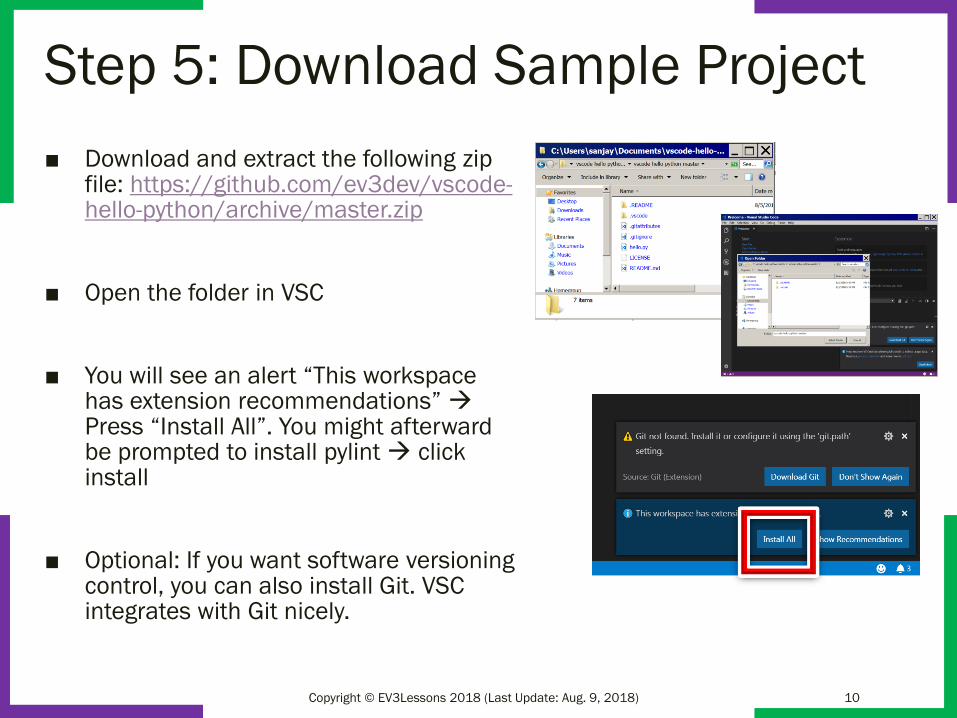
Step 5: Download Sample Project
■ Download and extract the following zip file: https://github.com/ev3dev/vscode-hello-python/archive/master.zip
■ Open the folder in VSC
■ You will see an alert “This workspace has extension recommendations” →Press “Install All”. You might afterward be prompted to install pylint → click install
■ Optional: If you want software versioning control, you can also install Git. VSC integrates with Git nicely.
Copyright © EV3Lessons 2018 (Last Update: Aug. 9, 2018) 10

Step 6: Install python 3
■ Download and install python3 from: https://www.python.org/downloads/
■ You won’t be running python on your desktop but the IDE setup needs this
Copyright © EV3Lessons 2018 (Last Update: Aug. 9, 2018) 11
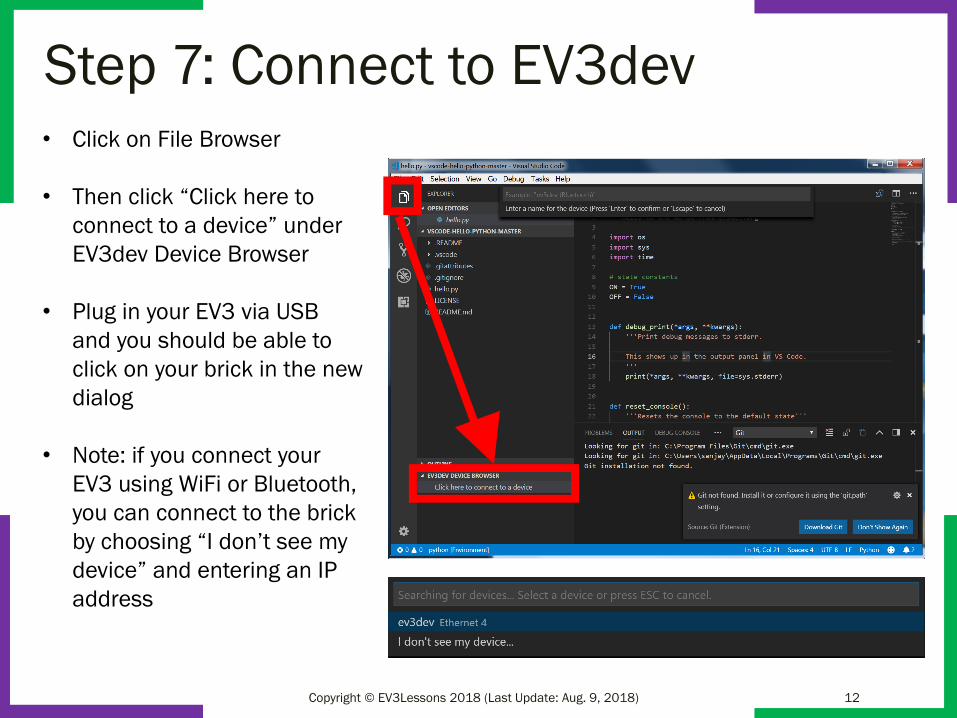
Step 7: Connect to EV3dev
Copyright © EV3Lessons 2018 (Last Update: Aug. 9, 2018)
• Click on File Browser
• Then click “Click here to
connect to a device” under
EV3dev Device Browser
• Plug in your EV3 via USB
and you should be able to
click on your brick in the new
dialog
• Note: if you connect your
EV3 using WiFi or Bluetooth,
you can connect to the brick
by choosing “I don’t see my
device” and entering an IP
address
12

Step 8: Running Code
Copyright © EV3Lessons 2018 (Last Update: Aug. 9, 2018)
• You can click on any file (or create a
file) in the left pane to edit it in python
• To run a program, click the debugger
icon on the left-hand pane and press
download and run
• Programs can also be run directly on
the brick under the “File Browser →
ev3dev” on the robot’s Brick Manager
13

CREDITS• This tutorial was created by Sanjay Seshan and Arvind Seshan from EV3Lessons
• More lessons are available at www.ev3lessons.com
• Credits: David Lechner, ev3dev.org, for the valuable feedback and information
used in the ev3dev-jessie vs stretch slide
Copyright © EV3Lessons 2018 (Last Update: Aug. 9, 2018)
This work is licensed under a Creative Commons Attribution-
NonCommercial-ShareAlike 4.0 International License.
14