evo - 123ignition.de€¦ · shrinking it) to give extra ... ber vacuum-hose may be connec- ......
TRANSCRIPT

installation manual123\2CV, 123\UNI & 123\EVO

Installation Instructions
All ”123ignition\2CV” modules are designed for thestock (black) 2CV-coil but are also compatible with highcurrent (brown) VISA coils. Previous models of the 123\2CV would get damaged bythe VISA coil, so do not use a VISA coil with those!
STEP 1Turn the ignition off. Remove the engine fan use a long14 mm socket or similar to unscrew the bolt holding it,once the bolt is removed, the fan comes loose by puttinga rod or the socket in it and tapping sideways with ahammer whilst the other hand pulls the fan from theengine. Once the fan is removed unscrew the 5 lowerscrews (8 mm spanner) and lift the rubber shield to gainaccess to the points box.
Disconnect the wire from the points box and also fromthe coil. You do not have to remove this wire, it may beuseful sometime in the future.
STEP 2 Remove the points box along with the capacitor. Setaside the two M7 bolts and square washers. Removethe metal protector plate to gain access to the centrifugaladvance mechanism. With two very small screwdriversyou can bend away and remove the small circlip ringfrom the end of the camshaft so that you can remove the
old situation with points
new situation with 123\2CV
new situation with 123\UNI
new situation with 123\EVO
thrust washer, the centrifugal weights and cam assembly.Put these parts in a ZipLock bag and store in a safeplace.
STEP 3Thoroughly clean the area, inspect the point where thecamshaft comes out of the block. If the cavity is moistwith an excessive amount of oil, you may have an engineproblem.
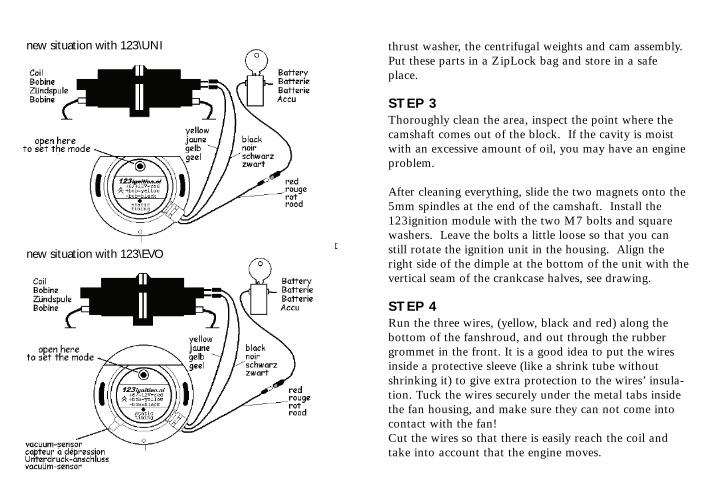
After cleaning everything, slide the two magnets onto the5mm spindles at the end of the camshaft. Install the123ignition module with the two M7 bolts and squarewashers. Leave the bolts a little loose so that you canstill rotate the ignition unit in the housing. Align theright side of the dimple at the bottom of the unit with thevertical seam of the crankcase halves, see drawing.
STEP 4 Run the three wires, (yellow, black and red) along thebottom of the fanshroud, and out through the rubbergrommet in the front. It is a good idea to put the wiresinside a protective sleeve (like a shrink tube withoutshrinking it) to give extra protection to the wires’ insula-tion. Tuck the wires securely under the metal tabs insidethe fan housing, and make sure they can not come intocontact with the fan! Cut the wires so that there is easily reach the coil andtake into account that the engine moves.
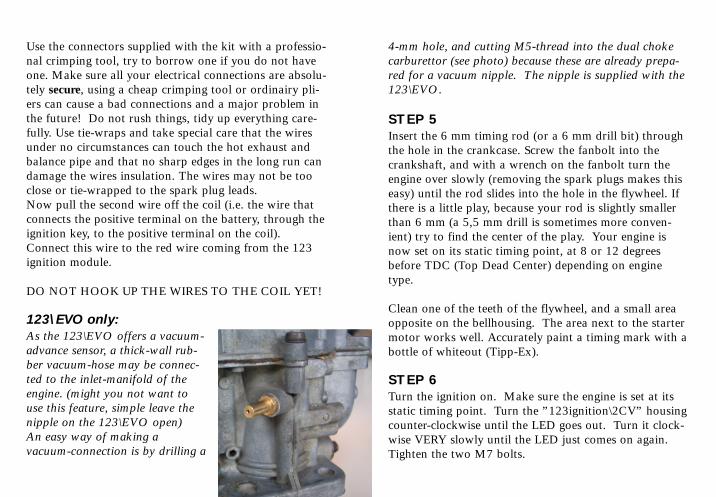
4-mm hole, and cutting M5-thread into the dual chokecarburettor (see photo) because these are already prepa-red for a vacuum nipple. The nipple is supplied with the123\EVO.
STEP 5 Insert the 6 mm timing rod (or a 6 mm drill bit) throughthe hole in the crankcase. Screw the fanbolt into thecrankshaft, and with a wrench on the fanbolt turn theengine over slowly (removing the spark plugs makes thiseasy) until the rod slides into the hole in the flywheel. Ifthere is a little play, because your rod is slightly smallerthan 6 mm (a 5,5 mm drill is sometimes more conven-ient) try to find the center of the play. Your engine isnow set on its static timing point, at 8 or 12 degreesbefore TDC (Top Dead Center) depending on enginetype.
Clean one of the teeth of the flywheel, and a small areaopposite on the bellhousing. The area next to the startermotor works well. Accurately paint a timing mark with abottle of whiteout (Tipp-Ex).
STEP 6 Turn the ignition on. Make sure the engine is set at itsstatic timing point. Turn the ”123ignition\2CV” housingcounter-clockwise until the LED goes out. Turn it clock-wise VERY slowly until the LED just comes on again.Tighten the two M7 bolts.
Use the connectors supplied with the kit with a professio-nal crimping tool, try to borrow one if you do not haveone. Make sure all your electrical connections are absolu-tely secure, using a cheap crimping tool or ordinairy pli-ers can cause a bad connections and a major problem inthe future! Do not rush things, tidy up everything care-fully. Use tie-wraps and take special care that the wiresunder no circumstances can touch the hot exhaust andbalance pipe and that no sharp edges in the long run candamage the wires insulation. The wires may not be tooclose or tie-wrapped to the spark plug leads.Now pull the second wire off the coil (i.e. the wire thatconnects the positive terminal on the battery, through theignition key, to the positive terminal on the coil).Connect this wire to the red wire coming from the 123ignition module.
DO NOT HOOK UP THE WIRES TO THE COIL YET!
123\EVO only: As the 123\EVO offers a vacuum-advance sensor, a thick-wall rub-ber vacuum-hose may be connec-ted to the inlet-manifold of theengine. (might you not want touse this feature, simple leave thenipple on the 123\EVO open)An easy way of making a vacuum-connection is by drilling a

switch with a small screwdriver.. If you can’t see theswitch position turn the switch clockwise and count theclicks until you arrive at the required curve. The factthat, when the engine is running, the LED flashes inMODE ”0” only, may come in handy if you’ve lostcount.
STEP 9Re-install the rubber shield, take away the fan bolt, put alitle grease on the crankshaft to prevent the fan fromsticking to the axle. Put the V-belt on the fanpulley andthe fan back on the axle without the bolt and turn thefan around on the axle and double-check to make surethe fan does not touch the wires! If you have some loctiteyou can put it on the thread of the fanbolt as extra secu-rity. Put in the fanbolt and tighten it firmly to 36 lb/ft or50 N/m.
Fire it up and enjoy!
REMOVE THE TIMING ROD OR DRILL BIT!
STEP 7 Check your timing as follows: Put the wrench on the fanbolt and turn the engine over (clockwise!) and slow downwhen the timing marks are approaching eachother. TheLED should light up at the exact moment when the tim-ing marks are aligned. If this is not the case, repeat step6.
STEP 8Turn the ignition off. Connect the yellow wire to thepositive terminal on the coil and the black wire to thenegative terminal on the coil. Put the sparkplugs in.If you own or can borrow a stroboscope timing light,now is a good time to use it. Start the engine and see ifthe painted marks align between 900-1100 rpm, if notadjust the123 until they do. If you do not have a strobo-scope you can do this check as soon as you come to aworkshop were there is one.
123\UNI or 123\EVO only:Choose the right standard curve for your engine (seetable) and select it with the curveselection switch. To access thisswitch, you must first remove thehexagonal plug with a 5mm Allenkey in the front of the 123ignitionunit. You can now carefully turn the

123\EVO mode switch settings
mode adv/rpm**) curve-type0 20°/3100 only for calibration,
temp. sensor inactive
1 20°/3100 tuning with regular fuel2 22°/3100 tuning with regular fuel3 24°/3100 tuning with regular fuel4 26°/3100 tuning with regular fuel5 28°/3100 tuning with regular fuel
6 14°/3600 curve ‘A’ for 375cc, A53 & M47 20°/3000 curve ‘B’ for A79/0 engine8 25°/3000 curve ‘C’ for A79/1, M28 & M28/19 23°/5000 VA1-curve for V06/630 (VISA/LNA)A 20,5°/5200 VA4-curve for V06/644 (VISA/LNA)
B 24°/3100 tuning with E85 / LPG *)C 26°/3100 tuning with E85 / LPG *)D 28°/3100 tuning with E85 / LPG *)E 30°/3100 tuning with E85 / LPG *)F 32°/3100 tuning with E85 / LPG *)**) excl. max 12° vacuum advance
Static timing: 8° for M28 & M28/1, 10° for VISA engines12° for A53, M4, A79/0, A79/1
123\UNI mode switch settings
mode engine plate engine-type static timing0 timing mode, 20°/3100 rpm only for calibration1 A 9 hp, 375cc 12°2 AZ A53 12°3 AM M4 12°4 AYA A79/0 12°5 AM2 M28 8°6 AYA2 A79/1 12°7 AK2 M28/1 8°8 A06/635 M28/1 8°9 A06/642 M28/1 8°A AM2A M28/1 8°B A06/664 M28/1 8°C - - -D - - - E - - - F ”E85 / LPG”*) M28/1 8°
*) This mode is ment for M28/1-engines running on ultrahigh octane fuels like LPG or E85.
E85 is a blend of 85% bio-ethanol and 15% gasoline. Itsoctane rating is 104 RON.You need a larger main jet ora ”123\FlexiJet” adjustable jetto run on E85 (see photo).

FINAL WORDS
CoilsCoils that have been overheated once when the car stillhad points will never give a strong spark anymore, evenif they still work they need to be replaced, get a new coil,another second hand coil can be just as bad.Using a VISA-coil, results in much higher currents thenwith the stock black coil. Check for power loss over theignition-key, and check (very important!!) the quality ofthe mass-cable from the gearbox to the battery.
Spark plug leadsSpark plug leads have to be replaced once in a while evenif they still seem ok they often start to leak spark energy,especially when they are wet. With the higher spark ener-gy of a 123 it is even more important to have fresh sparkplug leads, now is a good time to replace them! If youare uncertain if they still are ok you can test their isola-tion by slowly pouring water over them, it should notaffect how the engine runs!
MaintenanceYou can now congratulate yourself to have an ultramod-ern, maintenance free ignition system, which may seem tomake your car almost totally maintenance free itself. Ofcourse this is not the case and it will still need its plug-gaps checked every 5000 kms and new plugs every10.000 kms. Also other regular maintenance, like oil
ADVANCED USE: TUNING WITH THE 123\EVO.Caution, this is for advanced users only, most peopleshould stick to the standard curves. The standard curveshave the extra margins that Citroën used to prevent engi-ne damage under extreme situations. If you are an expie-renced 2cv mechanic and know what you are doing youcan use these margins and tune your car for maximumpower and fuel efficiency.
The procedure is as follows :a. Select curve 1, presumed you tune a car on regularfuel. (For LPG/E85 you should start with curve ”B”)b. Drive it, until the engine is warm, and measure maxi-mum speed at full throttle. c. Select curve 2 (or ”C”), and measure maximum speedat full throttle again. Listen for any evidence of knocking.Release the throttle when you hear this because this is theeasiest way to ruin your engine.
If the maximum speed increases and there is no sign ofknocking, select the next curve. If the maximum speeddoes not increase or any knocking occured, return to theprevious curve.Be aware, that using the quality of fuel can vary a greatdeal. Inferior fuel quality or higher ambient temperaturesthan during the tuning process, may cause knocking.Release the throttle when you hear this! Choose a lowercurve setting as soon as possible.

spark-balance: software controlled, betterthen half a degree crankshaft
wiring: red = +12Vyellow = ”+” coilblack = ”-” coil
engine-types:”123\2CV” A79/1 435cc
M28 & M28/1 602cc
”123\UNI” all standard ”2CV” - engines, selectable by mode-switch
”123\EVO” all standard and tuned ”2CV” engines, selectable by mode-switch. Cold start advance and overheat retard. Vacuum advance sensorfor reduced fuel consumption under medium loads.
changes, valve clearance checking, cleaning the oil cooleretc is still necessary to keep your car in good shape sodon’t neglect that just because it otherwise has become somuch more reliable with the 123ignition!
Raids and WaterproofingThe 123 is not absolutely waterproof and getting waterinto the system can irreversibly destroy it! Under normalcircumstances this is never a problem but take care whenusing high pressure cleaners (these can ruin the oil cooleras well) and when crossing deep water. It is possible tomake the unit more “Raid ready” with a silicone sealantaround the circuit boards edges on the rear of the unit,the LED in front and where the wires come out of theunit.
Technical data operating voltage: 4 – 18 Voltrange: 10 – 10000 rpmtemperature: -40° to 100° Celsiuscoil: stock black 2CV-coil, brown
VISA coil or other coil with aprimairy resistance not lower than 1 ohm
dwell: microprocessor controlled,adjusting to coil current and therefore independent ofbattery voltage

visit our website www.ignition.nl to checkout our other products