ex350 - american honda motor companycdn.powerequipment.honda.com/pe/pdf/manuals/31zc3603.pdf · the...
TRANSCRIPT

-e. Owner’s Manual EX350

mm The generator is a potential source of electrical shock if misused. Do not expose the generator to moisture, rain or snow. Do not let the generator get wet, and do not operate it with wet hands.
Thank you for purchasing a Honda generator.
This manual covers the operation and maintenance of the EX350 generator. The EX350 is equipped for manual starting only. All information in this publication is based on the latest product information available at the time of printing.
Honda Motor Co., Ltd. reserves the right to make changes at any time without notice and without incurring any obligation.
No part of this publication may be reproduced without written permission.
This manual should be considered a permanent part of the generator and should remain with the generator if it is resold.
In some areas, generators are required by law io be registered with local utility companies. Please check local regulations for proper registration and use procedures.
This generator is equipped with a U.S.D.A. qualified spark arrester which requires periodic maintenance to ensure its effectiveness. It is illegal in some areas to operate an engine without a spark arrester; check local laws and regulations.
Pay special attention to statements preceded by the following words:
w Indicates a strong possibility of severe personal injury or death if instructions are not followed.
CAUTION: Indicates a possibility of personal Injury or equipment damage if instructions are not followed.
NOTE: Gives helpful information.
If a problem should arise, or if you have eny questions about your generator, consult an authorized Honda dealer.
w Operating this equipment requires special effort to ensure the safety of the operator and the safety of others. Read and understand this Owner’s Manual before operating this equipment; failure to do so could result in personal injury or equipmeot damage,
HONDA MOTOR CO., LTD. 1988, ALL RIGHTS RESERVED
1

CONTENTS
1. SAFETY .............................................................................. 3 l Safety Label Location ........................................................ 3 l Safety Information ............................................................ 4
2: COMPONENT IDENTIFICATION .............................................. 6 3. PRE-OPERATION CHECKS ..................................................... 4. STARTING THE ENGINE ........................................................ 1: 6. GENERATOR USE ................................................................. 14
. AC Applications ............................................................... 18 l Output and Overload Indicators ........................................... . DC Application ................................................................. ii l High Altitude Operation ..................................................... 21
6. STOPPING THE ENGINE ........................................................ 22 7. MAINTENANCE ................................................................... 24
l Maintenance Schedule ...................................................... 24 l Air Cleaner Service ............................................................ 26 l Spark Plug Service ............................................................ 27 . Spark Arrester Maintenance ............................................... . Exhaust Pipe Screen Maintenance ...................................... ii
8. TRANSPORTING/STORAGE ................................................... 31 9. TROUBLESHOOTING ............................................................
10. WIRING DIAGRAM ............................................................... ii 11. SPECIFICATIONS ................................................................. 12. CUSTOMER SERVICE fNFORMATiON ............................................ x:
2

I. SAFETY
Read this label before you operate the generator.
3

Honda generators are designed to give safe and dependable service when operated according to instructions. Read and understand this Owner’s Manual before operating the generator. Failure to do so could result in per- sonal injury or equipment damage.
lo avoid severe personal injury or equipment damage, observe the following precautions:
l Place the generator on a firm, level surface; avoid loose sand or snow. If the generator is tilted or overturned, fuel spillage and a fire may result.
l To prevent fire hazards and to provide adequate ventilation, keep the generator at least 1 meter (3 feet) away from buildings and other equip- ment dun’ng operation. Do not place flammable objects close to the generator.
l Connections for standby power to a building’s electrical system must be made by a qualified electrician and must comply with all’applicable laws and electrical codes. Improper connections can allow electrical current from the generator to backfeed into the utility lines. Such backfeed may electrocute utility company workers or others who contact the lines dur- ing a power outage, and when utility power Is restored, the generator may explode, burn, or cause fires in the building’s electrical system.
l Children and pets must be kept away from the area of operation due to a possibility of electric shock or bums from hot components.
l Know how to stop the generator quickly, and understand the operation of all the controls. Never permit anyone to operate the generator with- out proper instruction.
l The generator is a potential source of electrical shock if misused. Do not expose the generator to moisture, rain or snow. Do not let the generator get wet, and do not operate it with wet hands.
l Fuel is extremely flammable and is explosive under certain conditions. - Refuel in a well-ventilated area with the engine stopped. Do not
smoke or allow flames or sparks in the refueling area or where fuel is stored.
- Do not overfill the fuel tank. After refueling, make sure the tank cap is closed properly and securely.
4

- Be careful not to spill fuel when refueling. Spilled fuel or fuel vapor may ignite. If any fuel is spilled, make sure the area is dry before star- ting the engine.
l Never run the engine in an enclosed or confined area. Exhaust contains poisonous carbon monoxide gas; exposure may cause loss of con- sciousness and may lead to death.
l The exhaust pipe becomes very hot during operation and remains hot for a while after stopping the engine. Be careful not to touch the exhaust pipe while it is hot. To avold severe bums or fire hazards, let the engine cool before transporting the generator or storing it indoors.
CAUTION: Equipment damage and corrosion from sand, dirt, and. water can occur if the generator Is overturned or sinka fnto a soft surface.
5

2. COMPONENT lDENTlFlCATlON
AC RECEPTACLE
/. DC RECEPTACLE /
OUTPUT WDICATOR
‘AC OVERLOAO INDICATOR
DC 0icw RREAXER TERMWAL COVER
6

FUEL TANK CAP
OtJTFUT
FRAMi BEmAt. NUMBER
7

3. PRE-OPERATION CHECKS
CAUTION: Check the fpmerator on l laval utrfaco with the engine Mopped.
FUEL The Honda EX36D has a two-stroke engine that requires a gasoline-oil mixture. Remove the filler cap and check the fuel level. Refill the tank with pre- mixed fuel if the fuel level ir low. Do not f&II above the UPPER LEVEL line.
l Your engine i de ‘gned to use any gasoline that has a pump oc- tane number ( v 1 of 86 or higher, or that has a research octane number of 91 or higher. Gasoline pumpa at service stations normally display the pump octane number.
l We recommend that you use unleaded fuel because It produces fewer engine and spark pluff deposits and extenda the fife of exhaust system components.
l Never use stale or contaminated gasoline. Avoid getting dirt, dust or water In the fuel tank, Use of a lower octane gasoline can cause persis- tent “pinging” or heavy “spark knock” (a metallic rapping noise) which, if severe, can lead to engh damage.
CAUTION: If “rpatk knock” or”- man at a ataady angina speed undernonruJlosd,c~bm6of~.Itrperk~korpinging parslats, consult your wthohed Honda d&u. Failure to do so Is con- rideredmisuse,Md~~by~bnotcovsndbyHonda’r LImIted wfmnty.
l Premix gasoline and oil In a ratio of 100 : 1 Use only HONDA 2-STROKE OIL or NMMA @IAl certified service TC-W 2-stroke oil.
Preparation of Gasoline-Oil Mixture: Use a plastic one-ounce kitchen measuring cup for the oil, prepare the mixture in a clean approved fuel container and shake until thoroughly
pFJ=gg t U.S. quart I liter
mixed before filling tha fuel tank.
n&L
. .
uwEnlEvEl
8

Fuel tank capacity: 0.81 I (0.21 US gal) Gasoline: Unleaded regular gasoline Oil: Honda 2-stroke oil or NMMA (BIA) certified service TC-W 2-stroke oil.
Occasionally you may experience light spark knock while operating under heavy loads. This is no cause for concern, it simply means your engine is operating efficiently.
l Gasoline is extremaly fbmmabb and b explosive under certain conditions.
l Refuel in a well-ventilated area with the engine btopped. Do not smoke or allow flamen or rparks In the area wherd- the engine is refueled or where gasoline is stored.
o Do not overfill the fuel tank (them &odd be no fuel ln the filler neck). After refueling, make sure the tank cap Is dosed properly and securely.
l Be careful not to spill fuel when refueling. Spilled fuel or fuel vapor may ignite. If any fuel is spilled, make sure the area is dry before starting the engine.
l Avoid repeated or prolonged contact wlth skin 01 breathing of vapor. KEEP OUT OF REACH OF CHILDREN.
9

AIR CLEANER
The air cleaner accumulates dust and must be cleaned periodically. If the engine in operated in unusually dusty arean, the air cleaner must be cleaned at more frequent intervale than specified In the maintenance section.
Check the air cleaner element to be sure it is clean and in good condition. Clean or replace the element if necessary (page 26).
CAUTION: Never run the engine without the ak cleaner. Rapid engine wear will result from conteminants, euch as dust end dirt, being drawn through the carburetor, Into the ongina.
1. Remove the spark plug Inspection cover by raising the tab. 2. Remove the air cleaner cover by loosening the cover screw with a
screwdriver.
TAB
W’AfiK PWO INBFECTIDN COVER
10
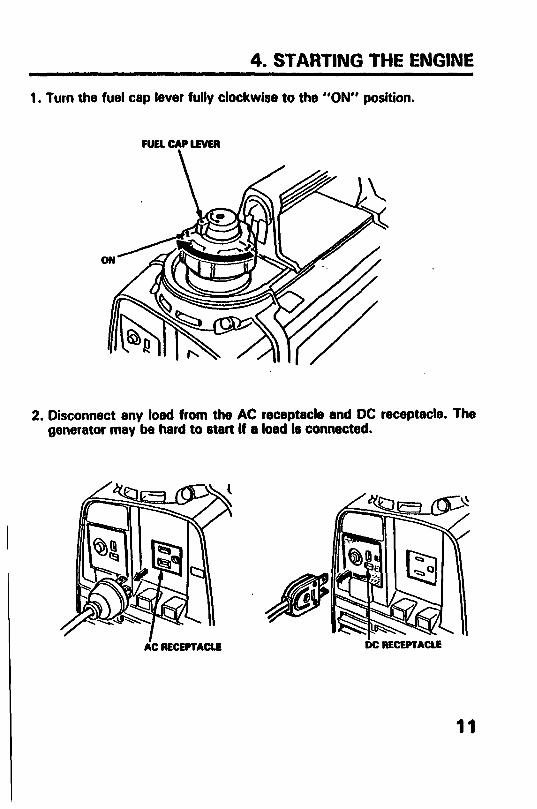
1. Turn the fuel cap lever fully clockwise to the “ON” position.
FUEL CAP LEVER
2. Disconnect any load from the AC receptacle and DC receptacle. The generator may be hard to start If a load Is connected.
AC RECEPTAUB DC RECEPTACLE
11

3. Move the engine switch to the CHOKE position.
NOTE: If restarting a warmed-up engine, set the switch to the ON position.
“Cold” Engine: wtart “Hot” Engine:
4. Pull the starter grip lightly until resistance is felt, then pull briskly.
CAUTION: Do not allow the starter grip to snap back against the generator. Return it gently to prevent damage to the housing.
12

5. Turn the engine switch to the ON position as the engine warms up.
ENOINE SWITCH
NOTE: l If the air temperature Is high, return the engine switch to ON as soon as
the engine starts. l The AC output indicator will light when the engine starts and will remain
lit while the engine is running.
13

5. GENERA-tOR USE
m Before connecting an appliance to the generator, make sure that it is in good working order, and that its electrfcal rating does not exceed that of the generator.
NOTE: Appliance and power tool manufacturers usually list rating informa- tion near the model number or serial number.
To ground the generator chassis, connect a length of heavy wire between the ground terminal and an independent ground source. Consult a qualified electrician for your particular appplication.
CAUTION: l Limit operation requlrfng maxfmum power f35OVA) to 30 minutes. For
continuous operation, do not exceed the rated power of 300 VA. In either ca.se, the total wattage of all appliances connected must be considered.
l Most motorfzed appliances requfre more than their rated wattage for startup.
l Do not exceed the current lfmft speclfbd ffor any output. a Do not connect the generator to a househofd circuit. This could cause
damage to the generator or to electrical appliances ln the house. l When using AC and DC output simultaneously, do not exceed 250 VA in
the load connected to the AC receptacle. An AC load exceeding 250 VA may not light the AC overload fight but when added to the DC load, It may ahorten the service fife of the generator.
14

Connections for standby power:
if the generator will he used to supply power to a building’s electrical system as an alternative to utility company power, a double-throw transfer switch must be Installed before connecting the generator. The transfer switch disconnects the utility lines from the building’s electrical system when the generator is connected.
A transfer switch is avallabfa from your euthorized Honda generator dealer. Installation must be performed by a qualified electrician and must comply with all applicable laws and elacwfcal codes. Consult the dealer regarding your specific power requirements and generator suitability for your standby pow& needs. .:
m Connectforts far standby power to a building% electrical system must be made by a qualified electrician snd must comply with ail applicable laws and electrical codes. Improper connections can allow electrical cur- rent from the generator to backfeed lnto the utiiitv lines. Such backfeed may electrocute utility company workers or others who contact the lines during a power outage, and when utility power is restored, the generator may explode, burn, or cause fire8 in the building’s electrical system.
15

AC applkatlons
1. Start the engine and make sure the output indicator light comes on. 2. Plug in the appliance.
OVLRLiJAD MMCATOR mEENI mm
CAUTION: l For continuous operation, do not exceed the rated power of 3OOVA. and
limit operation requiring the marlmum power of 35OVA to 30 minutes or less. Substantial overbading that cottUnuously lights the overload ln- dicator may damage the generator. Marginal overloading that temporari- ly tights the overload indicator may shorten the service life of the generator.
l Be sure that ail appliances are in good workfng order before connecting them to the generator. If an appliance begins to operate abnormally, becomes sluggish, or stops suddenly, turn off the generator engine switch immediately. Then disconnect the appliance, and examine it for signs of malfunction.
16

OUTPUT AND OVERLOAD INDICATORS
If the generator is overloaded fin excess of 350 VA), or If there is a short circuit in a connected appliance, the red overload light will go ON. The red overload light will stay ON, and after about ten seconds current to the connected appliancels) will shut off and the green light will go OFF. Stop the engine and investigate the problem.
Determine if the cause .is a short clrcuft In s connected appliance or an overload. Correct the problem and restart the generator.
Before connecting an appliance to the generator, make sure that it Is in good order and that its electrical rating does not exceed that of the generator. Then start the generator and connect the power cord of the appliance.
NOTE: The overload indicator (red lamp) will light if the engine slows down excessively. A clogged spark arrester or exhaust pipe screen may cause the engine to run slowly or stall. If that occurs, check the spark arrester fp. 29) and exhaust pips screen fp. 301, and clean them if necessary.
QulPuTJNiblcAlQR lQREENJ . OVEtiLOAD INMCATOR IREbl
NOTE: When an electric motor is started, both the red and the green lights may go on simultaneously. This Is normal if the red light goes off after about ten (101 seconds. If the red light stays on, consult your Honda generator dealer.
17

OUTPUT SELECTOR SWITCH
Turn the output selector switch to either position as required. You can turn the switch to the 150 VA position for quiet generator operation, if 150 VA is sufficient to operate your AC appliance.
Turn the switch to the 300 VA position for full generator output.
NOTE: When using the DC output, always set the switch in the 300 VA position.
18

DC application
The DC terminals may be used for charging 12 volt automotive-type bat- teries only. NOTE: When using the DC output, turn the output selector switch to the 300 VA position. 1. Start the generator. 2. Connect the red lead of the battery charging cable to the positive (+I
battery terminal and the black lead to the negative f-1 battery terminal. 3. Plug the battery charging cable into the DC receptacle of the generator.
l The battery gives off explosive gases; keep sparks, flames and ciga- rettes away. Provide adequate ventilation when charging or using bat- teries in an enclosed space.
l The battery contains sulfuric acid felectrolytel. Contact with skin or eyes may cause severe bums. Wear protective clothing and a face shield. - if electrolyte gets on your skin, flush with water. - If electrolyte gets in your eyes, flush with water for at least 15
minutes and call a physician Immediately. l Electrolyte is poisonous.
- if swallowed, drink large quantities of water or milk and follow with milk of magnesia or vegetable oil and call a physician.
l KEEP OUT OF REACH OF CHILDREN. l To prevent the possibility of creating a spark near the battery, connect
charging cables first to the battery, than to the generator. Disconnect cables first at the generator.
l Before connecting charging cables to a battery that Is installed in a vehi- cle, disconnect the vehicle’s grounded battery cable. Reconnect the vehicle’s grounded battery cable after the charging cables are removed. This procedure wiil prevent the possibility of a short circuit and sparks if you make accidental contact between a battery terminal and the vehi- cle’s frame or bodv.
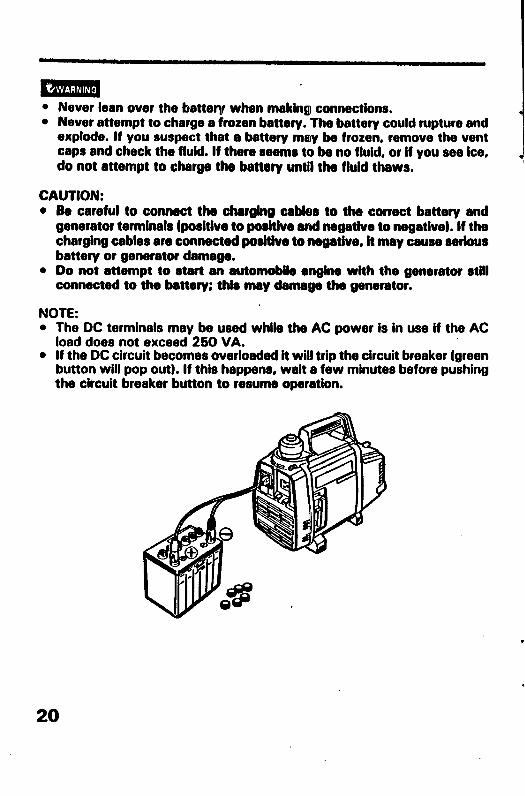
l Never lean over the battery when making connections. l Never attempt to charge a frozen battery. The battery could rupture and
explode. If you suspect that a battery may be frozen, remove the vent caps and check the fluid. If there seems to be no fluid, or lf you see ice, do not attempt to charge the battery untif the fluid thaws,
CAUTION: s Be careful to connect the chsrglng cabfer to the correct battery and
generator terrnlnals fposltive to poshfve snd negatfve to negative). If the charging cables am connected poshfve to negstfve, It may cause serious battery or generator damage.
l Do not attempt to start an eutomobffe engine with the generator still connected to the bettery; thfs may dsmage the generator.
NOTE: l The DC terminals may be used while the AC power is in use if the AC
load does not exceed 250 VA. l if the DC circuit becomes overloaded it will trip the circuit breaker (green
button will pop out). If this happens, wait a few minutes before pushing the circuit breaker button to resume operation.
20
l High altitude operation
At high altitude, the standard carburetor air-fuel mixture will be excessively rich. Performance will decrease, and fuel consumption will increase.
High altitude performance can be improved by Installing a smaller diameter main fuel jet in the carburetor and readjusting the pilot screw. If you always operate the generator at altitudes higher than 6,000 feet above sea level, have your authorized Honda Generator dealer perform these carburetor modifications,
Even with suitable carburetor jetting, engine horsepower will decrease ap- proximately 3.5% for each 1,000 foot increase.in altitude. The affect of altitude on horsepower will be greater than this If no carburetor modifica- tion is made.
CAUTION: Operation of the generator at an altitude lower than the car- buretor is jetted for may result in reduced performance, overheating, and serious engine damage caused by an excessively lean air/fuel mixture.
21

6. STOPPING THE ENGINE
NOTE: To stop the engine In an emergency, turn the engine switch to the OFF position.
In normal ~80:
1. Disconnect any load at the AC receptackt. Disconnect DC battery charging cable.
.
2. Turn the engine ewttch to the OFF positIon.
22

3. Turn the fuel cap lever fully countqrclockwise to the “OFF” position.
CAUTION: Be sure the fuel cap lever end the engina rwitch are “OFF” when stopping, transporting and/or storing the generator.
23

7. MAINTENANCE
Maintenance Schedule Periodic maintenance and adjustment is necessary to keep the generator in good operating condition. Perform the service and inspection scheduled in the table.
Shut off the engine before pedormlng any maintenance. If the engine must be run, make sure the area is well ventilated. Exhaust contains poisonous carbon monoxide gas; exposure can cause 10s~ of consciousness and may lead to death.
CAUTION: Use only ganulne HONDA parts or their equivalent. The use of replacement parts whkh are not of equivalent quality may damage the generator.
24

Maintenance Schedule
ccrnburtion chamber cbn Fud ten& and filter Ch
d.. ~~.
First month
2otrs.
0
NOTE: (11: Service more ~reqwntly when used ht rlurt~ MI. 121: These itemr l houkl be aarvked by n authorbad Homb de&r. unbrr ttm owner bar the
proper toob and IO rnechankrlly protkbnt. Sea tlu Honda Shop Manud. (31: Fofxod~nkrmt cornmarcW uao. lots tnurrr of oporrtbn to determine proper maintenance
25

.
Air Cleaner Service
The air cleaner accumulates dust and must be cleaned periodically. If the engine is operated in unusually dusty areas, the air cleaner must be cleaned at more frequent intervals than specified in the maintenance section.
A dirty air cleaner will restrict air flow to the carburetor. To prevent car- buretor malfunction, service the air cleaner regularly (page 24). Service more frequently when operating the generator in extremely dusty areas.
w Never use gasoline or low flash point solvents for cleaning the air cleaner elements. A fire or explosion could result.
CAUTION: Never run the generator without the air cleaner. Rapid engine wear will result from contaminants, such aa dust and dirt, being drawn through the carburetor, into the engine.
To clean the element: 1. Remove the spark plug inspection cover by lifting the tab. 2. Loosen the COVBC screw end remove the air cleaner case cover. 3. Remove the air cleaner element. Wash the element in clean nonflam-
mable or high flash point solvent and dry it thoroughly. Soak the element in clean engine oil and squeeze out the excess oil.
4. Reinstall the element and cover.
26
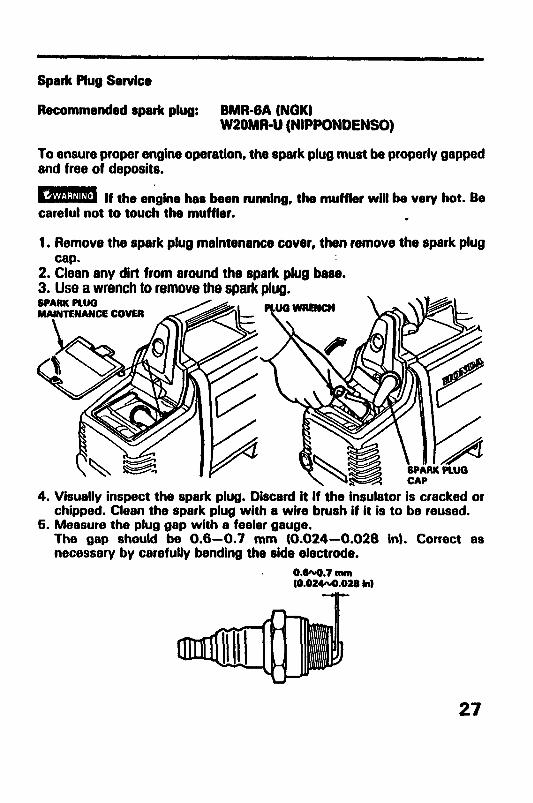
Spark Plug Service
Recommended spark plug: BMRdA (NGKI WPOMR-lJ (NIPPONDENSO)
To ensure proper engine operation, the spark plug must be properly gapped and free of deposits.
m If the engine has been running, the muffler will be very hot. Be careful not to touch the muffler. .
1. Remove the spark plug maintenance cover, then remove the spark plug cap.
2. Clean any dirt from around the spark plug bass. 3. Use a wrench to remove the spark plug.
4. Visually inspect the spark plug. Discard it If the insulator is cracked or chipped. Clean the spark plug with a wire brush if it is to be reused.
6. Measure the plug gap with a feeler gauge. The gap should be 0.6-0.7 mm (0.024-0.028 in). Correct as necessary by carefully bending the side electrode.
0.8-0.7 nun l0.024-0.028 w
27

6. Make sure that the spark plug washer Is in good condition, and thread the spark plug in by hand to prevent cross-threading.
7. After the spark plug is seeted, tighten with a spark plug wrench to com- press the washer.
NOTE: If installing a new spark plug, tighten 112 turn after the spark plug seats to compress the washer. If reinstalling a used spark plug, tighten l/8- l/4 turn after the spark plug seat8 to compress the washer.
CAUTION: l The spark plug murt a securely tIghtened. An impropedy tightened
aperk plug can become vorv hut and coukl damage the engine. l Never use spark plugs which have an hquroper heat range. Use +y the
mcommmded spark plug8 01 oquhfabnt.
28

Sparfc Amater Maintenanw
w If the generator has been nmnlng, the muffler will be very hot. Allow it to cool before proceeding.
CAUTION: The spa& arrester murt be servked every 100 hours to maln- tain its efficiency.
1. Remove the spark plug inspection cover. 2. loosen the cover bolt and remove the air cleaner case cover. 3. Unfasten the two latches, remove the 6 mm screws and side cover. 4. Remove the 6 mm bolts and 6 mm nut, then remove the muffler deflec-
tor and tail pipe. 6. Remove the spark arrester carefully from the tail pipe.
CAUTION: Be wefuf not to damage the sperk atrester screen.
29
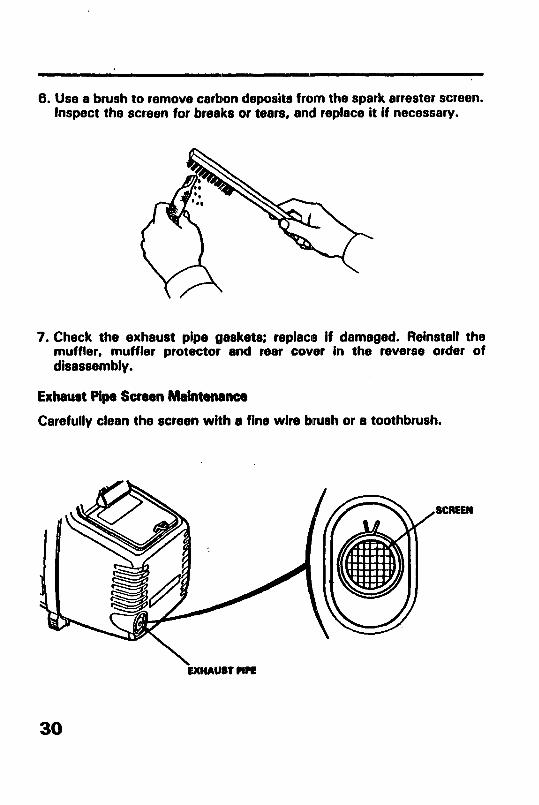
6. Use a brush to remove carbon deposits from the spark arrester screen. Inspect the screen for breaks or tears, and replace it if necessary.
7. Check the exhaust pipe gaskets; replace If damaged. Reinstall the muffler, muffler protector and rear cover in the reverse order of disassembly.
Exhaust Pipe Screen Mafntenence
Carefully clean the screen with a fine wire brush or a toothbrush.
30

8. TRANSPORTING/STORAGE
To prevent fuel spillage when transporting or during temporary storage, the generator should be secured upright in its normal operating position, with the engine switch OFF and the fuel cap lever turned fully counterclockwise to the “OFF” position.
M Spilled fuel or fuel vapor may Ignite.
Before storing the unit for an extended period: 1. Be sure the storage area is free of excessive humidity and dust. 2. Drain the fuel-
- Gasoline is extremely flammable and IS explosive under certain conditions. Do not smoke or allow flames or sparks in the area.
a. With the engine switch ON, remove the fuel tank cap. b. Drain the fuel into a suitable container by pouring the fuel mixture
from the tank. c. Loosen the drain screw and drain the fuel from the carburetor into a
suitable container. Retighten the screw. d. Move the engine switch to OFF. e. Reinstall the fuel cap and turn the fuel cap lever fully to “OFF.”
3. Remove the spark plug and pour about a teaspoonful of clean engine oil into the cylinder. Reinstall the spark plug.
4. Pull the starter grip until resistance is felt; the piston is coming up on its compression stroke. At this position the piston is above the intake and exhaust ports. This will help protect the engine from corrosion.
6. Cover the generator to keep out dust. 31

9. TROUBLESHOOTING
Engine will not start: l Is the fuel cap lever fully ON7 l Is the engine switch in the ON position? l Is there enough fuel? l Are all loads disconnected from the AC receptacle and DC receptacle? l Is there a spark at the spark plug?
8. Remove the spark plug cep. Clean any dust from around the spark plug base, and then remove the spark plug.
b. Install the spark plug in the plug cap. c. Turn the engine switch to ON. d. Grounding the aide electrode to any engine ground, pull the recoil
starter to see if sparks jump across the gap.
m 8e sure there la no spilled fuel near the spark plug. Spilled fuel may ignite. Perform this teat in a well ventilated area.
e. If there are no sparks, replace the plug. 1. If the new spark plug does not spark, take the generator to an
authorized Honda dealer.
Engine runs slowly or stalls: l Is the exhaust pipe screen OK? Inspect the screen and clean if clogged
(p. 30). a Is the spark arrester OK? Inspect the spark arrester and clean if clogged
fp. 29).
32
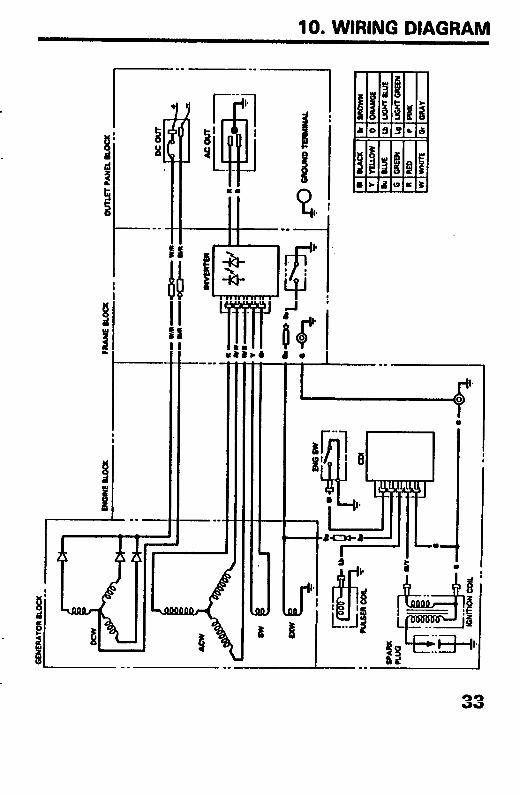
10. WIRING DIAGRAM
I-- + 0
.
I

11. SPECIFICATIONS
Dimension
Tvpe Power product description code Length x Width x Height
Dry Weight
EX350 Ii ECC
365x 195x305 mm (14.4x7.7x12.0 in)
8.6 kg (19.7 lb)
Engine
Engine Type HONDA GE35 Displacement 34.4 cc (2.1 cu in) IBore x Stroke] 137 x 32 mm ft.46 x 1.26 in)) Compression Ratio 6.7 : 1 Engine Speed 3,000/4,600 rpm Cooling System Forced air cooling Ignition System Fuel Tank Capacity Spark Plug
C.D.I. 0.91 I (0.21 US gal) BMR-GA (NGK) W20MW-U (NIPPONDENSO)
Generator
AC output Rated Voltage 12ov Rated Frequency 60Ht Rated Amperage 1.2512.5 A Rated Output 150/309 VA Maximum Output 1501350 VA
DC output Only for charging 12 V automotive : batteries.
Maximum charging output = 6A NOTE: Specifications are subject to change without notice.
34

12. WARRANTY SERVICE
Honda Power Equipment dealership personnel are trained professionals. They should be able to answer any question you may have. If you encounter a problem that your dealer does not solve to your satisfaction, please discuss it with the dealership’s management. The Service Manager or General Man- ager can help. Almost all problems are solved in this way.
If you are dissatified with the decision made by the dealership’s management, contact the Honda Power Equipment Customer Service Office. You can write to:
American Honda Motor Co., Inc. Honda Power Equipment Division Customer Service Office 4900 Marconi Drive Alpharetta, GA 300052600
Or telephone: (770) 497-6400
When you write or call, please give us this Information:
l Model and serial numbers (see page 7)
l Name of the dealer who sold the generator to you
l Name and address of the dealer who services your generator
l Date of purchase
l Your name, address, and telephone number
l A detailed description of the problem
35

MEMO
36

