exams internal/… · web viewthere are many time-consuming revision strategies that actually fool...
TRANSCRIPT

1
Revision StrategiesResourceBooklet

CONTENTS AND QUICK REFERENCE GUIDE
1. General revision strategies and exam tips Page 3
2. Effective note-taking Page 4
3. Writing Essays and the PEEL Structure Page 5
4. Memorising strategies: Mnemonicsa. How memory works and “Association, Imagination and Location” Page 7b. How learning style affects the use of mnemonics Page 8c. Using mnemonics to learn more effectively Page 9
d. The Link Method and the Story Method Page 10 e. The Number / Rhyme Technique Page 11 f. The Number / Shape System Page 12 g. The Journey Method Page 13 h. The Roman Room Method Page 15 i. The Major Memory System Page 16 j. Learning Foreign Languages Page 18
5. Mind Maps Page 20
6. Suggestions to help parents support students with exam nerves Page 23
7. Revision Timetables Page 24
Rationale
There are many time-consuming revision strategies that actually fool us into thinking we have embedded the knowledge into our long term memory. For example, simply re-reading texts or notes has been seen to have a low impact with regard to memory retention, especially considering how much time this can take, but students are happy because this is a relatively undemanding task that takes little mental effort and it feels like effective revision.
There are edu-myths that cloud effective planning for exam revision. There is an old adage, for example, that: “We learn: 10 percent of what we read; 20 percent of what we hear; 30 percent of what we both see and hear; 50 percent of what we discussed with others; 80 percent of what we experience personally; 95 percent of what we teach to someone else.” This is a myth based on no evidence. It has become perpetuated because it is an easily reductive formula, but it is unfounded. We need, therefore, to consider a range of other tested strategies that are proven to make a tangible and pronounced difference to the performance of students at all ability levels.
At De La Salle, we are committed to developing the thirst for new knowledge and understanding in our specialist subject areas while equipping the boys in our care with the skills to perform to their potential in all external examinations. This booklet is designed as part of a series of measures to teach effective revision techniques and to help optimise examination performance. While we will continue to invest in the teaching and learning techniques that embody best practice in all schools, we recognise that long term success and the ability to sustain optimum examination performance also relies upon an investment in a variety of tried and tested revision techniques and strategies.
Tim Silvester Assistant Headteacher
2

1. GENERAL REVISION STRATEGIES AND EXAM TIPS
Make a revision plan or ‘exam planner’at least a week before starting your revision; Keep a record of the work you have completed in your independent studies; Avoid copying notes or highlighting large parts of texts; Make a list of facts that must be memorised as early as possible; Have a clear goal - this may be a percentage or a grade; Develop a routine – it takes three weeks to develop a healthy routine, so start early enough; Spend most of your revision time practising past papers!
Remain task focused rather than time focused; Avoid feeling the need to start work on the hour, or half past the hour; this creates a focus
on time instead of a focus on completing tasks!
Breaks from work are to be encouraged, although 'a break' suggests a 5 minute pause, whereas switching on a games machine or watching television is a 'complete change of activity' (which is fine, provided it is recognised for what it is!)
Have a timetable of tasks to be completed by the end of each day; Make a list of weaker topic areas and subject areas and prioritise them; Discuss with subject staff regarding which tasks will give the most benefit; Share the work covered each day with parents before submitting for marking with teachers; Divide your time when completing past papers according to the number of marks available
(each mark is worth the total time in minutes divided by the total number of marks); Remember that completing past papers, practice essays, and model answers to examination
questions is key to securing excellent results!
Borrow work from your friends who are achieving higher grades and ask them or your teacher to explain why that work is successful;
Steal the best ideas and make them your own; Get feedback from your teacher and make sure you understand how to improve; Redo work whenever you get an opportunity to do so; Circle your mistakes and never make the same mistake twice!
Use the ANKI website to make flashcards (the shorter the notes, the better the retention); Use mindmaps to summarise information or plan essays (see section 5); Use mnemonics to memorise key facts (see section 4). Have all of the resources you need to revise next to you!
Try to emulate the conditions of an examination hall when studying as this assists both recall and examination technique. (Avoid listening to music or introducing other distractions that will not be available in the actual examination periods during revision sessions);
Highlight useful information in each question and practise reducing the amount of information you need to highlight;
Scan the paper before starting to answer the first question; Write key information down that you have memorised immediately!
3

2. EFFECTIVE NOTE-TAKING
Throughout the academic year you will have been taking lots of notes. The most effective note taking involves summarising the information you have learned at the end of each academic week throughout the academic year. Nevertheless, during revision time, the main objective is to work on your notes in various ways to make them more memorable:
Physically organise your notes so that they are clear, logically ordered and easy to find your way around;
Then read them through, underlining key words, highlighting different themes;
Devise your own colour coding system - it may seem childish, but associating different colours with different topics or themes will help you to memorise and compartmentalise things in your mind;
Write-out more and more concise versions of your notes, whittling down the content to manageable and digestible proportions - aim to reduce each topic to an index card. At this stage, your notes are an aide memoire, not a full repository of facts and arguments. You may find ‘spider diagrams’ and ‘mind maps’ helpful ways of summarising a lot of information onto a single page. They are also visually memorable, too. (See Section 5 on mind maps);
Make sure your notes are easy to follow and well organised. Keep things neatly filed together with clear labelling. Keep your lists of readings and references. Collect lists of past questions and past papers.
When it comes to note-making for revision purposes, less is more!
4

3. WRITING ESSAYS AND THE PEEL STRUCTURE
Essays require more than just a memorisation of facts. They require students to have an understanding of what they’re talking about. They also require students to know how to express themselves clearly and concisely in writing.
Being able to communicate well is an absolute must in the real world. It’s also necessary in all subject courses at university, and definitely in any professional capacity.
Essay writing is definitely a learnable skill, but not necessarily a straight forward one for a lot of students. Here are 3 key points to help with essay writing.
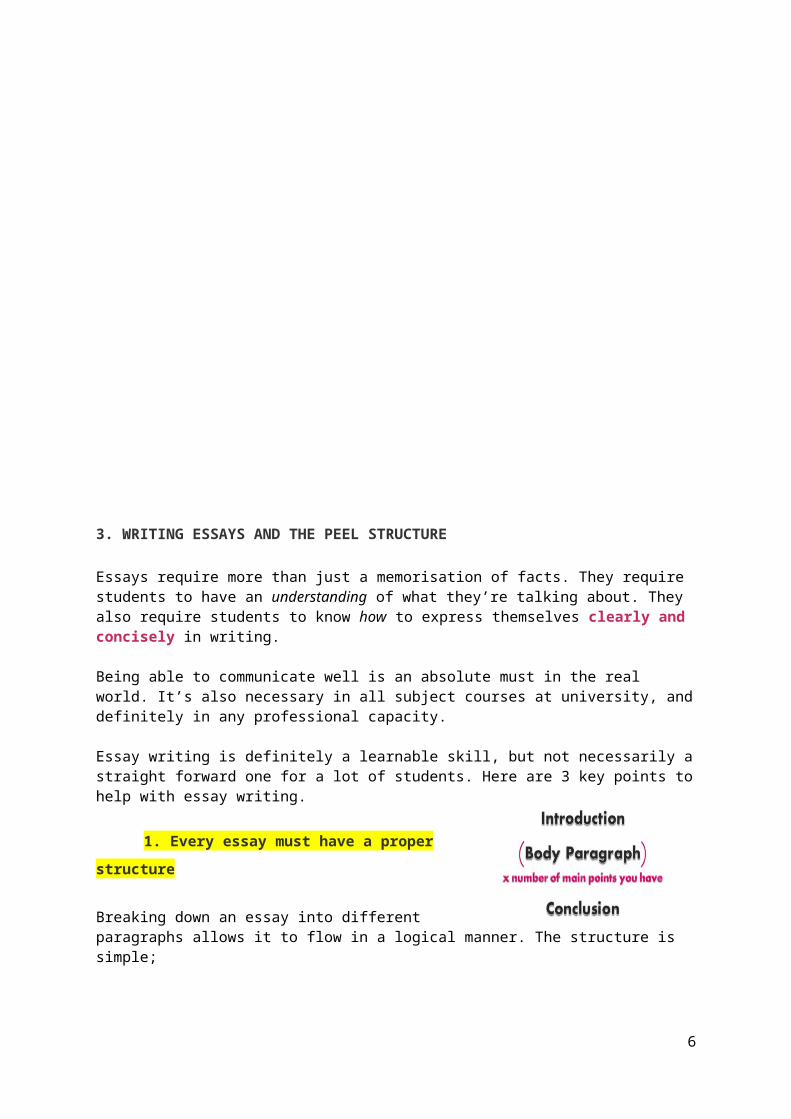
1. Every essay must have a proper structure
Breaking down an essay into different paragraphs allows it to flow in a logical manner. The structure is simple;
Introduction: Explain what you are going to say in your essay. Introduce the topic and briefly outline the points you’re going to make in your essay in the order you’re going to write about them. If the essay is meant to argue a point, make it clear in the introduction what your argument or point of view is.
Body Paragraphs: Make your points! An essay will usually have 3-5 paragraphs. Each paragraph contains its own main point that contributes to the overall theme or argument of the essay. (These paragraphs follow their own structure – see point 2.)
Conclusion: Explain what you have said. Sum up what the essay was about.
2. Each body paragraph must have a proper structure
Not only does the essay as a whole need structure, each paragraph needs to meet certain requirements.
REMEMBER PEELP = POINT: This is the main point of the paragraph. What part of the film is being discussed and what did it mean to the film? What was important about an historical event and how did it affect later events? Basically, what’s the point you’re about to discuss in this paragraph.
E = EXPLAIN: Explain what you said in your statement. Tell the reader why your statement is true. Why did the setting reflect how the main character was feeling? In what way did the weather affect the outcome of the battle? This part should make up the bulk of the paragraph.
E = EVIDENCE: Give an example! A quote, an example, a fact. Something concrete that gives evidence to your statement.
L = LINK: Why is the point you’ve made in this paragraph important to the essay or question? What does it mean to the story, or the film, or the event? Tell the reader why it matters.
5
3. Every essay needs an essay plan
An essay plan does not have to be a big thing. Not at all. It only takes a few minutes but will save SO much time overall.
Essay plans instantly give an essay structure, they prevent you from forgetting to include any important points, and they prevent you from losing your way as you write.
An essay plan can be quickly scribbled in a margin, or the first page of an exam book that isn’t marked. Here is an example of the way I would do an essay plan before I started writing. (It’s for the film The Matrix…)
Essay Plan Example
Each of the three ‘fingers’ coming off each paragraph make up ‘PEEL’. I haven’t done the ‘L’ part, but within each paragraph I would try and emphasize why this point was important to the setting of the film.
6

4. MEMORISING STRATEGIES: MNEMONICS (Sources: AcademicTips.org and Tony Buzan, “How to use your memory”)
Most people believe that their memories get worse as they get older. This is true only for people who do not use their memories properly: memory is like a muscle - the more it is used, the better it gets. The more it is neglected, the worse it gets.
a. How Memory Works Memory works by making links between information, fitting facts into mental structures and frameworks. The more you are actively remembering, the more facts and frameworks you hold, the more additional facts and ideas will slot easily into long term memory. The clear presentation and organisation of a good lesson provides a structure that is almost a mnemonic in its own right. Where information drifts in as isolated facts, it will normally be forgotten simply because it is not actively fitted into a mnemonic.
Association, Imagination and LocationThe three fundamental principles underlying the use of mnemonics are explained below.
Association Association is the method by which you link a thing to be remembered to a method of remembering it. Although we can and will suggest associations to you, your own associations are much better as they reflect the way in which your mind works. Some examples of the way things can be associated are:
being placed on top of the associated object crashing or penetrating into each other merging together wrapping around each other rotating around each other or dancing together being the same colour, smell, shape, or feeling
Whatever can be used to link the thing being remembered with the image used to recall it is the association image. As an example: Linking the number 1 with a goldfish might be done by visualising a 1-shaped spear being used to spear a goldfish to feed a starving family.
Imagination Imagination is used to create the links and associations needed to create effective memory techniques - put simply, imagination is the way in which you use your mind to create the links that have the most meaning for you. Images that I create will have less power and impact for you, because they reflect the way in which we think. The more strongly you imagine and visualise a situation, the more effectively it will stick in your mind for later recall. Mnemonic imagination can be as violent, vivid, or linked to the senses as you like, as long as it helps you to remember what needs to be remembered.
Location Location provides you with two things: a coherent context into which information can be placed so that it hangs together, and a way of separating one mnemonic from another: e.g. by setting one mnemonic in one village, I can separate it from a similar mnemonic located in another place. Location provides context and texture to your mnemonics, and prevents them from being confused with similar mnemonics. For example, by setting one mnemonic with visualisations in St Helier and another similar mnemonic with images of St Ouen allows us to separate them with no danger of confusion.
So using the three fundamentals of Association, Imagination and Location you can design images that strongly link things with the links between themselves and other things, in a context that allows you to recall those images in a way that does not conflict with other images and associations.
7

b. How Learning Style Affects the Use of Mnemonics
The way in which people learn affects the sort of mnemonics they should consider using to store information.
The three learning styles that are most commonly referred to are: visual, auditory and kinaesthetic (No-one uses one of the styles exclusively, and there is usually significant overlap in learning styles.)
Visual Learners (estimated at 65% of the population)
Visual learners relate most effectively to written information, notes, diagrams and pictures. Typically they want to take detailed notes. Some visual learners will take notes even when they have printed teacher notes on the desk in front of them. Visual learners will tend to be most effective in written communication, symbol manipulation etc.
Auditory Learners (estimated at 30% of the population)
Auditory learners relate most effectively to the spoken word. They will tend to listen to a teacher, and then take notes afterwards, or rely on printed notes. Often information written down will have little meaning until it has been heard - it usually helps auditory learners to read written information out loud. Auditory learners can be sophisticated speakers, and may specialise effectively in subjects like law or politics!
Kinaesthetic Learners (estimated at 5% of the population)
Kinaesthetic Learners learn effectively through touch and movement and space, and learn skills by imitation and practice. Predominantly kinaesthetic learners can appear slow, in that information is normally not presented in a style that suits their learning methods. Kinaesthetic learners make up around 5% of the population.
Memory Implications of Learning Styles
Most literature on mnemonics assumes the visual approach to learning styles - mnemonics are recommended to be as visually appealing and memorable as possible. Auditory or kinaesthetic learners may find that this emphasis on imagery leads to ineffective recall and they should try adjusting the mnemonics to suit their learning styles: in general; auditory learners can aim to use auditory cues to create mnemonics; kinaesthetic learners can imagine performing actions or using tools as the basis of memory techniques.
8

c. Using Mnemonics to Learn More Effectively
When creating a mnemonic, the following things help to make the mnemonic more memorable:
Use positive, pleasant images. The brain often blocks out unpleasant ones.
Exaggerate the size of important parts of the image
Use humour (perhaps linked with point 2)! Funny or peculiar things are easier to remember than normal ones.
Symbols (e.g. red traffic lights, pointing fingers, etc.) can be used in mnemonics.
Vivid, colourful images are easier to remember than drab ones.
Use all the senses to code information or dress up an image. Remember that your mnemonic can contain sounds, smells, tastes, touch, movements and feelings as well as pictures.
Bringing three dimensions and movement to an image makes it more vivid. Movement can be used either to maintain the flow of association, or can help to remember actions.
Locate similar mnemonics in different places with backgrounds of those places. This will help to keep similar images distinct and unconfused.
The important thing is that the mnemonic should clearly relate to the thing being remembered, and that it should be vivid enough to be clearly remembered whenever you think about it
9

A Choice of Mnemonic Methods and Examples of Use
d. The Link Method and the Story Method
The Link Method is one of the easiest mnemonic techniques available and it is quite powerful. It functions quite simply by making associations between things in a list, often as a story. The flow of the story and the strength of the visualisations of the images provide the cues for retrieval.
Taking the first image, imagine associations between items in a list. Although it is possible to remember lists of words where each word is just associated with the next, it is often best to fit the associations into a story: otherwise by forgetting just one association, the whole of the rest of the list can be lost.
As an example, you may want to remember a list of counties in the South of England: Avon, Dorset, Somerset, Cornwall, Wiltshire, Devon, Gloucestershire, Hampshire, Surrey This could be done with two approaches, the pure link method, and the story method:
The Link Method
This would rely on a series of images coding information:
An AVON (Avon) lady knocking on a heavy oak DOoR (Dorset). The DOoR opens to show a beautiful SuMmER landscape with a SETting sun (Somerset). The setting sun shines down onto a field of CORN (Cornwall). The CORN is so dry it is beginning to WILT (Wiltshire). The WILTing stalks slowly fall onto the tail of the sleeping DEVil (Devon). On the DEVil's horn a woman has impailed a GLOSsy (Gloucestershire) HAM (Hampshire)
when she hit him over the head with it. Now the Devil feels SoRRY (Surrey) he bothered her.
Note that there need not be any reason or underlying plot to the sequence of images: all that is important are the images and the links between images.
The Story Method
Alternatively this information may be coded by vividly imaging the following scene:
An AVON lady is walking up a path towards a strange house. She is hot and sweating slightly in the heat of high SUMMER (Somerset). Beside the path someone has planted giant CORN in a WALL (Cornwall), but it's beginning to WILT (Wiltshire) in the heat. She knocks on the DOoR (Dorset), which is opened by the DEVil (Devon). In the background she can see a kitchen in which a servant is smearing honey on a HAM (Hampshire), making in GLOSsy (Gloucestershire) and gleam in bright sunlight streaming in through a window. Panicked by seeing the Devil, the Avon lady panics, screams 'SoRRY' (Surrey), and dashes back down the path.
Given the fluid structure of this mnemonic, it is important that the images stored in your mind are as vivid as possible, and that significant images about the key words to be memorised are much stronger than ones that merely support the flow of the story.
This technique is expanded by adding images to the story. After a number of images, however, the system may start to break down.
10

e. The Number/Rhyme Technique
The Number/Rhyme technique is a very simple way of remembering lists of items in a specific order. It is an example of a peg system - i.e. a system whereby facts are 'pegged' to known sequences of cues (here the numbers 1 - 10). This ensures that no facts are forgotten (because gaps in information are immediately obvious), and that the starting images of the mnemonic visualisations are well known.
At a simple level it can be used to remember things such as a list of English Kings or of American Presidents in their precise order. At a more advanced level it can be used to code lists of experiments to be recalled in a science exam.
This technique works by helping you to build up pictures in your mind, in which the numbers are represented by things that rhyme with the number, and are linked to images that represent the things to be remembered.
The usual rhyming scheme is:
1 – Bun 2 – Shoe 3 – Tree 4 – Door 5 – Hive 6 – Bricks 7 - Heaven 8 – Skate 9 – Line 10 - Hen
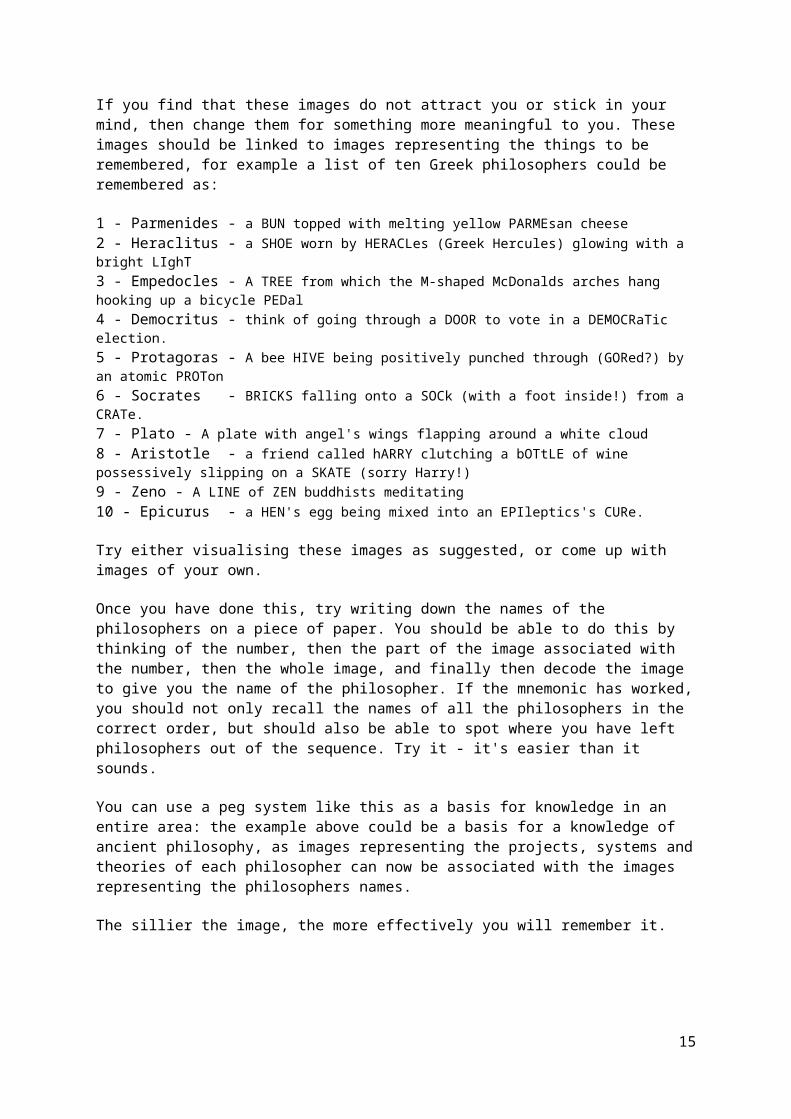
If you find that these images do not attract you or stick in your mind, then change them for something more meaningful to you. These images should be linked to images representing the things to be remembered, for example a list of ten Greek philosophers could be remembered as:
1 - Parmenides - a BUN topped with melting yellow PARMEsan cheese2 - Heraclitus - a SHOE worn by HERACLes (Greek Hercules) glowing with a bright LIghT3 - Empedocles - A TREE from which the M-shaped McDonalds arches hang hooking up a bicycle PEDal4 - Democritus - think of going through a DOOR to vote in a DEMOCRaTic election.5 - Protagoras - A bee HIVE being positively punched through (GORed?) by an atomic PROTon6 - Socrates - BRICKS falling onto a SOCk (with a foot inside!) from a CRATe.7 - Plato - A plate with angel's wings flapping around a white cloud8 - Aristotle - a friend called hARRY clutching a bOTtLE of wine possessively slipping on a SKATE (sorry Harry!)9 - Zeno - A LINE of ZEN buddhists meditating10 - Epicurus - a HEN's egg being mixed into an EPIleptics's CURe.
Try either visualising these images as suggested, or come up with images of your own.
Once you have done this, try writing down the names of the philosophers on a piece of paper. You should be able to do this by thinking of the number, then the part of the image associated with the number, then the whole image, and finally then decode the image to give you the name of the philosopher. If the mnemonic has worked, you should not only recall the names of all the philosophers in the correct order, but should also be able to spot where you have left philosophers out of the sequence. Try it - it's easier than it sounds.
You can use a peg system like this as a basis for knowledge in an entire area: the example above could be a basis for a knowledge of ancient philosophy, as images representing the projects, systems and theories of each philosopher can now be associated with the images representing the philosophers names.
The sillier the image, the more effectively you will remember it.
11

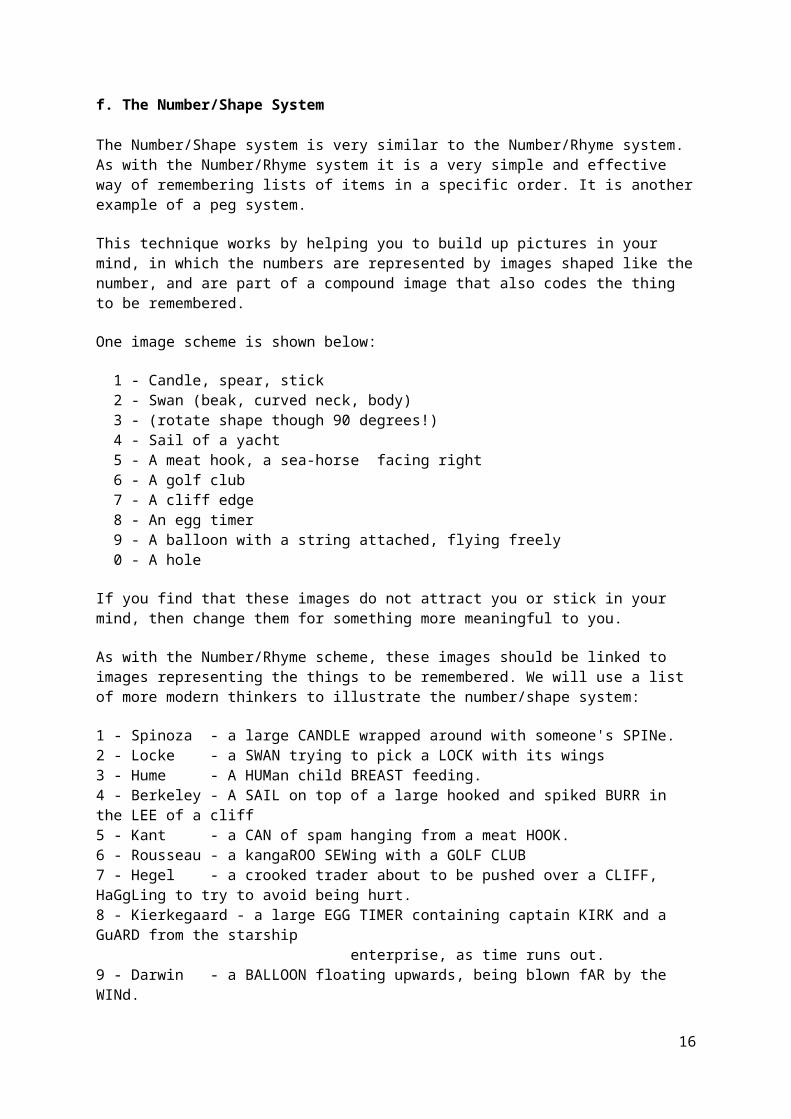
f. The Number/Shape System
The Number/Shape system is very similar to the Number/Rhyme system. As with the Number/Rhyme system it is a very simple and effective way of remembering lists of items in a specific order. It is another example of a peg system.
This technique works by helping you to build up pictures in your mind, in which the numbers are represented by images shaped like the number, and are part of a compound image that also codes the thing to be remembered.
One image scheme is shown below:
1 - Candle, spear, stick 2 - Swan (beak, curved neck, body) 3 - (rotate shape though 90 degrees!) 4 - Sail of a yacht 5 - A meat hook, a sea-horse facing right 6 - A golf club 7 - A cliff edge 8 - An egg timer 9 - A balloon with a string attached, flying freely 0 - A hole
If you find that these images do not attract you or stick in your mind, then change them for something more meaningful to you.
As with the Number/Rhyme scheme, these images should be linked to images representing the things to be remembered. We will use a list of more modern thinkers to illustrate the number/shape system:
1 - Spinoza - a large CANDLE wrapped around with someone's SPINe.2 - Locke - a SWAN trying to pick a LOCK with its wings3 - Hume - A HUMan child BREAST feeding.4 - Berkeley - A SAIL on top of a large hooked and spiked BURR in the LEE of a cliff5 - Kant - a CAN of spam hanging from a meat HOOK.6 - Rousseau - a kangaROO SEWing with a GOLF CLUB7 - Hegel - a crooked trader about to be pushed over a CLIFF, HaGgLing to try to avoid being hurt.8 - Kierkegaard - a large EGG TIMER containing captain KIRK and a GuARD from the starship enterprise, as time runs out.9 - Darwin - a BALLOON floating upwards, being blown fAR by the WINd.10 - Marx - a HOLE with white chalk MARks around it's edge
Try either visualising these images as suggested, or if you do not like them, come up with images of your own.
In some cases these images may be more vivid than those in the number/rhyme scheme, and in other cases you may find the number/rhyme scheme more memorable. There is no reason why you could not mix the most vivid images of each scheme together into your own compound scheme.
12

g. The Journey Method
The journey method is a powerful, flexible and effective mnemonic based around the idea of remembering landmarks on a well-known journey, for example taking a walk through the centre of town. In many ways it combines the narrative flow of the Link Method and the structure and order of the Peg Systems into one highly effective mnemonic.
Because the journey method uses routes that you know well, you can code information to be remembered to a large number of easily visualised or remembered landmarks along the routes. Because you know what these landmarks look like, you need not work out visualisations for them!
The journey you use could, for example, be your journey to school in the morning, the route you use to get to the front door when you get up in the morning, the route to visit your grandparents, or a tour around a place you often visit on holiday. It could even be a journey around the levels of a computer game. Once you are familiar with the technique you may be able to create imaginary journeys that fix in your mind, and apply these.
Preparing the Route
To use this technique most effectively, it is often best to prepare the journey beforehand so that the landmarks are clear in your mind before you try to commit information to them. One way of doing this is to write down all the landmarks that you can recall in order on a piece of paper. This allows you to fix these landmarks as the significant ones to be used in your mnemonic, separating them from others that you may notice as you get to know the route even better.
You can consider these landmarks as stops on the route. To remember a list of items, whether these are people, experiments, events or objects, all you need do is associate these things or representations of these things with the stops on your journey.
Example
For example, I may want to remember something mundane like a shopping list:
Coffee, salad, vegetables, bread, kitchen paper, fish, chicken breasts, pork chops, soup, fruit, bath cleaner.
I may choose to associate this with my journey to the supermarket. My mnemonic images therefore appear as:
1. Front door: spilt coffee grains on the doormat2. Rose bush in front garden: growing lettuce leaves and tomatoes around the roses.3. Car: with potatoes, onions and cauliflower on the driver's seat.4. End of the road: an arch of French bread over the road5. Past garage: with sign wrapped in kitchen roll6. Underpass: from which haddock and cod are dangling by their tails.7. Traffic lights: chickens squawking and flapping on top of lights8. Past church: in front of which a pig is doing karate, breaking boards.9. Through the tunnel: with a soup slick underneath: my car tyres send up jets of tomato soup.10. Past car park: with apples and oranges tumbling from the top level.11. Supermarket car park: a filthy bath is parked in the space next to my car!
13

Extending the Technique
This is an extremely effective method of remembering long lists of information: with a sufficiently long journey you could, for example, remember elements on the periodic table, lists of Kings and Presidents, geographical information, or the order of cards in a shuffled pack of cards.
The system is extremely flexible also: all you need do to remember many items is to remember a longer journey with more landmarks. To remember a short list, only use part of the route!
Long and Short Term Memory
You can use the journey technique to remember information both in the short term memory and long term memory. Where you need to use information only for a short time, keep a specific route (or routes) in your mind specifically for this purpose. When you use the route, overwrite the previous images with the new images that you want to remember. To symbolise that the list is complete, imagine that the route is blocked with cones or a 'road closed/road out' sign.
To retain information in long term memory, reserve a journey for that specific information only. Occasionally travel down it in your mind, refreshing the images of the items on it.
One advantage of this technique is that you can use it to work both backwards and forwards, and start anywhere within the route to retrieve information.
-Using the Journey System with other Mnemonics
This technique can be used in conjunction with other mnemonics, either by building complex coding images at the stops on a journey, linking to other mnemonics at the stops, moving onto other journeys where they may cross over. Alternatively, you may use a peg system to organise lists of journeys, etc.
14
h. The Roman Room Technique
The Roman Room technique is an ancient and effective way of remembering unstructured information where the relationship of items of information to other items of information is not important. It functions by imagining a room (e.g. your sitting room or bedroom). Within that room are objects. The technique works by associating images with those objects. To recall information, simply take a tour around the room in your mind, visualising the known objects and their associated images. The Roman Room technique is really useful for learning languages or for learning a series of images which are not necessarily linked to each other.
Imagine a room that you know well: perhaps this is your sitting room, a bedroom, an office, or a classroom. Within this room there are features and objects in known positions. The basis of the Roman Room system is that things to be remembered are associated with these objects, so that by recalling the objects within the room all the associated objects can also be remembered.
For example, I can imagine my sitting room as a basis for the technique. In my sitting room I can visualise the following objects:
table, lamp, sofa, large bookcase, small bookcase, CD rack, tape racks, stereo system, telephone, television, video, chair, mirror, black & white photographs, etc.
I may want to remember a list of World War I war poets:
Rupert Brooke, G.K. Chesterton, Walter de la Mare, Robert Graves, Rudyard Kipling, Wilfred Owen, Siegfried Sassoon, W.B. Yates
I could visualise walking through my front door, which has a picture on it of a scene from the Battle of the Somme, with an image of a man sitting in a trench writing in a dirty exercise book.
I walk into the sitting room, and look at the table. On the top is RUPERT the Bear sitting in a small BROOK (we do not need to worry about where the water goes in our imagination!) This codes for Rupert Brooke.
Someone seems to have done some moving: a CHEST has been left on the sofa with a Goal Keeper (wearing gloves and a yellow vest and standing ready to defend) on top. This codes for G K Chesterton.
The lamp has a small statuette of a brick WALL over which a female horse (MARE) is about to jumping. This codes for Walter de la Mare. etc!
Expanding the Roman Room System
The technique can be expanded in one way, by going into more detail, and keying images to smaller objects. Alternatively you can open doors from the room you are using into other rooms, and use their objects to expand the volume of information stored. When you have more experience you may find that you can build extensions to your rooms in your imagination, and populate them with objects that would logically be there.
Other rooms can be used to store other categories of information.
Moreover, there is no need to restrict this information to rooms: you could use a view or a town you know well, and populate it with memory images.
15
i. The Major Memory System (aimed at the Gifted and Talented students)
The Major Memory System is one of the two most powerful memory systems currently available. It requires a significant investment of time to learn and master, however once it is learned it is extremely powerful. It is the application of mainly this system that forms the basis of some of the extraordinary, almost magical, memory feats performed by magicians and memory technicians.
The system works by converting number sequences into nouns, nouns into images, and linking images into sequences. These sequences can be very complex and detailed.
The building blocks of the system are the association of the numbers below with the following consonant sounds:
0 - s, z, soft-c - remember as 'z is first letter of zero' 1 - d, t, th - remember as letters with 1 downstroke 2 - n - remember as having 2 downstrokes 3 - m - has three downstrokes 4 - r - imagine a 4 and an R glued together back-to-back 5 - L - imagine the 5 propped up against a book end (L) 6 - j, sh, soft-ch, dg, soft-g - g is 6 rotated 180 degrees. 7 - k, hard-ch, hard-c, hard-g, ng - imagine K as two 7s rotated and glued together 8 - f, v - imagine the bottom loop of the 8 as an eFfluent pipe discharging waste (letter image of F in alphabet system) 9 - p, b - b as 9 rotated 180 degrees.
These associations really must be learned before proceeding.
The system operates on a number of levels, depending on the amount of time a student is prepared to devote to learning the system. The first level, the coding of single digit numbers into consonants and small words, functions almost as a poor relation of the number/rhyme system. It is at higher levels that the power of the system is unleashed, however this level must be assimilated first.
The trick with the conversion into words is to use only the consonants that code information within the word, while using vowels to pad the consonants out with meaning. By choosing letters for your word in the preferential order AEIOU you stand a better chance of being able to reconstruct the image word if you forget it.
If consonants have to be used to make a word, use only those that are not already used - i.e. h, q, w, x, and y
1. Single number words: The first level codes single numbers into a short noun made up of the number consonant sound and some vowels. On a sheet of paper, write the numbers 1 to 9, and apply these rules to create your own memory words. An example is shown below: 1 – toe 2 – neigh 3 – ma 4 – ray 5 - law 6 – jaw 7 – key 8 – fee 9 – pay
These words can be used in association much like the other peg technique memory words.
16
2. Double number words:
Similar rules apply to creating a standard word from two numbers. It is best not to try to use single number word as a root, as this can confuse the image.
Add to your list of numbers 1 to 9 the numbers 10 to 99, and apply the rules to create memory words for yourself. A few examples are shown below:
17 - t, ch - tech 23 - n, m - name 36 - m, sh - mesh 41 - r,s - rose 52 - l, n - line 64 - ch, r - chair 75 - k, l - keel 89 - f, p - fop 98 - b, f - beef
3. Triple number words
Just using double number words may be enough to make this a sufficiently powerful mnemonic for you. Alternatively you may decide to use triple number words, using the same construction rules as double number words.
Examples are:
182 - d, v, n - Devon 304 - m, s, r - miser 400 - r, c, s - races 651 - j, l, d - jailed 801 - f, z, d - fazed
Even though words can be constructed from first principles it may be worth writing them down at this level of complexity, and running through them many times to strengthen the link in your mind between the numbers and the associated words. This will enable you to recall the number word faster.
Applying these images
Once you have devised words and images to link to your numbers, you can start to apply the technique to remember long numbers, etc. At as simple level you might decide just to remember a long telephone number. To do this you might just associate a few images together using the link or story technique. Alternatively, to remember a really long number, you might associate words made up of the components of these numbers with stops on a journey (see the journey technique).
17

j. Learning Foreign Languages
Foreign languages are the ideal subject area for the use of memory techniques: the process of learning words is essentially a matter of association - associating what is initially a meaningless collection of syllables with a word in a language that we understand.
Traditionally this association has been carried out by repetition - saying the word in one’s own language and the foreign language time and time and time and time again.
This whole tedious way of acquiring vocabulary can be eliminated by three good techniques:
1. Using mnemonic techniques to link foreign and own-language words: the Linkword technique
2. The Town Language Mnemonic 3. The hundred most common words.
Explanation of Language Mnemonics
1. The LinkWord Technique
The LinkWord technique uses an image to link a word in one language with a word in another language. The following are examples of use of the LinkWord technique:
English:French vocabulary rug/carpet - tapis - an ornate oriental carpet with a tap as the central design woven in chrome thread grumpy - grognon - a grumpy man groaning with irritation to tease - taquiner - a wife teasing her husband as she takes in the washing.
2. The Town Language Mnemonic
This is a very elegant, effective mnemonic.
The fundamental principle rests on the fact that the basic vocabulary of a language relates to everyday things: things that are typically found in a small town, city, or village. The basis of the technique is that the student should choose a Parish or location that he is very familiar with, and should use objects within that place as the cues to recall the images that link to foreign words.
Nouns in the town
Nouns should be associated to the most relevant locations: the image coding the foreign word for book should be associated with a book on a shelf in the library. The word for bread should be associated with an image of a loaf in a baker's shop. Words for vegetables should be associated with parts of a display outside a greengrocer's shop. Perhaps there is a farm just outside the town that allows all the animal name associations to be made.
Adjectives in the park
Adjectives should be associated with a garden or park within the town: words such as green, smelly, bright, small, cold, etc. can be easily related to objects in a park. Perhaps there is a pond there, a small wood, perhaps people with different characteristics are walking around.
18

Verbs in the sports centre
Verbs can most easily be associated with a sports centre or playing field. This allows us all the associations of lifting, running, walking, hitting, eating, swimming, driving, etc.
Remembering Genders
In a language where gender is important, a very elegant method of remembering this is to divide your town into two main zones where the gender is only masculine and feminine, or three where there is a neutral gender. This division can be by busy roads, rivers, etc. To fix the gender of a noun, simply associate its image with a place in the correct part of town. This makes remembering genders so easy!
Many Languages, many towns
Another elegant spin-off of the technique comes when learning several languages: normally this can cause confusion. With the town mnemonic, all you need do is choose a different city, town or village for each language to be learned. Ideally this might be in the relevant country, however practically it might just be a local town with a slight flavour of the relevant country, or twinned with it.
3. The hundred most common words
Tony Buzan, in his book 'Using your Memory', points out that just 100 words comprise 50% of all words used in conversation in a language. Learning this core 100 words gets you a long way towards learning to speak in that language, albeit at a basic level.
1. a, an 2. after 3. again 4. all 5. Almost
6. also 7. always 8. and 9. because 10. Before 11. big 12. but 13. (I) can 14. (I) come 15. either/or16. (I) find 17. first 18. for 19. friend 20. from21. (I) go 22. good 23. goodbye 24. happy 25. (I) have26. he 27. hello 28. here 29. how 30. I31. (I) am 32. if 33. in 34. (I) know 35. last36. (I) like 37. little 38. (I) love 39. (I) make 40. many41. one 42. more 43. most 44. much 45. my46. new 47. no 48. not 49. now 50. of51. often 52. on 53. one 54. only 55. or56. other 57. our 58. out 59. over 60. people61. place 62. please 63. same 64. (I) see 65. she66. so 67. some 68. sometimes 69. still 70. such71. (I) tell 72. thank you 73. that 74. the 75. their76. them 77. then 78. there is 79. they 80. thing81. (I) think 82. this 83. time 84. to 85. under86. up 87. us 88. (I) use 89. very 90. we91. what 92. when 93. where 94. which 95. who96. why 97. with 98. yes 99. you 100. your
From: 'Use Your Memory', Tony Buzan, BBC Books, London, ISBN 0-5633-37102-1 Mind Maps
19
5. MIND MAPS (Sources: Wikipedia and Tony Buzan, “The Mind Map Book”)
PART 1: PLANNING YOUR MINDMAP
1. Imagine an airplane flying in the sky. When you visualise or see an airplane in the sky, the airplane is your central focus at that moment. But your brain isn’t done there. It also immediately begins to make references, or associations, to the airplane. These might include the colour of the sky, different types of planes, how they fly, pilots, passengers, airports and so forth. Because we think in images, not words, these associations often appear in a visual form in our minds.
Your mind instantly starts making a map, creating links between these associations, or concepts.
2. Visualise a spider or a tree full of branches.
With a mind map, you take the concept of the airplane and write AIRPLANES in the center (the spider’s body or the trunk of the tree) of a horizontally oriented, blank piece of paper. Then, radiating out from the airplane, are different coloured lines (tree limbs or spider legs). On these you write the associations you had to airplanes, such as PILOTS and AIRPORTS. From each of these are more associations, which you note on individual lines.
in association with pilots you might think of their pay or training. And so the map grows. A mind map mirrors how our brains actually process and recall information – dynamically
and visually, not in a purely linear fashion as it was once thought. For instance, mind mapping has proven very effective for note taking. Instead of writing
down each word the teacher says as it’s said (linear thinking), you write the name of the lecture topic in the center of your paper. As subtopics, examples, dates and other information are discussed, you draw and label corresponding branches.
It’s also used instead of standard outlines to prepare essays and to study for exams.
3. Use your brain the way it thinks. Tony Buzan called this radiant thinking. When our brains lock onto something – an idea, sound, image, emotion, etc. – that “something” stands at the centre of our thinking. Radiating out from it are countless other things, ideas, other images, emotions, etc. that our brains associate with it.
A mind map helps you make connections between and among these different pieces of information and concepts. The more connections or associations our brains make to an idea or fact, the more likely we are to remember it.
4. Create, capture, consume and communicate information. Making these connections allows you to do each of these quickly and effectively. Making them also happens organically as you draw the map. The use of words, images, lines, colour, symbols, numbers and so forth identify and link concepts. Research shows that writing and imagery both improve memory, creativity and cognitive processing. Colour is also a potent memory enhancer.
20

Mind maps are a tool to create things, to capture information and to devise approaches for organising yourself. Doing this requires brainstorming. For instance, you could create mind maps for things like revision timetables, planning weekly homework, listing the key ideas in a poem or story or identifying all of the formulae and facts linked with triangles in Maths.
Mind maps can also be used as powerful tools for communication. You can create a mind map for presentations, group projects, heart-to-heart conversations, written materials, etc.
5. Make them by hand or with a computer program. People have been drawing mind maps for decades. With the advent of mind-mapping software, many people are creating them on their computers. The choice is personal and dependent on the environment.
Nonetheless, you are encouraged to find your own style and let it be free-flowing. Don’t be too rigid when constructing a mind map; be both creative and logical to use both
your right and left brain hemispheres. A mind map relies upon the person using both hemispheres to create a network of
associations – the right hemisphere for images, colour, dimension, imagination, and “big picture” thinking and the left for words, logic, analysis, numbers, and sequential thinking.
PART 2: CREATING A MINDMAP BY HAND
1. Show the shape of the subject. A mind map should ultimately show the shape or architecture of the subject. It does this by visually demonstrating the relative importance of various concepts to one another and how they relate to one another. You should be able to glance at it later and remember the information. First, however, you must allow it to grow as ideas come to you, and as you see more connections.
2. Brainstorm your topic. You can brainstorm the topic before beginning to draw, particularly if you're not recording information – such as notes from a lesson or as part of your revision. This can be done individually or in a group. It involves simply writing down everything you can think of related to the topic. Use keywords or phrases as opposed to sentences or paragraphs.
Don’t organise information at this point. Just get it out. When you're brainstorming, ask yourself how the topic relates to what you already know
and what’s different about it.
3. Go straight to mapping first instead. Many people prefer going straight to the drawing. Either way, first write your topic in the center of the page. Make sure you have your paper in a landscape orientation, and in the middle write the name of the topic in 1-2 words. Draw a circle around it. Some recommend only using lowercase or uppercase printed words to reduce clutter and to make it read quickly. Play with adding colour to the word and circle.
Strive for at least three colours in each map. They help separate ideas and aid memory. Don't use lined paper. It can lead you into thinking in a linear fashion.
21

4. Draw and label the first branches. Simply draw a line for each major sub-category of the topic that extends from the circled topic and label it with a word, very short phrase or image. Don’t use abbreviations. All lines or branches should connect in a mind map, and the first branches should be the thickest.
Each word or image used in a mind map must be on its own line. Use images, photos and drawings wherever possible. Use arrows, other symbols, spacing and so forth to connect images and produce an “image-
rich network,” which Tony Buzan says is the essence of a mind map.
5. Move to the next branches. These should be thinner than the first. Think about the things that relate to your first subcategories. What are the important issues or facts related to them? In our example, what do you associate with airports? Delays? Security? Expensive food?
You would then draw a line for each of these that branches off from the line for AIRPORTS. You’d give it a name, such as SECURITY.
Again, use colour and images.
6. Continue branching out. You continue in this fashion as long as needed to complete your mind map. The lines will continue to become thinner as sub-categories become increasingly comprised of supporting details like facts or dates. You will also add branches to those you’ve already created. You might even add another first branch after discovering something you didn’t know.
Some also suggest making subcategories hierarchical. Therefore, if “delays,” “security” and “expensive food" were all subcategories, you’d draw
three lines or branches – one for each. Then you’d put what you consider to be the most important sub-category on the top or uppermost line.
7. Add more or revise as a final. You can keep adding to it, modifying it and discovering new links. Or you can create a polished version. The latter allows you to check for consistency and errors in your logic. It also results in a neat mind map; you don’t want to clutter your mind maps. Too much clutter inhibits your ability to see both the big picture and the details.
GENERAL TIPS Don't get stuck in one area. Keep your ideas flowing. If a branch doesn’t work out, just start
at the central idea and work your way out again. Don't be afraid to bring out your inner artist. If the topic is music, make each branch a
musical instrument. Record what you are thinking by speaking out loud. Keep one branch of thought one colour and another branch a different colour. Make a draft and just put all your ideas on that draft then you can decide what you need to
put on your real paper. You can keep it really simple: forget colours, forget pictures. Just write a word and draw a
circle around it, send branches out and add other items as they come to your mind. Spending too much time on drawing pictures, colours, thick and thin lines, bright or dark can take away from the spontaneous nature of the mind map.
22

6. SUGGESTIONS TO HELP PARENTS SUPPORT STUDENTS WITH EXAM NERVES (Source: NHS)
Tests and exams can be a challenging part of school life for both children and parents. But there are ways to ease the stress.
Watch out for exam stress Students who experience stress may be irritable, not sleep well, lose interest in food, worry
a lot, and appear depressed or negative. Headaches and stomach pains can also be stress-related.
Having someone to talk to about their work can help. Support from a parent, tutor or friend can help students share their worries and keep things in perspective.
If you feel your son isn't coping, please contact De La Salle at the earliest opportunity to arrange for additional support and interventions to be set up.
Make sure your son eats well A balanced diet can help students to perform at their best during exam periods.
Help your child get enough sleep Good sleep will improve thinking and concentration. Most teenagers need between 8 and 10
hours' sleep a night. Allow half an hour or so for your sons to wind down between studying, watching TV or using
a computer and going to bed to help them get a good night's sleep. Cramming all night before an exam is usually a bad idea. Sleep will benefit your child far
more than a few hours of panicky last-minute study. Be flexible during exams
Family Lives advises parents to be flexible around exam time. When your child is revising all day, don't worry about household jobs that are left undone or untidy bedrooms.
Staying calm yourself can help. Remember, exams don't last forever. Help them to study
Help your son revise by making sure he has somewhere comfortable to study. Help him draw up a revision schedule and liaise with teachers at De La Salle if the need arises to help him.
Talk about exam nerves Remind your son that feeling anxious is normal. Nervousness is a natural reaction to exams. The key is to put these nerves to positive use. Being reminded of what they do know and the
time they have put into study can help students feel confident. Encourage exercise during exams
Make sure your son is active. Exercise can help boost energy levels, clear the mind and relieve stress.
Don't add to the pressure Support group ChildLine says that many of the children who contact them feel that the
greatest pressure at exam time comes from their family. "Keep things in perspective," says Rosanne Pearce, a senior supervisor. "Listen to them, give
support and avoid criticism." Before he goes in for a test or exam, be reassuring and positive. Make sure he knows that
failing isn't the end of the world, and that if things don't go well they may be able to take the exam again.
After each exam, encourage your child to talk it through with you. Then move on and focus on the next test, rather than dwelling on things that can't be changed.
Make time for treats When the exams are over, help your child celebrate by organising an end-of-exams treat. Don't use rewards as bribes. Instead, encourage your child to work for their own
satisfaction, offering small, frequent treats. For more information, read Mind's advice on tackling exam stress .
23

7. REVISION TIMETABLES
These are useful and effective tools that can help you prepare for exams and achieve the grades you deserve. Some people prefer A4 sized daily or weekly timetables whilst others prefer larger wall sized charts that cover a month long period. There is an example template below.
Tips on designing a revision timetable:
When compiling a schedule try to be as realistic as possible. Do not try to overburden your day with an agenda that you have no real chance of completing.
Make a list of the subjects that you need to revise for between now and your exams. Work out which subjects have the most content that needs to be revised. Concentrate on those specific topics or modules that you are weak on. Break down major revision subjects into smaller parts. Ensure that you include break times during the day, these are important to help you unwind
and to make sure you don’t burn yourself out. Work out when you ‘study best’, for instance some people are able to concentrate better in
the morning. Use these times to study those topics that require the most effort and energy. Do not leave your most difficult or hardest subjects till the end of the day. Instead try to get
these out of the way early on. After completing a revision period cross it off from your timetable. This will help to instil a
sense of accomplishment. At the end of each week assess your performance and change your plans accordingly. Consider using coloured pens to highlight specific lessons or rank subjects by importance.
However if you feel you may be changing things around then use a simple pencil. Keep your timetable flexible and be ready to change it if circumstances change. Try not to spend the whole day revising one subject. Most experts suggest studying in slots of 40 minutes and then taking a break before your
next session.
24