excel payroll program instructionexcelpayroll.org/excel payrollbook instruction.pdf · a special...
TRANSCRIPT
Excel Payroll Program Instruction
1 Questions or Comments: [email protected] or www.ExcelPayroll.Org
Welcome to Excel PayrollBook!
Congratulations! You are choosing a way to process your payroll without paying fees.
About the Program
This is a DIY Excel payroll program. No payroll fees, no payroll charges, and no monthly fees! It is
running in Ms Excel. It is easy, simple, accurate, and reliable!
This program was originally designed for educational purpose. It was created especially for payroll
and Excel classes. Students can use it for their payroll projects or Excel programming courses.
After a few quarters using this program in college classrooms, I felt that it might be a good idea to
convert it for small companies or non-profit organizations to process their payrolls. This idea was
encouraged and supported by my colleagues. I cut out some scholar theory modules and tailored
some academic features and replaced them with some practical functions to cater the needs in the
real business world. This free version of Excel Payroll Program was thus born.
This Excel Payroll Program Includes EVERYTHING you need!
This Excel Payroll Application does all for you:
Keeps payroll records and payroll registers
Prints payroll checks and generates payroll accounting entries
Generates accrual vacation and used vacation reports
940, 941, and DE-9, tax liabilities, payroll summary and detail reports
Prints W-2 Forms with W-3 information reports.
Worker’s compensation insurance premium calculation reports
Customized selection reports.
401K match and calculation; 125P, HSA or garnishment deductions
All reports in Excel format and are usable at your own will
Feel free to make copies and give this program to accounting students, Excel learners or whoever
likes to use this program for his/her small business.

Excel Payroll Program Instruction
2 Questions or Comments: [email protected] or www.ExcelPayroll.Org
Index
I. What’s in the package ……………………….……….….. (3)
II. Start ………………………………………………………... (3)
III. Setup a Company ………………………………………….. (3)
IV. Update the Tax Rates …..…………………………………. (8)
V. Print Payroll Checks ………………………………………. (9)
VI. View Employee Records, Register, and Other Reports.... (13)
VII. Pay Employee in a Batch ………………………………… (14)
VIII. Understand and Use the Files ……………………………(15)
IX. Mini Practice Set …………………..………………………(16)
X. Advanced Topics …………………………………………(19)

Excel Payroll Program Instruction
3 Questions or Comments: [email protected] or www.ExcelPayroll.Org
I. What’s in the package:
a. Excel Payroll.zip includes Four (4) Excel files: PayrollBook.xlsm, Payroll Record.xlsm, PRRecord.xlsm,
and Payroll Time Card.xlsm. These four files must be in the same folder.
b. One (1) PDF file: Excel Payroll Instruction.pdf (this instruction menu)
II. Start Unzip the Excel Payroll.zip file and copy all the four Excel files into a folder where you like to store your Excel
Payroll Program in your C: Drive. Example C:\ABC Company\Payroll\
You may change the folder name or path, but do not change the names of the files.
That’s all you need to do! No installation is needed!
III. Setup a company
Step 1. Open the program file from your folder: PayrollBook.xlsm (see figure 1)
This is the main page of the program:
Program
Main Page
Excel Payroll Program Instruction
4 Questions or Comments: [email protected] or www.ExcelPayroll.Org
(Figure 1)
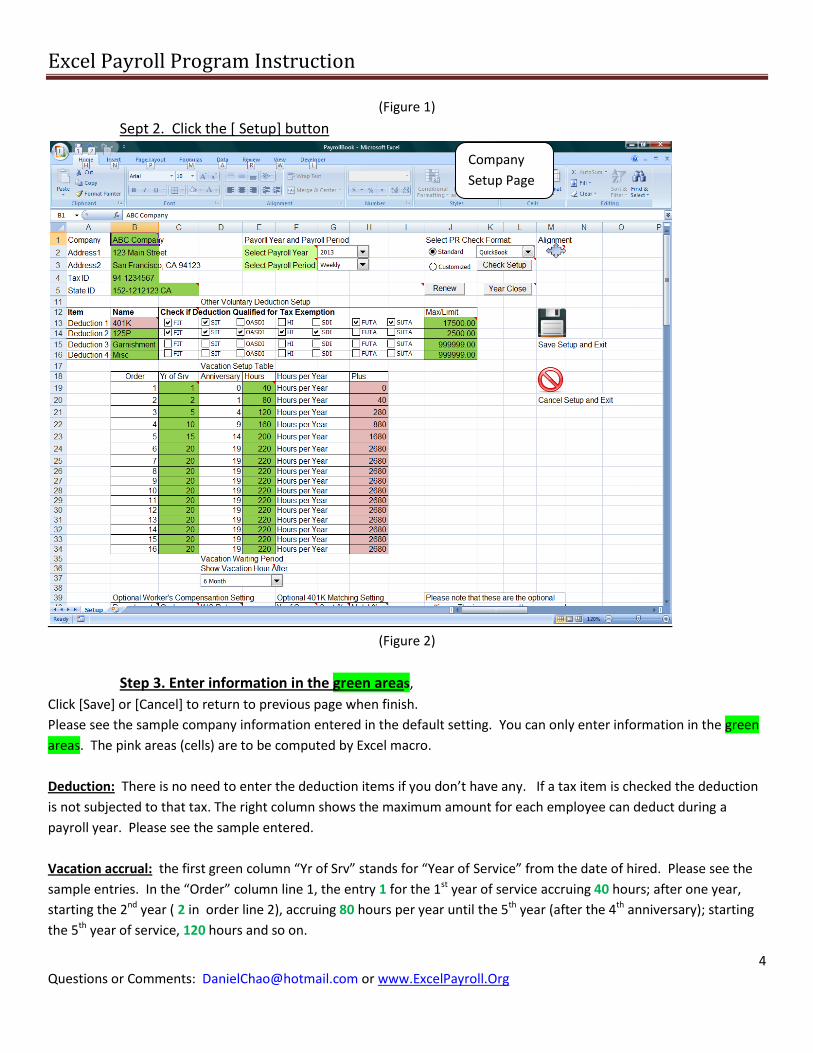
Sept 2. Click the [ Setup] button
(Figure 2)
Step 3. Enter information in the green areas,
Click [Save] or [Cancel] to return to previous page when finish.
Please see the sample company information entered in the default setting. You can only enter information in the green
areas. The pink areas (cells) are to be computed by Excel macro.
Deduction: There is no need to enter the deduction items if you don’t have any. If a tax item is checked the deduction
is not subjected to that tax. The right column shows the maximum amount for each employee can deduct during a
payroll year. Please see the sample entered.
Vacation accrual: the first green column “Yr of Srv” stands for “Year of Service” from the date of hired. Please see the
sample entries. In the “Order” column line 1, the entry 1 for the 1st year of service accruing 40 hours; after one year,
starting the 2nd year ( 2 in order line 2), accruing 80 hours per year until the 5th year (after the 4th anniversary); starting
the 5th year of service, 120 hours and so on.
Company
Setup Page

Excel Payroll Program Instruction
5 Questions or Comments: [email protected] or www.ExcelPayroll.Org
Payroll Period: You may select different payroll periods from weekly, bi-weekly, monthly quarterly, or annually. This is
for payroll tax computation purpose only. It has nothing to do with when and how often you pay your employees.
Standard Check: Check format preset for QuickBook, Quicken, Peachtree, SBT, Great Plains, Platinum, and other self-
design check formats. You may select one of them to print your check. You may even make adjustments after your
selection if the print-outs do not match the positions on your check.
Customize Check: You can design your own brand-new check layout by clicking this button. You can print out your
check any way you prefer. To do this, selection “Customize” and click on [Check Setup]:
(Figure 3)
After you click the [Check Setup] button, (see figure 3) what you need to do is to drag and move the
selected information you want to where you want to print on your computer check.
After you select, move, or format the information you prefer, please make sure you select and set the Print
Area, under “Page Layout”=> “Print Area” => “Set Print Area”. Also you may use Excel menu to do a few test
print pages to make sure the information printed properly at the right positions on your check.
Excel Payroll Program Instruction
6 Questions or Comments: [email protected] or www.ExcelPayroll.Org
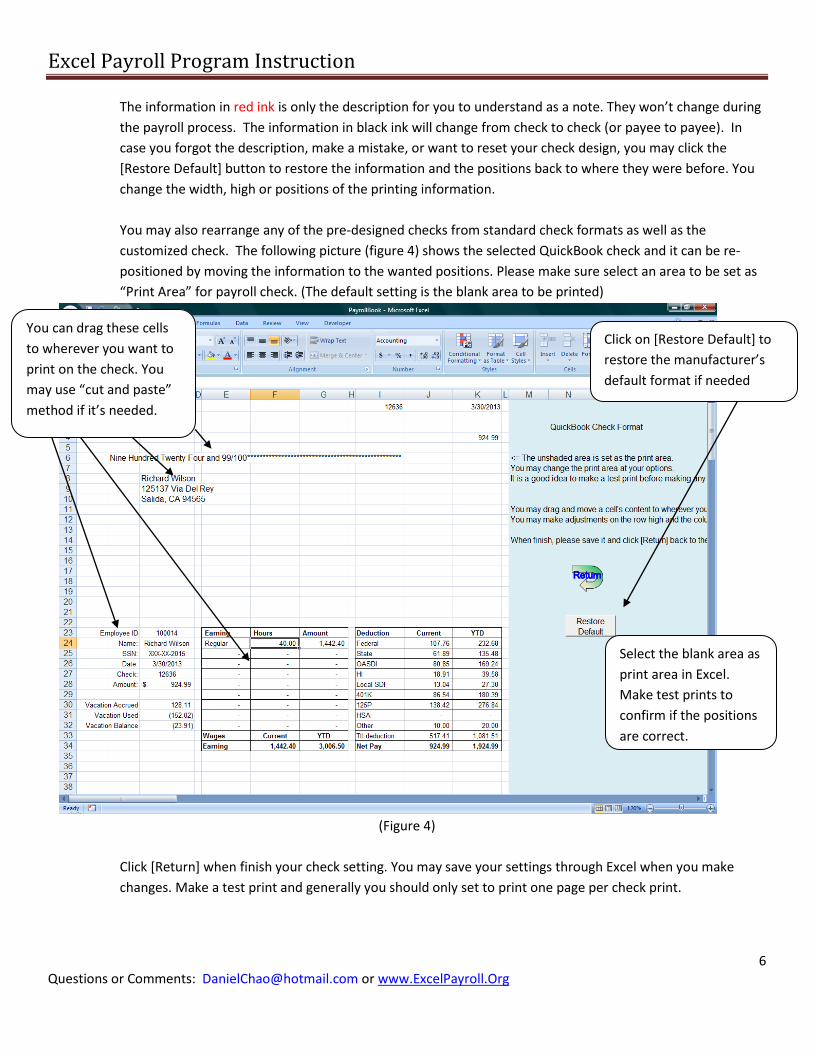
The information in red ink is only the description for you to understand as a note. They won’t change during
the payroll process. The information in black ink will change from check to check (or payee to payee). In
case you forgot the description, make a mistake, or want to reset your check design, you may click the
[Restore Default] button to restore the information and the positions back to where they were before. You
change the width, high or positions of the printing information.
You may also rearrange any of the pre-designed checks from standard check formats as well as the
customized check. The following picture (figure 4) shows the selected QuickBook check and it can be re-
positioned by moving the information to the wanted positions. Please make sure select an area to be set as
“Print Area” for payroll check. (The default setting is the blank area to be printed)
(Figure 4)
Click [Return] when finish your check setting. You may save your settings through Excel when you make
changes. Make a test print and generally you should only set to print one page per check print.
You can drag these cells
to wherever you want to
print on the check. You
may use “cut and paste”
method if it’s needed.
Select the blank area as
print area in Excel.
Make test prints to
confirm if the positions
are correct.
Click on [Restore Default] to
restore the manufacturer’s
default format if needed
Excel Payroll Program Instruction
7 Questions or Comments: [email protected] or www.ExcelPayroll.Org
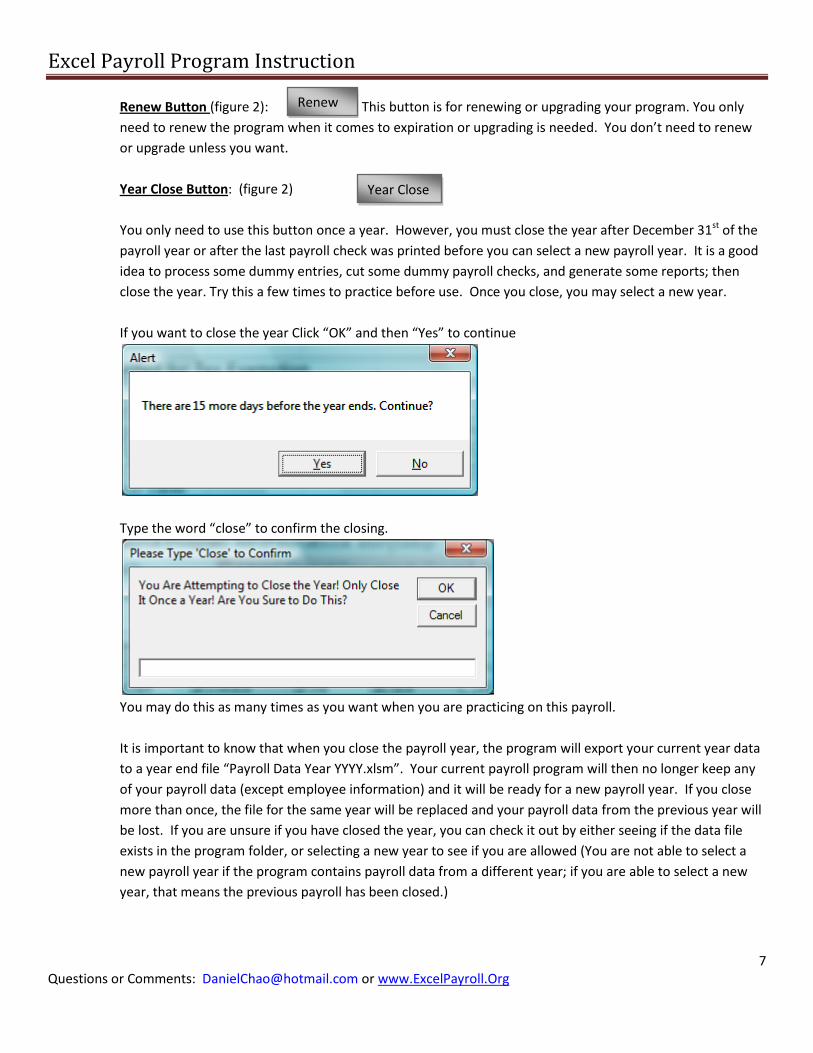
Renew Button (figure 2): This button is for renewing or upgrading your program. You only
need to renew the program when it comes to expiration or upgrading is needed. You don’t need to renew
or upgrade unless you want.
Year Close Button: (figure 2)
You only need to use this button once a year. However, you must close the year after December 31st of the
payroll year or after the last payroll check was printed before you can select a new payroll year. It is a good
idea to process some dummy entries, cut some dummy payroll checks, and generate some reports; then
close the year. Try this a few times to practice before use. Once you close, you may select a new year.
If you want to close the year Click “OK” and then “Yes” to continue
Type the word “close” to confirm the closing.
You may do this as many times as you want when you are practicing on this payroll.
It is important to know that when you close the payroll year, the program will export your current year data
to a year end file “Payroll Data Year YYYY.xlsm”. Your current payroll program will then no longer keep any
of your payroll data (except employee information) and it will be ready for a new payroll year. If you close
more than once, the file for the same year will be replaced and your payroll data from the previous year will
be lost. If you are unsure if you have closed the year, you can check it out by either seeing if the data file
exists in the program folder, or selecting a new year to see if you are allowed (You are not able to select a
new payroll year if the program contains payroll data from a different year; if you are able to select a new
year, that means the previous payroll has been closed.)
Year Close
Renew
Excel Payroll Program Instruction
8 Questions or Comments: [email protected] or www.ExcelPayroll.Org
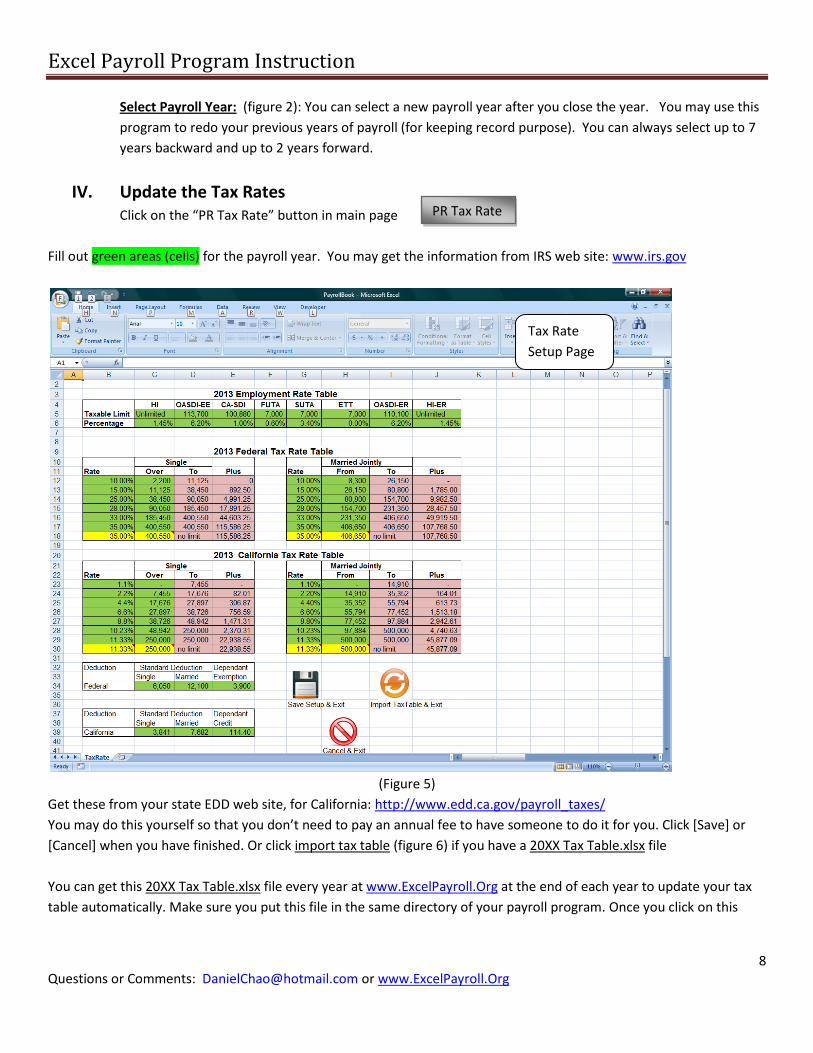
Select Payroll Year: (figure 2): You can select a new payroll year after you close the year. You may use this
program to redo your previous years of payroll (for keeping record purpose). You can always select up to 7
years backward and up to 2 years forward.
IV. Update the Tax Rates Click on the “PR Tax Rate” button in main page
Fill out green areas (cells) for the payroll year. You may get the information from IRS web site: www.irs.gov
(Figure 5)
Get these from your state EDD web site, for California: http://www.edd.ca.gov/payroll_taxes/
You may do this yourself so that you don’t need to pay an annual fee to have someone to do it for you. Click [Save] or
[Cancel] when you have finished. Or click import tax table (figure 6) if you have a 20XX Tax Table.xlsx file
You can get this 20XX Tax Table.xlsx file every year at www.ExcelPayroll.Org at the end of each year to update your tax
table automatically. Make sure you put this file in the same directory of your payroll program. Once you click on this
PR Tax Rate
Tax Rate
Setup Page
Excel Payroll Program Instruction
9 Questions or Comments: [email protected] or www.ExcelPayroll.Org
button, the program will search the same year as you selected in the setup page. So make sure you select a new payroll
before you click this button or your rate will not be updated to the latest year.
(Figure 6)
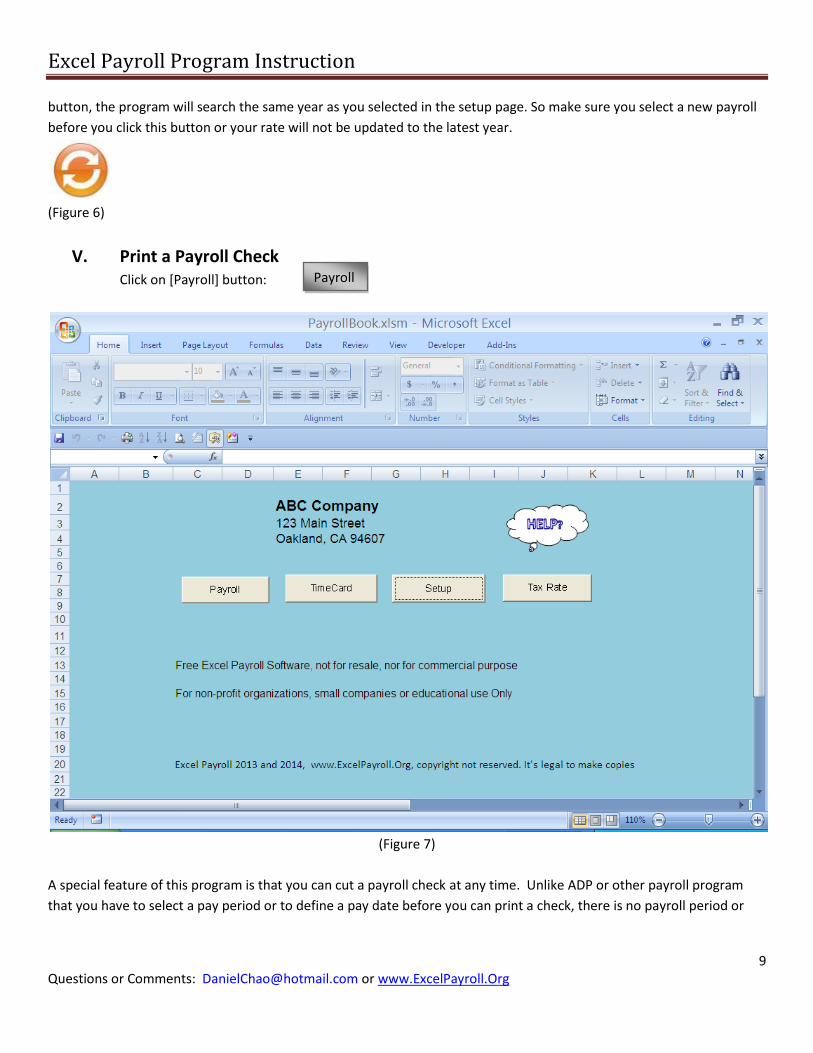
V. Print a Payroll Check Click on [Payroll] button:
(Figure 7)
A special feature of this program is that you can cut a payroll check at any time. Unlike ADP or other payroll program
that you have to select a pay period or to define a pay date before you can print a check, there is no payroll period or
Payroll

Excel Payroll Program Instruction
10 Questions or Comments: [email protected] or www.ExcelPayroll.Org
payroll date to select. You can enter any date as payroll date on the payroll check. Your payroll liabilities occur as the
same dates as your payroll check dates. You may even reprint or redo your old payroll records in back years.
For example, if today is June 23, 2018 you may redo your payroll for January 2011 as if you were paying in 2011 for
record keeping purpose.
(Figure 8)
Step 1: Select an employee in the selection dialog window and then click the [Pay] button.
See yellow arrow (figure 8):
If the employee is not in the selection window, click the [Add] button to add an employee. See (figure 9) after you click
on [Pay]:
Pay
Selection Page
Excel Payroll Program Instruction
11 Questions or Comments: [email protected] or www.ExcelPayroll.Org
(Figure 9)
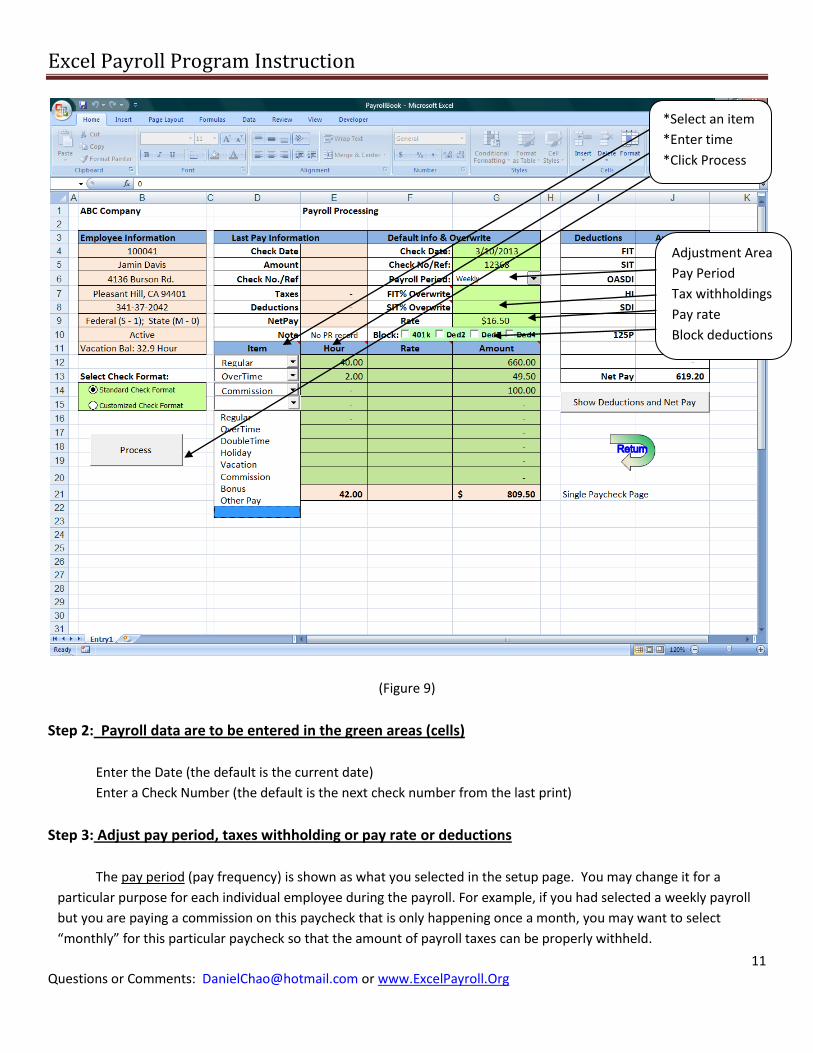
Step 2: Payroll data are to be entered in the green areas (cells)
Enter the Date (the default is the current date)
Enter a Check Number (the default is the next check number from the last print)
Step 3: Adjust pay period, taxes withholding or pay rate or deductions
The pay period (pay frequency) is shown as what you selected in the setup page. You may change it for a
particular purpose for each individual employee during the payroll. For example, if you had selected a weekly payroll
but you are paying a commission on this paycheck that is only happening once a month, you may want to select
“monthly” for this particular paycheck so that the amount of payroll taxes can be properly withheld.
*Select an item
*Enter time
*Click Process
Adjustment Area
Pay Period
Tax withholdings
Pay rate
Block deductions

Excel Payroll Program Instruction
12 Questions or Comments: [email protected] or www.ExcelPayroll.Org
Income tax withholding (FIT and SIT) may also be overwritten if you enter percentages in this adjustment area
(see figure 9). You may also block deductions for some checks.
The rate is the default rate when you add/edit an employee in the employee record. If you want to change the
rate for this particular paycheck you may do so.
Step 4: Enter hours or Amount:
Select the type of pay in the Item column and enter the hours in decimal format in the next Hour column (green
area section). There is no need to enter a rate in the Rate column if the rate is the same as the default rate in cell
“G9”(the default rate is being used if it is blank or zero). You may enter a new rate for a particular type of time for this
pay if it is different from the default. The Amount column will be calculated by the new rate if it is entered. If you
enter an amount in the Amount column, then no hour or rate should be entered. For example, if you are paying $500
commission for the employee you may not enter the hour or rate but just the amount. So you will leave the hour and
rate columns blank , and only enter $500 in the Amount column.
Step 5: Select “Check Format” and Click [Process] button:
You may select the “Standard” or the “Customized” format to print your payroll check.
[Show Deduction and Net Pay] button: you may click this button to see the calculations and make changes if necessary
before you process this paycheck. You can cancel it by clicking the [Cancel] button to return to the previous menu. Click
on [Process] button to process the payroll or print payroll check:
Process
Excel Payroll Program Instruction
13 Questions or Comments: [email protected] or www.ExcelPayroll.Org
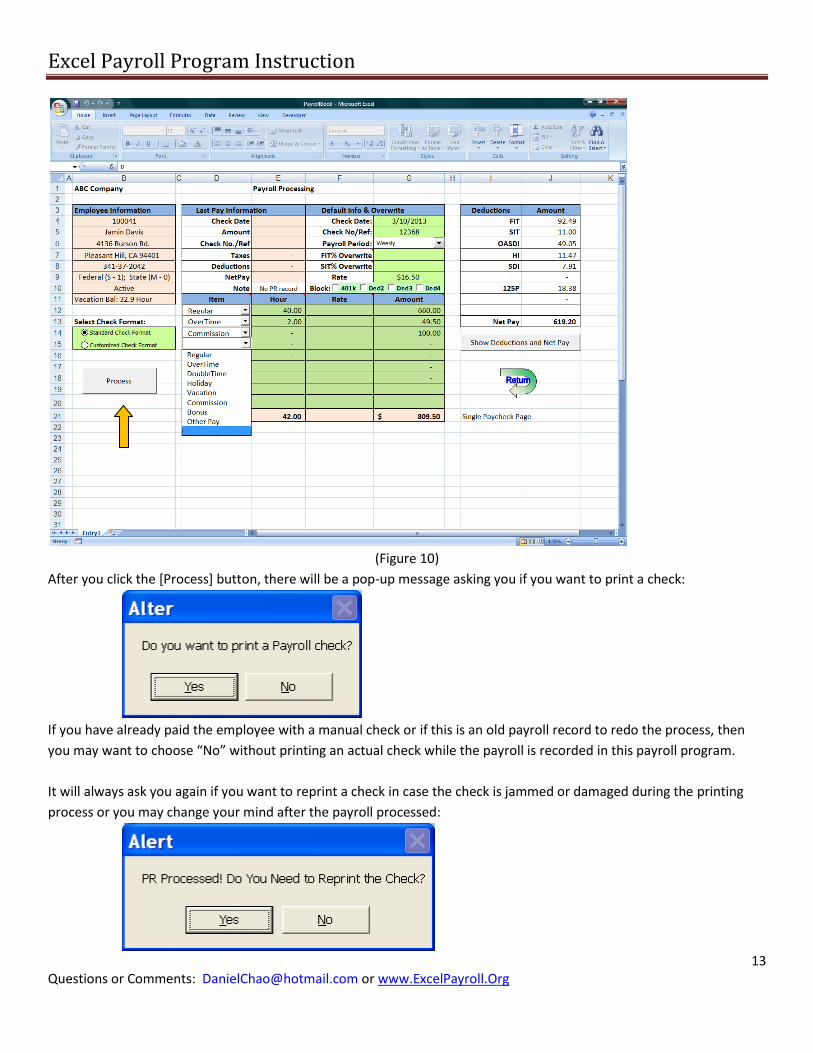
(Figure 10)
After you click the [Process] button, there will be a pop-up message asking you if you want to print a check:
If you have already paid the employee with a manual check or if this is an old payroll record to redo the process, then
you may want to choose “No” without printing an actual check while the payroll is recorded in this payroll program.
It will always ask you again if you want to reprint a check in case the check is jammed or damaged during the printing
process or you may change your mind after the payroll processed:

Excel Payroll Program Instruction
14 Questions or Comments: [email protected] or www.ExcelPayroll.Org
Click on [No] if do not wish to reprint the check again.
Step 6: Reprint a check after processed:
Click on [Pay in Batch] Select a check number to reprint
VI. To view an employee Record, Employee List, View Entry, Payroll Register, or print
940 and 941 Report.
Click on the following four (4) folders to view the frequent reports:
You also get a customized report by select a period (between the check dates) and generate a report on a separated
(export) Excel workbook:
(Figure 11)
Entry Register Record Employee
Excel Payroll Program Instruction
15 Questions or Comments: [email protected] or www.ExcelPayroll.Org
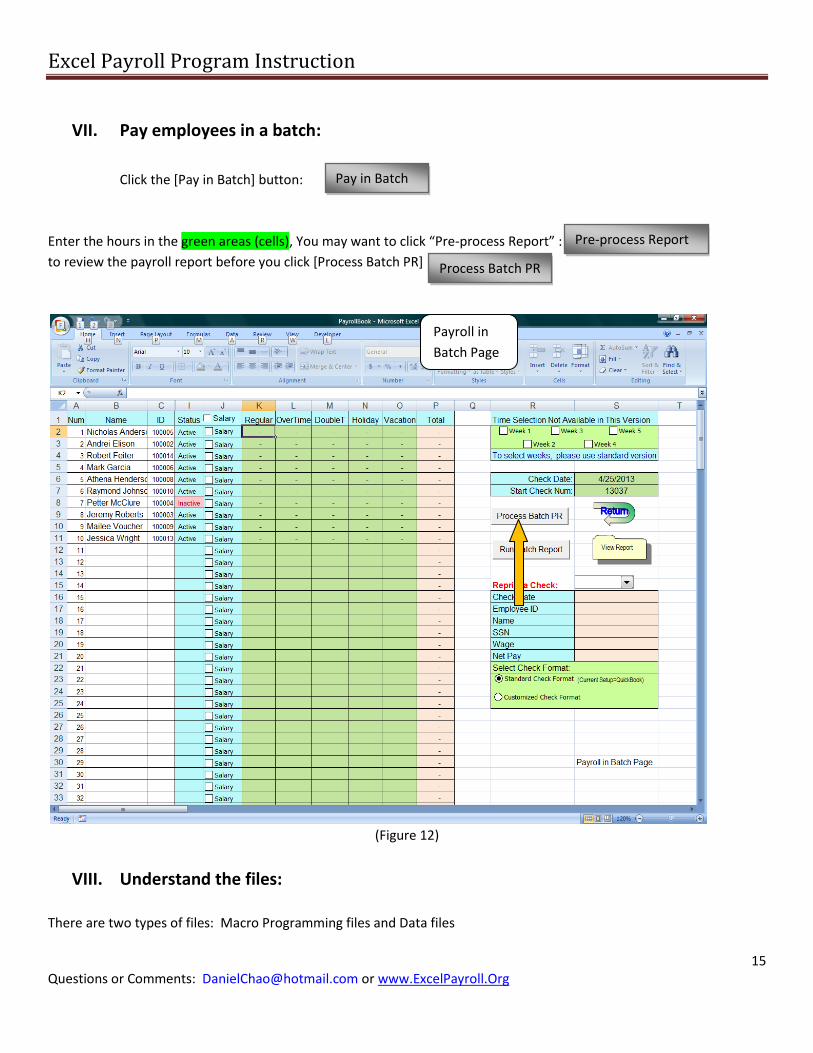
VII. Pay employees in a batch:
Click the [Pay in Batch] button:
Enter the hours in the green areas (cells), You may want to click “Pre-process Report” :
to review the payroll report before you click [Process Batch PR]
(Figure 12)
VIII. Understand the files:
There are two types of files: Macro Programming files and Data files
Pay in Batch
Pre-process Report
Process Batch PR
Payroll in
Batch Page

Excel Payroll Program Instruction
16 Questions or Comments: [email protected] or www.ExcelPayroll.Org
(a) Macro Programming files:
There are four Excel files working together to make this program work:
PayrollBook.xlsm – Main programming file (Major file, most of the macros stores in this file)
Payroll Record.xlsm – Supporting file (Supports the main file, the current payroll data store in this file)
PRRecord.xlsm – supporting file (supports the main file, it’s a setup file when you start or close a year)
Payroll Time Card.xlsm – supporting file (supports the main file, time card and costing data store here)
These four files must be stored in the same folder. You may use any folder name at your own preference; but you may
not change file names. Before you start, please copy these files into a folder where you would like to store the program
and your payroll data. (Such as in C:\Excel\ABC Company\Payroll\)
If you have more than one company, you may make one folder for each company and store all files in each folder. Such
as (C:\Payroll\ABC Co\; C:\Payroll\XYZ Co\; …)
Open PayrollBook.xlsm to start your payroll process. In fact, you should always open this file to begin your payroll
process and you will not need to deal with the other three files. The other three files are the working files that support
PayrollBook.xlsm within the macro program.
All other files are data files if more files saved either by you or the program. You may open data files for your own use.
There are three types of data files:
(b) Data files:
There are three kinds of data files: Timecard (employee timecard daily hour records), Payroll record and Payroll register,
and Job Costing files. You may open these files at any time for your own use.
1, time sheet file: its format as “WKYY-MM-DD .xlsx” (example: “WK12-11-16.xlsx” payroll time card data for week
ending Nov. 16, 2012). It is saved when you post the weekly time card.
2, payroll record and register file: All the current (year) data are kept in the “Payroll Record.xlsm” programming file
until you close the year. Once you close the payroll year, payroll records and register are posted into a file “Payroll Data
Year YYYY.xlsm” (where YYYY is the year, such as “Payroll Data Year 2012.xlsm”). Please note that a payroll must be
closed after December 31 before you can start/select a new payroll year.
3, job costing file: All the current (year) data is kept in the “Payroll Time Card.xlsm” programming file until you extract
the data for your own use. Data is saved in “CostYYMMDD.xlsx” (example “Cost121201.xlsx” containing all data from last
saved to December 1, 2012). It lists job numbers, direct labor hours used by employees, and by types of equipment
used.
Excel Payroll Program Instruction
17 Questions or Comments: [email protected] or www.ExcelPayroll.Org
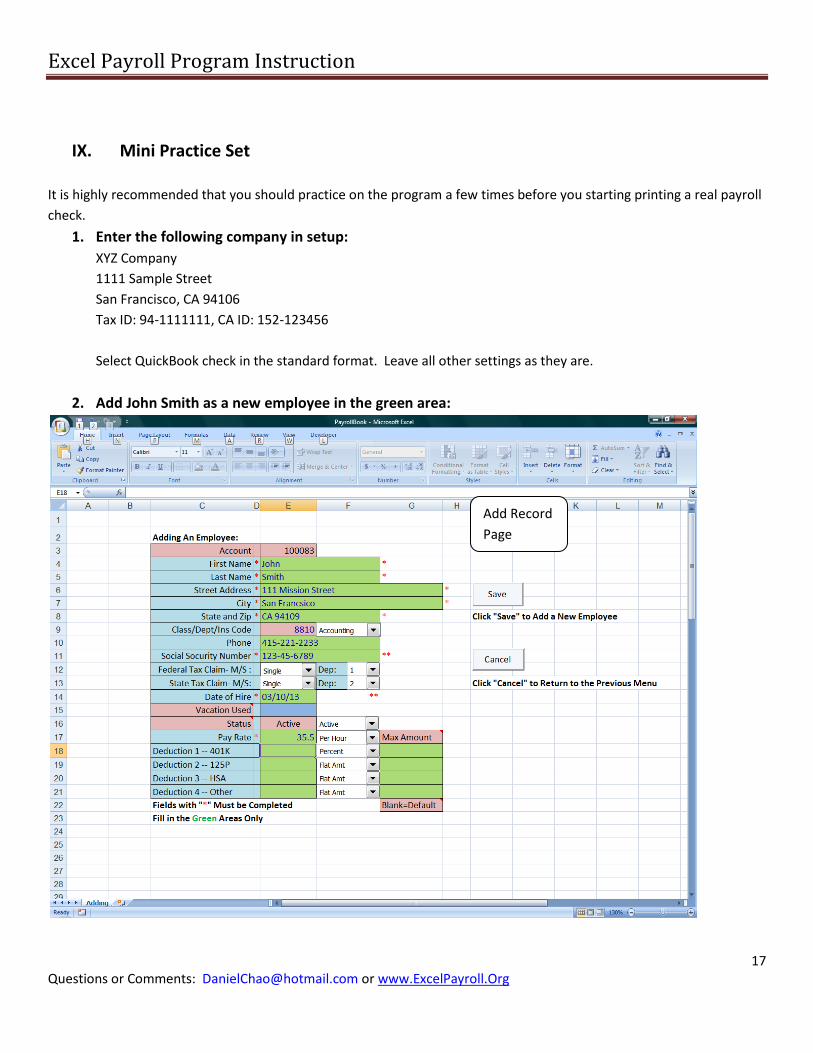
IX. Mini Practice Set
It is highly recommended that you should practice on the program a few times before you starting printing a real payroll
check.
1. Enter the following company in setup:
XYZ Company
1111 Sample Street
San Francisco, CA 94106
Tax ID: 94-1111111, CA ID: 152-123456
Select QuickBook check in the standard format. Leave all other settings as they are.
2. Add John Smith as a new employee in the green area:
Add Record
Page

Excel Payroll Program Instruction
18 Questions or Comments: [email protected] or www.ExcelPayroll.Org
Click on [Save] when finish.
3. Delete Linda and put Peter as inactive employee.
Step 1: Select Linda (highlighted Linda) in the selection window and make sure Linda’s information is shown in
the display window on the upper right corner.
Step 2: Click on [Delete] button
Step 3: Click on “Yes” from the pop-up message to confirm the deletion.
4. Pay John Smith:
Select the current date as the pay date and don’t change the check number:
Enter the following times:
Regular OT
Hour 38.75 1
Step 1: Select John Smith in the selection window
Step 2: Click on [Pay] button
Step 3: Click on cell “G4” to select or enter the current date as the pay date
Step 4: Leave check number and the pay rate as they are (You may change them if you would)
Step 5: Select “Regular” and enter 38.75; select “overtime” and enter 1
Step 6: Click on [Show Deductions and Net Pay] to view the total or detail.
Step 7: You may change the date, check number, hours, or rates if they are incorrect in Step 6
Step 8: Click on [Process] button to process the payroll and click “Yes” to print a check.
Note: Step 6 and 7 are an optional; you may skip them to Step 8 if you are sure the information are correct.
5. Pay all employees using the batch method
Step 1: Click on [Pay in Batch] button
Step 2: Enter 40 regular hours for each employee
Step 3: Don’t make any changes on date, check number and other settings.
Step 4: Click on [Run Pre-Process] to view the detail before process the batch (Optional)
Step 5: Click on [Process Batch PR] button to process and print checks.
6. Void John’s paycheck in 4 above
Step 1: Select John Smith in the selection window
Step 2: Click the “Record” Folder
Step 3: Select (highlight) the first date from the selection window on the upper left corner
Step 4: Click on [Void] button and click “Yes” to confirm the void action
Step 5: Click on [Return] back to selection page
7. View Folders and Get Payroll Reports
Click on each “Folder” on the left side of the selection page to view reports
Always click [Return] back to the selection page
Excel Payroll Program Instruction
19 Questions or Comments: [email protected] or www.ExcelPayroll.Org
Select a reporting period or enter dates in cells “D8” and “D9”; then select a report and click on [Get Report]
All reports are in Excel format; you may save them for your own use at your option.
X. Advance Topics
1. Make accrued vacation adjustments
There are two ways to make vacation adjustment at your option:
Select an employee from the selection page and click on [Edit] button; change the “Vacation Used” in the
blue Cell “E16”. This is accumulative balance of hours used. This program uses a perpetual method to keep
track the vacation balance. (net balance=total vacation accrued – total vacation used). The positive balance
in Cell “E16” is the hour used; not the net balance.
The second way to do is to adjust the “Length of Service”. You may change the “Date of Hire” in cell “E15” to
reflect the total accrued balance.
2. Close the payroll year and Select a new payroll year
This program is on a calendar year base. You must close the current year before you can select a new payroll
year. To do this, from this main page click on [Setup] and then click on [Year Close], you will be prompted for
warming. Click “OK” to continue and type in “Close” to confirm the closing.
Once the year is closed; your current year data will be saved as “Payroll Data Year YYYY.xlsm”. If you close more
than once for the same year the new file will replace the old one automatically.
3. Manage payroll data
It is recommended to make backup files. To culitivate a good habit of making back up files, you may need 3-5
moveable storage drives and marking them with Monday, Tuesday, Wednesday, Thursday, and Friday. If you
make a payroll on Monday, copy all files onto your Monday drive or if you make a payroll on Thursday, copy all
files onto your Thursday drive. Make sure you always make copies after you each payroll.
You may open and use all data files for your own use. All files are in Excel format.
4. Trouble shooting
Setup Error: if it is a setup error you may not be able process payroll. These problems are likely to be the setup
information error:
(a) Make sure data are within the parameter and within the program limit:
(b) Make sure numeric data are in number value rather than text or strings:
(c) Make sure numbers are in sequential order:
Selection Error: If the display employee information do not match the selection please click “Selecting by”
option: First, Last, Phone, Account a few times to refresh the display window.
Other Error: Contact [email protected]

Excel Payroll Program Instruction
20 Questions or Comments: [email protected] or www.ExcelPayroll.Org
5. Manage more voluntary deductions:
The major concept of this program is to keep the payroll process easy, simple, and brief. The four types of
voluntary deductions should be classified as:
Deduction 1: 401K deduction type – Tax exemption: pre-income taxes (Federal and States)
Deduction 2: All tax exemption type – Income taxes, FICA taxes, Local taxes, FUTA, and SUTA.
Deduction 3: Partial tax exemption type – Such as Health Saving Account contribution.
Deduction 4: Post tax deduction type – Loan Payment, garnishment and other deductions.
Based on these 4 types of deductions, you should be able to manage all the needs of your payroll deductions.
For example, if you have many insurance co-pays, loans and garnishments, the enclosed supplementary
spreadsheet should be able to help you keep your subsidiary clear:
John Smith 1/1/2013 Item Sub-Item Balance/Limit YTD total Payroll1 Payroll2 Payroll3 Pay…
Deduction 1 401K 17,500.00 172.00 86.00 86.00 Deduction 1 Total 17,500.00 172.00 86.00 86.00 - -
Deduction 2 Medical 1,260.00
48.46
All pre-tax type Dental 240.00
9.23 9.23 (Such as 125 P Vision 68.00
6.26 6.26
Cafeteria FSA) Other
FSA 2,500.00
96.15
Deduction 2 Total 4,068.00 312.92 156.46 156.46 - -
Deduction 3 HSA 6,500.00 60.00 30.00 30.00 (partial taxable)
Deduction3 Total 6,500.00 60.00 30.00 30.00 - -
Deduction 4 Garnishment1 5,500.00 40.00 20.00 20.00 (Post tax Garnishment2 6,500.00 50.00 25.00 25.00 Deductions) Garnishment3 200.00 20.00 10.00 10.00
Loan 1 3,000.00 24.00 12.00 12.00
Loan 2 2,500.00 20.00 10.00 10.00
Loan 3 1,200.00 20.00 10.00 10.00
Loan 4 360.00 16.00 8.00 8.00
Loan 5 500.00 10.00 5.00 5.00
Deduction 4 Total 19,760.00 200.00 100.00 100.00 - -
Enter the total in red ink as the Maximum limit and the subtotal highlighted in yellow as the deduction amount for each
payroll. This spreadsheet can be downloaded at www.ExcelPayroll.Org
File Name: Voluntary Deduction Subsidiary Template.xlsx
Enter this amount
as the limit amount
Enter this amount as
the Deduction Amount

Excel Payroll Program Instruction
21 Questions or Comments: [email protected] or www.ExcelPayroll.Org
6. Pay salary employees:
Salary employee payroll: This Excel Payroll program does not limit the ways of paying your employees. Because
you can pay your employees anytime at any pay period, you can just simply select {regular} pay type and enter a
flat salary amount (without entering the hour). If you are using the batch payroll method, you may either click
the salary check box or enter the full hours for your salary employees. (40 for weekly, 80 for bi-weekly, or 173.33
for monthly or 86.67 for semi-monthly payroll etc. for salary employees)
7. Handle Mid-year conversion: If you did a manual payroll or other system showing a record as below (John
Smith), you may convert it into this Excel Payroll program by entering the quarterly balance in a single process.
John Smith
SSN: 500-200-1000 5005 Mallard Creek Dr, Oakland CA 94607 DOH: 02/26/08
Period Wages Tax Deduction Other Deduction Payment
Date Gross OASDI HI FIT SIT SDI 401K 125P HSA Other Net Pay Check
1/4/2013
1,020.55
60.27
14.09
45.62 40.82
10.21
30.62
38.50
10.00
12.55
757.87 1102
1/18/2013
1,562.44
93.86
21.95
68.01 62.50
15.62
46.87
38.50
10.00
12.55
1,192.58 1105
2/1/2013
1,630.21
98.07
22.93
72.60 65.21
16.30
48.91
38.50
10.00
12.55
1,245.14 1109
2/15/2013
960.53
56.55
13.22
35.10 38.42
9.61
28.82
38.50
10.00
12.55
717.76 1205
3/1/2013
1,261.08
75.18
17.58
55.61 50.44
12.61
37.83
38.50
10.00
12.55
950.78 1236
3/15/2013
3,050.17
186.10
43.52
269.74 122.01
30.50
91.51
38.50
10.00
12.55
2,245.74 1300
3/29/2013
1,690.05
101.78
23.80
81.00 67.60
16.90
50.70
38.50
10.00
12.55
1,287.22 1350
1Q Total
11,175.03
671.81
157.09
627.68 447.00
111.75
335.26
269.50
70.00
87.85
8,397.09
4/12/2013
2,301.06
139.66
32.66
129.95 92.04
23.01
69.03
38.50
10.00
12.55
1,753.66 1360
4/26/2013
1,011.84
59.73
13.97
45.11 40.47
10.12
30.36
38.50
10.00
12.55
751.03 1370
5/10/2013
3,201.75
195.50
45.72
276.88 128.07
32.02
96.05
38.50
10.00
12.55
2,366.46 1375
5/24/2013
1,250.68
74.54
17.43
61.83 50.03
12.51
37.52
38.50
10.00
12.55
935.77 1421
6/7/2013
6/21/2013
2Q Total 7,765.33
469.43
109.78
513.77 310.61
77.66
232.96
154.00
40.00
50.20
5,806.92
Edit the deductions to flat amount as follow:
401K = 335.26
125P = 269.50
Excel Payroll Program Instruction
22 Questions or Comments: [email protected] or www.ExcelPayroll.Org
HSA = 70.00
Other = 87.85
Select and Pay:
Date = 3/31/20XX (Select or enter the last date of the quarter)
Check number = 1350 (optional to enter the last check number of the quarter)
Regular Wage = 11175.03 (without entering hours)
Withholding overwrite:
FIT withhold = 5.6168% (627.68/11175.03, enter 4 or more decimal digits with percentage to keep it as accurate as
possible)
SIT withhold = 4.0000% (447.00/11175.03, you may not see all the digits, but you may still enter them)
Click on [Process] button to process the total wages for the quarter and click ‘No’ and ‘No’ to defer printing an
actual check.
Repeat the same step to enter the 2nd quarter. Please make sure you change/edit the deductions back to normal
deduction rate when you finish entering the quarterly payroll.
8. Use Timecard option
By using the timecard option, you can save employees’ hour history and also keep track of your project (job)
cost, records of hours incurred on each job or project, and keep history of your employee’s timecard hours.
There are four (4) sheets in the Timecard File if you use the timecard option:
a) Timecard: You will enter all time/hours for each employee here
b) JobList: It is optional. Enter your job list here and you can keep record of job costs.
c) LaborType: It is optional. Enter your labor type here to keep tracks of what hours on your job cost
d) EquipmentType: it is optional. Enter your equipment type to keep record of equipment hours.
After you enter all employees’ hours for the selected week, click on [Weekly Post] button to post the time.
Once t he weekly posting is done, you may click on the [Return] button to the payroll page and do your payroll
in batch. You can select the weeks for each payroll to process your payroll without entering hours again.
Please note that a seven (7) minute rule is used in this timecard program. If the exact time is 3 hours and 8
minutes, it rounds to the nearest quarter as 3.25 hour (3 hour 15 minute) or if the exact time is 3 hours and 7
minutes, it rounds to the nearest quarter as 3.00 hour (3 hour 0 minute).
Excel Payroll Program Instruction
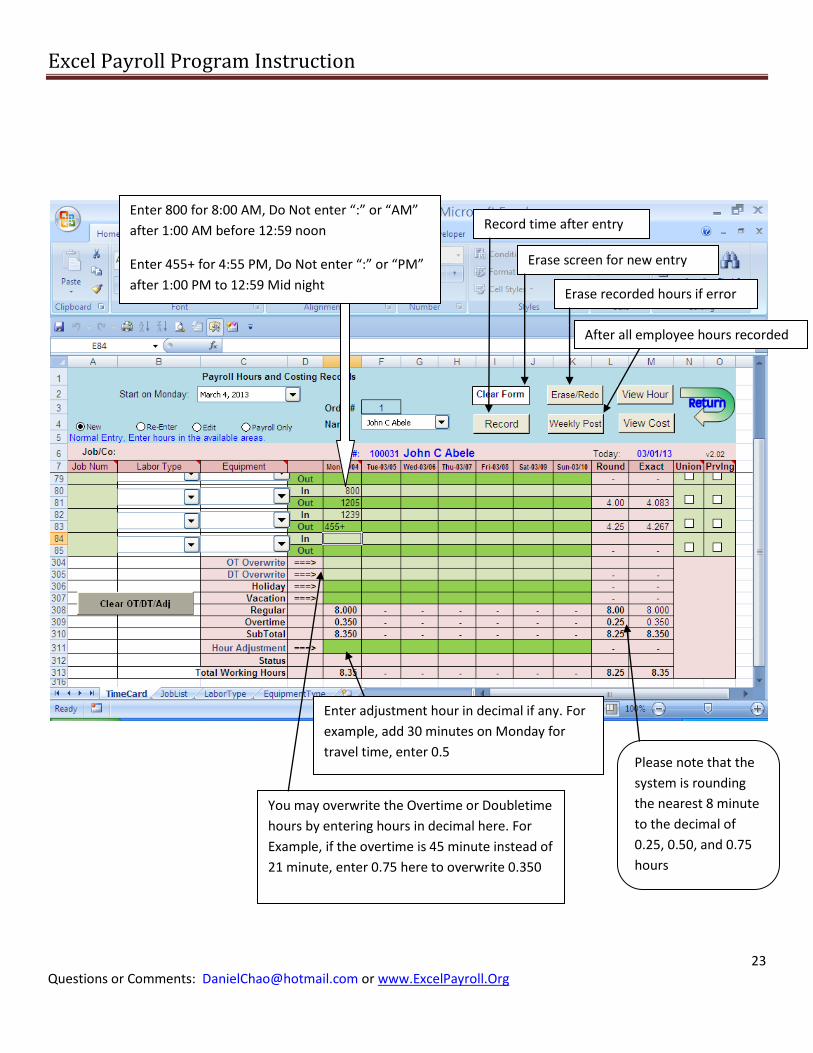
23 Questions or Comments: [email protected] or www.ExcelPayroll.Org
Record time after entry
Erase screen for new entry
Erase recorded hours if error
After all employee hours recorded
Enter 800 for 8:00 AM, Do Not enter “:” or “AM”
after 1:00 AM before 12:59 noon
Enter 455+ for 4:55 PM, Do Not enter “:” or “PM”
after 1:00 PM to 12:59 Mid night
Enter adjustment hour in decimal if any. For
example, add 30 minutes on Monday for
travel time, enter 0.5
You may overwrite the Overtime or Doubletime
hours by entering hours in decimal here. For
Example, if the overtime is 45 minute instead of
21 minute, enter 0.75 here to overwrite 0.350
Please note that the
system is rounding
the nearest 8 minute
to the decimal of
0.25, 0.50, and 0.75
hours
Excel Payroll Program Instruction
24 Questions or Comments: [email protected] or www.ExcelPayroll.Org
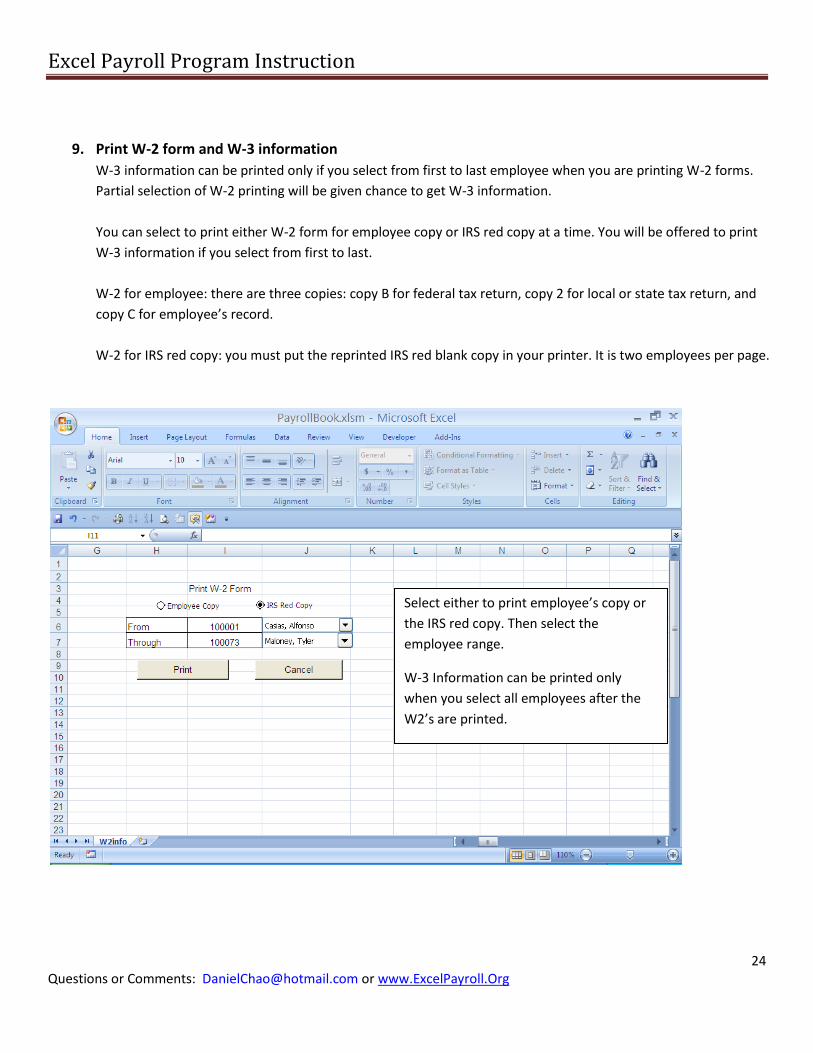
9. Print W-2 form and W-3 information
W-3 information can be printed only if you select from first to last employee when you are printing W-2 forms.
Partial selection of W-2 printing will be given chance to get W-3 information.
You can select to print either W-2 form for employee copy or IRS red copy at a time. You will be offered to print
W-3 information if you select from first to last.
W-2 for employee: there are three copies: copy B for federal tax return, copy 2 for local or state tax return, and
copy C for employee’s record.
W-2 for IRS red copy: you must put the reprinted IRS red blank copy in your printer. It is two employees per page.
Select either to print employee’s copy or
the IRS red copy. Then select the
employee range.
W-3 Information can be printed only
when you select all employees after the
W2’s are printed.

Excel Payroll Program Instruction
25 Questions or Comments: [email protected] or www.ExcelPayroll.Org
10. Technical Data:
(a) Runs on Excel 2007 or higher version
(b) Minimum hard drive space: 10M
(c) Maximum number of employees: 200
(d) Maximum active employees in timecard: 57
(e) Minimum pay rate: 7.50 per hour
(f) Maximum pay rate: 48,07.69 per hour
(g) Maximum payroll per year: 3,640
(h) Maximum wages per employee per year: 458,300.00
(i) Maximum amount on check is $99,999,999.99
(j) Years of use: 5 year backward and 2 years in advance in any given year in calendar
(k) Life of the program: from given year in calendar through 2280 (Max)
Note:
This program was designed for accounting students and for small business use only. Thus, I designed these
technical data to limit the users.
You may have up to 1000 employees in the database with 200 employee in batch payroll, but if you have
more than 50 active employees in the company then you are not a small business and please do Not use this
program. You are not qualified for free use.
You are required to pay your employee at least $7.5 per hour in order to use this program
If you pay more than $458,300.00 per year to an employee or pay over 4807 per hour then you are not
qualified for using this program for free or the tax withholdings will not be accurate. It is because you are
not small business.
If you make more than 3640 payroll transactions per year, then you are not qualified for using this program.
If you are a non-profit organization and have more than 57 active employees or have more than 3640
payroll transactions per year, please contact me to increase or remove the limit for you.