exel industrial uk ltd - professional finishing supplies ltd lab unit.pdf · exel industrial uk ltd...
TRANSCRIPT

400 SERIES LAB UNIT 1
EXEL Industrial UK LTD Unit 4 Lockflight Buildings, Wheatlea Industrial Estate,
Wigan WN3 6XR Téléphone 01942 829 111 Fax: 01942 820 491
http://www.exel-uk.com e-mail : [email protected]
400 SERIES PORTABLE
LABORATORY UNIT
INSTRUCTION MANUAL
DOCUMENT: 400 Lab Unit - Manual
DATE ISSUED: 12th.Oct.2004
ISSUE NUMBER: 1

400 SERIES LAB UNIT 2
CAUTION This equipment can be dangerous unless it is used in accordance with the rules laid down in this manual.
Read this manual completely before installing and operating the equipment, and keep on file. Ensure all safety instructions and procedures are correctly followed and that all operators are fully trained. This equipment must be installed and used in accordance with all relevant local and national safety codes and standards. In countries of the EEC, refer also to EN1953:1999 and the ATEX Directive 94/9/EEC. For Manual Powder Spray Installations refer also to EN50053: Part 2:1989 and for Automatic Powder Spray Installations refer also to EN50177:1997. DO NOT permit untrained or unauthorised personnel to maintain or adjust this equipment. All other manuals relevant to components and equipment of the installation must be followed. 1. Ensure that the equipment is properly earthed/grounded. Refer to assembly
instructions. 2. The electrical supply to the gun's electrostatic generator and the control unit
must be interlocked with the spray booth extraction system such that spraying cannot be carried out unless the exhaust ventilation system is in operation. The efficiency of the exhaust ventilation system should be checked regularly.
3. All conductive structures within the vicinity of the spray area shall be bonded together with the earth terminal of the high voltage generator to the protective earth of the system electrical supply.
4. The equipment operates by electrostatically charging the powder by means of a high voltage corona discharge at the nozzle of the spray gun. This electrostatic discharge can seriously damage other electronic equipment if it is sited in close proximity and not suitably protected.
5. It is essential that all jigs and work pieces are adequately earthed. The workpiece shall have a resistance to earth of no greater than 1 Mohm. This should be checked regularly. If the earthing is not adequate, this can result in:- a) Poor coating. b) Sparks between the product and jigs, which can constitute an ignition or
explosion hazard. c) Radio and TV interference from sparks between the product and jigs.
This interference may also affect computer systems and process controllers.
6. Ensure the air supply is clean and dry.
NOTE:- Refer to pneumatic specifications.

400 SERIES LAB UNIT 3
EC Declaration Of Conformity
We, Exel Industrial UK Ltd. declare that the following product: Description: i) Powder Coating Gun Control Unit ii) Manual Powder Coating Spray Gun Model: i) GCU400 ii) MG400 Use: Electrostatic Powder Coating Gun Control Unit to be used in conjunction with the MG400-Manual powder coating spray gun was manufactured by ourselves and conforms with the following standard (s) and / or other normative document (s):
EC Machinery Directive 89/392/EEC EC Low Voltage Directive 73/23/EEC EC Directive of Electromagnetic Compatibility 89/336/EEC Electrostatic Painting and Finishing Equipment Using Flammable Materials EN50 050:2001 and EN50 053:Part 2:1989 Signed on behalf of Exel Industrial UK Ltd. by
Mr. D.H. Campbell Technical Manager
EXEL Industrial UK LTD
Unit 4 Lockflight Buildings, Wheatlea Industrial Estate, Wigan WN3 6XR
Téléphone 01942 829 111 Fax: 01942 820 491 V.A.T. Reg. No. 535 0123 87
Company No. 3008 563 Registered In England

400 SERIES LAB UNIT 4
400 SERIES POWDER COATING EQUIPMENT
TOTAL ENERGY CONTROL (TEC)
The 400 series powder coating spray guns utilise the "Total Energy Control" system developed by Exel. Once the maximum energy level has been set the "Total Energy Control" system automatically adjusts both the current and voltage enabling the operator to gain optimum spraying results. Defects caused by back ionisation and the faraday cage effect etc. are minimised. SPRAY GUNS
MANUAL SPRAY GUN
Type MG 400 Part No. 3019002
The Exel MG 400 spray guns are built to a robust and compact design utilising a high efficiency corona discharge to charge the powder coating material. Both guns incorporate a high voltage multiplier charging system which converts the governed low voltage dc. power supply received from Exel's 400 Series Gun Control Unit to a maximum output voltage of 85kV and a maximum output current of either 50uA (mode 1) or 100uA (mode 2) at the single point corona needle. The gun nozzle may be fitted with a variety of powder deflectors and slotted caps which, combined with a forward air supply to the nozzle, enable the operator to control the spray pattern to suit the components being sprayed. A variety of nozzle adapters are available separately including extended nozzles and a cup attachment.
Both guns are manufactured with a minimum number of components and feature several mouldings offering greater reliability and ease of servicing. To this end the gun services may be disconnected within seconds. The power connection to the gun is via a screened highly flexible cable. The MG 400 Manual Powder Coating Spray Gun has been ergonomically designed to be well balanced, light weight and comfortable with a contoured grip.
GUN CONTROL UNIT Type GCU400, Part No. 2024002
The Gun Control Unit provides all the control functions necessary to spray and charge powder using the Exel 400 Series spray guns. It contains the control P.C.B. which provides a governed low voltage d.c. power supply to the spray gun. The operator may set the spray gun output to a maximum output voltage of 85kV and a maximum output current of either 50uA (mode 1) or 100uA (mode 2) using the control unit. The set value of kV (mode 1) or uA (mode 2) is displayed on a numerical led display. Separate led bar graph displays enable the operator to monitor the electrostatic charge supplied to the gun either in terms of the voltage or current. When used with manual guns the electrostatics may be turned off to enable powder emissions to be set without charging the powder. The unit has 3 regulated pneumatic outlets, the pressure regulators and gauges being mounted on the front panel. Two of these supply air to the venturi powder air and dilution air ports for pumping and controlling the supply of powder fed to the gun. The third is used to supply air to the nozzle of the spray gun. Led indicators on the front panel show whether the unit is set for use with manual or automatic guns and it’s also the unit is operating in mode 1 (TEC 1) or mode 2 (TEC 2).

400 SERIES LAB UNIT 5
The mains electrical supply to the unit is provided via. a sealed connector. A non-switched electrical outlet is provided to enable the electrical supply to be linked through to other units, for example when situated in an automatic system console or double operator manual units. Circuit protection is by means of miniature circuit breakers. The unit is mounted by means of 2 x M6 screws in each side, and on the rear panel.
SPECIFICATION GCU400
Electrical Data
Input Voltage 100-240 Volts 50 / 60 Hz single phase Power Consumption (full load) 45 VA Input Current (max.) 400 mA at 115 V 200 mA at 230 V Electrostatic output voltage (max.) 10 - 85 kV negative.
Electrostatic output current Mode 1; 0 - 50 uA Mode 2; 0 – 100 uA.
Electrical Controls
Mains Switch- Front Panel Rotary 3 position- OFF/ON/E’STATICS OFF
Mode Selection Front Panel
Push Button LED’s display mode selected
TEC 1 (mode 1)/ TEC 2 (mode 2)
Charge Control- Front Panel
Push Buttons +/- to increase or decrease
Sets the maximum level of kV(Mode1). Sets the maximum level of uA(Mode2).
Set Value Display Front Panel
Numerical LED Indicator
Displays set max. kV. (Mode1) TEC1 Displays set max. uA. (Mode2) TEC2
Electrostatic Charge Indicators Front Panel
LED Bar Graphs 0 to 100 µA / 0 to 100 kV
Mains Input Via connector on rear panel.
Mains Output Socket Non switched 6A max.- may be used to connect additional control units.
Trigger Switch - Hand Gun
Microswitch in hand gun-
connected through plug and socket on rear of control unit.
Remote Trigger - 24 V dc. Supply from Remote PLC.
connected through plug and socket on rear of control unit.
Circuit Protection Miniature circuit breakers:- Mains input - 0.6A Mains output - 6A
Pneumatic Data
Input air pressure 7.0 bar (100 p.s.i.) max. Input air conditioning Oil free to 0.1 p.p.m. and dry to 1.3 g/cubic Nm. Air consumption (Nominal)
400P 5.0 cubic m/h. ( 3.0 c.f.m. )
Input Connection 8mm. OD tube air fitting.
400 SERIES LAB UNIT 6
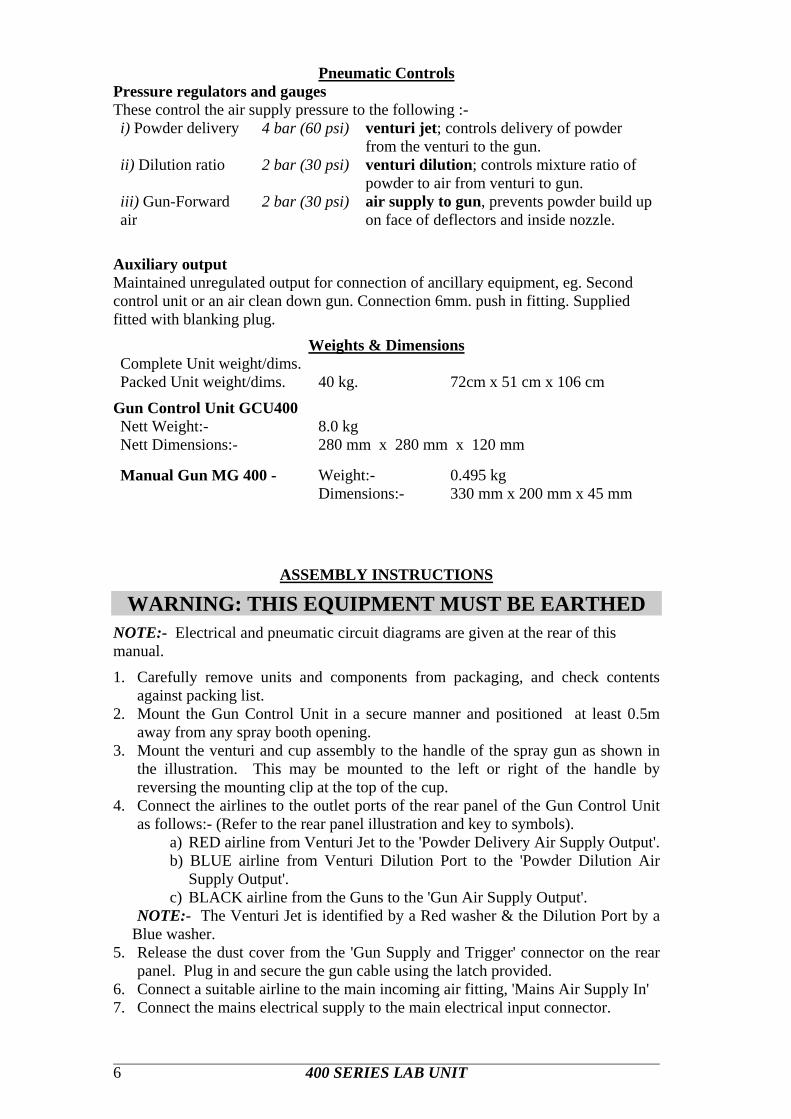
Pneumatic Controls Pressure regulators and gauges These control the air supply pressure to the following :- i) Powder delivery
4 bar (60 psi)
venturi jet; controls delivery of powder from the venturi to the gun.
ii) Dilution ratio
2 bar (30 psi)
venturi dilution; controls mixture ratio of powder to air from venturi to gun.
iii) Gun-Forward air
2 bar (30 psi)
air supply to gun, prevents powder build up on face of deflectors and inside nozzle.
Auxiliary output Maintained unregulated output for connection of ancillary equipment, eg. Second control unit or an air clean down gun. Connection 6mm. push in fitting. Supplied fitted with blanking plug.
Weights & Dimensions Complete Unit weight/dims. Packed Unit weight/dims. 40 kg. 72cm x 51 cm x 106 cm
Gun Control Unit GCU400
Nett Weight:- 8.0 kg Nett Dimensions:- 280 mm x 280 mm x 120 mm
Manual Gun MG 400 - Weight:- 0.495 kg Dimensions:- 330 mm x 200 mm x 45 mm
ASSEMBLY INSTRUCTIONS
WARNING: THIS EQUIPMENT MUST BE EARTHED
NOTE:- Electrical and pneumatic circuit diagrams are given at the rear of this manual.
1. Carefully remove units and components from packaging, and check contents against packing list.
2. Mount the Gun Control Unit in a secure manner and positioned at least 0.5m away from any spray booth opening.
3. Mount the venturi and cup assembly to the handle of the spray gun as shown in the illustration. This may be mounted to the left or right of the handle by reversing the mounting clip at the top of the cup.
4. Connect the airlines to the outlet ports of the rear panel of the Gun Control Unit as follows:- (Refer to the rear panel illustration and key to symbols).
a) RED airline from Venturi Jet to the 'Powder Delivery Air Supply Output'. b) BLUE airline from Venturi Dilution Port to the 'Powder Dilution Air
Supply Output'. c) BLACK airline from the Guns to the 'Gun Air Supply Output'.
NOTE:- The Venturi Jet is identified by a Red washer & the Dilution Port by a Blue washer.
5. Release the dust cover from the 'Gun Supply and Trigger' connector on the rear panel. Plug in and secure the gun cable using the latch provided.
6. Connect a suitable airline to the main incoming air fitting, 'Mains Air Supply In' 7. Connect the mains electrical supply to the main electrical input connector.

400 SERIES LAB UNIT 7
IMPORTANT When fitting a suitable plug to the mains lead, it is essential that it contains an earthing / grounding contact and that this is connected. Under no circumstances should this equipment be connected to a mains supply which does not include an earthing / grounding wire and contacts. e.g.. 2 -Wire extension leads as used for some domestic equipment MUST NOT BE USED.
NOTE:- The colour coding for mains wires are:-
U.K. U.S.A.
Live L Brown Black Neutral N Blue White Earth / Ground E Green / Yellow Green
NOTE:- The terminals used in the mains connectors on the rear panel of the unit are:-
Live Pin 1 Neutral Pin 3 Earth / Ground Pin E
For United Kingdom Installations If the colours of the mains lead of this appliance do not correspond with the coloured markings identifying the terminals in your plug, proceed as follows:- The GREEN and YELLOW wire must be connected to the terminal in the plug which is marked with the letter "E" or by the earth symbol, or coloured green or green/yellow. The BLUE wire must be connected to the terminal which is marked with the letter "N" or coloured black. The BROWN wire must be connected to the terminal which is marked with the letter "L" or coloured red.
NOTE:- The method of disconnection from the mains electrical supply shall be by removal of the plug on the mains lead from its respective supply socket.
NOTE:- If the system is intended to be permanently connected to mains wiring then the switch used to disconnect the unit from the supply voltage must disconnect all poles and have a contact separation of at lease 3mm.
The unit is now ready for use
400 SERIES LAB UNIT 8
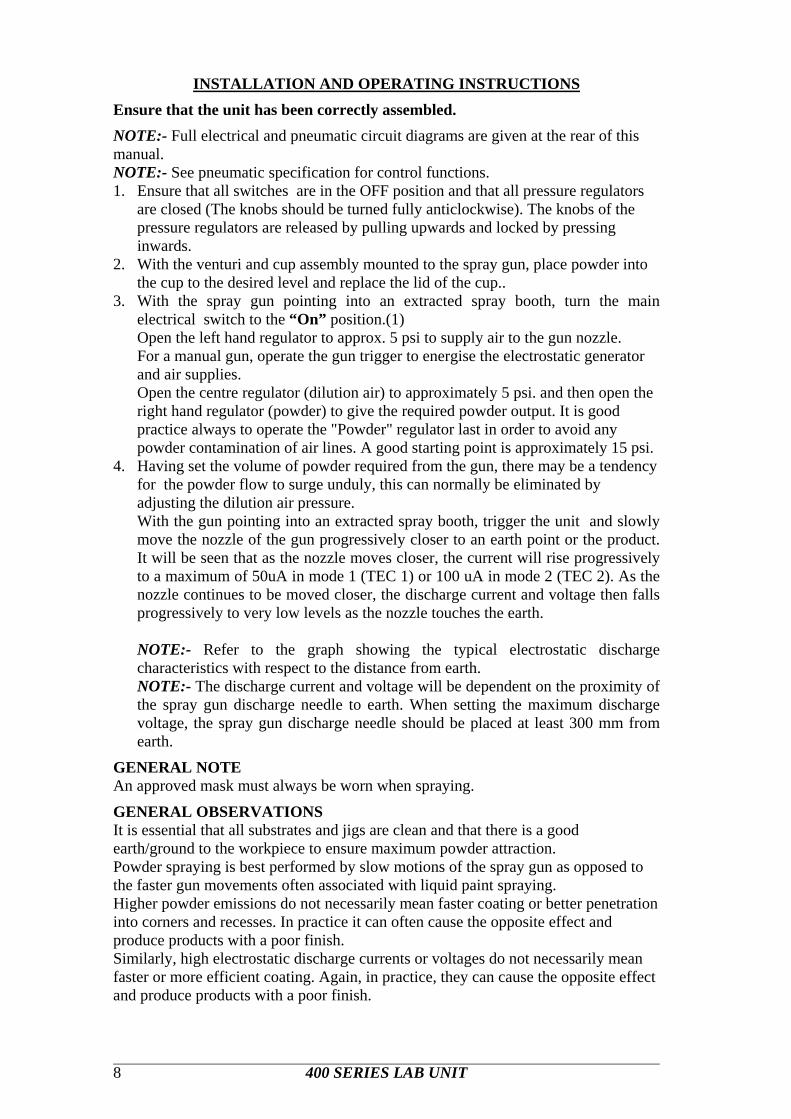
INSTALLATION AND OPERATING INSTRUCTIONS
Ensure that the unit has been correctly assembled.
NOTE:- Full electrical and pneumatic circuit diagrams are given at the rear of this manual. NOTE:- See pneumatic specification for control functions. 1. Ensure that all switches are in the OFF position and that all pressure regulators
are closed (The knobs should be turned fully anticlockwise). The knobs of the pressure regulators are released by pulling upwards and locked by pressing inwards.
2. With the venturi and cup assembly mounted to the spray gun, place powder into the cup to the desired level and replace the lid of the cup..
3. With the spray gun pointing into an extracted spray booth, turn the main electrical switch to the “On” position.(1) Open the left hand regulator to approx. 5 psi to supply air to the gun nozzle. For a manual gun, operate the gun trigger to energise the electrostatic generator and air supplies. Open the centre regulator (dilution air) to approximately 5 psi. and then open the right hand regulator (powder) to give the required powder output. It is good practice always to operate the "Powder" regulator last in order to avoid any powder contamination of air lines. A good starting point is approximately 15 psi.
4. Having set the volume of powder required from the gun, there may be a tendency for the powder flow to surge unduly, this can normally be eliminated by adjusting the dilution air pressure. With the gun pointing into an extracted spray booth, trigger the unit and slowly move the nozzle of the gun progressively closer to an earth point or the product. It will be seen that as the nozzle moves closer, the current will rise progressively to a maximum of 50uA in mode 1 (TEC 1) or 100 uA in mode 2 (TEC 2). As the nozzle continues to be moved closer, the discharge current and voltage then falls progressively to very low levels as the nozzle touches the earth. NOTE:- Refer to the graph showing the typical electrostatic discharge characteristics with respect to the distance from earth. NOTE:- The discharge current and voltage will be dependent on the proximity of the spray gun discharge needle to earth. When setting the maximum discharge voltage, the spray gun discharge needle should be placed at least 300 mm from earth.
GENERAL NOTE An approved mask must always be worn when spraying.
GENERAL OBSERVATIONS It is essential that all substrates and jigs are clean and that there is a good earth/ground to the workpiece to ensure maximum powder attraction. Powder spraying is best performed by slow motions of the spray gun as opposed to the faster gun movements often associated with liquid paint spraying. Higher powder emissions do not necessarily mean faster coating or better penetration into corners and recesses. In practice it can often cause the opposite effect and produce products with a poor finish. Similarly, high electrostatic discharge currents or voltages do not necessarily mean faster or more efficient coating. Again, in practice, they can cause the opposite effect and produce products with a poor finish.
400 SERIES LAB UNIT 9
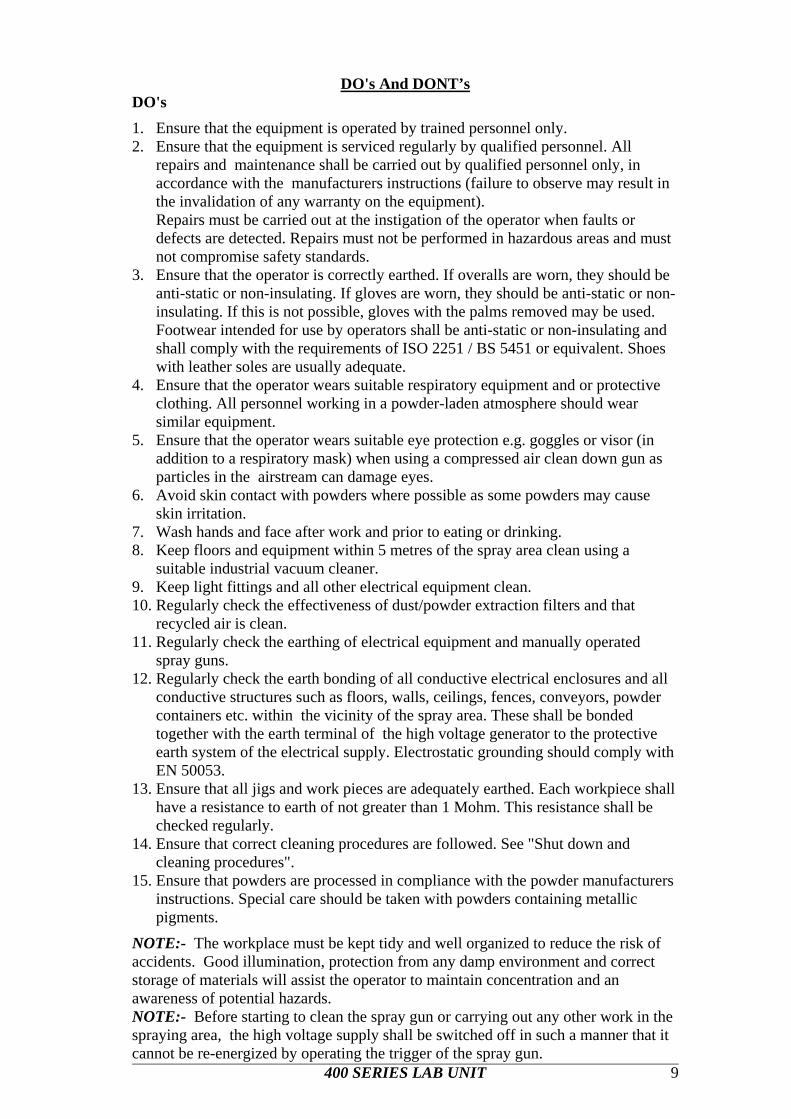
DO's And DONT’s
DO's
1. Ensure that the equipment is operated by trained personnel only. 2. Ensure that the equipment is serviced regularly by qualified personnel. All
repairs and maintenance shall be carried out by qualified personnel only, in accordance with the manufacturers instructions (failure to observe may result in the invalidation of any warranty on the equipment). Repairs must be carried out at the instigation of the operator when faults or defects are detected. Repairs must not be performed in hazardous areas and must not compromise safety standards.
3. Ensure that the operator is correctly earthed. If overalls are worn, they should be anti-static or non-insulating. If gloves are worn, they should be anti-static or non-insulating. If this is not possible, gloves with the palms removed may be used. Footwear intended for use by operators shall be anti-static or non-insulating and shall comply with the requirements of ISO 2251 / BS 5451 or equivalent. Shoes with leather soles are usually adequate.
4. Ensure that the operator wears suitable respiratory equipment and or protective clothing. All personnel working in a powder-laden atmosphere should wear similar equipment.
5. Ensure that the operator wears suitable eye protection e.g. goggles or visor (in addition to a respiratory mask) when using a compressed air clean down gun as particles in the airstream can damage eyes.
6. Avoid skin contact with powders where possible as some powders may cause skin irritation.
7. Wash hands and face after work and prior to eating or drinking. 8. Keep floors and equipment within 5 metres of the spray area clean using a
suitable industrial vacuum cleaner. 9. Keep light fittings and all other electrical equipment clean. 10. Regularly check the effectiveness of dust/powder extraction filters and that
recycled air is clean. 11. Regularly check the earthing of electrical equipment and manually operated
spray guns. 12. Regularly check the earth bonding of all conductive electrical enclosures and all
conductive structures such as floors, walls, ceilings, fences, conveyors, powder containers etc. within the vicinity of the spray area. These shall be bonded together with the earth terminal of the high voltage generator to the protective earth system of the electrical supply. Electrostatic grounding should comply with EN 50053.
13. Ensure that all jigs and work pieces are adequately earthed. Each workpiece shall have a resistance to earth of not greater than 1 Mohm. This resistance shall be checked regularly.
14. Ensure that correct cleaning procedures are followed. See "Shut down and cleaning procedures".
15. Ensure that powders are processed in compliance with the powder manufacturers instructions. Special care should be taken with powders containing metallic pigments.
NOTE:- The workplace must be kept tidy and well organized to reduce the risk of accidents. Good illumination, protection from any damp environment and correct storage of materials will assist the operator to maintain concentration and an awareness of potential hazards. NOTE:- Before starting to clean the spray gun or carrying out any other work in the spraying area, the high voltage supply shall be switched off in such a manner that it cannot be re-energized by operating the trigger of the spray gun.

400 SERIES LAB UNIT 10
DONT’s
1. The operator must not wear insulating gloves, clothing or footwear. 2. Do not smoke in areas where powder coating is being carried out or in areas
where powder is stored. 3. Do not eat or drink in areas where powder coating is being carried out or in dust-
laden atmospheres. 4. Do not spray into areas which are not properly extracted. The direction of airflow
should always be from behind the operator. It is recommended that airflow velocities over the face area of a booth opening should be in excess of 0.5 metre/sec.
5. Do not use compressed air for cleaning skin and clothing as it can penetrate the skin causing embolisms. Use a suitable industrial vacuum cleaner for clothing and wash skin with water.
6. Do not point compressed air clean down guns towards body orifices such as mouth, ears etc.
7. Do not enter spray booths when in operation. 8. Do not operate fluidized beds without connecting a suitable vent hose from its lid
to an extracted area such as a spray booth.
400 SERIES LAB UNIT 11
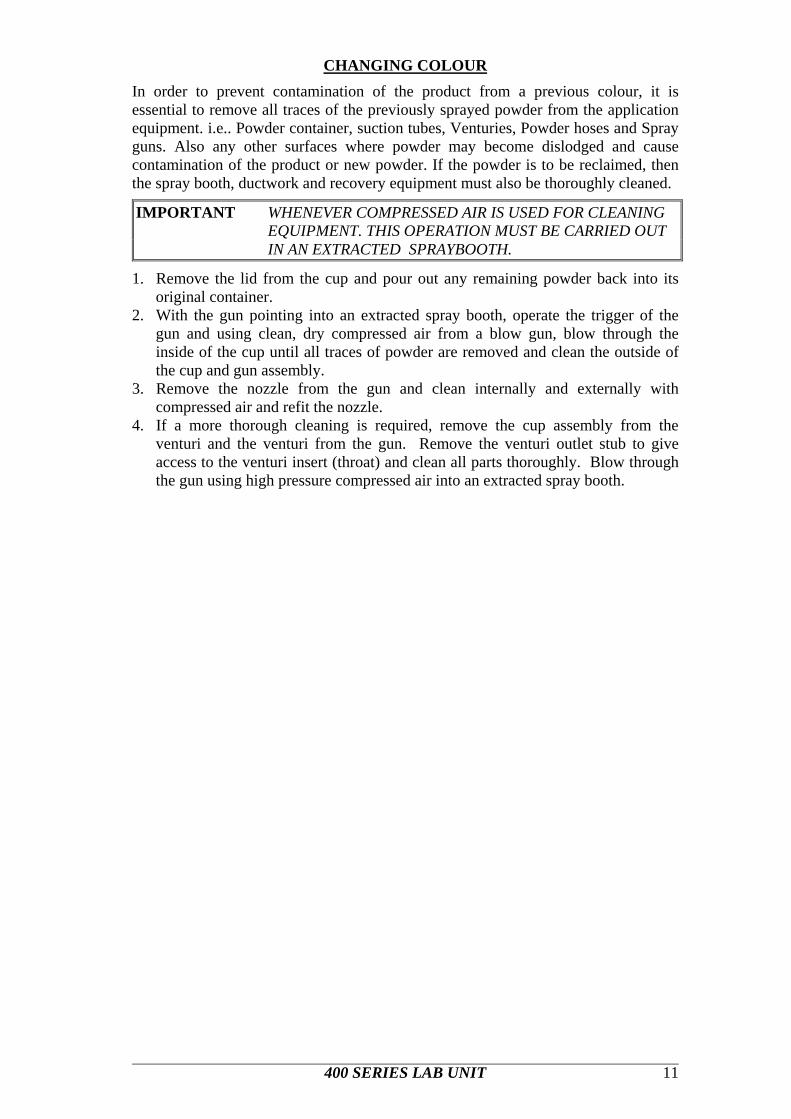
CHANGING COLOUR
In order to prevent contamination of the product from a previous colour, it is essential to remove all traces of the previously sprayed powder from the application equipment. i.e.. Powder container, suction tubes, Venturies, Powder hoses and Spray guns. Also any other surfaces where powder may become dislodged and cause contamination of the product or new powder. If the powder is to be reclaimed, then the spray booth, ductwork and recovery equipment must also be thoroughly cleaned.
IMPORTANT WHENEVER COMPRESSED AIR IS USED FOR CLEANING EQUIPMENT. THIS OPERATION MUST BE CARRIED OUT IN AN EXTRACTED SPRAYBOOTH.
1. Remove the lid from the cup and pour out any remaining powder back into its original container.
2. With the gun pointing into an extracted spray booth, operate the trigger of the gun and using clean, dry compressed air from a blow gun, blow through the inside of the cup until all traces of powder are removed and clean the outside of the cup and gun assembly.
3. Remove the nozzle from the gun and clean internally and externally with compressed air and refit the nozzle.
4. If a more thorough cleaning is required, remove the cup assembly from the venturi and the venturi from the gun. Remove the venturi outlet stub to give access to the venturi insert (throat) and clean all parts thoroughly. Blow through the gun using high pressure compressed air into an extracted spray booth.

400 SERIES LAB UNIT 12
FAULT FINDING
Check that mains connector is fitted to rear panel of control unit. Check that unit is connected to a suitable mains electrical supply and is switched on. (The electrical supply should be interlocked with the booth extraction system.)
UN
IT W
ILL
NO
T
OPE
RA
TE
(N
o L
ED
's w
ill
illum
inat
e)
Check that miniature circuit breaker (automatic fuses) on the rear panel of the control unit have not been tripped. If one or more has, then press to reset. If it trips again, switch off unit and refer to an authorized distributor or service agent. Check the gun trigger connection on the rear panel of the control unit is correctly fitted. Check the gun trigger connection on the bottom of the gun handle is correctly fitted.
UN
IT W
ILL
N
OT
O
PER
AT
E
(LE
D's
will
ill
umin
ate)
Check that the trigger switch in the gun is operating. Depress the trigger and an audible click should be heard if the trigger switch is operating. LED at “T” Check air supply to unit. Check that the powder container is not empty. Check that the powder in the powder container has no rat holes or voids around the suction or induction point - increase fluidization/vibration or agitate powder cup. Check that powder is not damp. Check for kinked or blocked powder hose. Check for blockage in suction tube, venturi body and gun.
NO
PO
WD
ER
DE
LIV
ER
Y
Check that the internal solenoid valve is operating by depressing gun trigger when an audible click should be heard from inside the control unit. If it is not, check the gun trigger connection on the rear panel of the control unit and the bottom of the gun. Check ratio of dilution air to powder air and adjust if necessary. Check for any kinks or partial blockages in the powder hose, venturi suction tube and body, or gun. Check that the venturi body is seating firmly on the mounting spigot and that the O-rings are not damaged. Check condition of the PTFE insert in the venturi for signs of wear- replace as necessary. Check that there is sufficient powder in the cup.
POW
DE
R D
EL
IVE
RY
IN
TE
RM
ITT
EN
T O
R
SUR
GIN
G
Check that the powder is not “rat holed”, if so shake the gun. This may indicate that the powder is damp. Manual guns:- Check that main switch is set to I (on) and not the second position which turns off the electrostatics. Check the that setting of the charge control (kV or uA) and that an electrostatic charge is present at the discharge electrode needle of the gun. If no charge (or very poor charge) is present, then check that there is no water present from the compressed air supply or from condensation. Check that the gun barrel is not contaminated with metallic particles from bright unbonded metallic powders. PO
WD
ER
DO
ES
NO
T
AD
HE
RE
TO
W
OR
KPI
EC
E
Check that the workpiece is properly earthed/grounded.
400 SERIES LAB UNIT 13
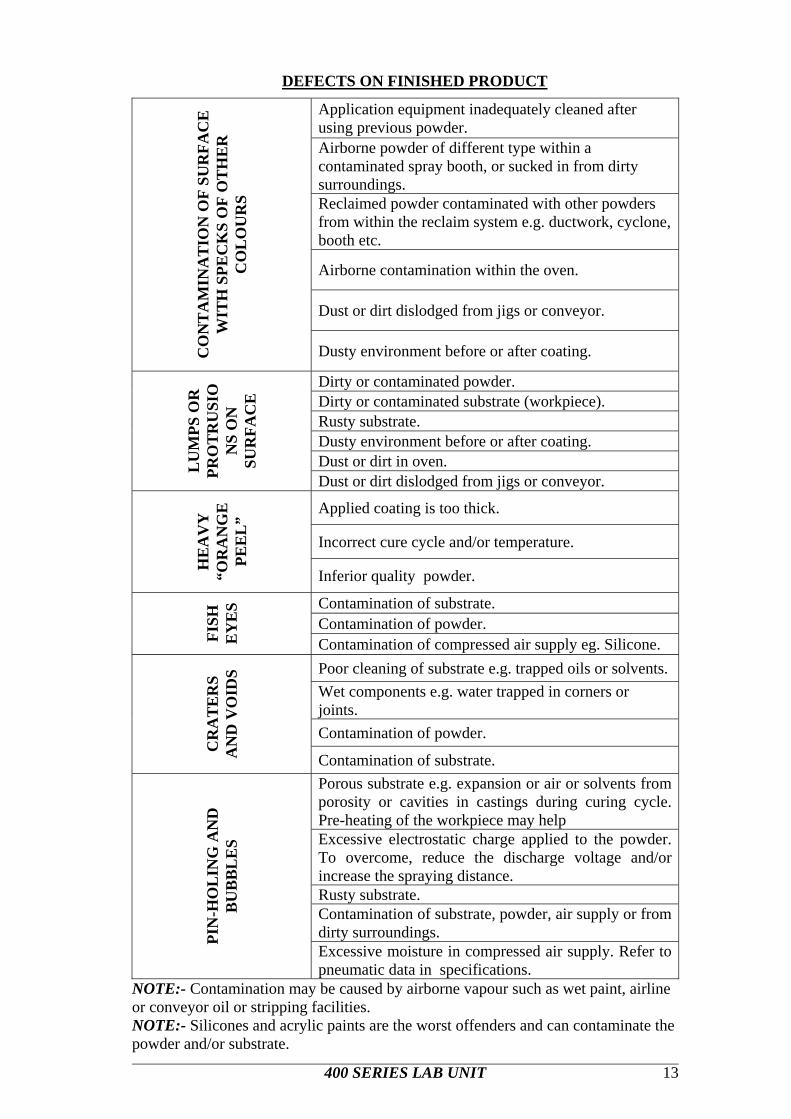
DEFECTS ON FINISHED PRODUCT
Application equipment inadequately cleaned after using previous powder. Airborne powder of different type within a contaminated spray booth, or sucked in from dirty surroundings. Reclaimed powder contaminated with other powders from within the reclaim system e.g. ductwork, cyclone, booth etc.
Airborne contamination within the oven.
Dust or dirt dislodged from jigs or conveyor.
CO
NT
AM
INA
TIO
N O
F SU
RFA
CE
W
ITH
SPE
CK
S O
F O
TH
ER
C
OL
OU
RS
Dusty environment before or after coating.
Dirty or contaminated powder. Dirty or contaminated substrate (workpiece). Rusty substrate. Dusty environment before or after coating. Dust or dirt in oven. L
UM
PS O
R
PRO
TR
USI
ON
S O
N
SUR
FAC
E
Dust or dirt dislodged from jigs or conveyor.
Applied coating is too thick.
Incorrect cure cycle and/or temperature.
HE
AV
Y
“OR
AN
GE
PE
EL
”
Inferior quality powder.
Contamination of substrate. Contamination of powder.
FISH
E
YE
S
Contamination of compressed air supply eg. Silicone. Poor cleaning of substrate e.g. trapped oils or solvents. Wet components e.g. water trapped in corners or joints. Contamination of powder.
CR
AT
ER
S A
ND
VO
IDS
Contamination of substrate. Porous substrate e.g. expansion or air or solvents from porosity or cavities in castings during curing cycle. Pre-heating of the workpiece may help Excessive electrostatic charge applied to the powder. To overcome, reduce the discharge voltage and/or increase the spraying distance. Rusty substrate. Contamination of substrate, powder, air supply or from dirty surroundings. PI
N-H
OL
ING
AN
D
BU
BB
LE
S
Excessive moisture in compressed air supply. Refer to pneumatic data in specifications.
NOTE:- Contamination may be caused by airborne vapour such as wet paint, airline or conveyor oil or stripping facilities. NOTE:- Silicones and acrylic paints are the worst offenders and can contaminate the powder and/or substrate.
400 SERIES LAB UNIT 14
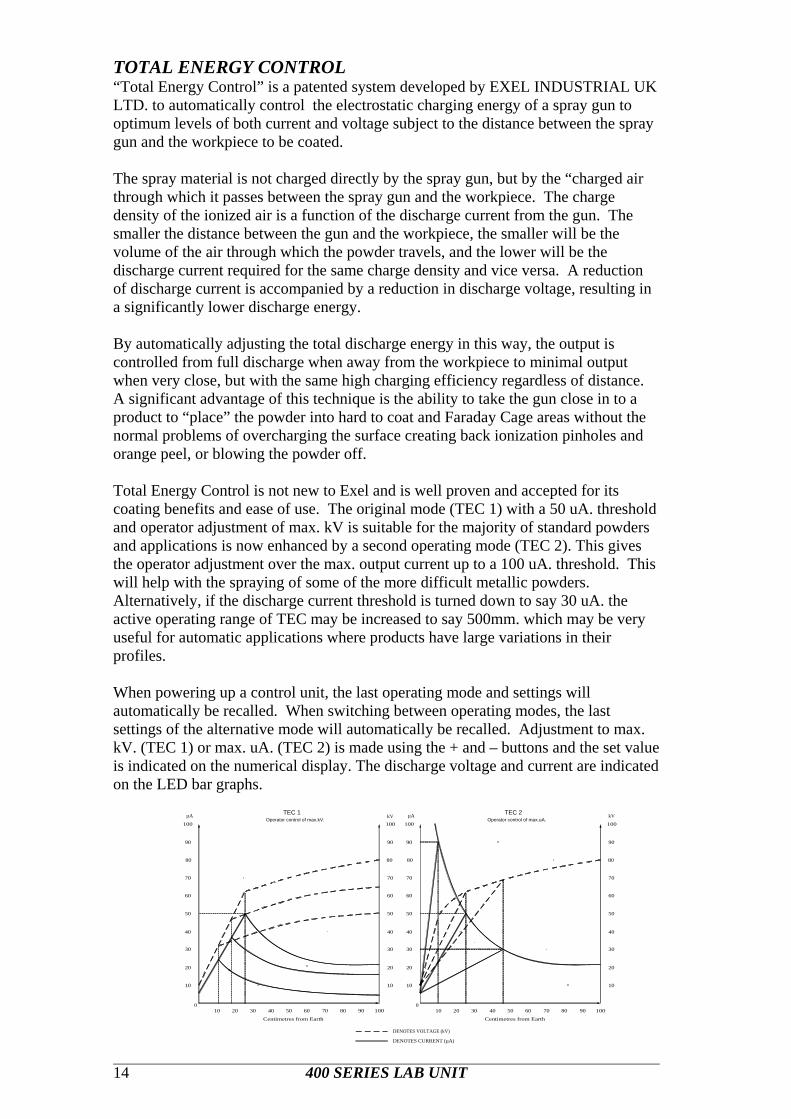
TOTAL ENERGY CONTROL “Total Energy Control” is a patented system developed by EXEL INDUSTRIAL UK LTD. to automatically control the electrostatic charging energy of a spray gun to optimum levels of both current and voltage subject to the distance between the spray gun and the workpiece to be coated. The spray material is not charged directly by the spray gun, but by the “charged air through which it passes between the spray gun and the workpiece. The charge density of the ionized air is a function of the discharge current from the gun. The smaller the distance between the gun and the workpiece, the smaller will be the volume of the air through which the powder travels, and the lower will be the discharge current required for the same charge density and vice versa. A reduction of discharge current is accompanied by a reduction in discharge voltage, resulting in a significantly lower discharge energy. By automatically adjusting the total discharge energy in this way, the output is controlled from full discharge when away from the workpiece to minimal output when very close, but with the same high charging efficiency regardless of distance. A significant advantage of this technique is the ability to take the gun close in to a product to “place” the powder into hard to coat and Faraday Cage areas without the normal problems of overcharging the surface creating back ionization pinholes and orange peel, or blowing the powder off. Total Energy Control is not new to Exel and is well proven and accepted for its coating benefits and ease of use. The original mode (TEC 1) with a 50 uA. threshold and operator adjustment of max. kV is suitable for the majority of standard powders and applications is now enhanced by a second operating mode (TEC 2). This gives the operator adjustment over the max. output current up to a 100 uA. threshold. This will help with the spraying of some of the more difficult metallic powders. Alternatively, if the discharge current threshold is turned down to say 30 uA. the active operating range of TEC may be increased to say 500mm. which may be very useful for automatic applications where products have large variations in their profiles. When powering up a control unit, the last operating mode and settings will automatically be recalled. When switching between operating modes, the last settings of the alternative mode will automatically be recalled. Adjustment to max. kV. (TEC 1) or max. uA. (TEC 2) is made using the + and – buttons and the set value is indicated on the numerical display. The discharge voltage and current are indicated on the LED bar graphs. µA
Centimetres from Earth
0
100
100
50
50
10
20
30
40
60
70
80
90
10 20 30 40 60 70 80 90
DENOTES VOLTAGE (kV)
DENOTES CURRENT (µA)
Centimetres from Earth
0
100
100
50
50
10
20
30
40
60
70
80
90
10 20 30 40 60 70 80 90
100
50
10
20
30
40
60
70
80
90
kV100
50
10
20
30
40
60
70
80
90
kVµATEC 1Operator control of max.kV.
TEC 2Operator control of max.uA.

400 SERIES LAB UNIT 15
EU
R0T
EC
TY
PE
GC
U 4
00
Ser
ial N
o.
INP
UT
: 1
00
- 2
60
V50 -
60 H
z. 1
PH
AS
E 3
5W
OU
TP
UT
: 14V
.Max
. 500
mA
.Max
.N
EG
AT
IVE
AIR
IN: 7
Bar
Max
.
WA
RN
ING
T HIS
EQ
UIP
ME
NT
MU
ST
BE
EA
RTH
ED
EE
x ia
T6
IP54
MA
DE
INE
NG
LAN
D
0.6
A6
A
0.6
A
6A
GU
N A
IR S
UP
PLY
OU
TLE
T
PO
WD
ER
DIL
UTI
ON
AIR
SU
PP
LY O
UTL
ET
PO
WD
ER
DE
LIV
ER
YK
AIR
SU
PP
LY O
UTL
ET
MA
INS
ELE
CTR
ICA
L IN
PU
T (A
RR
OW
PO
INTS
TO
WA
RD
S C
ON
NE
CTO
R)
MA
INS
ELE
CTR
ICA
L O
UTP
UT
(AR
RO
W P
OIN
TS A
WA
Y F
RO
M C
ON
NE
CTO
R)
ELE
CTR
ICA
L O
UTP
UT
TO G
UN
ELE
CTR
ICA
L IN
PU
T FR
OM
RE
MO
TE T
RIG
GE
R
EA
RTH
CO
NN
EC
TIO
N P
OIN
T
CIR
CU
IT B
RE
AK
ER
- G
EN
ER
ATO
R S
UP
PLY
CIR
CU
IT B
RE
AK
ER
- S
LAV
E O
UTP
UT
MA
IN A
IR S
UP
PLY
IN (A
RR
OW
PO
INTS
TO
WA
RD
S C
ON
NE
CTI
ON
)
FLU
ID B
ED
/ A
UX
. AIR
SU
PP
LY O
UT
VIB
RA
TOR
/ FL
UID
ISIN
G P
AD
AIR
SU
PP
LY O
UT
(AR
RO
W P
OIN
TS A
WA
Y F
RO
M (C
ON
NE
CTI
ON
)
(AR
RO
W P
OIN
TS A
WA
Y F
RO
M (C
ON
NE
CTI
ON
)
euro
tec
-
GCU
400
1+
MODE0
4060
8020
100
uAkV
TEC1
- kV
TEC2
- uA
AT
kV uA
TEC1
- kV
TEC2
- uA
AT
MODE - +
GU
N A
IR S
UPP
LY
POW
DER
DIL
UTI
ON
AIR
SU
PPLY
POW
DER
DEL
IVER
Y AI
R S
UPP
LY
0
0 1
UN
IT O
FF
UN
IT O
N -
POW
DER
& E
LEC
TRO
STAT
ICS
ON
WH
EN G
UN
SWIT
CH
OPE
RAT
EDU
NIT
ON
WIT
HO
UT
ELEC
TRO
STAT
ICS
WH
EN G
UN
TR
IGG
ER
BAR
GR
APH
DIS
PLAY
OF
DIS
CH
ARG
E KI
LO V
OLT
S
BAR
GR
APH
DIS
PLAY
OF
DIS
CH
ARG
E M
ICR
O A
MPS
ILLU
MIN
ATED
WH
EN T
OTA
L EN
ERG
Y C
ON
TRO
L M
OD
E 2
SEL
ECTE
D
ILLU
MIN
ATED
WH
EN U
NIT
TR
IGG
ERED
BY
MAN
UAL
GU
N O
R R
EMO
TE P
LC
ILLU
MIN
ATED
WH
EN A
UTO
GU
N C
ON
NEC
TED
PUSH
BU
TTO
N S
ELEC
TOR
SW
ITC
H F
OR
TEC
1 O
R T
EC 2
PUSH
BU
TTO
N S
WIT
CH
TO
RED
UC
E EL
ECTR
OST
ATIC
OU
TPU
T
PUSH
BU
TTO
N S
WIT
CH
TO
INC
REA
SE E
LEC
TRO
STAT
IC O
UTP
UT
OPE
RAT
OR
CO
NTR
OL
OF
uA
ILLU
MIN
ATED
WH
EN T
OTA
L EN
ERG
Y C
ON
TRO
L M
OD
E 1
SEL
ECTE
D
OPE
RAT
OR
CO
NTR
OL
OF
kV
SET
VALU
E O
F EL
ECTR
OST
ATIC
DIS
CH
ARG
E - k
V (T
EC1)
OR
uA
(TEC
2)
TRIG
GER
SW
ITC
H O
PER
ATED
GC
U-4
00 G
un C
ontr
ol U
nit
Fron
t Pan
el S
ymbo
ls E
xpla
natio
n Ill
ustra
tion
No.
600
0242
GC
U-4
00 G
un C
ontr
ol U
nit
Rea
r Pa
nel S
ymbo
ls E
xpla
natio
n Ill
ustra
tion
No.
6000
243

400 SERIES LAB UNIT 16
APPENDIX (i)
ASSEMBLY DRAWINGS
AND PARTS LISTS

400 SERIES LAB UNIT 17
GC
U-4
00 G
un C
ontr
ol U
nit
Gen
eral
Ass
embl
y Pr
oduc
t No.
202
4002
Ill
ustra
tion
No.
600
0203
E
UR
0TE
C T
YP
E G
CU
400
Ser
ial N
o.
INP
UT
: 1
00
- 2
60
V50
- 6
0 H
z. 1
PH
AS
E 3
5WO
UT
PU
T: 1
4V.M
ax. 5
00m
A.M
ax.
NE
GA
TIV
E A
IR IN
: 7 B
ar M
ax.
WAR
NIN
GTH
IS E
QU
IPM
ENT
MUS
T BE
EAR
THED
EE
x ia
T6
IP54
MA
DE
INE
NG
LAN
D
0.6
A6
A
11
468
41817 3
2
1
14
1042
55
31
12
65 5
16 16 16
19 1920
47
2121
2121
2522
2324
3939
3939
4343
4343 44
44
4444
22
264
3040
13
454
272829
29
32
OV
ER
LAP
50m
mB
UTT
ED
TIG
HTL
YTO
GET
HER
( AS
SH
OW
N)
BO
TTO
M S
OC
KE
TIN
SE
RTS
ON
LY
56
'A'
SE
CTI
ON
VIE
W 'A
'
626
4 4
3
22
5253
54
78
15
34
33
3536
3857
372
48
49
50

400 SERIES LAB UNIT 18
GCU-400 Gun Control Unit General Assembly PARTS LIST
Item Part No. Description Qty.
1 2024006 Control PCB 1 2 2024005 Display PCB 1 3 2000007 Manifold, Outlet Block Assy 1 4 2024009 Manifold, Inlet Block Assy 1 5 2000026 Pressure Regulator Assy, 2 Bar 2 6 2010018 Pressure Regulator Assy, 4 Bar 1 7 2024007 Wiring Loom, Mains , GCU 400 1 8 2024008 Wiring Loom, Low Voltage 1 9 10 2024010 Control Box Detail Type, GCU 400 1 11 2024011 Cover, GCU 400 1 12 2024012 Front Panel Overlay, GCU 400 1 13 2024013 Rear Panel Overlay, GCU 400 1 14 2024014 Chassis, 400 PSU/PCB 1 15 2024016 Gauge Support Plate 1 16 2024015 Spacer, Regulator 3 17 2020061 Gasket, Manifold Outlet 1 18 2020060 Gasket, Manifold Inlet 1 19 2024019 Pressure Gauge 30PSI/ 2 Bar 2 20 2024020 Pressure Gauge 60PSI/ 4 Bar 1 21 9000120 Connector Base, Panel Mounting 4 22 9000011 Connector Plug Insert, 3 pin + E 1 23 9000012 Connector Socket Insert, 3 pin + E 1 24 9000013 Connector Socket Insert, 4 pin + E 1 25 9000135 Connector Plug Insert, 4 Pin + E 1 26 9000014 Connector, Protective Cover 4 27 9000016A 0.6A Circuit Breaker 1 28 9000018A 6A Circuit Breaker 1 29 9000019A Circuit Breaker Boot 2 30 9000021 Terminal, Earth Post 1 31 9001322 Switch, Rotary, 2 Pole, 3 Positions 1 32 9000063 Seal Strip, Foam,Self Adhesive,15mmx3mm 1M 33 9000203 Tubing, 4mmODx2.5mmID PU, Black 0.4M 34 9001843 Nylon Airline, 6mm 3M 35 9000052 Straight, 1/8BSPFP – 4mm OD Tube PI 3 36 9000806 Lock Nut, 1/8BSP Brass 3

400 SERIES LAB UNIT 19
Continued:-
Item Part No. Description Qty. 37 2020059 Gasket, Connector Cover 2 38 5000040 Disc, Porous Plastic 6 39 9000832 Washer, M3, Crinkle 4 40 9000862 Washer, M5 Ext. S/P 1 41 42 9000650 Screw, M6 x 8, Skt, Btn Hd, Black 4 43 9000501 Screw, M3 x 6, St. Stl, Pan Hd 4 44 9000500 Screw, M3 x 8, Skt, Cap, Black 8 45 9000551 Screw, M4 x 8, Skt, Btn Hd, Black 4 46 9000600 Screw, M5 x 6, Skt, Csk Hd, Black 8 47 9000801 Nut, M4 Nyloc 5 48 9000855 Washer, 1/8BSP, Nylon, Black 1 49 9000854 Washer, 1/8BSP, Nylon, Blue 1 50 9000853 Washer, 1/8BSP, Nylon, Red 1 51 52 9000205 Label, Warning, Disconnect Mains 1 53 9000008 Cable Ties Base, Self Adhesive 6 54 9000022 Cable Ties, 2.5mm x 100mm 26 55 9001849 PCB Pillars, Display Board, 9.5mm 4 56 9001847 PCB Pillars, Control Unit, 6.4mm 4 57 9001848 PCB Pillars, Gauge Support Plate, 22.2mm 4

400 SERIES LAB UNIT 20
Manifold Inlet Block Assy PARTS LIST
Item Part No. Description 1 2000019 Manifold Inlet Block Detail 2 2000031 Valve, Non-Return 3 2000037 Seal, Non-Return 4 9001746 Banjo 3/8 – 6mm Quad 5 9000038 Valve, Solenoid, 2-2 3/8BSP 24V DC 6 9000042 Washer, Sealing, 3/8BSP, Nylon 7 9000030 Straight, 1/4BSPMT 8mm OD Tube, PI 8 9001880 Blank, 1/4 BSPMP 9 9000041 Straight, 1/8BSPMT 6mm OD Tube, PI 10 9000032 Straight 1/4BSPMT, 3/8BSPMT 11 9000105 Straight 1/4BSPMT 6mm OD Tube, PI 12 9001874 Blank, 1/8BSPMP, Hex, Skt
Manifold Inlet Block Assy GCU-400, Part No. 2024009
Illustration No. 6000208
400 SERIES LAB UNIT 21
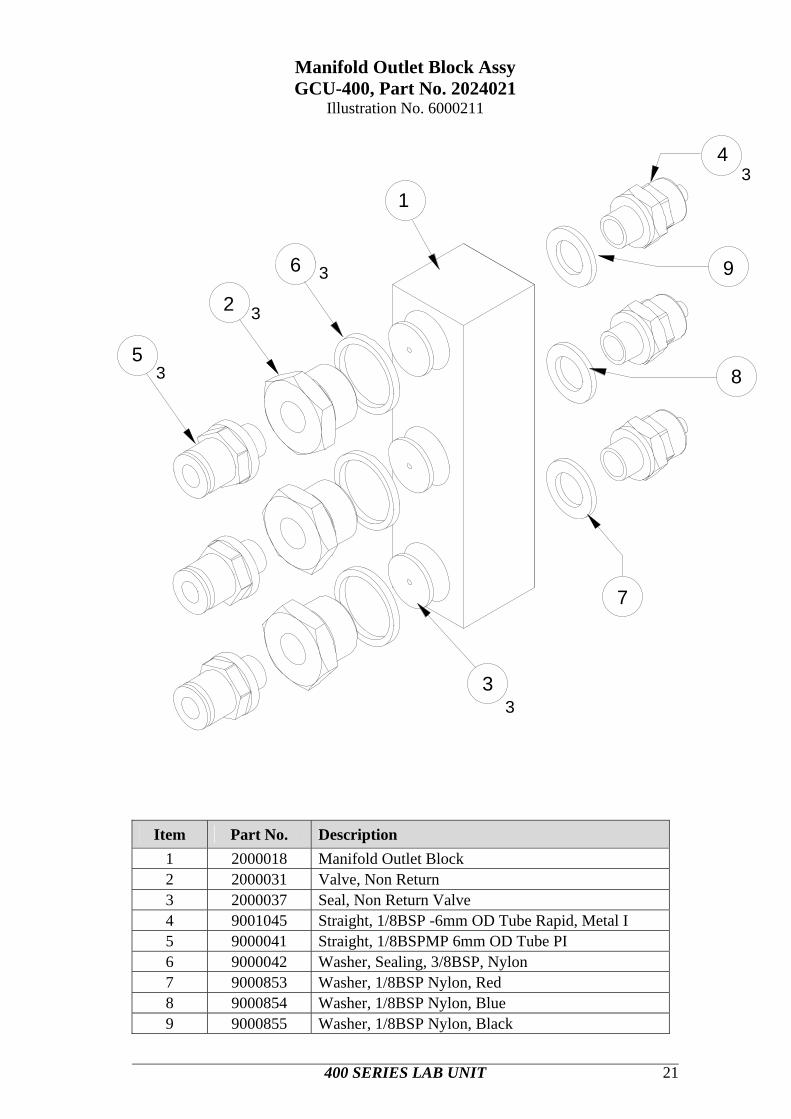
Manifold Outlet Block Assy GCU-400, Part No. 2024021
Illustration No. 6000211
Item Part No. Description 1 2000018 Manifold Outlet Block 2 2000031 Valve, Non Return 3 2000037 Seal, Non Return Valve 4 9001045 Straight, 1/8BSP -6mm OD Tube Rapid, Metal I 5 9000041 Straight, 1/8BSPMP 6mm OD Tube PI 6 9000042 Washer, Sealing, 3/8BSP, Nylon 7 9000853 Washer, 1/8BSP Nylon, Red 8 9000854 Washer, 1/8BSP Nylon, Blue 9 9000855 Washer, 1/8BSP Nylon, Black
5
2
6
3
1
4
7
8
9
3
3
3
3
3

400 SERIES LAB UNIT 22
Item Part No. Description 1 5000050 Disc Porous Plastic 8 x 3.2Thk 2 9000033 Elbow, 1/4BSPMT 6mm OD Short PI 3 9000062 Elbow, 1/8BSPMT 4mm OD Short PI 4 9000112 Pressure Regulator, 4 Bar
Pressure Regulator Assy 4 Bar Part No. 2010018
Illustration No. 6000091
Pressure Regulator Assy 2 Bar Part No. 2000026
Illustration No. 6000090
Item Part No. Description 1 5000050 Disc Porous Plastic 8 x 3.2Thk 2 9000033 Elbow, 1/4BSPMT 6mm OD Short PI 3 9000062 Elbow, 1/8BSPMT 4mm OD Short PI 4 9000111 Pressure Regulator, 2 Bar
1
3
4
22
1
3
4
22

400 SERIES LAB UNIT 23
62
48
19
0000
9
182
317
5
12
+
+
11
10
1
{ MG
400
Man
ual P
owde
r G
un
Gen
eral
Ass
embl
y Pr
oduc
t No:
301
9002
Il
lust
ratio
n N
o: 6
0002
09
400 SERIES LAB UNIT 24
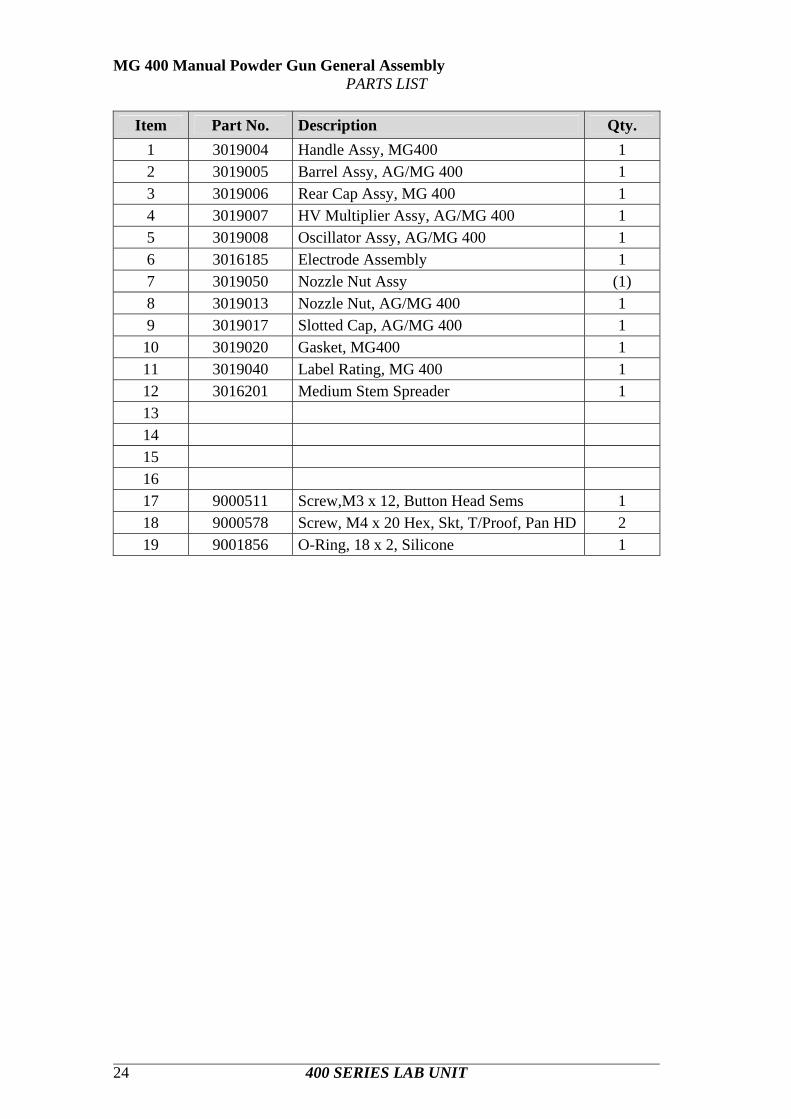
MG 400 Manual Powder Gun General Assembly PARTS LIST
Item Part No. Description Qty.
1 3019004 Handle Assy, MG400 1 2 3019005 Barrel Assy, AG/MG 400 1 3 3019006 Rear Cap Assy, MG 400 1 4 3019007 HV Multiplier Assy, AG/MG 400 1 5 3019008 Oscillator Assy, AG/MG 400 1 6 3016185 Electrode Assembly 1 7 3019050 Nozzle Nut Assy (1) 8 3019013 Nozzle Nut, AG/MG 400 1 9 3019017 Slotted Cap, AG/MG 400 1 10 3019020 Gasket, MG400 1 11 3019040 Label Rating, MG 400 1 12 3016201 Medium Stem Spreader 1 13 14 15 16 17 9000511 Screw,M3 x 12, Button Head Sems 1 18 9000578 Screw, M4 x 20 Hex, Skt, T/Proof, Pan HD 2 19 9001856 O-Ring, 18 x 2, Silicone 1

400 SERIES LAB UNIT 25
+
+
+
+
+
150.
0
{
{M
G 4
00 M
anua
l Pow
der
Gun
H
andl
e A
ssem
bly,
Par
t No.
301
9004
Ill
ustra
tion
No.
600
0210

400 SERIES LAB UNIT 26
MG 400 Gun Handle Assembly PARTS LIST
Item Part No. Description Qty.
1 3019033 Handle, Sub Assy, MG 400 1 2 3019009 Wiring Assy, MG 400 1 3 3019011 Elbow, MG 400 1 4 3019012 Trigger, MG 400 1 5 3019024 Powder Tube, MG 400 1 6 3019025 Powder Tail, MG 400 1 7 3019026 Latch Ring, AG/MG 400 1 8 3019027 Air Connector, Barrel, AG/MG 400 1 9 3019028 Air Connector, Handle, MG 400 1 10 3019048 Powder Tail Assy. (1) 11 3019049 Air Connector Assy (1) 12 9000501 Screw, M3 x 6 Pan HD 1 13 9000513 Screw, M3 x 20 Pozi, HD 3 14 9001853 Spring, Compression, Trigger 2 15 9001860 O-Ring, 3 x 1 Silicone 1 16 9001863 O-Ring, 12 x 2 Viton 1 17 9000203 Tubing, 4mm OD x 2.5mm ID, PU 0.15M
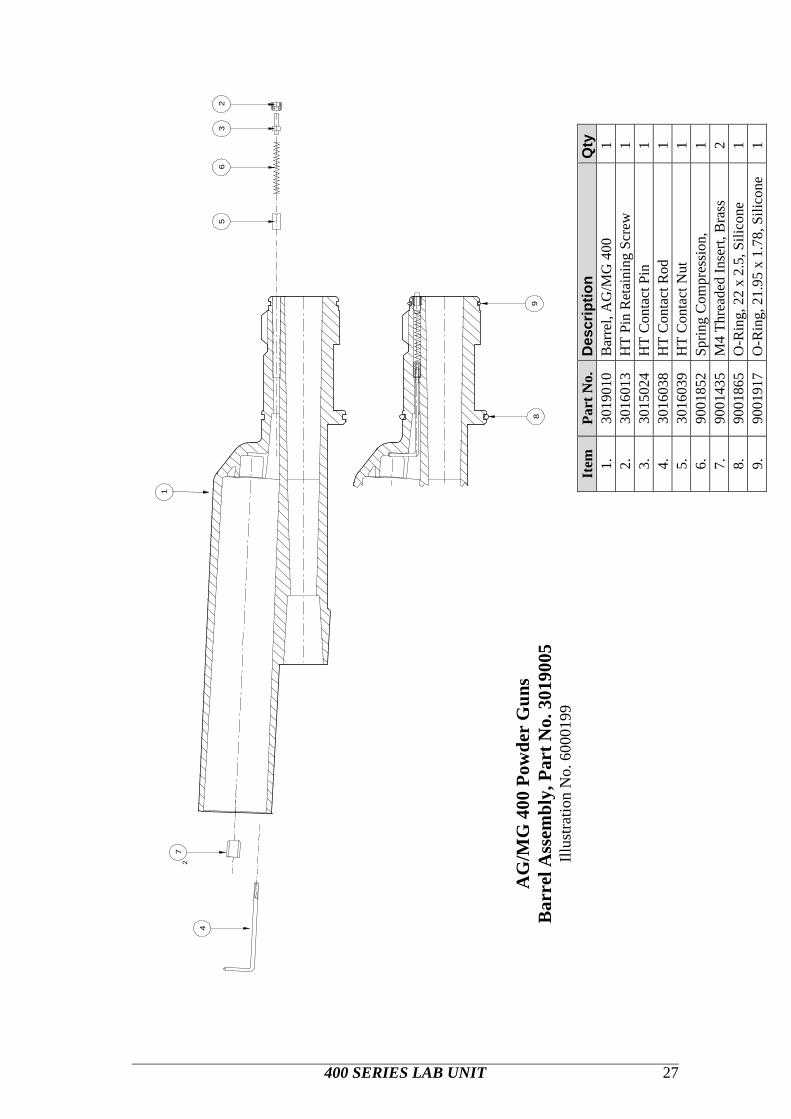
400 SERIES LAB UNIT 27
5
2
63
2
1
7
4
89
AG
/MG
400
Pow
der
Gun
s B
arre
l Ass
embl
y, P
art N
o. 3
0190
05
Illus
tratio
n N
o. 6
0001
99
Qty
1 1 1 1 1 1 2 1 1
Des
crip
tion
Bar
rel,
AG
/MG
400
H
T Pi
n R
etai
ning
Scr
ew
HT
Con
tact
Pin
H
T C
onta
ct R
od
HT
Con
tact
Nut
Sp
ring
Com
pres
sion
, M
4 Th
read
ed In
sert,
Bra
ss
O-R
ing,
22
x 2.
5, S
ilico
ne
O-R
ing,
21.
95 x
1.7
8, S
ilico
ne
Part
No.
30
1901
0 30
1601
3 30
1502
4 30
1603
8 30
1603
9 90
0185
2 90
0143
5 90
0186
5 90
0191
7
Item
1.
2.
3.
4.
5.
6.
7.
8.
9.
400 SERIES LAB UNIT 28
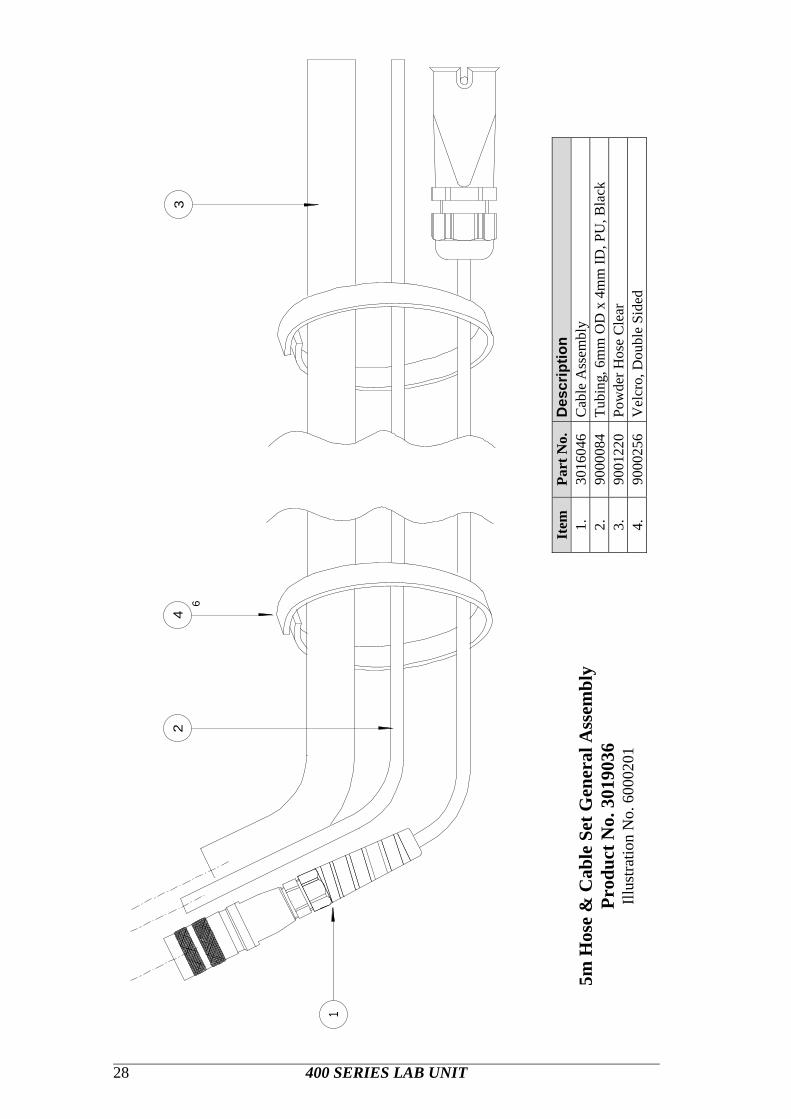
5m H
ose
& C
able
Set
Gen
eral
Ass
embl
y Pr
oduc
t No.
301
9036
Ill
ustra
tion
No.
600
0201
Des
crip
tion
Cab
le A
ssem
bly
Tubi
ng, 6
mm
OD
x 4
mm
ID, P
U, B
lack
Po
wde
r Hos
e C
lear
V
elcr
o, D
oubl
e Si
ded
Part
No.
30
1604
6 90
0008
4 90
0122
0 90
0025
6
Item
1.
2.
3.
4.
1
24
36

400 SERIES LAB UNIT 29
NOZZLE NUT ASSY, Pt. No. 3019050
ELECTRODE ASSEMBLY Pt. No. 3016185
SLOTTED CAP - 6mm, Pt. No. 3019017
STEM DEFLECTOR, SMALL Pt. No. 3016200
STEM DEFLECTOR, MEDIUM Pt. No. 3016201
STEM DEFLECTOR, LARGE Pt. No. 3016202
3 45
8
9
10
7
SLOTTED CAP - 4mm Pt. No. 3022019
6
21
Nozzle Components
Automatic & Manual Powder Guns Illustration No. 6000202
Item Part No. Description 1 3019013 Nozzle Nut 2 9001856 O-Ring 3 3016158 Moulded Electrode 4 3016171 Electrode Support 5 3016172 Electrode 6 3022019 Slotted Cap – 4mm 7 3019017 Slotted Cap - 6mm 8 3016200 Deflector, Small 9 3016201 Deflector, Medium
10 3016202 Deflector, Large
400 SERIES LAB UNIT 30
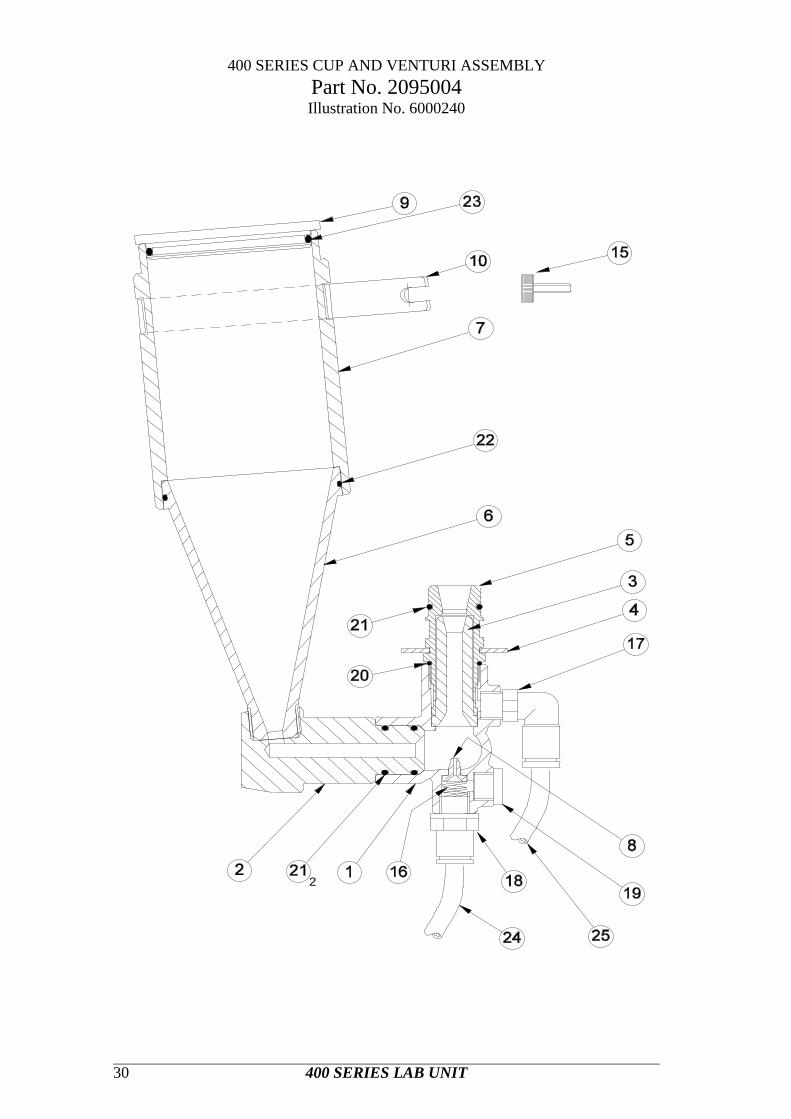
400 SERIES CUP AND VENTURI ASSEMBLY Part No. 2095004 Illustration No. 6000240
2

400 SERIES LAB UNIT 31
MG 400 Cup and Venturi Assembly PARTS LIST
1 2095010 Venturi Body, 400 Series 1 2 2095025 Cup Spigot, 400 Lab Unit 1 3 2095026 Venturi Insert, 400 Lab Unit 1 4 2095027 Earthing Disc 1 5 2095028 Venturi Tail 1 6 2095029 Cup, 400 Lab Unit 1 7 2095030 Cup Extension, 400 Lab Unit 1 8 2095031 Venturi Jet, 400 Lab Unit 1 9 2095032 Cup Lid, 400 Lab Unit 1 10 3016108 Cup Body Clamp 1 11 12 13 14 15 9001944 M3 X 10 Thumbscrew 1 16 9001855 Spring, Compression 1 17 9000031 Elbow, 1/8 bspmt - 06mm. OD. Tube Short PI. 1 18 9000041 Straight, 1/8 bspmt - 06mm. OD. Tube PI. 1 19 9001083 Plug, 1/8 bsp 1 20 9001861 O - Ring 15 X 1 Nitrile 1 21 9001863 O-Ring 12 x 2 Viton 3 22 9001935 O - Ring 032 1 23 9001036 O - Ring 133 1 24 9000168 Tubing, 06mm. OD. X 04mm. ID. Red 3 Mtr. 25 9000169 Tubing, 06mm. OD. X 04mm. ID. Blue 3 Mtr. 26 9000256 Velcro Tape, Black 25mm. Wide. 0.25 Mtr.

400 SERIES LAB UNIT 32
APPENDIX (ii)
SCHEMATIC DIAGRAMS

400 SERIES LAB UNIT 33
z
0,0 Ref
1
C 2003
EUR
OTEC
STATIC C
ON
TRO
LLER
STAT
IC-E
N
AUTO
-SW
GU
N-S
W
0V
10V-
REF
10V
AIR
-ON
0V
PSU
-OU
T
+5 V
OLT
GN
D
+24
VOLT
PLC
+24V
PLC
0V
0,0 Ref
EUROTEC STATIC CONTROLLER DISPLAY BOARD C 2003
0V0V
+5 V
dc
+24
V dc
GN
D
NL
1234E1234E
75
1
31
123E
123E
CO
NTR
OL
PCB
400
SER
IES
Pt. N
o. 2
0240
06
DIS
PLAY
PC
B40
0 SE
RIE
SPt
. No.
202
4005
POW
ER S
UPP
LY40
0 SE
RIE
SPt
. No.
202
4014
RIB
BON
CAB
LE
SOLE
NO
ID
VALV
E24
V dc
.
SKT
1 10
0-24
0V 5
0/60
Hz.
SUPP
LY
PL 1
SLAV
E O
UTP
UT
AS S
UPP
LY IN
6ACB1
0.6A
CB2
SW1
SKT
2TO
SPR
AY G
UN
LIVE
NEU
TRAL0V
TRIG
GER
OSC
ILLA
TOR
EAR
TH
AUTO
SEN
SE
PL2
REM
OTE
I/P
EAR
TH
LIVE
NEU
TRAL
EAR
TH
PLC
0V0V
PLC
+24
V dc
TRIG
GER
PRO
GR
AMM
ING
CO
NN
ECTO
RJ4
J2SE
RIA
L C
OM
MS.
JI U1
J5 J3OIS/B
26
VIO
LET
GR
EY
RED
WH
ITE
RED
GR
EEN
VIO
LET
OR
ANG
E / R
ED
GR
EY
OR
ANG
E / R
ED
OR
ANG
E
BLAC
K
YELL
OW
WH
ITE
VIO
LET
OR
ANG
E / B
LAC
K
PIN
K
VIO
LET
RED
GR
EEN
PIN
K
OR
ANG
E
BLAC
K
YELL
OW
RED
BLU
ER
EDR
EDBR
OW
N
BRO
WN
BLU
E
BRO
WN
BLU
E
Gun
Con
trol
Uni
t - 4
00
Mai
ns V
olta
ge &
Low
Vol
tage
W
irin
g D
iagr
am
Illus
tratio
n N
o. 6
0002
04

400 SERIES LAB UNIT 34
PNEUMATIC DIAGRAM
400 Series Lab Unit Illustration No. 6000241
BLUE
RED
WHITE
1
2
3
4
OV
TRIGGER SWITCH
OSC
1
2
3
4
BLUE
WHITE
RED
GREEN
Manual Powder Gun Wiring Diagram, Oscillator PCB
Illustration No. 6000206

400 SERIES LAB UNIT 35
APPENDIX (iii)
WARNING LABELS
SERIAL/YEAR:-
WARNINGTHIS EQUIPMENT
MUST BE EARTHED
50/60 SINGLE PHASE
200mA AT 230V
45 VA (FULL LOAD POWER CONSUMPTION)
INPUT:-
0 - 100uA
800mA (MAX)13.5VDC (MAX) OUTPUT:-
10 - 85kVGUN OUTPUT:-
0518
Sira 03ATEX5416XEN 50050EEx 2 mJ
II 2 D
IP54 T 50°C
100 - 240 VAC
400mA AT 115V
EXEL INDUSTRIAL (UK) LTD, WIGAN, UK.
Part No: 3019002Serial / Year
Wigan, UK
IP54 OUTPUT85kV (-ve) Max
100 uA Max
T 50°C
EN 50050EEx 2 mJ
0518 II 2 D
Sira 03ATEX5416X
Exel Industrial (UK) Ltd.
Sira Warning Labels Illustration No. 6000245
400 SERIES LAB UNIT
GCU 400 – Referred to Drawing No 2024002.
Page No. 23
Manual Powder Gun 400 – Referred to Drawing No 3019002
Page No. 31

400 SERIES LAB UNIT 36
NOTES: