exercise 1 – freebsd installation announced date: 2006/9/20 due date: 2005/10/4
Post on 19-Dec-2015
216 views
TRANSCRIPT

Exercise 1 –Exercise 1 –FreeBSD InstallationFreeBSD Installation
Announced Date: 2006/9/20
Due Date: 2005/10/4

Com
pu
ter C
en
ter, C
S, N
CTU
2
Outline Outline
FreeBSD version Installing FreeBSD Update source and make world Rebuild kernel

Com
pu
ter C
en
ter, C
S, N
CTU
3
FreeBSD branchesFreeBSD branches
Two parallel development branches:• -STABLE
Receive only well-tested bug fixes and other small incremental enhancement
Latest Release version:– 5.5 May, 2006
– 6.1 May, 2006
• -CURRENT Latest working sources for FreeBSD Latest Release version:
– 7.0-CURRENT

Com
pu
ter C
en
ter, C
S, N
CTU
4
FreeBSD versionFreeBSD version
A.B.C – Type• A: major version Number• B: minor version Number• C: slight patch version number• Type: version type
SNAP ALPHA 、 BETA 、 GAMMA RELEASE RELENG STABLE CURRENT
Snapshot AlphaBetaGamma
Release Releng Stable

Com
pu
ter C
en
ter, C
S, N
CTU
5
FreeBSD view of Disk (1)FreeBSD view of Disk (1)
What is the meaning of ad0s1e• Disk name
IDE: ad SCSI: da
• Slice is equal to the partition of common use
Primary partition: s1 ~ s4 Extended partition: s5 ~ sn
• Label in each slice a: root partition b: swap c: entire disk d: entire partition efgh: /usr, /home, …
MBR
Slice 1 (/dev/ad0s1)
Slice 2 (/dev/ad0s2)
Slice 3 (/dev/ad0s3)
Slice 4 (/dev/ad0s4)
Slice 5(/dev/ad0s5)
Slice 6(/dev/ad0s6)

Com
pu
ter C
en
ter, C
S, N
CTU
6
FreeBSD view of Disk (2)FreeBSD view of Disk (2)
D-Disk NTFS
Linux Swap
MBR
Slice 1 (ad0s1)
Slice 2 (ad0s2)
Slice 3 (ad0s3)
Slice 4
(ad0s4)
Windows XP (NTFS)
disklabel
ad0s3a
ad0s3b
ad0s3c
ad0s3d
ad0s3e
/ (root)
swap
/home
Extended Partiton
Linux (EXT3FS)
An Example

Com
pu
ter C
en
ter, C
S, N
CTU
7
Installing FreeBSDInstalling FreeBSD
Steps1. Knowing your hardware
2. Obtaining installation file
3. Booting from CD
4. sysinstall main menu
5. Custom Installation Options1. Partition
2. Label
3. Distribution
4. Media
5. Commit
6. Post Installation

Com
pu
ter C
en
ter, C
S, N
CTU
8
Installing FreeBSD –Installing FreeBSD –1. knowing your hardware 1. knowing your hardware
CPU• 32bit or 64bit• Intel 、 AMD or other brand• Pentium-II, Pentium4, Xeon, XP1700+, Optron, C3
RAM• Size
HD• Size, amount, SCSI or IDE
VGA• Brand, ram size
Sound• Brand
Network Interface Card• Brand• IP 、 Netmask 、 default gateway 、 Hostname 、 DNS
Other Special device

Com
pu
ter C
en
ter, C
S, N
CTU
9
Installing FreeBSD –Installing FreeBSD –2. Obtaining installation file2. Obtaining installation file
FreeBSD installation CD
• ftp://freebsd.csie.nctu.edu.tw/pub/ISO-IMAGES-i386/6.1/6.1-RELEASE-i386-bootonly.iso
• ftp://freebsd.csie.nctu.edu.tw/pub/ISO-IMAGES-i386/6.1/6.1-RELEASE-i386-disc1.iso
• Burn!
Boot Floppy Image
• ftp://freebsd.csie.nctu.edu.tw/pub/releases/i386/6.1-RELEASE/floppies/boot.flp
• ftp://freebsd.csie.nctu.edu.tw/pub/tools/fdimage.exe• C:\fdimage.exe boot.flp a:\

Com
pu
ter C
en
ter, C
S, N
CTU
10
Installing FreeBSD –Installing FreeBSD –3. Booting from CD3. Booting from CD

Com
pu
ter C
en
ter, C
S, N
CTU
11
Installing FreeBSD –Installing FreeBSD –4. sysinstall Main Menu4. sysinstall Main Menu
You can press “Scroll Lock” key to see probe results.
sysinstall Main Menu• Contry Selection “Taiwan”
• Console Keymap “USA ISO”
• Choose “Custom”

Com
pu
ter C
en
ter, C
S, N
CTU
12
Installing FreeBSD –Installing FreeBSD –5. Custom Installation Options5. Custom Installation Options
5 major steps1. Partition your disk
2. Label your disk
3. Choose what to install
4. Choose how to install
5. Commit

Com
pu
ter C
en
ter, C
S, N
CTU
13
Installing FreeBSD –Installing FreeBSD –5. Custom Installation – partition (1)5. Custom Installation – partition (1)
Create slice and choose boot manager• Press “C” to create a new slice or press “A” to use entire disk
• Press “S” to toggle ad0s1 as bootable (we will put / on this slice)
• Press “Q” to next step (Select Boot Manager)
Com
pu
ter C
en
ter, C
S, N
CTU
14
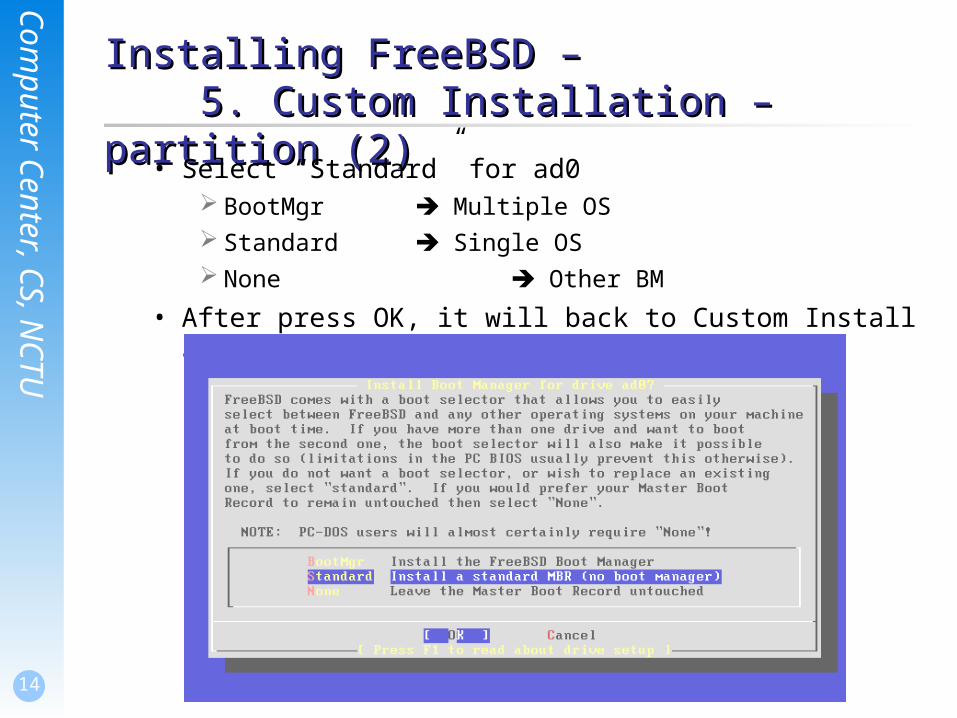
Installing FreeBSD –Installing FreeBSD –5. Custom Installation – partition (2)5. Custom Installation – partition (2)
• Select “Standard” for ad0 BootMgr Multiple OS Standard Single OS None Other BM
• After press OK, it will back to Custom Installation Options menu

Com
pu
ter C
en
ter, C
S, N
CTU
15
Installing FreeBSD –Installing FreeBSD –5. Custom Installation – partition (3)5. Custom Installation – partition (3)
If you have more than one disk…• You can choose whether to partition it.
• Install “BootMgr” for first disk and “none” for rest ones

Com
pu
ter C
en
ter, C
S, N
CTU
16
Installing FreeBSD –Installing FreeBSD –5. Custom Installation – Label (1)5. Custom Installation – Label (1)
Disklabel Editor• Move blue bar to select slice
• Press “C” to create disk label swap , / ( and /home, /var, …)
– Specify size
– Choose type (either swap or FS)
– Specify mount point
• Press “S” to toggle SoftUpdates (async written to disk)
• Press “Q” to next step (back to custom installation options menu)

Com
pu
ter C
en
ter, C
S, N
CTU
17
Installing FreeBSD –Installing FreeBSD –6. Custom Installation – Label (2)6. Custom Installation – Label (2)
• Create label in ad0 and specify size

Com
pu
ter C
en
ter, C
S, N
CTU
18
Installing FreeBSD –Installing FreeBSD –6. Custom Installation – Label (3)6. Custom Installation – Label (3)
• Complete disklabel
Com
pu
ter C
en
ter, C
S, N
CTU
19
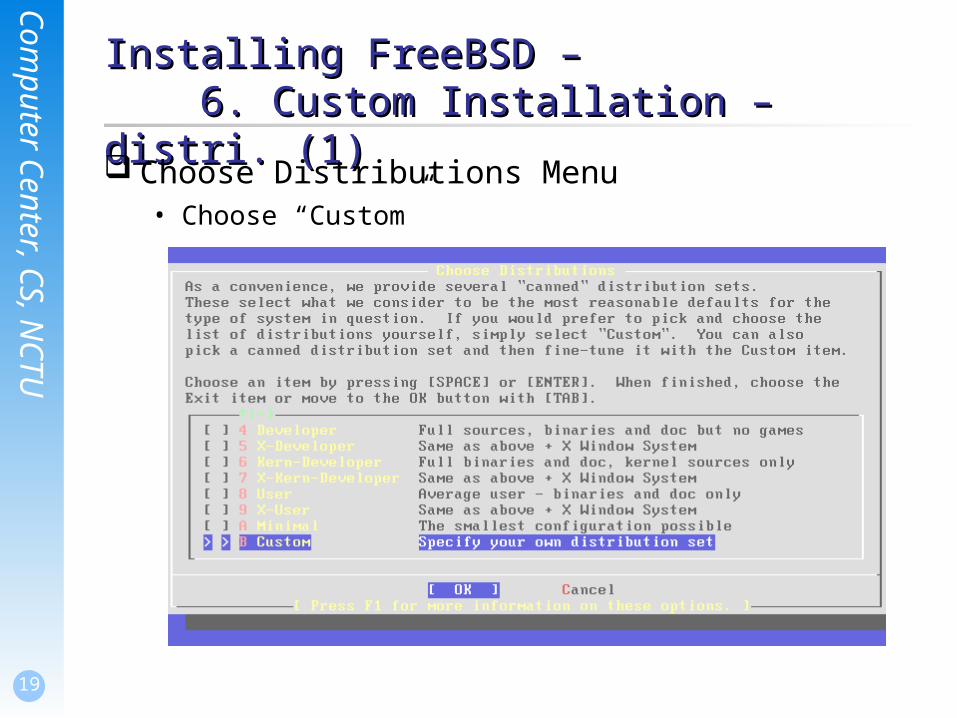
Installing FreeBSD –Installing FreeBSD –6. Custom Installation – distri. (1)6. Custom Installation – distri. (1)
Choose Distributions Menu• Choose “Custom”

Com
pu
ter C
en
ter, C
S, N
CTU
20
Installing FreeBSD –Installing FreeBSD –6. Custom Installation – distri. (2)6. Custom Installation – distri. (2)
Select • base ; binary
• kernels(all) ; Generic kernel and SMP kernel
• Man ; Manual
• src ; FreeBSD Source Code
• ports ; FreeBSD Software Collection
• local ; local additions
After Selection• Press “OK” and it will return to “Choose Distributions menu”
• Press “OK” again to back to “Custom Installation Options menu”
• Select “Media”

Com
pu
ter C
en
ter, C
S, N
CTU
21
Installing FreeBSD –Installing FreeBSD –6. Custom Installation – distri. (3)6. Custom Installation – distri. (3)

Com
pu
ter C
en
ter, C
S, N
CTU
22
Installing FreeBSD –Installing FreeBSD –6. Custom Installation – Media (1)6. Custom Installation – Media (1)
• Choose CD/DVD if you have 6.1 Stable CD
• Choose FTP if your NIC is detected Choose FTP Passive if you in private network

Com
pu
ter C
en
ter, C
S, N
CTU
23
Installing FreeBSD –Installing FreeBSD –6. Custom Installation – Media (2)6. Custom Installation – Media (2)
Install through FTP• Specify ftp server and path

Com
pu
ter C
en
ter, C
S, N
CTU
24
Installing FreeBSD –Installing FreeBSD –6. Custom Installation – Media (3)6. Custom Installation – Media (3)
• Select NIC
• IPv6 and DHCP

Com
pu
ter C
en
ter, C
S, N
CTU
25
Installing FreeBSD –Installing FreeBSD –6. Custom Installation – Media (4)6. Custom Installation – Media (4)
• Specify your IP information
• Press “OK” to next step

Com
pu
ter C
en
ter, C
S, N
CTU
26
Installing FreeBSD –Installing FreeBSD –6. Custom Installation – Commit6. Custom Installation – Commit
Start to format disk 、 make file system and install software You can press “Alt + F2” to see the install detail

Com
pu
ter C
en
ter, C
S, N
CTU
27
Installing FreeBSD –Installing FreeBSD –7. Post Installation (1)7. Post Installation (1)

Com
pu
ter C
en
ter, C
S, N
CTU
28
Installing FreeBSD –Installing FreeBSD –7. Post Installation (2)7. Post Installation (2)
Root Password Time Zone Asia Taiwan Mouse enable Networking sshd Packages (optional)
• net/csup
• editors/vim-lite

Exercise 1 –Exercise 1 –FreeBSD build world and kernelFreeBSD build world and kernel

Com
pu
ter C
en
ter, C
S, N
CTU
30
FreeBSD sourceFreeBSD source
Maintained in a CVS repository in California • Two softwares to get the latest FreeBSD source
CVSup CSup – A rewrite of the CVSup file updating client in C
We can use CSup keep our FreeBSD source up-to-date with any FreeBSD mirror sites• Install CSup• Edit CSup supfile• Update source using CSup
Up-to-date your system• Build world & kernel using the updated source.• Install softwares.• Upgrade softwares.

Com
pu
ter C
en
ter, C
S, N
CTU
31
FreeBSD sourceFreeBSD source CSup InstallationCSup Installation
Install via pkg_add• Package is pre-compiled application
• % pkg_add ftp://freebsd.csie.nctu.edu.tw/pub/releases/i386/6.1-RELEASE/packages/net/csup-20060223_1.tbz
• pkg_add package-name
• pkg_delete package-name
• pkg_info package-name
• All installed package is stored in /var/db/pkg
The csup binary is in /usr/local/bin/csup• You can use “whereis” command to find something

Com
pu
ter C
en
ter, C
S, N
CTU
32
FreeBSD sourceFreeBSD sourceCSup Configuration file (1)CSup Configuration file (1)
Example csup supfile• /usr/share/examples/cvsup/stable-supfile
• /usr/share/examples/cvsup/ports-supfile
Create your own supfile• Edit /usr/local/etc/cvsup-src
• Edit /usr/local/etc/cvsup-ports

Com
pu
ter C
en
ter, C
S, N
CTU
33
FreeBSD sourceFreeBSD sourceCSup Configuration file (2)CSup Configuration file (2)
/usr/local/etc/cvsup-src
*default host=freebsd.csie.nctu.edu.tw Where to get source*default base=/usr Where to put status file*default prefix=/usr Where to put source*default delete use-rel-suffix Allow cvs to delete*default compress Compress before trans
mit*default release=cvs tag=RELENG_6src-all

Com
pu
ter C
en
ter, C
S, N
CTU
34
FreeBSD sourceFreeBSD sourceCSup Configuration file (3)CSup Configuration file (3)
CVS tags• Branch Tags
. (FreeBSD-CURRENT line) RELENG_6 (FreeBSD 6-STABLE line) RELENG_5 (FreeBSD 5-STABLE line)
• Release Tags RELENG_6_1 (FreeBSD 6.1-RELEASE) RELENG_5_5 (FreeBSD 5.5-RELEASE)
• To refer to a specific point in time RELENG_6_1_0_RELEASE RELENG_5_5_0_RELEASE
http://www.freebsd.org/doc/en_US.ISO8859-1/books/handbook/cvs-tags.html

Com
pu
ter C
en
ter, C
S, N
CTU
35
FreeBSD sourceFreeBSD sourceCSup Configuration file (4)CSup Configuration file (4)
/usr/local/etc/cvsup-ports
*default host=freebsd.csie.nctu.edu.tw*default base=/usr*default prefix=/usr*default delete use-rel-suffix*default compress*default release=cvs tag=.ports-all

Com
pu
ter C
en
ter, C
S, N
CTU
36
FreeBSD sourceFreeBSD sourceCSup Configuration file (5)CSup Configuration file (5)
you can put them all together in /usr/local/etc/cvsup-all
*default host=freebsd.csie.nctu.edu.tw*default base=/usr*default prefix=/usr*default delete use-rel-suffix*default compress*default release=cvs tag=RELENG_6src-allports-all tag=.
Com
pu
ter C
en
ter, C
S, N
CTU
37
FreeBSD sourceFreeBSD sourceUpdate source using CSupUpdate source using CSup
Update both src and ports• % /usr/local/bin/csup -L 1 /usr/local/etc/cvsup-all > /var/log/csup.log
The “–L 1” tells cvsup to print out the details of all the file updates it is doing.
from 0 (silent) to 2

Com
pu
ter C
en
ter, C
S, N
CTU
38
Rebuilding world & kernelRebuilding world & kernel
The canonical way to update system• make buildworld
• make buildkernel
• make installkernel
• reboot and boot in single user mode
• mergemaster -p
• make installworld
• mergemaster
• reboot

Com
pu
ter C
en
ter, C
S, N
CTU
39
Rebuilding world & kernel –Rebuilding world & kernel –Prepare make.confPrepare make.conf
Example make.conf • /usr/share/examples/etc/make.conf 5.x ~ 6.x
• Everything add in make.conf is used every time you run make
• KERNCONF=CHBSD
• CPUTYPE?=pentium4
man make.conf has detail descriptions of it
Available CPUTYPE:See /usr/share/mk/bsd.cpu.mk

Com
pu
ter C
en
ter, C
S, N
CTU
40
Rebuilding world & kernel –Rebuilding world & kernel –make buildworldmake buildworld
Build FreeBSD entire system• % cd /usr/src
• % make buildworld >& /var/log/world.log &
make –j n buildworldSpawn multiple (n) processes to do make.The compiling processes of make world is I/O bound.

Com
pu
ter C
en
ter, C
S, N
CTU
41
Rebuilding world & kernel –Rebuilding world & kernel –make buildkernel (1)make buildkernel (1)
Why rebuild kernel?• Faster boot time.
Probe only necessary device
• Lower memory usage Smaller kernel image
• Additional hardware support.

Com
pu
ter C
en
ter, C
S, N
CTU
42
Rebuilding world & kernel –Rebuilding world & kernel –make buildkernel (2)make buildkernel (2)
Edit kernel config file• cd /usr/src/sys/i386/conf
GENERIC may not have all for your system LINT has every options
%use “make LINT” to generte the LINT file
• cp GENERIC “YOUR-NAME” We often use hostname to be “YOUR-NAME”
• edit config file Depend on your system Be attention to related options Following the explanation of
http://www.freebsd.org/doc/en_US.ISO8859-1/books/handbook/kernelconfig-config.html

Com
pu
ter C
en
ter, C
S, N
CTU
43
Rebuilding world & kernel –Rebuilding world & kernel –make buildkernel (3)make buildkernel (3)
Build kernel• % cd /usr/src
• % make KERNCONF=CHBSD buildkernel
If the KERNCONF=“YOUR-NAME”has been set in your make.confYou can use “make buildkernel” instead

Com
pu
ter C
en
ter, C
S, N
CTU
44
Rebuilding world & kernel –Rebuilding world & kernel –make installkernelmake installkernel
Install kernel• % cd /usr/src
• % make KERNCONF=CHBSD installkernel
make buildkernel && make installkernel= make buildkernel installkernel= make kernel

Com
pu
ter C
en
ter, C
S, N
CTU
45
Rebuilding world & kernel –Rebuilding world & kernel –reboot into single user modereboot into single user mode
Boot in single user mode• Press “4”
Or
• % shutdown now For a running system, this will drop it to single user mode

Com
pu
ter C
en
ter, C
S, N
CTU
46
Rebuilding world –Rebuilding world –make installworldmake installworld
mergemaster -p• -p
Pre-buildworld mode. Compares only files known to be essential to the success of {build|install}world, including /etc/make.conf.
Install the built world• % make installworld

Com
pu
ter C
en
ter, C
S, N
CTU
47
Rebuilding world –Rebuilding world –mergemastermergemaster
mergemaster• Synchronize /usr/src/etc with /etc
• Choose “i” for most case, such as /etc/defaults/rc.conf, …
• Press “enter” for certain file, such as master.passwd, hosts, csh.*

Com
pu
ter C
en
ter, C
S, N
CTU
48
RebootReboot
Reboot and enjoy it• % reboot

Com
pu
ter C
en
ter, C
S, N
CTU
49
If Something Goes Wrong … (1)If Something Goes Wrong … (1)
Possible errors in building new kernel• Configuration file
% cd /usr/src/sys/i386/conf/ % config CHBSD
• make fail
• Install fail
• Kernel does not boot Boot with old kernel, recompile kernel
• Kernel works, but ps does not work Build world

Com
pu
ter C
en
ter, C
S, N
CTU
50
If Something Goes Wrong … (2)If Something Goes Wrong … (2)
Boot with old kernel• In 5.x ~
Press “6” Type “boot /boot/kernel.old/kernel”
• In 4.x Hit any key other than “enter” when counting down Type “unload” Type “load /kernel.old” Type “boot”
Com
pu
ter C
en
ter, C
S, N
CTU
51
If Something Goes Wrong … (3)If Something Goes Wrong … (3)
Move working kernel to /boot/kernel• % mv /boot/kernel.old /boot/kernel
For versions of FreeBSD prior to 5.x• Unlock kernel
% chflags noschg /kernel % cp kernel.old kernel % sync;sync; reboot
• Lock kernel % chflags schg /kernel
Use ls –lo to check similar file
schg set the immutable ( 永遠不變的 ) flagls –o include file flags in long output

Com
pu
ter C
en
ter, C
S, N
CTU
52
Install softwareInstall software
Package• Pre-built ports• pkg_add, pkg_delete, pkg_deinstall, pkg_info, pkg_version
Ports• cd /usr/ports, make search, make install clean• ports/sysutils/portupgrade
portinstall, portupgrade, portversion /usr/local/etc/pkgtools.conf
Source• Tar ball• tar xzvf certain-source.tar.gz• ./configure• make; make install

Com
pu
ter C
en
ter, C
S, N
CTU
53
How to use portsHow to use ports
Using ports• Steps of install software
(1) Figure out the path to the software– % cd /usr/ports
– % make search key=mutt
– % cd /usr/ports/chinese/mutt
(2) Fetch and compile the source– % make install
• Uninstall % make deinstall
※Using portupgrade portinstall = portupgrade –N pkgtools.conf

Com
pu
ter C
en
ter, C
S, N
CTU
54
How to use ports (1)How to use ports (1)
Try to install some software, such as:• vim
• mutt
• wget