exercise bike owner’s...
TRANSCRIPT

EXERCISE BIKE OWNER’S MANUAL
PAROSPAROS PRO


3
IMPORTANT PRECAUTIONSSAVE THESE INSTRUCTIONSRead all instructions before using this bike. When using an electrical product, basic precautions should always be followed, including the following: Read all instructions before using this bike. It is the responsibility of the owner to ensure that all users of this bike are adequately informed of all warnings and precautions.
• If you experience chest pains, nausea, dizziness, or shortness of breath, stop exercising immediately and consult your physician before continuing.• Maintain a comfortable pace. Do not sprint above 80 rpms on this machine.• To maintain balance, it is recommended to keep a grip on the handlebars while exercising, mounting or dismounting the machine.• Do not wear clothes that might catch on any part of the bike.• Do not turn pedal arms by hand.• Make sure handlebars are secure before each use.• Do not insert or drop any object into any opening.• Unplug bike before moving or cleaning it. To clean, wipe surfaces down with soap and slightly damp cloth only; never use solvents. (See MAINTENANCE)• This bike should not be used by persons weighing more than 136kg Failure to comply will void the warranty.• The exerciser complies with the EN957-1/-5 standard, class of exerciser:HA; braking system is adjustable.• This bike is intended for in-home use only. Do not use this bike in any commercial, rental, school or institutional setting. Failure to comply will void the warranty.• Do not use bike in garages, porches, pool rooms, bathrooms, car ports or outdoors. Failure to comply this may void the warranty.• Use the bike only as described in this manual.
To reduce the risk of burns, fire, electrical shock or injury to persons:
It is essential that your bike is used only indoors, in a climate controlled room. If your bike has been exposed to colder temperatures or high moisture climates, it is strongly recommended that the bike is warmed up to room before first time use. Failure to do so may cause premature electronic failure.
WARNING
At NO time should pets or children under the age of 12 be closer to the bike than 10 feet.At NO time should children under the age of 12 use the bike. Children over the age of 12 should not use the bike without adult supervision.
PAROSPAROS PRO

4
BEFORE YOU BEGIN
CONGRATULATIONS! on choosing your bike. You’ve taken an important step in developing and sustaining an exercise program! Your bike is a tremendously effective tool for achieving your personal fitness goals. Regular use of your bike can improve the quality of your life in so many ways.
HERE ARE JUST A FEW OF THE HEALTH BENEFITS OF EXERCISE:• Weight Loss • A Healthier Heart• Improved Muscle Tone• Increased Daily Energy Levels
The key to reaping these benefits is to develop an exercise habit. Your new bike will help you eliminate obstacles that prevent you from exercising. Inclement weather and darkness won’t interfere with your workout when you use your bike in the comfort of your home. This guide provides you with basic information for using and enjoying your new machine.
LOCATION OF THE BIKEPlace the bike on a level and stable surface. There should be 6 feet of clearance behind the bike, 3 feet on each side and one foot in front for the power cord (See diagram to the right). Do not place the bike in any area that will block any vent or air openings. The bike should not be located in a garage, covered patio, near water or outdoors.
PAROSPAROS PRO
5
ASSEMBLY
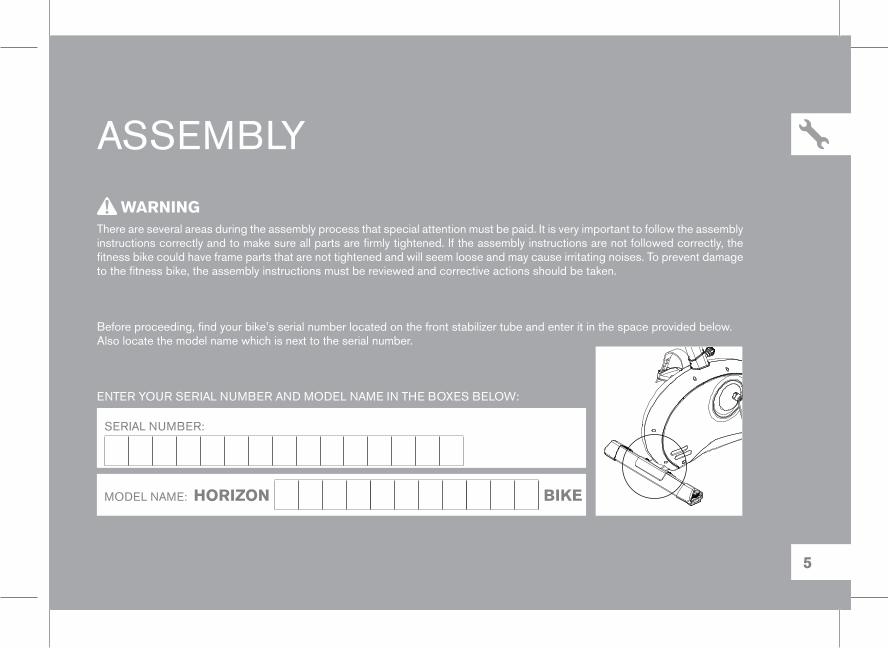
There are several areas during the assembly process that special attention must be paid. It is very important to follow the assembly instructions correctly and to make sure all parts are firmly tightened. If the assembly instructions are not followed correctly, the fitness bike could have frame parts that are not tightened and will seem loose and may cause irritating noises. To prevent damage to the fitness bike, the assembly instructions must be reviewed and corrective actions should be taken.
Before proceeding, find your bike’s serial number located on the front stabilizer tube and enter it in the space provided below. Also locate the model name which is next to the serial number.
ENTER YOUR SERIAL NUMBER AND MODEL NAME IN THE BOXES BELOW:
SERIAL NUMBER:
MODEL NAME: HORIzON BIKE
WARNING
6
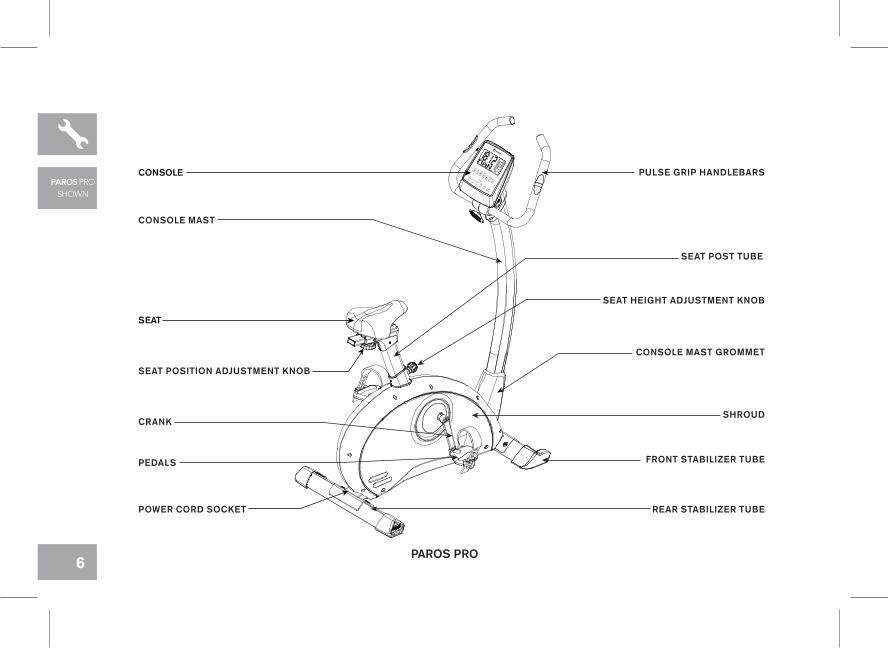
PAROS PROSHOWN
CONSOLE
SEAT
CRANK
PULSE GRIP HANDLEBARS
REAR STABILIZER TUBEPOWER CORD SOCKET
SEAT POSITION ADJUSTMENT KNOB
SEAT POST TUBE
SEAT HEIGHT ADJUSTMENT KNOB
FRONT STABILIZER TUBEPEDALS
SHROUD
CONSOLE MAST
CONSOLE MAST GROMMET
PROGRAMME
PROGRAMS
KÖRPERFETT
BODY FAT
NULLSTELLUNG
RESET
ERHOLUNG
RECOVERY
START/STOPP
START/STOP
AUSWAHL
MODE
SENKEN
DOWN
ERHÖHEN
UP
P1
P7
P8
P9
P10
P11
P12
P2
P3
P4
P5
P6
PAROS PRO
7
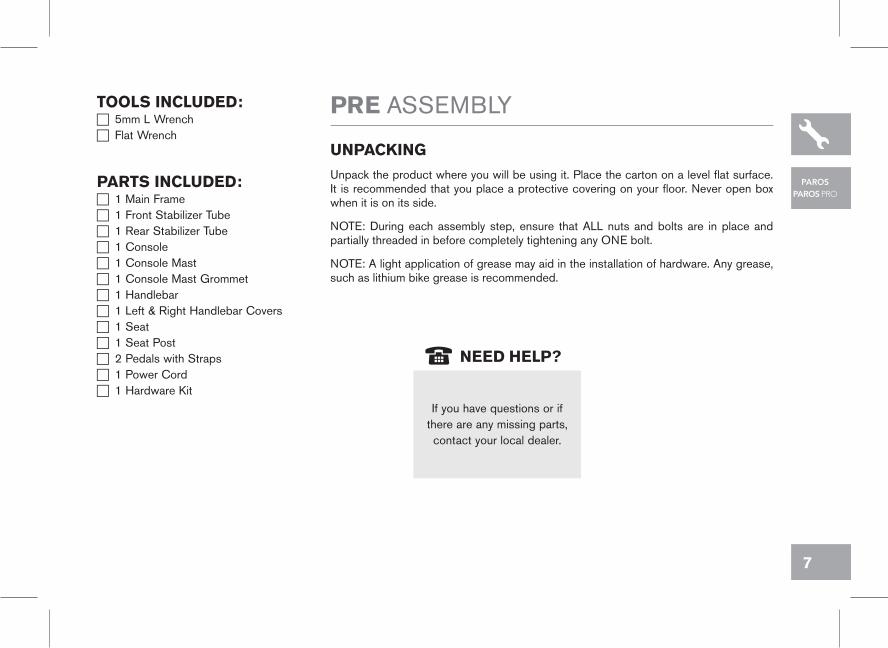
TOOLS INCLUDED: F 5mm L Wrench F Flat Wrench
PARTS INCLUDED: F 1 Main Frame F 1 Front Stabilizer Tube F 1 Rear Stabilizer Tube F 1 Console F 1 Console Mast F 1 Console Mast Grommet F 1 Handlebar F 1 Left & Right Handlebar Covers F 1 Seat F 1 Seat Post F 2 Pedals with Straps F 1 Power Cord F 1 Hardware Kit
PAROSPAROS PRO
UNPACKING
Unpack the product where you will be using it. Place the carton on a level flat surface. It is recommended that you place a protective covering on your floor. Never open box when it is on its side.
NOTE: During each assembly step, ensure that ALL nuts and bolts are in place and partially threaded in before completely tightening any ONE bolt.
NOTE: A light application of grease may aid in the installation of hardware. Any grease, such as lithium bike grease is recommended.
If you have questions or if there are any missing parts, contact your local dealer.
NEED HELP?
PRE ASSEMBLY

8
ASSEMBLY STEP 1
A Attach the REAR STABILIZER TUBE to MAIN FRAME using 2 PRE-INSTALLED BOLTS.
B Attach the FRONT STABILIZER TUBE to MAIN FRAME using 2 PRE-INSTALLED BOLTS.
NOTE: There is no hardware for this step.
PAROSPAROS PRO
MAIN FRAME
REAR STABILIZER TUBE
FRONT STABILIZER TUBE
PRE-INSTALLED BOLTS
9
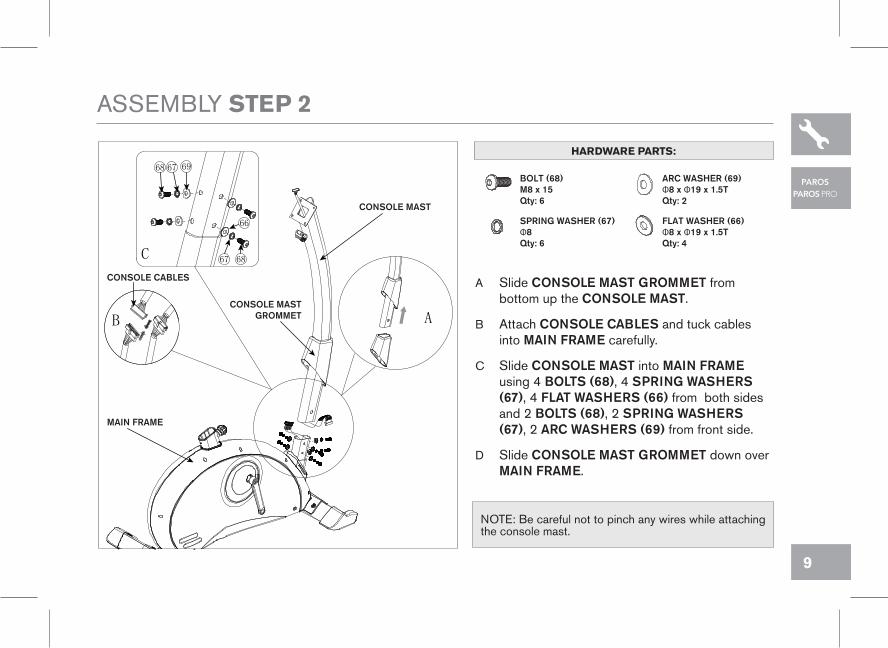
BOLT (68) M8 x 15 Qty: 6
ARC WASHER (69) Φ8 x Φ19 x 1.5T Qty: 2
SPRING WASHER (67) Φ8 Qty: 6
FLAT WASHER (66) Φ8 x Φ19 x 1.5T Qty: 4
A Slide CONSOLE MAST GROMMET from bottom up the CONSOLE MAST.
B Attach CONSOLE CABLES and tuck cables into MAIN FRAME carefully.
C Slide CONSOLE MAST into MAIN FRAME using 4 BOLTS (68), 4 SPRING WASHERS (67), 4 FLAT WASHERS (66) from both sides and 2 BOLTS (68), 2 SPRING WASHERS (67), 2 ARC WASHERS (69) from front side.
D Slide CONSOLE MAST GROMMET down over MAIN FRAME.
ASSEMBLY STEP 2
HARDWARE PARTS:
MAIN FRAME
CONSOLE CABLES
CONSOLE MAST
CONSOLE MASTGROMMETB
C
68 67 69
A
66
67 68
PAROSPAROS PRO
NOTE: Be careful not to pinch any wires while attaching the console mast.

10
ASSEMBLY STEP 3
A Attach SEAT to SEAT POST.
B Pull the SEAT HEIGHT ADJUSTMENT KNOB outward while sliding the SEAT POST into MAIN FRAME.
SEAT POST
SEAT
MAIN FRAME
SEAT HEIGHT ADJUSTMENT KNOB
PAROSPAROS PRO
NOTE: There is no hardware for this step.

11
ASSEMBLY STEP 4
A Attach the RIGHT PEDAL to the RIGHT CRANK ARM, tightening it CLOCKWISE with the provided flat wrench.
B Attach the LEFT PEDAL to the LEFT CRANK ARM, tightening it COUNTER-CLOCKWISE with the provided flat wrench.
RIGHT CRANK ARMRIGHT PEDAL
LEFT CRANK ARM
LEFT PEDAL
PAROSPAROS PRO
NOTE: There is no hardware for this step.

12
T KNOB (17) M8 x 55mm Qty: 1
BUSHING (18) Φ8 x Φ13 x 35mmQty: 1
A Feed the HANDLBAR WIRES through the hole in the CONSOLE MAST and out the top of the CONSOLE MAST.
B Attach the HANDLEBAR to CONSOLE MAST using 1 BUSHING (18) and 1 T KNOB (17).
ASSEMBLY STEP 5
HARDWARE PARTS:
17
18
HANDLEBAR
HANDLEBAR WIRE
CONSOLE MAST
PAROSPAROS PRO

13
ASSEMBLY STEP 6
A Connect the CONSOLE CABLES and carefully tuck the CONSOLE CABLES into the CONSOLE MAST.
B Attach the CONSOLE to the CONSOLE MAST using 4 PRE-INSTALLED BOLTS.
70
7
CONSOLE
CONSOLE MAST
CONSOLE CABLES PRE-INSTALLED BOLTS
PAROSPAROS PRO
NOTE: There is no hardware for this step.
NOTE: Be careful not to pinch any wires while attaching the console.

14
ASSEMBLY STEP 7
A Attach the LEFT & RIGHT CONSOLE MAST COVERS to the CONSOLE MAST using 4 PRE-INSTALLED BOLTS and 1 PRE-INSTALLED SCREWS.
B Plug in POWER ADAPTER.
LEFT CONSOLE MAST COVER
RIGHT CONSOLE MAST COVER
PRE-INSTALLED BOLT
PRE-INSTALLED BOLT
PRE-INSTALLED SCREW
CONSOLE MAST
PAROSPAROS PRO
NOTE: There is no hardware for this step.

15
ASSEMBLY STEP 8
ASSEMBLY COMPLETE!PAROS PRO
SHOWN
PAROS & PAROS PRO Max. User Weight: 136 kg / 300 Ibs Product Weight: 31kg / 68 IbsOverall Dimensions: 103 x 60 x 135 cm / 41” x 23” x 53”

16
BIKE OPERATIONADJUSTING THE SEATTo adjust the seat by rotating the knob and loosen the screw. Pull out the knob and adjust the seat to a comfortable pedaling position (one that keeps a slight bend in your knee while your legs are in the extended position). Lock the screw by rotating knob clockwise until it tightens.
NOTE: It is recommended that you do not sit on the seat while adjusting its position.
ADJUSTING THE HANDLEBARTo adjust the handlebar by rotating the knob and loosen the screw. Then, pull out the knob and adjust the handlebar to a position you prefer. Lock the screw by rotating knob clockwise until it tightens.
Do not operate the bike if the adaptor is damaged. If the bike appears to not be working properly, do not use the bike.
Our bikes are well built and heavy! Use care and additional help if necessary when moving.
WARNING
WARNING

17
PAROS CONSOLE DISPLAY PAROS PRO CONSOLE DISPLAY
PROGRAMME
PROGRAMS
KÖRPERFETT
BODY FAT
NULLSTELLUNG
RESET
ERHOLUNG
RECOVERY
START/STOPP
START/STOP
AUSWAHL
MODE
SENKEN
DOWN
ERHÖHEN
UP
P1
P7 P8 P9 P10 P11 P12
P2 P3 P4 P5 P6
F E D C B A
PROGRAMME
P1 P2 P3 P4 P5 P6
PROGRAMS
KÖRPERFETT
BODY FAT
NULLSTELLUNG
RESET
ERHOLUNG
RECOVERY
START/STOPP
START/STOP
AUSWAHL
MODE
SENKEN
DOWN
ERHÖHEN
UP
F E D C B A
PAROSPAROS PRO
18
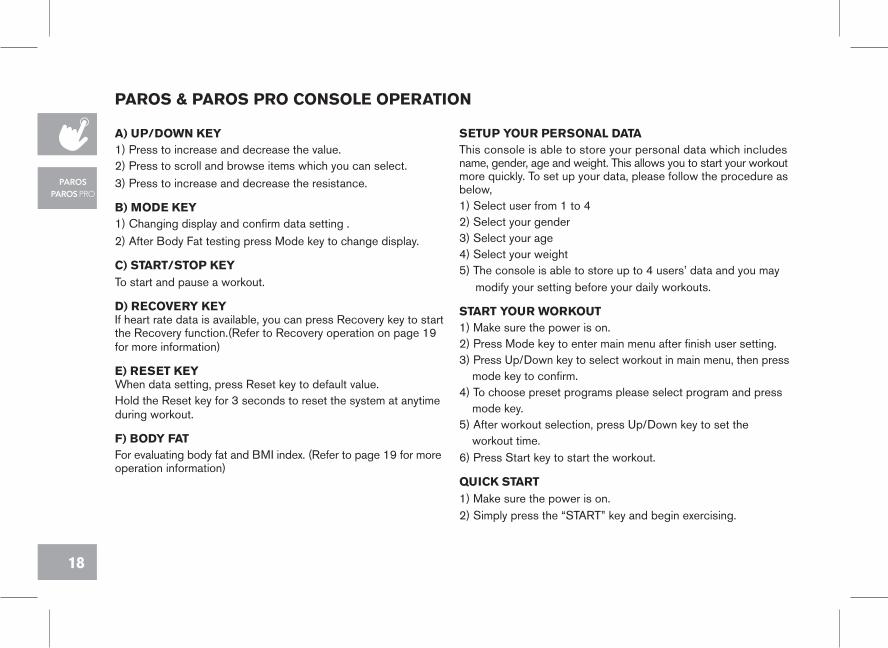
A) UP/DOWN KEY1) Press to increase and decrease the value.2) Press to scroll and browse items which you can select.3) Press to increase and decrease the resistance.
B) MODE KEY1) Changing display and confirm data setting .2) After Body Fat testing press Mode key to change display.
C) START/STOP KEYTo start and pause a workout.
D) RECOVERY KEY If heart rate data is available, you can press Recovery key to start the Recovery function.(Refer to Recovery operation on page 19 for more information)
E) RESET KEY When data setting, press Reset key to default value. Hold the Reset key for 3 seconds to reset the system at anytime during workout.
F) BODY FATFor evaluating body fat and BMI index. (Refer to page 19 for more operation information)
PAROS & PAROS PRO CONSOLE OPERATION
SETUP YOUR PERSONAL DATAThis console is able to store your personal data which includes name, gender, age and weight. This allows you to start your workout more quickly. To set up your data, please follow the procedure as below, 1) Select user from 1 to 42) Select your gender3) Select your age4) Select your weight5) The console is able to store up to 4 users’ data and you may modify your setting before your daily workouts.
START YOUR WORKOUT1) Make sure the power is on.2) Press Mode key to enter main menu after finish user setting.3) Press Up/Down key to select workout in main menu, then press mode key to confirm.4) To choose preset programs please select program and press mode key.5) After workout selection, press Up/Down key to set the workout time.6) Press Start key to start the workout.
QUICK START1) Make sure the power is on.2) Simply press the “START” key and begin exercising.
PAROSPAROS PRO

19
PAROSPAROS PRO
MANUALSelect manual at main menu and press start before workout selection.
HRC1) finish personal data setting and enter main menu.2) select HRC program at main menu and press mode key to enter setting.
3) select among 55%, 75% and 90% target or choose H.R.C.
Target to set your desired number between 30 to 230.
USER PROGRAM
1) select User program at main menu and use up/down and
mode key to set your own workout.2) press mode key for 3 seconds for confirming setting
WORKOUT RECOVERY
After exercising for a period of time (more than 30 seconds), Press RECOVERY key, hold onto the handgrips to conduct a workout recovery test.
TIME will count down from 00:60 to 00:00 and then show your heart rate recovery status from F1,F2….to F6.
(F1-F6 stands for your Fitness quotient, with F1 being the best result)
User may keep exercising to improve the heart rate recovery status. (Press the RECOVERY button again to return the main display)
BODY FAT MEASUREMENT1) Select User from U1 - U4 & workout then press START key.
2) After the selected workout is finished or stopped, press BODY FAT button to enter.3) Holding both pulse grips for 8-10 seconds then test results (percentage and BMI rate) will be displayed on LCD for 30 seconds.
B.M.I. (Body mass index) integrated
WATTS CONTROL (PAROS PRO ONLY)1) Finish user setting and enter workout selection.2) Select Watts control program at main menu and press mode key.3) Set target watt value by using up/down key.4) Press start after finish setting.
ENERGY SAVERTo minimize energy consumption, your machine will enter energy saver mode automatically when not in use for 4 minutes and could be quickly activated again with a touch of a button.
CALENDAR AND TIMEWhile powering on, this console will allow you to set the CALENDAR and TIME by using UP & DOWN keys and MODE key to confirm.
BODY FAT:
B.M.I LOW LOW/MED MEDIUM MED/HIGH
RANGE <20 20-24 24.1-26.5 >26.5
FAT% (-)LOW
(+)LOW/MED MEDIUM MED/HIGH
MALE <13% 13%-25.9% 26%-30% >30%
FEMALE <23% 23%-35.9% 36%-40% >40%

20
• P4: Improves performance and stamina by raising the resistance level to high peaks to simulate the most difficult outdoor terrains.
• P5: Complete exercise program to help you enhance body performance.
• P6: Increasing resistance for advanced users to tone your muscles, and challenges yourself.
• P2: Improves your strength, speed, and endurance by raising and lowering the resistance levels throughout your workout to involve both your heart and muscles.
• P3: Challenges with various combinations of hills and valleys (resistance) to burn more fat when exercising.
• P1: Promotes weight loss by raising and lowering the resistance level, while keeping you in your fat burning zone.
PAROS & PAROS PRO PRESET PROGRAM PROFILES
PAROS PRO

21
PAROSPAROS PRO
• P10: Improves performance and stamina by raising the resistance level to high peaks to simulate the hill environment.
• P11: Improve heart and lung capacity by simulates daily jogging.
• P12: Improves your strength, speed and endurance by automatically changing the resistance levels through-out your workout.
• P8: Simulates plateau hiking by increasing and decreasing the resistance gradually.
• P9: Gradually increasing resistance with hills and valleys allows user to reach their daily target.
• P7: Recover your heart and muscles after intensive workout.
PRESET PROGRAM PROFILES (PAROS PRO ONLY)

22
MONITORING YOUR HEART RATE
FEEDBACKYour Horizon Fitness bike offers two heart rate feedback options. You may choose to use the heart rate handlebars, or the chest transmitter (sold separately) for a hands free workout.
HEART RATE HANDLEBARPlace the palm of your hands directly on the heart rate handlebars. Both hands must grip the bars for your heart rate to register. When gripping the handlebars, do not grip tightly. Holding the grips tightly may elevate your blood pressure. Try to maintain moderate pressure while holding onto the heart rate handlebars. It is recommended that you hold the handlebars only long enough the see your heart rate readout on the console. You may experience an erratic readout if consistently holding the handlebars.
TELEMETRIC CHEST TRANSMITTER (SOLD SEPARATELY)Prior to wearing the chest transmitter (sold separately) on your chest, moisten the two rubber electrodes with water. Center the chest strap just below the breast or pectoral muscles, directly over your stermum, with the Horizon Fitness logo facing out. NOTE: The chest strap must be tight and properly placed to receive an accurate and consistent readout. If the chest strap is too loose, or positioned improperly, you may receive an erratic or inconsistent heart rate readout.
WARNING!The heart rate reading is intended only as an exercise aid and not for medical purpose. Your heart rate monitoring systems may be inaccurate. Various factors may affect the accuracy of your heart rate reading. Over exercise may result in serious injury or death.If you feel faint stop exercise immediately.
PAROSPAROS PRO

23
PAROSPAROS PRO
CONDITIONING GUIDELINES
ALWAYS CONSULT YOUR PHYSICIAN BEFORE BEGINNING AN EXERCISE PROGRAM.
HOW OFTEN? (FREQUENCY OF WORKOUTS)
The American Heart Association recommends that you exercise at least 3 to 4 days per week to maintain cardiovascular fitness. If you have other goals such as weight or fat loss, you will achieve your goal faster with more frequent exercise. Whether it’s 3 days or 6 days, remember that your ultimate goal should be to make exercise a lifetime habit. Many people are successful staying with a fitness program if they set aside a specific time of day to exercise. It doesn’t matter whether it’s in the morning before breakfast, during lunch hour or while watching the evening news. What’s more important is that it’s a time that allows you to keep a schedule, and a time when you won’t be interrupted. To be successful with your fitness program, you have to make it a priority in your life. So decide on a time, pull out your day planner and pencil in your exercise times for the next month!
HOW LONG? (DURATION OF WORKOUTS)
For aerobic exercise benefits, it’s recommended that you exercise from between 24 and 60 minutes per session. But start slowly and gradually increase your exercise times. If you’ve been sedentary during the past year, it may be a good idea to keep your exercise times to as little as five minutes initially. Your body will need time to adjust to the new activity. If your goal is weight loss, a longer exercise session at lower intensities has been found to be most effective. A workout time of 48 minutes or more is recommended for best weight loss results.
HOW HARD? (INTENSITY OF WORKOUTS)
How hard you workout is also determined by your goals. If you use your machine to prepare for a 5K workout, you will probably work out at a higher intensity than if your goal is general fitness. Regardless of your long term goals, always begin an exercise program at low intensity. Aerobic exercise does not have to be painful to be beneficial!

24
MAINTENANCE
WHAT KIND OF ROUTINE MAINTENANCE IS REQUIRED?We use sealed bearings throughout our bikes so lubrication is not needed. The most important maintenance step is to simply wipe your perspiration off the trainer after each use.
HOW DO I CLEAN MY BIKE?Clean with soap and water cleaners only. Never use solvents on plastic parts.Cleanliness of your bike and its operating environment will keep maintenance problems and service callstoaminimum. For this reason, Horizon Fitness recommends that the following preventive maintenance schedule be followed.
AFTER EACH USE (DAILY)Turn off the bike by unplugging the power cord from the wall outlet • Wipe down the bike with a damp cloth. Never use solvents, as they can cause damage to the bike. • Inspect the power cord. If the power cord is damaged, contact HorizonFitness. • Make sure the power cord is not underneath the bike or in any other area where it can become pinched or cut.
NOTE:The safety level of the equipment can be maintained only if it is examined regularly for damage and wear, e.g. connection parts. If any deterioration is observed, immediately replace all faulty parts and do not use until it is repaired.
WEEKLYClean underneath the bike, following these steps:• Turn off the bike.• Move the bike to a remote location.• Wipe or vacuum any dust particles or other objects that may have accumulated underneath the bike.• Return the bike to its previous position.
EVERY MONTH• Inspect all assembly bolts and pedals on the machine for proper tightness.
To remove power from the bike, the power cord must be disconnected from the wall outlet.
WARNING
PAROSPAROS PRO

25
PAROS EXPLODED VIEW
26
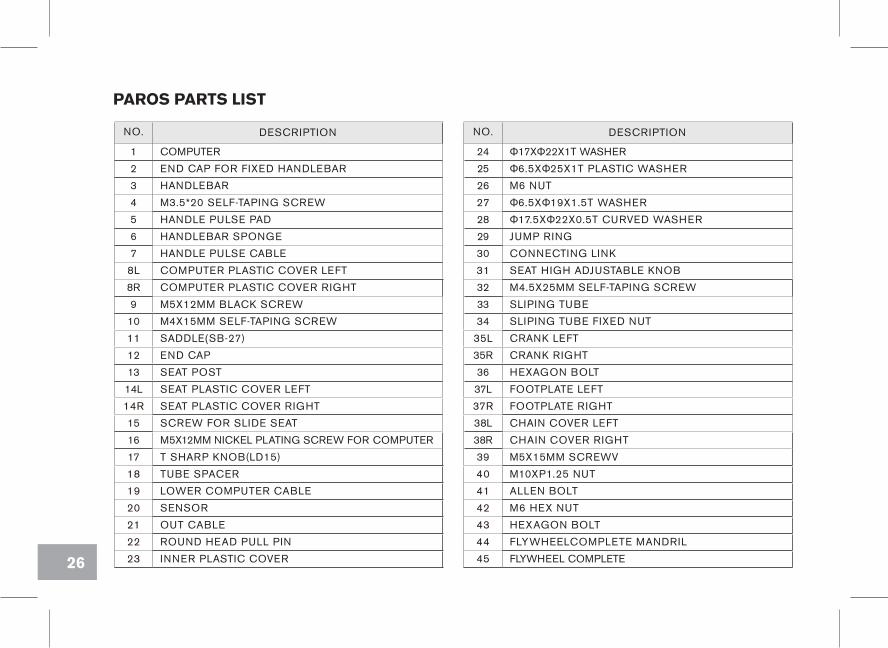
PAROS PARTS LIST
NO. DESCRIPTION
1 COMPUTER
2 END CAP FOR FIXED HANDLEBAR
3 HANDLEBAR
4 M3.5*20 SELF-TAPING SCREW
5 HANDLE PULSE PAD
6 HANDLEBAR SPONGE
7 HANDLE PULSE CABLE
8L COMPUTER PLASTIC COVER LEFT
8R COMPUTER PLASTIC COVER RIGHT
9 M5X12MM BLACK SCREW
10 M4X15MM SELF-TAPING SCREW
11 SADDLE(SB-27)
12 END CAP
13 SEAT POST
14L SEAT PLASTIC COVER LEFT
14R SEAT PLASTIC COVER RIGHT
15 SCREW FOR SLIDE SEAT
16 M5X12MM NICKEL PLATING SCREW FOR COMPUTER
17 T SHARP KNOB(LD15)
18 TUBE SPACER
19 LOWER COMPUTER CABLE
20 SENSOR
21 OUT CABLE
22 ROUND HEAD PULL PIN
23 INNER PLASTIC COVER
NO. DESCRIPTION
24 Φ17XΦ22X1T WASHER
25 Φ6.5XΦ25X1T PLASTIC WASHER
26 M6 NUT
27 Φ6.5XΦ19X1.5T WASHER
28 Φ17.5XΦ22X0.5T CURVED WASHER
29 JUMP RING
30 CONNECTING LINK
31 SEAT HIGH ADJUSTABLE KNOB
32 M4.5X25MM SELF-TAPING SCREW
33 SLIPING TUBE
34 SLIPING TUBE FIXED NUT
35L CRANK LEFT
35R CRANK RIGHT
36 HEXAGON BOLT
37L FOOTPLATE LEFT
37R FOOTPLATE RIGHT
38L CHAIN COVER LEFT
38R CHAIN COVER RIGHT
39 M5X15MM SCREWV
40 M10XP1.25 NUT
41 ALLEN BOLT
42 M6 HEX NUT
43 HEXAGON BOLT
44 FLYWHEELCOMPLETE MANDRIL
45 FLYWHEEL COMPLETE

27
NO. DESCRIPTION
46L REAR STABILIZER BAR END CAP LEFT
46R REAR STABILIZER BAR END CAP RIGHT
47 REAR STABILIZER BAR
48 DC CABLE
49 FLAT HEAD HEXAGON BOLT
50 Φ6XΦ13X1.5T FLAT WASHER
51 SPRING WASHER
52 TAPER SPRING
53 MOTOR
54 M5X15MM SCREW
55 6003 2RS BEARING
56 Φ17XΦ22X2T WASHER
57 Φ240 BELT WHEEL
58 BELT
59 PEDAL AXLE
60 M8X15MM BLACK ALLEN BOLT
61 CRANK END CAP
62 MAIN POST PLASTIC COVER
63L FRONT STABILIZER END CAP LEFT
63R FRONT STABILIZER END CAP RIGHT
64 FRONT STABLILIZER BAR
65 MAIN FRAME
66 Φ8XΦ19X1.5T FLAT WASHER
67 Φ8 SPRING WASHER
68 M8X15MM NICKEL PLATING ALLEN BOLT
NO. DESCRIPTION
69 Φ8XΦ19X1.5T CURVED WASHER
70 UPPER COMPUTER CABLE
71 MAIN POST
72 Φ2.0X28 BLACK SPRING
73 M8X5T WHITE ZINC HEX NUT
74 M8X20 ALLEN BOLT
75 AXLE FOR IDLER
76 CURVED WASHER
77 IDLER
78 M8 NICKEL PLATING NUT
79 M10X4TXP1.25 HEX NUT
80 6300 2RS BEARING
81 Φ30XΦ34X1T WASHER
82 Φ280 MAGNETIC FLYWHEEL
83 ONE DIRECTION BEARING
84 6203 2RS BEARING
85 FLYWHEEL MANDRIL
86 SMALL RATCHET WHEEL
87 6000 2RS BEARING
88 ALLEN KEY WRENCH
89 COMBINATION WRENCH
90 ADAPTOR
28
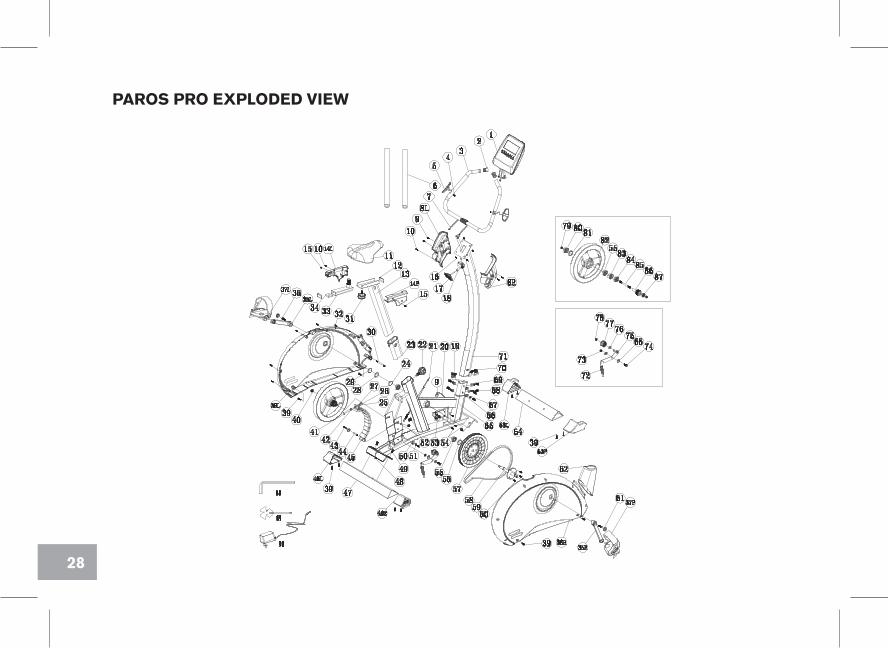
PAROS PRO EXPLODED VIEW

29
PAROS PRO PARTS LIST
NO. DESCRIPTION
1 COMPUTER
2 END CAP FOR FIXED HANDLEBAR
3 HANDLEBAR
4 M3.5*20 SELF-TAPING SCREW
5 HANDLE PULSE PAD
6 HANDLEBAR SPONGE
7 HANDLE PULSE CABLE
8L COMPUTER PLASTIC COVER LEFT
8R COMPUTER PLASTIC COVER RIGHT
9 M5X12MM BLACK SCREW
10 M4X15MM SELF-TAPING SCREW
11 SADDLE(SB-27)
12 END CAP
13 SEAT POST
14L SEAT PLASTIC COVER LEFT
14R SEAT PLASTIC COVER RIGHT
15 SCREW FOR SLIDE SEAT
16 M5X12MM NICKEL PLATING SCREW FOR COMPUTER
17 T SHARP KNOB(LD15)
18 TUBE SPACER
19 LOWER COMPUTER CABLE
20 SENSOR
21 OUT CABLE
22 ROUND HEAD PULL PIN
23 INNER PLASTIC COVER
NO. DESCRIPTION
24 Φ17XΦ22X1T WASHER
25 Φ6.5XΦ25X1T PLASTIC WASHER
26 M6 NUT
27 Φ6.5XΦ19X1.5T WASHER
28 Φ17.5XΦ22X0.5T CURVED WASHER
29 JUMP RING
30 CONNECTING LINK
31 SEAT HIGH ADJUSTABLE KNOB
32 M4.5X25MM SELF-TAPING SCREW
33 SLIPING TUBE
34 SLIPING TUBE FIXED NUT
35L CRANK LEFT
35R CRANK RIGHT
36 HEXAGON BOLT
37L FOOTPLATE LEFT
37R FOOTPLATE RIGHT
38L CHAIN COVER LEFT
38R CHAIN COVER RIGHT
39 M5X15MM SCREWV
40 M10XP1.25 NUT
41 ALLEN BOLT
42 M6 HEX NUT
43 HEXAGON BOLT
44 FLYWHEELCOMPLETE MANDRIL
45 FLYWHEEL COMPLETE

30
NO. DESCRIPTION
46L REAR STABILIZER BAR END CAP LEFT
46R REAR STABILIZER BAR END CAP RIGHT
47 REAR STABILIZER BAR
48 DC CABLE
49 FLAT HEAD HEXAGON BOLT
50 Φ6XΦ13X1.5T FLAT WASHER
51 SPRING WASHER
52 TAPER SPRING
53 MOTOR
54 M5X15MM SCREW
55 6003 2RS BEARING
56 Φ17XΦ22X2T WASHER
57 Φ240 BELT WHEEL
58 BELT
59 PEDAL AXLE
60 M8X15MM BLACK ALLEN BOLT
61 CRANK END CAP
62 MAIN POST PLASTIC COVER
63L FRONT STABILIZER END CAP LEFT
63R FRONT STABILIZER END CAP RIGHT
64 FRONT STABLILIZER BAR
65 MAIN FRAME
66 Φ8XΦ19X1.5T FLAT WASHER
67 Φ8 SPRING WASHER
68 M8X15MM NICKEL PLATING ALLEN BOLT
NO. DESCRIPTION
69 Φ8XΦ19X1.5T CURVED WASHER
70 UPPER COMPUTER CABLE
71 MAIN POST
72 Φ2.0X28 BLACK SPRING
73 M8X5T WHITE ZINC HEX NUT
74 M8X20 ALLEN BOLT
75 AXLE FOR IDLER
76 CURVED WASHER
77 IDLER
78 M8 NICKEL PLATING NUT
79 M10X4TXP1.25 HEX NUT
80 6300 2RS BEARING
81 Φ30XΦ34X1T WASHER
82 Φ280 MAGNETIC FLYWHEEL
83 ONE DIRECTION BEARING
84 6203 2RS BEARING
85 FLYWHEEL MANDRIL
86 SMALL RATCHET WHEEL
87 6000 2RS BEARING
88 ALLEN KEY WRENCH
89 COMBINATION WRENCH
90 ADAPTOR

D: Entsorgungshinweis
Vision Fitness / Horizon Fitness / TEMPO Fitness / TREO Fitness - Produkte sind recyclebar. Führen Sie das Gerät am Ende der Nutzungsdauer einer sachgerechten Entsorgung zu (örtliche Sammelstelle).
GB: Waste Disposal
Vision Fitness / Horizon Fitness / TEMPO Fitness / TREO Fitness products are recyclable. At the end if its useful life please dispose of this article correctly and safely (local refuse sites).
F: Remarque relative à la gestion des dèchets
Les produits Vision Fitness / Horizon Fitness / TEMPO Fitness / TREO Fitness sont recyclables. A la fin sa durrèe d`utilisation, remettez I´appareil à un centre de gestion de dèchets correct (collecte locale).
NL: Verwijderingsaanwijzing
Vision Fitness / Horizon Fitness / TEMPO Fitness / TREO Fitness producten zijn recycleerbaar. Breng het apparaat aan het einde van de gebruiksduur naar een op recycling gespecialiseerd bedrijf (plaatselijk verzamelpunt).
E: Informaciones para la evacuaciòn
Los productos de Vision Fitness / Horizon Fitness / TEMPO Fitness / TREO Fitness son riciclables. Cuando se termina la vida ùtil de un aparato o una màquina, entrèguelos an una impresa local de eleiminaciòn de residuos para su reciclaje.
I: Indicazione sullo smaltimento
I prodotti Vision Fitness / Horizon Fitness / TEMPO Fitness / TREO Fitness sono reciclabill. Quando I`apparecchio non servirà più, portatelo in un apposito punto di raccolta della Vostra città (Punti di raccolta comunall).
PL: Wskazòwka dotyczàca usuwania odpadòw.
Producty firmy Vision Fitness / Horizon Fitness / TEMPO Fitness / TREO Fitness podlegajà recyklingowi. Pod koniec okresu o`ywalnoÈcl pros`z oddac urzàdzenie do wlaÈciwego punkto usuwania odpadòw (lokalny punkt zbiorczy).
EXERCISE BIKE OWNER’S MANUALParos & Paros Pro Owner’s Manual 0628’12 Rev. 1.4 © 2012 Horizon Fitness