exit reform phase 2 user guidelines - xoserve · enter your gemini user id and password in the...
TRANSCRIPT
Page 1 of 96
NTS-External-UserGuidelines-ChapterAll-V3-1.doc24
NTS Exit Reform
External System User Guidelines
This document contains confidential or privileged information; it should not be copied or disclosed to any third party without the express permission of Xoserve Ltd. All rights reserved.
Copyright © 2013 Xoserve Ltd
Author (for this version): Therese Nott
Owning Group: Xoserve
Version: 3.1
Status: Updated
Date: 24 September 2013
Please Note: This document has been provided to give guidance regarding the operation of Gemini Exit, which is part of the UK Link systems with respect to the processes as detailed in the UNC. Every effort has been made to ensure that the information contained within it is correct. However if there is a conflict with National Grid's Gas Transporter Licence in respect of the NTS('the Licence'), or the Uniform Network Code ('UNC'), then the Licence or UNC shall prevail
Page 2 of 96
NTS-External-UserGuidelines-ChapterAll-V3-1.doc24
Contents
Introduction ........................................................................................................................................................... 5
Accessing the system ............................................................................................................................................. 6
Points to Remember .............................................................................................................................................. 7
List of Abbreviations ............................................................................................................................................. 7
Chapter One - Reports .......................................................................................................................................... 9
1. Reports ..................................................................................................................................................... 10
Points to Remember ........................................................................................................................................... 10
1.1 Capacity and Price Information ........................................................................................................... 11
1.2 Daily Forecast Demand Report ............................................................................................................ 12
1.3 Request Window Details Report ........................................................................................................... 12
1.4 Auction Request Information Report .................................................................................................... 13
1.5 Application Request Information Report .............................................................................................. 15
1.6 Entitlements Report .............................................................................................................................. 17
1.7 User Commitment Amount Report ........................................................................................................ 18
1.8 Buyback Contract Request Information Report .................................................................................... 20
1.9 Sold/Unsold Report .............................................................................................................................. 22
1.10 Incremental Capacity Allocation Report .............................................................................................. 23
1.11 Requests/Users Report .......................................................................................................................... 24
1.12 Max/Min Price Information Report ...................................................................................................... 25
1.13 Weighted Average Price (WAP) Report................................................................................................ 26
1.14 Aggregate User Enduring Capacity Report.......................................................................................... 27
1.15 Indicative/Actual Price Report ............................................................................................................. 29
1.16 OCS/OPS Request Information Report ................................................................................................. 30
1.17 Publish Offtake Flow Reduction Invitation Report ............................................................................... 32
1.18 Offtake Flow Reduction Allocation Report ........................................................................................... 32
1.19 Offtake Flow Reduction Offer Informatio ............................................................................................. 33
1.20 Current Overrun Prices Report ............................................................................................................ 35
1.21 Capacity by Quantity Holder Report .................................................................................................... 35
1.22 Off Peak Capacity Release Details ....................................................................................................... 36
1.23 Meter Site Relationship Report ............................................................................................................. 37
Chapter Two Introduction to Processes ............................................................................................................ 39
2 Introduction to Long Term Applications and Short Term Auctions ...................................................... 40
Page 3 of 96
NTS-External-UserGuidelines-ChapterAll-V3-1.doc24
2.1 Request Types (Long Term) .................................................................................................................. 40 2.1.1 Enduring Annual Flat Exit Capacity (EAFLEC) - Increase Request ............................................. 40 2.1.2 Enduring Annual Flat Exit Capacity (EAFLEC) - Decrease Request ........................................... 40 2.1.3 Annual NTS Exit Capacity (AFLEC) Requests ............................................................................. 40 2.1.4 Ad-hoc Increase Application (AIEFLEC) Requests ...................................................................... 40 2.1.5 Ad-hoc Decrease Application (ADEFLEC) Requests ................................................................... 41 2.1.6 Exit Flat Capacity Buyback Contract ............................................................................................ 41 2.1.7 DN Adjustment Window ............................................................................................................... 41
2.2 Long Term Applications – Table .......................................................................................................... 42
2.3 Request Types (Short Term) ................................................................................................................. 42 2.3.1 Day Ahead Daily NTS Exit (Flat) Capacity – (DADNEX) ........................................................... 42 2.3.2 Within Day Daily NTS Exit (Flat) Capacity – (WDDNEX) ......................................................... 43 2.3.3 Daily Off-peak NTS Exit (Flat) Capacity – (DONEX) ................................................................. 43 2.3.4 Daily Buyback NTS Exit (Flat) Capacity – (DBNEX) .................................................................. 43
2.4 Daily Short Term Auctions – Table ...................................................................................................... 43
2.5 Status .................................................................................................................................................... 44
Chapter 3 Set Up User Preferences ................................................................................................................... 45
3. Introduction to Setup User Preferences ................................................................................................... 46
3.1 Add User Preferences ........................................................................................................................... 47
3.2 Modify User Preferences ...................................................................................................................... 48
Chapter 4 Capturing Your Requests ................................................................................................................. 49
4 Introduction to Capturing your Requests ................................................................................................. 50
4.1 View Existing Requests ......................................................................................................................... 50
4.2 Placing Requests .................................................................................................................................. 52
4.3 Modify Requests.................................................................................................................................... 53
4.4 Withdraw Requests ............................................................................................................................... 54
Chapter 5 Transfers and Assignments .............................................................................................................. 56
5. Introduction to Transfers and Assignments .......................................................................................... 57
5.1 Bulletin Board ...................................................................................................................................... 57 5.1.1 Adding a Bulletin........................................................................................................................... 57
5.2 Registering a Transfer .......................................................................................................................... 58
5.3 Accepting a Transfer ............................................................................................................................ 62
5.4 Assignments process ............................................................................................................................. 64 5.4.1 Registering an Assignment ............................................................................................................ 64 5.4.2 Accepting an Assignment .............................................................................................................. 69
Chapter 6 OCS/OPS Process .............................................................................................................................. 71
6 Introduction to OCS/OPS Process ............................................................................................................. 72
6.1 Submitting OCS and OPS Request Information ................................................................................... 72
6.2 Submitting OCS and OPS Request Information (during DN Adjustment Window) .............................. 74
Page 4 of 96
NTS-External-UserGuidelines-ChapterAll-V3-1.doc24
Chapter Seven Constraints ................................................................................................................................. 77
7. Introduction to Constraints ....................................................................................................................... 78
7.1 History Screen (Constraint/Restoration) .............................................................................................. 78
7.2 Offtake Flow Reduction (OFR) ............................................................................................................. 79 7.2.1 OFR Set up User Preferences ........................................................................................................ 79 7.2.2 Add OFR User Preferences ........................................................................................................... 80 7.2.3 Modify OFR User Preference ........................................................................................................ 81
7.3 Capture OFR Offers ............................................................................................................................. 82 7.3.1 Add OFR Offer .............................................................................................................................. 84 7.3.2 Modify OFR Offer ......................................................................................................................... 85 7.3.3 Withdraw OFR Offer ..................................................................................................................... 87
7.4 DNO Flow Swaps ................................................................................................................................. 88 7.4.1 Initiating Flow Swaps .................................................................................................................... 88 7.4.2 Add Flow Swap ............................................................................................................................. 90 7.4.3 Accept Flow Swap ......................................................................................................................... 91 7.4.4 Reject Flow Swap .......................................................................................................................... 92 7.4.5 Withdraw Flow Swap .................................................................................................................... 93 7.4.6 DNO Flow Swap History .............................................................................................................. 94
Version History .................................................................................................................................................... 96
Page 5 of 96
NTS-External-UserGuidelines-ChapterAll-V3-1.doc24
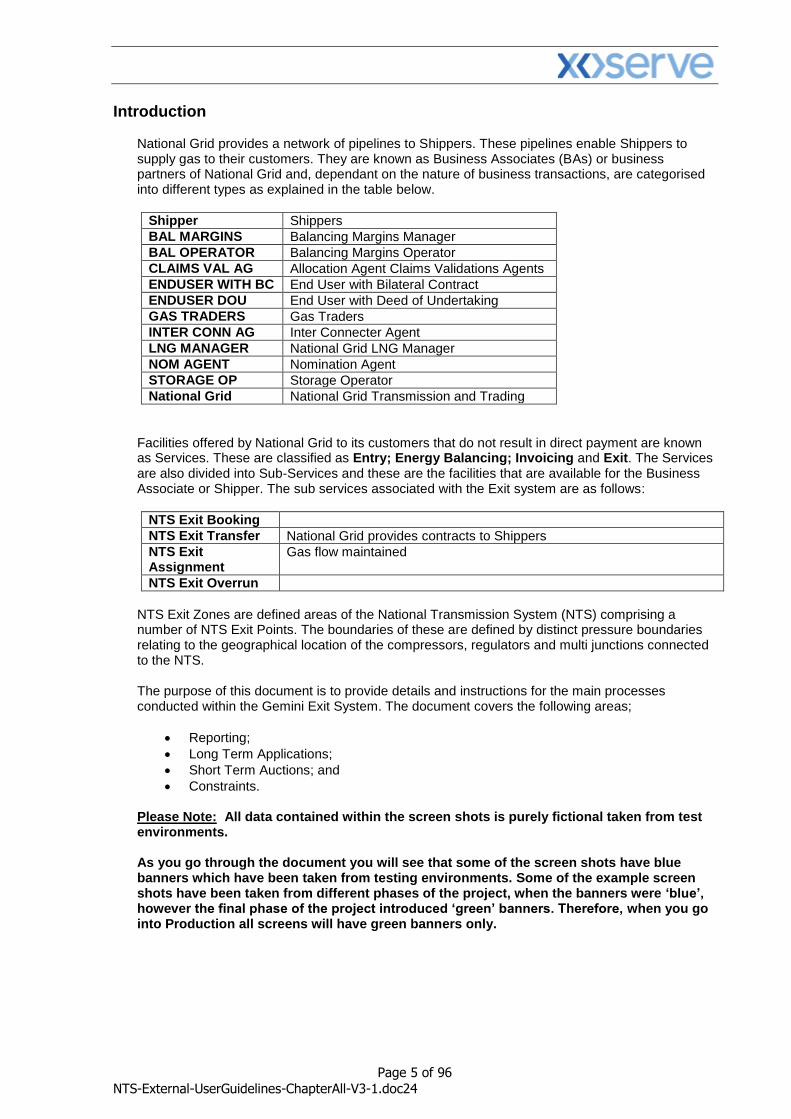
Introduction National Grid provides a network of pipelines to Shippers. These pipelines enable Shippers to supply gas to their customers. They are known as Business Associates (BAs) or business partners of National Grid and, dependant on the nature of business transactions, are categorised into different types as explained in the table below.
Shipper Shippers
BAL MARGINS Balancing Margins Manager
BAL OPERATOR Balancing Margins Operator
CLAIMS VAL AG Allocation Agent Claims Validations Agents
ENDUSER WITH BC End User with Bilateral Contract
ENDUSER DOU End User with Deed of Undertaking
GAS TRADERS Gas Traders
INTER CONN AG Inter Connecter Agent
LNG MANAGER National Grid LNG Manager
NOM AGENT Nomination Agent
STORAGE OP Storage Operator
National Grid National Grid Transmission and Trading
Facilities offered by National Grid to its customers that do not result in direct payment are known as Services. These are classified as Entry; Energy Balancing; Invoicing and Exit. The Services are also divided into Sub-Services and these are the facilities that are available for the Business Associate or Shipper. The sub services associated with the Exit system are as follows:
NTS Exit Booking
NTS Exit Transfer National Grid provides contracts to Shippers
NTS Exit Assignment
Gas flow maintained
NTS Exit Overrun
NTS Exit Zones are defined areas of the National Transmission System (NTS) comprising a number of NTS Exit Points. The boundaries of these are defined by distinct pressure boundaries relating to the geographical location of the compressors, regulators and multi junctions connected to the NTS.
The purpose of this document is to provide details and instructions for the main processes conducted within the Gemini Exit System. The document covers the following areas;
Reporting;
Long Term Applications;
Short Term Auctions; and
Constraints. Please Note: All data contained within the screen shots is purely fictional taken from test environments. As you go through the document you will see that some of the screen shots have blue banners which have been taken from testing environments. Some of the example screen shots have been taken from different phases of the project, when the banners were ‘blue’, however the final phase of the project introduced ‘green’ banners. Therefore, when you go into Production all screens will have green banners only.
Page 6 of 96
NTS-External-UserGuidelines-ChapterAll-V3-1.doc24
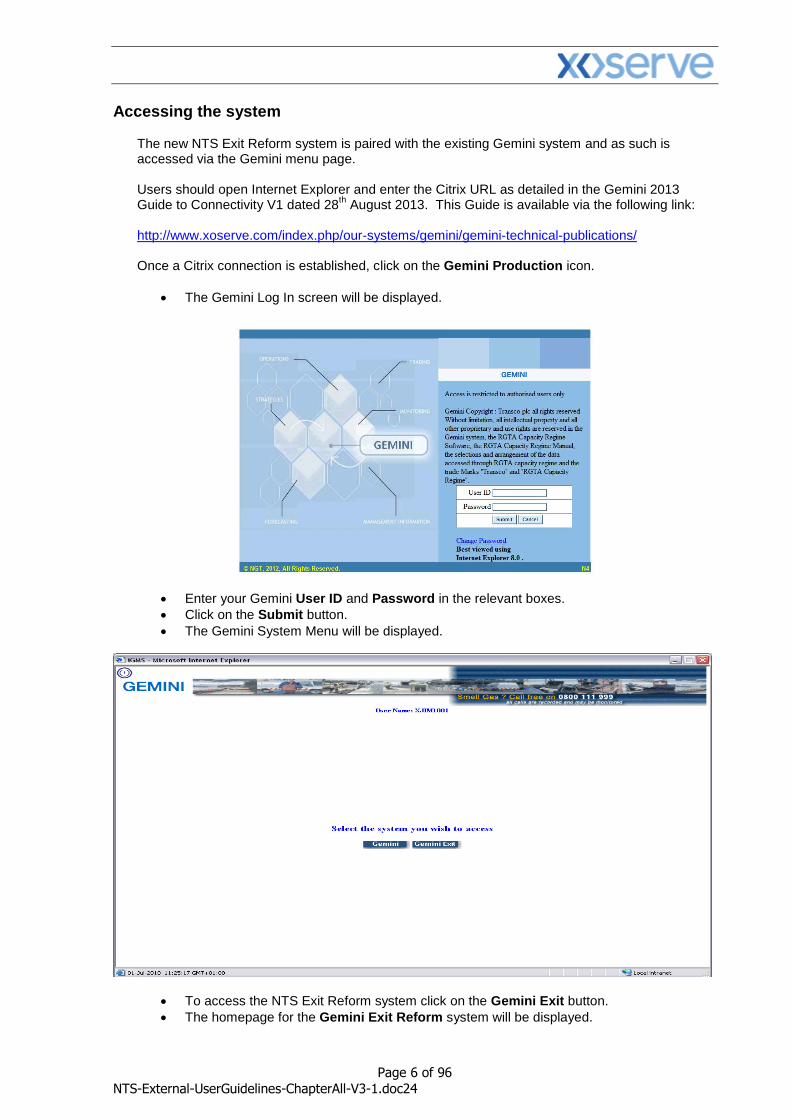
Accessing the system The new NTS Exit Reform system is paired with the existing Gemini system and as such is accessed via the Gemini menu page. Users should open Internet Explorer and enter the Citrix URL as detailed in the Gemini 2013 Guide to Connectivity V1 dated 28
th August 2013. This Guide is available via the following link:
http://www.xoserve.com/index.php/our-systems/gemini/gemini-technical-publications/ Once a Citrix connection is established, click on the Gemini Production icon.
The Gemini Log In screen will be displayed.
Enter your Gemini User ID and Password in the relevant boxes.
Click on the Submit button.
The Gemini System Menu will be displayed.
To access the NTS Exit Reform system click on the Gemini Exit button.
The homepage for the Gemini Exit Reform system will be displayed.
Page 7 of 96
NTS-External-UserGuidelines-ChapterAll-V3-1.doc24
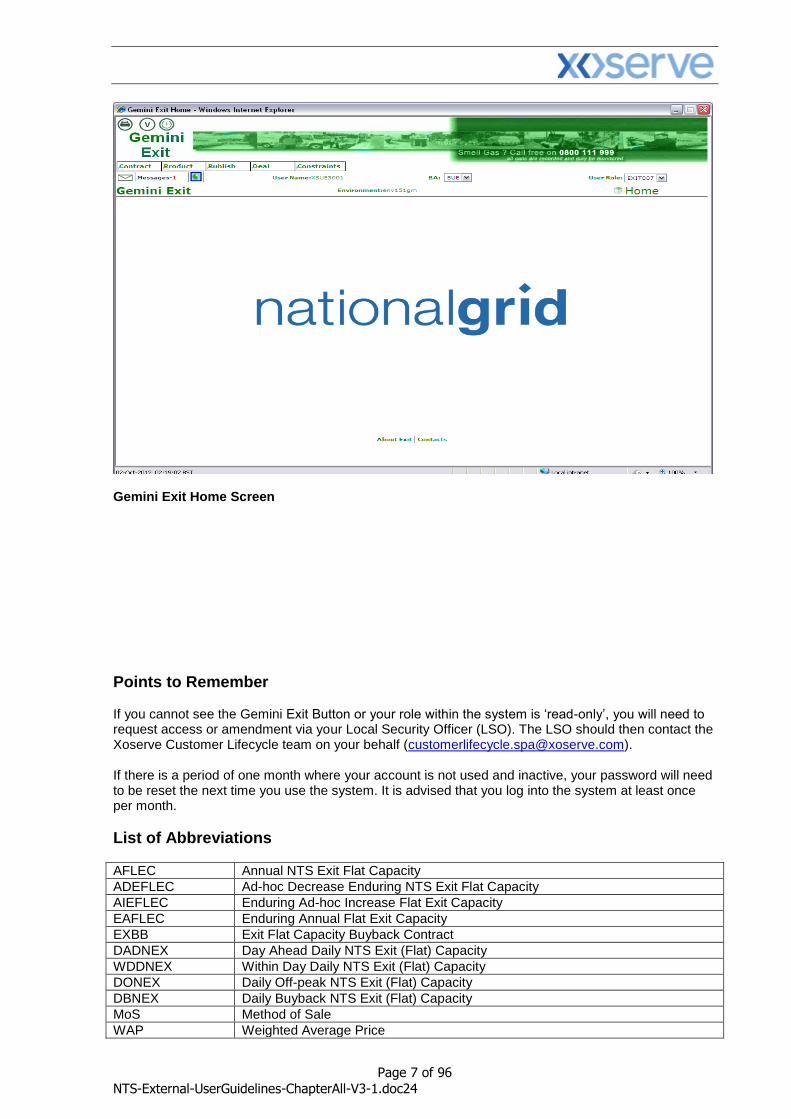
Gemini Exit Home Screen
Points to Remember If you cannot see the Gemini Exit Button or your role within the system is ‘read-only’, you will need to request access or amendment via your Local Security Officer (LSO). The LSO should then contact the Xoserve Customer Lifecycle team on your behalf ([email protected]). If there is a period of one month where your account is not used and inactive, your password will need to be reset the next time you use the system. It is advised that you log into the system at least once per month.
List of Abbreviations
AFLEC Annual NTS Exit Flat Capacity
ADEFLEC Ad-hoc Decrease Enduring NTS Exit Flat Capacity
AIEFLEC Enduring Ad-hoc Increase Flat Exit Capacity
EAFLEC Enduring Annual Flat Exit Capacity
EXBB Exit Flat Capacity Buyback Contract
DADNEX Day Ahead Daily NTS Exit (Flat) Capacity
WDDNEX Within Day Daily NTS Exit (Flat) Capacity
DONEX Daily Off-peak NTS Exit (Flat) Capacity
DBNEX Daily Buyback NTS Exit (Flat) Capacity
MoS Method of Sale
WAP Weighted Average Price
Page 8 of 96
NTS-External-UserGuidelines-ChapterAll-V3-1.doc24
OFR Off-take Flow Reduction
DN Distribution Network
BA Business Associate
OCF Off-peak Curtailment Factor
LSO Local Security Officer
OPN Offtake Profile Notice
Page 9 of 96
NTS-External-UserGuidelines-ChapterAll-V3-1.doc24
Gemini NTS
Exit Reform
Chapter One
Reports
Page 10 of 96
NTS-External-UserGuidelines-ChapterAll-V3-1.doc24
1. Reports
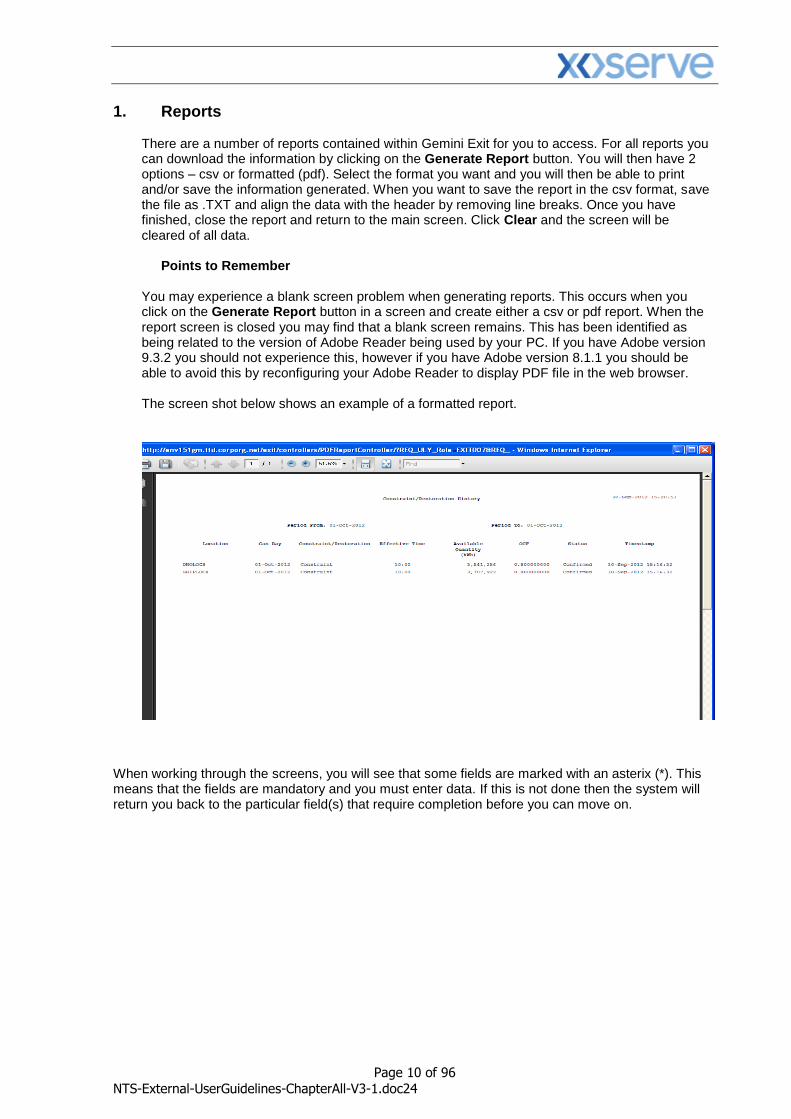
There are a number of reports contained within Gemini Exit for you to access. For all reports you can download the information by clicking on the Generate Report button. You will then have 2 options – csv or formatted (pdf). Select the format you want and you will then be able to print and/or save the information generated. When you want to save the report in the csv format, save the file as .TXT and align the data with the header by removing line breaks. Once you have finished, close the report and return to the main screen. Click Clear and the screen will be cleared of all data.
Points to Remember
You may experience a blank screen problem when generating reports. This occurs when you click on the Generate Report button in a screen and create either a csv or pdf report. When the report screen is closed you may find that a blank screen remains. This has been identified as being related to the version of Adobe Reader being used by your PC. If you have Adobe version 9.3.2 you should not experience this, however if you have Adobe version 8.1.1 you should be able to avoid this by reconfiguring your Adobe Reader to display PDF file in the web browser. The screen shot below shows an example of a formatted report.
When working through the screens, you will see that some fields are marked with an asterix (*). This means that the fields are mandatory and you must enter data. If this is not done then the system will return you back to the particular field(s) that require completion before you can move on.
Page 11 of 96
NTS-External-UserGuidelines-ChapterAll-V3-1.doc24
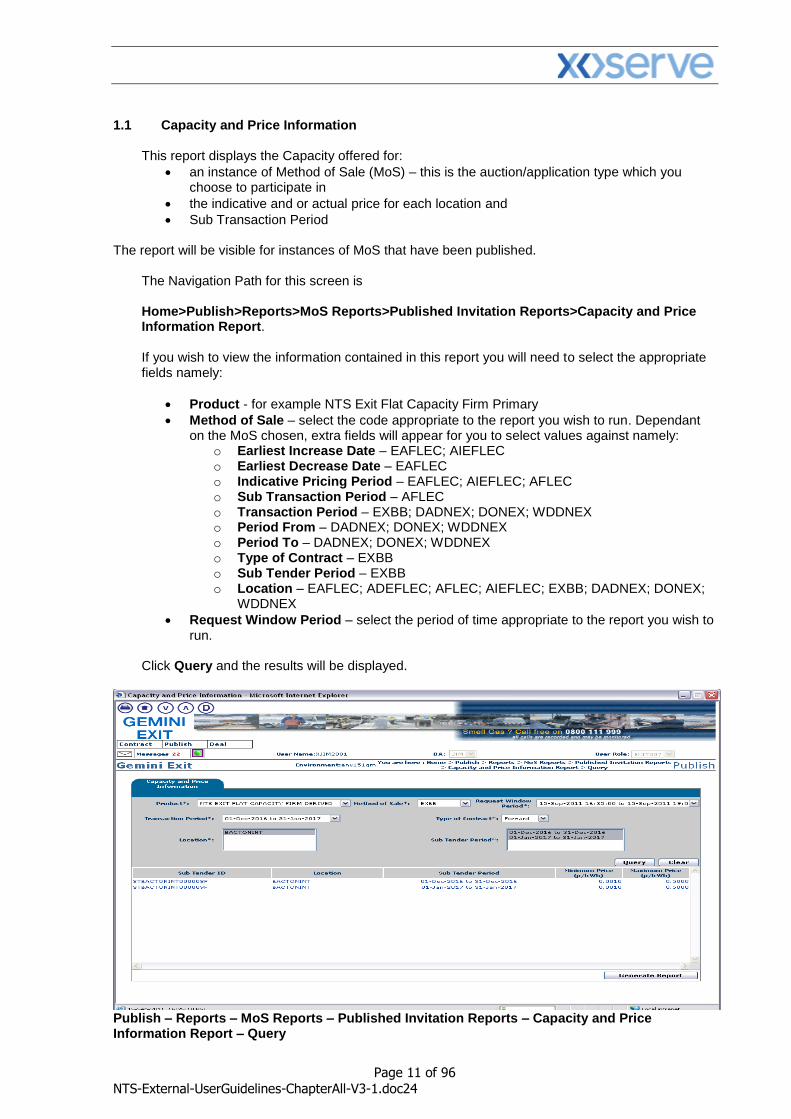
1.1 Capacity and Price Information
This report displays the Capacity offered for:
an instance of Method of Sale (MoS) – this is the auction/application type which you choose to participate in
the indicative and or actual price for each location and
Sub Transaction Period
The report will be visible for instances of MoS that have been published.
The Navigation Path for this screen is Home>Publish>Reports>MoS Reports>Published Invitation Reports>Capacity and Price Information Report. If you wish to view the information contained in this report you will need to select the appropriate fields namely:
Product - for example NTS Exit Flat Capacity Firm Primary
Method of Sale – select the code appropriate to the report you wish to run. Dependant on the MoS chosen, extra fields will appear for you to select values against namely:
o Earliest Increase Date – EAFLEC; AIEFLEC o Earliest Decrease Date – EAFLEC o Indicative Pricing Period – EAFLEC; AIEFLEC; AFLEC o Sub Transaction Period – AFLEC o Transaction Period – EXBB; DADNEX; DONEX; WDDNEX o Period From – DADNEX; DONEX; WDDNEX o Period To – DADNEX; DONEX; WDDNEX o Type of Contract – EXBB o Sub Tender Period – EXBB o Location – EAFLEC; ADEFLEC; AFLEC; AIEFLEC; EXBB; DADNEX; DONEX;
WDDNEX
Request Window Period – select the period of time appropriate to the report you wish to run.
Click Query and the results will be displayed.
Publish – Reports – MoS Reports – Published Invitation Reports – Capacity and Price Information Report – Query
Page 12 of 96
NTS-External-UserGuidelines-ChapterAll-V3-1.doc24
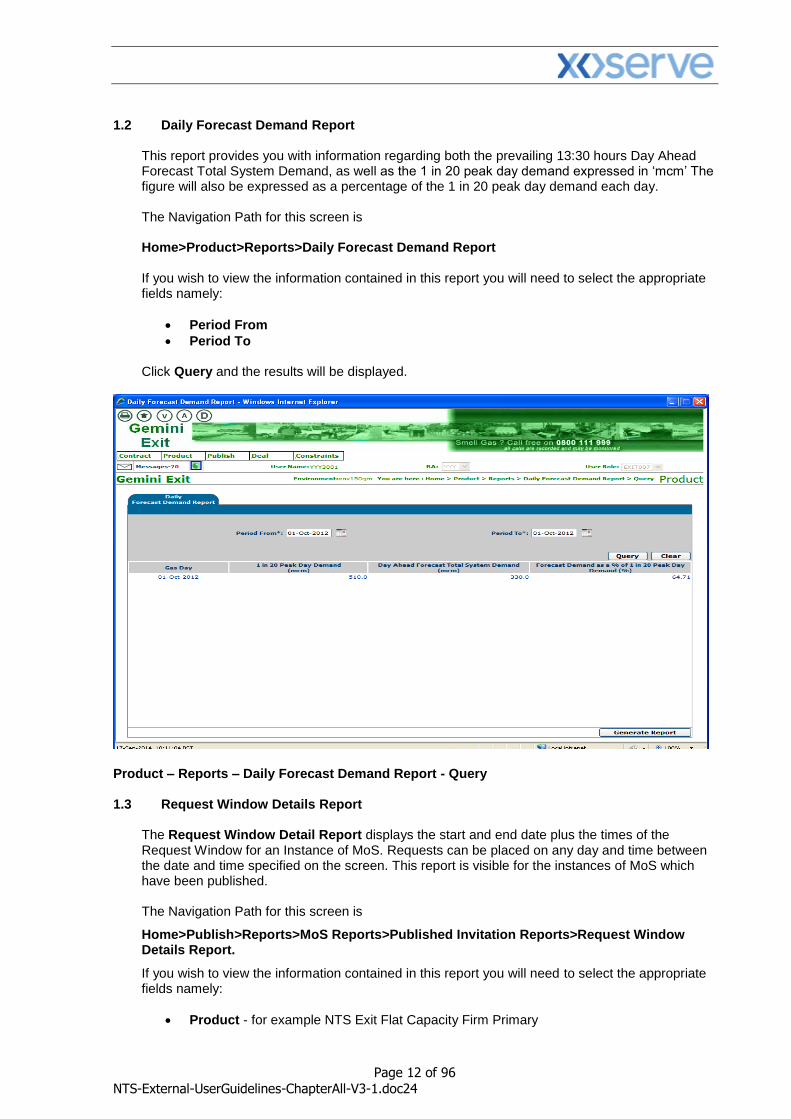
1.2 Daily Forecast Demand Report
This report provides you with information regarding both the prevailing 13:30 hours Day Ahead Forecast Total System Demand, as well as the 1 in 20 peak day demand expressed in ‘mcm’ The figure will also be expressed as a percentage of the 1 in 20 peak day demand each day. The Navigation Path for this screen is Home>Product>Reports>Daily Forecast Demand Report If you wish to view the information contained in this report you will need to select the appropriate fields namely:
Period From
Period To Click Query and the results will be displayed.
Product – Reports – Daily Forecast Demand Report - Query 1.3 Request Window Details Report
The Request Window Detail Report displays the start and end date plus the times of the Request Window for an Instance of MoS. Requests can be placed on any day and time between the date and time specified on the screen. This report is visible for the instances of MoS which have been published.
The Navigation Path for this screen is
Home>Publish>Reports>MoS Reports>Published Invitation Reports>Request Window Details Report.
If you wish to view the information contained in this report you will need to select the appropriate fields namely:
Product - for example NTS Exit Flat Capacity Firm Primary

Page 13 of 96
NTS-External-UserGuidelines-ChapterAll-V3-1.doc24
Method of Sale – select the code appropriate to the report you wish to run. Dependant on the MoS chosen, extra fields will appear for you to select values against:
o Request Type (Increase or Decrease) – AIEFLEC; EAFLEC; ADEFLEC o Earliest Increase Start Date (default) – AIEFLEC; EAFLEC o Earliest Decrease Start Date (default) – EAFLEC; ADEFLEC o Transaction Period – AFLEC; EXBB; DADNEX; DONEX; DBNEX; WDDNEX o Application Window Type – EAFLEC o Sub Transaction Period – AFLEC
Click Query and the results will be displayed.
Publish – Reports – MoS Reports – Published Invitation Reports – Request Window Details Report – Query 1.4 Auction Request Information Report
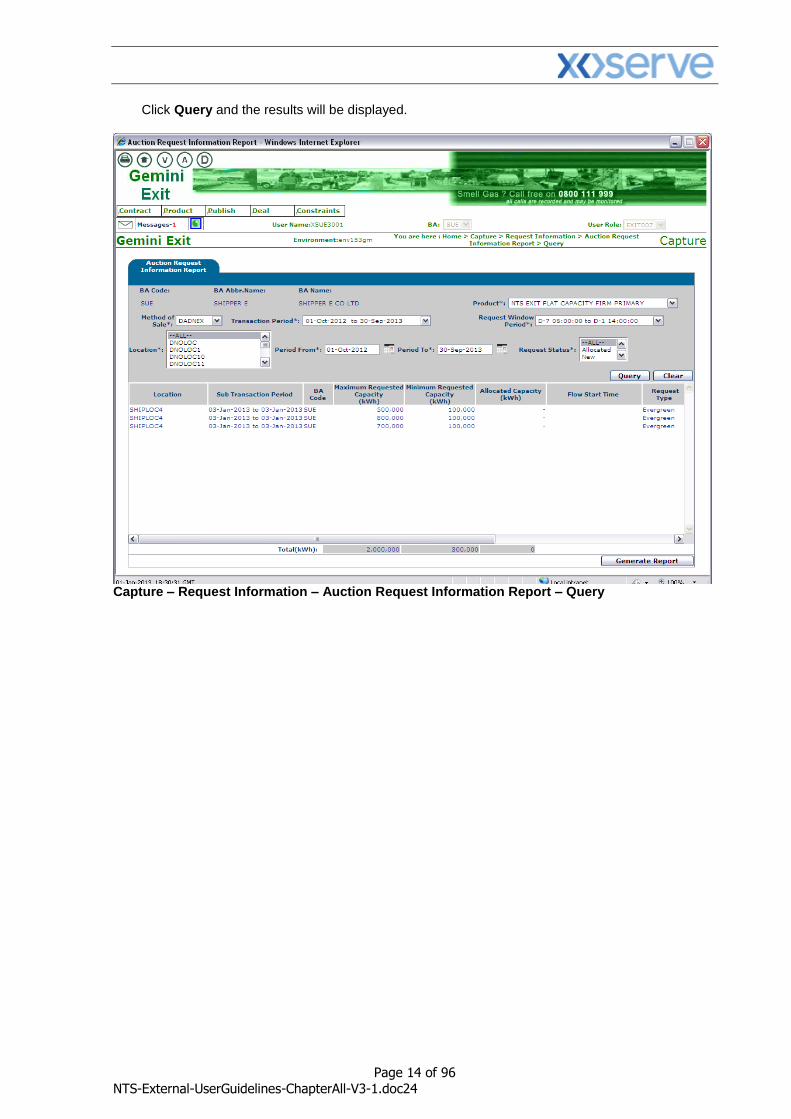
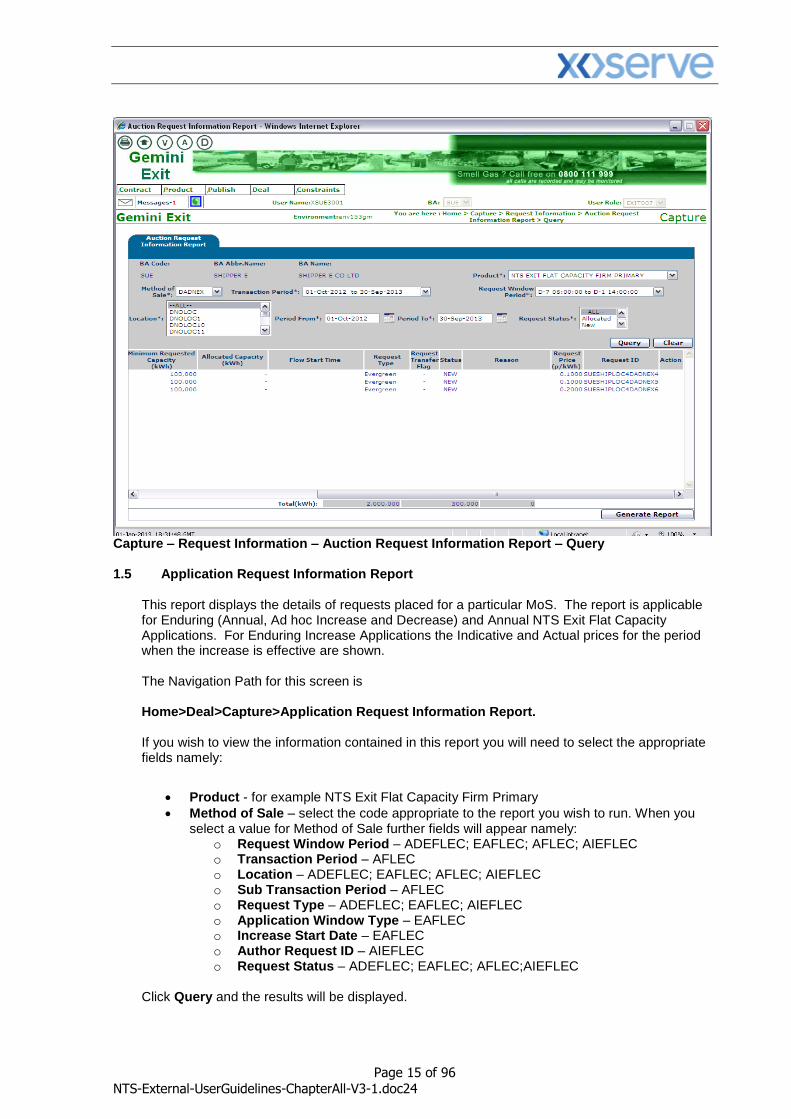
The Auction Request Information Report displays the details of requests that have been placed along with the status. The information generated is based on Product and MoS that you enter. This report is only applicable for Daily Short Term Auctions that is DADNEX; WDDNEX; DONEX and DBNEX The Navigation Path for this screen is Home>Deal>Capture>Request Information>Auction Request Information Report
If you wish to view the information contained in this report you will need to select the appropriate fields namely:
Product - for example NTS Exit Flat Capacity Firm Primary
Method of Sale – select the code appropriate to the report you wish to run
Transaction Period – select the appropriate period of time. This represents the period in which the Gas Day falls for the date you wish to buy or sell capacity
Request Window Period
Location
Period From
Period To
Request Status
Page 14 of 96
NTS-External-UserGuidelines-ChapterAll-V3-1.doc24
Click Query and the results will be displayed.
Capture – Request Information – Auction Request Information Report – Query
Page 15 of 96
NTS-External-UserGuidelines-ChapterAll-V3-1.doc24
Capture – Request Information – Auction Request Information Report – Query
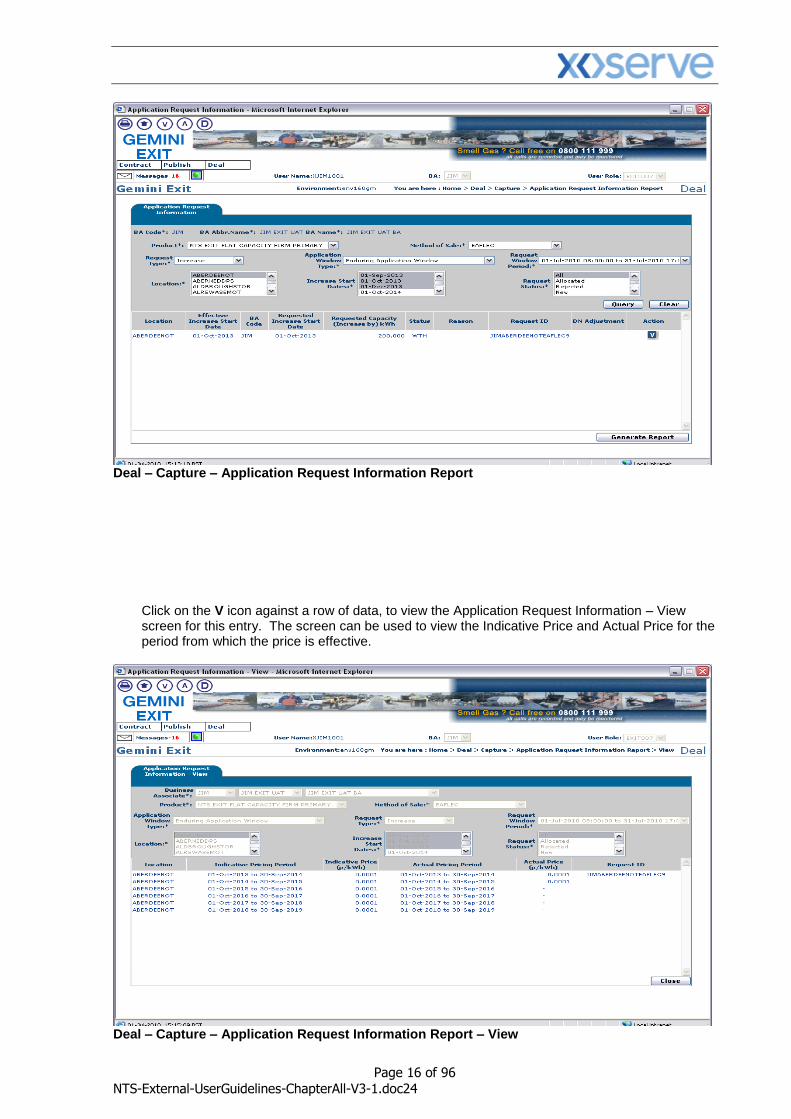
1.5 Application Request Information Report
This report displays the details of requests placed for a particular MoS. The report is applicable for Enduring (Annual, Ad hoc Increase and Decrease) and Annual NTS Exit Flat Capacity Applications. For Enduring Increase Applications the Indicative and Actual prices for the period when the increase is effective are shown. The Navigation Path for this screen is Home>Deal>Capture>Application Request Information Report. If you wish to view the information contained in this report you will need to select the appropriate fields namely:
Product - for example NTS Exit Flat Capacity Firm Primary
Method of Sale – select the code appropriate to the report you wish to run. When you select a value for Method of Sale further fields will appear namely:
o Request Window Period – ADEFLEC; EAFLEC; AFLEC; AIEFLEC o Transaction Period – AFLEC o Location – ADEFLEC; EAFLEC; AFLEC; AIEFLEC o Sub Transaction Period – AFLEC o Request Type – ADEFLEC; EAFLEC; AIEFLEC o Application Window Type – EAFLEC o Increase Start Date – EAFLEC o Author Request ID – AIEFLEC o Request Status – ADEFLEC; EAFLEC; AFLEC;AIEFLEC
Click Query and the results will be displayed.
Page 16 of 96
NTS-External-UserGuidelines-ChapterAll-V3-1.doc24
Deal – Capture – Application Request Information Report
Click on the V icon against a row of data, to view the Application Request Information – View screen for this entry. The screen can be used to view the Indicative Price and Actual Price for the period from which the price is effective.
Deal – Capture – Application Request Information Report – View

Page 17 of 96
NTS-External-UserGuidelines-ChapterAll-V3-1.doc24
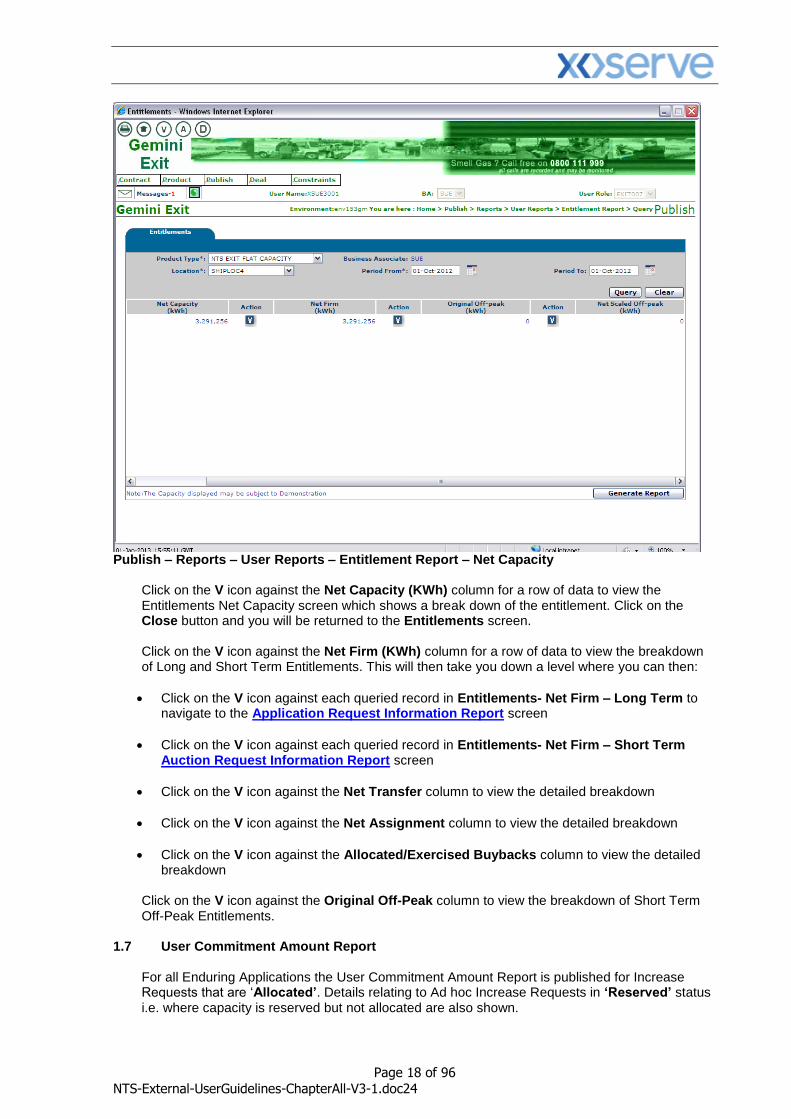
1.6 Entitlements Report
This report provides details of the total Capacity Entitlements based on Location and Period From and To dates. The Entitlement Report displays data relating to ‘allocated’ requests
The Navigation Path for this screen is Home>Publish>Reports>User Reports>Entitlement Report. If you wish to view the information contained in this report you will need to select the appropriate fields namely:
Product - for example NTS Exit Flat Capacity Firm Primary
Location
Period From
Period To Click Query and the results will be displayed.
Publish – Reports – User Reports – Entitlement Report – Net Capacity
Page 18 of 96
NTS-External-UserGuidelines-ChapterAll-V3-1.doc24
Publish – Reports – User Reports – Entitlement Report – Net Capacity
Click on the V icon against the Net Capacity (KWh) column for a row of data to view the Entitlements Net Capacity screen which shows a break down of the entitlement. Click on the Close button and you will be returned to the Entitlements screen. Click on the V icon against the Net Firm (KWh) column for a row of data to view the breakdown of Long and Short Term Entitlements. This will then take you down a level where you can then:
Click on the V icon against each queried record in Entitlements- Net Firm – Long Term to navigate to the Application Request Information Report screen
Click on the V icon against each queried record in Entitlements- Net Firm – Short Term Auction Request Information Report screen
Click on the V icon against the Net Transfer column to view the detailed breakdown
Click on the V icon against the Net Assignment column to view the detailed breakdown
Click on the V icon against the Allocated/Exercised Buybacks column to view the detailed breakdown
Click on the V icon against the Original Off-Peak column to view the breakdown of Short Term Off-Peak Entitlements.
1.7 User Commitment Amount Report
For all Enduring Applications the User Commitment Amount Report is published for Increase Requests that are ‘Allocated’. Details relating to Ad hoc Increase Requests in ‘Reserved’ status i.e. where capacity is reserved but not allocated are also shown.
Page 19 of 96
NTS-External-UserGuidelines-ChapterAll-V3-1.doc24
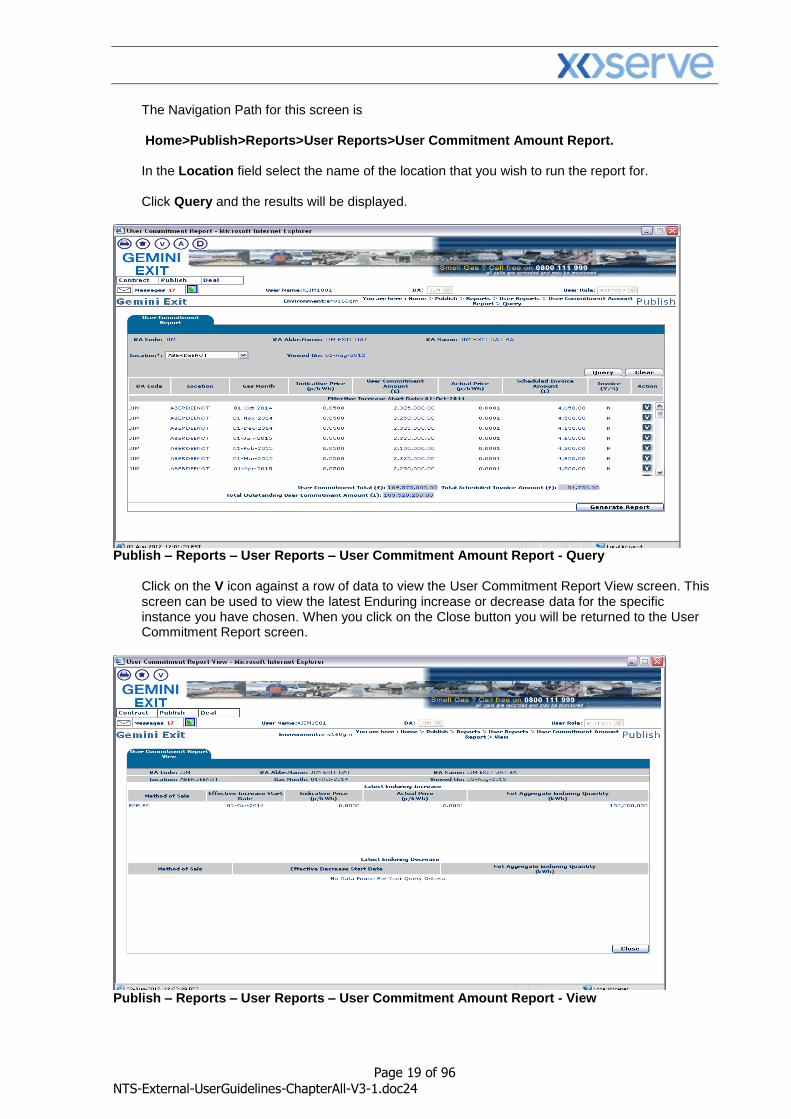
The Navigation Path for this screen is Home>Publish>Reports>User Reports>User Commitment Amount Report. In the Location field select the name of the location that you wish to run the report for. Click Query and the results will be displayed.
Publish – Reports – User Reports – User Commitment Amount Report - Query
Click on the V icon against a row of data to view the User Commitment Report View screen. This screen can be used to view the latest Enduring increase or decrease data for the specific instance you have chosen. When you click on the Close button you will be returned to the User Commitment Report screen.
Publish – Reports – User Reports – User Commitment Amount Report - View
Page 20 of 96
NTS-External-UserGuidelines-ChapterAll-V3-1.doc24
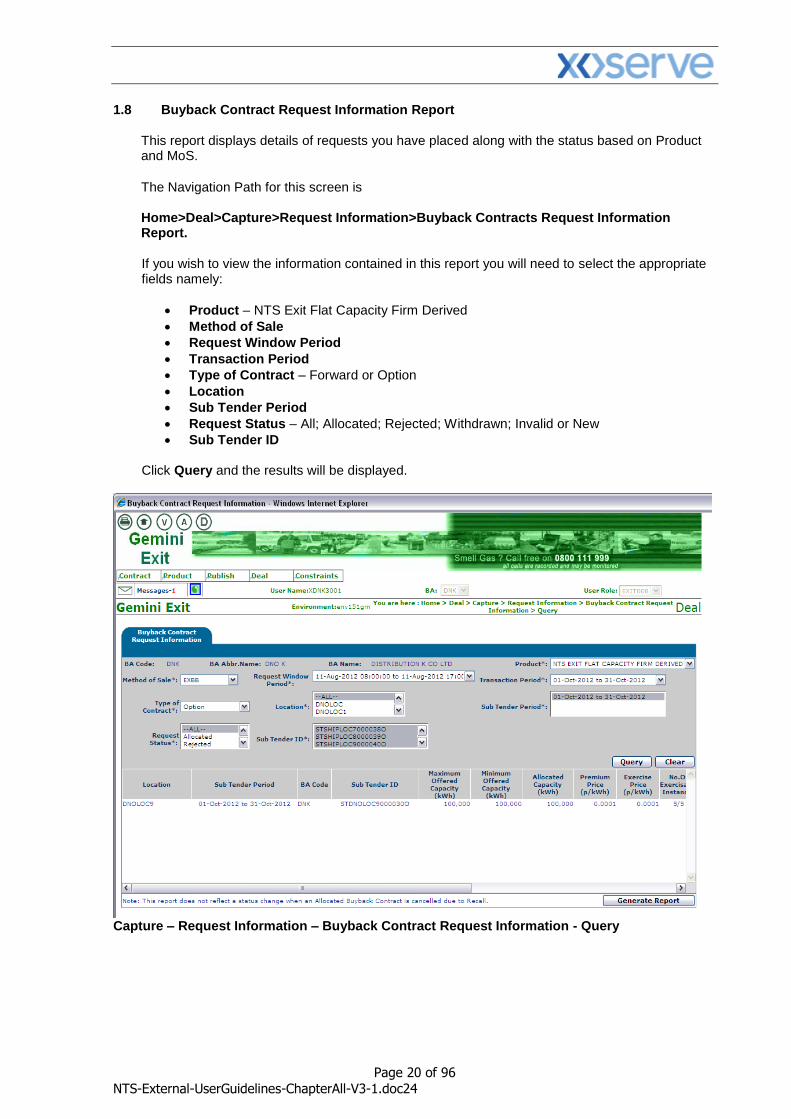
1.8 Buyback Contract Request Information Report
This report displays details of requests you have placed along with the status based on Product and MoS.
The Navigation Path for this screen is Home>Deal>Capture>Request Information>Buyback Contracts Request Information Report. If you wish to view the information contained in this report you will need to select the appropriate fields namely:
Product – NTS Exit Flat Capacity Firm Derived
Method of Sale
Request Window Period
Transaction Period
Type of Contract – Forward or Option
Location
Sub Tender Period
Request Status – All; Allocated; Rejected; Withdrawn; Invalid or New
Sub Tender ID
Click Query and the results will be displayed.
Capture – Request Information – Buyback Contract Request Information - Query
Page 21 of 96
NTS-External-UserGuidelines-ChapterAll-V3-1.doc24
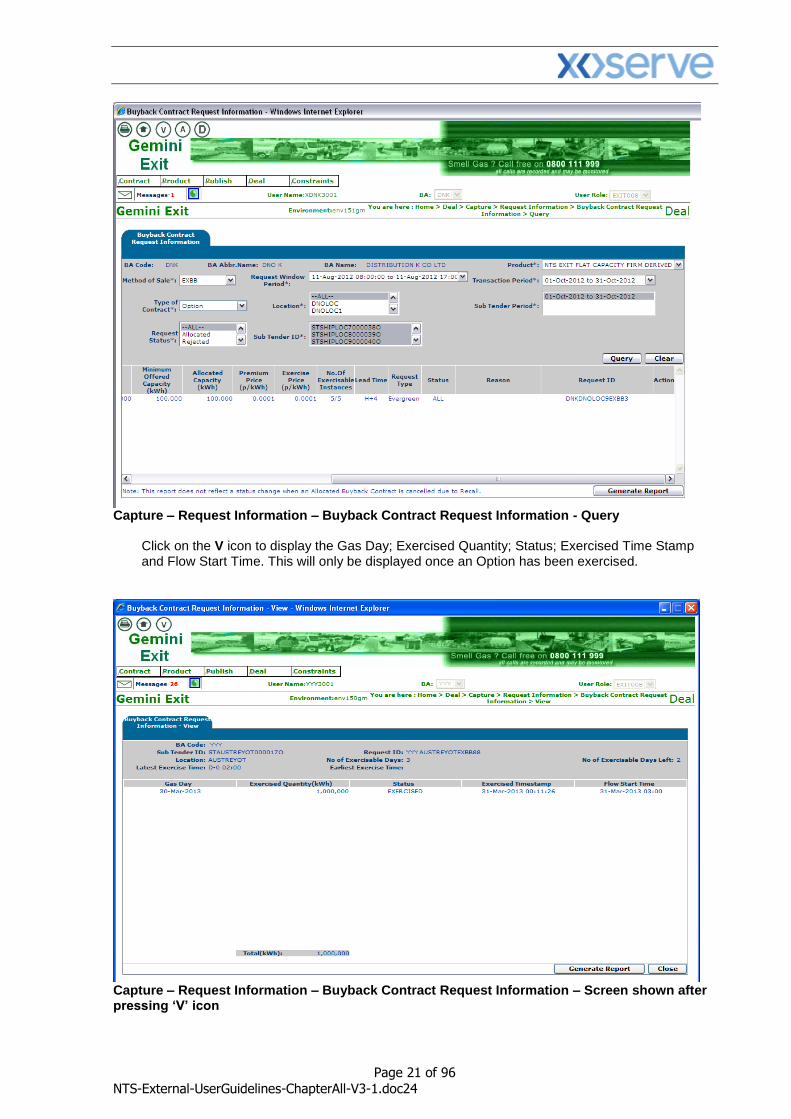
Capture – Request Information – Buyback Contract Request Information - Query
Click on the V icon to display the Gas Day; Exercised Quantity; Status; Exercised Time Stamp and Flow Start Time. This will only be displayed once an Option has been exercised.
Capture – Request Information – Buyback Contract Request Information – Screen shown after pressing ‘V’ icon
Page 22 of 96
NTS-External-UserGuidelines-ChapterAll-V3-1.doc24
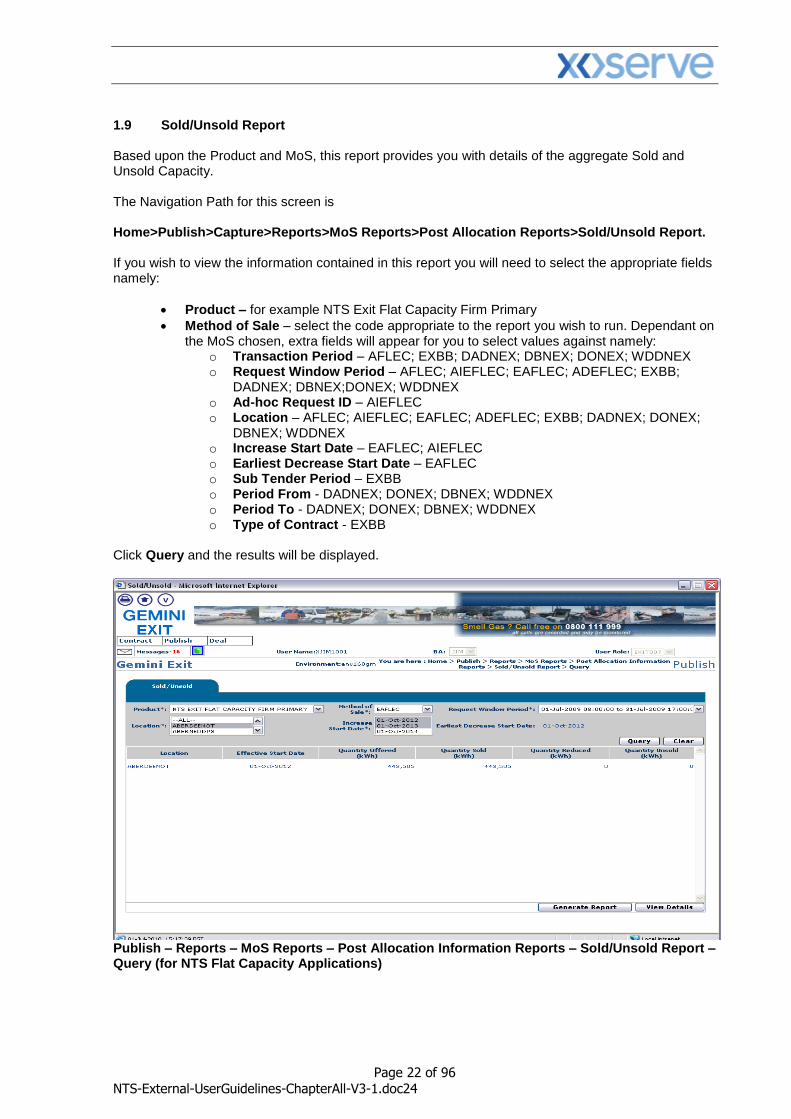
1.9 Sold/Unsold Report Based upon the Product and MoS, this report provides you with details of the aggregate Sold and Unsold Capacity. The Navigation Path for this screen is
Home>Publish>Capture>Reports>MoS Reports>Post Allocation Reports>Sold/Unsold Report.
If you wish to view the information contained in this report you will need to select the appropriate fields namely:
Product – for example NTS Exit Flat Capacity Firm Primary
Method of Sale – select the code appropriate to the report you wish to run. Dependant on the MoS chosen, extra fields will appear for you to select values against namely:
o Transaction Period – AFLEC; EXBB; DADNEX; DBNEX; DONEX; WDDNEX o Request Window Period – AFLEC; AIEFLEC; EAFLEC; ADEFLEC; EXBB;
DADNEX; DBNEX;DONEX; WDDNEX o Ad-hoc Request ID – AIEFLEC o Location – AFLEC; AIEFLEC; EAFLEC; ADEFLEC; EXBB; DADNEX; DONEX;
DBNEX; WDDNEX o Increase Start Date – EAFLEC; AIEFLEC o Earliest Decrease Start Date – EAFLEC o Sub Tender Period – EXBB o Period From - DADNEX; DONEX; DBNEX; WDDNEX o Period To - DADNEX; DONEX; DBNEX; WDDNEX o Type of Contract - EXBB
Click Query and the results will be displayed.
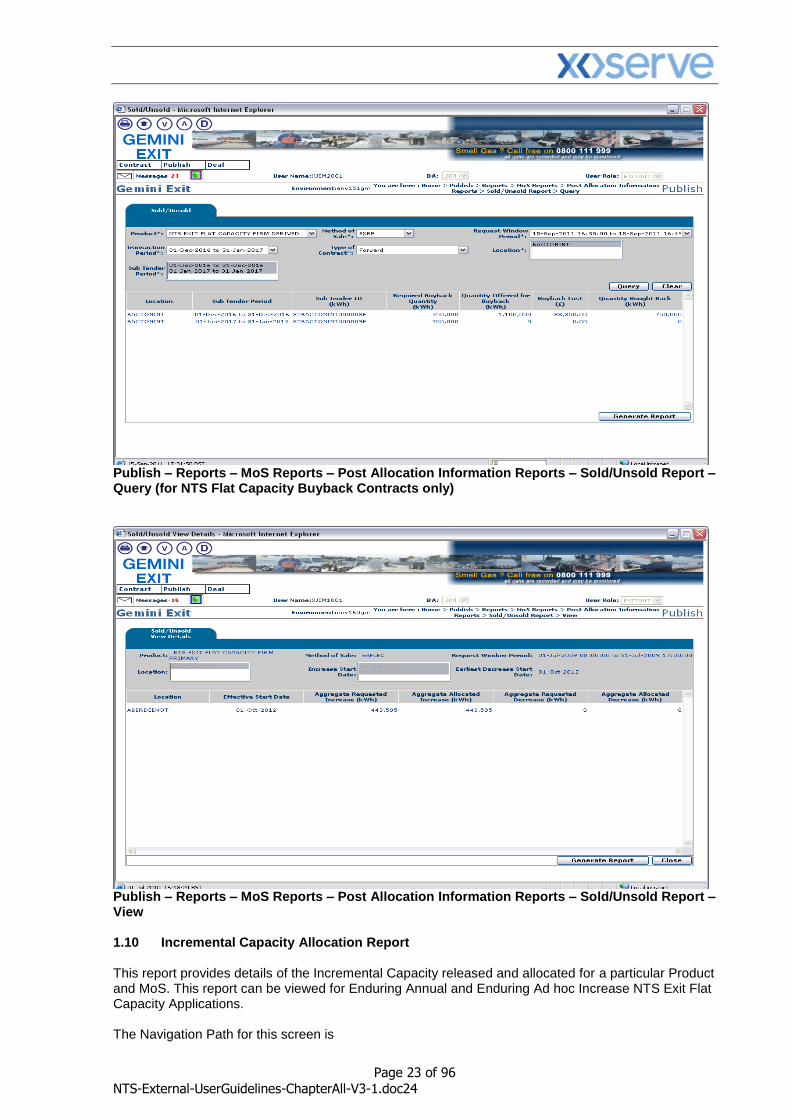
Publish – Reports – MoS Reports – Post Allocation Information Reports – Sold/Unsold Report – Query (for NTS Flat Capacity Applications)
Page 23 of 96
NTS-External-UserGuidelines-ChapterAll-V3-1.doc24
Publish – Reports – MoS Reports – Post Allocation Information Reports – Sold/Unsold Report – Query (for NTS Flat Capacity Buyback Contracts only)
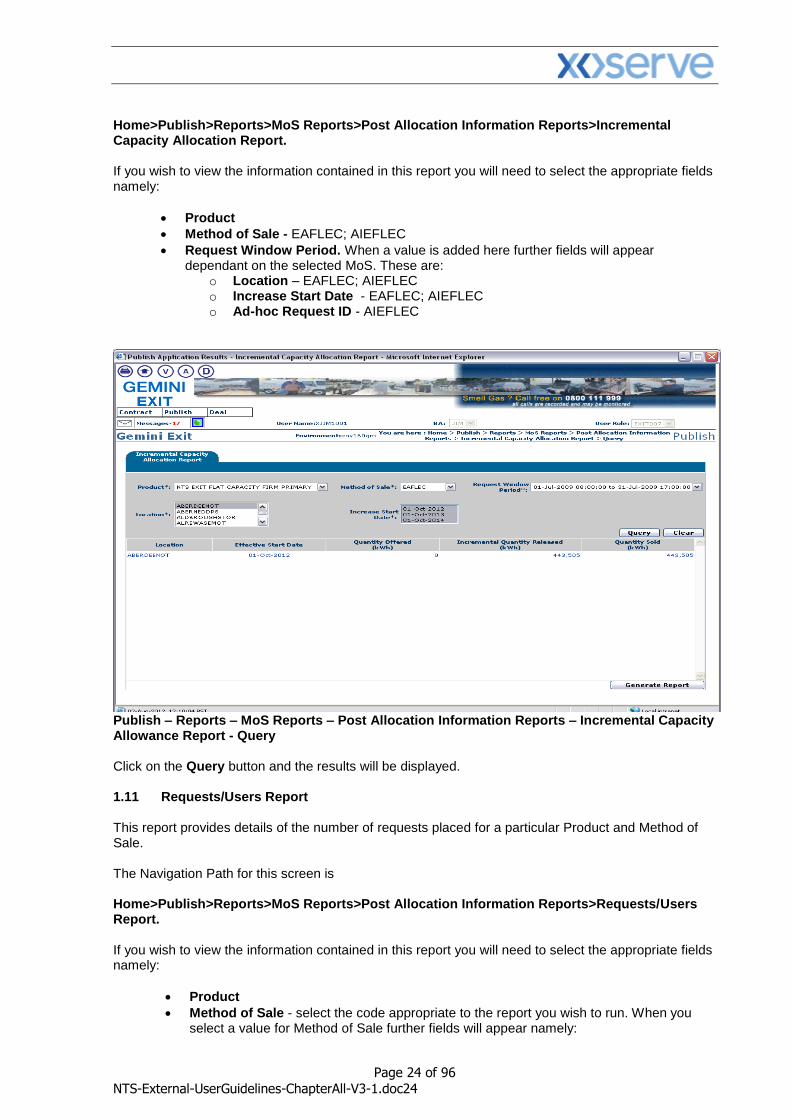
Publish – Reports – MoS Reports – Post Allocation Information Reports – Sold/Unsold Report – View 1.10 Incremental Capacity Allocation Report This report provides details of the Incremental Capacity released and allocated for a particular Product and MoS. This report can be viewed for Enduring Annual and Enduring Ad hoc Increase NTS Exit Flat Capacity Applications. The Navigation Path for this screen is
Page 24 of 96
NTS-External-UserGuidelines-ChapterAll-V3-1.doc24
Home>Publish>Reports>MoS Reports>Post Allocation Information Reports>Incremental Capacity Allocation Report. If you wish to view the information contained in this report you will need to select the appropriate fields namely:
Product
Method of Sale - EAFLEC; AIEFLEC
Request Window Period. When a value is added here further fields will appear dependant on the selected MoS. These are:
o Location – EAFLEC; AIEFLEC o Increase Start Date - EAFLEC; AIEFLEC o Ad-hoc Request ID - AIEFLEC
Publish – Reports – MoS Reports – Post Allocation Information Reports – Incremental Capacity Allowance Report - Query
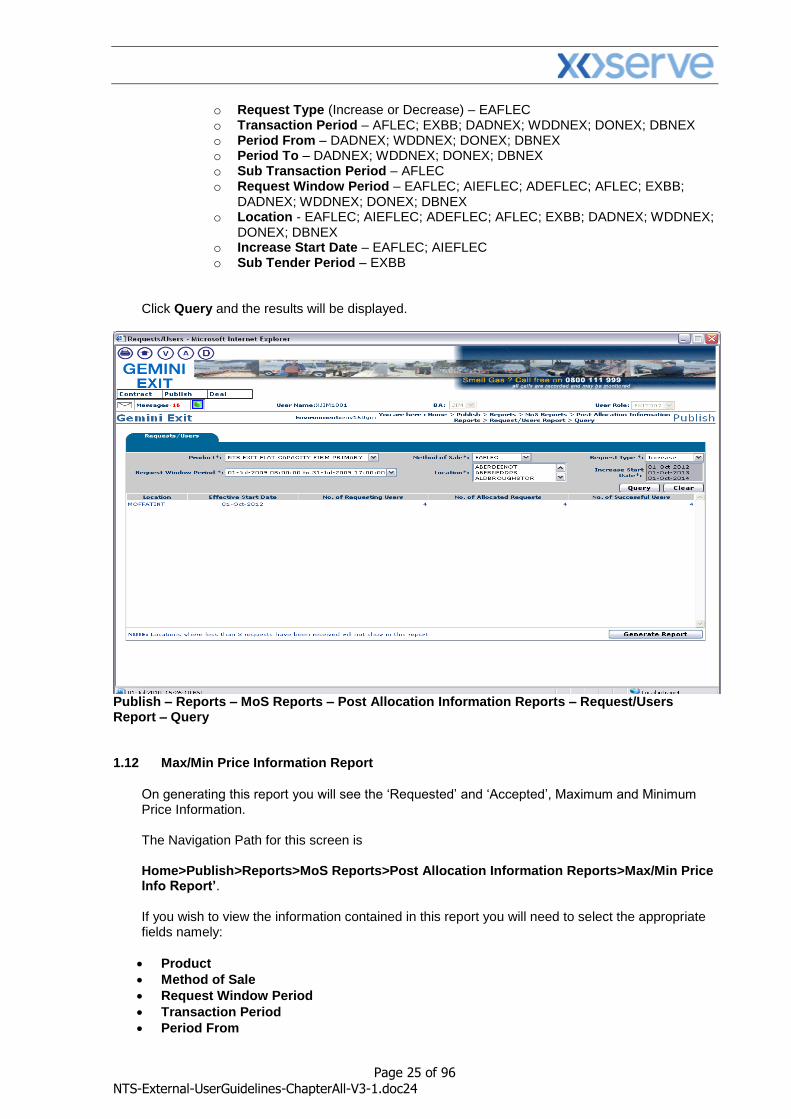
Click on the Query button and the results will be displayed. 1.11 Requests/Users Report This report provides details of the number of requests placed for a particular Product and Method of Sale. The Navigation Path for this screen is Home>Publish>Reports>MoS Reports>Post Allocation Information Reports>Requests/Users Report. If you wish to view the information contained in this report you will need to select the appropriate fields namely:
Product
Method of Sale - select the code appropriate to the report you wish to run. When you select a value for Method of Sale further fields will appear namely:
Page 25 of 96
NTS-External-UserGuidelines-ChapterAll-V3-1.doc24
o Request Type (Increase or Decrease) – EAFLEC o Transaction Period – AFLEC; EXBB; DADNEX; WDDNEX; DONEX; DBNEX o Period From – DADNEX; WDDNEX; DONEX; DBNEX o Period To – DADNEX; WDDNEX; DONEX; DBNEX o Sub Transaction Period – AFLEC o Request Window Period – EAFLEC; AIEFLEC; ADEFLEC; AFLEC; EXBB;
DADNEX; WDDNEX; DONEX; DBNEX o Location - EAFLEC; AIEFLEC; ADEFLEC; AFLEC; EXBB; DADNEX; WDDNEX;
DONEX; DBNEX o Increase Start Date – EAFLEC; AIEFLEC o Sub Tender Period – EXBB
Click Query and the results will be displayed.
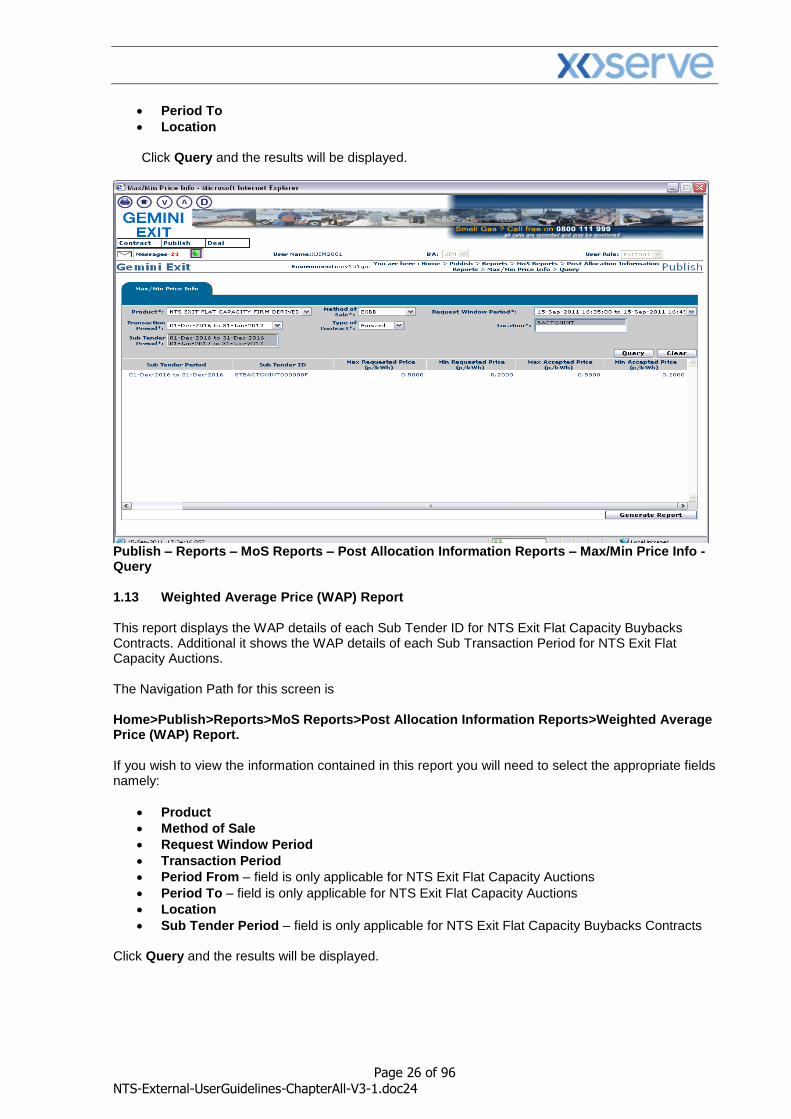
Publish – Reports – MoS Reports – Post Allocation Information Reports – Request/Users Report – Query 1.12 Max/Min Price Information Report
On generating this report you will see the ‘Requested’ and ‘Accepted’, Maximum and Minimum Price Information. The Navigation Path for this screen is Home>Publish>Reports>MoS Reports>Post Allocation Information Reports>Max/Min Price Info Report’. If you wish to view the information contained in this report you will need to select the appropriate fields namely:
Product
Method of Sale
Request Window Period
Transaction Period
Period From
Page 26 of 96
NTS-External-UserGuidelines-ChapterAll-V3-1.doc24
Period To
Location Click Query and the results will be displayed.
Publish – Reports – MoS Reports – Post Allocation Information Reports – Max/Min Price Info - Query 1.13 Weighted Average Price (WAP) Report This report displays the WAP details of each Sub Tender ID for NTS Exit Flat Capacity Buybacks Contracts. Additional it shows the WAP details of each Sub Transaction Period for NTS Exit Flat Capacity Auctions. The Navigation Path for this screen is Home>Publish>Reports>MoS Reports>Post Allocation Information Reports>Weighted Average Price (WAP) Report. If you wish to view the information contained in this report you will need to select the appropriate fields namely:
Product
Method of Sale
Request Window Period
Transaction Period
Period From – field is only applicable for NTS Exit Flat Capacity Auctions
Period To – field is only applicable for NTS Exit Flat Capacity Auctions
Location
Sub Tender Period – field is only applicable for NTS Exit Flat Capacity Buybacks Contracts Click Query and the results will be displayed.
Page 27 of 96
NTS-External-UserGuidelines-ChapterAll-V3-1.doc24
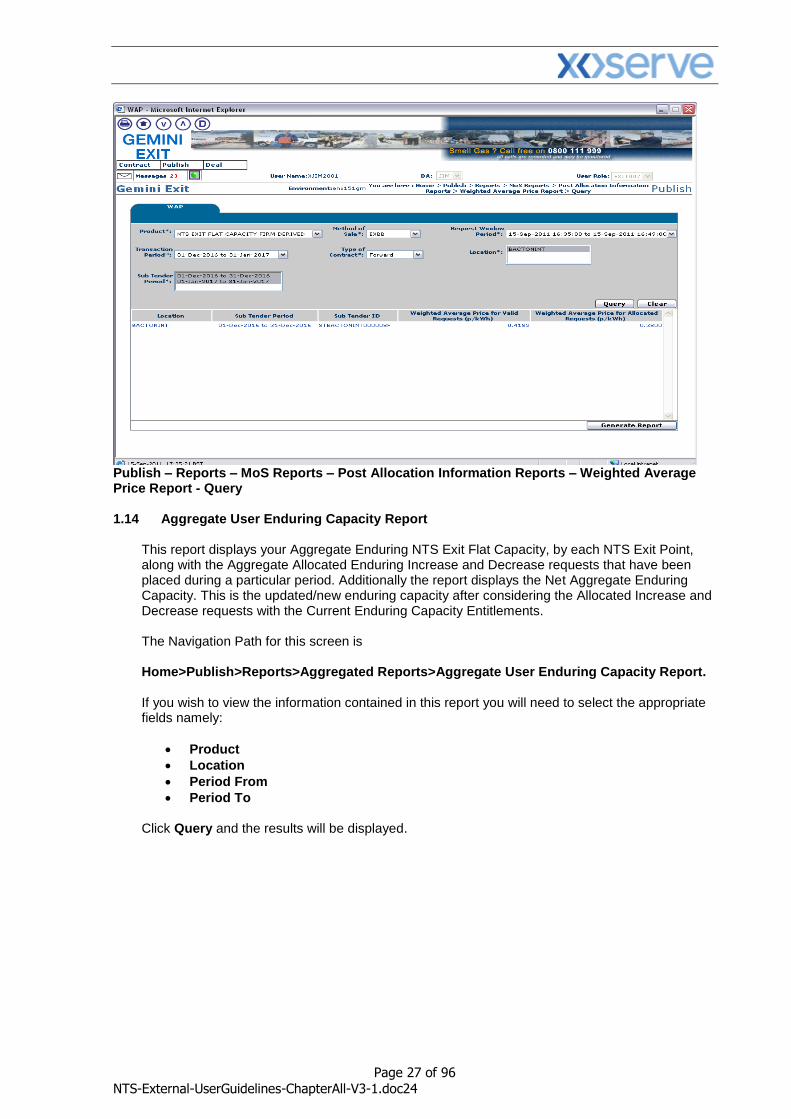
Publish – Reports – MoS Reports – Post Allocation Information Reports – Weighted Average Price Report - Query 1.14 Aggregate User Enduring Capacity Report
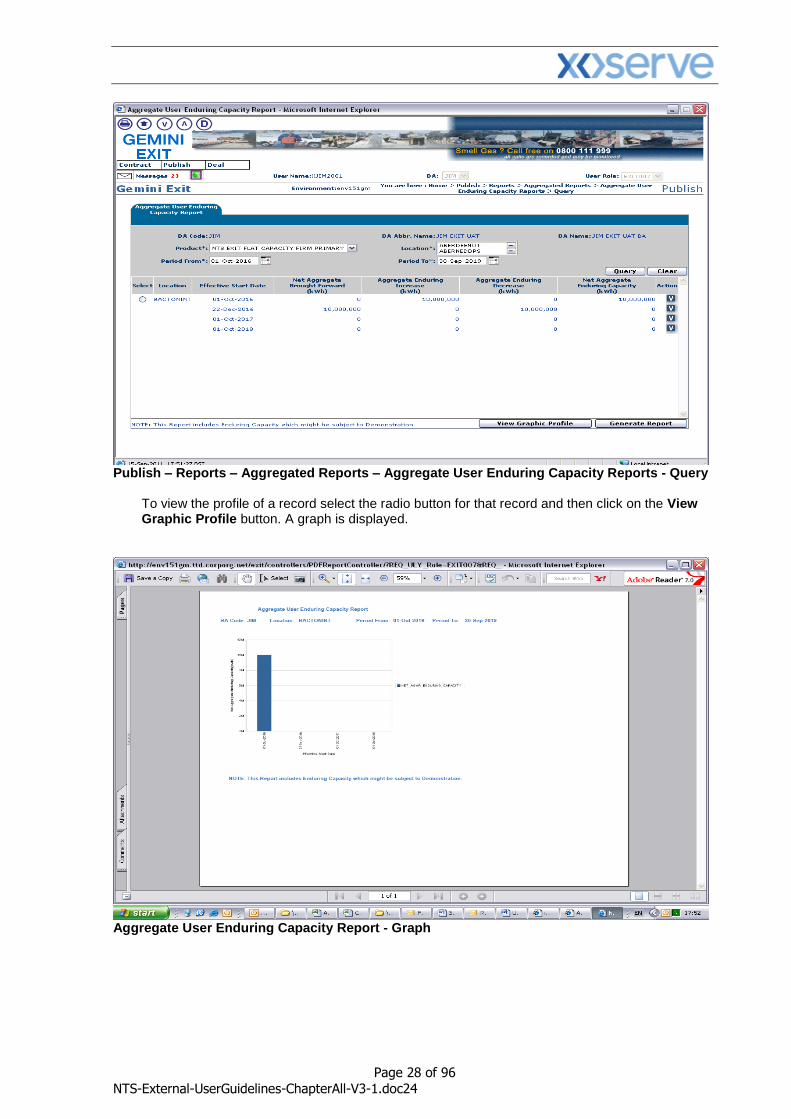
This report displays your Aggregate Enduring NTS Exit Flat Capacity, by each NTS Exit Point, along with the Aggregate Allocated Enduring Increase and Decrease requests that have been placed during a particular period. Additionally the report displays the Net Aggregate Enduring Capacity. This is the updated/new enduring capacity after considering the Allocated Increase and Decrease requests with the Current Enduring Capacity Entitlements. The Navigation Path for this screen is Home>Publish>Reports>Aggregated Reports>Aggregate User Enduring Capacity Report. If you wish to view the information contained in this report you will need to select the appropriate fields namely:
Product
Location
Period From
Period To Click Query and the results will be displayed.
Page 28 of 96
NTS-External-UserGuidelines-ChapterAll-V3-1.doc24
Publish – Reports – Aggregated Reports – Aggregate User Enduring Capacity Reports - Query
To view the profile of a record select the radio button for that record and then click on the View Graphic Profile button. A graph is displayed.
Aggregate User Enduring Capacity Report - Graph
Page 29 of 96
NTS-External-UserGuidelines-ChapterAll-V3-1.doc24
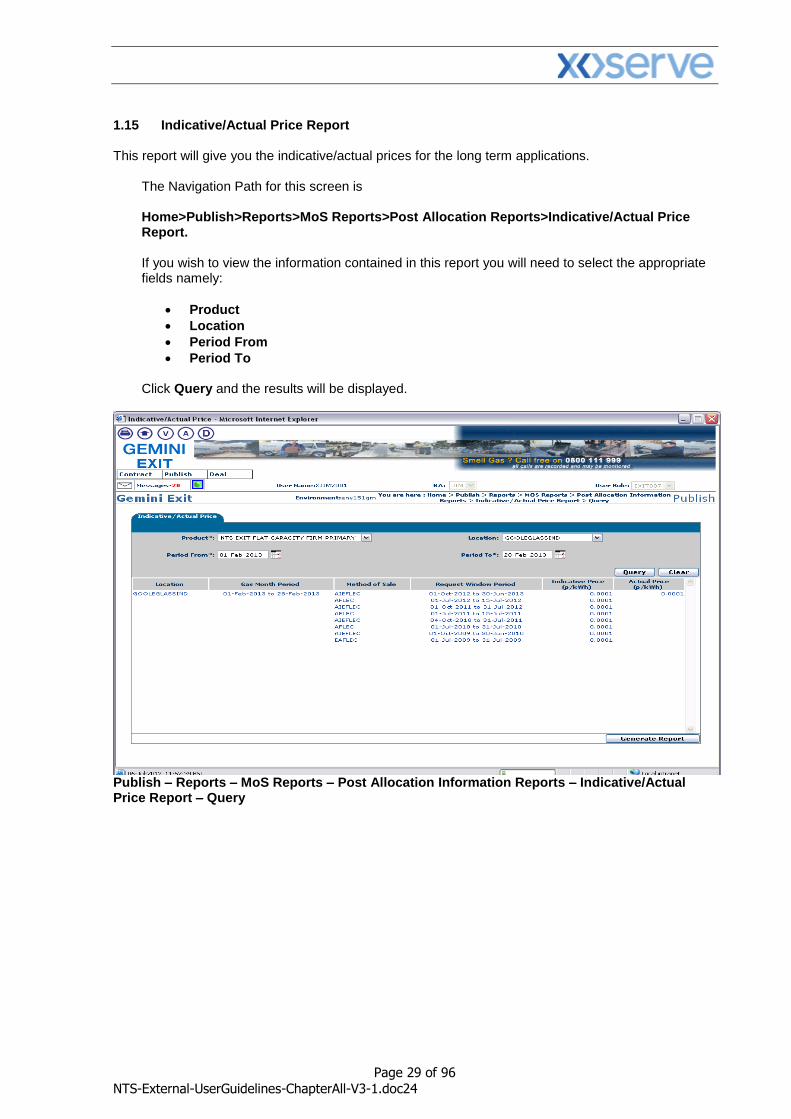
1.15 Indicative/Actual Price Report This report will give you the indicative/actual prices for the long term applications.
The Navigation Path for this screen is Home>Publish>Reports>MoS Reports>Post Allocation Reports>Indicative/Actual Price Report. If you wish to view the information contained in this report you will need to select the appropriate fields namely:
Product
Location
Period From
Period To Click Query and the results will be displayed.
Publish – Reports – MoS Reports – Post Allocation Information Reports – Indicative/Actual Price Report – Query
Page 30 of 96
NTS-External-UserGuidelines-ChapterAll-V3-1.doc24
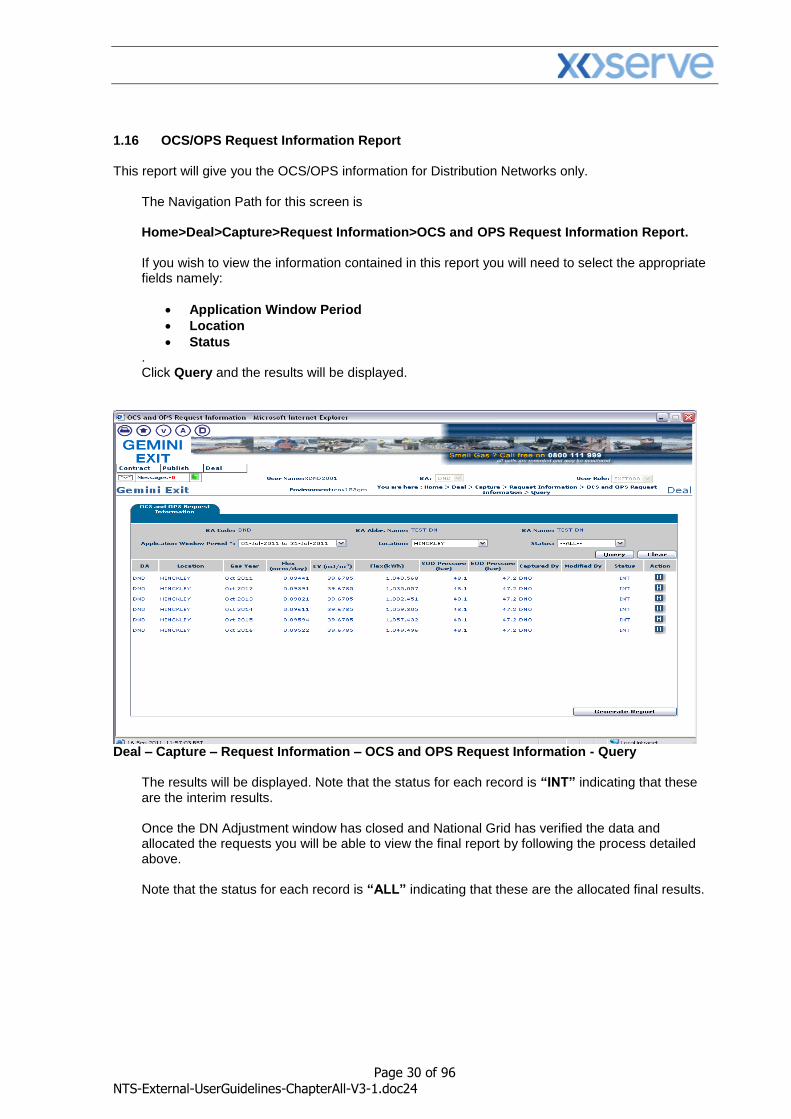
1.16 OCS/OPS Request Information Report This report will give you the OCS/OPS information for Distribution Networks only.
The Navigation Path for this screen is Home>Deal>Capture>Request Information>OCS and OPS Request Information Report. If you wish to view the information contained in this report you will need to select the appropriate fields namely:
Application Window Period
Location
Status . Click Query and the results will be displayed.
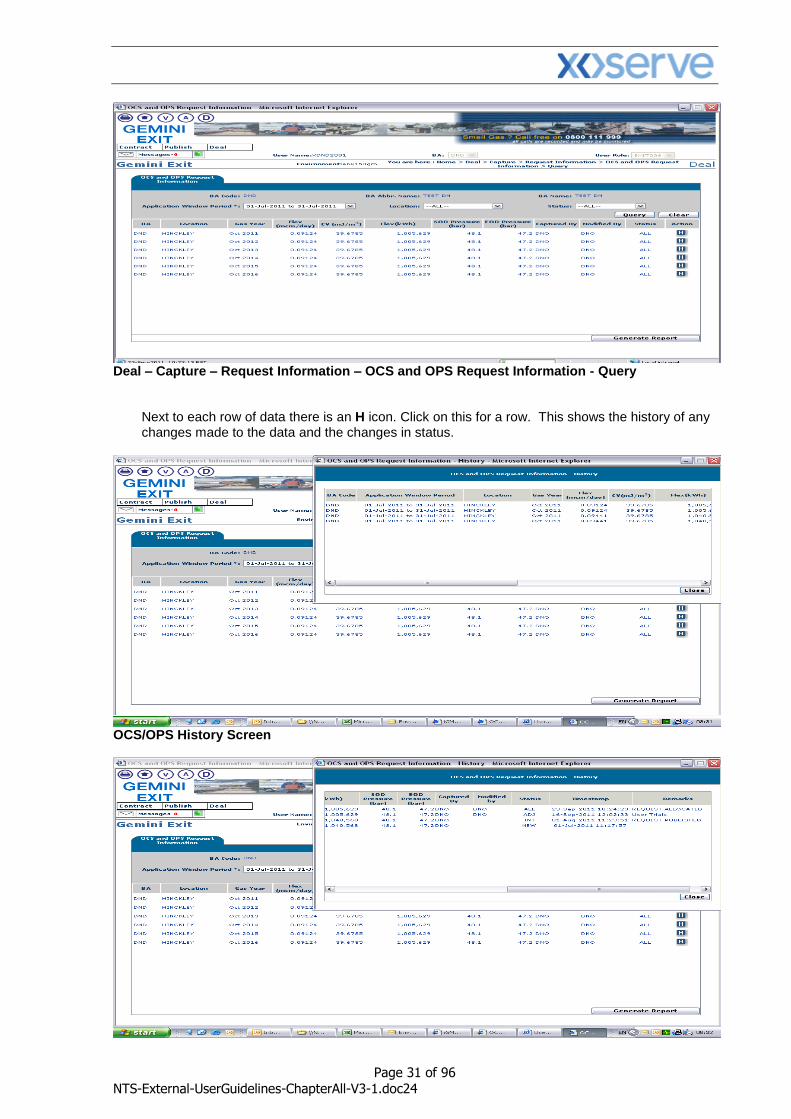
Deal – Capture – Request Information – OCS and OPS Request Information - Query
The results will be displayed. Note that the status for each record is “INT” indicating that these are the interim results. Once the DN Adjustment window has closed and National Grid has verified the data and allocated the requests you will be able to view the final report by following the process detailed above. Note that the status for each record is “ALL” indicating that these are the allocated final results.
Page 31 of 96
NTS-External-UserGuidelines-ChapterAll-V3-1.doc24
Deal – Capture – Request Information – OCS and OPS Request Information - Query
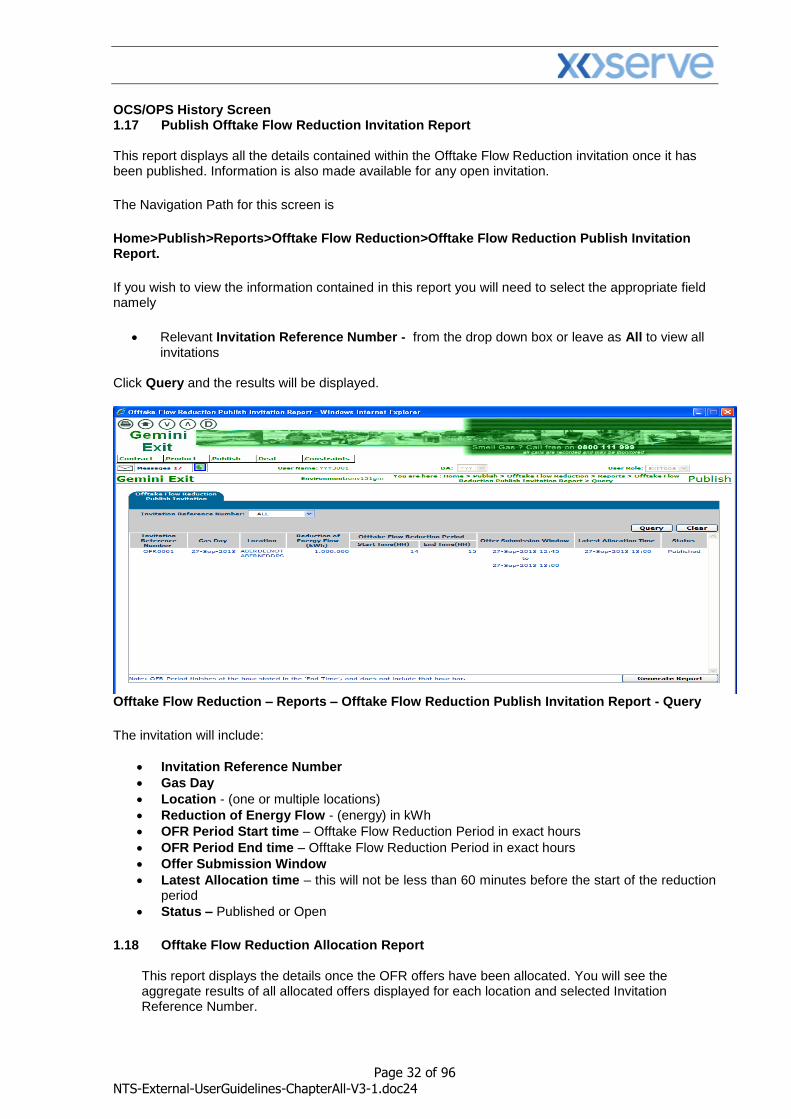
Next to each row of data there is an H icon. Click on this for a row. This shows the history of any changes made to the data and the changes in status.
OCS/OPS History Screen
Page 32 of 96
NTS-External-UserGuidelines-ChapterAll-V3-1.doc24
OCS/OPS History Screen 1.17 Publish Offtake Flow Reduction Invitation Report This report displays all the details contained within the Offtake Flow Reduction invitation once it has been published. Information is also made available for any open invitation.
The Navigation Path for this screen is
Home>Publish>Reports>Offtake Flow Reduction>Offtake Flow Reduction Publish Invitation Report.
If you wish to view the information contained in this report you will need to select the appropriate field namely
Relevant Invitation Reference Number - from the drop down box or leave as All to view all
invitations Click Query and the results will be displayed.
Offtake Flow Reduction – Reports – Offtake Flow Reduction Publish Invitation Report - Query
The invitation will include:
Invitation Reference Number
Gas Day
Location - (one or multiple locations)
Reduction of Energy Flow - (energy) in kWh
OFR Period Start time – Offtake Flow Reduction Period in exact hours
OFR Period End time – Offtake Flow Reduction Period in exact hours
Offer Submission Window
Latest Allocation time – this will not be less than 60 minutes before the start of the reduction period
Status – Published or Open
1.18 Offtake Flow Reduction Allocation Report
This report displays the details once the OFR offers have been allocated. You will see the aggregate results of all allocated offers displayed for each location and selected Invitation Reference Number.
Page 33 of 96
NTS-External-UserGuidelines-ChapterAll-V3-1.doc24
The Navigation Path for this screen is Home>Publish>Reports>Offtake Flow Reduction>Offtake Flow Reduction Allocation Report.
If you wish to view the information contained in this report you will need to select the appropriate fields namely
Gas Day
Invitation Reference Number
Location Click Query and the results will be displayed.
Publish – Offtake Flow Reduction – Report - Offtake Flow Reduction Offer Allocation Report – Query 1.19 Offtake Flow Reduction Offer Information Report
This report will display the offer details along with the offer status and Offtake Profile Notice (OPN) compliance status. The Navigation Path for this screen is
Home>Publish>Reports>Offtake Flow Reduction>Offtake Flow Reduction Offer Information Report.
If you wish to view the information contained in this report you will need to select the appropriate fields namely
Gas Day
Invitation Reference Number
Location
Offer Status Click Query and the results will be displayed.
Page 34 of 96
NTS-External-UserGuidelines-ChapterAll-V3-1.doc24
Publish - Reports – Offtake Flow Reduction – Offtake Flow Reduction Offer Information Report - Query
Publish - Reports – Offtake Flow Reduction – Offtake Flow Reduction Offer Information Report - Query
Page 35 of 96
NTS-External-UserGuidelines-ChapterAll-V3-1.doc24
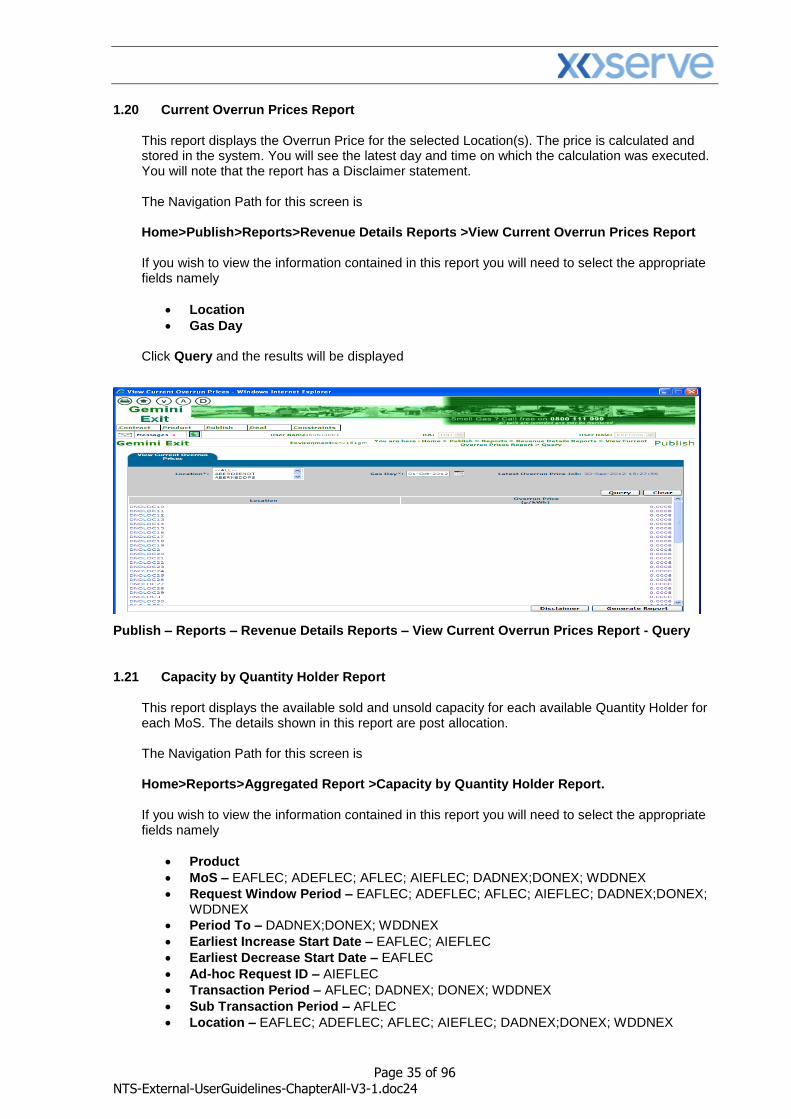
1.20 Current Overrun Prices Report
This report displays the Overrun Price for the selected Location(s). The price is calculated and stored in the system. You will see the latest day and time on which the calculation was executed. You will note that the report has a Disclaimer statement. The Navigation Path for this screen is Home>Publish>Reports>Revenue Details Reports >View Current Overrun Prices Report If you wish to view the information contained in this report you will need to select the appropriate fields namely
Location
Gas Day
Click Query and the results will be displayed
Publish – Reports – Revenue Details Reports – View Current Overrun Prices Report - Query
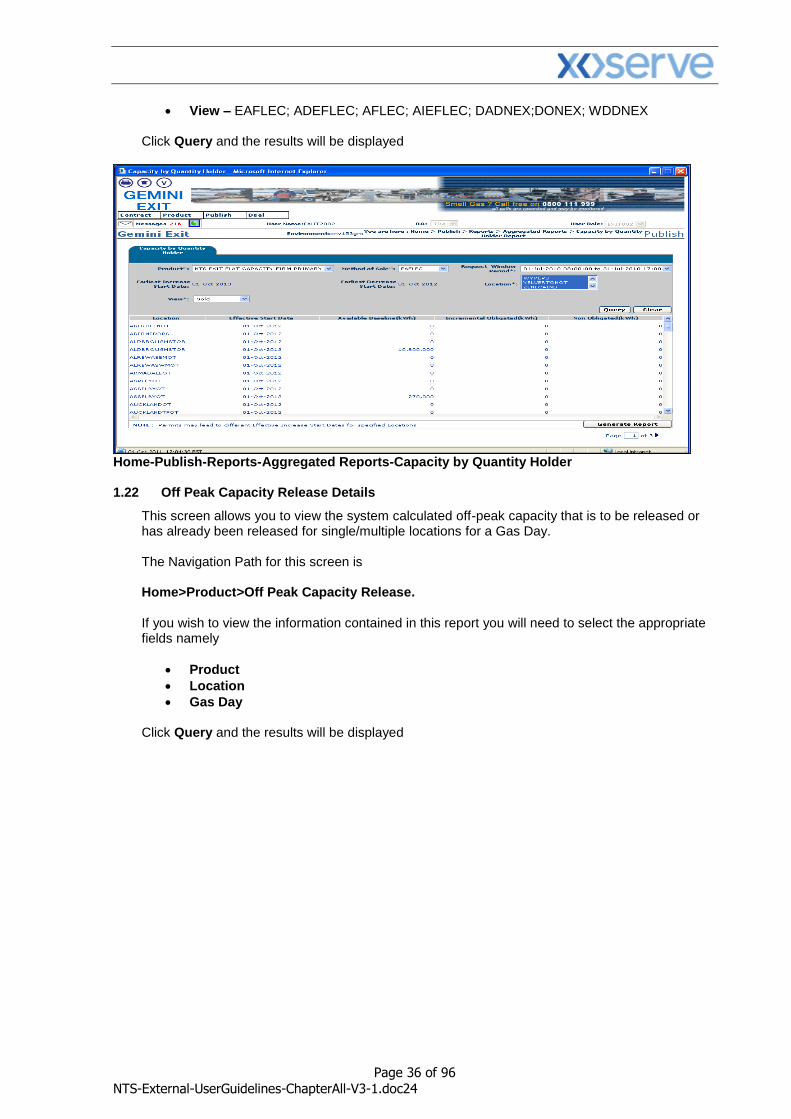
1.21 Capacity by Quantity Holder Report
This report displays the available sold and unsold capacity for each available Quantity Holder for each MoS. The details shown in this report are post allocation. The Navigation Path for this screen is Home>Reports>Aggregated Report >Capacity by Quantity Holder Report. If you wish to view the information contained in this report you will need to select the appropriate fields namely
Product
MoS – EAFLEC; ADEFLEC; AFLEC; AIEFLEC; DADNEX;DONEX; WDDNEX
Request Window Period – EAFLEC; ADEFLEC; AFLEC; AIEFLEC; DADNEX;DONEX; WDDNEX
Period To – DADNEX;DONEX; WDDNEX
Earliest Increase Start Date – EAFLEC; AIEFLEC
Earliest Decrease Start Date – EAFLEC
Ad-hoc Request ID – AIEFLEC
Transaction Period – AFLEC; DADNEX; DONEX; WDDNEX
Sub Transaction Period – AFLEC
Location – EAFLEC; ADEFLEC; AFLEC; AIEFLEC; DADNEX;DONEX; WDDNEX
Page 36 of 96
NTS-External-UserGuidelines-ChapterAll-V3-1.doc24
View – EAFLEC; ADEFLEC; AFLEC; AIEFLEC; DADNEX;DONEX; WDDNEX Click Query and the results will be displayed
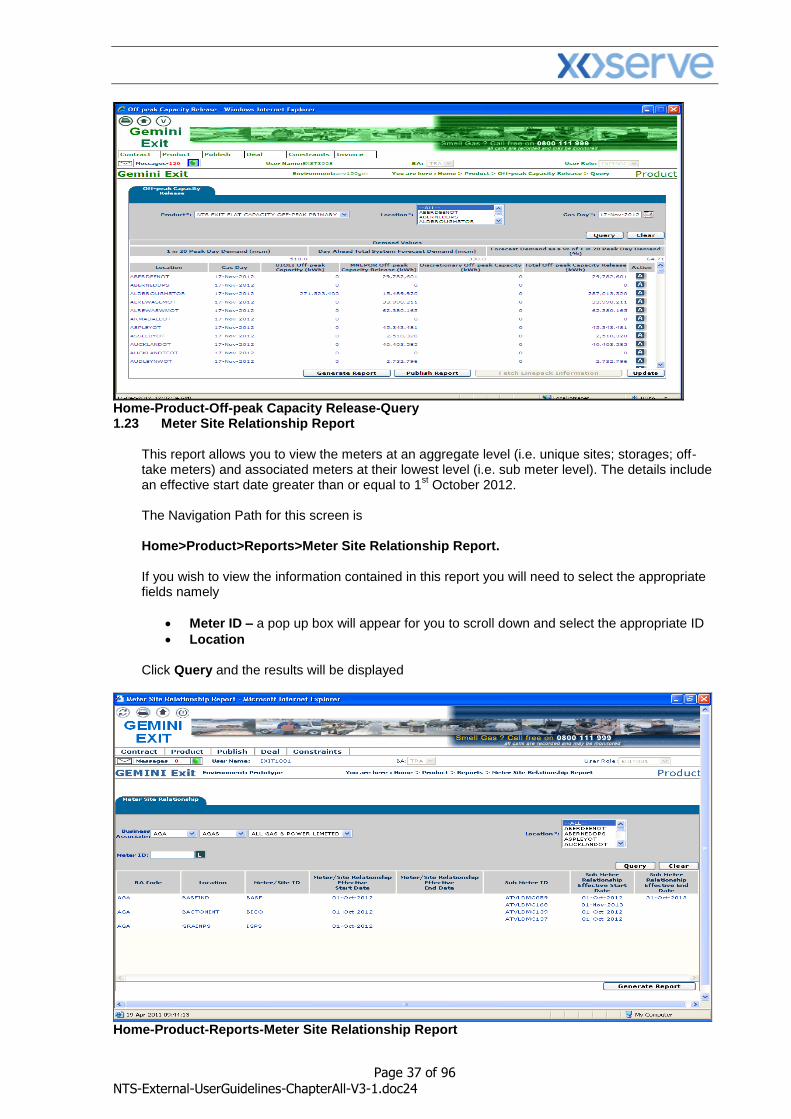
Home-Publish-Reports-Aggregated Reports-Capacity by Quantity Holder 1.22 Off Peak Capacity Release Details
This screen allows you to view the system calculated off-peak capacity that is to be released or has already been released for single/multiple locations for a Gas Day. The Navigation Path for this screen is Home>Product>Off Peak Capacity Release. If you wish to view the information contained in this report you will need to select the appropriate fields namely
Product
Location
Gas Day Click Query and the results will be displayed
Page 37 of 96
NTS-External-UserGuidelines-ChapterAll-V3-1.doc24
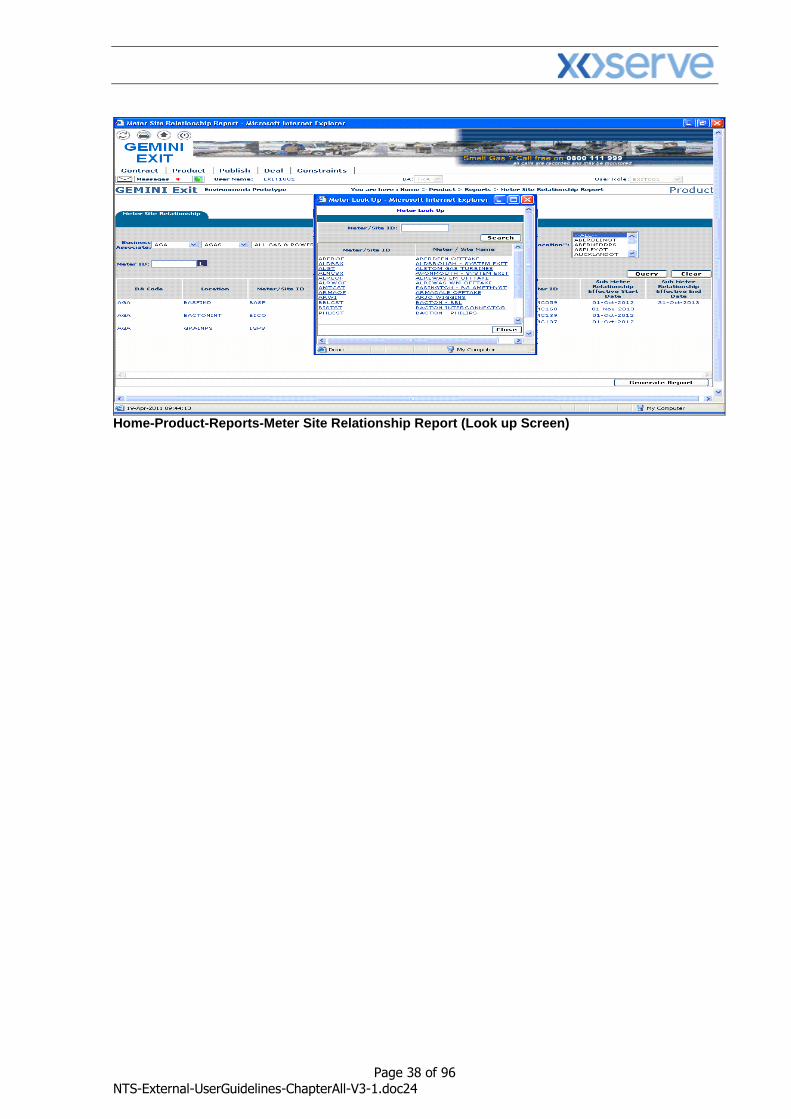
Home-Product-Off-peak Capacity Release-Query 1.23 Meter Site Relationship Report
This report allows you to view the meters at an aggregate level (i.e. unique sites; storages; off-take meters) and associated meters at their lowest level (i.e. sub meter level). The details include an effective start date greater than or equal to 1
st October 2012.
The Navigation Path for this screen is Home>Product>Reports>Meter Site Relationship Report. If you wish to view the information contained in this report you will need to select the appropriate fields namely
Meter ID – a pop up box will appear for you to scroll down and select the appropriate ID
Location
Click Query and the results will be displayed
Home-Product-Reports-Meter Site Relationship Report
Page 38 of 96
NTS-External-UserGuidelines-ChapterAll-V3-1.doc24
Home-Product-Reports-Meter Site Relationship Report (Look up Screen)

Page 39 of 96
NTS-External-UserGuidelines-ChapterAll-V3-1.doc24
Gemini NTS
Exit Reform
Chapter Two
Introduction to Processes
Page 40 of 96
NTS-External-UserGuidelines-ChapterAll-V3-1.doc24
2 Introduction to Long Term Applications and Short Term Auctions 2.1 Request Types (Long Term) Before placing a request it is advised that you take note of the following information 2.1.1 Enduring Annual Flat Exit Capacity (EAFLEC) - Increase Request
The minimum increase by quantity in an application window is 100,000kwh. Only one increase request can be placed, per NTS Exit Point, per increase start date, per Application window. Where a new increase request overlaps with an existing decrease request that has not been allocated, the decrease request will be allocated first followed by the increase request. When you place a request a warning message will be displayed asking if you wish to continue. An increase request that overlaps with an allocated decrease request for the same period cannot be placed. Where a new increase request is placed and the commitment period contains an unallocated decrease request, the decrease request may be rejected and a warning message will be displayed. An increase request cannot be placed where the Commitment Period for that request would overlap with a previously allocated decrease request. 2.1.2 Enduring Annual Flat Exit Capacity (EAFLEC) - Decrease Request
The decrease start date must not be earlier than the date set by the Default Reduction Notice Parameter and must be the start of a month. The Decrease To value cannot be greater than your entitlement for the Decrease Start Date. Where a new Decrease Request overlaps with an earlier Increase Request for the same period that has not been allocated, the decrease will be allocated prior to the Increase Request. A warning message will be displayed asking if you wish to continue. A Decrease Request that overlaps with an allocated Increase Request for the same period cannot be placed 2.1.3 Annual NTS Exit Capacity (AFLEC) Requests
National Grid NTS will issue an invitation letter via the Joint Office and web fax giving you 28 days prior to the application window. application window. The National Grid Capacity team will allocate requests and the results will be published on the dates specified in the invitation letter. Applications previously entered can be withdrawn or modified in the same Application window.
2.1.4 Ad-hoc Increase Application (AIEFLEC) Requests
Ad-hoc requests can be made between 1st October and 30th June in any Gas Year. You can apply for up to 4 separate tranches, the first gas flow must not be earlier than 6 months from the date of application or later that the default delivery date. The total requested capacity (including all tranches) should be equal to at least 1GWh or 125% of NTS Exit Point baseline capacity at the relevant NTS Exit Point. National Grid NTS will accept receipt of the application after which an offer must be made within 15 days if no works are required. If it is believed that works will be required, National Grid will respond within 90 days or more if both parties agree.
The offer will specify the following:
The Offer must be accepted by a User within 30 calendar days. Within 10 days of acceptance National Grid will publish the results; and
The Capacity Registration Date.
Once received the Offer must be accepted within 30 calendar days
National Grid NTS will publish the incremental quantity allocated within 10 days. If an Ad-hoc Increase request has already been placed for an NTS Exit Point, a second request by the same company can only be placed once the first request has been allocated and closed. Once an Ad-hoc request has been placed it cannot be modified. The existing request should be withdrawn and a new request placed prior to National Grid accepting the initial request. An Increase request that overlaps with an
allocated decrease request for the same period cannot be placedWhere a new Increase request is
Page 41 of 96
NTS-External-UserGuidelines-ChapterAll-V3-1.doc24
placed and the Commitment Period contains an unallocated Decrease request, the Decrease request
may be rejected and a warning message will be provided to the User. An Increase request cannot be placed where the Commitment Period for that request would overlap with a previously allocated Decrease request. 2.1.5 Ad-hoc Decrease Application (ADEFLEC) Requests
National Grid NTS will invite Users to submit requests for reductions and this may occur if an ad-hoc increase has been received. This request can be submitted outside the Reduction Application Window. This invitation will specify:
When you can submit a reduction request for a particular NTS Exit Point(s);
The earliest date for which reductions are being sought (this will always be the first of any month);
The date when you will be notified of the outcome (hence the fixed lead time parameter would not be applicable).
You will be able to submit one decrease request per NTS Exit Point; however National Grid NTS may override the information submitted in the request. The requested capacity figure can be amended anywhere between the minimum figure and what you have requested. National Grid may accept an offer either in whole or in part. If you request is accepted your ongoing User Commitments at that particular NTS Exit Point, from the effective start date, will be reduced by the amount that has been allocated. Allocation of ad-hoc decrease requests will not be performed in conjunction with any increase requests in the same application. However you should note that there can be a separate increase application process occurring at the same time for the same period. 2.1.6 Exit Flat Capacity Buyback Contract
National Grid NTS can enter into a Buyback of Firm NTS Exit Flat Capacity with you for a period of one or more continuous gas days via a contract tendering process. All active external Users within the system and selected by National Grid NTS are known as eligible Users and are allowed to submit an offer under the tendering process. They will then be able to view and accept the terms and conditions of the contract that are detailed within the system. National Grid NTS can issue an Invitation to Tender (ITT) any time. A single Buyback contract can include tenders for one or more contract types (see below) at one or more NTS Exit point(s). Buyback contracts are categorised into Forwards or Options.
Forwards contracts allow you to offer back to NG Transmission a quantity of Firm NTS Exit Flat Capacity for all gas days within a specified period. The specified price will be in p/kWh/day.
Options contracts allow you to offer back to NG Transmission a quantity of Firm NTS Exit Flat Capacity for a predefined number of gas days within a specified period. The specified prices are:
o Premium – this is the price (p/kWh/day) payable for each of the pre-defined number of gas days specified for a particular Options contract; and
o Exercise – this is the price (p/kWh/day) payable for each gas day where the Buyback is exercised and utilised by National Grid NTS for a particular Options contact.
Please Note: for more information on placing your requests; adding, modifying or withdrawing requests please refer to Chapter 4.
2.1.7 DN Adjustment Window
This facility is only available to Distribution Networks (DN) Operators and the window enables DNs to submit adjustments or withdraw requests placed during the original July application. Additionally DNs will be able to add a new request if required. These requests are submitted during a defined 10 business day period after the closure of the Application Window but before allocation. The precise dates are notified when the Application is published. Once adjustments are submitted they are subject to validations and are either approved/modified or rejected.
Page 42 of 96
NTS-External-UserGuidelines-ChapterAll-V3-1.doc24
2.2 Long Term Applications – Table NTS Exit Flat Capacity; NTS Exit Flat Capacity Off-peak Primary and NTS Exit Flat Capacity Firm Derived are the Products that are offered to the External Users. The Method of Sale (MoS) is the name given to the long term application process through which capacity is sold or bought. Long Term Applications available to you are detailed in the table below:
Application Type (Method of Sale ((MoS))
Details Product Period Allocation Time
EAFLEC - Enduring Annual Flat Exit Capacity
Increase or Decrease the ‘evergreen’ Enduring Firm NTS Exit (Flat) Capacity right
Enduring Increase Starting Yr+4 Yr+5 Yr+6 Enduring Decrease Starting at 1
st of any month from Oct
Yr+2
Application Window is July allocated by 30
th
September Y
AFLEC - Annual NTS Exit Flat Capacity
Distinct 12 month Firm Exit Capacity tranche covering an entire Gas Year
Covers 1 whole year Yr+1 Yr+2 Yr+3
Application Window is July allocated by 30
th
September Y
AIEFLEC - Enduring Ad-hoc Increase Flat Exit Capacity
Increase the ‘evergreen’ Firm NTS Exit (Flat) Capacity right
Enduring Increase Starting M+6 to October Yr+6
Ad-hoc Application Window initiated by Shipper
ADEFLEC - Ad-hoc Decrease Enduring NTS Exit Flat Capacity
Decrease of Enduring Firm Exit Capacity, only initiated by National Grid NTS in relation to another Ad-hoc increase request
Reduce from the 1st of any
month as requested by National Grid NTS
Ad-hoc Application Window initiated and allocated by National Grid NTS
EXBB - Exit Flat Capacity Buyback Contract
A contract entered into with National Grid NTS - these can be Forward or Options Contracts
Contracts entered into can cover a period of one or more continuous gas days
National Grid NTS can issue invitations at any time of the year.
2.3 Request Types (Short Term) There are four types of daily auction where you may want to place requests, these are;
2.3.1 Day Ahead Daily NTS Exit (Flat) Capacity – (DADNEX)
Unsold Long Term NTS Exit Flat Capacity can be rolled over and made available within the short term auction process. This daily auction process enables National Grid NTS the ability to sell all remaining available NTS Exit Flat Firm Capacity (unsold baseline; obligated incremental and non obligated incremental. The auction will allow National Grid to process bids for each gas day and the results will be published to you on a daily basis. You can submit up to 10 bids for an NTS Exit Point for each gas day and this can be done 7 days in advance from 06:00 hours until D-1 at 14:00 hours. The allocation will then start at 15:00 hours on D-1. This auction also gives you the option to carry over any unallocated Day Ahead bids through to the Within Day auction. The system will roll over any unallocated bids only if you have chosen to do so by checking the ‘transfer’ box. If you do not do this than any unallocated bids will automatically be rejected. Once the bids have rolled over they are then subject to the within day process whereby allocations are made at various times throughout the day.
Page 43 of 96
NTS-External-UserGuidelines-ChapterAll-V3-1.doc24
2.3.2 Within Day Daily NTS Exit (Flat) Capacity – (WDDNEX)
This is another type of ‘sell’ auction and, as the title suggests, these are held within the gas day. Requests are captured from D-1 @14:00 hours until D0 at midnight. The allocation times are 08:00; 14:00; 18:00; 22:00 and 01:00 hours, however auctions can also be initiated at any other time within the gas day. 2.3.3 Daily Off-peak NTS Exit (Flat) Capacity – (DONEX)
This auction works on the same principles as DADNEX; however this process enables you to submit bids for NTS Exit Flat Capacity Off-peak. This capacity can also be subject to a scale back whereby a restriction (%) is placed on what you will be entitled to flow. For example if you are entitled to flow 200,000 kWh of which 100,000 kWh is firm capacity and 100,000 kWh is off peak capacity, if National Grid applies a constraint of 40% for 06:00 hours you will only be allowed 160,000 kWh – this will mean you can only have 100,000 kWh firm and 60,000 kWh Off peak capacity. 2.3.4 Daily Buyback NTS Exit (Flat) Capacity – (DBNEX)
This process is initiated by National Grid NTS whereby you will be invited to submit offers to surrender your available NTS Exit Firm Capacity for a specified NTS Exit Point and gas day. You will be able to submit offers seven days in advance, 06:00 D-7, until 02:00 hours on D-0. National Grid will then allocate no earlier than 15:00 hours on D-1 and no later than 03:00 hours on D-0. If you have an offer accepted, National Grid NTS will pay a surrender/exercise charge and this will be equal to the accepted offer/option quantity multiplied by the accepted offer/exercise price of your offer/option. Please Note: for more information on placing your requests; adding, modifying or withdrawing requests please refer to Chapter 4. 2.4 Daily Short Term Auctions – Table National Grid NTS will initiate auctions for D-1 (Day Ahead) and D0 (Within Day).
Auction Type (Method of Sale (MoS))
Buy or Sell Auction
Requests captured from
Requests captured until
Auction Allocation Times
Full Product Name
DADNEX Sell D-7@ 6:00hrs D-1@ 14:00hrs
D-1@ 15:00hrs
NTS Exit Flat Capacity Firm Primary
WDDNEX Sell D-1 @ 14:00hrs
D0 @ 00:00hrs
D0 @ 08:00, 14:00, 18:00, 22:00 and 01:00hrs **
NTS Exit Flat Capacity Firm Primary
DONEX Sell D-7 @ 6:00hrs D-1 @ 14:00hrs
D-1 @ 15:00hrs
NTS Exit Flat Capacity Off-peak
DBNEX Buy D-7 @ 6:00hrs D0 @ 02:00hrs
As required based on strategy
NTS Exit Flat Capacity Firm Derived
**Daily WDDNEX auctions are processed at the times stated, but can be initiated at any other time
within the Gas Day with one hours notice.
Page 44 of 96
NTS-External-UserGuidelines-ChapterAll-V3-1.doc24
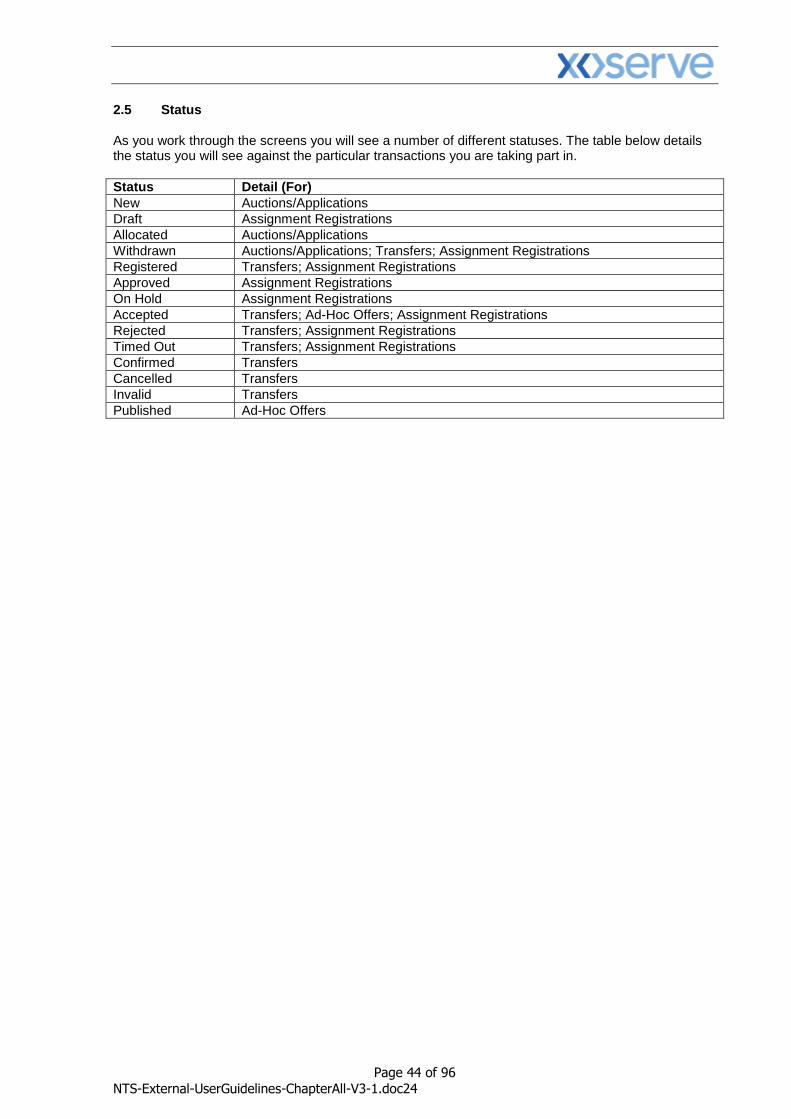
2.5 Status As you work through the screens you will see a number of different statuses. The table below details the status you will see against the particular transactions you are taking part in.
Status Detail (For)
New Auctions/Applications
Draft Assignment Registrations
Allocated Auctions/Applications
Withdrawn Auctions/Applications; Transfers; Assignment Registrations
Registered Transfers; Assignment Registrations
Approved Assignment Registrations
On Hold Assignment Registrations
Accepted Transfers; Ad-Hoc Offers; Assignment Registrations
Rejected Transfers; Assignment Registrations
Timed Out Transfers; Assignment Registrations
Confirmed Transfers
Cancelled Transfers
Invalid Transfers
Published Ad-Hoc Offers
Page 45 of 96
NTS-External-UserGuidelines-ChapterAll-V3-1.doc24
Gemini Exit
Chapter 3
Set-Up User Preferences
Page 46 of 96
NTS-External-UserGuidelines-ChapterAll-V3-1.doc24
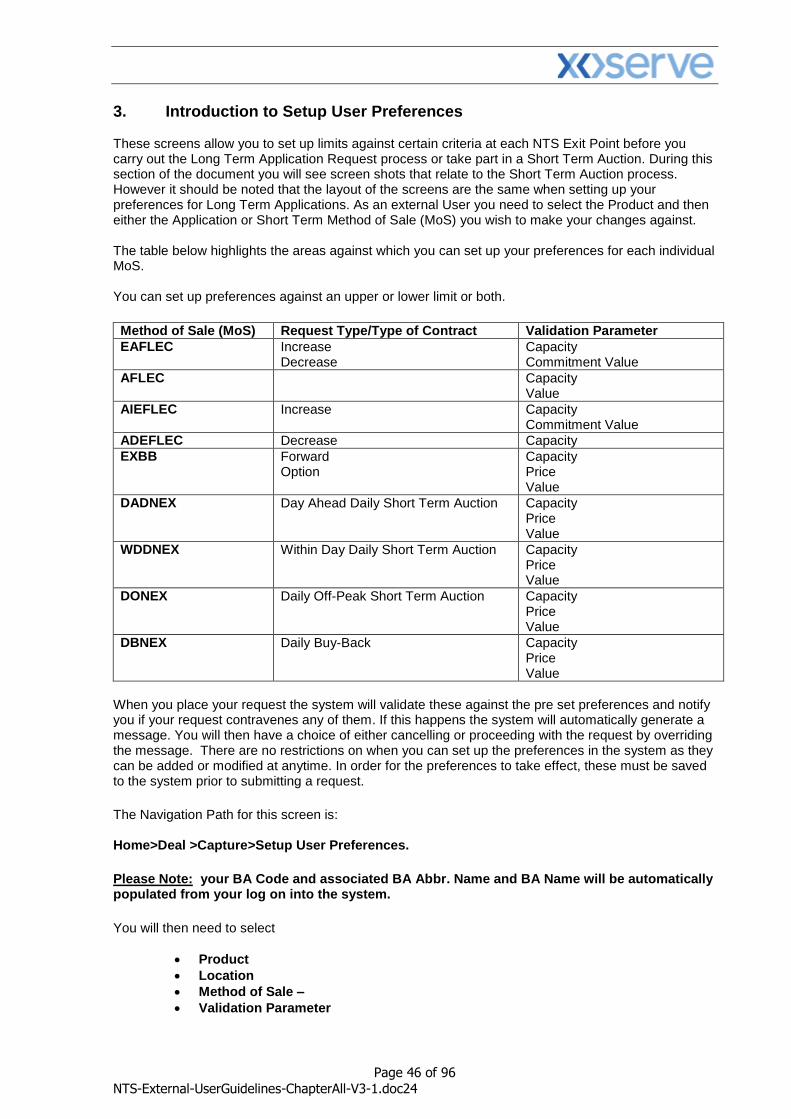
3. Introduction to Setup User Preferences These screens allow you to set up limits against certain criteria at each NTS Exit Point before you carry out the Long Term Application Request process or take part in a Short Term Auction. During this section of the document you will see screen shots that relate to the Short Term Auction process. However it should be noted that the layout of the screens are the same when setting up your preferences for Long Term Applications. As an external User you need to select the Product and then either the Application or Short Term Method of Sale (MoS) you wish to make your changes against. The table below highlights the areas against which you can set up your preferences for each individual MoS. You can set up preferences against an upper or lower limit or both.
Method of Sale (MoS) Request Type/Type of Contract Validation Parameter
EAFLEC Increase Decrease
Capacity Commitment Value
AFLEC Capacity Value
AIEFLEC Increase Capacity Commitment Value
ADEFLEC Decrease Capacity
EXBB Forward Option
Capacity Price Value
DADNEX Day Ahead Daily Short Term Auction Capacity Price Value
WDDNEX Within Day Daily Short Term Auction Capacity Price Value
DONEX Daily Off-Peak Short Term Auction Capacity Price Value
DBNEX Daily Buy-Back Capacity Price Value
When you place your request the system will validate these against the pre set preferences and notify you if your request contravenes any of them. If this happens the system will automatically generate a message. You will then have a choice of either cancelling or proceeding with the request by overriding the message. There are no restrictions on when you can set up the preferences in the system as they can be added or modified at anytime. In order for the preferences to take effect, these must be saved to the system prior to submitting a request.
The Navigation Path for this screen is: Home>Deal >Capture>Setup User Preferences.
Please Note: your BA Code and associated BA Abbr. Name and BA Name will be automatically populated from your log on into the system.
You will then need to select
Product
Location
Method of Sale –
Validation Parameter
Page 47 of 96
NTS-External-UserGuidelines-ChapterAll-V3-1.doc24
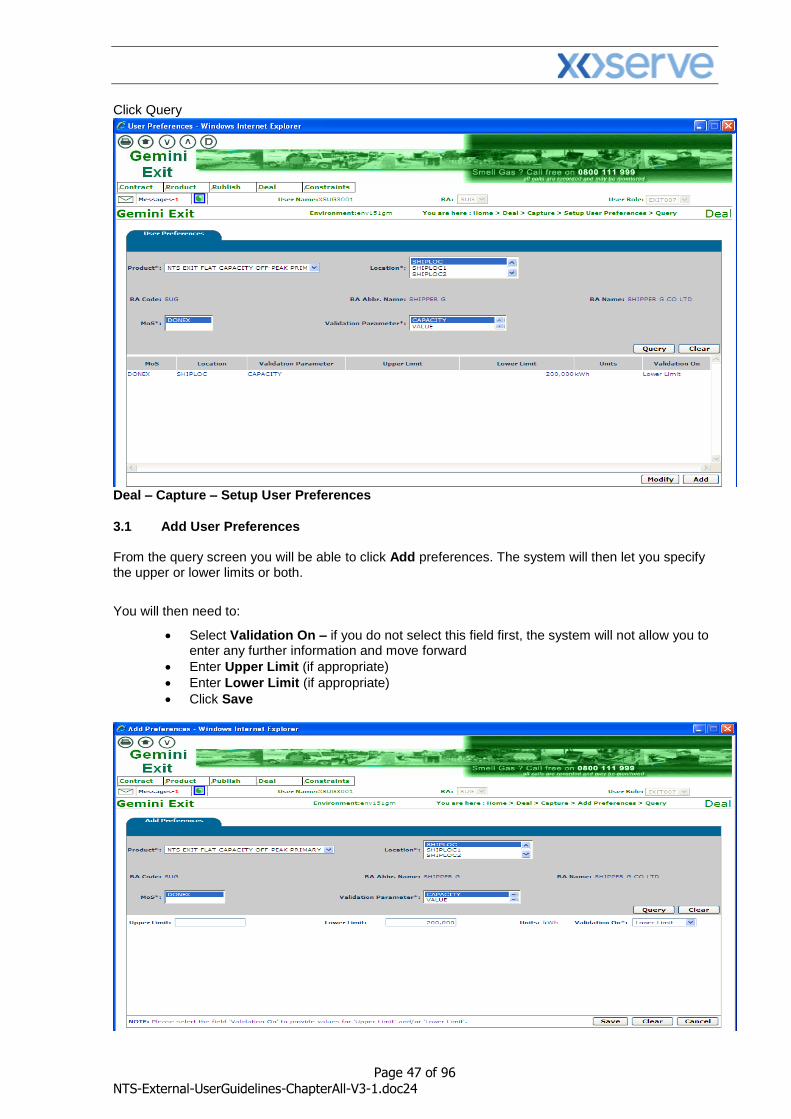
Click Query
Deal – Capture – Setup User Preferences
3.1 Add User Preferences
From the query screen you will be able to click Add preferences. The system will then let you specify the upper or lower limits or both.
You will then need to:
Select Validation On – if you do not select this field first, the system will not allow you to enter any further information and move forward
Enter Upper Limit (if appropriate)
Enter Lower Limit (if appropriate)
Click Save
Page 48 of 96
NTS-External-UserGuidelines-ChapterAll-V3-1.doc24
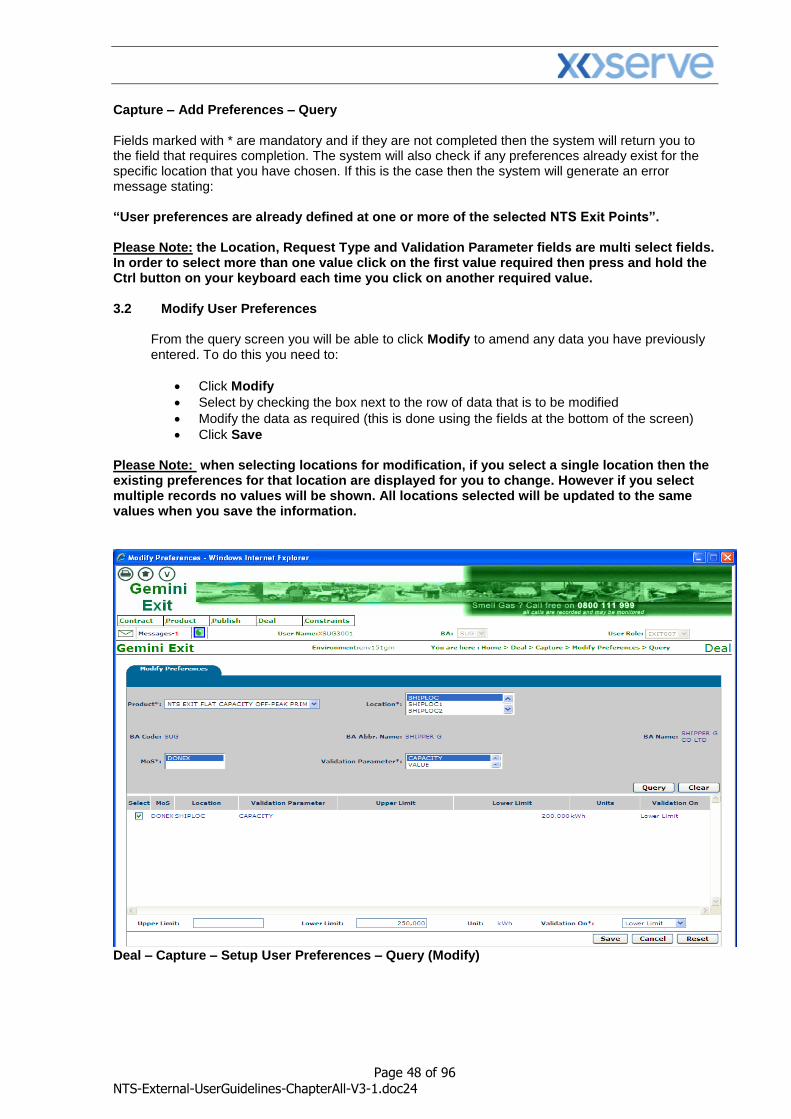
Capture – Add Preferences – Query Fields marked with * are mandatory and if they are not completed then the system will return you to the field that requires completion. The system will also check if any preferences already exist for the specific location that you have chosen. If this is the case then the system will generate an error message stating: “User preferences are already defined at one or more of the selected NTS Exit Points”. Please Note: the Location, Request Type and Validation Parameter fields are multi select fields. In order to select more than one value click on the first value required then press and hold the Ctrl button on your keyboard each time you click on another required value. 3.2 Modify User Preferences
From the query screen you will be able to click Modify to amend any data you have previously entered. To do this you need to:
Click Modify
Select by checking the box next to the row of data that is to be modified
Modify the data as required (this is done using the fields at the bottom of the screen)
Click Save Please Note: when selecting locations for modification, if you select a single location then the existing preferences for that location are displayed for you to change. However if you select multiple records no values will be shown. All locations selected will be updated to the same values when you save the information.
Deal – Capture – Setup User Preferences – Query (Modify)
Page 49 of 96
NTS-External-UserGuidelines-ChapterAll-V3-1.doc24
Gemini Exit
Chapter 4
Capturing Your Requests
Page 50 of 96
NTS-External-UserGuidelines-ChapterAll-V3-1.doc24
4 Introduction to Capturing your Requests
The screens and guidance detailed in this section applies to all types of long term applications and short term daily auctions. As an external User you will need to select the Product and Method of Sale to place your requests. In addition you will see screen shots that relate to the short term auction process only,
When the request window is Open, you can capture a new request. In addition, you can modify and/or withdraw an existing request at New status. To view open auctions you can to access the Request Windows Details Report. Before capturing any new requests you may also wish to view the Capacity and Price Information Report and/or the Entitlements Report.
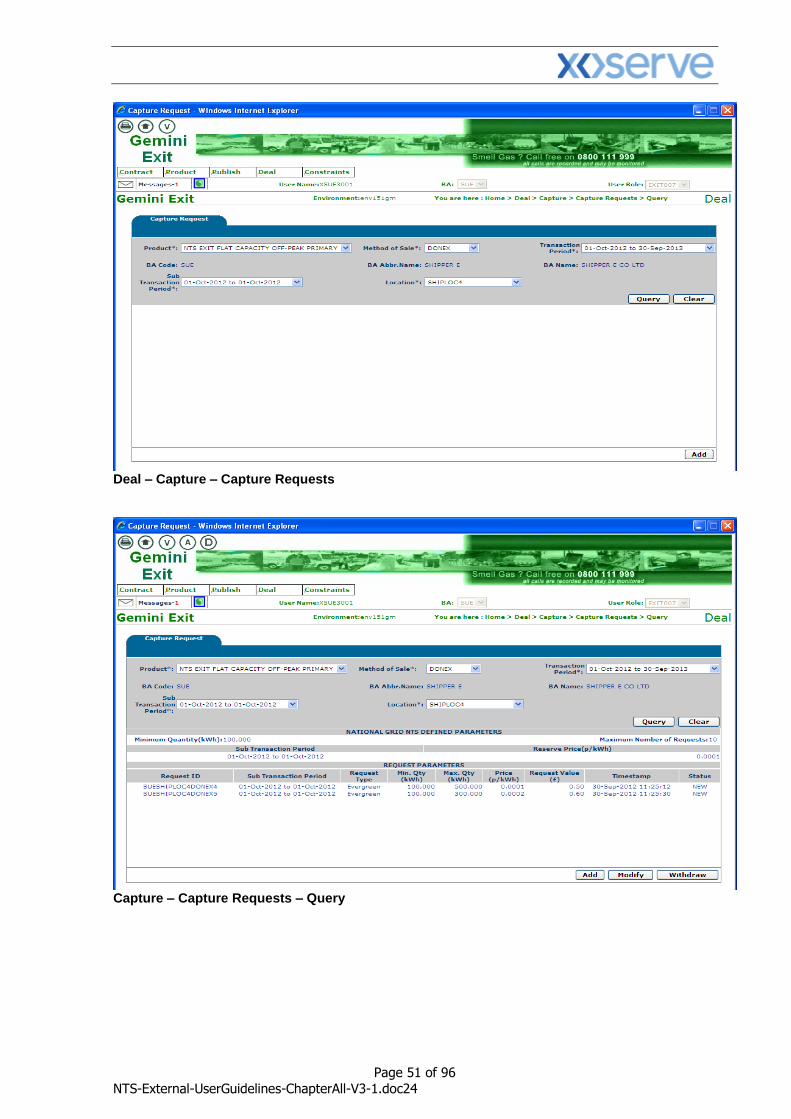
4.1 View Existing Requests The Navigation Path for this screen is Home>Deal>Capture>Capture Requests.
Select the following criteria:
Product
Method of Sale
Transaction Period - select the appropriate period of time. This represents the period in which the gas day falls for the date you wish to buy or sell capacity.
Type of Contract – this field will appear for forwards and options buyback contracts
Sub Transaction Period – for long term applications and short term daily auctions; select the gas day
Location - this will list all the locations associated with the auction for the Sub Transaction Period selected.
Sub Tender Period - this field will appear for forwards and options buyback contracts
Sub Tender ID - this field will appear for forwards and options buyback contracts Please Note: your BA Code and associated BA Abbr. Name and BA Name will be automatically populated from your log on into the system.
Click Query. If any data has already been captured it will be displayed; otherwise you will see the following message: “No Data Found for Your Query Criteria.”
Page 51 of 96
NTS-External-UserGuidelines-ChapterAll-V3-1.doc24
Deal – Capture – Capture Requests
Capture – Capture Requests – Query
Page 52 of 96
NTS-External-UserGuidelines-ChapterAll-V3-1.doc24
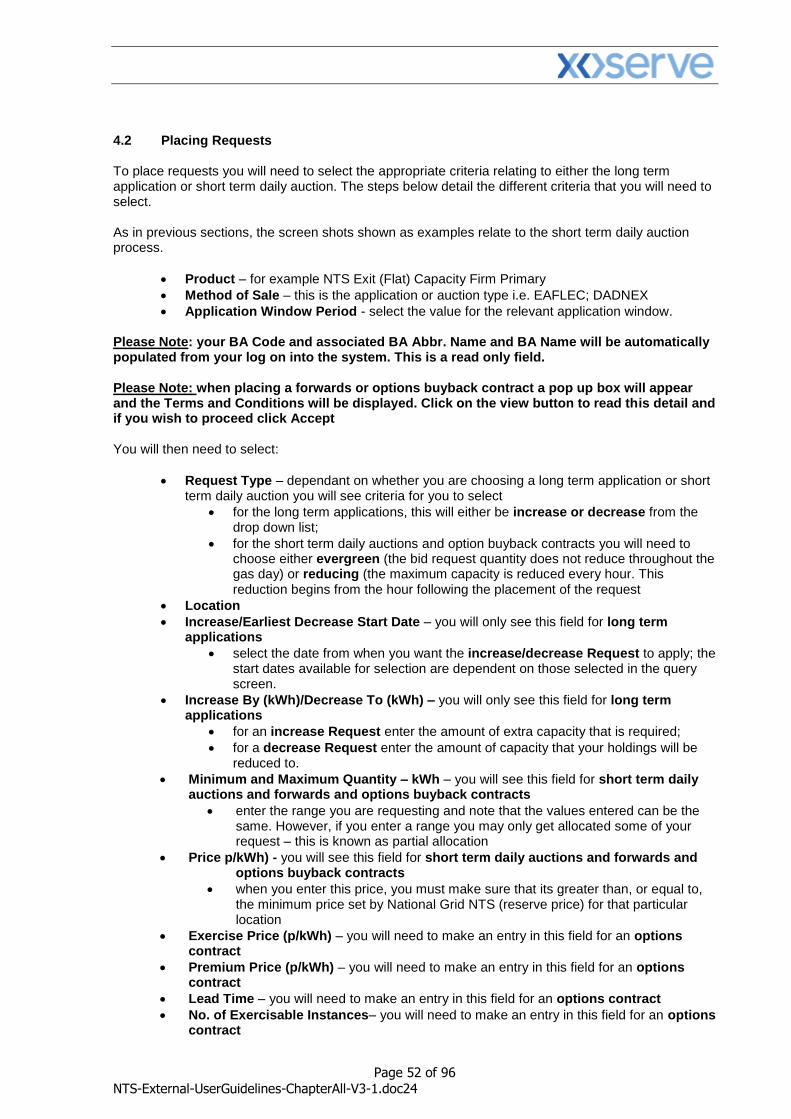
4.2 Placing Requests To place requests you will need to select the appropriate criteria relating to either the long term application or short term daily auction. The steps below detail the different criteria that you will need to select. As in previous sections, the screen shots shown as examples relate to the short term daily auction process.
Product – for example NTS Exit (Flat) Capacity Firm Primary
Method of Sale – this is the application or auction type i.e. EAFLEC; DADNEX
Application Window Period - select the value for the relevant application window.
Please Note: your BA Code and associated BA Abbr. Name and BA Name will be automatically populated from your log on into the system. This is a read only field. Please Note: when placing a forwards or options buyback contract a pop up box will appear and the Terms and Conditions will be displayed. Click on the view button to read this detail and if you wish to proceed click Accept You will then need to select:
Request Type – dependant on whether you are choosing a long term application or short term daily auction you will see criteria for you to select
for the long term applications, this will either be increase or decrease from the drop down list;
for the short term daily auctions and option buyback contracts you will need to choose either evergreen (the bid request quantity does not reduce throughout the gas day) or reducing (the maximum capacity is reduced every hour. This reduction begins from the hour following the placement of the request
Location
Increase/Earliest Decrease Start Date – you will only see this field for long term applications
select the date from when you want the increase/decrease Request to apply; the start dates available for selection are dependent on those selected in the query screen.
Increase By (kWh)/Decrease To (kWh) – you will only see this field for long term applications
for an increase Request enter the amount of extra capacity that is required;
for a decrease Request enter the amount of capacity that your holdings will be reduced to.
Minimum and Maximum Quantity – kWh – you will see this field for short term daily auctions and forwards and options buyback contracts
enter the range you are requesting and note that the values entered can be the same. However, if you enter a range you may only get allocated some of your request – this is known as partial allocation
Price p/kWh) - you will see this field for short term daily auctions and forwards and options buyback contracts
when you enter this price, you must make sure that its greater than, or equal to, the minimum price set by National Grid NTS (reserve price) for that particular location
Exercise Price (p/kWh) – you will need to make an entry in this field for an options contract
Premium Price (p/kWh) – you will need to make an entry in this field for an options contract
Lead Time – you will need to make an entry in this field for an options contract
No. of Exercisable Instances– you will need to make an entry in this field for an options contract
Page 53 of 96
NTS-External-UserGuidelines-ChapterAll-V3-1.doc24
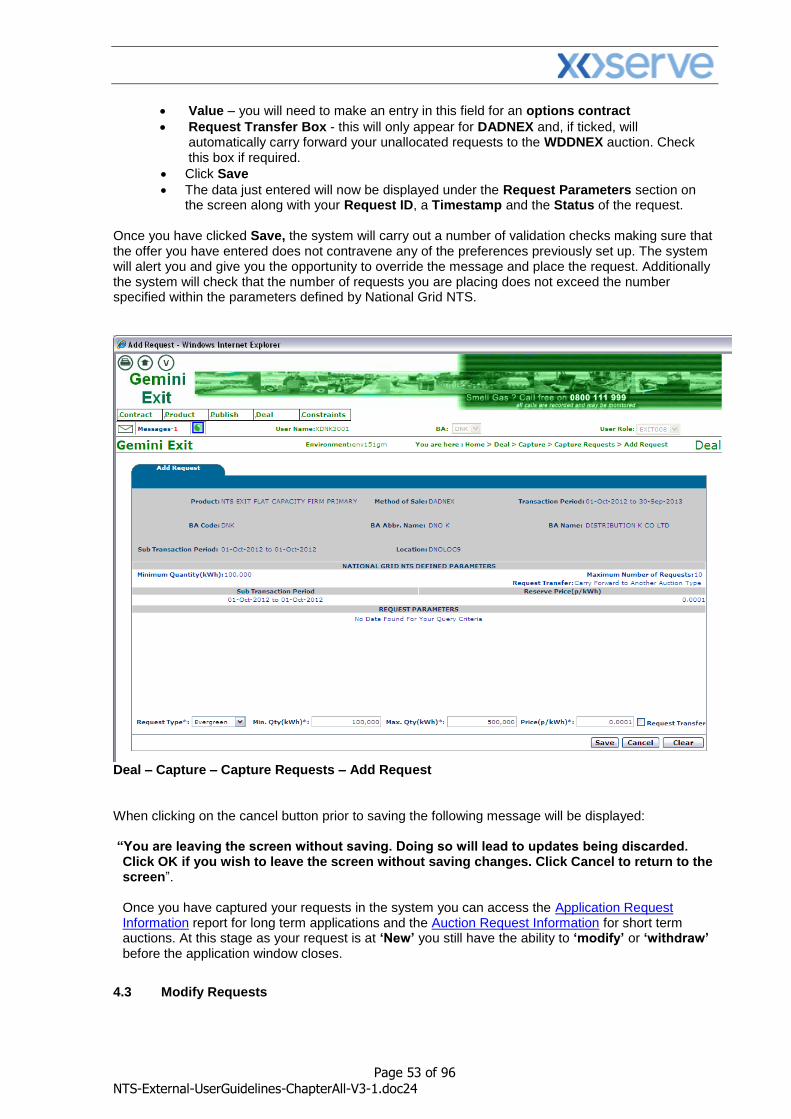
Value – you will need to make an entry in this field for an options contract
Request Transfer Box - this will only appear for DADNEX and, if ticked, will automatically carry forward your unallocated requests to the WDDNEX auction. Check this box if required.
Click Save
The data just entered will now be displayed under the Request Parameters section on the screen along with your Request ID, a Timestamp and the Status of the request.
Once you have clicked Save, the system will carry out a number of validation checks making sure that the offer you have entered does not contravene any of the preferences previously set up. The system will alert you and give you the opportunity to override the message and place the request. Additionally the system will check that the number of requests you are placing does not exceed the number specified within the parameters defined by National Grid NTS.
Deal – Capture – Capture Requests – Add Request
When clicking on the cancel button prior to saving the following message will be displayed: “You are leaving the screen without saving. Doing so will lead to updates being discarded.
Click OK if you wish to leave the screen without saving changes. Click Cancel to return to the screen”.
Once you have captured your requests in the system you can access the Application Request Information report for long term applications and the Auction Request Information for short term auctions. At this stage as your request is at ‘New’ you still have the ability to ‘modify’ or ‘withdraw’ before the application window closes.
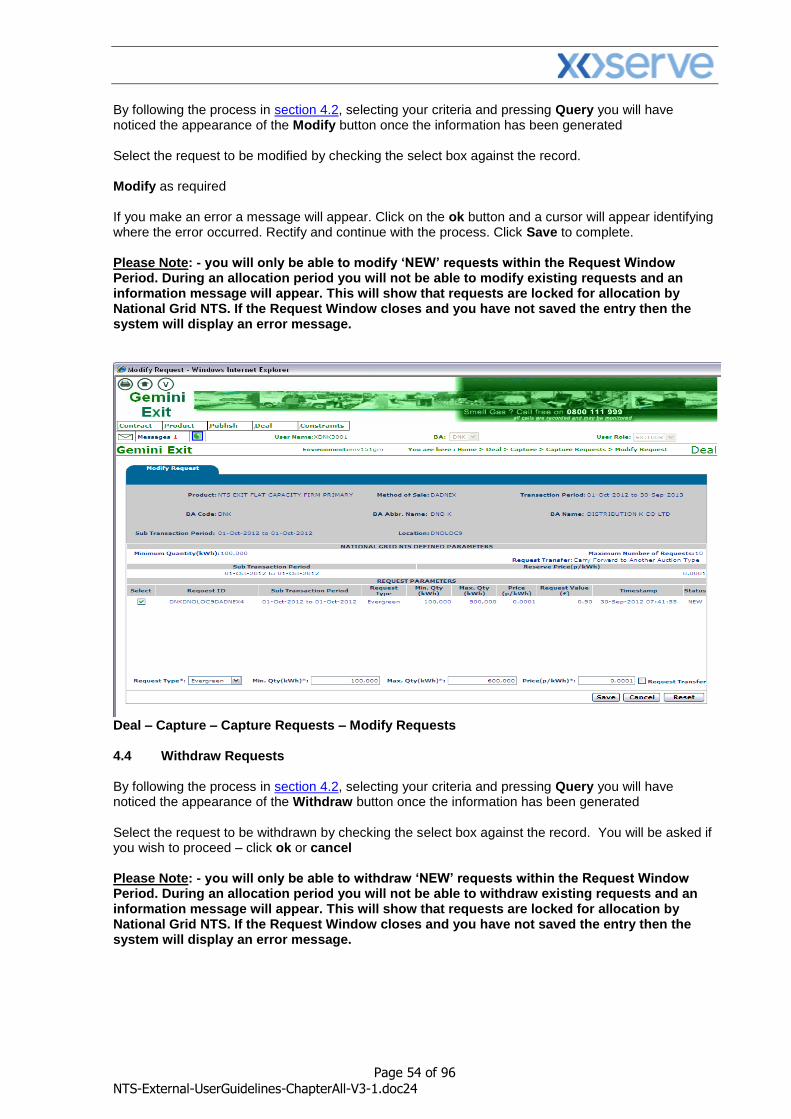
4.3 Modify Requests
Page 54 of 96
NTS-External-UserGuidelines-ChapterAll-V3-1.doc24
By following the process in section 4.2, selecting your criteria and pressing Query you will have noticed the appearance of the Modify button once the information has been generated Select the request to be modified by checking the select box against the record. Modify as required If you make an error a message will appear. Click on the ok button and a cursor will appear identifying where the error occurred. Rectify and continue with the process. Click Save to complete. Please Note: - you will only be able to modify ‘NEW’ requests within the Request Window Period. During an allocation period you will not be able to modify existing requests and an information message will appear. This will show that requests are locked for allocation by National Grid NTS. If the Request Window closes and you have not saved the entry then the system will display an error message.
Deal – Capture – Capture Requests – Modify Requests 4.4 Withdraw Requests By following the process in section 4.2, selecting your criteria and pressing Query you will have noticed the appearance of the Withdraw button once the information has been generated
Select the request to be withdrawn by checking the select box against the record. You will be asked if you wish to proceed – click ok or cancel
Please Note: - you will only be able to withdraw ‘NEW’ requests within the Request Window Period. During an allocation period you will not be able to withdraw existing requests and an information message will appear. This will show that requests are locked for allocation by National Grid NTS. If the Request Window closes and you have not saved the entry then the system will display an error message.

Page 55 of 96
NTS-External-UserGuidelines-ChapterAll-V3-1.doc24
Deal – Capture – Capture Requests – Withdraw Requests
Once your requests have been allocated, post allocation reports are available to you within the system namely:
User Commitment Amount
Aggregate User Enduring Capacity
Sold/Unsold
Requests/Users
Max/Min Price
Weighted Average Price (WAP)
Incremental Capacity Allowance
Buyback Contract Request Information
Indicative/Actual Price Report
Capacity by Quantity Holder
Page 56 of 96
NTS-External-UserGuidelines-ChapterAll-V3-1.doc24
Gemini Exit
Chapter 5
Transfers and Assignments
Page 57 of 96
NTS-External-UserGuidelines-ChapterAll-V3-1.doc24
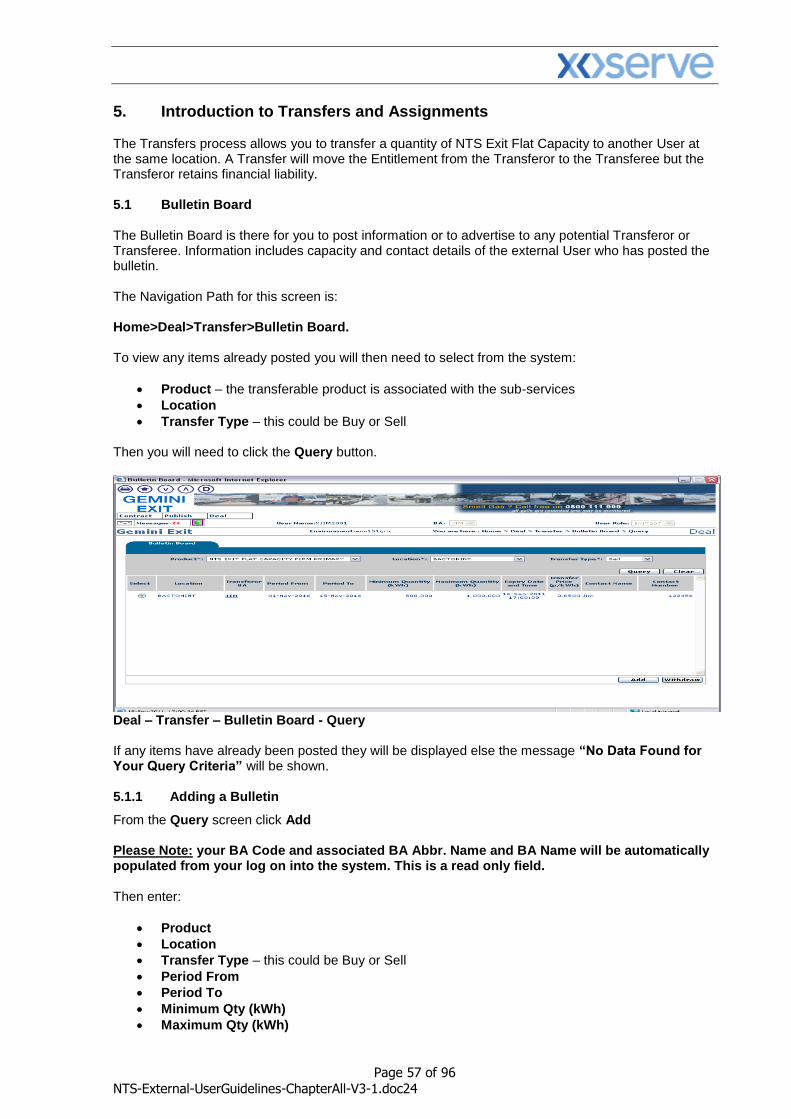
5. Introduction to Transfers and Assignments The Transfers process allows you to transfer a quantity of NTS Exit Flat Capacity to another User at the same location. A Transfer will move the Entitlement from the Transferor to the Transferee but the Transferor retains financial liability. 5.1 Bulletin Board The Bulletin Board is there for you to post information or to advertise to any potential Transferor or Transferee. Information includes capacity and contact details of the external User who has posted the bulletin. The Navigation Path for this screen is: Home>Deal>Transfer>Bulletin Board. To view any items already posted you will then need to select from the system:
Product – the transferable product is associated with the sub-services
Location
Transfer Type – this could be Buy or Sell Then you will need to click the Query button.
Deal – Transfer – Bulletin Board - Query If any items have already been posted they will be displayed else the message “No Data Found for Your Query Criteria” will be shown. 5.1.1 Adding a Bulletin
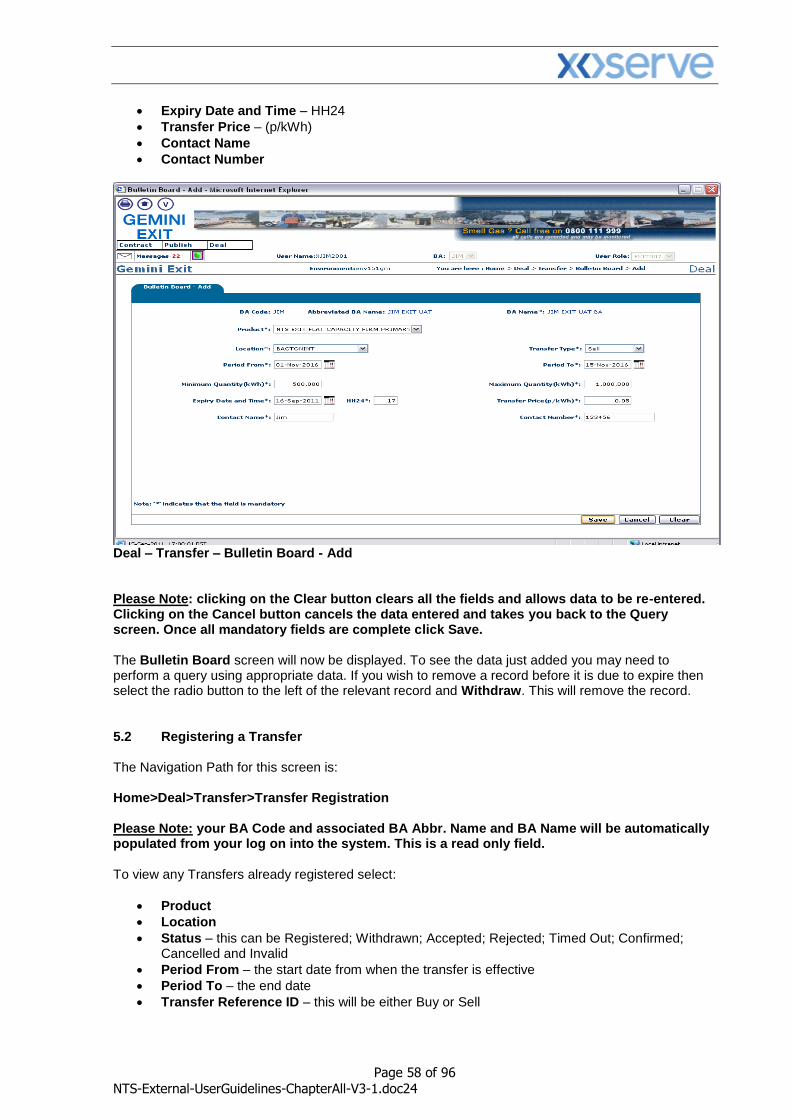
From the Query screen click Add Please Note: your BA Code and associated BA Abbr. Name and BA Name will be automatically populated from your log on into the system. This is a read only field. Then enter:
Product
Location
Transfer Type – this could be Buy or Sell
Period From
Period To
Minimum Qty (kWh)
Maximum Qty (kWh)
Page 58 of 96
NTS-External-UserGuidelines-ChapterAll-V3-1.doc24
Expiry Date and Time – HH24
Transfer Price – (p/kWh)
Contact Name
Contact Number
Deal – Transfer – Bulletin Board - Add
Please Note: clicking on the Clear button clears all the fields and allows data to be re-entered. Clicking on the Cancel button cancels the data entered and takes you back to the Query screen. Once all mandatory fields are complete click Save. The Bulletin Board screen will now be displayed. To see the data just added you may need to perform a query using appropriate data. If you wish to remove a record before it is due to expire then select the radio button to the left of the relevant record and Withdraw. This will remove the record. 5.2 Registering a Transfer The Navigation Path for this screen is: Home>Deal>Transfer>Transfer Registration Please Note: your BA Code and associated BA Abbr. Name and BA Name will be automatically populated from your log on into the system. This is a read only field. To view any Transfers already registered select:
Product
Location
Status – this can be Registered; Withdrawn; Accepted; Rejected; Timed Out; Confirmed; Cancelled and Invalid
Period From – the start date from when the transfer is effective
Period To – the end date
Transfer Reference ID – this will be either Buy or Sell
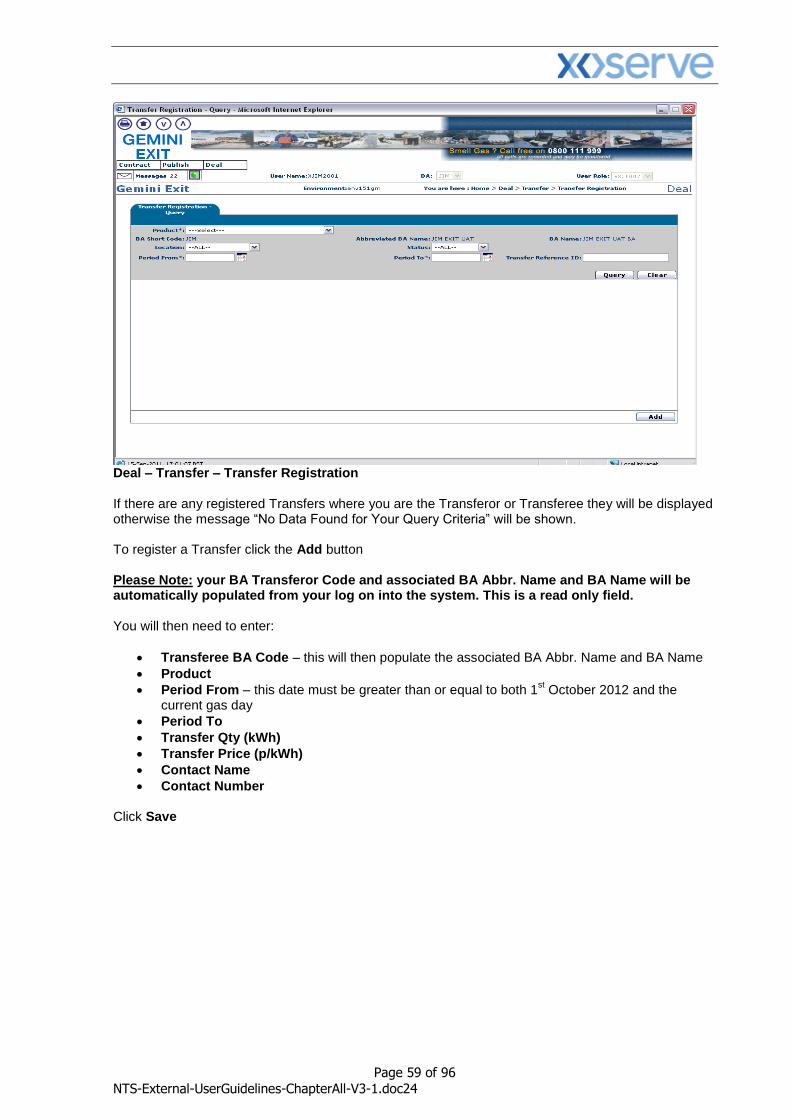
Page 59 of 96
NTS-External-UserGuidelines-ChapterAll-V3-1.doc24
Deal – Transfer – Transfer Registration If there are any registered Transfers where you are the Transferor or Transferee they will be displayed otherwise the message “No Data Found for Your Query Criteria” will be shown. To register a Transfer click the Add button Please Note: your BA Transferor Code and associated BA Abbr. Name and BA Name will be automatically populated from your log on into the system. This is a read only field. You will then need to enter:
Transferee BA Code – this will then populate the associated BA Abbr. Name and BA Name
Product
Period From – this date must be greater than or equal to both 1st October 2012 and the
current gas day
Period To
Transfer Qty (kWh)
Transfer Price (p/kWh)
Contact Name
Contact Number Click Save
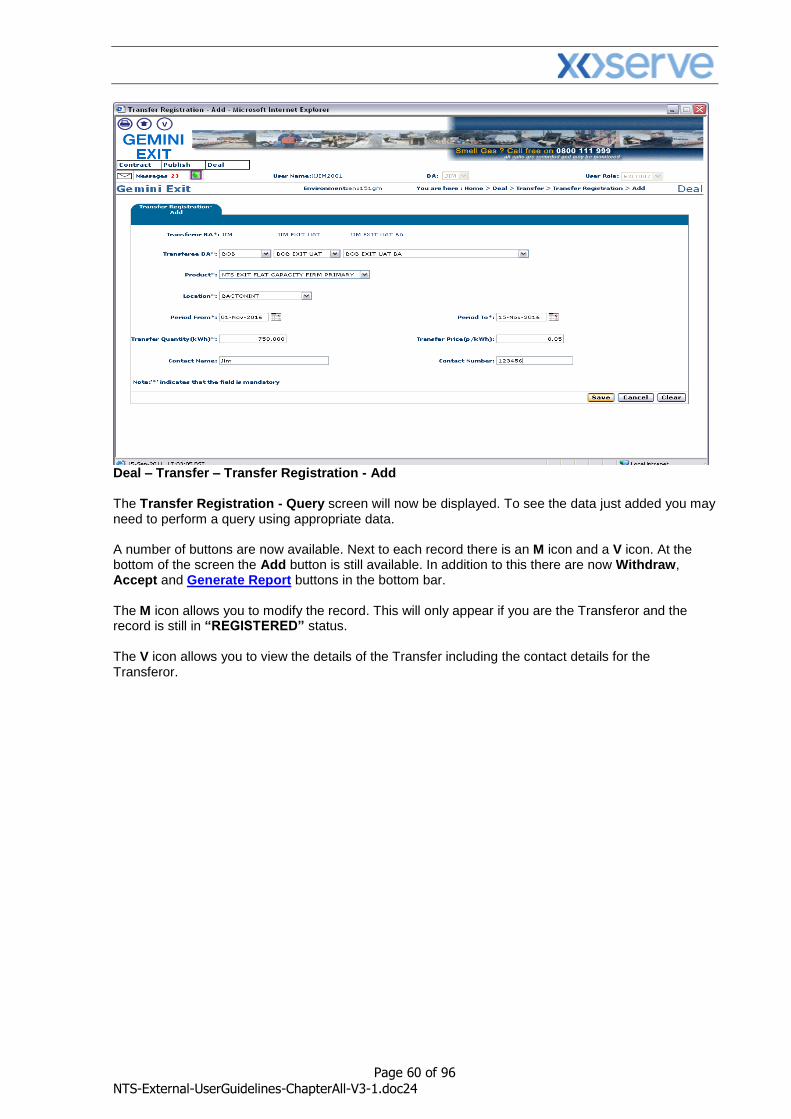
Page 60 of 96
NTS-External-UserGuidelines-ChapterAll-V3-1.doc24
Deal – Transfer – Transfer Registration - Add The Transfer Registration - Query screen will now be displayed. To see the data just added you may need to perform a query using appropriate data. A number of buttons are now available. Next to each record there is an M icon and a V icon. At the bottom of the screen the Add button is still available. In addition to this there are now Withdraw, Accept and Generate Report buttons in the bottom bar. The M icon allows you to modify the record. This will only appear if you are the Transferor and the record is still in “REGISTERED” status. The V icon allows you to view the details of the Transfer including the contact details for the Transferor.
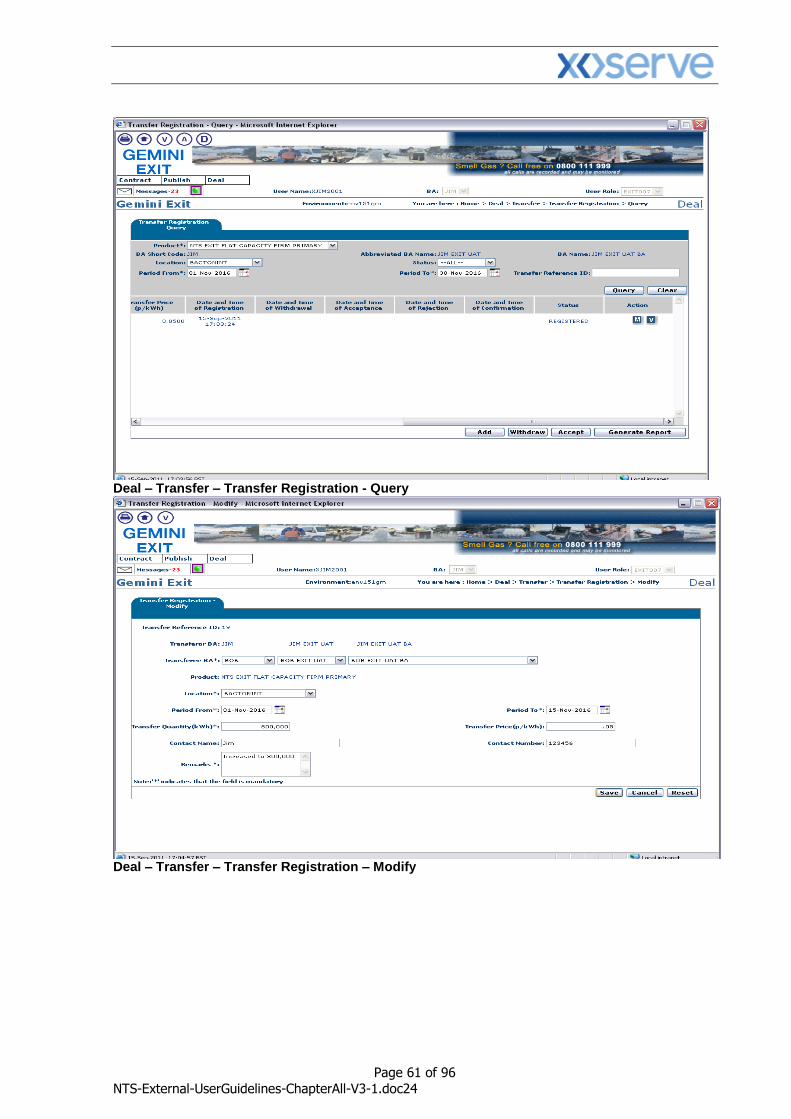
Page 61 of 96
NTS-External-UserGuidelines-ChapterAll-V3-1.doc24
Deal – Transfer – Transfer Registration - Query
Deal – Transfer – Transfer Registration – Modify
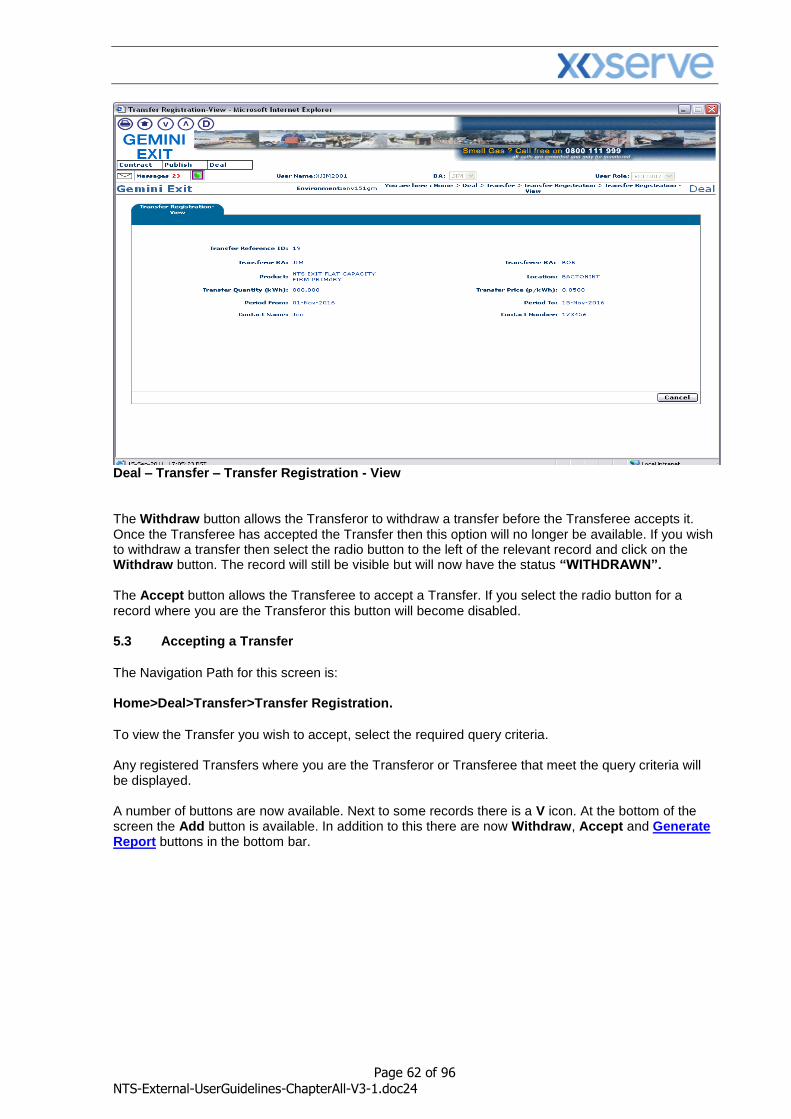
Page 62 of 96
NTS-External-UserGuidelines-ChapterAll-V3-1.doc24
Deal – Transfer – Transfer Registration - View The Withdraw button allows the Transferor to withdraw a transfer before the Transferee accepts it. Once the Transferee has accepted the Transfer then this option will no longer be available. If you wish to withdraw a transfer then select the radio button to the left of the relevant record and click on the Withdraw button. The record will still be visible but will now have the status “WITHDRAWN”. The Accept button allows the Transferee to accept a Transfer. If you select the radio button for a record where you are the Transferor this button will become disabled. 5.3 Accepting a Transfer
The Navigation Path for this screen is: Home>Deal>Transfer>Transfer Registration.
To view the Transfer you wish to accept, select the required query criteria. Any registered Transfers where you are the Transferor or Transferee that meet the query criteria will be displayed. A number of buttons are now available. Next to some records there is a V icon. At the bottom of the screen the Add button is available. In addition to this there are now Withdraw, Accept and Generate Report buttons in the bottom bar.
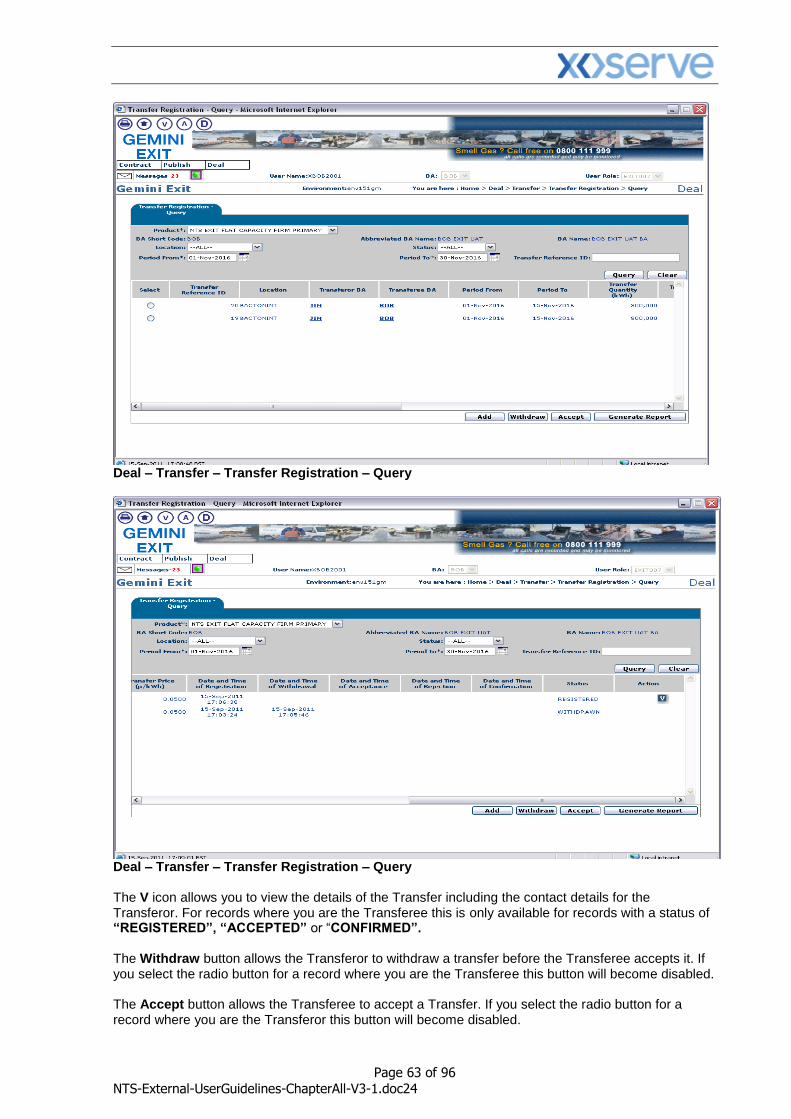
Page 63 of 96
NTS-External-UserGuidelines-ChapterAll-V3-1.doc24
Deal – Transfer – Transfer Registration – Query
Deal – Transfer – Transfer Registration – Query The V icon allows you to view the details of the Transfer including the contact details for the Transferor. For records where you are the Transferee this is only available for records with a status of “REGISTERED”, “ACCEPTED” or “CONFIRMED”. The Withdraw button allows the Transferor to withdraw a transfer before the Transferee accepts it. If you select the radio button for a record where you are the Transferee this button will become disabled. The Accept button allows the Transferee to accept a Transfer. If you select the radio button for a record where you are the Transferor this button will become disabled.
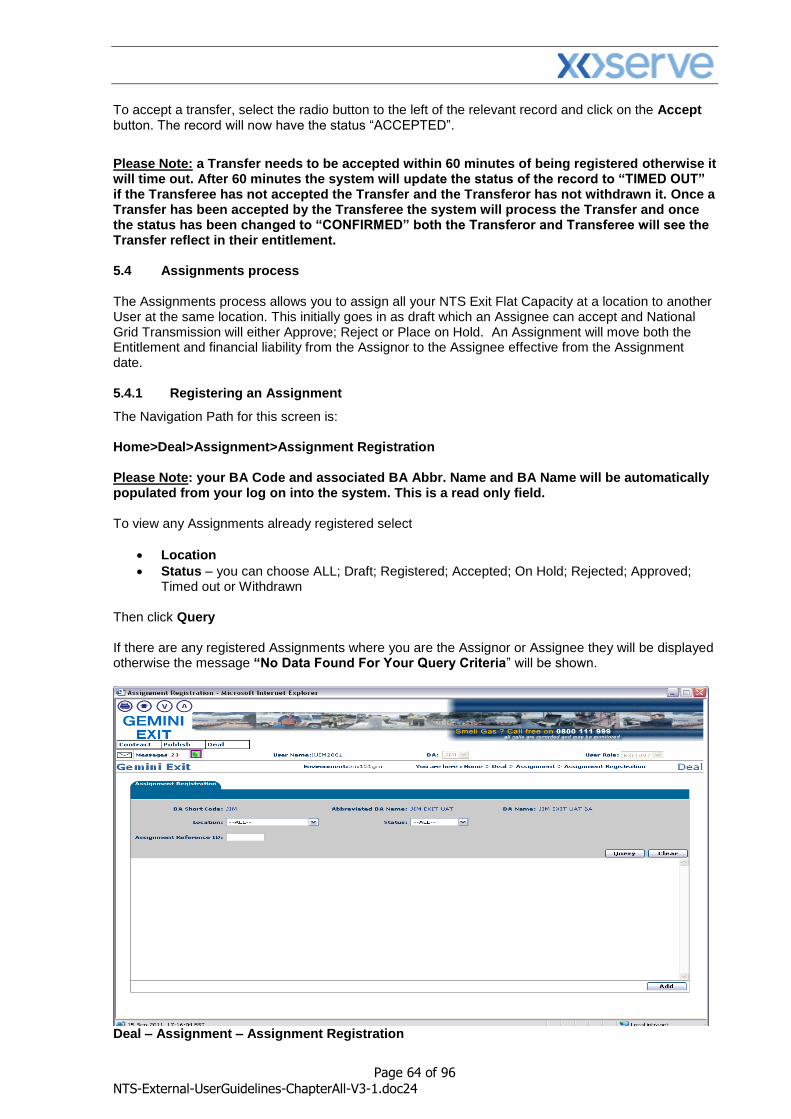
Page 64 of 96
NTS-External-UserGuidelines-ChapterAll-V3-1.doc24
To accept a transfer, select the radio button to the left of the relevant record and click on the Accept button. The record will now have the status “ACCEPTED”.
Please Note: a Transfer needs to be accepted within 60 minutes of being registered otherwise it will time out. After 60 minutes the system will update the status of the record to “TIMED OUT” if the Transferee has not accepted the Transfer and the Transferor has not withdrawn it. Once a Transfer has been accepted by the Transferee the system will process the Transfer and once the status has been changed to “CONFIRMED” both the Transferor and Transferee will see the Transfer reflect in their entitlement. 5.4 Assignments process The Assignments process allows you to assign all your NTS Exit Flat Capacity at a location to another User at the same location. This initially goes in as draft which an Assignee can accept and National Grid Transmission will either Approve; Reject or Place on Hold. An Assignment will move both the Entitlement and financial liability from the Assignor to the Assignee effective from the Assignment date. 5.4.1 Registering an Assignment
The Navigation Path for this screen is: Home>Deal>Assignment>Assignment Registration Please Note: your BA Code and associated BA Abbr. Name and BA Name will be automatically populated from your log on into the system. This is a read only field. To view any Assignments already registered select
Location
Status – you can choose ALL; Draft; Registered; Accepted; On Hold; Rejected; Approved; Timed out or Withdrawn
Then click Query If there are any registered Assignments where you are the Assignor or Assignee they will be displayed otherwise the message “No Data Found For Your Query Criteria” will be shown.
Deal – Assignment – Assignment Registration
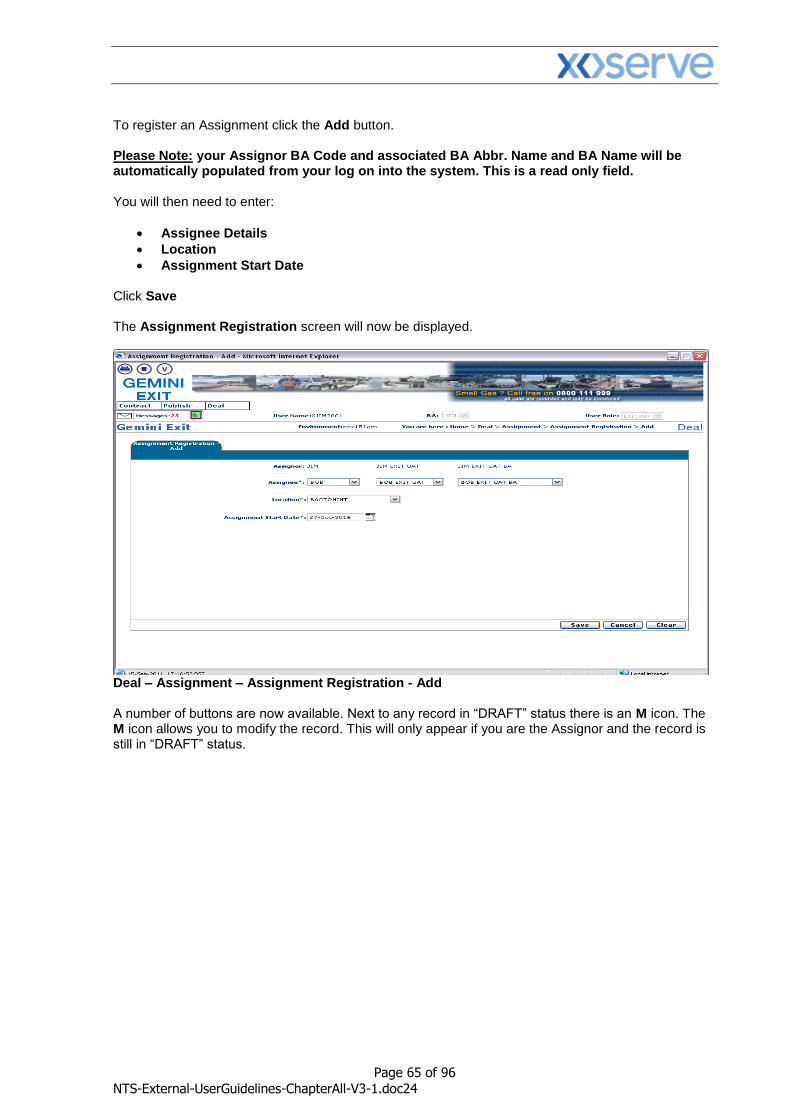
Page 65 of 96
NTS-External-UserGuidelines-ChapterAll-V3-1.doc24
To register an Assignment click the Add button. Please Note: your Assignor BA Code and associated BA Abbr. Name and BA Name will be automatically populated from your log on into the system. This is a read only field. You will then need to enter:
Assignee Details
Location
Assignment Start Date Click Save The Assignment Registration screen will now be displayed.
Deal – Assignment – Assignment Registration - Add A number of buttons are now available. Next to any record in “DRAFT” status there is an M icon. The M icon allows you to modify the record. This will only appear if you are the Assignor and the record is still in “DRAFT” status.

Page 66 of 96
NTS-External-UserGuidelines-ChapterAll-V3-1.doc24
Deal – Assignment – Assignment Registration - Modify Next to any record in “REGISTERED” or “APPROVED” status there is a V icon. The V icon allows you to view the capacity profile details of the Assignment. At the bottom of the screen the Add button is still available. In addition to this you will now see Confirm, Accept, Withdraw and Generate Report in the bottom bar. The Accept button allows the Assignee to accept an Assignment. If you select the radio button for a record where you are the Assignor this button will become disabled. The Withdraw button allows the Assignor to withdraw an Assignment before the Assignee accepts it. Once the Assignee has accepted the Assignment then this option will no longer be available. If you wish to withdraw an Assignment then select the radio button to the left of the relevant record and click on the Withdraw button. The record will still be visible but will now have the status “WITHDRAWN”.
Deal – Assignment – Assignment Registration - Query
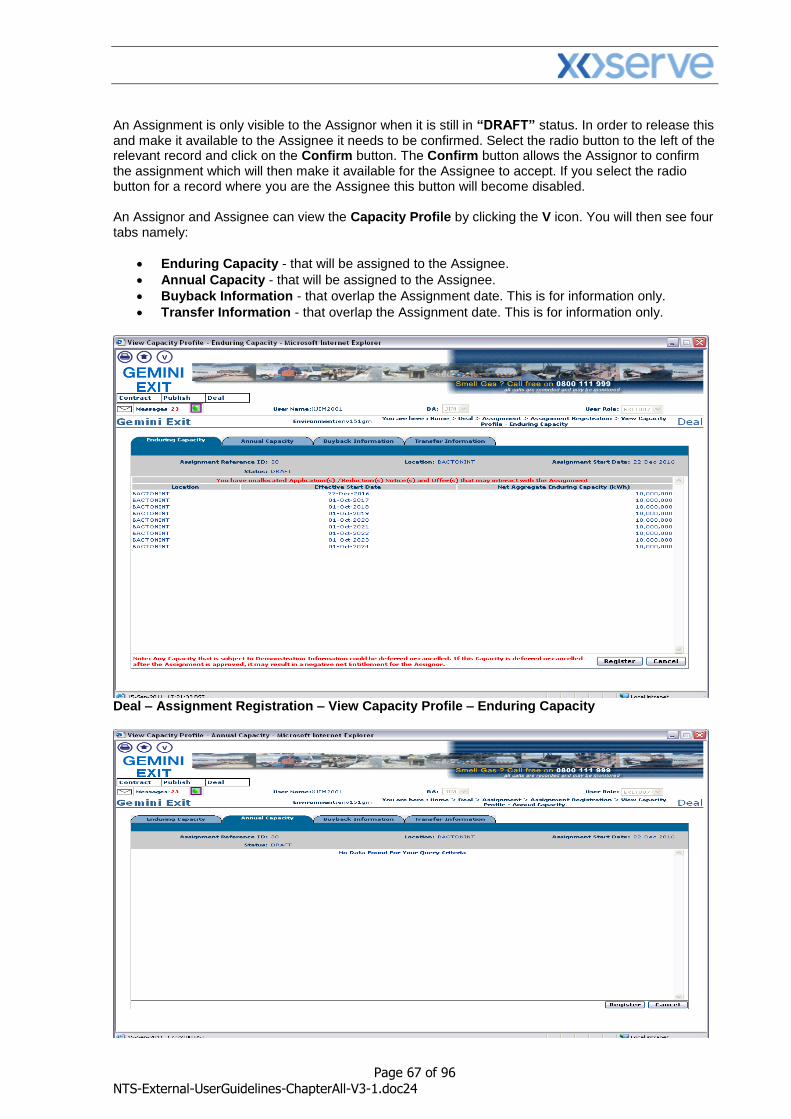
Page 67 of 96
NTS-External-UserGuidelines-ChapterAll-V3-1.doc24
An Assignment is only visible to the Assignor when it is still in “DRAFT” status. In order to release this and make it available to the Assignee it needs to be confirmed. Select the radio button to the left of the relevant record and click on the Confirm button. The Confirm button allows the Assignor to confirm the assignment which will then make it available for the Assignee to accept. If you select the radio button for a record where you are the Assignee this button will become disabled. An Assignor and Assignee can view the Capacity Profile by clicking the V icon. You will then see four tabs namely:
Enduring Capacity - that will be assigned to the Assignee.
Annual Capacity - that will be assigned to the Assignee.
Buyback Information - that overlap the Assignment date. This is for information only.
Transfer Information - that overlap the Assignment date. This is for information only.
Deal – Assignment Registration – View Capacity Profile – Enduring Capacity
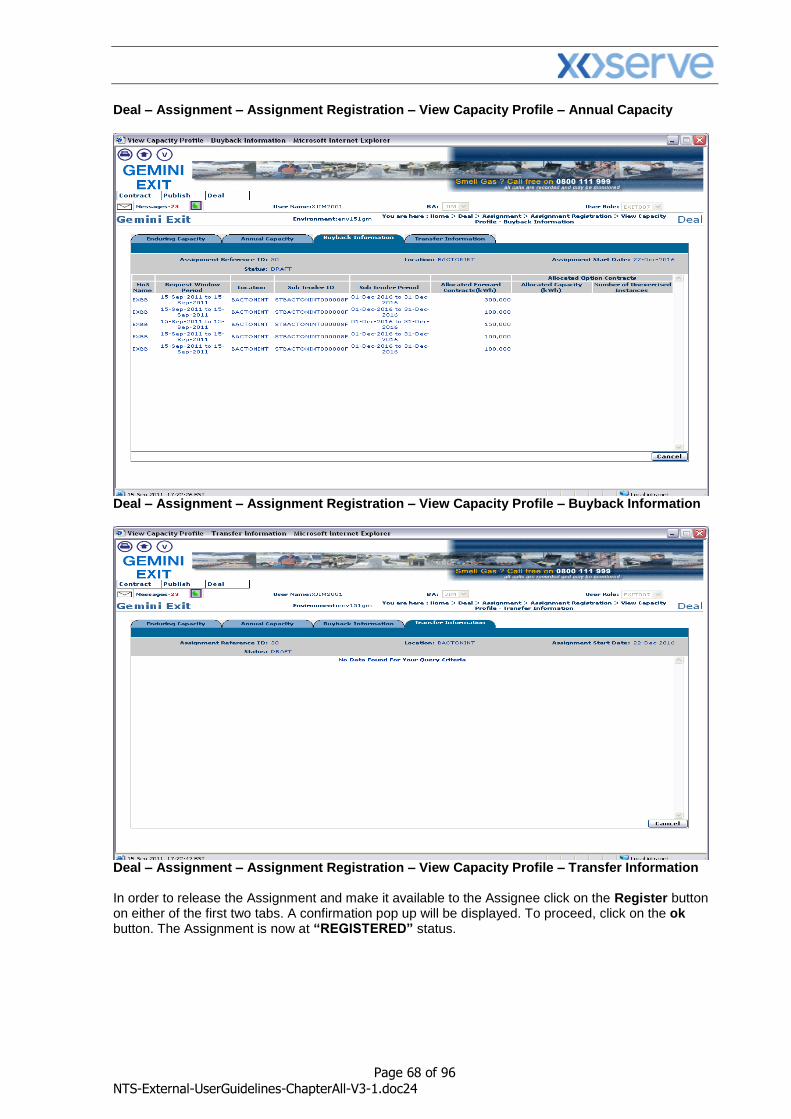
Page 68 of 96
NTS-External-UserGuidelines-ChapterAll-V3-1.doc24
Deal – Assignment – Assignment Registration – View Capacity Profile – Annual Capacity
Deal – Assignment – Assignment Registration – View Capacity Profile – Buyback Information
Deal – Assignment – Assignment Registration – View Capacity Profile – Transfer Information In order to release the Assignment and make it available to the Assignee click on the Register button on either of the first two tabs. A confirmation pop up will be displayed. To proceed, click on the ok button. The Assignment is now at “REGISTERED” status.
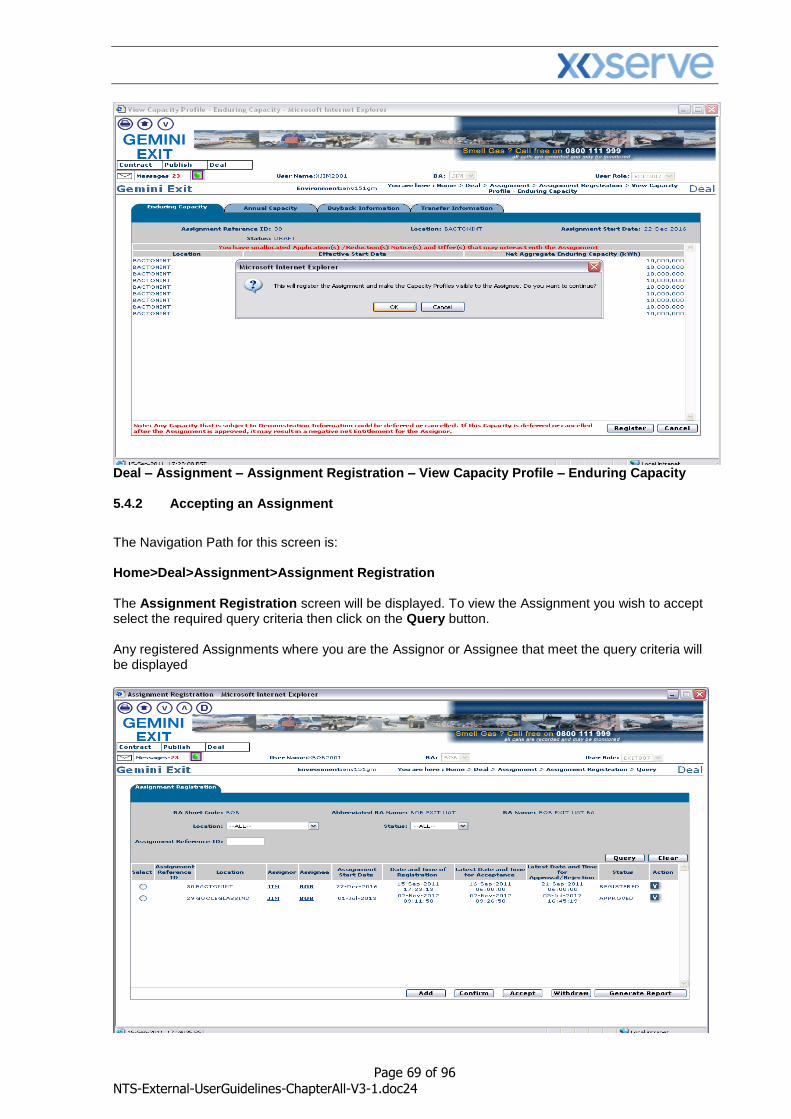
Page 69 of 96
NTS-External-UserGuidelines-ChapterAll-V3-1.doc24
Deal – Assignment – Assignment Registration – View Capacity Profile – Enduring Capacity 5.4.2 Accepting an Assignment
The Navigation Path for this screen is: Home>Deal>Assignment>Assignment Registration The Assignment Registration screen will be displayed. To view the Assignment you wish to accept select the required query criteria then click on the Query button. Any registered Assignments where you are the Assignor or Assignee that meet the query criteria will be displayed
Page 70 of 96
NTS-External-UserGuidelines-ChapterAll-V3-1.doc24
Deal – Assignment – Assignment Registration – Query A number of buttons are now available. Next to any record in “DRAFT” status there is an M icon. Next to any record in “REGISTERED” or “APPROVED” status there is a V icon. At the bottom of the screen the Add button is available. In addition to this there are Confirm, Accept, Withdraw and Generate Report. The M icon allows you to modify the record. This will only appear if you are the Assignor and the record is still in “DRAFT” status. The V icon allows you to view the capacity profile details of the Assignment. The Confirm button allows the Assignor to confirm the assignment which will then make it available for the Assignee to accept. If you select the radio button for a record where you are the Assignee this button will become disabled. The Accept button allows the Assignee to accept an Assignment. If you select the radio button for a record where you are the Assignor this button will become disabled. The Withdraw button allows the Assignor to withdraw an Assignment before the Assignee accepts it. Once the Assignee has accepted the Assignment then this option will no longer be available. If you wish to withdraw an Assignment then select the radio button to the left of the relevant record and click on the Withdraw button. The record will still be visible but will now have the status “WITHDRAWN”. Before accepting an Assignment the capacity profile can be viewed by clicking on the V icon next to the relevant record. The capacity profile screens will be displayed and you will see two tabs namely:
Enduring Capacity and
Annual Capacity.
Both of these are assigned to the Assignee.
Click on the Cancel button to return to the Assignment Registration screen. In order to accept an Assignment you will need to select the radio button to the left of the relevant record and click Accept. A confirmation pop up will be displayed and if you wish to proceed click OK. Once you have done this you will see that the Assignment is now at “ACCEPTED” status. Please Note: an Assignment needs to be accepted by the end of the same gas day as it is registered otherwise it will time out after which the system will update the status of the record to “TIMED OUT”, if the Assignee has not accepted the Assignment or the Assignor has not withdrawn it. Once an Assignment has been accepted by the Assignee National Grid will process the Assignment within 4 Gas Days (unless it has been placed On Hold) and either reject or approve it. Once an Assignment is in “APPROVED” status both the Assignor and Assignee will see the Assignment reflected in their holdings and entitlement.
Page 71 of 96
NTS-External-UserGuidelines-ChapterAll-V3-1.doc24
Gemini Exit
Chapter 6
OCS/OPS Requests

Page 72 of 96
NTS-External-UserGuidelines-ChapterAll-V3-1.doc24
6 Introduction to OCS/OPS Process This menu option is available only during the ‘Annual Application Window’ (1st July – 31st July) or the ‘DN Adjustment Window’ (No later than 15 Business Days following the last Day of the Annual Application Window for a period of 10 Business Days). 6.1 Submitting OCS and OPS Request Information The Navigation Path for this screen is: Home>Deal>Capture>Capture OCS and OPS Requests. Please Note: your BA Code and associated BA Abbr. Name and BA Name will be automatically populated from your log on into the system. This is a read only field. Select the relevant Location. Click Query.
Deal – Capture – Capture OCS and OPS Requests If data has previously been saved for the relevant gas years then these values will be displayed otherwise the editable fields will be blank. You can either enter the data directly into the screen or you can upload the data via the Bulk Upload facility. To enter data directly into the screen click into each box in each row and enter the relevant value. Once you enter a value for “Flex (mcm/day)” the system automatically calculates the corresponding “Flex (kWh)” value.

Page 73 of 96
NTS-External-UserGuidelines-ChapterAll-V3-1.doc24
Deal – Capture – Capture OCS and OPS Requests Once all relevant data has been entered click on Save. The OCS and OPS Request Confirmation screen will be displayed. Any data that you have amended/added in the previous screen is shown in red font in this screen.
Deal – Capture – OCS and OPS Request Confirmation To confirm the data click ok. The OCS and OPS Request screen will be displayed and you will note that each record now has a status against it.
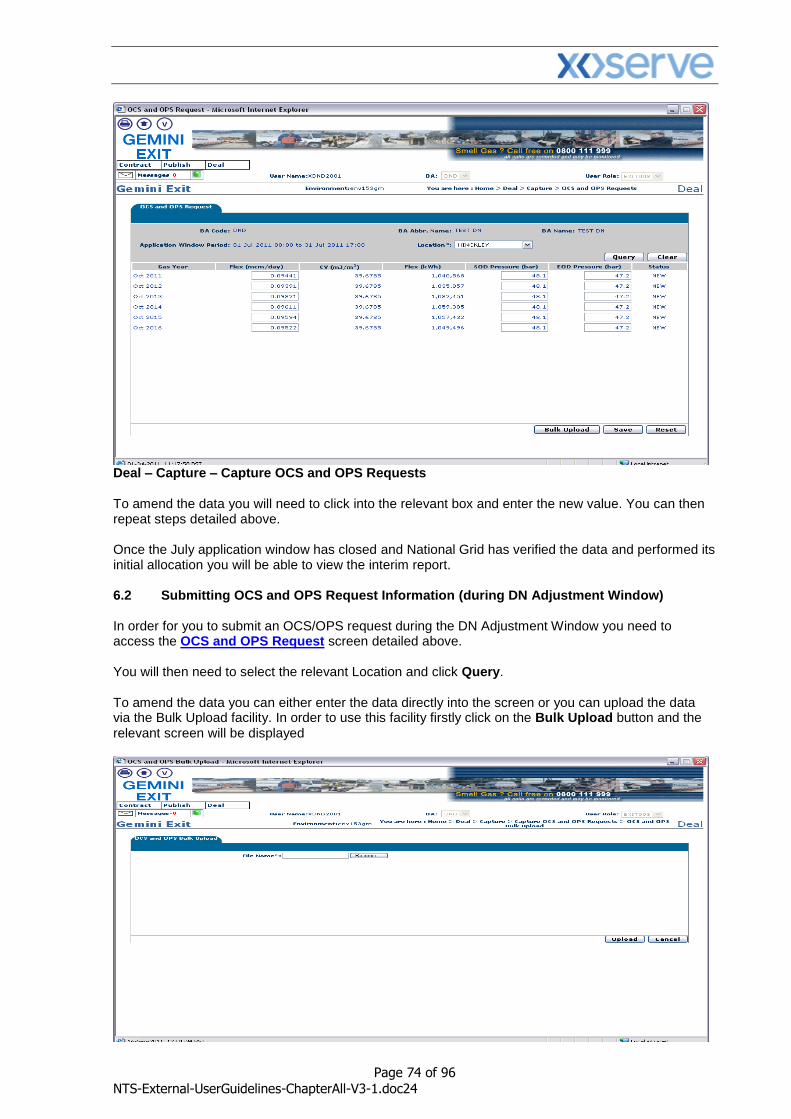
Page 74 of 96
NTS-External-UserGuidelines-ChapterAll-V3-1.doc24
Deal – Capture – Capture OCS and OPS Requests To amend the data you will need to click into the relevant box and enter the new value. You can then repeat steps detailed above. Once the July application window has closed and National Grid has verified the data and performed its initial allocation you will be able to view the interim report. 6.2 Submitting OCS and OPS Request Information (during DN Adjustment Window) In order for you to submit an OCS/OPS request during the DN Adjustment Window you need to access the OCS and OPS Request screen detailed above. You will then need to select the relevant Location and click Query. To amend the data you can either enter the data directly into the screen or you can upload the data via the Bulk Upload facility. In order to use this facility firstly click on the Bulk Upload button and the relevant screen will be displayed

Page 75 of 96
NTS-External-UserGuidelines-ChapterAll-V3-1.doc24
Deal – Capture – Capture OCS and OPS Requests – OCS and OPS Bulk Upload Once you have accessed the front screen you will see the option to upload a file. Please note this needs to be a csv file in the correct file format and naming convention. More information is available to you in the supplementary documentation that supports the UK Link Manual. If you require more information please contact the customer lifecycle team. Click Browse. A dialogue box will be displayed that will allow you to retrieve your saved file to be uploaded. This is a mandatory field and you must enter comments in this box. Locate the file; select it and click on Open.
Opening a File You should now see that the file you selected is displayed in the File Name field. Click Upload. A pop up will be displayed allowing you to record remarks. Enter any remarks and then click ok.
Bulk Upload The OCS and OPS Bulk Upload screen will be displayed. This identifies to you whether the data has been successfully uploaded.
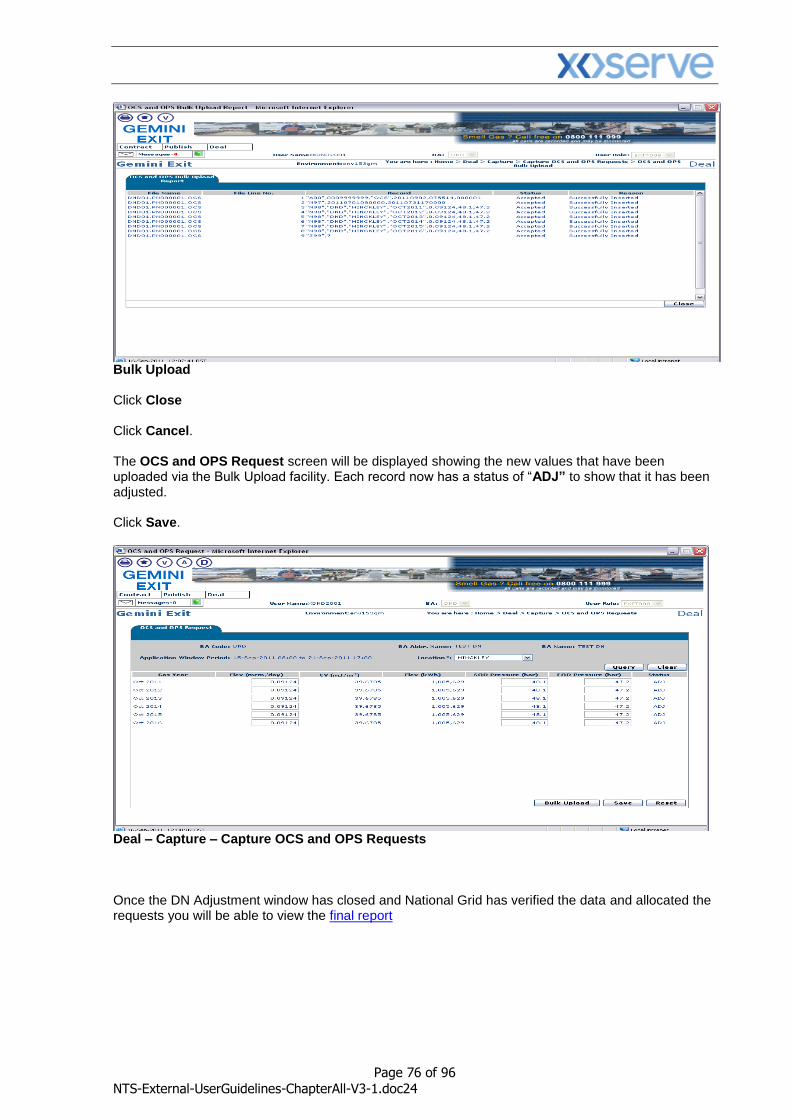
Page 76 of 96
NTS-External-UserGuidelines-ChapterAll-V3-1.doc24
Bulk Upload Click Close Click Cancel. The OCS and OPS Request screen will be displayed showing the new values that have been uploaded via the Bulk Upload facility. Each record now has a status of “ADJ” to show that it has been adjusted. Click Save.
Deal – Capture – Capture OCS and OPS Requests Once the DN Adjustment window has closed and National Grid has verified the data and allocated the requests you will be able to view the final report
Page 77 of 96
NTS-External-UserGuidelines-ChapterAll-V3-1.doc24
Gemini Exit
Chapter Seven
Constraints
Page 78 of 96
NTS-External-UserGuidelines-ChapterAll-V3-1.doc24
7. Introduction to Constraints UNC Modification 0195AV introduced a number of Exit Constraint Management commercial mechanisms, namely:
Curtailment of Off-peak capacity entitlement “constraint”
Buyback of Firm capacity rights – “DBNEX”
Exit Capacity Management Agreements (Forwards and Options) – “EXBB”; and
Offtake Flow Reduction (OFR)
DN Flow Swaps National Grid NTS may constrain and, following this, restore Off-Peak Exit Flat Capacity Entitlements at one or more NTS Exit Point(s). The notice sent will specify the NTS Exit Point(s) and Gas Day; the effective time and Off-peak Curtailment Factor. The OCF can be of any value between 0 and 1. OCF 1 – no scale back therefore there will be 100% of Off-peak NTS Exit (Flat) Capacity available. OCF 0 – total scale back therefore there is no capacity available. An OCF can be applied at any time before and throughout a gas day following the allocation of any Off-peak Capacity at 15:00 (D-1). All Users will be notified via ANS message indicating the revised OCF at applicable NTS Exit Points giving a minimum of 4 hours notice. In order to avoid potential overrun charges it is expected that you will revise any nominations accordingly. Following the scale back if conditions change and it is anticipated that the forecasted NTS Exit Constraint has been resolved then a full or partial restoration may take place. You will be informed of this via ANS message that will detail the changed OCF. Please Note: after National Grid NTS has applied a constraint and/or restoration, you will be able to view your own revised off-peak entitlements in the Entitlements report. . 7.1 History Screen (Constraint/Restoration) The Navigation Path for this screen is Home>Constraints >Constraint/Restoration History. Once you have accessed this screen you need to select to the following criteria:
Location
Period From – you can enter the date or select it from the calendar
Period To – you can enter the date or select it from the calendar
Click Query Information based on your selected query criteria will be displayed that will include:
Location
Gas Day – on which the constraint/restoration is effective
Constraint or Restoration
Effective Time – details when the constraint or restoration is due to take place
Available Quantity (kWh) – for both firm and off-peak capacity at the selected location(s) after the constraint/restoration has taken place
Off-peak Curtailment Factor (OCF) – once it has been calculated at confirmed and cancelled status and is applicable from the effective time.
Status – this can be either confirmed or cancelled
Timestamp
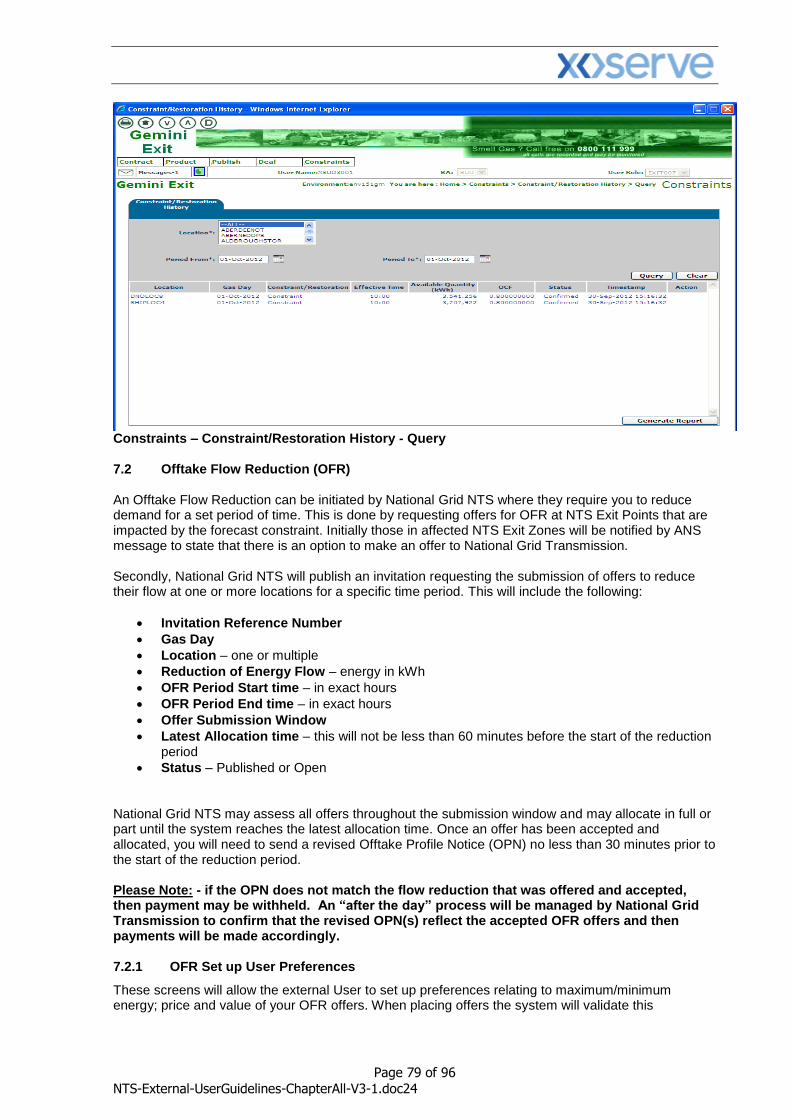
Page 79 of 96
NTS-External-UserGuidelines-ChapterAll-V3-1.doc24
Constraints – Constraint/Restoration History - Query 7.2 Offtake Flow Reduction (OFR) An Offtake Flow Reduction can be initiated by National Grid NTS where they require you to reduce demand for a set period of time. This is done by requesting offers for OFR at NTS Exit Points that are impacted by the forecast constraint. Initially those in affected NTS Exit Zones will be notified by ANS message to state that there is an option to make an offer to National Grid Transmission. Secondly, National Grid NTS will publish an invitation requesting the submission of offers to reduce their flow at one or more locations for a specific time period. This will include the following:
Invitation Reference Number
Gas Day
Location – one or multiple
Reduction of Energy Flow – energy in kWh
OFR Period Start time – in exact hours
OFR Period End time – in exact hours
Offer Submission Window
Latest Allocation time – this will not be less than 60 minutes before the start of the reduction period
Status – Published or Open National Grid NTS may assess all offers throughout the submission window and may allocate in full or part until the system reaches the latest allocation time. Once an offer has been accepted and allocated, you will need to send a revised Offtake Profile Notice (OPN) no less than 30 minutes prior to the start of the reduction period. Please Note: - if the OPN does not match the flow reduction that was offered and accepted, then payment may be withheld. An “after the day” process will be managed by National Grid Transmission to confirm that the revised OPN(s) reflect the accepted OFR offers and then payments will be made accordingly. 7.2.1 OFR Set up User Preferences
These screens will allow the external User to set up preferences relating to maximum/minimum energy; price and value of your OFR offers. When placing offers the system will validate this
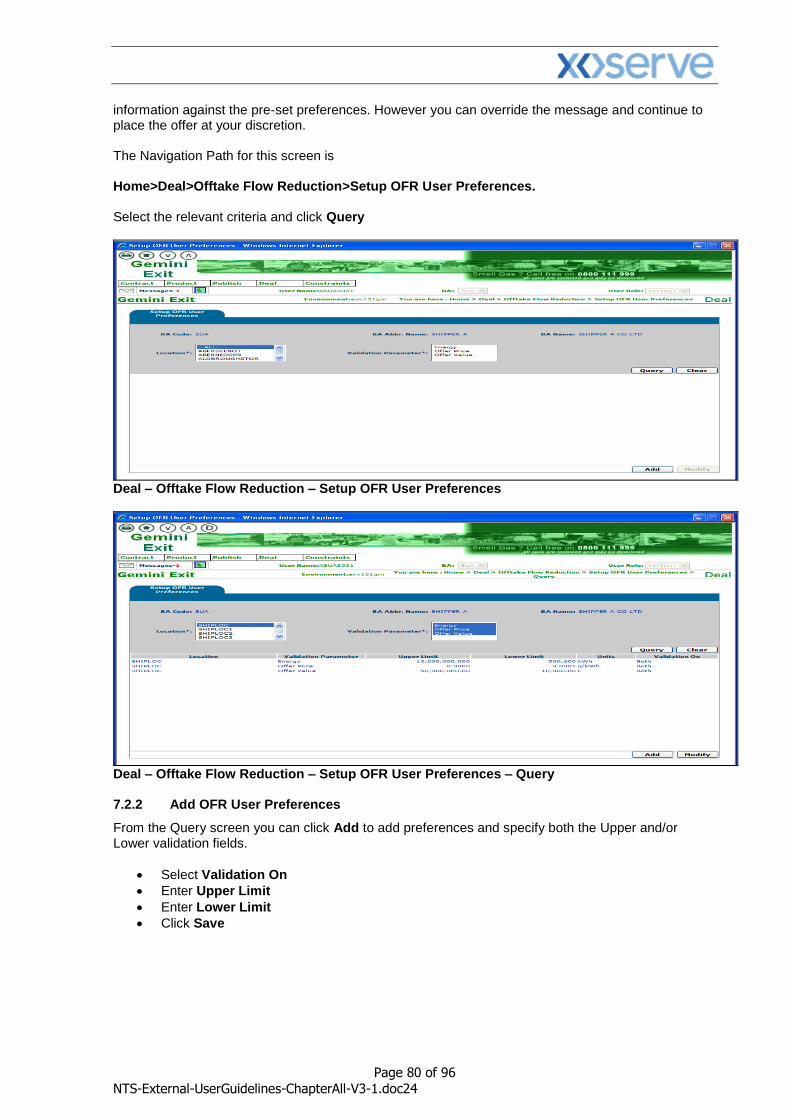
Page 80 of 96
NTS-External-UserGuidelines-ChapterAll-V3-1.doc24
information against the pre-set preferences. However you can override the message and continue to place the offer at your discretion. The Navigation Path for this screen is Home>Deal>Offtake Flow Reduction>Setup OFR User Preferences. Select the relevant criteria and click Query
Deal – Offtake Flow Reduction – Setup OFR User Preferences
Deal – Offtake Flow Reduction – Setup OFR User Preferences – Query 7.2.2 Add OFR User Preferences
From the Query screen you can click Add to add preferences and specify both the Upper and/or Lower validation fields.
Select Validation On
Enter Upper Limit
Enter Lower Limit
Click Save
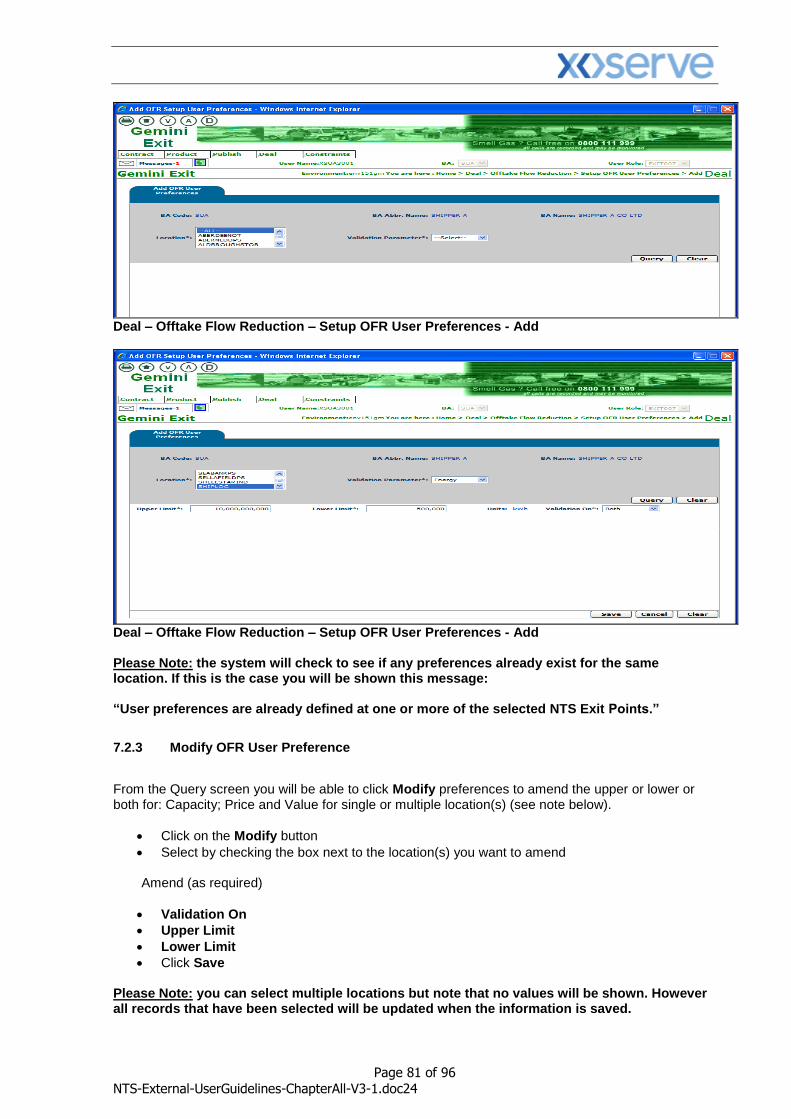
Page 81 of 96
NTS-External-UserGuidelines-ChapterAll-V3-1.doc24
Deal – Offtake Flow Reduction – Setup OFR User Preferences - Add
Deal – Offtake Flow Reduction – Setup OFR User Preferences - Add Please Note: the system will check to see if any preferences already exist for the same location. If this is the case you will be shown this message: “User preferences are already defined at one or more of the selected NTS Exit Points.”
7.2.3 Modify OFR User Preference
From the Query screen you will be able to click Modify preferences to amend the upper or lower or both for: Capacity; Price and Value for single or multiple location(s) (see note below).
Click on the Modify button
Select by checking the box next to the location(s) you want to amend
Amend (as required)
Validation On
Upper Limit
Lower Limit
Click Save Please Note: you can select multiple locations but note that no values will be shown. However all records that have been selected will be updated when the information is saved.

Page 82 of 96
NTS-External-UserGuidelines-ChapterAll-V3-1.doc24
Deal – Offtake Flow Reduction – Setup OFR User Preferences - Modify Please Note: When modifying both preferences then the upper and lower limits must be entered or the record will not be saved 7.3 Capture OFR Offers The Navigation Path for this screen is Home>Deal>Offtake Flow Reduction>Offtake Flow Reduction Offer Capture.
Enter Gas Day
Select Invitation Reference Number
Enter Location
Click Query
Deal – Offtake Flow Reduction – Offtake Flow Reduction Offer Capture
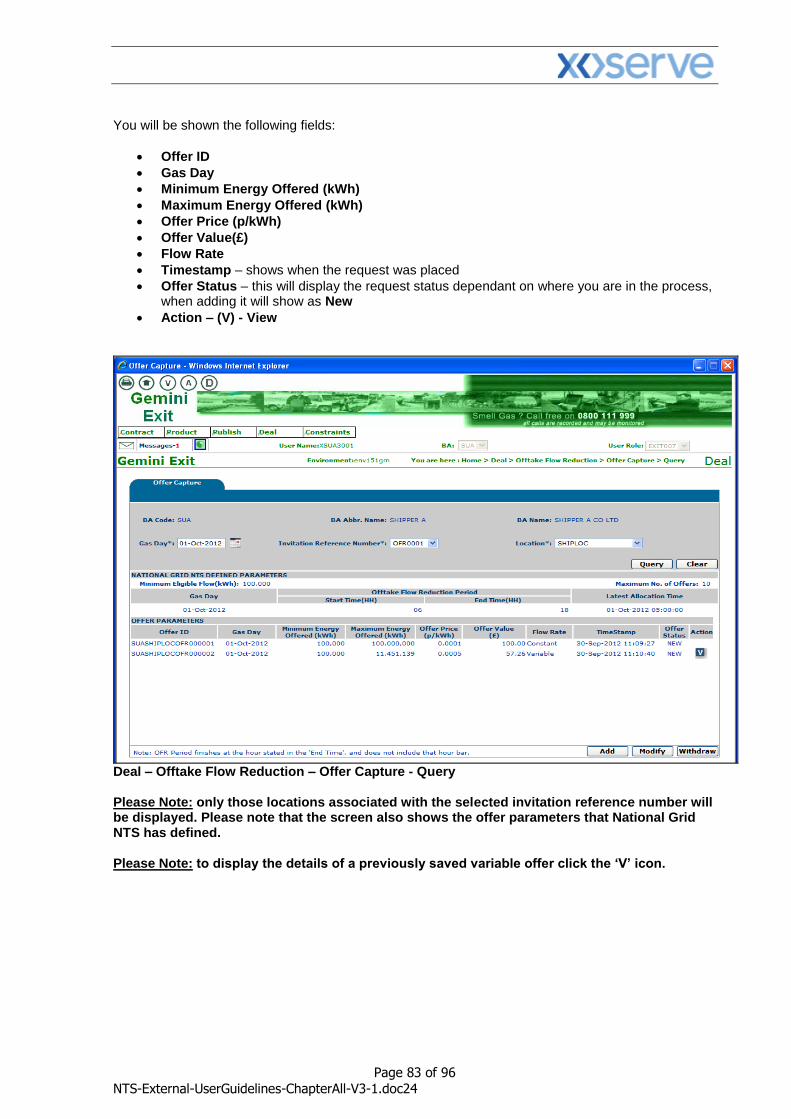
Page 83 of 96
NTS-External-UserGuidelines-ChapterAll-V3-1.doc24
You will be shown the following fields:
Offer ID
Gas Day
Minimum Energy Offered (kWh)
Maximum Energy Offered (kWh)
Offer Price (p/kWh)
Offer Value(£)
Flow Rate
Timestamp – shows when the request was placed
Offer Status – this will display the request status dependant on where you are in the process, when adding it will show as New
Action – (V) - View
Deal – Offtake Flow Reduction – Offer Capture - Query Please Note: only those locations associated with the selected invitation reference number will be displayed. Please note that the screen also shows the offer parameters that National Grid NTS has defined. Please Note: to display the details of a previously saved variable offer click the ‘V’ icon.
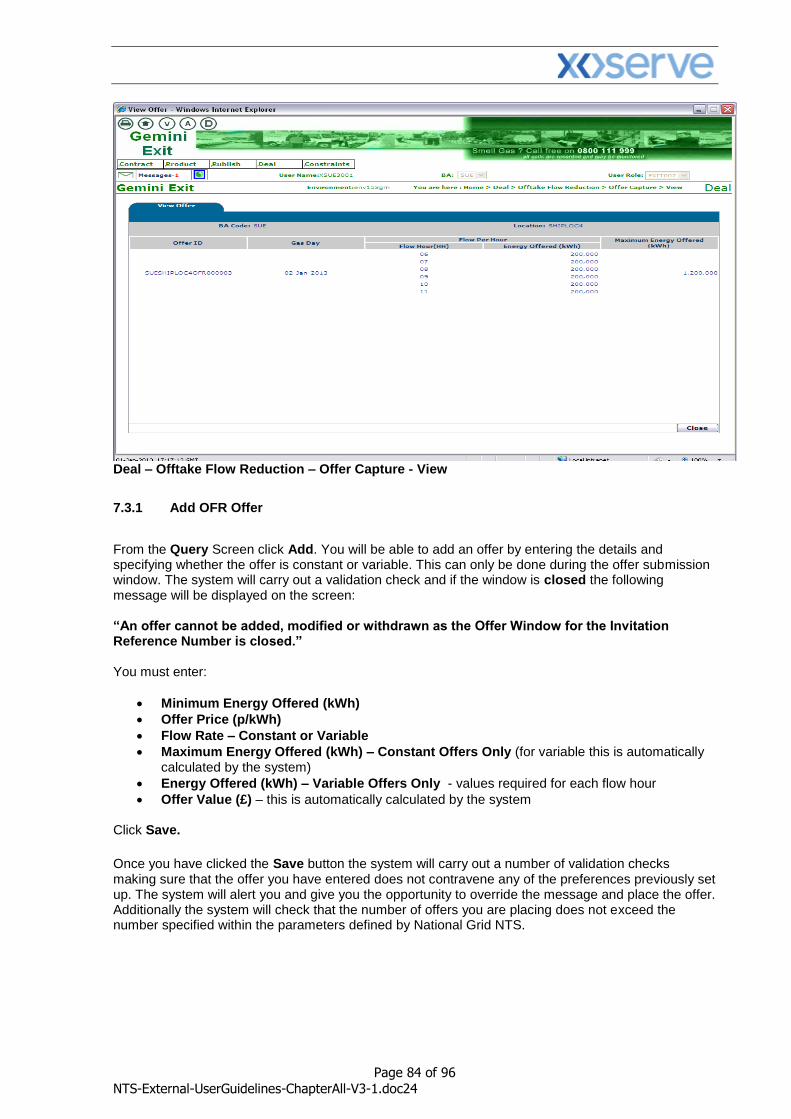
Page 84 of 96
NTS-External-UserGuidelines-ChapterAll-V3-1.doc24
Deal – Offtake Flow Reduction – Offer Capture - View
7.3.1 Add OFR Offer
From the Query Screen click Add. You will be able to add an offer by entering the details and specifying whether the offer is constant or variable. This can only be done during the offer submission window. The system will carry out a validation check and if the window is closed the following message will be displayed on the screen: “An offer cannot be added, modified or withdrawn as the Offer Window for the Invitation Reference Number is closed.” You must enter:
Minimum Energy Offered (kWh)
Offer Price (p/kWh)
Flow Rate – Constant or Variable
Maximum Energy Offered (kWh) – Constant Offers Only (for variable this is automatically calculated by the system)
Energy Offered (kWh) – Variable Offers Only - values required for each flow hour
Offer Value (£) – this is automatically calculated by the system Click Save.
Once you have clicked the Save button the system will carry out a number of validation checks making sure that the offer you have entered does not contravene any of the preferences previously set up. The system will alert you and give you the opportunity to override the message and place the offer. Additionally the system will check that the number of offers you are placing does not exceed the number specified within the parameters defined by National Grid NTS.
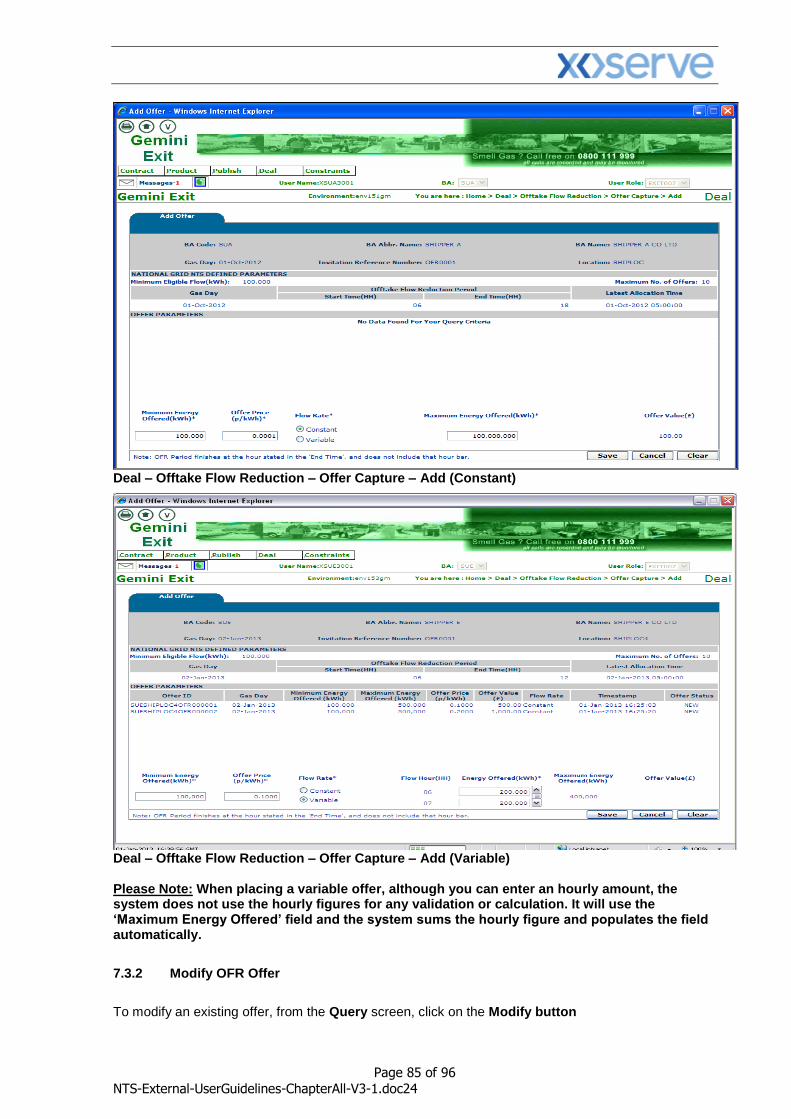
Page 85 of 96
NTS-External-UserGuidelines-ChapterAll-V3-1.doc24
Deal – Offtake Flow Reduction – Offer Capture – Add (Constant)
Deal – Offtake Flow Reduction – Offer Capture – Add (Variable) Please Note: When placing a variable offer, although you can enter an hourly amount, the system does not use the hourly figures for any validation or calculation. It will use the ‘Maximum Energy Offered’ field and the system sums the hourly figure and populates the field automatically.
7.3.2 Modify OFR Offer
To modify an existing offer, from the Query screen, click on the Modify button

Page 86 of 96
NTS-External-UserGuidelines-ChapterAll-V3-1.doc24
Select the offer using the radio button. You can then update the following fields
Minimum Energy Offered (kWh)
Offer Price (p/kWh)
Flow Rate – Constant or Variable
Maximum Energy Offered (kWh) – Constant Offers Only (for variable this is automatically calculated by the system)
Energy Offered (kWh) – Variable Offers Only - values required for each flow hour Click Save Once you have clicked the Save button the system will carry out a number of validation checks making sure that the offer you have entered does not contravene any of the preferences that were previously set up. The system will alert you and give you the opportunity to override the message and place the offer.
Additionally the system checks if your offer has been allocated and if so displays the following message: “The Offer can not be modified as the Offer is already allocated.” If the Offer window is closed the following message is displayed “The Offer can not be modified as the Offer window for the Invitation reference is closed.”
Deal – Offtake Flow Reduction – Offer Capture – Modify (Constant)
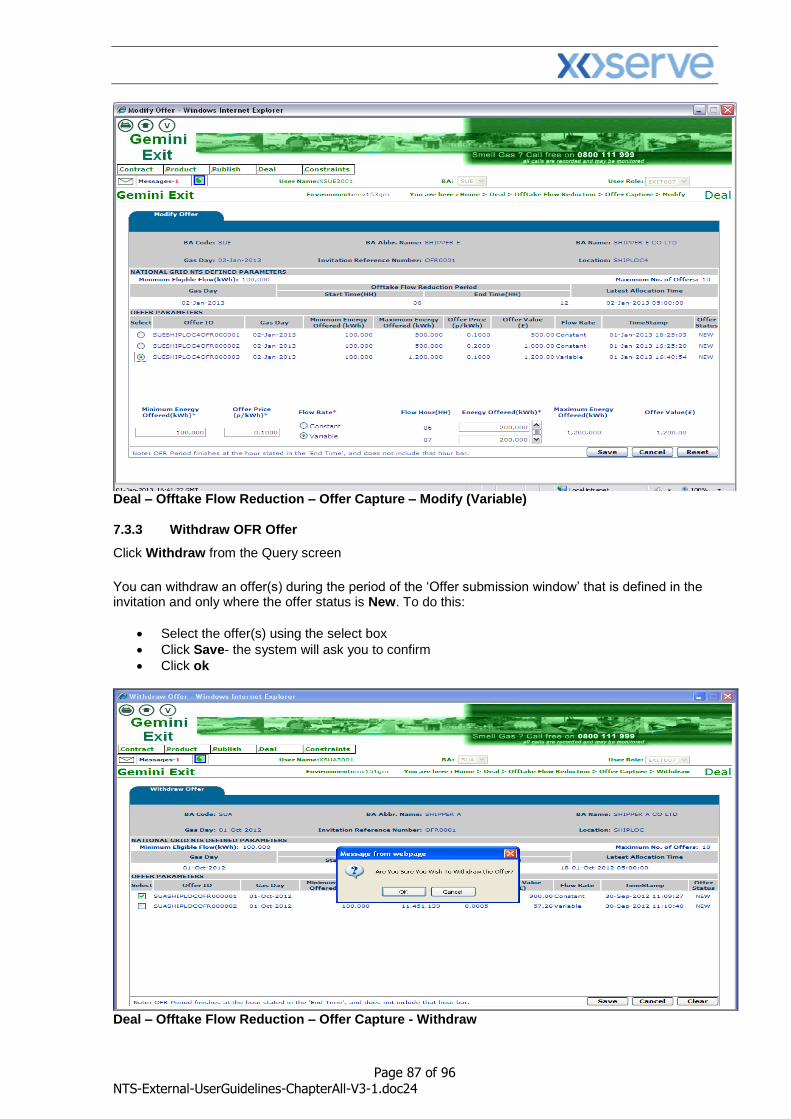
Page 87 of 96
NTS-External-UserGuidelines-ChapterAll-V3-1.doc24
Deal – Offtake Flow Reduction – Offer Capture – Modify (Variable) 7.3.3 Withdraw OFR Offer
Click Withdraw from the Query screen
You can withdraw an offer(s) during the period of the ‘Offer submission window’ that is defined in the invitation and only where the offer status is New. To do this:
Select the offer(s) using the select box
Click Save- the system will ask you to confirm
Click ok
Deal – Offtake Flow Reduction – Offer Capture - Withdraw
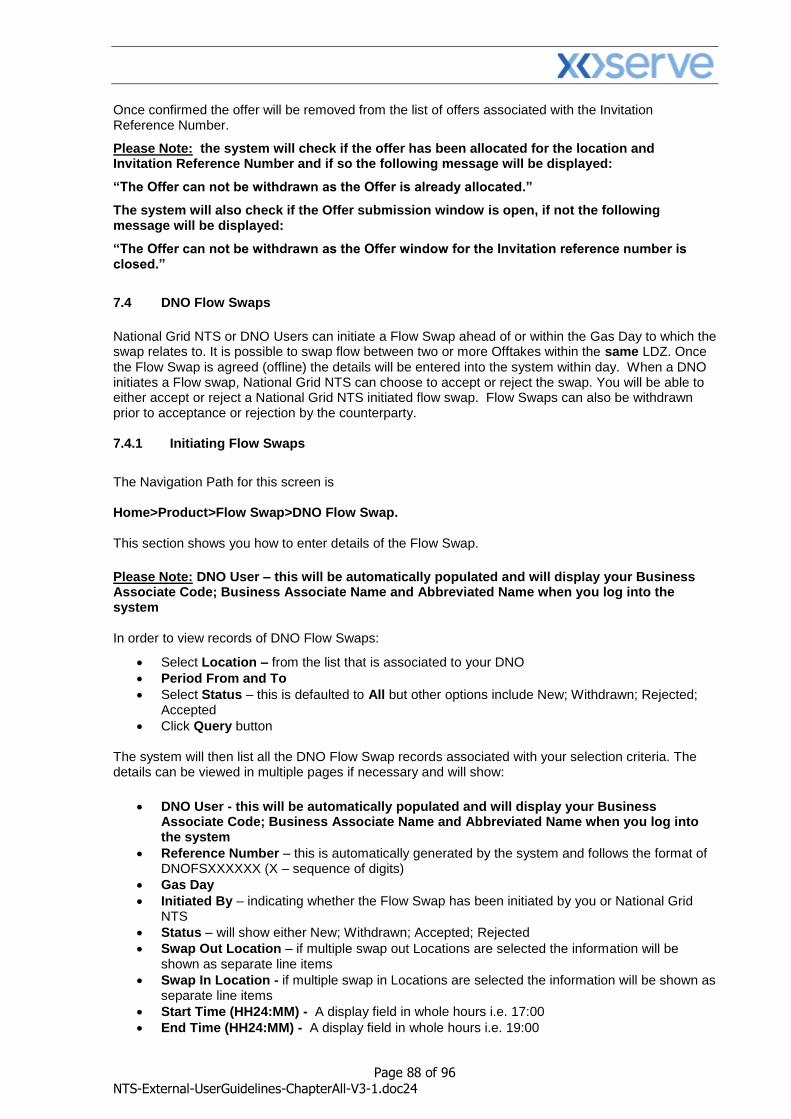
Page 88 of 96
NTS-External-UserGuidelines-ChapterAll-V3-1.doc24
Once confirmed the offer will be removed from the list of offers associated with the Invitation Reference Number.
Please Note: the system will check if the offer has been allocated for the location and Invitation Reference Number and if so the following message will be displayed:
“The Offer can not be withdrawn as the Offer is already allocated.”
The system will also check if the Offer submission window is open, if not the following message will be displayed:
“The Offer can not be withdrawn as the Offer window for the Invitation reference number is closed.”
7.4 DNO Flow Swaps
National Grid NTS or DNO Users can initiate a Flow Swap ahead of or within the Gas Day to which the swap relates to. It is possible to swap flow between two or more Offtakes within the same LDZ. Once the Flow Swap is agreed (offline) the details will be entered into the system within day. When a DNO initiates a Flow swap, National Grid NTS can choose to accept or reject the swap. You will be able to either accept or reject a National Grid NTS initiated flow swap. Flow Swaps can also be withdrawn prior to acceptance or rejection by the counterparty. 7.4.1 Initiating Flow Swaps
The Navigation Path for this screen is Home>Product>Flow Swap>DNO Flow Swap. This section shows you how to enter details of the Flow Swap.
Please Note: DNO User – this will be automatically populated and will display your Business Associate Code; Business Associate Name and Abbreviated Name when you log into the system In order to view records of DNO Flow Swaps:
Select Location – from the list that is associated to your DNO
Period From and To
Select Status – this is defaulted to All but other options include New; Withdrawn; Rejected; Accepted
Click Query button
The system will then list all the DNO Flow Swap records associated with your selection criteria. The details can be viewed in multiple pages if necessary and will show:
DNO User - this will be automatically populated and will display your Business
Associate Code; Business Associate Name and Abbreviated Name when you log into the system
Reference Number – this is automatically generated by the system and follows the format of DNOFSXXXXXX (X – sequence of digits)
Gas Day
Initiated By – indicating whether the Flow Swap has been initiated by you or National Grid NTS
Status – will show either New; Withdrawn; Accepted; Rejected
Swap Out Location – if multiple swap out Locations are selected the information will be shown as separate line items
Swap In Location - if multiple swap in Locations are selected the information will be shown as separate line items
Start Time (HH24:MM) - A display field in whole hours i.e. 17:00
End Time (HH24:MM) - A display field in whole hours i.e. 19:00
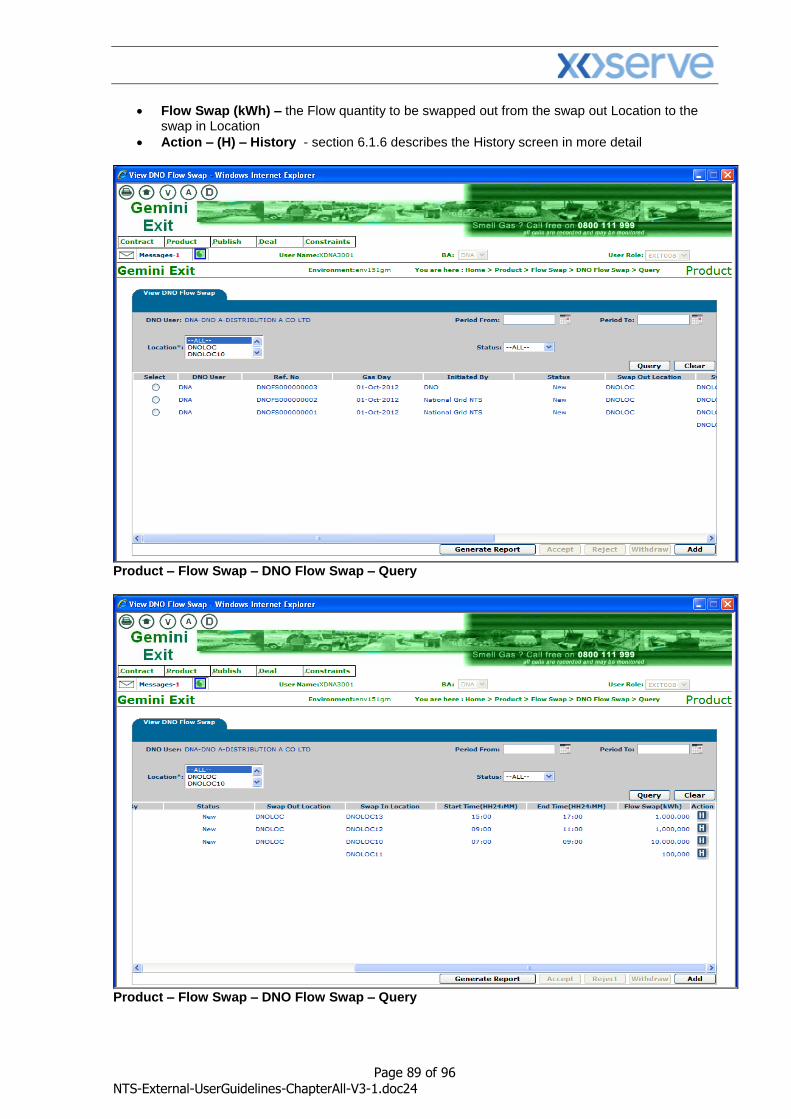
Page 89 of 96
NTS-External-UserGuidelines-ChapterAll-V3-1.doc24
Flow Swap (kWh) – the Flow quantity to be swapped out from the swap out Location to the swap in Location
Action – (H) – History - section 6.1.6 describes the History screen in more detail
Product – Flow Swap – DNO Flow Swap – Query
Product – Flow Swap – DNO Flow Swap – Query
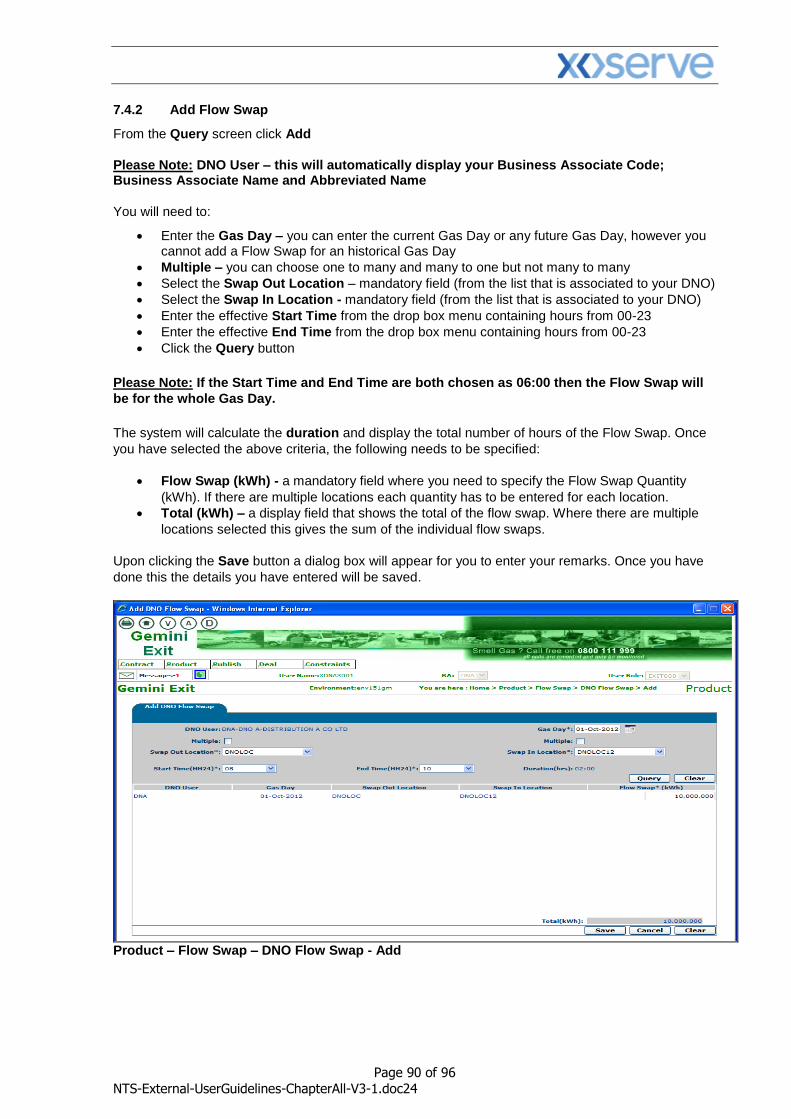
Page 90 of 96
NTS-External-UserGuidelines-ChapterAll-V3-1.doc24
7.4.2 Add Flow Swap
From the Query screen click Add
Please Note: DNO User – this will automatically display your Business Associate Code; Business Associate Name and Abbreviated Name
You will need to:
Enter the Gas Day – you can enter the current Gas Day or any future Gas Day, however you cannot add a Flow Swap for an historical Gas Day
Multiple – you can choose one to many and many to one but not many to many
Select the Swap Out Location – mandatory field (from the list that is associated to your DNO)
Select the Swap In Location - mandatory field (from the list that is associated to your DNO)
Enter the effective Start Time from the drop box menu containing hours from 00-23
Enter the effective End Time from the drop box menu containing hours from 00-23
Click the Query button
Please Note: If the Start Time and End Time are both chosen as 06:00 then the Flow Swap will
be for the whole Gas Day.
The system will calculate the duration and display the total number of hours of the Flow Swap. Once
you have selected the above criteria, the following needs to be specified:
Flow Swap (kWh) - a mandatory field where you need to specify the Flow Swap Quantity
(kWh). If there are multiple locations each quantity has to be entered for each location.
Total (kWh) – a display field that shows the total of the flow swap. Where there are multiple
locations selected this gives the sum of the individual flow swaps.
Upon clicking the Save button a dialog box will appear for you to enter your remarks. Once you have
done this the details you have entered will be saved.
Product – Flow Swap – DNO Flow Swap - Add
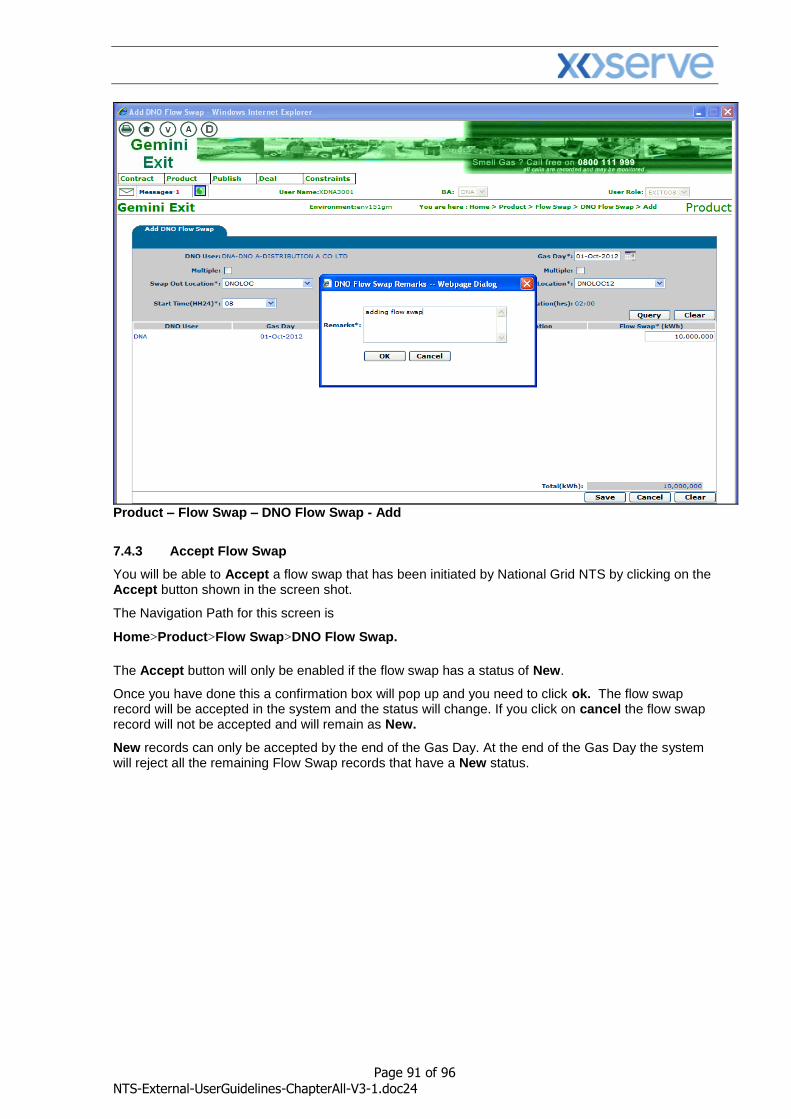
Page 91 of 96
NTS-External-UserGuidelines-ChapterAll-V3-1.doc24
Product – Flow Swap – DNO Flow Swap - Add
7.4.3 Accept Flow Swap
You will be able to Accept a flow swap that has been initiated by National Grid NTS by clicking on the Accept button shown in the screen shot.
The Navigation Path for this screen is
Home>Product>Flow Swap>DNO Flow Swap.
The Accept button will only be enabled if the flow swap has a status of New.
Once you have done this a confirmation box will pop up and you need to click ok. The flow swap record will be accepted in the system and the status will change. If you click on cancel the flow swap record will not be accepted and will remain as New.
New records can only be accepted by the end of the Gas Day. At the end of the Gas Day the system will reject all the remaining Flow Swap records that have a New status.
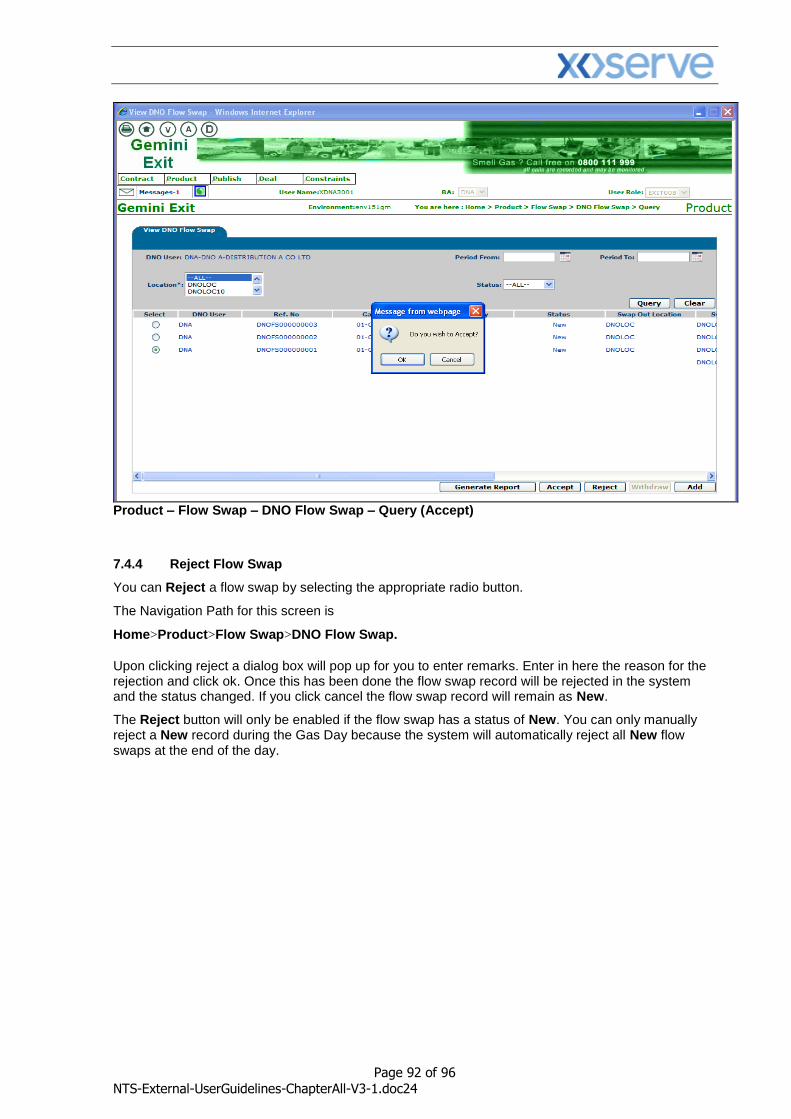
Page 92 of 96
NTS-External-UserGuidelines-ChapterAll-V3-1.doc24
Product – Flow Swap – DNO Flow Swap – Query (Accept)
7.4.4 Reject Flow Swap
You can Reject a flow swap by selecting the appropriate radio button.
The Navigation Path for this screen is
Home>Product>Flow Swap>DNO Flow Swap.
Upon clicking reject a dialog box will pop up for you to enter remarks. Enter in here the reason for the rejection and click ok. Once this has been done the flow swap record will be rejected in the system and the status changed. If you click cancel the flow swap record will remain as New.
The Reject button will only be enabled if the flow swap has a status of New. You can only manually reject a New record during the Gas Day because the system will automatically reject all New flow swaps at the end of the day.
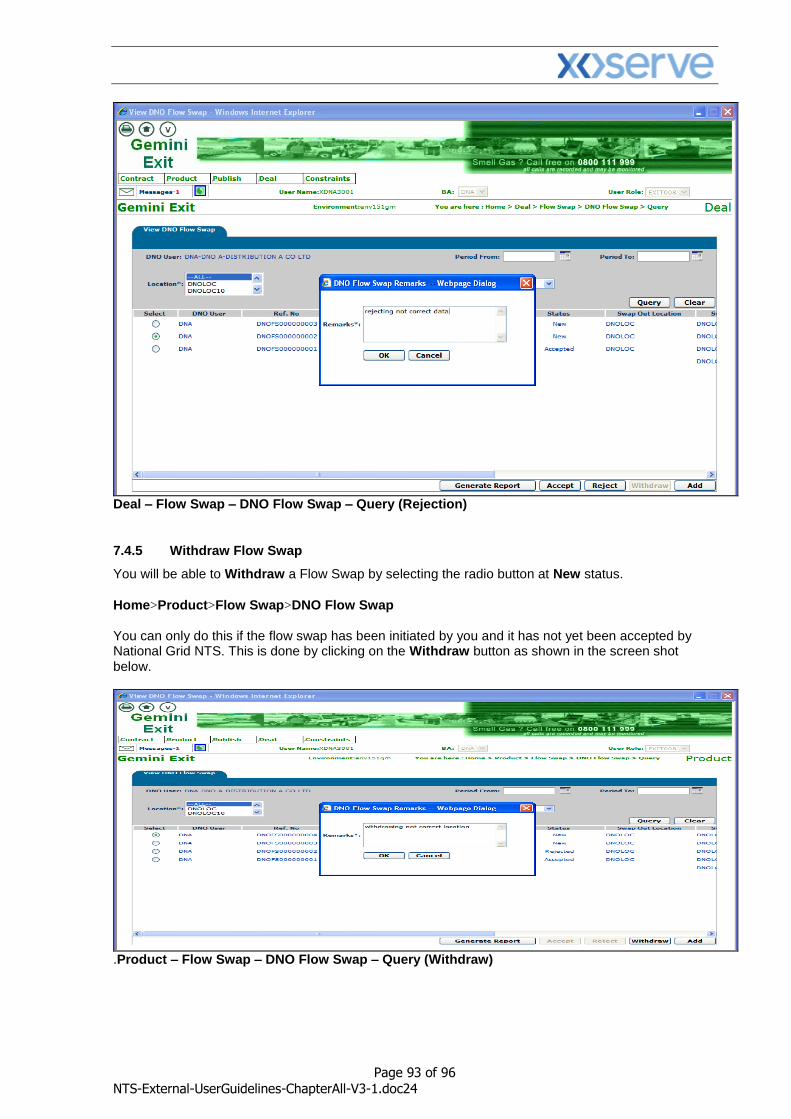
Page 93 of 96
NTS-External-UserGuidelines-ChapterAll-V3-1.doc24
Deal – Flow Swap – DNO Flow Swap – Query (Rejection)
7.4.5 Withdraw Flow Swap
You will be able to Withdraw a Flow Swap by selecting the radio button at New status.
Home>Product>Flow Swap>DNO Flow Swap You can only do this if the flow swap has been initiated by you and it has not yet been accepted by National Grid NTS. This is done by clicking on the Withdraw button as shown in the screen shot below.
.Product – Flow Swap – DNO Flow Swap – Query (Withdraw)
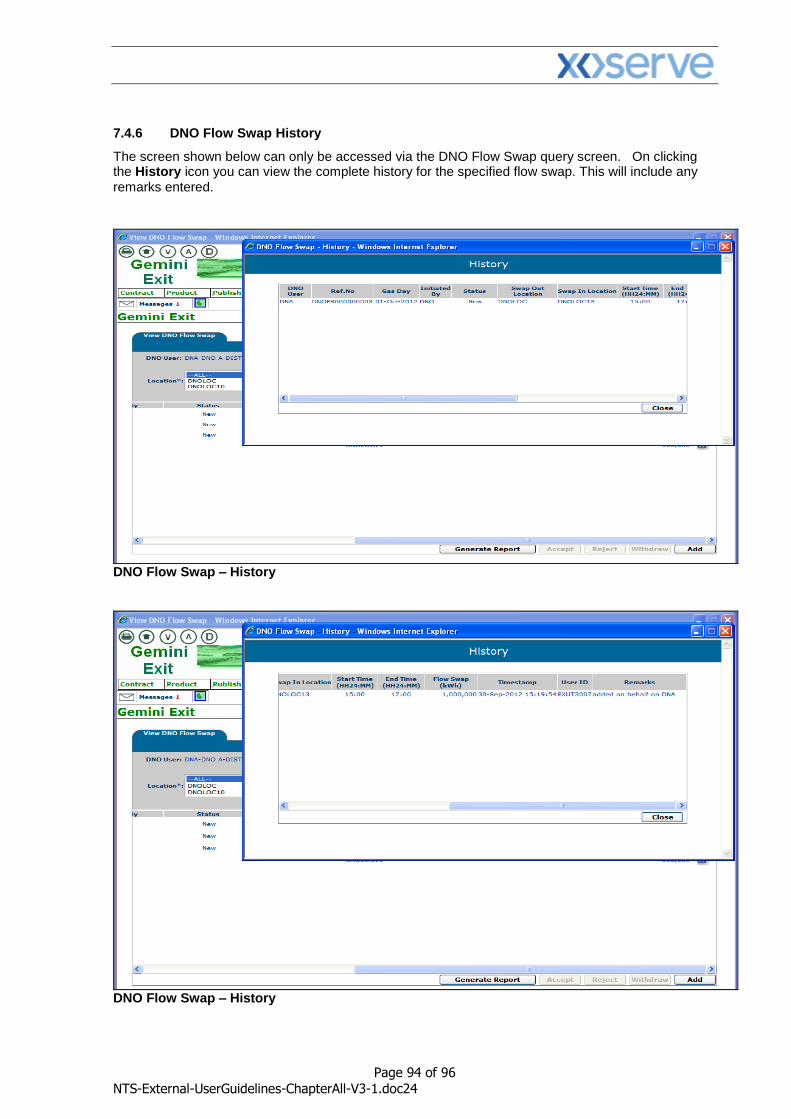
Page 94 of 96
NTS-External-UserGuidelines-ChapterAll-V3-1.doc24
7.4.6 DNO Flow Swap History
The screen shown below can only be accessed via the DNO Flow Swap query screen. On clicking the History icon you can view the complete history for the specified flow swap. This will include any remarks entered.
DNO Flow Swap – History
DNO Flow Swap – History
Page 95 of 96
NTS-External-UserGuidelines-ChapterAll-V3-1.doc24

Page 96 of 96
NTS-External-UserGuidelines-ChapterAll-V3-1.doc24
Version History
Version Status Date Author(s) Summary of Changes
0.1 Draft 30/06/10 Hannah Reddy Initial draft
0.2 Draft 6/10/10 Nicola Patmore Document revised to incorporate review comments
0.3 For Approval 24/11/10 Nicola Patmore Document revised to incorporate review comments
1 Approved 29/11/10 Nicola Patmore Approved
1.1 Updated 03/05/11 Joanna Harze Updated Phase 1 Document
1.2 For Review 9/5/11 Joanna Harze For Review
1.3 For Approval 23/05/11 Hannah Reddy For Approval
2.0 Approved 31/05/11 Joanna Harze Approved
2.1 Updated 05/03/13 Liz Butler Updated Phase 2 Document
2.2 For Review 15/03/13 Liz Butler Amended following review meeting with National Grid Transmission
2.3 For Review 15/03/13 Liz Butler Amended following internal QA process by project team
2.4 For Review 23/04/13 Liz Butler Amended following 2
nd review by National
Grid Transmission
2.5 For Review 02/05/13 Liz Butler Further amendments following table review with project team and National Grid Transmission
3 Approved 17/05/13 Liz Butler Approved
3.1 Updated 24/9/13 Therese Nott
Citrix connectivity screen has been replaced with a reference to the Gemini 2013 Guide to Connectivity as a result of GRP Implementation , approved by NG