exploring the wars of america page
TRANSCRIPT

FoundationsCycle 2
A Journey Through Learning www.ajourneythroughlearning.com
Exploring the
Wars of AmericaLearning Lapbook with Study Guide
A
JT
L
Copyright 2013 A Journey Through Learning 1
Sample
Page

Authors-Paula Winget and Nancy Fileccia
Copyright © 2013 A Journey Through Learning
Pages may be copied for other members of household only. For group use,
please see our website to purchase a classroom/co-op license.
Please check our website at:
www.ajourneythroughlearning.com
While you are there, sign up for our email newsletter and
receive a FREE lapbook!
You’ll also receive great discount codes, special offers, find out
what’s new and what’s to come!
Join us on Facebook!
Clipart is from www.clipart.com with permission and
Copyright 2013 A Journey Through Learning 2
Sample
Page

Things to Know
Hamburger Fold-Fold horizontally Hotdog Fold-Fold vertically
Dotted Lines-These are the cutting lines.
Accordion Fold-This fold is like making a paper fan. Fold on the first line so that title is on top. Turn over and fold on next line so that title is on top again. Turn over again and fold again on the next line so that title is on top. Continue until all folds are done.
Cover Labels-Most of the booklets that are folded look nicer with a label on top instead of just a blank space. They will be referred to as “cover label.”
Folder 1
This placement key tells you the template goes in the first folder at the top of the left flap.
How do I know where to place each template in the folder?
How Long Does it Take to Complete the Lapbook?
Doing a study guide page and mini-booklet a day, a 3-folder lapbook takes about one month to complete. However, you can expand the study portion and make it last as long as you like! That’s the beauty of homeschooling! Do it YOUR way!
Lapbook Assembly Choices
(see photos on how to fold and glue your folders together)We recommend using Zip Dry Glue or Elmer's Extreme.
Choice #1 -Do not glue your folders together until you have completely finished all three folders. It is easier to work with one folder instead of two or three glued together.
Choice #2 -Glue all of your folders together before beginning. Some children like to see the entire project as they work on it. It helps with keeping up with which folder you are supposed to be working in. The choices are completely up to you and your child!
Copyright 2013 A Journey Through Learning 3
Sample
Page

Folding a Lapbook Base
Gather the number of folders required for the project. Fold them flat as seen here.
Original fold line
For each folder, fold the left and right sides inward toward the original line to create two flaps. Crease so that the highest part of each flap is touching the original line. It is important not to let the two flaps overlap. You may want
to take a ruler and run it down each crease to
make it sharper.
Highest part of flap.
GLUE
GLUE
Glue your folders together by putting glue (or you may staple) on the inside of the flaps. Then press the newly glued flaps together with your hands until they get a good strong hold to each other. Follow this step to add as many folders as you need for your project. Most of our lapbooks have either 2 or 3 folders.
GLUE
GLUE
Photo of a completedlapbook base
Copyright 2013 A Journey Through Learning 4
Sample
Page

1. Label your tabs: Study Guide, Book Log, NICK, Biography Reports, Outlines (Copywork and Notebooking, if using these).
2. Make copies of NICK notes and outline forms and put them behind the tabs. Your child can use either the NICK notes form (easier) or the outline form (a bit harder) after any of the study guides. These serve as a good review of the material in the study guide.
3. Hole punch your study guide and mini-booklets sheets and place behind the Study Guide tab. You will read a page of a study guide. Behind the study guide are all of the booklets that go with that study guide.
4. Keeping your office supplies handy-Measure the bottom of a quart size zip-lock bag. Then measure out a strip of duct tape that length. Lay the zip-lock bag on the lower edge of the tape. Fold the other end of the tape down on the zip-lock bag. Your duct tape should be sticking out from the bag. Now, you can hole punch the duct tape strip. DO NOT HOLE PUNCH INTO THE BAG! Then put it into your 3-ring binder. Use this bag to store items you will be using for your lapbook. Glue, scissors, hole puncher, stapler and extra staples, crayons, pencils, brads, ribbon, and any unfinished work. Doing this one step keeps you from having to constantly gather supplies every time you want to work on your lapbook!
Supplies Need:
½ inch three-ring binder
5 tabs (if you are using our copywork and/or notebooking pages, you will need to have 7 tabs. Label with copywork and notebooking)
Quart size baggies
Duct tape
Your study guide and mini-booklets pages
Office supplies-glue, scissors, brads, stapler, pencils, crayons, and ribbon (if needed)
Tips and tricks to go the extra mile!
Copyright 2013 A Journey Through Learning 5
Sample
Page

Folder 1
Folder 2
Folder 3
Oklahoma City
Bombing
World War II World War I
The Vietnam
War
The Korean
War
Insignia
Weapons used from
1917 - 1975
Persian Gulf War
9/11
Weapons 1990 - 2001
ChangesIn
Weapons
Freedom
WarOn
Terrorism
Statics
Persian Gulf Map
Small Wars
Country Report
FunFact
FunFact
FunFact
FunFact
FunFact
FunFact
Copyright 2013 A Journey Through Learning 6
Sample
Page

Folder 1
Folder 2
Folder 3
Entire Lapbook
Use photos as a guide to lapbook assembly
Copyright 2013 A Journey Through Learning 7
Sample
Page

Table of Contents
World War IWorld War I WeaponsWorld War I UniformsWorld War II
Pearl HarborThe Atom Bomb
World War II UniformsWorld War II WeaponsKorean War
Korean War UniformsKorean War WeaponsThe Cold War
Vietnam WarVietnam Uniforms
Vietnam War Weapons
Persian Gulf War
Persian Gulf War Weapons
Oklahoma City Bombing
Terrorists Attack-9/11
War on TerrorismWar on Terrorism Weapons
War Statistics
Small Wars
(Dominican Republic, Lebanon, Grenada, Panama, Somalia)
Exploring the Wars of America LapbookCovers wars and conflicts that the United States was involved in between
the years 1900 and the present. It is written at a level your child will understand and is a great hands-on way to learn!
Copyright 2013 A Journey Through Learning 8
Sample
Page

Exploring Wars of AmericaFoundations Cycle 2
Lapbook
Name ________________________Glue this page to front of closed lapbook
Copyright 2013 A Journey Through Learning 9
Sample
Page

World War I
World War I involved several countries in Europe that were split into two sides. Germany, Austria-Hungary, and Turkey were sided together and called the Central Powers. Britain, Italy, France, Belgium, and Russia sided together and were called the Allies.
Because things were often very tense between the two sides, a war could start easily. And it did! On June 28, 1914, Archduke Franz Ferdinand, heir to the Austrian throne, was visiting Bosnia, a small country just south of Austria-Hungary. He was assassinated by a Serbian student! One month later, Austria-Hungary declared war on Serbia. Germany came to the aid of Austria-Hungary, and Russia aided Serbia. Now the two sides were at war.
For four years, the two sides faced each other along a line called the Western Front. Deep trenches were dug for protection but those same trenches hindered each side from advancing very far against each other. Soldiers stayed in trenches for weeks at a time. Many men lost their lives coming out of the trenches to fight.
Eventually, Turkey and Bulgaria joined the Central Powers. Italy, Greece, and Portugal joined to help the Allies.
In 1917, America joined the war on the Allies’ side when German u-boats sunk American ships going to Great Britain.
Germany launched one last attack on the Western front but failed. Germany surrendered. On June 28, 1919, Germany signed the Treaty of Versailles, a peace treaty with the Allies—but under protest. World War I had officially come to an end.
What day did the war begin?
What day did the war end?
Copyright 2013 A Journey Through Learning 10
Sample
Page

Grenade No 1- was a grenade made out of cast iron. The canister was placed on the end of an 18-inch stick. It was considered to be one of the most dangerous weapons to use. The detonator was placed in the tip end of the grenade by unscrewing it. To ignite the fuse, a long string was pulled.
World War I Weapons
Big Bertha- was a portable cannon. It was a 43-ton howitzer and could fire a 2,200-lb shell over nine miles. It was moved to different location by a Daimler-Benz tractor. It took over 200 men and six hours to re-assemble at its new location.
Little Willie- was a form of Daimler engine. It weighed over fourteen tons, was twelve feet long, and moved at two miles per hour. It could hold three crew members.
World War I Uniforms
Due to budget cuts at the time of the war, soldiers used a combination of several different types of uniforms. Most clothing was the traditional olive-drab or “OD” as it was called. Each solider had a wool garrison cap, wool trousers, wool shirt, a four-button tunic, and brown service shoes.
All wars dating back to prehistory have had some type of symbol or design worn on the uniform. These designs are called insignia.
Navy Army
Copyright 2013 A Journey Through Learning 11
Sample
Page
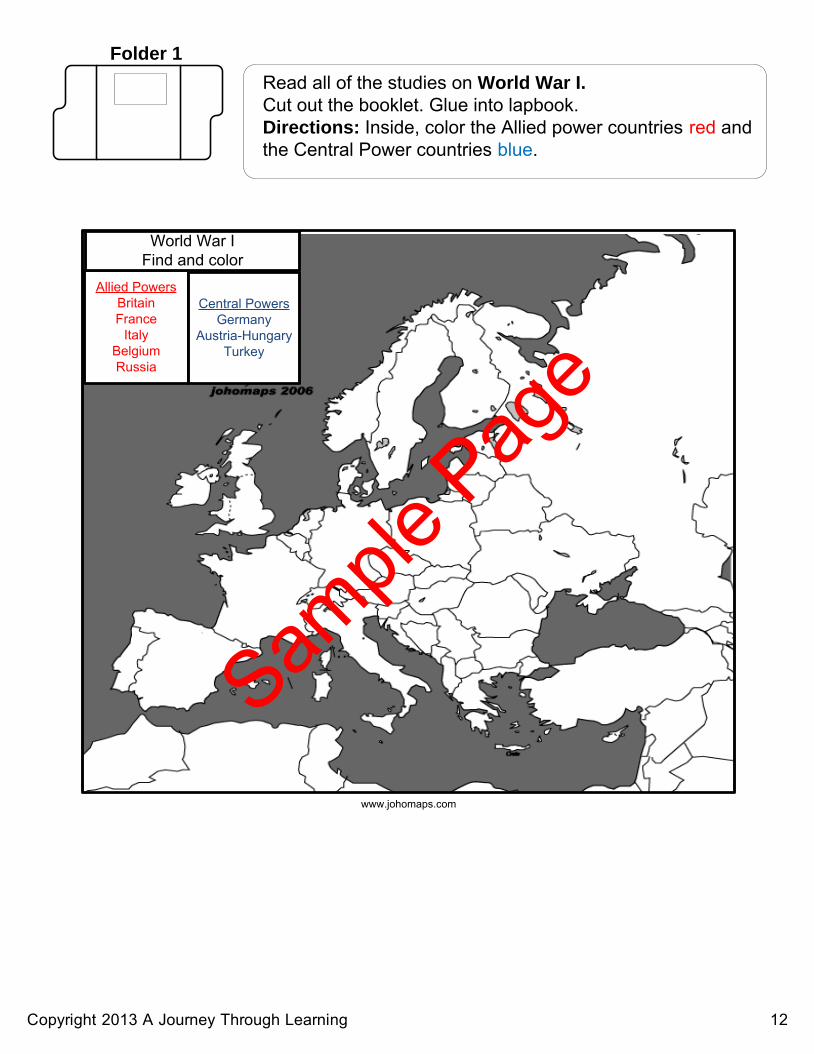
www.johomaps.com
Allied PowersBritainFrance
ItalyBelgiumRussia
Central PowersGermany
Austria-HungaryTurkey
World War IFind and color
Read all of the studies on World War I. Cut out the booklet. Glue into lapbook. Directions: Inside, color the Allied power countries red and the Central Power countries blue.
Folder 1
Copyright 2013 A Journey Through Learning 12
Sample
Page