extendable backwater valve maintenance guide
TRANSCRIPT

EXTENDABLE BACKWATER VALVEMAINTENANCE GUIDE
PROTECTION FROM SEWAGE BACKUPS
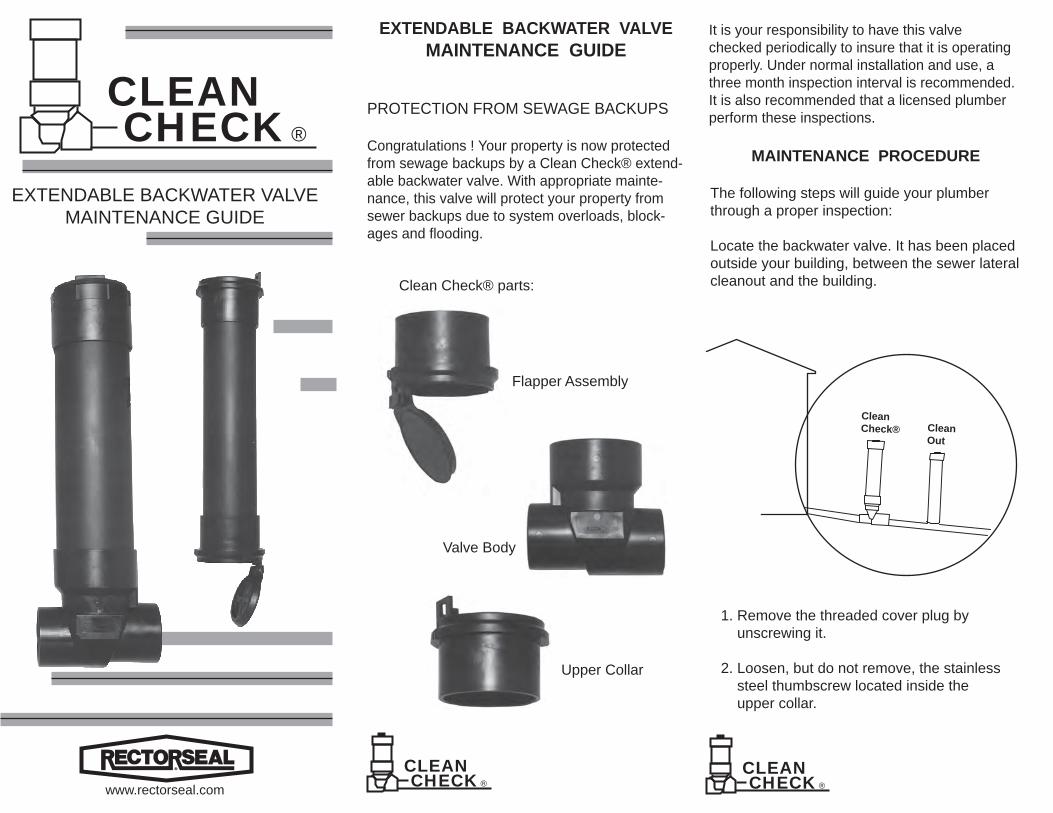
Congratulations ! Your property is now protected from sewage backups by a Clean Check® extend-able backwater valve. With appropriate mainte-nance, this valve will protect your property from sewer backups due to system overloads, block-ages and flooding.
CHECK ®
CLEAN
Flapper Assembly
Valve Body
Upper Collar
Clean Check® parts:
It is your responsibility to have this valve checked periodically to insure that it is operating properly. Under normal installation and use, a three month inspection interval is recommended. It is also recommended that a licensed plumber perform these inspections.
MAINTENANCE PROCEDURE
The following steps will guide your plumber through a proper inspection:
Locate the backwater valve. It has been placed outside your building, between the sewer lateral cleanout and the building.
CleanCheck® Clean
Out
1. Remove the threaded cover plug by unscrewing it.
2. Loosen, but do not remove, the stainless steel thumbscrew located inside the upper collar.
CHECK ®
CLEAN
CHECK ®
CLEAN
EXTENDABLE BACKWATER VALVEMAINTENANCE GUIDE
www.rectorseal.com
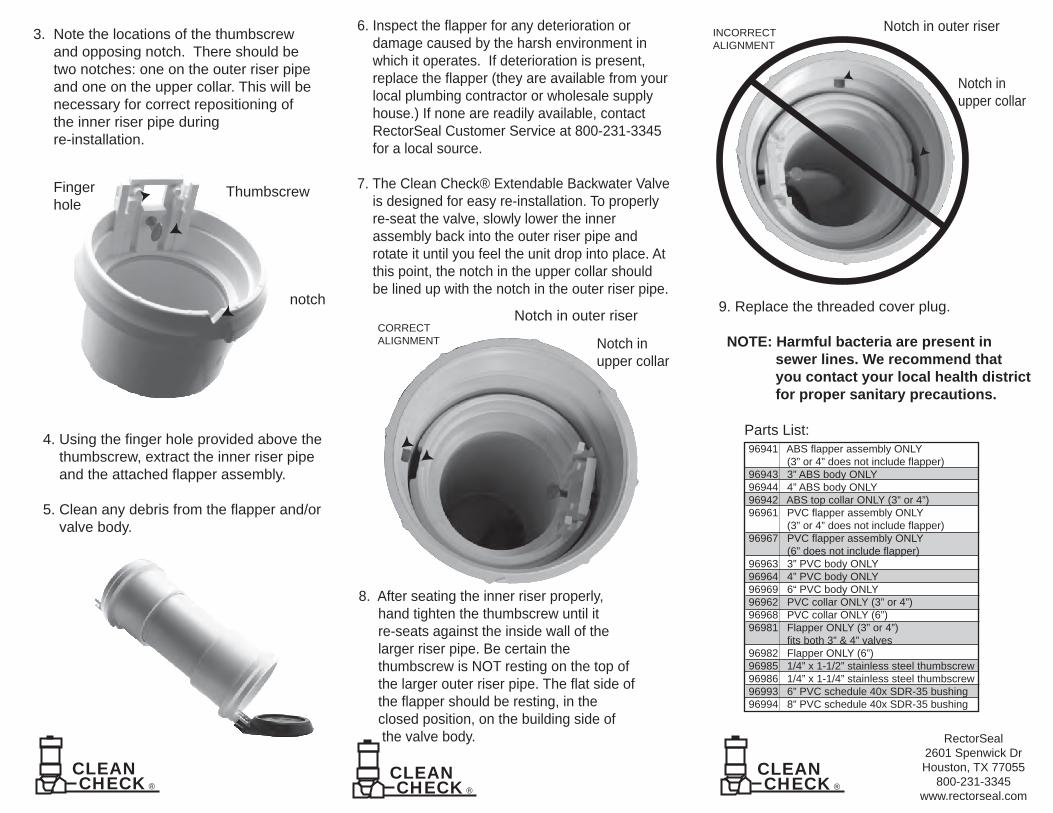
6. Inspect the flapper for any deterioration or damage caused by the harsh environment in which it operates. If deterioration is present, replace the flapper (they are available from your local plumbing contractor or wholesale supply house.) If none are readily available, contact RectorSeal Customer Service at 800-231-3345 for a local source.
7. The Clean Check® Extendable Backwater Valve is designed for easy re-installation. To properly re-seat the valve, slowly lower the inner assembly back into the outer riser pipe and rotate it until you feel the unit drop into place. At this point, the notch in the upper collar should be lined up with the notch in the outer riser pipe.
Notch in upper collar
Notch in outer riser
CHECK ®
CLEANCHECK ®
CLEAN
8. After seating the inner riser properly, hand tighten the thumbscrew until it re-seats against the inside wall of the larger riser pipe. Be certain the thumbscrew is NOT resting on the top of the larger outer riser pipe. The flat side of the flapper should be resting, in the closed position, on the building side of the valve body.
Notch in upper collar
Notch in outer riser
9. Replace the threaded cover plug.
NOTE: Harmful bacteria are present in sewer lines. We recommend that you contact your local health district for proper sanitary precautions.
RectorSeal2601 Spenwick DrHouston, TX 77055
800-231-3345www.rectorseal.com
96941 ABS flapper assembly ONLY (3” or 4” does not include flapper)96943 3” ABS body ONLY96944 4” ABS body ONLY96942 ABS top collar ONLY (3” or 4”)96961 PVC flapper assembly ONLY (3” or 4” does not include flapper)96967 PVC flapper assembly ONLY (6” does not include flapper)96963 3” PVC body ONLY96964 4” PVC body ONLY96969 6“ PVC body ONLY96962 PVC collar ONLY (3” or 4”)96968 PVC collar ONLY (6”)96981 Flapper ONLY (3” or 4”) fits both 3” & 4” valves96982 Flapper ONLY (6”)96985 1/4” x 1-1/2” stainless steel thumbscrew96986 1/4” x 1-1/4” stainless steel thumbscrew96993 6” PVC schedule 40x SDR-35 bushing96994 8” PVC schedule 40x SDR-35 bushing
Parts List:
CORRECTALIGNMENT
INCORRECTALIGNMENT
3. Note the locations of the thumbscrew and opposing notch. There should be two notches: one on the outer riser pipe and one on the upper collar. This will be necessary for correct repositioning of the inner riser pipe during re-installation.
Thumbscrew
notch
CHECK ®
CLEAN
4. Using the finger hole provided above the thumbscrew, extract the inner riser pipe and the attached flapper assembly.
5. Clean any debris from the flapper and/or valve body.
Fingerhole