extensible interface platform - faxcoredownloads.faxcore.com/faxcore_ev5/connector/xerox/eip...40...
TRANSCRIPT

Xerox Corporation Confidential Page 1 of 19 Last updated on April 15, 2008
EIP Enablement Instructions
1 2 3
Extensible Interface Platform 4
EIP Enablement Instructions 1.2 5 6 7 8
This document provides the device enablement instructions for the 9 Extensible Interface Platform (EIP). 10
11 12 13 14 15 16 17 18

Xerox Corporation Confidential Page 2 of 19 Last updated on April 15, 2008
EIP Enablement Instructions
TABLE OF CONTENTS 19
1 INTRODUCTION.................................................................................................................................................3 1.1 DOCUMENT PURPOSE ......................................................................................................... 3 1.2 OVERVIEW.......................................................................................................................... 3 1.3 ACRONYMS......................................................................................................................... 3 1.4 RELATED DOCUMENTS ....................................................................................................... 3
2 INSTRUCTIONS..................................................................................................................................................4 2.1 INSTRUCTIONS FOR ENABLING EIP ON WORKCENTRE 7655 FAMILY.................................. 4 2.2 INSTRUCTIONS FOR ENABLING EIP ON WORKCENTRE 5632 FAMILY.................................. 8 2.3 INSTRUCTIONS FOR ENABLING EIP ON WORKCENTRE PRO 245 FAMILY .......................... 11 2.4 INSTRUCTIONS FOR ENABLING EIP ON WORKCENTRE 73XX, 72XX AND 52XX FAMILIES . 14 2.5 DOCUMENT HISTORY........................................................................................................ 19
20

Xerox Corporation Confidential Page 3 of 19 Last updated on April 15, 2008
EIP Enablement Instructions
1 Introduction 21
1.1 Document Purpose 22
This document provides the Xerox Device Enablement Instructions for the Extensible Interface 23 Platform (EIP). 24
1.2 Overview 25
The Extensible Interface Platform (EIP) is a set of extensibility interfaces that are supported on 26 certain Xerox Office device platforms. This document gives detailed instructions on how to 27 enable this feature on the compatible Xerox Office devices. 28
1.3 Acronyms 29
SSL Secure Sockets Layer 30 DLM Dynamically Loaded Module 31
1.4 Related Documents 32
References: 33 Title EIP User’s and Programmer’s Guide Document location
Within this EIP SDK distribution
Description Provides user’s perspective and provides programming guidelines for partners developing applications using the EIP APIs
34

Xerox Corporation Confidential Page 4 of 19 Last updated on April 15, 2008
EIP Enablement Instructions
2 Instructions 35
2.1 Instructions for enabling EIP on WorkCentre 7655 Family 36
1. Load “installCustomServices.dlm” if not already installed. Check configuration report 37 under Installed Options for “Custom Services”, if present, dlm has been installed. The 38 DLM is located in the Presentation Services SDK. It also is available for download from 39 www.support.xerox.com under WorkCentre 7655/7665/7675 “Drivers and Downloads”. 40
a. Navigate to Properties on the Device Web UI. 41 b. Expand General Setup in the tree menu 42 c. Expand Machine Software on the tree menu 43 d. Select “Manual upgrade”. 44 e. Use the browse button to find the “installCustomServices.dlm and click “Install 45
Software”. 46
47

Xerox Corporation Confidential Page 5 of 19 Last updated on April 15, 2008
EIP Enablement Instructions
48 2. Enable SSL (not required for all EIP services but still recommended). 49
a. Navigate to Properties on device WebUI. 50 b. Expand General Setup in tree menu. 51 c. Select “Extensible Service Setup” 52 d. Select Settings for HTTP (SSL) 53
1. Create or upload digital certificate by selecting “Configure Digital 54 Certificate” link. 55
2. Click radio button to enable SSL transport. Port can be changed as desired 56 but all sample code in SDK uses port 443 for SSL. 57
58

Xerox Corporation Confidential Page 6 of 19 Last updated on April 15, 2008
EIP Enablement Instructions
59 3. Enable Web services required, at minimum enable the Extensible Service Registration web 60
service. 61 a. Navigate to Properties on Device web UI 62 b. Expand General Setup 63 c. Select “Extensible Service Setup”. 64
Note: If this is still selected from step 2 above, the page may need to be refreshed in 65 order to get back to the settings page. 66
67

Xerox Corporation Confidential Page 7 of 19 Last updated on April 15, 2008
EIP Enablement Instructions
68 d. Select Settings for “Extensible Service Registration”. 69
1. Enable at minimum the Extensible Service Registration. 70 2. To enable the equivalent of “Custom Services” on the WorkCentre Pro 71
240/255 Family, enable the following: 72 o Extensible Service Registration 73 o Scan Template Management 74 o Session Data 75 o Scan Extension 76 o Device Configuration 77
78

Xerox Corporation Confidential Page 8 of 19 Last updated on April 15, 2008
EIP Enablement Instructions
2.2 Instructions for enabling EIP on WorkCentre 5632 Family 79
1. Load “installCustomServices.dlm” if not already installed. Check configuration report 80 under Installed Options for “Custom Services”, if present, dlm has been installed. The 81 DLM is located in the Presentation Services SDK. It also is available for download from 82 www.support.xerox.com under WorkCentre 5632/5638 “Drivers and Downloads”. 83
a. Navigate to Properties on the Device Web UI. 84 b. Expand General Setup in the tree menu 85 c. Expand Machine Software on the tree menu 86 d. Select “Manual Upgrade”. 87 e. Use the browse button to find the “installCustomServices.dlm and click “Install 88
Software”. 89
90

Xerox Corporation Confidential Page 9 of 19 Last updated on April 15, 2008
EIP Enablement Instructions
91 2. Enable SSL. 92
a. Navigate to Properties on device WebUI. 93 b. Expand Connectivity 94 c. Expand Protocols 95 d. Select “HTTP”. 96
1. Create or upload digital certificate by selecting “Configure Digital 97 Certificate” link. 98
2. Click radio button to enable SSL transport. Port can be changed as desired 99 but all sample code in SDK assumes port 443 for SSL. 100
101

Xerox Corporation Confidential Page 10 of 19 Last updated on April 15, 2008
EIP Enablement Instructions
102 3. Enable Custom Services 103
a. Navigate to Properties on device WebUI. 104 b. Expand Services 105 c. Expand Custom Services 106 d. Select “Custom Services” 107 e. Select Enabled and click “Apply”. 108
109

Xerox Corporation Confidential Page 11 of 19 Last updated on April 15, 2008
EIP Enablement Instructions
2.3 Instructions for enabling EIP on WorkCentre Pro 245 Family 110
1. Load “installCustomServices.dlm” if not already installed. Check configuration report 111 under Installed Options for “Custom Services”, if present, dlm has been installed. The 112 DLM is located in the Presentation Services SDK. It also is available for download from 113 www.support.xerox.com under WorkCentre 245/255 “Drivers and Downloads”. 114
a. Navigate to Properties on the Device Web UI. 115 b. Expand Services in the tree menu 116 c. Expand Machine Software on the tree menu 117 d. Select “Manual Upgrade”. 118 e. Use the browse button to find the “installCustomServices.dlm and click “Install 119
Software”. 120
121

Xerox Corporation Confidential Page 12 of 19 Last updated on April 15, 2008
EIP Enablement Instructions
122 2. Enable SSL. 123
a. Navigate to Properties on device WebUI. 124 b. Expand Security 125 c. Select “SSL”. 126
1. Create or upload digital certificate by selecting “Create New Certificate”. 127 2. Click check box to enable SSL transport. Port can be changed as desired 128
but all sample code in SDK assumes port 443 for SSL. 129
130

Xerox Corporation Confidential Page 13 of 19 Last updated on April 15, 2008
EIP Enablement Instructions
131 3. Enable Custom Services 132
a. Navigate to Properties on device WebUI. 133 b. Expand Services 134 c. Expand Custom Services 135 d. Select “Custom Services” 136 e. Select Enabled and click “Apply”. 137
138

Xerox Corporation Confidential Page 14 of 19 Last updated on April 15, 2008
EIP Enablement Instructions
2.4 Instructions for enabling EIP on WorkCentre 73xx, 72xx and 139 52xx Families 140
1. Check configuration report under System Settings for “Controller+PS ROM” Software 141 Version. EIP Requires Controller Software Version 1.221.201 or higher. Contact Xerox 142 Support if a software upgrade is required. 143
2. Enable SSL. 144 a. Navigate to the Properties tab on the device WebUI. 145 b. Expand Security 146 c. Select “Machine Digital Certificate Management” to create or upload a digital 147
certificate. 148
149
Xerox Corporation Confidential Page 15 of 19 Last updated on April 15, 2008
EIP Enablement Instructions
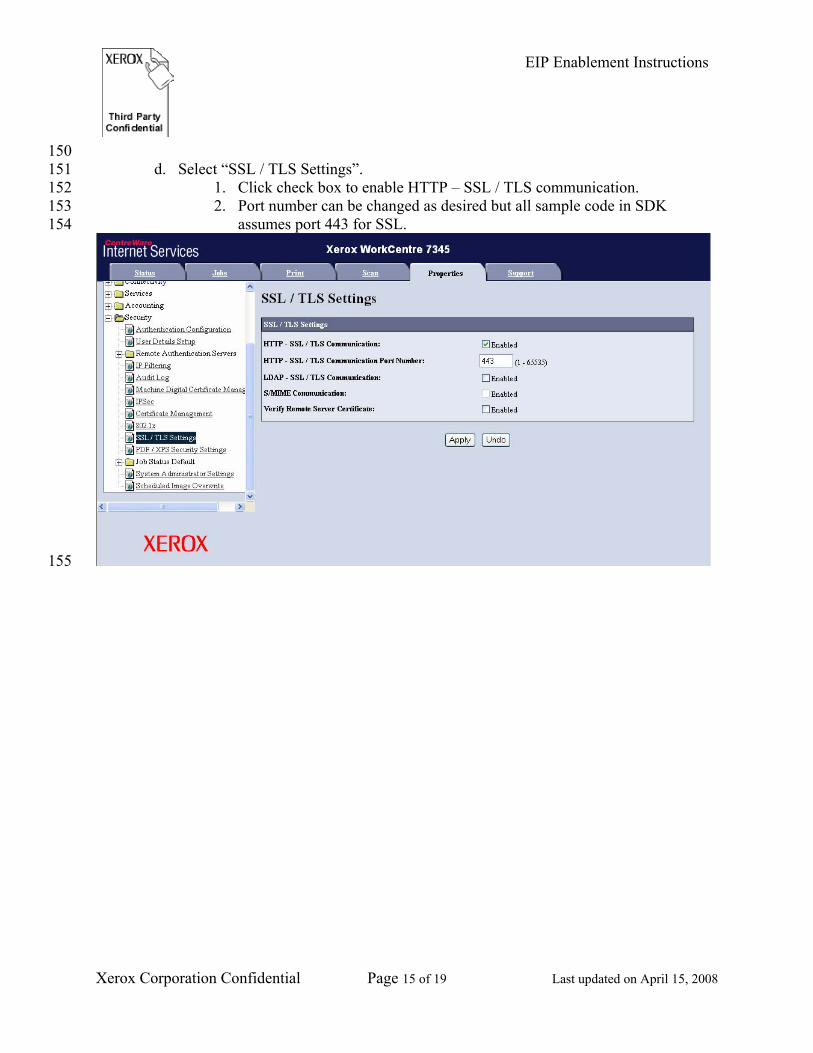
150 d. Select “SSL / TLS Settings”. 151
1. Click check box to enable HTTP – SSL / TLS communication. 152 2. Port number can be changed as desired but all sample code in SDK 153
assumes port 443 for SSL. 154
155

Xerox Corporation Confidential Page 16 of 19 Last updated on April 15, 2008
EIP Enablement Instructions
3. Enable Custom Services. 156 a. Navigate to the Properties tab on the device WebUI. 157 b. Expand Services 158 c. Expand Custom Services 159 d. Select “Custom Services” 160 e. Select Enabled and click “Apply”. 161
162

Xerox Corporation Confidential Page 17 of 19 Last updated on April 15, 2008
EIP Enablement Instructions
4. Enable Scan Template Management. 163 a. Navigate to the Properties tab on the device WebUI. 164 b. Expand Services 165 c. Expand Network Scanning 166 d. Select “Scan Template Management” 167 e. Select Enabled. 168
169

Xerox Corporation Confidential Page 18 of 19 Last updated on April 15, 2008
EIP Enablement Instructions
5. Enable FTP Client for Scan Template Management (if necessary). 170 a. Navigate to the Properties tab on the device WebUI. 171 b. Expand Connectivity 172 c. Select “Port Settings” 173 d. Click Check Box to enable FTP Client. 174 e. Click Check Box to enable SMB. 175 f. Click Check Box to enable SOAP and click “Apply”. 176 177
178

Xerox Corporation Confidential Page 19 of 19 Last updated on April 15, 2008
EIP Enablement Instructions
Appendices 179
2.5 Document History 180
Document Contributors 181 Prepared by: Ronald E. Dukes Contributors: Version 1.2 Date April 21, 20088 Status EIP SDK 2.1.2
182
Document Revision 183 Version Date Description Author 1.1 Oct 16, 2007 Original version reformatted. Instructions for
WorkCentre 73xx Family added. R. Dukes
1.2 April 15, 2008 Update to include 52xx and 72xx Families R. Dukes 184