exterior and interior wall manual - cedar shake &shingle · 1 certi-label western cedar...
TRANSCRIPT
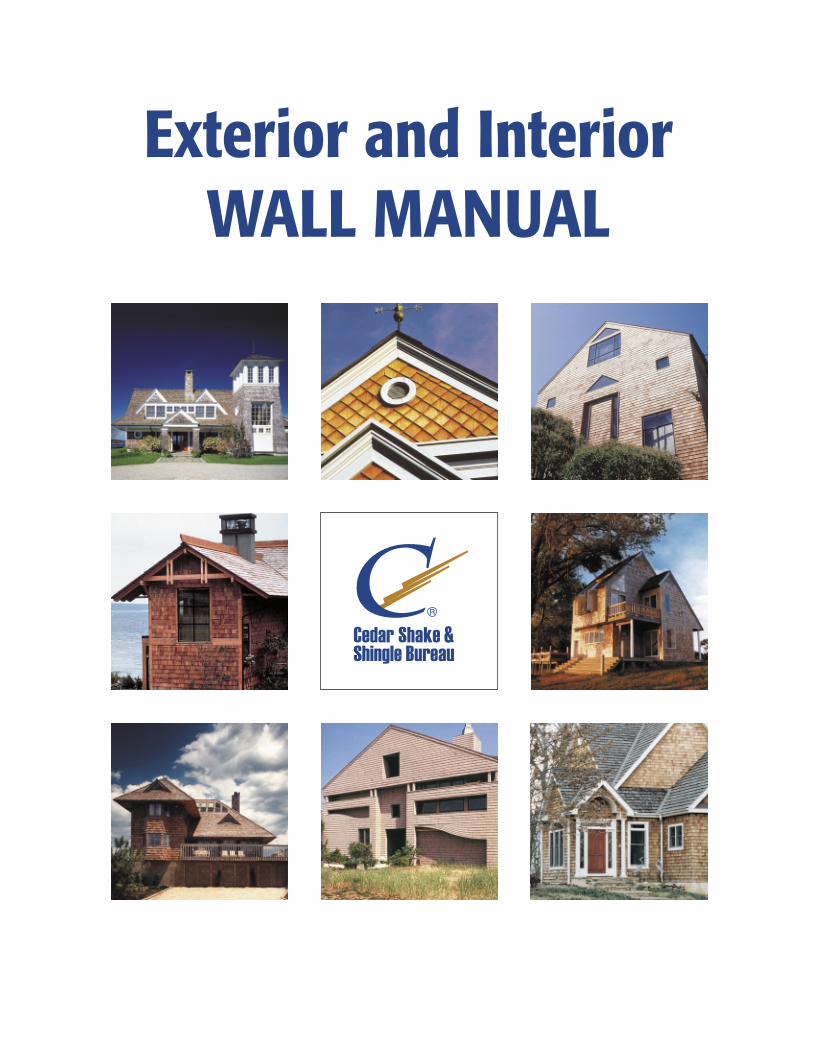
Exterior and InteriorWALL MANUAL
R
Credits, front cover:Left column1. Architect: Shope Reno Wharton, Photo: Robert Benson2. Architect: Gaylord Grainger, Libby O’Brien-Smith Architects, Photo: Eduardo Calderon3. Architect: Meyers and D’Aleo, Inc., Photo: Otto Baitz
Centre columm1. Architect: Gary Tabasinske, AIA, Photo: Chris Eden2. Architect: Alfredo De Vido Associates, Photo: Paul Warchol
Right column1. Architect: Tanner and VanDine Architects, Photo: Mark Citret2. Architect: Archimedia, Photo: George Kennedy, AIA & Cosby Bowyer, Inc.3. Photo: Celia Pearson
Manufacturers’ product lines continued to broaden and, in 1988, the members changed the organization’s name to the Cedar Shake & Shingle Bureau. In the late 1980s, mill quality control inspections were subcontracted to independent, third party quality control agencies.Each year the Cedar Shake & Shingle Bureau’s staff answer thousands of technical questions and product selection queries. Our proud history, quality reputation and dedicated members provide excellent
TMCerti-label cedar shingle and shake siding and roofing products.
TMCerti-label ProductsCerti-label Western Cedar shingles and shakes manufactured by members of the Cedar Shake & Shingle Bureau (“CSSB”) are the only products labeled with the “Certi” brand name. Certi-label Western Cedar shingles and shakes are made by experienced craftsmen who take pride in their trade and the quality of their product. Despite their varying sizes and sometimes remote locations, member mills are bound together by a rigid quality code. Unannounced independent inspections conducted by accredited third party agencies ensure that product quality is maintained. Products are inspected to conform with various local, national and international codes and standards (contact the CSSB for specific details).All CSSB member product has the mill's distinctive Certi-label tucked under the bundle strap or printed on the carton. Asking for “the blue label” or “number one blue label” is not specific enough: CSSB members' products are the only ones with the Certi brand name on the label.
Application NotesGood workmanship is crucial to the integrity of any sidewall system. Installers should read this manual carefully and ensure that they follow proper workmanship practices. Certi-label Western Cedar shingles and shakes are applied on walls in a different manner than on roofs. The major point of difference is in permissible weather exposures - on walls the maximum weather exposure is greater than it is on roofs. A given area of wall, therefore, will require less material than the same area of roof.
Note: This manual replaces all previous versions of the “Cedar Shake and Shingle Bureau Design and Application Manual for Exterior and Interior Walls”
This manual is intended for use with Western Red Cedar and Alaskan Yellow Cedar shingle and shake applications only. Western Red Cedar products manufactured by CSSB members are labeled with the “Certi” brand name. Alaskan Yellow Cedar products manufactured by CSSB members are labeled with “Yellow Cedar” at the top of their label. For ease of reference this manual refers to
TM“Certi-label Western Cedar” and the term is understood to include both Western Red Cedar and Alaskan Yellow Cedar products manufactured by CSSB members.
TMCerti-label Western Cedar shingles and shakes are the ideal exterior wall cladding for new construction and remodeling. They bring life in the form of beauty, texture, durability, insulative quality, and low maintenance to any building. Restyling with Certi-label Western Cedar shingles or shakes is easily accomplished, whether replacing the previous wall material (re-walling) or applying right over the existing wall (over-walling).
Exterior and Interior Walls Construction ManualMaterial for this manual has been compiled from various authoritative sources, and many of the construction methods shown herein have been developed by the shingle and shake specialists in both the United States and Canada. The design and application details and methods of construction reflect current good building practice. Other options are possible but ensure that you check with your local code jurisdiction for approval.
The information in this manual is not intended to supercede local building codes.
Cedar Shake & Shingle Bureau HistoryOn June 9, 1915, at a meeting of the Trustees of the West Coast Lumber Manufacturers Association, it was agreed to establish a branch of the association to serve those members who manufactured shingles. Our influence grew, and as we survived both the Great Depression and World War II, manufacturers continued their quality commitment. In 1963 the organization merged with the Handsplit Shake Bureau to become the Red Cedar Shingle & Handsplit Shake Bureau.
INTRODUCTION
CONTENTS
Certi-label Products pages 1-3
Exterior New Wall Construction pages 4, 6, 7, 8, 9
Sidewall Fastener Guidelines page 5
Exterior Over-Wall and Re-Wall Construction page 10
Interior Wall Construction page 11
Sidewall ApplicationGuidelines page 12
Sidewall Finishing page 13
Sidewall Coverage Tables pages 14, 15
How to Read a Certi-label page 16
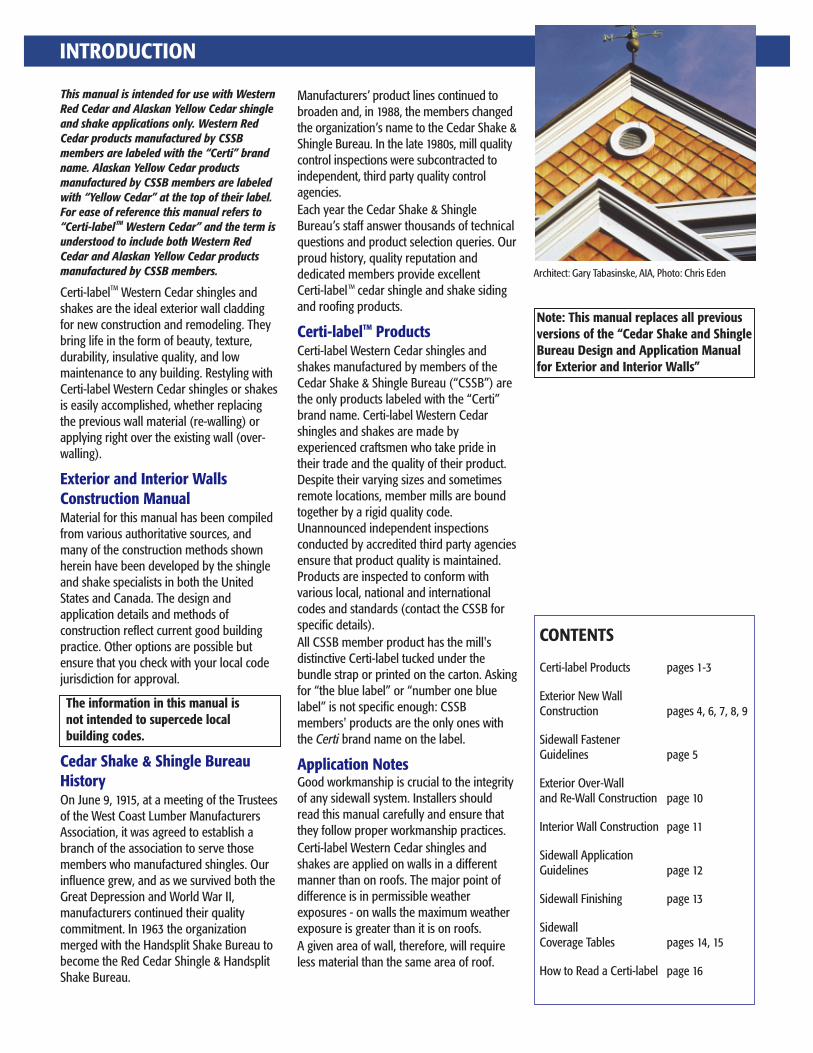
Architect: Gary Tabasinske, AIA, Photo: Chris Eden

CERTI-LABEL WESTERN CEDAR PRODUCTS1
CERTI-LABEL WESTERN CEDAR SHAKES®Certi-Split Handsplit Shakes
®Certi-Split Tapersplit Shakes
®Certi-Split Straight-Split Shakes
®Certi-Sawn Tapersawn ShakesThese shakes are sawn both sides. Premium and Number 1 Grades are the most common. Premium Grade is 100% edge grain, 100% clear and 100% heartwood. Number 1 Grade allows up to 20% flat grain in each bundle. Number 2 and 3 Grades are also available.
These shakes have split faces and sawn backs. Cedar logs are first cut into desired lengths. Blanks or boards of proper thickness are split and then run diagonally through a bandsaw to produce two tapered shakes from each blank. Available in Premium Grade (100% edge grain) or Number 1 Grade (Up to 20% flat grain allowed in each bundle).
Produced by hand, using a sharp bladed steel froe and a mallet. The natural shingle-like taper is achieved by reversing the block, end-for-end, with each split. Premium Grade only.
Produced by machine or in the same manner as tapersplit shakes except that by splitting from the same end of the block, the shakes acquire the same thickness throughout. Premium Grade only.
® CERTIGRADE WESTERN CEDAR SHINGLES
Number 2 Red Label
A good grade for many applications. Not less than 10" clear on 16" shingles, 11" clear on 18" shingles and 16" clear on 24" shingles. Flat grain and limited sapwood are permitted in this grade.
Number 3 Black Label
A utility grade for economy applications and secondary buildings. Not less than 6" clear on 16" and 18" shingles, 10" clear on 24" shingles.
Number 4 Undercoursing
A utility grade for undercoursing of double coursed sidewalls only. Not a roofing material and not to be used as a starter course for roofs.
®Number 1 Blue Label
The premium grade of shingles for sidewalls and roofs. These top-grade shingles are 100% heartwood, 100% clear and 100% edge grain. Available in 16" or 18" or 24" lengths.
Note: Western Cedar’s natural color varies.
Tapersawn Red Cedar Shakes CEDAR SHAKE & SHINGLE BUREAU
THE RECOGNIZED AUTHORITY SINCE 1915SUMAS, WASHINGTON (604) 820-7700
Handsplit Red Cedar Shakes
PREMIUM GRADE
PREMIUM GRADE
CEDAR SHAKE & SHINGLE BUREAU
100% Edge Grain
THE RECOGNIZED AUTHORITY SINCE 1915SUMAS, WASHINGTON (604) 820-7700
CERTI-SPLIT
Handsplit Red Cedar ShakesCEDAR SHAKE & SHINGLE BUREAU
PREMIUM GRADE100% Edge Grain
100% Edge Grain
THE RECOGNIZED AUTHORITY SINCE 1915SUMAS, WASHINGTON (604) 820-7700
CERTI-SPLIT
Handsplit Red Cedar ShakesCEDAR SHAKE & SHINGLE BUREAU
THE RECOGNIZED AUTHORITY SINCE 1915SUMAS, WASHINGTON (604) 820-7700
CERTI-SPLITPREMIUM GRADE
100% Edge Grain
- 100% Edge Grain - 100% All Clear -- 100% Heartwood -
R IGRADECE TRed Cedar Shingles
CEDAR SHAKE & SHINGLE BUREAUTHE RECOGNIZED AUTHORITY SINCE 1915SUMAS, WASHINGTON (604) 820-7700
CEDAR SHAKE & SHINGLE BUREAUTHE RECOGNIZED AUTHORITY SINCE 1915SUMAS, WASHINGTON (604) 820-7700
- Third Grade -
®CERTIGRADE®CERTIGRADE®CERTIGRADE
Red Cedar Shingles
NUMBER GRADE
CEDAR SHAKE & SHINGLE BUREAUTHE RECOGNIZED AUTHORITY SINCE 1915SUMAS, WASHINGTON (604) 820-7700
Red Cedar Shingles
SPECIALTY CERTI-LABEL WESTERN CEDAR SIDEWALL PRODUCTS
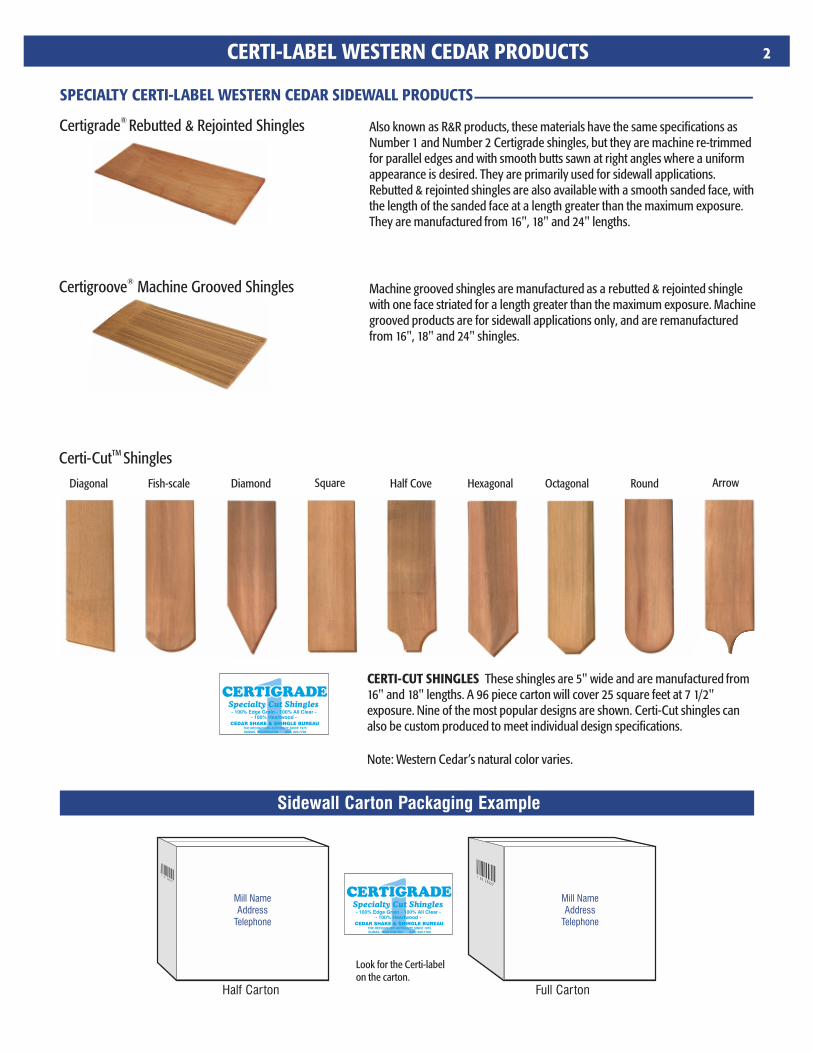
Diagonal Fish-scale Square Arrow Diamond Half Cove Round Octagonal Hexagonal
2CERTI-LABEL WESTERN CEDAR PRODUCTS
CERTI-CUT SHINGLES These shingles are 5" wide and are manufactured from 16" and 18" lengths. A 96 piece carton will cover 25 square feet at 7 1/2" exposure. Nine of the most popular designs are shown. Certi-Cut shingles can also be custom produced to meet individual design specifications.
Note: Western Cedar’s natural color varies.
Also known as R&R products, these materials have the same specifications as Number 1 and Number 2 Certigrade shingles, but they are machine re-trimmed for parallel edges and with smooth butts sawn at right angles where a uniform appearance is desired. They are primarily used for sidewall applications. Rebutted & rejointed shingles are also available with a smooth sanded face, with the length of the sanded face at a length greater than the maximum exposure. They are manufactured from 16", 18" and 24" lengths.
Machine grooved shingles are manufactured as a rebutted & rejointed shingle with one face striated for a length greater than the maximum exposure. Machine grooved products are for sidewall applications only, and are remanufactured from 16", 18" and 24" shingles.
® Certigrade Rebutted & Rejointed Shingles
®Certigroove Machine Grooved Shingles
TM Certi-Cut Shingles
Sidewall Carton Packaging Example
Full CartonHalf Carton
Mill NameAddress
Telephone
Mill NameAddress
Telephone- 100% Edge Grain - 100% All Clear -
- 100% Heartwood -
R IGRADECE TSpecialty Cut Shingles
CEDAR SHAKE & SHINGLE BUREAUTHE RECOGNIZED AUTHORITY SINCE 1915SUMAS, WASHINGTON (604) 820-7700
- 100% Edge Grain - 100% All Clear -- 100% Heartwood -
R IGRADECE TSpecialty Cut Shingles
CEDAR SHAKE & SHINGLE BUREAUTHE RECOGNIZED AUTHORITY SINCE 1915SUMAS, WASHINGTON (604) 820-7700
Look for the Certi-labelon the carton.
CERTI-LABEL WESTERN CEDAR PRODUCTS
CERTI-GUARD PRESSURE-TREATED FIRE-RETARDANT SHAKES & SHINGLES
CEDAR SHAKE & SHINGLE BUREAU
R
CERTI-GUARD PRESSURE-TREATED FIRE-RETARDANT SHAKES & SHINGLES
CEDAR SHAKE & SHINGLE BUREAU
R
CERTI-LASTPRESERVATIVE TREATED CEDAR SHAKES & SHINGLES
CEDAR SHAKE & SHINGLE BUREAU
R
Architect: Shope Reno Wharton, Photo: Robert Benson
3
Certi-label Western Cedar shingle and shake size, exposure, width of joints, width of product, kiln versus air-drying process, moisture content and the local environment will all affect the expansion/contraction of Certi-label Western Cedar sidewall products. These factors should always be taken into consideration when determining the installation details and adequate spacing needed for your specific project. Consult with your installer and refer to page 4 for more lateral spacing details.
Certi-label Sidewall Application Tips
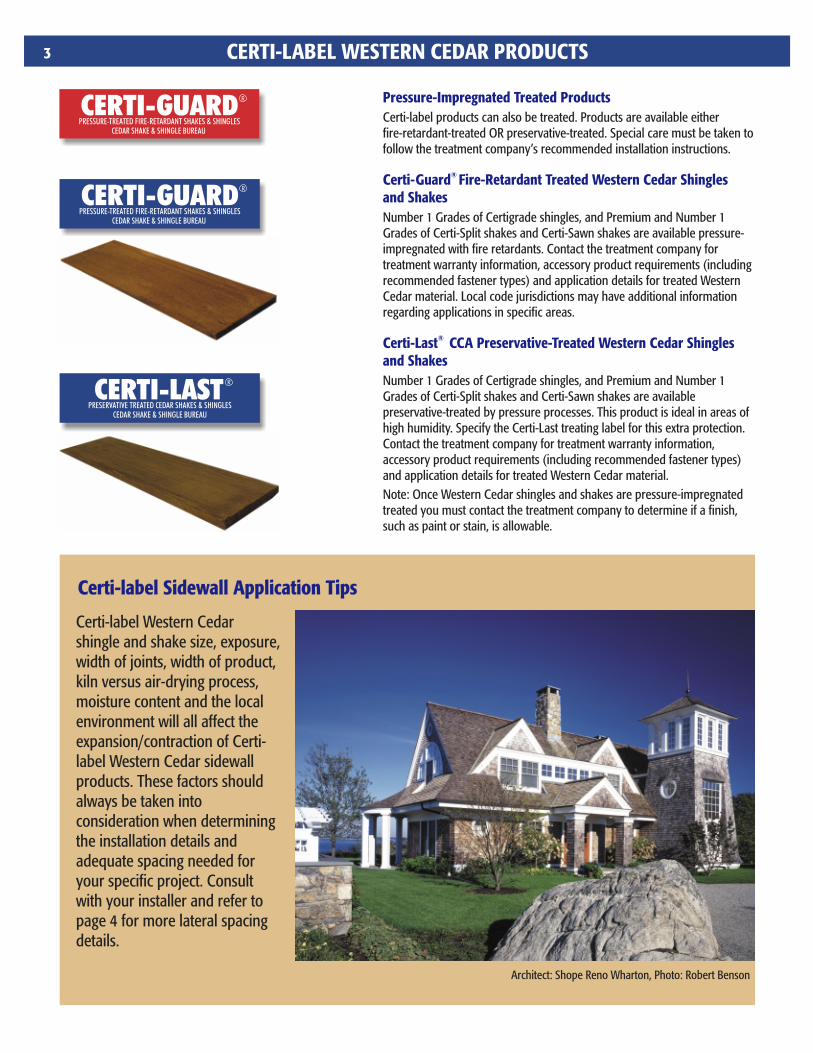
Pressure-Impregnated Treated ProductsCerti-label products can also be treated. Products are available either fire-retardant-treated OR preservative-treated. Special care must be taken to follow the treatment company’s recommended installation instructions.
® Certi-Guard Fire-Retardant Treated Western Cedar Shingles and ShakesNumber 1 Grades of Certigrade shingles, and Premium and Number 1 Grades of Certi-Split shakes and Certi-Sawn shakes are available pressure-impregnated with fire retardants. Contact the treatment company for treatment warranty information, accessory product requirements (including recommended fastener types) and application details for treated Western Cedar material. Local code jurisdictions may have additional information regarding applications in specific areas.
® Certi-Last CCA Preservative-Treated Western Cedar Shingles and ShakesNumber 1 Grades of Certigrade shingles, and Premium and Number 1 Grades of Certi-Split shakes and Certi-Sawn shakes are available preservative-treated by pressure processes. This product is ideal in areas of high humidity. Specify the Certi-Last treating label for this extra protection. Contact the treatment company for treatment warranty information, accessory product requirements (including recommended fastener types) and application details for treated Western Cedar material.Note: Once Western Cedar shingles and shakes are pressure-impregnated treated you must contact the treatment company to determine if a finish, such as paint or stain, is allowable.
EXTERIOR NEW WALL CONSTRUCTION
Design and Application Details The instructions given here are not meant to supercede local code requirements. Check with your local building official for their preference in your area.
Preparation - Be sure that the walls are smooth, without protuberances. Nail ends or points should be removed or pounded flush.
Underlayment - The CSSB recommends No. 30 felt (ASTM D226 Type II or ASTM D4869 Type IV) underlayment material. Apply it horizontally, with a staple gun, starting at the base of the wall, with a 2" horizontal overlap with each succeeding course, and a 6" overlap vertically when starting a new roll. Wrap the No. 30 felt underlayment 4" each way around both inside and outside corners.
Corner Boards - Install corner boards (Figure 8) at this time.
Flashing - Flashings associated with doors, windows, and penetration details should be in accordance with good building practice.
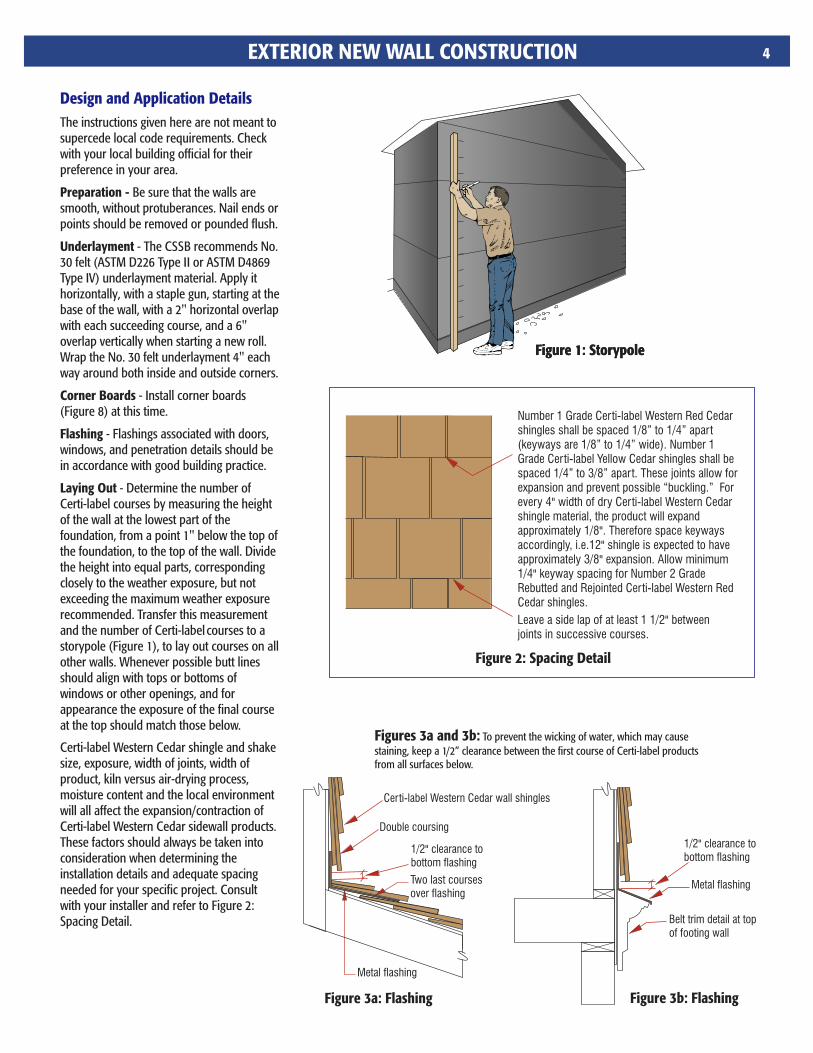
Laying Out - Determine the number of Certi-label courses by measuring the height of the wall at the lowest part of the foundation, from a point 1" below the top of the foundation, to the top of the wall. Divide the height into equal parts, corresponding closely to the weather exposure, but not exceeding the maximum weather exposure recommended. Transfer this measurement
and the number of Certi-label courses to a storypole (Figure 1), to lay out courses on all other walls. Whenever possible butt lines should align with tops or bottoms of windows or other openings, and for appearance the exposure of the final course at the top should match those below.
Certi-label Western Cedar shingle and shake size, exposure, width of joints, width of product, kiln versus air-drying process, moisture content and the local environment will all affect the expansion/contraction of Certi-label Western Cedar sidewall products. These factors should always be taken into consideration when determining the installation details and adequate spacing needed for your specific project. Consult with your installer and refer to Figure 2: Spacing Detail.
Figures 3a and 3b: To prevent the wicking of water, which may cause staining, keep a 1/2” clearance between the first course of Certi-label products from all surfaces below.
Figure 3a: Flashing
1/2" clearance tobottom flashing
Certi-label Western Cedar wall shingles
Double coursing
Two last courses over flashing
Metal flashing
Figure 1: StorypoleFigure 1: Storypole
4
Figure 2: Spacing Detail
Leave a side lap of at least 1 1/2" between joints in successive courses.
Number 1 Grade Certi-label Western Red Cedar shingles shall be spaced 1/8” to 1/4” apart (keyways are 1/8” to 1/4” wide). Number 1 Grade Certi-label Yellow Cedar shingles shall be spaced 1/4” to 3/8” apart. These joints allow for expansion and prevent possible “buckling.” For every 4" width of dry Certi-label Western Cedar shingle material, the product will expand approximately 1/8". Therefore space keyways accordingly, i.e.12" shingle is expected to have approximately 3/8" expansion. Allow minimum 1/4" keyway spacing for Number 2 Grade Rebutted and Rejointed Certi-label Western Red Cedar shingles.
Figure 3b: Flashing
Metal flashing
Belt trim detail at topof footing wall
1/2" clearance tobottom flashing
SIDEWALL FASTENER GUIDELINES
YESCorrect - flush with surface
NOUnderdriven
NOOverdriven
5
Figure 4: Nail Driving Detail
Figure 5: Course Alignment
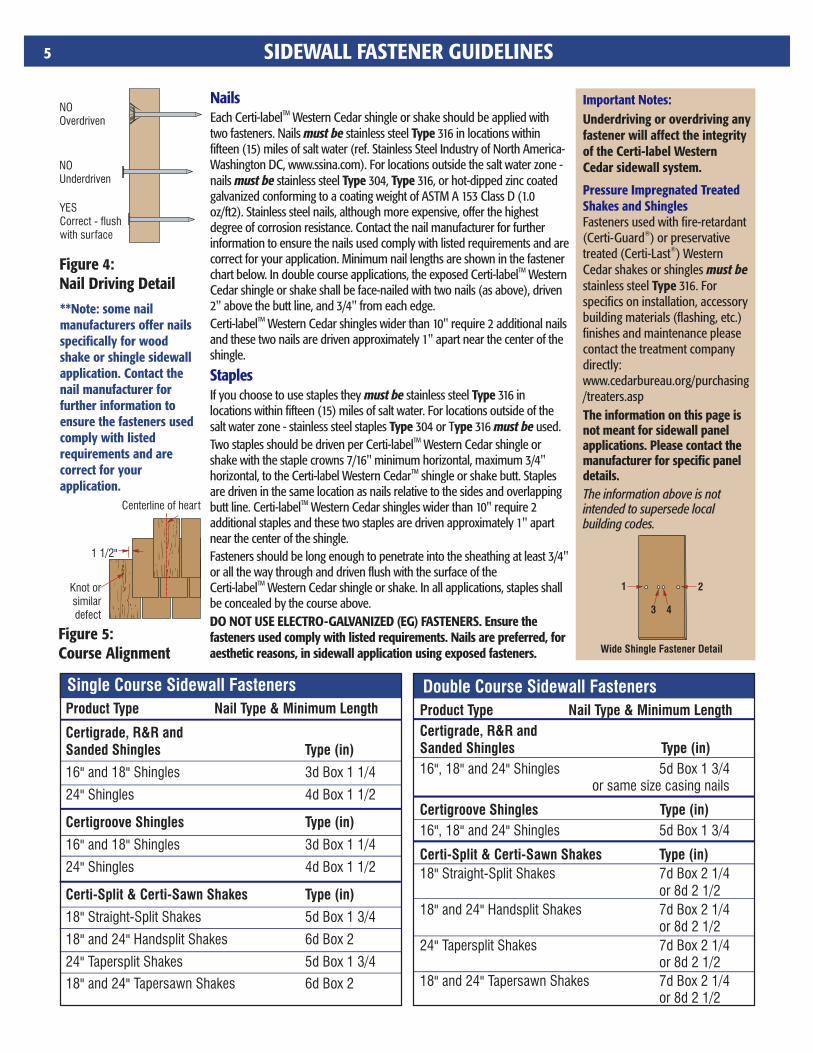
NailsTMEach Certi-label Western Cedar shingle or shake should be applied with
two fasteners. Nails must be stainless steel Type 316 in locations within fifteen (15) miles of salt water (ref. Stainless Steel Industry of North America-Washington DC, www.ssina.com). For locations outside the salt water zone - nails must be stainless steel Type 304, Type 316, or hot-dipped zinc coated galvanized conforming to a coating weight of ASTM A 153 Class D (1.0 oz/ft2). Stainless steel nails, although more expensive, offer the highest degree of corrosion resistance. Contact the nail manufacturer for further information to ensure the nails used comply with listed requirements and are correct for your application. Minimum nail lengths are shown in the fastener
TMchart below. In double course applications, the exposed Certi-label Western Cedar shingle or shake shall be face-nailed with two nails (as above), driven 2" above the butt line, and 3/4" from each edge.
TMCerti-label Western Cedar shingles wider than 10" require 2 additional nails and these two nails are driven approximately 1" apart near the center of the shingle.
StaplesIf you choose to use staples they must be stainless steel Type 316 in locations within fifteen (15) miles of salt water. For locations outside of the salt water zone - stainless steel staples Type 304 or Type 316 must be used.
TMTwo staples should be driven per Certi-label Western Cedar shingle or shake with the staple crowns 7/16" minimum horizontal, maximum 3/4"
TMhorizontal, to the Certi-label Western Cedar shingle or shake butt. Staples are driven in the same location as nails relative to the sides and overlapping
TMbutt line. Certi-label Western Cedar shingles wider than 10" require 2 additional staples and these two staples are driven approximately 1" apart near the center of the shingle.Fasteners should be long enough to penetrate into the sheathing at least 3/4" or all the way through and driven flush with the surface of the
TMCerti-label Western Cedar shingle or shake. In all applications, staples shall be concealed by the course above. DO NOT USE ELECTRO-GALVANIZED (EG) FASTENERS. Ensure the fasteners used comply with listed requirements. Nails are preferred, for aesthetic reasons, in sidewall application using exposed fasteners.
Important Notes:Underdriving or overdriving any fastener will affect the integrity of the Certi-label Western Cedar sidewall system.
Pressure Impregnated Treated Shakes and ShinglesFasteners used with fire-retardant
®(Certi-Guard ) or preservative ®treated (Certi-Last ) Western
Cedar shakes or shingles must be stainless steel Type 316. For specifics on installation, accessory building materials (flashing, etc.) finishes and maintenance please contact the treatment company directly:www.cedarbureau.org/purchasing /treaters.aspThe information on this page is not meant for sidewall panel applications. Please contact the manufacturer for specific panel details.The information above is not intended to supersede local building codes.
Product Type Nail Type & Minimum Length
Certigrade, R&R and Sanded Shingles Type (in)
16" and 18" Shingles 3d Box 1 1/4
24" Shingles 4d Box 1 1/2
Certigroove Shingles Type (in)
16" and 18" Shingles 3d Box 1 1/4
24" Shingles 4d Box 1 1/2
Certi-Split & Certi-Sawn Shakes Type (in)
18" Straight-Split Shakes 5d Box 1 3/4
18" and 24" Handsplit Shakes 6d Box 2
24" Tapersplit Shakes 5d Box 1 3/4
18" and 24" Tapersawn Shakes 6d Box 2
Single Course Sidewall Fasteners
Product Type Nail Type & Minimum Length
Certigrade, R&R and Sanded Shingles Type (in)
16", 18" and 24" Shingles 5d Box 1 3/4 or same size casing nails
Certigroove Shingles Type (in)
16", 18" and 24" Shingles 5d Box 1 3/4
Certi-Split & Certi-Sawn Shakes Type (in)
18" Straight-Split Shakes 7d Box 2 1/4 or 8d 2 1/2
18" and 24" Handsplit Shakes 7d Box 2 1/4 or 8d 2 1/2
24" Tapersplit Shakes 7d Box 2 1/4 or 8d 2 1/2
18" and 24" Tapersawn Shakes 7d Box 2 1/4 or 8d 2 1/2
Double Course Sidewall Fasteners
Wide Shingle Fastener Detail
1 2
3 4
Centerline of heart
Knot or similar defect
1 1/2"
**Note: some nail manufacturers offer nails specifically for wood shake or shingle sidewall application. Contact the nail manufacturer for further information to ensure the fasteners used comply with listed requirements and are correct for your application.
EXTERIOR NEW WALL CONSTRUCTION 6
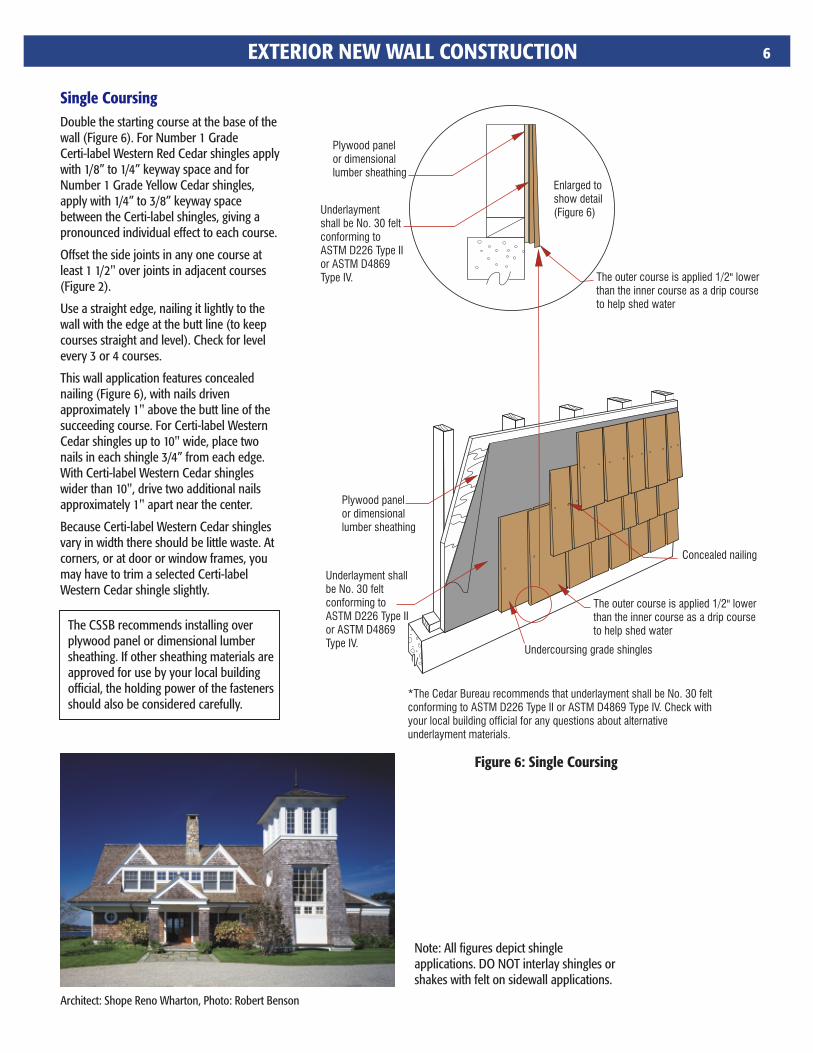
Single CoursingDouble the starting course at the base of the wall (Figure 6). For Number 1 Grade Certi-label Western Red Cedar shingles apply with 1/8” to 1/4” keyway space and for Number 1 Grade Yellow Cedar shingles, apply with 1/4” to 3/8” keyway space between the Certi-label shingles, giving a pronounced individual effect to each course.
Offset the side joints in any one course at least 1 1/2" over joints in adjacent courses (Figure 2).
Use a straight edge, nailing it lightly to the wall with the edge at the butt line (to keep courses straight and level). Check for level every 3 or 4 courses.
This wall application features concealed nailing (Figure 6), with nails driven approximately 1" above the butt line of the succeeding course. For Certi-label Western Cedar shingles up to 10" wide, place two nails in each shingle 3/4” from each edge. With Certi-label Western Cedar shingles wider than 10", drive two additional nails approximately 1" apart near the center.
Because Certi-label Western Cedar shingles vary in width there should be little waste. At corners, or at door or window frames, you may have to trim a selected Certi-label Western Cedar shingle slightly.
Plywood panelor dimensionallumber sheathing
Architect: Shope Reno Wharton, Photo: Robert Benson
The CSSB recommends installing over plywood panel or dimensional lumber sheathing. If other sheathing materials are approved for use by your local building official, the holding power of the fasteners should also be considered carefully.
The outer course is applied 1/2" lowerthan the inner course as a drip courseto help shed water
Enlarged to show detail(Figure 6)
Figure 6: Single Coursing
*The Cedar Bureau recommends that underlayment shall be No. 30 felt conforming to ASTM D226 Type II or ASTM D4869 Type IV. Check with your local building official for any questions about alternative underlayment materials.
Undercoursing grade shingles
Concealed nailing
The outer course is applied 1/2" lowerthan the inner course as a drip courseto help shed water
Plywood panelor dimensionallumber sheathing
Note: All figures depict shingle applications. DO NOT interlay shingles or shakes with felt on sidewall applications.
Underlayment shall be No. 30 felt conforming to ASTM D226 Type II or ASTM D4869 Type IV.
Underlayment shall be No. 30 felt conforming to ASTM D226 Type II or ASTM D4869 Type IV.
EXTERIOR NEW WALL CONSTRUCTION7
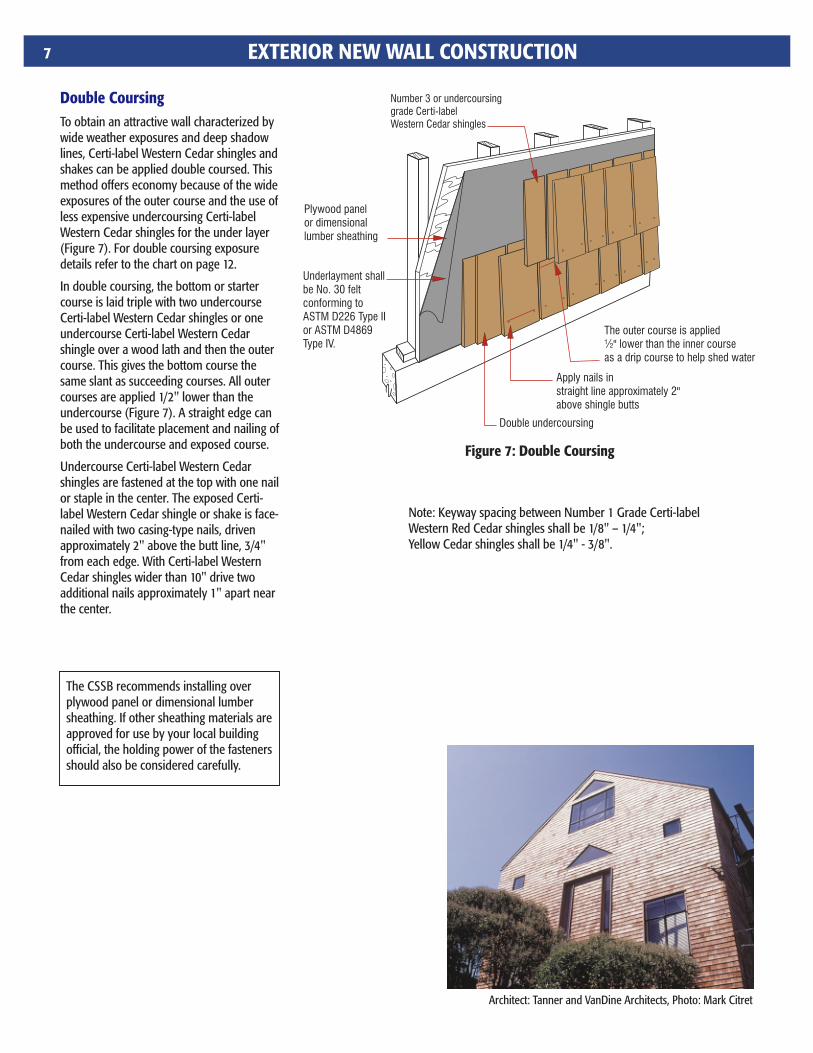
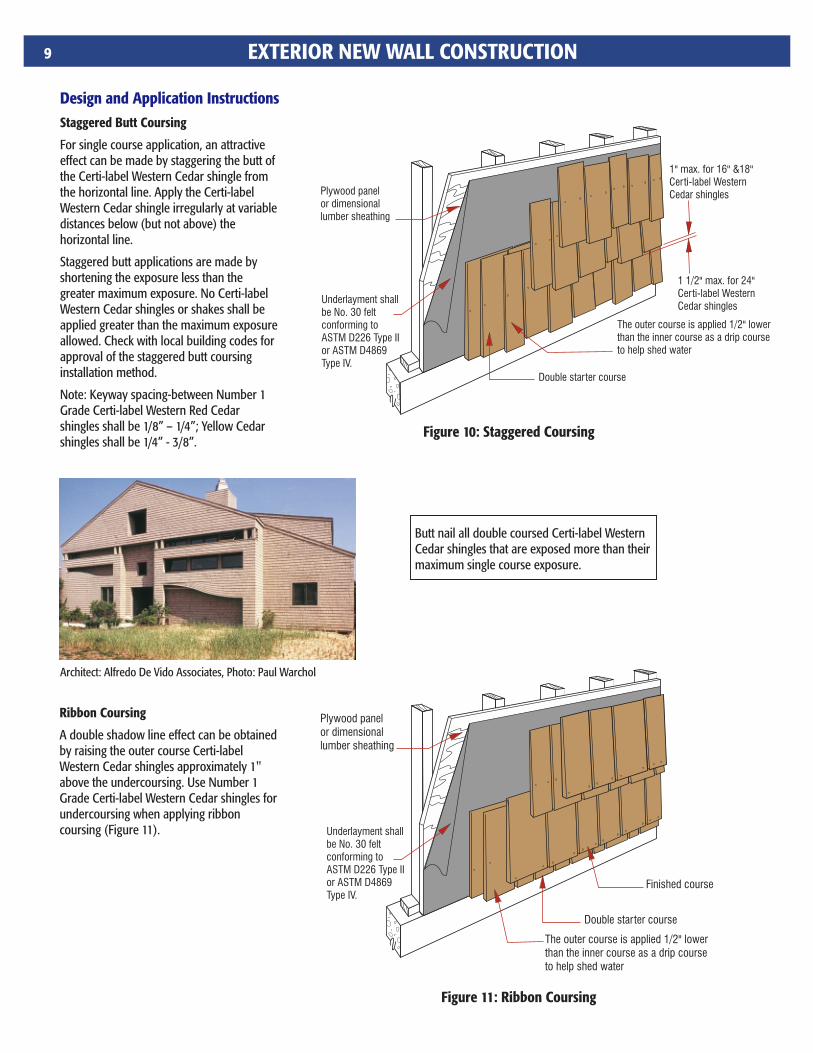
Double CoursingTo obtain an attractive wall characterized by wide weather exposures and deep shadow lines, Certi-label Western Cedar shingles and shakes can be applied double coursed. This method offers economy because of the wide exposures of the outer course and the use of less expensive undercoursing Certi-label Western Cedar shingles for the under layer (Figure 7). For double coursing exposure details refer to the chart on page 12.
In double coursing, the bottom or starter course is laid triple with two undercourse Certi-label Western Cedar shingles or one undercourse Certi-label Western Cedar shingle over a wood lath and then the outer course. This gives the bottom course the same slant as succeeding courses. All outer courses are applied 1/2" lower than the undercourse (Figure 7). A straight edge can be used to facilitate placement and nailing of both the undercourse and exposed course.
Undercourse Certi-label Western Cedar shingles are fastened at the top with one nail or staple in the center. The exposed Certi-label Western Cedar shingle or shake is face-nailed with two casing-type nails, driven approximately 2" above the butt line, 3/4" from each edge. With Certi-label Western Cedar shingles wider than 10" drive two additional nails approximately 1" apart near the center.
Architect: Tanner and VanDine Architects, Photo: Mark Citret
The CSSB recommends installing over plywood panel or dimensional lumber sheathing. If other sheathing materials are approved for use by your local building official, the holding power of the fasteners should also be considered carefully.
Figure 7: Double Coursing
The outer course is applied ½" lower than the inner course as a drip course to help shed water
Apply nails in straight line approximately 2"above shingle butts
Double undercoursing
Plywood panelor dimensionallumber sheathing
Number 3 or undercoursing grade Certi-label Western Cedar shingles
Underlayment shall be No. 30 felt conforming to ASTM D226 Type II or ASTM D4869 Type IV.
Note: Keyway spacing between Number 1 Grade Certi-label Western Red Cedar shingles shall be 1/8" – 1/4"; Yellow Cedar shingles shall be 1/4" - 3/8".
EXTERIOR NEW WALL CONSTRUCTION
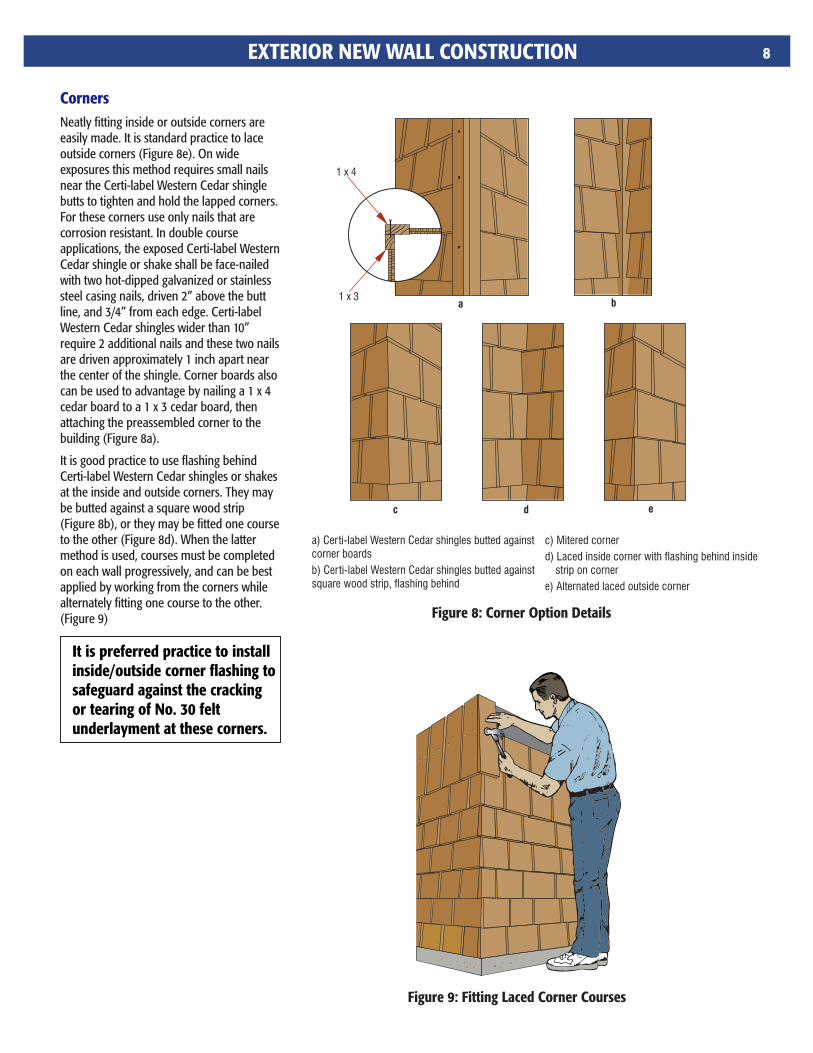
CornersNeatly fitting inside or outside corners are easily made. It is standard practice to lace outside corners (Figure 8e). On wide exposures this method requires small nails near the Certi-label Western Cedar shingle butts to tighten and hold the lapped corners. For these corners use only nails that are corrosion resistant. In double course applications, the exposed Certi-label Western Cedar shingle or shake shall be face-nailed with two hot-dipped galvanized or stainless steel casing nails, driven 2” above the butt line, and 3/4” from each edge. Certi-label Western Cedar shingles wider than 10” require 2 additional nails and these two nails are driven approximately 1 inch apart near the center of the shingle. Corner boards also can be used to advantage by nailing a 1 x 4 cedar board to a 1 x 3 cedar board, then attaching the preassembled corner to the building (Figure 8a).
It is good practice to use flashing behind Certi-label Western Cedar shingles or shakes at the inside and outside corners. They may be butted against a square wood strip (Figure 8b), or they may be fitted one course to the other (Figure 8d). When the latter method is used, courses must be completed on each wall progressively, and can be best applied by working from the corners while alternately fitting one course to the other. (Figure 9)
It is preferred practice to install inside/outside corner flashing to safeguard against the cracking or tearing of No. 30 felt underlayment at these corners.
a) Certi-label Western Cedar shingles butted against corner boards
b) Certi-label Western Cedar shingles butted against square wood strip, flashing behind
c
1 x 4
1 x 3
Figure 8: Corner Option Details
c) Mitered corner
d) Laced inside corner with flashing behind inside strip on corner
e) Alternated laced outside corner
8
Figure 9: Fitting Laced Corner Courses
a b
d e
9 EXTERIOR NEW WALL CONSTRUCTION
Design and Application InstructionsStaggered Butt Coursing
For single course application, an attractive effect can be made by staggering the butt of the Certi-label Western Cedar shingle from the horizontal line. Apply the Certi-label Western Cedar shingle irregularly at variable distances below (but not above) the horizontal line.
Staggered butt applications are made by shortening the exposure less than the greater maximum exposure. No Certi-label Western Cedar shingles or shakes shall be applied greater than the maximum exposure allowed. Check with local building codes for approval of the staggered butt coursing installation method.
Note: Keyway spacing-between Number 1 Grade Certi-label Western Red Cedar shingles shall be 1/8” – 1/4”; Yellow Cedar shingles shall be 1/4” - 3/8”.
Ribbon Coursing
A double shadow line effect can be obtained by raising the outer course Certi-label Western Cedar shingles approximately 1" above the undercoursing. Use Number 1 Grade Certi-label Western Cedar shingles for undercoursing when applying ribbon coursing (Figure 11).
Architect: Alfredo De Vido Associates, Photo: Paul Warchol
Butt nail all double coursed Certi-label Western Cedar shingles that are exposed more than their maximum single course exposure.
Figure 10: Staggered Coursing
1" max. for 16" &18" Certi-label Western Cedar shingles
1 1/2" max. for 24" Certi-label Western Cedar shingles
Double starter course
The outer course is applied 1/2" lowerthan the inner course as a drip courseto help shed water
Plywood panelor dimensionallumber sheathing
Plywood panelor dimensionallumber sheathing
Figure 11: Ribbon Coursing
The outer course is applied 1/2" lowerthan the inner course as a drip courseto help shed water
Double starter course
Finished course
Underlayment shall be No. 30 felt conforming to ASTM D226 Type II or ASTM D4869 Type IV.
Underlayment shall be No. 30 felt conforming to ASTM D226 Type II or ASTM D4869 Type IV.
EXTERIOR OVER-WALL AND RE-WALL CONSTRUCTION
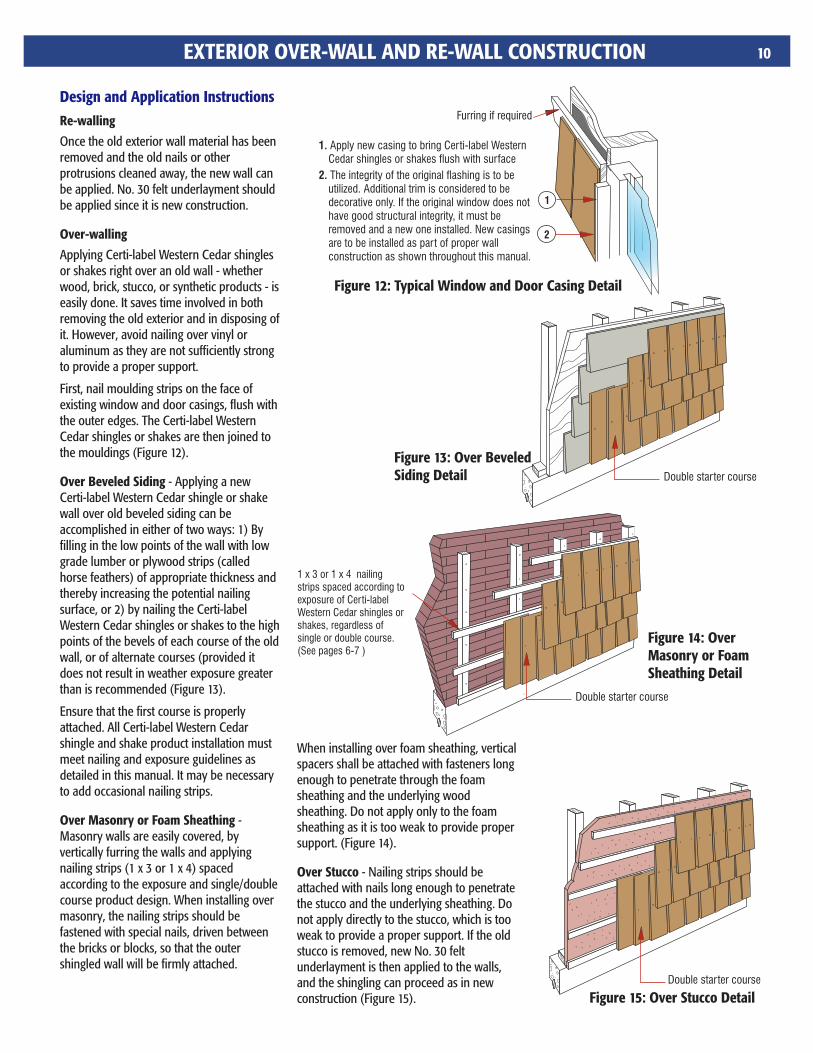
Figure 12: Typical Window and Door Casing Detail
Figure 13: Over BeveledSiding Detail
10
Design and Application InstructionsRe-walling
Once the old exterior wall material has been removed and the old nails or other protrusions cleaned away, the new wall can be applied. No. 30 felt underlayment should be applied since it is new construction.
Over-walling
Applying Certi-label Western Cedar shingles or shakes right over an old wall - whether wood, brick, stucco, or synthetic products - is easily done. It saves time involved in both removing the old exterior and in disposing of it. However, avoid nailing over vinyl or aluminum as they are not sufficiently strong to provide a proper support.
First, nail moulding strips on the face of existing window and door casings, flush with the outer edges. The Certi-label Western Cedar shingles or shakes are then joined to the mouldings (Figure 12).
Over Beveled Siding - Applying a new Certi-label Western Cedar shingle or shake wall over old beveled siding can be accomplished in either of two ways: 1) By filling in the low points of the wall with low grade lumber or plywood strips (called horse feathers) of appropriate thickness and thereby increasing the potential nailing surface, or 2) by nailing the Certi-label Western Cedar shingles or shakes to the high points of the bevels of each course of the old wall, or of alternate courses (provided it does not result in weather exposure greater than is recommended (Figure 13).
Ensure that the first course is properly attached. All Certi-label Western Cedar shingle and shake product installation must meet nailing and exposure guidelines as detailed in this manual. It may be necessary to add occasional nailing strips.
Over Masonry or Foam Sheathing - Masonry walls are easily covered, by vertically furring the walls and applying nailing strips (1 x 3 or 1 x 4) spaced according to the exposure and single/double course product design. When installing over masonry, the nailing strips should be fastened with special nails, driven between the bricks or blocks, so that the outer shingled wall will be firmly attached.
1 x 3 or 1 x 4 nailing strips spaced according to exposure of Certi-label Western Cedar shingles or shakes, regardless of single or double course. (See pages 6-7 )
1. Apply new casing to bring Certi-label Western Cedar shingles or shakes flush with surface
2. The integrity of the original flashing is to be utilized. Additional trim is considered to be decorative only. If the original window does not have good structural integrity, it must be removed and a new one installed. New casings are to be installed as part of proper wall construction as shown throughout this manual.
2
Furring if required
1
Double starter course
Figure 14: Over Masonry or Foam Sheathing Detail
Double starter course
Figure 15: Over Stucco DetailDouble starter course
When installing over foam sheathing, vertical spacers shall be attached with fasteners long enough to penetrate through the foam sheathing and the underlying wood sheathing. Do not apply only to the foam sheathing as it is too weak to provide proper support. (Figure 14).
Over Stucco - Nailing strips should be attached with nails long enough to penetrate the stucco and the underlying sheathing. Do not apply directly to the stucco, which is too weak to provide a proper support. If the old stucco is removed, new No. 30 felt underlayment is then applied to the walls, and the shingling can proceed as in new construction (Figure 15).
11 INTERIOR WALL CONSTRUCTION
Figure 16: Furring Strip Detail
Figure 19: Top Course
Figure 18: Corner Detail
Figure 17: Starter Course
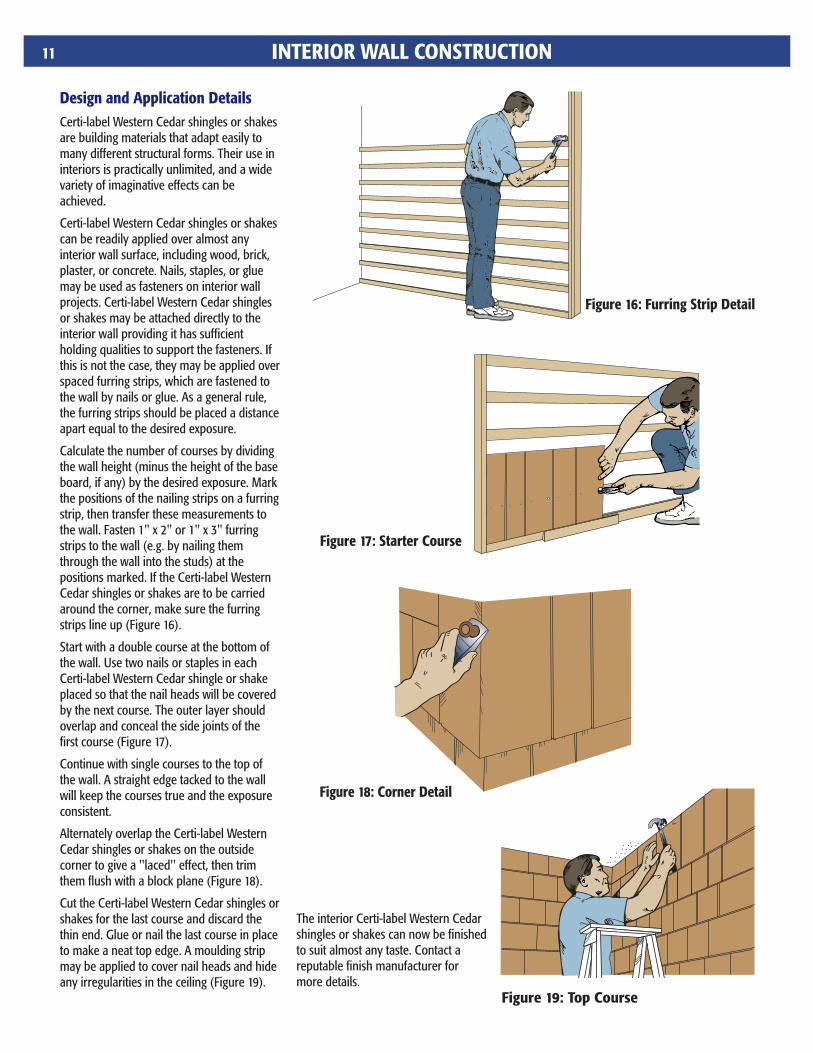
Design and Application DetailsCerti-label Western Cedar shingles or shakes are building materials that adapt easily to many different structural forms. Their use in interiors is practically unlimited, and a wide variety of imaginative effects can be achieved.
Certi-label Western Cedar shingles or shakes can be readily applied over almost any interior wall surface, including wood, brick, plaster, or concrete. Nails, staples, or glue may be used as fasteners on interior wall projects. Certi-label Western Cedar shingles or shakes may be attached directly to the interior wall providing it has sufficient holding qualities to support the fasteners. If this is not the case, they may be applied over spaced furring strips, which are fastened to the wall by nails or glue. As a general rule, the furring strips should be placed a distance apart equal to the desired exposure.
Calculate the number of courses by dividing the wall height (minus the height of the base board, if any) by the desired exposure. Mark the positions of the nailing strips on a furring strip, then transfer these measurements to the wall. Fasten 1" x 2" or 1" x 3" furring strips to the wall (e.g. by nailing them through the wall into the studs) at the positions marked. If the Certi-label Western Cedar shingles or shakes are to be carried around the corner, make sure the furring strips line up (Figure 16).
Start with a double course at the bottom of the wall. Use two nails or staples in each Certi-label Western Cedar shingle or shake placed so that the nail heads will be covered by the next course. The outer layer should overlap and conceal the side joints of the first course (Figure 17).
Continue with single courses to the top of the wall. A straight edge tacked to the wall will keep the courses true and the exposure consistent.
Alternately overlap the Certi-label Western Cedar shingles or shakes on the outside corner to give a ''laced'' effect, then trim them flush with a block plane (Figure 18).
Cut the Certi-label Western Cedar shingles or shakes for the last course and discard the thin end. Glue or nail the last course in place to make a neat top edge. A moulding strip may be applied to cover nail heads and hide any irregularities in the ceiling (Figure 19).
The interior Certi-label Western Cedar shingles or shakes can now be finished to suit almost any taste. Contact a reputable finish manufacturer for more details.
SIDEWALL APPLICATION GUIDELINES 12
Sidewall Guidelines
This information has been designed to aid architects, consultants and builders in specifying Certi-label Western Cedar shingles and shakes. It suggests a standardized terminology and style for ordering in the hope of improving accuracy. It incorporates a general outline of the latest application information. Please note, however, that this is an application guide only. The information in this manual is not intended to supercede local codes. Refer to local building codes for more information.
General Application Notes1. The contractor shall cover all wall
surfaces with Certi-label Western Cedar shingles or shakes bearing the Cedar Shake & Shingle Bureau's official grade marked label.
2. Certi-label Western Cedar shingles/ shakes for outer courses shall be (specify grade and length).
3. Certi-label Western Cedar shingles/ shakes for undercourses shall be (specify grade and length).
Sidewall Application4. Certi-label Western Cedar sidewall
shingles/shakes shall be (doubled or tripled) at foundation lines.
5. Number 1 Grade Certi-label Western Red Cedar sidewall shingles shall be spaced apart 1/8" to 1/4"; Yellow Cedar shingles shall be spaced 1/4" to 3/8".
Note: Number 2 Grade Certi-label Western Red Cedar shingles shall be spaced 1/4” apart.
6. Joints of Certi-label Western Cedar shingles/shakes in any one course shall be offset not less than 1 1/2" from the joints in adjacent courses.
7. Certi-label Western Cedar shakes on sidewalls shall be spaced apart not more than 3/8" to 1/2".
8. Certi-label Western Cedar sidewall shingles/shakes shall be applied with a weather exposure of (specify in inches from exposure chart).
Fastening Sidewall Shingles/Shakes9. Fasteners should be long enough to penetrate into the sheathing at least 3/4" or all the way through and driven flush with the surface of the Certi-label Western Cedar shingle or shake. In all applications, staples shall be concealed by the course above. Fasteners cannot be electro-galvanized as they will cause staining. For aesthetic reasons, nails are preferred for sidewall applications.
[Note: Due to the diverse range of fastener requirements, please refer to the charts on page 5 for fastener specifications].
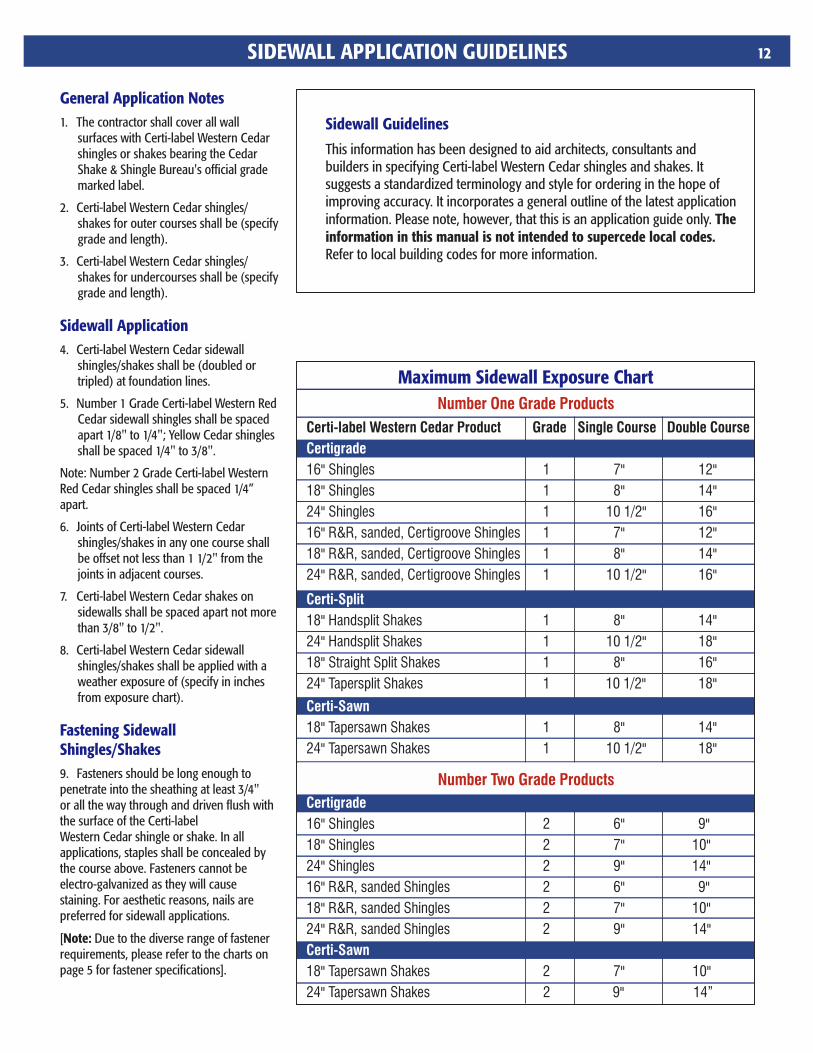
Maximum Sidewall Exposure Chart
Certi-label Western Cedar Product Grade Single Course Double Course
Certigrade
16" Shingles 1 7" 12"
18" Shingles 1 8" 14"
24" Shingles 1 10 1/2" 16"
16" R&R, sanded, Certigroove Shingles 1 7" 12"
18" R&R, sanded, Certigroove Shingles 1 8" 14"
24" R&R, sanded, Certigroove Shingles 1 10 1/2" 16"
Certi-Split
18" Handsplit Shakes 1 8" 14"
24" Handsplit Shakes 1 10 1/2" 18"
18" Straight Split Shakes 1 8" 16"
24" Tapersplit Shakes 1 10 1/2" 18"
Certi-Sawn
18" Tapersawn Shakes 1 8" 14"
24" Tapersawn Shakes 1 10 1/2" 18"
Certigrade
16" Shingles 2 6" 9"
18" Shingles 2 7" 10"
24" Shingles 2 9" 14"
16" R&R, sanded Shingles 2 6" 9"
18" R&R, sanded Shingles 2 7" 10"
24" R&R, sanded Shingles 2 9" 14"
Certi-Sawn
18" Tapersawn Shakes 2 7" 10"
24" Tapersawn Shakes 2 9" 14”
Number One Grade Products
Number Two Grade Products
13 SIDEWALL FINISHING13 SIDEWALL FINISHING13 SIDEWALL FINISHING
Exterior Finishes (also known as Coatings)There are a variety of paints, stains, and preservative treatments available for Certi-label Western Cedar sidewall products. Certi-label sidewall products are available pre-finished, (pre-primed or pre-stained) and natural (unfinished). Please note: A detailed product finishing discussion is beyond the scope of this manual; however, a brief overview is presented below. It is critical to read the instructions on the finish product’s container as well as follow the finish manufacturer’s directions. All areas of the world present unique painting/staining challenges. Some of the topics you should discuss with your sidewall product manufacturer, finish manufacturer, and professional contractor include the following:1. Product coverage2. Surface preparation3. Qualified finish contractors in your area4. Certi-label Western Cedar moisture content level recommended for your specific locale5. Appropriateness of finish for Certi-label Western Cedar sidewall products6. Drying color versus sample chip color7. Material Safety Data Sheet8. Mildew resistance9. UV resistance and water repellency10. Exterior/Interior finish usage11. Depth of finish penetration12. Application method, including how to cover all sides of product, mixing/stirring (to prevent lap marks), temperature, brush versus spraying tools, and recommended proper clean up and disposal of all tools, brushes and rags. Talk to your finish manufacturer if you have questions about back-priming instructions for your particular project. 13. Price. Do not be fooled by a low price. Better quality brands tend to be more expensive. A cheap finish will usually cost more in the long run through quicker weathering, poorer coverage and less pigment. Use only the highest quality products from your finish manufacturer.Quality finish manufacturers have technical help lines you can call (some are toll-free). Advice is also available via the Internet.
The CSSB recognizes these general types of finishes:Transparent finishes (penetrating oil-based): clear, allow natural grain to show through, may also include paintable water repellant preservatives. Such treatment can possibly, depending upon the product, inhibit mildew growth as well as rapid change in color dueto weathering.
Semi-transparent and semi-solid stains (penetrating oil-based): have some pigment, but allow some wood grain to show.Paint or solid stain: provide opaque coverage, allowing little to no wood grain to show.
Certi-label Western Cedar Sidewall Finishing Systems: Preferred Paint SystemStep 1 Factory or field applied alkyd oil or latex stain blocking primers on all surfacesStep 2: Field-applied top coat of highest quality 100% acrylic latex paint. This type of top coat is more flexible and more resistant to blistering and cracking. The best protection against extractive bleeding is the application of an oil-based, stain- blocking primer before the top coat is applied. ORLess Durable Paint SystemStep 1: Factory or field applied alkyd oil or latex stain blocking primers on all surfaces
Step 2: Field-applied oil-based or alkyd top coat.
CSSB member manufacturers do supply factory-primed products. These products are usually more cost-effective than on-site priming.
StainsUse oil-based stains only. CSSB member manufacturers can factory-apply a coat of semi-transparent or semi-solid oil-based stain. This process is usually more cost-effective than on-site staining. Further enhancing the natural durability of Certi-label Western Cedar shingles and shakes, some CSSB members offer pass-through finish warranties on their factory finished sidewall shingles and shakes. These can be further enhanced by application of a final, field-applied top coat. Contact participating CSSB members for details.
To Accelerate the Weathering ProcessTo hasten the weathering process, apply a bleaching oil finish.
How Soon to FinishGenerally finish products IMMEDIATELY after installation PROVIDING that the moisture content is appropriate for both the finish product being used and your locale. If the finish is not applied promptly, adhesion will be compromised (unless additional surface preparation is undertaken).If you have installed a natural product (unfinished), apply your finish before rain and other moisture are absorbed. Ensure that you account for high humidity concerns.If you are using a pre-finished product (where finish is applied at the manufacturing plant), ensure that the product is thoroughly dried before applying a top finish coat.
In all instances drying time varies from region to region. Excessive moisture will limit finish adhesion. Check with your professional contractor, finish manufacturer and/or sidewall product manufacturer for assistance.
Surface CleaningThere are products that claim to be effective for removing dirt, airborne pollution marks, mildew and prior finishes. If you clean the surface prior to finishing, ensure that it is allowed to dry to the finish manufacturer's recommended moisture content level before applying a new finish. Contact your finish manufacturer for more details.
Extractive BleedingExtractive bleeding is characterized by the tannins in the wood being dissolved in moisture and migrating to the surface of the product. Rain will sometimes wash these stains away; however if left to weather, the sun can cause polymerization, thus requiring the addition of a tannin blocker and new top coat of finish (ensure proper surface preparation before applying new top coat) once the moisture problem has been solved. Compounds containing oxalic acid appear to be the most effective at removing extractive bleeding stains: ensure you use proper safety precautions and follow the oxalic acid compound manufacturer’s application directions. Extractive bleeding does not signify failure of the applied finish, but instead is found in applications where a source of moisture is present. Extractive bleeding is not a manufacturing defect nor is it a finish defect; it is a natural phenomenon that occurs in applications. Tannin blocking products help, however, the CSSB does not provide any finish warranty. Check with your sidewall product manufacturer, finish manufacturer, and professional contractor for more assistance.The CSSB does not warrant this information or instruction regarding finishes. If you see an attractive job that has endured in your locale, inquire about the type of finish used. Once Certi-label Western Cedar shingles and shakes are pressure-impregnated treated you must contact the treatment company to determine if a finish, such as paint or stain, is allowable. If there is any confusion whatsoever it is highly recommended that you contact both your sidewall product manufacturer and the finish manufacturer.
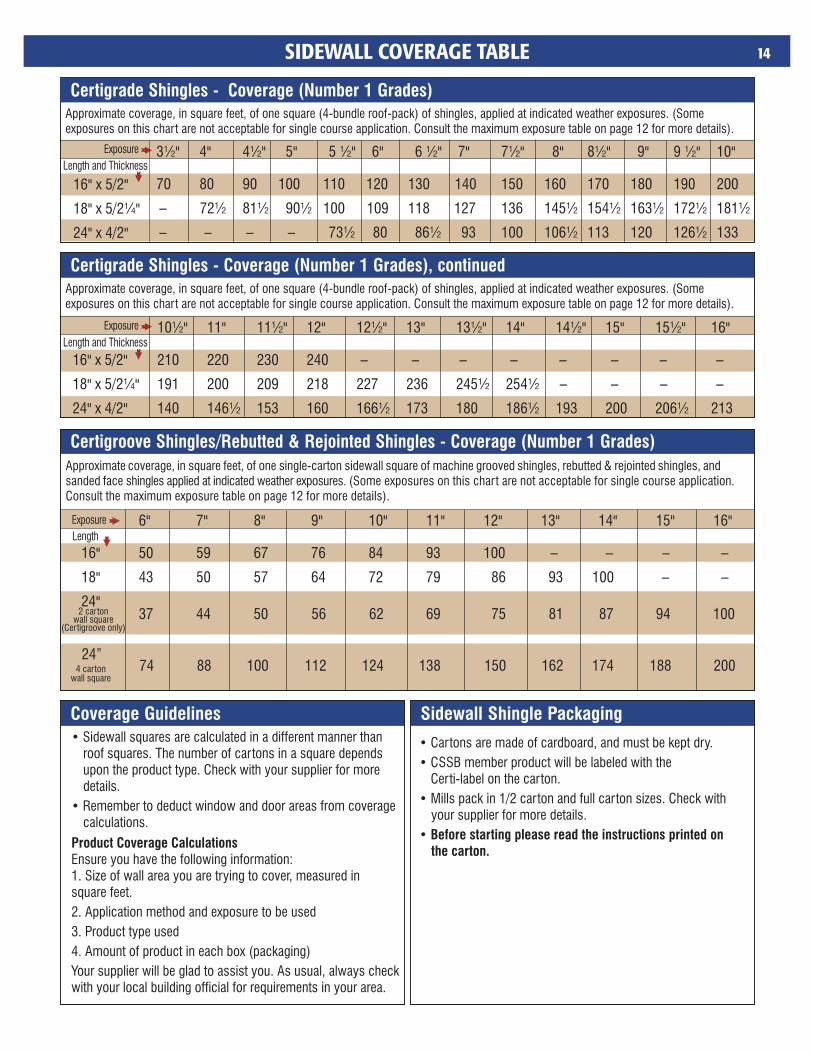
3½" 4" 4½" 5" 5 ½" 6" 6 ½" 7" 7½" 8" 8½" 9" 9 ½" 10"
70 80 90 100 110 120 130 140 150 160 170 180 190 200
– 72½ 81½ 90½ 100 109 118 127 136 145½ 154½ 163½ 172½ 181½
– – – – 73½ 80 86½ 93 100 106½ 113 120 126½ 133
Approximate coverage, in square feet, of one square (4-bundle roof-pack) of shingles, applied at indicated weather exposures. (Some exposures on this chart are not acceptable for single course application. Consult the maximum exposure table on page 12 for more details).
16" x 5/2"
18" x 5/2¼"
24" x 4/2"
Length and Thickness
Exposure
Certigrade Shingles - Coverage (Number 1 Grades)
PHOTOSSIDEWALL COVERAGE TABLE 14
• Cartons are made of cardboard, and must be kept dry.
• CSSB member product will be labeled with the Certi-label on the carton.
• Mills pack in 1/2 carton and full carton sizes. Check with your supplier for more details.
• Before starting please read the instructions printed on the carton.
• Sidewall squares are calculated in a different manner than roof squares. The number of cartons in a square depends upon the product type. Check with your supplier for more details.
• Remember to deduct window and door areas from coverage calculations.
Product Coverage CalculationsEnsure you have the following information:1. Size of wall area you are trying to cover, measured in square feet.
2. Application method and exposure to be used
3. Product type used
4. Amount of product in each box (packaging)
Your supplier will be glad to assist you. As usual, always check with your local building official for requirements in your area.
Sidewall Shingle PackagingCoverage Guidelines
Approximate coverage, in square feet, of one square (4-bundle roof-pack) of shingles, applied at indicated weather exposures. (Some exposures on this chart are not acceptable for single course application. Consult the maximum exposure table on page 12 for more details).
10½" 11" 11½" 12" 12½" 13" 13½" 14" 14½" 15" 15½" 16"
210 220 230 240 – – – – – – – –
191 200 209 218 227 236 245½ 254½ – – – –
140 146½ 153 160 166½ 173 180 186½ 193 200 206½ 213
16" x 5/2"
18" x 5/2¼"
24" x 4/2"
Length and Thickness
Exposure
Certigrade Shingles - Coverage (Number 1 Grades), continued
Approximate coverage, in square feet, of one single-carton sidewall square of machine grooved shingles, rebutted & rejointed shingles, and sanded face shingles applied at indicated weather exposures. (Some exposures on this chart are not acceptable for single course application. Consult the maximum exposure table on page 12 for more details).
Length
Exposure
2 carton wall square
(Certigroove only)
4 carton wall square
Certigroove Shingles/Rebutted & Rejointed Shingles - Coverage (Number 1 Grades)
37 44 50 56 62 69 75 81 87 94 100
74 88 100 112 124 138 150 162 174 188 20024”
6" 7" 8" 9" 10" 11" 12" 13" 14" 15" 16"
16" 50 59 67 76 84 93 100 – – – –
18" 43 50 57 64 72 79 86 93 100 – –
24"
SIDEWALL COVERAGE TABLE15
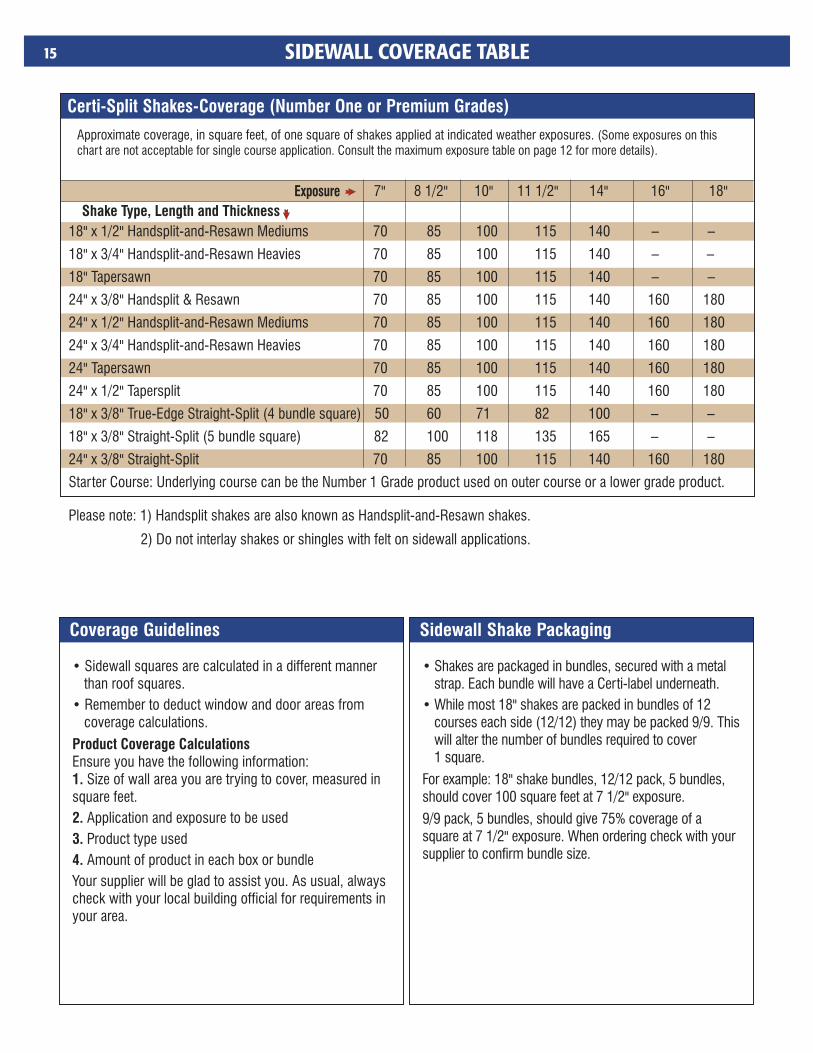
Certi-Split Shakes-Coverage (Number One or Premium Grades)
7" 8 1/2" 10" 11 1/2" 14" 16" 18"
18" x 1/2" Handsplit-and-Resawn Mediums 70 85 100 115 140 – –
18" x 3/4" Handsplit-and-Resawn Heavies 70 85 100 115 140 – –
18" Tapersawn 70 85 100 115 140 – –
24" x 3/8" Handsplit & Resawn 70 85 100 115 140 160 180
24" x 1/2" Handsplit-and-Resawn Mediums 70 85 100 115 140 160 180
24" x 3/4" Handsplit-and-Resawn Heavies 70 85 100 115 140 160 180
24" Tapersawn 70 85 100 115 140 160 180
24" x 1/2" Tapersplit 70 85 100 115 140 160 180
18" x 3/8" True-Edge Straight-Split (4 bundle square) 50 60 71 82 100 – –
18" x 3/8" Straight-Split (5 bundle square) 82 100 118 135 165 – –
24" x 3/8" Straight-Split 70 85 100 115 140 160 180
Starter Course: Underlying course can be the Number 1 Grade product used on outer course or a lower grade product.
Shake Type, Length and Thickness
Exposure
• Shakes are packaged in bundles, secured with a metal strap. Each bundle will have a Certi-label underneath.
• While most 18" shakes are packed in bundles of 12 courses each side (12/12) they may be packed 9/9. This will alter the number of bundles required to cover 1 square.
For example: 18" shake bundles, 12/12 pack, 5 bundles, should cover 100 square feet at 7 1/2" exposure.
9/9 pack, 5 bundles, should give 75% coverage of a square at 7 1/2" exposure. When ordering check with your supplier to confirm bundle size.
Sidewall Shake PackagingCoverage Guidelines
• Sidewall squares are calculated in a different manner than roof squares.
• Remember to deduct window and door areas from coverage calculations.
Product Coverage CalculationsEnsure you have the following information:1. Size of wall area you are trying to cover, measured in square feet.
2. Application and exposure to be used
3. Product type used
4. Amount of product in each box or bundle
Your supplier will be glad to assist you. As usual, always check with your local building official for requirements in your area.
Approximate coverage, in square feet, of one square of shakes applied at indicated weather exposures. (Some exposures on this chart are not acceptable for single course application. Consult the maximum exposure table on page 12 for more details).
Please note: 1) Handsplit shakes are also known as Handsplit-and-Resawn shakes.
2) Do not interlay shakes or shingles with felt on sidewall applications.
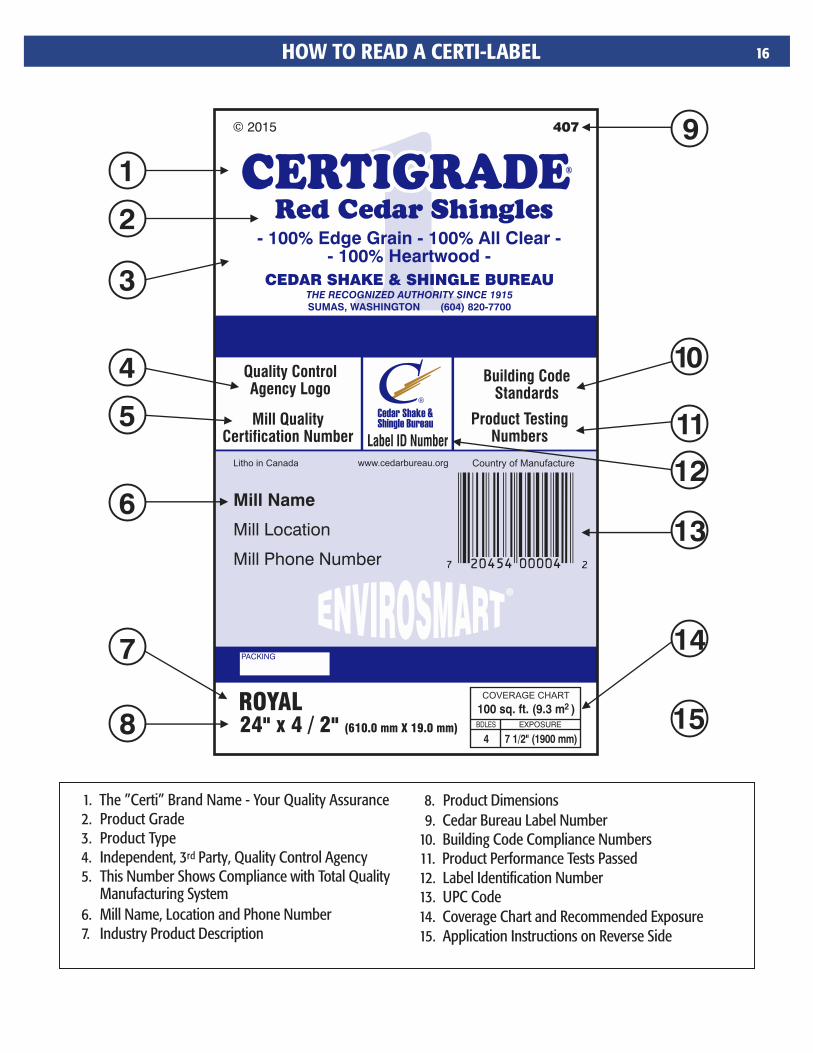
HOW TO READ A CERTI-LABEL 16
9. Cedar Bureau Label Number10. Building Code Compliance Numbers11. Product Performance Tests Passed12. Label Identification Number13. UPC Code14. Coverage Chart and Recommended Exposure 15. Application Instructions on Reverse Side
1. The ”Certi” Brand Name - Your Quality Assurance2. Product Grade3. Product Type
rd 4. Independent, 35. This Number Shows Compliance with Total Quality
Manufacturing System6. Mill Name, Location and Phone Number7. Industry Product Description
8. Product Dimensions
Party, Quality Control Agency
407
PACKING
Litho in Canada
BDLES EXPOSURE
www.cedarbureau.org Country of Manufacture
ROYAL24" x 4 / 2" (610.0 mm X 19.0 mm)
© 2015
Mill Name
Mill Location
Mill Phone Number
Quality ControlAgency Logo
Mill QualityCertification Number
Building CodeStandards
Product TestingNumbers
Label ID Number
7
6
4
5
1
2
3
8
10
11
12
13
15
9
100 sq. ft. (9.3 m )
4 7 1/2" (1900 mm)
2COVERAGE CHART
CEDAR SHAKE & SHINGLE BUREAUTHE RECOGNIZED AUTHORITY SINCE 1915SUMAS, WASHINGTON (604) 820-7700
- 100% Edge Grain - 100% All Clear - - 100% Heartwood -
R
14
Contact us for more information:
US AddressPO Box 1178Sumas, WA 98295-1178
Canadian Address#2 – 7101 Horne St.Mission, BC V2V 7A2
February 2016
TEL: 604-820-7700FAX: [email protected]
R
This manual shows Cedar Shake & Shingle Bureau recommended procedures as of the manual’s print date. It is advisable to contact the Cedar Shake & Shingle Bureau to ensure that you are using the latest available information.
® ® ®The CSSB logo (”C” with shingles/shakes), Blue Label , Certigrade , ® ® ® ® ® ®Certigroove ,Certi-Cut , Certi-Guard , Certi-Last , Certi-Ridge , Certi-Sawn ,
® ® ® Certi-Split , Certi-Wood and Envirosmart are registered trademarks of the Cedar Shake & Shingle Bureau.
®Certi-label and other marks appearing in this manual are trademarks of the Cedar Shake & Shingle Bureau.