external graphics guide windows® 10 · bios basic input output system pc personal computer nvm...
TRANSCRIPT
1
External Graphics Guide – Windows® 10
Sonnet Technologies, Inc.
July 2019

2
CONTENTS Abbreviations ............................................................................................................................................................................................................................ 2
General Information .................................................................................................................................................................................................................. 3
Software/ Firmware Check ........................................................................................................................................................................................................ 4
Setting up External Graphics (eGPU) ......................................................................................................................................................................................... 8
Manually Selecting the External Graphics Processor (eGPU) .................................................................................................................................................. 12
Troubleshooting ...................................................................................................................................................................................................................... 15
Table of Figures ....................................................................................................................................................................................................................... 16
ABBREVIATIONS
Copyright © 2019 Sonnet Technologies, Inc. All Rights Reserved.
Abbreviation Description
GPU Graphics Processing Unit
eGPU External Graphics Processing Unit (connected via Thunderbolt)
dGPU Discrete Graphics Processing Unit (inside laptop)
iGPU Integrated Graphics Processing unit (part of the processor)
USB Universal Serial Bus
BIOS Basic Input Output System
PC Personal Computer
NVM Non-Volatile Memory
PCIe Peripheral Component Interconnect Express
App Application (computer program)

3
GENERAL INFORMATION
External graphics using AMD® or NVIDIA® graphics chips are supported on most Thunderbolt TM 3 enabled machines. Only Thunderbolt 3
machines running the latest version of 64-bit Windows 10 support external graphics. If you are not sure if your system can support external
graphics then follow the guidelines in step: “Software/ Firmware Check”.
Thunderbolt 3 Windows PCs with a 9th, 8th or 7th generation Intel-Core processor support external graphics, as long as they have current
OS, BIOS, firmware and drivers. Systems based on a 6th generation Intel-Core processor may support external graphics with usage errata,
depending on whether recent BIOS and firmware are available.
Please make sure that your machine has a Thunderbolt 3 port and not a regular USB-C port. Thunderbolt 3 (USB-C connector type) ports on a Windows PC and all Thunderbolt 3 cables must be marked with the Intel® Thunderbolt trademark logo (see Figure 1). Only a Thunderbolt 3 port connected with a Thunderbolt 3 cable supports external graphics. The number “3” on a Thunderbolt 3 cable indicates that the cable is rated for 40Gb/s. (A Thunderbolt cable without the 3 is generally rated at only 20Gb/s.)
If the port has the lightning bolt logo below (see Figure 2), it means that this is a USB-C Charging Port and not a Thunderbolt port.
Figure 2: Icon for USB-C Charging Port. A port marked with this icon is not a Thunderbolt Port.
Figure 1: Thunderbolt 3 cable and port with Thunderbolt logo.
4
SOFTWARE/ FIRMWARE CHECK
To confirm that your Thunderbolt 3 enabled Windows 10 system is ready to fully support external graphics please check the following:
1. Computer BIOS: Make sure your machine has the latest BIOS installed. Go to your computer manufacturer’s website and find your
system model under support. Check for updates. Many PCs also have support assistance software installed that allows you to
check for software updates (such as HP Support Assistant, Dell Support Assist or Dell Command Update, Lenovo ThinkVantage
System Update).
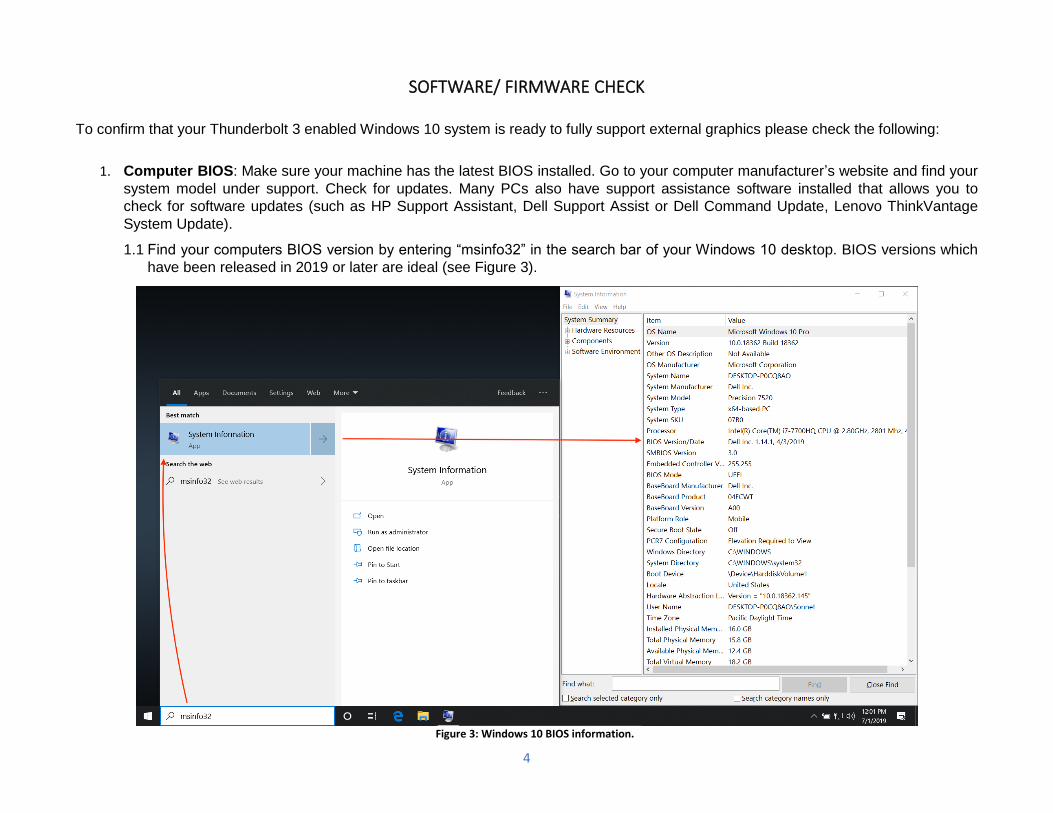
1.1 Find your computers BIOS version by entering “msinfo32” in the search bar of your Windows 10 desktop. BIOS versions which
have been released in 2019 or later are ideal (see Figure 3).
Figure 3: Windows 10 BIOS information.

5
2. Windows Version: Install all Windows 10 updates and check which version of Windows you have.
2.1 Install Windows 10 updates by going to Settings → Update & Security → Check for updates (see Figure 4).
Figure 4: Windows 10 update.

6
2.2 Make sure your Windows 10 installation is at least at version 1903 by entering “winver.exe” in the search bar in the lower left-
hand corner of your Windows 10 desktop (see Figure 5).
Figure 5: Windows 10 version check.
7
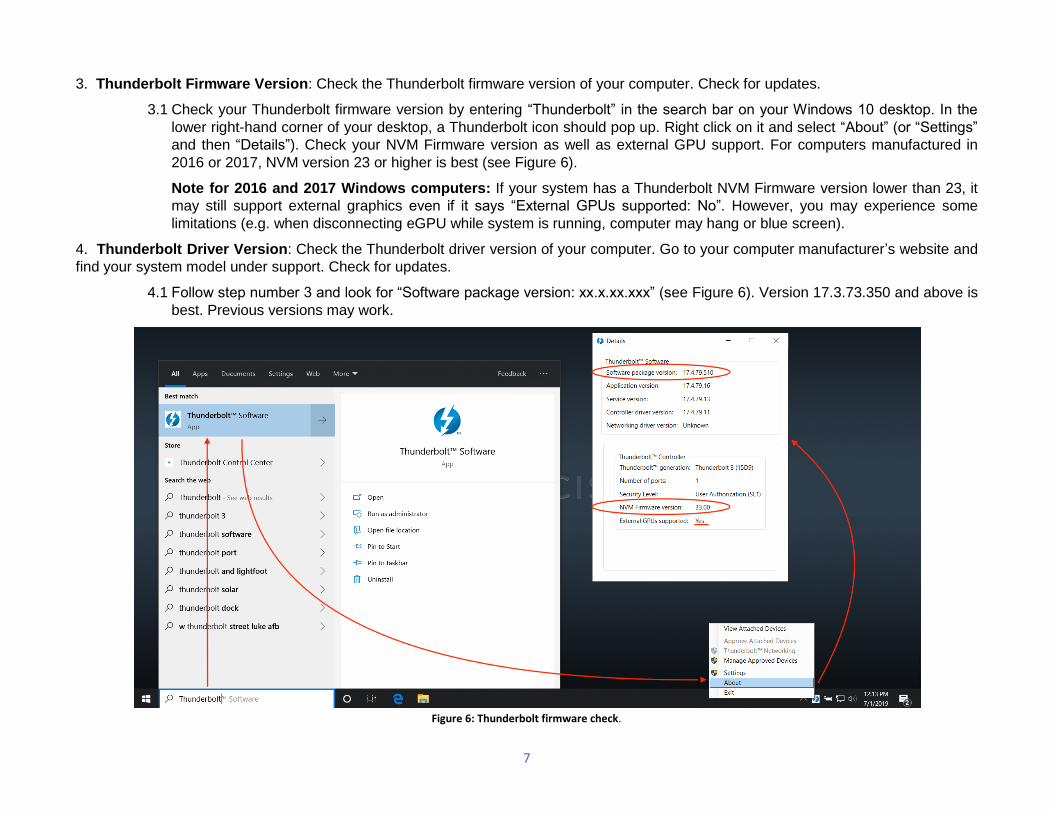
3. Thunderbolt Firmware Version: Check the Thunderbolt firmware version of your computer. Check for updates.
3.1 Check your Thunderbolt firmware version by entering “Thunderbolt” in the search bar on your Windows 10 desktop. In the
lower right-hand corner of your desktop, a Thunderbolt icon should pop up. Right click on it and select “About” (or “Settings”
and then “Details”). Check your NVM Firmware version as well as external GPU support. For computers manufactured in
2016 or 2017, NVM version 23 or higher is best (see Figure 6).
Note for 2016 and 2017 Windows computers: If your system has a Thunderbolt NVM Firmware version lower than 23, it
may still support external graphics even if it says “External GPUs supported: No”. However, you may experience some
limitations (e.g. when disconnecting eGPU while system is running, computer may hang or blue screen).
4. Thunderbolt Driver Version: Check the Thunderbolt driver version of your computer. Go to your computer manufacturer’s website and
find your system model under support. Check for updates.
4.1 Follow step number 3 and look for “Software package version: xx.x.xx.xxx” (see Figure 6). Version 17.3.73.350 and above is
best. Previous versions may work.
Figure 6: Thunderbolt firmware check.

8
SETTING UP EXTERNAL GRAPHICS (EGPU)
1. Choose either a Sonnet eGFX Breakaway Puck or an eGFX Breakaway Box. If you go with a Sonnet eGFX Breakaway Box choose
a compatible graphics card. Use our Graphics Card Compatibility Chart to find the right card and Box.
2. If you have an eGFX Breakaway Box install your AMD or NVIDIA card in the Box. Plug the auxiliary power connector(s) into the
card. Close the Box. Plug the Box or Puck into the power outlet. Turn on the power switch if the Box has one.
3. Connect the eGFX device to your computer with the included Thunderbolt 3 cable (The blue light on the device will not come on
until you connect it to a live computer). Click on the message indicating that a new Thunderbolt device has been attached. Allow the
app to make changes. You should get a message asking whether you want to connect this Thunderbolt device. Select “always
connect” and click “OK” (see Figure 7). If a message pops up saying external graphics is not supported, continue anyway.
Figure 7: Approving connected Thunderbolt device.

9
4. If you double click on the Thunderbolt icon in the lower right-hand corner of your desktop, you should now see the eGFX device in
the window “Attached Thunderbolt Devices” (see Figure 8).
Figure 8: Attached Thunderbolt devices.

10
5. Go to the AMD or NVIDIA website to find the right driver for your eGPU. Download and install the desktop driver. Follow the
instructions of the installation assistant.
Note: The NVIDIA GeForce desktop driver will work with discrete Quadro and external GeForce GPUs at the same time. However, you have to uninstall the Quadro driver before installing the GeForce driver.
6. Check that your eGPU is being detected by your computer. Enter “Device Manager” in the search bar of your Windows desktop.
Open the tab “Display adapters”. Your eGPU should appear without any caution signs (see Figure 9).
Figure 9: Device Manager with external AMD Radeon (TM) Pro WX 9100.

11
7. One more thing and you're ready to go!
Please note: When you disconnect your external graphics processor, use the safe eject feature (Icons: AMD , NVIDIA ), see
Figure 10 and Figure 11. With NVIDIA, when you reconnect the eGPU, you have to click “Connect GPU” to reactivate your external
graphics card (see Figure 12).
Figure 12: Nvidia connect GPU.
Figure 11: Nvidia disconnect GPU.
Figure 10: AMD eject external graphics.

12
MANUALLY SELECTING THE EXTERNAL GRAPHICS PROCESSOR (EGPU)
1. In order to manually assign the external Graphics Processor to an application, navigate to your computer desktop screen.
Right click and select “Display settings”. Then select “Graphics settings” (see Figure 13).
Figure 13: Right click to open "Display settings" and "Graphics settings".

13
2. Click the “Browse” button to search for an application. Applications are generally located in the “Program Files” or “Program
Files (x86)” folder. Once the application has been added, click the “Options” button to select the graphics preferences (see
Figure 14).
Figure 14: Browse for an application and select “Options” for the graphics preferences.

14
3. In the “Graphics specifications” window there are two GPUs listed. The power savings GPU is generally the integrated GPU
and the high-performance GPU is generally the external GPU. The application can be forced to use either the integrated or the
external GPU by setting the graphics preferences to either “Power saving” or “High performance” (see Figure 15). Select the
desired GPU, save the selection and exit.
Figure 15: Switch between the integrated and the external GPU.
15
TROUBLESHOOTING
If your external graphics card isn’t working correctly, please check the following:
• Make sure the Thunderbolt interface of your eGFX product is being detected. See “Setting up External Graphics (eGPU)” (Step 4,
Figure 8).
If you don't see your Sonnet product under “Attached Thunderbolt devices”, check the following:
◦ Does your computer have a Thunderbolt port? (see Figure 2)
◦ Is the power cable connected, the power switch on (not all eGFX Breakaway Boxes have a switch), the Thunderbolt 3 cable
connected and the computer on? If not all of the above, the eGFX device will not turn on.
◦ Are you using a Thunderbolt cable? Check for the Thunderbolt logo on the connectors (see Figure 1).
◦ Could the cable be defective? Try a different Thunderbolt 3 cable.
◦ Do other Thunderbolt devices (not USB devices) work with your PC? If not, your Thunderbolt port may be defective or your
Thunderbolt driver may be corrupted. Contact your computer manufacturer to get assistance.
◦ If only the Sonnet eGFX product doesn’t work, please reach out to the Sonnet Tech Support.
• If your Sonnet eGFX product appears under “Attached Thunderbolt devices” (see step above), try to find your external GPU in the
Device Manager under “Display adapters”. See “Setting up External Graphics (eGPU)” (Step 6, Figure 9).
◦ If you don't find your eGPU under “Display adapters” but you see a “Microsoft Basic Display Adapter”, install the correct graphics
driver.
◦ If you have a Breakaway Box and neither your eGPU nor a “Microsoft Basic Display Adapter” appear under “Display adapters”,
make sure your eGPU is correctly seated in the PCIe slot. Also, make sure that the auxiliary power cable is fully seated and
connected to your eGPU. It is also possible that your card is defective.
◦ If you have a Breakaway Puck and your eGPU does not appear under “Display Adapters” reach out to the Sonnet Tech Support.
• If you are a professional user, make sure that your application has detected the external GPU. You may have to select the external
graphics card in the system preferences of your application.
16
TABLE OF FIGURES
Figure 1: Thunderbolt 3 cable and port with Thunderbolt logo. ............................................................................................................................................... 3
Figure 2: Icon for USB-C Charging Port. A port marked with this icon is not a Thunderbolt Port. ........................................................................................... 3
Figure 3: Windows 10 BIOS information. .................................................................................................................................................................................. 4
Figure 4: Windows 10 update. .................................................................................................................................................................................................. 5
Figure 5: Windows 10 version check. ........................................................................................................................................................................................ 6
Figure 6: Thunderbolt firmware check. ..................................................................................................................................................................................... 7
Figure 7: Approving connected Thunderbolt device. ................................................................................................................................................................ 8
Figure 8: Attached Thunderbolt devices. .................................................................................................................................................................................. 9
Figure 9: Device Manager with external AMD Radeon (TM) Pro WX 9100. ........................................................................................................................... 10
Figure 10: AMD eject external graphics. ................................................................................................................................................................................. 11
Figure 11: Nvidia disconnect GPU. .......................................................................................................................................................................................... 11
Figure 12: Nvidia connect GPU. ............................................................................................................................................................................................... 11
Figure 13: Right click to open "Display settings" and "Graphics settings". ............................................................................................................................. 12
Figure 14: Browse for an application and select “Options” for the graphics preferences. ..................................................................................................... 13
Figure 15: Switch between the integrated and the external GPU. ......................................................................................................................................... 14