extremity fractures
TRANSCRIPT
23.1
Extremity Fractures
Chapter 23
Extremity Fractures
IntroductionThis chapter discusses two techniques for safe transportationof a wounded soldier with a long bone fracture: transportationcasts and temporary external fixation. Both of these methodsare acceptable for initial treatment of a patient who will beevacuated out of theater. Precise indications for external fixatoruse versus casting have not been established.
In general, good indications for external fixator use includewhen the soft tissues need to be evaluated while en route, suchas with a vascular injury; when other injuries make use of castingimpractical, such as with a femur fracture and abdominal injury;or when the patients have extensive burns. Advantages ofexternal fixation are that it allows for soft tissue access, can beused for polytrauma patients, and has a minimal physiologicimpact on the patient. Disadvantages are the potential for pinsite sepsis or colonization and less soft tissue support than casts.
Advantages of transportation casts are that they preserve themaximum number of options for the receiving surgeon; the softtissues are well supported, and the casts are relatively low tech.Disadvantages are that casts cover soft tissues, may not besuitable for polytrauma patients, and are more labor-intensivethan external fixators.
Both transportation casts and external fixators are equallyacceptable methods for the initial management of long bonefractures. In the end, the choice of initial fracture stabilizationmust be made on a case-by-case basis by the treating surgeon.That decision should be based on the surgeon’s experience, his/her assessment of the evacuation process, the materials available,

23.2
Emergency War Surgery
the nature of the patient’s wounds and the patient’s overallcondition.
Though standard in civilian trauma centers, intramedullarynailing of major long bone fractures is contraindicated incombat zone hospitals because of a variety of logisticaland physiologic constraints. This method may be usedonce a patient reaches an echelon above corps (EAC) orother site where more definitive care can be provided.
In this chapter, the term casting material is used in place ofdescribing either plaster or fiberglass for constructing casts. Bothare acceptable materials for application of transportation casts.
General Considerations of Wound Management� Initial management.
ο Treat by irrigation and debridement as soon as feasible toprevent infection.
ο Femur fractures are at high risk for infection (about 40%,historically).
ο Biplanar radiographs should be obtained.ο Neurovascular status of the extremity should be documented
and checked repeatedly.ο Internal fixation is contraindicated.ο Begin IV antibiotics as soon as possible and maintain
throughout the evacuation chain. Use a broad spectrumcephalosporin (cefazolin 1 g q 8 h). An aminoglycosidemay be harmful for someone in shock or dehydrated. Thetwo most harmful bacteria—clostridia and strep—arecovered by a 1st generation cephalosporin.
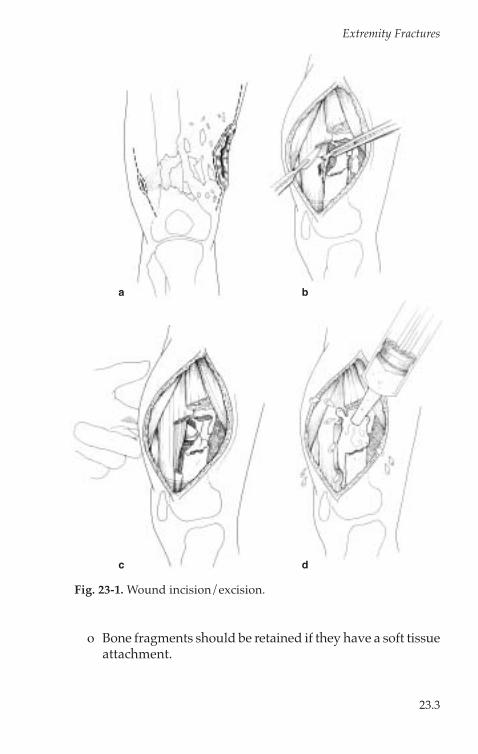
� Wound incision/excision.ο Guidelines as per soft tissue injury section.ο Longitudinal incisions to obtain exposure.ο Fascia incised longitudinally to expose underlying
structures and compartment release.ο All foreign material in the operative field must be removed
(Fig. 23-1a, b, c).
23.3
Extremity Fractures
ο Bone fragments should be retained if they have a soft tissueattachment.
a b
c d
Fig. 23-1. Wound incision/excision.
23.4
Emergency War Surgery
ο Detached bone fragments smaller than a thumbnail arediscarded.
ο Larger fragments that contribute to the structural integrityof the long bone should be retained.
ο Irrigation is essential (Fig. 23-1d).
� Closure of wounds.ο Primary closure is never indicated. Loose approximation
of tissues with one or two retention sutures is appropriateto cover nerves, vessels, and tendons, but there must be aprovision for substantial free drainage.
ο Skin grafts, local flaps, and relaxing incisions arecontraindicated in the initial management.
ο Delayed primary closure may be attempted as describedin the section on soft tissue wounds. This should beaccomplished in a stable environment.
Transportation Casts� Introduction.
ο A transportation cast is a well-padded cast that is uniqueto the treatment of combat casualties. It is used to transportpatients between hospitals and not intended as a meansof definitive care.
ο Definitive reduction is not required with the initial surgicalprocedure.
ο The goal of transportation casts is to immobilize a fracturealong the evacuation chain. The cast must meet thedimensions of the standard NATO litter (FM 8-10-6).
ο Transportation casts are applied prior to evacuation.ο All casts must be bivalved prior to evacuation. (Hip spica
— univalved.)ο If a patient is expected to have multiple procedures at the
same hospital, balanced skeletal traction should be utilizeduntil the last procedure prior to transportation. The tractionpin may be incorporated into the transportation cast.
ο Slab splinting may not be adequate for transportation,particularly for severely unstable fractures Splinting isappropriate for stable fractures, particularly in the hand,wrist, forearm, foot, ankle and lower leg.

23.5
Extremity Fractures
ο Portable skeletal traction should not be used for transpor-tation of a patient.
ο Tobruk splint (a Thomas splint with circular plaster)should not be used.
� Hip, femur, and knee, and some proximal tibia fractures.ο Low hip spica transportation cast.ο Disadvantages: Limited soft tissue access. Not suitable in
polytrauma.ο Technique.♦ Adequate anesthesia is given, and patient is placed on
fracture table (Fig. 23-2).♦ Irrigation and debridement as indicated above.♦ Precise reduction not necessary, but usually requires two
assistants.♦ Stockinette over abdomen, distal thigh of uninvolved
side, and foot of the involved side (Fig. 23-3).
Fig. 23-2. Portable fracture table.
Fig. 23-3. Patient position on fracture table.

23.6
Emergency War Surgery
♦ Felt padding is placed over sacrum and anteriorsuperior iliac spine (ASIS) and other bony prominences.
♦ Towel is placed over abdomen to allow breathing space.♦ Six-inch Webril or similar cotton batting is wrapped, 2-
4 layers.♦ Six-inch casting material is then rolled over the Webril
from ASIS to the foot on the affected side to the distalthigh on the unaffected side (Fig. 23-4). Splints areapplied over the posterior, lateral, or groin areas toreinforce the groin (Fig. 23-5). Use a finishing roll afterturning down the edges of the stockinette to give a neatappearance.
♦ An adequate perinealspace must be left forhygiene.
♦ Use a 1/2" dowel orsimilar material tomake anterior/post-erior crossbars.
♦ Affected knee bentabout 20°.
♦ Space between feetmust not exceed stan-dard litter, althoughthis makes perinealaccess difficult.
♦ Towel is removed,cast is bivalved, anda circular area overthe abdomen is cutout.
Fig. 23-4. Hip spica transportation cast.
Fig. 23-5. Reinforce cast at hip withsplints.

23.7
Extremity Fractures
♦ Use an indelible marker to draw the fracture configuration,and note the dates of surgery and wounding on the cast.
♦ Support the cast with towels, blankets, or pillows torelieve pressure on the cast, especially the back edge.
� Proximal/mid/distal tibia and ankle fractures.ο Long Leg Cast (Fig. 23-6).
Fig. 23-6. Long leg cast.
Fig. 23-7. Supracondylar mold of long leg cast.
ο Technique.♦ The foot, leg, and thigh are placed in a stockinette at
the conclusion of the operation for the open wounds.♦ Two people are needed to maintain the reduction and
apply the cast. Hold the knee flexed about 20°.♦ Webril applied from the toes to the groin.♦ Six-inch wide casting material is then rolled over this
region, with a turn down of the stockinette prior to thefinal layer, to make a neat edge.
♦ Reinforce the knee to strengthen the cast.♦ Make a supracondylar mold to provide support (Fig. 23-7).
23.8
Emergency War Surgery
♦ Bivalve the cast.♦ Label the cast with the dates of injury and surgery, and
draw the fracture on outside of the cast.♦ Elevate the leg so the tibia is parallel to the litter or bed.
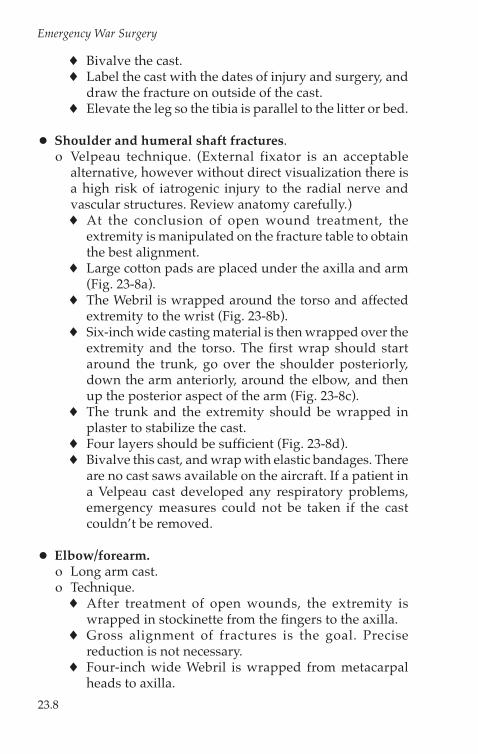
� Shoulder and humeral shaft fractures.ο Velpeau technique. (External fixator is an acceptable
alternative, however without direct visualization there isa high risk of iatrogenic injury to the radial nerve andvascular structures. Review anatomy carefully.)♦ At the conclusion of open wound treatment, the
extremity is manipulated on the fracture table to obtainthe best alignment.
♦ Large cotton pads are placed under the axilla and arm(Fig. 23-8a).
♦ The Webril is wrapped around the torso and affectedextremity to the wrist (Fig. 23-8b).
♦ Six-inch wide casting material is then wrapped over theextremity and the torso. The first wrap should startaround the trunk, go over the shoulder posteriorly,down the arm anteriorly, around the elbow, and thenup the posterior aspect of the arm (Fig. 23-8c).
♦ The trunk and the extremity should be wrapped inplaster to stabilize the cast.
♦ Four layers should be sufficient (Fig. 23-8d).♦ Bivalve this cast, and wrap with elastic bandages. There
are no cast saws available on the aircraft. If a patient ina Velpeau cast developed any respiratory problems,emergency measures could not be taken if the castcouldn’t be removed.
� Elbow/forearm.ο Long arm cast.ο Technique.♦ After treatment of open wounds, the extremity is
wrapped in stockinette from the fingers to the axilla.♦ Gross alignment of fractures is the goal. Precise
reduction is not necessary.♦ Four-inch wide Webril is wrapped from metacarpal
heads to axilla.

23.9
Extremity Fractures
♦ Four-inch wide casting material is applied frommetacarpal heads to axilla.
♦ Fold the stockinette before finishing layer for a neat edge.♦ Bivalve cast after drying.♦ Reassess neurovascular status.
Bivalving CastsWhen a cast is bivalved, it is completely split longitudinallyalong opposing sides of the cast. Splitting the cast into anteriorand posterior halves is preferred. The purpose of bivalving isto allow room for soft tissue swelling, thus lessening the chance
a b
c d
Fig. 23-8a. Padding Velpeau.Fig. 23-8b–c. Webril application for Velpeau cast.Fig. 23-8d. Completed Velpeau cast.
23.10
Emergency War Surgery
of postcasting compartment syndrome. It is important that theunderlying cast padding also be completely split underneaththe cast cuts; otherwise, the cast padding can restrict swellingand a compartment syndrome could still develop.
External Fixation� General technique: The surgeon should be familiar with four
types of standard constructs of external fixation for use inthe initial care of battle casualties: femur, tibia, knee, andankle. External fixation can also be applied for humerus andulna fractures as needed.ο A thorough understanding of the anatomy of the lower
extremity is essential for application of the pins in a safecorridor.
ο The external fixator for military purposes should be modularand allow for building up or down as healing progresses.
ο Application of the external fixator may be done withoutthe use of plain films or fluoroscopy.
ο Pins can be inserted by hand using a brace without powerinstruments.
ο Enough pins should be used to adequately stabilize thefracture for transport. This is usually two per clamp, butthree may occasionally be required.
ο The present external fixation system (Hoffmann II) allowsfor the use of either single pin clamps or multipin clamps.Both clamps are acceptable to use in standard constructs.
ο Multipin clamps provide geater stability and are thecurrent fixators fielded. Dual pin placement (with multipinclamps) is described here. The technique for single pinplacement is similar.
� Femur diaphyseal fracture technique.ο The entire limb is prepared for surgery, from the ASIS to the toes.ο A standard OR table or portable fracture table may be used.ο An assistant should apply counter pressure while pins are
inserted.ο Precise reduction is not necessary. A padded “bump”
under the thigh will help reduce the fracture (Fig. 23-9).

23.11
Extremity Fractures
ο The position of the proximal femur should be identifiedby palpation. A 1-cm longitudinal stab incision is madeover the midaxis, or midlateral axis, of the femur (Fig. 23-10). The pin closest to the fracture should be outside of thefracture hematoma, and at least three fingerbreadths fromthe fracture (Fig. 23-11).
ο Bluntly spread with a clamp down to bone. Put the pindown on the bone, and determine the midportion of thebone by moving the pin back and forth across the widthof the femur. You do not want to plunge to one or the otherside. Your assistant should provide stability and counter
Fig. 23-9. Placing a towel underneath the thigh helps to reproducethe bow of the femur.
Fig. 23-11. Femur pin placement.Fig. 23-10. A 1-cm or so incisiondirectly over the middle of the bone,cut in a longitudinal direction.

23.12
Emergency War Surgery
pressure. Two taps on the end of the bit brace shouldprovide an indent in the bone and allow you to startinsertion. Apex pins are placed by hand. There is nopredrill nor power insertion. 5-mm half-pins should beused. Insert the pin in the midportion of the bone throughboth the near and far cortex of thebone (Fig. 23-12). The pin willmove easier as it enters the inter-medullary canal, and then getmore difficult to drive as it entersthe far cortex.
ο Place a multipin clamp over theinserted pin (Fig. 23-13). Ideally,the pin should occupy one of theend positions (eg, position 1, Fig.23-14).
ο Using the clamp as a guide, inserta second pin through the clamp.An assistant should hold theclamp. Ensure that the clamp is aligned to the bone andthat bicortical purchase is obtained with the second pin.The second pin must be parallel to the first (Fig. 23-15).Use the pin sites that are the farthest apart on the clamp aspossible for biomechanical stability (clamp positions 1 and
Fig. 23-12. Bicorticalplacement of 5-mmhalf-pin.
Fig. 23-13.

23.13
Extremity Fractures
5 are best, see Fig. 23-14). A third pinmay be inserted if needed foradditional clamp stability.
ο Apply a second multipin clamp andpins in the same manner to the distalfemoral fracture fragment.
ο Connect the two clamps with elbows,bar-to-bar clamps, and twolongitudinal bars placed parallel toeach other (Fig. 23-16).
Fig. 23-14.Multipin clampshowing pinpositions 1-5.
1
2
3
4
5
Fig. 23-15.
ο Reduce the fracture with longitudinal traction. Manipulatingthe fracture fragments using the clamps may be helpful.Once adequate reduction is achieved, tighten all theconnections. Precise reduction is not necessary.
� Tibia shaft fracture technique.ο Palpate the anterior-medial border of the tibia. Place a 1-
cm longitudinal incision over the midportion of the surface(Fig. 23-17). The pin closest to the fracture site should beoutside the hematoma and at least three fingerbreadthsaway from the fracture site (Fig. 23-18).

23.14
Emergency War Surgery
ο Insert one pin into either the proximal or distal fragment,engaging both cortices. This pin should be placedperpendicular to the subcutaneous border of the tibia, andcentered across the width of the tibia (Fig. 23-19).
Fig. 23-16.
Fig. 23-17. Palpation of the anterior and posterior margins of themedial face of the tibia where a 1 cm incision has been mademidway between these two points.

23.15
Extremity Fractures
o Using the clamp as a guide, insert a second pin throughthe clamp. An assistant should hold the clamp. Ensure thatthe clamp is aligned to the bone and that bicorticalpurchase is obtained with the second pin. The second pin
Fig. 23-18. The anteriomedial surface is the safest way to introduce pinsto the tibia. The pin should be a minimum of two or three fingerbreadthsfrom the fracture site.
Fig. 23-19. This is the ideal bicortical placement for a pin in the tibia.
must be parallel to the first. Use the pin sites as far aparton the clamp as possible for biomechanical stability (Figure23-20 and positions 1 and 5 in Fig. 23-14). The second pinshould be through the clamp farthest away from thefracture site (Fig. 23-20).
23.16
Emergency War Surgery
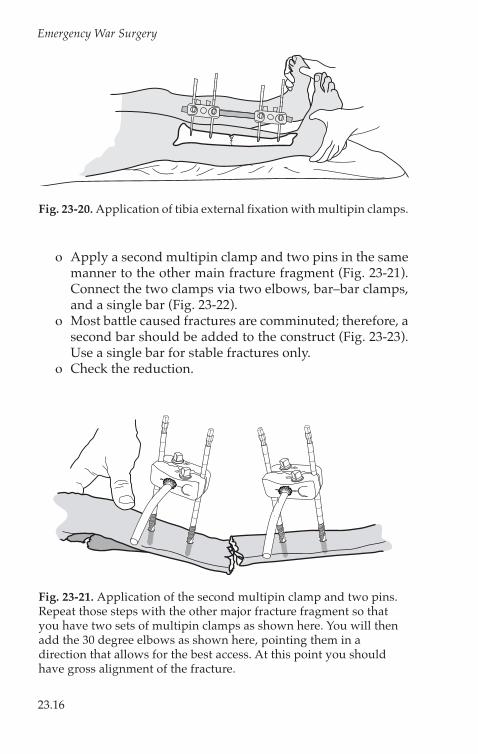
ο Apply a second multipin clamp and two pins in the samemanner to the other main fracture fragment (Fig. 23-21).Connect the two clamps via two elbows, bar–bar clamps,and a single bar (Fig. 23-22).
ο Most battle caused fractures are comminuted; therefore, asecond bar should be added to the construct (Fig. 23-23).Use a single bar for stable fractures only.
ο Check the reduction.
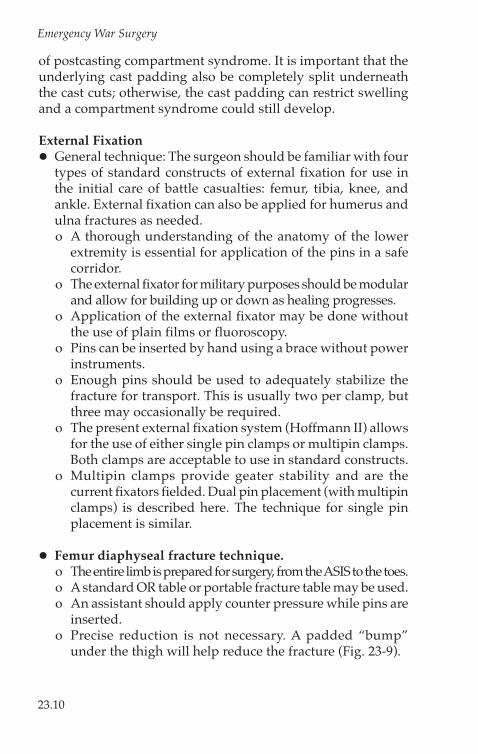
Fig. 23-20. Application of tibia external fixation with multipin clamps.
Fig. 23-21. Application of the second multipin clamp and two pins.Repeat those steps with the other major fracture fragment so thatyou have two sets of multipin clamps as shown here. You will thenadd the 30 degree elbows as shown here, pointing them in adirection that allows for the best access. At this point you shouldhave gross alignment of the fracture.

23.17
Extremity Fractures
� Technique to span knee.ο Indications are proximal tibia fractures, distal femur
fractures, or extensive knee injuries, or vascular repairs inthe popliteal fossa.
Fig. 23-22. Addition of the cross bar and two bar-to-bar clamps.Have your assistant apply longitudinal traction to reduce the frame,and then tighten the frame in alignment.
Fig. 23-23. Two-bar apparatus. As the majority of tibia fractures areunstable, it creates a more stable construct by adding a second bar.This requires the use of two of the kits but makes little difference whenyou are using the tub container at the CSH or equivalent hospitals.

23.18
Emergency War Surgery
ο Check the distal vascular status of the limb prior to andafter the procedure. If there is a vascular injury, refer toChapter 27, Vascular Injuries.
ο An assistant will be required to help apply the frame.ο General reduction maneuver should be longitudinal
traction with slight (10°–15°) flexion at the knee.ο Pins are placed anterior medial on the proximal tibia and
antero-lateral on the distal femur. Pin placement shouldbe outside of the zone of injury, at least three fingerbreadthsfrom a fracture site, and outside of the knee joint. At thedistal femur, a longitudinal stab incision is made over theantero-lateral aspect of the bone, so that the pin may beinserted into the center of the bone at about a 45° anglefrom the horizontal. Depending on the fracture config-uration, it may also be placed directly anteriorly, thoughit is generally better to avoid the quadriceps tendon.
ο Blunt dissection is used to create a corridor to the bone.ο A single pin is inserted by hand through both cortices of
the bone fragment.ο A multipin clamp is used as a guide for a second pin. The
second pin must be parallel to the first and also bicortical— care should be taken to maintain pin alignment. Theproximal tibia should be palpated on the anterior medialsurface and the anterior and posterior border should beidentified. Midway anterior/posterior, a 1-cm longitudinalstab incision should be made and a blunt soft tissuedissection made to bone.
ο A multipin clamp should be used as a guide to insert asecond pin in the proximal tibia.
ο The two pin clusters (femur and tibia) should be connectedvia two elbows, two bar-bar clamps, and a single bar. Theknee should be aligned.
ο A second bar should be added in the manner describedabove.
� Technique to span ankle.ο An assistant will be required to help apply the frame and
reduce the ankle.
23.19
Extremity Fractures
ο General indications are for open distal tibia fractures andopen ankle wounds.
ο Pins should be inserted on the anterior medial surface ofthe tibia and the medial aspect of the calcaneus.
ο Check the distal vascular status prior to and after theprocedure. Mark where the posterior tibial and dorsalispedis artery pulses can be felt.
ο Palpate the anterior medial border of the tibia. Make a 1-cm longitudinal incision midway between the anterior andposterior border of the tibia. Insert the most distal pin onthe tibia outside the zone of injury, at least threefingerbreadths from the fracture site.
ο Using a multipin clamp as a guide, insert a second pin inthe tibia more proximal to the first. The pin must be paralleland be aligned in the longitudinal axis to the first.
ο Palpate the medial border of the calcaneus. Make alongitudinal incision over the calcaneus away from theposterior neurovascular structures: dissect to the bonewith a clamp and insert the pin.
ο Using a multipin clamp as a guide, insert a second pin inthe calcaneus.
ο Connect the two clamps via two elbows, two bar–barclamps, and a single bar.
� Skeletal traction.ο Skeletal traction provides a quick means to immobilize a
large number of fracture cases with a minimum of technicalsupport.
ο Indications.♦ Patients who are expected to have more than one
procedure in the same forward hospital prior toevacuation.
♦ Large casualty load.ο Technique.♦ Large threaded Steinman pins are used to obtain skeletal
traction of a femur or tibia.♦ Aseptic preparation of a pin site is necessary prior to
placement.♦ Apply local anesthetic to pin site.

23.20
Emergency War Surgery
♦ Incise skin and dissect to bone bluntly.♦ For femur fractures, incision is made 2 cm posterior and
lateral to the tibial tuberosity (directly under, as in Fig.23-24). Place pin from lateral to medial through andthrough the proximal tibia.
♦ Apply a Thomas splint with Pierson device, with weightapplied midthigh (10–20 lb), to the leg (10–20 lb), andto the traction pin (20–40 lb) to obtain balanced skeletaltraction as shown in Fig. 23-25.
♦ For tibia fractures, incise medially 2 cm anterior and 2cm cephalad from the tip of the heel. Place the pin frommedial to lateral through and through the calcaneus.Place the leg on a Bohler-Braun frame and apply tractionto the calcaneal pin (10–20 lb).
♦ Wait at least 1/2 hour after applying traction to obtainradiographs.
� Care in the evacuationchain.ο Patients do not
improve in theevacuation system.
Fig. 23-24. Thomas splint withPierson device.
Fig. 23-25. Bohler-Braun frame withtraction.
Consider patient safety during evacuation when planningprocedures.
ο Medications should be arranged prior to departure. Ensureadequate pain control.
ο Skeletal traction should not be used for transportation.

23.21
Extremity Fractures
ο Casts should be bivalved. Follow neurovascular statusduring transport because casts may act as tourniquets dueto tissue swelling.
ο All documentation, including radiographs, shouldaccompany the patient.