ez track 4100 training & procedure manual. load capacity one of the most important...
TRANSCRIPT

EZ Track 4100Training & Procedure Manual
Load Capacity
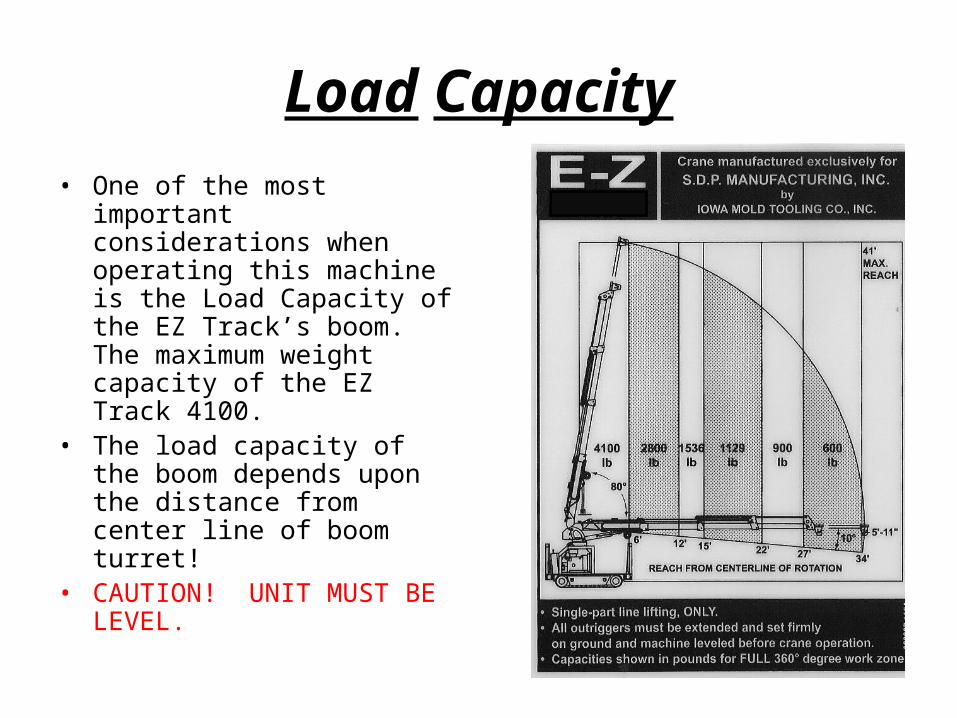
• One of the most important considerations when operating this machine is the Load Capacity of the EZ Track’s boom. The maximum weight capacity of the EZ Track 4100.
• The load capacity of the boom depends upon the distance from center line of boom turret!
• CAUTION! UNIT MUST BE LEVEL.

EZ Track 4100 Safety
While the EZ Track 4100 is smaller than a line truck, its function is the same and all safety precautions that would apply to a line truck also apply to the EZ Track 4100. The EZ Track 4100 is a powerful machine that should be operated with respect & caution. Misuse or carelessness can result in serious injury, property damage or death.

Hard hats and protective gear must be worn by all personnel when using the EZ Track 4100.

4101• The capacity of the EZ Track
4100 is rated at 4100 pounds which means that the most the boom will ever safely lift is 4100 pounds. Refer to the load capacity chart or on the machine itself for more specific indications of the mini-derrick’s capacity.
• Properly use all outriggers whenever the boom is in use. The EZ Track 4100 boom must never be operated without the outriggers being properly set.
DANGER!ALL OUTRIGGERS MUST
BE FULLY EXTENDED BEFORE OPERATING
THE CRANE!

Safety Guidelines• Before operating any heavy machine, it is important to learn its
safety rules. All of your existing in-house safety precautions must be followed as well as the precautions listed in this manual.
• The EZ Track 4100 is not electrically insulated until final stage manual boom is extended and pinned into place. Be sure to follow your company’s safety procedures to protect against electrocution.
• The EZ Track 4100 is not designed to carry passengers. Never let anyone ride on the machine.
• Operators must be properly trained before operating any part of the EZ Track 4100. Properly set the outriggers whenever the boom is in use.
Safety Guidelines
• Operate the EZ Track 4100 in a well-ventilated area only. The engine emits exhaust gases, which can cause sickness and death.
• The EZ Track 4100’s controls react to input rapidly. Know the location and function of all controls before starting the machine.
• The EZ Track 4100 can be shut down in an emergency by releasing all drive controls and turning the ignition switch to the “off” position.
• Take care that the EZ Track 4100 is properly secured on its trailer before transporting it.

Pre-trip Inspection
• Before each day’s operation, the EZ Track 4100 must be inspected by the operator.
• Do a visual inspection to check for lose, worn, missing or broken parts such as bolts, nuts, wires & retaining pins.
a. Check hydraulic hoses for cuts, wear, loose connections.
b. Check engine and hydraulic system.

Pre-trip Inspection
Check all tires on the EZ Track 4100 trailer for wear & proper inflation.

Pre-trip Inspection
Test all turn signal, parking and brake lights by turning them on. Be sure to test the braking action on the trailer before traveling to the work site.

Pre-trip Inspection
• Check to make sure that EZ Track 4100 is properly secured to the trailer.
• Look inside the trailer toolbox & make sure it contains all tools & equipment necessary for operating the EZ Track 4100.
Pre-trip Inspection
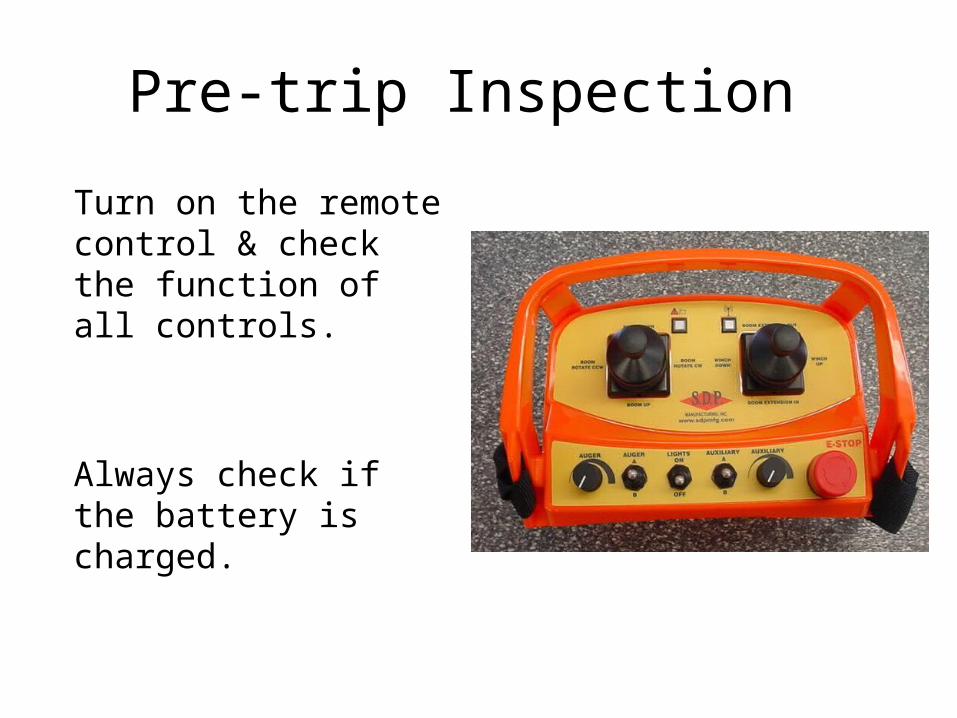
Turn on the remote control & check the function of all controls.
Always check if the battery is charged.

Pre-trip Inspection
Inspect the lift line and hook for signs of wear or damage. Replace any worn or damages parts before using the EZ Track 4100.
(Pictures may not be a true representation of your machine.)

EZ Track 4100 Controls
Familiarize yourself with all of the controls and layout of the controls on the machine.
As the operator you need to know!
Remote Control Basic Operation
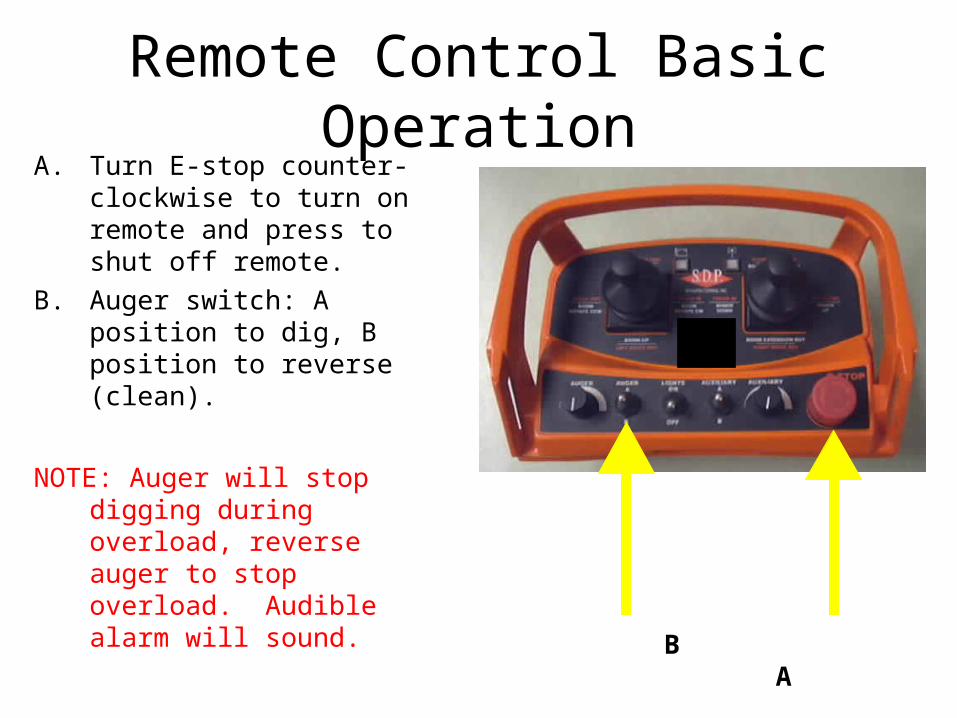
A. Turn E-stop counter-clockwise to turn on remote and press to shut off remote.
B. Auger switch: A position to dig, B position to reverse (clean).
NOTE: Auger will stop digging during overload, reverse auger to stop overload. Audible alarm will sound.
B A

Driving the EZ Track 4100
The EZ Track 4100 does not require its full engine power when moving. Set the engine speed relatively low when driving the unit, reserving the higher engine speeds for powering hydraulic accessories.

Unloading the EZ Track 4100
• Caution: While unloading the EZ Track 4100, always have the trailer attached to a truck and the boom in its lowest position.
• Note: If the EZ Track 4100 engine is not started, start it and let it warm up for 5 minutes.

NOTE: The EZ Track 4100 is secured for transport at the front and back of the trailer.
(Pictures may not be a true representation of your machine.)

Moving the EZ Track 4100
One of the advantages of the EZ Track 4100 is that it is tough enough to operate in areas which are considered too rugged to use a line truck.

Lifting and carrying a pole can be performed easily with the hydraulic outriggers.
EZ Track 4100Transporting a Pole
Attach the provided lifting chains to the pole and to the d-rings on the EZ Track 4100 outrigger arms as shown.

Using the outrigger control levers lift both outriggers equally until pole is securely in place.
NOTE: Pole must clear tracks when completely lifted
Reverse procedure when pole is ready to be lowered to the ground.

Setting a Pole With the EZ Hauler 4100
• Remember the EZ Track 4100 is not totally electrically insulated. Use your company’s insulation procedure to avoid electrocution. Before setting a pole the load capacity chart must be thoroughly understood.

Setting the Outriggers
Use the outrigger controls to lower outriggers to level and support the machine.
Oversized outrigger pads might be required depending on soil conditions.
Make sure the PTO is pushed in for outrigger function.

Auger Operation Procedure

1. Make sure that boom sections are fully retracted and that auger pins are in correct position.
2. Using the auger remote circuit wind up the auger slightly to release tension on latch pin.
NOTE: Use the flow control on the remote control to control the speed of the auger.

3. Release auger latch and slowly lower auger.
4. IMPORTANT: You must raise boom to lower auger assembly and avoid equipment damage.

5. Carefully unwind (dig) auger and remove strap. You are now ready to use the remote control to auger as needed.
(Pictures may not be a true representation of your machine.)

5. Reverse this procedure to store the auger. Again making sure to have boom extensions fully retracted before stowing auger. DO NOT “OVER STORE” THE AUGER AS DAMAGE CAN OCCURE!
NOTE: Make sure to place boom extension pins in proper CRANE location before extending boom sections.

Digging the Hole• Position the machine over the
desired hole replacement area. Extending boom 12 or 14 inches and allowing enough slack in rope to drill a straight hole down.
• Turn on the remote and toggle the Auger switch to the correct direction then lower the auger to begin digging.
• NOTE: It may be required to lower the auger speed to allow for booming down of the digger derrick while digging.
• CAUTION: Buried lines may be in your digging area.

Take small bites and let the auger dig at its own pace until the hole is the proper depth. Different regions have many different soil compositions; familiarize yourself with your digging surface for your safety and those around you.
(Pictures may not be a true representation of your machine.)

(Pictures may not be a true representation of your machine.)
If needed, the extension bar may adjusted for more digging depth.

Setting the Pole
1. Unwind winch line.
2. Unpin 3rd stage fiberglass extension.
3. Pull extension out past first pin holes. Making sure stop latch handle is in a vertical position.

4. Pull extension out until stop latch pin engages.
WARNING! Fiberglass final stage must be fully extended and pinned for dielectric insulation!
5. Reinstall lock pin.
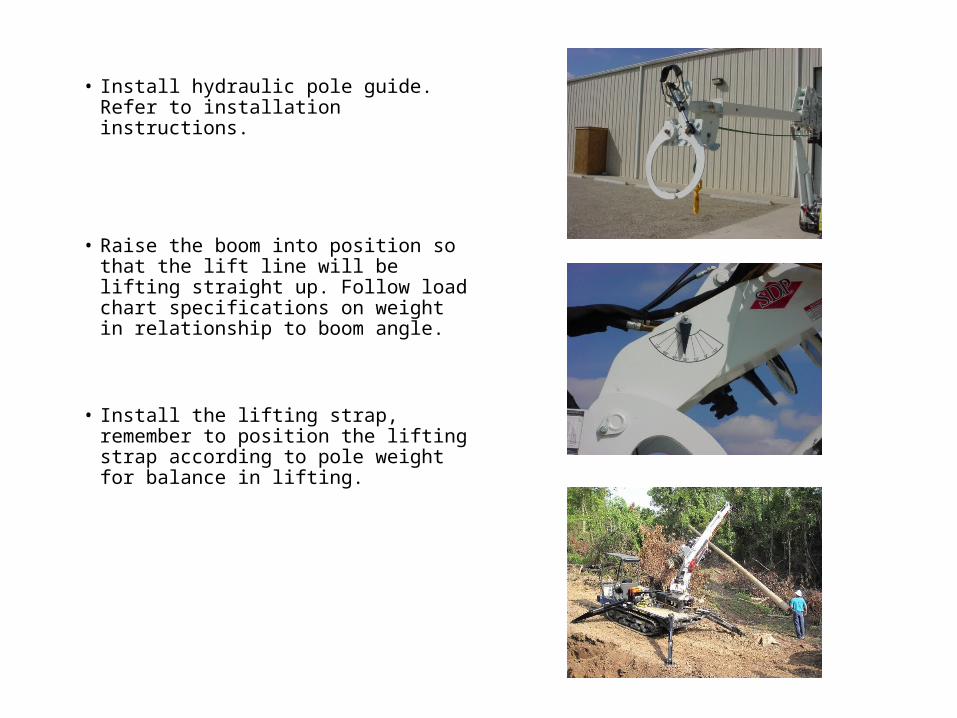
• Install hydraulic pole guide. Refer to installation instructions.
• Raise the boom into position so that the lift line will be lifting straight up. Follow load chart specifications on weight in relationship to boom angle.
• Install the lifting strap, remember to position the lifting strap according to pole weight for balance in lifting.

• Lift the pole straight up and set into the hole.
• Always operate EZ Hauler 4100 from a safe distance using the remote control.
• Never use manual lever overrides for normal operation, they are for emergency use only.

Bucket Assembly Standard Operating Procedure

• CAUTION: Prior to using the bucket assembly, extend and secure all outriggers to the fullest settings.
• NOTATION: The bucket assembly has the lifting capabilities of 300 pounds.
• The following instructions are provided to ensure safe operation of the bucket assembly.
• Always engage bucket attachment switch .

The bucket attachment switch allows for the operator to disable the winch function on the remote control and disengage the H.O.P. overload system as to prevent the operator from locking the unit in a vertical position.
Warning: The bucket attachment switch must be set to attached whenever bucket is in use.

With remote control extend boom to bucket and pin bucket to boom.
Follow all safety procedures and weight charts when operating the bucket.
After completing the tasks, return the hydraulic boom sections to the retracted “stowed” position before lowering the bucket to a flat surface.
CAUTION! Stay clear of bucket while in operation.
(Pictures may not be a true representation of your machine.)

Hydraulic Pole GuideProcedure

1. Slide pole guide in to receiver of sheave head.
2. Install and secure pin.

3. Make sure hydraulic couplers on pole guide and hose reel are clean.
4. Connect hydraulic couplers from hose reel to pole guide. Make sure connection is secure.

5. Remember that the pole guide is conductive so it will not be insulated against cross fazing, but with the fiberglass 3rd stage boom properly pinned in place the EZ Hauler 4100 and its operator will be substantially protected.
The EZ Track 4100 series of machines are all dielectrically tested to 46kv category “C” guidelines. This qualification test is performed at the factory in accordance with ANSI A10.31 guidelines.
It is important that periodic tests be performed to the EZ Track just as any other digger-derrick in a companies fleet.
IMPORTANT!