faast part i section b web (1)
TRANSCRIPT

FAAST TRAINING AND
REFERENCE MANUAL
PART 1: Firearm operations and management
This document was produced by the FAAST Management
Committee and Murrumbidgee College of Agriculture
March 2003

SECTION B
Firearms operations

Contents SECTION B
Module 4 The Self Loading Rifle (LR) ....................................................................33
Module 5 The Pump Action Shotgun ......................................................................58
Module 6 Firearm Safety and Firing Range Instruction ..........................................74

MODULE 4 THE SELF LOADING RIFLE (SLR)
© NSW Agriculture FAAST TRAINING AND REFERENCE MANUAL 33
4 The self loading rifle (SLR)
Summary:
� The L1A1 self loading rifle (SLR) has been approved by the FAAST Management
Committee for use by FAAST shooters, but only after the necessary modifications
are made to make it suitable for aerial shooting operations.
� The loading and firing cycle of an L1A1 SLR involves the following steps:
unlocking, ejection, feeding and locking.
� The most important aspect of firearm safety is to check that the firearm is unloaded
and the safety is engaged before handling. This involves six steps.
� To operate an L1A1 SLR successfully, the user must be able to strip, assemble and
clean it.
� An L1A1 SLR rifle needs to be fitted with a non-magnification red dot scope
before use and must be zeroed before use.
4.1 Learning outcomes
1. After completing this module successfully, students will be able to:
2. Explain why FAAST has approved the SLR L1A1 for its operations.
3. List the steps required for loading and firing an L1A1 SLR.
4. Explain the operation (unloading, ejection, feeding, and locking) of a L1 A1 SLR.
5. Demonstrate the 6 steps required to ensure an L1A1 SLR is safe to handle.
6. Demonstrate the stripping, cleaning and assembling of an SLR.
7. State the procedure required for an immediate action (IA) drill.
8. Discuss the causes of SLR malfunctions and suitable corrective actions.
9. Be able to zero the SLR.
4.2 Introduction
Prior to 1992 the NSW National Parks and Wildlife Service and NSW Rural Lands
Protection Boards used firearms with differing calibres and actions for the job of feral
animal control via aerial shooting. The choice of calibre and firearm usually reflected
personal choice.

THE SELF LOADING RIFLE (SLR) MODULE 4
34 FAAST TRAINING AND REFERENCE MANUAL © NSW Agriculture
When FAAST was established in 1992, it became clear that the choice of firearm
needed to be limited.
Advice from experienced pilots and rangers coupled with the logistics of obtaining
and maintaining a rifle, suggested that a semi-automatic rifle, commonly known as the
SLR (L1A1) in calibre .308 Winchester, be used. This became the approved firearm
for the aerial culling of feral animals by the FAAST.
4.3 The L1A1 self loading rifle
Figure 4.1 Self loading rifle L1A1 1 Photo: S McGilchrist
This rifle is an imperial scaled copy of the Belgium F.A.L rifle and was produced at
Lithgow, NSW between 1959 and 1988.
The qualities that made this rifle an excellent military service weapon are the same
that make it suitable for aerial culling of feral animals. These include factors like:
� Suitable calibre 7.62mm (.308Win)
� Semi automatic 1 round is fired on each depression of the trigger, allowing for fast, repetitive,
aimed shots.

MODULE 4 THE SELF LOADING RIFLE (SLR)
© NSW Agriculture FAAST TRAINING AND REFERENCE MANUAL 35
� Faster second shot The semi-automatic operation reduces the need to change sight picture between
shots. Therefore a quicker second shot, if required to humanely dispatch a
wounded animal, is ensured.
� Re-loading The firearm can easily be reloaded with a large capacity magazine without loosing
sight of the target.
� Control The pistol grip fitted to the firearm allows for a more comfortable shooting
position and assists in controlling the firearm in the wind stream of the aircraft.
� Serviceability No tools are required to break the firearm down for cleaning.
� Longevity The firearm is designed to take a higher degree of abuse than commercial rifles.
For example it has a chrome chamber and bore.
� Accuracy The accuracy of the rifle exceeds the needs of aerial culling where the majority of
shots are taken at less than one hundred metres.
� Availability The ban on semi-automatic rifles has narrowed the field of competing types, these
rifles are still available for sale via the Australian army logistics command.
4.4 Modifications to the L1A1 SLR
Prior to using the rifle from an aircraft the following modifications must be
performed.
4.4.1 Fitting of case deflector
The SLR tends to throw the expended ammunition case sideways and forward.
Therefore, a case deflector must be fitted to the rifle to minimise the possibility of an
expended case hitting the helicopter rotors.
The case deflector usually consists of a flat steel plate extending out over the ejection
port. It must be securely attached and of robust construction.

THE SELF LOADING RIFLE (SLR) MODULE 4
36 FAAST TRAINING AND REFERENCE MANUAL © NSW Agriculture
4.4.2 Fitting of a non-magnified red dot scope
The rifle must be fitted with a non-magnified red dot scope. It has been clearly
demonstrated that such a sighting device will increase the speed of target acquisition
and improve shot placement. The scope can be attached by having a mount fitted to
either the dust cover or the upper receiver of the rifle.
When the mount is attached to the dust cover there are a number of limitations. These
are listed below.
� If the case deflector is attached to the mount, it has to be dismantled before the
firearm can be stripped for cleaning. The additional weight of the mount and
scope can cause the rear of the dust cover to crack.
� The mount itself prevents the use of the iron sights which may need to be used if
the scope fails during use.
A scope mount fitted to the receiver is the recommended means of attachment. It
provides a secure spot to which the case deflector can be attached. It also allows the
use of the rifle’s iron sight if the scope fails and doesn’t induce any additional wear on
the dust cover. The rifle can still be easily stripped down for cleaning.
However, experience has shown that the screws holding the mount to the receiver can
become loose. This can be alleviated by the addition of spring roll pins to the mount.
Do not allow the mount to be welded to the receiver. This can warp the action leading
to malfunctions, or can change the temper of the locking shoulder which can cause the
shoulder to fail. Both of these situations can result in serious injury to the user.
4.4.3 Prong removal
It is required on all SLRs that the prongs on the flash suppressor be removed. There
have been examples of one or more of the prongs fatiguing to the point that they break
off during shooting. One of these broken prongs can cause as much damage to the
helicopter rotor blades as an expended case can.
The preferred modification is to remove the prongs but refit the body of the
suppressor to the barrel so as to give protection to the muzzle.

MODULE 4 THE SELF LOADING RIFLE (SLR)
© NSW Agriculture FAAST TRAINING AND REFERENCE MANUAL 37
Figure 4.2 SLR fitted with case deflector and pro-point sight Photo: S McGilchrist
4.5 Cycle of operation
4.5.1 To load
1. Check the safety is on ‘safe’. (up position)
2. Insert magazine.
3. Engage cocking handle and pull to rear.
4. Allow action to go forward under it’s own momentum.
5. Ensure cocking handle is forward against the body.
4.5.2 Firing
1. Move the safety to ‘R’ (down position)
2. Acquire target
3. Squeeze the trigger.
4. The hammer will strike the rear of the firing pin extension, driving it and the
firing pin forward against the primer in the base of the round.

THE SELF LOADING RIFLE (SLR) MODULE 4
38 FAAST TRAINING AND REFERENCE MANUAL © NSW Agriculture
Figure 4.3 The SLR L1A1 trigger mechanism – ready to fire.
Source: Australian Army Volume 4 Pamphlet No.5. The Self Loading Rifle 7.62mm Liai, 1983
Figure 4.4 The SLR L1A1 trigger mechanism – firing.
Source: Australian Army Volume 4 Pamphlet No.5. The Self Loading Rifle 7.62mm Liai, 1983
4.6 Operation
As the expanding gases drive the bullet down the barrel, they enter the gas vent and
pass through the gas plug into the gas cylinder and drive the piston rearward.
Excess gas escapes though the hole in the gas block, the amount being determined by
the setting on the gas regulator.
The piston strikes the bolt carrier and drives it rearward compressing the return spring
which arrests the rearward movement of the carrier, which then commences to drive
forward.

MODULE 4 THE SELF LOADING RIFLE (SLR)
© NSW Agriculture FAAST TRAINING AND REFERENCE MANUAL 39
Figure 4.5 Path of gases in gas block
GAS CYLINDER
Source: Australian Army Volume 4 Pamphlet No.5. The Self Loading Rifle 7.62mm Liai, 1983
4.6.1 Unlocking
As the slide travels rearward it lifts the breechblock up and out of the locked position,
carrying it to the rear.
4.6.2 Ejection
The empty case is held by the extractor and is drawn out of the chamber as the breech
bolt moves rearwards. During the rearward movement the base of the cartridge case
hits the ejector, causing the case to be thrown out of the ejection port. As the breech
block clears the magazine the next round moves upwards and is positioned ready for
firing.

THE SELF LOADING RIFLE (SLR) MODULE 4
40 FAAST TRAINING AND REFERENCE MANUAL © NSW Agriculture
Figure 4.6 SLR L1A1 unlocking mechanism.
Breech Block
Source: Australian Army Volume 4 Pamphlet No.5. The Self Loading Rifle 7.62mm Liai, 1983
Figure 4.7 SLR L1A1 ejection mechanism.
Cartridge case
Ejector
Source: Australian Army Volume 4 Pamphlet No.5. The Self Loading Rifle 7.62mm Liai, 1983
4.6.3 Feeding
As the return spring pushes the breech bolt and carrier forward, the breech bolt
contacts the top round in the magazine and feeds it into the chamber.
4.6.4 Locking
As the breech bolt stops, the carrier continues forward and forces the breech bolt
down into the locked position at the same time the extractor grips the base of the
round.

MODULE 4 THE SELF LOADING RIFLE (SLR)
© NSW Agriculture FAAST TRAINING AND REFERENCE MANUAL 41
Figure 4.8 SLR L1A1 feeding and locking mechanism.
Source: Australian Army Volume 4 Pamphlet No.5. The Self Loading Rifle 7.62mm Liai, 1983
4.7 Safety precautions
The most important aspect of firearm safety is to check that the firearm is unloaded
and the safety is engaged before handling.
This involves the following six steps:
1. Check the safety is set to ‘safe’.
2. Remove magazine.
3. With the firearm tilted to the right, engage the cocking handle and pull it to the
THE SELF LOADING RIFLE (SLR) MODULE 4
42 FAAST TRAINING AND REFERENCE MANUAL © NSW Agriculture
rear.
4. Engage the hold open device or physically hold the bolt carrier to the rear.
5. Inspect the chamber to make sure it is empty.
6. Ease the working parts forward.
4.8 Stripping the L1A1 SLR
Stripping dismantles the firearm for maintenance and cleaning and involves the
following steps:
1. Carry out safety precautions, using the 6 steps listed above.
2. Cock the firearm and engage the safety catch.
3. Remove the gas plug and piston by depressing the wide end of the gas plug
plunger. Turn the plug a quarter of a turn clockwise and remove it under
control.
4. With the muzzle pointed down, press the body locking lever to the rear and
open the weapon by lowering the butt.
5. Slide the dust cover to the rear and out.
6. Remove the bolt carrier by pulling the rat tail and slide and supporting the bolt
from below, until the slide is fully withdrawn.
7. Separate the bolt from the carrier by depressing the firing pin extension and
pulling the bolt away from the rat tail end of the carrier.
4.9 Assembling the L1A1 SLR
After stripping for maintenance or cleaning, the L1A1 SLR needs to be assembled.
This involves the following steps:
1. Reassemble the breech block and slide by turning the bolt carrier upside down
and placing the firing pin extension through the hole on the rear of the slide.
Then press the firing pin, as for stripping, and lower the bolt into the slide.
2. With the body open and the muzzle pointed down slide the carrier and bolt
down the body.
3. Slide the dust cover back into the body.
4. Close the body.
5. With the rifle held upright replace the gas piston and spring into the gas tube.
6. Replace the gas plug on the piston head with the narrow recess on the side of
the plug to the left. Push the plug in as far as it will go and turn it

MODULE 4 THE SELF LOADING RIFLE (SLR)
© NSW Agriculture FAAST TRAINING AND REFERENCE MANUAL 43
anticlockwise until it stops.
4.10 Immediate action drills
If the rifle stops or fails to fire, the immediate action (IA) drill, is to be carried out at
once. The procedure is as follows:
1. Tilt the rifle to the right.
2. Pull the cocking handle to the rear and engage the hold open device.
3. Tilt the rifle to the left and look into the body and chamber.
4.10.1 Stoppages
Stoppages are commonly due to an empty magazine, an empty chamber or an
insufficient gas supply. Other causes and their corrective actions are listed later in this
module.
Empty magazine
Remove the magazine and replace with a full one. Then engage the cocking handle
and pull to rear. Release the cocking handle and resume firing.
Empty chamber
If the chamber is empty and there are rounds still in the magazine pullback and
release the cocking handle and resume firing.
Gas stoppage
If, after conducting the IA drill, the firearm stops again, pull back the cocking handle
and release it. Engage the safety and withdraw the rifle and turn the gas regulator
down 2 numbers lower. Return safety to ‘R’ position and resume firing.
Figure 4.9 SLR Gas block.
Source: Australian Army Volume 4 Pamphlet No.5. The Self Loading Rifle 7.62mm Liai, 1983

THE SELF LOADING RIFLE (SLR) MODULE 4
44 FAAST TRAINING AND REFERENCE MANUAL © NSW Agriculture
Table 4.1 SLR stoppages – causes and corrective actions
Stoppage Cause Corrective action
Failure to feed, chamber or load Dirty breech block or chamber. Clean breech block and chamber
a round into the breech
Damaged magazine. Replace magazine
Incorrectly loaded magazine Reload magazine
Double feed Remove rounds from body and
breech
Broken or damaged return spring Replace return spring
Fouled or damaged gas cylinder Clean or replace gas cylinder
Failure to fire Faulty ammunition Replace ammunition
Broken firing pin Replace firing pin
Carbon build up on firing pin Clean firing pin, breech block
and carrier
Empty magazine
Replace magazine
Insufficient gas
Turn gas regulator down two
Failure to extract or eject Carbon build up on breech head Clean chamber, breech block and
or chamber extractor
Weak or damaged extractor
Replace extractor
Broken ejector
Gunsmith required
Rim stripped from case Insert cleaning rod from muzzle
and tap the case out
4.11 Basic ballistics
4.11.1 The metallic cartridge
The metallic cartridge is the only sure way of delivering a projectile accurately to a
target to effect a quick and humane termination. The cartridge used by FAAST is the
.308 Winchester which has a proven and stable design with an excellent balance of
velocity and weight.

MODULE 4 THE SELF LOADING RIFLE (SLR)
© NSW Agriculture FAAST TRAINING AND REFERENCE MANUAL 45
Figure 4.10 The metallic cartridge and its parts Source: A manual for the control of feral animals from helicopters, FMC May 1999
The housing of the metallic cartridge is called the case, which is described as a semi-
water proof pressure pot. The case contains the primer which is a device developed to
explode after being struck by the firing pin of the rifle.
The primer ignites the stored energy contained in the propellent which sits above the
primer and is held by the case.
Upon ignition the propellent burns rapidly creating a large amount of pressure and gas
which drives upwards and pushes the projectile, which sits in the neck of the case, out
of the firearm.
Figure 4.11 Bullet parts and types. Source: A manual for the control of feral animals from helicopters, FMC May 1999

THE SELF LOADING RIFLE (SLR) MODULE 4
46 FAAST TRAINING AND REFERENCE MANUAL © NSW Agriculture
Depending on the weight of the projectile and the type of targets to be destroyed a
number of types of projectile constructions are used by FAAST. The most common
are a 130-160 grain, hollow point, jacketed expanding bullets. These are generally
used on small to medium target species. When larger animals are destroyed the 180
grain projectile is often used, which has a soft point construction.
4.11.2 Internal ballistics
Internal ballistics describes the sequence and components of firing from the time the
trigger is pulled to the exiting of the projectile from the muzzle.
1. The firing pin strikes the primer cup causing it to depress. The dented cup crushes
the priming mixture against the anvil which is held in place by the primer pocket
base. The crushing effect causes the mixture to explode.
2. The sparks from the explosion are forced through the flash hole and into the
powder cavity of the case. Hot sparks bounce around between the powder cavity
walls and the propellent is ignited.
3. The powder is burnt rapidly and converted into expanding gas which reaches
around 55,000 psi. The heat decreases and the gas reaches maximum pressure in
all directions.
4. At this point the cartridge face is forced back against the bolt and the shoulders
and body of the case are forced outwards in all directions to create a gas seal in
the rifle chamber. The weak point in the pressure chamber is the neck/projectile
seal.
5. The neck expands under pressure and the projectile breaks free. The projectile
shank and base seal the expanding gases behind it as it moves into the throat of the
chamber. The projectile builds up speed rapidly as it enters the lands and grooves
of the rifling twist and the pressure drops off as it reaches the muzzle.
6. The projectile exits the muzzle at supersonic speed, rotating rapidly at around
3000 rotations per second from the rifling twist. Rotation ensures gyroscopic
stability of the projectile.
7. The cartridge case shrinks back to near its original dimensions where it can be
withdrawn by the extractor and ejected from the firearm.
Head space Head space is the distance from the bolt face to that part of the chamber which stops
forward movement of the cartridge case when the action is loaded and locked. It is
very important that any firearm is headspaced correctly. Insufficient head space
interferes with the closing of the breach and would make the cartridge too long for the
breach. Excessive head space permits the cartridge case to unduly stretch and
separate. This could endanger the firearm and the shooter.
MODULE 4 THE SELF LOADING RIFLE (SLR)
© NSW Agriculture FAAST TRAINING AND REFERENCE MANUAL 47
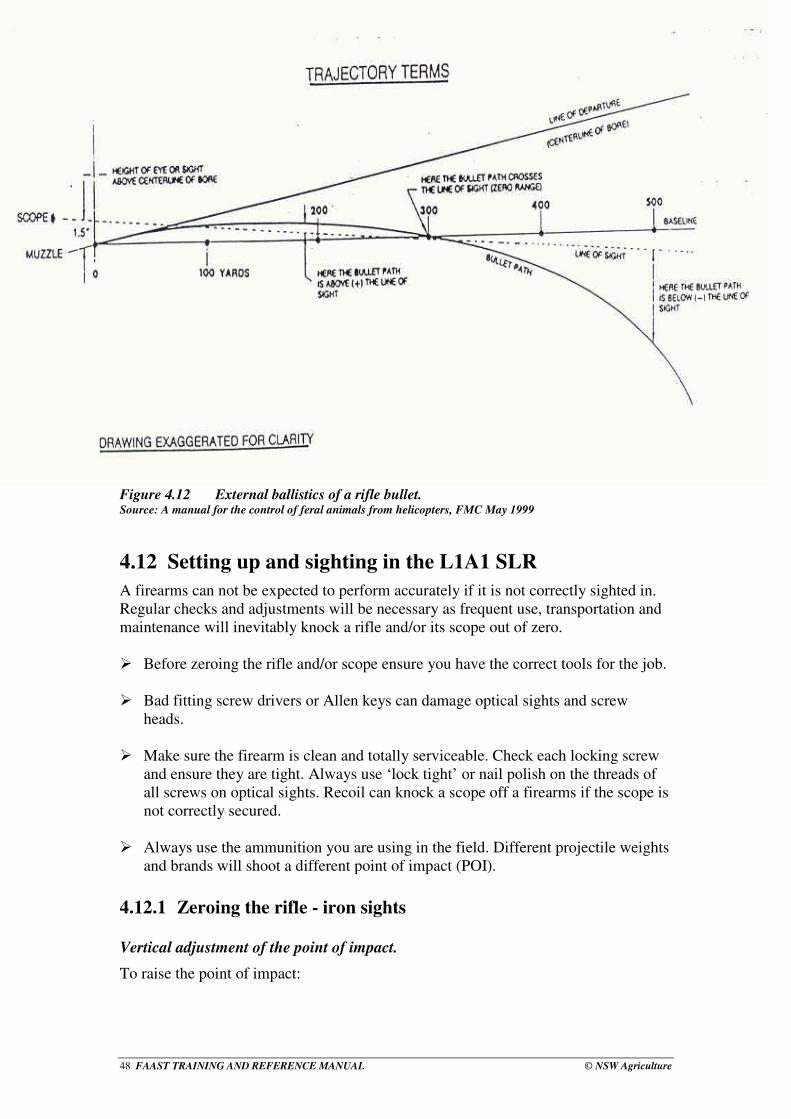
4.11.3 External ballistics
Bullet trajectory
Many forces exert influence on a projectile in flight. The most significant is air
resistance, which works upon the projectile the instant it leaves the muzzle. Gravity
also exerts a strong force on the projectile. From the moment a projectile leaves the
muzzle it losses velocity and steadily drops lower the further it travels. With these two
natural forces working on the projectile the bullet path tends towards an increasing
curve the further it travels from the muzzle. This is known as bullet trajectory and can
be best explained by the diagram below.
Wind
Another force encountered may be wind. A strong wind across a projectiles path will
blow it off course in the winds direction. The wind factor, when present must be taken
into account while aiming. Some lead into the wind will be necessary, particularly at
longer distances when the projectiles velocity is lower.
Other forces
There are other forces which act on a projectile in flight. These are, altitude,
atmospheric pressure, temperature, rain and shooting up hill and down hill and over
water. However, these factors have such a minimal influence on trajectory under
100m that they are not worthy of consideration.
FAAST shooters normally encounter moving targets and for longer shots some ‘lead’
may need to be given to the target. However at shorter distances none or very little
may be required because the helicopter will normally be travelling at a faster or
equivalent rate to the target and the speed of the projectile will mostly negate the need
for lead time. For example a .308 130 grain projectile will travel at approximately
2,800 ft/sec and have a flight time of 0.1173 of a second at 100m and 0.2701 of a
second at 200m.
When a 130-160 grain .308 hollow point projectile (as commonly used by FAAST)
hits a target animal it releases an excess of 2,000 foot ponds of energy. When this
energy enters the animal’s vital zone the projectile will expand and break up, creating
a massive wound channel with excessive amounts of bleeding and shock followed by
a rapid death.
THE SELF LOADING RIFLE (SLR) MODULE 4
Figure 4.12 External ballistics of a rifle bullet. Source: A manual for the control of feral animals from helicopters, FMC May 1999
48 FAAST TRAINING AND REFERENCE MANUAL © NSW Agriculture
4.12 Setting up and sighting in the L1A1 SLR
A firearms can not be expected to perform accurately if it is not correctly sighted in.
Regular checks and adjustments will be necessary as frequent use, transportation and
maintenance will inevitably knock a rifle and/or its scope out of zero.
� Before zeroing the rifle and/or scope ensure you have the correct tools for the job.
� Bad fitting screw drivers or Allen keys can damage optical sights and screw
heads.
� Make sure the firearm is clean and totally serviceable. Check each locking screw
and ensure they are tight. Always use ‘lock tight’ or nail polish on the threads of
all screws on optical sights. Recoil can knock a scope off a firearms if the scope is
not correctly secured.
� Always use the ammunition you are using in the field. Different projectile weights
and brands will shoot a different point of impact (POI).
4.12.1 Zeroing the rifle - iron sights
Vertical adjustment of the point of impact.
To raise the point of impact:
MODULE 4 THE SELF LOADING RIFLE (SLR)
© NSW Agriculture FAAST TRAINING AND REFERENCE MANUAL 49
� Loosen foresight screw.
� Rotate foresight blade in clockwise direction.
To lower the point of impact:
� Loosen foresight screw.
� Rotate foresight blade in anti-clockwise direction.
A half turn of the foresight will adjust the point of impact by 50 mm, at one hundred
metres.
Sideways adjustment of the point of impact.
To move the point of impact to the right
� Loosen right back sight keeper screw, by rotating it anti-clockwise.
� Tighten left side keeper screw by rotating it clockwise the same number of turns.
To move the point of impact to the left.
� Loosen left back sight keeper screw, by rotating it clockwise.
� Tighten right back sight keeper screw, by rotating it anticlockwise the same
number of turns.
4.12.2 Zeroing the rifle - red-dot scopes
To fit a new scope or relocate a scope to the SLR, the following steps should be
followed:
� Centre both the windage and elevation adjustment within the scope. This is done
by gently turning each adjustment screw fully one way (clockwise). Then, while
counting the number of clicks or units, reverse the direction (anti-clockwise),
counting the number of units, until the adjustment is screwed fully in reverse (this
is when resistance is felt). Screw the adjustment in the clockwise direction for half
the number of units just counted. Complete for windage and elevation
adjustments.
� Fit the scope to the firearm. Check for eye relief and freedom of movement in the
cocking handle, bolt handle and any other moving parts. When satisfied tighten all
the screws evenly.

THE SELF LOADING RIFLE (SLR) MODULE 4
50 FAAST TRAINING AND REFERENCE MANUAL © NSW Agriculture
To sight the firearm in using a scope complete the following steps:
1. Using a firing range of known distance, set up a reasonable sized target (initially
1m square is adequate).
2. Fire a group of three shots and note the point of impact (POI). Adjust where
necessary.
3. If your mount has external adjustment for windage then screw those first. When
you get your group close to the centre, then use the internal adjustment screws.
4. Have a note pad and pencil ready and record the direction (use the clock face) and
the number of clicks that you make. Note down each adjustment and the next
groups POI. After a few groups the direction and number of clicks should be
revealed.
5. Keep the pad and the recording for future reference. It may save a lot of time and
ammunition when next the zero needs adjustment.
Red-dot sights are preferred on L1A1 SLR’s due to their ability to provide a clear
aiming point without any loss of field of view, usually associated with magnification
sights/scopes. Aiming points are holographically projected into the centre of the
scopes field of view in the form of a red dot. Two brands of Red-dot scopes are
recommended – the Pro-point and the Eotech.
Zeroing the Pro-point.
The pro-point red-dot sight is a scope produced by Tasco Optics for specific shotgun
and rifle types. It is a smaller version of the larger magnification scopes distributed by
most optic manufacturers and it has a one piece tube construction. To zero the Tasco
Pro-point sight complete the following:
� Activate the illuminated reticule by turning the knob clockwise to brighten.
� Strip the bolt and carrier from the body of the rifle after carrying out safety
precautions. Then with the barrel supported, sight along the bore at the target.
Use the windage and elevation adjustments on the pro-point to align the lighted
reticule with the target as seen through the bore.
Each click moves the point of impact 5mm at 25 metres.

MODULE 4 THE SELF LOADING RIFLE (SLR)
© NSW Agriculture FAAST TRAINING AND REFERENCE MANUAL 51
Figure 4.13 Components of a pro-point red dot sighting mechanism. Source: Pro-Point Operator’s Manual
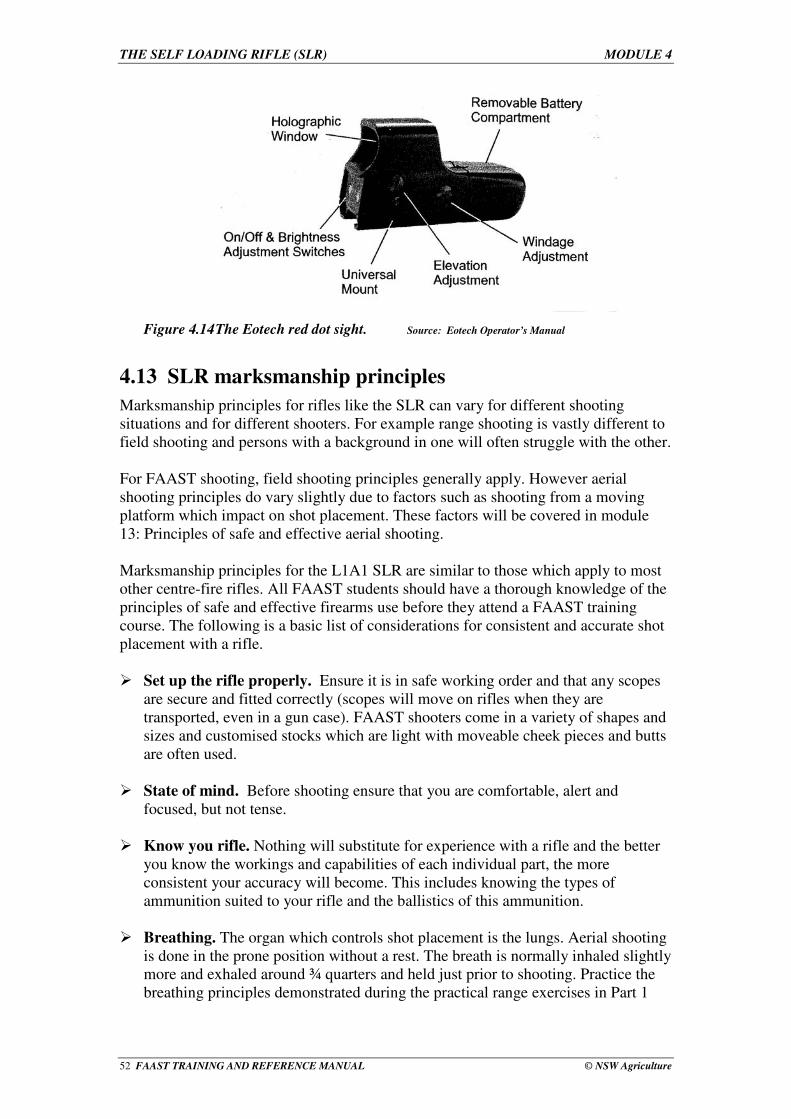
Zeroing the Eotech
The Eotech red-dot sight is slightly different to the pro-point sight due to its open
sight wall which lacks an enclosed tube. The aiming point is holographically
projected onto an arched screen which is protected by a short sleeve. The Eotech
sight should be bore sighted, as described above for the pro-point sight.
To zero the Eotech sight complete the following:
� To move the point of impact right turn the windage adjustment clockwise.
� To move the point of impact left turn the windage adjustment counter clockwise.
� To move the point of impact up turn the elevation adjustment clockwise.
� To move the point of impact down turn the elevation adjustment counter
clockwise.
THE SELF LOADING RIFLE (SLR) MODULE 4
52 FAAST TRAINING AND REFERENCE MANUAL © NSW Agriculture
Figure 4.14 The Eotech red dot sight. Source: Eotech Operator’s Manual
4.13 SLR marksmanship principles
Marksmanship principles for rifles like the SLR can vary for different shooting
situations and for different shooters. For example range shooting is vastly different to
field shooting and persons with a background in one will often struggle with the other.
For FAAST shooting, field shooting principles generally apply. However aerial
shooting principles do vary slightly due to factors such as shooting from a moving
platform which impact on shot placement. These factors will be covered in module
13: Principles of safe and effective aerial shooting.
Marksmanship principles for the L1A1 SLR are similar to those which apply to most
other centre-fire rifles. All FAAST students should have a thorough knowledge of the
principles of safe and effective firearms use before they attend a FAAST training
course. The following is a basic list of considerations for consistent and accurate shot
placement with a rifle.
� Set up the rifle properly. Ensure it is in safe working order and that any scopes
are secure and fitted correctly (scopes will move on rifles when they are
transported, even in a gun case). FAAST shooters come in a variety of shapes and
sizes and customised stocks which are light with moveable cheek pieces and butts
are often used.
� State of mind. Before shooting ensure that you are comfortable, alert and
focused, but not tense.
� Know you rifle. Nothing will substitute for experience with a rifle and the better
you know the workings and capabilities of each individual part, the more
consistent your accuracy will become. This includes knowing the types of
ammunition suited to your rifle and the ballistics of this ammunition.
� Breathing. The organ which controls shot placement is the lungs. Aerial shooting
is done in the prone position without a rest. The breath is normally inhaled slightly
more and exhaled around ¾ quarters and held just prior to shooting. Practice the
breathing principles demonstrated during the practical range exercises in Part 1

MODULE 4 THE SELF LOADING RIFLE (SLR)
© NSW Agriculture FAAST TRAINING AND REFERENCE MANUAL 53
and Part 2 of the course.
� Trigger control. Shooters should develop a consistent trigger pull to ensure that
the shooting process does not vary and the moment of firearm discharge is
predictable. Shooters should practice the trigger control practices outlined during
practical demonstrations in Part 1 of the FAAST training course.
� Windage. Wind is normally not a factor during aerial shooting due to the
relatively short distances involved and helicopter rotor wind does not affect the
ballistics of the .308.
� Practice! Practice! Practice!. When undertaking ground range practice with the
SLR, always shoot as if you are in a helicopter and live animals are being shot.
Some FAAST shooters employ the ‘third eye’ technique which many professional
sports shooters use. This method involves imagining hitting the target animal in
the right spot whilst aerial shooting. The simulation of stoppage drills and
unexpected situations whilst practicing on the range is also important.
All of these factors and other SLR marksmanship principles will be covered during
practical range demonstrations and range practice during Part 1 and Part 2 of the
FAAST accreditation training course.
4.14 Cleaning the SLR
The rifle must be cleaned and oiled at the completion of each days shooting. It is
important to use the correct equipment. This includes:
� A cleaning rod of appropriate bore size.
� A bronze bristle brush of appropriate bore size.
� A jag of appropriate bore size.
� Cleaning patches.
� Perishables: Hoppe’s No. 9, Sweets 7.62 and quality gun oil.
� Cleaning the SLR involves the following steps:
� Carry out the safety precautions.
� Strip the rifle by removing the gas plug, pistol, dust cover, carrier and breech bolt.
� Clean the bore with a mild solvent like Hoppe’s No.9. (Do not use Sweets 7.62
solvent – It is too harsh can damage the chrome inside the barrel). To do this first
run a clean patch through the bore 2 or 3 times to remove course or loose fouling.
Then run patches with Hoppe’s No. 9 through 2 or 3 times and follow with 2 or 3
runs with a bronze bristle brush. Follow this with clean patches until no fouling is
detected. Then run Hoppe’s No. 9 through again and clean patches. Finally run a
patch through the bore with light gun oil on it. Remember before the firearms next

THE SELF LOADING RIFLE (SLR) MODULE 4
54 FAAST TRAINING AND REFERENCE MANUAL © NSW Agriculture
use run 2 or 3 clean patches through to remove excess oil as this may caused
excessive pressure build up in the first couple of shots.
� Clean the gas plug and head of the gas piston with solvent and Scotch Brite
material.
� Only strip the gas tube and regulator for cleaning when there is a large build up of
carbon material. Excessive stripping of this area will cause unnecessary wear.
� Lightly oil the working parts but keep the face of the breech block and gas vent
dry.

MODULE 4 THE SELF LOADING RIFLE (SLR)
© NSW Agriculture FAAST TRAINING AND REFERENCE MANUAL 55
Figure 4.15 Components of the SLR L1A1
Source: Slr Australia’s Fnfal, I Skennerton & D Balmer, 1989

THE SELF LOADING RIFLE (SLR) MODULE 4
56 FAAST TRAINING AND REFERENCE MANUAL © NSW Agriculture
Figure 4.16 Components of the SLR L1A1 1
Source: Slr Australia’s Fnfal, I Skennerton & D Balmer, 1989
MODULE 4 THE SELF LOADING RIFLE (SLR)
© NSW Agriculture FAAST TRAINING AND REFERENCE MANUAL 57
1. To put the L1A1 SLR rifle in safety position, which direction is the safety
catch moved?
2. List the 6 steps to be followed to be sure an L1A1 SLR rifle is safe to handle.
3. What is the first step required for stripping and cleaning of an L1A1 SLR
rifle?
4. Why is it necessary to deflect the ejected cases?
5. An immediate action drill requires three steps. What are they?

THE PUMP ACTION SHOTGUN MODULE 5
58 FAAST TRAINING AND REFERENCE MANUAL © NSW Agriculture
5. The pump action shotgun
Summary:
� While the effective range is less than for a self-loading rifle, pump action shotguns
play a valuable role in aerial shooting operations.
� There are two shotgun models recommended for FAAST activities which are only
to be used with approved ammunition.
� FAAST shotguns also requires an approved configuration (setup)
� There are 4 steps to ensure a shotgun is safe before handling it.
� Likely faults, their causes and recommended actions are listed
5.1 Learning outcomes
After successfully completing this module, students will be able to:
1. State the shotgun models recommended for FAAST activities.
2. Explain why shotguns have an effective range of 30 metres.
3. Describe the configuration of a shotgun recommended for FAAST activities.
4. List the steps required to make a shotgun safe.
5. List the steps required for an immediate action drill (stoppage drill) for a pump
action shotgun.
6. List the steps required to strip and assemble a shotgun (either a Remington 870 or
a Mossberger 500).
5.2 Introduction
The shotgun is a versatile firearm that can fire a single round or launch groups of sub-
missiles towards the intended target. It is designed for shooting fast moving targets
and kills by expelling multiple projectiles (shot). Multiple projectile wounds kill very
quickly. The theory being that 2 or more wounds are not just multiples, but squared
multiples, of that effect. For example, 2 wounds have 4 times the effect as 1 and 3
wounds have 9 times the effect as 1.
Historically, all manner of makes and action types have been used for aerial culling
by FAAST shooters, with differing levels of success. How ever like for the SLR the
FMC has restricted their use. Currently the approved shotguns for FAAST activities
are the:

MODULE 5 THE PUMP ACTION SHOTGUN
© NSW Agriculture FAAST TRAINING AND REFERENCE MANUAL 59
� Remington 870 pump action shotgun and the
� Mossberg 500 pump action shotgun.
Both are chambered for 2 ¾ inch 12 gauge ammunition.
5.3 Ammunition
The approved calibre is the 2 ¾” 12 gauge cartridge, bore dimension 0.729” .The
ammunition must be plastic sided rather than paper or cardboard which can cause
jamming.
Figure 5.1 The shotgun shell.
Source: A manual for the control of feral animals from helicopters, FMC May 1999
Table 5.1 lists the recommended shot to be used for the different size animals likely to
be targeted during FAAST shooting operations.
Table 5.1 Recommended shot to used for various sized targets
Game size Example Recommended
shot
Small game Foxes/Cats/Piglets AAA,
BB (or No.4 for very small piglets)
Medium game Pigs/Goats SG
(00), SSG
Large Game Cattle Shotgun not recommended. However,
circumstances dictate, use rifled slugs.
if
THE PUMP ACTION SHOTGUN MODULE 5
60 FAAST TRAINING AND REFERENCE MANUAL © NSW Agriculture
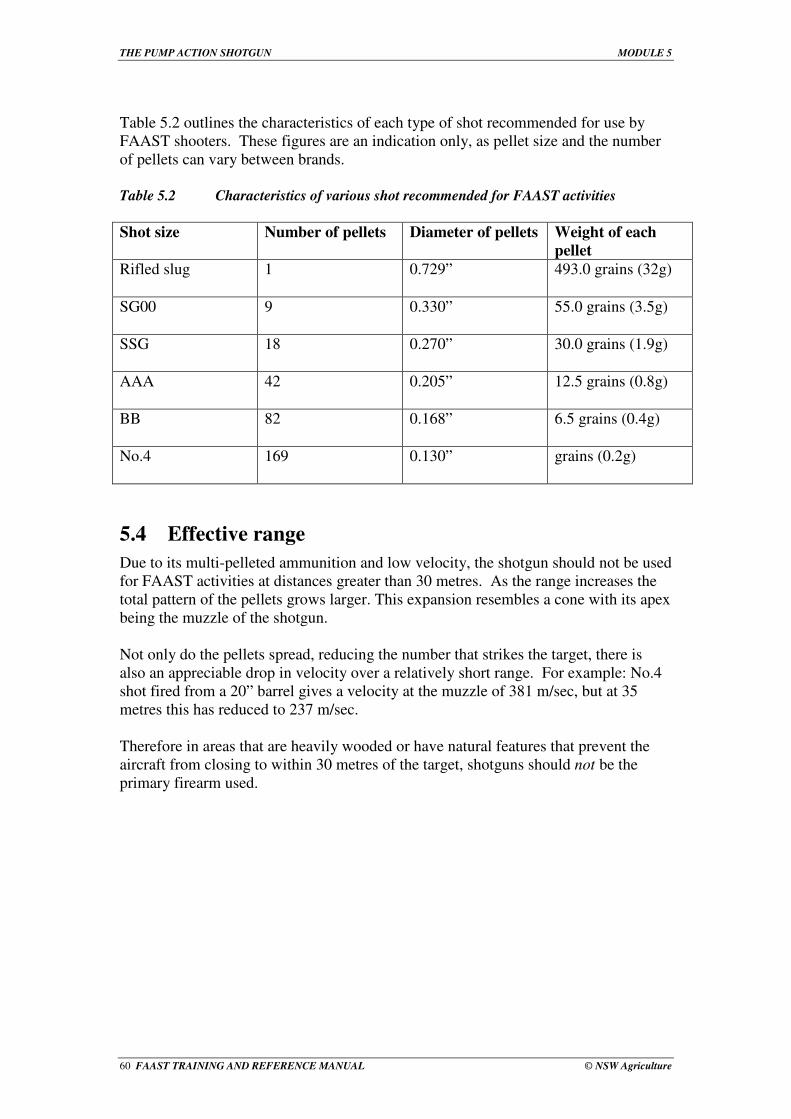
Table 5.2 outlines the characteristics of each type of shot recommended for use by
FAAST shooters. These figures are an indication only, as pellet size and the number
of pellets can vary between brands.
Table 5.2 Characteristics of various shot recommended for FAAST activities
Shot size Number of pellets Diameter of pellets Weight
pellet
of each
Rifled slug 1 0.729” 493.0 grains (32g)
SG00 9 0.330” 55.0 grains (3.5g)
SSG 18 0.270” 30.0 grains (1.9g)
AAA 42 0.205” 12.5 grains (0.8g)
BB 82 0.168” 6.5 grains (0.4g)
No.4 169 0.130” grains (0.2g)
5.4 Effective range
Due to its multi-pelleted ammunition and low velocity, the shotgun should not be used
for FAAST activities at distances greater than 30 metres. As the range increases the
total pattern of the pellets grows larger. This expansion resembles a cone with its apex
being the muzzle of the shotgun.
Not only do the pellets spread, reducing the number that strikes the target, there is
also an appreciable drop in velocity over a relatively short range. For example: No.4
shot fired from a 20” barrel gives a velocity at the muzzle of 381 m/sec, but at 35
metres this has reduced to 237 m/sec.
Therefore in areas that are heavily wooded or have natural features that prevent the
aircraft from closing to within 30 metres of the target, shotguns should not be the
primary firearm used.

MODULE 5 THE PUMP ACTION SHOTGUN
© NSW Agriculture FAAST TRAINING AND REFERENCE MANUAL 61
Figure 5.2 Spread pattern of shotgun shot with different choke settings. Source: Smith, G. 1999. Hunting and shooting in Australia SSAA.
5.5 Chokes
A choke is a constriction at the muzzle of a shotgun to reduce the spread and increase
the density of the shot column.
The 4 commonly identified chokes are:
� True cylinder - no constriction at all.
� Improved cylinder - some constriction (0.007”)
� Modified Choke – more constriction
� Full choke - maximum constriction
5.6 Shotgun configuration recommended for FAAST
activities
The following shotgun configuration is recommended for FAAST activities.
5.6.1 Barrel length
The barrel must be longer than 61 cm (24”) to assist in both the safe handling of the
firearm during flying and improved ammunition performance.
5.6.2 Magazine capacity
Long barrels also allow increased magazine tube length. A magazine capacity of
about 8 rounds is considered suitable for FAAST operations. In relation to the
Remington 870, the magazine extension must be supported by the barrel to avoid
damaging the threads on the end of the magazine.

THE PUMP ACTION SHOTGUN MODULE 5
62 FAAST TRAINING AND REFERENCE MANUAL © NSW Agriculture
5.6.3 Sights
Due to the need for accurate shooting, the single bead front sight is not acceptable for
FAAST operations. The minimum requirement is for rifle sights to be fitted. Ghost
ring sights, pictured below, have produced good results. If funding allows, red dot
sights would be the ideal choice. They greatly assist in target acquisition.
Figure 5.3. Ghost ring sights.
Source: A Manual for the control of Feral Animals from helicopters, FMC May 1999
5.6.4 Choke
A modified choke or improved cylinder is recommended. Full choke has a tendency
to elongate the pattern spread when using SG and true cylinder shortens the effective
range as the pattern spreads too quickly.
5.7 Making the shotgun safe
When receiving a shotgun always check it’s condition. The following steps outline the
procedure required to ensure the shotgun is safe.
� Point the muzzle in a safe direction
� Slide the fore-end to the rear. (If this doesn’t move it indicates that the firearms is
cocked, and possibly with a chambered shell. If so depress the action bar lock
then slide the fore-end to the rear)
� Look into the breech and to ensure it is clear of all ammunition. Then using a
finger manually feel for ammunition.
� Invert the firearm, depress the carrier, look into the magazine then manually feel
for any ammunition.

MODULE 5 THE PUMP ACTION SHOTGUN
© NSW Agriculture FAAST TRAINING AND REFERENCE MANUAL 63
5.8 Immediate action (stoppage drill) for the pump action
shotgun
1. Engage the safety
2. Tilt the shotgun to the right
3. Pull the action slide to the rear
4. Tilt the shotgun to the left and look into the receiver and chamber
Empty magazine
If the stoppage was an empty magazine and there is no ammunition in the chamber,
magazine or on the shell lifter (elevator);
- Insert a shell through the ejection port
- Push action slide forward
- Load magazine
Empty chamber
If on inspection of the chamber after an IA drill there is no ammunition in the
chamber or elevator, but there is ammunition in the magazine;
- Push action slide forward
- Cycle the action slide firmly to chamber a round from the magazine
Failure to fire
If upon carrying out the IA a live shell is ejected and there are cartridges in the
magazine;
- Leave the action slide to the rear
- Check if magazine cap is loose – if so tighten
Failure to eject If after carrying out the IA drill a cartridge has not been ejected;
- Leave the action slide to the rear
- Tilt the shotgun to the right
- Flick the round out with your fingers
Failure to fire
If after an IA drill there is still a round in the chamber;
- Tilt shotgun to the right
- Allow the round on the lifter to fall out the ejection port
- Push action slide forward
- Pull action slide to rear firmly
- If round has still not bean extracted, leave action to rear with the safety engaged
and disassemble barrel from shotgun.

THE PUMP ACTION SHOTGUN MODULE 5
64 FAAST TRAINING AND REFERENCE MANUAL © NSW Agriculture
5.9 The Remington 870 shotgun
This is one of the pump action shotguns recommended for FAAST activities.
Figure 5.4 Remington model 870 pump action shotgun - general parts.
Source:: Remington sporting firearms field service manual
5.10 Stripping the Remington 870
1. Point the muzzle in a safe direction.
2. Carry out the procedures to make the firearm safe.
3. Cock the action, by sliding the fore-end fully to the rear and then fully forward.
4. Remove magazine cap, by unscrewing it.
5. Remove barrel, by pulling it away from the receive group.
6. With the action closed depress the left shell latch within the loading port and
remove the fore-end from the magazine tube.
7. Separate the breech block and slide from the action bars.
8. Remove the trigger group by setting safety on safe then drift out the front and rear
pins followed by pulling the rear of the trigger group down.
9. To remove the magazine spring, insert the blade of a small flat screwdriver into
the hole in the spring retainer. Then pry the retainer from magazine tube.
Remove retainer slowly to relieve tension of magazine spring. Spring and retainer
may now be removed. NOTE: Removing the spring is not necessary for usual
maintenance.

MODULE 5 THE PUMP ACTION SHOTGUN
© NSW Agriculture FAAST TRAINING AND REFERENCE MANUAL 65
a) b)
Figure 5.5 Remington 870 pump action shotgun
a) Removing trigger group b) Removing magazine spring
Source: Remington sporting firearms field service manual
5.11 Assembling the Remington 870
The following steps outlines the procedures required to assemble a Remington 870
shotgun.
NOTE: Action must by cocked when assembling shotgun.
� Place the breech block and slide in the correct position on the action bars.
� Slide the fore-end over the magazine and insert the action bars into the
corresponding grooves in the receiver.
� Move the fore-end gently to the rear until the action bars contact the right shell
latch.
� Depress the right shell latch and move the fore-end to the rear until the action bars
contact the left shell latch.
� Depress the left shell latch and allow the fore-end to slide rearwards until the
action bars contact the action bark lock.
� Depress the action bar lock and half cock the firearm.
� Replace the barrel.
� Replace the magazine cap.
� Cycle the action forward, disengage the safety, fire the action, check for correct
functioning of the weapon.

THE PUMP ACTION SHOTGUN MODULE 5
66 FAAST TRAINING AND REFERENCE MANUAL © NSW Agriculture
Figure 5.6 Configuration of the Remington 870 pump action shotgun
Source:: Remington sporting firearms field service manual

MODULE 5 THE PUMP ACTION SHOTGUN
© NSW Agriculture FAAST TRAINING AND REFERENCE MANUAL 67
5.12 The Mossberg 500 shotgun
This is one of the pump action shotguns recommended for FAAST activities.
5.13 Stripping the Mossberg 500
� Point the muzzle in a safe direction.
� Carry out the procedures to make the firearm safe.
� Move safety to rear position.
� Move bolt from rearward position slowly until the front of the bolt is in the middle
of the ejection port. (Refer to Fig 5.7)
� Loosen the take down screw turning counter clockwise until the screw is
completely disengaged.
� Remove the barrel by pulling it out from the receiver.
� Use a drift to push out the trigger housing pin, then remove trigger group by
rotating the rear portion upward first. (Refer to Fig 5.8)
� Now remove the cartridge interrupter and cartridge stop from inside the receiver.
It may be necessary to gently tap the sides of the receiver to remove them.
� Move the action slide assembly rearwards so that the bolt assembly and bolt slide
are three quarters of the way rearward. Now lift the bolt slide upward and out of
the receiver.
� The bolt can be removed by sliding forward out of the receiver. (Refer to Fig 5.9)
� The elevator can be removed by squeezing the legs together and disengaging from
the receiver.
Figure 5.7 Barrel removal of a Mossberg 500 - bolt position
Source: Mossberg armours manual, North Haven USA

THE PUMP ACTION SHOTGUN MODULE 5
68 FAAST TRAINING AND REFERENCE MANUAL © NSW Agriculture
Figure 5.8 Trigger group removal of a Mossberg 500
Source: Mossberg armours manual, North Haven USA
Figure 5.9 Bolt and elevator assembly of a Mossberg 500
Source: Mossberg armours manual, North Haven USA
5.14 Assembling the Mossberg 500
Assembling the Mossberg 500 is simply the stripping procedure carried out in reverse.

MODULE 5 THE PUMP ACTION SHOTGUN
© NSW Agriculture FAAST TRAINING AND REFERENCE MANUAL 69
Figure 5.10 Configuration of the Mossberg 500
Source: Mossberg armours manual, North Haven USA
5.15 Pump action shotgun marksmanship principles
Marksmanship principles for the pump action shotgun vary considerably compared to
rifles. This is because they have a much shorter range and a different method of
killing involving a pattern of projectiles that inflicts numerous injuries to target
animals over a wide area.

THE PUMP ACTION SHOTGUN MODULE 5
70 FAAST TRAINING AND REFERENCE MANUAL © NSW Agriculture
Due to the greater volume of projectiles emitted which increases the probability of
hitting the kill zone, shotguns are normally pointed at targets rather than aimed.
Basic pump action shotgun marksmanship principles are listed below:
� Set up the shot gun properly. Ensure it is in safe working order and that any
extra sights are secure and fitted correctly. FAAST shooters come in a variety of
shapes and sizes and customised stocks which are light and have moveable cheek
pieces and butts are often used.
� State of mind. Before shooting ensure that you are comfortable, alert and
focused, but not tense.
� Know your shotgun. Nothing will substitute for experience with a firearm and
the better you know your individual firearm’s parts, their workings and
capabilities the more consistent your accuracy will become.
� Know your ammunition. Know the spread pattern, size and number of shot for
the ammunition being used and understand the limitations of the ammunition and
the appropriate use of the ammunition for different target species.
� Breathing. Consistent, normal breathing is required when aerial shooting with a
shotgun.
� Trigger control. Develop a consistent trigger pull to ensure that the shooting
process does not vary and the moment of firearm discharge is predictable.
� Practice! Practice! Practice!. When undertaking ground range practice always
shoot as if you are in a helicopter and live animals are being shot. Some FAAST
shooters employ the ‘third eye’ technique which many professional sports
shooters use. This method involves shooters imagining themselves hitting the
target animal in the right spot whilst aerial shooting. The simulation of stoppage
drills and unexpected situations by FAAST shooters whilst practicing on the range
is also important.
All of these factors and other pump action shotgun marksmanship principles will be
covered during practical range demonstrations and range practice during Part 1 and
Part 2 of the FAAST training course.

MODULE 5 THE PUMP ACTION SHOTGUN
© NSW Agriculture FAAST TRAINING AND REFERENCE MANUAL 71
Figure 5.11 A FAAST student undergoing pump action shotgun training.
Source: K Pines
5.16 Cleaning a pump action shotgun
The shotgun must be cleaned and oiled at the completion of each days shooting.
Ensure you have the correct equipment. This can include:
� A cleaning rod of appropriate bore size.
� A bronze bristle brush of appropriate bore size.
� A jag of appropriate bore size.
� Cleaning patches.
� Perishables: Hoppe’s No. 9, Sweets 7.62 and quality gun oil
Cleaning the pump action shot gun involves the following steps:
1. Carry out the safety precautions.
2. Strip the shotgun.
3. Clean the bore by first running a clean patch through the bore 2 or 3 times to
remove course or loose fouling. Then run patches with Hoppe’s No. 9 through 2 or
3 times and follow with 2 or 3 runs with a bronze bristle brush. Follow this with
clean patches until no fouling is detected. Then run Sweets 7.62 through 2 or 3

THE PUMP ACTION SHOTGUN MODULE 5
72 FAAST TRAINING AND REFERENCE MANUAL © NSW Agriculture
times and remove it 5 - 10 minutes later with and clean patches. Finally run a
patch through the bore with light gun oil on it. Remember before using the firearm
next time, run 2 or 3 clean patches through to remove excess oil as this may
caused excessive pressure build up in the first couple of shots.
4. Clean the breach and ejection port with solvent and Scotch Brite material.
5. The working parts should be lightly oiled but the face of the breech block and gas
vent should be dry.
5.17 Troubling shooting
Table 5.3 outlines some of the common faults that occur with pump action shotguns.
It also includes likely causes and recommended actions.
Table 5.3 Common faults associated with a pump action shotgun
FAULT CAUSE ACTION 1. Shell fails to load Bent carrier does not allow Gunsmith repair
shell alignment with magazine.
Defective shell latch Gunsmith repair
2. Fore-end fails to fully Bent action bars Gunsmith repair
cycle Jammed or bent shell latch Gunsmith repair
Foreign object or part in Remove and clean
receiver.
3. Failure to feed Shell latch holding back shell Gunsmith repair
Magazine follower sticks in Clean and lightly oil
magazine tube.
4. Double feed Failure of shell latch to retain With the action open press
shell in magazine after one has down on the nose of the
been ejected onto the carrier shell and push the
and action can not close. partially released shell
into the magazine until
retained by shell latch.
5. Stacked feed A round is in the chamber and Apply safety catch. Grasp
the action is closed. The shell the fore-end firmly and
latch has failed to retain the pull back firmly whilst
shell once the action is closed depressing the action bar
and ejected it onto the carrier lock.
6. Failure to fire Weapon is unloaded Load weapon
Safety is on. Disengage safety. Cycle
the action.
Mechanical defect. Gunsmith repair
7. Failure to extract Broken extractor Gunsmith repair
Dirty chamber Clean weapon
8. Action will not open Could be caused by expansion Correct as per stacked
of shell against fouling after feed
firing or split shell casing
9. Failure to eject Ejector missing or broken. Gunsmith repair
Stovepipe, a partially ejected Pull for-end fully to the
shell trapped by breech block in rear, remove the shell,
ejection port cycle the action forward
and continue firing.
MODULE 5 THE PUMP ACTION SHOTGUN
© NSW Agriculture FAAST TRAINING AND REFERENCE MANUAL 73
1. A shotgun should not be used for targets greater than ______metres away?
2. What does the choke do on a shotgun?
3. What are the first two steps to be carried out when stripping a Remington 870 or a
Mossberg 500?
4. List 3 possible causes for a shotgun failing to fire.
5. What is the recommended choke setting and magazine capacity for FAAST
shotguns?
FIREARM SAFETY AND FIRING RANGE INSTRUCTION MODULE 6
74 FAAST TRAINING AND REFERENCE MANUAL © NSW Agriculture
6. Firearm safety and firing range instructions
Summary:
� The use of firearms, particularly from helicopters is a dangerous and hazardous
practice and penalties apply to FAAST shooters and students for breaches of
protocol.
� There are 8 key firearms safety commandments and many others which are
contained in the NSW Police Handbook on Firearms Safety Awareness.
� There are a number of essential safety precautions for the handling of firearms
around base camps.
� A number of firing range protocols and commands exist to ensure that clear and
concise directions are conveyed between shooters and range officers and that safe
and professional conduct is exhibited by all.
6.1 Learning outcomes
After completing this module successfully, students will be able to:
1. Demonstrate an understanding of general firearm safety principles.
2. Demonstrate an understanding of firing range rules and the ‘load-action-fire’
and ‘cease fire sequences’
6.2 Introduction
Firearms are inherently dangerous and hazardous items, particularly when in the
hands of inexperienced or incompetent users. However, if used in a safe and
professional manner they are a crucial tool for pest and wildlife managers.
For FAAST shooters, the risks of firearms are somewhat greater than in normal
shooting situations. This is due to the capabilities of the firearms involved and the
nature of aerial shooting with its many additional principles, safety procedures and
potential risks.
For this reason FAAST shooters and students undertaking training must ensure that
before handling firearms, they are alert and aware of all of their actions and
responsibilities. There is no second chance if a FAAST shooter or a student
mishandles a firearm through carelessness, horseplay or other inappropriate practice
(see FAAST shooters disciplinary code - module 2 of this manual and the FAAST
Procedures Guide).

MODULE 6 FIREARM SAFETY AND FIRING RANGE INSTRUCTION
© NSW Agriculture FAAST TRAINING AND REFERENCE MANUAL 75
FAAST students will have a thorough grounding in the safe handling and use of
FAAST firearms however, due to the inherent risks of using FAAST firearms for the
first time:
ANY BREACH OF FIREARM SAFETY AT A FAAST TRAINING COURSE
WILL LEAD TO THE INSTANT DISMISSAL FROM THE COURSE OF THE
STUDENT CONCERNED.
6.3 General firearms safety
Some firearms safety principles are generic and can be applied to all situations
involving firearms. In this section some of the generic firearms safety principles
relevant to aerial shooting operations, including those relevant to ground range work,
will be outlined. All of these principles and others are contained in the NSW Police
Handbook on Firearms Safety Awareness produced by the NSW Firearms Safety
Awareness Council. A full copy of this booklet can be found in attachment.3.
Figure 6.1 Firearms are to be treated with extreme caution at all times. Source :A.Moriarty
6.3.1 The 8 commandments of firearms safety
1. Treat every firearm as being loaded.
2. Always point firearms in a safe direction.
3. Never have loaded firearms in the car, home or camp.
4. Identify your target and what is behind it.
5. Never fire at hard surfaces or water.
6. Store firearms and ammunition separately.
7. No alcohol or drugs when handling firearms.
8. Do not climb fences or obstacles with loaded firearms.

FIREARM SAFETY AND FIRING RANGE INSTRUCTION MODULE 6
76 FAAST TRAINING AND REFERENCE MANUAL © NSW Agriculture
6.3.2 Additional firearms safety principles
� Treat every firearm as being loaded. If it has not been continually in your
possession, there is a chance that it may be loaded. If you have not personally
checked it, assume that it is loaded.
� Always check that the muzzle is pointed in a safe direction. Do not point a loaded
or unloaded firearm at anybody of anything you do not wish to shoot (this should
become habit).
� When first picking up a firearm, keep the muzzle under control and always
pointing in a safe direction. Immediately check if it is unloaded. Whenever taking
possession of a firearm also check that the barrel is not cocked and that the action
is unobstructed.
� Never take a loaded firearm indoors. Accidental discharge can cause death, injury
or property damage.
� Never carry a loaded firearm in a vehicle. Carry only empty firearms, preferably
with the action open and the bolt removed or dismantled, in an appropriate
carrying case. Driving over rough roads or terrain can cause a loaded firearm to
discharge.
� Exercise extreme care when placing a firearm in, or removing it from any vehicle
(including helicopter). Never have the barrel pointing towards any person. Always
handle the firearms by the butt or frame with the muzzle pointed in a safe
direction.
� Never lean a loaded firearm against a wall, fence, tree or vehicle, as the firearm
may fall. The impact with the floor or ground may cause it to discharge.
� Never “skylark” or engage in “horseplay” when you have a firearm in your hands.
This is irresponsible behaviour and can result in serious accidents.
� Never mix alcohol or drugs with firearms use. Alcohol dulls and slows mental and
physical faculties. Alertness is essential to proper and safe firearms use.
� Safety catches should be engaged at all times when not firing. However safety
catches are mechanical devices and may become worn and not work. Do not let
them give you a false sense of firearms security. Keep your finger off the trigger
unless you are about to fire.
� Load your firearm only when you are ready to shoot. This is a practice
recommended by the most experienced and safest shooters and one which should
be followed by all.
� Make certain your target is positively identified before firing. Keep you finger out
of the trigger guard until your target is identified. If in doubt do not shoot.

MODULE 6 FIREARM SAFETY AND FIRING RANGE INSTRUCTION
© NSW Agriculture FAAST TRAINING AND REFERENCE MANUAL 77
� Do not fire at movement. Do not fire at colour. Do not fire at shape. Do not fire
at sound.
� When shooting check your danger zone. The danger zone is the area between you
and your target and the area beyond the target which is within range of your
projectile. Remember, for high powered rifles a bullet from an upward shot may
travel for kilometres. Ensure that the path from the muzzle to the target is free of
obstructions likely to impede its safe progress.
� Never shoot during the hours of darkness. During these hours it is impossible to
see what may be in your danger zone.
� Never shoot over the top of hills or ridges. This creates danger to people, animals
and property because you have no knowledge of what may be out of sight.
� Always seek the permission of land-holders before shooting on their land.
� Firing at or across water, flat hard ground or metal objects is always dangerous
and may cause a ricochet.
� Unless you are an expert, damaged firearms should be repaired by a gunsmith.
� Use only the correct ammunition as specified for your firearm.
� Be particularly careful at the moment of closing, cocking, taking off the safety
catch, uncocking or opening a loaded firearm. This is the time when accidental
discharge most frequently occurs.
� Practice self-control continually when shooting. Indiscriminate, unplanned
shooting usually results in damage to property and may cause death or injury to
humans or livestock.
� If you shoot at an animal and cause obvious injury, do your utmost to make the
final kill. Failure to do this will often subject the animal to days or weeks of
suffering before death.
� Repeated exposure to shotgun and centre-fire rifle explosion discharge can cause
permanent hearing damage.
It is recommended that FAAST students and FAAST shooters read and familiarise
themselves with all firearms safety principles as outlined in the NSW Police
Handbook on Firearms Safety Awareness (attachment 3).
6.4 Firearm safety around base camp
The following rules must be adhered to around the base camp during all FAAST
operations and FAAST training courses.
� All students/shooters must be licensed for the weapons they carry and use.

FIREARM SAFETY AND FIRING RANGE INSTRUCTION MODULE 6
78 FAAST TRAINING AND REFERENCE MANUAL © NSW Agriculture
� All students/shooters must be familiar with general firearms safety principles
outlined above and those outlined in the N.S.W. Police Firearms Safety
Awareness booklet (attachment 3).
� Upon arrival all students/shooters may surrender their personal weapons to the
weapons instructors who will prove the weapons clear and secure all weapons in a
designated secure area.
� No ammunition or loaded magazines will be stored in the weapons area.
� Under no circumstances will any weapon be loaded in or near the base camp site.
� No weapons will be removed from the storage area without the authority of a
weapons instructor/master.
� When weapons are returned from the range area they must be inspected by a
weapons instructor/master and cleared prior to the commencement of daily
weapons cleaning. There will be no ammunition in the cleaning area.
� After cleaning has been completed the firearms are to be proven safe and
appropriately stored.
6.5 Firing range rules
It is critical that firing range rules are fully understood and followed by everyone
using the range.
� The range master will be the officer in charge of these sessions and will wear
identifiable clothing.
� No more than four students, each with an instructor, will be on the range at any
one time. Everyone else must remain off the range in a designated area.
Weapons will be removed from the storage area under the directions of a weapons
instructor.
� Weapons will be conveyed to the range in one vehicle under the supervision of a
weapons instructor. No loaded weapons will be conveyed and ammunition will be
conveyed in a separate vehicle.
� All weapons will remain in the designated vehicle under the immediate control of
a weapons instructor, whilst at the back of the range, in a designated area.
� Ammunition and magazines will be located on a separate vehicle located a safe
distance away from the weapons vehicle. All weapons, not in immediate use,
must be placed on a nominated vehicle.
� One instructor will be nominated ‘ammunitions officer’ and will have sole
responsibility over ammunition.

MODULE 6 FIREARM SAFETY AND FIRING RANGE INSTRUCTION
© NSW Agriculture FAAST TRAINING AND REFERENCE MANUAL 79
� Weapons will be issued to the students when required to be taken into the range.
They will remain checked and unloaded until directed otherwise by the range
master.
� Weapons movement to and from the range will be as follows - Actions locked
open, magazines removed and the muzzle of the weapon pointed in a safe
direction.
� All weapons will be taken onto the range and placed on the ground with the
muzzle facing directly down towards the target.
� No weapon will be loaded until directed by the range master.
� All fire will cease and safety catches will be applied immediately on the direction
of the range master.
� At the completion of the live shoot, weapons will have their magazines removed
and proved clear by the weapons instructor prior to being returned to the
designated weapons vehicle.
Figure 6.2 It is critical that firing range rules are fully understood and followed by
everyone using the range. Source: D.Pitt
6.6 ‘Load-action-fire’ and ‘cease fire’ sequences
The range master will explain the sequences to the students before entering the firing
range. Students will be given the opportunity to ask questions to ensure that everyone
clearly understands the sequences.
� The range master will call, "Students ready. Earmuffs on."

FIREARM SAFETY AND FIRING RANGE INSTRUCTION MODULE 6
80 FAAST TRAINING AND REFERENCE MANUAL © NSW Agriculture
� Students will put their earmuffs on.
� The range master will call "Load", (or an appropriate signal as indicated
beforehand).
� Students will load the magazine into the weapon.
� The range master will call "Action” or give an appropriate signal as indicted
beforehand.The Students will action the weapon (load the chamber).
� The range master will call "Commence Fire” or give an appropriate signal as
indicated beforehand. The students will commence fire and complete the
sequence.
� In the event of a student experiencing a weapon malfunction (stoppage) they will
immediately keep the weapon pointed down range at their target, apply the safety
catch and raise one arm as an indication of a problem. A weapons instructor will
respond immediately.
� On the final call of “cease fire” All students will remain in their shooting position
until the range master and the weapons instructors have cleared all weapons on the
range and the range master has called "Range closed".
� At the completion of the session all weapons will be inspected, magazines
removed and cleared by the range master or a weapons instructor prior to being
dismissed from the range.
� Students will leave the range immediately and return the weapons to the
designated vehicle for surrender to the weapons instructor stationed at that
location.
� The weapons instructor will prove the weapons safe and place them on the
vehicle.
6.6.1 Warning signal
At the indicated warning, all fire is to stop immediately. All students will stop firing,
apply the safety catch and remain where they are situated with the muzzle of the
weapon pointed down range and wait for further instruction.

MODULE 6 FIREARM SAFETY AND FIRING RANGE INSTRUCTION
© NSW Agriculture FAAST TRAINING AND REFERENCE MANUAL 81
Figure 6.3 SLR marksmanship training by a FAAST student. Source: D Pitt
1. List 2 of the 8 firearms safety commandments.
2. What is the maximum number of students allowed on the firing range at any
time?
3. In what state is the firearm carried onto the firing range?
4. How are shooters to respond if the range master gives repeated whistle blasts?
5. When transporting FAAST firearms to a range for use where should the
ammunition be?