fabfilter pro-c help
TRANSCRIPT

Introduction
This manual contains complete documentation for FabFilter Pro-C in printer-friendly format. All information in this manual is also accessible via the Help button in FabFilter Pro-C's user interface.
Table of contents

Table of Contents
Introduction About FabFilter Pro-C 3 Quick start 4 About compression Compressor basics 5 Advanced compressor techniques 8 Mid/Side introduction 10 Using FabFilter Pro-C Overview 11 Knobs and switches 13 Dynamic parameters 14 Time parameters 16 Output section 18 Displays 20 Expert mode 22 MIDI learn 26 Presets Loading presets 27 Saving presets 28 How presets are stored 29 Purchasing FabFilter Pro-C Purchasing FabFilter Pro-C 30 Entering your license key 31 Support Support 32 Manual installation 33 Component routing 34 VST plug-in versions 36 License agreement 37 Acknowledgements 38 About FabFilter 39

1.1
About FabFilter Pro-C
There is one signal-processing tool that is almost impossible to do without in any form of audio recording or post-production: compression. Compression is available in a wide variety of different formats, flavors, designs and degrees of quirkiness.
FabFilter Pro-C is not just a good sounding compressor. FabFilter Pro-C is an unusual stereo compressor with all the tricks up its sleeve that you will ever need. With added options like Mid/Side compression, side-chaining with built-in filters or even with external sources, it can work in any way you'll ever need. Whether for mastering or mixing, Pro-C will do the job with lots of style.
Key features include various program dependent compression characteristics, very high quality sound with 64-bit internal processing and zero latency, flexible routing and side chain possibilities, and an innovative interface. Apart from its beautiful sound and character, FabFilter Pro-C also offers amazingly flexible routing options for both mono, stereo, and mid/side processing.
FabFilter Pro-C is available as RTAS, Audio Units and VST plug-in for Mac OS X (Universal) and as RTAS and VST plugin for Windows.
Next: Quick start
See AlsoUsing FabFilter Pro-C

1.2
Quick start
The installer will copy the FabFilter Pro-C plug-in into the common RTAS and VST plug-in folders (Windows) or the /Library/Audio/Plug-Ins/Components, VST, or Pro Tools plug-ins folder (OS X) on your computer.
In most cases, your host will then recognize the plugin automatically. However, if the instructions below do not work, see Manual installation instead.
● Cubase SXChoose an empty insert slot and select FabFilter Pro-C from the pop-up menu. To use Pro-C MIDI Learn feature, create a new MIDI track and set its output to the FabFilter Pro-C instance you have just created.
● Logic AudioChoose an empty insert slot on one of your audio tracks, instrument tracks or buses and select FabFilter Pro-C from the pop-up menu. You will find FabFilter Pro-C in the Stereo > VST (Windows) or Stereo > Audio Units (OS X) section. A mono version is also available from the Mono menu.
● Pro ToolsChoose an empty insert slot on one of your audio tracks, instrument tracks or buses and select FabFilter Pro-C from the pop-up menu in the Dynamics section. Note that there are both mono and stereo versions of Pro-C available.
To begin, make sure attack and release are both zero. Put the ratio in a gentle 4:1 setting and bring down the threshold to make compression audible. Play with those parameters until you have the desired effect. Have fun!
Next: FabFilter Pro-C overview
See AlsoCompressor BasicsOverviewVST plug-in versions

2.1
Compressor basics
The compressor was invented to control the gain on a recorded track. In the early days this was done by hand. The best way to even out the level of a recorded track is to "ride" the fader manually. When the signal gets too loud, the engineer brings it down. This involved following a score (or working from memory) and making level changes in anticipation of the peaks in the music. And so the compressor was invented to do this automatically. It takes less attention and it can respond to faster changes.
But then came, yes indeed, The Beatles! And they started using that compressor to change sound in a new way. Sly Stone was also very pleased with heavily compressed sounds. Since those days compression is everywhere. Compression can be applied to any signal that varies too much in level, on separate tracks or complete mixes. Or can be used as a way to create a certain sound famously used on Daft Punk albums.
Nowadays it is used extensively in audio recording, production work, noise reduction, and live performance applications. Compression can easily be overdone though, and this leads to music with little or no dynamics. This also created the so-called (not so cool) "loudness war" to which FabFilter Pro-C does not intend to contribute. (More on that in this Wikipedia article .)
So how does it work?
On an analogue mixer a fader would be a "manually controlled amplifier", but since it is here done automatically that component is shown as DCA (digitally controlled amplifier). To make that fader "go down", the signal is sent to a so-called "side chain" which consists of a level detector and gain control. So the gain control is the actual compressor. It will control the level in time using the attack and release times of the compressor, and will change the volume based on threshold and ratio settings.
When a signal is fed to the level detector that is above the threshold, the gain controller will lower the volume (after the attack time) with an amount based on the ratio setting. This input/output relationship is often described by a simple graph called the transfer function. The horizontal axis corresponds to the input signal level, and the vertical axis is the output level (measured in decibels). The line at 45 degrees corresponds to a ratio of 1 (no compression).
The compressor setting is usually stated as a ratio, such as 2:1, which means that the input level would have to

increase by two decibels to create a one decibel increase in the output and thus the effective gain reduction is 1 dB. With a 4:1 setting, the input would need to change by 4 dB for a 1 dB change in the output level and thus the effective gain reduction is 3 dB, and so on. This means the amount of gain reduction is determined by the ratio control in combination with the threshold. Low thresholds mean the compression starts at a lower level, so there will be a lot of gain reduction. High ratios squash signals above the threshold harder, also introducing a lot of gain reduction.
This picture shows what is actually happening:
Here you can see that the compressor will lower the level of a signal above the threshold based on the ratio setting after the attack time. When the input signal falls below the threshold again, the compressor recovers with the release time, back to the original signal. And that's what a compressor is all about.
Last but not least:
Soft knee compression works slightly different. A soft knee brings in the compression more progressively by gradually increasing the compression ratio as the signal level approaches the threshold level. Soft knee compression is more subtle, since the compressor doesn't wait and then suddenly applies the full level of compression at the threshold. Therefore a soft knee is more suitable for compressing whole mixes or gentle sounds that hover around the threshold.

Next: Advanced compressor techniques
See AlsoDynamic parametersTime parametersExpert mode

2.2
Advanced compressor techniques
If you understand Compressor Basics, it is time for some more advanced use of the compressor technology. As mentioned above, the compressor normally monitors the main input signal through a side-chain circuit, but we could send another signal to the level detector. The most common example would be the radio DJ. While music is playing, speaking into the microphone will cause the level of the music to drop so that it's easier to hear the DJ talking. To do this we have to insert the compressor on the music track but send the vocal to the level detector.
This technique is called "ducking". When mixing in the studio, ducking can also be used to emphasize certain elements, such as the kick drum. The kick could lower other tracks in the mix, increasing its "presence".
FabFilter Pro-C also provides the option to patch an EQ unit before the level detector to make the compressor respond only to frequencies passed on by the EQ. Remember that this EQ does not effect the actual input signal but only the level detector. The gain control then adjusts the actual input signal."Why?" I hear you ask... Maybe we want the compressor to ignore the low end of a drum mix when compressing that drum mix. Then we need a high-pass filter before the level detector so the level of the low kick drum will not cause the compressor to react.
If you have more questions you could start reading this article (the Internet has many good articles about this subject).
Just one more thing we'd like to add. When using compression there is only one thing to

remember: there is no rule. Experiment with settings and all the possibilities FabFilter Pro-C has to offer!
Next: Mid/Side introduction
See AlsoCompressor basicsDynamic parametersTime parametersExpert mode
2.3
Mid/Side introduction
Mid/Side, or the representation of stereo sound as the sum and difference of the two channels. What does that mean and why would we want that in a compressor?
The Mid/Side concept has its origin in stereo microphone techniques using two microphones (more about that here on Wikipedia ) but also gives us many options to change a stereo audio signal.
Now, if you can handle a bit of schoolboy algebra let's demonstrate how it works. To begin with, the 2-channel audio data is described in terms of the Left (L) and Right (R) channel. From these we can get the Mid and Side channels with the following calculation:
Mid = (L+R)/2Side = (L-R)/2
The Mid channel is also often called "Mono" and Side "Stereo" (that's nice, the first letters are the same!). The Mid channel contains the signal that is in the center of the stereo mix, and the Side channel contains the rest (everything that is on the sides of the mix). By seperating them, we have the opportunity to process those signals independently.
Should we wish to return from Mid/Side format back to Left/Right, then we can recreate the Left channel by summing the Mid plus the Side, and the Right channel by taking the Mid minus the Side, as follows:
Left = Mid + SideRight = Mid - Side
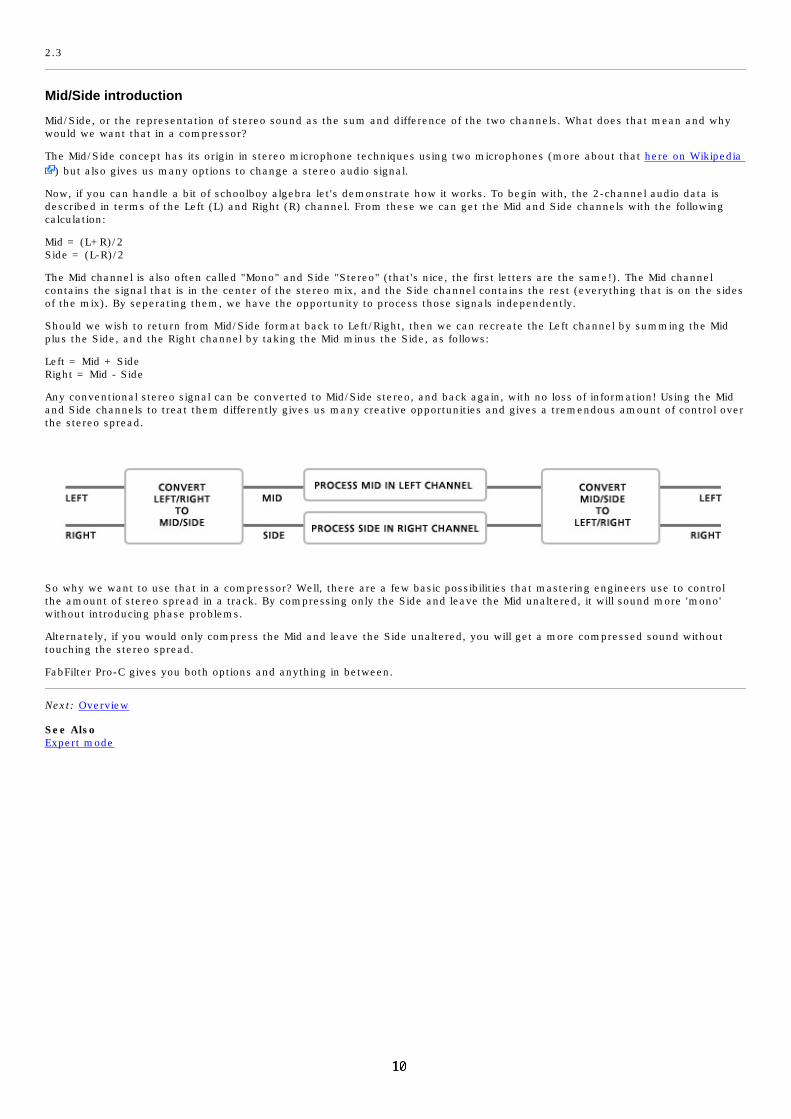
Any conventional stereo signal can be converted to Mid/Side stereo, and back again, with no loss of information! Using the Mid and Side channels to treat them differently gives us many creative opportunities and gives a tremendous amount of control over the stereo spread.
So why we want to use that in a compressor? Well, there are a few basic possibilities that mastering engineers use to control the amount of stereo spread in a track. By compressing only the Side and leave the Mid unaltered, it will sound more 'mono' without introducing phase problems.
Alternately, if you would only compress the Mid and leave the Side unaltered, you will get a more compressed sound without touching the stereo spread.
FabFilter Pro-C gives you both options and anything in between.
Next: Overview
See AlsoExpert mode

3.1
Overview
The interface of FabFilter Pro-C is divided in several sections. The top section controls the dynamic behavior and consists of the level and time parameters. At the right you'll find the output section. Several displays in the left bottom corner show all dynamic information, while the right bottom corner contains the MIDI Learn controls.
● Dynamic parameters This section contains the parameters that control the dynamic behavior of the compressor. The input and threshold combined with the ratio will determine how much compression is being applied. The input can be panned when Expert mode is activated. See Dynamic Parameters.
● Time parametersThe time parameters section contains the attack and release time controls. See Time parameters.
● Output sectionThis is where the output mix and panning settings are controlled. The dry (unprocessed) signal and the output of the compressor have their own output volume knobs allowing parallel compression. Panning can be applied when Expert mode is activated. See Output section.
● Level displaysThis section contains the transfer function display, animated level display, and the peak level meters. These enable you to very precisely monitor input and output level and the applied gain reduction for every second of sound. See Displays.

● Expert parameters In Expert mode, this section will give you unsurpassed options to compress the audio signal. External input, stereo linked, unlinked, mid/side compression or anything in between is possible. See Expert mode.
● PresetsWith the preset buttons, you can easily browse through the factory presets or save your own settings so you can re-use them in other songs. See Loading presets.
● MIDI learnMIDI Learn offers the possibility to easily associate any MIDI controller with any plug-in parameter. See MIDI Learn.
Next: Knobs and switches
See AlsoQuick startExpert modeCompressor basicsComponent routing

3.2
Knobs and switches
It is easy to control Pro-C's parameters with the large round knobs and switches. They will light up when you move the mouse cursor around to indicate that you can adjust them. The moment you move the mouse cursor over a knob, a parameter value display will pop up, which shows the current value and unit of the parameter.
All knobs support two click-and-drag modes:
1. Vertical modeClick on the center area of a knob and drag up or down to adjust it. This is particularly useful for quick changes, but you can also hold down the Shift key while dragging to make precise adjustments. In addition, the knob detects when you are dragging slowly and will then increase its resolution so you can easily fine-tune the parameter.
2. Rotate modeGrab the arrow of the knob and drag it around. By moving the mouse cursor further away from the knob while dragging it, you can make very precise adjustments.
Tips
● To reset a knob to its default position, hold down the Ctrl key (Windows) or Command key (OS X) and click the knob once.
● Some controls are linked to each other so they can be adjusted together by holding down the Alt key (Windows) or Option key (OS X) while dragging one of the knobs. This applies to the Output and Dry Mix knobs and the two Side Chain Level knobs in Expert mode (both the inner knob and the outer rings).
● When running the RTAS plug-in in Pro Tools, the standard Pro Tools shortcuts are used instead of those listed above. These are Alt/Option to reset, Shift to link, and Ctrl/Command to fine-tune.
Next: Dynamic parameters
See AlsoOverview

3.3
Dynamic parameters
The section in the top-left corner of the FabFilter Pro-C user interface is where the conventional compression settings can be found: input gain and panning, threshold and ratio. These determine the dynamic behavior of Pro-C. For in-depth background information on these settings, see Compressor basics.
● KneeThe Knee switch chooses between a custom soft knee that is different for each compressor style, or a simple hard knee. You can view the resulting transfer function in the transfer function display.
● StyleFabFilter Pro-C comes with 3 different styles of compression: Clean, an allround, low distortion, feedforward, program dependent, soft knee style; Classic: a vintage, feedback, very program dependent style; and Opto: a relatively slow, very soft knee, more linear opto style.
● InputThe Input knob controls the amount of input gain that is applied before the input signal enters the compressor. If Expert mode is active, it is also possible to pan the input signal.
● ThresholdThe Threshold knob sets the threshold at which compression begins. Lower thresholds give heavier compression.
● RatioThe Ratio knob sets the amount of compression. At a ratio of 10:1, just one dB of output signal above the threshold remains for every 10 dB of input signal above the threshold. You can click on the small dots around the Ratio knob to jump to certain fixed ratio amounts. If you move the knob completely to the left (1:1), no compression will take place. If you move it completely to the right (infinity), everything above the threshold will be completely compressed away, making Pro-C act as a limiter.

Next: Time parameters
See AlsoCompressor basicsOverview

3.4
Time parameters
The time parameters section at the top of the compressor contains the attack and release settings.
● AttackThe Attack knob sets the time after which gain reduction sets in. For transient-rich program material like drums, fast attack times are needed to minimize overshoot. For other program material, too short attack times may dull the sound a bit. FabFilter Pro-C is capable of very fast attack times and they are program dependent.
● ReleaseThe Release knob sets the time that the compressor takes to recover from gain reduction. The various compression characteristics of Pro-C use different release models, and in most cases, the release time is very program dependent.
● Auto ReleaseThe Auto Release button enables a smart auto release feature. When enabled, the compressor adjusts the release time depending on the current amount of gain reduction, so this actually introduces an additional form of program dependency. When Auto Release is used, the Release knob changes into the Auto Release Speed knob that adjusts the overall effect of the auto release feature on the release time.
Program dependency
The different compressor styles in FabFilter Pro-C all have their own kind of program dependency. This means that the compressor reacts differently to different kinds of input (program material). For example, Pro-C will recover very fast from transients (fast changes/peaks), but will react quite a bit slower after longer periods of gain reduction. Both the attack and release times are program dependent.
The Classic style is by far the most program dependent style. Even at the fastest release time setting, the actual release time can increase up to a few seconds! Also the Clean style uses a form of program dependency to sound smooth on various types of program material. The Opto style implements only little program dependency.

Next: Output section
See AlsoCompressor basicsOverview

3.5
Output section
When all audio is processed the way you want, it is sent to the output. The output section of the interface contains controls for adjusting main volume. The output of the compressor and the dry (unprocessed) signal have their own output knob (and panning rings when Expert mode is activated).
This allows for parallel compression. Parallel compression refers to mixing the dry signal with a compressed copy of itself. The dynamics in the dry signal are preserved while the compressed signal adds body and character to the overall sound. The advantage of this is that the sound is reinforced where it needs it, but without the risk of crushing any peak transients.
For example, you can smash the living crap out of the snare drum to get whatever effect you are looking for while at the same time just lightly blending that snare into the mix. A very powerful function so we suggest you experiment with this.
The Auto Gain knob will help you to restore volume after compression. This is also known as "make-up gain" because it compensates for the gain reduction introduced by the compressor.
Warning: Auto Gain is not a guaranteed way of getting the "right" result. Rather, it can be a useful tool while you are tweaking the threshold and ratio parameters. Especially when using Expert mode functions like filtering, panning and side chain levels, it is better to switch Auto Gain off and adjust the Output level manually.
Next: Displays

See AlsoOverview

3.6
Displays
FabFilter Pro-C comes with some very cool ways of looking at all the dynamic information.
On the left, you'll find the basic transfer function display which shows the input/output relationship. The horizontal axis corresponds to the input signal level, and the vertical axis is the output level (measured in decibels). The red area in the display shows the current signal level. Furthermore the threshold, ratio and knee are visible so you have a clear view on those compressor settings. See Compressor basics for more information.
In the center is a very useful other window: the animated level display showing the actual input, output and gain-reduction levels in a 2D animated display. Very useful if you want to know exactly what's happening. The input level is shown in grey, the gain reduction as a red line, and the output level is yellow. Use the three small colored knobs underneath the display to adjust the opacity of each of the three curves to your liking.
To the right, there are three very accurate peak level meters, which are always displaying the current input level, gain reduction level, and output level as well. In addition, the output meter will freeze the peak level if it has clipped (shown in red). Click the meter to reset it.
Notes
● The animated level display will slide under the knee display when Expert mode is enabled.
● You can change the scale of the level display and the peak level meters with the Meter Scale drop-down button, ranging from 48 dB (the default) to 8 dB for very precise mastering purposes. The transfer function display always keeps the 48 dB range.
● With the small Display Enabled button, you can turn off all animated displays in case you find them distracting. The peak level meters will always be visible, though.
● To save all display settings so they will be re-used in future plug-in instances, click Save Interface Defaults on the Help menu. The display settings will also be saved with presets and in songs.
● If the output meter indicates clipping, this does not imply distortion in Pro-C: it can handle levels above 0 dB easily. Rather, this indicates that the output signal might clip in another part of the audio chain, for example your sound card or host software.

Next: Expert mode
See AlsoCompressor basicsOverview

3.7
Expert Mode
If Expert mode is activated with the button under the peak level meters, the animated level display slides away to reveal controls that makes FabFilter Pro-C shine. In Expert mode, input and output controls get panning options and Pro-C is now capable of side-chain compression, both with filtered or external side-chain inputs, but also mid/side compression, mostly used in mastering studios.
Before you read on we recommend you to read Advanced compressor techniques and Mid/Side introduction.
Internal/external input
Normally, the side chain receives input from the regular plug-in input signal. In this case side-chain should be set to In. Alternatively, the side-chain can receive its signal from any other track from your DAW. In this case the side-chain should be set to Ext. (In VST hosts, the Ext option can be disabled. See VST plug-in versions.) Use the Audition button to listen to the side chain signal exclusively.
Filtering
You can filter the side chain signal with steep 48 dB/octave low-pass and high-pass filters. To adjust the filters, drag the triangular buttons at the buttom of the side chain section. The filters will be bypassed completely when they are at the far left and right sides of the filter controller. To drag both filters at once, either hold down the Alt/Option key or drag the highlighted area between the buttons. Again, use the Audition button to listen to the filtered side chain signal.
Side chain gain
The side chain can be used very precisely because of its unique gain structure. In Pro-C it is possible to use stereo compression stereo-linked or unlinked and best of all, you can have anything in between. By using the gain and panning knobs it is very easy to
precisely determine the level and channel which will be sent to each level detector of each channel.
If you put both volume levels at zero dB and both panning knobs in center position, Pro-C will be stereo linked because both channel level detectors get the same audio signal. This means that if the left channel's signal rises above the threshold, the right channel's gain will react the same way and will be reduced by the same amount as the left channel, and vice versa. This keeps the stereo image from wandering from left to right when compressing a stereo mix.
If you then only turn the panning ring for the left signal to the full left position and the right panning ring to the full right position Pro-C is unlinked. Now compression on both channels will work independently. (You can hold down the Alt/Option key to link both panning rings.)
It is important to understand that all other settings will result in anything between linked and unlinked (but maybe also cross-channel-compression).
Mid/Side compression
Pro-C has a special feature that sets it apart from most other compressors: Mid/Side compression. To turn Mid/Side mode on, click the M/S button. The red indicator tries to make it clear that we're now using the two compression channels for two totally different signals.
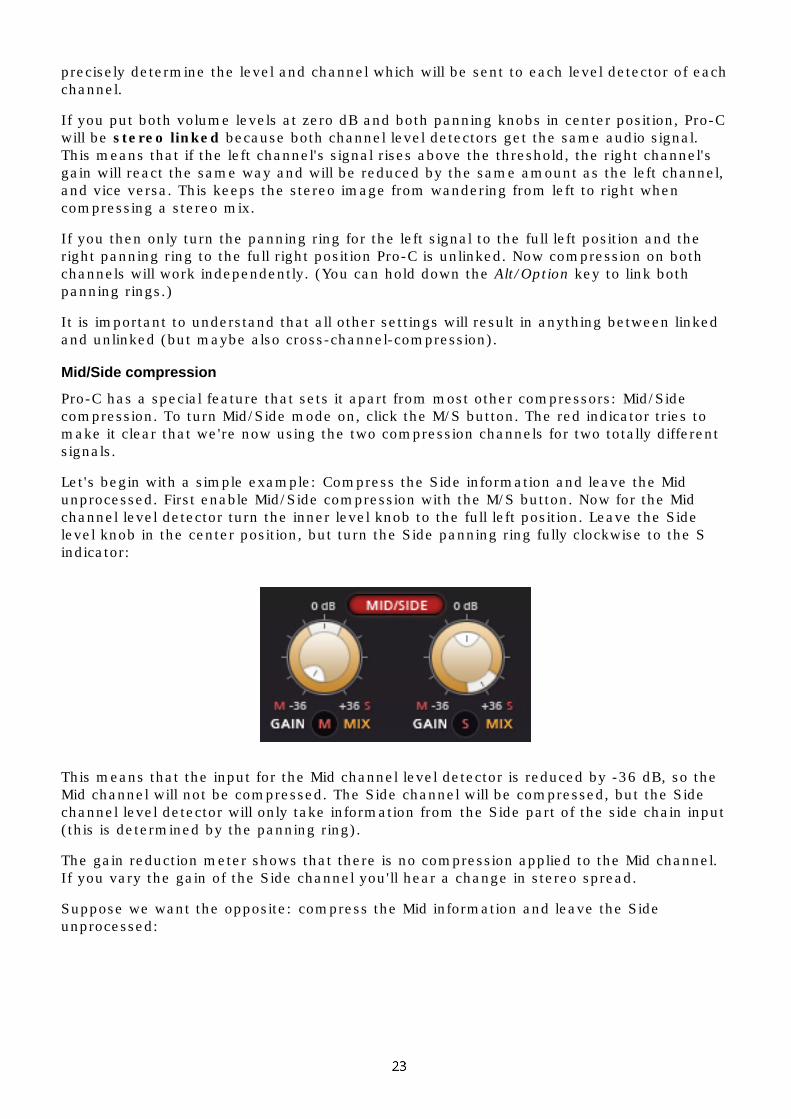
Let's begin with a simple example: Compress the Side information and leave the Mid unprocessed. First enable Mid/Side compression with the M/S button. Now for the Mid channel level detector turn the inner level knob to the full left position. Leave the Side level knob in the center position, but turn the Side panning ring fully clockwise to the S indicator:
This means that the input for the Mid channel level detector is reduced by -36 dB, so the Mid channel will not be compressed. The Side channel will be compressed, but the Side channel level detector will only take information from the Side part of the side chain input (this is determined by the panning ring).
The gain reduction meter shows that there is no compression applied to the Mid channel. If you vary the gain of the Side channel you'll hear a change in stereo spread.
Suppose we want the opposite: compress the Mid information and leave the Side unprocessed:

To eventually hear the right mix of the Mid and Side channels you can adjust the output panning ring. Now this can act like a stereo enhancer! Play with these settings and you'll feel inspired for some great sounds or you can surgically treat your audio any way you want. There is a lot you can achieve with FabFilter Pro-C. This is not only interesting for compressing material with much Mid/Side difference, but also great to "duck" the Mid or Side with another track as its side-chain.
Here is one last example that compresses only the Side input signal using the Mid side chain signal:
Panning
Sometimes you'll find that your input signal is not balanced evenly between the right and left channel. This can make your compression work erroneously. The panning ring of the input knob makes it possible to make sure the compressor works on a evenly balanced stereo source. In addition to this you can also balance the output of the compressor and the unprocessed signal independently. When Mid/Side is used it controls the mix between Mid and Side signal.
Notes
● The side chain level knob and panning ring at the left side of the side chain section control the compressor channel that works on the Left or Mid channel. Likewise, the righthand knob and ring control the compressor channel that works on the Right or Side channel.
● The panning rings in the side chain section determine from which channel mix the L/M or R/S detector takes its input.
● If the side chain level panning rings are in the center position, L/R and M/S processing give the same result, because the channels are always fully linked. Note that you can use the Ctrl/Command key to reset a panning ring.
● You could use Pro-C solely as a mid/side processor by enabling M/S mode, setting Output to zero, and using the input and dry mix panning rings.

Next: MIDI learn
See AlsoCompressor basicsOverviewComponent routing

3.8
MIDI learn
Controlling FabFilter Pro-C's parameters with MIDI is very easy using the MIDI learn feature. With MIDI learn, you can associate MIDI controller numbers with any parameter.
Enable MIDI learn by clicking the Learn button so that its light is on. Now do the following to associate a controller number with a parameter:
1. Turn the knob or adjust the switch for the desired parameter in FabFilter Pro-C user interface.
2. Adjust the slider or knob on your MIDI keyboard or MIDI controller that you want to associate with that parameter.
That's all! The parameter will now be controlled by the MIDI controller. The controller number appears in the Learn button to show the association while MIDI learn is on. You can now go back to step 1 to associate a different parameter. If you turn a knob for a parameter that already has an association, the MIDI learn button shows the corresponding controller number.
To see all current parameter associations, click the menu button at the right-hand side of the MIDI Learn button. The menu that pops up enables you to view all settings, clear specific settings or all settings, save all settings and revert to previously saved settings.
The MIDI learn settings will automatically be loaded when opening the plugin and saved when closing it. Use the Revert and Save commands in the MIDI learn menu to explicitly save and load the settings.
Tips
● You can enable or disable MIDI for the plug-in with the Enabled button. Disabling MIDI events is useful if your host automatically sends MIDI to all effects on a channel.
● In Logic Audio, effect plug-ins do not receive MIDI by default. If you want to use Pro-C MIDI Learn feature, you have to put Pro-C on its own instrument channel as a MIDI effect, and route audio through it with a side-chain.
Next: Loading presets

4.1
Loading presets
Plenty of presets are provided with FabFilter Pro-C, giving a good idea of what you can do. You can either use the presets as they are, or tweak them further to create your own unique settings.
● To load a preset, click the preset button. The presets menu will appear with all available presets. Click on a menu item to load that preset. The currently selected preset is highlighted with check marks.
● To explore the presets one by one, click on the little arrow buttons to the left and right of the main preset button. This will load the previous or next preset in the menu.
The preset button shows the name of the current preset. If you have changed the preset by adjusting one or more knobs, the name is dimmed to show that this is not the original preset.
The Default Setting preset is loaded automatically when FabFilter Pro-C is started. To change the default setting, simply overwrite this preset.
MIDI Program Change and Bank Select
Loading a presets can also be done via MIDI, using Bank Select and Program Change messages. The preset menu contains an item View Bank/Program Numbers. If checked, all preset names are preceded by their bank/program number combination. (For example: (1/10 Clean). This means that you can load the setting by first sending a Bank Select message to select bank 1 and then sending a program change message to select program 10.
Important:
All the presets in your preset folder are numbered automatically, starting with bank 0 and program 0. This way, you are able to access any of the presets via MIDI. However, this also means that when you add new presets to the menu, bank/program numbers of other presets might change. Be aware of this when recording program changes in a song!
Next: Saving presets
See AlsoUsing FabFilter Pro-CAcknowledgements

4.2
Saving presets
You can easily extend the included presets with new settings to build your own library of sounds that you can reuse in various projects. This is also a good way to copy settings across multiple instances of FabFilter Pro-C in a song.
To save the current setting as a preset, click the preset button, and then click Save As. A standard Save dialog will appear. Type a name for the new preset and click Save to finish.
In the Save dialog, you can also rename and delete existing presets and create a new folder to store presets in. New folders will show up as new categories in the preset menu.
If you have accidentally lost the factory presets, restore them by reinstalling FabFilter Pro-C.
Next: How presets are stored
See AlsoLoading presetsUsing FabFilter Pro-C

4.3
How presets are stored
Presets for FabFilter Pro C are stored in separate files with the .ffp extension (for FabFilter Preset). All presets reside in subfolders in the main preset folder. The subfolders will show up as separate categories in the preset menu. You can also further divide the subfolders into categories.
You can move, copy, rename and delete the preset files just like other files. The easiest way to do this is in the Save dialog that appears if you are saving a preset. The preset menu will automatically reload itself with the changes when the dialog is closed.
The default location of the main preset folder is My Documents\FabFilter\Pro C for Windows, and ~/Library/Audio/Presets/FabFilter/FabFilter Pro C/ for OS X. To change this location, first copy all presets to the desired new location, and then click Change Preset Folder in the preset menu to select the new folder.
Because FabFilter presets use the same file format on Windows and Mac OS X, you can easily share your newly created presets with other users.
Next: Purchasing FabFilter Pro C
See AlsoSaving presetsUsing FabFilter Pro C

5.1
Purchasing FabFilter Pro-C
Once you have downloaded and installed the evaluation copy of FabFilter Pro-C, you may use it freely for 30 days. Every time you start the plugin, you will see the following dialog:
While there are still days left, you can click Evaluate to start working with the plugin. If you want to keep using FabFilter Pro-C after the evaluation period, you must buy a copy in the online FabFilter Shop by clicking the Buy Now button in the evaluation dialog.
● Go to the FabFilter Shop and purchase FabFilter Pro-C now
We accept credit cards from all major credit card companies, check payments, wire payments, and PayPal. The FabFilter Shop uses secure connections and encryption, therefor your personal information is safe.
Within a few minutes after you have purchased your copy, you will receive an e-mail containing your personal license key. You use this license key to turn the evaluation copy into a fully registered version without the evaluation dialog and the 30-day trial restriction.
Next: Entering your license key
See AlsoSupportLicense agreement

5.2
Entering your license key
After you have purchased FabFilter Pro-C in the online FabFilter Shop , you will immediately receive an e-mail containing your personal license key. This license key will turn the evaluation version into a fully registered plug-in.
● Start FabFilter Pro-C and click Enter License in the evaluation dialog, or click Enter License on the Help menu if the plugin is already running.
● Copy the license information from the e-mail you have received and paste it into the text field.
After you have entered your license information, you will be need to restart the plug-in host, so make sure you save your settings if needed. From now on, you will be able to use FabFilter Pro-C for an unlimited period of time with full support via email.
Next: Support
See AlsoPurchasing FabFilter Pro-CSupportLicense agreement

6.1
Support
If you need help with problems or questions, and the help file does not provide an answer, please visit the support pages on our web site.
● Go to FabFilter Support
The support pages contain online help files and PDF manuals for easy printing. Also, you can download extra presets and other goodies. Go to the specialized user forums to ask your questions and get answers from the experts!
For sales questions and technical support, you can also contact FabFilter directly at [email protected].
Next: Manual installation
See AlsoUsing FabFilter Pro-CAcknowledgementsAbout FabFilter

6.2
Manual installation
When installing FabFilter Pro-C, the installation program will try to copy the plugin into the common VST plugins folder (Windows) or the /Library/Audio/Plug-Ins/Components or VST folder (Mac OS X) on your computer. In most cases, your favorite host will then find the plug-in right away.
On OS X, this is the only possible location for a Audio Units plug-in (although you can install them in the user Library folders under ~/Library/Audio/Plug-Ins as well).
On Windows though, most hosts have their own VST plug-ins folder. So if you are using Windows and your host does not recognize FabFilter Pro-C, you need to locate the proper plug-ins folder for your host first (it is usually shown in the Preferences or similar dialog). Then, copy the file FabFilter Pro-C.dll from C:\Program Files\FabFilter\Pro-C to the plug-ins folder that you have found and restart the host so it can reload all its plug-ins.
If you are using the RTAS version of Pro-C, copy the FabFilter Pro-C.dpm and FabFilter Pro-C.dpm.rsr files to the Pro Tools plug-in directory on your computer.
If you still have problems, contact FabFilter Support.
Next: Component routing
See AlsoQuick startSupport

6.3
Component routing
To make sure you understand how audio is flowing through FabFilter Pro-C, this routing overview will make things more clear.

Next: VST plug-in versions
See AlsoOverviewExpert mode

6.4
VST plug-in versions
There are four versions of the FabFilter Pro-C VST plug-in that form all combinations of mono/stereo and with or without external side chain input:
● FabFilter Pro-C (stereo without side chain)
● FabFilter Pro-C (SC) (stereo with side chain)
● FabFilter Pro-C (Mono) (mono without side chain)
● FabFilter Pro-C (Mono SC) (mono with side chain).
The default VST plug-in does not have external side chain support because some hosts (e.g. Steinberg WaveLab) will not work correctly otherwise.
The external side chain feature in FabFilter Pro-C (SC) works well in Ableton Live 6 and in Tracktion 2 (use Tracktion's Rack feature to be able to route the side chain input).
With Steinberg Cubase, do the following to use an external side chain input:
1. Create a Group Channel track with Quadro configuration (in the More... menu).
2. Open the VST Connections window. In the Group/FX tab, locate the group bus you just created and right-click it to create child buses for the Stereo and Stereo (Ls Rs) parts.
3. In the Mixer, insert FabFilter Pro-C (SC) in the group channel track.
4. You can now route the input audio signal track to the Stereo child bus. The side chain track must be routed to the Stereo (Ls Rs) child bus. (The routing settings are found at the top of each channel.)
5. Use Pro-C's Audition feature to confirm that everything is routed as you want it.
Note: In earlier versions of Cubase, the Group/FX tab is missing from the VST Connections window. In this case, you must pan the input track to the front of the quadro bus, and the side chain track to the rear of the quadro bus. If you're using Cubase 4, make sure you have upgraded to version 4.02 to get everything to work.
Next: License agreement
See AlsoQuick startManual installation Expert mode

6.5
FabFilter Software License Agreement
1. Disclaimer
FABFILTER, FREDERIK SLIJKERMAN AND FLORIS KLINKERT, AUTHORS OF THIS FABFILTER PRODUCT, SPECIFICALLY DISCLAIM ALL WARRANTIES, EXPRESSED OR IMPLIED, INCLUDING BUT NOT LIMITED TO IMPLIED WARRANTIES OF MERCHANTABILITY AND FITNESS FOR A PARTICULAR PURPOSE. IN NO EVENT SHALL FABFILTER, FREDERIK SLIJKERMAN AND FLORIS KLINKERT, BE LIABLE FOR ANY DAMAGE A FABFILTER PRODUCT MAY CAUSE, INCLUDING BUT NOT LIMITED TO SPECIAL, INCIDENTAL, CONSEQUENTIAL OR OTHER DAMAGES.
2. Terms of Use
You may use an evaluation copy of this FabFilter product for an period of up to 30 days. Once the evaluation period has ended, you must either purchase your copy, or remove it from your computer. If you have purchased your copy of this FabFilter product, you may continue to use your evaluation copy beyond the end of the 30-day evaluation period until your license key arrives.
We encourage you to distribute the evaluation copy and give copies to friends, as long as there is no payment involved.
You may not reverse engineer, reverse compile, or disassemble any of the files in the distribution.
You are not allowed to distribute or copy the full version of any FabFilter product. The license key that you receive when purchasing it is personal and confidential and may not be disclosed. The full version is a commercial program. It is a violation of international copyright laws to give copies to other people. You may give them the evaluation copy, so they can purchase the program on their own.
3. VST plugin technology
VST is a trademark of Steinberg Soft- und Hardware GmbH.
Next: Acknowledgements
See AlsoPurchase FabFilter Pro-CSupport

6.6
Acknowledgements
Credits go to Gijs van Klooster for writing most of this help file, especially the About compression and Expert mode sections. You can visit Gijs' web site at www.redhouse.nl
.
Thanks to bManic (bM) and Nils Hahmann (NH) for making most of the factory presets.
And of course, a huge thanks to our beta testers for their relentless testing of five different beta versions over the course of more than six months!
Next: About FabFilter
See AlsoPurchase FabFilter Pro-CSupport

6.7
About FabFilter
FabFilter Software Instruments was founded in 2002 by Frederik Slijkerman MSc and Floris Klinkert MSc, and is based in the center of Amsterdam in the Netherlands.
In their roles as professional musicians and studio engineers, Floris Klinkert and Frederik Slijkerman have always loved the sound of old analog gear but also kept up with new software synthesis developments. However, none of the available software instruments met their high quality standards.
Many plug-in developers try to emulate old analog gear, or stuff their plug-ins with as many features and (often mediocre) effects as possible, diverting you from the real issue: the sound.
Both also being professional software engineers, Frederik Slijkerman and Floris Klinkert decided to do things differently and create the software instruments they dreamed of, resulting in the release of FabFilter One in early 2004, followed by FabFilter Volcano, Twin, Timeless, Simplon and Pro-C.
To accomplish their goals, a lot of effort has been put into developing highly advanced filter techniques, superb digital oscillators, smart parameter interpolation methods and innovative user interface solutions. The highly optimized FabFilter plug-in design results in very little CPU requirements.
FabFilter strongly believes that musicians don't just need more knobs, faders or options on plug-ins: they need better sound quality and usability. That is why FabFilter creates easy-to-use yet powerful plug-ins, with innovatie interfaces and superb sound quality, for a reasonable price.
FabFilter will expand their range of plug-ins in the future, supporting both Mac OS X and Windows, providing the best possible sound quality and filter designs. We hope that you will enjoy our products and feel free to contact us if you have any suggestions.
The FabFilter Team
See AlsoSupportFabFilter web site