facebook privacy guide
TRANSCRIPT
Facebook Privacy Guide
Every day we upload more and more personal information to our Facebook profile: pictures, events,
favorite places, personal data… not only that, but day to day more websites allow people to check in
via Facebook, which represents a large amount of private information transferred and shared with third
parties.
For this reason it is very important to control and properly configure your privacy settings. In this guide,
we put together a step by step to learn how to set it up correctly.
1. How to set up lists of friends on Facebook
In today’s world, it’s rare to find a person who does not have a Facebook profile. Friends, classmates,
mothers, distant uncles, bosses and coworkers are mixed in a heterogeneous space halfway between
the personal and professional, and between pictures of last Saturday and a current link related to our
profession.
To avoid embarrassing moments like the “like” your boss left on a picture of your childhood tagged by
your mother, Facebook allows us to manage and control our privacy and visibility of our
information through mechanisms such as lists of friends or Privacy settings. These are tasks that we should
check frequently to make sure nothing has changed since social networks are constantly making
changes.
But how do you know exactly what you’re sharing with your contacts? Let’s look at the necessary steps
to properly configure your lists of friends.
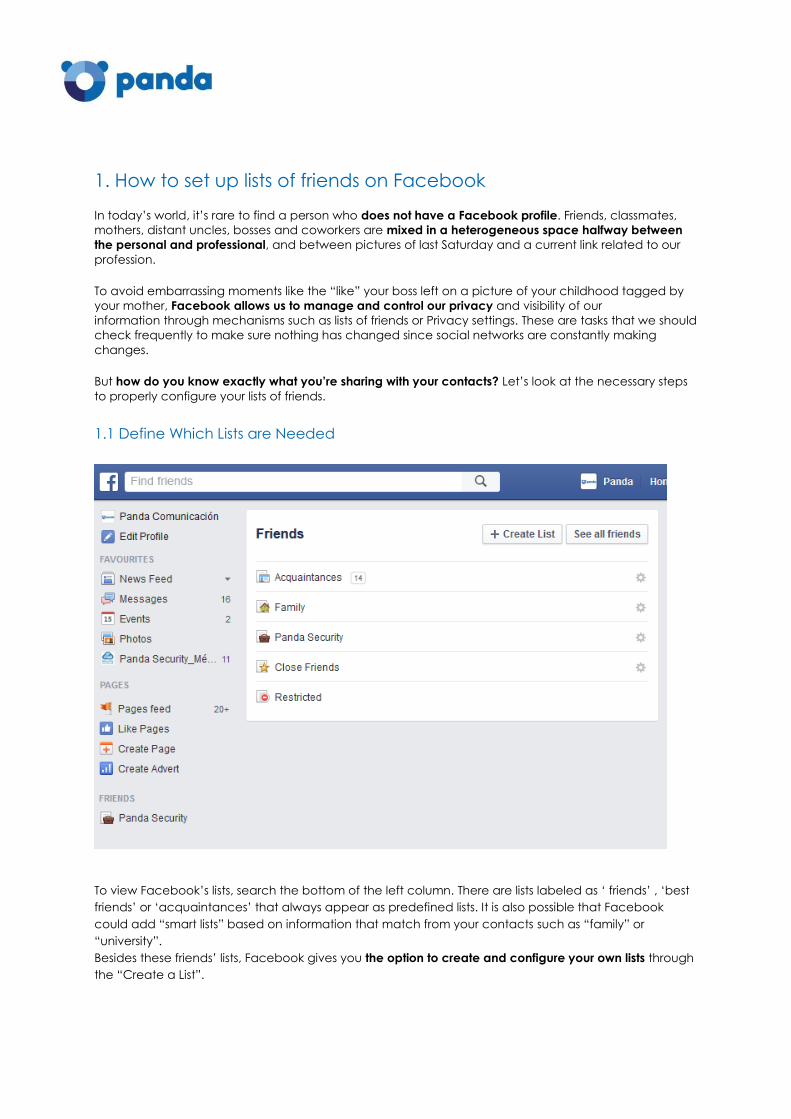
1.1 Define Which Lists are Needed
To view Facebook’s lists, search the bottom of the left column. There are lists labeled as ‘ friends’ , ‘best
friends’ or ‘acquaintances’ that always appear as predefined lists. It is also possible that Facebook
could add “smart lists” based on information that match from your contacts such as “family” or
“university”.
Besides these friends’ lists, Facebook gives you the option to create and configure your own lists through
the “Create a List”.
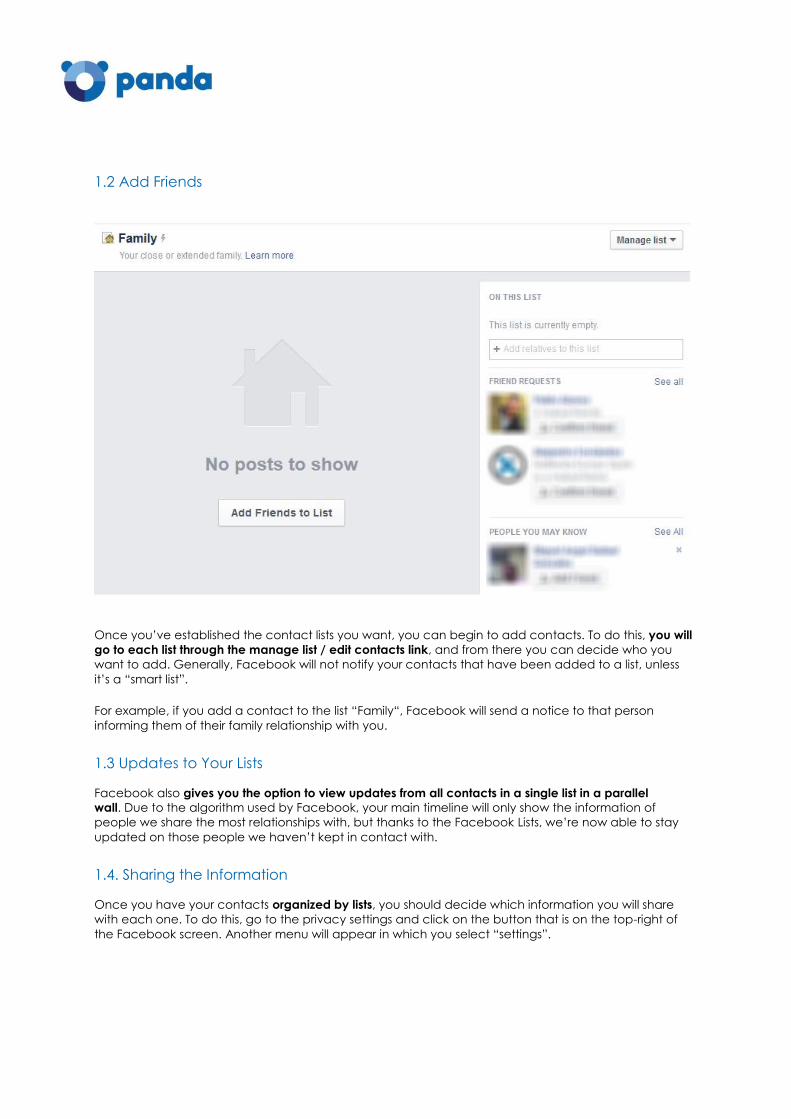
1.2 Add Friends
Once you’ve established the contact lists you want, you can begin to add contacts. To do this, you will
go to each list through the manage list / edit contacts link, and from there you can decide who you
want to add. Generally, Facebook will not notify your contacts that have been added to a list, unless
it’s a “smart list”.
For example, if you add a contact to the list “Family“, Facebook will send a notice to that person
informing them of their family relationship with you.
1.3 Updates to Your Lists
Facebook also gives you the option to view updates from all contacts in a single list in a parallel
wall. Due to the algorithm used by Facebook, your main timeline will only show the information of
people we share the most relationships with, but thanks to the Facebook Lists, we’re now able to stay
updated on those people we haven’t kept in contact with.
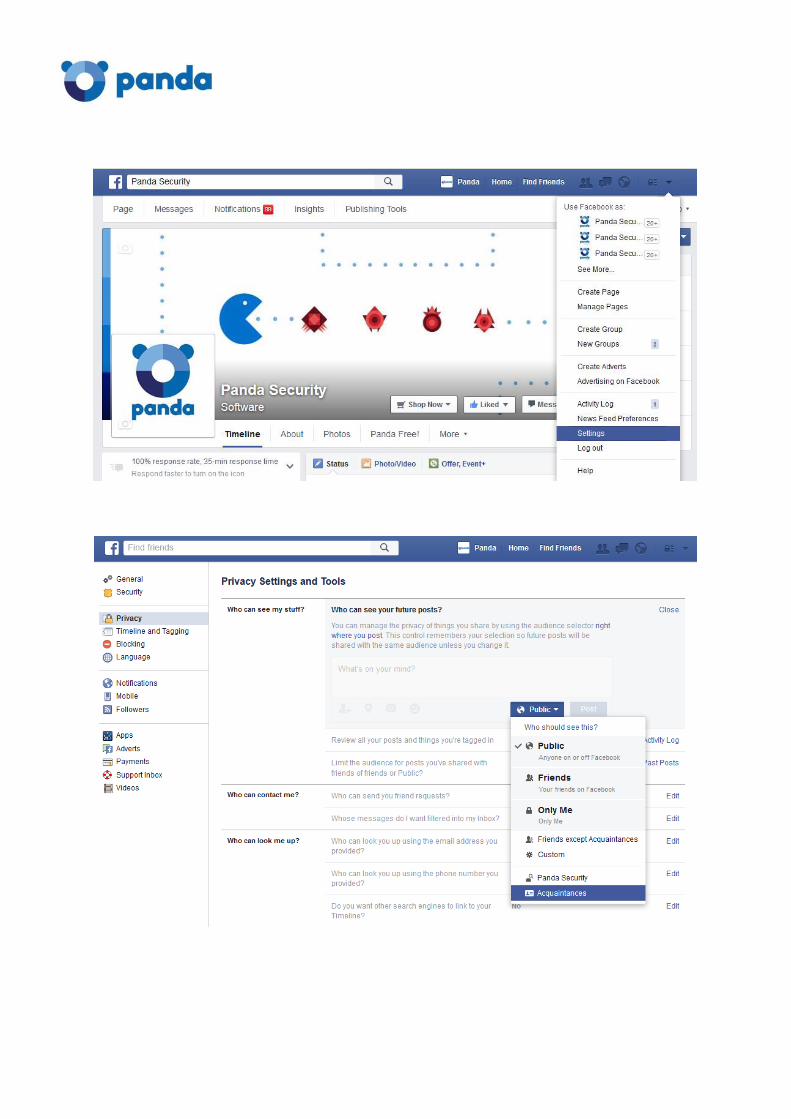
1.4. Sharing the Information
Once you have your contacts organized by lists, you should decide which information you will share
with each one. To do this, go to the privacy settings and click on the button that is on the top-right of
the Facebook screen. Another menu will appear in which you select “settings”.
My posts: Via the privacy setting “Who can see my posts?” you need to establish the general
setting for sharing updates, links or pictures on your timeline. You will decide if you want to share
your information with just one list, with friends, with friends of friends, or personalize it, so that you
can add different lists and exclude others. This is the default setting for all updates, although
you will have the option of changing it each time you share something on your timeline.
Limit access to old posts: with this option you can apply a new privacy setting to old posts that
were published before the change.
Use of the lists for photographs and albums: Facebook has established the same visibility setting
in shared photos and albums on your timeline. However, you can change the lists that receive
notifications when we upload new images.
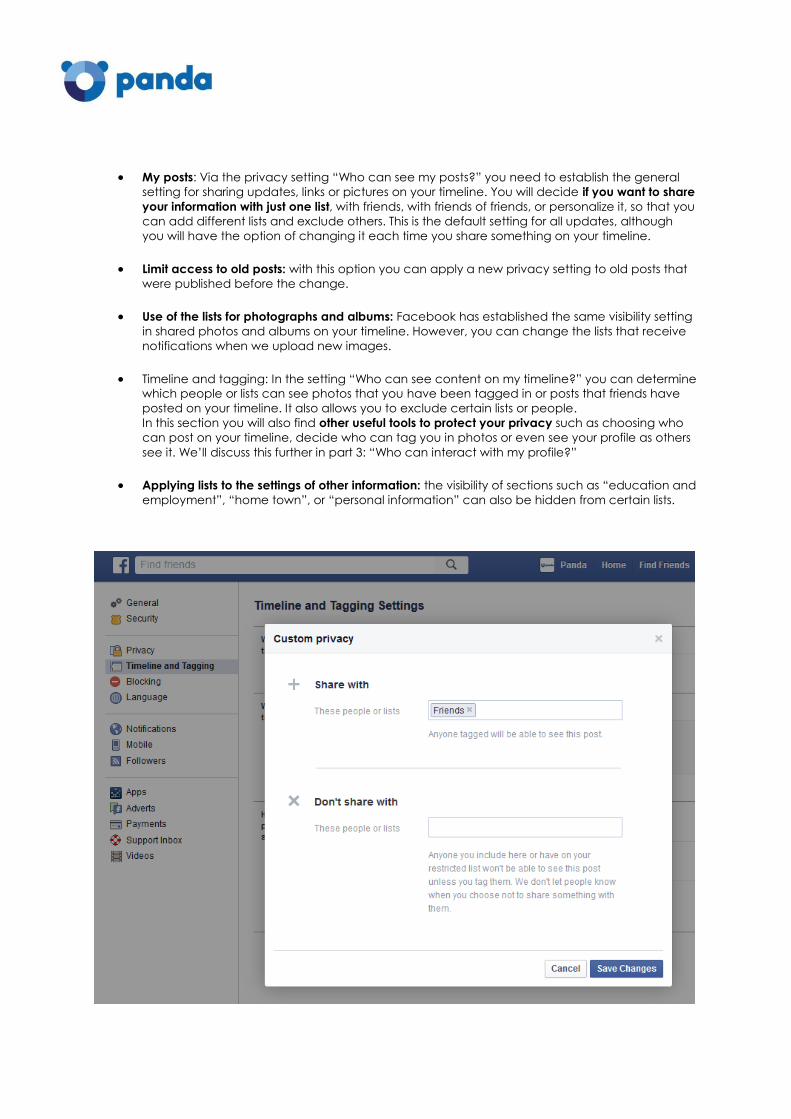
Timeline and tagging: In the setting “Who can see content on my timeline?” you can determine
which people or lists can see photos that you have been tagged in or posts that friends have
posted on your timeline. It also allows you to exclude certain lists or people.
In this section you will also find other useful tools to protect your privacy such as choosing who
can post on your timeline, decide who can tag you in photos or even see your profile as others
see it. We’ll discuss this further in part 3: “Who can interact with my profile?”
Applying lists to the settings of other information: the visibility of sections such as “education and
employment”, “home town”, or “personal information” can also be hidden from certain lists.
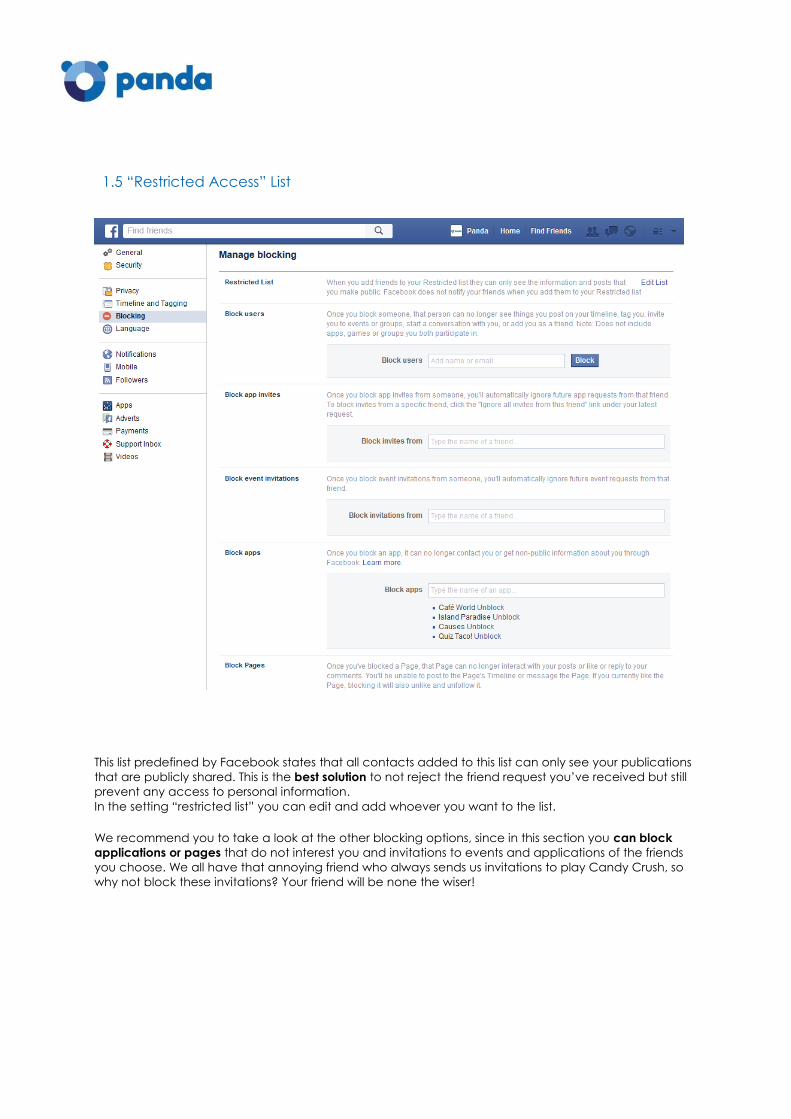
1.5 “Restricted Access” List
This list predefined by Facebook states that all contacts added to this list can only see your publications
that are publicly shared. This is the best solution to not reject the friend request you’ve received but still
prevent any access to personal information.
In the setting “restricted list” you can edit and add whoever you want to the list.
We recommend you to take a look at the other blocking options, since in this section you can block
applications or pages that do not interest you and invitations to events and applications of the friends
you choose. We all have that annoying friend who always sends us invitations to play Candy Crush, so
why not block these invitations? Your friend will be none the wiser!
2. How to control the privacy of photographs shared on Facebook
One of the topics that more we must bear in mind at the time of forming our privacy in Facebook is who
can see our photos, and who can download them. Facebook gives us several options to upload the
images and albums that we put on our profile.
2.1 Uploading Photos and Albums to Our Personal Profile
Photographs and albums you upload to your profile will, as a general standard, have the same default
privacy settings as other publications.
But you can also exclusively change the privacy of this new publication. You can decide if you want to
share only with one of your lists or contacts, or if you want to restrict viewing to another list or person.
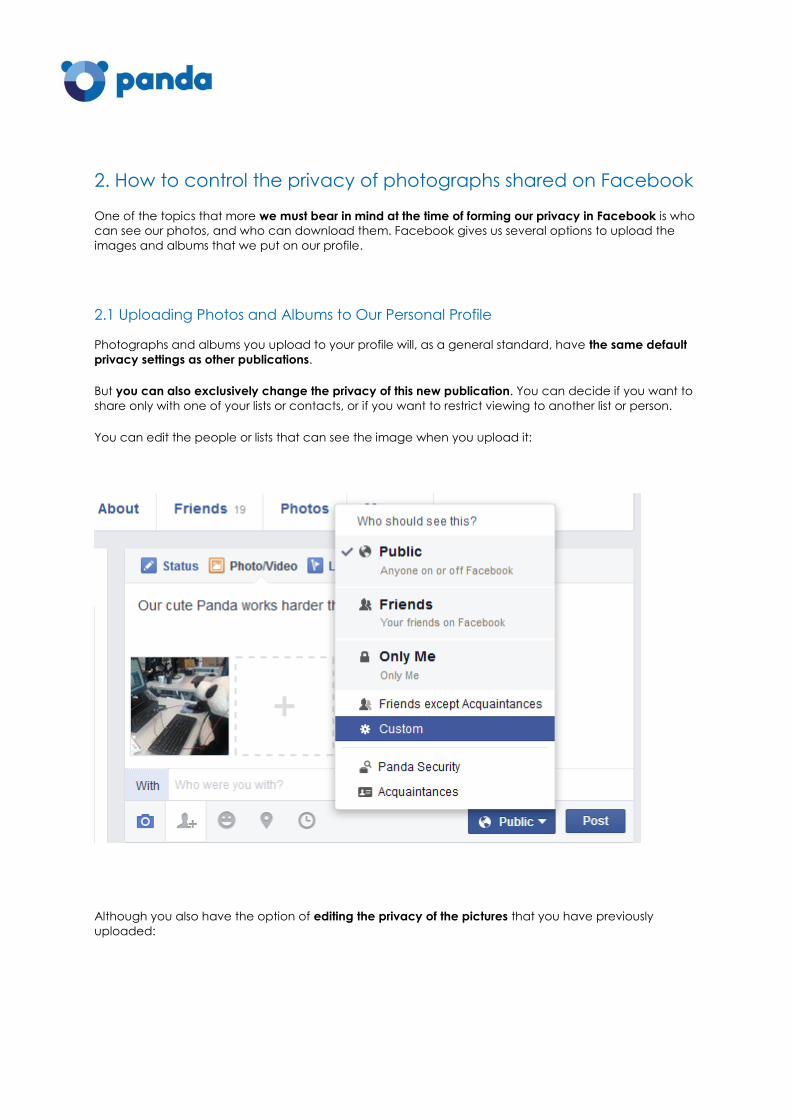
You can edit the people or lists that can see the image when you upload it:
Although you also have the option of editing the privacy of the pictures that you have previously
uploaded:
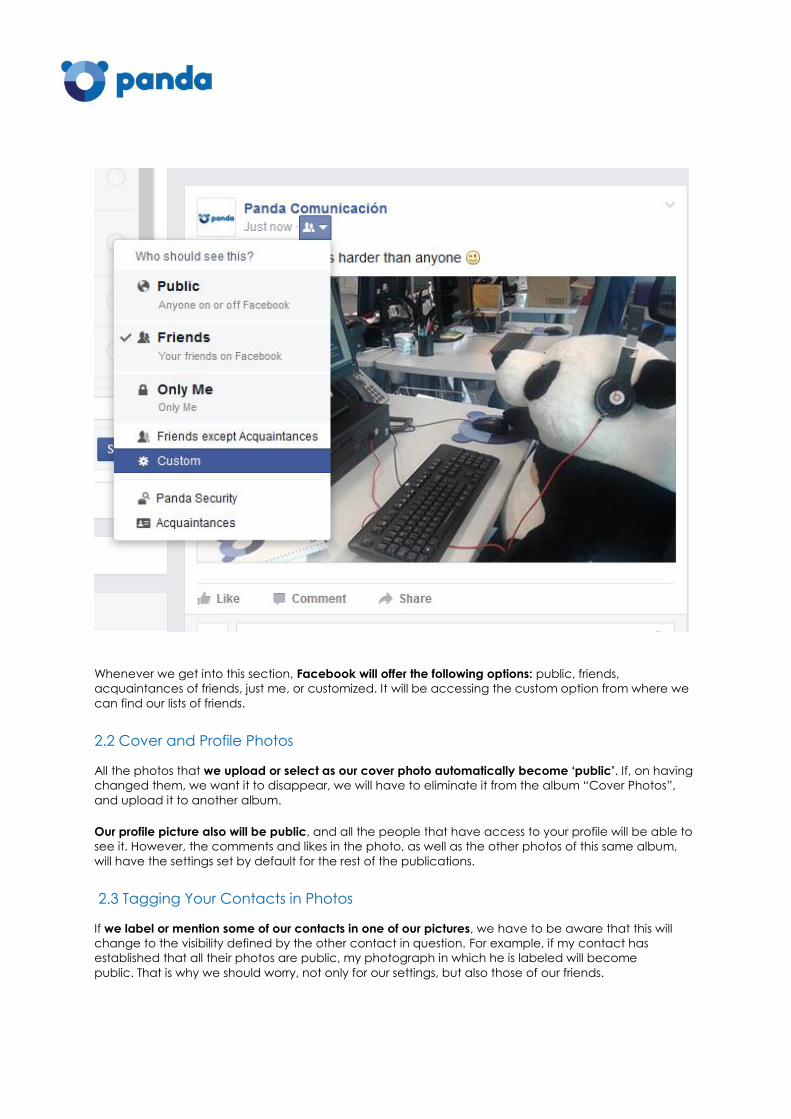
Whenever we get into this section, Facebook will offer the following options: public, friends,
acquaintances of friends, just me, or customized. It will be accessing the custom option from where we
can find our lists of friends.
2.2 Cover and Profile Photos
All the photos that we upload or select as our cover photo automatically become ‘public’. If, on having
changed them, we want it to disappear, we will have to eliminate it from the album “Cover Photos”,
and upload it to another album.
Our profile picture also will be public, and all the people that have access to your profile will be able to
see it. However, the comments and likes in the photo, as well as the other photos of this same album,
will have the settings set by default for the rest of the publications.
2.3 Tagging Your Contacts in Photos
If we label or mention some of our contacts in one of our pictures, we have to be aware that this will
change to the visibility defined by the other contact in question. For example, if my contact has
established that all their photos are public, my photograph in which he is labeled will become
public. That is why we should worry, not only for our settings, but also those of our friends.
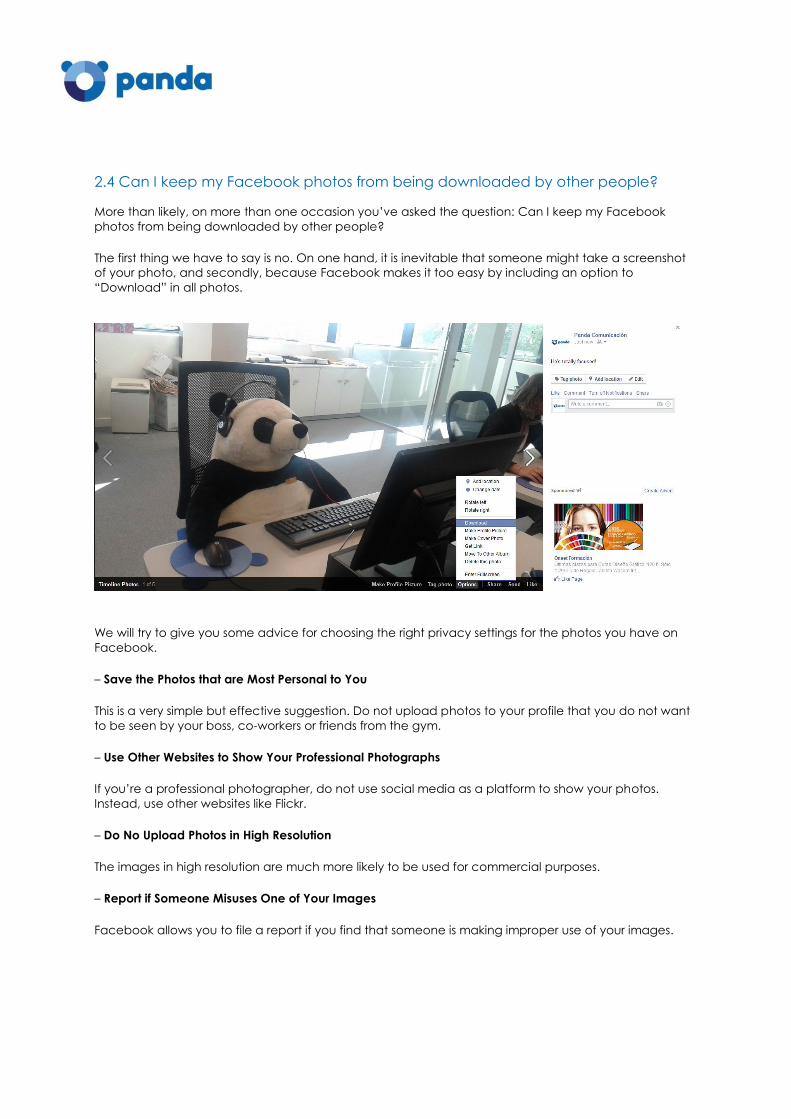
2.4 Can I keep my Facebook photos from being downloaded by other people?
More than likely, on more than one occasion you’ve asked the question: Can I keep my Facebook
photos from being downloaded by other people?
The first thing we have to say is no. On one hand, it is inevitable that someone might take a screenshot
of your photo, and secondly, because Facebook makes it too easy by including an option to
“Download” in all photos.
We will try to give you some advice for choosing the right privacy settings for the photos you have on
Facebook.
– Save the Photos that are Most Personal to You
This is a very simple but effective suggestion. Do not upload photos to your profile that you do not want
to be seen by your boss, co-workers or friends from the gym.
– Use Other Websites to Show Your Professional Photographs
If you’re a professional photographer, do not use social media as a platform to show your photos.
Instead, use other websites like Flickr.
– Do No Upload Photos in High Resolution
The images in high resolution are much more likely to be used for commercial purposes.
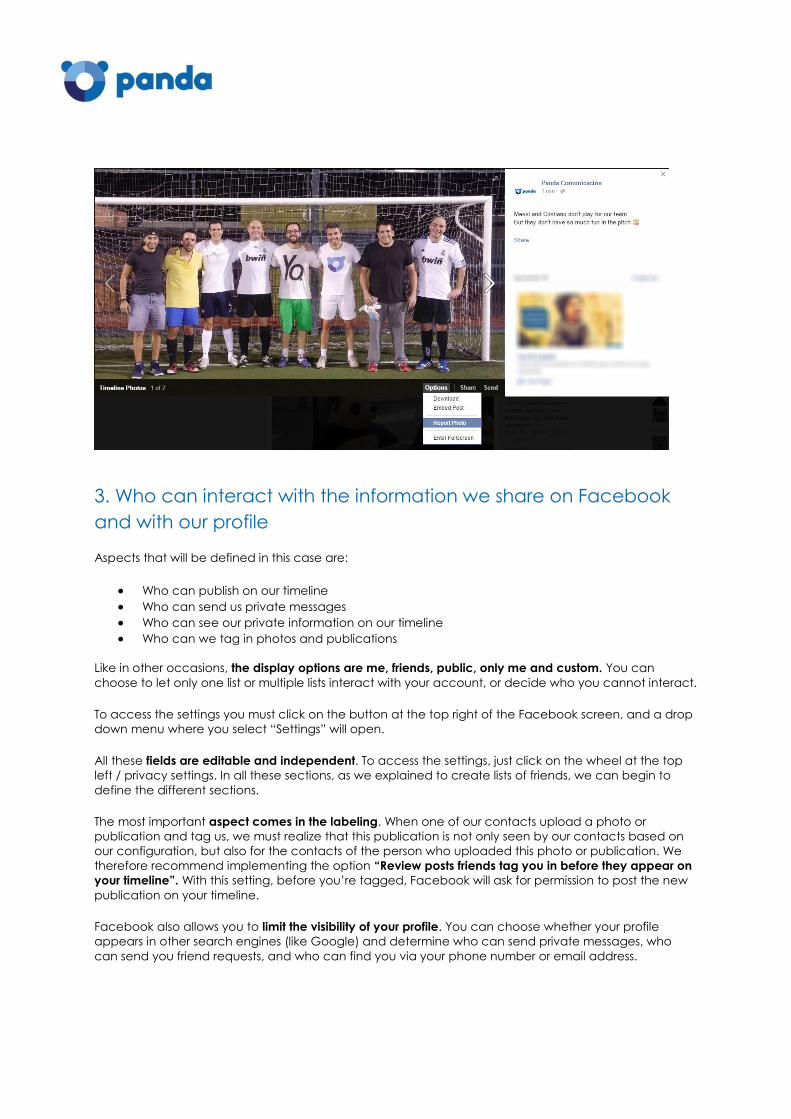
– Report if Someone Misuses One of Your Images
Facebook allows you to file a report if you find that someone is making improper use of your images.
3. Who can interact with the information we share on Facebook
and with our profile
Aspects that will be defined in this case are:
Who can publish on our timeline
Who can send us private messages
Who can see our private information on our timeline
Who can we tag in photos and publications
Like in other occasions, the display options are me, friends, public, only me and custom. You can
choose to let only one list or multiple lists interact with your account, or decide who you cannot interact.
To access the settings you must click on the button at the top right of the Facebook screen, and a drop
down menu where you select “Settings” will open.
All these fields are editable and independent. To access the settings, just click on the wheel at the top
left / privacy settings. In all these sections, as we explained to create lists of friends, we can begin to
define the different sections.
The most important aspect comes in the labeling. When one of our contacts upload a photo or
publication and tag us, we must realize that this publication is not only seen by our contacts based on
our configuration, but also for the contacts of the person who uploaded this photo or publication. We
therefore recommend implementing the option “Review posts friends tag you in before they appear on
your timeline”. With this setting, before you’re tagged, Facebook will ask for permission to post the new
publication on your timeline.
Facebook also allows you to limit the visibility of your profile. You can choose whether your profile
appears in other search engines (like Google) and determine who can send private messages, who
can send you friend requests, and who can find you via your phone number or email address.
Keep in mind that anyone who enters your name into a social network can find you. Therefore, the only
alternative to avoid being found is to use a different name. I’m sure you already have a friend who
does this.
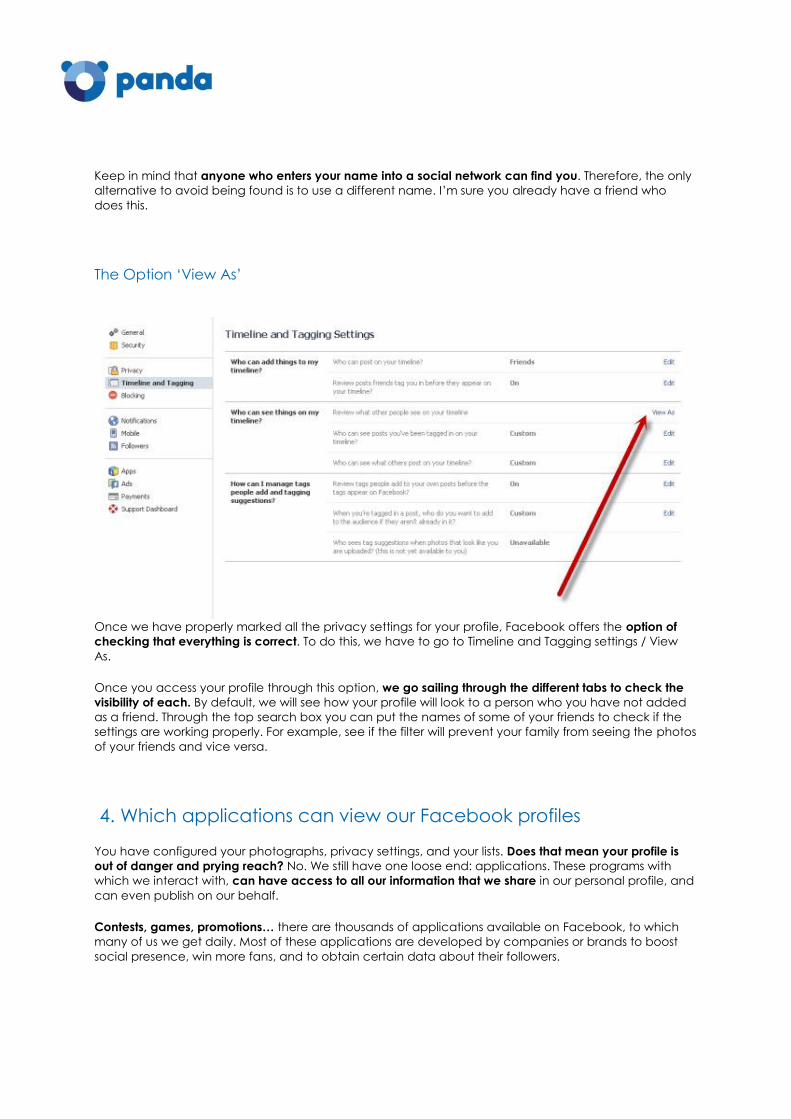
The Option ‘View As’
Once we have properly marked all the privacy settings for your profile, Facebook offers the option of
checking that everything is correct. To do this, we have to go to Timeline and Tagging settings / View
As.
Once you access your profile through this option, we go sailing through the different tabs to check the
visibility of each. By default, we will see how your profile will look to a person who you have not added
as a friend. Through the top search box you can put the names of some of your friends to check if the
settings are working properly. For example, see if the filter will prevent your family from seeing the photos
of your friends and vice versa.
4. Which applications can view our Facebook profiles
You have configured your photographs, privacy settings, and your lists. Does that mean your profile is
out of danger and prying reach? No. We still have one loose end: applications. These programs with
which we interact with, can have access to all our information that we share in our personal profile, and
can even publish on our behalf.
Contests, games, promotions… there are thousands of applications available on Facebook, to which
many of us we get daily. Most of these applications are developed by companies or brands to boost
social presence, win more fans, and to obtain certain data about their followers.
To access these applications normally, we accept the transfer of certain information such as name, age,
photos, contacts…
It may be that we do not think it’s important for the company or brand in question get this information;
however we must know that we have the option, once the game is used or the promotion is
terminated, to remove the access of this app to our data.
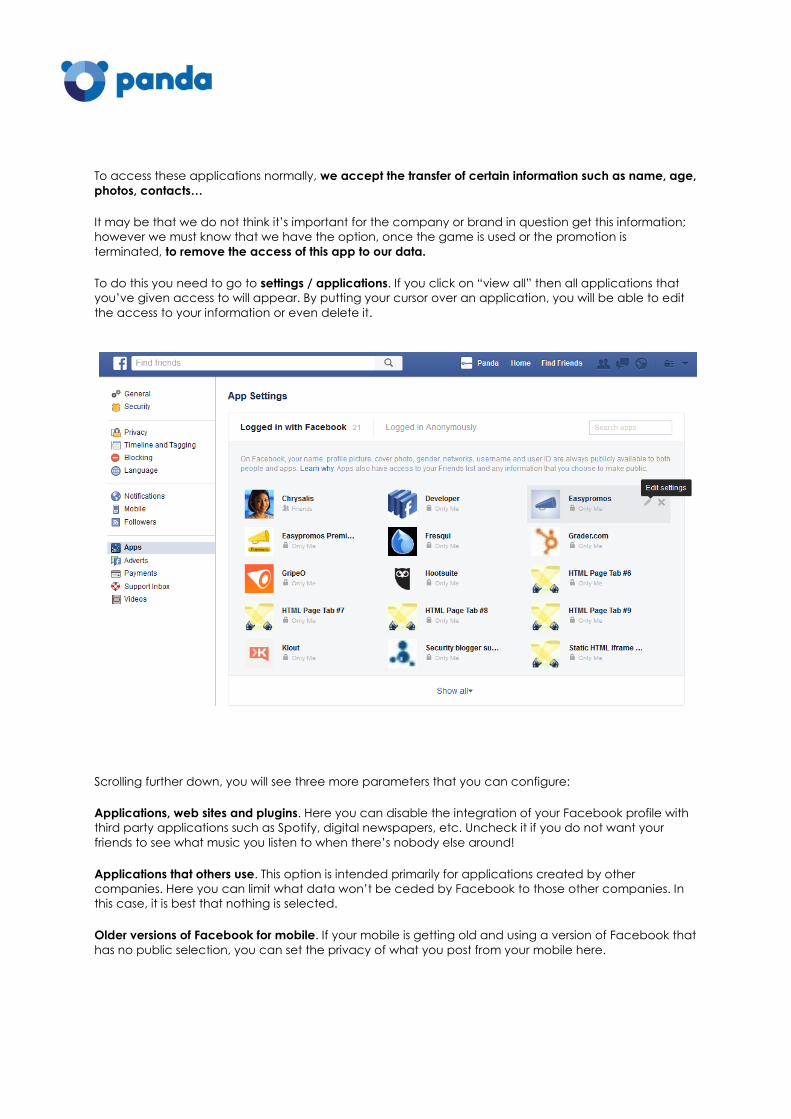
To do this you need to go to settings / applications. If you click on “view all” then all applications that
you’ve given access to will appear. By putting your cursor over an application, you will be able to edit
the access to your information or even delete it.
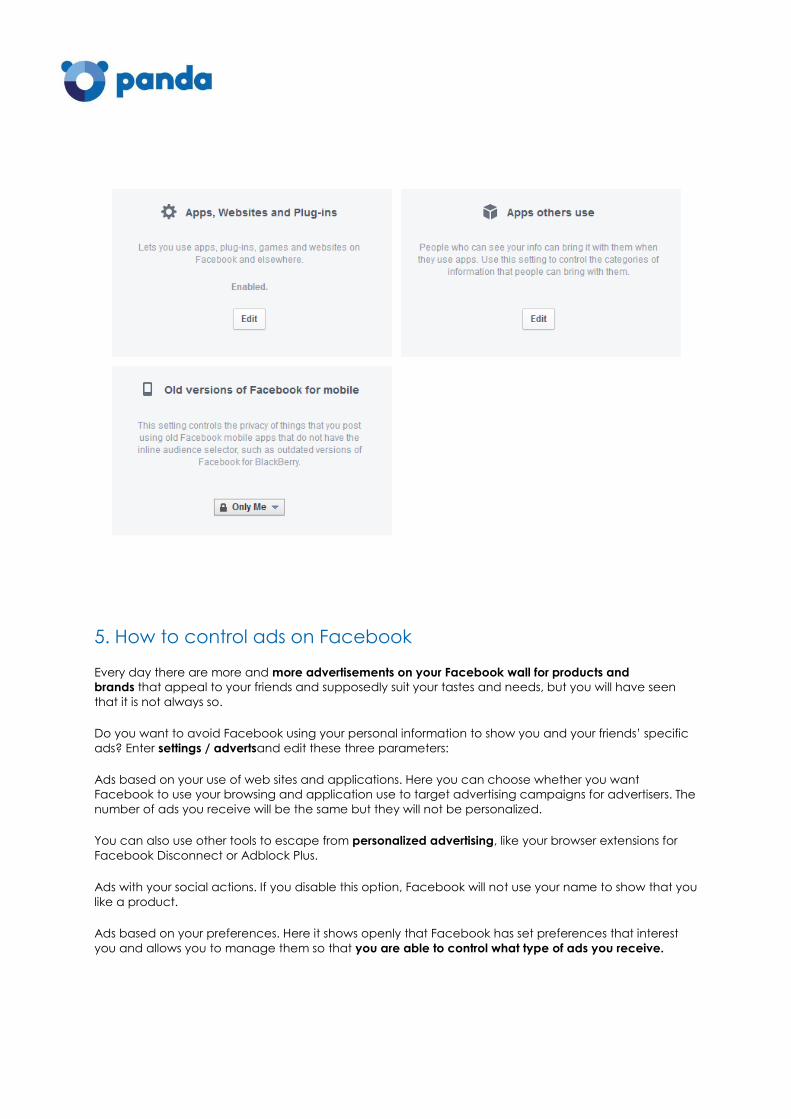
Scrolling further down, you will see three more parameters that you can configure:
Applications, web sites and plugins. Here you can disable the integration of your Facebook profile with
third party applications such as Spotify, digital newspapers, etc. Uncheck it if you do not want your
friends to see what music you listen to when there’s nobody else around!
Applications that others use. This option is intended primarily for applications created by other
companies. Here you can limit what data won’t be ceded by Facebook to those other companies. In
this case, it is best that nothing is selected.
Older versions of Facebook for mobile. If your mobile is getting old and using a version of Facebook that
has no public selection, you can set the privacy of what you post from your mobile here.
5. How to control ads on Facebook
Every day there are more and more advertisements on your Facebook wall for products and
brands that appeal to your friends and supposedly suit your tastes and needs, but you will have seen
that it is not always so.
Do you want to avoid Facebook using your personal information to show you and your friends’ specific
ads? Enter settings / advertsand edit these three parameters:
Ads based on your use of web sites and applications. Here you can choose whether you want
Facebook to use your browsing and application use to target advertising campaigns for advertisers. The
number of ads you receive will be the same but they will not be personalized.
You can also use other tools to escape from personalized advertising, like your browser extensions for
Facebook Disconnect or Adblock Plus.
Ads with your social actions. If you disable this option, Facebook will not use your name to show that you
like a product.
Ads based on your preferences. Here it shows openly that Facebook has set preferences that interest
you and allows you to manage them so that you are able to control what type of ads you receive.
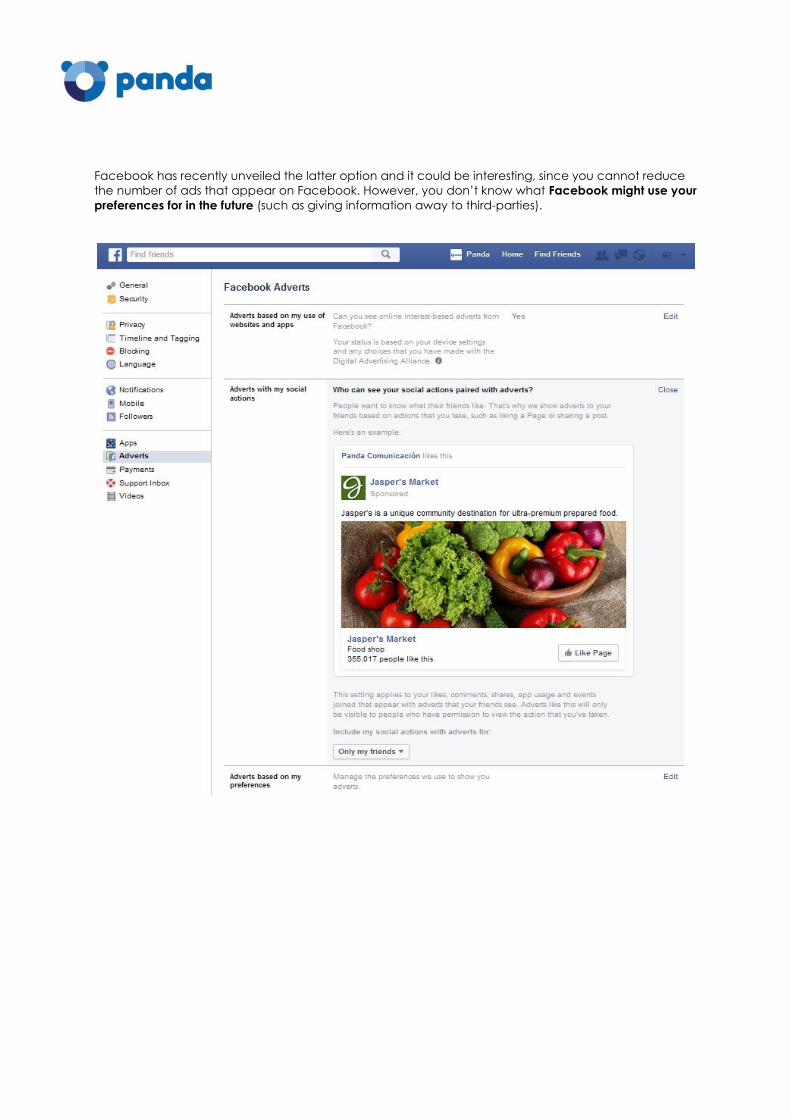
Facebook has recently unveiled the latter option and it could be interesting, since you cannot reduce
the number of ads that appear on Facebook. However, you don’t know what Facebook might use your
preferences for in the future (such as giving information away to third-parties).
6. Try to set your privacy on Facebook!
Once we have set up all these parameters, the configuration for our Facebook profile will be controlled.
However, we recommend that you monitor and control your privacy periodically. Continued Facebook
changes sometimes cause changes in our privacy settings, exposing all the publications whose visibility
we had defined.
In the same way, if we have our privacy controlled but not that of our contacts, our updates can turn out
to be compromised.
We encourage you to spend an afternoon setting these parameters. The image we give of ourselves in
social networks is becoming more important and has more weight in the employment screening
process.
Do you have any question? Ask us!