faculty guide to teaching and learning technology - facultynet matc
TRANSCRIPT

P a g e | 1
Instructional technology policies, procedures, and information from the Teaching and Learning
Technology department at Milwaukee Area Technical College.
TTEEAACCHHIINNGG AANNDD LLEEAARRNNIINNGG TTEECCHHNNOOLLOOGGYY Faculty Innovation Center, Room M201 Milwaukee Area Technical College 700 W. State Street Milwaukee, Wisconsin 53233 414. 297.6735 [email protected]
TTEEAACCHHIINNGG AANNDD LLEEAARRNNIINNGG TTEECCHHNNOOLLOOGGYY
FFAACCUULLTTYY GGUUIIDDEE TTOO TTEEAACCHHIINNGG AANNDD LLEEAARRNNIINNGG TTEECCHHNNOOLLOOGGYY

T E A C H I N G A N D L E A R N I N G T E C H N O L O G Y | 2
IINNDDEEXX
CCHHAAPPTTEERR 11:: TTEEAACCHHIINNGG AANNDD LLEEAARRNNIINNGG TTEECCHHNNOOLLOOGGYY…………………………………………………………………………………………..55
Who We Are: The Teaching & Learning Technology Team Faculty Innovation Center (FIC) Technologies
Audio Bridge Blackboard Broadcast Teleconferencing Instructional Technologies (Faculty Resource Centers)
Video Cameras Photography Cameras Podcast Equipment Laptop Computers Multimedia Carts iClickers Adobe Connect Camtasia Studio Online Tools and Mobile Apps
Media Site (Lecture Capture) Multimedia Rooms
Scheduling Support (Tech Line)
Video Streaming
CCHHAAPPTTEERR 22:: BBLLAACCKKBBOOAARRDD PPOOLLIICCIIEESS AANNDD PPRROOCCEEDDUURREESS…………………………………………………………………………....1177
Are You New to Online Teaching? Course design Blackboard course shells Course cartride support
Issues to Consider Pre‐class Checklist During Class Checklist End of Class Checklist
Registration Process
T E A C H I N G A N D L E A R N I N G T E C H N O L O G Y | 3
Logging In: Identification and Security Making Requests with Online Forms
Changing faculty in courses Adding users to courses Adding a test student to your course Requesting a personal master Requesting a department master Requesting a state curriculum master
CCHHAAPPTTEERR 33:: PPRREEPPAARRIINNGG FFOORR YYOOUURR OONNLLIINNEE CCOOUURRSSEE……………………………………………………………………………………....2277
Minimum computer requirements Blackboard supported browsers Mobile Technology
Java, JavaScript , and Cookies Third Party Plugins Troubleshooting common issues Creating accessible content
Previewing your course : Edit mode and test student accounts
CCHHAAPPTTEERR 44:: CCOOUURRSSEE DDEESSIIGGNN AANNDD MMAAIINNTTEENNAANNCCEE……………………………………………………………………………………..……4411 Instructional Design Sample Syllabus
Maintaining Your Course’s Quality Quality Checklists for Online Courses Course availability Stacking courses Archive & export Import
Course copy Backing up your grade center End of semester process
CCHHAAPPTTEERR 55:: SSUUPPPPOORRTT RREESSOOUURRCCEESS………………………………………………………………………………………………………………………………....5533
MATC HelpDesk Blackboard Support
Blackboard Support Website Teaching with Technology Today Newsletter

T E A C H I N G A N D L E A R N I N G T E C H N O L O G Y | 4
Faculty Instructional Support Peer‐to‐Peer Support Website Training resources
Professional Developmet Courses Workshops Drop‐in Training Sessions
Faculty Resource Centers Student Support Student Support Website Blackboard Orientations Computer skills assessment Academic Support Centers Student Email (Gmail) H1N1 Preparation
Online Course Conversion
CCHHAAPPTTEERR 66:: CCOOPPYYRRIIGGHHTT AANNDD FFAAIIRR UUSSEE PPOOLLIICCYY………………………………………………………………………………………………....6666
Copyright Guidelines Copyright Chart
T E A C H I N G A N D L E A R N I N G T E C H N O L O G Y | 5
CCHHAAPPTTEERR 11:: TTEEAACCHHIINNGG && LLEEAARRNNIINNGG TTEECCHHNNOOLLOOGGYY –– WWHHOO
WWEE AARREE
WWHHOO WWEE AARREE:: TTHHEE TTEEAACCHHIINNGG && LLEEAARRNNIINNGG TTEECCHHNNOOLLOOGGYY TTEEAAMM The Teaching and Learning Technology Department provides MATC faculty with instructional support regarding Blackboard, multimedia equipment, multimedia classrooms, and related resources. Located at the Downtown Milwaukee Campus, we can be found in the Faculty Innovation Center, room M201 of the Main Building.
OOUURR SSEERRVVIICCEESS IINNCCLLUUDDEE::
• Performing instructional technology support for faculty in the classroom and online
• Providing faculty with one‐on‐one and group technology training
• Conducting one‐on‐one mentoring with online instructors
• Evaluating and procuring technology, software tools, and materials for instructional use
• Implementing technology tools that support faculty and student needs
• Developing updates on Web‐enhanced technologies for online instruction
• Designing, installing, and supporting multimedia classrooms
• Provide a safe environment for faculty to test new technologies
• Providing professional development opportunities related to teaching with technology
(Blackboard, Camtasia Studio, Adobe Connect, etc.)
• Managing and supporting the college‐adapted Blackboard Learning Management System for
faculty and students
• Providing instructional resources and multimedia equipment for check‐out and support in
Faculty Resource Centers district‐wide
• Maintaining a library of instructional best practices
• Answering FAQs and provide links to published resources
Contact Us:
Brian Carlson Manager, Teaching and Learning Technology (414) 297‐7508 (x77508) [email protected]
Jim Stepp Coordinator, Multimedia Classroom Support (414) 297‐7066 (x77066) [email protected]
Pam Curtin Coordinator , Blackboard Student Support (414) 297‐7986 (x77986) [email protected]
Megan HamiltonEducational Assistant, Web Enhanced Instruction (414) 297‐8372 (x78372) [email protected]
Joan Barry ITV/Teleconference Scheduling (414) 297‐6735 (x76735) [email protected]
Rita NewsomEducational Assistant, Faculty Innovation Center Phone: (414) 297‐8980 (x78980) [email protected]
Dawn Ackermann Educational Assistant, Faculty Innovation Center (414) 297‐6499 (x76499) [email protected]
Seng ThaoEducational Assistant, Faculty Innovation Center (414) 297‐6499 (x76499) [email protected]
Barbara Geddes College of the Air (414) 297‐7323 (x77323) [email protected]
Michelle FelixER&D Local Site Coordinator/Instructor of English (414) 297‐6142 (x76142) [email protected]
T E A C H I N G A N D L E A R N I N G T E C H N O L O G Y | 6
FFAACCUULLTTYY IINNNNOOVVAATTIIOONN CCEENNTTEERR ((FFIICC)) At the Milwaukee Campus, the Teaching & Learning Technology department and the Educational Research & Dissemination department has come together to provide faculty with a convenient, centralized location for the resources to support instruction that faculty use most frequently. This space is called the Faculty Innovation Center (FIC), and is located in room M201 of the Main building.
Hours of Operation
Semester Hours Monday through Thursday
7:30 AM – 8:00 PM Friday
7:30 AM – 4:30 PM
Summer Hours 7:30 AM – 4:30 PM
Located in Main Building (Milwaukee Campus)
M201
TTEEAACCHHIINNGG AANNDD LLEEAARRNNIINNGG TTEECCHHNNOOLLOOGGYY OOFFFFIICCEESS The Teaching and Learning Technology Department provides MATC faculty with instructional support for Blackboard, multimedia equipment, multimedia classrooms, and online technology to support instruction. To support our faculty, we have created a Blackboard Faculty Support Website (http://tiny.cc/4bsyj) which contains helpful step‐by‐step tutorials and videos for learning how to create and manage your

T E A C H I N G A N D L E A R N I N G T E C H N O L O G Y | 7
Blackboard course. Links to current faculty instructional support hours, workshops, training sessions and professional development courses are also available on the support Website.
PPRROOFFEESSSSIIOONNAALL DDEEVVEELLOOPPMMEENNTT OOFFFFIICCEE Located in the Faculty Innovation Center, the Professional Development office is your source for skill development, professional development and personal growth. The Professional Development department offers courses for certification credit each semester. For more information, contact Lynnett Harvey at 297‐6912 or visit http://facultynet.matc.edu/profdev/.
EEDDUUCCAATTIIOONN RREESSEEAARRCCHH && DDIISSSSEEMMIINNAATTIIOONN OOFFFFIICCEESS Local Site Coordinator Michelle Felix, Curriculum Coordinator Toshiba Adams, and Peer Support Coordinators Julie Rock and Mark Mankowski make up your administrative ER&D team. Together they work with the Professional Development and Teaching and Learning Technology offices as well as Associate Provost Barbara Cannell, to bring you course offerings that will enhance your teaching and bolster educational success.
CCOOPPYY PPRROODDUUCCTTIIOONN CCEENNTTEERR The Milwaukee Campus Copy Production Center is located in the FIC and can be accessed through room M201 during business hours. After hours, the Copy Production Center can be accessed via room M284 with a faculty/staff Z‐key. The following equipment is available for use in the Copy Production Center:
• (4) printers (print, copy, scan to PDF)
• (3) desktop computers with Internet access
• (2) scantron machines
• Basic office equipment: Laminator, hole punch, stapler, and shredder Milwaukee Area Technical College has launched a print management initiative, which was developed to help create awareness regarding printing efficiencies and copying strategies. As such, the copiers in the Copy Production Center are outfitted with the Pharos print management system. In order to use these copiers, instructors must obtain a MATC Stormer Card (Campus Card).
HHOOWW DDOO II GGEETT AA SSTTOORRMMEERRSS CCAARRDD?? To print or copy documents in the FIC, you must have a Stormer Card, which can be obtained at any MATC campus location. For times and locations see the Instructions for Getting Stormers Card (http://tiny.cc/6nx8q). Verification of your MATC employment is required. Bring a picture ID and proof of employment with you (i.e.: MATC pay advice, teaching schedule, or keys). If you encounter any issues while trying to use your Stormer Card see the Instructions for Resolving Card Issues (http://tiny.cc/nyobf).
T E A C H I N G A N D L E A R N I N G T E C H N O L O G Y | 8
HHOOWW DDOO II PPRRIINNTT?? To print you must first have your Stormer Card. Then print as normal, for example: File > Print. Afterwards, you can release your print job at a Pharos card reader by swiping your Stormer card. For more detailed instructions see Instructions for Printing Using Pharos (http://tiny.cc/mppmb).
HHOOWW DDOO II CCOOPPYY?? To copy you must first have your Stormer Card. Swipe your card in the Pharos card reader to activate the printer‐copier. Then, on the Pharos touch screen, choose COPY to use the copier. Once you have done this, you can begin making copies. When you are done, tap the Pharos touch screen’s EXIT button. For more detailed instructions see Instructions for Copying Using Pharos (http://tiny.cc/jh22d).
FFAACCUULLTTYY CCOOMMPPUUTTEERR LLAABB AANNDD LLOOUUNNGGEE The FIC provides faculty with a secured computer lab and lounge for performing course‐related work or meeting with colleagues. The lab is located inside M201 and provides the following:
• (6) computers (3 PC, 3 Mac) with Internet access and basic office and multimedia productivity software
• (1) Printer
• (2) Scanners
• Faculty lounge with seating and laptop accommodation arms
• (2) small group meeting areas
• Wi‐Fi access (“MATC‐Guest” Network)
• Support staff available for assistance
MMUULLTTIIMMEEDDIIAA WWOORRKKSSHHOOPP CCLLAASSSSRROOOOMM The Multimedia Workshop Classroom is located in room M201A. This classroom is outfitted with 12 participant computers, 1 presenter computer with SMARTpodium, and an overhead projector. The primary use of this classroom for faculty development workshops offered by Teaching and Learning Technology and ER&D. The Workshop Classroom is available to MATC faculty and support staff by appointment. To reserve the room, please contact Joan Barry at 297‐6735.
CCIISSCCOO TTEELLEEPPRREESSEENNCCEE CCLLAASSSSRROOOOMM The Cisco TelePresence Classroom is located in M201B and is home to innovative Cisco technologies that present an immersive visual experience for classes communicating between MATC campuses or other colleges and universities. The room has a capacity of 18 and is used for instructional purposes to communicate
between MATC’s regional campuses and the Milwaukee campus. The primary use of this classroom is for distance learning classes, workshops, and Professional Development courses. To reserve the room, please contact Joan Barry at 297‐6735.
T E A C H I N G A N D L E A R N I N G T E C H N O L O G Y | 9
TTEECCHHNNOOLLOOGGIIEESS Through the Teaching & Learning Technology Department, MATC Instructors can gain access to a wide assortment of cutting edge instructional tools and technologies.
AAUUDDIIOO BBRRIIDDGGEE The MATC Audio Bridge Conferencing service enables users to attend or participate in meetings, conferences, class/group discussions and oral presentations over the telephone, using one dial‐in number. The bridge service can link up to 24 telephone lines/ports, when available. At a predetermined time and date, participants dial in the audio bridge number and enter a meeting ID to join the meeting/discussion from different locations, such as from home, the office or cellular phone.
MATC Audio Bridge gives you these advantages:
• easy to set up and use
• availability of lines
• convenient hours
• state‐of‐the‐art digital audio quality and performance
To request an Audio Bridge Conference, call Joan Barry at 297‐6735 or complete our online request form located at http://imatc/DistLearn/matc‐line_request_form.html. Information on how to setup your conference will be emailed to you when your request has been completed.
BBLLAACCKKBBOOAARRDD Blackboard (https://blackboard.matc.edu/) is MATC’s learning management system that faculty can use to efficiently and effectively organize, store, and dcourse content to students online. Blackboard content can include syllabi, course documents, announcements, online tests and assignments, and discussion board forums. Additional features include an online course Grade Center, email communication, and synchronous communication tools (ie. chatrooms).
eliver
Basic computer, word processing, and Web navigation skills are necessary to be successful in teaching an online course in Blackboard. If you are not familiar with the Blackboard Learning Management System, you must complete one of our Introduction to Blackboard professional development courses. These courses are offered each semester and cover the basics of using Blackboard. Topics include both the student and instructor views, creating and editing pages, user management, assessment options, creating assessments, using the online grade book, discussion boards, virtual chat, tracking student activities, and site management and security. As important updates are made to the Blackboard system, it is important to stay current with these changes by completing Blackboard professional development courses and/or attending Blackboard workshops. Doing so will help familiarize yourself with any changes as necessary.

T E A C H I N G A N D L E A R N I N G T E C H N O L O G Y | 10
To support our faculty, we have created a Blackboard Faculty Support Website (http://facultynet.matc.edu/blackboard/blackboard9/bb_support/index.htm) which contains helpful step‐by‐step tutorials and videos for learning how to create and manage your Blackboard course. Links o current Faculty instructional support hours, Blackboard workshops, and professional development ourses are also available on the support Website. tc
BBRROOAADDCCAASSTT TTEELLEECCOONNFFEERREENNCCIINNGG Broadcast Teleconferencing allows for two‐way audio/video interactive teleconferencing, either with our outlying campuses or another outside facility. To schedule a Broadcast Teleconference, reserve a teleconference room by calling Joan Barry at 297‐6735 or complete the Application for Use of Facilites form found online at http://imatc/Calendars/index.html. On the form indicate broadcast eleconferencing under Special Services and state which campuses or facility you want to broadcast to. he scheduler will coordinate the teleconference details for you. tT
IINNSSTTRRUUCCTTIIOONNAALL TTEECCHHNNOOLLOOGGIIEESS ((FFAACCUULLTTYY RREESSOOUURRCCEE CCEENNTTEERRSS)) Faculty Resoure Centers (FRCs) are located at MATC’s Mequon, Oak Creek, and West Allis campuses. In addition, the downtown Milwaukee campus is home to the Faculty Innovation Center. Each center provides instructional technologies for instructors to use in their courses through completing a simple check‐out form (http://tiny.cc/jbt9b). Instructional technologies that are available include:
VVIIDDEEOO CCAAMMEERRAASS
• Flip Digital Camera ‐ The Flip Digital Camera can record up to 30 minutes of video. An Instructor can easily download videos from the device to his or her computer through its built in USB connector and software. The video can then be edited in a video editing program or shared online through e‐mail or upload to Youtube. Basic camera operation instructions (http://tiny.cc/hbn6m) are available.
• Sony DVD HandyCam – Suitable for longer projects,the Sony DVD Handycam can record up to
60 minutes of video and take high‐resolution still photographs. Video and images are output as a ready‐to‐play DVD, but can be transferred to your computer in a digital format for editing in video and photograph editing programs. Basic camera operation instructions (http://tiny.cc/e722u) are available.
PPHHOOTTOOGGRRAAPPHHYY CCAAMMEERRAASS
• Canon PowerShot SD800 – The Canon PowerShot SD800 is a 7‐megapixel compact digital still camera that features: a 28‐105mm wide angle lens; 3.8x optical zoom; built‐in flash; auto‐focus; and customizeable settings. The camera is capable of taking still photographs and short video clips, saving them to an SD or SDHC memory card. The camera uses a rechargable lithium battery. Pictures and video can be downloaded to your computer through an installation of the camera’s software and USB connector. Basic camera operation instructions (http://tiny.cc/7p8o8) are available.
T E A C H I N G A N D L E A R N I N G T E C H N O L O G Y | 11
• Kodak EasyShare z915 Digital Camera – The Kodak EasyShare z915 camera is a 10‐megapixel
camera with a 35‐350mm lens, 10x optical zoom, auto‐focus, and customizable settings. The camera is capable of storing 4GB of photo and video on its on‐board memory and can save even more by using an SDHC high‐speed card. The camera uses AA batteries. Pictures and video can be downloaded to your computer through an installation of the camera’s software and USB connector. Basic camera operation instructions (http://tiny.cc/pif9g) are available.
PPOODDCCAASSTT EEQQUUIIPPMMEENNTT • iPod – The Apple iPod is a portable digital media player and digital media storage device.
Instructors can use iPods to create podcasts, or digital audio lectures, to be included in their Blackboard courses. iPods can also be used to download media from iTunes. Instructors can check out an iPod from their local FRC using an iPod checkout form (http://tiny.cc/2mcif).
• Micromemo audio recorder – The Micromemo audio recorder is high‐fidelity audio recording
unit that attaches to an Apple iPod. Once the Micromemo audio recorder is attached to the bottom of an iPod, the instructor can begin creating an audio recording. The audio clip is saved as an MP3 and can be reviewed using the iPod’s playback controls. The MP3 and can be uploaded to iTunes or downloaded to your computer for inclusion in your Blackboard course. Basic operation instructions (http://tiny.cc/r7yvb) are available.
• Audacity ®– Audacity® is free, open source software for recording and editing sounds on one’s
computer and is a great resource instructors can use to create their own podcast episodes. With Audacity®, instructors can record live audio through the use of a microphone and computer as well as edit audio tracks with simple tools. The Teaching and Learning Technology Department has put together a brief tutorial (http://tiny.cc/w4h7w) that describes the installation and recording process.
• Snowball USB microphone – The Snowball USB microphone can connect to your computer through a simple USB port to capture high‐quality, professional sounding audio when using a sound recording program like Audacity®. No additional software or downloads are required to make the microphone work. A basic use and operation guide (http://tiny.cc/mpjfe) is available.
LLAAPPTTOOPP CCOOMMPPUUTTEERRSS
• Windows Laptops – An assortment of Windows laptops, equipped with Microsoft Office and Internet connectivity, are available to MATC instructors for educational purposes. Instructors can check out laptops for extended periods of time that do not exceed 1 semester by filling out an extended laptop checkout form (http://tiny.cc/2wy4i).

Please note that use of MATC laptops are for instructional use and must occur on MATC premises unless approved in advance by your Dean and Associate Dean. Please be careful when handling an MATC laptop as charges may be levied for damages, loss, or theft that occurs while the item is checked out to you. Laptops must be returned within 2 days of the expected due date. Equipment that is turned in more than 2 days past due‐date will result in a 1‐month suspension of all check out services.
Please note that use of MATC laptops are for instructional use and must occur on MATC premises unless approved in advance by your Dean and Associate Dean. Please be careful when handling an MATC laptop as charges may be levied for damages, loss, or theft that occurs while the item is checked out to you. Laptops must be returned within 2 days of the expected due date. Equipment that is turned in more than 2 days past due‐date will result in a 1‐month suspension of all check out services.
MMU
T E A C H I N G A N D L E A R N I N G T E C H N O L O G Y | 12
UL
M LTMU TIIMMEEDDIIAA CCAARRTTSS
• Multimedia Carts• ULLTTIIMMEEDDIIAA CCAARRTTSS
Multimedia Carts – Multimedia carts come equipped with a ready‐to‐use Window’s laptop, RGB projector, document camera, audio speakers, and extension cord. To use a multimedia cart, simply plug the extension cord into an outlet and turn on the devices that you want to use. To project from the laptop, please be sure that the projector is in RGB mode by pressing it’s input button until RGB mode is displayed. To use the document camera, unfold the projector’s camera arm and push the projector’s camera button to go into document camera mode. Basic operation instructions (http://tiny.cc/vhhmz) are available.
IICCLLIICCKKEERRSS
• iClicker – iClicker is a plug‐and‐play classroom polling system used for facilitating student participation. The iClicker system consists of an iClicker reciever, flash drive, and several clicker remotes. To use the iClicker system, the instructor plugs in the iClicker reciever into a USB port on their computer and connects the iClicker flash drive to the back of the iClicker reciever. After a simple set‐up process, students will be able to contribute to poll questions posed through the iClicker system via their clicker remotes. Student participation can be graded through iClicker’s student registration and grading features. Basic setup and use instructions (http://tiny.cc/p0qpv) are available.
AADDOOBBEE CCOONNNNEECCTT
• Adobe Connect – Formerly Macromedia Breeze, Adobe Connect is Web conferencing software that is used to share presentations, training materials, video, and audio on the Web. Adobe Connect is a very good resource for online classes because of its asynchronous (one at a time) and synchronous (at the same time) communication options. As an MATC faculty member, you can utilize this technology without additional licensing fees or software. All you need is a computer and access to the Internet. To use Adobe Connect, simply download the software and schedule a Web conference. Once the meeting is scheduled, you will receive a URL (web link) that students can use to access the meeting through a Web browser. Complete instructions on downloading Adobe Connect and sheduling a Web conference are available at http://facultynet.matc.edu/frc/adobe_connect.html.
CCAAMMTTAASSIIAA SSTTUUDDIIOO
• Camtasia Studio• Camtasia Studio – For MATC instructors who want to create video screencasts of computer‐based demonstrations, Camtasia Studio is the tool of choice. Camtasia is an easy‐to‐use screen recording software product that is designed to capture your screen activity, audio, and Web‐cam images and can be used to create videos, narrated slideshows, software demonstrations, and short flash‐based quizzes that can be incorporated your Blackboard course. MATC instructors can have easy access to Camtasia software through the computers in their Faculty Resource Center. For a taste of what Camtasia can do, a 30‐day free trial of Camtasia’s latest software release is also available for at its Web site. The Teaching and Learning Technology Department has prepared a series of helpful Camtasia Studio tutorials which can be found at http://facultynet.matc.edu/frc/camtasia.htm
download
.
T E A C H I N G A N D L E A R N I N G T E C H N O L O G Y | 13
OONNLLIINNEE TTOOOOLLSS AANNDD MMOOBBIILLEE AAPPPPSS
• Google Docs – Educators and students who have a Google Gmail or GMATC e‐mail account (http://goo.gl/ZIqkT) have unlimited free access to Google Docs, a superior web‐based suite of office productivity software. In addition to creating content online, Google Docs has the ability to work with and store most document file formats uploaded from a PC.
• TeacherTube ‐ TeacherTube (http://www.teachertube.com/) is a repository of teacher‐created
videos and audio‐visual materials for learners at all grade levels that also include an online learning community. TeacherTube can be a source of educational video to include in your Blackboard course through shared URLs or embedded media players.
• Films on Demand ‐ Through MATC’s subscription to Films on Demand, instructors can have
access to an up‐to‐date, cross‐curricular library of over 6,000 high quality digital videos. Instructors can choose to share links to a whole video or just particular segments of a video with their students in Blackboard. More information about Films on Demand can be found by visiting the MATC Library Website (http://matc.edu/library/matclibrary.html).
• Web 2.0 Best Practices Videos – A series of online teaching best practices videos is available through the Teaching and Learning Technology Website (http://facultynet.matc.edu/frc/) and our streaming media‐server. Our current titles include: Online Retention Strategies; Effective Lecture, Simulation, & Assessment; and Mediasite, Access = Success!
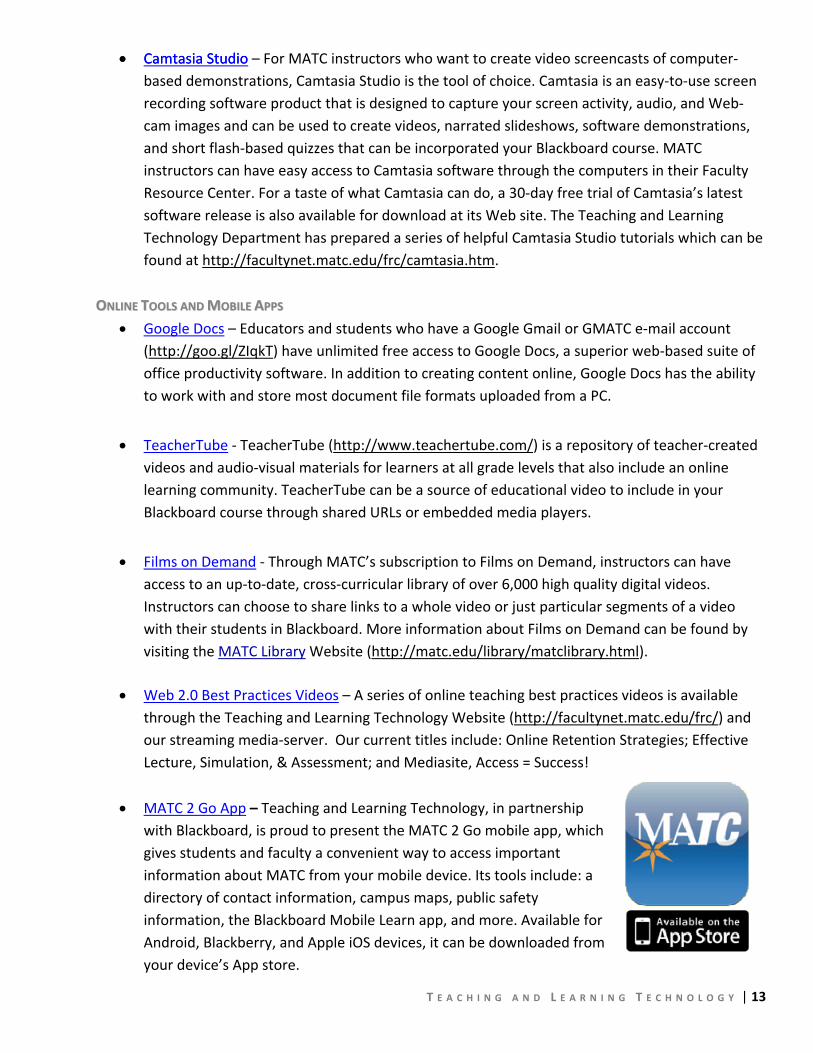
• MATC 2 Go App – Teaching and Learning Technology, in partnership with Blackboard, is proud to present the MATC 2 Go mobile app, which gives students and faculty a convenient way to access important information about MATC from your mobile device. Its tools include: a directory of contact information, campus maps, public safety information, the Blackboard Mobile Learn app, and more. Available for Android, Blackberry, and Apple iOS devices, it can be downloaded from your device’s App store.

T E A C H I N G A N D L E A R N I N G T E C H N O L O G Y | 14
MMEEDDIIAASSIITTEE ((LLEECCTTUURREE CCAAPPTTUURREE)) MediaSite is a tool for recording and saving recorded classroom sessions or demonstrations. While recording video with the MediaSite recorder, the instructor can display their computer screen and/or video of themselves. As an example, students can watch their instructor as they lecture and display a PowerPoint presentation, computer screen or document camera similar to a split screen video recording. The recorded video can then be viewed live or streamed on the Web and distributed to your students via a Web link. MATC’s MediaSite recording devices have been distributed across all four MATC campuses for use in your classrooms. For a demonstr‐ation of how Mediasite is used, please see instructor Kevin Mulvenna’s Mediasite demonstration video. Please contact the Teaching and Learning Technology Department if you would like to record a video using a MediaSite recorder.
If you need assistance in recording a MediaSite video, please contact one of our Instructional Support Personnel :
Jim Stepp Downtown Campus (414) 297‐7066 (x77066) Room M201 [email protected]
Peter Attipetty South Campus (414) 571‐4719 (x17719) Room A206 [email protected]
Aaron Davis North Campus (414) 238‐2354 (x82354) Room A280 [email protected]
Greg Davis West Campus (414) 456‐5347 (x65347) Room 350 [email protected]
MMUULLTTIIMMEEDDIIAA RROOOOMMSS Following is a brief description and list of amenities for the multimedia rooms that may be reserved through Teaching and Learning Technology: Room: S120 Conference Center Location: 1st Floor Student Center Building Description: With two‐way conferencing, wireless interactive technology and large projection
screens, the S120 Conference Center can accommodate up to 100 people in a spacious, comfortable atmosphere. MATC Catering Services are available in an adjacent breakout room.
Amenities Include:
• Two‐way audio and video teleconferencing with uplink and downlink
• Multimedia functions
• Individual microphones and speaker system (one system per two guests)

T E A C H I N G A N D L E A R N I N G T E C H N O L O G Y | 15
• Projections screens
• Wireless Technology
• Reception area
• Adjacent breakout rooms with catering available
• Wheelchair accessible
• Equipment for the hearing‐impaired
RROOOOMM:: SS111166 CCOONNFFEERREENNCCEE CCEENNTTEERR
Location: 1st Floor Student Center Building
Description: With two‐way conferencing, wireless interactive technology and multiple projection screens, the S116 Conference Center can accommodate up to 30 people for your smaller presentations/meetings. MATC Catering Services are available in an adjacent breakout room.
Amenities include:
• Two‐way audio and video teleconferencing with uplink and downlink
• Multimedia functions
• Projection screens
• Wireless Technology
• Reception area
• Adjacent breakout rooms with catering available
• Wheelchair accessible
RROOOOMM:: TT330077 CCOONNFFEERREENNCCEE RROOOOMM
Location: 3rd Floor T‐Building Description: With two‐way conferencing and wireless interactive technology, the T307 Conference
Room accommodates your smaller meetings, up to 20 people. Amenities include:
• Two‐way audio and video teleconferencing with uplink and downlink

T E A C H I N G A N D L E A R N I N G T E C H N O L O G Y | 16
• Multimedia functions
• Individual microphones and speaker system (one system per two guests)
• Projection screen
• Wireless Technology
• Wheelchair accessible
RROOOOMM:: MM220044 CCOONNFFEERREENNCCEE RROOOOMM Location: 2nd Floor Main Building Description: A multimedia function room with wireless technology, that accommodates 15 people. Amenities include:
• Multimedia functions
• Projection screen
• Wireless technology
• Wheelchair accessible
SSCCHHEEDDUULLIINNGG To schedule one of our Multimedia Rooms, contact Joan Barry at 297‐6735. Rooms are reserved on a first come, first serve basis. You will then be instructed to follow up your call by completing an Application for Use of Facilites form found online at http://imatc/Calendars/index.html . The form can be completed online, saved, and emailed back as an attachment. Be sure to indicate any special requirements on the form such as broadcast teleconferencing, MediaSite recording, audio visual equipment needs, etc.
MMUULLTTIIMMEEDDIIAA SSUUPPPPOORRTT ((TTEECCHH‐‐LLIINNEE)) A multimedia technician is always one call away for assistance during class hours and special events. Downtown Milwaukee campus dial: (414) 460‐4775 or (414) 235‐7102 Mequon campus dial: (262) 238‐2354 Oak Creek campus dial: (414) 571‐4719 West Allis campus dial: (414) 456‐5347
VVIIDDEEOO SSTTRREEAAMMIINNGG MATC Instructors who have created their own video content can send a request to the Teaching and Learning Technology department to have the video uploaded to our streaming media‐server in order to make it available for online viewing in Blackboard.
To better serve you, we ask that you follow these instructions before you make a request: To better serve you, we ask that you follow these instructions before you make a request: 1. Please review the copyright guidelines1. Please review the copyright guidelines (http://tiny.cc/oplkw) and chart (http://tiny.cc/05ual)
before you make your request. If you are NOT the original creator or copyright holder of the video, you must obtain official, written permission from the person, program, or corporation that made or owns the video. MATC requires that instructors do this before reproducing, modifying, or redistributing any copyrighted material. A permission form and instructions are included in the copyright guidelines document.
2. Please prepare your video for transfer to the media‐server before you make your request.
Because MATC's media‐server is only compatible with media in Windows Format , instructors may need to convert their videos to this format (.WMV) using video editing or conversion software such as the free and easy‐to‐use Any Video Converter (http://tiny.cc/qtxcc). Save your Windows Media file to a disc or flash drive and bring it with you when you submit your request to the Teaching and Learning Technology Department.
After you have completed these tasks, you may submit your requests to:
Megan Hamilton (414) 297‐8372 (x78372) [email protected]
Once the process is complete, the instructor will receive a Web address (URL) to their video, which can be copied and pasted into a Blackboard course for students to view.
T E A C H I N G A N D L E A R N I N G T E C H N O L O G Y | 17
CCHHAAPPTTEERR 22:: BBLLAACCKKBBOOAARRDD PPOOLLIICCIIEESS AANNDD PPRROOCCEEDDUURREESS
AARREE YYOOUU NNEEWW TTOO OONNLLIINNEE TTEEAACCHHIINNGG?? Online classes use the Internet, e‐mail, computer‐assissted learning, multimedia courseware and other instructional technology resources. Different forms of online instruction include:
• Sharing information on a Web site
• Delivering library resources through the Internet.
• Providing online activities, such as simulations and games.
• Communicating one‐to‐one or one‐to‐many via e‐mail for instructional purposes.
• Conducting discussions by using a threaded discussion board.
• Holding on‐line office hours through chat room software.
• Posting assignments online for students to complete and submit electronically.

T E A C H I N G A N D L E A R N I N G T E C H N O L O G Y | 18
Online courses can be partially online, such as in a blended course where there are face‐to‐face sessions as well as online components, or completely online, such as in distance learning. It is recommended that you have taught your class for at least one semester in the traditional classroom setting, using Blackboard to supplement your content delivery, and have worked through your course design issues before teaching a course online.
CCOOUURRSSEE DDEESSIIGGNN When planning to teach online, please consider what activities, presentations, multimedia materials, and assignments have helped students learn in the traditional classroom and decide how you can organize and deliver them online through Blackboard. The Teaching and Learning Technology department provides peer‐to‐peer support to assist you with Blackboard and online technology. Creating an environment where learning is achieved without face‐to‐face contact is the chall‐enge of online course development. When developing and teaching your online course, it is wise to assess what skills you will need, how much time will be involved, and whether you possess the characteristics of an online instructor. To assess your understanding there will be a learning curve associated with becoming familiar with how to use your new technology tools. This is central to course development, because you have to know what features you have use, and in what manner, as you plan to work in an electronic classroom and office. Regarding the development of an online course and its materials; it is hard to know how much time will be required to create a finished online course. It will vary based upon your preparedness and the process of creating or adapting your course materials for online distribution. As a general rule of thumb, to have a polished, finished online course, most research recommends an eighteen (18) month lead‐time, broken up into three parts: skill building and organizing course content; moving content online; and testing and revising your content online. The reality is that you will likely have far less time at your disposal than recommended. You may find that the initial development of an online course will initially take more time to prepare than a traditional, face‐to‐face course. However, once your content is developed for online use, it can be used in any of your online courses and can be easily modified or updated. Faculty most likely to enjoy and succeed teaching online have certain qualities and traits. Some of the characteristics are basic to teaching in general; others are specific to exploring new ideas and methods:
• Knowledge and enthusiam for the subject
• Proficent experience navigating online and using office productivity software
• Flexibility in teaching methods and approaches

T E A C H I N G A N D L E A R N I N G T E C H N O L O G Y | 19
• Experience in teaching
• Good course organization
• Effective communication skills with students
• Liking students
• Fairness in evaluation and grading
• Comfortable and efficient using technology
• Enjoying writing
• Responsive to students, provides timely feedback
• Good time management and organization skills
BBLLAACCKKBBOOAARRDD CCOOUURRSSEE SSHHEELLLLSS All MATC courses are given a Blackboard course shell (online class space). Instructors in face‐to‐face classes can choose to utilize their Blackboard course shells, however, this is optional and should be considered as a supplementary feature. For fully online courses, the Blackboard course shell is the primary instructional environment. Instructors and students access Blackboard through a supported Web browser, Internet connection, and a simple login process. For students to access content in Blackboard courses, instructors must turn their courses on (make them available) by the first day of class. By default, all Blackboard course shells have their availability setting switched to “Off” and students cannot view them until the instructor turns them “On.” Semester course shells are kept in the Blackboard system for 1‐year following the beginning of the semester. Each semester, old Blackboard courses from the past semester are deleted from Blackboard (Example: FA2011 courses deleted before the FA2012 semester). Faculty are notified through e‐mail several weeks in advance before this procedure is completed. To save and protect your course materials for future use or revision, is it strongly recommended that you perform the End of Semester Process for each of your courses. In this process, you archive your course (saving a file offline) and import your course content into a Personal Master shell. A Personal Master shell is your master copy of a course that is never deleted from Blackboard and can be used for further course development.
CCOOUURRSSEE CCAARRTTRRIIDDGGEE SSUUPPPPOORRTT Course Cartridges are pre‐made materials produced by professional authors, editors, and publishers that can be downloaded and added to a course. Course cartridges are supported on a limited basis and must be formatted for use with Blackboard version 9.1. They require a download key to unlock their content and add them to your course. Download Keys are obtained from the publisher of the cartridge for the textbook you are using. Just as it is the choice of the instructor to decide the contents of his or her own course, it is the responsibility of the instructor to import a course cartridge into his or her own course. Instructions

T E A C H I N G A N D L E A R N I N G T E C H N O L O G Y | 20
(http://tiny.cc/gd27h) for importing a course cartridge into a course are available at the Blackboard Faculty Support Website. Please note that the import/download process is not immediate and will take some time to complete once initiated. If you experience technical difficulties with importing a course cartridge, please contact your publisher for assistance.
IISSSSUUEESS TTOO CCOONNSSIIDDEERR
OONNLLIINNEE AASSSSEESSSSMMEENNTT AANNDD AACCAADDEEMMIICC DDIISSHHOONNEESSTTYY Online assessment offers benefits to both the student and the instructor. Completely paperless, students can submit assignments and take tests online, which are automatically tracked in the course’s gradebook. Through the course gradebook, students can discover the results of their assignments, tests, or quizzes and recieve feedback immediately. However, there is the issue of how to control cheating and plagiarism in online course environments. Special measures must be taken into consideration to discourage and prevent academic dishonesty in online courses. To learn more about tools and strategies that you can implement in your online courses, we recommend that you read our guide to Countering Academic Dishonesty with Technology (http://tiny.cc/4ndlp).
IINNTTEELLLLEECCTTUUAALL PPRROOPPEERRTTYY Because of intellectual property concerns, TLT staff does not copy course content of any kind from one instructor’s course to a different instructor’s course without expressed written consent from the instructor or department owning the content.
MMOOTTIIVVAATTIINNGG SSTTUUDDEENNTTSS No matter whether your class takes place in a traditional classroom or online, an educational environment can present challenges to motivating and engaging students in the task of learning. The following actions can be done to promote student motivation in distance learning courses:
• To promote student engagement in learning, deliver your course with enthusiasm.
• Develop rapport with students by giving timely positive and constructive feedback.
• Inform students of your expectations and what they need to know to succceed.
• Make clear the relevance of course material to situations in the real world.
• Use appropriate, concrete, understandable examples to explain course content.
• Cover an appropriate difficulty of material.
• Increase the difficulty of course material as students master content.
• Present a well organized course.
T E A C H I N G A N D L E A R N I N G T E C H N O L O G Y | 21
• Provide students with a variety of learning activities and assessments.
• Use clear, consistant communication.
For more information, we recommend reading the following articles from our Teaching with Technology Today newsletter:
• Making E‐Learning More Engaging (http://tiny.cc/hyxi5) by Megan Hamilton and Mercedes Fisher
• Creating Effective Online Communities in Your MATC Course (http://tiny.cc/9e1zn) by Megan Hamilton and Mercedes Fisher
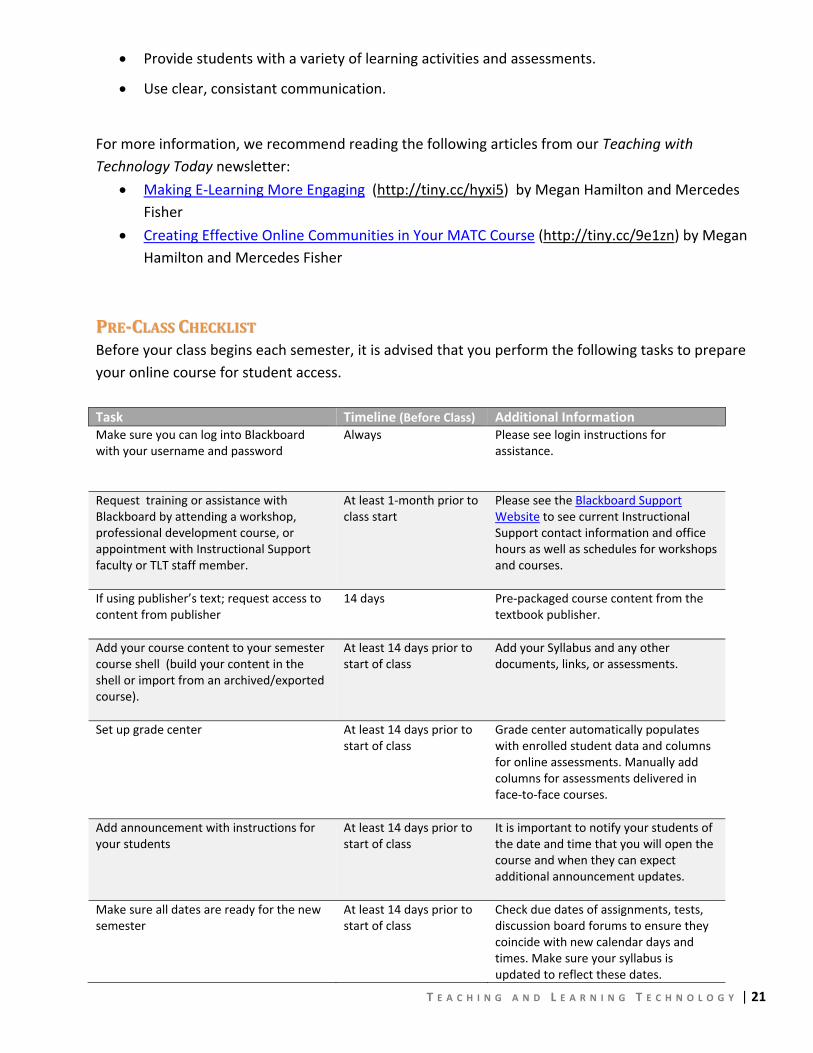
PPRREECCLLAASSSS CCHHEECCKKLLIISSTT Before your class begins each semester, it is advised that you perform the following tasks to prepare your online course for student access. Task Timeline (Before Class) Additional Information Make sure you can log into Blackboard with your username and password
Always Please see login instructions for assistance.
Request training or assistance with Blackboard by attending a workshop, professional development course, or appointment with Instructional Support faculty or TLT staff member.
At least 1‐month prior to class start
Please see the Blackboard Support Website to see current Instructional Support contact information and office hours as well as schedules for workshops and courses.
If using publisher’s text; request access to content from publisher
14 days Pre‐packaged course content from the textbook publisher.
Add your course content to your semester course shell (build your content in the shell or import from an archived/exported course).
At least 14 days prior to start of class
Add your Syllabus and any other documents, links, or assessments.
Set up grade center At least 14 days prior to start of class
Grade center automatically populates with enrolled student data and columns for online assessments. Manually add columns for assessments delivered in face‐to‐face courses.
Add announcement with instructions for your students
At least 14 days prior to start of class
It is important to notify your students of the date and time that you will open the course and when they can expect additional announcement updates.
Make sure all dates are ready for the new semester
At least 14 days prior to start of class
Check due dates of assignments, tests, discussion board forums to ensure they coincide with new calendar days and times. Make sure your syllabus is updated to reflect these dates.
T E A C H I N G A N D L E A R N I N G T E C H N O L O G Y | 22
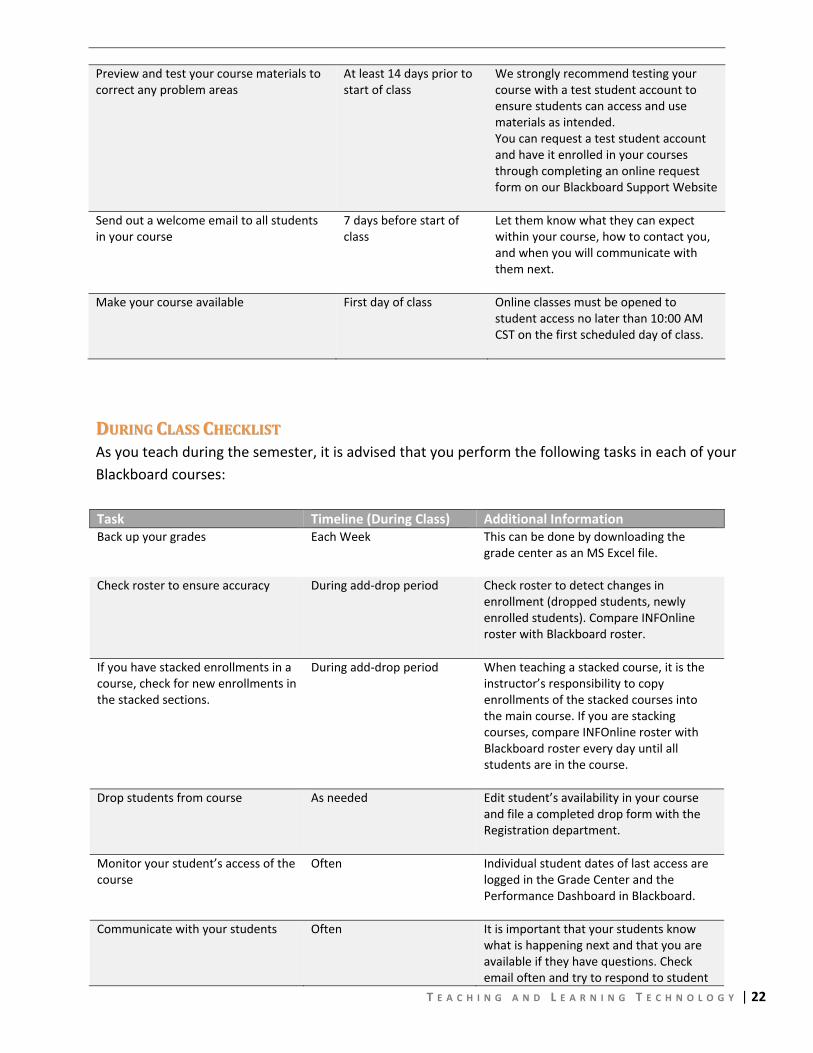
Preview and test your course materials to correct any problem areas
At least 14 days prior to start of class
We strongly recommend testing your course with a test student account to ensure students can access and use materials as intended. You can request a test student account and have it enrolled in your courses through completing an online request form on our Blackboard Support Website
Send out a welcome email to all students in your course
7 days before start of class
Let them know what they can expect within your course, how to contact you, and when you will communicate with them next.
Make your course available First day of class Online classes must be opened to student access no later than 10:00 AM CST on the first scheduled day of class.
DDUURRIINNGG CCLLAASSSS CCHHEECCKKLLIISSTT As you teach during the semester, it is advised that you perform the following tasks in each of your Blackboard courses: Task Timeline (During Class) Additional Information Back up your grades Each Week This can be done by downloading the
grade center as an MS Excel file.
Check roster to ensure accuracy During add‐drop period Check roster to detect changes in enrollment (dropped students, newly enrolled students). Compare INFOnline roster with Blackboard roster.
If you have stacked enrollments in a course, check for new enrollments in the stacked sections.
During add‐drop period When teaching a stacked course, it is the instructor’s responsibility to copy enrollments of the stacked courses into the main course. If you are stacking courses, compare INFOnline roster with Blackboard roster every day until all students are in the course.
Drop students from course As needed Edit student’s availability in your course and file a completed drop form with the Registration department.
Monitor your student’s access of the course
Often Individual student dates of last access are logged in the Grade Center and the Performance Dashboard in Blackboard.
Communicate with your students Often It is important that your students know what is happening next and that you are available if they have questions. Check email often and try to respond to student

T E A C H I N G A N D L E A R N I N G T E C H N O L O G Y | 23
email within 24 hours of receiving a message.
Send out an email of encouragement to the students.
Mid‐point Let your students know how they are doing and what the next steps are.
Survey students Mid‐point Ask them for feedback to determine what they like and dislike about your course.This can be a simple e‐mail,an actual survey delivered through Blackboard, or an annomyous poll in Google Docs.
Keep Blackboard Support staff informed of problems
All term Please contact us regarding any technical problems you experience.
EENNDD OOFF CCLLAASSSS CCHHEECCKKLLIISSTT As the end of the semester, it is advised that you perform the following tasks in each of your Blackboard courses: Task Timeline after class ends Additional Information Make your course unavailable Final day Unless you have students who need to
complete the class, turn your class “off”
Leave notes to yourself
5‐days (and during the semester)
Leave notes about things that worked well and things that did not work so well during the course. This will help you decide what content to revise or repeat.
Make copies of good examples of quality student work
7‐days Get permission from students to use their excellent work to use as a model for your next online course. If students can see what is expected, they are more likely to produce the desired result.
Survey your students 7‐days Anonymous surveys are a great way of getting feedback from students that can be used in reviewing or revising your course.
Download your course’s Grade Center
7‐days Use “Work Offline” action from the Grade Center to save a copy offline. It is the instructor’s responsibility to save his or her course’s Grade Center so its content will be preserved and can be accessed at a later time.
Request a personal master
7‐days If you do not already have one for the course, request a Personal Master so that it can be used as a developmental space inbetween semesters.
Archive or export your course 7‐days It is the instructor’s responsibility to save
T E A C H I N G A N D L E A R N I N G T E C H N O L O G Y | 24
their course so its content can be accessed at a later date.
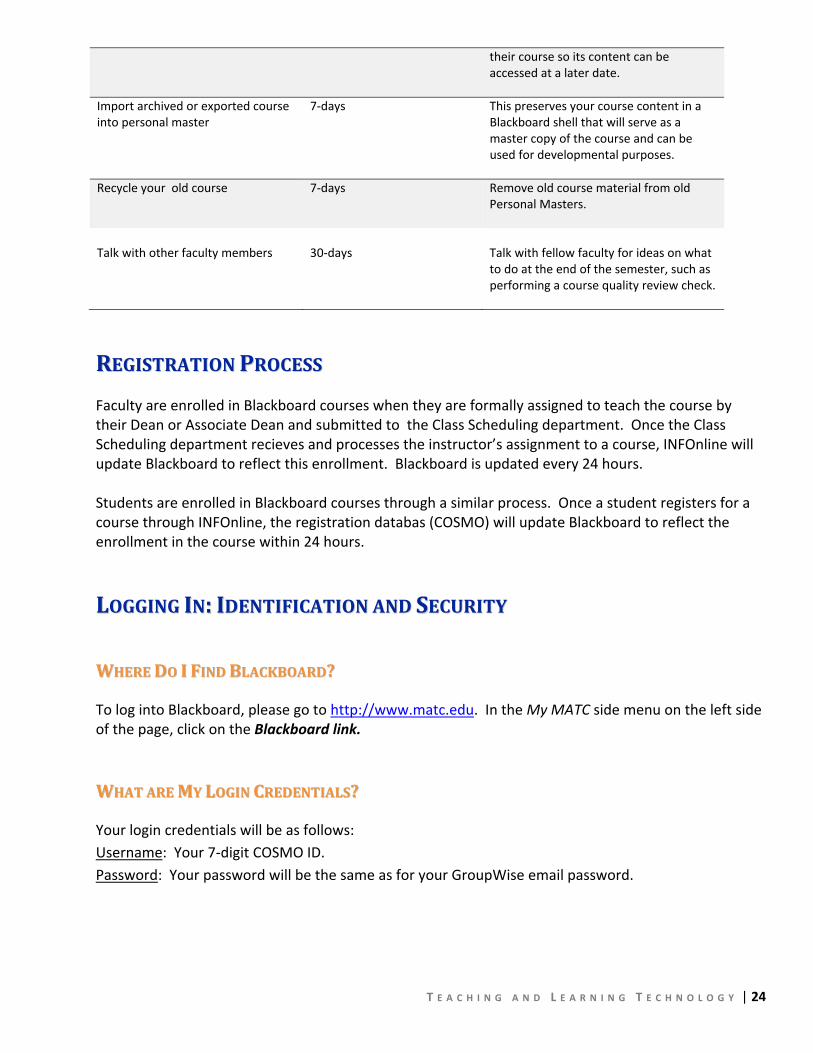
Import archived or exported course into personal master
7‐days This preserves your course content in a Blackboard shell that will serve as a master copy of the course and can be used for developmental purposes.
Recycle your old course
7‐days Remove old course material from old Personal Masters.
Talk with other faculty members
30‐days Talk with fellow faculty for ideas on what
to do at the end of the semester, such as performing a course quality review check.
RREEGGIISSTTRRAATTIIOONN PPRROOCCEESSSS Faculty are enrolled in Blackboard courses when they are formally assigned to teach the course by their Dean or Associate Dean and submitted to the Class Scheduling department. Once the Class Scheduling department recieves and processes the instructor’s assignment to a course, INFOnline will update Blackboard to reflect this enrollment. Blackboard is updated every 24 hours. Students are enrolled in Blackboard courses through a similar process. Once a student registers for a course through INFOnline, the registration databas (COSMO) will update Blackboard to reflect the enrollment in the course within 24 hours.
LLOOGGGGIINNGG IINN:: IIDDEENNTTIIFFIICCAATTIIOONN AANNDD SSEECCUURRIITTYY
WWHHEERREE DDOO II FFIINNDD BBLLAACCKKBBOOAARRDD??
To log into Blackboard, please go to http://www.matc.edu. In the My MATC side menu on the left side of the page, click on the Blackboard link.
WWHHAATT AARREE MMYY LLOOGGIINN CCRREEDDEENNTTIIAALLSS??
Your login credentials will be as follows: Username: Your 7‐digit COSMO ID. Password: Your password will be the same as for your GroupWise email password.

PPA
T E A C H I N G A N D L E A R N I N G T E C H N O L O G Y | 25
ASSSSWWOORRDD MMAAIINNTTEENNAANNCCEE//CCHHAANNGGIINNGG YYOOUURR PPAASSSSWWOORRDD
Your Novell / GroupWise email / Blackboard password expires 120 days after you set it. You will need to go to the Password Manager (http://www.matc.edu/TecHELP/ TecHelp_PasswordManager.html) and change your password at or before that time. Novell will send you an email 15 days before your password expires and 5 days before your password expires. The message will suggest that you change your password immediately and will include a link to the Password Manager. When you change your password at this location, your new password will be used to access your email, Blackboard and Novell immediately. If you have not already done so, please use the Password Manager now to set your two challenge questions. Having done so will allow you to reset your own password with the Password Manager even if you forget your password. If you have not set your challenge questions and you forget your password you will need to contact the MATC HelpDesk directly.
If you are experiencing trouble accessing Blackboard, please call the MATC HelpDesk at:(414) 297‐6541
Only HelpDesk support personnel can resolve login problems.
MMAAKKIINNGG RREEQQUUEESSTTSS WWIITTHH OONNLLIINNEE FFOORRMMSS CCHHAANNGGIINNGG FFAACCUULLTTYY IINN CCOOUURRSSEESS
When an instructor is assigned to teach a course by their Dean or Associate Dean and then entered by the Class Scheduling department, Blackboard will be updated to reflect these enrollments within 24 hours of the request. Teaching and Learning Technology staff cannot assign or re‐assign primary instructors to Blackboard courses. Additional faculty can be added to your course for the purpose of peer coaching, curriculum development or coordination, or emergency substitution.
AADDDDIINNGG UUSSEERRSS TTOO CCOOUURRSSEESS
Supplementary users can be enrolled in your Blackboard course shell under the following circumstances by filling out the Enroll Supplementary Users form:
• Adding a past student to the Blackboard course for the purpose of finishing an incomplete. • Adding a test student to one’s course for the purpose of previewing course content. • Adding a tutor for your course for sharing course materials and assisting students. • Sharing course content with a fellow instructor or supervisor for developing course design,
quality assessment, and peer coaching.

T E A C H I N G A N D L E A R N I N G T E C H N O L O G Y | 26
If you have dropped a student with the Registration department and wish to re‐add the student to your course, the student must enroll in the class through Registration’s add/drop processes in order for the student to have access to Blackboard once again. Once the INFOnline system is updated with the change in the student’s enrollment, Blackboard will be updated within 24 hrs. The student will regain access once INFOnline updates Blackboard accordingly and all previous assignments, tests, and grades will appear in the course once again Blackboard support personnel cannot manually add the student ahead of this process being completed.
To add a supplementary user to a Blackboard course shell, complete the Enroll Supplementary Users form (http://facultynet.matc.edu/blackboard/enroll_user_form.htm) with your information. Following completion of the form, you will be notified via email that the process is complete.
AADDDDIINNGG AA TTEESSTT SSTTUUDDEENNTT TTOO YYOOUURR BBLLAACCKKBBOOAARRDD CCOOUURRSSEE A test student account can help a faculty member see their class in the way a student will. It can help in testing availability of items, course cartridge content, tests, quizzes and navigation. A test student account is a separate, unique Blackboard identity with username and password that is supplied to instructors upon request To request a test student account, please complete the online Test Student Account Creation form (http://facultynet.matc.edu/blackboard/test_student_form.htm). Once a test student account is assigned to you, it is your account for as long as you teach at MATC. The account is added to your courses each semester upon your request. Instructors must complete the Enroll Supplementary Users form for each semester if they wish to access their course(s) with their test student account.
RREEQQUUEESSTTIINNGG AA PPEERRSSOONNAALL MMAASSTTEERR A Personal Master is a permanent, personal Blackboard course shell created specifically as a master copy of a course you teach. By developing your course in a Personal Master, you can efficiently maintain course materials between semesters. Build or archive your course once with a Personal Master and you can import its contents into any live semester course shell. While a Semester course shell is kept for one semester following the semester in which they were taught and then are automatically deleted, a Personal Master is your permanent archive that will never be deleted unless you request deletion. When completing the form you will be given a choice of having a Blank or Enhanced Personal Master created. A Blank Personal Master is a course shell without buttons, content areas and folders created. An Enhanced Personal Master is a course shell with basic buttons, content areas, and folders pre‐created for your use. To request a personal master, please complete the online Personal Master request form (http://facultynet.matc.edu/blackboard/PM_form.html). After submitting the form, you
will be notified via email when your Personal Master has been created and the Blackboard Course ID of the Personal Master so you can identify it in Blackboard. will be notified via email when your Personal Master has been created and the Blackboard Course ID of the Personal Master so you can identify it in Blackboard.
T E A C H I N G A N D L E A R N I N G T E C H N O L O G Y | 27
RREEQQUUEESSTTIINNGG AA DDEEPPAARRTTMMEENNTT MMAASSTTEERR Department Masters are used for storage of course content that was paid for by the college. This content belongs to the department that designs the course and can be used by members of the department as requested by the Associate Dean or Dean of the department. Like Personal Masters, these courses will not be deleted unless specifically requested. The request will need to come from the Associate Dean, Dean or Instructional Chair. To request a department master, please complete the online Department Master request form
REQUESTING A DEPARTMENT MASTER Department Masters are used for storage of course content that was paid for by the college. This content belongs to the department that designs the course and can be used by members of the department as requested by the Associate Dean or Dean of the department. Like Personal Masters, these courses will not be deleted unless specifically requested. The request will need to come from the Associate Dean, Dean or Instructional Chair. To request a department master, please complete the online
REQUESTING A D MEPARTMENT ASTER
Department Master request form (http://facultynet.matc.edu/blackboard/DM_form.htm).
RREEQQUUEESSTTIINNGG AA SSTTAATTEEWWIIDDEE CCUURRRRIICCUULLUUMM MMAASSTTEERR Statewide Curriculum Masters are used for storage of course content that was developed as part of a statewide curriculum project. This content is shared among a number of institutions. Like Personal Masters, these courses will not be deleted unless specifically requested by its creators.
A request for a Statewide Curriculum Master must come from an Associate Dean, Dean or Instructional Chair by completing the online Statewide Curriculum Master request form (http://facultynet.matc.edu/blackboard/SM_form.htm).
CCHHAAPPTTEERR 33:: PPRREEPPAARRIINNGG FFOORR YYOOUURR OONNLLIINNEE CCOOUURRSSEE
MMIINNIIMMUUMM CCOOMMPPUUTTEERR RREEQQUUIIRREEMMEENNTTSS All Internet delivered courses require faculty and students to have regular access to a personal computer system. This computer system can be either a Microsoft Windows‐based computer or an Apple Macintosh system. Linux‐based operating systems are not compatible with MATC’s online learning software. On the next page, you can view the minimum computer requirements for teaching and taking online courses at MATC.
Note: You may experience slow connectivity if your computer only meets the minimum requirements. Viewing course documents, video lectures, and additional materials may require a more powerful computer, memory (RAM) and a Broadband Internet connection.
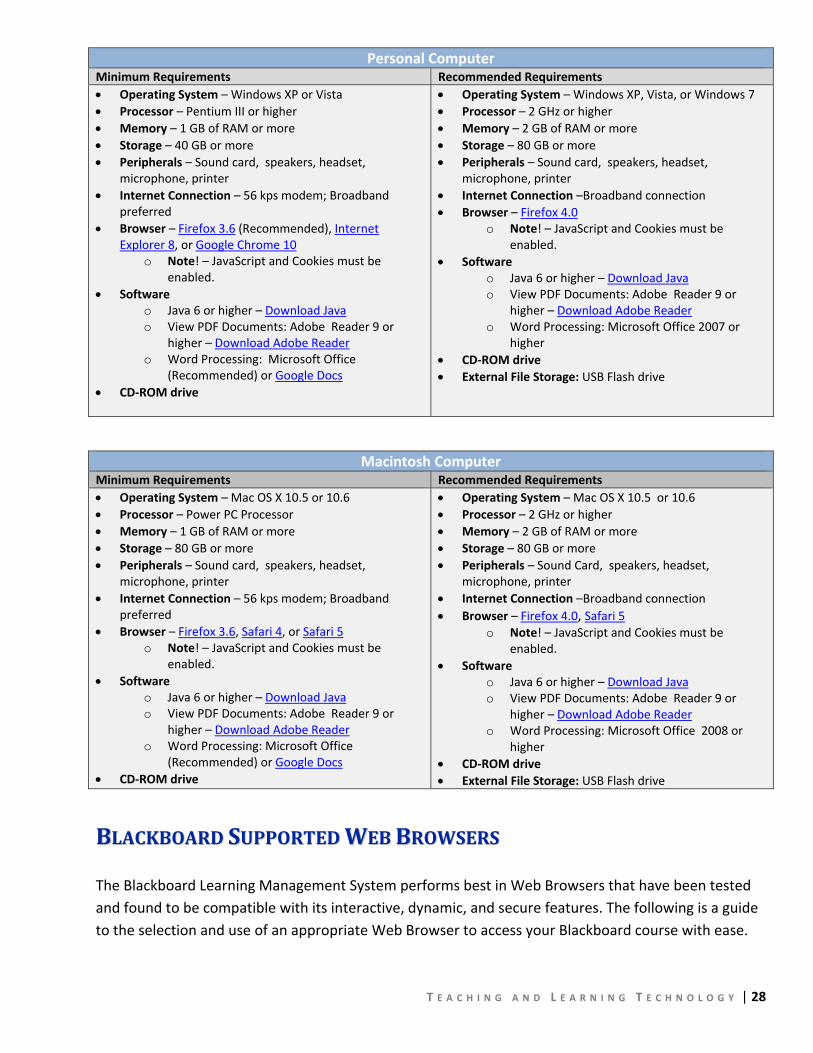
T E A C H I N G A N D L E A R N I N G T E C H N O L O G Y | 28
Personal Computer Minimum Requirements Recommended Requirements • Operating System – Windows XP or Vista • Processor – Pentium III or higher • Memory – 1 GB of RAM or more • Storage – 40 GB or more • Peripherals – Sound card, speakers, headset,
microphone, printer • Internet Connection – 56 kps modem; Broadband
preferred • Browser – Firefox 3.6 (Recommended), Internet
Explorer 8, or Google Chrome 10 o Note! – JavaScript and Cookies must be
enabled. • Software
o Java 6 or higher – Download Java o View PDF Documents: Adobe Reader 9 or
higher – Download Adobe Reader o Word Processing: Microsoft Office
(Recommended) or Google Docs • CD‐ROM drive
• Operating System – Windows XP, Vista, or Windows 7 • Processor – 2 GHz or higher • Memory – 2 GB of RAM or more • Storage – 80 GB or more • Peripherals – Sound card, speakers, headset,
microphone, printer • Internet Connection –Broadband connection • Browser – Firefox 4.0
o Note! – JavaScript and Cookies must be enabled.
• Software o Java 6 or higher – Download Java o View PDF Documents: Adobe Reader 9 or
higher – Download Adobe Reader o Word Processing: Microsoft Office 2007 or
higher • CD‐ROM drive • External File Storage: USB Flash drive
Macintosh Computer Minimum Requirements Recommended Requirements • Operating System – Mac OS X 10.5 or 10.6 • Processor – Power PC Processor • Memory – 1 GB of RAM or more • Storage – 80 GB or more • Peripherals – Sound card, speakers, headset,
microphone, printer • Internet Connection – 56 kps modem; Broadband
preferred • Browser – Firefox 3.6, Safari 4, or Safari 5
o Note! – JavaScript and Cookies must be enabled.
• Software o Java 6 or higher – Download Java o View PDF Documents: Adobe Reader 9 or
higher – Download Adobe Reader o Word Processing: Microsoft Office
(Recommended) or Google Docs • CD‐ROM drive
• Operating System – Mac OS X 10.5 or 10.6 • Processor – 2 GHz or higher • Memory – 2 GB of RAM or more • Storage – 80 GB or more • Peripherals – Sound Card, speakers, headset,
microphone, printer • Internet Connection –Broadband connection • Browser – Firefox 4.0, Safari 5
o Note! – JavaScript and Cookies must be enabled.
• Software o Java 6 or higher – Download Java o View PDF Documents: Adobe Reader 9 or
higher – Download Adobe Reader o Word Processing: Microsoft Office 2008 or
higher • CD‐ROM drive • External File Storage: USB Flash drive
BBLLAACCKKBBOOAARRDD SSUUPPPPOORRTTEEDD WWEEBB BBRROOWWSSEERRSS The Blackboard Learning Management System performs best in Web Browsers that have been tested and found to be compatible with its interactive, dynamic, and secure features. The following is a guide to the selection and use of an appropriate Web Browser to access your Blackboard course with ease.
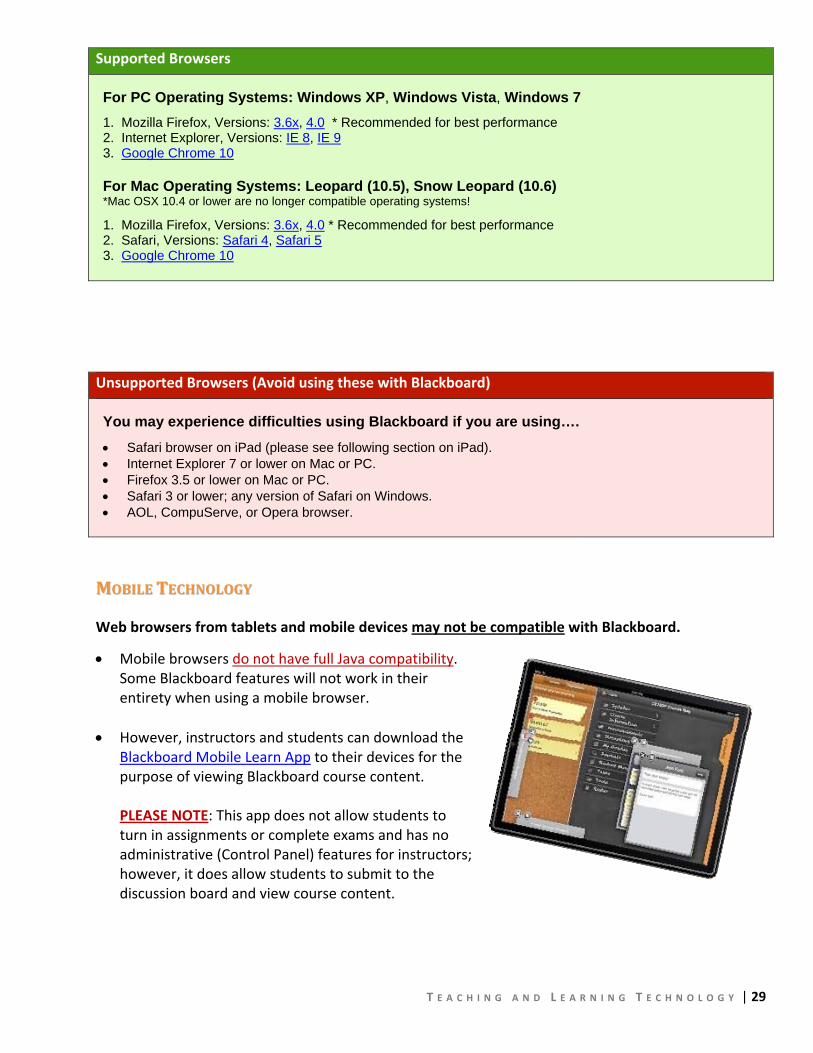
Supported Browsers
For PC Operating Systems: Windows XP, Windows Vista, Windows 7
1. Mozilla Firefox, Versions: 3.6x, 4.0 * Recommended for best performance 2. Internet Explorer, Versions: IE 8, IE 9 3. Google Chrome 10 For Mac Operating Systems: Leopard (10.5), Snow Leopard (10.6) *Mac OSX 10.4 or lower are no longer compatible operating systems!
1. Mozilla Firefox, Versions: 3.6x, 4.0 * Recommended for best performance 2. Safari, Versions: Safari 4, Safari 5 3. Google Chrome 10
Unsupported Browsers (Avoid using these with Blackboard)
You may experience difficulties using Blackboard if you are using….
• Safari browser on iPad (please see following section on iPad). • Internet Explorer 7 or lower on Mac or PC. • Firefox 3.5 or lower on Mac or PC. • Safari 3 or lower; any version of Safari on Windows. • AOL, CompuServe, or Opera browser.
T E A C H I N G A N D L E A R N I N G T E C H N O L O G Y | 29
MMOOBBIILLEE TTEECCHHNNOOLLOOGGYY
Web browsers from tablets and mobile devices may not be compatible with Blackboard.
• Mobile browsers do not have full Java compatibility. Some Blackboard features will not work in their entirety when using a mobile browser.
• However, instructors and students can download the
Blackboard Mobile Learn App to their devices for the purpose of viewing Blackboard course content. PLEASE NOTE: This app does not allow students to turn in assignments or complete exams and has no administrative (Control Panel) features for instructors; however, it does allow students to submit to the discussion board and view course content.

T E A C H I N G A N D L E A R N I N G T E C H N O L O G Y | 30
TTHHEE FFOOLLLLOOWWIINNGG CCHHAARRTTSS CCLLAARRIIFFYY WWHHIICCHH BBRROOWWSSEERRSS AARREE CCOOMMPPAATTIIBBLLEE WWIITTHH BBLLAACCKKBBOOAARRDD::
For Windows Configurations IE9 IE8 IE7 or lower Firefox 4 Firefox 3.6 Chrome 10
Windows XP (32‐bit)
Unsupported Compatible Unsupported Compatible Compatible Compatible
Windows Vista (32‐bit)
Certified Compatible Unsupported Certified Compatible Compatible
Windows Vista (64‐bit)
Compatible Compatible Unsupported Compatible Compatible Compatible
Windows 7 (32‐bit)
Certified Compatible Unsupported Certified Compatible Certified
Windows 7 (64‐bit)
Compatible Compatible Unsupported Compatible Compatible Compatible
For Mac OSX Configurations Safari 5.0 Safari 4.0 Firefox 4.0 Firefox 3.6 Chrome 10
Mac OSX 10.5 (Leopard)
Compatible Compatible Compatible Compatible Compatible
Mac OSX 10.6 (Snow Leopard)
Certified Compatible Certified Compatible Certified
Users can access Blackboard using any of the “Compatible” or “Certified” Web Browser/Operating System combinations detailed in the above chart.
HHOOWW DDOO II KKNNOOWW WWHHAATT BBRROOWWSSEERR II AAMM UUSSIINNGG??
An easy way to check your browser’s compatibility is to use the Browser Tester when you visit the
Blackboard home page.
Click the “Browser Tester” button to check your browser’s compatibility.
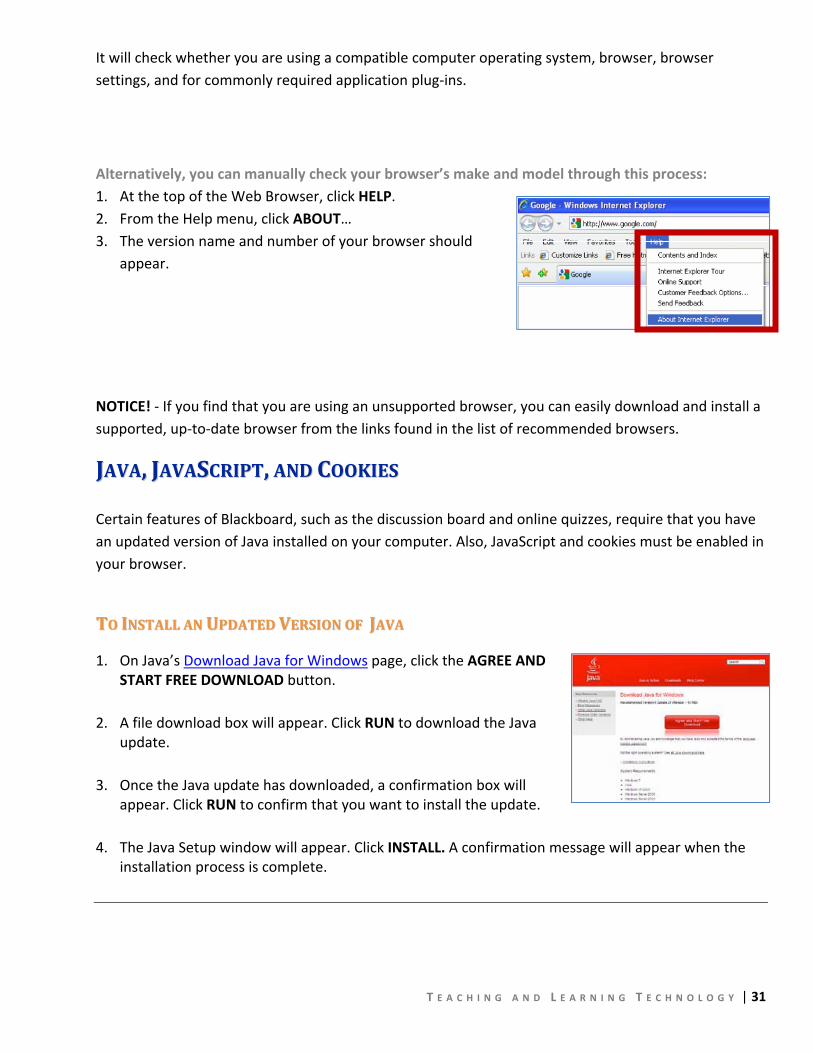
It will check whether you are using a compatible computer operating system, browser, browser settings, and for commonly required application plug‐ins.
Alternatively, you can manually check your browser’s make and model through this process: 1. At the top of the Web Browser, click HELP. 2. From the Help menu, click ABOUT… 3. The version name and number of your browser should
appear.
NOTICE! ‐ If you find that you are using an unsupported browser, you can easily download and install a supported, up‐to‐date browser from the links found in the list of recommended browsers.
T E A C H I N G A N D L E A R N I N G T E C H N O L O G Y | 31
JJAAVVAA,, JJAAVVAASSCCRRIIPPTT,, AANNDD CCOOOOKKIIEESS Certain features of Blackboard, such as the discussion board and online quizzes, require that you have an updated version of Java installed on your computer. Also, JavaScript and cookies must be enabled in your browser.
TTOO IINNSSTTAALLLL AANN UUPPDDAATTEEDD VVEERRSSIIOONN OOFF JJAAVVAA
1. On Java’s Download Java for Windows page, click the AGREE AND START FREE DOWNLOAD button.
2. A file download box will appear. Click RUN to download the Java update.
3. Once the Java update has downloaded, a confirmation box will appear. Click RUN to confirm that you want to install the update.
4. The Java Setup window will appear. Click INSTALL. A confirmation message will appear when the installation process is complete.

T E A C H I N G A N D L E A R N I N G T E C H N O L O G Y | 32
TTOO EENNAABBLLEE JJAAVVAASSCCRRIIPPTT IINN MMOOZZIILLLLAA FFIIRREEFFOOXX
If you are using a Windows PC: 1. Click the TOOLS menu at the top of the browser and
select OPTIONS.
2. In the Options window, select CONTENT.
3. In the Content panel, check the checkbox next to the words “Enable JavaScript”.
4. Click OK to save the settings and close the Options window. If you are using a Mac: 1. Click PREFERENCES at the top of the browser.
2. In the Preferences window, click the CONTENT tab.
3. Check the “Enable JavaScript” checkbox.
4. Close the Preferences window to save the settings.
TTOO EENNAABBLLEE JJAAVVAASSCCRRIIPPTT IINN SSAAFFAARRII ((MMAACC))
1. In the Safari browser’s menu, click PREFERENCES.
2. In the Preferences window, click the SECURITY tab.
3. On the Security tab, check the “Enable JavaScript” checkbox.
4. Close the preferences dialogue box. TTOO EENNAABBLLEE JJAAVVAASSCCRRIIPPTT IINN GGOOOOGGLLEE CCHHRROOMMEE 1. If you are using a PC:
a. Click the WRENCH ICON in Chrome’s toolbar, then select OPTIONS.
b. On the Options page, click the UNDER THE HOOD link.
c. On the Under the Hood page, click the CONTENT SETTINGS button.
d. On the Content Settings page, select the ALLOW JAVASCRIPT radio button.
e. Close the Options tab when done.
2. If you are using a Mac:
a. Click the WRENCH ICON in Chrome’s toolbar, then select PREFERENCES. a. Click the WRENCH ICON in Chrome’s toolbar, then select PREFERENCES.
b. On the Options page, click the UNDER THE HOOD link. b. On the Options page, click the UNDER THE HOOD link.
c. On the Under the Hood page, click the CONTENT SETTINGS button. c. On the Under the Hood page, click the CONTENT SETTINGS button.
d. On the Content Settings page, select the ALLOW JAVASCRIPT radio button. d. On the Content Settings page, select the ALLOW JAVASCRIPT radio button.
e. Close the Options tab when done. e. Close the Options tab when done.
T
T E A C H I N G A N D L E A R N I N G T E C H N O L O G Y | 33
TOO EENNAABBLLEE CCOOOOKKIIEESS
If you are using Internet Explorer:
1. At the top of the browser, click the TOOLS button, and then click INTERNET OPTIONS from the tools menu.
2. In the Internet Security box that appears, click the PRIVACY tab.
3. Click the "Default" button (or manually slide the bar down to "Medium") under "Settings".
4. Click OK.
If you are using Firefox 3.6 or greater:
1. At the top of the browser, click the TOOLS button, and then click OPTIONS from the tools menu.
2. In the Options box that appears, click the PRIVACY tab.
3. Make sure that REMEMBER HISTORY is selected in the drop‐down list.
4. Click OK.
If you are using Google Chrome 10 or greater:
1. Click the WRENCH ICON in Chrome’s toolbar, then select OPTIONS.
2. On the Options page, click the UNDER THE HOOD link.
3. On the Under the Hood page, click the CONTENT SETTINGS button.
4. On the Content Settings page, select the ALLOW LOCAL DATA TO BE SET option.
5. Close the Options tab when done.

TTH
T E A C H I N G A N D L E A R N I N G T E C H N O L O G Y | 34
HIIRRDD PPAARRTTYY PPLLUUGGIINNSS
Instructors and students should download the appropriate viewers, readers, and Web Browser plug‐ins for their course needs and computer to ensure everyone can access online course content.
DDOOCCUUMMEENNTT VVIIEEWWEERRSS
Adobe Acrobat Reader Microsoft Word Viewer Microsoft PowerPoint Viewer Microsoft Excel Viewer Office 2008 for Mac Autodesk DWF Viewer
MMEEDDIIAA PPLLAAYYEERRSS
Adobe Flash Player Windows Media player QuickTime Player Real Player Shockwave Player Authorware Player
If you have trouble accessing content, it could be that you do not have the appropriate plug‐in installed, that you need to install an update for the plug‐in, or the plug‐in is not currently enabled in your Web Browser.
TTRROOUUBBLLEESSHHOOOOTTIINNGG CCOOMMMMOONN WWEEBB BBRROOWWSSEERR IISSSSUUEESS
When using Blackboard, we highly recommend accessing Blackboard through the Mozilla Firefox Web
Browser as it is the most highly compatible with Blackboard.
IINNTTEERRNNEETT EEXXPPLLOORREERR:: PPOOPPUUPP IINNTTEERRNNEETT SSEECCUURRIITTYY NNOOTTIICCEESS
Internet Explorer 8
Click “No” to display the full page. Internet Explorer 9

In Internet Explorer 8 or higher, an Internet Security warning may appear when you come to a Blackboard page containing embedded multimedia or click a link that takes you outside the secured Blackboard environment.
Click “Show All Content” to display the full page.
To display the page’s content, follow these instructions for the browser model you are using (see right).
However, be advised that this may reload the page you are trying to view.
Note: If you do not want to deal with these sorts of notifications when using Blackboard, we recommend accessing
Blackboard through Mozilla Firefox or Google Chrome.
T E A C H I N G A N D L E A R N I N G T E C H N O L O G Y | 35
IINNTTEERRNNEETT EEXXPPLLOORREERR AANNDD CCOOMMPPAATTAABBIILLIITTYY MMOODDEE
If you are using IE 8 or greater, please be sure that the browser’s compatibility mode is turned OFF. This will help you load and navigate through the Grade Center.
IINNTTEERRNNEETT EEXXPPLLOORREERR:: BBLLOOCCKKEEDD SSIITTEE NNOOTTIICCEESS
In Internet Explorer, a blocked site security notice may appear in your Web Browser’s information bar when you attempt to open or download a document or run active content, such as a quiz, in Blackboard.
Click on the information bar and select
DOWNLOAD FILE from the menu that appears. If this doesn’t immediately take you to the document or active content, refresh the page and try accessing the content again.
IINNTTEERRNNEETT EEXXPPLLOORREERR AANNDD ““CCAANNCCEELLLLEEDD NNAAVVIIGGAATTIIOONN”” EERRRROORR MMEESSSSAAGGEE When attempting to navigate to some Websites when using Internet Explorer, you may receive a

T E A C H I N G A N D L E A R N I N G T E C H N O L O G Y | 36
notice that navigation to the page has been cancelled. This is a common issue with Internet Explorer and its security zone settings. You can resolve this issue through this process:
Step 1 – Adjust Security Settings
1. In Internet Explorer, click the TOOLS menu. 2. From the Tools menu, select INTERNET OPTIONS. 3. In Internet Options, click the SECURITY TAB. 4. Click TRUSTED SITES in the “Select a Zone to View or Change a Security Setting” area. 5. Add the site to the list of trusted sites. 6. UNCHECK the ENABLED PROTECTED MODE checkbox and click OK.
Step 2 – Clear Temporary Internet Files
1. Access Internet Options again. 2. In Internet Options, click the SAFETY button and click DELETE BROWSING HISTORY. 3. Select the check box next to each category of information you want to delete. 4. Click DELETE.
Step 3 – Close and Re‐Open Your Browser. Try to access your Website.
CCRREEAATTIINNGG AACCCCEESSSSIIBBLLEE CCOONNTTEENNTT
Instructors may include files, such as Word documents, Adobe PDF documents, and PowerPoint slides in their Blackboard courses through upload or attachment methods. To ensure that students can easily access a file through a Web Browser, its best to follow these guidelines.
FFIILLEE NNAAMMIINNGG CCOONNVVEENNTTIIOONNSS
Special characters (i.e. $@#$%^&*<>?[]{}|+, etc.) and foreign language characters or accents (i.e.
When naming your files, only use letters, numbers, and underscores. Although Blackboard supports filenames and documents that incorporate foreign language or special alphanumeric characters, there is no guarantee that other Web Browser’s will also. Following these file naming conventions will ensure that you and students do not experience problems with accessing files submitted and accessed in Blackboard.
• File names cannot exceed 72 characters in length.
• Avoid using blank spaces, special characters, and foreign language characters or scripts when naming files.
• umlauts, tildes) often pose a challenge to Web browsers and computer operating systems, makingyour well crafted document impossible to download or open successfully.
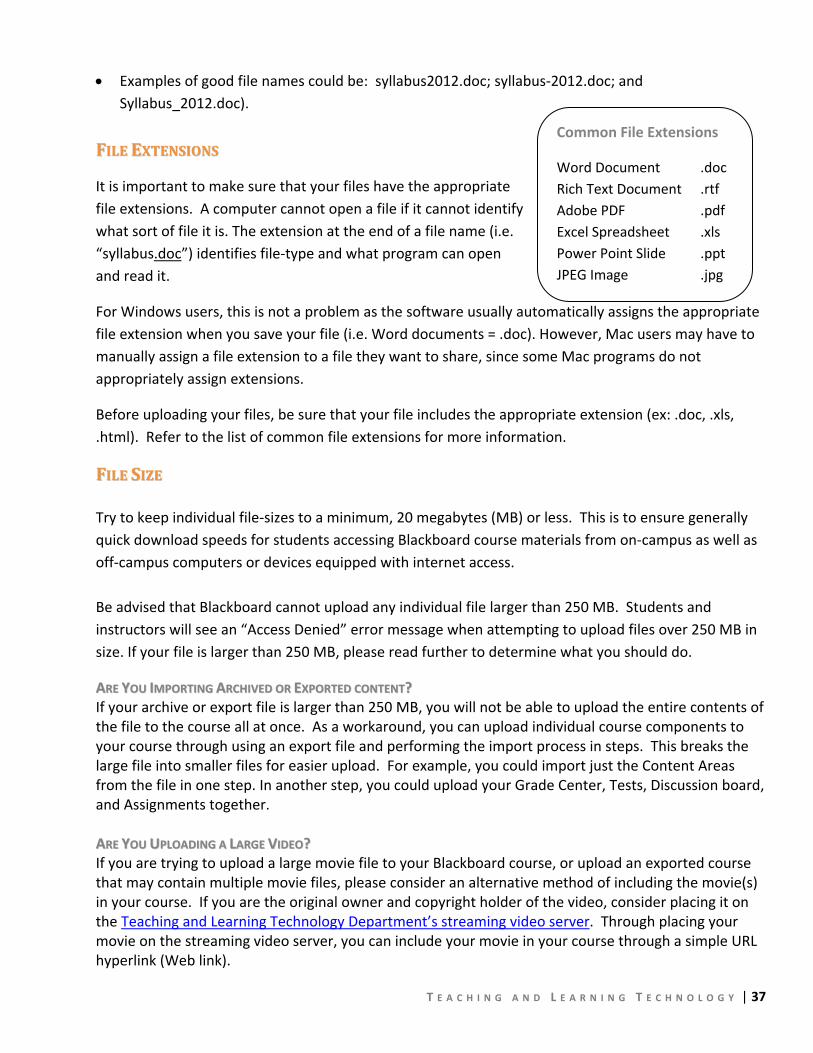
Common File Extensions Word Document .doc Rich Text Document .rtf Adobe PDF .pdf Excel Spreadsheet .xls Power Point Slide .ppt JPEG Image .jpg
• Examples of good file names could be: syllabus2012.doc; syllabus‐2012.doc; and Syllabus_2012.doc).
T E A C H I N G A N D L E A R N I N G T E C H N O L O G Y | 37
FFIILLEE EEXXTTEENNSSIIOONNSS
It is important to make sure that your files have the appropriate file extensions. A computer cannot open a file if it cannot identify what sort of file it is. The extension at the end of a file name (i.e. “syllabus.doc”) identifies file‐type and what program can open and read it.
For Windows users, this is not a problem as the software usually automatically assigns the appropriate file extension when you save your file (i.e. Word documents = .doc). However, Mac users may have to manually assign a file extension to a file they want to share, since some Mac programs do not appropriately assign extensions.
Before uploading your files, be sure that your file includes the appropriate extension (ex: .doc, .xls, .html). Refer to the list of common file extensions for more information.
FFIILLEE SSIIZZEE Try to keep individual file‐sizes to a minimum, 20 megabytes (MB) or less. This is to ensure generally quick download speeds for students accessing Blackboard course materials from on‐campus as well as off‐campus computers or devices equipped with internet access. Be advised that Blackboard cannot upload any individual file larger than 250 MB. Students and instructors will see an “Access Denied” error message when attempting to upload files over 250 MB in size. If your file is larger than 250 MB, please read further to determine what you should do.
AARREE YYOOUU IIMMPPOORRTTIINNGG AARRCCHHIIVVEEDD OORR EEXXPPOORRTTEEDD CCOONNTTEENNTT?? If your archive or export file is larger than 250 MB, you will not be able to upload the entire contents of the file to the course all at once. As a workaround, you can upload individual course components to your course through using an export file and performing the import process in steps. This breaks the large file into smaller files for easier upload. For example, you could import just the Content Areas from the file in one step. In another step, you could upload your Grade Center, Tests, Discussion board, and Assignments together. AARREE YYOOUU UUPPLLOOAADDIINNGG AA LLAARRGGEE VVIIDDEEOO?? If you are trying to upload a large movie file to your Blackboard course, or upload an exported course that may contain multiple movie files, please consider an alternative method of including the movie(s) in your course. If you are the original owner and copyright holder of the video, consider placing it on the Teaching and Learning Technology Department’s streaming video server. Through placing your movie on the streaming video server, you can include your movie in your course through a simple URL hyperlink (Web link).
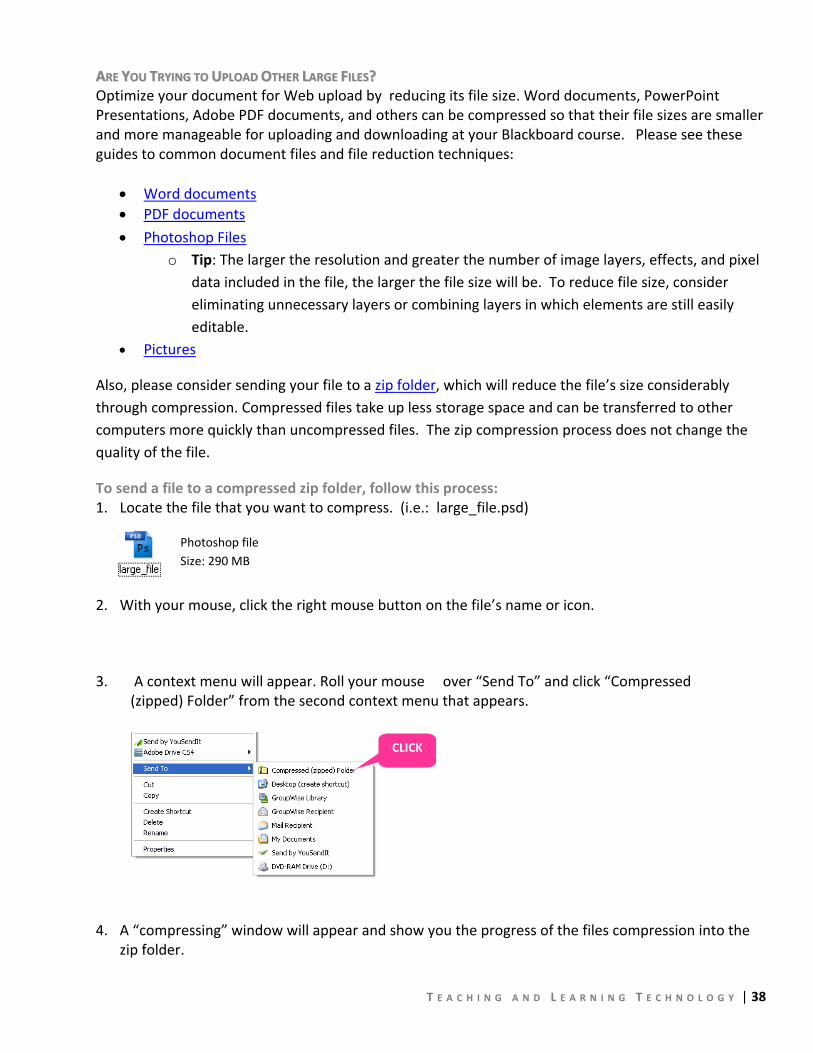
AAR
T E A C H I N G A N D L E A R N I N G T E C H N O L O G Y | 38
REE YYOOUU TTRRYYIINNGG TTOO UUPPLLOOAADD OOTTHHEERR LLAARRGGEE FFIILLEESS?? Optimize your document for Web upload by reducing its file size. Word documents, PowerPoint Presentations, Adobe PDF documents, and others can be compressed so that their file sizes are smaller and more manageable for uploading and downloading at your Blackboard course. Please see these guides to common document files and file reduction techniques:
• Word documents • PDF documents
• Photoshop Files o Tip: The larger the resolution and greater the number of image layers, effects, and pixel
data included in the file, the larger the file size will be. To reduce file size, consider eliminating unnecessary layers or combining layers in which elements are still easily editable.
• Pictures
Also, please consider sending your file to a zip folder, which will reduce the file’s size considerably through compression. Compressed files take up less storage space and can be transferred to other computers more quickly than uncompressed files. The zip compression process does not change the quality of the file.
To send a file to a compressed zip folder, follow this process: 1. Locate the file that you want to compress. (i.e.: large_file.psd)
Photoshop file Size: 290 MB
2. With your mouse, click the right mouse button on the file’s name or icon.
3. A context menu will appear. Roll your mouse over “Send To” and click “Compressed (zipped) Folder” from the second context menu that appears.
CLICK
4. A “compressing” window will appear and show you the progress of the files compression into the zip folder.

5. When the compression is complete, you will see a newly created zip folder with the name of your file (Ex: large_file.zip).
T E A C H I N G A N D L E A R N I N G T E C H N O L O G Y | 39
Compressed File (Zip Folder)Size: 89.2 MB
This example file’s size has decreased by 69% as a result of the compression and can now be uploaded to Blackboard, as it is now fewer than the 250 MB cut‐off.
To Open Files downloaded in a zip folder
• In Windows XP (or greater) or Apple OS‐X (or greater), simply double‐click on the zip folder to browser the contents of a folder as you normally would. Then, drag the file from the compressed folder to a new location.
• Older computer operating systems may require a third party zip compression utility like WinRAR or the free 7‐Zip to open a zip folder.
PPRREEVVIIEEWWIINNGG YYOOUURR CCOOUURRSSEE It is strongly recommended that you preview and test all areas of your course to ensure that students will be able to access and interact with your content and to detect and correct problems proactively.
Instructors can preview their courses by turning “Edit mode” off when signed into Blackboard. Even better, instructors can preview and interact with their course content as students do with a Blackboard test student account.
EEDDIITT MMOODDEE The Edit Mode button is located towards the upper‐right corner of your Blackboard course. Your course’s Edit Mode can be toggled on or off. When Edit Mode is on, you can add, edit, delete, and re‐arrange your course content.
When Edit Mode is off, you will notice that your view of the course will be different. This is a student's view of the course. In this view an instructor will not see empty Content Areas, content marked as unavailable or hidden, or any of the editing tools in the course menu.

T E A C H I N G A N D L E A R N I N G T E C H N O L O G Y | 40
PPRREEVVIIEEWWIINNGG YYOOUURR CCOOUURRSSEE WWIITTHH AA TTEESSTT SSTTUUDDEENNTT AACCCCOOUUNNTT A “test student” account is a separate login that can be used to access the course as a student would. Instructors can request a test student account that can be used to access and interact with course content as a real student might. This is useful for ensuring that students can access course content as intended and identify areas that need adjustment.
Once a test student account is made, instructors can request that the test student be enrolled in one or more of their live Semester Course shells. To view the course with a test student account, the instructor will need to make the course available.
Alternatively, if an instructor has a Personal Master for their course, they can request that the test student be enrolled in the Personal Master. A Personal Master is a course shell that instructors can use to build their course content independent of the live Semester Course shells.
Enrolling one’s test student into their Personal Master gives the instructor the option of copying the test student’s enrollment from the Personal Master into any of their online classes themselves. This reduces the number of requests the instructor must submit to a Blackboard administrator.
To Copy Your Personal Master’s Test Student Enrollment into another Course 1. Navigate to the Personal Master. Double‐check to be sure this is the course.
2. Within the Personal Master, scroll down to the CONTROL PANEL and click ON PACKAGES AND
UTILITIES. From the expanded menu, select COPY COURSE. 3. The Copy Course page will appear. Fill out the following information:
Section 1 (Copy Type) : Be sure its set to “Copy Course Materials into an Existing Course.”
Section 2 (Copy Options) : Click BROWSE. A page with your courses listed will appear. Select the course you want to copy your Personal Master’s enrollment into. Please check to verify you have selected the correct course. When done, click SUBMIT; the course’s ID will be added to the “Destination Course ID” text field.
PLEASE NOTE! ‐ Content stored within a Personal Master can be moved into a live, Semester Course shell through a specific process: archive and import.

Next, CHECK ONE CHECKBOX listed under “Select Course Materials”. This can be any item you wish, but we advise you to choose something that will not affect your live Semester course, like the Calendar tool.
Next, CHECK ONE CHECKBOX listed under “Select Course Materials”. This can be any item you wish, but we advise you to choose something that will not affect your live Semester course, like the Calendar tool.
Section 3 (Course Files: Links and Content): Section 3 (Course Files: Links and Content): Leave the default settings selected, “Copy Links and Copy Files”. Section 4 (Enrollments): Check the INCLUDE ENROLLMENTS IN THE COPY checkbox to copy your test student into the destination course. Click SUBMIT when done.
NOTE: ONLY PERFORM THIS ACTION WHEN COPYING CONTENTS FROM YOUR PERSONAL MASTER INTO YOUR LIVE SEMESTER SHELL.
4. A confirmation message will appear on screen and be sent to your MATC e‐mail account.
Once a test student account is acquired and enrolled in a course, you can access the course with your test student account’s login and password. If you forget the password to your Blackboard test student account, please call a Faculty Blackboard Support Team member to reset it for you:
Faculty Blackboard Technical Support
Brian Carlson Manager, Teaching and Learning Technology (414) 297‐7508 (x77508)
Megan Hamilton Educational Assistant ‐ Web Enhanced Instruction (414) 297‐8372 (x78372)
T E A C H I N G A N D L E A R N I N G T E C H N O L O G Y | 41
CCHHAAPPTTEERR 44:: CCOOUURRSSEE DDEESSIIGGNN AANNDD MMAAIINNTTEENNAANNCCEE
IINNSSTTRRUUCCTTIIOONNAALL DDEESSIIGGNN As you may already know, developing a new class of any kind requires a period where you plan how you are going to organize the course components. In addition, since you may be using new technology for the first time, there will be a learning curve associated with becoming familiar with how to use your new technology tools. This is central to course development, because you have to know what features

T E A C H I N G A N D L E A R N I N G T E C H N O L O G Y | 42
you can use, and in what manner, as you plan to work in an electronic classroom and office. This the Instructional Design Phase of course development.
At MATC, instructors are responsible for designing and maintaining their own course content in Blackboard. For assistance or ideas regarding course design, there are a couple things you can do:
• Make an appointment with Faculty Blackboard Support specialist, Megan Hamilton, for one‐on‐one Blackboard counseling and assistance. Call 414‐297‐8372 to make an appointment.
• Contact a peer Faculty Instructional Support representative for one‐on‐one counseling and examples of instructional design for online and blended courses. Each peer representative specializes in a particular academic area and holds office hours at a Faculty Resource Center. Their specialties, office hours, and locations can be found by visiting the Faculty Blackboard Support Website.
• Self Inventory: What activities, presentations, multimedia materials, and assignments have helped students learn in your face‐to‐face courses? How might they be adapted for online courses? Review the tutorials on the Faculty Blackboard Support Website to learn about the different tools and features of Blackboard and how you might implement them.
• Contact the publisher’s representative of your favorite textbook and see if they provide multimedia ancillaries that accompany the book. Some provide Course Cartridges with assignments, tests, and other content that is ready‐made for use in Blackboard.
• Look for online examples of educational content for online courses: o MERLOT (http://www.merlot.org) – MERLOT is a database of high‐quality peer‐reviewed
teaching and learning content that you can use in your online courses.
o World Lecture Hall (http://wlh.webhost.utexas.edu/index.cfm) ‐ The World Lecture Hall contains links to pages created by faculty worldwide who are using the Web to deliver course materials.
SSAAMMPPLLEE SSYYLLLLAABBUUSS
A basic syllabus template is available for instructors to download and modify as needed for their courses. The syllabus can be found by visiting FacultyNet’s Teaching and Learning Technology page (http://tiny.cc/yeley).

T E A C H I N G A N D L E A R N I N G T E C H N O L O G Y | 43
MMAAIINMA NTTAAIINNIINNGG YYOOUURR CCOOUURRSSEE’’SS QQUUAALLIITTYY
Effective courses show evidence of clear, comprehensive planning. For a course to remain effective, and preserve its quality, it is essential that instructors conduct a regular review of the design, organization, and content of the course. Through reviewing and maintaining course content regularly, instructors can maintain the effectiveness of their courses and facilitate student achievement of the targeted learning objectives.
Effective courses show evidence of clear, comprehensive planning. For a course to remain effective, and preserve its quality, it is essential that instructors conduct a regular review of the design, organization, and content of the course. Through reviewing and maintaining course content regularly, instructors can maintain the effectiveness of their courses and facilitate student achievement of the targeted learning objectives.
QQUUAALLIITTYY CCHHEECCKKLLIISSTTSS FFOORR OONNLLIINNEE CCOOUURRSSEESS
for the evalu
When reviewing and maintaining your course, it is always helpful to refer to a rubric or guide that will give you an objective and reliable measure of your course’s quality based on approved standards. If you or your department does not already possess such a tool ation of online courses, it is a good idea to develop your own. MATC’s Teaching and
Learning Technology department has developed a Quality Checklist for Online Courses
When reviewing and maintaining your course, it is always helpful to refer to a rubric or guide that will give you an objective and reliable measure of your course’s quality based on approved standards. If you or your department does not already possess such a tool ation of online courses, it is a good idea to develop your own. MATC’s Teaching and
Learning Technology department has developed a
AIINNTTAAIINNIINNGG YYOOUURR CCOOUURRSSEE’’SS QQUUAALLIITTYY
QQUUAALLIITTYY CCHHEECCKKLLIISSTTSS FFOORR OONNLLIINNEE CCOOUURRSSEESS
for the evaluQuality Checklist for Online Courses guide
(http://tiny.cc/icg77) to help you in the development and maintenance of high‐quality online courses.
Additionally, Quality Matters, an organization devoted to improving and recognizing the quality of
g this
CCOOUURRSSEE AAVVAAIILLAABBIILLIITTYY
online education and student learning, provides a free, detailed guide with scoring system that instructors can use to assess their courses. If an instructor’s course scores at least 72 points usinguide, the course is said to meet quality expectations.
ll n shells are not available to students until the rt of
Inside your course, locate the course control panel.
. the Control Panel, click on the CUSTOMIZATION menu to view
mization menu, select PROPTERTIES.
4. n the Properties page, scroll down to part 3 of the form, called SET AVAILABILITY.
5. lick Submit to apply the change.
By default, a ew semester courseinstructor opens the class. To make your class available to students at the stathe semester, you must turn on the course’s availability. Your course must be made available to your students no later than the first day of class. To make your course available, follow this process:
1.
2 Inyour options.
3. From the Custo ONext to the words “Make Course Available”, choose the YES radio‐button. C
CLICKCLICK

T E A C H I N G A N D L E A R N I N G T E C H N O L O G Y | 44
SSTTAACCKKIINNGG CCOOUURRSSEESS Instructors can combine multiple sections of a course into one course through the use of the Course Copy function in Blackboard. However, before you attempt to do this, please decide which course will serve as the primary course and which sections will be copied into it. Students enrolled in the other sections will be moved into the primary course section.
HHOOWW TTOO SSTTAACCKK CCOOUURRSSEE EENNRROOLLLLMMEENNTTSS 1. First, decide which section will be your primary course section.
2. Once you have decided which section will be your primary section, navigate to a course section
that you want to copy into it.
3. In the course to be copied, scroll down to the CONTROL PANEL of your Blackboard course.
4. In the Control Panel, click the PACKAGES AND UTILITIES menu and select COURSE COPY.
5. The Copy Course page will appear. Scroll down to Section Two (Select Copy Options). Click the BROWSE button next to the words “Destination Course ID”. A courses dialogue box, containing a list of your Blackboard courses, will appear. Carefully choose the course you want to copy enrollments into. PLEASE DOUBLE‐CHECK YOUR SELECTION TO BE SURE IT IS THE RIGHT ONE BEFORE CLICKING SUBMIT.
Once sure that this is the destination course, click Submit. In Section Two, the Destination Course ID will now be updated to the one you selected.

6. Next, CHECK ONE OF THE CHECKBOXES from the list (ex: Tasks, Settings, Glossary). This is necessary for this function to work correctly.
7. Under Section 3 (Course Files), select
“Copy links and copies of the content (Include all Course Files)”.
8. Under Section 4 (Enrollments), CHECK THE CHECKBOX to copy enrolled students in this course into the destination course. Click SUBMIT when done.
9. A confirmation message will appear on the screen, stating “Success: Course copy action queued. An
email will be sent when the process is complete.” Once you receive this e‐mail, be sure to check your course’s enrollment data (Control Panel Users and Groups Users). Also, be sure to make the copied course unavailable to students.
PLEASE NOTE! ‐ If a new student registers for a non‐primary course section after you have stacked your sections, you will need to repeat the following process again. The process will only copy and move those newly enrolled students from the non‐primary course section into the primary section and will not create double enrollments.
T E A C H I N G A N D L E A R N I N G T E C H N O L O G Y | 45
AARRCCHHIIVVEE && EEXXPPOORRTT Instructors can archive or export course content from a personal master or semester course through a simple process that produces a compressed ZIP folder. The archive or export file can be downloaded to your computer for safekeeping as well as uploaded to a Blackboard shell.
Archiving your Blackboard shell creates a permanent record of a course including all the content and user interactions available at the time the archive file is created. In comparison, exporting creates a
T E A C H I N G A N D L E A R N I N G T E C H N O L O G Y | 46
package of course content, settings, and tools that can be imported into any Blackboard course that you teach. Archive files work well for creating a backup file of a live, semester course that includes grade data and all student contributions up to the time the archive was created. In the event that you need to look at grade data from a past course, an archive file can be useful. Export files work well for packaging up course content from a previous course or a personal master for easy transfer to a new course.
HHOOWW TTOO AARRCCHHIIVVEE OORR EEXXPPOORRTT AA CCOOUURRSSEE
1. In your course, scroll down to your course’s CONTROL PANEL.
2. In the Control Panel, click the PACKAGES AND UTILITIES menu and select EXPORT/ARCHIVE COURSE.
3. You will be taken to the Export/Archive page.
a. If you want to create an Archive file, do the following: 1. Click the ARCHIVE button.
2. You will be taken to the Archive page. In Section One, check the checkbox to INCLUDE GRADE CENTER HISTORY if you would like this to be included in the archive. In Section Two, make sure that “COPY LINKS AND COPIES OF THE CONTENT (INCLUDE ALL COURSE FILES)” is selected.
3. Click SUBMIT.
4. Proceed to step 4.
b. If you want to create an Export file, do the following: 1. Click the ARCHIVE button.
2. In Section Two (Course Files), make sure that “COPY LINKS AND COPIES OF THE CONTENT (INCLUDE ALL COURSE FILES)” is selected.
3. In Section Three, select the materials to include in the export package.
4. Click Submit.
5. Proceed to step 4.
4. You will be taken back to the Archive/Export page, where a confirmation message will be displayed: “Success: This action has been queued. An email will be sent when the process is complete”.
5. Once you have received your confirmation email that the process is complete, come back to the Archive/Export page if you left it (Packages and Utilities > Export/Archive Course > Archive). If you never left the page, refresh the page in your browser.

6. You should now see a link to your archived course. You need to save this file. To do so, Right‐Click your
mouse on the link and select “SAVE TARGET AS.” A Window will appear. Choose the location where you want to save your archive file and press Save
IIMMPPOORRTT Once you have created an archive or export file, you will be able to import it into another one of your courses. For example, this could be done if you want to load course content from your Personal Master or last Semester’s course into your new semester shell. H
Browse and select your archive or export file
HO
T E A C H I N G A N D L E A R N I N G T E C H N O L O G Y | 47
OWW TTOO IIMMPPOORRTT AANN AARRCCHHIIVVEE OORR EEXXPPOORRTT F Check all
checkmarks to bring all content into course.
FIILLEE IINNTTOO YYOOUURR CCOOUURRSSEE 1. Navigate to the DESTINATION COURSE in
which you want the archived or exported content added to.
2. When you are inside the destination course, scroll down to the course’s CONTROL PANEL and click PACKAGES AND UTILITIES and select IMPORT PACKAGE/VIEW LOGS.
3. You will be taken to the Import Package/View Logs page. Click the IMPORT PACKAGE button.
4. On the IMPORT PACKAGE FORM that appears, fill out the following sections:
a. Section 2 (Select a Package): Click the BROWSE button and select your archive or export file from its location on your computer or storage media.
b. Section 3 (Select Course Materials): Select all of the content materials by checking all of the boxes. This is to ensure that all of your course content is brought into your course.
When you are done, click SUBMIT. 5. A confirmation status message will appear on the screen, saying that the action has been queued.
Depending on the file size of the package you import, this process may take several minutes. Once the import process is complete, you will receive the confirmation email from Blackboard.
CCOOUURRSSEE CCOOPPYY Instructors can copy and transfer the content of one course into another by making a copy of the course through Blackboard’s Packages and Utilities section. This can be done when the content of one course can be used in another course. For example, in the case of the same course being held in both spring and fall semesters, instead of making a completely new Blackboard course with new content
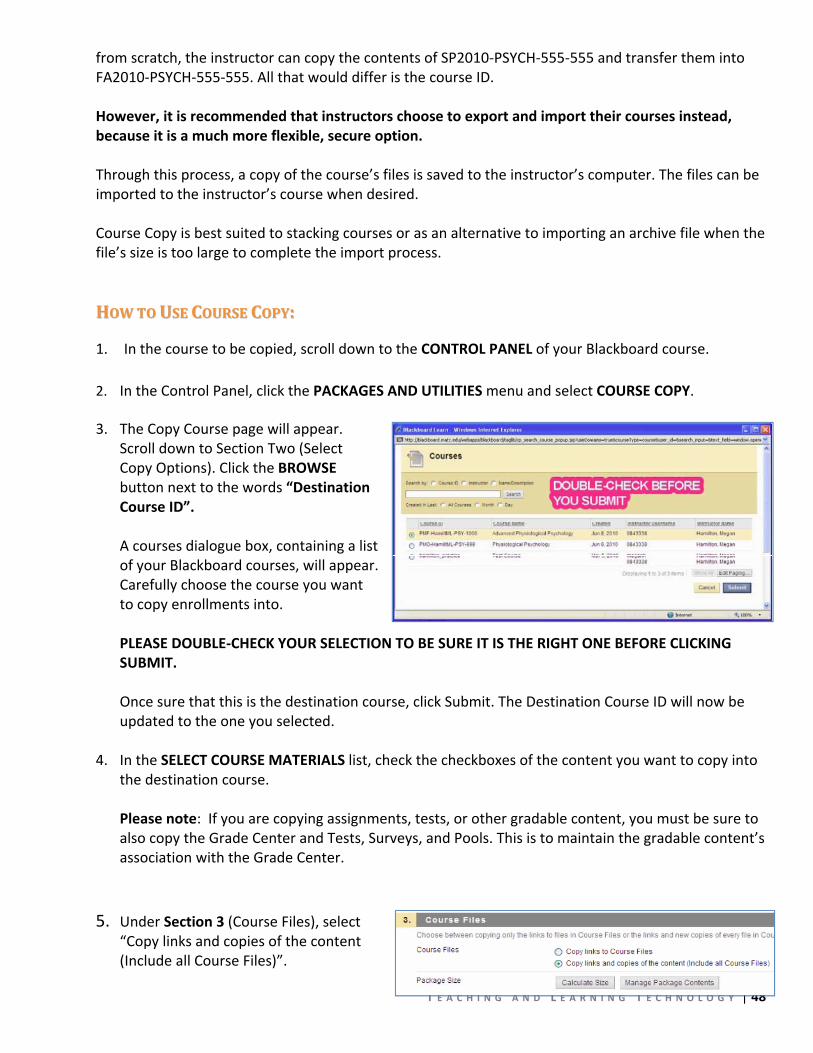
from scratch, the instructor can copy the contents of SP2010‐PSYCH‐555‐555 and transfer them into FA2010‐PSYCH‐555‐555. All that would differ is the course ID. However, it is recommended that instructors choose to export and import their courses instead, because it is a much more flexible, secure option. Through this process, a copy of the course’s files is saved to the instructor’s computer. The files can be imported to the instructor’s course when desired. Course Copy is best suited to stacking courses or as an alternative to importing an archive file when the file’s size is too large to complete the import process.
T E A C H I N G A N D L E A R N I N G T E C H N O L O G Y | 48
HHOOWW TTOO UUSSEE CCOOUURRSSEE CCOOPPYY::
1. In the course to be copied, scroll down to the CONTROL PANEL of your Blackboard course.
2. In the Control Panel, click the PACKAGES AND UTILITIES menu and select COURSE COPY.
3. The Copy Course page will appear. Scroll down to Section Two (Select Copy Options). Click the BROWSE button next to the words “Destination Course ID”. A courses dialogue box, containing a list of your Blackboard courses, will appear. Carefully choose the course you want to copy enrollments into. PLEASE DOUBLE‐CHECK YOUR SELECTION TO BE SURE IT IS THE RIGHT ONE BEFORE CLICKING SUBMIT. Once sure that this is the destination course, click Submit. The Destination Course ID will now be updated to the one you selected.
4. In the SELECT COURSE MATERIALS list, check the checkboxes of the content you want to copy into the destination course. Please note: If you are copying assignments, tests, or other gradable content, you must be sure to also copy the Grade Center and Tests, Surveys, and Pools. This is to maintain the gradable content’s association with the Grade Center.
5. Under Section 3 (Course Files), select “Copy links and copies of the content (Include all Course Files)”.

T E A C H I N G A N D L E A R N I N G T E C H N O L O G Y | 49
BBAACCKKIINNGG UUPP YYOOUURR GGRRAADDEE CCEENNTTEERR
DDOOWWNNLLOOAADDIINNGG YYOOUURR GGRRAADDEE CCEENNTTEERR AASS AANN EEXXCCEELL DDOOCCUUMMEENNTT It is recommended that instructors back up the work they have done in their course’s Grade Center by downloading an Excel file version of the Grade Center through the following process.
D
1. Once you are signed into Blackboard and have navigated within the
course you want to work with, scroll down the page to the CONTROL PANEL. Expand the GRADE CENTER menu and select FULL GRADE CENTER.
1. Once you are signed into Blackboard and have navigated within the course you want to work with, scroll down the page to the CONTROL PANEL. Expand the GRADE CENTER menu and select FULL GRADE CENTER.
2. On the Grade Center page, roll your mouse over the WORK OFFLINE button. On the pop‐up menu
that appears, click DOWNLOAD. 2. On the Grade Center page, roll your mouse over the WORK OFFLINE button. On the pop‐up menu
that appears, click DOWNLOAD.
3. On the Download Grades page, fill out the following sections… 3. On the Download Grades page, fill out the following sections… Section 1 (Data):
BBAACCKKIINNGG UUPP YYOOUURR GGRRAADDEE CCEENNTTEERR
DOOWWNNLLOOAADDIINNGG YYOOUURR GGRRAADDEE CCEENNTTEERR AASS AANN EEXXCCEELL DDOOCCUUMMEENNTT It is recommended that instructors back up the work they have done in their course’s Grade Center by downloading an Excel file version of the Grade Center through the following process.
Section 1 (Data): Click the FULL GRADE CENTER radio button to download the entire Grade Center. Section 2 (Options): Next to the words DELIMITER TYPE select the TAB radio button. This
option saves the Grade Center as a file that can be opened directly in Microsoft Excel. option saves the Grade Center as a file that can be opened directly in Microsoft Excel. Section 3 (Save Location):Section 3 (Save Location): Select the MY COMPUTER radio button to save the file to your computer.
When done, click SUBMIT.
4. The Download Grades page
will once more. Click the DOWNLOAD button to save or open the file.
BBL
T E A C H I N G A N D L E A R N I N G T E C H N O L O G Y | 50
LAACCKKBBOOAARRDD EENNDD OOFF TTHHEE SSEEMMEESSTTEERR PPRROOCCEESSSS This process should be repeated for each of your courses once the class has completed. It is the instructor’s responsibility to save their Grade Center and Archive their course so the content can be accessed at a later date. It is also important that you make your course “unavailable” once the semester has ended. This removes the course from the student’s course list. Please contact Brian Carlson at x77508 with questions regarding this process.
Process Overview
Step 1. Download the Grade Center Step 2. Make the Semester Shell (live section) “Unavailable” Step 3. Request a Personal Master Step 4. Archive the Semester Shell (live section) Step 5. Recycle your Old Personal Master (if applicable) Step 6. Import the Archive file Into the Personal Master
SSTTEEPP 11:: DDOOWWNNLLOOAADDIINNGG TTHHEE GGRRAADDEE CCEENNTTEERR
Downloading the Grade Center is the only way that the grades can be saved and accessed at a later date. Follow these steps:
1. Navigate to your course.
2. Scroll down to the Control Panel.
3. Expand the Grade Center menu and click Full Grade Center.

T E A C H I N G A N D L E A R N I N G T E C H N O L O G Y | 51
4. Once the Grade Center loads, select Work Offline at the top right of the Grade Center spreadsheet.
5. Select Download from the Work Offline menu. You will be taken to the Download Grades page.
6. Leave all of the default choices set. Press Submit to download your Grade Center.
7. A screen will appear with a DOWNLOAD link. Select this link to save your Grade Center as an Excel
file.
8. A File Download window will appear. Choose Save to save the file to your computer.
9. When the Browse window appears, locate the folder on your computer (or I‐Drive) to save the file
to.
10. Press Save to start the download.
When you have successfully downloaded and saved your Grade Center, proceed to Step 2.
SSTTEEPP 22:: MMAAKKEE TTHHEE SSEEMMEESSTTEERR SSHHEELLLL ““UUNNAAVVAAIILLAABBLLEE””
At the end of each semester it is the instructor’s responsibility to make their course “unavailable.” Making the course “unavailable” removes the course from your student’s course list. This also removes their access to the course. Follow these steps:
1. In the Control Panel, click the double arrows to expand the Customization menu.
2. Select the Properties button.
3. In the Set Availability option (#3), select Unavailable to remove student access to the course.
4. When finished, press Submit.
Once you have made your semester shell unavailable, proceed to Step 3.
SSTTEEPP 33:: RREEQQUUEESSTT AA PPEERRSSOONNAALL MMAASSTTEERR
A personal master is a Blackboard course shell created specifically for you and the course you request. A personal master is your course shell to keep course documents between semesters or as your own personal archive of course information. If you would like to request a Personal Master, please complete the Online Form Request (http://facultynet.matc.edu/blackboard/ PM_form.html).
Skip this step if you already have a Personal Master for the course that has just completed. Proceed to step 4.
SSTTEEPP 44:: AARRCCHHIIVVEE TTHHEE CCOOUURRSSEE
archiving the course compresses all course files into a .ZIP file. This file can be later imported into your Personal Master for editing between semesters or your live course shell for display to your students. This is an important step to save your course content and repurpose it at a later time.

T E A C H I N G A N D L E A R N I N G T E C H N O L O G Y | 52
1. Navigate to your course. In the Control Panel area select the Package and Utilities section.
2. Select Export/Archive Course and then select the Archive button.
3. The next screen will ask you if you would like to include your Grade Center history. It is recommended that you select Yes.
4. Next, select Submit. You will receive a notification on the next screen that should look like: Success: This action has been queued. An email will be sent when the process is complete.
5. After you receive the email from Blackboard telling you that your archive is complete, come back to the Archive screen. (Packages and Utilities > Export/Archive Course > Archive).
6. You should now see a link to your archived course. You need to save this file. To do so, Right‐Click
your mouse on the link and select “Save Target As.” A Window will appear. Choose the location where you want to save your archive file and press Save.
When you have successfully archived and saved your course to your computer or storage media, proceed to Step 5.
SSTTEEPP 55:: RREECCYYCCLLEE TTHHEE OOLLDD PPEERRSSOONNAALL MMAASSTTEERR ((IIFF AAPPPPLLIICCAABBLLEE))
If you already had a personal master for the course that has just completed, it is best to recycle (remove) all content from the old Personal Master before importing the course you just archived into it.
Note! ‐ Make sure that you have Archived your course shell prior to Recycling your old Personal Master.
Skip this step if you do not have an old Personal Master that needs to be Recycled.
1. Navigate to your old Personal Master.
2. In the Control Panel, select Packages and Utilities.
3. Select Bulk Delete.
4. Check all of the boxes within Section 1. In Section 2, check all boxes EXCEPT for “Users”.
5. In the Confirmation field, type “Delete” (without quotation marks).
Blackboard will now remove all content from your Personal Master. Once this process is complete you will only see empty Content Areas (course menu buttons). Select the down arrow next to each button and select Delete.
Note! ‐ Do NOT Delete your Announcements or Home button (depending on which button you have in your course menu).
When you have completed this step, proceed to Step 6.
SST
T E A C H I N G A N D L E A R N I N G T E C H N O L O G Y | 53
TEEPP 66:: IIMMPPOORRTT TTHHEE AARRCCHHIIVVEE FFIILLEE IINNTTOO YYOOUURR PPEERRSSOONNAALL MMAASSTTEERR Importing your archive file into your Personal Master gives you the opportunity to view the course materials between semesters and update any content as necessary. Follow these steps:
When you have completed this step, proceed to Step 6.
SST
1. In the Control Panel select Packages and Utilities. 1. In the Control Panel select Packages and Utilities.
2. Within Packages and Utilities, select Import Package/View Logs. 2. Within Packages and Utilities, select Import Package/View Logs.
3. Then select the Import Package button. 3. Then select the Import Package button.
4. To add your archived file from your computer, in the Select a Package section select the Browse
button.
4. To add your archived file from your computer, in the Select a Package section select the Browse
button.
5. In the File Upload dialog box, select your .zip file and click the Open button. 5. In the File Upload dialog box, select your .zip file and click the Open button.
6. In the Select Course Materials section, select the materials to include in the import process. 6. In the Select Course Materials section, select the materials to include in the import process.
7. Select the Submit button, at the lower right, to finish the import process. 7. Select the Submit button, at the lower right, to finish the import process.
Depending on the file size of your course, this process may take several minutes. Once the import process is complete, you will receive an email from Blackboard. Depending on the file size of your course, this process may take several minutes. Once the import process is complete, you will receive an email from Blackboard.
CCHHAAPPTTEERR 55:: SSUUPPPPOORRTT RREESSOOUURRCCEESS
TEEPP 66:: IIMMPPOORRTT TTHHEE AARRCCHHIIVVEE FFIILLEE IINNTTOO YYOOUURR PPEERRSSOONNAALL MMAASSTTEERR Importing your archive file into your Personal Master gives you the opportunity to view the course materials between semesters and update any content as necessary. Follow these steps:
CCHHAAPPTTEERR 55:: SSUUPPPPOORRTT RREESSOOUURRCCEESS
MAMATTCC HHEELLPP DDEESSKK
xperiencing o twork a
6541 f
If you are having trouble logging into Blackboard or GroupWise, or are ether technical difficulties with MATC phone lines, internet connectivity, neccess from home or computer equipment, please call the Help Desk at 414‐297‐or assistance.
The IT Direct Website (http://facultynet.matc.edu/helpdesk/itdirect.html) is also available for requesting assistance by creating a trouble‐ticket. Once a ticket is received, a representative from the Help Desk will be assigned to your case and follow up with you.
FFAACCUULLTTYY BBLLAACCKKBBOOAARRDD TTEECCHHNNIICCAALL SSUUPPPPOORRTT If you need technical assistance with using Blackboard or you experience a problem, please call our offices.

Faculty Blackboard Technical Support
Brian Carlson Manager, Teaching and Learning Technology (414) 297‐7508 (x77508) [email protected]
Megan Hamilton Educational Assistant ‐ Web Enhanced Instruction (414) 297‐8372 (x78372) [email protected]
Alternatively, you can contact the Teaching and Learning Technology Department through our Contact form at our Faculty Blackboard Website. To better assist you, we ask that you provide the specific Blackboard course ID and any specifics of your request, such as error messages being experienced or a clear, detailed explanation of an issue. Steps to replicate a problem are very helpful.
T E A C H I N G A N D L E A R N I N G T E C H N O L O G Y | 54
@@MMAATTCCBBBB OONN TTWWIITTTTEERR MATC Blackboard is now on Twitter! This means that MATC faculty, staff, and students can follow @MATCBb on Twitter to receive real‐time information about Blackboard such as; known issues, support options, professional development sessions, tutorials, reminders, and more. Not a member of Twitter? No problem! You can view the @MATCBb live feed by visiting the MATC Blackboard Faculty Support or Student Support websites.
FFAACCUULLTTYY BBLLAACCKKBBOOAARRDD SSUUPPPPOORRTT WWEEBBSSIITTEE
Maintained by the Blackboard Technical Support staff, the Faculty Blackboard Support Website (http://tiny.cc/ubh8u) is your resource for live Blackboard news, tutorials, and information about workshops and professional development course offerings. Here,
you will find our online contact form as well as forms for requesting personal masters and adding supplementary users to your courses.
TTEEAACCHHIINNGG WWIITTHH TTEECCHHNNOOLLOOGGYY TTOODDAAYY NNEEWWSSLLEETTTTEERR
Available to faculty through their GroupWise e‐mail and on the Web, the monthly Teaching with Technology Today newsletter informs you about technological trends in education and offers insights on how to make more effective learning‐design decisions that positively impact the experiences of students. Topics in the past have included: iPads in Education; Simulated Learning; How to Make E‐Learning More Engaging; and Deterring Cheating and Plagiarism in Online Assessments. In future issues, we will include helpful handouts about current topics such as how to effectively use discussion forums in Blackboard, publish a blog, communicate with students, develop course materials, or build bibliographies. You'll discover how students are using Blackboard tools, the ways it will impact how they learn, and how you can easily create, combine, and distribute a wide range of information in your courses. The most current issue of Teaching with Learning Technology Today can be found online by visiting the Faculty Blackboard Support Website. A searchable online archive of past issues can be found at FacultyNet (http://tiny.cc/pone5).

T E A C H I N G A N D L E A R N I N G T E C H N O L O G Y | 55
FFAACCUULLTTYY IINNSSTTRRUUCCTTIIOONNAALL SSUUPPPPOORRTT The Teaching and Learning Technology department provides peer‐to‐peer support to assist you with implementing Blackboard and online technology in your courses. Visit these Instructional Support representatives in your Faculty Resource Center or contact them directly for one‐on‐one assistance. Please see the Faculty Instructional Support Schedule on the Blackboard Support Website
FACULTY INSTRUCTIONAL SUPPORT The Teaching and Learning Technology department provides peer‐to‐peer support to assist you with implementing Blackboard and online technology in your courses. Visit these Instructional Support representatives in your Faculty Resource Center or contact them directly for one‐on‐one assistance. Please see the Faculty Instructional Support Schedule on the
FACULTY INSTRUCTIONAL SUPPORT
Blackboard Support Website for their most current office hours.
Kevin Mulvenna PreCollege Education
[email protected] (414) 297‐7987 ext. 77987 Downtown Campus – M201 (FIC)
Jerry Lieberthal School of Business
[email protected] Phone: 604 ‐6282 West Campus – Room 262
Phil Leverault Technical and Applied Sciences
[email protected] (414) 297‐6510 ext. 76510 South Campus – A206 (FRC)
Stephanie McKennie Health Occupations
[email protected] (262) 238‐4119 ext. 84119 Mequon Campus – B222 (FRC)
FFAACCUULLTTYYNNEETT WWEEBBSSIITTEE The FacultyNet website (http://facultynet.matc.edu/) is your source for important faculty information. Visit this website for information about: Peer Coaching, ER&D programs, Blackboard, Professional Development, Frequently asked questions about teaching and working at MATC, mentoring resources, podcasts, videos and more.
FFAACCUULLTTYY TTRRAAIINNIINNGG AANNDD PPRROOFFEESSSSIIOONNAALL DDEEVVEELLOOPPMMEENNTT Every Semester, the offices of Teaching and Learning Technology, ER&D, and Professional Development offer opportunities for faculty to receive training in technology and teaching practices to enhance their professional skills.
PPRROOFFEESSSSIIOONNAALL DDEEVVEELLOOPPMMEENNTT CCOOUURRSSEESS
The aim of Professional Development’s programs is to provide course and seminar opportunities for MATC employees for their skill development, professional development, and personal growth. By investing in the development of our employees, we advocate the philosophy of lifelong learning, and
T E A C H I N G A N D L E A R N I N G T E C H N O L O G Y | 56
we are committed to providing educational courses to all our employees. To learn more about Professional Development course offerings and opportunities, please visit Professional Development’s FacultyNet Website (http://facultynet.matc.edu/profdev/) Teachning and Learning Technology Professional Development Courses If you are new to using the Blackboard learning management system or have questions about how you can use technology to meet your course goals, consider taking one of Teaching and Learning Technology's Professional Development courses. For more information, look for communication from the Professional Development department and the schedule on our support website.
WWOORRKKSSHHOOPPSS
Every Semester, a series of informal Blackboard workshops are held at every campus. These non‐credit workshops are perfect for faculty who do not have experience with Blackboard or for faculty who have questions or need assistance with particular features. All your Blackboard questions will be answered. There is no registration required to attend. Just select a workshop date and bring your COSMO ID number and Novell GroupWise email password with you. Workshop dates will be announced through your Novell GroupWise email as well as posted on the Faculty Blackboard Support Website (http://tiny.cc/zv64n).
DDRROOPPIINN TTRRAAIINNIINNGG SSEESSSSIIOONNSS Teaching and learning technology is offers a series of training sessions in the Faculty Innovation Center (FIC) at the Milwaukee Campus. These “Drop In” sessions are available so that faculty can stop by any time during the scheduled session to receive assistance and learn more on the topic discussed. Feel free to stop by for as little or as long as you wish. See the schedule of drop‐in session on our support website and via our weekly email announcement. Contact Rita Newsom at 297‐8980 for more information.
FFAACCUULLTTYY RREESSOOUURRCCEE CCEENNTTEERRSS Faculty can visit their campus’s Faculty Resource Center (FRC) to do work on computers, make copies, get assistance with Blackboard or other technologies, and check out equipment for instructional use. For a full list of equipment that is available for check‐out through the FRC’s, please read the FRC’s Equipment List (http://tiny.cc/fjuv6). Checkout forms and policies can be reviewed at the FRC’s Website (http://tiny.cc/540vm).
T E A C H I N G A N D L E A R N I N G T E C H N O L O G Y | 57
FFRRCC LLOOCCAATTIIOONNSS
Milwaukee Campus (Faculty Innovation Center) Room M201Mequon Campus Room A280South Campus Room A206 West Allis Campus Room 350
SSTTUUDDEENNTT SSUUPPPPOORRTT Students at MATC have a variety of academic support resources available to them.
SSTTUUDDEENNTT BBLLAACCKKBBOOAARRDD SSUUPPPPOORRTT WWEEBBSSIITTEE
Available through Blackboard’s “Student Support” tab, the Student Support Website (http://tiny.cc/hidfl) contains a collection of helpful resources to help students decide if an online class is right for them or to help them be successful in using Blackboard once they have registered and are ready to begin. Topics include how to troubleshoot common browser problems, submit assignments, take tests, use the discussion board, and more. Faculty is encouraged to direct students toward using this Website when students need assistance with using Blackboard or online learning in general.
BBLLAACCKKBBOOAARRDD SSTTUUDDEENNTT OORRIIEENNTTAATTIIOONNSS
Every Semester, a series of student Blackboard Orientation sessions are held at each campus. The aim of these sessions is to briefly introduce students to using their school e‐mail account as well as basic components of Blackboard in order to prepare them for courses incorporating online learning. Topics covered include: Gmail, submitting assignments, test taking, using the discussion board, Respondus Lockdown Browser, and more. The Student Support Website and other available resources are introduced to students as well. Attendance is optional; however, it is highly recommended that students attend an orientation in order to better prepare themselves for online learning. For a list of upcoming in‐person orientation dates, please visit the Student Blackboard Support site. An online version of the Blackboard Orientation is always available through the Student Blackboard Support Website as well. No login is required to access the Blackboard Online Orientation. For questions about Blackboard student support, please contact Pam Curtin at 297‐7986.

T E A C H I N G A N D L E A R N I N G T E C H N O L O G Y | 58
CCOOMMPPUUTTEERR SSKKIILLLLSS SSEELLFFAASSSSEESSSSMMEENNTT
Students are encouraged to assess their basic computer skills with the Student Support site’s Computer Skills Self‐Assessment quiz (http://tiny.cc/iq111). The quiz can be used to make students more aware of the skills they may need to learn or improve in order to take online courses successfully.
AACCAADDEEMMIICC SSUUPPPPOORRTT CCEENNTTEERRSS
MATC's Academic Support centers and services provide all enrolled students with opportunities to achieve academic success in courses and programs. All four campuses offer supportive and intervention services. If you have questions about the Academic Support Centers, contact Jonathan Feld, Manager of Academic Support, Downtown Milwaukee Campus, 414‐297‐7324, [email protected]. To see the latest hours of operation for any of MATC’s Academic Support Centers, please visit the Academic Support Centers Website (http://tiny.cc/jxhv1).
MMIILLWWAAUUKKEEEE CCAAMMPPUUSS AACCAADDEEMMIICC SSUUPPPPOORRTT CCEENNTTEERRSS
Communication Center Offers assistance in business and business‐related courses, computer application courses, computer use, keyboarding, medical transcription and multimedia presentations.
Room C278
Computer Production Center Provides help in computer use, computer programming, computer application courses, keyboarding, multimedia presentations and website creation.
Room M273
Math Center Helps students in all levels of math, accounting, engineering‐related courses, occupational math and statistics.
Room C271
Science Center Provides assistance in anatomy and physiology, astronomy, biology, biochemistry, chemistry, medical terminology, microbiology, nutrition, physics, psychology, sociology, engineering sciences, social sciences and technical sciences.
Room C271
Tutoring Services Include one‐on‐one tutoring and study groups. Contact Tutoring Services through the Homework Helpline at 414‐297‐8376 or 262‐238‐2479, the Online Tutoring Center, or visit Room C201.
Room C201
T E A C H I N G A N D L E A R N I N G T E C H N O L O G Y | 59
Writing Center Works in conjunction with the Online Writing Lab (OWL) to assist students in course‐related written assignments including essays, research papers, professional writing and other writing projects in all disciplines.
Room C270
MMEEQQUUOONN CCAAMMPPUUSS AACCAADDEEMMIICC SSUUPPPPOORRTT CCEENNTTEERR
Academic Support Center Assists students in areas at the Mequon Campus. For information, contact visit room B210.
Room B210
OOAAKK CCRREEEEKK CCAAMMPPUUSS AACCAADDEEMMIICC SSUUPPPPOORRTT CCEENNTTEERR
Academic Support Center Assists students in areas at the Oak Creek Campus. For information, visit room A208.
Room A208
WWEESSTT AALLLLIISS CCAAMMPPUUSS AACCAADDEEMMIICC SSUUPPPPOORRTT CCEENNTTEERR
Academic Support Center Assists students in areas listed at the West Allis Campus. For information, visit room 249.
Room 249
SSTTUUDDEENNTT EEMMAAIILL
Each student at MATC is issued an MATC Gmail account (Login Here: http://tiny.cc/186l9). This e‐mail account is the primary means of communication between the school, faculty, and the student. The following resources are available for students in regard to their MATC Gmail accounts:
GGEETTTTIINNGG SSTTAARRTTEEDD 11‐‐22‐‐33 IINNSSTTRRUUCCTTIIOONNSS
Students who have never logged into their MATC Gmail accounts before should view these instructions (http://tiny.cc/ijyyt) for learning what their username and default password will be. If a student cannot log into his or her MATC Gmail account, they must call the Help Desk at 414‐297‐6541.
GGMMAAIILL TTUUTTOORRIIAALL VVIIDDEEOOSS Students may also receive training in logging into their school e‐mail and performing specific tasks by viewing these videos. Windows Media Player (http://tiny.cc/1ic8f) is required to view these videos.
T E A C H I N G A N D L E A R N I N G T E C H N O L O G Y | 60
• Logging into your MATC Gmail account for the first time (http://video.matc.edu/gmail/gmatc‐login.asx)
• Changing your MATC Gmail password (http://video.matc.edu/gmail/gmatc‐password.asx)
• Compose and send an email using your MATC Gmail account (http://video.matc.edu/gmail/gmatc‐sending.asx)
• Organizing your MATC Gmail mailbox (http://video.matc.edu/gmail/gmatc‐organizing.asx)
• Forwarding your MATC email to a non‐MATC email address (http://video.matc.edu/gmail/gmatc‐forwarding.asx)
• Where to go for help with Gmail (http://video.matc.edu/gmail/gmatc‐help.asx)
GGMMAAIILL FFAAQQ
Students may also review this extensive list of Frequently Asked Questions (http://tiny.cc/d886n) to learn more about Gmail.
HH11NN11 PPRREEPPAARRAATTIIOONN:: AALLTTEERRNNAATTIIVVEE WWAAYYSS TTOO CCOONNDDUUCCTT CCLLAASSSS
The following are suggestions for alternatives to lectures, homework and exams, class discussions, office hours, and grading to prepare faculty for the possibility of disruptions in courses due to the H1N1 Flu virus or other emergencies. PPOOIINNTTSS TTOO CCOONNSSIIDDEERR
Instructional matters and assessment‐related matters need to be addressed. For example, instructors should plan: 1. How to provide information and resources to students
2. How to communicate or conference with students
3. How to collect student’s work
4. How to administer exams
5. How to modify grading in light of changed course requirements (sequence of course topics, assignment deadlines, number of assignments, etc.)
T E A C H I N G A N D L E A R N I N G T E C H N O L O G Y | 61
BBEECCOOMMEE FFAAMMIILLIIAARR WWIITTHH AALLTTEERRNNAATTIIVVEE TTEECCHHNNOOLLOOGGYY AAVVAAIILLAABBLLEE AATT MMAATTCC
Instructors should take time early on to learn the MATC Blackboard Learning Management System ‐ before their use is urgent. Also, determine if guidance to students regarding the use of alternative technologies is needed. Every class at MATC has a Blackboard course page created and ready to add course content. Additionally, every student and faculty member has a Blackboard login. Please visit the Faculty Blackboard Support website for video tutorials and step‐by‐step quick reference guides (http://tiny.cc/owi96). Also see the Professional Development calendar (http://tiny.cc/i0et0) for more information about ongoing Blackboard classes. PPOOSSTT AA CCOONNTTIINNGGEENNCCYY AANNNNOOUUNNCCEEMMEENNTT IINN YYOOUURR CCLLAASSSS
Consider posting the following announcement in your classes: “In the event of the disruption of normal classroom activities due to an incidence of H1N1 flu, the format for this course may be modified to enable completion of the course. In that event, I will provide an addendum to the syllabus that will supersede the original syllabus.”
AALLTTEERRNNAATTIIVVEE WWAAYYSS TTOO SSHHAARREE IINNFFOORRMMAATTIIOONN
UUPPLLOOAADD AANNDD PPUUBBLLIISSHH CCOONNTTEENNTT IINN BBLLAACCKKBBOOAARRDD Use Blackboard’s Content Area tools to make course files, such as an updated syllabus available to students. Please visit the Blackboard Faculty Support Website (http://tiny.cc/owi96) for information about creating and managing online content in Blackboard. PPLLAACCEE AANNNNOOUUNNCCEEMMEENNTTSS OONN YYOOUURR BBLLAACCKKBBOOAARRDD CCOOUURRSSEE’’SS AANNNNOOUUCCEEMMEENNTTSS PPAAGGEE Keep students informed of important messages such as changes to upcoming deadlines, assignment directions, or class cancellations. The Blackboard Faculty Support Website provides instructors with a step‐by‐step guide to using the Announcements tool in PDF (http://tiny.cc/lj1bq) and video format (http://tiny.cc/xrhz3). EE‐‐MMAAIILL SSTTUUDDEENNTTSS Instructors can e‐mail students via their MATC e‐mail or use Blackboard’s e‐mail tool (http://tiny.cc/v7lcb).
LLEECCTTUURREE AALLTTEERRNNAATTIIVVEESS
CCRREEAATTEE EELLEECCTTRROONNIICC CCOOPPIIEESS OOFF LLEECCTTUURREE MMAATTEERRIIAALLSS E‐mail these to students, or store them online in Blackboard for easy retrieval.

T E A C H I N G A N D L E A R N I N G T E C H N O L O G Y | 62
HHOOLLDD LLEECCTTUURREESS OONNLLIINNEE VVIIAA AADDOOBBEE CCOONNNNEECCTT Instructors can use the Adobe Connect web conferencing tool to provide real‐time lectures and share PowerPoint slideshows, WebPages, and views of desktop applications. Sessions can also be recorded for students to view at a later time. To learn more about Adobe Connect, please read the Adobe Connect Resources Guide (http://tiny.cc/gctg6). To Request an Adobe Connect Meeting:
1. Contact Vicki Sahr ([email protected]) at Fox Valley Technical College to receive an Adobe Connect Login. If you already have an Adobe Connect login, contact Vicki to schedule a meeting time for Adobe Connect. Note: all Adobe Connect meetings are set up through Vicki at FVTC.
a. Include the following in your meeting request: i. Title of the meeting ii. Meeting start time iii. Meeting end time iv. Estimated number of participants logging in
2. Once the meeting is scheduled, you will receive a URL (web link) to access the meeting using
your Internet Browser. As the meeting host, you will log in to the meeting using your Adobe Connect Login.
3. To Invite participants to your meeting give each attendee the meeting URL. Participants can log in as a “Guest.” Upon doing so, they will have access to your meeting and can enter their name to display so others know they are present.
HHOOLLDD LLEECCTTUURREESS UUSSIINNGG BBLLAACCKKBBOOAARRDD CCHHAATT The chat function in Blackboard can be used for real‐time, synchronous discussion and can be used to determine students’ understanding of course materials using a question and answer format. The Faculty Blackboard Support Website has a step‐by‐step guide to using Blackboard chats and virtuals classrooms in PDF (http://tiny.cc/bske0) and video format (http://tiny.cc/jttgv). RREECCOORRDD LLEECCTTUURREESS UUSSIINNGG AAUUDDAACCIITTYY Audacity, an audio recording program, can be downloaded for free from audacity.com. Audio recordings should be saved in an mp3 file format and can be added to content areas within your Blackboard course. The Faculty Blackboard Support Website has a step‐by‐step guide to using Audacity (http://tiny.cc/0h86c) to record audio files and make them available to students in Blackboard. CCRREEAATTEE VVIIDDEEOO RREECCOORRDDIINNGG OOFF LLEECCTTUURREE Though video recordings usually take more time and effort, and require either a webcam or digital video camera, programs like Camtasia Studio (PCs) (http://tiny.cc/p3o3z) and iMovie (Macs) can greatly reduce the effort necessary to produce a video lecture.

T E A C H I N G A N D L E A R N I N G T E C H N O L O G Y | 63
HHOOMMEEWWOORRKK AANNDD EEXXAAMM AALLTTEERRNNAATTIIVVEESS
SSUUBBMMIITT AASSSSIIGGNNMMEENNTTSS UUSSIINNGG TTHHEE BBLLAACCKKBBOOAARRDD Students can submit their work for instructor review. Although students can’t view each other’s work using this method, instructors can pull submitted assignments from the Grade Center and publish them in the course within a content area for all students to view if desired. SSUUBBMMIITT AASSSSIIGGNNMMEENNTTSS VVIIAA EE‐‐MMAAIILL To help manage assignments and incoming e‐mail, have students use specific e‐mail subject lines and filenames. For example, in the subject line, put the course ID (e.g. ENG‐201), and assignment name/number. Have students save their files to include their name, assignment name and/or date in the file name. Example: SmithJohn‐Assign1‐011209.doc CCRREEAATTEE AANN OONNLLIINNEE AASSSSEESSSSMMEENNTT IINN BBLLAACCKKBBOOAARRDD With the exception of essay questions and uploaded assignments, online assignments (created in Blackboard) are automatically graded in the Blackboard Grade Center. If a student misses an assignment, exceptions can be made for them. More information is available here: http://tiny.cc/w6nng GGIIVVEE TTAAKKEE‐‐HHOOMMEE EEXXAAMMSS Instructors can distribute a take‐home exam via their Blackboard course. SSUUBBMMIITT AASSSSIIGGNNMMEENNTTSS VVIIAA TTHHEE UU..SS.. MMAAIILL Students can mail their assignment via the U.S. mail to their instructor’s office if they need to submit large files, CDs, Videos, etc. Instructors should consider e‐mailing students their postal address or including it on their course syllabus. Using this method will be a lengthier process, so it’s important that instructors allow for extra turnaround time.
CCLLAASSSS DDIISSCCUUSSSSIIOONN AALLTTEERRNNAATTIIVVEESS SSHHAARREE CCLLAASSSS NNOOTTEESS UUSSIINNGG TTHHEE BBLLAACCKKBBOOAARRDD DDIISSCCUUSSSSIIOONN BBOOAARRDD Share your class notes, and/or allow students to share notes with others who may be unable to attend class. HHOOLLDD EE‐‐MMAAIILL DDIISSCCUUSSSSIIOONNSS Have discussions via e‐mail with students who have been absent. If the discussion is with a large number of students, consider creating an e‐mail group mailing list. Students could be put in pairs for discussions and then e‐mail discussion summarizations to the instructor. Instructors should define discussion topics and have clear, but extended deadlines for responses. HHOOLLDD AASSYYNNCCHHRROONNOOUUSS ((OONNEE AATT AA TTIIMMEE)) DDIISSCCUUSSSSIIOONNSS VVIIAA TTHHEE BBLLAACCKKBBOOAARRDD DDIISSCCUUSSSSIIOONN BBOOAARRDD Instructors can post questions and have students post responses and analyses.

T E A C H I N G A N D L E A R N I N G T E C H N O L O G Y | 64
HHOOLLDD SSYYNNCCHHRROONNOOUUSS ((AATT TTHHEE SSAAMMEE TTIIMMEE)) DDIISSCCUUSSSSIIOONNSS VVIIAA AADDOOBBEE CCOONNNNEECCTT Live, real‐time discussions that integrate PowerPoint slideshows, webcam images, text chat, documents, and audio chat can be helpful for small group collaboration and planning.
AALLTTEERRNNAATTIIVVEESS TTOO OOFFFFIICCEE HHOOUURRSS
AANNSSWWEERR NNOONN‐‐UURRGGEENNTT QQUUEESSTTIIOONNSS VVIIAA EE‐‐MMAAIILL To help manage incoming e‐mail, have students use specific e‐mail subject lines, such as their name or the course name/number. AANNSSWWEERR QQUUEESSTTIIOONNSS AASSYYNNCCHHRROONNOOUUSSLLYY ((OONNEE AATT AA TTIIMMEE)) OONN TTHHEE BBLLAACCKKBBOOAARRDD DDIISSCCUUSSSSIIOONN BBOOAARRDD Instructors can create Forums or Threads where students can post questions. More information is available here: http://tiny.cc/3n4ml HHOOLLDD SSTTUUDDEENNTT CCOONNSSUULLTTAATTIIOONNSS OOVVEERR TTHHEE PPHHOONNEE Be flexible and allow time outside of normal office hours for one‐on‐one, in‐depth consultations. .
GGRRAADDEE AASSSSEESSSSMMEENNTT AALLTTEERRNNAATTIIVVEESS
AADDJJUUSSTT GGRRAADDEE SSHHEEEETTSS OORR RRUUBBRRIICCSS This may be necessary to capture the same learning that face‐to‐face students have missed but would otherwise experience. EEXXTTEENNDD AASSSSIIGGNNMMEENNTT DDEEAADDLLIINNEESS Assignment due dates may need to be rescheduled for live performances, speeches, group work, research, laboratory work, fieldwork, and field trips. CCRREEAATTEE AALLTTEERRNNAATTIIVVEE AASSSSIIGGNNMMEENNTTSS These could include attending web‐based, virtual field‐trips, accessing multimedia, or visiting particular sites. RREECCOORRDD PPRREESSEENNTTAATTIIOONNSS WWIITTHH AADDOOBBEE CCOONNNNEECCTT Instructors can use the Adobe Connect web conferencing software to record their presentations (audio and/or video). For more information visit the WTCS Adobe Connect Website (http://tiny.cc/v5shq). These additional resources and technologies are available to instructors for distance learning in the event of an emergency:
• Preparing for the Swine Flu (webinar slideshow)
• Blackboard Crash Course (webinar slideshow)
• Adobe Connect Resource Guide
OONNLLIINNEE CCOOUURRSSEE CCOONNVVEERRSSIIOONN
MATC has a policy in place that outlines the process of converting a course from face‐to‐face format to an online format. For your convenience, an online form is available that outlines the steps within this
T E A C H I N G A N D L E A R N I N G T E C H N O L O G Y | 65
process http://facultynet.matc.edu/frc/pdf/Online_Course_Process‐2012.pdf. Please contact Brian Carlson at [email protected] or 414‐297‐7508 for more information. Basic Assumptions:
• The developer is a member of the MATC faculty. • Selection of the developer is consistent with the Local 212 contract. • Faculty member meets the requirements in the Local 212 contract related to use of the college‐
supported learning management system and training in the use of it (Blackboard). • Conversion assignments will clearly identify any intended use of a course cartridge or part of a
cartridge. Course conversions which utilize all or parts of a course cartridge will be reviewed individually to determine whether the project will receive approval for development and payment.
CCOOUURRSSEE CCOONNVVEERRSSIIOONN PPRROOCCEESSSS::
1) An instructor, department, or administrator proposes that an existing course be taught online.
2) The proposal is brought to a scheduled department meeting and presented for discussion. The department approves or disapproves the proposed offering.
3) The rationale for the proposal, the department faculty present, and the outcome is recorded on the Online Conversion Proposal. Reasons for disapproval are recorded. If approved, a timeframe for introducing the course online is suggested. (A copy of the form is retained with the department meeting minutes, and a copy is forwarded to the Associate Dean.) The Associate Dean ensures that the course meets strategic planning goals of the college.
4) If a Course Outcome Summary does not exist for the course or is not current, the development or update of it may become a part of the conversion project, unless the Associate Dean designates another instructor to complete that task.
5) Department faculty members are notified of the availability of the conversion project and a developer is identified who meets professional development requirements for online as identified in the Local 212 faculty contract.
6) The Associate Dean and faculty developer jointly complete the Curriculum Development Proposal and the Curriculum Project Assignment – Online Conversion forms, which specify the stages, and timeline for course conversion and anticipated payment. The forms, approved as indicated, are forwarded to the Provost for final approval.
7) The developer informs the administrator of the college’s Learning Management System of the need for a Department Master shell in the system.
8) The developer is strongly encouraged to use the Quality Standards for Online Courses as a guide and works with the divisional Online Instructional Technology Support liaison that provides feedback and assistance throughout the development process. Not all criteria on the Quality Standards for Online Courses will be appropriate for all course conversions. Use of the Quality Standards for Online Courses as a guide for development will be presumed unless it is clearly stated on the Curriculum Project Assignment form that the Standards will not be used.
9) Upon completion of the course conversion, the developer and the Associate Dean indicate its completion by signing the Request for Payment on the Quality Standards for Online Courses form.

10) The Quality Standards for Online Courses, which includes the Request for Payment is submitted to the Dean and then to the Provost for approval.
10) The Quality Standards for Online Courses, which includes the Request for Payment is submitted to the Dean and then to the Provost for approval.
11) Disputes with respect to proposal approval, project assignment and project payment will be resolved through the meeting of the Provost and a representative of Local 212 or the normal grievance process.
11) Disputes with respect to proposal approval, project assignment and project payment will be resolved through the meeting of the Provost and a representative of Local 212 or the normal grievance process.
12) Within one semester of the course conversion completion, the Associate Dean collaborates with the divisional liaison to review the course and complete the eTech Quality Checklist for Online Courses rubric.
12) Within one semester of the course conversion completion, the Associate Dean collaborates with the divisional liaison to review the course and complete the eTech Quality Checklist for Online Courses rubric.
T E A C H I N G A N D L E A R N I N G T E C H N O L O G Y | 66
EEVVAALLUUAATTIIOONN::
MATC will utilize the eTech process to evaluate the course during the first semester in which it is offered. Copies of the eTech Quality Checklist for Online Courses rubric are available in the Faculty Innovation Center (FIC), M201 and online
MATC will utilize the eTech process to evaluate the course during the first semester in which it is offered. Copies of the eTech Quality Checklist for Online Courses rubric are available in the Faculty Innovation Center (FIC), M201 and
EEVVAALLUUAATTIIOONN::
online. Rubrics and best practices checklists from other sources will also be made available in the FIC. Faculty developers are encouraged to review and utilize these documents in the design and self‐evaluation of courses they convert to and deliver online.
CCHHAAPPTTEERR 66:: CCOOPPYYRRIIGGHHTT AANNDD FFAAIIRR UUSSEE
IINNFFOORRMMAATTIIOONN FFAACCUULLTTYY SSHHOOUULLDD KKNNOOWW AABBOOUUTT CCOOPPYYRRIIGGHHTTSS
The copying standards outlined in this guide are based on the laws involving copyrighted works and restricted materials, as well as MATC’s guidelines in dealing with copyrighted materials. The lists of copyrighted works and legal restrictions provided here are not exhaustive and are provided as examples only. It is very important that you are aware of the legal issues involved when copying or digitizing copyrighted and restricted materials. WWHHAATT IISS AA CCOOPPYYRRIIGGHHTT??
A copyright is a form of protection provided to the creators of original works by the laws of the creator's resident country and through international treaties. Copyright owners have the exclusive right to reproduce or modify their copyrighted work. They may, however, grant permission to others who wish to reproduce the copyrighted work. Photographers, artists, authors, software developers, publishers, singers, writers and composers can all be copyright owners. RREEPPRROODDUUCCIINNGG CCOOPPYYRRIIGGHHTTEEDD MMAATTEERRIIAALL AATT MMAATTCC
MATC requires that instructors receive written permission from the copyright owner before reproducing or modifying any copyrighted material. For your convenience, a Permission Request Form is provided in this guide.

T E A C H I N G A N D L E A R N I N G T E C H N O L O G Y | 67
TTHHEE CCOOPPYYRRIIGGHHTT NNOOTTIICCEE Copyright owners may place a copyright notice (for example, ©2007 Jane Doe) on their works. However, this notice is not required under the law. Works are still considered copyright protected without depicting a copyright notice. WWOORRKKSS PPRROOTTEECCTTEEDD BBYY CCOOPPYYRRIIGGHHTT Examples of copyrightable materials include: • Graphics • Video • Newspapers • Books • Photographs • Audio, Music and Lyrics CCOOPPYYRRIIGGHHTT OOWWNNEERRSS
If you are the copyright owner, ownership and identification must be verified before MATC will reproduce any copyrighted material. Please note that mere ownership of a physical book, manuscript, video, photograph, computer software program or a copy of such items does not give the possessor of these items copyright ownership or the right to copy or modify them. WWHHAATT IISS RREESSTTRRIICCTTEEDD MMAATTEERRIIAALL??
Materials that are of monetary value, negotiable instruments or items that can be used for identification purposes are considered restricted materials. It is the MATC policy to uphold the law against counterfeiting materials that are negotiable instruments or used for identification purposes. Additionally, under no circumstance may restricted material be scanned. RREEPPRROODDUUCCIINNGG PPRROOFFEESSSSIIOONNAALL PPHHOOTTOOGGRRAAPPHHSS AANNDD VVIIDDEEOO
It is illegal for anyone to reproduce or assist in reproducing, in any manner or media, a professional photograph and video without the express written permission of the copyright owner, usually the photographer that took the photograph or video, or studio that hired the photographer. Just like any other copyright‐protected works, photographers have the exclusive right to reproduce or modify their photographs and videos. Please note that mere ownership of a copy or print of a professional photograph or video does not give you the right to copy or modify it. You have simply purchased the photograph or video, not ownership of the copyright. MATC respects copyright ownership rights and will require that all instructors receive and provide MATC with written permission from photographers or studios before reproducing any professional photographs or videos. Examples of what might be professional photographs include:
T E A C H I N G A N D L E A R N I N G T E C H N O L O G Y | 68
• Those depicting a standard copyright notice (such as, ©2007 Jane Doe Photography).
• Photographs that appear professional due to style or media (such as, glossy prints, canvas and so on).
• Photographs containing digital watermarks or logos to visually notify or prohibit unauthorized use (such as stock demos).
Therefore, if a photograph contains any of the above characteristics, MATC will not reproduce or allow you to use its equipment to reproduce it, unless you can provide written permission from the photographer or studio that took the photograph. This includes manipulating or reproducing the photograph or video in black and white or color, in or on any media (hard copy, digital, online course and so on), or by any means (including scanning, photocopying, and so on). When creating your own podcast, it is important to make sure all necessary rights and permissions are secured for the material included in your podcasts. This is relatively easy if you create all of the material that is included in your podcast but can become progressively more complex the more you include material created by other people. As a general rule, if you incorporate text that has been written by someone else into your podcast‐text that appears either on a blog, in a book, a journal, magazine or newspaper (or whatever) – you need the express and specific permission of the person who owns copyright in that material (note that sometimes the copyright owner is different to the original writer. WWHHAATT IISS ““FFAAIIRR UUSSEE”” OOFF CCOOPPYYRRIIGGHHTTEEDD MMAATTEERRIIAALL??
Fair use is a legal principle that provides certain limitations on the exclusive rights of copyright holders. Section 107 of the Copyright Act sets forth the four fair use factors which should be considered in each instance: 1. TTHHEE PPUURRPPOOSSEE AANNDD CCHHAARRAACCTTEERR OOFF TTHHEE UUSSEE:: a. Is the new work merely a copy of the original? If it is simply a copy, it is not as likely to be
considered fair use. b. Does the new work offer something above and beyond the original? Does it transform the
original work in some way? If the work is altered significantly, used for another purpose, appeals to a different audience, it is more likely to be considered fair use.
c. Is the copyrighted work for nonprofit or educational purposes? The use of copyrighted works
for nonprofit or educational purposes is more likely to be considered fair use.
2. TTHHEE NNAATTUURREE OOFF TTHHEE CCOOPPYYRRIIGGHHTTEEDD WWOORRKK.. a. Is the copyrighted work published or unpublished? Unpublished works are less likely to be
considered fair use. b. Is the copyrighted work out of print? If it is, it is more likely to be considered fair use.
T E A C H I N G A N D L E A R N I N G T E C H N O L O G Y | 69
c. Is the work factual or artistic? The more a work tends toward artistic expression, the less likely it will be considered fair use.
3. TTHHEE AAMMOOUUNNTT AANNDD SSUUBBSSTTAANNTTIIAALLIITTYY OOFF TTHHEE PPOORRTTIIOONN UUSSEE:: a. The more you use, the less likely it will be considered fair use.
b. Does the amount you use exceed a reasonable expectation? If it approaches 50 percent of the entire work, it is likely to be considered an unfair use of the copyrighted work. c. Use only enough to make your point.
4. TTHHEE EEFFFFEECCTT OOFF UUSSEE OONN TTHHEE PPOOTTEENNTTIIAALL MMAARRKKEETT FFOORR TTHHEE CCOOPPYYRRIIGGHHTTEEDD WWOORRKK:: a. The more the new work differs from the original, the less likely it will be considered an infringement.
b. Does the work appeal to the same audience as the original? If the answer is yes it will likely be considered an infringement. c. Does the work contain anything original? If it does, it is more likely the use of the copyrighted material will be seen as fair use.
WWHHAATT IISS TTHHEE FFAACCEETTOOFFAACCEE TTEEAACCHHIINNGG ““FFAAIIRR UUSSEE”” EEXXEEMMPPTTIIOONN?? Section 110(1) of the Copyright Act permits “performance or display of a work by instructors or pupils in the course of face‐to‐face teaching activities of a nonprofit educational institution, in a classroom or similar place devoted to instruction.” If you meet the requirements of this section, your performance or display does not need to meet the requirements of fair use. Thus, Section 110(1) exemption permits the instructor to play a rental video in class if the following requirements are met: • The performance of the video is part of the teaching activity of the class; • The class is part of the regular curriculum; • The entire audience is involved in the teaching activity; • The entire audience and the teacher are in the same room or general area; and • The performance takes place in a classroom or similar place devoted to instruction, such
as a school library, gym, auditorium or workshop. This exemption applies only to the performance or display of lawfully made copies; if the copy was not legally made, it cannot be performed or displayed in the classroom. WWHHAATT IISS TTHHEE DDIISSTTAANNCCEE EEDDUUCCAATTIIOONN ““FFAAIIRR UUSSEE”” EEXXEEMMPPTTIIOONN?? Under Section 110(2) of the Copyright Act, many performances or displays that would be permitted in the classroom would also be permitted to be transmitted by closed‐circuit television or by the internet to students in remote locations.
T E A C H I N G A N D L E A R N I N G T E C H N O L O G Y | 70
Under the TEACH Act, a 2002 amendment to the Copyright Act, the distance education exemption generally permits instructors to distribute on‐line the same materials that the instructor could present in face‐to‐face teaching (see above). Distribution under the TEACH Act is subject to restrictions. TTHHEE FFOOLLLLOOWWIINNGG CCAATTEEGGOORRIIEESS OOFF MMAATTEERRIIAALLSS MMAAYY BBEE DDIISSTTRRIIBBUUTTEEDD UUNNDDEERR TTHHEE AAUUTTHHOORRIITTYY OOFF TTHHEE TTEEAACCHH AACCTT::
• Entire performances of non‐dramatic literary and musical works; • Reasonable and limited parts of dramatic literary, musical or audiovisual works; and • Displays of other works, such as images, in amounts similar to typical displays in face‐to‐face
teaching. TTHHEE FFOOLLLLOOWWIINNGG MMAATTEERRIIAALLSS AARREE SSPPEECCIIFFIICCAALLLLYY EEXXCCLLUUDDEEDD FFRROOMM DDIISSTTRRIIBBUUTTIIOONN UUNNDDEERR TTHHEE TTEEAACCHH AACCTT::
• Material specifically marketed for classroom use for digital distance education; • Copies the instructor knows, or should know, have been made illegally; • Textbooks, course packs, electronic reserves or similar materials typically purchased individually by
students for independent review outside the classroom. IINN UUSSIINNGG MMAATTEERRIIAALLSS UUNNDDEERR TTHHEE TTEEAACCHH AACCTT,, TTHHEE IINNSSTTRRUUCCTTOORR MMUUSSTT AALLSSOO EENNSSUURREE TTHHAATT::
• Access to the materials is restricted to students registered in the course; • Access to the materials is terminated at the end of the course; • The materials are used at the direction of the instructor; • The materials used are directly related and of material assistance to the course content; • The materials include the following notice that the materials are protected by copyright:
The materials used in this course are protected by copyright, and they are presented here for use only by students registered in this course.
AADDDDIITTIIOONNAALL IINNFFOORRMMAATTIIOONN
For more information on the laws regarding copyrights, contact the United States Copyright Office at 202‐707‐3000. A helpful telephone number: Copyright Clearance Center (CCC) 978‐750‐8400, Fax 978‐750‐4470 MATC Copyright Information http://matc.edu/library/copyright/index.html
For a Copyright Guideline Chart and MATC Copyright Permission Request Form: http://facultynet.matc.edu/frc/pdf/Copyright%20Guidelines%20and%20Chart.pdf
For a Copyright Guideline Chart for Teachers: http://www.halldavidson.net/copyright_chart.pdf