faculty portal manual - my campus
TRANSCRIPT

Faculty Portal Logging In:
Access the portal via the web address provided by your institution. If your institution is using Active Directory to authenticate, you may not be required to log in at this page.
Web Browsers supported for the Faculty Portal are:
� Windows – Internet Explorer and Firefox � Mac – Safari 3.01 (or greater) and Firefox 2.x & 3.x
Note: When viewing non-English languages, users browsing the portals must set their browser to UTF-8 encoding.
Figure 1: Log In
Step-By-Step: Log In to the Faculty Portal
1. Enter your User name, Password (case sensitive) and select the term. 2. Click the Log In button to enter the Faculty Portal.
Figure 2: FERPA Notice

Figure 3: Faculty Portal Home page
Change Term
Use the Current term’s Change link to select a different term. Every option on the navigation bar is based on the current term displayed at the upper left corner.
Figure 4: Change Term

Edit Address
Use the Edit Address link to change address, email and phone number information. Click the Show on Directory check box if you choose to allow other faculty members to view this information on the faculty directory. This information is not visible from the student portal.
Figure 5: Edit Address
Logout
Use the Logout link to end the portal session.
Figure 6: Logout

My Students
The My Student link displays the different options available for viewing advisee and student information. This includes Transcript, Schedule, Degree Audit, and Grade Report. The student’s contact information is listed, along with a photo, and any FERPA Restrictions.
Figure 7: My Students
Transcript
Unofficial student transcripts can be viewed and printed to assist with the advising process. Faculty can only view transcripts for students to which they are the advisor.
Step-By-Step: View a Student’s Transcript
1. Click the My Students link in the navigation bar, and then select a student from the Advisee List or one of your courses for the current term, which are displayed in the upper left corner of the Faculty Portal. Click the Transcript link to view the student’s Unofficial Transcript.
Schedule
Easy access to a student’s matrix schedule can be helpful during the advising process. In
Step-By-Step: View a Student’s Matrix Schedule
1. Click the My Students link in the navigation bar, and then select a student from the Advisee List or one of your courses for the current term, which are displayed in the upper left corner of the Faculty Portal. Click the Schedule link to view the student’s Matrix Schedule.
2. Click Select to view the student’s Matrix Schedule. 3. Click Show to see the student’s attendance for that particular course.

Figure 8: Student Matrix Schedule
Degree Audit
The Degree Audit link of Degree Audit allows advisors to evaluate a student’s transcript against the audit program(s) assigned to the student in CAMS Enterprise.
Step-By-Step: View a Student’s Degree Audit
1. Click the My Students link in the navigation bar then select a student from the Advisee List or one of your courses for the current term displayed in the upper left corner of the Faculty Portal.
2. Click Select to open the Student Options page for a student. 3. Click Degree Audit >Detail to open the degree audit program for which the student is evaluated
against. Credits Required displays how many credits are required for the degree, and Credits Completed displays how many credits the student has completed towards that program.
Note: An asterisk in the Report column, next to the word detail, denotes that the student’s degree audit must be updated before it displays. This can take several minutes. The update flag is set any time there is a change to the student’s transcript maintenance, such as when the student registers for a class or receives a grade. Since Degree Audit considers all changes to a student’s official courses (even courses not applied to the audit, which would be in an elective group), any change in a student’s official courses will cause the audit to require reevaluation.
4. Click Detail to display details about the requirements, including the status of the requirement, a list of each class, the grade earned for the class, the status of the class in relation to the evaluated program, and the status of each group in the requirement.
The Grade Met By column displays the actual courses that satisfied the requirement. These could be the same course, a transfer course, an equivalent course, or a mapped course. If there are options in how the student can take the listed classes a Formula link displays.

5. Click the Formula link to see the options.
Student Grade Report
Mid Term, Final, and Narrative grades can be viewed and printed to assist with the advising process. Faculty can only view grades for students to which they are the advisor.
Step-By-Step: View a Student’s Grades
1. Click the My Students link in the navigation bar, and then select a student from the Advisee List or one of your courses for the current term, which are displayed in the upper left corner of the Faculty Portal.
2. Click the Grades link, and then choose Mid Term, Final, or Narrative Grades from the drop down.
My Schedule
The My Schedule link displays courses for which you are scheduled in the selected current term. Building, room, meeting days, start time, and end times, credits, and enrollment statistics are displayed. Waitlisted students, if any, are shown for each course. Click the Printer Friendly link to display the printer-friendly schedule. The page opens and is sent to your default printer. Close the printer-friendly page after printing or you can keep it open while working in other areas of the portal. Click the Refresh link on the printer-friendly page to update the page.
Figure 9: Faculty Schedule

Registration
Course Offering
The Course Offering displays course schedule and instructor information for the current term.
Figure 10: Course Offering filter
The Schedule Filter Options can be used to view a specific range or type of classes. This option can help find classes that are needed and will fit into existing class schedules.
You can select any combination of days and times, such as, classes on Monday and Wednesday that are between 12 – 8 PM or Tuesdays 7 AM – 3 PM. You can also include filter criteria by Campus, Departments, and/or Divisions.
Step-By-Step: Filter for Classes in Course Offering
1. From the Faculty Portal home page, click Course Offering. The Course Offering page displays. 2. Click Show Filter to expand Schedule Filter Options.
Figure 11: Show Filter button
3. Select the desired schedule days and start times.
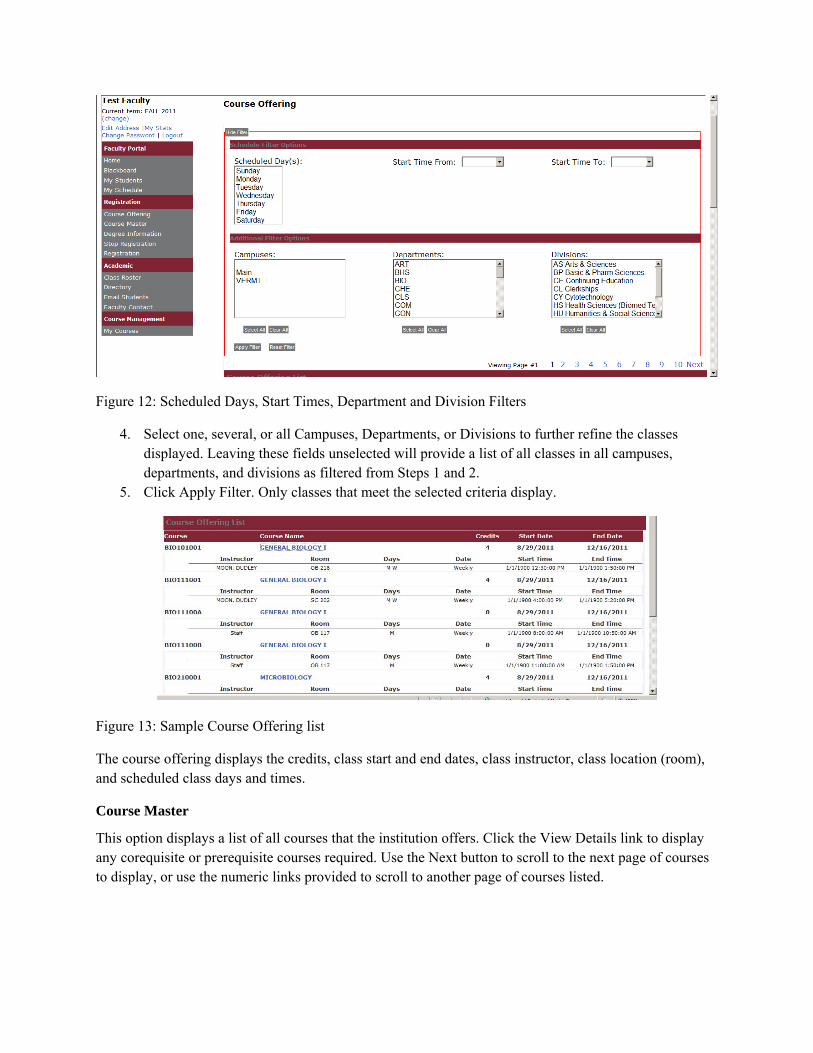
Figure 12: Scheduled Days, Start Times, Department and Division Filters
4. Select one, several, or all Campuses, Departments, or Divisions to further refine the classes displayed. Leaving these fields unselected will provide a list of all classes in all campuses, departments, and divisions as filtered from Steps 1 and 2.
5. Click Apply Filter. Only classes that meet the selected criteria display.
Figure 13: Sample Course Offering list
The course offering displays the credits, class start and end dates, class instructor, class location (room), and scheduled class days and times.
Course Master
This option displays a list of all courses that the institution offers. Click the View Details link to display any corequisite or prerequisite courses required. Use the Next button to scroll to the next page of courses to display, or use the numeric links provided to scroll to another page of courses listed.
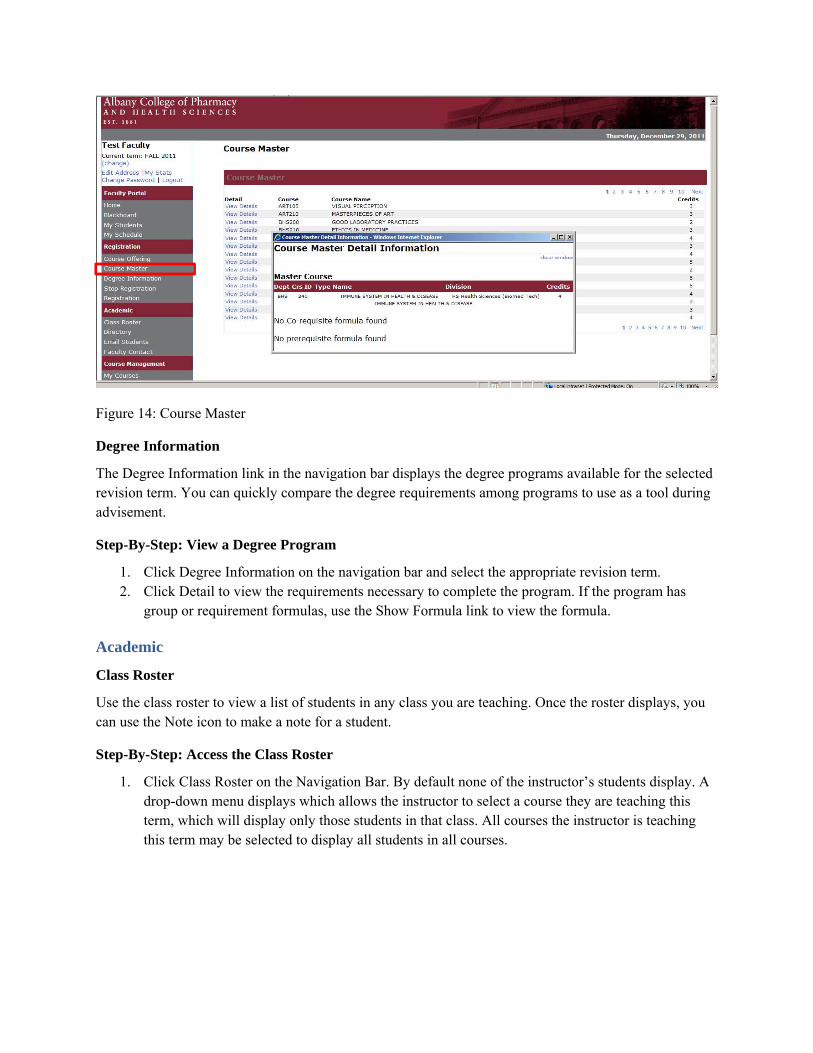
Figure 14: Course Master
Degree Information
The Degree Information link in the navigation bar displays the degree programs available for the selected revision term. You can quickly compare the degree requirements among programs to use as a tool during advisement.
Step-By-Step: View a Degree Program
1. Click Degree Information on the navigation bar and select the appropriate revision term. 2. Click Detail to view the requirements necessary to complete the program. If the program has
group or requirement formulas, use the Show Formula link to view the formula.
Academic
Class Roster
Use the class roster to view a list of students in any class you are teaching. Once the roster displays, you can use the Note icon to make a note for a student.
Step-By-Step: Access the Class Roster
1. Click Class Roster on the Navigation Bar. By default none of the instructor’s students display. A drop-down menu displays which allows the instructor to select a course they are teaching this term, which will display only those students in that class. All courses the instructor is teaching this term may be selected to display all students in all courses.
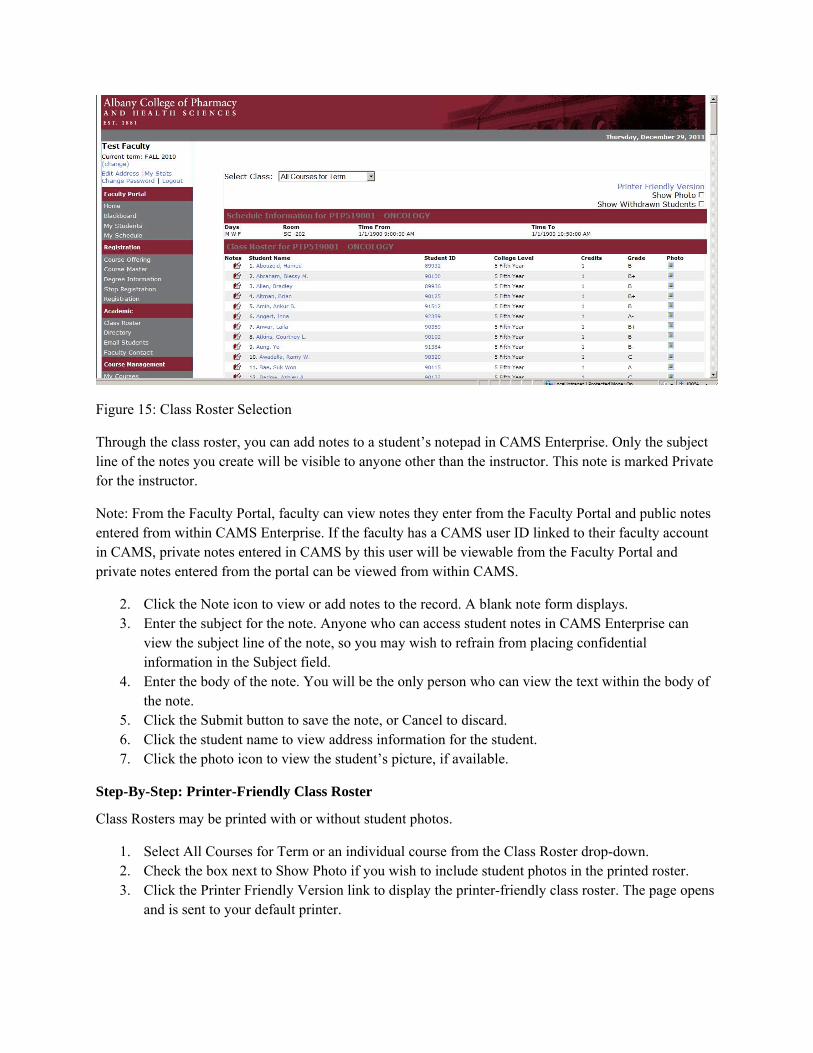
Figure 15: Class Roster Selection
Through the class roster, you can add notes to a student’s notepad in CAMS Enterprise. Only the subject line of the notes you create will be visible to anyone other than the instructor. This note is marked Private for the instructor.
Note: From the Faculty Portal, faculty can view notes they enter from the Faculty Portal and public notes entered from within CAMS Enterprise. If the faculty has a CAMS user ID linked to their faculty account in CAMS, private notes entered in CAMS by this user will be viewable from the Faculty Portal and private notes entered from the portal can be viewed from within CAMS.
2. Click the Note icon to view or add notes to the record. A blank note form displays. 3. Enter the subject for the note. Anyone who can access student notes in CAMS Enterprise can
view the subject line of the note, so you may wish to refrain from placing confidential information in the Subject field.
4. Enter the body of the note. You will be the only person who can view the text within the body of the note.
5. Click the Submit button to save the note, or Cancel to discard. 6. Click the student name to view address information for the student. 7. Click the photo icon to view the student’s picture, if available.
Step-By-Step: Printer-Friendly Class Roster
Class Rosters may be printed with or without student photos.
1. Select All Courses for Term or an individual course from the Class Roster drop-down. 2. Check the box next to Show Photo if you wish to include student photos in the printed roster. 3. Click the Printer Friendly Version link to display the printer-friendly class roster. The page opens
and is sent to your default printer.

Directory
The Faculty Directory and Student Directory display a list of faculty or students, respectively, their addresses, and email addresses. If a photo is available, you may view it by clicking the photo icon. Faculty and students with a setting of No for Display on Directory in CAMS Enterprise (Student Admissions and Faculty Information) will not display in the list. Faculty must also have a setting of Yes for Active in the Faculty Information window. Directories display alphabetically by last name. Click a letter hyperlink to view individuals whose last name begins with that letter. Click the email address link to open a blank email with the To field populated with that email address.
E-mail Students
You can email select students, an entire class, all students in all your classes, or just your advisees.
Step-By-Step: Email Students
1. Click E-mail Students on the navigation bar. An email template page displays.
Figure 16: Email Class
2. Select individual students or check Select All for every student. Students without an email address do not have a checkbox.
3. Enter a Subject, Reply To and a Message (All required fields). Click Send. 4. The BCC field will only send BCC emails to email addresses entered into the field separated by a
semi-colon. 5. Note: An email goes out separately to each student so that they will not see any other student’s
email address. 4. After the email has been sent if you click the Back button you will return to email screen and all
Subject, Reply To and Message fields will have retained what was sent previously. You can then select a different set of students, modify the message, or change the reply to field and send the
new email. To send an email to all students in all your courses please refer to the Course Management document for detailed instructions.
Faculty Contact
From this screen Faculty can update their personal contact information, as displayed in the Student portal.
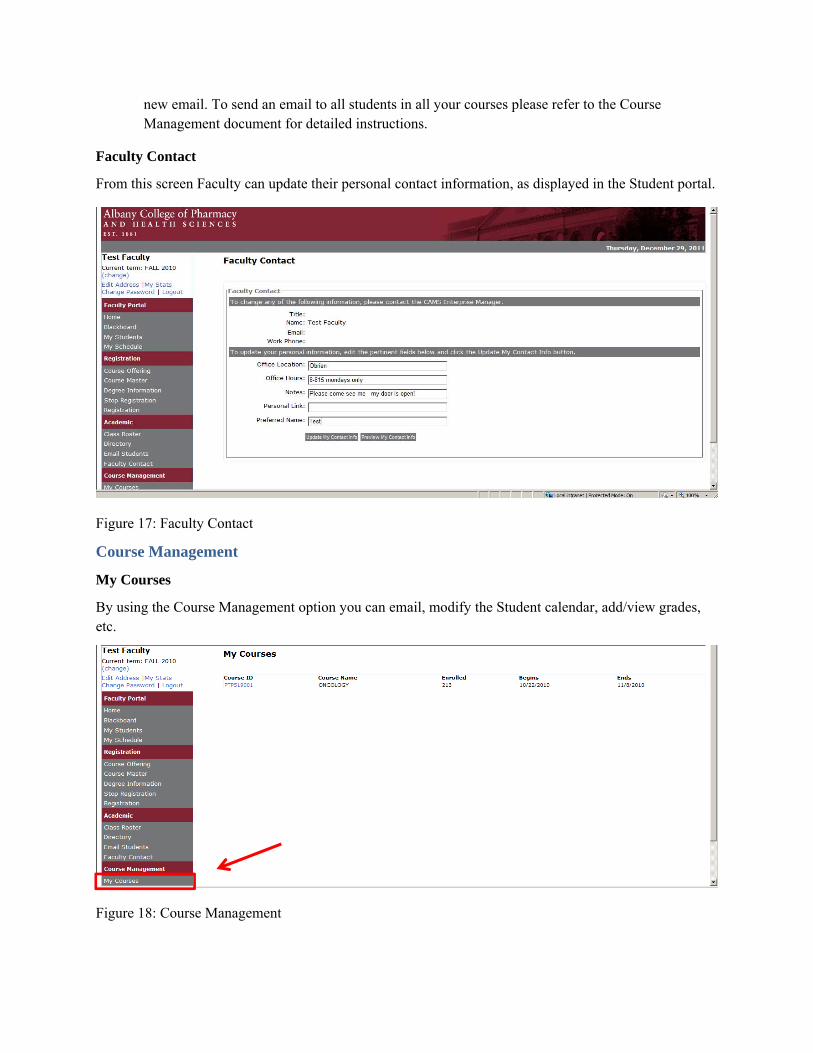
Figure 17: Faculty Contact
Course Management
My Courses
By using the Course Management option you can email, modify the Student calendar, add/view grades, etc.
Figure 18: Course Management

Figure 19: Specific Course Management options
Student Calendar
The students have a calendar option from the Student Portal. Instructors can add calendar entries on all of your students for an individual course.
Step-By-Step: Email Students
1. Select My Courses 2. Click the Course ID for the course you want to communicate to students 3. Click on Calendar from Course Communication
Figure 19: Student Calendar
4. Click on Add Calendar Item

Figure 20: Student Calendar
5. Enter the message and the date 6. Click Submit