faculty tutorial: grade an assignment · faculty tutorial: grade an assignment ... see the tutorial...
TRANSCRIPT
©Indian Hills Community College | www.indianhills.edu | Page 1 of 24
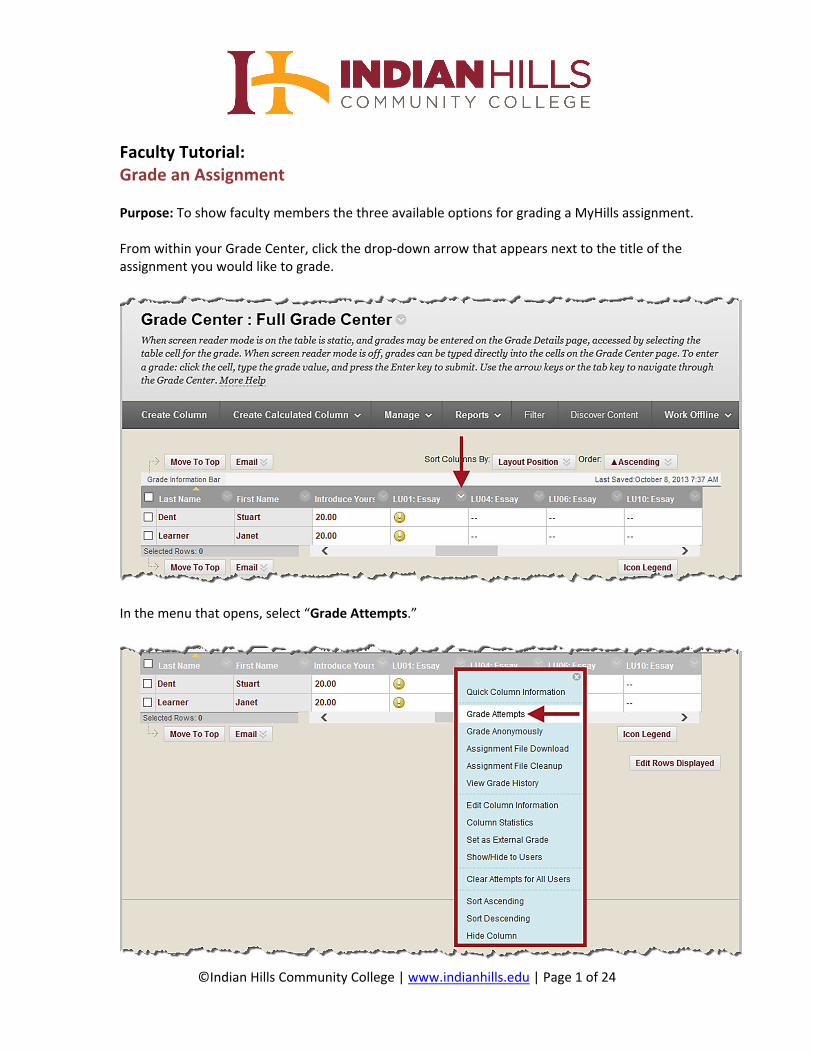
Faculty Tutorial: Grade an Assignment Purpose: To show faculty members the three available options for grading a MyHills assignment. From within your Grade Center, click the drop‐down arrow that appears next to the title of the assignment you would like to grade.
In the menu that opens, select “Grade Attempts.”
©Indian Hills Community College | www.indianhills.edu | Page 2 of 24
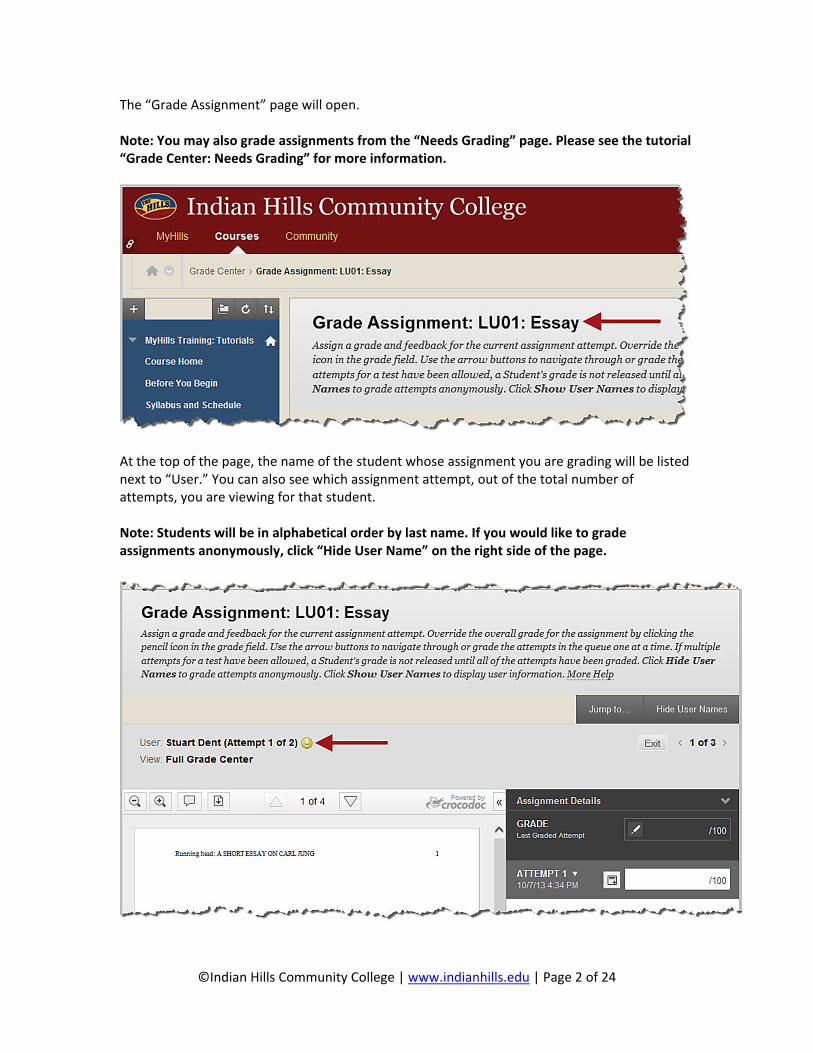
The “Grade Assignment” page will open. Note: You may also grade assignments from the “Needs Grading” page. Please see the tutorial “Grade Center: Needs Grading” for more information.
At the top of the page, the name of the student whose assignment you are grading will be listed next to “User.” You can also see which assignment attempt, out of the total number of attempts, you are viewing for that student. Note: Students will be in alphabetical order by last name. If you would like to grade assignments anonymously, click “Hide User Name” on the right side of the page.
©Indian Hills Community College | www.indianhills.edu | Page 3 of 24
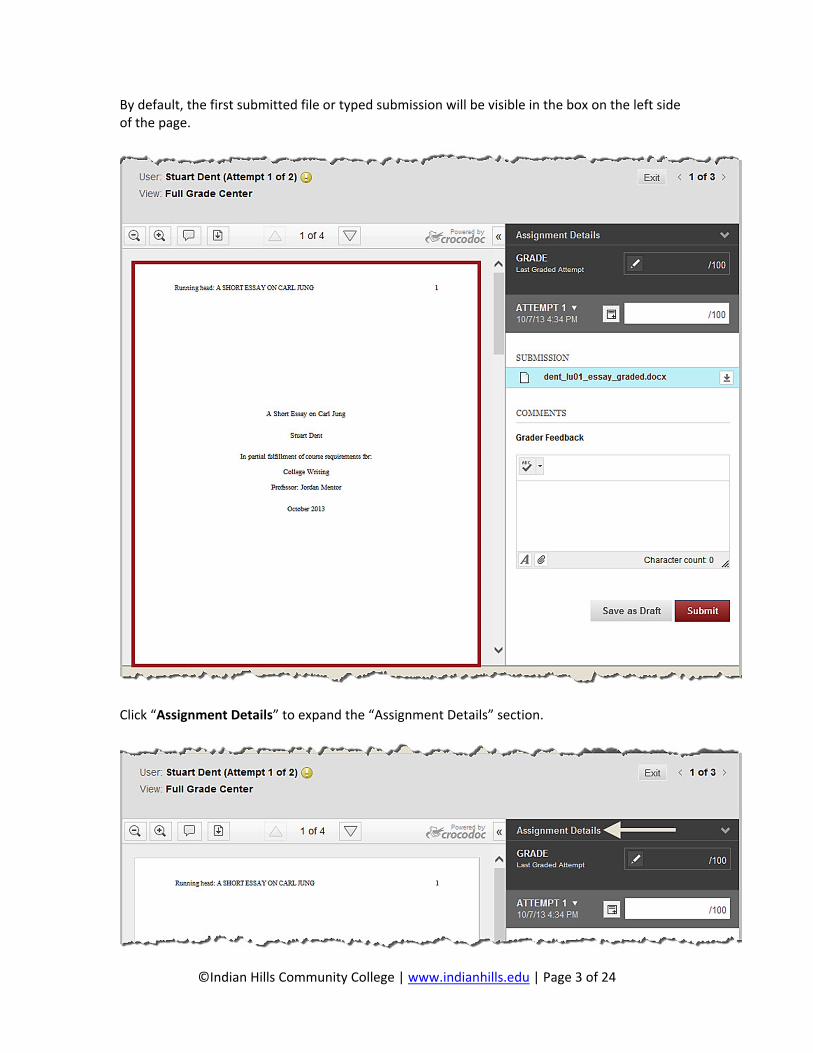
By default, the first submitted file or typed submission will be visible in the box on the left side of the page.
Click “Assignment Details” to expand the “Assignment Details” section.
©Indian Hills Community College | www.indianhills.edu | Page 4 of 24
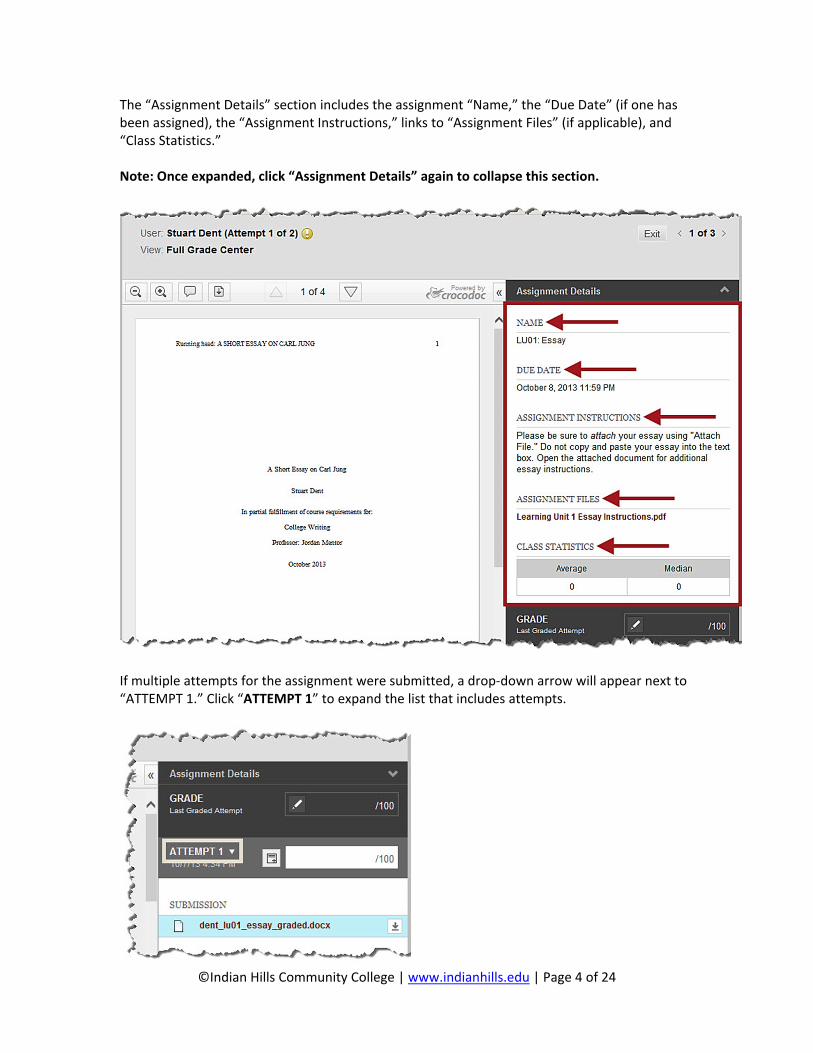
The “Assignment Details” section includes the assignment “Name,” the “Due Date” (if one has been assigned), the “Assignment Instructions,” links to “Assignment Files” (if applicable), and “Class Statistics.” Note: Once expanded, click “Assignment Details” again to collapse this section.
If multiple attempts for the assignment were submitted, a drop‐down arrow will appear next to “ATTEMPT 1.” Click “ATTEMPT 1” to expand the list that includes attempts.

©Indian Hills Community College | www.indianhills.edu | Page 5 of 24
Then, in the list that appears, select the attempt you would like to view. Note: “ATTEMPT 1” will be selected by default.
The submitted file(s) and/or “Submission Text” for the attempt you chose should now be listed under “SUBMISSION.”
©Indian Hills Community College | www.indianhills.edu | Page 6 of 24
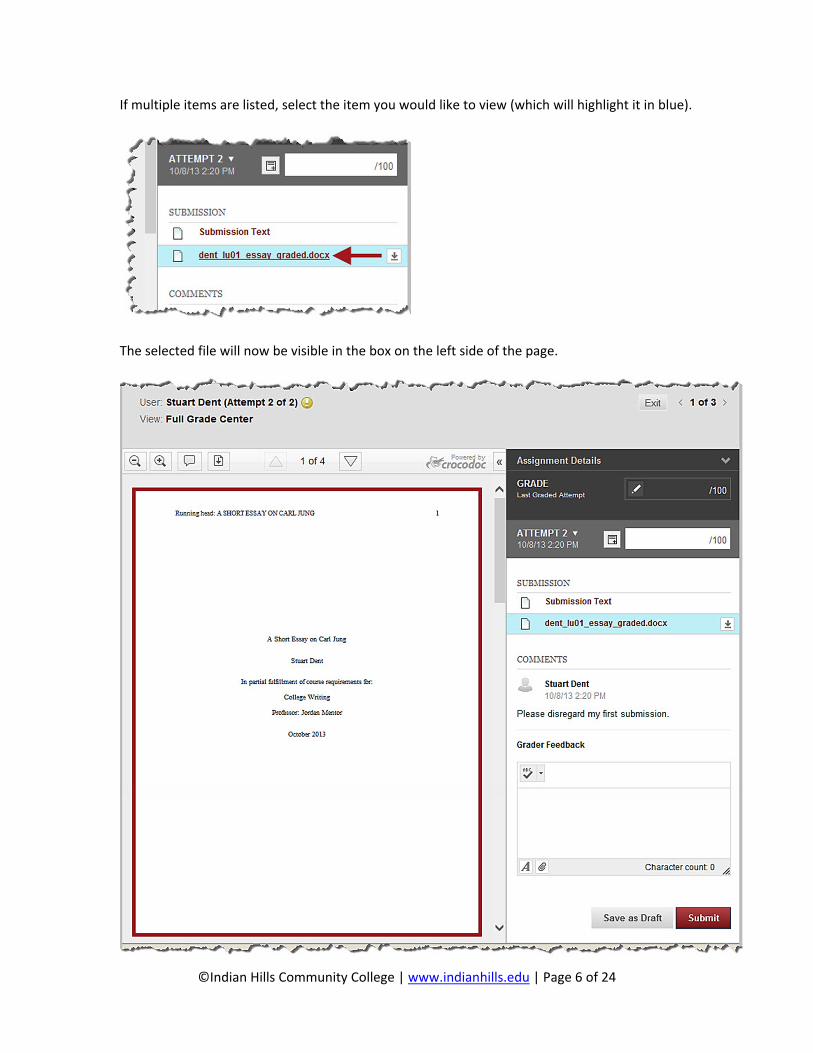
If multiple items are listed, select the item you would like to view (which will highlight it in blue).
The selected file will now be visible in the box on the left side of the page.
©Indian Hills Community College | www.indianhills.edu | Page 7 of 24
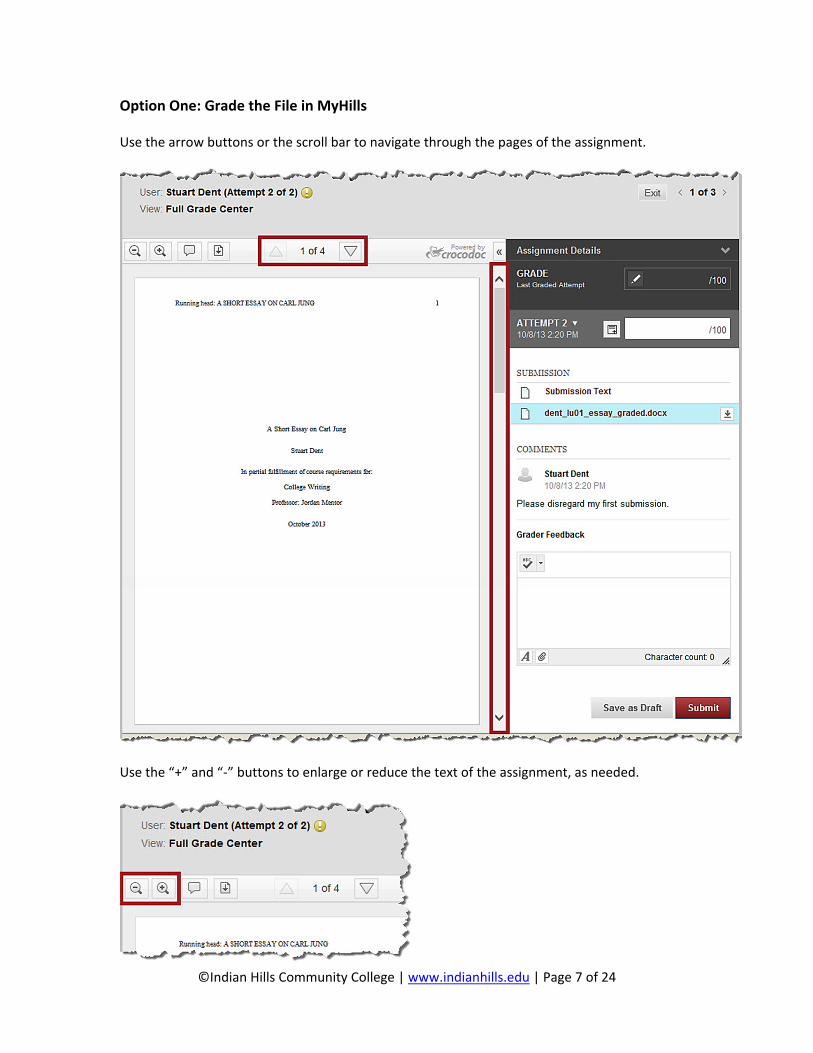
Option One: Grade the File in MyHills Use the arrow buttons or the scroll bar to navigate through the pages of the assignment.
Use the “+” and “‐” buttons to enlarge or reduce the text of the assignment, as needed.
©Indian Hills Community College | www.indianhills.edu | Page 8 of 24
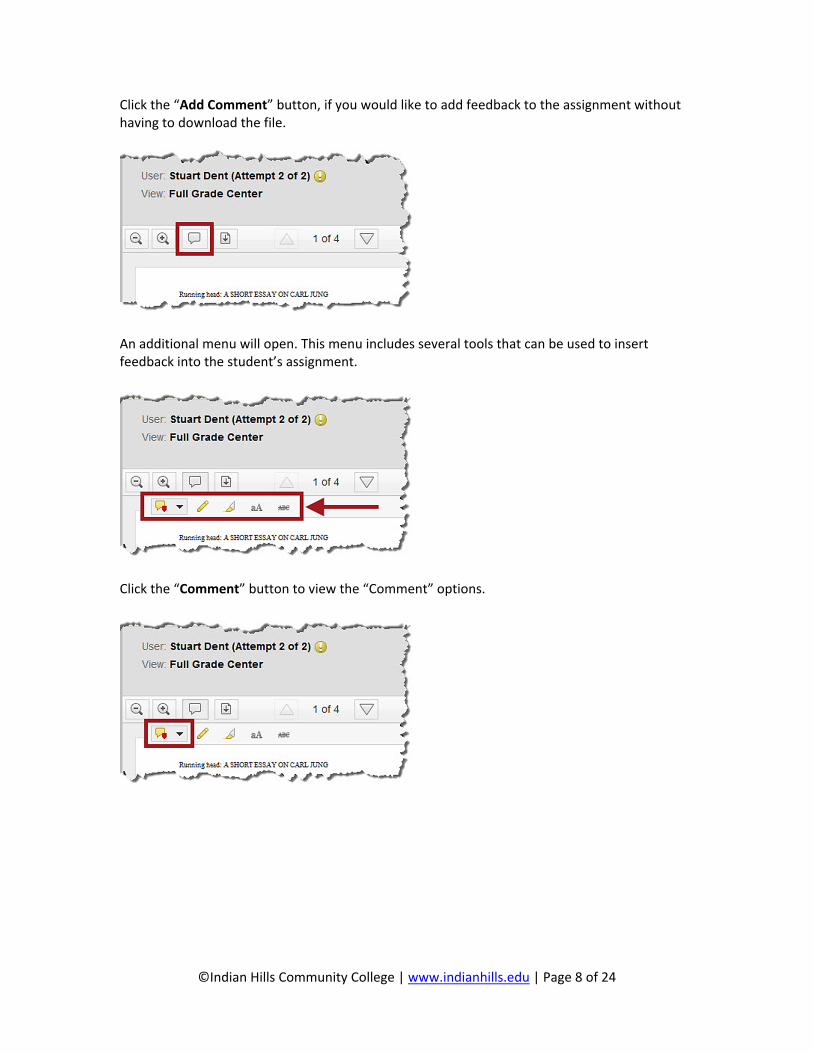
Click the “Add Comment” button, if you would like to add feedback to the assignment without having to download the file.
An additional menu will open. This menu includes several tools that can be used to insert feedback into the student’s assignment.
Click the “Comment” button to view the “Comment” options.
©Indian Hills Community College | www.indianhills.edu | Page 9 of 24
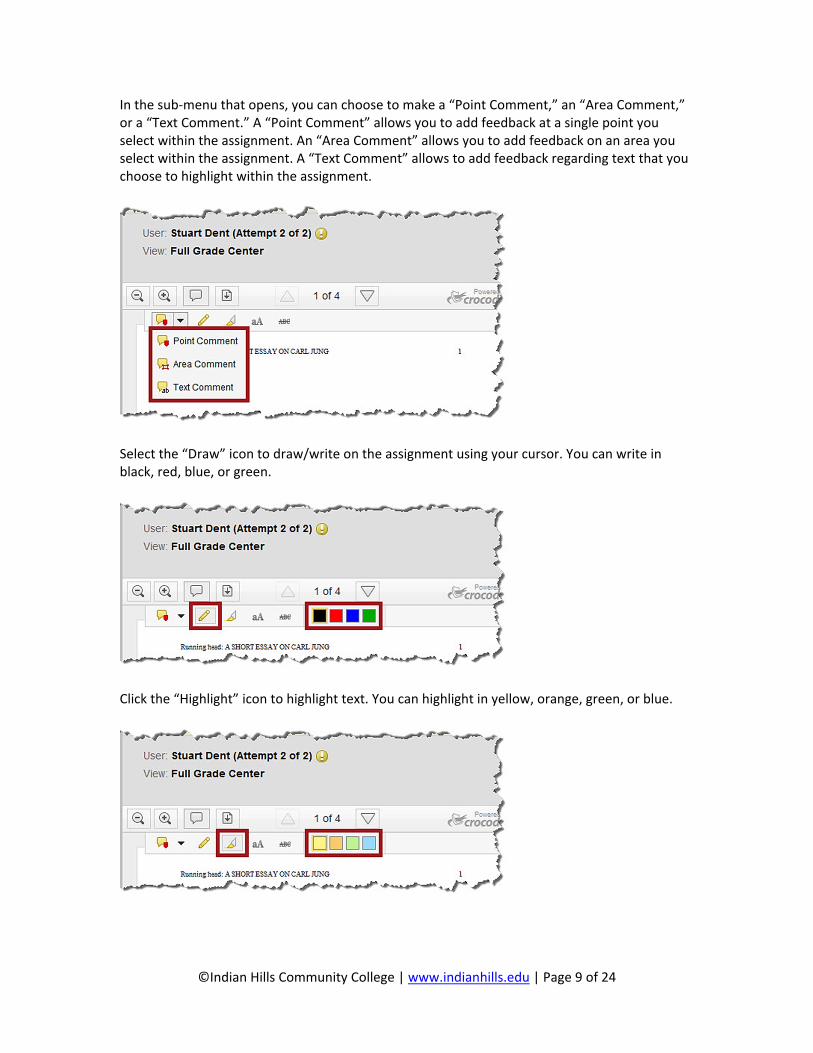
In the sub‐menu that opens, you can choose to make a “Point Comment,” an “Area Comment,” or a “Text Comment.” A “Point Comment” allows you to add feedback at a single point you select within the assignment. An “Area Comment” allows you to add feedback on an area you select within the assignment. A “Text Comment” allows to add feedback regarding text that you choose to highlight within the assignment.
Select the “Draw” icon to draw/write on the assignment using your cursor. You can write in black, red, blue, or green.
Click the “Highlight” icon to highlight text. You can highlight in yellow, orange, green, or blue.
©Indian Hills Community College | www.indianhills.edu | Page 10 of 24
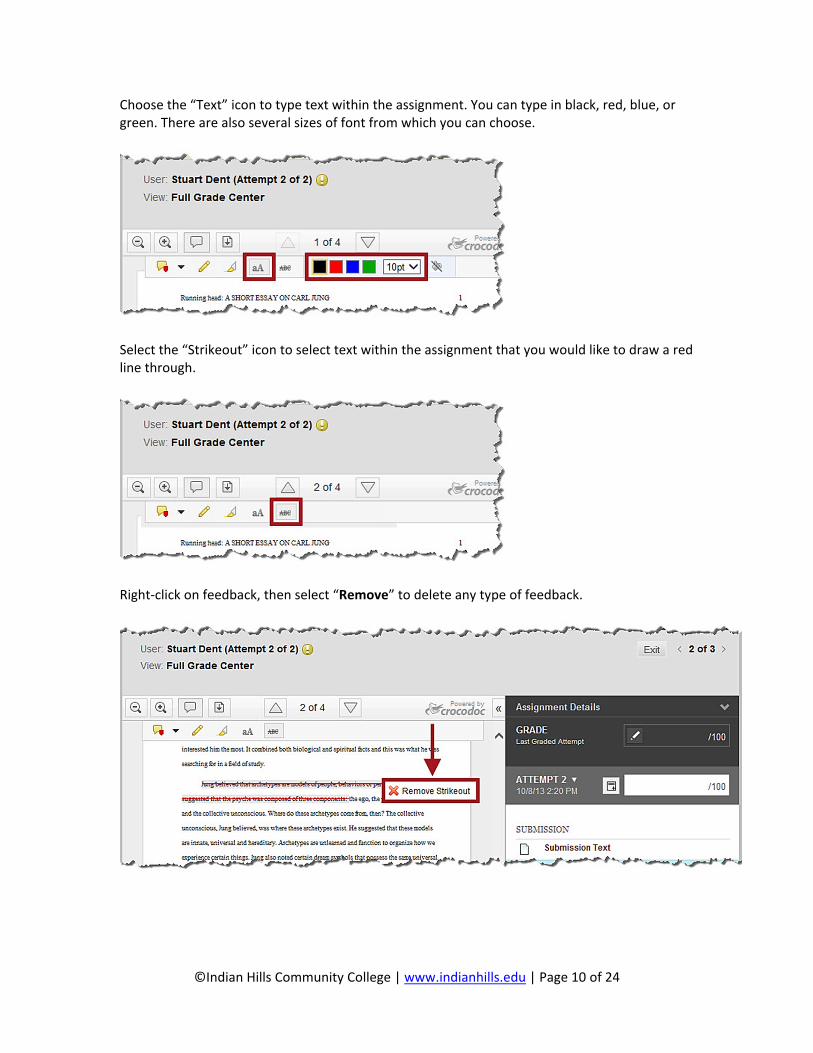
Choose the “Text” icon to type text within the assignment. You can type in black, red, blue, or green. There are also several sizes of font from which you can choose.
Select the “Strikeout” icon to select text within the assignment that you would like to draw a red line through.
Right‐click on feedback, then select “Remove” to delete any type of feedback.
©Indian Hills Community College | www.indianhills.edu | Page 11 of 24
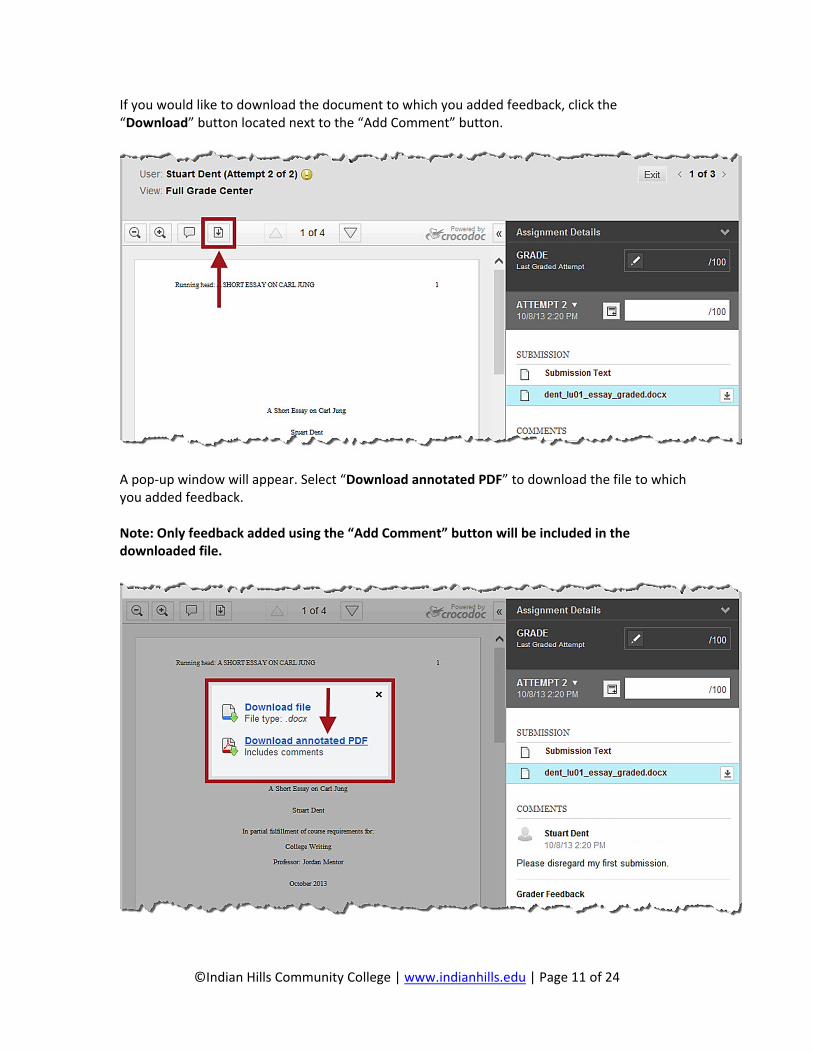
If you would like to download the document to which you added feedback, click the “Download” button located next to the “Add Comment” button.
A pop‐up window will appear. Select “Download annotated PDF” to download the file to which you added feedback. Note: Only feedback added using the “Add Comment” button will be included in the downloaded file.
©Indian Hills Community College | www.indianhills.edu | Page 12 of 24
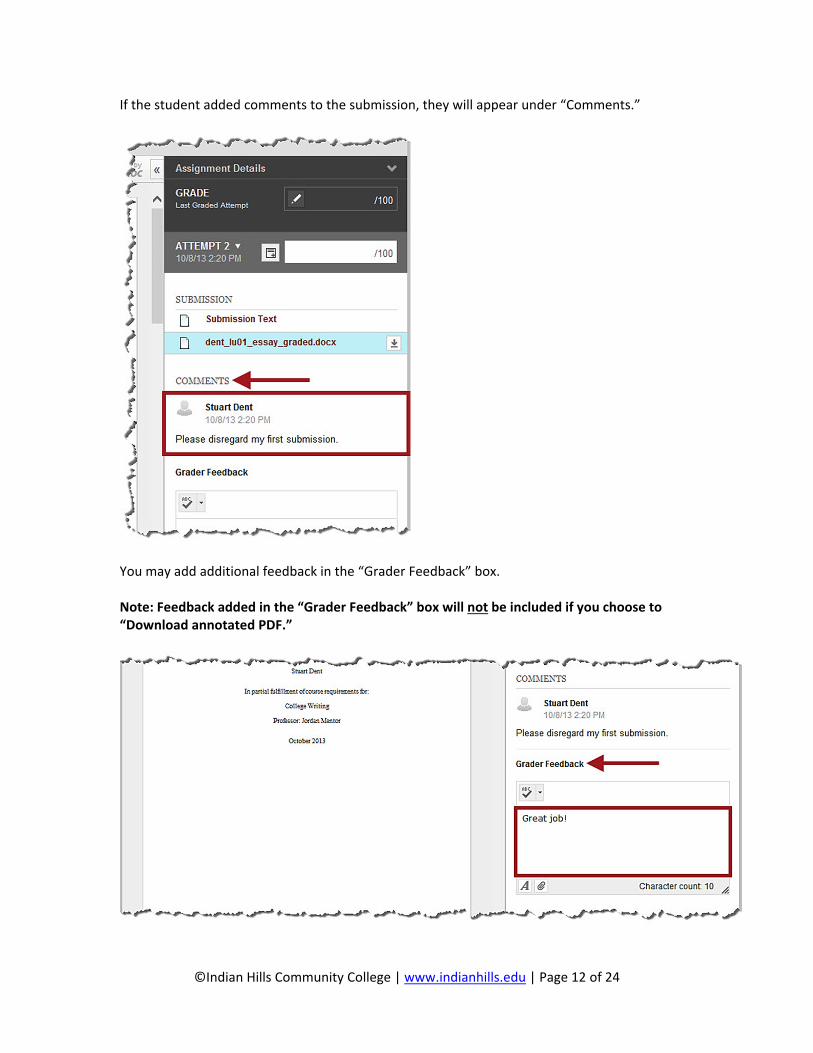
If the student added comments to the submission, they will appear under “Comments.”
You may add additional feedback in the “Grader Feedback” box. Note: Feedback added in the “Grader Feedback” box will not be included if you choose to “Download annotated PDF.”
©Indian Hills Community College | www.indianhills.edu | Page 13 of 24
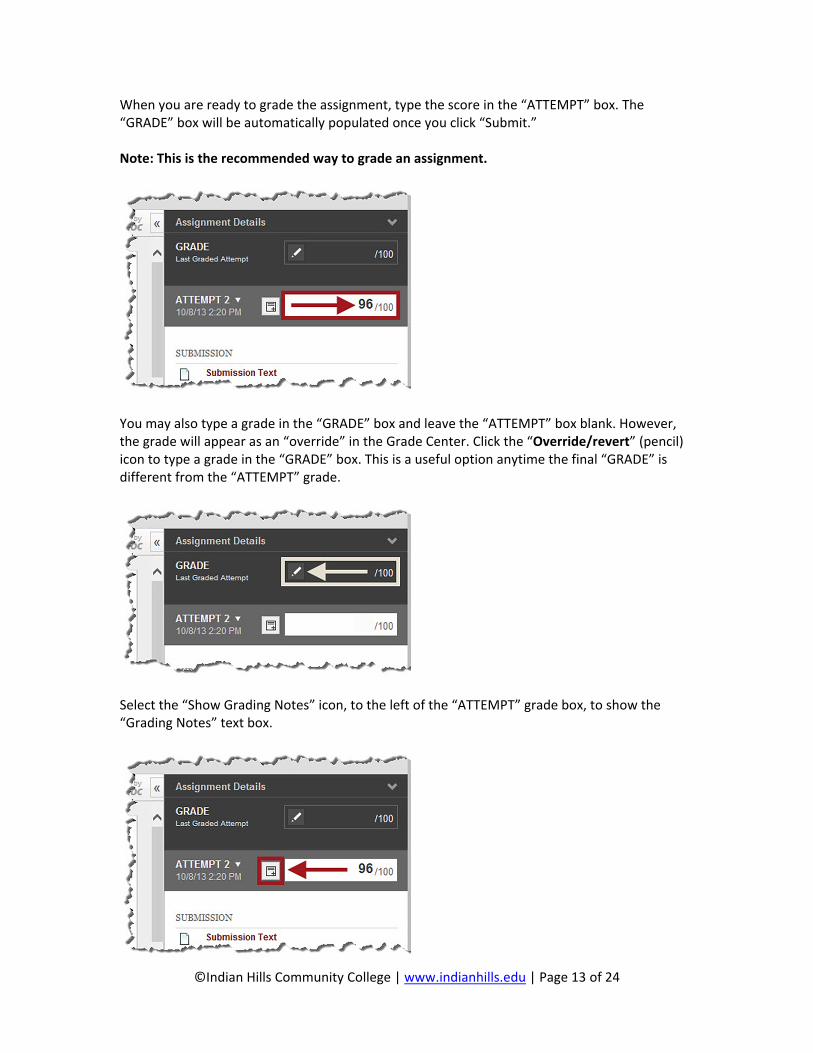
When you are ready to grade the assignment, type the score in the “ATTEMPT” box. The “GRADE” box will be automatically populated once you click “Submit.” Note: This is the recommended way to grade an assignment.
You may also type a grade in the “GRADE” box and leave the “ATTEMPT” box blank. However, the grade will appear as an “override” in the Grade Center. Click the “Override/revert” (pencil) icon to type a grade in the “GRADE” box. This is a useful option anytime the final “GRADE” is different from the “ATTEMPT” grade.
Select the “Show Grading Notes” icon, to the left of the “ATTEMPT” grade box, to show the “Grading Notes” text box.
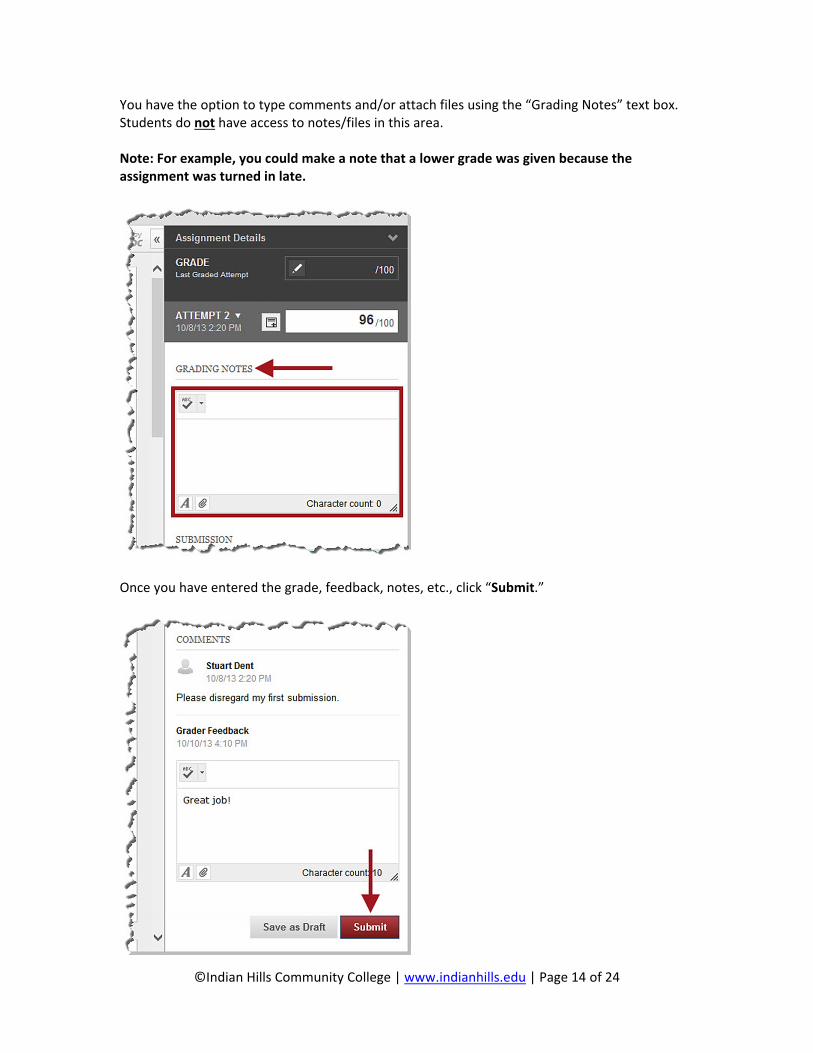
©Indian Hills Community College | www.indianhills.edu | Page 14 of 24
You have the option to type comments and/or attach files using the “Grading Notes” text box. Students do not have access to notes/files in this area. Note: For example, you could make a note that a lower grade was given because the assignment was turned in late.
Once you have entered the grade, feedback, notes, etc., click “Submit.”
©Indian Hills Community College | www.indianhills.edu | Page 15 of 24
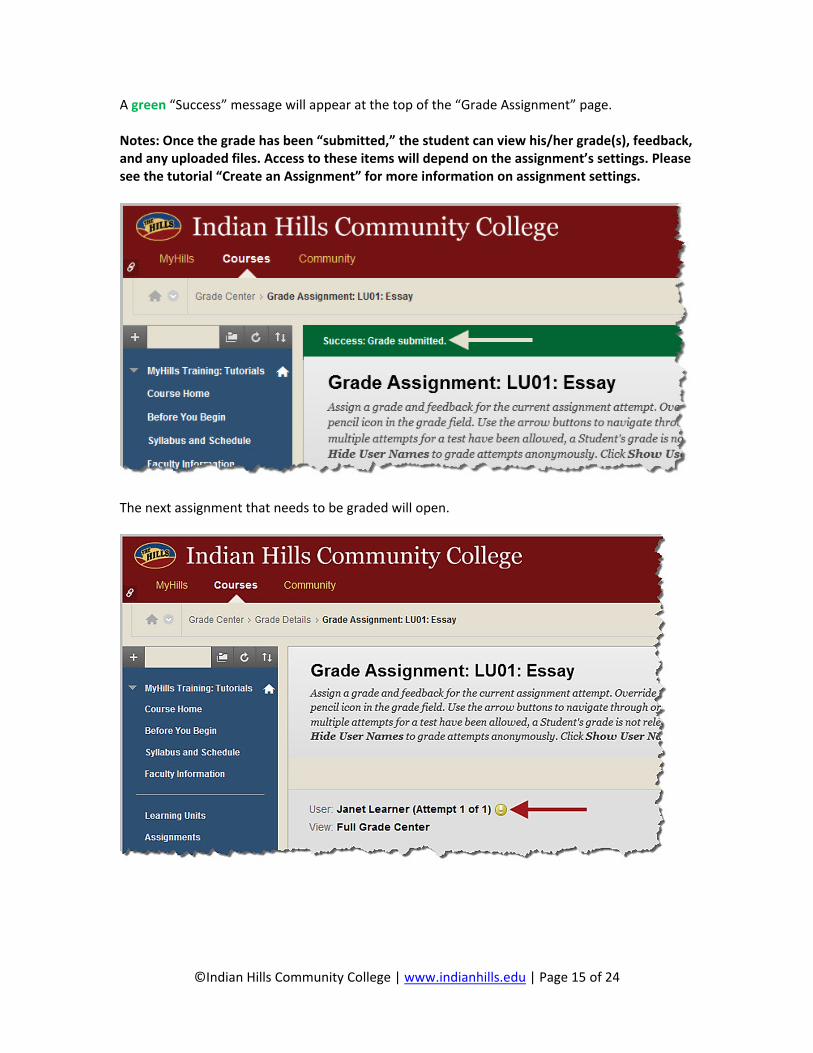
A green “Success” message will appear at the top of the “Grade Assignment” page. Notes: Once the grade has been “submitted,” the student can view his/her grade(s), feedback, and any uploaded files. Access to these items will depend on the assignment’s settings. Please see the tutorial “Create an Assignment” for more information on assignment settings.
The next assignment that needs to be graded will open.

©Indian Hills Community College | www.indianhills.edu | Page 16 of 24
Option 2: Download the File From the “Grade Assignment” page, click one of the two “Download” buttons to download the student’s submitted assignment to your computer.
If you choose the “Download” button next to the “Add Comment” button and you added feedback using the method shown in “Option 1,” a pop‐up window will appear. Select “Download file” to download the original file submitted by the student.
©Indian Hills Community College | www.indianhills.edu | Page 17 of 24
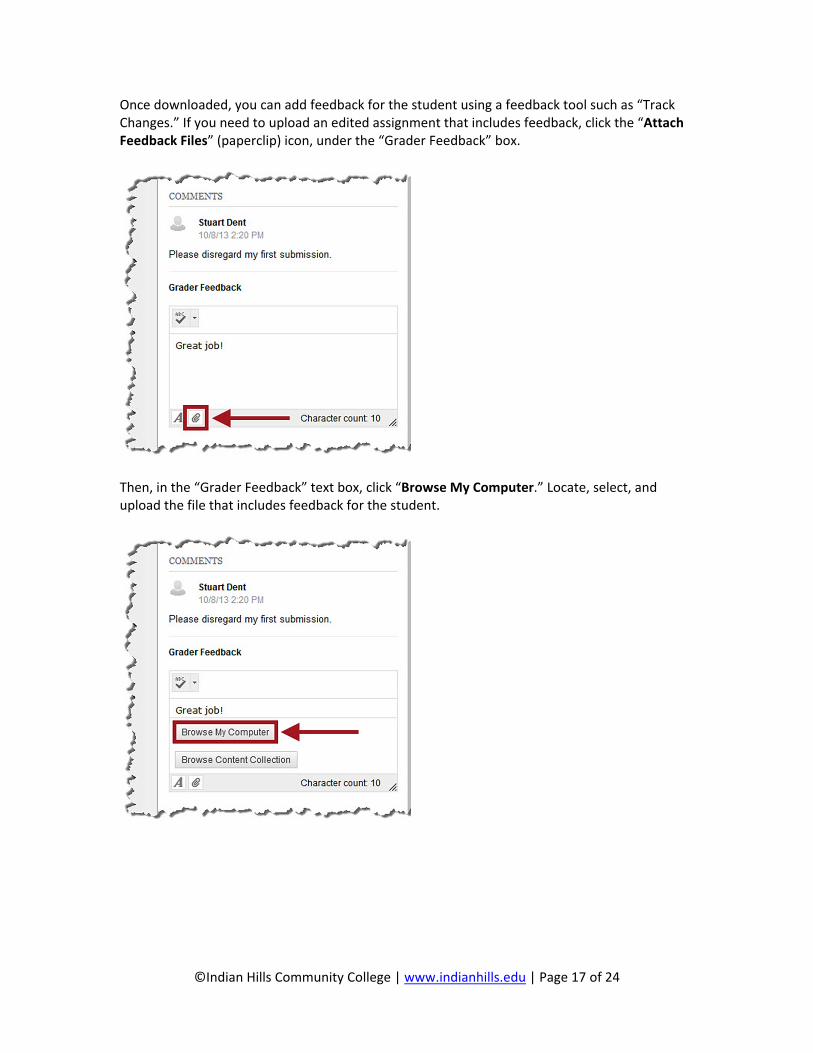
Once downloaded, you can add feedback for the student using a feedback tool such as “Track Changes.” If you need to upload an edited assignment that includes feedback, click the “Attach Feedback Files” (paperclip) icon, under the “Grader Feedback” box.
Then, in the “Grader Feedback” text box, click “Browse My Computer.” Locate, select, and upload the file that includes feedback for the student.

©Indian Hills Community College | www.indianhills.edu | Page 18 of 24
Once you have uploaded the file that includes feedback and you have entered a grade for the assignment in the “ATTEMPT” or “GRADE” box, click “Submit.”
A green “Success” message will appear at the top of the “Grade Assignment” page. Notes: Once the grade has been “submitted,” the student can view his/her grade(s), feedback, and any uploaded files. Access to these items will depend on the assignment’s settings. Please see the tutorial “Create an Assignment” for more information on assignment settings.
©Indian Hills Community College | www.indianhills.edu | Page 19 of 24
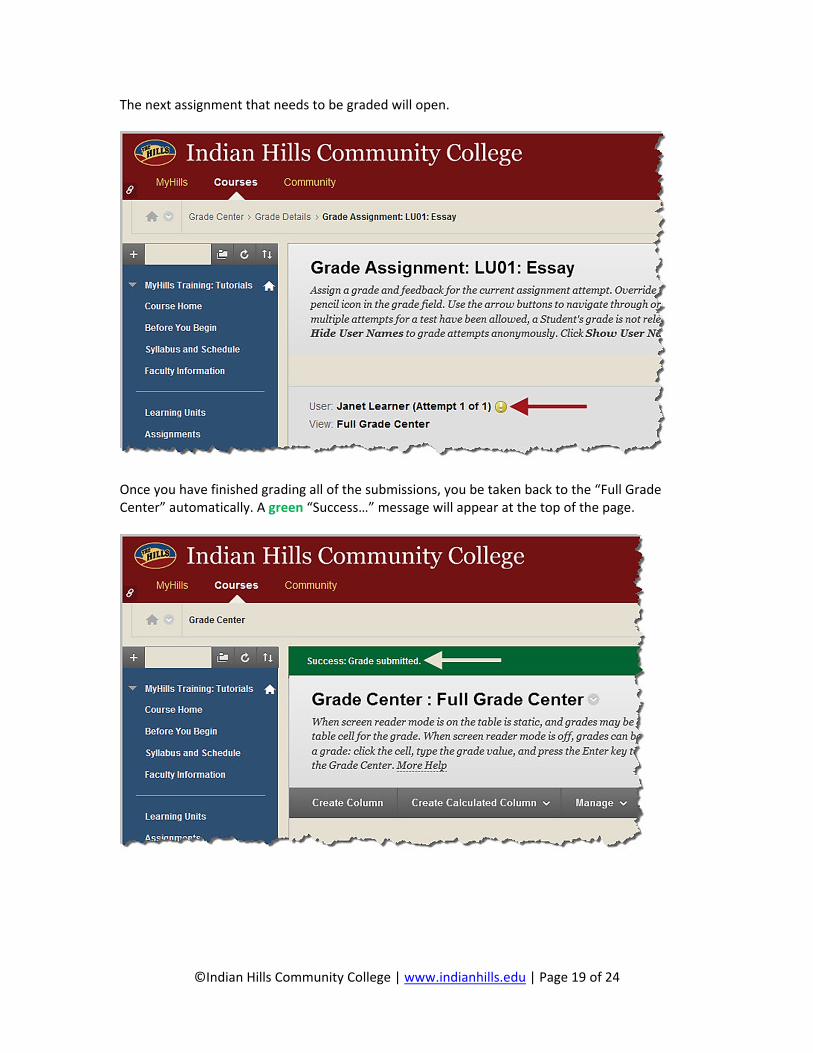
The next assignment that needs to be graded will open.
Once you have finished grading all of the submissions, you be taken back to the “Full Grade Center” automatically. A green “Success…” message will appear at the top of the page.
©Indian Hills Community College | www.indianhills.edu | Page 20 of 24
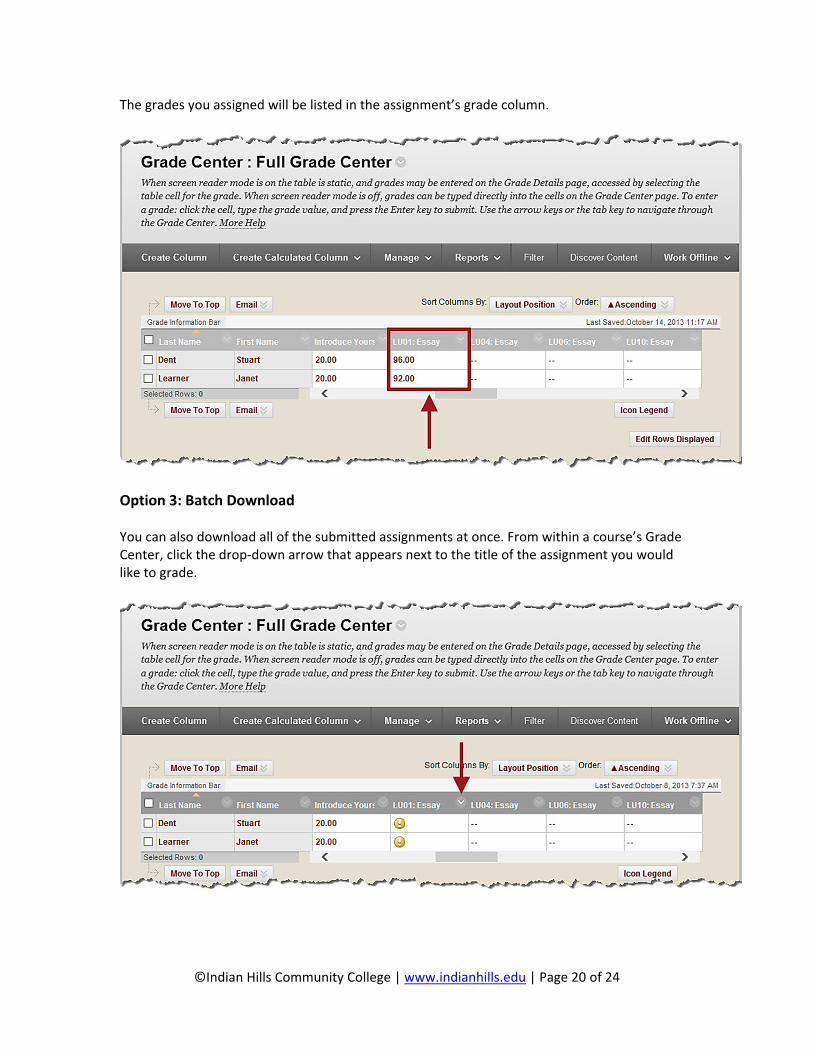
The grades you assigned will be listed in the assignment’s grade column.
Option 3: Batch Download You can also download all of the submitted assignments at once. From within a course’s Grade Center, click the drop‐down arrow that appears next to the title of the assignment you would like to grade.
©Indian Hills Community College | www.indianhills.edu | Page 21 of 24
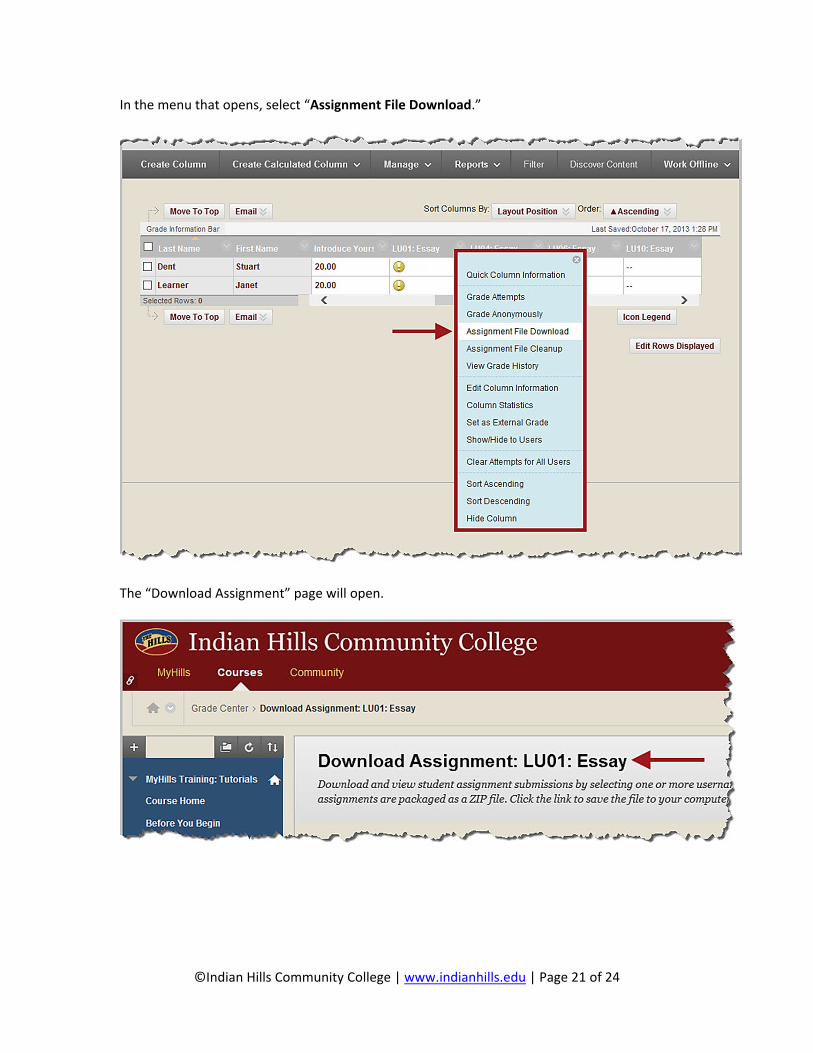
In the menu that opens, select “Assignment File Download.”
The “Download Assignment” page will open.
©Indian Hills Community College | www.indianhills.edu | Page 22 of 24
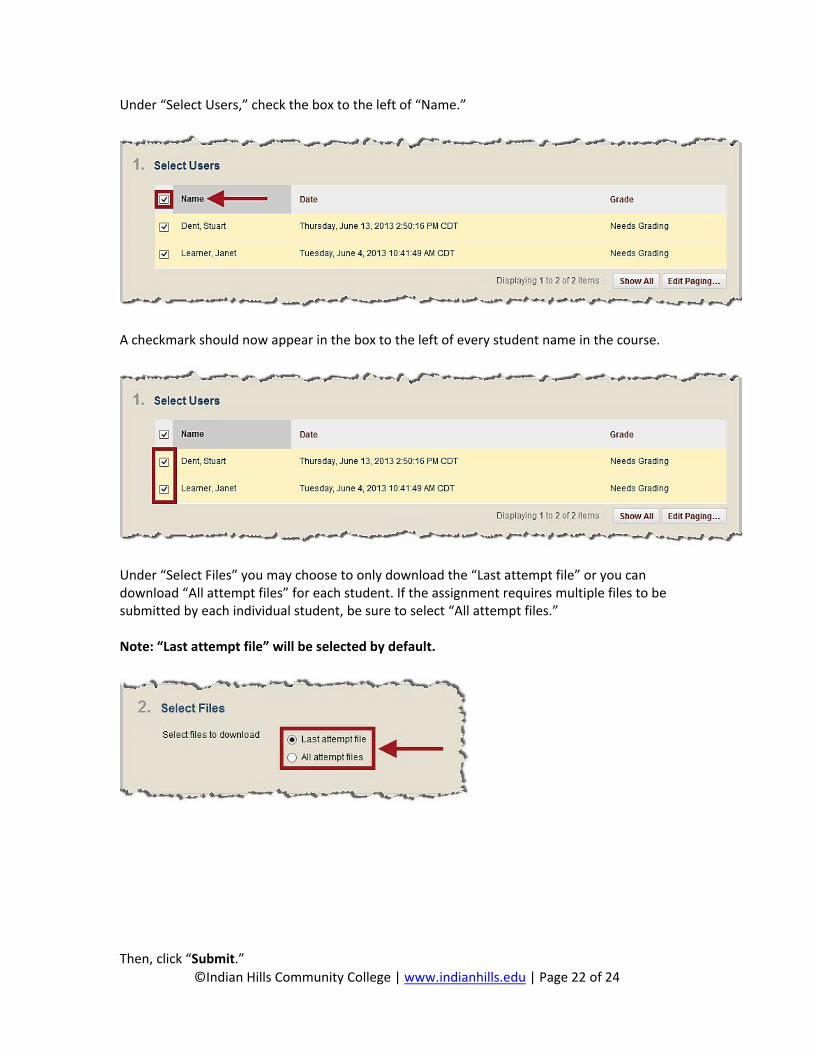
Under “Select Users,” check the box to the left of “Name.”
A checkmark should now appear in the box to the left of every student name in the course.
Under “Select Files” you may choose to only download the “Last attempt file” or you can download “All attempt files” for each student. If the assignment requires multiple files to be submitted by each individual student, be sure to select “All attempt files.” Note: “Last attempt file” will be selected by default.
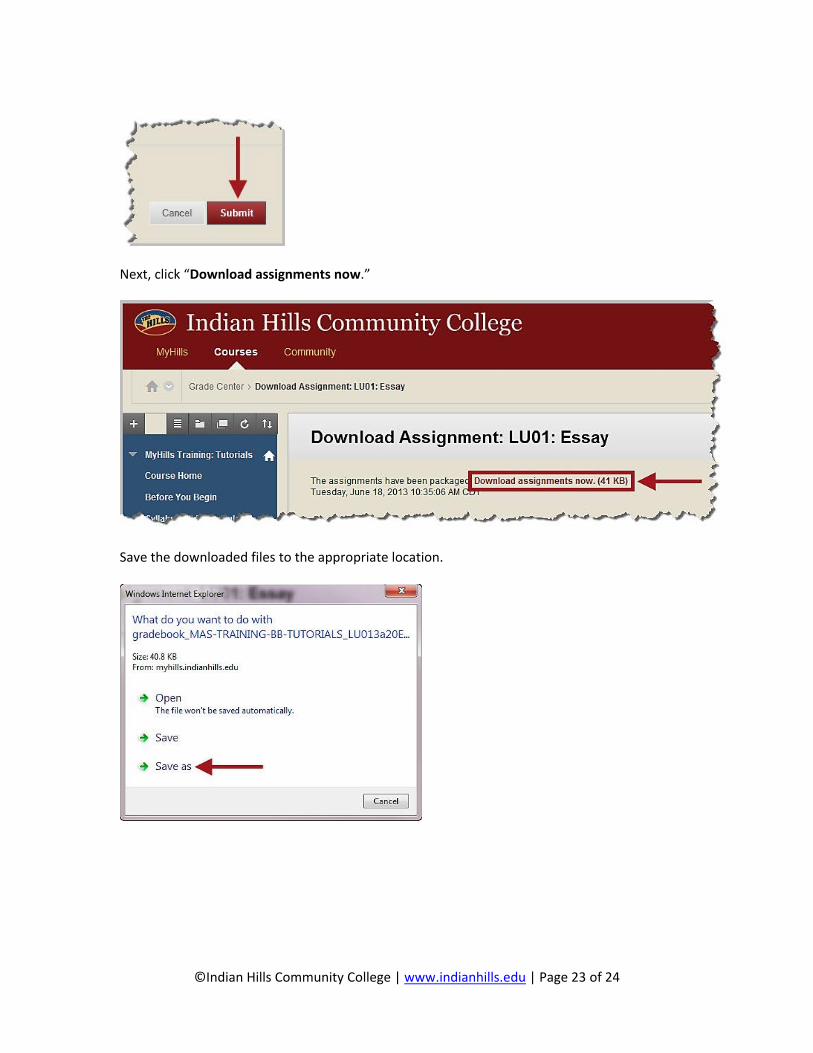
Then, click “Submit.”
©Indian Hills Community College | www.indianhills.edu | Page 23 of 24
Next, click “Download assignments now.”
Save the downloaded files to the appropriate location.
©Indian Hills Community College | www.indianhills.edu | Page 24 of 24
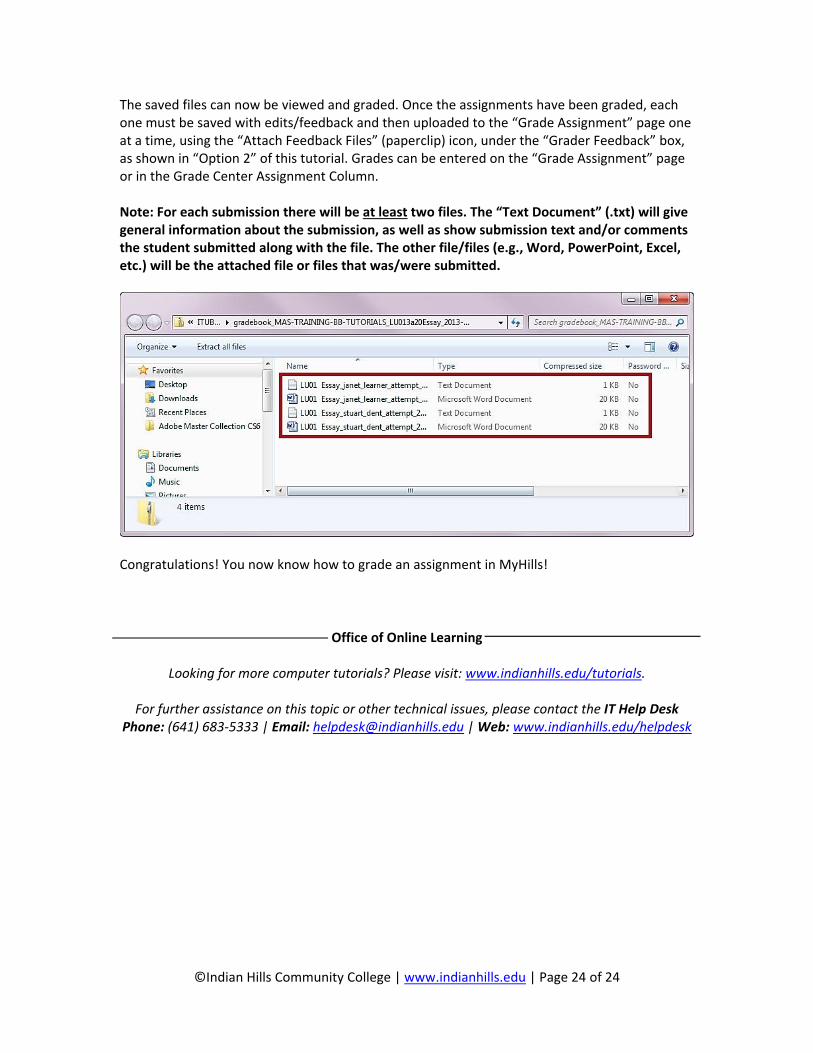
The saved files can now be viewed and graded. Once the assignments have been graded, each one must be saved with edits/feedback and then uploaded to the “Grade Assignment” page one at a time, using the “Attach Feedback Files” (paperclip) icon, under the “Grader Feedback” box, as shown in “Option 2” of this tutorial. Grades can be entered on the “Grade Assignment” page or in the Grade Center Assignment Column. Note: For each submission there will be at least two files. The “Text Document” (.txt) will give general information about the submission, as well as show submission text and/or comments the student submitted along with the file. The other file/files (e.g., Word, PowerPoint, Excel, etc.) will be the attached file or files that was/were submitted.
Congratulations! You now know how to grade an assignment in MyHills!
Office of Online Learning
Looking for more computer tutorials? Please visit: www.indianhills.edu/tutorials.
For further assistance on this topic or other technical issues, please contact the IT Help Desk Phone: (641) 683‐5333 | Email: [email protected] | Web: www.indianhills.edu/helpdesk