farcry 7.0 cms contributor guide
TRANSCRIPT

FarCry 7.0 CMS Contributor Guide

Daemon Pty Limited 46a Macleay St Potts Point NSW 2011 GPO Box 263 Sydney NSW 2001 Australia [email protected] www.daemon.com.au © Copyright 2015 Daemon Pty Limited. All rights reserved. Information in this manual may change without notice and does not represent a commitment on the part of Daemon Pty Limited. You are free to copy, distribute and transmit this work. You must attribute this work to Daemon Pty Limited. 46a Macleay St, Potts Point NSW 2011, Australia. You may not use this work for commercial purposes. If you wish to license a copy for your client, email [email protected] or phone +61 2 8999 8884. You may not alter, transform, or build upon this work. You can always contribute to our forum at http://discourse.farcrycore.org/
FarCry 7 CMS Contributor Guide | Page 1 of 43

Contents Unit 1: Introduction to FarCry CMS
Content Management Where does FarCry fit in? Walkthrough: Logging In Lab: Exploring the FarCry Webtop Dashboard Site Site Navigation and Utility areas Content Admin
First login Unit 2: Site Tree
Overview of Site Tree Examining the site tree context menu Creating New Content Walkthrough: Creating a Folder & HTML Page Summary Web Pages: What goes into them? HTML (HyperText Markup Language) Colours Text Tables Media Content Locking General Steps Content Challenge
Unit 3: Workflow FarCry Workflow Requesting Approval Approving Multiple Content Items Walkthrough: Approving Content Editing Approved Content Lab: Editing Live Content Challenge
Unit 4: Media Library Walkthrough: Adding an image to an HTML page. Walkthrough: File library Media Assets Lab: Inserting Images from the Image Library
Unit 5: Dynamic Content Category Management Walkthrough: Set up keywords Create News Content Walkthrough: Creating a News Item Create Event Content
FarCry 7 CMS Contributor Guide | Page 2 of 43

Walkthrough: Creating an Event Lab: Inserting Images from the Image Library
Unit 6: Containers & Publishing Rules Walkthrough: Design Mode Publishing Rules Walkthrough: Publishing News Content Lab: Other Publishing Rules Challenge
Appendix 1: Rich Text Editor
FarCry 7 CMS Contributor Guide | Page 3 of 43

Unit 1: Introduction to FarCry CMS
Content Management Content Management Systems (CMS) are used to store and subsequently find and retrieve large amounts of data. CMSs work by indexing text, images, etc., within a database. CMSs are often used to create web sites or information portals for organizations and can serve as the foundation for knowledge management. They can also be used to organise documents and media assets. For example, a newspaper may use a content management system to provide an archive of every story ever written for the paper. Likewise, they might use the CMS to provide an extensive library of photographs that are reusable for future stories.
Where does FarCry fit in? Built on the knowledge gained from years of experience developing content management solutions for enterprise clients, FarCry provides you with all the tools you need to quickly become productive. FarCry’s tree view allows you to build a site, and then rearrange the structure by simply dragging and dropping pages, files, images and even whole branches to suit your requirements. Changes you make are instantly reflected (once approved) on the site without requiring timeconsuming and costly technical expertise. Once you have a basic site structure, nontechnical content contributors can quickly add to a company’s Internet, Intranet or Extranet sites through the use of “wizards”. These stepbystep processes are completely browser based and available for all site management tasks including creating, updating, publishing, scheduling and analysing both locationspecific and timespecific (dynamic) content. Adding new functionality is as simple as adding additional prebuilt or custombuilt content types which can include events, facts, polls, competitions, FAQs, plus many more (these types are built by developers by following the steps laid down on the FARCRY website). All custom content types utilise a consistent workflow and appearance, meaning little or no retraining of users.
Walkthrough: Logging In 1. Log into the FarCry Webtop and modify your user profile details. Go to the webtop URL. Typically
this is the website address with the suffix /webtop. For example, for a website with an address of http://community.daemonite.com/ this would be http://community.daemonite.com/webtop.
2. Note: if you repeatedly enter the wrong details you may be locked out of the system for a period of time. This is a security precaution.
3. Once you have logged in, locate the profile information on the top right of the screen. Select “Edit Profile” and complete the details as required.
FarCry 7 CMS Contributor Guide | Page 4 of 43

Image: Logging in: webtop login with fields for username and password
Lab: Exploring the FarCry Webtop Login to FarCry with your instructor to explore the primary functional regions of the webtop by tab: dashboard, site, content and admin.
Dashboard The dashboard area is unique to each user in the system and can be custom configured to show relevant information. From the dashboard you can review the current status of content under your control. The main content area of the Dashboard tab provides information on any content items the logged in user may be working on at the time including: • Items pending approval (if the user has the appropriate permissions) • Items that may be in draft • Items that are locked This area provides a useful overview for each user to track which content they may be working on, and possibly action items that need to be addressed (e.g. approve or unlock content items).
FarCry 7 CMS Contributor Guide | Page 5 of 43

Image: The FarCry Webtop Dashboard view
Site The site tab gives you an overall view of the information hierarchy of the web site. The site tree represents all the fixedposition content of the web site in one view. This area can be used to create, edit and delete sections of the site. The tree also enables you to move branches of content to new locations, allowing you to reorganise the information hierarchy when you need to. If you have appropriate permissions, you can also secure access to certain regions of the site to create private or “extranet” areas of the site accessible only to members. Site navigation or menu items are represented by blue folders which indicate an actual navigation menu a visitor would see on the website. As you might guess, you can easily group navigation items by creating a navigation folder within another navigation folder. To make traversing easier for a contributor, FarCry automatically collapses all navigation folders when the Site tab first loads. Users can then expand the particular area they are interested in working on.
FarCry 7 CMS Contributor Guide | Page 6 of 43
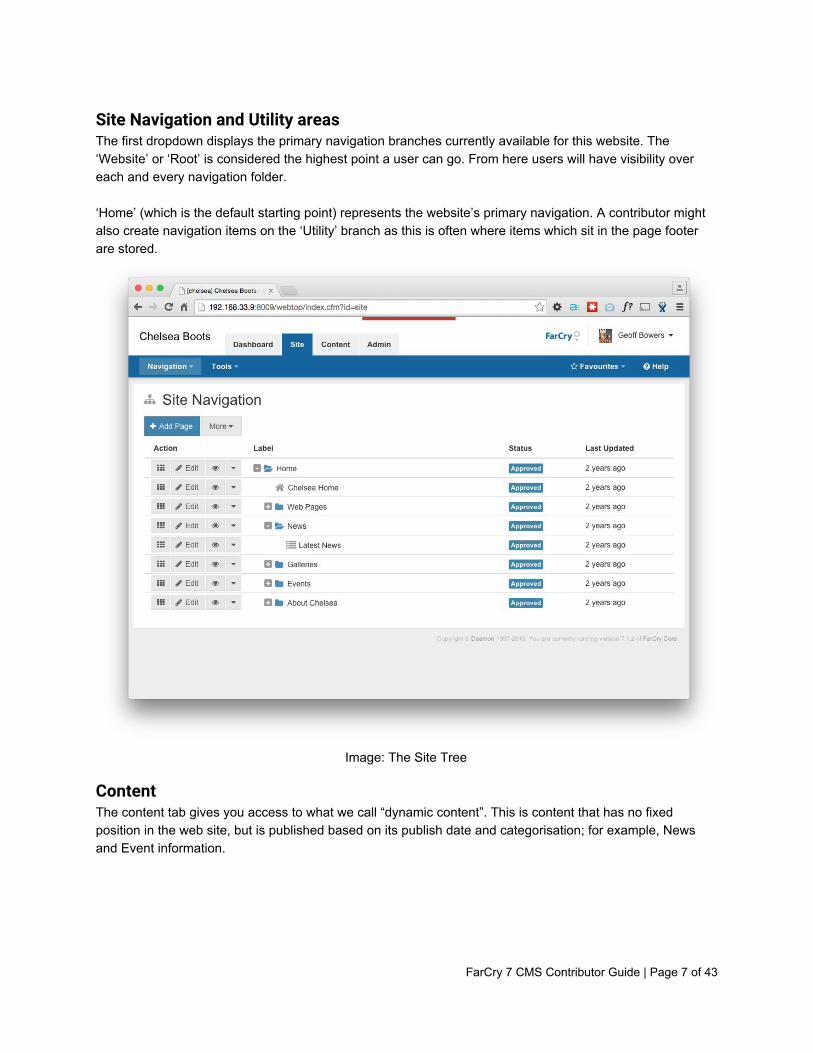
Site Navigation and Utility areas The first dropdown displays the primary navigation branches currently available for this website. The ‘Website’ or ‘Root’ is considered the highest point a user can go. From here users will have visibility over each and every navigation folder. ‘Home’ (which is the default starting point) represents the website’s primary navigation. A contributor might also create navigation items on the ‘Utility’ branch as this is often where items which sit in the page footer are stored.
Image: The Site Tree
Content The content tab gives you access to what we call “dynamic content”. This is content that has no fixed position in the web site, but is published based on its publish date and categorisation; for example, News and Event information.
FarCry 7 CMS Contributor Guide | Page 7 of 43

Image: News content
FarCry 7 CMS Contributor Guide | Page 8 of 43

In addition, there are a variety of content tools available for assisting in content creation; including a global media library and category tools.
Image: Media (image) library
Functionality within the ‘Content’ tab is broken into different ‘subsections’ which are accessible via the dropdown box at the top of the sidebar. Users will see different options contained within the dropdown depending on their permissions, however all users will see:
1. CMS Content 2. Content Publishing
The ‘CMS Content’ area holds the following core content types:
News Events Links Facts Feedback
The ‘Content Publishing’ area allows users to manage content such as images and files, like category management in a centralised location.
FarCry 7 CMS Contributor Guide | Page 9 of 43

Image: Website content area
Admin The Admin tab is typically hidden from most contributors. This area allows site administrators and developers to set various configuration options for the web site as a whole. For example;
managing the free text search engine collections configuring the rich text editor deploying custom extensions to FarCry managing content cache setting and resetting Friendly URLs
The General Admin sub section is primarily used for managing FarCry Users and their permissions in the system.
First login The first time you login to FarCry you will be prompted to update your user details. This is an important step as it will set your FarCry ‘profile’, which is essential for tracking things like who performed what action as well as receiving email notifications based on FarCry events.
FarCry 7 CMS Contributor Guide | Page 10 of 43

Unit 2: Site Tree
Overview of Site Tree The site tree corresponds to the information hierarchy of the whole website including the navigation and layout. The navigation folder is a fundamental building block of the site tree. Each folder represents a section in the website. The folder label corresponds to the menu label in the navigation structures within the website design. Clicking on a menu item in the web site displays the content sitting under the folder in the site tree.
Image: Menu items showing underlying content pages in site tree
Examining the site tree context menu
Whenever you click the ‘dropdown’ button (down arrow icon) next to a menu item, a context menu will appear providing functional options for a contributor.
FarCry 7 CMS Contributor Guide | Page 11 of 43

The options available will be different depending on the content type a user ‘right clicks’ on (e.g. a navigation node or HTML page).
Image: The context menu dropdown
The context menu for a navigation node will contain:
Add Page Zoom Status (approve/send to draft) Sort Order Copy to Move to Delete
‘Add Page’ allows a contributor to add new content type underneath the current navigation node. Status allows contributors to set the ‘status’ of the item, enabling a user to send and object to draft or approve (or request approval of) an item. Clicking ‘Zoom’ will refresh the screen to show only the items underneath the parent folder. The full site tree can be accessed again by clicking in the webtop menu: Navigation>Site Navigation, or hitting the browser’s ‘back’ button.
FarCry 7 CMS Contributor Guide | Page 12 of 43

The ‘Status’ option can change the page from draft to published and back again. ‘Sort order’ is to rearrange menu items within one tier of the folder structure. ‘Copy to’ option allow you to to copy a navigation node (and any children it may contain) to another part of the site tree. ‘Move to’ allows you to move a navigation node (and any children it may contain) to another part of the site tree. ‘Delete’ will permanently remove a navigation node from the site. It is worth noting that some of the same options in the context menu will be available from the main section of the screen, particularly for editing the current content item.
Creating New Content Navigation folders can hold a variety of different content types depending on the setup of your specific website. It is very common for navigation folders to each hold a single HTML content item. In this scenario, the folder corresponds to the navigation menu label and the HTML content item represents the actual page of content. Note: If you place multiple HTML content items under a single navigation folder then only the first one will actually have a specific navigation reference. This would be desirable if you have a multipage article but generally you should stick to one folder and one html page. This only applies to those whose configuration of the FarCry application allows this.
Walkthrough: Creating a Folder & HTML Page To create an HTML page a NAVIGATION link needs to be created first. Click on the SITE tab Using the site tree (on the left side of the screen) right click on the “Home” folder, go to ADD PAGE and select where in the hierarchy you would like your page to appear.
FarCry 7 CMS Contributor Guide | Page 13 of 43

Image: Select where in the hierarchy you would like your page to appear
As soon as you save the navigation folder, a screen to describe the link and the page type will appear. Name the link in the TITLE field.
FarCry 7 CMS Contributor Guide | Page 14 of 43

Image: The page creation wizard
Enter the link name in the TITLE field.
Set the NAVIGATION BEHAVIOUR to Normal Content Set the CONTENT type as a Web Page Ignore the page ALIAS Ignore the Imagery section for now as we’ll look at these later. Once all fields are completed at this step, click on SAVE (note that this will save any data currently
entered)
FarCry 7 CMS Contributor Guide | Page 15 of 43

Image: Add page screen
This screen is the first of a multistep wizard that defines the page.
1. Add a TITLE for your page 2. Select a DISPLAY METHOD (determines the layout of the page). Choose Standard. 3. Add a TEASER. This field summarises the page content and can be picked up by search engines,
depending on your settings. 4. You can choose to add a TEASER IMAGE 5. The BODY field is a rich text box that allows you to format text styles, insert media, files or links.
a. To attach an image, first attach the image to this page (attached images are located underneath the body text box). You can select one from the media library, or create one from a file on your hard drive.
6. Ignore the RELATED CONTENT area for now. At this stage, you can click SAVE and exit the wizard. If you wish to continue with the next steps, click NEXT or on the item (listed in the right side). The SEO (Search Engine Optimisation) step provides a preview of how the page will appear on Google. You can overwrite the default text by completing the fields. The area in orange provides a quick preview.
FarCry 7 CMS Contributor Guide | Page 16 of 43

Image: SEO options
The next step in the wizard defines miscellaneous options. These options include the person responsible for the content on the page (who receives an email when the page is approved for publication); and whether to include a review date for the content. It also supports ‘Categories’, which offer an extremely important yet simple addition to any content item: the ability to categorise or ‘tag’ content with a specific keyword. This can be beneficial when a contributor wishes to find or output similar content, or just categorise the content. Categories are created and edited in the ‘Content’ tab. Once you are satisfied with the content and metadata on your page click COMPLETE. Congratulations! Your HTML page has now been created.
Summary You created an HTML page using the FarCry wizard. The wizard is a multistep process a contributor can operate to create and edit a FarCry content item.
FarCry 7 CMS Contributor Guide | Page 17 of 43

HTML pages traditionally have 4 steps: 1. Webpage 2. SEO 3. Miscellaneous
The ‘Webpage’ step holds page overview information such as the page title (for display in FarCry), an optional teaser area for custom page summaries, and all main content of the HTML page. ‘SEO’ will allow you to override the default page metadata for search engines. It provides a preview of how your page will look for a Google search result. ‘Miscellaneous’ allows you to set an owner, review date and related categories.
Web Pages: What goes into them? This is probably a good time to introduce some web specific concepts when it comes to editing content. The most important thing to realise is that the web is not a word processor and that your options for formatting are more limited. Secondly, depending on how your web site is configured your “look and feel” may be dictated by a global style sheet. Our recommendation is to follow a “less is more” approach. Try to format your content as little as possible. Let the overall design of the site dictate how the content will look. Don’t try and do too much in terms of formatting and concentrate on the substance of the content. The content management system and the web site design should take care of the rest. That said; let’s explore some of the options available to you as a contributor.
HTML (HyperText Markup Language) In contrast to programs such as Microsoft Word, which combine text and images in the one file, web pages are simply text documents with links and references to other files, which may be html, image, video, audio, text or animation. Consequently, it can be a little fiddlier getting all of these things to format properly on the front end view. FarCry tries to assist in this area by managing images, files and other resources separately and then bringing them all together at the right time. We’ll learn more about images and files management in a later unit.
Colours If you were to look at the code for any given page you’d notice that the colours are expressed in the following format: #000000. This is a hexadecimal representation of the colour that the browser can interpret. When deciding on colours, keep in mind general readability and possible problems for colourblind users as well as consistency with site design. Also, bear in mind that although changing text and background colours may be straightforward, many web site style guides forbid the use of colour changes within content. Instead they insist that you use a “style” which can be globally changed when needed.
FarCry 7 CMS Contributor Guide | Page 18 of 43
Text FarCry uses cascading style sheets (CSS), a separate linked text file that is a neat and effective way of describing text and other format elements. Typically it is considered very bad practice to attempt to dictate font styles outside of the style sheet. This makes life easy for the contributor – just go with whatever font appears in your list of fonts. Beware of special characters such as &, “, #: to display correctly, they need to be inserted with a special code called an ‘HTML entity’. Word processors have a notorious habit of adding all kinds of special characters to your content that will not necessarily display correctly on your web page. Tip: A good piece of advice if you find yourself copy and pasting content from something like Word. Make sure you remove all the formatting before you paste the content. This can be done quite easily by cutting and pasting into Notepad (Start Menu, > All Programs > Accessories > Notepad) first, before transferring the content to your web page. In your html editor, hitting “Enter” creates a new paragraph, while “Shift+Enter” creates a single carriage return.
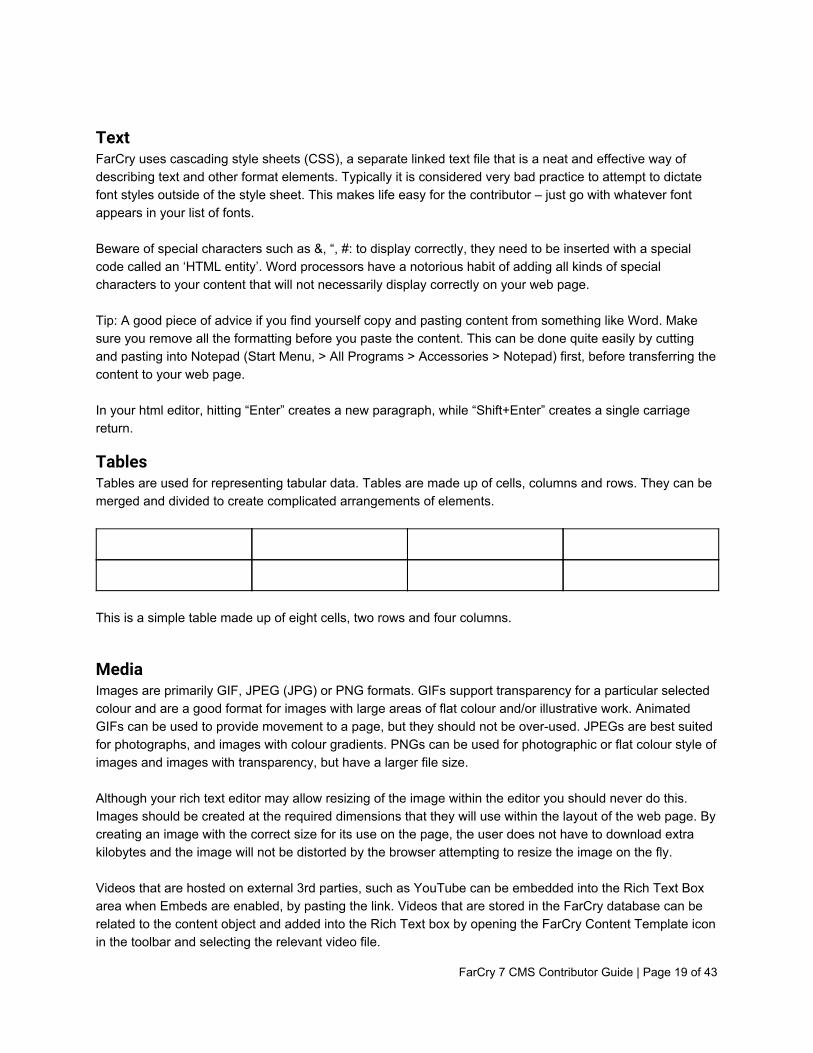
Tables Tables are used for representing tabular data. Tables are made up of cells, columns and rows. They can be merged and divided to create complicated arrangements of elements.
This is a simple table made up of eight cells, two rows and four columns.
Media Images are primarily GIF, JPEG (JPG) or PNG formats. GIFs support transparency for a particular selected colour and are a good format for images with large areas of flat colour and/or illustrative work. Animated GIFs can be used to provide movement to a page, but they should not be overused. JPEGs are best suited for photographs, and images with colour gradients. PNGs can be used for photographic or flat colour style of images and images with transparency, but have a larger file size. Although your rich text editor may allow resizing of the image within the editor you should never do this. Images should be created at the required dimensions that they will use within the layout of the web page. By creating an image with the correct size for its use on the page, the user does not have to download extra kilobytes and the image will not be distorted by the browser attempting to resize the image on the fly. Videos that are hosted on external 3rd parties, such as YouTube can be embedded into the Rich Text Box area when Embeds are enabled, by pasting the link. Videos that are stored in the FarCry database can be related to the content object and added into the Rich Text box by opening the FarCry Content Template icon in the toolbar and selecting the relevant video file.
FarCry 7 CMS Contributor Guide | Page 19 of 43

Content Locking When you are editing a content item it’s obviously important that another contributor doesn’t accidentally overwrite the work that you are doing. To help prevent this from happening FarCry implements content locking for content items. A “content lock” prevents other users from modifying the content item that you are currently working on. A content lock is automatically created whenever you begin editing a content item. The lock is released as soon as you hit “save” or “cancel” from the editing wizard or form. Remember that you can see a summary of all items you may have locked from the ‘Overview’ tab.
Image: Locked content
In this lab you will need to create a small subsection of pages.
FarCry 7 CMS Contributor Guide | Page 20 of 43

General Steps First create a navigation folder within your section of the site Underneath this new folder create an HTML page (remember only one HTML content item per
folder) Preview the page within the web site to make sure things are looking correct Repeat these steps until you have created the subsection of the site as shown
Content It’s always good to practice with some real content. If you don’t have any available you can always use the “lorem ipsum” site to generate some random Latin content for your pages (http://www.lipsum.com/).
Challenge Once you have created your pages, experiment with the formatting options available in the “Rich Text Editor” that comes with your installation. Remember we’ll be looking at images and files a little bit later on in the course.
FarCry 7 CMS Contributor Guide | Page 21 of 43

Unit 3: Workflow
FarCry Workflow Most FarCry content types have a simple workflow plan attached to them. When content is first created it is in DRAFT. Contributors can request content be sent live, changing the status of the content item to PENDING. Users with the appropriate privileges can then approve or decline content as required. Only APPROVED content is visible on the website to the general public.
Requesting Approval In the site tree, DRAFT content is indicated by an icon with a little pencil. Right mouse clicking on the content item will give you the option to send the content for approval. Note: If you have the appropriate permissions, you may be able to bypass the workflow and approve the content yourself.
Image: Request Approval
FarCry 7 CMS Contributor Guide | Page 22 of 43

Once you request approval you’ll be asked to comment and select the individual approvers you’d like to consider your request. The default is all approvers.
Image: Request Approval, Change Status
The list of approvers available depends on how your system is configured but essentially follows these rules for the approver:
Has permission to approve the section of the site and content type Has an email set in their profile Has elected to receive approval emails
Regardless of their settings, all approvers will see the content item pending approval when they next login to FarCry.
Approving Multiple Content Items Approving a navigation folder will always approve any underlying content at the same time. That’s just the underlying content and not the underlying navigation folders. Approving a branch will attempt to approve the entire branch of content in one fell swoop. This is a great way of sending an entire subsection live at once.
FarCry 7 CMS Contributor Guide | Page 23 of 43

Walkthrough: Approving Content We’re going to practice requesting approval for content and actually approving content for the website.
1. Right mouse click on your draft subsection or branch 2. Go to Status then Request Approval for Branch from the menu 3. Make a comment and select any relevant approvers 4. Note that the content item’s status has changed 5. If you have the relevant permissions, approve your content by rightclicking again, going to Status
and then Approve Branch (alternatively, you can Send to Live in the righthand side menu) 6. Otherwise ask your instructor to approve your content
Editing Approved Content Once a content item is approved and on the web site we still want to be able to go through an approval process for changes without removing the current content from the site. FarCry manages this by allowing you to create an underlying DRAFT item.
Image: Underlying Draft
Once you have finished editing your underlying draft content you can request approval and approve this content item in the same way. When the draft item finally goes live, the current live content item is archived
FarCry 7 CMS Contributor Guide | Page 24 of 43

and replaced by your content changes. FarCry stores this archived content just in case you need to rollback to an earlier version of the content item.
Lab: Editing Live Content In this lab you will create an editable draft version of a live content item. General Steps:
Select one of the HTML content items in your subsection Create an editable draft version of the content item by clicking on “Edit: Create Underlying Draft” Make some visible changes to the content Preview the draft content on the web site Approve the content
Challenge If you have time, try rolling back to an earlier version of your content by using the ‘History’ tab and rollback utility. The archive can be accessed under the History tab along the top of the content Overview screen.
Image: History and Rollback/Discard
FarCry 7 CMS Contributor Guide | Page 25 of 43

Unit 4: Media Library When editing most content types, contributors have access to a central image and file library. Images can be selected from the image library if they are both shared and approved. Images can also be uploaded to the library within the content item wizard to be used within the body of your content.
Image: Relating images
Walkthrough: Adding an image to an HTML page. In this walkthrough we’re going to add an image to an HTML content item:
Create an editable draft version of an existing HTML content item From the BODY step, open the image library popup under “Related Content > Media Library” Choose a Source Image Click Save. The image should now be associated to the page (shown in a list with a thumbnail). Add the image to your body by clicking on the ‘FarCry Content Templates’ icon in the Rich Text
Editor.
FarCry 7 CMS Contributor Guide | Page 26 of 43

In the dropdown menu, select Image.
FarCry 7 CMS Contributor Guide | Page 27 of 43

In the popup that appears, select the associated image from Image List Add the image by clicking ‘Ok’.
Discuss the use of templates that have fixed positions for images as compared to embedding image content within the body property.
Walkthrough: File library Demonstrate the file library and compare the functionality to the image library.
1. Create an editable draft version of an existing HTML content item 2. From the BODY step, open the file library popup under “Related Content > Related Content” 3. Create a new file by choosing the ADD NEW tab on the file popup or select an existing item 4. Add the file to the library, make sure it is selected and then close the popup 5. Add the file to your body by clicking on the ‘Related Object Content Templates’ (or FarCry) icon in
the Rich Text Editor.
FarCry 7 CMS Contributor Guide | Page 28 of 43
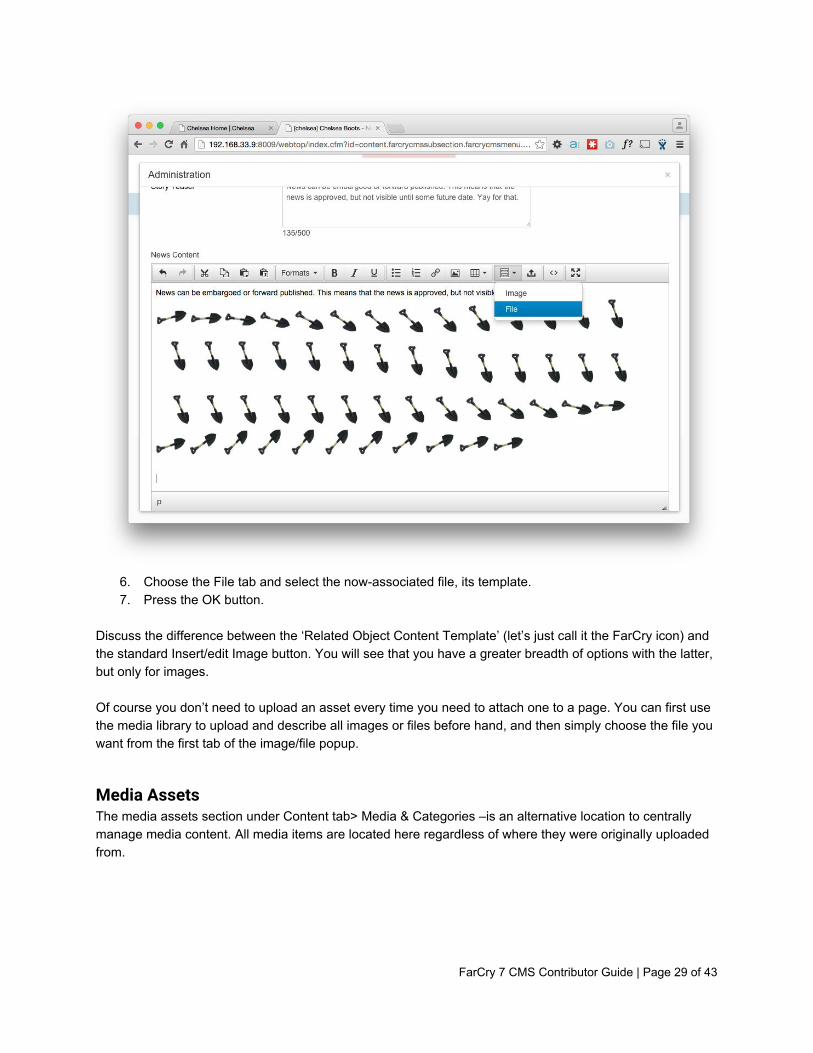
6. Choose the File tab and select the nowassociated file, its template. 7. Press the OK button.
Discuss the difference between the ‘Related Object Content Template’ (let’s just call it the FarCry icon) and the standard Insert/edit Image button. You will see that you have a greater breadth of options with the latter, but only for images. Of course you don’t need to upload an asset every time you need to attach one to a page. You can first use the media library to upload and describe all images or files before hand, and then simply choose the file you want from the first tab of the image/file popup.
Media Assets The media assets section under Content tab> Media & Categories –is an alternative location to centrally manage media content. All media items are located here regardless of where they were originally uploaded from.
FarCry 7 CMS Contributor Guide | Page 29 of 43

Image: Image Library
It is possible to place content inline from an external URL using the Rich Text Editor, however it is generally better to use the Library as it provides more consistency. For example, the external source could delete or move the image, whereas using the Library means that any changes made are carried through to the pages that use the image.
Lab: Inserting Images from the Image Library In this lab you will create an editable draft version of a live content item, and insert images uploaded by a colleague into the content item. General Steps:
Go to the Image Library. Locate your colleague’s image. Make sure the images are approved before proceeding. Go to the Site section of the webtop Select one of the HTML content items in your subsection Create an editable draft version of the content item Go to the body step of the wizard Relate/associate the image to the page using the steps covered above.
FarCry 7 CMS Contributor Guide | Page 30 of 43

Insert the image into the body content of your page Preview the draft content on the web site
Unit 5: Dynamic Content
Category Management FarCry allows you to set up a category tree to better organise content, with whatever category names (keywords in FarCry 6.0) you deem appropriate. These categories can then be made available to contributors to classify all the different content types in the FarCry system.
Image: Category tree builder
Walkthrough: Set up keywords With your instructor; set up some keywords for categorisation.
Select the Content tab Switch to the Media & Categories subsection Select Manage Keywords Review the current keyword hierarchy with your instructor. If anything needs to be changed, rightclick on the relevant category to move, delete or insert a new
category.
FarCry 7 CMS Contributor Guide | Page 31 of 43

Image: Manage Keywords Tip: You might like to try your luck with the Category Tree Quick Builder utility. This enables contributors to add a lot of category items at once. Very useful if you are just starting out!
Create News Content News content differs from a standard HTML content item in that it has no fixed position in the website. It appears only if the current time is past it’s publish date, before the expiry date and its categorisation matches that categories assigned for a specific region of the site.
Walkthrough: Creating a News Item To create a NEWS ITEM
Click on the CONTENT tab Under CMS Content select NEWS to bring up the NEWS ADMINISTRATION page
FarCry 7 CMS Contributor Guide | Page 32 of 43

Image: News Administration webtop grid view
Click on the ADD button. The News items wizard should now be displayed. Give the news item a title in the TITLE field. Enter text and add an associated image from the library in the STORY TEASER area if applicable. Enter the body text for this News item including the formatting required. Images and other RELATED CONTENT can be associated to the news item by accessing the
relevant library and dragging the item into the “selected” tray. Once there, it can be added to the news story above.
Near the bottom of the page, set the NEWS CATEGORY, if applicable. Select the PUBLISH DATE you would like to the news item to go live and also an expiry date if
applicable. Once all fields on this page are complete click SAVE.
Create Event Content Event content is very similar to News content. Events have extra fields specific to events, such as event start and end dates. Also the way in which events are displayed is slightly different; for example people normally want to list events by event start date as opposed to publish date.
FarCry 7 CMS Contributor Guide | Page 33 of 43

Image: Event Administration webtop grid view
Walkthrough: Creating an Event To create an event:
Click on the CONTENT > CMS Content > EVENTS Click on the ADD button. The EVENTS wizard should now be displayed. Give the event a title in the TITLE field. Select the START and END DATES for the event and add the location. Set the EVENT CATEGORY if applicable. Select the PUBLISH DATE you would like to the event to go live and also an EXPIRY DATE if
applicable. Enter the body text for this event including the formatting required. Enter text and add an associated image from the library in the STORY TEASER area if applicable. Images and other RELATED CONTENT can be associated to the news item by accessing the
relevant library and dragging the item into the “selected” tray. Once there, it can be added to the news story above.
Click SAVE to finish. Approve Event
FarCry 7 CMS Contributor Guide | Page 34 of 43

Lab: Inserting Images from the Image Library In this lab you will create several news and event content items, and approve them for publishing. We’ll use these content items to activate the publishing rules in the following unit. General Steps:
Go into the Content section Create a news content item and categorise appropriately Approve the content Create an event content item and categorise appropriately Approve the content
Challenge: Try to contain your excitement as you learn more and more about FarCry.
FarCry 7 CMS Contributor Guide | Page 35 of 43

Unit 6: Containers & Publishing Rules Templates contain containers which contain publishing rules which in turn contain content items!
FarCry has a special subsystem for managing dynamic content within the presentation layer. Specific regions of any template can be designated as a “container” and have dynamic content scheduled into them by nontechnical authors. These features can also be known as portlets, page behaviours, pods, etc. This concept is important to understand because it represents some of the most powerful aspects of the FarCry Content Management Platform. Containers are regions of a page where some sort of programmatic behaviour can be placed. For example, a list of the latest news items, an event calendar, content to be syndicated via XML from another website, a randomly picked fact and so on. These programmatic behaviours in FarCry are called “Publishing Rules”. Containers Containers are placed in a template by a website developer. They should already be in place before you come to adding content on your site. Containers can be unique to a specific page, shared across a specific section of the website or shared globally throughout the website. They are populated by contributors selecting from a predefined set of publishing rules.
Walkthrough: Design Mode 1. Make sure you are logged into the FarCry webtop 2. Click on the View site link in the top right hand corner of the webtop; this should open up a browser
with a view of the main website 3. When you are logged into FarCry as a contributor you should see a round icon at the bottom left of
the page. Clicking on this icon opens a tray with the following menu items: Hide Tray
FarCry 7 CMS Contributor Guide | Page 36 of 43

Webtop Update Application Logout Edit
Image: FarCry tray on front end of site
4. Click on the “Rules” button and it will switch to “showing rules” so you can activate the containers. When “Showing Rules” is activated (grey) container widgets should be visible on the page
5. Click on the Add Rule icon (plus sign) to add a publishing rule. A dialogue box will open from which you can select your rule. Do this twice so that you publish 2 publishing rules.
FarCry 7 CMS Contributor Guide | Page 37 of 43
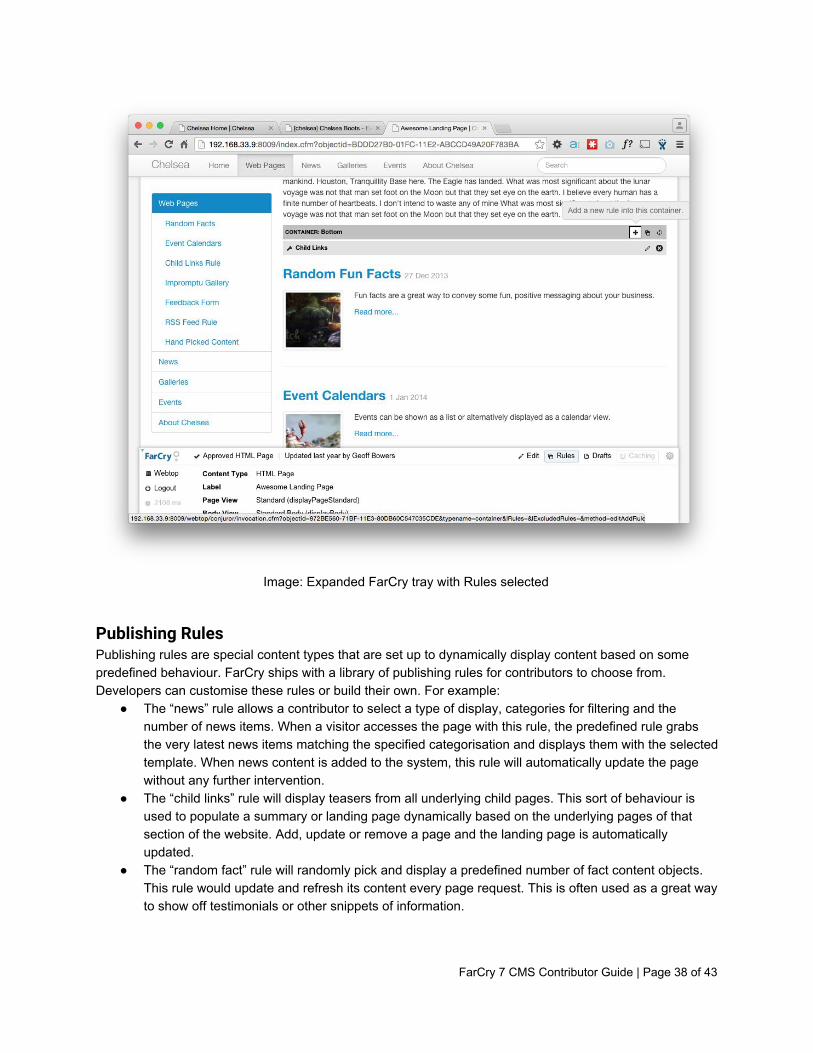
Image: Expanded FarCry tray with Rules selected
Publishing Rules Publishing rules are special content types that are set up to dynamically display content based on some predefined behaviour. FarCry ships with a library of publishing rules for contributors to choose from. Developers can customise these rules or build their own. For example:
The “news” rule allows a contributor to select a type of display, categories for filtering and the number of news items. When a visitor accesses the page with this rule, the predefined rule grabs the very latest news items matching the specified categorisation and displays them with the selected template. When news content is added to the system, this rule will automatically update the page without any further intervention.
The “child links” rule will display teasers from all underlying child pages. This sort of behaviour is used to populate a summary or landing page dynamically based on the underlying pages of that section of the website. Add, update or remove a page and the landing page is automatically updated.
The “random fact” rule will randomly pick and display a predefined number of fact content objects. This rule would update and refresh its content every page request. This is often used as a great way to show off testimonials or other snippets of information.
FarCry 7 CMS Contributor Guide | Page 38 of 43

Walkthrough: Publishing News Content Open the container editor for a page and schedule a News rule onto the page.
Browse to a page within your section of the web site Change the view to design mode Click on the container widget to open the container management area Utility Select the News Rule from the list and click “save”
Image: Select Rule
Choose the display method. Select a category if applicable.
FarCry 7 CMS Contributor Guide | Page 39 of 43

Image: Editing the Rule
Click SAVE Reload the underlying page to see the news content on the page
Lab: Other Publishing Rules Chat with the instructor about the other rules.
Challenge Experiment with the following rules. Your mileage may vary depending on your installation: Child Link Rule; for summaries and landing pages Event Rule: for publishing a calendar view of events XML Publishing Rule; for syndicating remote RSS feeds and publishing them on your pages
FarCry 7 CMS Contributor Guide | Page 40 of 43

Appendix 1: Rich Text Editor The Rich Text Editor is a 3rd party integration used to format HTML. More information can be found at the TinyMCE homepage.
In addition to the toolbar items described on the official website, the following icons are noteworthy:
Related Content (or FarCry button): Any kind of content that has been associated from the Media Library will appear here in its relevant tab. Simply select the item and the template to be used if applicable. Once previewed, it can be inserted. In the case of images, it may be beneficial to add them via their separate button if you wish to have more options.
Link/Unlink/Anchor: Selecting some text or an object will enable the Link button. The Anchor button can be used to create links within the same page; for example if it has become so long that you wish to break it up into sections. Any URL can be added, however there is also a Link list generated from the local site. Anchors that have been placed can be selected as well. The Target refers to the method used to open the link. The Title refers to mouseover text which appears over the link.
FarCry 7 CMS Contributor Guide | Page 41 of 43

Insert/Edit Image: An image can be inserted anywhere in the TinyMCE text area. Use this instead of the Related Content button for more options. An external image URL can be added, however associated pictures will appear in the Image list. The image description is the ALT text that appears for those with images disabled, and the Title refers to mouseover text which appears over the image. Alignment, borders and other visual options can be set via this panel. If applicable, classes and styles can be set individually as well.
FarCry 7 CMS Contributor Guide | Page 42 of 43